

Page 1
Model:RLDEDV3289
LED TV/DVD COMBO
Page 2
CONTENTS
1
2
2
3
3
6
3
4
8
8
9
9
10
10
4
6
6
7
SAFETY
PRECAUTION
IMPORTANT
SAFETY
INSTRU CTION
ACCESSORIES
GETTIN G
STARTE D
5
CONTRO L
REFERE NCE
GUIDE
CONNEC TIONS
Remote Con trol
Front Vi ew
Back Vie w
Side View/ Front View
Antenna Co nnection
AV Connec tion
YPbPr Conn ection
HDMI Conne ction
VGA Connect ion
Headphon e Connection
Power Cord C onnection
Digital Audio out Connection
1
English
10
11
ATTACHING
THE STAND
20
21
24
27
28
10
18
16
14
14
14
13
12
Page 3
29
30
33
35
36
38
39
40
41
42
43
17
Page 4
*
SAFETY PRECAUTION
CAUTI ON
WAR NING:
PL ACEM ENT INF ORMATION
SA FETY INFORM ATIO N
CONDE NSATIO N INFOR MATION
RATING PL ATE LOC ATIO N
FCC STATEM ENTS
CLASS 1 LASER
PRODUCT
WARNIN G:
CAUTION MA RKI NG WAS LOCATED A T THE R EAR
OF THE APPAR ATU S.
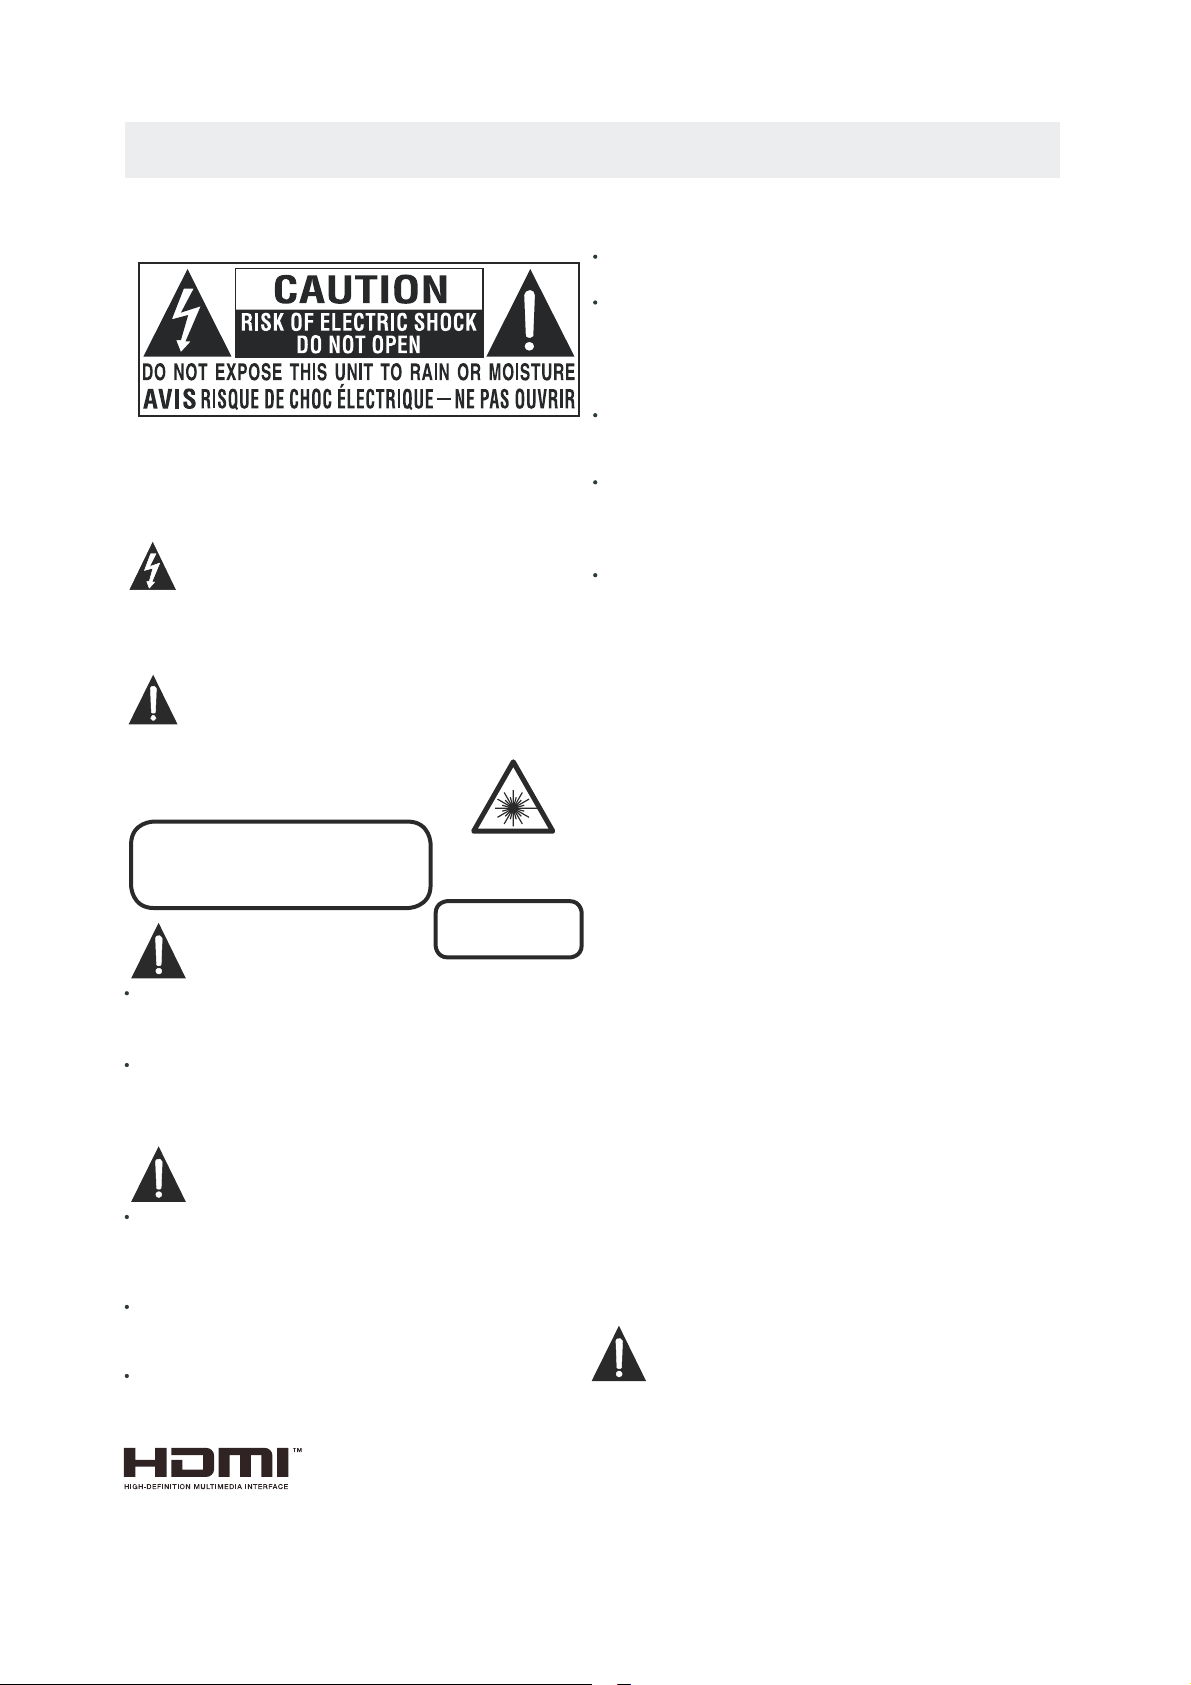
WARNING:TO REDUCE THE RISK OF ELECTRIC
SHOCKˈDO NOT REMOVE COVER˄OR BACK˅
NO USER SERVICEABLE PARTS INSIDE.
REFER SERVICING TO QUALIFIED SERVICE
PERSONNEL.
The lightning flash with arrowhead symbol,
within an equilateral triangle,is intended to
alert the user to the presence of uninsulated
“ dangerous voltage”within the product's enclosure
that may beof sufficient magnitude to constitute a
risk of electric shock to persons.
The exclamation point within an equilateral
Triangle is intended to alert the user to
The presence of important operating and
maintenance (servicing) instructions in the literature
accompanying the appliance.
CAUTION
INVISIBLE LASER RADIATION WHEN
OPEN AND INTERLOCKS DEFEATED
AVOID EXPOSURE TO BEAM
This product
Contains a low
power laser device.
DANGER OF EX PLO SIO N IF BA TTERY IS
INCORREC TLY R EPL ACED. REP LAC E ONL Y
WITH THE SAM E OR EQ UIV ALE NT TYPE.
TO REDUCE TH E RIS K OF FI RE OR E LECTRIC
SHOCK, DO NO T EXP OSE T HIS A PPLIANC E TO
RAIN OR MOIS TUR E.
TO REVENT FI RE OR S HOC K HAZARD, DO NOT
EXPOSE THI S UNI T TO RA IN OR M OISTURE . DO
NOT PLACE OB JEC TS FI LLED WITH LIQU IDS O N
OR NEAR THIS U NIT .
SHOULD ANY T ROU BLE O CCUR, DISCON NEC T
THE AC POWER C ORD A ND RE FER SERVICIN G
TO A QUALIFI ED TE CHN ICIAN.
Do not use thi s uni t in pl aces that a re ex tre mel y
hot, cold, d ust y or hu mid.
Do not restr ict t he ai rflow of th is un it by p lacing it
somewher e wit h poo r airflow , by co ver ing it with
a cloth, by pl aci ng it o n bedding o r car pet ing.
When conne cti ng or d isconn
ecting the A C pow er
cord, grip t he pl ug an d not the cor d its elf . Pulling
the cord may d ama ge it and create a h aza rd.
When you are n ot go ing t o use the uni t for a l ong
perio d of ti me, d isc onnect th e AC po wer c ord.
When left in a h eat ed ro om where it i s war m and
damp, wate r dro ple ts or conde nsa tio n may form
insid e the e qui pment. When th ere i s con densation
inside the u nit , the u nit may not func tio n nor mally.
Let the unit s tan d for 1 -2 hours be for e tur nin g the
power o n or gr adu ally heat the ro om an d let t he
unit dry bef ore u se.
The rating p lat e is lo cated on th e rea r of th e uni t.
NOTE: This u nit h as be en t
ested and fo und t o com ply
with the lim its f or a Cl ass B digital de vic e, pu rsuant
to Part 15 of th e FCC R ule s. These li mit s are d esi gned
to provide r eas onable prote cti on ag ainst harmfu l
interfer enc e in a re sidenti al in sta llation.
This unit ge ner ate s, uses and c an ra dia te radio
frequenc y ene rgy and, if not in sta lle d and used in
accor dan ce wi th th e instruc tio ns, m ay ca use harmf ul
interfer enc e to ra dio commu nic ati on. However, t her e
is no gua ran tee t hat i nterfer enc e wil l not occur in a
particul ar in sta llation . If th is un it does cause ha rmf ul
interfer e
nce to radio o r tel evi sion rece pti on, w hich
can be de ter min ed by turning th e uni t off a nd on , the
user is e nco ura ged to try to corr ect t he in terference
by one or more o f the f oll owing mea sur es:
- Reori ent o r rel oca te the rece ivi ng an tenna.
- Increase t he se par ation bet wee n the u nit and
recei ver .
-Conn ect t he un it in to an outle t on a ci rcu it different
from that to w hic h the r eceiver i s con nec ted.
- Consu lt th e dea ler or an experi enc ed ra dio/TV
technici an fo r hel p.
Chang es or mo dificat ions to thi s
unit
not exp ressly approv ed by the par ty res ponsibl e
for com pliance c ould v oid the use r auth ority
to oper ate the unit.
USE OF CONTR OLS O R ADJ USTMENTS OR
PERFORMA NCE O F PRO CEDURES OTHE R
THAN THOSE S PEC IFI ED MAY RESULT IN
HAZARDOU S RAD IAT ION EXPOSURE .
“HDMI, the HD MI lo go an d High-De fin iti on Multimedi a
Interfac e are t rad emarks or r egi ste red t rademar ks of
HDMI Licen sin g LLC.”
Page 5

IMPORTANT SAFETY INSTRUCTIONS
1)Read t hes e ins tructions.
2)Keep t hes e ins tructions.
3)Heed a ll wa rni ngs.
4)Foll ow al l ins tructions.
5)Do not u se th is ap paratus near w ate r.
6)Clea n onl y wit h a dry cloth.
7)Do not b loc k any v entilation o pen ing s.
Install in a cco rdance with th e
manufact ure r's instruct ion s.
8)Do not i nst all n ear any heat sou rce s suc h
as radiato rs, h eat r egister s, st ove s, or
other appa rat us (I ncludin g amp lif iers) tha t
produ ce he at.
9)Do not d efe at the s afe ty purpos e of th e
polar ize d or gr ounding -ty pe pl ug.
A polar ize d plu g has two blades w ith o ne
wider t han t he ot her.
A groun din gty pe plug has two bl ade s
and a third gr oun ding prong.
The wid e bla de or t he third prong i s
provi ded f or yo ur sa fety.
If the provi ded p lug does not fit i nto y our
wall ou tle t, co nsu lt an elect ric ian f or
repla cem ent o f the o bsolete o utl et.
10)Pro tec t the p ower cord from b ein g wal ked on
or pinc hed p art icularly at pl ugs , con venienc e
recep tac les , and the point wh ere t hey e xit
from the app ara tus .
11)Onl y use a tta chments / acce sso rie s specifi ed
by the manuf act ure r.
12)Use o nly w ith t he cart, stand ,
tripod, br ack et, o r tabl
e
speci fie d by th e manufactur er,
or sold with t he ap par atus.
When a cart is u sed , use c aution wh en
movin g the c art / a pparatus com bin ati on to
avoid i nju ry fr om tip-over.
13)Unp lug t his a pparatus dur ing l ightning
Storms or wh en un used for long pe rio ds of
time.
14)Ref er al l ser vicing to qual ifi ed service
perso nne l. Se rvicing is req uir ed when the
appar atu sha s been damaged i n any w ay,
such as the po wer c ord or plug is dam age d,
liqui d has b een s pilled or o bje cts h ave fallen
into the app ara tus , the appar atu s has b een
expos ed to r ain o r moisture, do es no t ope
rate
norma lly , or ha s been dropped .
Energy saving mode
Page 6
ACCESSORIES
Pl eas e check an d ident ify the su ppli ed acce ssor ies.
GETTING STARTED
US ING TH E REM OT E CON TROL
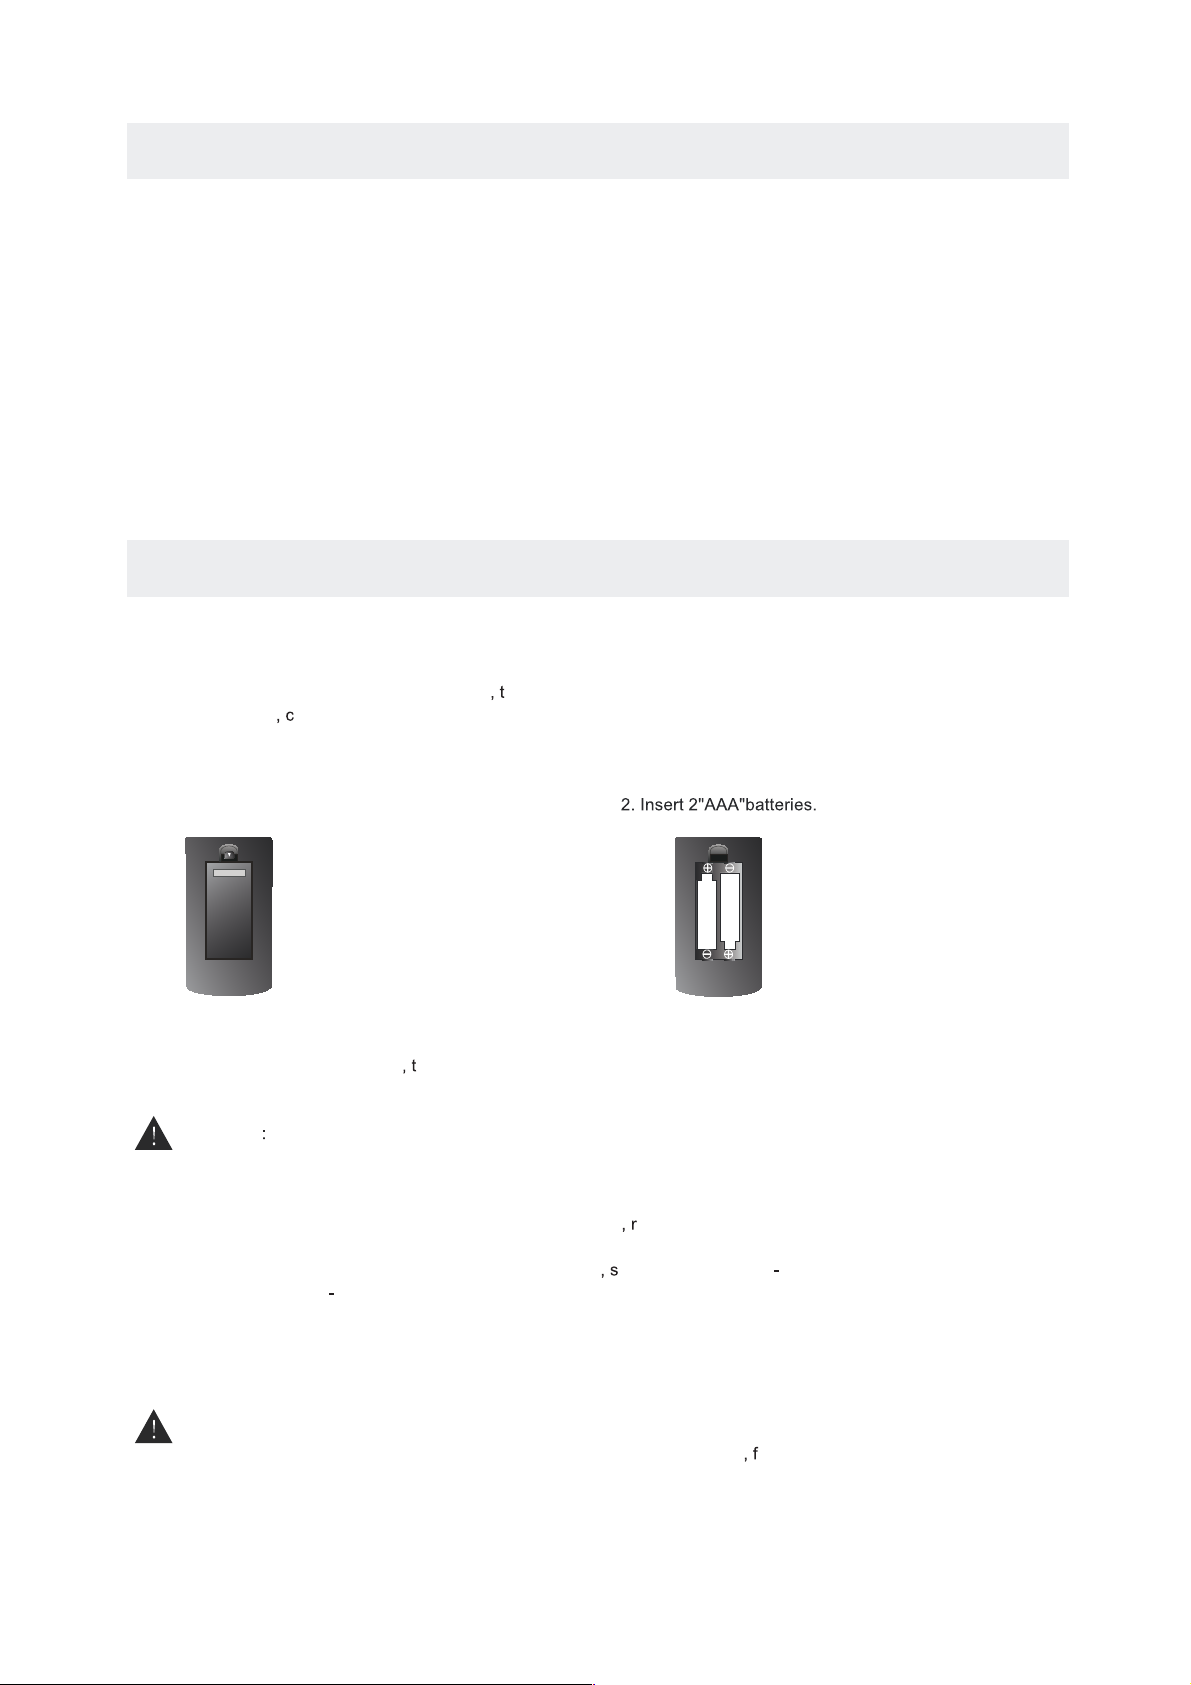
TO INS TALL THE BATTE RIES
BATTERY REPL ACE MEN T
CAUTION
1. O pen th e bat tery do or.
Da nger of ex plos ion if battery is in correct ly re placed.
NOT ES
WARNI NG :
x 1
Remote con tro l ... ... ............. ... ... ... ............. ... ... ... .......... ... ... ... ............. ... ... ... .......... ... ... ... ....
·Point t he re mot e control a t the r emo te sensor l oca ted o n the unit.
·When there i s a str ong ambie nt li ght s ource
he perf orm anc e of the infr are d rem ote senso r
·may be de gra ded
ausin g unr eli able oper ati on.
·The rec omm end ed effect ive d ist ance for re mot e ope ration is a bou t 16 fe et (5 meter s).
When the bat ter ies becom e wea k he oper ati ng di stance of t he re mote control i s gre atly
reduc ed an d you w ill need to r epl ace the batter ies .
·If the remot e con trol is not goin g to be u sed for a lon g tim e emo ve th e batteri es to a voi d
damag e cau sed b y battery l eak age corro sio n.
·Do not mi x old a nd ne w batteri es. Do no t mix ALKAL INE
tanda rd (C ARB ON ZINC ) or
recha rge abl e (NICKEL
CADMI UM) b att eries.
·Alway s rem ove b atterie s as so on as t hey becom e wea k.
·Weak ba tte rie s can leak an d sev ere ly damage t he re mote control .
Do not dispo se ba tteries in a fir e. Ba tteries may ex plo de or leak.
Batterie s sha ll not be expose d to ex cessive h eat s uch a s sunshin e
ire or th e lik e.
.. ... .... .... ....... .... .... ....... .... .... ... .... .... .... ... .... .... ....
x 1
2 Base st and s and 4 b ase stand s cre ws
.. ... .... .... ....... .... .... ....... .... .... ... .... .... .... ... .... .... .... ... .... .... ....... .... .... ....... .... ..
x 1
Warra nty C ard
.. ... .... .... ....... .... .... ....... .... .... ... .... .... .... ... .... .... .... ... .... .... ....... .... .... ....... .... .... ..
x 2
Battery( AAA )
.. ... .... .... ....... .... .... ....... .... .... ... .... .... .... ... .... .... .... ... .... .... ....... .... .... ....... .
x 1
Instruct ion M anual
Page 7

CONTROL REFERENCE GUIDE
REMOTE CONTROL
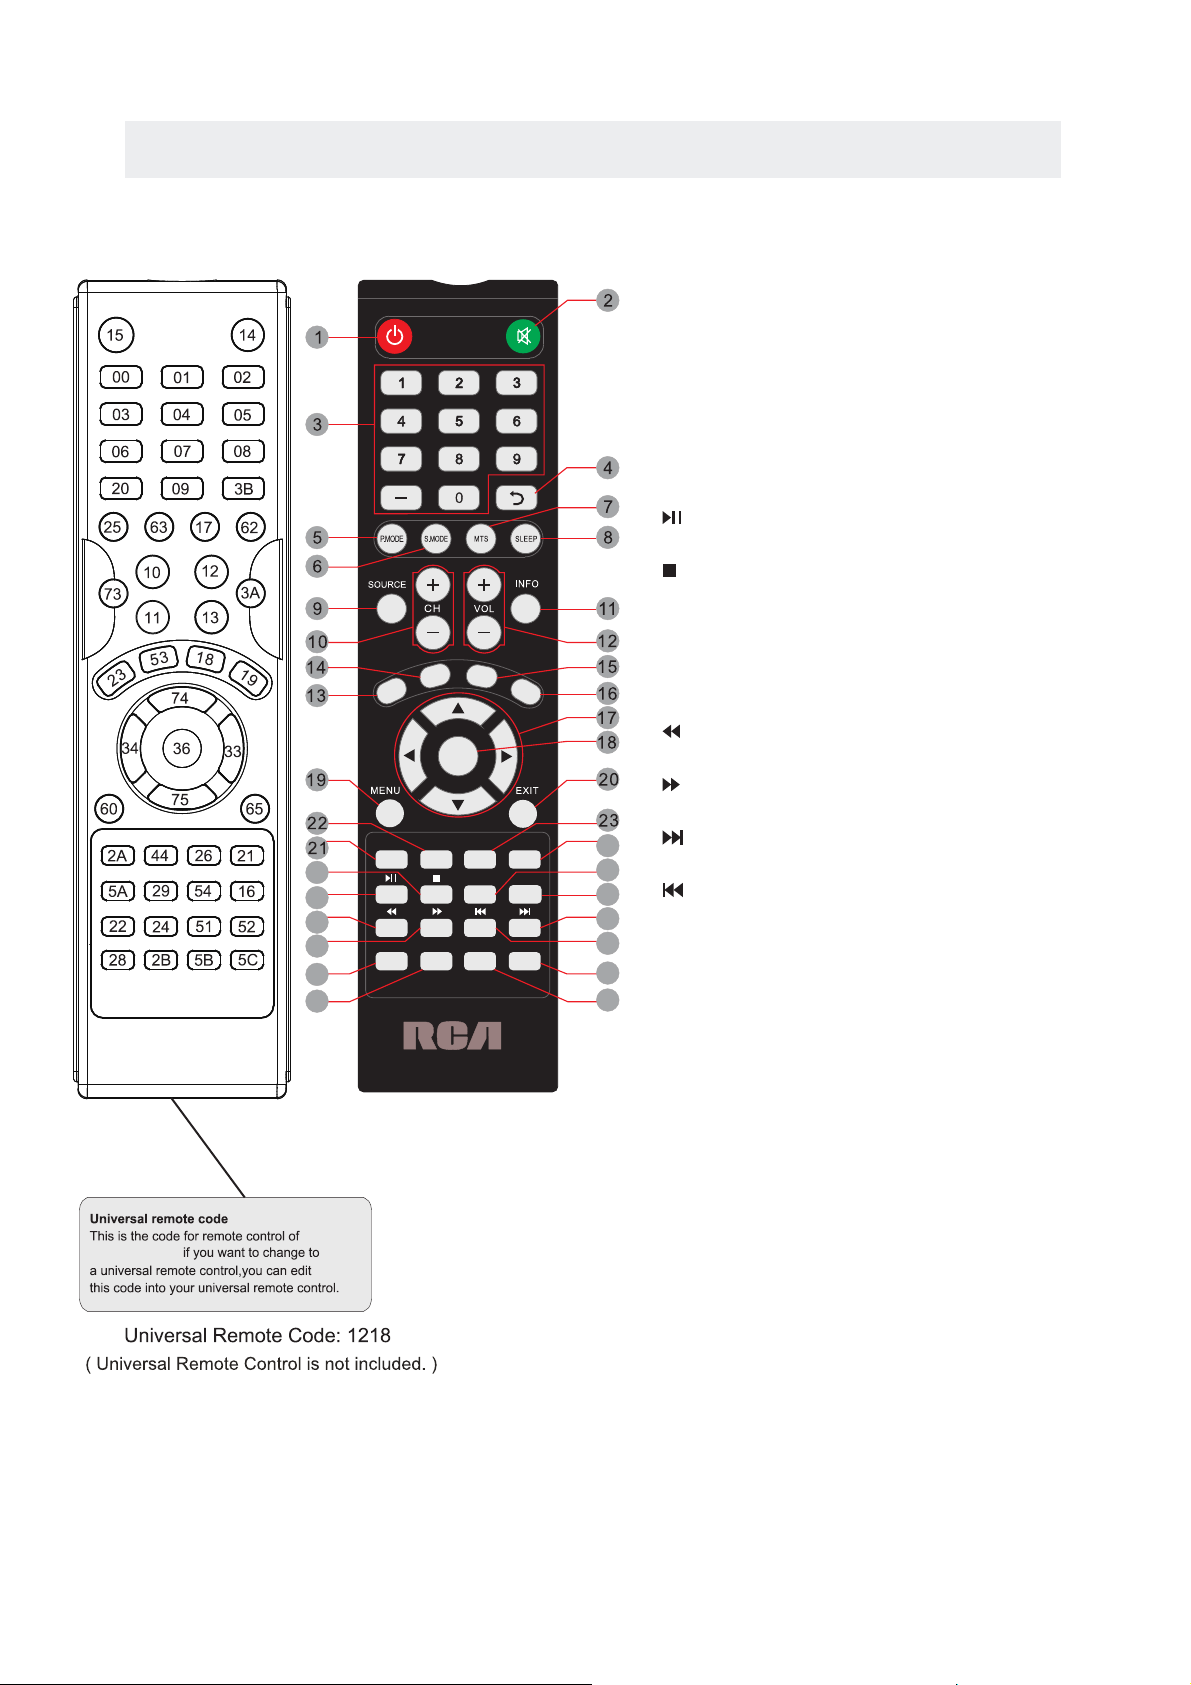
1.STANDBY
To switch o n the TV or make the TV int o
stand by mod e.
2.MUT E
Press t his bu tto n to mut e or restor e soun d.
3.0-9
Allow s you to change the c hannel of the TV.
4.
Switc hes back an d fort h between t he cur rent and pr evio us
chann els, or to edit th e prog ram list of y our DVD disc in
DVD mod e.
5.P.MO DE
Press t his bu tto n to sel ect a pictu re mod e for diff eren t
pictu re qua lities.
6.S.M ODE
Press t his bu tton to sel ect sound s etti ng for differe nt
sound e ffe cts.
7.MTS
To change a mong S TEREO, MO NO and SAP. If there i s no
secon d lang u
age ava ilab le for the si gnal r eceived , LED
Displ ay aud io will out put to m ono.
8.SLE EP
To select t he amo unt of time b efore your TV tu rns
Off au toma tically.
9.SOU RCE
Press t his bu tton to sel ect an inpu t sour ce.
10.CH +/CH Skips t o the ne xt/prev ious chan nel on TV mode.
11.IN FO
Show th e info rmation o f the program you a re watchi ng.
12.VO L+/VOLIncre ases/De crea ses the Volu me con trol.
13.CC
Press t he button t o ente r into the CC m ode.
14.EP G
15.FAV
Press t his bu tton ente r the favou rite l ist.
16.AU TO
Press t his bu tto n to aut oadjust t he scr een in PC mod e.
17.UP
/DOWN /LEFT/R IGHT
Moves t he cur sor upwar d/downward/ to the left /to the rig ht
when ma king a s electio n.
18.EN TER
Press t o confirm selec tions on a me nu scr een.
MENU
Displ ays th e OSD Menu of t he TV.
Exit
Press t his bu tto n to exi t the on scre en dis play.
Press t his bu tto n to sel ect the ele ctro nic progr amme
guide i n DTV mo de.
19.
20.
GOTO
ANGLE
REPEAT
AB
SUBTITLE
AUDIO
EJECT
TITLE
D.MENU
D.SETUP
ENTER
10
10+
CC
EPG
AUTO
FAV
24
27
26
25
28
29
30
31
32
33
34
35
36
PRO
RLDEDV3289,
Page 8
CONTROL REFERENCE GUIDE
REMOTE CONTROL
21.EJ ECT
To eject a di sc.
22.TI TLE
To goto the t itle menu if the DV D disc has a ti tle pa ge.
To show the m enu of t he DVD disc .
24.D. SETUP
Press t his bu tto n to sho w the DVD SET UP me nu.
25.
Press t his bu tton to pla y or pause th e DVD yo u’re watc hing .
26.
Press t his bu tton to sto p playing t he DVD y ou’re wat chin g.
27.SU BTITLE
To show the s ubti tle for the p rogram yo u're w atching .
28.AU DIO
Press t his bu tton to cha nge the aud io lan guage of th e DVD.
29.
Fast re vers e in DVD mode .
30.
Fast fo rwar d in DVD mode .
31.
Next ch apter in DVD mode .
32.
Previ o
us chap ter in D VD mode.
33.GO TO
Press t his bu tto n to sta rt playin g the di sc progra m from
the tim e you want.
34.AN GLE
To select d iff erent ang les to w hich the pi cture suits you r
prefe renc e.
35.RE PEAT
Press t his bu tton for re peat the pr ogra m.
36.AB
Press t his bu tton for re peat play p oint A and B .
23.D. MENU
GOTO
ANGLE
REPEAT
AB
SUBTITLE
AUDIO
EJECT
TITLE
D.MENU
D.SETUP
ENTER
10
10+
CC
EPG
AUTO
FAV
24
27
26
25
28
29
30
31
32
33
34
35
36
PRO
RLDEDV3289,
Page 9

CONTROL REFERENCE GUIDE
FRONT VIEW
BACK VIEW
1.Color Screen
2.Remote Sensor
Do not block this sensor or the
remote control will not work.
3.Standby Indicator
Indicates whether the unit is ON
or in STANDBY (OFF) mode.
Light in red
he unit is in STANDBY.
Light in
blue
The unit is turned ON.
4. Speakers
1.Power Cor
2.Headphone Jack
3.Digital Audio Output Jack
4.AV IN Jack
5.COMPONENT IN Jack
6.HDMI IN Jack(Connect to HDMI 1 for
Audio Return Channel Function)
7.VGA IN Jack
8.PC AUDIO IN Jack
9.
TV ANTENNA Terminal
d
6 6 7 8
9 10
1
2
(ARC)
Digital
Audio out
Page 10
8.
Press to eject a disc.
Press this start pause or resume p layback of
a disc.
CONTROL REFERENCE GUIDE
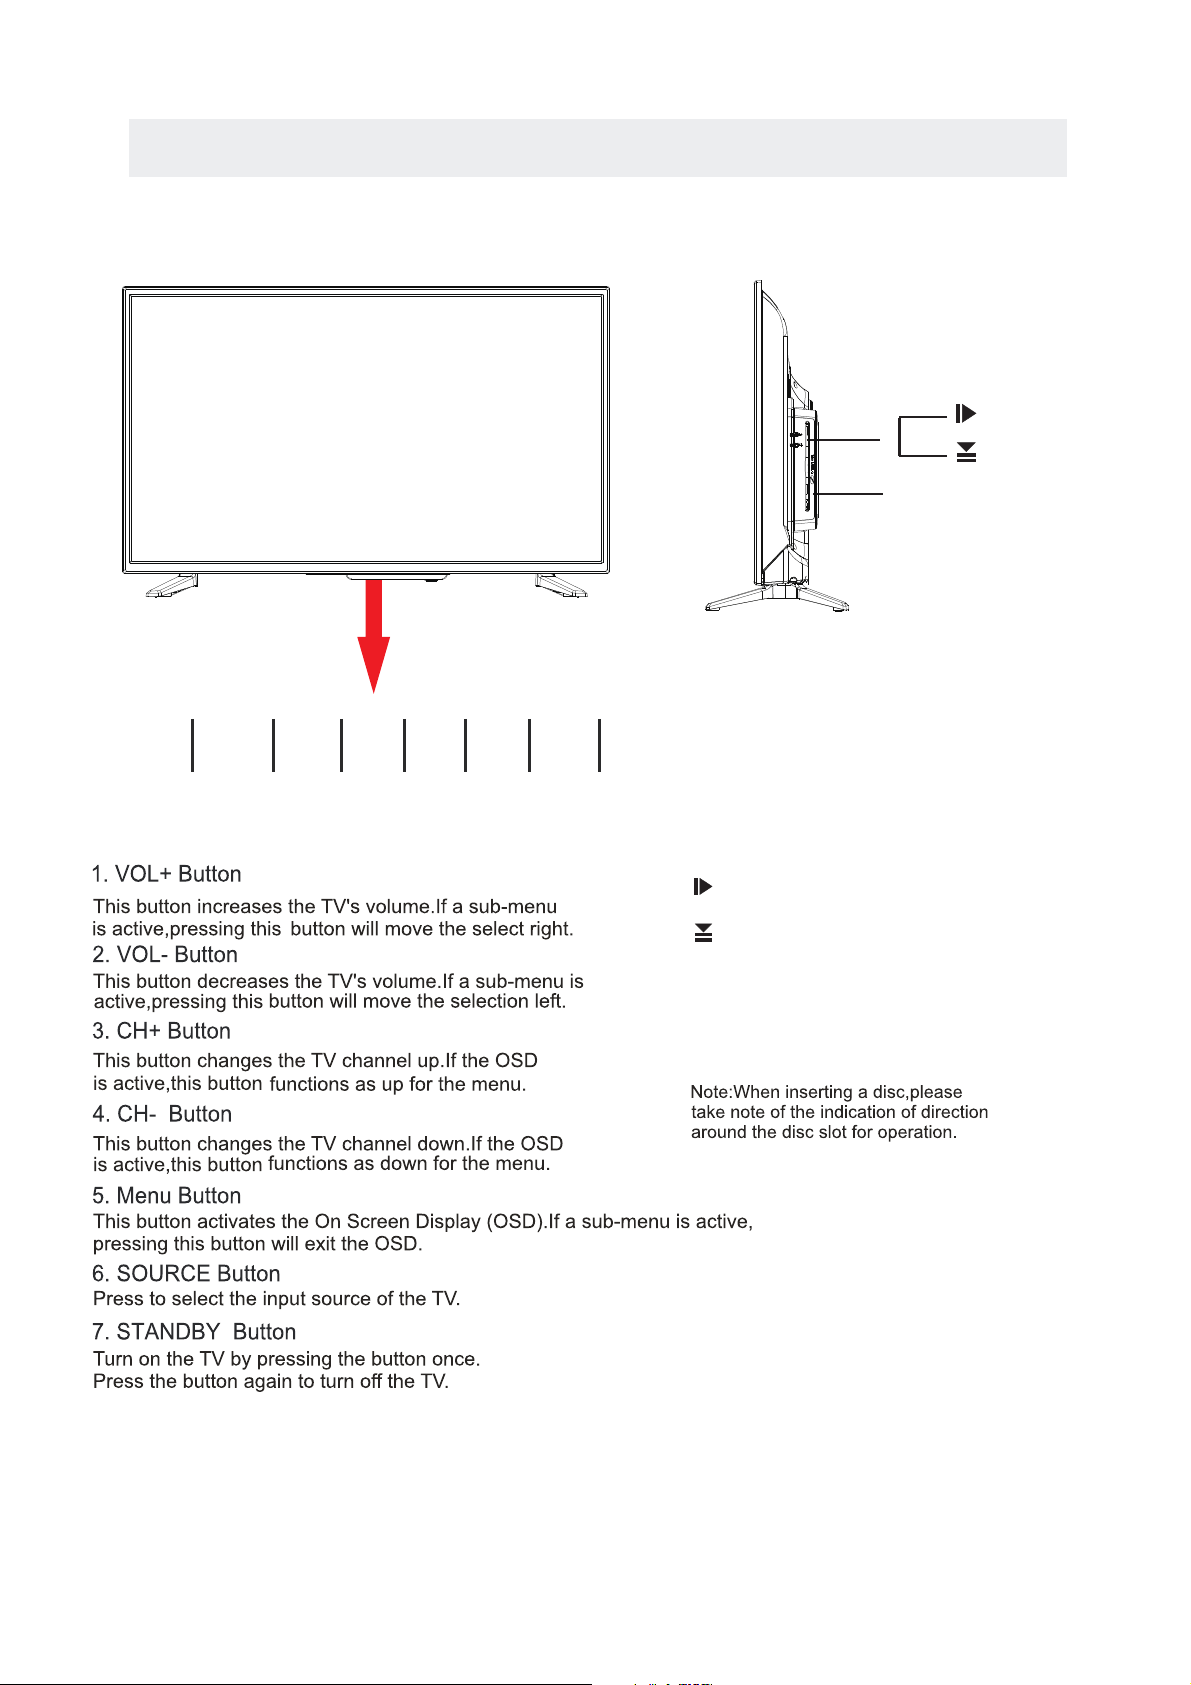
9.Disc Slot
Insert discs to disc slot
SIDE VIEW /FRONT VIEW
(Right direction put the side of
the disc facing yoursel f
: mirror
)
8
9
1
VOL+
2
VOL-
3
CH+
4
CH-
5
MENU
6
SOURCE
7
STANDBY
Page 11
CONNECTIONS
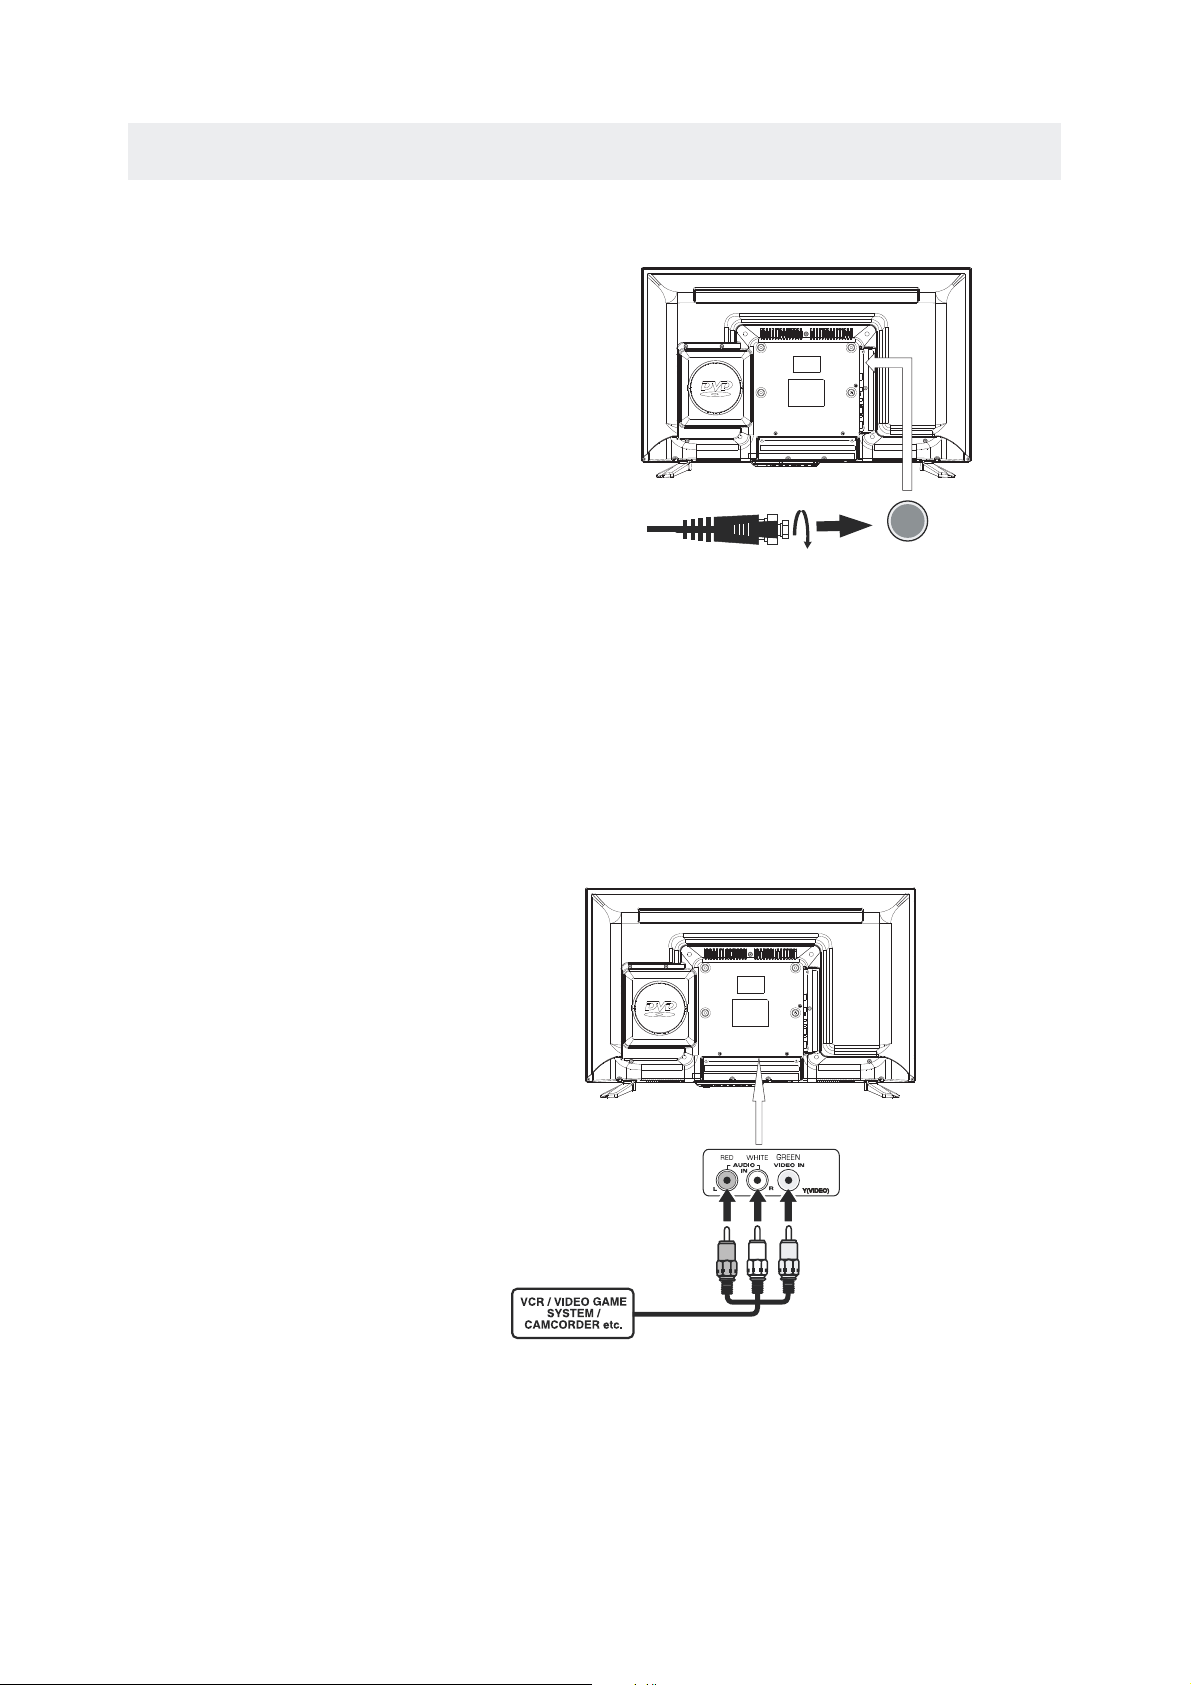
CONNECTING A T V AN TENNA / C ABLE / SATELLITE
To view tele visio n channe ls corre ctly, a si gnal mus t
be received from on e of the fol lowing source s:
- An indoor or outdoor aer ial antenna
- A ca ble sys tem
- A satel lite sys tem
Fo r recei ving over-the -air TV broadcas ts, we
recomm end tha t you use a n exte r nal fixed ant enna.
Sh ould yo u requ ire th e use of a tempor ar y a nten na,
pl ease ens ure tha t you purc hase an antenna with
su ffici ent abil ity to rec eive in we ak signa l areas.
On ly when y ou are i n close p roximity to a trans m itte r
wi ll a te mporar y antenna reprod uce a sig nal as
st rong ly as a fixed ante nna.
To connect to other equ ipmen t such as a VCR, camco rder, satel lite sy stem or cab le, etc .
CONNECT ING AN A/V DEV ICE
NOTE
CONNEC TING DEVI CES WITH A COMPO SITE (GR EEN RCA-TYPE)
VI DEO OUTP UT
Co nnect ing to a VCR / Vid eo Game System / Cam corde r
AUDIO VI DEO OUT
NOTE
To con nect A/ V devices such as a VCR, v ideo gam e system or cam cord er.
Co nnect th e AUDIO / VID EO cable (n ot inclu ded) as shown.
Ma ke su re you c onnect the cabl e from t he othe r equip ment ( and ) to this un it
1.Pl ease refer to t he user m anual
fo r the oth er equi pment f or
mo re info rmati on.
Sa tel lit e, cabl e or TV an ten na
ca ble t o T V ANTENNA
termi nal (c able no t inclu ded )
To AU DI O / VID EO
IN j ac ks
To AU DIO / VID EO
OU T jac ks
(AV in)
2. Composite v ideo i nput
(share d with c omponent)
Page 12
CONNECTIONS
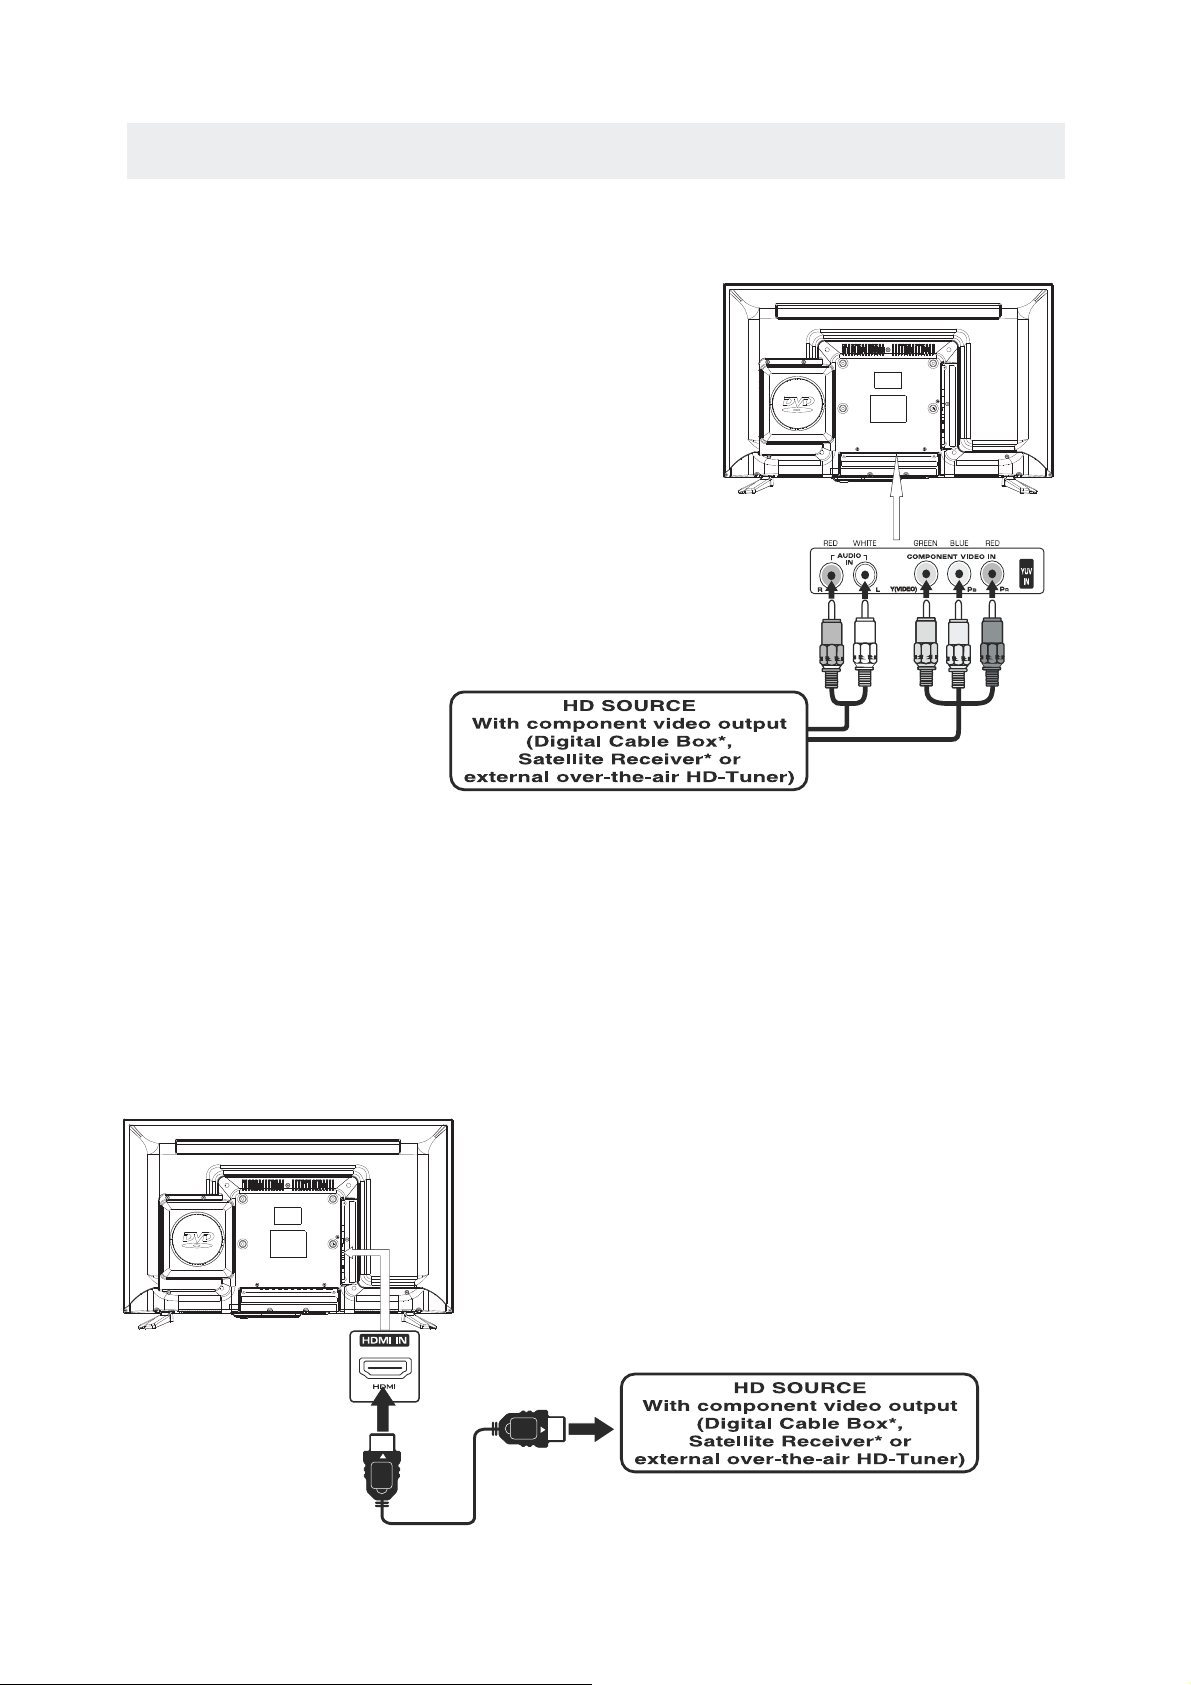
CONNE CTING A HIGH -DE FINI TION (H D) SOU RCE USING HDM I CONN ECTI ON
HDMI (Hi gh Definit ion Multim edia Inter f ace ) suppo r ts both video an d audi o on a single di gital conn ection
fo r use wi th DV D players, DT V, set-top boxes an d othe r digi tal AV d evic es. HD MI was d eve lope d to provi de
the technol ogie s of High Bandw idth Digit al Content Protecti on (HD CP) as well as Dig ital Vi sual In ter f ace
(D VI) in one sp ecif ication . HDCP i s use d to protect dig i tal conte nt tr ansm itted and rece ive d by
DVI-c ompl ian t or HDMIcomp liant disp lays.
HDMI has th e capa bility to suppor t standa rd, en han ced or high-d efin iti on vide o plus standa rd to
multi -cha nne l surround -so und aud io. HD MI feature s incl ude uncomp res sed di gita l video , a ba ndwi dth of
up to 2.2 gig abyt es per se cond (w ith HDTV si gnal s), one co nne cto r (instead of seve ral cab les an d
conne cto r s), an d communic ation betw een the AV sourc e and AV de vice s such as DTVs.
To HDMI
IN jack
To HDMI
ja ckOUT
Co nnect the H DMI ca ble ( not in clud ed) a s
sh own :
Ma ke sure y ou con nect the ca ble from th e
so urc e equipmen t ( ) to this unit
( ).
HD MI OUT
HD MI IN
HDMI CABLE
(NOT INC LUDED)
CONNE CTI NG A HIG H-D EFIN ITI ON (HD) SOURCE USIN G CONN ECTI ON
NOTE
COMPONENT
High- Def init ion (H D) Dev ices with com pon ent video out put must be connected to the Y inpu t.
Conne ct the co mponent vi deo ca ble an d audio ca ble (n ot inc lude d) as sho wn.
Ma ke sure y ou con nect t he co mpon ent vi deo c able a nd aud io ca ble from th e othe r equipme nt
When conn ecting a DVD player to the televisio n,
the pictu re resolut ion is sole ly depe ndent upon
the reso lutio n suppo r ted by the DVD player att ache d.
DVD playe r resolutio ns vary fro m 480i to 108 0p.
and this television can support DVD players up to
a maximum resolution of 1080p.
PbPr
* May require a subscription
fo r receiv ing HD chann els,
ch eck with your cabl e/satellite
se r vice prov ider for det ails.
To CO MPO NENT
VI DEO OUT jac ks
To COMPONENT
VIDEO IN jacks
AU DIO I N jacks
To COMPONENT AUDIO
OU T jacks
˄COMPONENT OUT and AUDIO OUT˅to the unit COMPONENT IN.
COMPONENT IN
To COMPONENT
Page 13

CONNECTIONS
CONNE CTIN G A PC
VGA
) .
)
).
TO
TO AUD IO OUT j acks
Insert et
If it and
cause
e
Do n ot to uch th e pow er plu g with a w et ha nd
This
Do ovided
with th is
V This e
Do n ot da mage t he pow er co rd
A da mag ed cord may c ause f ire or e lec tric al sh ock
Do
TV d
socket .
Do no t pla ce a hea vy obj ect on t he co rd or place
the
d e .
Do no t twi s t the c ord
be nd it e x ces sively o r stre tc h it.
Do
the d. H d.
Do no t use a d amag ed pow er plu g or so cket o utlet.
.
.)
.
.
.
connected to prevent electrical shoc k.
Ensure tha t the p owe r plug is easily a cce ssi ble .
Ensure the e art h pin o n the power plug i s sec ure ly
.)
.)
.)
Page 14
CONNECTIONS
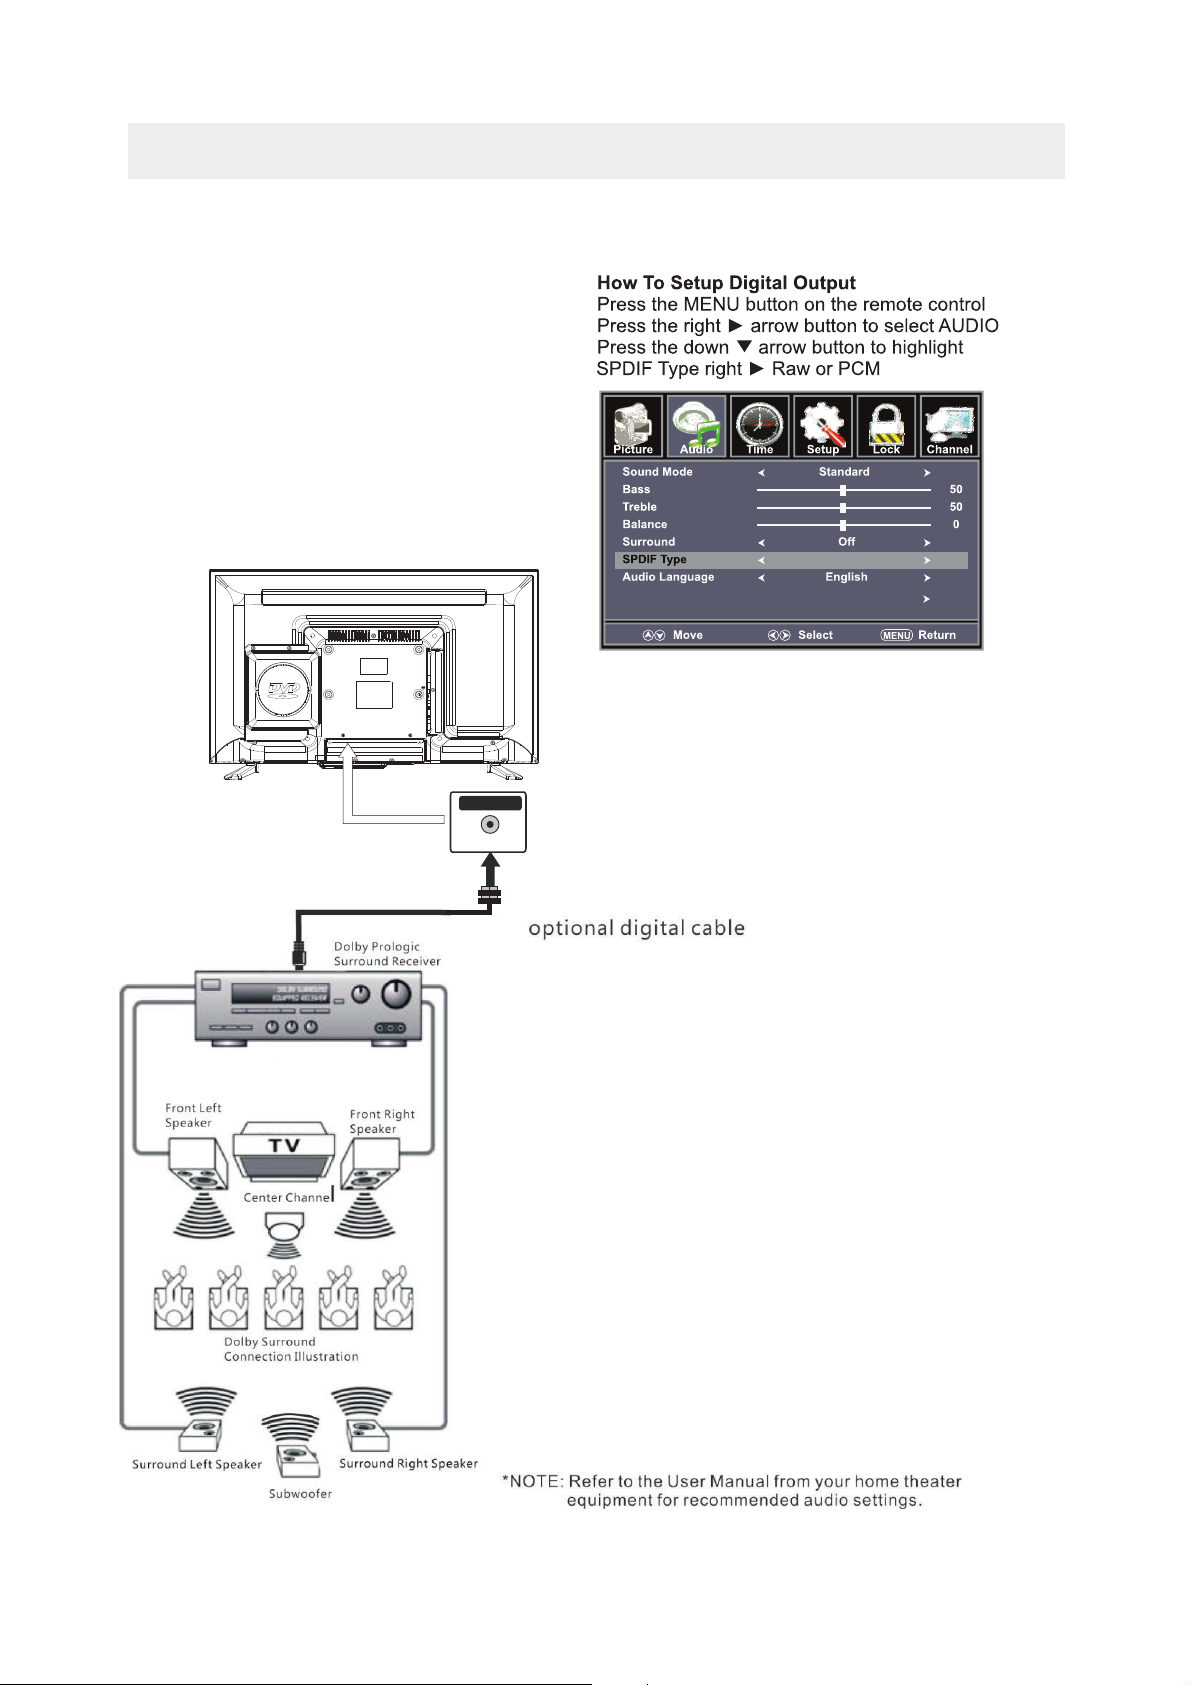
Connection to a Home Theater Audio System
For BEST audio performance
Connecting to a Home Theater System
Dolby Digital ca n deliv er opti mal 2 channel
stereo or surround soun d with fi ve discrete
full range chann els plu s a sixth c hannel for
a subwoofer.
Enjoy optimal sound rep roduc tion from your
system with a Dolby Digit al ampl ifier that
incorporates a digita l coaxi al input. Connect
an optional digi tal cab le dire ctly to the
television’s
Digital Audio
uo tput to listen
through all inpu ts exce pt VGA.
(The VGA does not support digital a udio
)
Digital Audio output
SPD IF OUT
Accessibility
RAW
Page 15

WALL MOUNT INSTALLATION
INSTALLI NG REMOVING THE BASE STAND
WAR NING
/
Th e TV D isplay is ve ry fra gil e a nd mus t be pro tec ted at a ll tim es wh en rem ovin g the b ase
Stand
Be sure that no hard or sha rp object o r anyt hin g that could scratch or da mag e the TV display co mes in to
co nta ct wit h it Do NOT exe rt pressu re on t he front of the un it at any tim e beca use the screen c ould crac k
.
. .
NOT E
Remo ve the base sta nd bef ore mo unti ng the un it on the wal l.
8”
4”
M4
MO UNT ING ON THE WALL
(200mm x 10 0mm ) mountin g kit designed for flat pan el TVs ( not su ppl ied ). Mou nt thi s unit ac cording to
the ins tru ctions inclu ded in th e mounting kit.
Length of screw s hould n ot exce ed 8 mm.
1 Disco nne ct all cables or cords connected to the uni t
2 La y the u nit do wn on a f lat su rfa ce wit h the b ack si de fa cing down.
3 To remove t he base sta nd loo sen sc rew s off the ho les t hen pu ll downwa rds t o rel ease
th e bas e stan d
.
.
. .
.
4
Page 16

ATTACHING THE STAND
Page 17

TV
COMP/AV
DVD
HDMI1
HDMI2
VGA
TV,COMP/AV,DVD,HDMI1/2,VGA)
Page 18

Good
14
C hanne l L ist
C hanne l L ist
Page 19

temp.
ENERGY SAVING.
5
User
User
User
Page 20

TV SETUP
User
User
User
User
Note:
Page 21

TV SETUP
Surround Sound
Accessibility
/
R
AW
RAW
Surround Sound
Accessibility
Surround Sound
Accessibility
User
User
User
5
>SPORT.
R
AW
Page 22

TV SETUP
R
AW
RAW
Surround Sound
Accessibility
Voice Guide
Video Description
Off
Voice Guide
Volum
Middle
Middle
Middle
Speed
Pitch
Off
Surround Sound
Accessibility
Video Description
The default is OFF.This option can be used only on the DTV mode.
Voice Guidance
The default is OFF.When you want to use this function,you can select On,and adjust
the Volume,Speed,Pitch.
User User
Page 23

TV SETUP
Clock 2012
12 Hour
On
/11/20 04 08 PM
Time Format
Auto Clock
Clock 2012
12 Hour
On
/11/20 04
08 PM
Time Format
Auto Clock
Clock 2012
12 Hour
On
/11/20 04
08 PM
Time Format
Auto Clock
ATLANTIC.
Page 24

TV SETUP
Auto adjust success
Adjust
HDMI CEC
Setup Wizard
HDMI CEC
Setup Wizard
HDMI CEC
Setup Wizard
HDMI CEC
Setup Wizard
HDMI CEC
Setup Wizard
Page 25

TV SETUP
Auto adjust success
Adjust
Auto adjust success
Adjust
Auto adjust success Auto adjust success
Adjust
HDMI CEC
Setup Wizard
1920 x 1080.
Page 26

TV SETUP
HDMI CEC
Setup Wizard
HDMI CEC
Setup Wizard
Page 27

TV S ETUP
Clear Lock Clear Lock
Page 28

TV S ETUP
Page 29

TV S ETUP
Page 30

TV S ETUP
Good
C hanne l L ist
Good
C hanne l L ist
Good
C hanne l L ist
Page 31

TV SETUP
Page 32

DISC FORMATS
Th e unit ca n play
REGIO N MANA GEM ENT INFORM ATI ON
Region Manage men t Info rmation
This unit is
desig ned an d manu fac tur ed to respo nd to the
Region Manage men t Info rmation that is enc ode d
on DVDs. If the reg ion nu mbe r printed on th e
DV D doe s not co rre spon d to th e reg ion nu mber
of this unit
this unit cann ot pla y that di sc.
Th e reg ion n umbe r of th is equipme nt is .
ICONS US ED ON DVDs
Sa mpl e Icons
Langu age se lec tio ns for au dio
Langu age se lec tio ns for su btitles
Scre en aspect ratio
Multi ple ca mer a angl es
Region code indicator
TI TLE S CHAP TERS AN D TRAC KS
DVDs are divi ded in to TIT LES an d CHAP TER S .
If t he di sc has m ore t han on e mov ie on it
each mo vie would be a separate TI TLE .
“C HAP TERS
are sec tio ns of ti tles .
Audio CDs are divide d into TRACKS .
NOTE
Nu mbe r s iden tify eac h title
ch apt er and tr ack
on a d isc . Most d iscs have t hes e numb ers re cord
on t hem
bu t som e do not .
NOTES ON UNAUTHO RIZE D DISC S
You may n ot be a ble to play bac k some D VDs
on this equ ipme nt if the y were purch ased from
ou tsi de your ge ographi c area or ma de for
bu sin ess pur pose s.
DVDs
12 cm disc
Au dio CDs
12 cm disc
CD R CD RW
Compatible
A TRA CK is us uall y one so ng on a n Audi o CD.
NOTES ON COPYRIGHT
It is for bidden by law to co py, broadcast , show,
broad cast o n cable, pl ay in pu blic or ren t
copyr ight ed materi al without perm ission.
Appar atus C laims of U. S. Patent N os. 6, 836,549 ;
6,381 ,747 ; 7,0 50,6 98; 6,516 ,132 ; and 5,583 ,936
licen sed fo r limited v iewi ng uses onl y.
DVDs ar e copy p rotecte d, and any re cord ings made
from th ese di scs will be d isto rted. Th is pro duct
incor pora tes copyr ight p rotecti on techno logy t hat is
prote cted by met hod cl aims of cer tain U .S. paten ts
and oth er int
ellec tual p roperty r ights owned by
Macro visi on Corpor atio n and other r ights owners.
Use of th is cop yright pr otectio n tech nology mu st be
autho rize d by Macrov ision Corpora tion, and i s
inten ded fo r home and ot her limited vie wing uses
only, unles s otherwi se aut horized b y Macr ovision
Corpo rati on. Rever se eng ineerin g or dis assembl y
is proh ibit ed.
NO T E
When pl ayin g back a CD-G ( Graphic s) or
CD EXTR A disc, the audio po rtion will be pla yed,
but the g raph ic images m ay not b e shown.
DI SC FUN CTIO N OR OPERATION
TH AT IS NOT AVAILAB LE
Wh en th e “ INVALID KEY ”
it in dic ates that the fun cti on or oper ation
at tem pte d is not ava ilab le at tha t time.
Th is occ urs bec ause th e D VD manufac turer
de ter mines the spe cifi c func tion s.
Ce r tain func tion s may no t be avail able o n
so me dis cs. Be sure to rea d the docu men tati on
provi ded with the DVD.
sy mbo l appe ars on t he screen
Page 33

Insert the disc to the disc slot (mi rror si de of the disc has to face yoursele f),th e playe r
S KIP (PR E VIOUS /NE XT )
Page 34

PRO
PRO
Page 35

Page 36

2.You can di rectly pr ess 0- 9 number button
great er tha n 10,you ca n pres s the 10+ but ton and pre ss the c orrespo ndin g number bu tton (s) for the
chapt er/track you wa nt.
to high ligh t a chapter /track. If you w ant the cha pters / tra cks
Page 37

Page 38

Edge to center Move In From Top
PR O
PR O
Page 39

Page 40

Page 41

(The default password:0000)
Page 42

DISPLAY MODE
PC FORMATS
NOT E :
This product does not sup port th e display mode not listed above.
In order to achieve the bes t displ ay effect, pl ease se lect th e above-listed
6 display modes in put sig nal.
Because of the difference of display driver s outpu t signal
(especially no n-sta ndard s ignal output), the display im age may a ppear little
disturbance wh ich can b e adjus ted on the PC menu.
To prolong this unit's serv ice lif e, please set your computer to power manageme nt mode .
Horizontal
S canning F requency
R esolution
(KHz)
Vertical
S canning F requency
(Hz)
Format
640 480
800 600
800 600
1024 768
1360 768
47. 7
31. 5
X
X
X
X
X
1920 x 1080
66
. 6
Page 43

DISPLAY MODE
VIDEO FORMATS
SUPPORTED COMPONENT / HDMI INPUT MODE
Horizontal
Scanning Frequency
Vertical
Scanning Frequency
Format
(Hz)
720 480
720 480
1280 720
1280 720
1920 1080
31. 47
15. 734
37. 5
45
31. 25
33. 75
59. 94
59. 94
50
60
50
60
480 p
480 i
1080 i
720 p
720 p
1080 i
Resolution
X
X
X
X
The above listed format s are als o related to the AV devices you are about to conn ect.
Before you connect this u nit wit h other s please read all instruction s caref ully and
make sure all nece ssary c ables a re connected.
.
This unit may be incompat ible wi th some other formats which are not meet t he
above conditions.
NOT E :
1920 1080
X
X
1920 1080
X
1920 1080
X
1080 p
1080 p
1920 1080
X
1080 p
50
60
24
27
56. 25
67. 50
Page 44

SPECIFICATION
32”LED TV / DVD COMBO
Panel Type LED Panel
32 inches
Diagonal Size
Screen Format 16 9:
Color System
ATSC/QAM/NTSC
Model Description
Panel
Resolution 1920 x 1080
View Angle
Response Time
Contrast
Brightness
Maximum Color
200cd/㎡
1200:1
16.7M colors
Sound Output
RF Input 75 ohm external terminal
HDMI
(HDMI 1 has Audio Return
Channel function only)
Input
Video 480i 480p 720p 1080i,1080p .: , , ,
Audio Two channel linear PCM 32 44 1 and 48kHz 16 20 and 24 bits: , . , ,
PC RGB Input-
D sub 15pinG 0 7Vp p 75ohms: . - ,
B 0 7Vp p 75ohms: . - ,
R 0 7Vp p 75ohms: . - ,
Power Requirement
Input /
Output
Jacks
Systems
Power
Sound System
M
Audio System
BTSC
L/R Speaker:8 W+8 W
Composite Video Input
Component Y Pb Pr Input/
Sound
Digital Audio Out
Input
Region Code
1
DVD
Disc Size
12cm disc
Compatible Disc Type
DVD,DVD-R/+ R, DVD- RW RW, VCD, CD , CD - R, CD- RW/+
Y: 1.0 Vp-p , 75oh ms, 0.3V negativ e sync
Pb: 0.7Vp-p , 75ohms
Pr : 0.7Vp- p, 75o hms
AC100-240V~ 50/60Hz
178(H )/1 78V )
50 W
This manual is only for your reference.
Specifications are subject to update without prior notice.
1.0 Vp- p, 75ohms RCA
PC AUDIO: For PC RGB Audio input
500mV
S/PDIF Coaxial
rms, Impedance: 20k ohms
AV AUDIO: For CVBS
Component AUDIO: For Component Audio input
8 ms
Rated powe r con sum ption
Page 45

Make sure the power cord is connected.
Turn on the unit.
Remove any obstacles between the remote and the unit.
Use the remote near the unit.
Point the remote at the remote sensor on the unit.
Replace the batteries in the remote with new ones.
No power.
The remote does not
function.
Make sure that you’ve selected DVD mode.
The
system is in pause mode.Press the
button to return to
normal play mode.
Fast
forward or fast reverse is performed.Press the button
to return to normal play mode.
Make
sure the AUDIO /
VIDEO
output
and AV IN input
connections are correct.
This
unit is too hot. Power off the unit for 30 minutes to cool
down.
The region number of the disc doesn’t match the region number
of this unit.
Clean the disc.
The disc is scratched
plugs and jacks are dirty.Wipe them with a cloth slightly
Clean the disc
There is no disc inside(“No Disc”appears on the screen).
Insert the disc correctly with the label side facing yourself.
Clean the disc.
A non-NTSC disc has been inserted.The unit and disc region
number are incompatible.
Condensation may have formed inside the unit due to a
sudden change in temperature.Wait about an hour for it to
clean and try again.
DVD
No s ound or only a
very low-level sound is
heard.
No picture
The picture is not clear
Severe hum or noiseis
heard.
The disc does not play.
SYMPTOM CAUSE AND REMEDY( )
TROUBLESHOOTING GUIDE
The
moistened with alcohol.
Page 46

SYMPTOM CAUSE AND REMEDY( )
TV
Bad
Picture
(snow,
multiple
images
distortion,blurry)
No sound.
Black
and
White
picture.
No picture or sound.
Coloredp atches of
picture.
Panel function key does
not respond correctly.
Check the location of the antenna and adjust it if necessary.
Make sure the antenna cable is firmly connected.
Make sure all input cables are firmly connected.
Increase the volume.
Check the PICTURE setting within the PICTURE menu.
Make sure the unit is plugged in and turned on.
Make sure that the ATV mode is selected.
Try a new channel to check for possible station trouble.
Make sure the antenna is connected properly.
Increase the volume.
Make sure all cables are firmly connected.
Check for local interference.
Make sure there are no unshielded electrical devices nearby
that are causing interference.
Turn the TV off for 30 minutes, then try it again.
Under the influence of electrostatic phenomenon, the product
may malfunction and require usertopowerreset.
Unplug and re-plug the power cord.
TROUBLESHOOTING GUIDE
Check to make sure the program you are watching is broadcast
in Color and not Black & White.
Check
whether the mute function has been activated on the
Remote Control.
The display monitor's
panel goes hot.
LED TV takes inside lighten phosphor. It may increase the
temperature of the screen in some occasions. It's not a defect.
Unusual dots
Black dots and Bright points may appear on the LED screen.
This is a structural property of the LED panel and is not a defect.
Stripes on screen
Adjust the impulse phase may decrease stripes. RGB in
The top of the monitor
It may occur during long-time working. It's not a defect.
gets hot
.
Make sure the antenna or audio/video source device is
working properly.
Unable to select a
certain channel.
The channel may be skipped. Choose this channel by
directly selecting the buttons from the remote control.
Disorder display
at power on.
This may be caused because of a very short interval
between STANDBY OFF and ON.
Unplug the power and restart.
 Loading...