

Page 1
INSTRUCTION MANUAL
LED TV
RLDED5078A-F
Page 2

Table of Contents
1
Caution
Important Safety Precautions
Top/Side panel diagram
Remote Controller
Battery Installation
Using the Remote Control
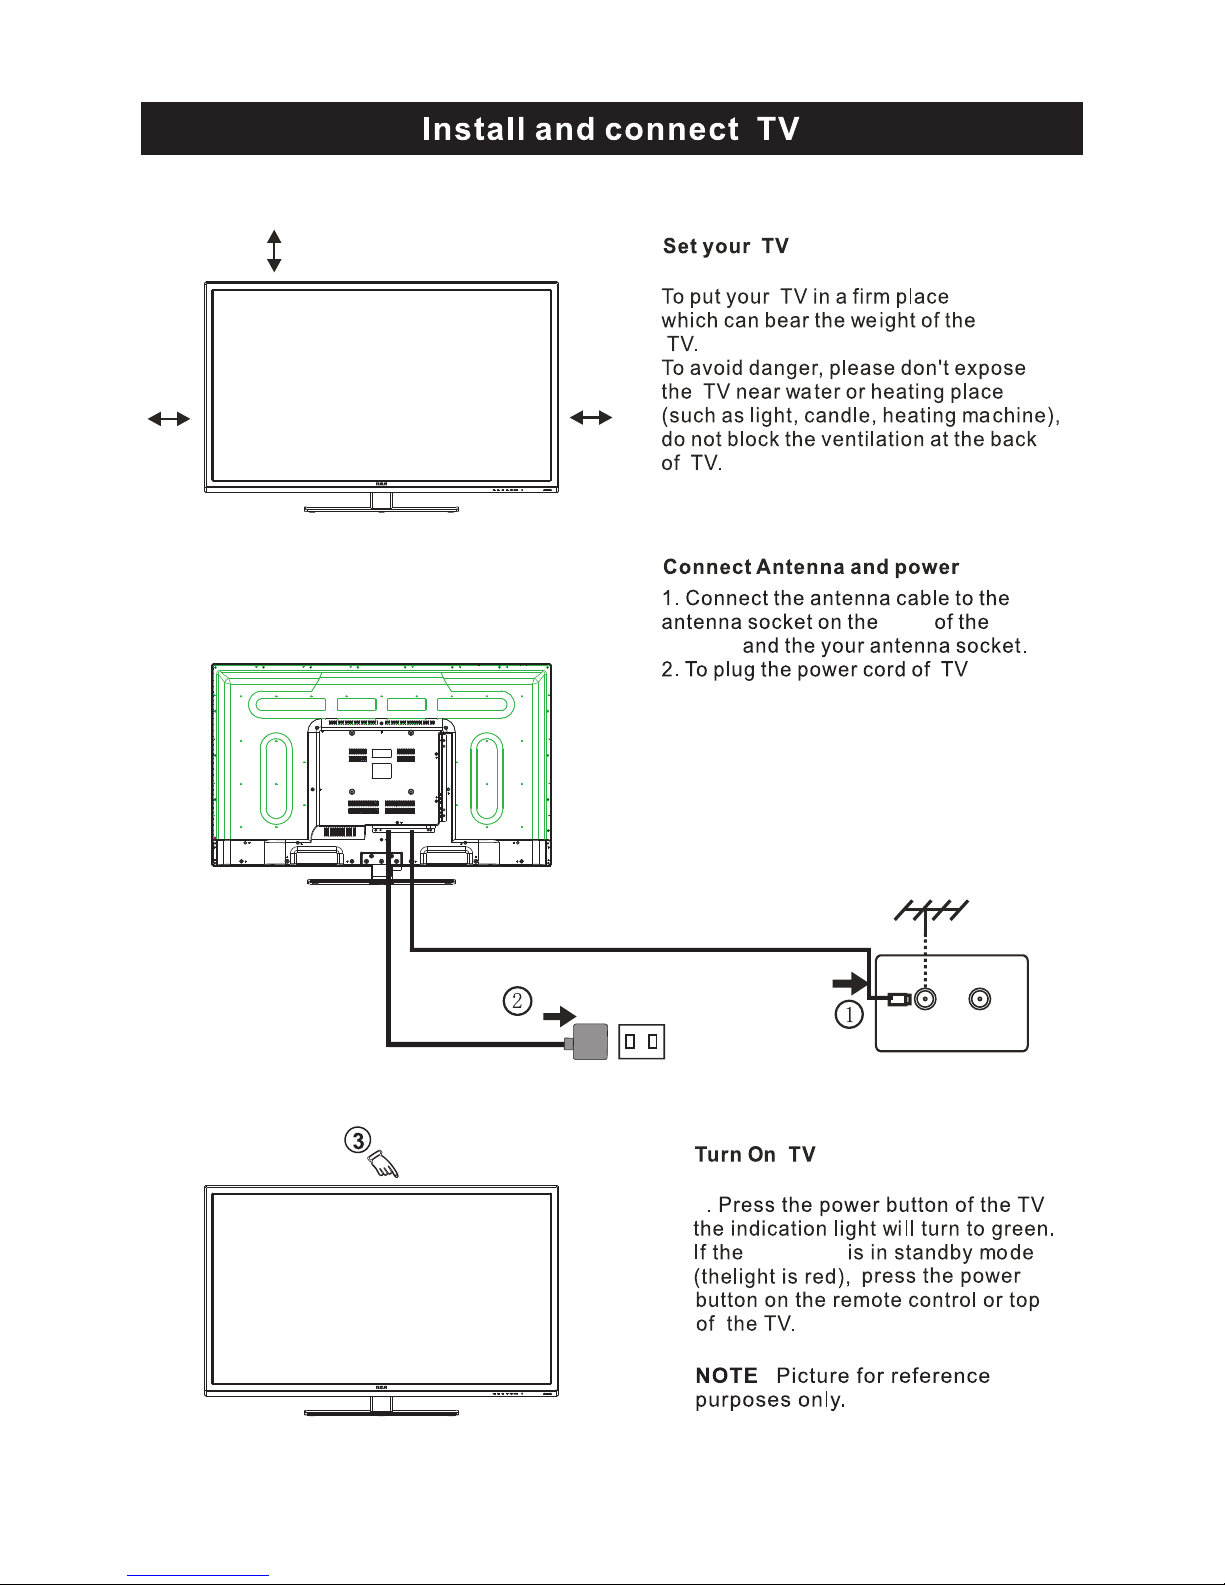
Install TV
Set your TV
Connect Antenna and power
Turn On TV
Help
2
3
4
6-7
8
9
12-13
15-31
34
35
TV Bracket assembly
5
Specifications
Setup Wizard
Wall Mount Installation
Main Menu Operation
Sound Menu
Time Menu
Setup Menu
Close Caption
Lock Menu
US Rating
TV
MPAA
Canada Rating
Hotel Menu
Channel Menu
15-17
17-18
19
20
21-23
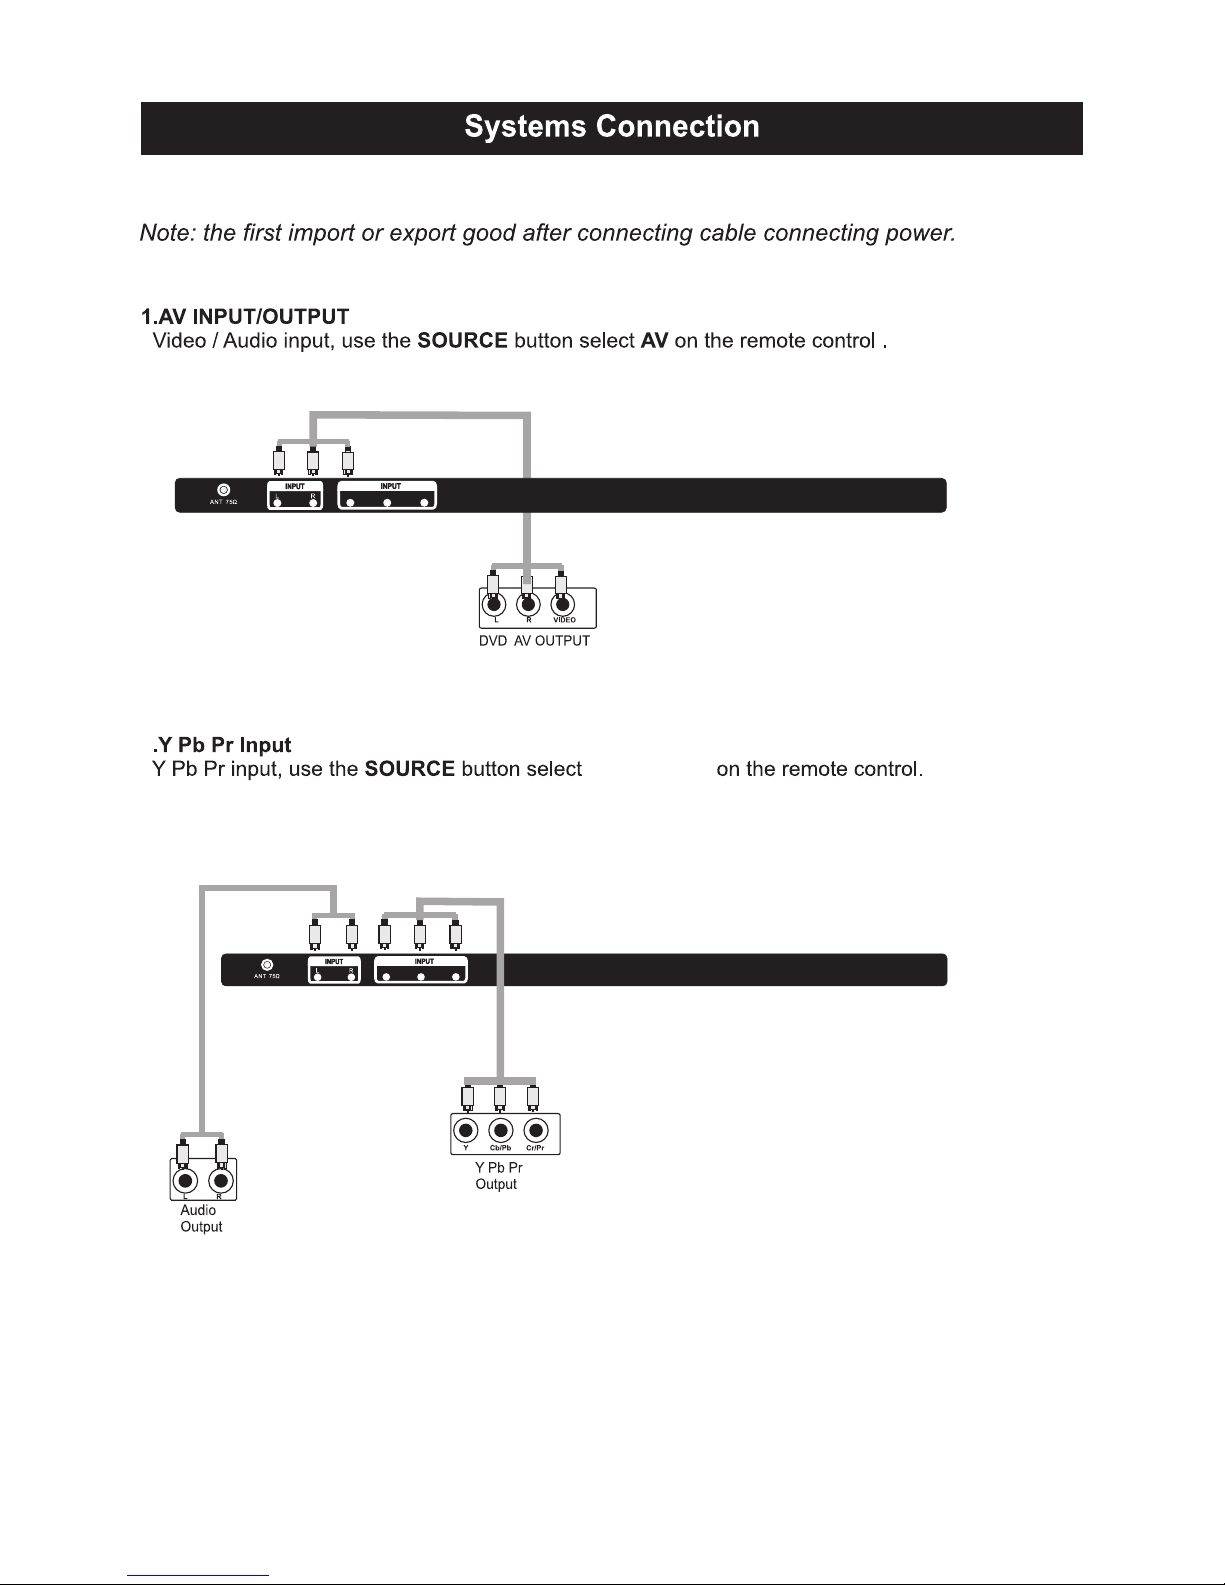
Systems Connection
10
14
Select Input Source
TV
24-25
26
26
27
27
28-29
30-31
PC
32-33
PC Menu
Page 3
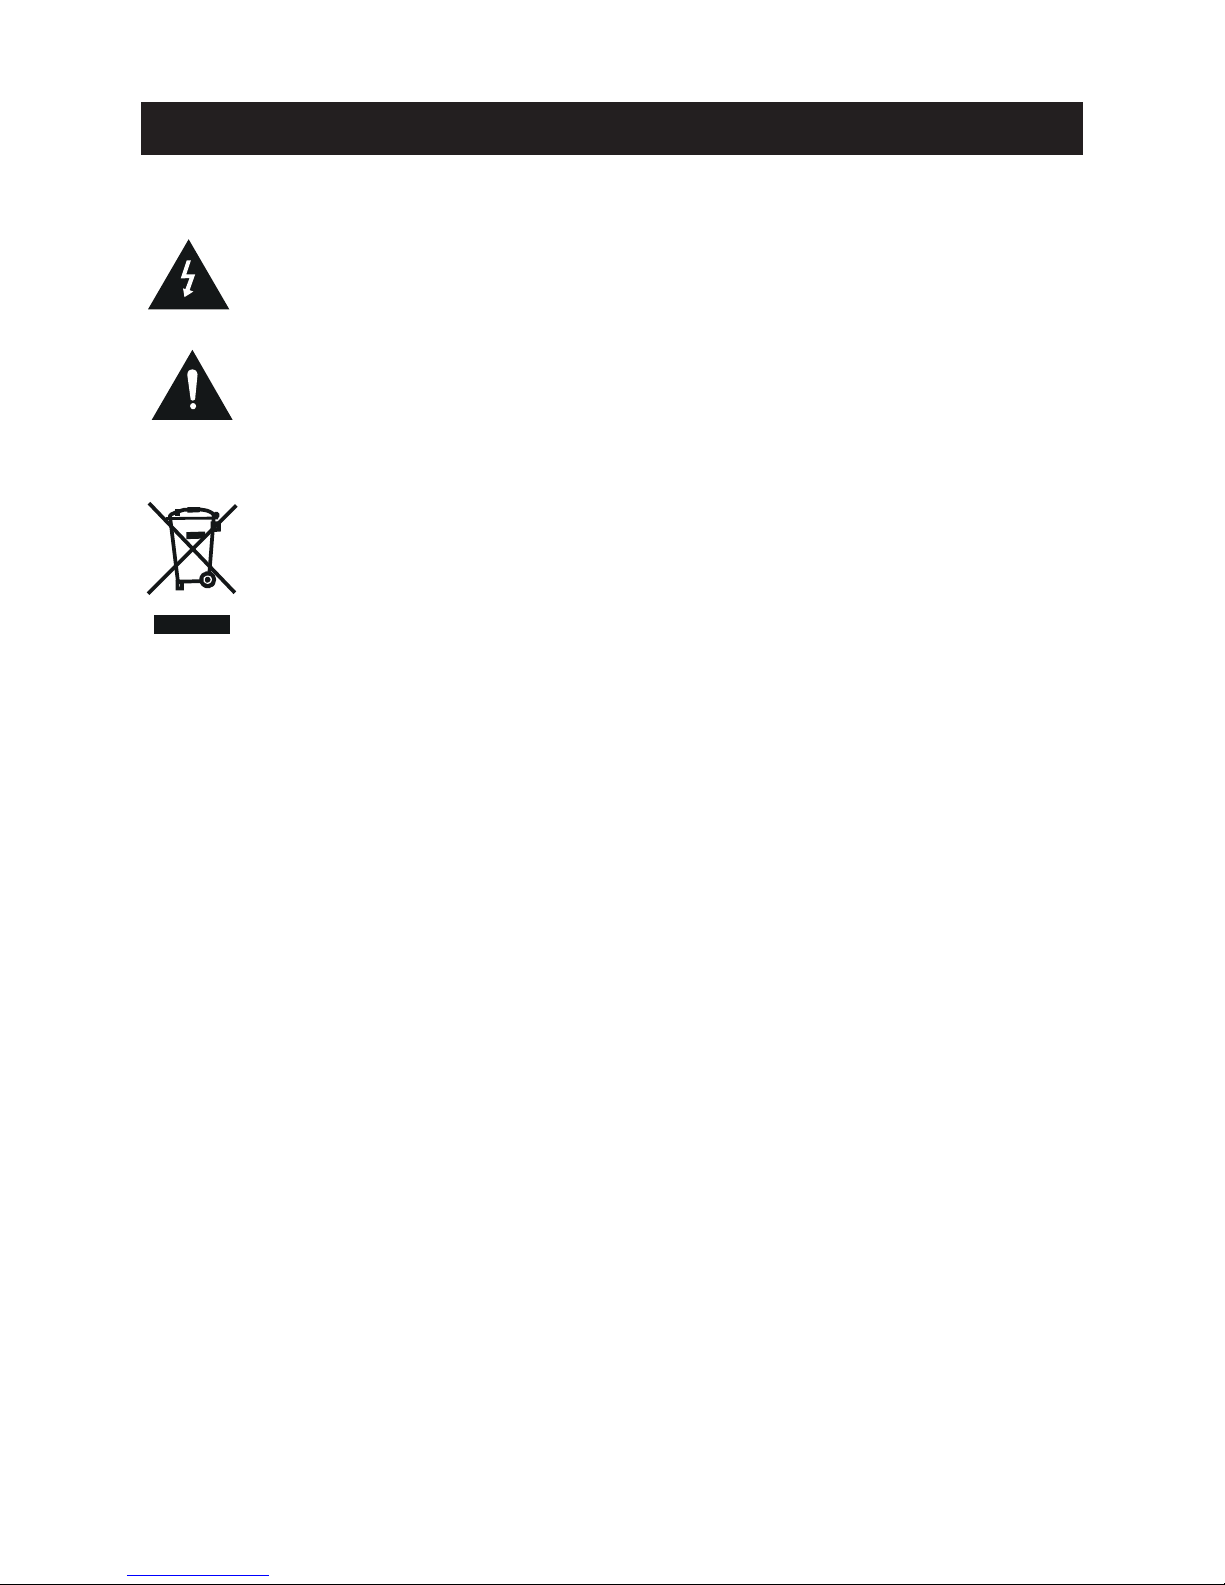
The light eni ng fl ash w ith a rro whead symbol, with in an e qui lat era l triangle is
intende d to al ert t he us er to t he pr esence of un-in sul ate d "da nge rou s voltage"
within th e pro duc ts en clo sur e that may be of suffi cie nt ma gni tud e to constitute a
risk of ele ctr ic sh ock t o the p ersons.
The excla mat ion p oin t wit hin a n equilateral tria ngl e is in ten d to al ert the user to
the prese nce o f imp ort ant o per ating and maintena nce ( ser vic ing ) instructions in
the liter atu re ac com pan yin g the appliance.
Co r r e c t disp osal o f th is Pr o duct
W aste Electr ica l & Ele ctr oni c Equipment (WEEE)
Your produc t is de sig ned a nd ma nuf actured with high qu ali ty ma ter ial s and
compone nts w hic h can b e rec ycl ed and reused.
This symb ol me ans t hat e lec trical and electro nic e qui pme nt, a t the ir end-of-life,
should be d isp ose d of se par ate ly from your househo ld wa ste .
Please di spo se of t his e qui pme nt at your local commu nit y was te
collect ion /re cyc lin g centre.
In the Euro pea n Uni on th ere a re se parate collectio n sys tem s for u sed e lectrical
and elect ron ic pr odu cts . Ple ase help us to conserv e the e nvi ron men t we li ve in!
Caution
2
Page 4
3
Page 5

4
8
7.87”
7.87”
4
3.95 ” x 3. 95”
100 100
Wall Mount Installation
Page 6
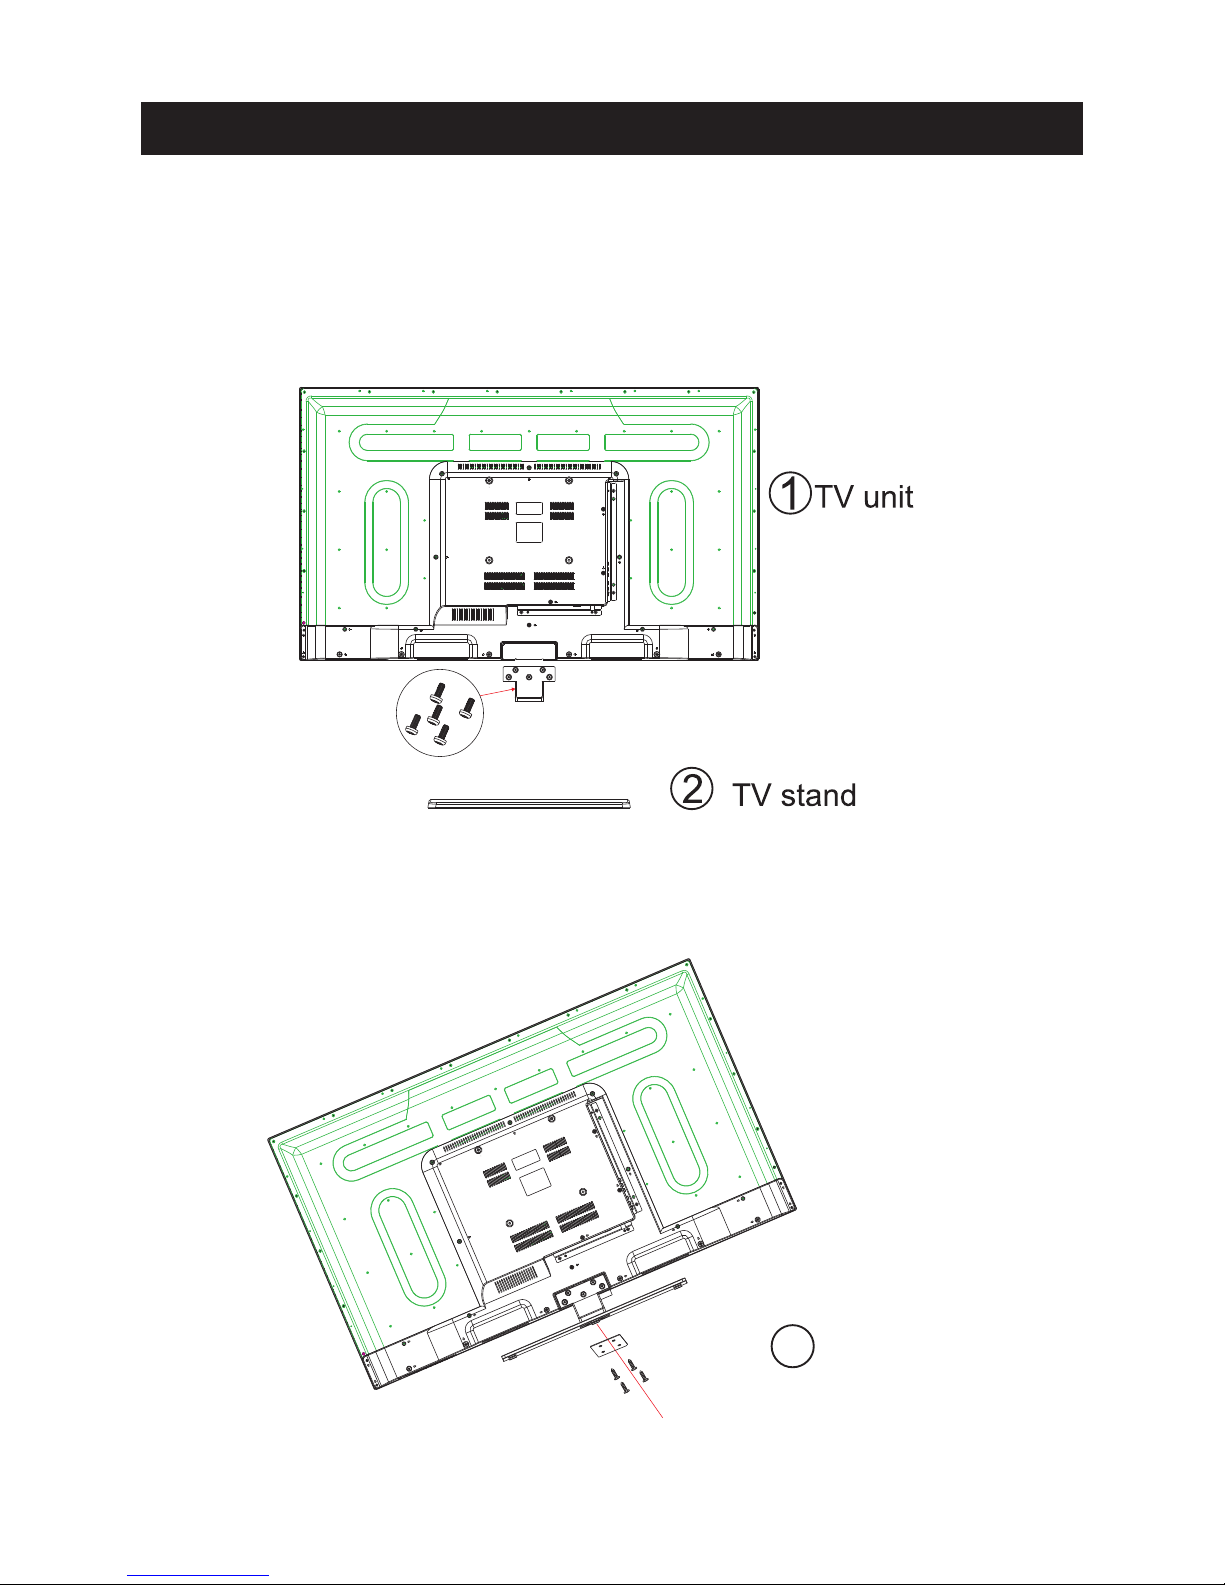
1.Match the TV unit into the stand, then hold the TV stand,
revolve and lock the tv unit tightly as the arrowhead point.
2.Fix the screws into the TV stand after installing the tv
unit and tv stand.
3
screws
TV Bracket assembly
5
Page 7
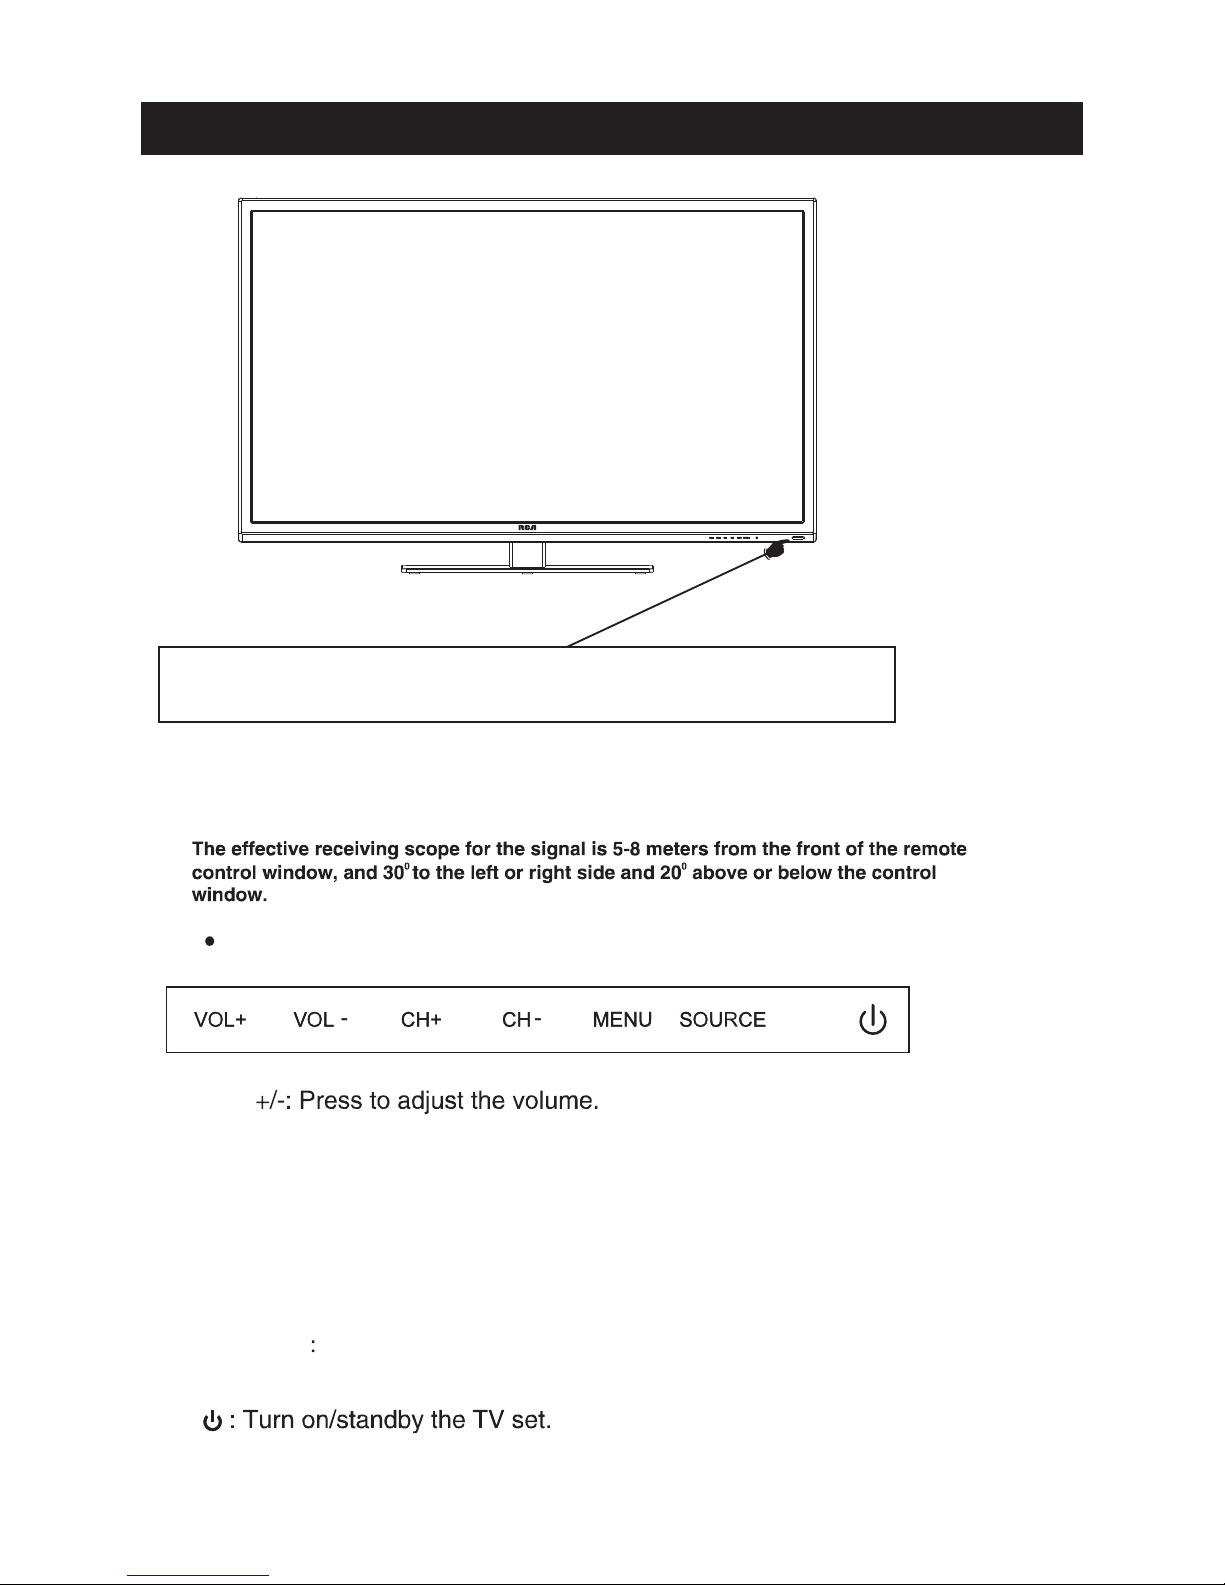
Indicator on(Red) Standby mode
Indicator on(Green) Power on mode
(IR) Infrared Receiver: Receives IR signals from the remote control.
(Power on/Standby) LED Indicator: Press
to turn on and off
VOL
The functions of the buttons on the are as follows:TV
CH+/-:When watching TV: select channels.
MENU:
1.Press Menu.
2.Press SOURCE to enter.
3.Use CH+/- to shift UP/DOWN.
4.Press SOURCE to confirm, then press VOL+/-to adjust.
5.Press SOURCE to confirm
Top panel diagram
6
SOURCE External signal input selection and confirm the
item selected.
Page 8
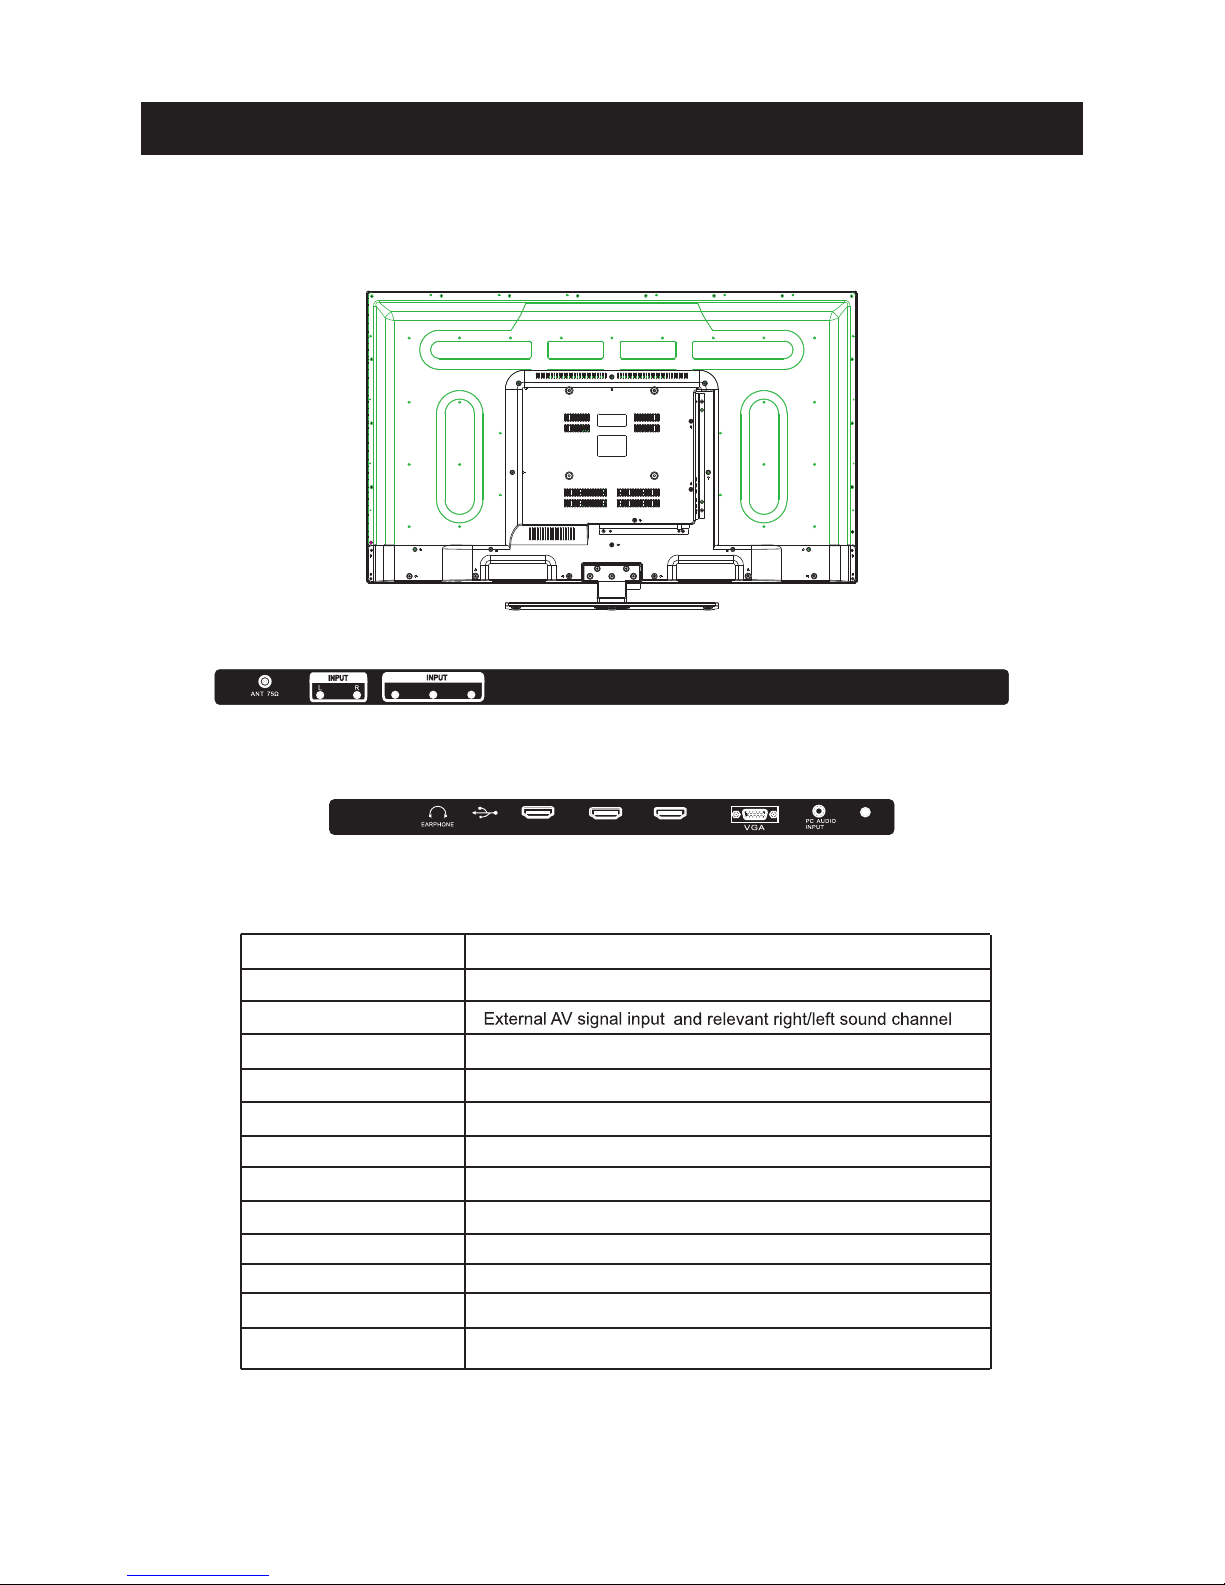
Side Panel Diagram
7
(Left Side)
(Back Side)
Conne ct to ANT or cable source
PC AUDIO IN
PC audio input
VGA IN
VGA signal from computer output
YPbPr
Connect to the composite terminal of your DVD/VCR
ANT 75 Ω
EARPHON E
For Upgrade Use
AV INPUT
Earphone out put
COAXIAL
Digital Audio O utp ut
Servic e Port
HDMI IN
Connect to HDMI of DVD or other equipment
Name
Function Description
VIDE O/Y
Pb Pr
AC 100- 240V ~
50/60 Hz
HDM I1
HDM I2
HDM I3
COAXI AL
servi ce por t
Page 9
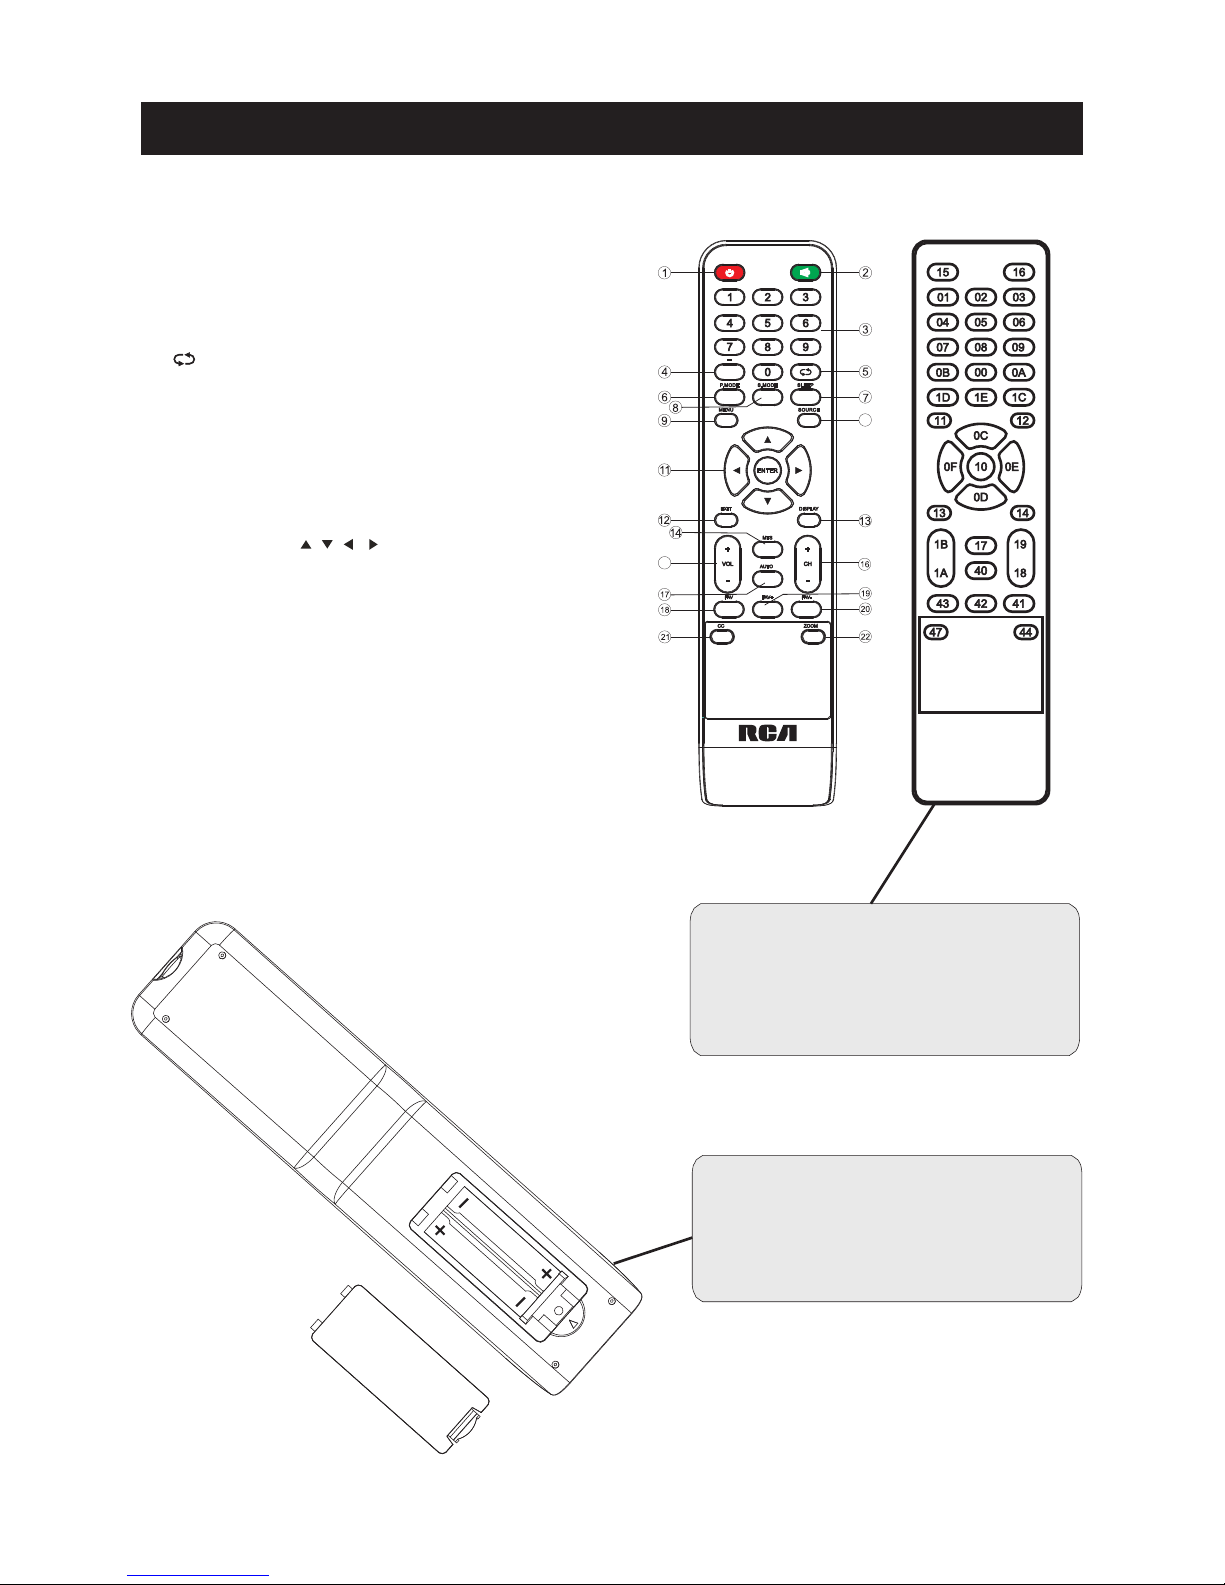
Remote Controller
8
Universa l rem ote c ode
This is the co de fo r rem ote c ontrol of
RLDED507 8A- F,if yo u want to change to a
universa l rem ote c ont rol,you can edit
this code in to yo ur un ive rsal remote contr ol.
(1)Open the ba tte ry co mpa rtm ent cover
on the back s ide
(2)Inse rt tw o 1.5 V bat ter ies o f AAA type
with corr ect p ola rit y
(3)Close the b att ery c omp art ment cover
on the back s ide
Universal Remote Control code:007F
(Universal Remote control is not included)
15
10
1.Power: Set your TV to power on or standby mode.
2.MUTE: Press to mute the sound. Press again or press VOL+
to unmute.
3.0-9: Press 0-9 to select a TV channel directly when you are
watching TV. The channel will change after a few seconds.
4.- : Press “-” to enter a program number for multiple program
channel, such as2-1etc.Return to the previous channel
viewed.
5. : Return to the previous channel viewed.
6.P.MODE: Press to cycle through the different picture settings.
7.SLEEP: Select the amount of time before TV turns off
automatically.
8.S.MODE: Press to cycle through the different sound settings.
9.MENU: Allows you to navigate the on-screen menus.
10.SOURCE: Press to cycle through the input source in following:
TV → AV → YPBPR→ HDMI1 → HDMI2 → HDMI3→PC
11.THUMBSTICK( / / / / ENTER):
Allows you to navigate the on-screen menus and adjust the
system settings to your preference.
12.EXIT: Exit from the menu or sub- menu and cancel the
function in progress (if possible).
13.DISPLAY: Press to display the source and channel’s
information.
14.MTS: Press to select the audio mode,you can select Stereo,
Mono,or SAP (second audio program).
15.V +/-: Press to increase or decrease the sound level.
16.CH+/-: Press to scan through or to select a channel.
17.AUTO: Adjusting the PC image rate automatically.
18.FAV: Set or cancel current channel to be a favourite channel.
19.FAV+: Down move Favourite program.
20.FAV-: Up move Favourite program.
21.CC: Press to display the closed caption.
22.ZOOM: Select display mode.
Page 10
3
side
indicator
9
10cm
10cm 10cm
LED TV
Page 11
2
10
Component
VIDEO /Y
Pb Pr
VIDEO /Y
Pb Pr
Page 12

11
AC 100- 240V~
50/60H z
HDMI 1
HDMI 2
HDMI 3
COAXIA L
servi ce port
AC 100- 240V~
50/60H z
HDMI 1
HDMI 2
HDMI 3
COAXIA L
servi ce port
Page 13

12
Setup Wizard
Connect an RF cable from the TV’s input called “RF-In” and to your TV Aerial socket.
Select Language
Press </ > button to select the language to be used for menus and mess age.
Press ▼ / ▲ button to select go to next step and press ENTER/ button to go.
Select Time
Press ▼ / ▲ button to select the time zone, daylight saving time and time format you want to.
Press </ > button on the remote control to adjust.
Press ▼ / ▲ button on the remote control to select go to next step and press ENTER/ button
to go.
Page 14

13
Auto Scan
Press </ > button to select the antenna type.
Press ▼ / ▲ button to select go to next step and press ENTER/> button to start auto scan.
Setup Wizard
Page 15

14
Select Input Source
Press INPUT butto n to display the input source list,
Press ▼ / ▲ or button to select the input
source you want to,
Press ENTER butto n to enter the input source,
Press EXIT button to quit.
INPUT
Main Menu
Press MENU to display the main menu or return to the previous menu or close the main menu.
Press </ > to highlight the desired menu icon, and press ENTER to select.
Source Select
TV
AV
Component
HDMI 1
PC
HDMI 2
HDMI 3
Page 16

15
TV
Picture Menu
Pre ss
Pre ss
Pre ss
Pre ss
ENU to enter th e main menu, Pre ss butt on to select.
Pre ss to ente r.
ENU again to exit or back to parent menu.
butt on to select among Pictu re Mode /B rightness/ Contra st / Color / Tint / Sharp ness / Color
Tempera tu re / Advanced Sett ings.
Pre ss to ente r.
Pre ss butt on to adjust.
ENU again or back to pare nt menu.
M </ >
ENTER / ▼
M
▼ / ▲
ENTER / ▼
</ >
M
【Pic tu re Mode】
Adjust pictu re mode to change pictu re appeara nce.
Pre ss butt on to select(S ta ndard / Dynamic / So ft / User).
【Brig htness】
Pre ss butt on to adjust.
【Contra st】
Pre ss butt on to adjust.
</ >
Adjust th e visual perc epti on outp ut of th e enti re pictu re , it will effe ct th e iuminousness of th e pi ctu re.
</ >
Adjust th e highlight inte nsity of th e pic tu re , but th e shadow of th e pictu re is invariable.
</ >
Note :The bri ghtn ess,c ontra st, color, ti nt and sharp ness are only a vailable in User mode,y ou can adjust as
you like.
Sta ndard Pro duces a highly defi ned image in a norm ally lit ro om.
Dynamic Pro duces a highly defi ned image in a bri ghtl y lit ro om.
Soft Pro duces a highly defi ned image in a soft lit ro om.
User Select to customize pictu re sett ings.
Main Menu Operation
Page 17

16
TV
【Colo r】
【Tin t】
Adjust th e hue(R e d,G reen,B l ue) of th e pictu re.
Pre ss butt on to adjust.
【Sharp ness】
Pre ss butt on to adjust.
【Colo r Temperatu re】
【Advanced Settin gs】
Adjust advanced video fe a tu re s to fi ne tu ne the pictu re .
Pre ss butt on to ente r .
【Aspect Ratio 】
Adjust how th e pictu re fi lls th e screen.
【Nois e Reductio n】
Set opti ons to re duce video noise.
Adjust th e satu rati on of th e color based on your own like.
</ >
</ >
Adjust th e peakin g in th e deta il of th e pictu re.
</ >
Incre ase or re duce warm color of th e pictu re pers onally(re d),a nd th e cool color pers onally(b lue) according
to your like.
> sub-m enu.
Pre ss butt on to adjust.
Norm al
Norm al Auto ma ti cally adjust Aspect Rati o based on TV size and TV pro gra m.
Wide Use to watc h wide scre en(1 6:9 ) conte nt.
Zoom Expands image to fi ll scre en. Top and butt on maybe cut off.
Cinema Stre tc hes image at edges but keeps a clear ima ge in th e cente r.
Off Select to tu rn off video noi se dete cti on.
Low Dete ct and re duce low video noise.
Medium Dete ct and re duce modera te video noise.
High Dete ct and re duce enhanced video noi se.
Auto Dete ct and re duce video noise auto mati cally.
Incre ase th e sex-l inked colors fo r th e white .
Warm In cre ase th e red color fo r th e white .
Cool In cre ase th e blue to ne fo r th e white .
Page 18

17
TV
Sound Menu
Pre ss
Pre ss
Pre ss
Pre ss
ENU to enter th e main menu, Pre ss butt on to select.
Pre ss to ente r.
ENU again to exit or back to parent menu.
butt on to select among /S ound Mode / Bass / Tre ble / Balance /M TS/ Audio Language
/Digita l Audio Output/ Surro und Sound/ AVL .
Pre ss to ente r.
Pre ss butt on to adjust.
ENU again or back to pare nt menu.
M </ >
ENTER / ▼
M
▼ / ▲
ENTER / ▼
</ >
M
【HDMI Mode】
Only available in HDMI input.
【Dynamic Contra st】
Auto mati cally adjust picture deta il and bri ghtn ess.
Pre ss butt on to select (Off/O n).
Pre ss butt on to select (Video/G raphic).
</ >
</ >
Page 19

18
TV
【Sound Mode】
Select a sound mode to achieve ideal so und.
Pre ss butt on to select(S ta ndard / Music / Movie / Sports / User) .</ >
Note :The bass and tre ble are only available in User mode,you can adjust as you like.
Sta ndard Pro duces a balanced sound in all environments.
Music Pre serv es th e ori ginal sound. Good fo r musical pro gra ms.
Movie Enhances tre ble and bass fo r a ri ch sound experi ence.
Sports Enhances vocals fo r TV audio.
User Select to customize audio settings.
【Bass】
Adjust th e bass effe ct. In cre ases or decre ases lower-p itc hed sounds.
Pre ss butt on to adjust.</ >
【Treble】
Adjust th e tre ble effe ct. Incre ases or decre ases high-p itched sounds.
Pre ss butt on to adjust.</ >
【Bala nce】
Adjust th e balance betw een left and ri ght speakers to adapt to your liste ning positi on.
Pre ss butt on to adjust.</ >
【MTS】
It is only available in ATV. Confi gure s the multi-tra ck sound.
Pre ss butt on to select(M ono/S tere o/S AP).</ >
Mono Sets the sound to mono.
Ste re o Sets th e sound to ste reo when stere o is not available, the sound is auto mati cally switc hed
to mono.
SAP Sets th e sound to th e second audio progra m.
【Audio Language】
. It is only available in DTV. Select th e language supporte d by the chose n digital channel
Pre ss butt on to select(E nglish / / ).</ > Fre nch Spanish
【Dig ita l Audio Outp ut】
Send digita l audio to extern al audio syste m.
Pre ss butt on to select.</ >
PCM Select to outp ut audio in 2-c hannel ste re o.
Raw Ori ginal image coded date .
Off Set digita l audio outp ut o ff.
【AVL】
Set th e auto volume contro l.
Pre ss butt on to </ > select(O n / Off) .
NOTE:
Balance: This ite m can ad just the speaker’s outpu t, it en able s you to l isten to best at your position.
AVL: This item uses fo r redu cing the difference betwee n chan nel and program’s
volume autom atic ally.
it made the overall wa ter to b e even. This function will als o redu ce the fluctuation of the sound .
【Surr ound Sound】
Pre ss butt on to </ > select(O n / Off) .
Page 20

19
TV
Time Menu
Pre ss
Pre ss
Pre ss
Pre ss
ENU to enter th e main menu, Pre ss butt on to select.
Pre ss to ente r.
ENU again to exit or back to parent menu.
butt on to select among Sleep Timer / Time Zone / Daylight Saving Time / Time Format / Auto
Clock / Clock.
Pre ss to ente r.
Pre ss butt on to adjust.
ENU again or back to pare nt menu.
M </ >
ENTER / ▼
M
▼ / ▲
ENTER / ▼
</ >
M
Tim e Zone
Dayli ght Saving Tim e
Tim e Form at
Auto Clo ck
【Sle ep Tim er】
Set a ti mer fo r the TV to tu rn off auto mati cally.
Pre ss butt on to select(O ff / 5min/10min /1 5min/ 30min / 60min / 90min / 120min/180min/2 40m in).
【 】
Select your ti me zone.
Pre ss butt on to select(E aste rn / Centra l / Mountain / Pacifi c / Alaska / Hawaii /S amoa/
Newfo undland / Atl anti c).
【 】
Set th e daylight saving time fo r your are a.
Pre ss butt on to select(O n / Off) .
【 】
Select your ti me fo rm at.
Pre ss butt on to select(1 2-hour / 24-hour) .
【 】
It is only available in DTV.
Pre ss butt on to select(O n / Off) .
</ >
</ >
</ >
</ >
</ >
Use to synchro nize th e display auto mati cally.
Page 21

20
TV
Setup Menu
Pre ss
Pre ss
Pre ss
Pre ss
ENU to enter th e main menu, Pre ss butt on to select.
Pre ss to ente r.
ENU again to exit or back to parent menu.
butt on to select among Menu Language / Tra nspare nt / OSD Timeout / Closed Caption /O ver
Scan/ In put Label / Oth er sett ings / Resto re D efa ult / Setu p Wizard .
Pre ss to ente r.
Pre ss butt on to adjust.
ENU again or back to pare nt menu.
M </ >
ENTER / ▼
M
▼ / ▲
ENTER / ▼
</ >
M
【Menu la nguage】
Pre ss butt on to select language(E nglish / Fra nçais ).
【Transparent】
Adjust th e tra nspare ncy of th e OSD (o n scre en display) menu.
Pre ss butt on to select.(0 %,2 5%,5 0%,7 5%,100%)
【OSD Tim e out】
Adjust th e dura tion of th e OSD (o n scre en display) menu.
Pre ss butt on to select.(5 Sec., 15Sec., 30Sec.,45Sec., 60Sec.
【Clo sed Captio n】
Adjust Closed Capti oning sett ings. On ly available under TV an d AV sourc e.
Pre ss ENTER / butt on to enter.
For deta il please re fer to page 21.
Select an OSD menu language can be displayed.D efault English is selecte d as menu language.
</ >
</ >
</ >
Page 22

21
TV
CC Mode
Analo g CC
Dig ita l CC
O
Mode
Font Sty le
Font Siz e
Font Edge Sty le
Font Edge Colo r
FG Colo r
Colo r
FG Opacity
Opacity
【 】
Turn C losed Capti oning on/off.
Pre ss butt on to select(C C Off / CC On / CC OnMute ).
【 】
Set Closed Capti oning for sta ndard (analog) pro gra m.
Pre ss butt on to select(C C1 / CC2 / CC3 / CC4 / TEXT1 / TEXT2 / TEXT3 / TEXT4).
【 】
Set Closed Capti oning for digital pro gra m.
Pre ss butt on to select(O ff / Serv ice1 / Serv ice2 / Serv ice3 / Serv ice4 / Serv ice5 / Service6).
【 ptio n】
Adjust th e digita l Closed C apti oning sett ing.
Pre ss butt on to ente r.
【 】
Set th e look of digita l Closed Capti oning. Automati c uses broadcaste r’s style.
Pre ss butt on to select(D efault / Custo m).
【 】
Select fro m 8 fo nt sty les.
Pre ss butt on to select(D efault / Font 0 / Font 1 / Font 2 / Font 3 / Font 4 / Font 5 / Font 6 / Font 7).
【 】
Adjust th e size of the digital Closed Capti oning font.
Pre ssvbutt on to select(D efa ult /N orm al / Larg e / Small).
【 】
Adjust th e edge of th e digital Closed Capti oning box.
Pre ss butt on to select(D efault / None / Raised / Depre ssed / Unifo rm / Left Shadow / Right Shadow).
【 】
Adjust th e color of the digita l Closed Captioning box.
Pre ss butt on to select(D efault/ Black / White / Red / Gre en / Blue / Yellow / Magenta / Cyan).
【 】
Adjust th e color of the digita l Closed Capti oning fo nt.
Pre ss butt on to select(D efault/ Black / White / Red / Gre en / Blue / Yellow / Magenta / Cyan).
【BG 】
Adjust th e digita l Closed C apti oning backgro und color.
Pre ss butt on to select(D efault/ Black / White / Red / Gre en / Blue / Yellow / Magenta / Cyan).
【 】
Adjust th e tra nspare ncy of th e digital Closed Capti oning font.
Pre ss butt on to select(D efault / Solid / Flash ing / Tra nslucent) .
【BG 】
Adjust th e digita l Closed C apti oning backgro und tra nspare ncy.
Pre ss butt on to select(D efault / Solid / Flash ing / Tra nslucent) .
</ >
</ >
</ >
>
</ >
</ >
</ >
</ >
</ >
</ >
</ >
</ >
Close Caption
Page 23

22
TV
【Over Scan】
Pre ss butt on to select(O n / Off) .
It is only available to ente r 1080i/720p/1 080p in DTV/C omponent/ HDMI. Defa ult is On.
It fi xed set to be On in ATV/AV. It fi xed set to be Off in PC/U SB.
【Input Labels】
Cre ate labels for th e devices connected to your TV.
Pre ss ENTER / button to ente r.
【Oth er Settin gs】
Set th e para mete r of a udio only, no signal power off and no opera ti on power off.
Pre ss ENTER / button to ente r.
【Blu e Scre en】
To select th e tra nsiti on ty pe re quire d while changing fro m one channel to anoth er
Pre ss butt on to select(O n / Off) .
【Audio Only】
Play th e audio with th e pictu re tu rn ed off. When you turn th e Audio Only on and exit th e OS D menu,
the panel will be dark; and th en pre ss any key to e xit th e Audio Only sta tus.
Pre ss butt on to select(O n / Off) .
</ >
</ >
</ >
Page 24

23
TV
【Resto re Defa ult】
Change power on options or re set TV to fa ctory defa ult.
Pre ss ENTER / butt on to enter.
【Setu p Wiz ard】
Set th e firs t time installati on.
Pre ss ENTER / butt on to ente r.
For deta il please re fer to page 12~13.
>
>
Page 25

24
TV
Lock Menu
Pre ss
Pre ss
Pre ss
Pre ss
, .
ENU to ente r the main menu Pre ss butt on to sel ect
.
Pre ss to ente r
.
ENU again to exit or back to pare nt menu
butt on to select among Change Pa ssword / Syste m Lock / In p ut Block / US Rati ng / Canad a
Rati ng /R RT Sett ing / Reset RRT/Hote l menu
.
Pre ss to ente r
.
Pre ss butt on to adjust
.
ENU again or back to pare nt menu
-
Ente r your 4 digital password . Defa ult password is 0000,
M </ >
ENTER /
▼
M
/
▲
▼
ENTER /
▼
</ >
M
and if fo rget what you set, please call th e
serv ice cente r.
Page 26

25
TV
【Change Password】
Ente r a new 4-d igita l password th en re -e nte r it to confi rm .
Pre ss butt on to e nte r.
【Syste m Lock】
Lock or unlock th e butt ons on th e TV.
Pre ss butt on to select(O ff / On).
【Input Blo ck】
Block or unblock th e input so urc es.
Pre ss button to enter.
Pre ss butt on to select(U nblock / Block).
【
Restri ct movie and TV pro grams by US Rati ngs.
Only available when "S yste m Lock" is "o n".
Pre ss button to enter.
For deta il please re fer to page 26~27.
【
Restri ct movie and TV pro grams by Canadian Rati ngs..
Only available when "S yste m Lock" is "o n".
Pre ss button to enter.
For deta il please re fer to page 27.
【RRT Settin g】
Display an advance V-C hip ra ti ng ta ble fo r di gita l channe ls.
The ite m is available only When curre nt stre am has downloadable ra ti ng data .
【Reset RRT】
Reset th e RRT to defa ult.
The ite m is available only When curre nt stre am has downloadable ra ti ng data .
>
</ >
>
</ >
>
>
US Ratin g】
Canada Ratin g】
【
Press button to enter.
For detail ple ase refer to page 28.
Hotel Menu】
>
Page 27

26
TV
Age
Define
TV-Y
TV-Y7
TV-G
TV-PG
TV-14
TV-MA
General audience
Parental guidance suggested
Parents strongly cautioned
Retricted
No one 17 and under admitted
Adult audience only
*Note:
The content ratings will increase depen ding on the level of the age-based rating.
For example, a program with a TV-PG V( violence) rating may contain moderate violence, while a
TV-14 V(violence) rating may contain intense violence. So locking a higher level option will
automatically cause locking the options that has more sensitive level.
TV
The TV r ating compose of two aspects: age-based and content-based.
US Rating
For the United States, the rating setting basically includ e the following options: TV, MPAA.
Page 28

27
TV
For Canada, t he rat ing se tting include the fol lowi ng opt ions: Canada English, French.Canad a
Canada English
These ratin gs are f or pro grams which are using
English rating sy stem .
Rating
Defined as
C
C8+
G
PG
14+
18+
Children
Children 8 years an d olde r
General pro gram ming
Parental gu idan ce
Viewers 14 and old er
Adult progr ammi ng
Rating
Defined as
G
8 ans+
13 ans+
16 ans+
18 ans+
General
Not recomme nded f or
under age 8
children
Not recomme nded f or chi ldren
under age 13
Not recomme nded f or
under age 16
children
This progra m is res tric ted to adults
Canada French
The ratings are for programs
French rating system.
which are u sing
Off
News and sports
Off
News and sports
Rating
Define
G
PG
PG-13
R
NC-17
X
General aud ienc e. All ag es adm itted.
Parental gu idan ce sug gest ed. Some material may n ot be su itab le for children.
Parents str ongl y cautioned. Some materia l may be i napp ropr iate for children
under 13.
Restricte d. Chi ldre n under 17 require accompanying p aren t or adu lt guardian.
No one 17 and under adm itte d.
Adult audie nce on ly.
MPAA
This system d efin es the r ating control which c ome fr om MPAA rules.
Canada Rating
Off
Page 29

TV
28
Hotel Menu
【Hotel Mode】
Set hotel mode On or Off.
Note: The following settings wo rk only when Hotel Mode is set to be On.
【Boot Setting】
【Picture Mode】
Adjust picture mode to change picture appearance.
Press button to select(Standard / Dynamic / Soft / User).
【Default Volume】
【Max Volume】
【Boot Source】
</ >
Set the default vol ume for every time you open the TV, the default volume is 20.
Set the max volume th at you can adjust.
Set the default inp ut source when turning on your TV.
Page 30

TV
29
【Boot Channel】
【Channel Select】
Set boot default on what channels.After channel se arching,channels in the list can be selected.
【Hotel Lock】
Set boot channel On o r Off.
Note:Channel Se lect is available when Boot Channel is set to be On.
To lock the Tuner/Key Pad/Menu Lock that you want.
Channel searching is invalid when Tuner Lock i s set to be On
【Power Save】
Set a timer for the TV to turn off automatically.
Timer:60Min,120Min,180Min,24 0Min,Off
【TV to USB】
【USB to TV】
【Reset Hotel Setting 】
Available
Backup da ta to USB.
Restore data from USB.
Recall the default settings of Hotel menu.
Page 31

TV
30
Channel Menu
Pre ss
Pre ss
Pre ss
Pre ss
EN U to ente r the mai n menu, Pre ss b utt on to se lect .
Pre ss to ente r.
EN U again to ex it or ba ck to pare n t menu .
butt o n to sel ect among Air/C able / Auto S can / Fa vorite / ch anne l ist / Show/Hide / C hannel Number / C hann el
Label .
Pre ss to ente r.
Pre ss butt o n to adj ust.
EN U again or back to pa re nt men u.
M </ >
ENTER / ▼
M
▼ / ▲
ENTER / ▼
</ >
M
【Air/C able】
.
Pre ss butt o n to sel ect(A ir/C able).
【Auto Sc an】
Auto m ati c ally search fo r c hannels.
Pre ss ENTER / butt o n to ente r.
Selec t sign al ty pe
</ >
>
Page 32

【Favorite s】
Add channels to cre ate a fa vori te lis t.
Pre ss butt on to enter.
【Channel Number】
.
Pre ss butt on to ad just .
【Channel Label】
.
Pre ss butt on to ad just .
>
>
>
</ >
</ >
【Channel Lis t】
Display your pro gra m list.
Pre ss butt on to enter.
【Show/H id e】
Show or hide th e channels in your pro gra m list.
Pre ss butt on to enter.
Show th e channel number
Cre ate labels fo r channels ,up to 7 ch ara c te rs
TV
31
Page 33

PC Menu
Pre ss
Pre ss
Pre ss
Pre ss
to select PC sourc e.
ENU to enter th e main menu, Pre ss butt on to select Setu p menu.
Pre ss to select PC Sett ings.
butt on to select among H -P os / V-Pos / Cloc k / Phase / Auto .
Pre ss to ente r
.
Pre ss butt on to adjust
.
ENU again or back to pare nt menu
.
INPUT
M </ >
▼
▼
/
▲
ENTER /
▼
</ >
M
PC
32
Page 34

【H-Pos】
Adjust t he horizontal pos ition of the pictur e.
Press button to adju st.
【V-Pos】
Adjust t he vertical posit ion of the picture.
Press button to adju st.
【Clock】
Adjust t he vertical posit ion of the picture.
Press button to adju st.
【Phase】
Adjust t he horizontal int erfering lines.
Press button to adju st.
【Auto】
Press button to ente r.
</ >
</ >
</ >
</ >
>
Adjust t o the sc reen automa tically to the optimal position of the p icture.
*Notes:
PICTURE are in valid.
2. MTS and Au dio Language in SOU ND menu are invalid.
3. Auto Clo ck in TIME menu is invalid .
4.Clos e Caption in SETUP menu is i nvalid.
5.US Rating, C anada Ratin g, RRT Setting and Rese t RRT in LOCK menu ar e invalid.
6. mode has n o CHANNEL menu.
1. Color, Ti nt,Sharpness, Noise Reduction ,Dynamic Co ntra st and HDMI Mod e in
PC
PC
33
Page 35

Help
34
Page 36

NOTE:
This use r s manual is for reference only .Specications are subject to change
withou t notice
Parameter specification
VGA
Resol utio n
60HZ
640x 48 0 800X 60 0 1024x 76 8
1360 x7 68
Vert ical fr equen cy hz
HDMI
60HZ
50HZ 50HZ/60 HZ
50HZ /6 0HZ
Vert ical fr equen cy hz
Forma t
576 i/ P
720 P
480 i/ P
1080 i /P
60HZ60HZ60HZ
NTSC / ATSC
800
PAL, NTSC
IN:T V, AV, YPb Pr, P C AUDI O, VGA, HD MI .
OUT: COA XI AL,EA RPHON E.
10W+10 W
108W
AC 120V ~, 60H z
60HZ
1920 x1 080
Screen S ize
50”
Specifications
35
 Loading...