

Page 1

USER’S MANUAL
RLDED3930A-RK
39”
LED TV
,VT RCAeht htiw seriuqni ro ecnatsissa ecivres roF :troppuS ACR
please visit: www.curtcoint.com
Roku Support: For service assistance or inquires with the Roku Streaming Stick™,
please visit www.roku.com/support
deganam era kcitS ginimaertS ukoR eht dna VT ACR eht rof ytnarraw ehT :etoN
exclusively by their respective companies. Please complete each warranty
and submit to their respective parties.
independantly
Page 2

Contents
Introduction
Warning
Caution
Important Information
Attaching or Removing the Stand
Installing Batteries to the Remote Control
Identifying Front and Rear Panel
Connection Suggestion
Main Unit Description
Remote Control
OSD Basic Adjustment
How Do I Clean The TV
Troubleshooting
Specifications
FCC Compliance Statement
1
Roku Quick Start Guide
5&$ Warranty
Roku Important Product Information & Warranty
Page 3

Intr
oduction
Thank
you very much for purchasing your LED TV. It serves as a normal colour TV
and a PC monitor. To enjoy your set fully from the very beginning, read this manual
carefully and keep it handy for future reference.
INSTALLATION
Locate
the receiver in the room where direct light does not strike the screen. Total
darkness or a reflection on the picture screen can cause eyestrain. Soft and indirect
lighting is recommended for comfortable viewing.
Allow enough space between the receiver and the wall to permit ventilation.
Avoid excessively warm locations to prevent possible damage to the cabinet or
premature component failure.
This TV can be connected to AC 100-240V~ 50/60Hz.
Do not install the TV in a location near heat sources such as radiators, air ducts,
direct sunlight, or in closed compartments and closed areas. Do not cover the
ventilation openings when using the TV.
The indicator light will last for about 30 seconds after the power has been turned
off.
Wait until the indicator light goes out before repowering the TV.
6
User manual x1
Warranty card x1
Remote control x1
Battery (pair, AAA) x1
Accessories list for this TV set:
x
x
x
x
Page 4
Warning
This symbol is intended to alert the user to avoid the risk
of electric shock. This equipment may only be disassembled
by qualified service personnel.
This symbol is intended to alert the user to the presence
of important operation and maintenance instructions in
the literature accompanying the equipment.
CAUTION: TO AVOID THE RISK OF ELECTRIC SHOCK.
DO NOT REMOVE COVER (OR BACK).
NO USER- SERVICEABLE PARTS INSIDE.
REFER SERVICING TO QUALIFIED SERVICE PERSONNEL
.
CAUTION
RISK OF ELECTRIC SHOCK
DO NOT OPEN
Class I structures of equipment should be connected to the grid
power output with a protective earth connection on the socket.
Power plug as a broken appliance,
broken installations should
be easy to operate.
3
Page 5
Caution
Caution
High voltages are used in the operation of this product.
- Do not open the product's casing. Refer servicing
to qualified service personnel .
Caution
To prevent fire or electrical shock hazard, do not expose
the main unit to
rain or moisture,
do not place objects
filled with liquids, such as vases, on the apparatus.
Caution
Do not drop or push objects into the television cabinet
slots or openings. Never spill any kind of liquid on the
television receiver.
Caution
Avoid exposing the main unit to direct sunlight and other
sources of heat. Do not stand the television receiver
directly on other products which give off heat: e. g. video
cassette players and audio amplifiers. Do not block the
ventilation holes in the back cover. Ventilation is essential
to prevent failure of electrical components. Do not squash
the power supply cord under the main unit or other heavy
objects.
4
Page 6
Caution
Caution
Never stand on, lean on or suddenly push the product
or its stand. You should pay special attention to
children.
Caution
Do not place the main unit on an unstable cart stand,
shelf or
table. Serious injury to an individual and
damage to the television may result if it should fall.
Caution
When the product is not used for an extended period
of time, it is advisable to disconnect the AC power
from the AC outlet.
Caution
The LED panel used in this product is made of glass and
is ther
efore breakable. This product must not be dropped
or banged. If the LED Panel breaks be careful of being
injured by broken glass.
5
Page 7
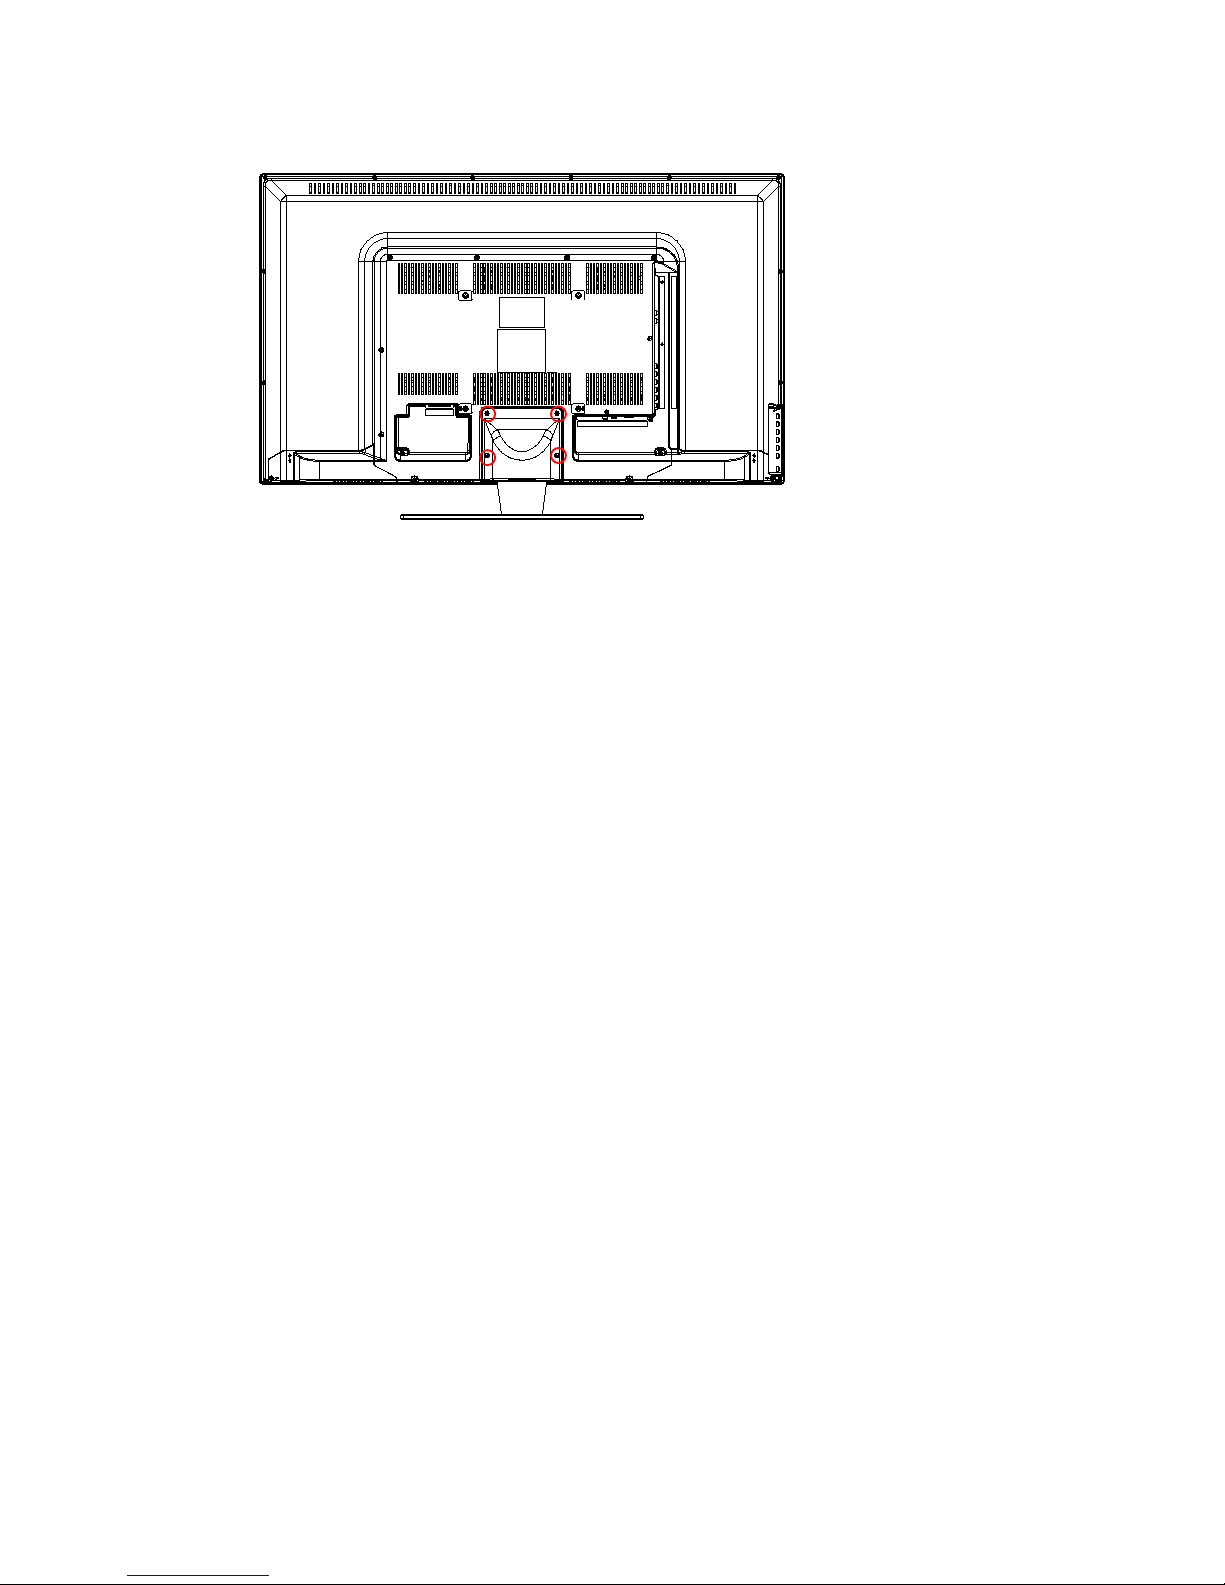
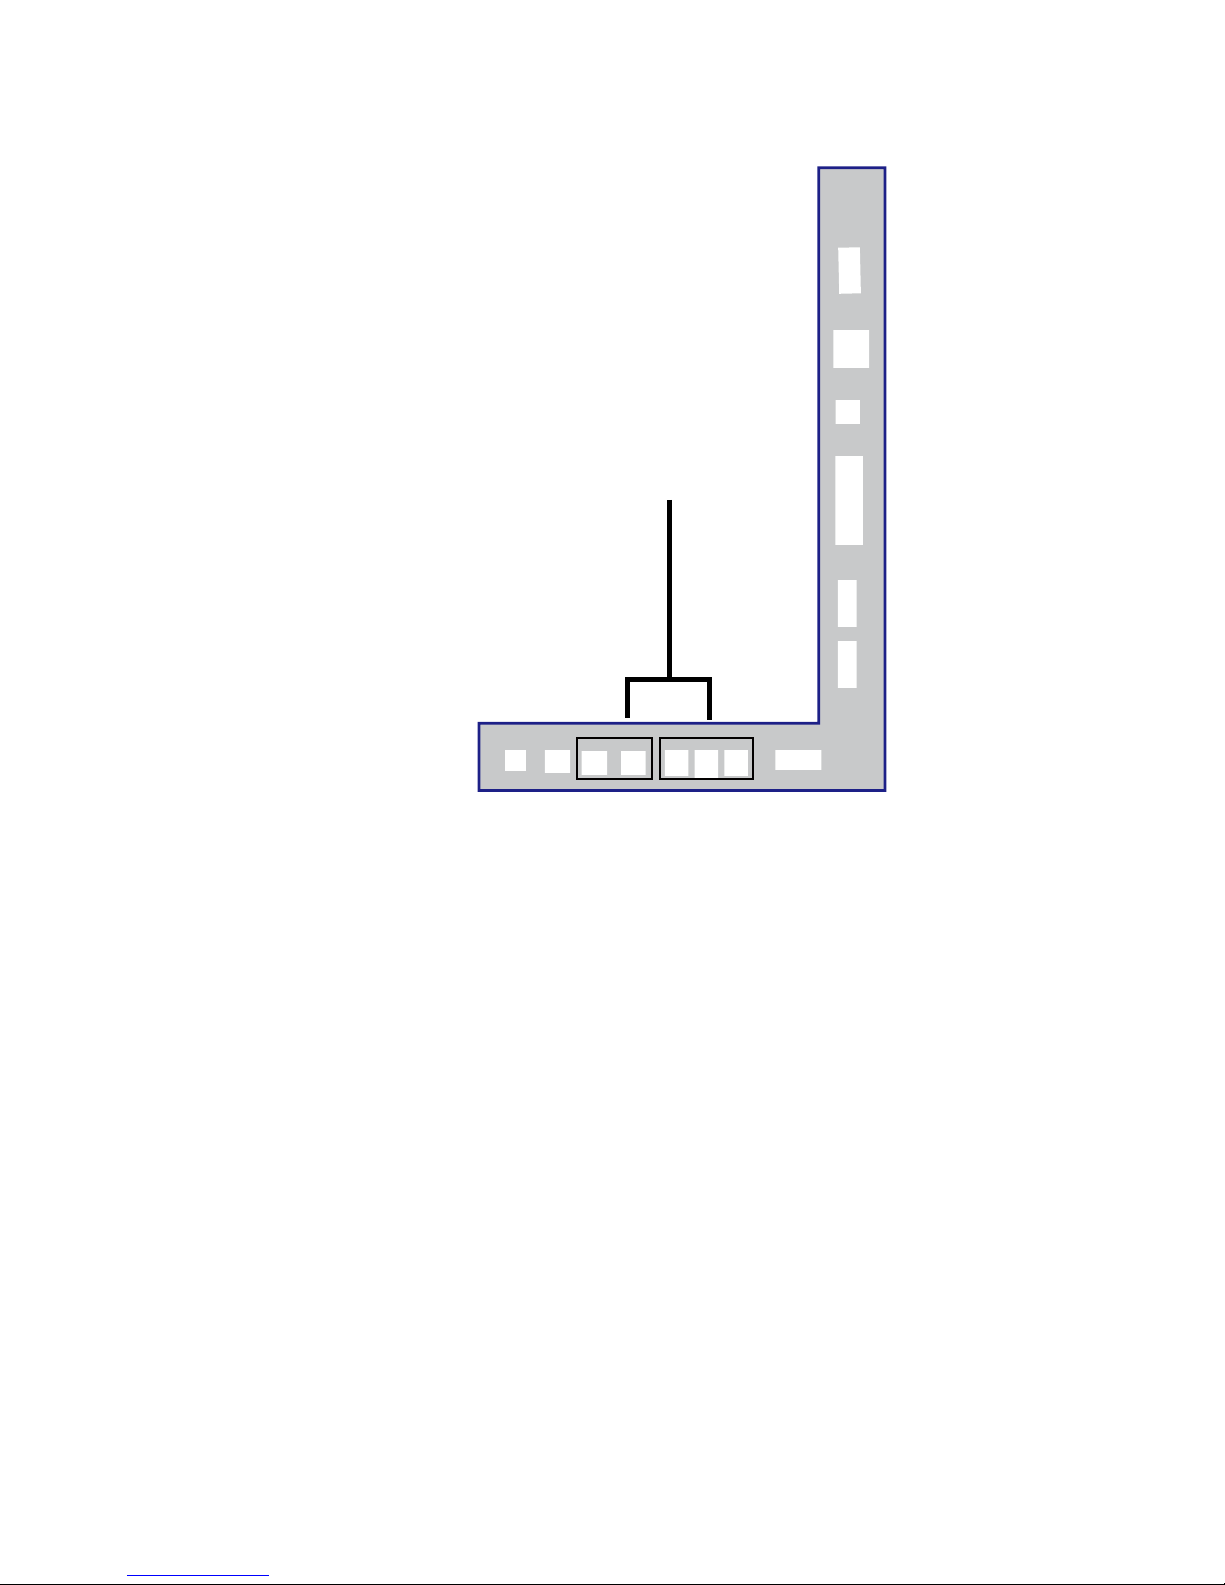
Attacthing or Removing the Stand
1. To attach the base place the display unit flat on a table. Afterwards attach the stand onto
the bottom of the stand. Screw in the 4 screws to secure the stand.
7•
Page 8
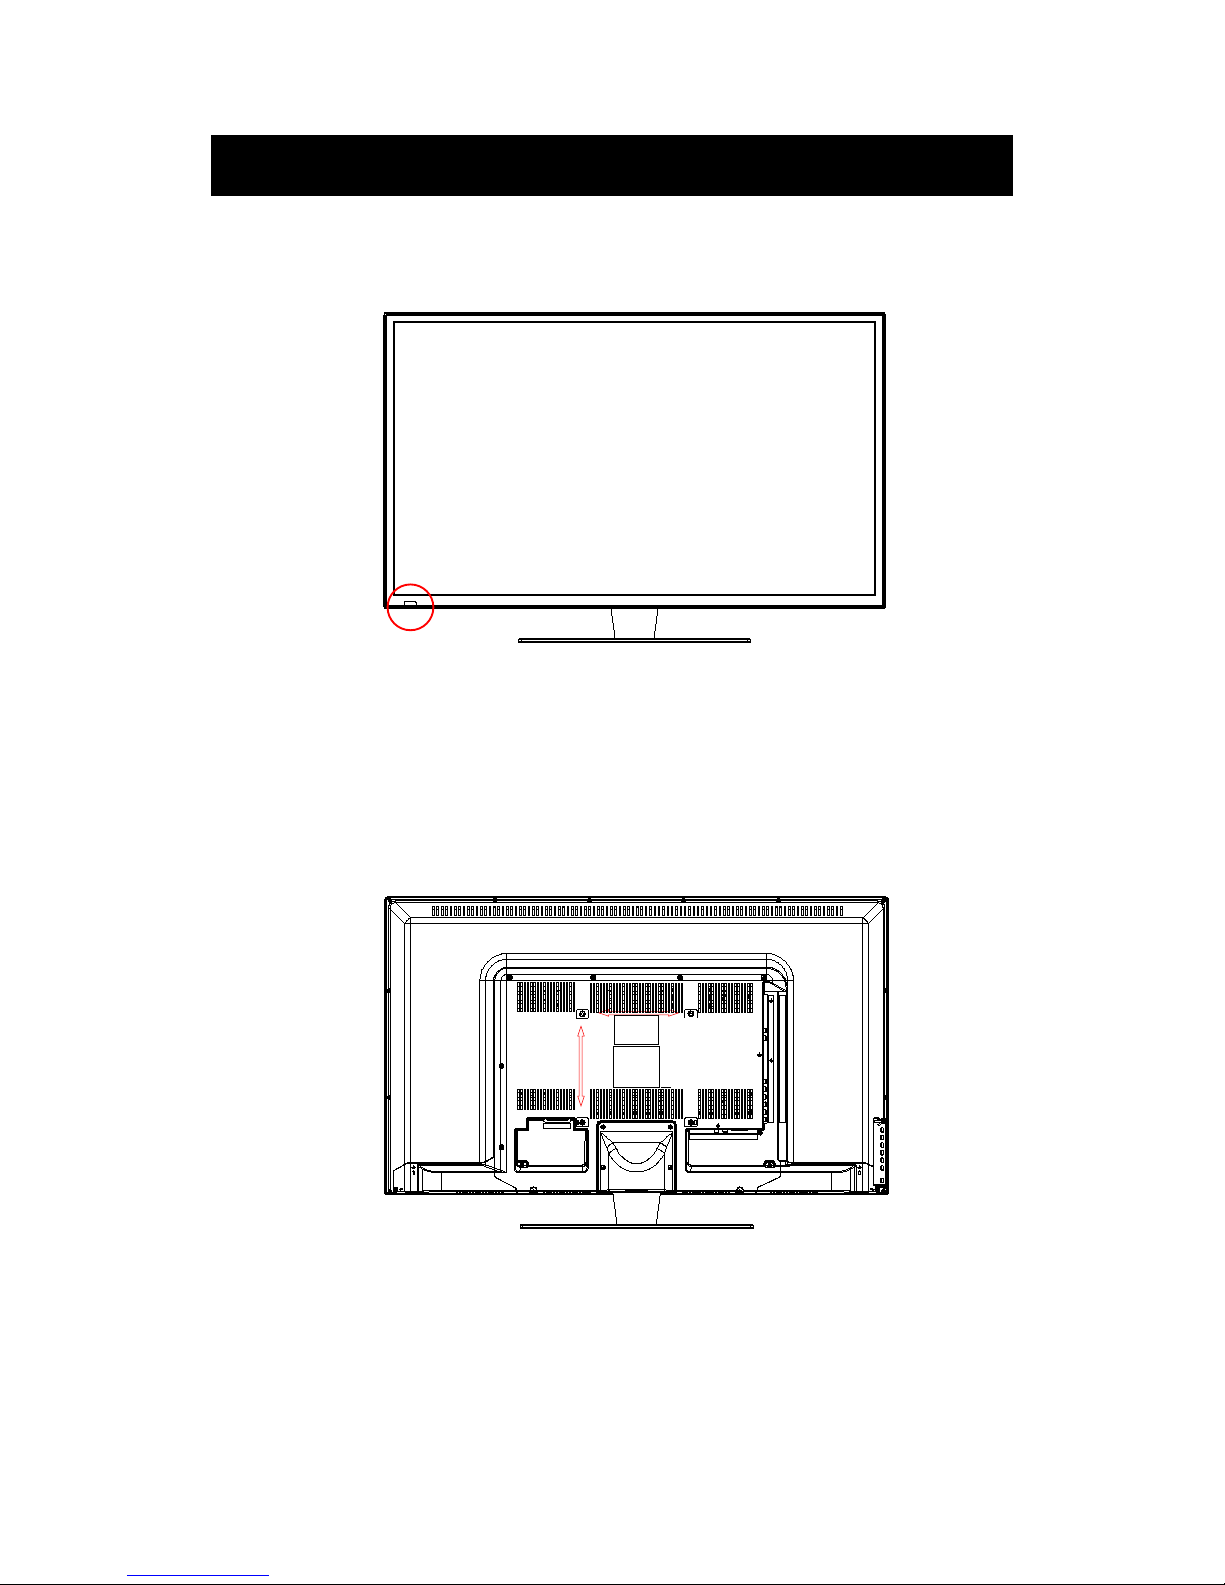
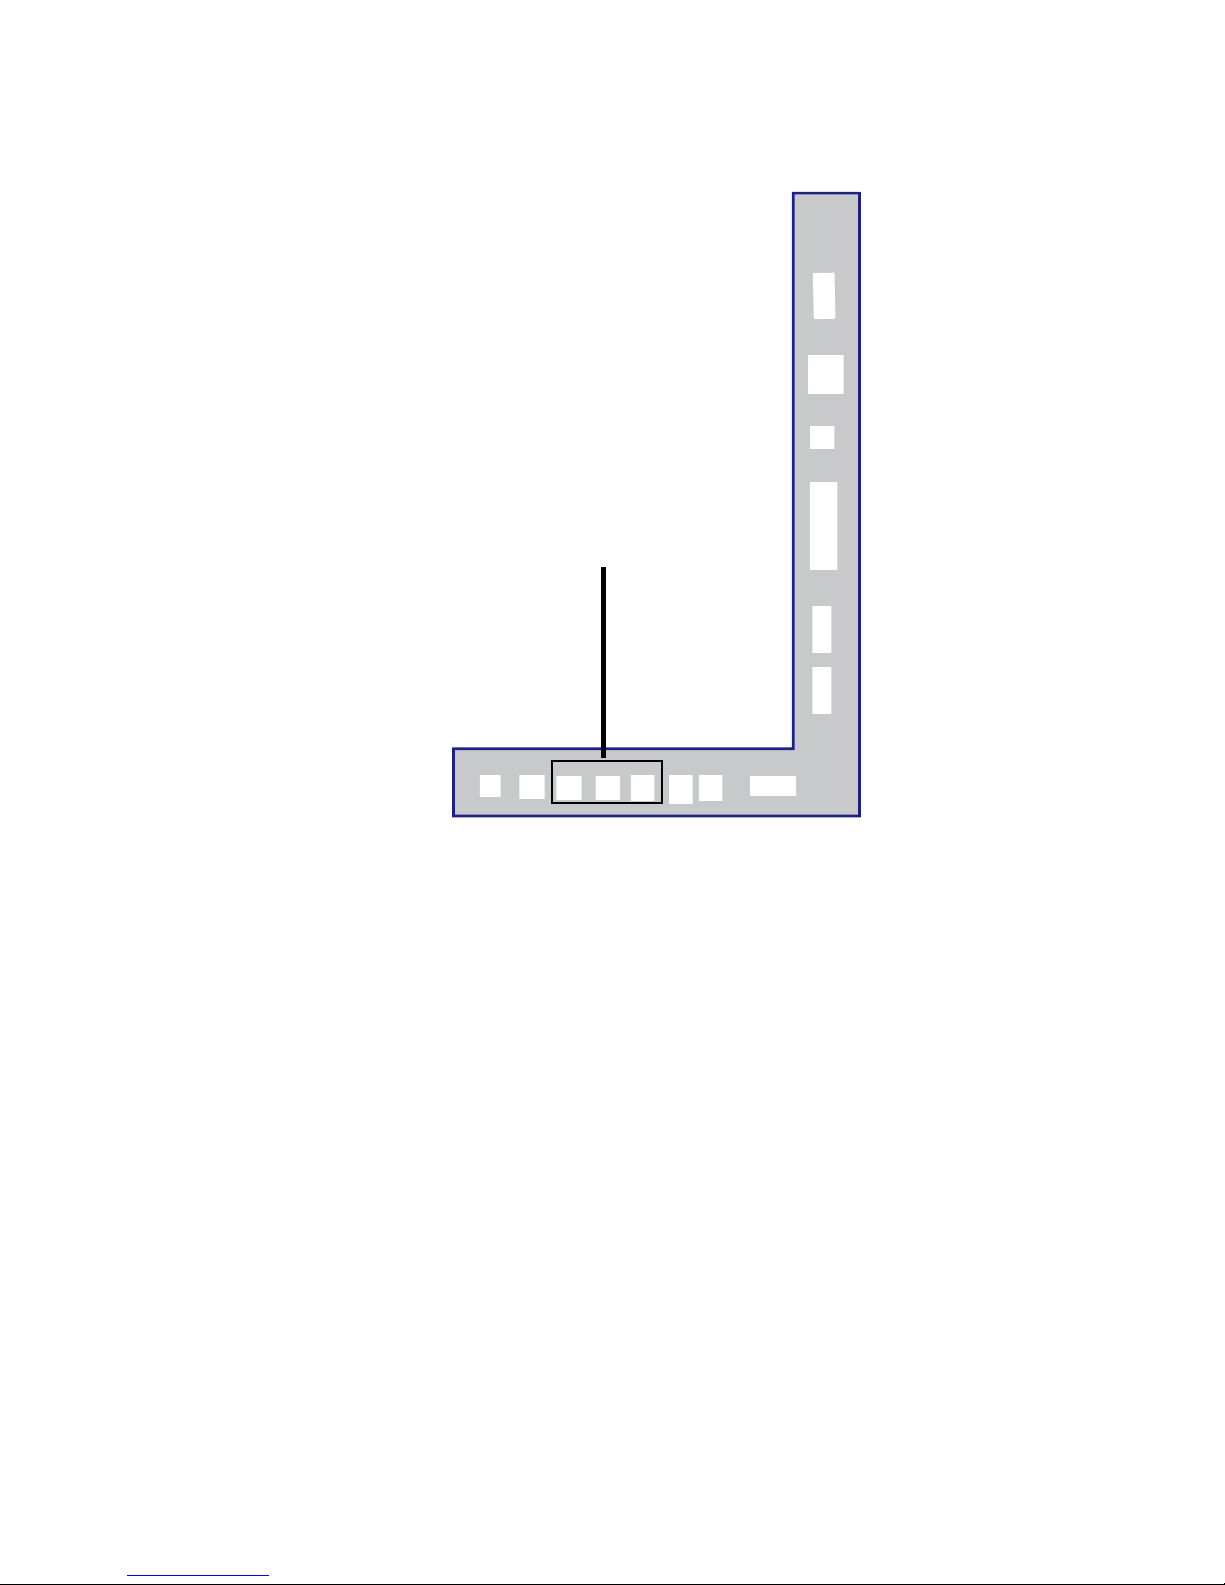
2. To remove the stand, remove the 4 screws in the area and the stand will come off.
Installing Batteries to the Remote Control
Please insert two AAA batteries into the remote control. Make sure that you match the (+)
and (-) symbols on the batteries with the (+) and (-) symbols inside the battery compartment.
Afterwards, re-attach the battery cover.
Please note:
Only use AAA batteries.
Do not mix new and old batteries. This may result in cracking or leakage that may pose a
fire risk or lead to personal injury.
Inserting the batteries incorrectly may also result in cracking or leakage that may pose a
fire risk or lead to personal injury.
Dispose the batteries in accordance with local laws and regulations.
Keep the batteries away from children and pets.
If the remote control is not used for a long time, remove the batteries.
Keep the remote control away from moisture, sunlight, and high temperatures.
8•
Page 9
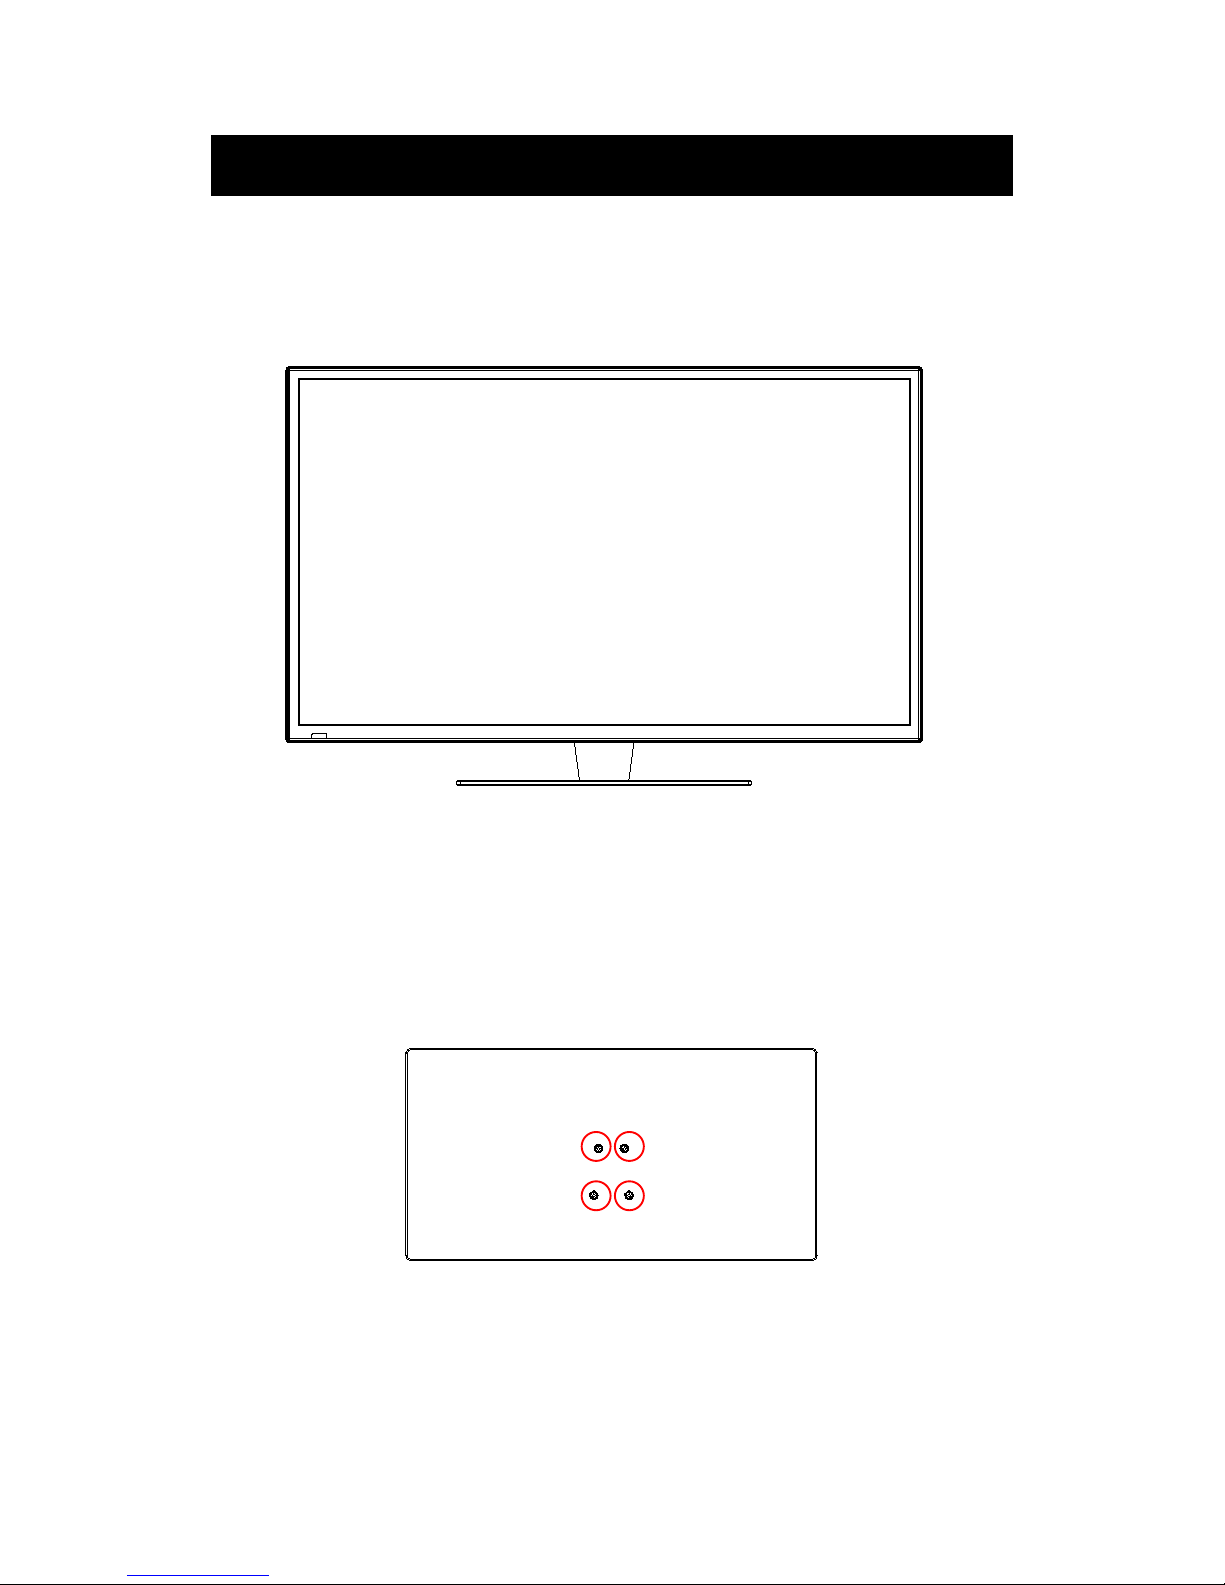
Front View
Rear View Mounting Pattern
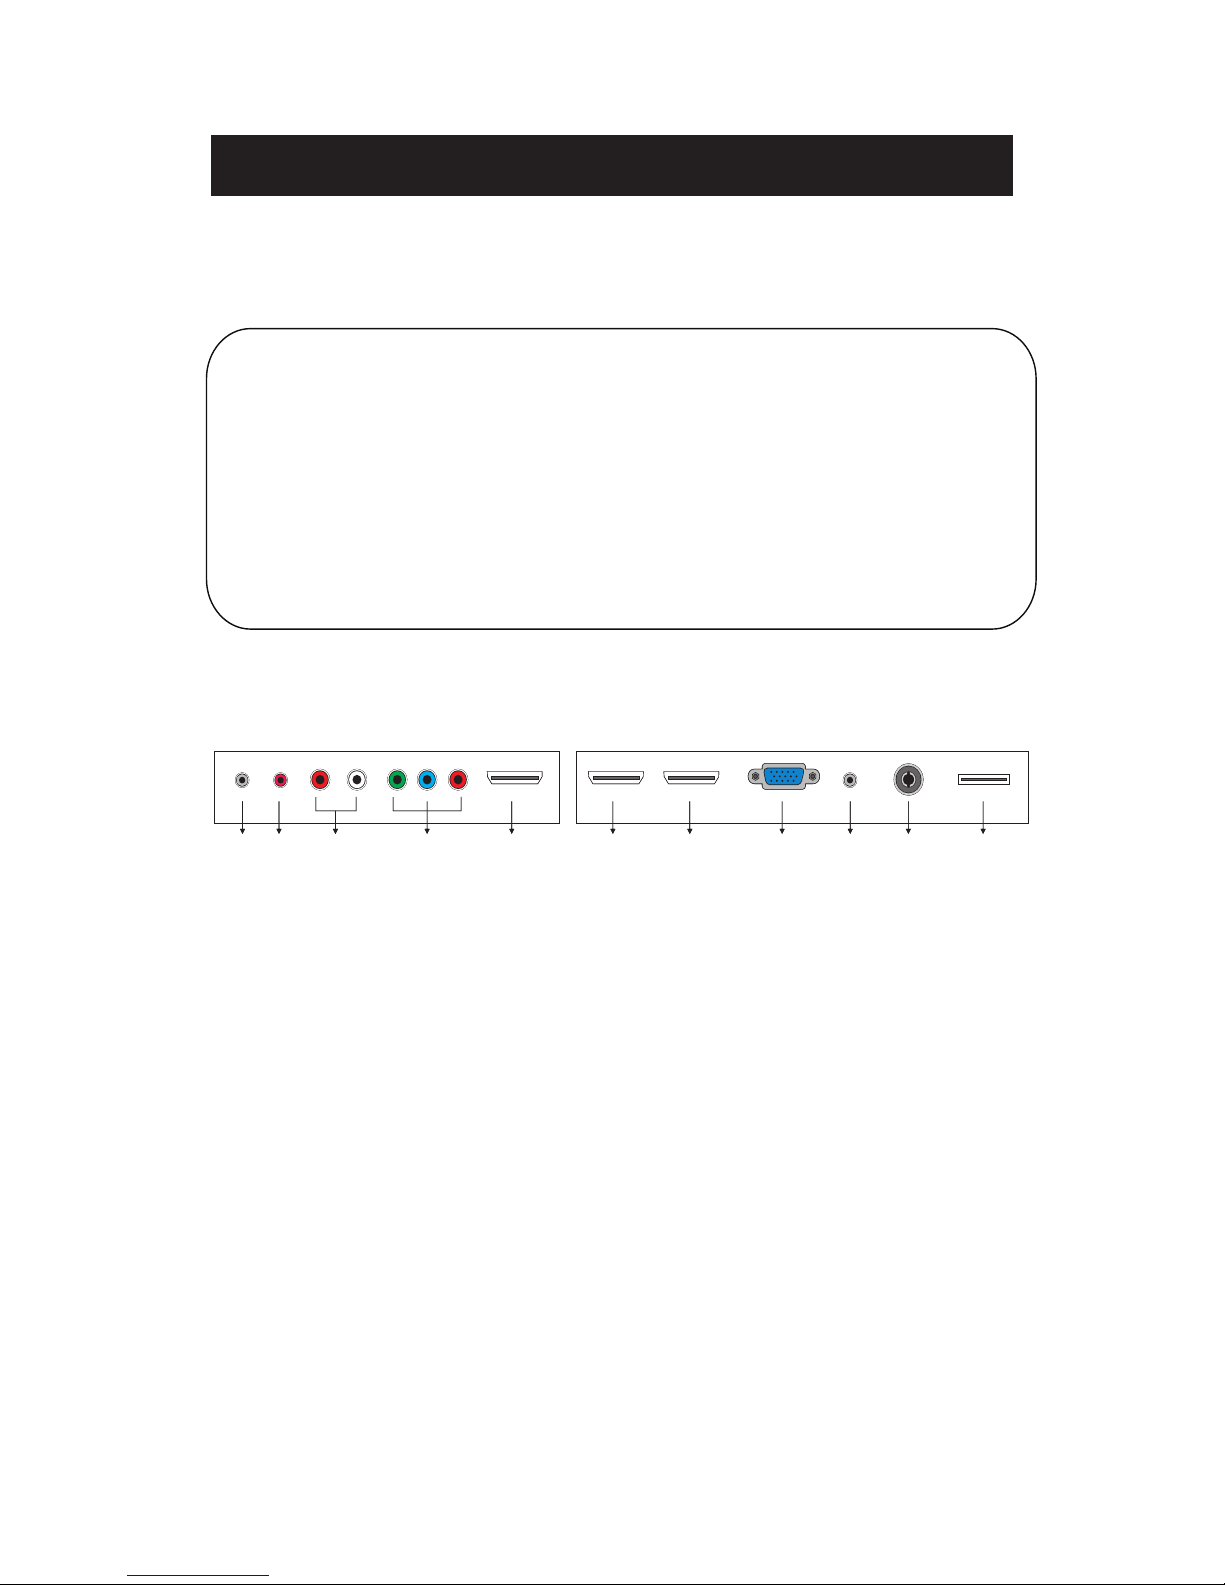
Identifying Front and Rear Panel
INDICATOR LIGHT – The light is red when power is plugged in but the TV is not turned on.
The light turns blue when the TV is turned on. Because of the LED in the panel, the TV
might take 10 – 12 seconds to power on.
REMOTE SENSOR – The remote sensor receives all the commands from the remote control.
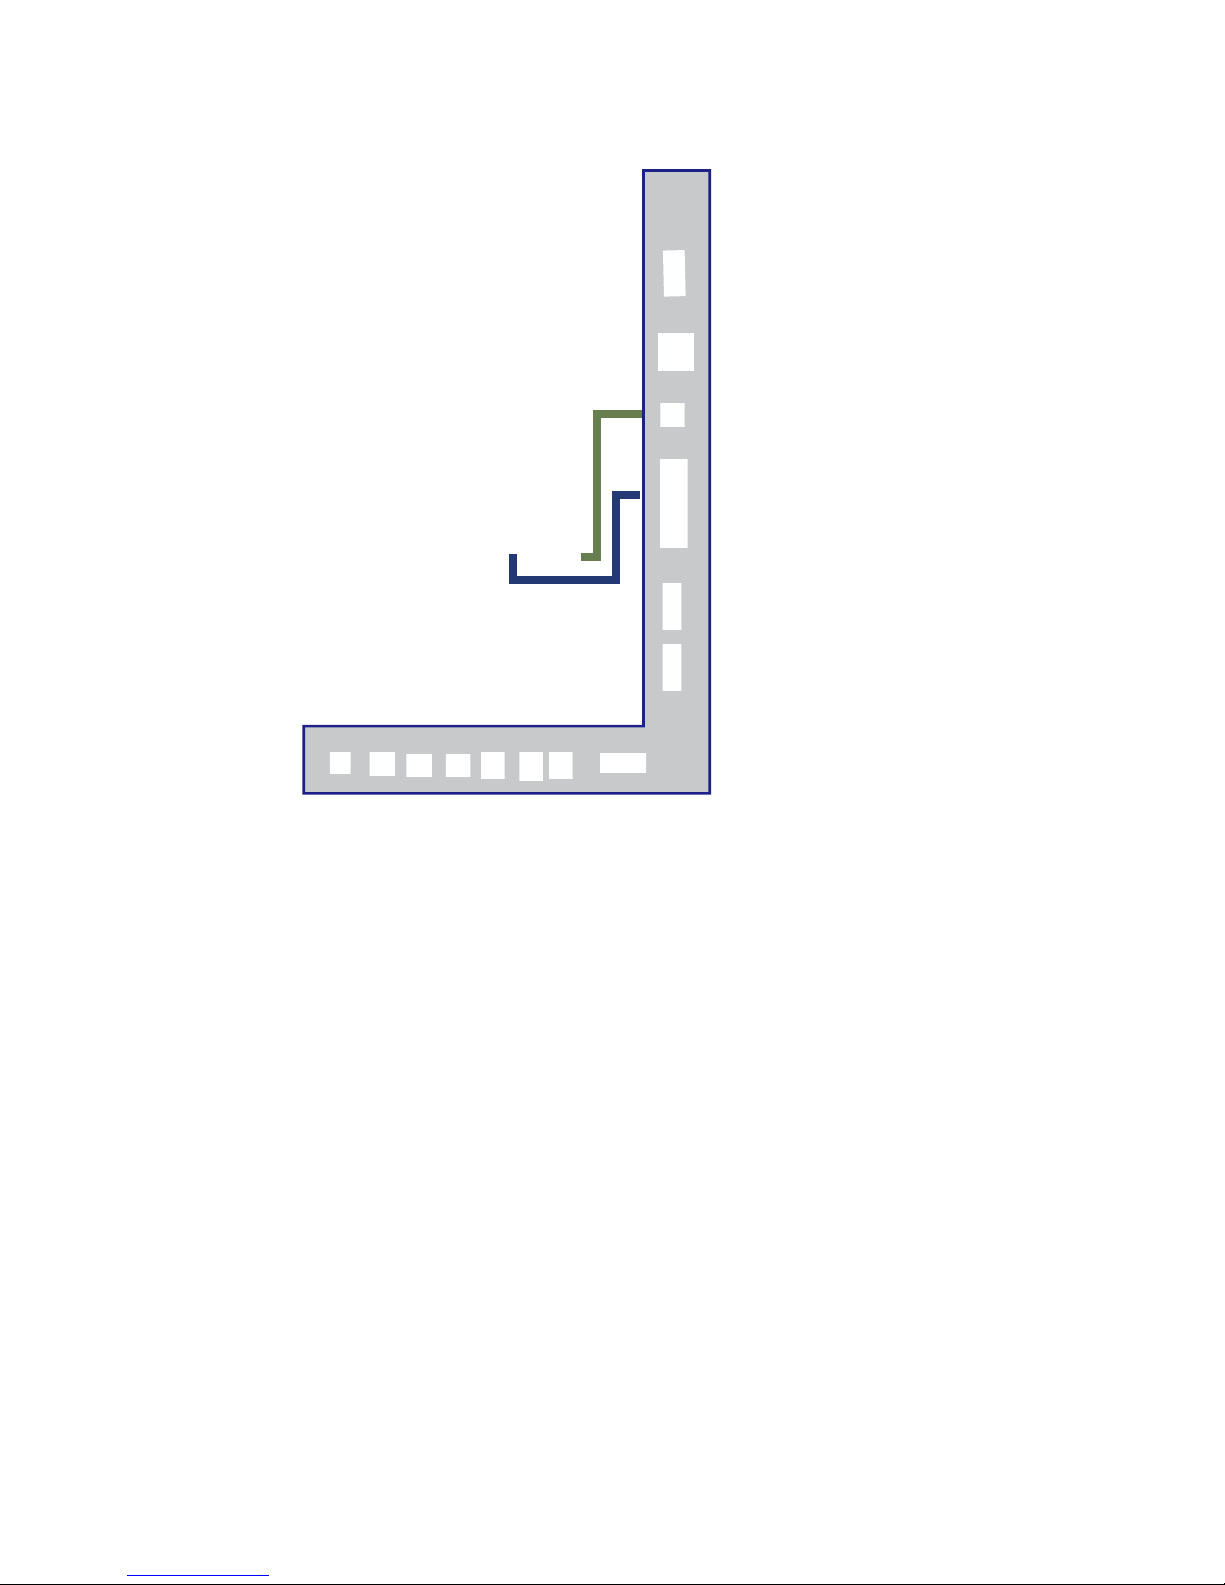
Mounting Specification : 200mm x 200mm using screw size M6. Length of screw should not
exceed 8mm. Please Note : The 8mm length of screw refers to how deep the screw can go
inside the mounting holes. When you’re buying screws, you should add the original 8mm to
the thickness of your mounting plate in order to get the total screw
length.
9
Page 10
Television Antenna Connection Protection
Important Information
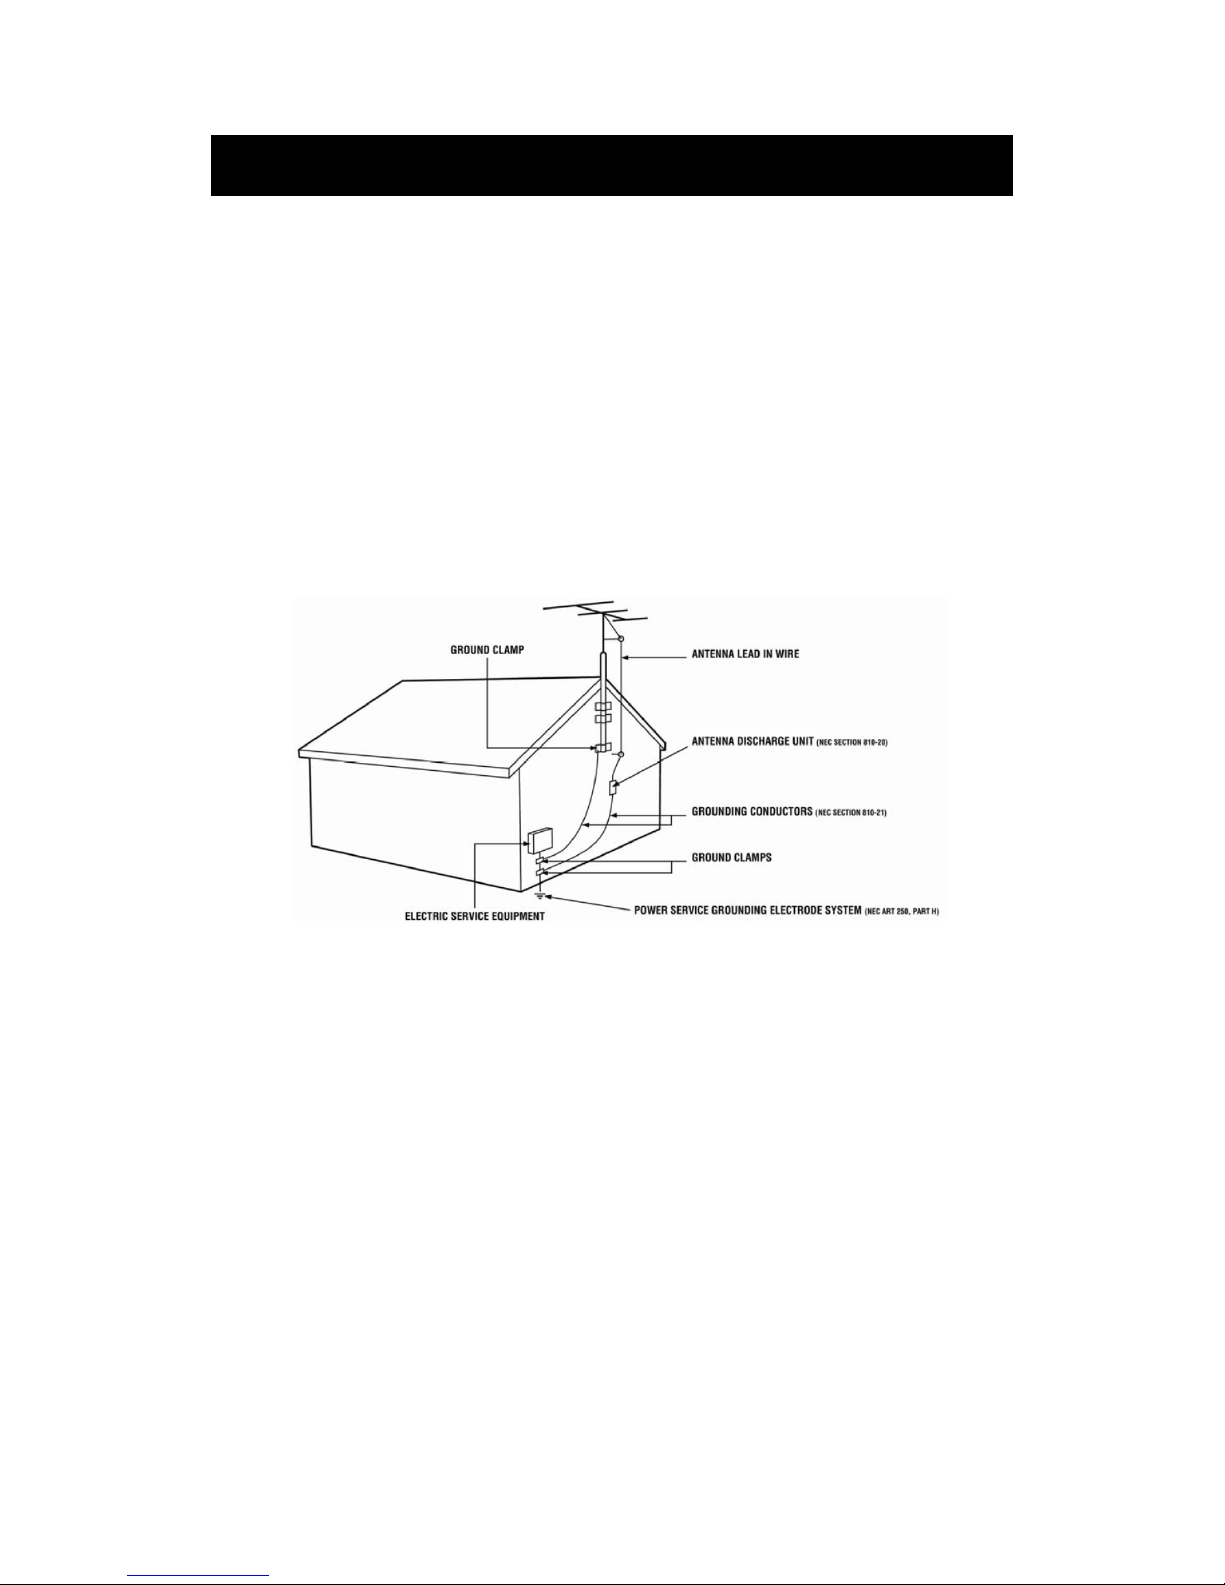
External Television Antenna Grounding
If an outside antenna or cable sy
stem is to be connected to the TV, make sure that the antenna or
cable system is electrically grounded to provide some protection against voltage surges and
static charges. Article 810 of the National Electrical Code, ANSI/NFPSA 70, provides
information with regard to proper grounding of the mast and supporting structure, grounding of
the lead-in wire to an antenna discharge unit, size of the grounding conductors, location of
antenna discharge unit, connection to grounding electrodes, and requirements of the grounding
electrode.
Lightning Protection
For added protection of the TV during a lightning storm or when it is left unattended or unused
for long periods of time, unplug the TV from the wall outlet and disconnect the antenna or cable
system.
Power Lines
Do not locate the antenna near overhead light or power circuits, or where it could fall into such
power lines or circuits.
6
Page 11
If You Have Digital Cable without Cable Box or Antenna…
Connection Suggestions
1.
Make sure the power of HDTV is turned off.
2.
Connect the RF cable from your antenna or digital cable to the TV port on the
back of your HDTV.
3.
Turn on the HDTV.
4.
Follow the first time on screen instructions.
Not all broadcasts are in High Definition (HD). Please refer to your local
broadcasting stations for more information.
The HDTV’s tuner is designed for HDTV therefore requires a stronger signal than
normal TVs. If you cannot achieve that signal level with your antenna or cable, your
HDTV might lose picture or sound.
Please Note:
10
or
Page 12
Connecting DVD Player with Component YPbPr…
1. Make sure the power of HDTV and your DVD player is turned off.
2. Obtain a Component Cable. Connect the green color connector to both your DVD
player and YPbPr’s green connector port on the back of your HDTV.
3. Connect the blue color connector to both your DVD player and YPbPr’s blue
connector port on the back of your HDTV.
4. Connect the red color connector to both your DVD player and YPbPr’s red connector
port on the back of your HDTV.
5. Obtain a RCA Audio Cable. Connect the white color connector to both your DVD
player and YPbPr’s white connector port on the back of your HDTV.
6. Connect the red color connector to both your DVD player and YPbPr’s red connector
port on the back of your HDTV.
7. Turn on the HDTV and your DVD player.
8. Use the remote control’s source button or the source button on the TV to switch to
YPbPr.
Please Note :
Sometimes DVD players will not automatically output to YPbPr. You will
need to configure your DVD player with AV connection first then switch to
YPbPr. Please reference the DVD player’s manual, to make sure the DVD
player is configured to output correctly to the TV.
This source shares audio jacks with composite video.
11
Page 13
Connecting Wii™ with Composite…
1. Make sure the power of HDTV and your Wii™ is turned off.
2.
Obtain a Yellow Video Cable. Connect the Yellow Video connector to both your Wii™
and AV’s Yellow Video connector port on the back side of your HDTV.
3.
Obtain a RCA Audio Cable. Connect the white color connector to both your Wii™
and AV’s white connector port on the back side of your HDTV.
4.
Connect the red color connector to both your Wii™ and AV’s red connector port on the
back side of your HDTV.
5.
Turn on the HDTV and your Wii™.
6.
Use the remote control’s source button or the source button on the TV to switch to AV.
Please Note:
Make sure to read your Wii™ installation guide for further information.
This source shares audio jacks with YPbPr.
12
Page 14

Connecting Cable or Satellite boxes with HDMI…
1. Make sure the power of HDTV
and your set-top box is turned off.
2. Connect a HDMI cable to the HDMI output of your set-top box and the other end to
the HDMI port on the back of your HDTV.
3. Turn on the HDTV and your set-top box.
4. Use the remote control’s source button or the source button on the TV to switch to
HDMI.
Please Note:
Please reference the set-top box’s manual, to make sure the set-top box is
configured to output correctly to the TV.
HDTV supports NEC’s universal remote code. Please look up NEC’s
codes in your universal remote’s hand book.
13
Page 15
1. Make sure the power of HDTV and your PC is turned off.
2. Obtain a 15-pin D-Sub VGA cable; connect to the VGA output of your PC and the other
end to the VGA port on the back of your HDTV.
3. Obtain a 3.5 mm Mini-jack, connect to the audio out of your PC and the other end to the
VGA Stereo Input port.
4. Turn on the power of the HDTV and your PC.
5. Use the remote control’s source button or the source button on the TV to switch to PC.
6. Change your PC resolution to 1360x768 at 60hz refresh rate.
7. Press MENU to use the OSD’s PICTURE option.
8. Under the PICTURE option select PC Settings.
9. Under PC Settings use AUTO ADJUST to adjust the screen.
Please Note:
For the best results, please set your PC resolution to 1360x768 at 60 Hz. Please
refer to the PC or graphic card’s manual for further instructions on how to set your
resolution and refresh rate.
Please refer to your PC manual for video output requirements of the video card.
The VGA port of the TV features a power saving mode which will automatically
turn off the TV, if there’s no signal provided for more than 5 minutes.
14
Connecting to a PC with VGA and 3.5 mm minijack …
Page 16

Connecting a Digital Audio Receiver with Coaxial...
1.
Make sure the power of HDTV and your receiver is turned off.
2.
Obtain a COAXIAL cable, connect it to your receiver’s COAXIAL digital
input and the COAXIAL connection on the LINE OUT port on the back of the
HDTV.
3.
Turn on the HDTV and your receiver.
Please Note:
If you want pure digital stream for your receiver to decode, you must also
configure the TV’s OSD Sound->Digital Audio Out function. Make sure the
option is on 5.1CH.
If your receiver is making static noises when receiving 5.1CH, you must use
the PCM option instead.
Please reference the receiver’s manual as well, to make sure the receiver is
configured to receive signals correctly from the TV.
The TV’s COAXIAL out for 5.1CH is ONLY used for antenna/cable
connection. Any other incoming audio signal will be passed out of
COAXIAL in PCM format.
15
Page 17
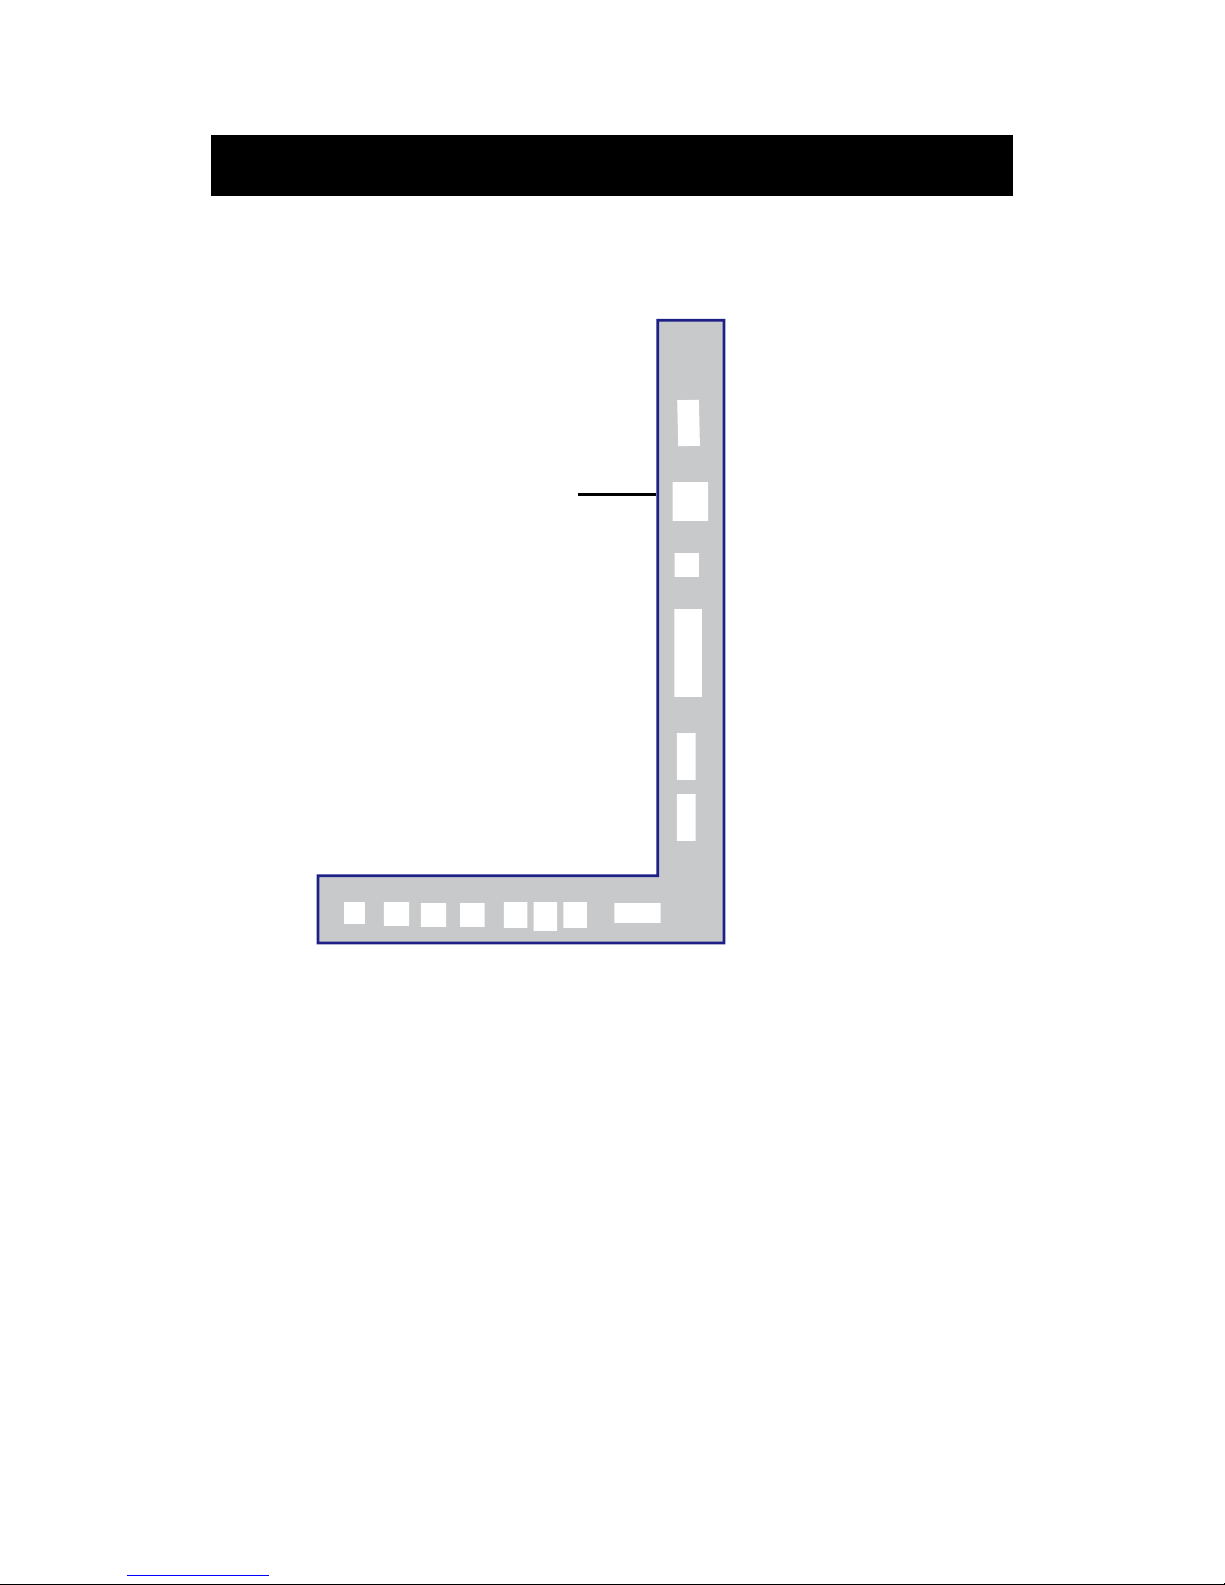
Main unit description
Control Panel Button Function
TV Terminal Connections
1.HEADPHONE out terminal.
2. Coaxial out terminal.
3. AUDIO input terminal.(Audio input terminal for YPBPR and AV)
4. Component input terminal.(OR Video input terminal)
5. HDMI1 input terminal.
6. HDMI2(MHL) input terminal.
7. HDMI3 input terminal
8. VGA input terminal of simulation signal of PC.
9. PC AUDIO input terminal.
10. RF antenna.
11. USB input terminal(Only be used to upgrade).
16
VOL+
:
Increase volume; if OSD is active, functions as right in the menu;
in SOURCE menu, functions as ENTER.
VOL- :
Decrease volume; if OSD is active, functions as left in the menu.
CH+ :
Change channel up; if OSD is active, functions as up in the menu
CH- :
MENU : Press to select the main menu.
SOURCE : Select the input signal.
POWER : Switch on when at standby mode or enter the standby mode.
Change channel down; if OSD is active, functions as down in
the menu.
1 2 3 4 5 6 7 8 9 10 111 2 3 4 5 6 7 8 9 10 11
Page 18

Remote control
POWER: Powe
r on/
off button, press once to turn the TV on and press
again to turn the TV off.
MUTE: Press this button to mute or restore sound.
MTS/AUDIO: When stereo program is received, press this key to
switch sound system between mono and stereo.
When SAP program is received, press this button to switch sound
system between mono and SAP
When stereo and SAP program is received, press this key to switch
among mono, stereo and SAP.
Press this key to show the list of audio languages available for the
current channel in ATSC.
ASPECT: Press to
adjust picture ratio.
PMODE: Select picture mode.
SMODE: Select sound mode.
0-9: Select and switch to a channel using 0 - 9.
-/--:
Switch t
he program
digit.
DISPLAY: Display TV information.
EPG
Enter electronic program
guide
AUTO: Adjust the picture automatically in pc mode.
SLEEP: Se
t the sleep timer.
OK: Enter the selected option or perform the selected operation.
SOURCE: Press to change signal source.
MENU: Press this button to enter the main menu.
CH+/CH-: Change the channel.
CC: Press this key to select the CC ,ON or OFF mode and CC on Mute .
INFO:
Press to obtain more information or access special options on Roku
VOL+/VOL-: Adjust the volume
.
FAV: Switch between custom set "Favorite List"
F.LIST: Press this key to display the Favorite List mode.
C.LIST: Press this key to display the channel list mode.
17
12
3
4
5
6
789
0
INFO
DISPLAY
MTS/AUDIO
ASPECT PMODE SMODE
CH
MENU
SOURCE
OK
VOL
BACK
CC
FAV
F.LIST
C.LIST
SLEEP AUTOEPG
*
RECALL
:
Press
to
change
to the previously viewed channel.
Press to rewind, scroll left one page at a time
Press to Start or Pause Playback
Press to fast forward, scroll right one page at a time
BACK: Skips back approximately 7 seconds in the currently playing video
Press to return to Roku home screen
CURSOR: Use
the up, down, left, and right keys to move within the menu.
*
Page 19

Installation Guide
Press MENU butto
n to display the MAIN OSD MENU; Press ◄ / ►button to select the
MENU you want; Press ENTER button to enter the sub menu; Press ▼ / ▲ button to select the
option and then press ◄ / ► to adjust the value in the sub menu; You can press MENU button to
go back to the upper menu or EXIT button to close the OSD.
PICTURE
You c
an select the type of picture, which best corresponds to your viewing. Press the “MENU”
button to enter the OSD menu .Then
press “/” button to select the
“PICTURE” menu.
1. Press “” button to select “Picture
Mode”, press “
/
” but
ton to select.
2. Press “/” button to select
“Brightness” and press the “/”
button to enter brightness adjustment
menu to adjust brightness.
3. Press “/” button to select
“Contrast” and press the “/” button
to enter contrast adjustment menu to
adjust contrast.
4. Press “/” button to select “Color” and press the “/” button to enter color adjustment
menu to adjust color.
5. Press “/” button to select “Tint” and press the “/” button to enter hue adjustment menu
to adjust tint.
Note:
The 'Tint' item is used in NTSC mode only
.
6. Press “/” butto
n to select “Sharpness” and press the “/” button to enter sharpness
adjustment menu to adjust sharpness.
7. Press “/” button to select “Color Temperature” and press the “/” button to select.
8. Press “/” button to select “Advanced Setting” and press the “ENTER/” button to enter
sub-menu.
18
Page 20

a. Press “/” button to
“Aspect Ratio” and
“ /” button to
select.
b. Press “/” button to
“Noise Reduction”
and press the
button to select.
c. Press “/” button to
“Dynamic Contrast”
and press the
button to select “On” or
“Off”.
SOUND
You can select the type of sound, which best corresponds to your listening.
Press the
“MEN
U” button
to enter the OSD
menu .Then
press “/”
button to select
the “SOUND”
menu.
1. Press “”
button to
select
“Equalizer
Settings”
and press
the
“ENTER/” button to enter sub-menu.
a. Press “/” button to select “Equalizer Mode”. Press “/” button to select.
b. Press “/” button to select “150Hz”. Press “/” button to select.
c. Press “/” button to select “500 Hz”. Press “/” button to select.
d. Press “/” button to select “1K Hz”. Press
“/” button to select.
e. Press “/” button to select “5K Hz”.
Press“/” button to select.
f. Press “/” button to select “10K Hz”.
Press “/” button to select
g. Press “/” button to select “Balance”.
Press “/” button to select
sele
ct
press the
select
“/”
select
“ /”
19
Page 21

Note: The b
、c、d、e、
f、g function it is
only available in USER m
o
de.
2. Press “/” button to select “MTS” and press the “/” button to adjust.
Note: It is only available in ATV.
3. Press “/” button to select “Audio Language” and press the “/” button to adjust.
Note: It is only available in DTV.
4. Press “/” button to select “Digital Audio Output” and press the “/” button to adjust.
5. Press “/” button to select “AVL” and press the “/” button to select “On” or “Off”.
TIME
Press the “MENU” button to enter the OSD menu .Then press “/” button to
select the “T
IME” menu.
1. Press “” button to select “Sle
ep Timer” and press the “/” button to enter sleep timer
adjustment menu to adjust sleep timer.
2. Press “/” button to select “Time Zone” a
nd press the “/” button to enter time zone
adjustment menu to select the local time zone.
3. Press “/” button to select “Daylight Saving Time” and press the “/” button to select
“On” or “Off”.
4. Press “/” button to select “Time Format” and press the “/” button to select “12-hour”
or “24-hour”.
5. Press “/” button to select “Auto Clock” and press the “/” button to select “On” or
“Off”.
6. Press “/” button to select “Clock” and press the “ENTER/” button to adjust.
20
Page 22

1. Press “” button t
o select “OSD Language” and press the “/” button to select the OSD
language which you
desire.
2. Press “/” button to elect
“Transparent” and press
the “/”
button to select.
3. Press “/” button to select
“OSD Timeout” the
button to
adjust OSD timeout.
4. Press “/” button to select
“Closed
Caption” and press the
“ENTER/” button to enter
a. Press “/” button to select “CC Mode” the “/” button to adjust.
b. Press “/” button to select “Analog CC ” the “/” button to adjust.
c. Press “/” button to select “Digital CC” the “/” button to adjust.
d. Press “/” button to select “Option” the “ENTER/” button to enter sub-menu.
Note: The c、d function it is only available in DTV.
Note: The option is adjust the digital closed captioning setting.
SETUP
Press the “MENU” button to enter the OSD menu .Then press “/” button to select
the “Setup” menu.
“/”
sub-m
enu.
21
Page 23

(a). Press “/” bu
tton to select “Mode” the “/” button to adjust.
(b). Press “/” button to select “Font Style” the “/” button to adjust.
(c). Press “/” button to select “Font Size” the “/” button to adjust.
(d). Press “/” button to select “Font Edge Style” the “/” button to adjust.
(e). Press “/” button to select “Font Edge Color” the “/” button to adjust.
(f). Press “/” button to select “FG Color” the “/” button to adjust.
(g). Press “/” button to select “BG Color” the “/” button to adjust.
(h). Press “/” button to select “FG Opacity” the “/” button to adjust.
(i). Press “/” button to select “BG Opacity” the “/” button to adjust.
Note: All the option it is not available in Custom.
5. Press “/” button to select “Input Label” and press the “ENTER/” button to enter
sub-menu.
Note: The
source label is
Create labels
for the
devices
connected to
your TV.
6. Press
“/”
button to select
“Other
Settings”
and press
the “ENTER/” button to enter
sub-menu.
22
Page 24

7. Pr
ess “/” button to select “Restore Default” and press the “ENTER/”, Press “/”
button selecting “Yes” to restore all setting to default setting
default.
8. Press “/” button to select “Setup wizard” and press the
“ENTER” button to enter sub-menu.
a. Pr
ess “/” button to select “Menu Language” and press the “/” button to select
language.
b. Press “/” button to select “Go to next step” and press the “ENTER/” button to enter
next step.
23
a. Press “/” button to select “Audio Only” the “/” button to select “On” or “Off”.
b. Press “/” button to select “Blue Screen” the “/” button to select “On” or “Off”.
When select “On”, only listen sound and the screen is black; When select “Off”,watch
TV normally.
Page 25

c. Press “/” button to select “Time Zone” and press th
e “/” button to select time zone.
d. Press “/” button to select “Daylight Saving Time” and press the “/” button to select
“On” or “Off”.
e. Press “/” button to select “Time Format” and press the “/” button to select “12-hour”
or “24-hour”.
f. Press “/” button to select “Go to next step” and press the “ENTER/” button to enter next
step.
g. Pr
ess “
/”
button to select
“Air/C
able”
and
pre
ss the
“/” button to select “Air” or
“Cable”.
h. Press “/” button to select “Go to next step” and press the “ENTER/” button to start auto
scan.
Note: Searching platform will take a long time. Please be patient!
24
Page 26

LOCK
Pr
ess the “MENU” button to enter the OSD menu .Then press “/” button
to select the “Lock” menu.
1. Press “” but
ton to select “Enter Password” and press select digital button to enter.
Note: The default password is “0000”
2.
Press ▼ / ▲ button to
selec
t
“Change Password”, then press
“ENTER/”
button
to
ad
just
the va
lu
e.
If the password is changed, all of the passwords in the menu will be changed at the same time.
Note
: If y
ou forget your
password, you can use “1470”
to enter any menu locked.
3.
Press “/” button
to select “System Lock”
and press the “/”
button to select “On” or
“Off”.
4. Press ▼ / ▲ bu
tton to
select “Input Block”, then press
“ENTER/” bu
tton to enter
sub-menu.
a.
Press “/” button to select “TV” and press the “/”
button to select “Block”
or “Unblock”.
b.
Press “/” button to select “A
V” and press the “/” button to select “Block”
or “Unblock”.
25
Page 27

c. Press “/” button to select “C
omponent” and press the “/” button to select
“Block” or “Unblock”.
d.
Press “/” button to sele
ct
“HDMI” and press the “/”
button to select “Block” or
“Unblock”.
e.
Press “/” button to select
“PC” and press the “/”
button to select “Block
” or
“Unblock”.
5.
Press
“/” button to select “US Rating” and press “ENTER/” button to enter sub-menu.
a. Press “/” button to select “TV” and press “ENTER/” button to enter sub-menu.
Press “/”
button to select and press “ENTER”to block or unblock.
b. Press “/” button to select “MPAA” and press the “/” button to select
“Off/G/PG/PG-13/R/NC-17/X”.
6. Press “/” button to select “Canada Rating” and press “ENTER/” button to enter sub-menu.
a. Press “/” button to select “Canada English” and press the “/” button to select
“Off/C/C8+/G/PG/14+/18+”.
b. Press “/” button to select “Canada French” and press the “/” button to select
“Off/G/8ans+/13ans+/16ans+/18ans+”.
7. Press “/” button to select “RRT Setting” and press “ENTER/” button to enter sub-menu.
26
Page 28

Note: The item is available only when
current stream has downloadable rating data.
8. Press “/” button to select “Reset RRT” and press “ENTER/” button to reset.
Channel
Press the “MENU” button to enter the OSD menu .Then press “/” button to
select the “Channel” menu.
1.
Press “” button to select
“AIR/CLABLE”
and press the
“/”button to select
Cable or
AIR.
2. Press “/” button to
select “Auto Scan” a
nd press
the “
ENTER/
” button
/
“
ENTER” to do auto scan.
3. Press “/” button to
select
“Favorite” and press
the “
ENTER/
” button to enter.
4. Press “/” button to select “Channel list” and press the “
ENTER/
” button to enter.
5. Press “
/” button to select “Show/Hide” and press the “
ENTER/
” button to enter
.
6. Press “/” button to select “Channel Number” and press the “
/
” button to adjust.
7. Press “/
” button to select “Channel Label” and press the “ENTER/” button to enter.
enter then press" " button
button to select "YES" and press
27
Page 29

1. Press “/” button to select “H
-Pos” and press the “
/
” button to adjust.
2. Press “
/” button to select “V-Pos” and press the “
/
” button to adjust.
3. Press “/” button to select “Clock” and press the “
/
” button to adjust.
4. Press “
/” button to select “Phase” and press the “
/” button to adjust.
5. Press “
/” button to select “Auto” and press the “
ENTER/
” button to do auto ad
just.
Note: The pictures in regard to function are provided for reference purposes only.
PC Setting
Press the “MENU” button to enter the OSD menu .Then press “/” button to select
the “Setup” menu.
And then press
“” button to select “
PC Setting” and press the
“
ENTER/
” button to enter sub-m
enu.
28
Page 30

How do I Clean the TV?
IMPORTANT
1. The power cable has to be removed from the socket before cleaning the
TV.
2. Do not use volatile solvent (alcohol, rosin, and toluene) to clean the TV. These
types of chemicals might damage the housing and the LED glass.
Cleaning the bezel and remote control
1. Use a 100% cotton cloth or micro-fiber cloth for cleaning.
2. If the remote control or bezel is dirty to the point where you cannot simply dry
wipe it, please lightly dampen the wiping material (the wiping material cannot
be dripping wet, because if water drips into the panel it will cause
malfunction and possible permanent damage to the panel which will not be
covered under the warranty) with clean water and wipe again. Wipe the
display with a dry micro-fiber cloth or 100% cotton cloth afterwards.
Please Note :
Make sure you wring the water out of the cloth before cleaning the
bezel or remote in order to prevent water from penetrating into the
electronics.
Cleaning the Screen
1. Use a 100% cotton cloth or micro-fiber cloth for cleaning.
2. The LED screen glass is extremely fragile. Do not scrape it with any material.
Do not press or tap the screen to avoid cracking. When the screen is dirty to the
point where you cannot simply dry wipe it, please lightly dampen the wiping
material with clean water and wipe again. Wipe the display with a dry
micro-fiber cloth or 100% cotton cloth afterwards.
29
Page 31

Troubleshooting
Problems Solutions
NO PICTURE
Connect power cord correctly.
Turn on power.
Connect video cable correctly.
Select the input signal source with proper cable connection with the source button.
ABNORMAL
COLORS
Match the colors on the cables to the ports off the back of the television.
I.E. red cable to red colored
port.
PICTUR
E IS TOO
DARK
Adjust y
our
contr
a
st, brightness and lamp settings from the OSD Menu. For adjust controls
AUDIO ONLY NO
PICTURE
Ma
ke sure you have connected both your video and audio cables.
The TV’s tuner sign
al must not be lower than 65 %.
PICTURE ONLY NO
AUDIO
Ma
ke sure the audio cable is connected.
Readjust your volume via the remote contr
ol.
The TV’s tuner sign
al must not be lower than 65 %.
REMOTE C
ONTROL
DOES NOT WORK
Turn
off the TV, unplug it from the socket. Remove the batteries out of the remote for 30 minutes.
Press the remote buttons and the power button randomly for a good 2 seconds, and then reinstall the
batteries. Try the remote to see if it works. For battery removal instructions.
The TV’s remote sensor is also housed in the same place as the
power indicator light. Please make
sure there is line of sight from the remote control’s front sensor to the remote sensor of the TV.
CANNOT RECEIVE
SUFFICIENT
CHANN
ELS
THROUGH THE
ATSC/NTSC TUNER
The TV’s tuner signal must not be lower than 65 %. Change the direction of your antenna and rescan
your channels. If you have cable call up your cable company and ask about signal strength of your
local cable.
NO COLOR
Please adjust your picture setup and make sur
e the saturation and the RGB are not turned all the way
down. For adjustment controls.
The TV’s tuner sign
al must not be lower than 65 %. Check your signal.
WEAK SIGNAL OR
NO PROGRAM
SYMBO
L ON
SCREEN
The TV’s tuner signal must not be lower than 65 %. Change the direction of your antenna and rescan
your channels. If you have cable call up your cable company and ask about signal strength of your
local cable.
TV’S UNIVERSAL
REMOTE CODE
This television follows NEC’s universal remote
code. To find the actual code you must read
through your own universal re
mote’s guide book.
Troubleshooting
The following table contains the common problems and the solutions to these prob
lems. Please check this list before
you contact the technicians.
30
Page 32

TV CHANNELS ARE
BLOCKED
Check your auto lock function’s settings inside the OSD. Y
ou may have locked up some channels but forgot
about them.
UNIVERSAL REMO TE
CODE
This TV follows NEC’s universal rem
ote code. Please check your hand book for NEC’s codes then apply
them.
THE TV TURNS ON OR
OFF SLOWLY AND
THE
SCREEN SHOWS UP
SLOWLY
This TV is a High Definition liquid cry
stal display panel TV. It requires a few more seconds than normal TVs
to power up and show the picture.
NO SOUND ON PC Make sure you have a 3.5 mm
mini-jack cable connected from your pc’s sound output to the TV’s VGA
STEREO INPUT.
HDCP VIDEO SAYS NO
HDCP
SUPPORT
Reboot your HDCP video device but turning them off and unplugging the power cord. Wait up to 8 minutes
to plug the power back in to see if it works or not.
HDCP
VIDEO HAS NO
AUDIO
M
ake sure you have a 3.5 mm mini-jack cable connected from your HDCP video device’s sound output to the
TV’s VGA STEREO INPUT. If your HDCP video device uses RCA AUDIO jacks, you’ll need to obtain a
RCA audio converted into 3.5 mm mini-jack cable.
CANNOT GET 1360X768
ON PC VGA
Make sure the TV is recognized as plug and play monitor. Try updating your video card’s drivers as well. If
that does not help, most likely you’ll need to upgrade your video card to a newer one.
PICTURE IS
DISTORTED OR HAS
ABNORM
AL SOUND
This might be from interference from large electrical appliances, cars, motorcycles, or fluorescent lights. If
the TV is close to the wall, try moving the TV to another room in your house to see if the problem still occurs.
PICTUR
E DOES NOT
COVER THE ENTIRE
SCREEN
If
you’re using HDMI or a TV digital channel make sure you use the ASPECT button to switch to 16:9 format.
If you are using VGA, use the AUTO ADJUST function to adjust to the screen. Please Note : If you are using
regular analog TV, AV, or component in 480i resolution, use the ASPECT button to switch to 16:9 in order to
fill up the screen. Please Note : This note this feature will distort the picture.
PICTURE QUALITY IS
HORRIBLE!!
For best im
age quality, view HD widescreen programs where possible. If HD content is not available view
“Standard Definition” from a digital source. Standard, analog TV will always be noticeable inferior to HD
because your TV has video that is many times better than old TV’s and so you can see interference and
deficiencies you did not KNOW you had.
PICTURE HAS PIXELS
THAT ARE A
LWAYS
DISPLAYING THE
SAME COLOR
Your TV is manufactured using an extremely high level of precision technology, however, sometimes some
pixels of your TV may not display. Pixels defects within industry specifications are inherent to this type of
product and do not constitute a defective product.
I CANNOT CHANGE
THE TIME MANUALL
Y
Your TV syncs time automatically according to your local TV channel. This function only works while the
TV’s tuner is connected to an ANTENNA.
BIG BLACK BOX IN
THE MID
DLE OF
SCREEN
You have turned on closed captioning and are using TEXT1 –
TEXT4. Change the setting to CC1 or turn off
closed captioning and the box will disappear.
Problems Solutions
31
Page 33

SWITCHING A
CHANNEL OR
SOURCE
CHANGES
THE VOLUME
Different channels and inputs will sometimes have this effect because the channel signal’s own volume
is already loud. There is no way remove this completely. The TV has an AUTO VOLUME LEVEL
function that can combat this type of effect. Please make sure that function is turned on.
THERE IS NOISE OR
TRASH PIXELS ON
THE SCREEN
When your TV’s resolution is higher than the digital channel’s broadcast resolution, the signal is
up-converted to match your TV’s resolution. Up-converting can cause this type of effect.
TIPS FOR HIGH
DEFINITION US
ERS
The TV is an ideal platform for viewing High Definition Content. The best image quality can be
achieved by HDMI, YPbPr (Component), then VGA. However, due to variances in broadcast
practices, it is possible some image distortions can occur.
TIPS FOR LETTERBOX
CONTENT USER
S
Letterboxed (Widescreen) versions of DVD movies are most commonly formatted for standard 4:3 TVs.
The TV has the capability of expanding this content so the entire screen is filled at the expense of the
image proportion. To use this function press the aspect button on the remote control and cycle among
the available options.
I CANNOT FIND THE
VOLUME AND
CHANNEL CHANGING
BUTTONS
The buttons are represented by the ▲▼◄► buttons located on the remote control. ▲▼ changes the
channels and ◄► changes the volume.
TV TURNS OFF
AUTOM
ATICALLY
AFTER 5 MINUTES
The TV features a power saving mode which will automatically turn off the TV, if there’s no signal
provided for more than 5 minutes.
MY TV PICTURE IS
VERY
DIM
Check to see if you are under POWER SAVING mode for your picture mode. Keep pressing the
PICTURE button on the remote control to cycle out of POWER SAVING.
Problems Solutions
32
Page 34

D
isplay panel
Ite
m
I
llustration
A
ctive Area / Screen Size Diagonal 39 inches
1
neercsediW oitaR tcepsA 6:9
P
ixel Pitch 0.5303 (H) x RGB x 0.5303(V) um per one triad
M
ax. of Pixels (Resolution) FHD (1920 x 1080 pixels) resolution
B
rightness 280 nits (Typical)
C
ontrast 1500:1 (Typical) with Auto Contrast Enhancement
R
esponse Time 8 ms (gray to gray)
V
iewing Angle
Typical 178/178 Degree
(Horizontal/Vertical)
Lamp Life of Backlight > 30,000hrs
TV
DISPLAY
D
imension
36.60” x 21.64 ” x 3.35” (without stand)
36.60” x 24.10” x 8.74” (with stand)
W
eight 24.96Ibs
P
ower input AC 100 – 240V, 60/50 Hz, 3A(Max.)
Function
(1)
Video
D3 ecalretni-eD
2:3 revocer emarF
Noise reducing core technology 3D
A
spect ratio Wide, Normal, Cinema, Zoom
ammaG dexiF ammaG
seY tsujda pmaL
P
icture mode
ssenprahS / tniT / roloC / tsartnoC / ssenthgirB tsujda oediV
Specifications
Standard
/ soft / Power Saving / User/Dynamic
33
Page 35

Sound
Mode
s
eY lortnoC emuloV otuA
e
noT
)
xaoc( seY tuO LAIXAOC
Speakers
6 watt per channel
(3) Gen
eral
)
ydaeR elbaC latigiD( MAQ / CSTA / CSTN renuT VT dirbyH
s
eY nacs otua lennahC
Sleep
timer
W
1 rednU rewop ybdnatS
p
0801 / i0801 / p027 / p084 / i084 oediV-troppus gnimiT
PC timi
ng
19200*1080@60 Hz (NATIVE)
1024*768@60
800*600@60
640*480@60
720x400@70
(4)NTSC/ATSC
NTSC
Sound:
Mono / Stereo / SAP
Favor
ite Channel
V-c
hip
Cl
osed caption
(CC1-CC4, Text 1-Text 4)
AT
SC
Favorite Channel
V-c
hip
Video
input format: 1080i, 720p, 480p, 480i
Analo
g closed caption:
(CC1-CC4, Text 1-Text 4)
Digital closed caption:
(Service 1-Service 6)
(5)I/O
1
input x TV Tuner (NTSC/ATSC),
1 input x AV,
1 input x YPbPr(audio shared with AV)
3 inputs x HDMI/HDCP (optional, HDCP audio shared with VGA Audio In),
1 input x VGA,
1 input x VGA Audio In,
1 output x COAXIAL (digital audio) out,
1 output x Headphone out,
*T
he product’s specifications may change without notice or obligation.
**This manual’s pictures and words are for references only and are subject to change without notice or obligation.
(2)Audio
Music/Standard/ Movie/User/Sport
150Hz/500Hz/1KHz/5KHz/10KHz/Balance
Off/5mins/10mins/15mins/30mins/60mins/90mins/120mins/180mins/240mins
34
1 intput x R/L Audio In (RCA interface)
1 intput x USB In (only for servise)
Page 36

FCC Compliance Statement
This device complies with Part 15 of the FCC Rules.
Operation is subject to the following conditions:
This device may not cause
harmful interference
This device must accept any interference received, including interference that my cause
undesired operation.
Please Note: This equipment has been tested and found to comply with the limits for a Class B
digital device, pursuant to part 15 of the FCC Rules. These limits are designed to provide
reasonable protection against harmful interference in a residential installation. This equipment
generates uses and can radiate radio frequency energy and, if not installed and used in
accordance with the instructions, may cause harmful interference to radio communications.
However, there is no guarantee that interference will not occur in a particular installation. If
this equipment does cause harmful interference to radio or television reception, which can be
determined by turning the equipment off and on, the user is encouraged to try to correct the
interference by one or more of the following measures:
Reorient or relocate the receiving antenna.
Increase the separation between the equipment and the receiver.
Connect the equipment into an outlet on a circuit different from that to which
the receiver is connected.
Caution: To comply with the limits for an FCC Class B computing device, always use the
signal cord and power cord supplied with this unit.
The Federal communications Commission warns that changes or modifications to the unit not
expressly approved by the party responsible for compliance could void the user’s authority to
operate the equipment.
European Notice
Products with the CE marking comply with both the EMC Directive (89/336/EEC),
(93/68/EEC) and the Low Voltage Directive (72/23/EEC) issued by the Commission of the
European Community.
35
Page 37

Hi!
Let’s get started.
Page 38

R
oku Streaming Stick
TM
Wh
at you need
High speed
Int
ernet
ireless Router
W
36
Page 39

Know your
Streaming Stick
[MHL C
MHL port on the back of your TV.
[S
TATUS LIGHT] Signies it is on
when lit, or activity when ashing.
[RESET BUTT
your Streaming Stick
ONNECTOR] Plugs into the
ON] Used to reset
37
Page 40

W
hat to do
38
Page 41

C
onnect to network
Now you can grab your remote
and jump right into guided
setup. Have your network name
and password ready and do the
following:
Select y
our network from the
list of available networks.
Enter your network password,
if you use one. Remember,
network passwords are case
sensitive.
39
Page 42

What to do
(
cont.)
Complete guided setup
It’s the nal stretch and hooray—it’s
!
on-scr
Get the la
Link the R
to your Roku account on your
computer.
een instructions and you’ll:
test software.
oku Streaming Stick™
40
Page 43

Your Roku account:
During setup, you’ll be
prompted to create
your Roku® account
online at roku.com/link. Your Roku
Streaming Stick™ will generate
a unique code that links your
player to your new account. Roku®
accounts are free and secure. And
while a valid credit card number is
required to create your account,
rest assured you will only be
charged if you authorize purchases
of channels and games from the
Roku Channel Store.
42
Page 44

Troubleshooting
Ha
ving trouble completing setup?
Don’t worry: it’s usually an easy x.
If you cannot see a picture on
your TV:
Mak
e sure your TV is turned
on. (This tip could save you
some embarrassment.)
Mak
e sure the video input
on your TV or home theater
receiver is set to match the
output (usually HDMI or MHL)
used with the Roku Streaming
Stick™. Most TVs have an Input button
(or a source button) on the remote
control to change video inputs.
43
Page 45

If y
ou cannot connect to your
wireless home network during
guided setup:
If y
ou are not getting 3 or
more signal-strength bars
above your wireless network,
adjust the location of your
Roku Streaming Stick™ and/
or wireless router. Make sure
there are no obstructions, like
cement walls, between your
Roku Streaming Stick™ and your
wireless router.
Mak
e sure you select the
correct wireless router name
on the “Wireless” screen.
44
Page 46

Troubleshooting
cont.)
(
Mak
e sure you enter the
correct password, if your
network is security-enabled
(password is case sensitive).
If y
S
ou have turned o
SID broadcasting on your
wireless router, you can add
your network by selecting
“My network is not shown”
from the “Wireless” screen.
If you cannot hear sound:
Mak
e sure the connectors on
the cables between your TV
and home theater receiver
are pushed in all the way.
45
Page 47

(
cont.)
Mak
e sure the volume on your
TV or home theater receiver is
turned up and isn’t on mute.
46
Page 48

LIMI
TED PRODUCT WARRANTY
RCA CANADA TV
*Please note: This warranty card is exclusively for the RCA TV.
**
For the
Roku Streaming Stick™, please complete the Roku Warranty Card separately.
PT TO THE EXTENT PROHIBITED BY APPLICABLE LAW, THIS WARRANTY
DOES NOT
WA
RRANTIES AND CONDITIONS WITH RESPECT TO ANY PRODUCT USED FOR INSTITUTIONAL OR OTHER COMMERCIAL PURPOSES
COVER, AND AS DESCRIBED BELOW CURTIS INTERNATIONAL LTD EXPRESSLY DISCLAIMS, ALL ACTUAL AND IMPLIED
EXCE
NCLUDING BUT NOT LIMITED TO RENTAL PURPOSES).
(I
at your warranty covers:
Wh
• Defects in materials or workmanship to the original purchaser.
For how long after purchase:
• One year parts and labor.
What Curtis International Ltd. will do:
• At Curtis’s discretion, pay an Authorized Curtis Service Centre for both labor charges and parts to repair your television, or replace your television with a new or
refurbished/remanufactured unit. See “How to get service”
How to get service:
• Call 1-800-968-9853. Please have your unit’s date of purchase and model/serial number ready. The model/serial number information can be found on the back of
your unit.
resentative will troubleshoot your problem over the phone.
• A rep
• If it is determined that your unit requires service, the service location will be at the sole discretion of Curtis based upon the Curtis Limited Warranty statement.
• At the sole discretion of Curtis, Televisions are either consumer carry-in to an Authorized Curtis Service Centre or directly exchanged for a new or
refurbished/remanufactured unit.
• Proof of purchase in the form of an original bill of sale or receipted invoice from an Authorized Dealer which is evidence that the product is within the warranty
period must be presented to obtain warranty service.
Your warranty does not cover damages which are caused by:
• Fire, accident, lightening, flood and/or other acts of God;
• Faulty installation, set-up adjustments, improper antenna, inadequate signal reception, adjustment of consumer controls and/or improper maintenance; and/or
• Failure which results from misuse, abuse, neglect, mishandling, misapplication, and/or alteration.
What your warranty does not cover:
• Customer instruction (Your Owner’s Manual describes how to install, adjust, and operate your unit. Any additional information should be obtained from your
dealer);
• Transportation cost to and from the Service Centre (Unless you have made other arrangements with your dealer at the time of purchase whereby he undertakes
this responsibility);
• Installation and set-up service adjustments;
• Products connected otherwise than as outlined in the Owner’s Manual;
• Products on which the serial number has been altered or removed;
• External antenna or cable systems;
• Remote control & batteries;
• A television that has been modified or incorporated into other products or is used for institutional or other commercial purposes (including but not limited to rental
purposes);
• A unit purchased or serviced outside Canada;
• Special, incidental or consequential damages; and/or
• Normal wear or cosmetic damage.
If you purchased your unit outside of Canada:
• This warranty does not apply. Contact your dealer for warranty information.
©Curtis International Ltd.
315 Attwell Drive, Toronto, Ontario M9W 5C1
www.curtisint.com
ONLY RETURN RCA TV. DO NOT RETURN ROKU STREAMIING STICK
STREAMING STICK™ PLEASE VISIT WWW.ROKU.COM/SUPPORT
ROKU
™. FOR ISSUES PERTAINING TO THE
“RCA”, “NIPPER & CHIPPER” ARE TR
ADEMARKS OF RCA TRADEMARK MANAGEMENT
CURTIS INTERNATIONAL LTD.
47
USED UNDER L
ICENSE TO:
Page 49

R
oku Streaming Stick
TM
Impor
he License Agreement
T
he Roku and third-party software license terms can be found at: www.roku.com/
T
license. Use of the Roku Streaming Stick™ (“Streaming Stick”) constitutes acceptance
of as well as agreement to those license terms.
One
Subject t
Limited Warranty:
R
oku or from one of its authorized re-sellers or distributors; and
Unit
ed States and Canada.
Limit
R
oku warrants the Streaming Stick hardware against defects in materials and
workmanship under normal use for a period of o n e ( 1 ) y e a r from the date
of purchase (“Warranty Period”). If Roku determines that the Streaming Stick’s
hardware is defective, Roku will either repair the unit or replace the unit with either
a new or rebuilt Streaming Stick, at its option. If the Warranty Period has expired
or is otherwise not applicable (see Scope and Limitation on Warranty below), we
will return the Streaming Stick to you. More information about this warranty can
tant Product Information
(1) Year Limited Hardware Warranty
o the additional terms and conditions set forth below, Roku provides this
ed Warranty
eturn and Warranty Service Process
R
Please ac
before seeking warranty service. To return or obtain warranty service for a
number fr
e
xpire thirty days from issuance. Roku may attempt to troubleshoot a warranty-
ship y
accessories, in either the original packaging or pa
of pr
Failure to return any of the accessories could result in a delay and/or result in an
invoice to you or credit to Roku for the missing accessories.
cess and review the online help resources at www.roku.com/support
om a Customer Support Representative (CSR) at Roku. Customer Support
our Streaming Stick, freight prepaid, together with proof of purchase and all
otection, to the Roku authorized distribution facility identified by the CSR.
48
Page 50

Important:ƫ
with your request: (a) model number, (b) serial number, (c) problem description, (d)
software version (located in the System Configuration menu), (e) date of purchase,
(f) place of purchase (re-seller or online place of purchase), and (g) return shipping
.!//ƫĨċċƫ+4!/ƫ.!ƫ*+0ƫ!,0! ĩċ
ope of and Limitation on Warranty
Sc
T
he warranty on the Streaming Stick is limited to the repair or replacement of defective
units as described in the Limited Warranty section above. This warranty does not cover
customer training or education, installation, set up adjustments, or signal reception
problems. This warranty also does not cover any issue related to the service provided
by your Service Provider, including but not limited to service disruption, changes
in service terms, changes in oerings, changes in format, or technical problems.
$%/ƫ3..*05ƫ +!/ƫ*+0ƫ+2!.ƫ )#!ƫ 1!ƫ 0+ƫ 0/ƫ +"ƫ + Čƫ % !*0Čƫ )%/1/!Čƫ 1/!Čƫ
negligence, commercial use or modification of, or to any part of, your Streaming Stick.
This warranty does not cover damage due to improper operation or maintenance,
connection to improper voltage supply or attempted repair by anyone other than a
facility authorized by Roku to service your Streaming Stick. This warranty does not
cover consumables (such as fuses and batteries).
$!*ƫ!)%(%*#ƫ"+.ƫƫƫ*1)!.Čƫ,(!/!ƫ,.+2% !ƫ0$!ƫ"+((+3%*#ƫ%*"+.)0%+*ƫ
egal Notices
L
F
ederal Communication Commission Interference Statement
$%/ƫ !-1%,)!*0ƫ $/ƫ !!*ƫ 0!/0! ƫ * ƫ "+1* ƫ 0+ƫ +),(5ƫ 3%0$ƫ 0$!ƫ (%)%0/ƫ "+.ƫ ƫ (//ƫ ƫ
digital device, pursuant to Part 15 of the FCC Rules. These limits are designed to
provide reasonable protection against harmful interference in a residential installation.
This equipment generates, uses and can radiate radio frequency energy and, if not
installed and used in accordance with the instructions, may cause harmful interference
to radio communications. However, there is no guarantee that interference will not
occur in a particular installation. If this equipment does cause harmful interference to
radio or television reception, which can be determined by turning the equipment o
and on, the user is encouraged to try to correct the interference by one of the following
measures:
đƫ!+.%!*0ƫ+.ƫ.!(+0!ƫ0$!ƫ.!!%2%*#ƫ*0!**ċ
đƫ*.!/!ƫ0$!ƫ/!,.0%+*ƫ!03!!*ƫ0$!ƫ!-1%,)!*0ƫ* ƫ.!!%2!.ċ
đƫ+**!0ƫ0$!ƫ !-1%,)!*0ƫ%*0+ƫ*ƫ+10(!0ƫ+*ƫƫ%.1%0ƫ %û!.!*0ƫ".+)ƫ0$0ƫ0+ƫ3$%$ƫ0$!ƫ
receiver is connected.
đƫ+*/1(0ƫ0$!ƫ !(!.ƫ+.ƫ*ƫ!4,!.%!*! ƫ. %+ĥƫ0!$*%%*ƫ"+.ƫ$!(,ċ
$%/ƫ !2%!ƫ +),(%!/ƫ 3%0$ƫ .0ƫ āĆƫ +"ƫ 0$!ƫ ƫ 1(!/ċƫ ,!.0%+*ƫ %/ƫ /1&!0ƫ 0+ƫ 0$!ƫ
following two conditions: (1) This device may not cause harmful interference, and (2)
this device must accept any interference received, including interference that may
cause undesired operation.
49
Page 51

FCC C
re
hannels 1 through 11.
c
Wireless Radio Use:
b
I
MPORTANT NOTE:
aution:
sponsible for compliance could void the user’s authority to operate this equipment.
and.
FCC Radiation Exposure Statement:
Th
is equipment complies with FCC radiation exposure limits set forth for an
uncontrolled environment. This equipment should be installed and operated with
minimum distance 20cm between the radiator and your body.
This transmitter must not be co-located or operating in conjunction with any other
antenna or transmitter.
N
ote to US model owner:
To co
mply with US FCC regulation, the country selection function has been completely
removed from all US models.
The availability of some specific channels and/or operational frequency bands
are country dependent and are firmware programmed at the factory to match the
intended destination. The firmware setting is not accessible by the end user.
Industry Canada statement
This device complies with RSS-210 of the Industry Canada Rules. Operation is subject
to the following two conditions: (1) this device may not cause harmful interference,
and (2) this device must accept any interference received, including interference that
may cause undesired operation. The device for operation in the band 5150-5250 MHz
is only for indoor use to reduce the potential for harmful interference to co-channel
mobile satellite systems.
afety Precautions
S
e Streaming Stick has been designed with the highest concern for safety. However,
Th
any electrical device, if used improperly, has the potential for causing fire, electrical
shock or personal injury. To help ensure accident-free operation, follow these guidelines:
ectrical outlet and disconnect any other cables immediately if the Streaming Stick
el
or the device functions in an abnormal manner, produces unusual sounds or smells or
becomes too hot to touch.
roku.co
m/support.
50
Page 52

Use and Handling
of small childr
Stick or ac
humidity or dir
ww.roku.com
w
cessories.
en.
ect sunlight.
tr
ademarks or registered trademarks of Roku, Inc.
51
Page 53

MANUEL D’UTILISATION
RLDED3930A-RK
39”
Télévision DEL
Page 54

Introduction
Avertissement
Attention
Informations importantes
Fixation ou enlèvement du support
Installation des piles dans la télécommande
Identification des panneaux avant et arrière
Suggestion de connexion
Description de l'unité principale
Télécommande
Réglage de base de l’écran
Comment nettoyer le téléviseur
Dépannage
Spécifications
Déclaration de conformité FCC
Dépannage
Table des matières
1
Page 55

1. Introduction
Nous vous
remercions d’avoir fait l’acquisition de ce TV LED. Il fait à la fois office d’un TV
couleur classique et d’un moniteur PC. Pour bénéficier pleinement de votre TV dès le début,
lisez attentivement ce manuel et conservez-le à proximité pourvous y référer ultérieurement.
1.1 INST
ALLATION
x Mettez la
TV dans un endroit où la lumière directe ne frappe pas l’écran. L’obscurité
totale ou un reflet sur l’écran d’image peut causer une fatigue oculaire. La lumière douce
et indirecte est recommandée pour visualiser de manière confortable.
x Laissez de
l’espace suffisant entre le récepteur TV etle mur pour laisser passer la ventilation.
x Evitez les endroits excessivement chauds pour éviter tout risque d’endommager le châssis ou
une défaillance prématuré d’un composant.
x Cette TVpeut être connectée sur secteur AC100-240V50/60Hz.
x Ne pas installer la TV dans un endroit près de sources de la chaleur telles que le radiateur, la
conduite d’air, la lumière solaire directe, ou dans des endroits fermés. Ne pas couvrir les
ouvertures de ventilation quand vous utilisez laTV.
x Le voyant LED du TV sur le panneau avant dure environ 30 secondes après la coupure
l’électricité, durant cette période, vous ne pouvez pas rallumer le TVjusqu’à ce que le voyant
LED s’éteigne, mercibeaucoup pourvotre attention!
Manuel D'utilisation x1
Carte de garantie x1
Télécommande x1
Batterie (piles, AAA) x1
Liste des accessoires pour téléviseur
x
x
x
x
x
Page 56

1.2 A
VE
RTISSEMENT
S
Ce symbole est destiné à ave
rtir l’utilisateur de risque de choc
électrique, ne pas démonter cet appareil, excepté par un technicien
de maintenance qualifié.
Ce
symbole est destiné à a
vertir l’utilisateur de la présence
d’instructions importantes quant au fonctionnement et l’entretien
dans la documentation accompagnant cet appareil.
PRECAUTION: POUR EVITER LE RISQUE DE CHOC ELECTRIQUE.
NE PAS ENLEVEZ LE COUVERCLE (OU DOS).
AUCUNE PARTIE UTILISATEUR SERVICEABLE A L’INTERIEUR.
REFERENCEZ LA MAINTENANCE AU PERSONNEL DE
MAINTENANCE QUALIFIE.
PRECAUTION
RISQUE DE CHOC ELECTRIQUE
NE
PAS OUVRIR
Les struct
ures de classe I doivent être reliées au réseau é
lectrique
par une prise munie d'une connexion à la terre de protection.
Alimenter à la prise comme un appareil à disjoncteur, les
installations à disjoncteur devraient être faciles à utiliser.
3
Page 57

1.3 PRECAUTIONS
Précaution
Des hautes tensions dangereuses existe
nt à l'intérieur de cet appareil.
Ne pas retirer l'arrière du boîtier de votre appareil. Pour toute
réparation, veuillez faire appel à un technicien qualifié.
Précaution
Précaution
N'introduisez pas d'objets
dans les fentes des panneaux du téléviseur.
Ne renversez jamais de liquide sur le téléviseur.
Précaution
Evitez l’exposition de l’appareil à
la lumière solaire et autres sources
de chaleur. Ne posez pas directement le téléviseur sur d’autres
appareils qui dégagent de la chaleur. Tels que les magnétoscopes, les
amplificateurs audio. Ne pas bloquez les ouvertures d’aération à
l’arrière de l’appareil. La ventilation est essentielle pour éviter une
défaillance des composants électriques. Ne pas écraser le cordon
d’alimentation sous le téléviseur ou sous d’autres objets lourds
.
Pour éviter tout i
ncendie ou choc électrique, n'exposez pas l'unité
l'humidité
, ni ne placez pas d'objets remplis
de liquides, tels que des vases, sur l'appareil.
principale à la pluie ou à
4
Page 58

1.4 Précautions
Précaution
Ne montez jamais sur le téléviseur,
ne vous appuyez pas dessus et
ne le poussez pas brusquement de son socle. Prêtez
particulièrement attention aux enfants.
Précaution
Ne placez pas le téléviseur sur un ch
ariot, une étagère, ou une table
instable. Le téléviseur risque de tomber et peut provoquer des
blessures graves et des dommages matériels importants.
Précaution
Lorsque le téléviseur n’est pas utilisé p
our longtemps, il est
conseillé de déconnecter le cordon d’alimentation de la prise
secteur.
Précaution
Le panneau LED utilisé dans ce prod
uit est fait de verre. Par
conséquent, il peut se casser si le téléviseur tombe ou reçoit des
impacts. Faites attention à ne pas vous blesser avec des morceaux
de verre au cas où le panneau LED se brise.
5
Page 59

Protection de la connexion de l’antenne de télévision
Mise à la terre de l'antenne externe de
télévision
En cas de connexion de l'appareil à une antenne extérieure ou un système de télévision par
câble, assurez-vous que ces derniers sont mis à la terre afin de les protéger des surtensions
électriques ou des accumulations d'électricité statique. L'article 810 Code national de
l'électricité (National Electrical Code), ANSI/NFPA N° 70, fournit des informations
concernant la mise à la terre adéquate du mât et de la structure de support, la mise à la terre du
câble d'entrée vers une unité de décharge d'antenne, la taille des conducteurs de mise à la terre,
l'emplacement de l’unité de décharge de l'antenne, la connexion aux électrodes de mise à la
terre et les exigences concernant les électrodes de mise à la terre..
Protection contre la foudre
Pour une meilleure protection de cet équipeme
nt durant un orage ou lorsque il est inutilisé
pendant une longue période, débranchez-le de la prise murale et déconnectez l'antenne ou le
système de télévision par câble.
Lignes électriques
Un système d'antenne extérieure ne devrait pas être installé près de lignes électriques aériennes
afin d'éviter qu'il ne tombe sur ces lignes ou sur des circuits électriques.
Collier de mise à la terre
Câble d'entrée d'antenne
Conducteurs de mise à la
terre (section NEC
Unité de décharge à la
terre (section NEC
Collier de mise à la terre
Service d'alimentation du système prise
de terre (ART 250, Partie H du NEC)
Équipement électrique
Informations Importantes
Dépannage
Informations Importantes
6
Page 60

Fixation ou enlèvement du support
Informations Importantes
Dépannage
Fixation ou enlèvement du support
1. Pour fixer la base, placez l'unité d'affichage plate sur une table. Ensuite, fixez le support au fond du support. Vissez
les 4 vis pour fixer le support.
2. .ehcatéd es troppus el te setnesérp siv 4sel zeriter ,troppus el reriter ruoP
• •
Page 61

Vue avant
LAMPE TÉ
MOIN - La lumière est rouge lorsque l'appareil est branché, mais le téléviseur
n'est pas allumé. La lumière s'allume en bleu lorsque le téléviseur est allumé. En raison de
l'écran LED dans le panneau, le téléviseur peut prendre de 10 à 12 secondes pour
s'allumer.
TÉLÉ-CAPTEUR - Le télé-capteur reçoit toutes les commandes de la télécommande.
Vue arrière du schéma de montage
Spécification de m
ontage : 200 mm x 200 mm en utilisant une vis M6. La longueur de la vis ne
doit pas dépasser 8mm. Veuillez noter : La longueur de 8mm de la vis se réfère à la profondeur
de la vis dans les trous de montage. Lorsque vous achetez des vis, vous devez ajouter les 8mm
initiaux à l'épaisseur de votre plaque de montage afin d'obtenir la longueur totale de la vis.
Installation des piles dans la télécommande
Identification des panneaux avant et arrière
Fixation ou enlèvement du support
Informations Importantes
Identification des panneaux avant et arrière
• •
Page 62

Veuillez insérer deux piles AAA dans la télécommande. Assurez-vous que vous faites
correspondre les symboles (+) et (-) sur les piles avec les sy
mboles (+) et (-) à l'intérieur du
compartiment des piles. Ensuite, remettez en place le couvercle du compartiment des piles.
Veuillez noter :
Utilisez seulement des piles AAA.
Ne combinez pas des piles neuves avec des piles usagées. Cela peut provoquer des fissur
es
ou des fuites qui pourraient poser un risque d'incendie ou entraîner des blessures.
L’insertion incorrecte des piles pourrait aussi entraîner des fissures ou des fuites qui
pourraient poser un risque d'incendie ou d'entraîner des blessures.
Éliminez les piles conformément aux lois et règlements locaux.
Gardez les piles hors de portée des enfants et des animaux domestiques.
Si la télécommande n'est pas utilisée pendant une longue période, retirez les piles.
Gardez la télécommande à l'écart de l'humidité, de la lumière du soleil et des températures
élevées.
9
Page 63

Pour la câblodistribution numérique sans boîte de jonction ou antenne ...
1.
Assurez-vous que l’alimentation du téléviseur HD est coupée.
2.
Branchez le câble RF à partir de votre antenne ou câble numérique au port TV à
l’arrière de votre téléviseur HD.
3.
Allumez le téléviseur HD.
4.
La première fois, suivez les instructions à l'écran.
Veuillez noter :
Toutes les émissions ne sont en Haute Définition (HD). Veuillez vous renseigner
auprès de vos stations de d’émission locales pour plus d'informations.
Suggestions
de connexion
Le syntoniseur du téléviseur HD est conçu pour un téléviseur HD, donc il nécessite un
signal plus fort que les téléviseurs normaux. Si vous ne pouvez pas atteindre ce niveau
de signal avec votre antenne ou câble, votre téléviseur HD pourrait perdre l’image ou le
son.
Identification des panneaux avant et arrière
Fixation ou enlèvement du support
Informations Importantes
Suggestions
de connexion
10
ou
Page 64

Connecter
le lecteur DVD avec YpbPr composant…
1. Assurez-vous que l
’alimentation du téléviseur HD et de votre lecteur DVD est coupée.
2. Procurez-vous un câble composant. Branchez le connecteur de coul eur verte à la fois à
votre lecteur DVD et au port du connecteur vert de l’YPbPr à l’arrière de votre
téléviseur HD.
3. Branchez le connecteur de couleur bleue à la fois à votre lecteur DVD et au port du
connecteur bleu de l’YPbPr à l’arrière de votre téléviseur HD.
4. Branchez le connecteur de couleur rouge à la fois à votre lecteur DVD et au port du
connecteur rouge de l’YPbPr à l’arrière de votre téléviseur HD.
5. Procurez un câble audio RCA. Branchez le connecteur de couleur blanche à la fois à
votre lecteur DVD et au port du connecteur blanc de l’YPbPr à l’arrière de votre
téléviseur HD.
6. Branchez le connecteur de couleur rouge à la fois à votre lecteur DVD et au port du
connecteur rouge de l’YPbPr à l’arrière de votre téléviseur HD.
7. Allumez le téléviseur HD et votre lecteur DVD.
8. Utilisez le bouton source de la télécommande ou le bouton source de la TV pour passer
à YPbPr.
Veuillez noter :
Parfois, les lecteurs DVD n’ont pas de sortie automatique vers YPbPr. Vous
devrez d'abord configurer votre lecteur DVD avec une connexion AV, puis
passer à YPbPr. Consultez le manuel de référence du lecteur DVD, pour
s'assurer que le lecteur DVD est configuré pour sortir correctement vers la TV.
Cette source partage les prises audio avec la vidéo composite.
11
Page 65

Connexion
W
ii™ avec composite…
1.
Assurez-vous que l
’alimentation du téléviseur HD et votre Wii™ est éteinte.
2.
Procurez-vous un câble vid
éo jaune. Branchez le connecteur vidéo jaune à la fois à
votre Wii™ et au port du connecteur vidéo jaune de l’AV à l’arrière de votre téléviseur
HD.
3.
Procurez un câble audio RCA. Branche
z le connecteur de couleur blanche à la fois à
votre Wii™ et au port du connecteur blanc de l’AV à l’arrière de votre téléviseur HD.
4.
Branchez le connecteur de
couleur rouge à la fois à votre Wii™ et au port du
connecteur rouge de l’AV à l’arrière de votre téléviseur HD.
5.
Allumez le téléviseur HD et votre consol
e Wii™.
6.
Utilisez le bouton source de la téléco
mmande ou le bouton source de la TV pour passer
à l'AV.
Veuillez noter :
Assurez-vous de lire votre guide d'installation Wii™ pour plus d'informations.
Cette source partage les prises audio avec l’YPbPr.
12
Page 66

Connexion du récept
eur câble/satellite avec HDMI ...
1. Assurez-vous que l’alimentation du
téléviseur HD et de votre boîtier décodeur est
coupée.
2. Branchez un câble HDMI à la sortie HDMI de votre boîtier décodeur et l'autre
extrémité au port HDMI à l’arrière de votre téléviseur HD.
3. Allumez le téléviseur HD et votre boîtier décodeur.
4. Utilisez le bouton source de la télécommande ou le bouton source de la TV pour passer
à HDMI.
Veuillez noter :
Consultez le manuel de réf
érence du boîtier décodeur pour s'assurer que le
boîtier décodeur est lié correctement à la sortie du téléviseur.
HDT
V prend en charge le code de la télécommande universelle NEC.
Veuillez consulter les codes NEC dans le guide de votre télécommande
universelle.
13
Page 67

1. Assurez-vous que l
’alimentation du téléviseur HD et de votre ordinateur est coupée.
2. Procurez-vous un câble VGA D-Sub à 15 broches ; connectez-le à la sortie VGA de votre
ordinateur et l'autre extrémité au port VGA à l’arrière de votre téléviseur HD.
3. Procurez-vous une mini-prise de 3,5 mm, connectez-la à la sortie aud io de votre or dinateur
et l'autre extrémité au port d'entrée stéréo VGA.
4. Allumez le téléviseur HD et l’ordinateur.
5. Utilisez le bouton source de la télécommande ou le bouton source de la TV pour passer à
l’ordinateur.
6. Changez la résolution de votre ordinateur à 1360x768 à un taux de rafraîchissement de 60
Hz.
7. Appuyez sur MENU pour utiliser l'option IMAGE de l'écran.
8. Sous l'option IMAGE sélectionnez Réglages ordinateur.
9. Sous Réglages ordinateur, utilisez le RÉGLAGE AUTOMATIQUE pour régler l'écran.
Veuillez noter :
Pour les meilleurs résultats, veuillez régler la résolution de votre ordinateur à
1360x768 à 60 Hz. Veuillez consulter le manuel de l'ordinateur ou le manuel de la
carte graphique pour obtenir des instructions sur la façon de régler la résolution et
le taux de rafraîchissement.
Veuillez consulter le manuel de votre ordinateur pour les exigences de sortie vidéo
de la carte vidéo.
Le port VGA du téléviseur dispose d'un mode d'économie d'énergie qui éteint
automatiquement le téléviseur s'il n'y a pas de signal fourni pendant plus de 5
minutes.
14
Connexion à un ordinateur
avec VGA et mini-prise de 3,5 mm...
Page 68

Connecter
un récepteur audio numérique avec un coaxial ...
1
.
Assurez-vous
que l’alimentation du téléviseur HD et de votre récepteur est coupée.
2
.
Procurez-vous
un câble coaxial , connectez-le à l'entrée numérique
récepteur et la liaison coaxiale au le port de SORTIE à
l’arrière de le téléviseur HD.
3
.
Allu
mez le téléviseur HD et votre récepteur.
Veuillez noter :
Si vous voulez que votre récepteur décode un flux numérique pur, vous devez
également configurer la fonction audio OSD du téléviseur -> Sortie audio
numérique. Assurez-vous que l'option est activée à 5.1CH.
Si votre récepteur fait des bruits statiques lors de la réception du 5.1CH, vous
devez plutôt utiliser l'option PCM.
Veuillez consulter le manuel du récepteur aussi, pour s'assurer que le récepteur
est configuré pour recevoir correctement les signaux de la télévision.
La sortie COAXIAL du téléviseur pour 5.1CH est utilisée uniquement pour la
connexion antenne/câble. Tout autre signal audio entrant sera transmis
de COAXIAL sous format PCM.
coaxiale de votre
15
Page 69

2.2 Vue générale
2.3.1. Panneau avant
2.3.2. Panneau arrière des connections
1. Borne de sortie pour ÉCOUTEURS
6.
Borne d'entrée HDMI 1.
7.
Borne d'entrée HDMI 2(MHL).
9.
Borne d'entrée VGA.
10.
Borne d'entrée AUDIO PC.
2.
11.
Antenne de télévision.
8.
Borne d'entrée HDMI 3.
5.
Borne d'entrée pour composants.
4.
Borne d'entrée AUDIO. (Borne d'entrée audio pour YPbPr et AV)
3.
Borne de sortie coaxiale.
.
Borne d'entrée USB. (Utilisée seulement pour la mise à niveau)
16
1. VOL- :Pour baisser le volume
2. VOL+ : Pour augmenter le volume
3. CH- : Permet d’accéder à la chaîne précédente
4. CH+ : Permet d’accéder à la chaîne suivante
5. MENU : Permet d’afficher le Menu principal des réglages
6. SOURCE : Permet de sélectionner la source d’entrée
7. POWER : Appuyez pour mettre en marche et éteindre la TV ou mettre en veille.
VOL+/VOL-/CH+/CH-:fonctionne comme déplacer le curseur droite / gauche
/ haut / bas dans le menu.
VOL+:travaux que confirmer «source» du menu.
1 2 3 4 5 6 7 8 9 10 111 2 3 4 5 6 7 8 9 10 11
Page 70

RAPPEL:Press t
o change to the previously viewed channel.
Appuyez sur pour revenir en arrière, défiler vers la gauche d'une page à la fois.
Appuyez sur pour lancer ou interrompre la lecture.
Appuyez sur pour l'avance rapide, défilement vers la droite d'une page à la fois.
INFO:
*
1 2
3
4
5
6
7
8 9
0
INFO
DISPLAY
MTS/AUDIO
ASPECT PMODE SMODE
CH
MENU
SOURCE
OK
VO
L
BACK
CC
FAV
F.LIS
T C.LIST
SLEEP AUTOEPG
*
Retour: Ap
puyez sur pour revenir à l'écran precedent
Appuyez sur pour revenir à l'écran précédent
Curseur: utilisez les flèches haut, bas, gauche et droite pour déplacer à l'intérieur du menu
OK: Entrez l'option choisie ou effectuer l'opération sélectionnée
EPG
Enter electronic
program guide
Page 71

Guide d’installation
A
ppuyez sur le bouton MENU pour afficher le MENU OSD PRINCIPAL ; Appuyez sur le
bouton ◄ / ► pour sélectionner le MENU désiré ; Appuyez sur le bouton ENTER (ENTRÉE)
pour accéder au sous-menu ; Appuyez sur le bouton ▼ / ▲ pour sélectionner l'option puis
appuyez sur ◄ / ► pour ajuster la valeur dans le sous-menu ; Vous pou vez appuyer sur le bouton
MENU pour revenir au m enu supérieur ou sur le bout on EXIT (QUITTER) pour quitter le m enu
OSD (affichage à l’écran).
PICTURE (IMAGE)
Vous
pouvez sélectionner le type d'image qui correspond le mieux à votre visio nnag e. Appuy e z su r
le bouton « MENU » pour accéder au menu OSD. Ensuite, appuyez sur le bouton « / » pour
sélectionner le menu « PICTURE »
(« IMAGE »).
1. Appuyez sur le bouton « » pour
sélectionner « Picture Mode » (mode
Image), puis appuyez sur le bouton
«
/
» po
ur sélectionner.
2. Appuyez sur le bouton « / » pour
sélectionner « Brightness »
(Luminosité), puis appuyez sur le
bouton « / » pour accéder au menu
de réglage de la luminosité pour régl er la
luminosité.
3. Appuyez sur le bouton « / » pour sélectionner « Contrast » (« Contraste ») puis appuyez sur
le bouton « / » pour accéder au menu de réglage du contraste pour régler le contraste.
4. Appuyez sur le bouton « / » pour sélectionner « Color » (« Couleur »), puis appuyez sur le
bouton « / » pour accéder au menu de réglage de la couleur pour régler la couleur.
5. Appuyez sur le bouton « / » pour sélectionner « Tint » (« Teinte »), puis appuyez sur le
bouton « / » pour accéder au menu de réglage de la teinte pour régler la teinte.
Remarque: L’élément « Tint » (« Teinte ») est utilisé en mode NTSC uniquement.
6. Appuyez sur le bouton « / » pour sélectionner « Sharpness » (« Netteté »), puis appuyez sur
le bouton « / » pour accéder au menu de réglage de la netteté pour régler la netteté.
7. Appuyez sur le bouton « / » pour sélectionner « Color Temperature » (« Température des
couleurs »), puis appuyez sur le bouton « / » pour sélectionner.
8. Appuyez sur le bouton « / » pour sélectionner « Advanced Setting » (« Paramètres
avancés »), puis appuyez sur le bouton « ENTER/ » (« ENTRÉE/ ») pour accéder au
sous-menu.
Réglage de base de l’écr
an
18
Page 72

a. Ap
puyez sur l
e bouton
pour sélectionner
(« Format
appuyez
sur le bouton « / »
sélectionner.
b. Appuyez sur le bouton
pour sélectionner
« Noise Reduction »
(« Réduction de bruit »),
sur le bouton
sélectionner.
c. Appuyez sur le bouton
sélectionner « Dynamic Contrast » (« Contraste dynamique »), puis appuyez sur le
pour sélectionner « On » (activer) or « Off » (désactiver).
SOUND (AUDIO)
Vo
us pouvez sélectionner le type de son qui correspond le mieux à votre écoute.
Appuyez sur le
bouton
« MENU » pour
accéder au menu OSD . Ensuite,
appuyez sur le
bouton « / »
pour sélectionner
le menu
« SOUND »
(« AUDIO »).
1. Appuyez
sur le bouton
« » pour
sélectionner
(« Paramètres de l'égaliseur »), puis appuyez sur le bouton « ENTER/
pour accéder au sous-menu.
a. Appuyez sur le bouton « / » pour sélectionner « Equalizer Mode » (« Mode Égaliseur »).
Appuyez sur le bouton « / » pour sélectionner.
b. Appuyez sur le bouton « / » pour sélectionner « 150Hz ». Appuyez sur le bouton « / »
pour sélectionner.
c. Appuyez sur le bouton « / » pour sélectionner « 500Hz ». Appuyez sur le bouton « / »
pour sélectionner.
d. Appuyez sur le bouton « / » pour
sélectionner « 1K Hz ». Appuyez sur le
bouton « / » pour sélectionner.
« / »
«
Aspect Ratio »
de l'image »), puis
pour
« / »
puis appuyez
« / » pour
« / » pour
bouton « / »
« Equalizer Settings »
» (« ENTRÉE/ »)
19
Page 73

e. Appuyez sur le bouton «
/ » pour sélectionner « 5K Hz ». Appuyez sur le bouton « / »
pour sélectionner.
f. Appuyez sur le bouton « / » pour sélectionner « 10K Hz ». Appu yez sur le bouton « / »
pour sélectionner
g. Appuyez sur le bouton « / » pour sélectionner « Balance » (« Balance »). Appuyez sur le
bouton « / » pour sélectionner
Remarque : La fonction b、c、d、e、f、g n'est disponible qu'en mode USER (UTILISATEUR).
2. Appuyez sur le bouton « / » pour sélectionner « MTS », puis appuyez sur le bout on « /
» pour régler.
Remarque : Cela n'est disponible qu'en mode ATV.
3. Appuyez sur le bouton « / » pour sélectionner « Audio Language » (« Langue audio »),
puis appuyez sur le bouton « / » pour régler.
Remarque : Cela n'est disponible qu'en mode DTV.
4. Appuyez sur le bouton « / » pour sélectionner « Digital Audio Output » (« Sortie audio
numérique »), puis appuyez sur le bouton « / » pour régler.
5. Appuyez sur le bouton / pour sélectionner « AVL », puis appuyez sur le bouton « / »
pour sélectionner « On » (activer) or « Off » (désactiver).
TIME (MINUTERIE)
Appuye
z sur le bouton « MENU » pour
accéder au menu OSD . Ensuite, appuyez sur le
bouton «
/
» pour sélectionner le menu « TIME » (« MINUTERIE »).
1. Appuy
ez sur le bouton « » pour sélectionner « Sleep Timer » (« Minuterie de veille »), puis
appuyez sur le bouton « / » pour accéder au menu de réglage de la minuterie de veille pour
régler la minuterie de veille.
2. Appuyez sur le bouton « / » pour sélectionner « Time Zone » (« Fuseau horaire »), puis
appuyez sur le bouton « / » pour accéder au menu de réglage du fuseau horaire pour
sélectionner le fuseau horaire local.
20
Page 74

3. Appuyez s
ur le bouton « / » pour sélectionner « Daylight Saving Time » (« Heure
avancée »), puis appuyez sur le bouton « / » pour sélectionner « On » (activer) or « Off »
(désactiver).
4. Appuyez sur le bouton « / » pour sélectionner « Time Format » (« Format de l’heure »),
puis appuyez sur le bouton « / » pour sélectionner « 12-hour » (« 12 heures ») ou
« 24-hour » (« 24 heures »).
5. Appuyez sur le bouton « / » pour sélectionner « Auto Clock » (« Horloge automatique »),
puis appuyez sur le bouton « / » pour sélectionner « On » (activer) or « Off » (désactiver).
6. Appuyez sur le bouton « / » pour sélectionner « Clock » (« Horloge »), puis appuyez sur le
bouton « ENTER/ » (« ENTRÉE/ ») pour régler.
SETUP (CONFIGURATION)
Appuyez sur
le bouton « MENU » pour accéder au menu OSD. Ensuite, appuyez sur le bouton
«
/
» pour sélec
tionner le menu « Setup » (« Configuration »).
1. Appuyez sur le bouton « » pour sélectionner « OSD Language » (« Langue OSD »), puis sur
le bouton « / »
pour sélectionner la
langue OSD que vous
souhaitez.
2. Appuyez sur le bouton
« / » pour
sélectionner « Transparent »
(« Transparence »),
puis appuyez sur le
bouton « / » pour
sélectionner.
3. Appuyez sur le bouton
sélectionner « OSD Timeout »
l'interruption OSD.
4. Appuyez sur le bouton « / » pour
le bouton « ENTER/ »
« / » pour
(« Interruption OSD »), puis appuyez
sur le
bouton « / » pour régler
sélectionner « Closed Caption »
le bouton « ENTER/ » (« ENTRÉE/
(« Sous-titrage »), puis
appuyez sur
appuyez sur
») pour accéder au sous-menu.
21
Page 75

a. Appuyez sur le bouton «
/ » pour sélectionner « CC Mode » (« Mode de sous-titrage »),
puis appuyez sur le bouton « / » pour régler.
b. Appuyez sur le bouton « / » pour sélectionner « Anal og CC » (« Sous-titrage analogique »),
puis appuyez sur le bouton « / » pour régler.
c. Appuyez sur le bouton « / » pour sélectionner « Digital CC » (« Sous-titrage numérique »),
puis appuyez sur le bouton « / » pour régler.
d. Appuyez sur le bouton « / » pour sélectionner « Option » (« Option »), puis appuyez sur le
bouton « ENTER/ » (« ENTRÉE/ ») pour accéder au sous-menu.
Remarque : La fonction c、d n'est disponible qu'en mode DTV.
Remarque : L'option est d'ajuster le réglage de sous-titrage numérique.
(a). Appuyez sur le bouton
« / » pour sélectionner « Mode » (« Mode »), puis appuyez sur le
bouton « / » pour régler.
(b). Appuyez sur le bout on « / » pour sélectionner « Font Style » (« Style de police »), puis
appuyez sur le bouton « / » pour régler.
(c). Appuyez sur le bouton « / » pour sélectionner « Font Size » (« Taille de la police »), puis
appuyez sur le bouton « / » pour régler.
(d). Appuyez sur le bout on « / » pour sélectionner « Font Edge Style » (« Style de bordure de
police »), puis appuyez sur le bouton « / » pour régler.
(e). Appuyez sur le bouton « / » pour sélectionner « Font Edge Color » (« Couleur de bordure
de police »), puis appuyez sur le bouton « / » pour régler.
(f). Appuyez sur le bouton « / » pour sélectionner « FG Color » (« Couleur FG »), puis appuyez
sur le bouton « / » pour régler.
(g). Appuyez sur le bout on « / » pour sélectionner « BG Color » (« Couleur BG »), puis
appuyez sur le bouton « / » pour régler.
(h). Appuyez sur le bout on « / » pour sélectionner « FG Opacity » (« Opacité FG »), puis
appuyez sur le bouton « / » pour régler.
(i). Appuyez sur le bouton « / » pour sélectionner « BG Opacity » (« Opacité BG »), puis
appuyez sur le bouton « / » pour régler.
Remarque : Toutes les options ne sont pas disponibles dans Custom (Personnalisé).
5. Appuyez sur le bouton « / » pour sélectionner « Input Label » (« Étiquette d'entrée »),
puis appuyez sur le bouton « ENTER/ » (« ENTRÉE/ ») pour accéder au sous-menu.
22
Page 76

Remarque:
L'étiquette
sour
ce est Créer
des étiquettes
pour les appareils
connectés à votre téléviseur.
6. Appuyez sur le bouton
« / »
pour
sélectionner
Settings »
(« Autres réglages »),
pour accéder au sous-menu.
a. Appuyez sur le bouton « / » pour sélectionner « Audio Only » (« Audio uniquement »),
puis appuyez sur le bouton « / » pour sélectionner « On » (activer) or « Off »
(désactiver).
b. Appuyez sur le bouton « / » pour sélectionner « Blue Screen » (« Écran bleu »), puis
appuyez sur le bouton « / » pour sélectionner « On » (activer) or « Off » (désactiver).
7. Appuyez sur le bouton « / » pour sélectionner « Restore Default » (« Restaurer la
configuration par défaut »), puis sur « ENTER/ »
et sélectionnez
par défaut.
8. Appuyez sur le bouton « / » pour sélectionner « Setup
wizard » (« Assistant de configuration »), puis appuyez sur le bouton « ENTER » (« ENTRÉE »)
pour accéder au sous-menu.
« Other
puis
appuyez sur le bouton
»
« ENTER/
(« ENTRÉE/ »)
« Oui » pour rétablir tous les réglages .
(« ENTRÉE/ ») et sur le bouton « / »
23
Quand sélectionner "On", seulement écouter le son et l'écran est noir; Quand sélectionner
"Off", regarder la télévision normalement.
Page 77

a. Appuyez sur le bouton « /
» pour sélectionner « Menu Language » (« Langue du menu »),
puis appuyez sur le bouton « / » pour sélectionner la langue.
b. Appuyez sur le bouton « / » pour sélectionner « Go to next step » (« Passer à l'étape
suivante »), puis appuyez sur le bouton « ENTER/ » (« ENTRÉE/ ») pour accéder à l'étape
suivante.
c. Appuyez sur le bouton «
/ » pou
r
sélectionner « Time Zone » (« Fuseau horaire »), puis
appuyez sur le bouton « / » pour sélectionner.
d. Appuyez sur le bouton « / » pour sélectionner « Daylight Saving Time » (« Heure
avancée »), puis appuyez sur le bouton « / » pour sélectionner « On » (activer) or « Off »
(désactiver).
e. Appuyez sur le bouton « / » pour sélectionner « Time Format » (« Format de l’heure »),
puis appuyez sur le bouton « / » pour sélectionner « 12-hour » (« 12 heures ») ou « 24-hour »
(« 24 heures »).
f. Appuyez sur le bouton « / » pour sélectionner « Go to next step » (« Passer à l'étape
suivante »), puis appuyez sur le bouton « ENTER/ » (« ENTRÉE/ ») pour accéder à l'étape
suivante.
24
Page 78

g. Appuyez sur le bouton « / » pour
sélectionner « Air/Cable » (« Antenne/Câble »), puis
appuyez sur le bouton « / » pour sélectionner « Air » (« Antenne ») ou « Cable » (« Câble »).
h. Appuyez sur le bouton « / » pour sélectionner « Go to next step » (« Passer à l'étape
suivante »), puis appuyez sur le bouton
« ENTER/ » (« ENTRÉE/ ») pour lancer la
recherche automatique.
Remarque : La recherche prendra une longue période de temps. Veuillez patienter !
LOCK (VERROUILLAGE)
Appuyez sur le bouton « MENU » pour accéder au
menu OSD . Ensuite, appuyez sur le
bouton «
/ » pour sélectionner le menu « L
ock » (« Verrouillage »).
1. Appuyez sur le bouton « » pour sélectionner « Enter Password » (« Saisir mot de passe »),
puis appuyez sur le bouton numérique de sélection pour saisir.
Remarque: Le mot de passe par défaut est « 0000 »
25
Page 79

2. A
p
puyez sur le bouton ▼ / ▲ pour sélectionner « Change Password » (« Changer mot de
passe »), puis appuyez sur le bouton « ENTER/
» (« ENTRÉE/
») pour régler la valeur.
Si le mot de passe est changé, tous les mots de passe dans le menu changeront en même temps.
Remarque : Si vous oubliez
votre mot de passe, vous
pouvez utiliser « 1470 » pour
accéder à n'importe quel
menu verrouillé.
3. Appuyez sur le bouton
«
/
» p
our sélectionner
« System Lock »
(« Verrouillage du
système »), puis appuyez sur
le bouton «
/
»
pour
sélectionner « On » (activer)
or « Off » (désactiver).
4. Appuyez sur le bouton
/
pour sélectionner « Input Block » (« Verrouillages d'entrée »), puis
appuyez sur le bouton « ENTER/
» (« ENTRÉE/
») pour accéder au sous-menu.
a. Appuyez sur le bouton «
/
»
pour sélectionner « TV » (« Téléviseur »), puis appuyez sur
le bouton «
/ »
pour sélectionner « Block » (Bloquer) or « Unblock » (Débloquer).
b. Appuyez sur le bouton «
/ »
pour sélectionner « AV » (« AV »), puis appuyez sur le
bouton «
/
»
pour sélectionner « Block » (Bloquer) or « Unblock » (Débloquer).
c. Appuyez sur le bouton «
/
» pour sélectionner « Comp
onent » (« Composant »), puis
appuyez sur le bouton «
/
»
pour
sélectionn
er « Block » (Bloquer) ou
« Unblock » (Débloquer).
d. Appuyez sur le bouton «
/
»
pour sélectionner « HDMI »
(« HDMI »), puis a
ppuyez sur le
bouton «
/
»
pour sélectionner «
Block » (Bloquer) or « Unblock »
(Débloquer).
e. Appuyez sur le bouton «
/
»
26
Page 80

pour sélectionner «
PC » (« Ordinateur »), puis appuyez sur le bouton «
/
» pou
r sélectionner
« Block » (Bloquer) or « Unblock » (Débloquer).
5. Appuyez sur le bouton « / » pour sélectionner « US Rating » (« Classifications États-Unis »),
puis appuyez sur le bouton « ENTER/ » (« ENTRÉE/ ») pour accéder au sous-menu.
a. Appuyez sur le bouton « / » pour sélectionner « TV » (« Téléviseur »), puis appuyez sur le
bouton « ENTER/ » (« ENTRÉE/ ») pour accéder au sous-menu.
A
ppuyez sur l
e b
out
on «
/ » pour
sélectionner, puis appuyez sur « ENTER » (« ENTRÉE »)
pour bloquer ou débloquer.
b. Appuyez sur le bouton «/ » pour sélectionner « MPAA » (« MP AA »), puis appuyez sur le
bouton « / » pour sélectionner « Off/G/PG/PG-13/R/NC-17/X ».
6. Appuyez sur le bouton « / » pour sélectionner « Canada Rating » (« Classifications
Canada »), puis appuyez sur le bouton « ENTER/ » (« ENTRÉE/ ») pour accéder au
sous-menu.
a. Appuyez sur le bouton «/ » pour sélectionner « Canada English » (« Anglais du
Canada »), puis appuyez sur le bouton « / » pour sélectionner « Off/C/C8+/G/PG/14+/18+ ».
b. Appuyez sur le bouton «/ » pour sélectionner « Canada French » (« Français du
Canada »), puis appuyez sur le bouton « / » pour sélectionner «
Off/G/8ans+/13ans+/16ans+/18ans+ ».
7. Appuyez sur le bouton « / » pour sélectionner « RRT Setting » (« Réglage RRT »), puis
appuyez sur le bouton « ENTER/ » (« ENTRÉE/ ») pour accéder au sous-menu.
27
Page 81

Remarque : L'élément est disponible uniquement lorsque le flux actuel possède des données de
classification téléchargeables.
8. Appuyez sur le bouton « / » pour sélectionner « Reset RRT » (« Réinitialiser RRT »), puis
appuyez sur le bouton « ENTER/ » (« ENTRÉE/ ») pour réinitialiser.
Channel (Chaîne)
Appuyez sur le bouton «
MENU » pour accéder au menu OSD . Ensuite, appuyez sur le bouton
«
/
» pour sélectionner
le menu « Channel » (« Chaîne »).
1. Appuyez sur le bouton
«
» pour sélectionner
« AIR/CLABLE »
(« AN
TENNE/CÂBLE »),
puis appuyez sur le bouton
«
/
» pour
sélectionner Cable (C
âble)
ou Air (Antenne)
2. Appuyez sur le bouton
« / » pour sélectionner
« Balayage automatique »,
puis appuyez sur le bouton
« ENTER/
»
« ENTRÉE/
»
le bouton «
/
» pour sélectionner « YES » («
OUI
») puis sur « ENTER »
pour effectuer la recherche automatique.
3. Appuyez sur le bouton « / » pour sélectionner « Favorite » (« Favori »), puis appuyez sur le
bouton « ENTER/
» (« ENTRÉE/ ») pour y accéder.
4. Appuyez sur le bout
on « / » pour sélectionner « Channel list » (« Liste des chaînes »), puis
appuyez sur le bouton « ENTER/
» (« ENTRÉE/ ») pour y accéder.
5.
Appuyez sur le bouton «/ » pour sélectionner « Show/Hide » (« Afficher/Masquer »), puis
appuyez sur le bouton « ENTER/
» (« ENTRÉE/ ») pour y accéder.
6. Ap
puyez sur le bouton « / » pour sélectionner « Channel Number » (« Num éro de cha îne ») ,
puis appuyez sur le bouton «
/
» pour régler.
7. Appuyez sur le
bouton « / » pour sélectionner « Channel Label » (« Étiquette de chaîne »),
pour y accéder ; appuyez sur
(« ENTRÉE »)
puis appuy
ez sur le bouton « ENTER/
» (« ENTRÉE/ ») pour y accéder.
28
Page 82

Paramètr
es d'ordinateur
Appuyez sur le bouton « M
ENU » pour accéder au menu OSD . Ensuite, appuyez sur le bouton
«
/
» pour sélectionner
le menu « Setup » (« Configuration »). Appuyez sur le bouton « »
pour sélectionner « PC Setting » (« Paramètres d'ordinateur »), puis appuyez sur le bouton
« ENTER/
» (« ENTRÉE/ ») pour accéder au sous-menu.
1. Ap
puyez sur le bouton « /
» pour sélectionner « H-Pos » (« Position horizontale »), puis
appuyez sur le bouton «
/
» pour régler.
2. Appuyez sur le
bouton « / » pour sélectionner « V-Pos » (« Position verticale »), puis
appuyez sur le bouton «
/
» pour régler.
3. Ap
puyez sur le bouton « / » pour sélectionner « Clock » (« Horloge »), puis appu yez sur le
bouton «
/
»
pour régler.
4.
Ap
puyez sur le bouton « / » pour sélectionner « Phase » (« Phase »), puis appuyez sur le
bouton «
/
» pour régler.
5. Appuyez sur l
e bouton «/ » pour sélectionner « Auto » (« Automatique »), puis appuyez sur le
bouton « ENTER/
» (« ENTRÉE/ ») pour le réglage automatiqu
e.
Remarque: Les images illustrant la fonction sont fournies à titre de référence seulement.
29
Page 83

IMPOR
TANT
1. Débranchez l'appareil de la prise murale avant de procéder au nettoya
ge.
2. Do not use volatile solvent (alcohol, rosin, and toluene) to clean the TV. These
types of chemicals might damage the housing and the LED glass.
Nettoyage du cadran et de la télécommande
1. Utilisez un chiffon en microfibres ou 100 % coton pour le nettoyage.
2. Si la télécommande ou le cadran est sale au point où vous ne pouvez pas tout
simplement l'essuyer avec un chiffon sec, veuillez humecter le chiffon (le chiffon
ne doit pas être mouillé, parce que si de l’eau s’écoule dans le panneau, cela
provoquera un dysfonctionnement et possiblement des dommages
permanents au panneau qui n’est pas sous garantie) avec de l'eau propre et
essuyez de nouveau. Essuyez ensuite l'écran avec un chiffon en microfibres ou 100
% coton sec.
Veuillez noter :
Assurez-vous que vous vous tordez le chiffon avant de nettoyer le
cadran ou la télécommande afin d'empêcher l'eau de pénétrer dans le
circuit électronique.
Nettoyage de l'écran
1. Utilisez un chiffon en microfibres ou 100 % coton pour le nettoyage.
2. La vitre de l'écran ACL est extrêmement fragile. Ne la rayez pas avec rien.
N’appuyez pas sur l'écran, ni ne le tapotez pas, pour qu’il ne se fissure pas.
Lorsque l'écran est sale au point où vous ne pouvez pas tout simplement le nettoyer
avec un chiffon sec, humectez le chiffon à l'eau claire et essuyez à nouveau.
Essuyez ensuite l'écran avec un chiffon en microfibres ou 100 % coton sec.
30
Dépannage
Nettoyage du téléviseur
Page 84

Le tableau suivant contient les problèmes communs et les solutions à ces problèmes. Veuillez
consulter cette liste avant de contacter les techniciens.
Problèmes Solutions
PAS D'IMAGE
Branchez le cordon d'alimentation correctement.
Mettez sous tension.
Branchez le câble vidéo correctement.
Sélectionnez la source du signal d'entrée avec le câble de raccordement
approprié à l’aide du bouton source.
COULEURS
ANORMALES
Faites correspondre les couleurs des câbles aux ports à l’arrière de du
téléviseur. Exemple : câble rouge au port de couleur rouge.
L’IMAGE EST
TROP
OBSCURE
Réglez les paramètres de contraste, de lum
inosité et la lampe dans le menu
OSD. Pour le réglage des commandes.
SEULEMENT
SON, SANS
IMAGE
Assurez-vous que vous avez connecté à la fois les câbles audio et vidéo.
Le signal du syntoniseur de la TV ne doit pas être inférieur à 65 %.
SEULEMENT
IMAGE SANS
SON
Assurez-vous que le câble audio est connecté.
Réajustez le volume à l’aide de la télécommande.
Le signal du syntoniseur de la TV ne doit pas être inférieur à 65 %.
LA
TÉLÉCOMMAN
DE NE
FONCTIONNE
PAS
Éteignez le téléviseur, puis débranchez-le de la prise. Sortez les piles de la
télécommande pendant 30 minutes. Appuyez sur les bouto
ns de la
télécommande etsur le bouton de marche/arrêt au hasard pendant 2
secondes, puis réinsérez les piles. Faites la probe de la télécommande pour
voir si elle fonctionne. Pour des instructions de retrait des piles.
Le télé-capteur du téléviseur est également situé dans le même endroit que
la lampe témoin. Veuillez vous assurer qu'il existe une connexion directe
entre le télé-capteur avant de la téléco
mmande et le télé-capteur du
téléviseur.
INCAPABLE
DE RECEVOIR
UN NOMBRE
INSUFFISSANT
DE CHAÎNES
par le
SYNTONISEUR
ATSC/NTSC
Le signal du syntoniseur de la TV ne doit pas être inférieur à 65 %.
Changez l’or
ientation de votre antenne et balayer de nouveau vos chaînes.
Si vous avez de la télévision par câble, appelez votre compagnie de câble et
renseignez-vous sur la force du signal de votre fournisseur local.
PAS DE
COULEUR
Veuillez ajuster votre configuration d'image et assurez-vous que la
saturation et le RVB ne sont pas dim
inués complètement. Pour les
commandes de réglage.
Le signal du syntoniseur de la TV ne doit pas être inférieur à 65 %. Vérifiez
votre signal.
Signal faible ou
pas DE
SYMBOLE DE
PROGRAMME
À L'ÉCRAN
Le signal du syntoniseur de la TV ne doit pas être inférieur à 65 %.
Changez l’orientation de votre antenne et balay
er de nouveau vos chaînes.
Si vous avez de la télévision par câble, appelez votre compagnie de câble et
renseignez-vous sur la force du signal de votre fournisseur local.
CODE POUR
TÉLÉCOMMA
NDE
UNIVERSELL
E DU
TÉLÉVISE
UR
Ce téléviseur fonctionne d’après le code pour télécommande
universelle NEC. Pour trouver le code réel vous devez parcourir le
guide de votre télécommande universelle.
Dépannage
Dépannage
31
Page 85

Problèmes Solutions
LES CHAÎNES de
TÉLÉVISION sont
BLOQUÉES
Vérifiez les paramètres de votre fonction de verrouillage automatique dans l'OSD.
Vous avez peut-être verrouillé quelques chaînes, mais en avez oublié.
CODE POUR
TÉLÉCOMMAND
E UNIVERSELLE
Ce téléviseur fonctionne d’après le code pour télécommande universelle NEC.
Veuillez consulter votre guide pour les codes NEC, puis les appliquer.
LE TÉLÉVISEUR
S’ALLUME OU
S’ÉTEINT
LENTEMENT ET
L'ÉCRAN
S’AFFICHE
LENTEMENT
Ce téléviseur est un téléviseur haute définition à panneau d’affichage de cristaux
liquides. Il nécessite quelques secondes plus que les téléviseurs normaux pour
s’allumer et montrer l'imag
e.
PAS DE SON SUR
L’ORDINATEUR
Assurez-vous que vous disposez d'un câble mini-prise de 3,5 mm connecté de la
sortie audio de votre ordinateur à l'entrée VGA STÉRÉO du téléviseur.
HDCP VIDÉO
INDIQUE QUE
HDCP N’EST PAS
PRIS EN
CHARGE
Redémarrez v
otre appareil vidéo HDCP, en l’éteignant, puis en débranchant le
cordon d'alimentation. Attenez jusqu'à 8 minutes pour brancher l'appareil sous
tension pour voir s’il fonctionne ou non.
HDCP VIDÉO
N’A PAS DE SON
Assurez-vous que vous disposez d'un câble mini-prise de 3,5 mm connecté de la
sortie audio de l’appareil vidéo HDCP à l'entrée VGA
STÉRÉO du téléviseur. Si
votre appareil vidéo HDCP utilise des prises RCA audio, vous devrez obtenir un
RCA audio converti en câble mini-prise de 3,5 mm.
NE PEUX PAS
OBTENIR
1360X768 SUR
VGA
ORDINATEUR
Assurez-vous que le téléviseur est reconnu comme moniteur ‘plug
and play’.
Essayez de mettre à jour les pilotes de votre carte vidéo aussi. Si cela n'aide pas, le
plus probable vous devez remplacer votre carte vidéo avec une carte plus récente.
L’IMAGE EST
DÉFORMÉE OU
EST
ACCOMPAGNÉE
D’UN SON
ANORMAL
Cela pourrait être le résultat de l’interférence de grands appareils électriques,
voitures, motos, ou les lampes fluorescentes. Si le téléviseur est proche du m
ur,
essayez de le déplacer dans une autre pièce de votre maison pour voir si le
problème persiste.
L’IMAGE NE
COUVRE PAS
TOUT L'ÉCRAN
Si vous utilisez HDMI ou une chaîne de télévision numérique assurez-vous que
vous utilisez le bouton ASPECT pour pas
ser au format 16:9. Si vous utilisez
VGA, utilisez la fonction de rÉglage automatique pour adapter l’image à l'écran.
Veuillez noter : Si vous utilisez régulièrement la télévision analogique, AV, ou un
composant ayant la résolution 480i, utilisez le bouton ASPECT pour passer au
format 16:9 afin de remplir l'écran. Veuillez noter : Veuillez noter que cette
fonction déformera l'image.
LA QUALITÉ DE
L’IMAGE EST
HORRIBLE !
Pour une meilleure qualité de l'image, regarder des programmes HD à écran large
où possible. Si le contenu HD n'est pas disponible, voir «
Définition standard » à
partir d'une source numérique. En standard, la télévision analogique sera toujours
sensiblement inférieure à la HD parce que votre téléviseur est doté du vidéo qui
est beaucoup mieux que l'ancien téléviseur, donc vous pouvez voir les
interférences et les carences que vous ne saviez pas que vous aviez.
L’IMAGE A DES
PIXELS QUI
AFFICHENT
TOUJOURS LA
MÊME COULEUR
Votre téléviseur est fabriqué en utilisant un niveau extrêmement élevé de
technologie de précision, cependant, il est possible que certains pixels ne
s’
allument pas sur votre téléviseur. C’est une propriété structurale de la
technologie de l’affichage à cristaux liquides, et n’est pas un signe de défaut de
fonctionnement.
JE NE PEUX PAS
CHANGER
L’HEURE
MANUELLEMEN
T
Votre téléviseur synchronise l'heure auto
matiquement en fonction de votre chaîne
de télévision locale. Cette fonction fonctionne seulement lorsque le syntoniseur
du téléviseur est relié à une antenne.
32
Page 86

Problèmes
LA
COMMUTATIO
N D’
UNE
CHAINE OU
D’UNE SOURCE
CHANGE LE
VOLUME
De différentes chaînes et entrées auront parfois cet effet parce que le volume
propre du signal de la chaîne est déjà fort. Il n'existe aucun moyen de le
supprimer complètement. La télévision a une fonction de niveau
automatique du volume qui peut lutter contre ce type d'effet. Veuillez vous
assurer que cette fonction est activée.
IL Y A DU
BRUIT ET DES
PARASITES SUR
L'
ÉCRAN
Lorsque la résolution de votre téléviseur est plus élevée que la résolution de
diffusion de la chaîne numérique, le signal est converti (augmenté) pour
correspondre à la résolution de votre téléviseur. L’augmentation peut
provoquer ce type d'effet.
CONSEILS
POUR LES
UTILISATE
URS
DE LA HAUTE
DÉFINITION
La TV est une plateforme idéale pour la visualisation du contenu Haute
Définition. La meilleure qualité d'image peut être obtenue par la prise
HDMI, YPbPr (Composante), puis VGA. Toutefois, en raison des écarts
dans les pratiques de diffusion, il est possible que certaines distorsions de
l'image se produisent.
CONSEILS
POUR LES
UTILISATE
URS
DU CONTENU
DE L’ÉCRAN
LARGE
Les versions de films sur DVD Letterbox (écran large) sont le plus souvent
formatées pour les téléviseurs 4:3 standards. La télévision a la possibilité
d'étendre ce contenu de sorte que tout l'écran soit rempli, au détriment de la
proportion de l'image. Pour utiliser cette fonction, appuyez sur le bouton
aspect de la télécommande et testez les options disponibles.
JE NE PEUX PAS
TROUVE
R LES
VOLUMES DE
VOLUME E
T DE
CHANGEMENT
DES CHAINES
Ces boutons sont représentés par les boutons ▲▼ ◄► de la télécommande.
Les ▲▼changent les chaînes et les ◄► changent le volume.
LE TELEVIS
EUR
S’ETEINT
AUTOMATIQUE
MENT APRES 5
MINUTES
Le téléviseur dispose d'un mode d'économie d'énergie qui l’éteint
automatiquement s'il n'y a pas de signal fourni pendant plus de 5 minutes.
L’IMAGE TV
EST TRES
FAIBLE
Vérifiez si vous êtes en m
ode d’Économie d'Énergie quant au mode d'image.
Continuez à appuyer sur le bouton IMAGE de télécommande pour faire
désactiver l’Économie d'Énergie.
GRAN
DE BOITE
NOIRE AU
MILIEU D
EL’ECRAN
Vous avez activé le sous-titrage et vous utilisez TEXTE1 - TEXTE4. Changez le
réglage à CC
1 ou désactivez le sous-titrage et la boîte disparaîtra.
33
Solutions
Page 87

Panneau d'affichage
Point
Illustration
Taille de la zone active / de
l'écran
Diagonale de 39 pouces
Format Écran large 16:9
Distance entre pixels 0,5303 (H) x R VB x 0,5303 (V) um par une triade
Max. de pixels (résolution) Résolution FHD (1920 x 1080 pixels )
Luminosité 280 nits (typique)
Contraste 1500:1 (typique) avec augmentation automatique du contraste
Durée de réponse 8 ms (gris à gris)
Angle de vision
Typiquement 178/178 degrés
(Horizontal /Vertical)
Durée de vie du projecteur de
fond
> 30,000 h
AFFICHAGE TV
Dimension
36.60 po x 21.64 po x 3.35 po (sans support)
36.60 po x 24.10 po x 8.74po (avec support)
Poids
24.96lb
Entrée d’alimentation 100 CA – 240 V, 60/50 Hz, 3 A (max.)
Fonction
(1) Vidéo
Non-entrelacement 3D
Rétablissement cadre 3:2
Technologie de base pour
réduire le bruit
3D
Format Large, Normal, Cinéma , Zoom
Ga
mma Gamma fixe
Réglage lampe Oui
Mode image
Réglage vidéo Luminosité / Contraste / Couleur / Teinte / Netteté
Spécifications
Dépannage
Spécifications
Standard / Doux / Économie d'énergie / Utilisateur / Dynamique
••••
Page 88

Mode a
udio
Cont
rôle automatique du
volume
Oui
Tonne
Sortie SPDIF Oui
(coaxial)
Haut
-parleurs 6 watts par chaîne
(3) Général
Tu
ner TV hybride NTSC / ATSC / QAM (Câble Numérique Prêt)
Balayage automatique des
chaînes
Oui
Minuteur de
mise en veille
Énergie en mode veille
Sous 1 W
Aide
synchronisation vidéo 480i / 480p / 720p / 1080i / 1080p
Calendrier ordinateur
1920*1080
à 60 Hz (natIF)
1024*768 à 60
800*600 à 60
640*480 à 60
720x400 à 70
(4) NTSC/ATSC
NTSC
Son : Mono / Stéréo / SAP
Chaîne
favorite
puce antiviolence
Sous-titrage codé
(CC1-CC4,
Texte 1-Texte 4)
ATSC
Chaîne favorite
puce antiviolence
Format d
'entrée vidéo : 1080i, 720p, 480p, 480i
Sous-ti
trage analogique :
(CC1-CC4, Texte 1-Texte 4)
Sous-titrage numérique :
(Service 1-Service 6)
(5) E/S
1 ent
rée x Syntoniseur TV (NTSC/ATSC),
1 entrée x AV,
1 entrée x YPbPr (audio partagé avec AV)
3 entrées x HDMI / HDCP (en option, HDCP audio partagée avec l’entrée
audio VGA),
1 entrée x VGA,
1 entrée x entrée audio VGA,
1 entrée x sortie SPDIF (audio numérique),
1 entrée x sortie casque,
*Le
s spécifications du produit peuvent changer sans préavis ni obligation.
**Les images et mots de ce manuel sont pour référence uniquement et sont sujettes à
modification sans préavis ni obligation.
(2) Audio
Musiqu
e / Standard / Cinéma / Utilisateur / Sport
150 Hz / 500 Hz /1 KHz / 5 KHz/ 10 KHz /Balance
Arrêté / 5 minutes/10 minutes/15 minutes/30 minutes/60 minutes/
90 minutes/120 minutes/180 minutes/240 minutes
35
1
entrée )ecafretni ACR( oidua L/R x
)esires ruop tnemeuqinu( nE x BSU eértne 1
Page 89

Ce dispositif est conforme à la partie 15 de la réglementation FCC.
Le fonctionnement est soumis aux conditions suivantes :
Cet appareil
ne doit pas générer d'interférences nuisibles
Cet appareil accepte toute interférence reçue, y compris les interférences qui peuvent perturber
son fonctionnemen.
Veuillez noter : Ce matériel a été mis à l'essai et respecte les limites concernant les équipements
numériques de classe B, conformément à la partie 15 de la réglementation FCC. Ces limites
sont conçues pour offrir une protection raisonnable contre le brouillage nuisible dans une
résidence. Cet appareil génère, utilise et peut émettre des signaux radioélectriques. En outre,
s’il n’est pas installé et utilisé conformément aux instructions, il peut provoquer des
interférences génantes pour les communications radio. Toutefois il n'existe aucune garantie que
ces interférences n'interviendront pas dans une installation particulière. Si cet équipement
provoque effectivement des interférences préjudiciables à la réception radiophonique ou
télévisuelle, ce que l'on peut vérifier en éteignant et en rallumant l'appareil, l'utilisateur est
invité à essayer de les corriger en suivant l'une des procédures ci-dessous :
Réorienter ou déplacer l'antenne de réception.
Augmenter la distance entre l'équipement et le récepteur.
Connecter l'équipement dans une prise d'un circuit d'alimentation différent de
celui auquel le récepteur est connecté.
ATTENTION : Pour respecter limites d’un appareil informatique FCC de classe B,
utilisez toujours le câble de signal et le cordon d'alimentation fournis avec cet appareil.
La Commission des communications fédérales avertit que les changements ou modifications
apportées à l'unité n'étant pas expressément approuvés par la partie responsable de la
conformité pourrait annuler l'autorité de l'utilisateur de faire fonctionner l'équipement.
Déclaration de conformité FCC
Dépannage
Déclaration de conformité FCC
36
Page 90

Hé!
laissez-nous commencer
Page 91

Roku Streaming Stick
TM
Ce dont vous avez besoin
Internet haute vitesse Routeur sans fil
37
Page 92

App
renez à connaître votre clé streaming
[CONNECTEUR MHL] Se branche sur le port MHL sur
le dos de votre téléviseur.
[VOYANT D'ÉTAT] Lorsqu'il est allumé, la clé est
active ; lorsqu'il clignote, il y a une activité.
[BOUTON DE RÉINITIALISATION] Permet de
réinitialiser votre clé streaming
38
Page 93

M
arche à suivre
Brancher
Branchez votre clé streaming Roku dans le port MHL du
téléviseur prêt à utiliser Roku.
C’est aussi simple que ça.
39
Page 94

Se connecte
r au réseau
Maintenant, vous pouvez saisir votre télécommande et
passer directement à la configuration guidée. Ayez votre
nom de réseau et mot de passe prêts et effectuez les
opérations suivantes :
• Sélectionnez votre réseau dans la liste des réseaux
disponibles ;
• Entrez le mot de passe de votre réseau, si vous en avez
un. N'oubliez pas que le mot de passe est sensible à la
casse.
40
Page 95

Ma
rche à suivre (suite)
Terminer la configuration guidée
Il s'agit de la dernière étape et elle est simple comme
bonjour ! Continuez de suivre les directives à l'écran pour :
• Obtenir la dernière version du logiciel ;
• Relier la clé streaming Roku à votre compte Roku sur
votre ordinateur.
41
Page 96

V
otre compte Roku :
Lors de la configuration guidée, on vous
demande de créer un compte Roku en
ligne à l'adresse roku.com/link. Votre clé
streaming Roku génère alors un code unique qui relie votre
lecteur à votre nouveau compte. Les comptes Roku sont
gratuits et sécurisés. De plus, bien qu'un numéro de carte
de crédit soit nécessaire à la création de votre compte,
seuls les achats de chaînes et de jeux que vous autorisez
dans le magasin « Channel Store » de Roku vous seront
facturés.
42
Page 97

Dép
annage
Avez-vous de la difficulté à terminer la configuration
guidée ?
Ne vous inquiétez pas : ce n'est généralement pas dif ficile à
régler.
S'il n'y a pas d'image sur votre téléviseur :
• Assurez-vous que votre téléviseur est en fonction. (Ce
truc pourrait vous éviter des embarras).
• Assurez-vous que l'entrée vidéo de votre téléviseur ou
récepteur de cinéma maison correspond à la sortie
(généralement HDMI ou MHL) utilisée pour brancher la clé
streaming Roku. La plupart des télécommandes de
téléviseurs ont un bouton Input (Source) pour modifier
l'entrée vidéo.
43
Page 98

Si vou
s n'arrivez pas à vous connecter à votre réseau
sans fil lors de la configuration guidée :
• S'il n'y a pas au moins 3 barres de puissance du signal
au-dessus de votre réseau sans fil, modifiez l'emplacement
de votre clé streaming Roku et/ou routeur sans fil.
Assurez-vous qu'il n'y a pas d'obstruction, comme un mur
de ciment, entre votre clé streaming Roku et votre routeur
sans fil.
• Assurez-vous de sélectionner le bon nom de réseau
sans fil à l'écran « Choisir le réseau sans fil ».
44
Page 99

Dép
annage (suite)
• Si votre réseau est sécurisé, assurez-vous d'avoir entré
le bon mot de passe (le mot de passe est sensible à la
casse).
• Si vous avez désactivé la d iffusion SSID de votre routeur
sans fil, vous pouvez ajouter votre réseau en sélectionnant
« Mon réseau n'est pas montré » dans l'écran « Sans fil ».
Si vous ne pouvez pas entendre le son :
• Assurez-vous que les connecteurs des câbles reliant
votre clé streaming Roku et votre téléviseur ou récepteur
de cinéma maison sont bien enfoncés.
45
Page 100

(su
ite)
• Assurez-vous que le volume de votre téléviseur ou de
votre récepteur de cinéma maison n'est pas en mode
sourdine.
46
 Loading...