

Page 1

LCD TV
RLCVD1924
INSTRUCTION MANUAL
Page 2
Table of Contents
Safety Information
Important Safety Precautions
INSTALLATION
Front/Back panel diagram
Remote Controller
Battery Installation
Using the Remote Control
Install TV
Set your TV
Connect Antenna and power
Turn On TV
PICTURE MENU
SOUND MENU
TUNE MENU
FUNCTION MENU
2
3
4-6
7-8
9-10
11
12-13
13
13
14
14
PARENT CONTROL
CHANGE PASSWORD
TV RATOMG
OSD MENU
PC MENU
COLOR TEMP
GEOMETRY
DVD Setup
RESOLUTION
HELP
SPECIFICATIONS
15
15
16
16
16
17
17
18-24
25
26
27
1
Page 3
2
Page 4

Read these instructions
Keep these instructions
Heed all warnings
Follow all instructions
.
.
.
.
Please refer to the specification sheet on page for the character of this TV set
Do not break the earth pin of the plug if the plug can not fit the electrical outlet
,,
21
.
.please turn to the professional for help
Please unplug the TV power cord when the following conditions occur
When there is a thunder storm Please pull out the power cord and antenna
-- ( )
When Cleaning the TV set
--
When the TV set not used for a long time
-- .
Do not use corrosive depurative when cleaning the TV set
Do not put the TV set under direct sunlight or near to the heat
Do not put the naked light for example the lighting candle or the heater on the top of or
near to the TV set
.
Leave plenty of space at least cm around the TV set for ventilation
,, ,
()
1.0
.
.
Put the TV set away from where it can be ruined by the rain or water for example near
the window
Do not put the container with liquid like a vase on the top of the TV set
Don t move away the TV set when turning on the power
'.
Don t touch push and scratch the surface of TV set with hard stuff
', .
When the TV surface is dirty please use the wetting cotton cloth or soft cloth with
non corrosive cleanser to clean it carefully Don t use the acetone toluene or alcohol to
-.',
clean the TV sets
.)
() .
,
.
:
,( ,
Be careful of the hydrosphere coagulation due to the temperature changing The
coagulated hydrosphere will damage inner electronic components When the coagulated
hydrosphere disappears the TV screen may appear blur or spot
Be sure to ask technicians to install the TV sets on the wall The incorrect installations will
put the TV sets into the unsafe situation
Don t let the children climb up the TV sets or play near it in order to avoid being spilled from
'
he TV sets or the TV sets damaged the children when falling down
t
Don t hit the panel with hard object uch as high speed football or other objects to
'(-)
prevent the panel from damages
Don t cover the TV sets with quilts or other objects when it is working Keep the heats
' .
dissipate and keep away from the fire
,.
.
.
sS
.
.
.
.
.
3
Page 5
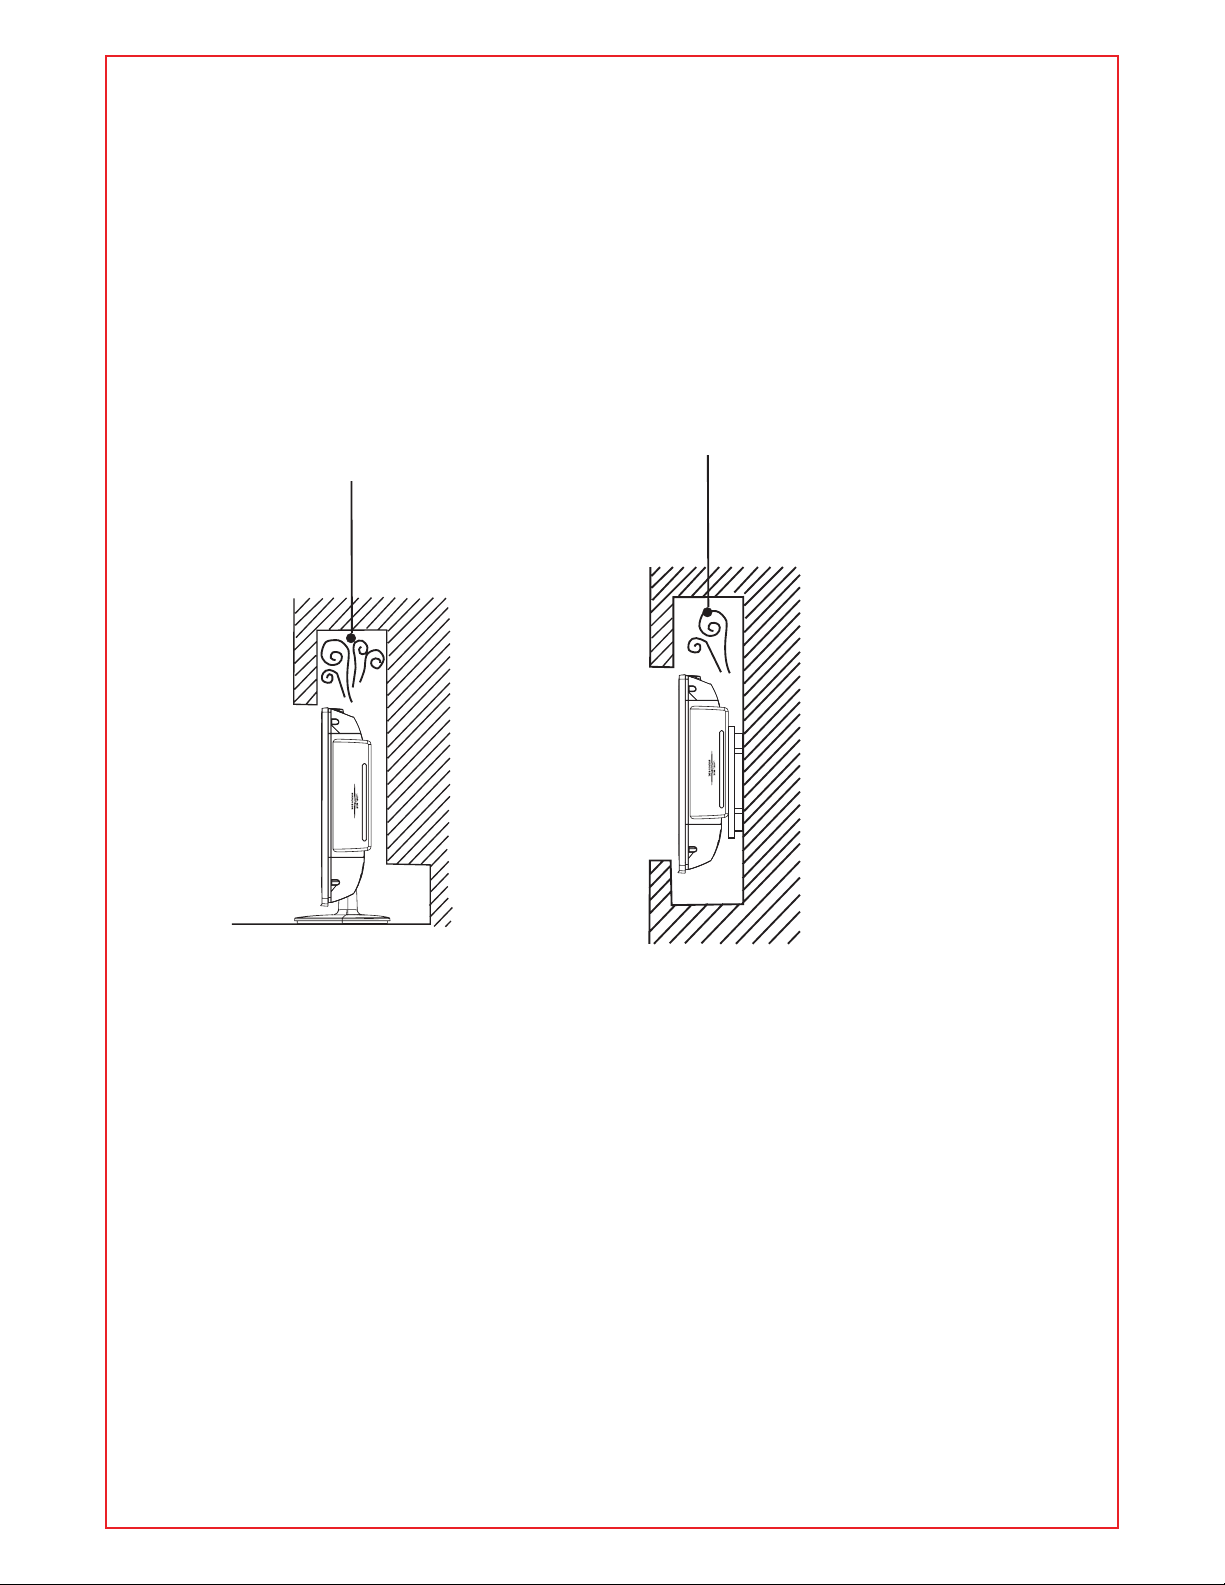
INSTALLATION
STANDARD INSTALLATION
The TV can be installed in various ways such as on a wall, or on a desktop etc.
10inches
10inches
10inches
10inches
10inches
The TV is designed to be mounted horizontally.
Ensure that you connect the earth ground wire to prevent possible electric shock.
if grounding methods are not possible, have a qualified electrician install a
separate circuit breaker.
Power
Supply
Short-Circuit
Breaker
Do not try to ground the unit by connceting it to telephone wires, lightening rods
or gas pipes.
a. Desktop Pedestal Installation
This is the default installation way of the TV.
4
Page 6
STANDARD INSTALLATION
b. Wall Mount: Horizontal installation
(1) Secure the wall brackets with the bolts(not provided as parts of the product, must
purchase separately) on the wall.Match the height of the bracket that is mounted on
the wall. The wall bracket is of nomal dimension. Please see the position of the wall
brackets bolts as follow picture. The actual dimension of the wall brackts bolt should
according to the products.
The wall brackets bolt position
75mm
75mm
Four Mounting
Holes
Size:M4 Screws
(2) Remove the table stand of the TV when install the TV on a wall as follow:
(3) For proper ventilation, allow a clearance of 10” on each side from the wall.
10inches
10inches
10inches
10inches
10inches
5
Page 7
NOTES OF WALL INSTALLATION
(1) Keep the TV stand for may be future use.
(2) Don’t set the TV set on shelves, carpets, beds, or closets.
(3) Don’t cover the TV with curtain or paper.
(4) Leave ventilation space to avoid the following:
No good for ventilation
No good for ventilation
6
Page 8
Front/Back panel diagram
DVD
7
Page 9
Front/Back panel diagram
9
INPUT
OUTPU T
VIDEORL
VIDEORL
11 1
S-VIDEO
YPbPr:Color difference
components input and relevant
video input
S-VIDEO: Color and brightness
difference components input.
AV Output
VGA/AUDIO: VGA audio input.
1415
22 2
P
r
VIDEORL
P
b
Y
HDM I
(3.5mm)
ANT 75 ohm: Connect the antenna to
the antenna input.
HDMI Input: Digital signal input from
HDMI video connector
14/15. VIDEO/R/L :1/2 external AV
signal input and relevant right/left
sound channel.
16. POWER(DC IN) Connect to Mains
Adapter
16
4A
8
Page 10

Remote Controller
1 Sets your TV to power on or standby mode.POWER :
2 Press to mute the sound. Press again or pressMUTE :
VOL+ to unmute.
3 0--9 Press 0~9 to select a TV channel directly while watching
TV. The channel will change after 2 seconds.Applicable for
entering page number in teletext mode and so on.
4 : Return to the previously viewed program.
5 Press to scan through or to select a channel.CH +/- :
6 Press to increase / decrease the sound level.V +/-:
7 -/-- Press this button to enter a program number for
different digit. eg. -/--/---
8 Press to display the source and channel's info.DISPLAY :
9
10 SOURCE: Press to list the source items.
11 SLEEP: Select amount of time before TV turn itself
off automatically.
12 E Exits from the menu or sub-menu and menus and adjustXIT:
the system settings to your preference.
13 MENU : Allows you to navigate the on-screen menus.
14 Press to cycle through the different picture settingsP.MODE::
15 Press to select the MTS mode.(for example,Nicam ,MTS::
BTSC,MONO,STEREO .eg )
16 S.MODE: Press to cycle through the different sound settings.
1B
3
748
+
MUTE
MTS
SOURCE
VOL
8
2
9
3
D
5B
5F
4B
7
4F
4
A
11
C
15
6
16
1010
E
1F
13
+
5
17
POWER
4
1
5
1
1
2
57
53
5
6
47
43
2
14
0
9
P.MODE S.MODE SLEEP
CH
13
MENU
7
-
VOL
9
ENTER
6
B
3
12
54
-
CH
DISPLAYEXIT
50
44
40
55
OPEN/CLOSE
PLAY/PAUSE
D.ENTER
STOP
PROG
41
45
SETUP
ZOOM
DISP
51
46
PREV NEXT REV FWD
42
56
AUDIO SUBTITLE ANGLE MENU/PBC
52
GOTO A-B REPEAT TITLE
8
58
5C
48
4C
59
5D
49
4D
4A
4E
5A
5E
F
CUSTOM CODE:007F
9
Page 11

Remote Controller
17/19/20/21/31.
ENTER
When the DVD menu or system menu display on the
TV screen and wait for selection, press these buttons
to select an item in a menu. Moves an enlarged picture
up/down/left/right.
Press this button to confirm a selection.
18
22
23
24
25
26
27
28
29
30
32
ZOOM
33
In DVD source this buttons to adjust DVD picture size
34
Press display button to show the information of the
DVD player.
35
36
37
MENU/PBC
38
39
40
3
748
+
-
MUTE
MTS
SOURCE
DISPLAYEXIT
VOL
+
17
POWER
1
2
5
6
0
9
P.MODE S.MODE SLEEP
MENU
-
VOL
CH
ENTER
CH
18
19
20
21 33
22 34
223
24 36
25
26
27
28
OPEN/CLOSE
D.ENTER
SETUP ZOOM DISP
PREV NEXT REV FWD
AUDIO SUBTITLE ANGLE MENU/PBC
GOTO A-B REPEAT TITLE
PLAY/PAUSE
STOP
PROG
29
30
31
32
35
37
38
39
40
Battery Installation:
Remove the battery compartment lid on the rear of the remote control by sliding the lid down, then
off. Put two AAA batteries inside the battery compartment with their + and - ends aligned as
indicated. Do not mix old and new batteries or different types of batteries Replace the battery
compartment lid. Slide the lid until you hear it click into place.
Using the Remote Control:
Unless stated otherwise, the remote control can operate all the features of the TV.
Always point the remote control directly at the remote sensor in the front of the TV.
10
Page 12

Adaptor
side
DC 12V 4A
3
indicator
11
Page 13

DVD
7
12
Page 14

sub-menu.
Press Menu to exit
13
Page 15

14
Page 16

G PG PG13
NC17
NONE
X
R
Empty
Empty
C
G
18 ANS +
C8+
14+18+
8 ANS + 13 ANS +
16 ANS +
G
PG
15
Page 17

16
Page 18

17
Page 19

Overview of Remote Control
TITLE BUTTON
DVD Mode
Press TITLE button there will have an,
screen indication ITLET""
Press the direction or numeric buttons to select
your favourite title. Will play from the first chapter
of the selected title for DVD disc only.( )
D.ENTER
D ENTER Validation key bottom section of.: .(
D ENTER button for DVD function only.)
When in DVD mode,use the arrows in the
bottom section of the remote to operate the
menus etc.
EJECT BUTTON(
)
ARROW BUTTONS (
/ / / ):Use to move
cursor up down left right direction buttons of///.(
bottom section for DVD function only)
SUBTITLE This function may enable you to:
select multi subtitle languages as many as(32
Press the OPEN CLOSE button whenthe power is/
on the disc will eject Put the disc in the slot slightly.,
with the data side facing towards you Press OPEN.
kinds only for the discs with multi subtitles
encoded Press the SUBTITLE button to get).
desired display.
/CLOSE button again the disc is pulled in
automatically and the unit starts playing,
automatically Without auto play function for JPEG(
DISP Press DISP buttom to show the the:
information of the DVD player.
discs).
GO TO BUTTON
MENU PBC BUTTON/
Press MENU PBC button and the screen will/
Press this button to go to desired position The.
player provides search mode3.
display oot Menu select item according to your"R "
preference This button is valid to DVD disc.(
TITLE XX XX CHAPTER/[]/XXX
possessing multilayer Menu PBC button lets you).
play Video CDs interactiv ely If PBC is on you,-. ,
can use the number buttons to select tracks in
the menu If PBC is off you can select the tracks.,
directly.
[]DVD only
CHAPTER XX XX/ TIME
[]DVD only
DISC GO TO
AUDIO BUTTON
When play DVD by pressing this button you can,,
change the audio language from the one selected
at the initial settings to a different language,
[]DVD only
TRACK GO TO
Select Track
available.
REPEAT BUTTON
Press the REPEAT button one time it repeats the,
chapter Press it again and it repeats all chapters.
of the disc Press REPEAT button one more time.
and the repeat function cancels.
On the remote control, the bottom section
ARROW BUTTONS ( / / / ):Up and down
buttons of the OSD menu to change the OSD,
menu items Left and right buttons of the OSD;
[CD]
menu to select the OSD menu items only for,.(
A B REPEAT BUTTON-
Press the A B button once to set point A Press-.
the A B button a second time to set point B After-.
setting the program repeat playing from A to B.
Pressing the A B button a third time will cancelthe repeat.
DVD function)
When the above items are showed on LCD
screen you can input numbers to locate desired,
sector.
The number you input is invalid if it is beyond the
track capacity'.s
18
VCD
[
]
[CD]
XX
:
VCD
[
]
Page 20

PLAY AND PAUSE BUTTON( )
Press this button to start playback Press this.
button again to pause playback.
STOP BUTTON(
)
Press button once to stop Press button.STOP
to resume from where you stopped.
Use number key enter the title No. and the cursor
will move to the chapter, enter the chapter No. by
press number key again
Select “Start” and press D.ENTER to play
programmed chapter
Select “Next” and press D.ENTER to turn to
next page
Select “ Exit” and press D.ENTER to quit program
Press button Twice to stop Press button.STOP
to start from beginning In order to protect the disc.,
press button then pressSTOP OPEN/CLOSE
button to take the disc out When the disc is.
2. In CD,VCD and SVCD play mode, press PROG
to enter programming and the TV will display as
follows:
ejected hold the disc edge, to prevent scratches.
When not using the DVD function in standby(
mode or using others modes for a long time),
please take out the disc to protect the DVD loader
and the disc.
PREV NEXT BUTTON/(
/ )
S Q No..
Track No.
When playing a DVD disc press PREV to play the,
previous chapter when playing a SVCD VCD.,,
CD disc press PREV to play the previous track,.
Use number key enter the track No. and
When playing a DVD disc press NEXT to play,,
the next chapter when playing a SVCD CD disc.,,
press NEXT to PLAY the next track.
Select “Star” and press to play programmed
chapter to play programmed track
Select “Next” and press D.ENTER to turn to next
page
REV FWD BUTTON/(
To Use Fast Forward or Fast Reverse:
1. ,When playing a DVD press FWD buuton to fast
forward through the disc Press REV button to.
fast reverse through the disc.
2. .Press PLAY button to resume normal playback
/ )
Select “ Exit” and press D.ENTER to quit program
For VCD SVCD DVD discs, it can program 20
、、
items mostly, when finish the first 10 programs
please move the cursor to “Next” and press
D.ENTER to turn to next page, please go ahead
to program. If you want to change the
programmed items please move the cursor to
SETUP BUTTON
Press this button to get the setup menu you can.
select the setting as you like .
PROGRAM
1. In DVD Mode, press PROG to enter
that item and use direction key to move to the
location where you want to amend, enter the
correct track No. Title No. or Chapter No.
◆
The track No., Title No. or Chapter No. might
be different as per different discs.
◆
Please enter valid track No., Title No. or
Chapter No. when programming.
programming and the TV will display as follows:
S Q No..
Title No.
Chapter
No.
ZOOM
Press ZOOM to view different kindly of zoomed
pictures.
EachtimethewhenpressZOOM,itcanbe
viewed 2X X and 4X zoomed pictures.
、3
You can move,enjoy the parts of the picture
when the picture zoom in.
19
Page 21

ANGLE OF CHOICE
Press “ANGLE” then you can enjoy the picture
with different angle when you play multi-angle
picture. Multi-angle means that take a photo
from different scene. as follows:
For example: the DVD discs have three
different angles, Press “ANGLE”,TV will
display as follows:
ANGLE
1/3
2/3
3/3
20
Page 22

DVD Setup Menu
Interface Function
21
Page 23

22
Page 24

23
Page 25

Disc Care
Care of Disc
Video disc contains high-density compressed data that needs proper handling.
1. Hold the disc with fingers by outer edge and/or the center spindle hole. Do not touch the discs surface.
2.Do not bend or press the disc.
3.Do not expose the disc to direct sunlight or heating sources, Stere discs in cabinet vertically, and in dry
condition.
Prevent exposure to:
Direct sunlight
Heat or exhaust from a heating device
Extreme humidity
Clean the disc surface with a soft, dry cleaning cloth, Wipe the disc surface gently and radically from
center toward the outer edge.
Do not apply thinner, alcohol, chemical solvent, or sprays when cleaning. Such cleaning
fluids will permanently damage the disc surface.
WARNING! DO NOT INSERT OR
PLAY 8CM DISC, THEY WILL GET
STUCK.
Region Code 1
As it is usual for DVD movies to be released at
different times in different regions of the world, all
players have region codes and discs can have
an optional region code. If you load a disc of a
different region code into your player you will see
the region code notice on the screen. The disc will
not playback and should be unloaded.
The region code for this player is 1(refer to the
symbols below ).
24
Page 26

25
Page 27

No Power
Signal receive
not properly
No picture
Video is ok ,but
without audio
Audio is ok, but
color error or no
picture.
snow statics
picture and noise
Level broken line
Dual-Image or
"simulacrum"
The TV no
response with
the Remote.
NO Video In.
(PC Mode)
Vertical twinkling
(PC Mode)
horizontal ripping
(PC Mode)
The screen is too
bright or too dark
(PC Mode)
PC Function no
response
Ripping line in
RCA connecting
Problem still
exist
HELP
Check the AC cord of TV is plus in or not. If still no power, please
Pull out the plug and replug in after60 seconds. And open the TV
again.
To cause double image or phantom if there has high building or high
mountain round -TV. You can adjust image effect by manually
operation: consult instruction of vernier regulation or change the direction
of external antenna.
If you use the indoor antenna . under certain circumstance, receive will be
more difficult .So you can change the direction of the antenna to adjust the
image effect . If can't change image receiving effect either , you have to
use external antenna.
Check the antenna at the back of TV is connected properly or not.
Try to select other channels and check whether the TV problem itself or not.
Increase the volume.
Check the TV is in mute mode or not , and please press the mute
button to make sound resume.
Increase contrast and brightness.
Check the antenna at the back of TV is connected or not .
Maybe has electrical appliance interfere, such as hair drier, vacuum
cleaner and so on, please turn off these kinds of electrical appliance.
Perhaps the location for the antenna is not good.Use the tall beamed
antenna can be improved quality of the display image.
Operate the remote direct to the remote sensor on the TV.If still no
response for the TV, please check if the plastic bag on the remote take or
not. And checkif the location for the battery is correct.Change the new
battery.
The TV will shift to the STAND BY if no response from the remote in the
few minutes.
Please check if the display cable connect to the VGA correcte .
Please check if there has the bend on the display cable.
Enter the main menu, Use the clock regulator for the Video display noise
to eliminate the vertical line.
Adjust the Audio sound horizontal in the main menu to clear the horizontal
ripping line.
Adjust the contrast ratio or brightness in the main menu.
Check the computer setting in the state of compatible display resolution
Please use good quality connecting cable.
Unplug the power cable and wait for 30 seconds, then connect.If there is
some problem with our TV, do not repair it by yourself, please contact with
the customer service center.
26
Note: There will be complete picture and the brightness will come down if the TV
is in the static picture for too long time, So please do not keep the TV in a state of same
Menu or same picture that has much difference in brightness and contrast ratio for too
long time.
Page 28

SPECIFICATIONS
Screen Size
TV system
Video system
Preset Channels
Input/Output
Audio output power
Power requirement
Max. power consumption
19”
NTSC M PAL M/N
NTSC/PAL
AIR:2-69 :1-125CATV
IN:.VGA, A/VX2, S-VIDEO, HDMI, Y PBPR, inputPC Audio
ANT 75
3Wx2
DC 12V 4A
<48W
Ω
OUT: EARPHONE, A/V. Built-in DVD player.
User's manual
Accessories
AC adaptor
Supporting DVD Format
This product can play the following DVD formats disc.
Remote controller
2 x AAA Batteries
Power cord
Disc Type Disc Size
(Diameter)
DVD 12cm Single side:120mins.
Super
VCD
VCD 12cm 74mins. Approx MPEG1
CD 12cm 74mins. Approx CD-DA: Digital audio
HD-CD 12cm 74mins. Approx HD-DA: Digital audio
MP3/JPEG 12cm 600mins. Approx Digital audio
NOTE: Also supports DVD-R, CD-R,
CD-RW playback.
12cm 45mins. Approx MPEG2 Compressed
Recorded Time Recorded Content Remarks
DVD format:
Approx
Double side:240mins.
Approx
Compressed digital
audio and video
digital audio and video
Compressed digital
audio and video
Include SVCD
Include:
VCD2.0/ VCD1.1
VCD1.0/ DVCD
27
 Loading...