

Page 1

RLC4036A
40” ATSC TUNER
LCD TV
READ CAREFULLY BEFORE OPERATION
Page 2

CONTENTS
..............................................................................................03~07
....................................................................................................................01
...............................................................................................................02
......................................................................................................................08
.................................................................................................16
.......................................................................................................20
..........................................................................10~12
........................................................................................................21
..................................................................................................................21
....................................................................................................09
..................................................................................................13
...........................................................................17
....................................................................................................17
............................................................................................................18
......................................................................................................19
...............................................................................................19
.................................................................................................21
....................................................................................................20
....................................................................................................20
.......................................................................................30~34
........................................................................................28~29
............................................................................................35~37
.........................................................................................22~25
............................................................................................26~27
..............................................................................................38
ACCESSORIES
CONTROLS
CONNECTION OPTION
REMOTE CONTROL KEY FUNCTIONS
INSTALLING BATTERIES
ANTENNA CONNECTION
EXTERNAL EQUIPMENT CONNECTIONS
USB CONNECTION
PC CONNECTION
HDMI CONNECTION
YPBPR CONNECTION
EARPHONE CONNECTION
TURNING THE TV ON
VOLUME ADJUSTMENT
PROGRAM SELECTION
SLEEP TIMER
RETURN FUNCTION
SOURCE INPUT SWI TCH
MAIN MENU
PICTURE MENU OPTIONS
SOUND MENU OPT IONS
CHANNEL MENU OPTIONS
PARENTAL MENU OPTIONS
SETUP MENU OPTIONS
OTHERS MENU OPTIONS
MEDIA MENU OPTIONS
STAND INSTALLATION
NOTES OF WALL INSTALLATION
ARD
INSTRUCTION
CONNECTIONS & SETUP
BASIC OPERATION
OSD OPERATION
INSTALLATION
CONTENTS
CONTENTS
ACCESSORIES
SAF TY E INSTRUCTION
SAFETY INSTRUCTION
.......................................................................................15
..........................................................................................14~15
........................................................................................................18
.................................................................................................................21
............................................................................................39~41
.............................................................................................42~43
..............................................................................................44
TROUBLE SHOOTING
PRODUCT SPECIFICATION
APPENDIX
1
Page 3
3
SAFETY INSTRUCTION
This LCD TV is engineered and manufactured to comply with the international safety
standards. The same as other electrical equipments,all the safety and operating
instructions should be read before the appliance is operated.
About Symbols
This manual includes different kinds of symbols. To ensure the correct using, as well as
to avoid danger to users and others, the following introductions should be adhered to.
No Operations when Problems Occur
If any event out of the ordinary, such as smoking, smell, no picture, no voice, over loud
voice, damage of part or cable, and inside of liquid or other things, there might be fire
or electrical shock. Under such occasions, please unplug the TV set, make sure there
is no smoke or smell, and get contact with the dealer. DO NOT repair it by yourself, or
there might be hurt to human body.
No Entry of Liquid or Object
There might be fire or electrical shock if liquid or other object get inside the appliance.
Please pay more attention to your children. If it happens, please unplug the TV set,
make sure there is no smoke or smell, and get contact with the dealer.
This is a WARNING symbol. If the users ignore this warning, there might be
personal damage or even death due to incorrect operation.
This is anATTENTION symbol. If the users ignore this warning, there might
be damage to the person or to the appliance due to incorrect operation.
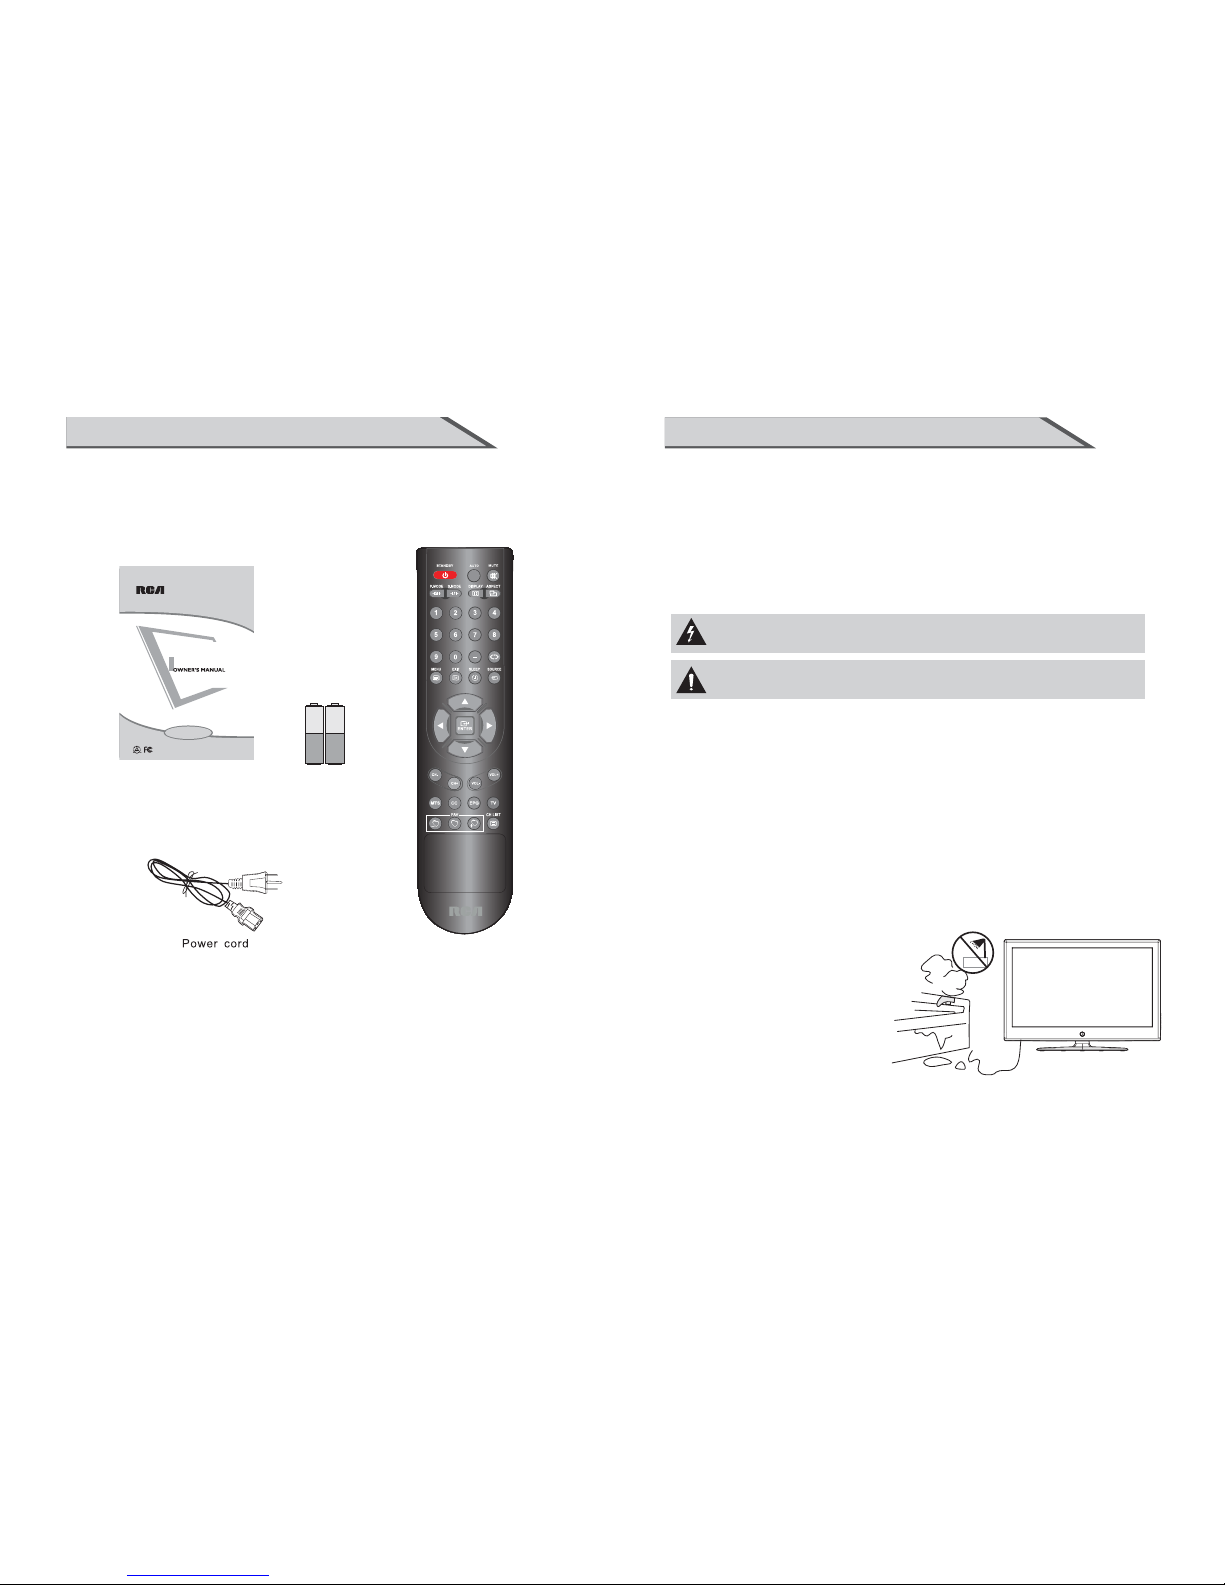
Ensure that the following accessories are included with yourTV.
If an accessory is missing, please contact the dealer where you
purchased the product.
ACCESSORIES
Remote control
Batteries(AAA)
ƵKeep the TV away from rain and moisture.
Ƶ Do not set liquids, including flower vases
and vessels filled with chemicals or water etc.
On top of the TV or around it.
Ƶ Do not set metal or tinder on top of
the TV or around it.
2
RLC4036A
40” ATSC TUNER
LCD TV
READ CAREFULLY BEFORE OPERATION
User Manual
Page 4

Connect to Earthing Connection
This appliance shall be connected to a mains socket outlet with a protective earthing
connection. If the provided plug does not fit into your outlet, consult an electrician for
replacement of the obsolete outlet. Take care of the cord, or there might be fire or
electrical shock due to broken cord. Please make sure that the cord is not over hot,
pressed, or tensed. If the cord has problem (the core string emerges or the cord
breaks), please get contact with t
he dealer.
Ƶ Never allow heavy objects such as the TV set itself to be placed on the power cord.
Never cover the cord with table cloth, for it may lead you to set heavy object on the cord
duo to ignorance.
ƵWhen removing the power plug from the socket, always hold onto the plug, never pull by
the cord.
ƵDon’t set the cord next to heaters.
ƵDon’t touch the plug right after it is unplugged to avoid electrical shock.
ƵDon’t touch the plug during lightning.
ƵDon’t allow cord to become knotted or tangled.
ƵProtect the power cord from being walked on or pinched particularly at plugs,
c
onvenience receptacles, and the point where they exit from the apparatus.
Dispose the Batteries Carefully
ƵIncorrect disposal of batteries may cause fire or human damage, and even
explosion.
ƵDon’t throw batteries into fire or water.
ƵKeep the batteries far away from fire or heat.
ƵKeep the batteries under cool and dry environment.
ƵMatch the batteries to the (+) and (-) marks in the battery compartment.
ƵDon’t charge up the batteries.
ƵDon’t impact the batteries.
ƵPlease use the batteries that are appointed in the user’s manual.
ƵPlease treat the used batteries w
ith the observance of the local law.
Keep the TV Set away from Moisture and Dust
If you set the appliance under moisture or dust environment, it might cause fire or
electrical shock due to lampblack or erosive gas.
ƵDon’t set theTV in kitchen, places nearby heaters, or places of lampblack and
moisture. For heat from high temperature may affect the display or other components,
and cause distortion, meltage, and fire.
ƵDon’t set theTV, remote control, or other components under sun or near heaters.
ƵDon’t set theTV where the difference in temperature is great.Remove the power
plug f
rom the socket on occasions when you will not be using the set for an extended
period.
ƵBefore cleaning, please turn off the TV and unplug the power cord. Or there might
be fire or electrical shock.
4
Don’t Remove or Rejigger the TV Set
There is high voltage subassembly inside the TV set, which may cause fire or electrical
shock during repair.
ƵDO N OT re mo ve c ov er ( o r bac k ).
NO Quiver or Concussion on TV Set
This appliance should not be exposed to dripping or broken. Continuous use might
cause fire or electrical shock. If the panel gets broken, please unplug the TV set, and
get contact with the dealer.
Set the TV on Balanced Spot
There will be damage if theTV drops or breaks.
ƵDon’t set theTV on uneven, oblique, or shacking surface.
Ventilation
Don’t interfere with its proper ventilation when the TV is working or has just been
unplugged, or the display may be spoiled or life shortened due to over heating. In order
to keep proper ventilation, please allow a clearance of 10 inches on each side from the
wall.
ƵDon’t set any object around the ventilation openings of the appliance.
ƵDon’t block the ventilation openings.
ƵNo inversion of the screen.
ƵDon’t cover the appliance with table cloth.
ƵDon’t set the appliance on carpet, bedding, or near to curt
ain.
Power Sources
Unbefitting power sources may cause fire or electrical shock. The appliance should be
connected to a power supply of the type described in the operating instructions or as
marked on the appliance.
ƵPower supply cord should adapt to the socket outlet.
Power Cord Connection
Incorrect connection of power cord may cause fire or electrical shock.
ƵDon’t touch the cord with wet hands.
Ƶ Please check the pontes if it is clean ( no dust ) before use. If it is not, please do the
cleaning with dry and soft fabric.
Ƶ Fix the power cord steadily in to the socket outlet to avoid it becoming flexible, or it
may have malfunction.
Ƶ Don’t cut off the cord, for it may debase the performance. If you want to lengthen it,
please make an appropriate one or get contact with the dealer.
ƵIf you want to change the fuse in the connector plugs, please change it with the same
rating and model.
SAFETY INSTRUCTIONSAFETY INSTRUCTION
5
( For Remote Control )
Page 5
How to Clean the TV Set
Clean the TV and control panel with a soft cloth. Amild soap may be used if the screen
is extremely dirty. Dry them with a soft cloth after cleaning. Choose the right cleanser,
or it may fade the TV set, or make it scratched or cracked.
ToAvoid Wireless Receiver
This TV set is designed to comply with the EMI standard to avoid problems of wireless
receiver.
ƵSet the TV far away from wireless receiver.
ƵAdjust the wireless’s antenna to avoid interference on TV;
ƵMake sure theTV set is out of interference with the wi
reless;
ƵThe antenna should use coaxial line.
ƵTurn off all the equipments, except the TV set to check if the TV interferes the
wireless receiver;
ƵIf the problem occurs, please check all the notes above.
6
Don’t Set the TV in the places below:
ƵUnder sun or near heaters.
ƵPlaces where difference in temperature goes great.
ƵPlaces that have bad ventilation.
ƵNear fire.
ƵMoist places such as bathroom.
ƵPlaces that human walks frequently or places where are quivering fiercely.
ƵPlaces where is deflective or unbalanced.
Watching TV
Please watch TV indoors where there is proper brightness. Please make sure the sunlight
will not fall directly on the picture screen. Please relax your eyes every now and then by
taking an overlook.
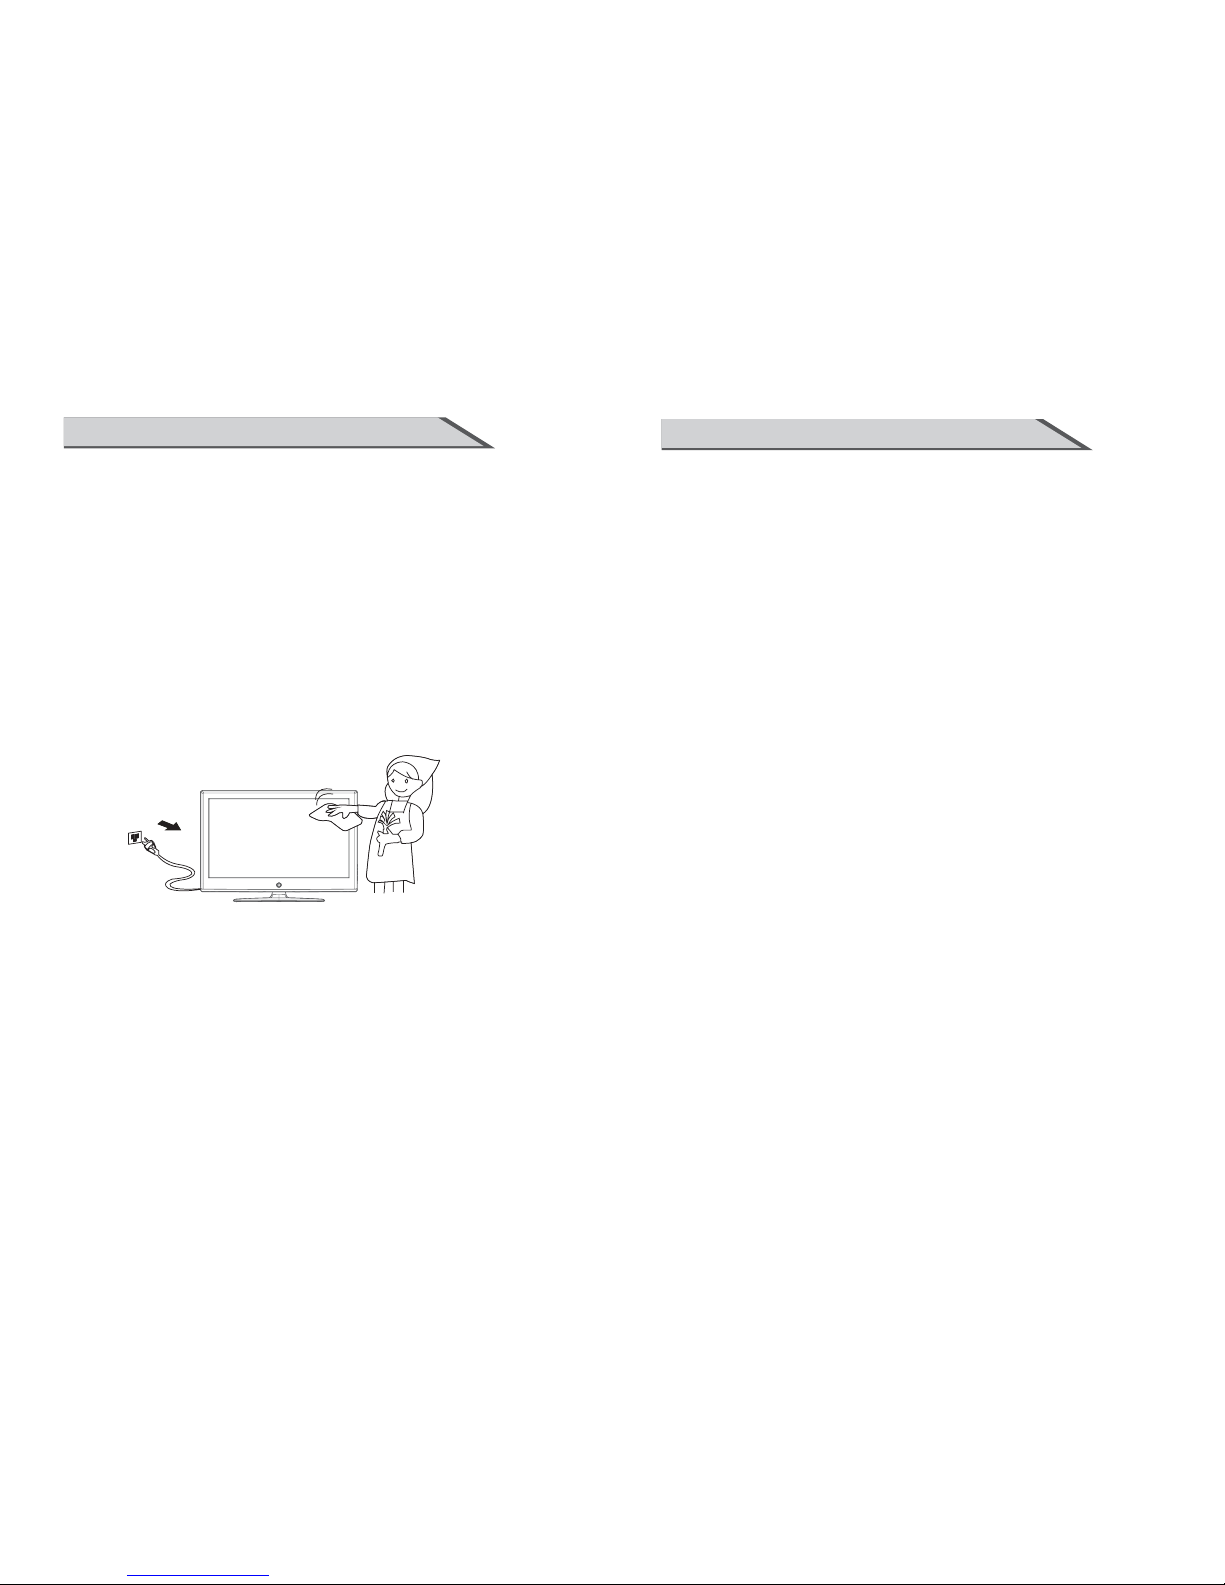
How to Clean the Picture Screen
Before cleaning, please turn off the TV and unplug the power cord. Clean the screen with a
soft cloth moistened in warm water. A mild soap may be used if the screen is extremely
dirty. Dry the screen with a soft cloth after cleaning.
SAFETY INSTRUCTION
7
SAFETY INTRODUCTIONS
Notes of Cable Connection
ƵMake sure that all cables, including connector plugs, extend lines, and connecting cables between
equipments are specify by the manufacturer. Before changing the connection, please turn off
the power and unplug the power cord.
ƵThe power cord should not be the same one as other equipments.
ƵUse plugs with a protective earthing connection.
Notes of Transportation
Other Notes
Notes on Installation
Please handle with care during transportation. Please use the original carton,
or it may damage theTV set. Please retain the original carton.
ƵThe sensor of remote control will not work if the lights, such as sunlight or bright indoor
illumination fall directly on it. Make sure that there is no interference from wireless, or it
may cause distortion of the picture or unusual sound. There should no equipment like
mobile telephone or wireless receiver.
Impacts on remote control may lead to trouble.
Handle the remote control with care
ƵPlease don’t throw the remote control;
ƵDon’t set heavy object on remote control.
ƵPlease dispose the appliance with the observance of the local law.
ƵDo be ware of all electrical equipments.
ƵNever use wooden screws and bracket to fix. Use those that are specified by the manufacturer.
ƵUse only the stand, tripod, bracket, or table specified by the manufacturer, or sold with the
apparatus. Use caution when moving the apparatus.
ƵPleas follow all the operating instructions of the wall or ceiling mounting.
ƵUse only the attachments/accessories specified by the manufacturer.
ƵIf you have any questions on installation, operation, or safety, please call the dealer.
Page 6
9
INSTRUCTION
CONNECTION OPTION
This is the back panel LCD TV
ŶThis is a simplified representation of a back panel.
Here shown may be somewhat different from your TV.
8
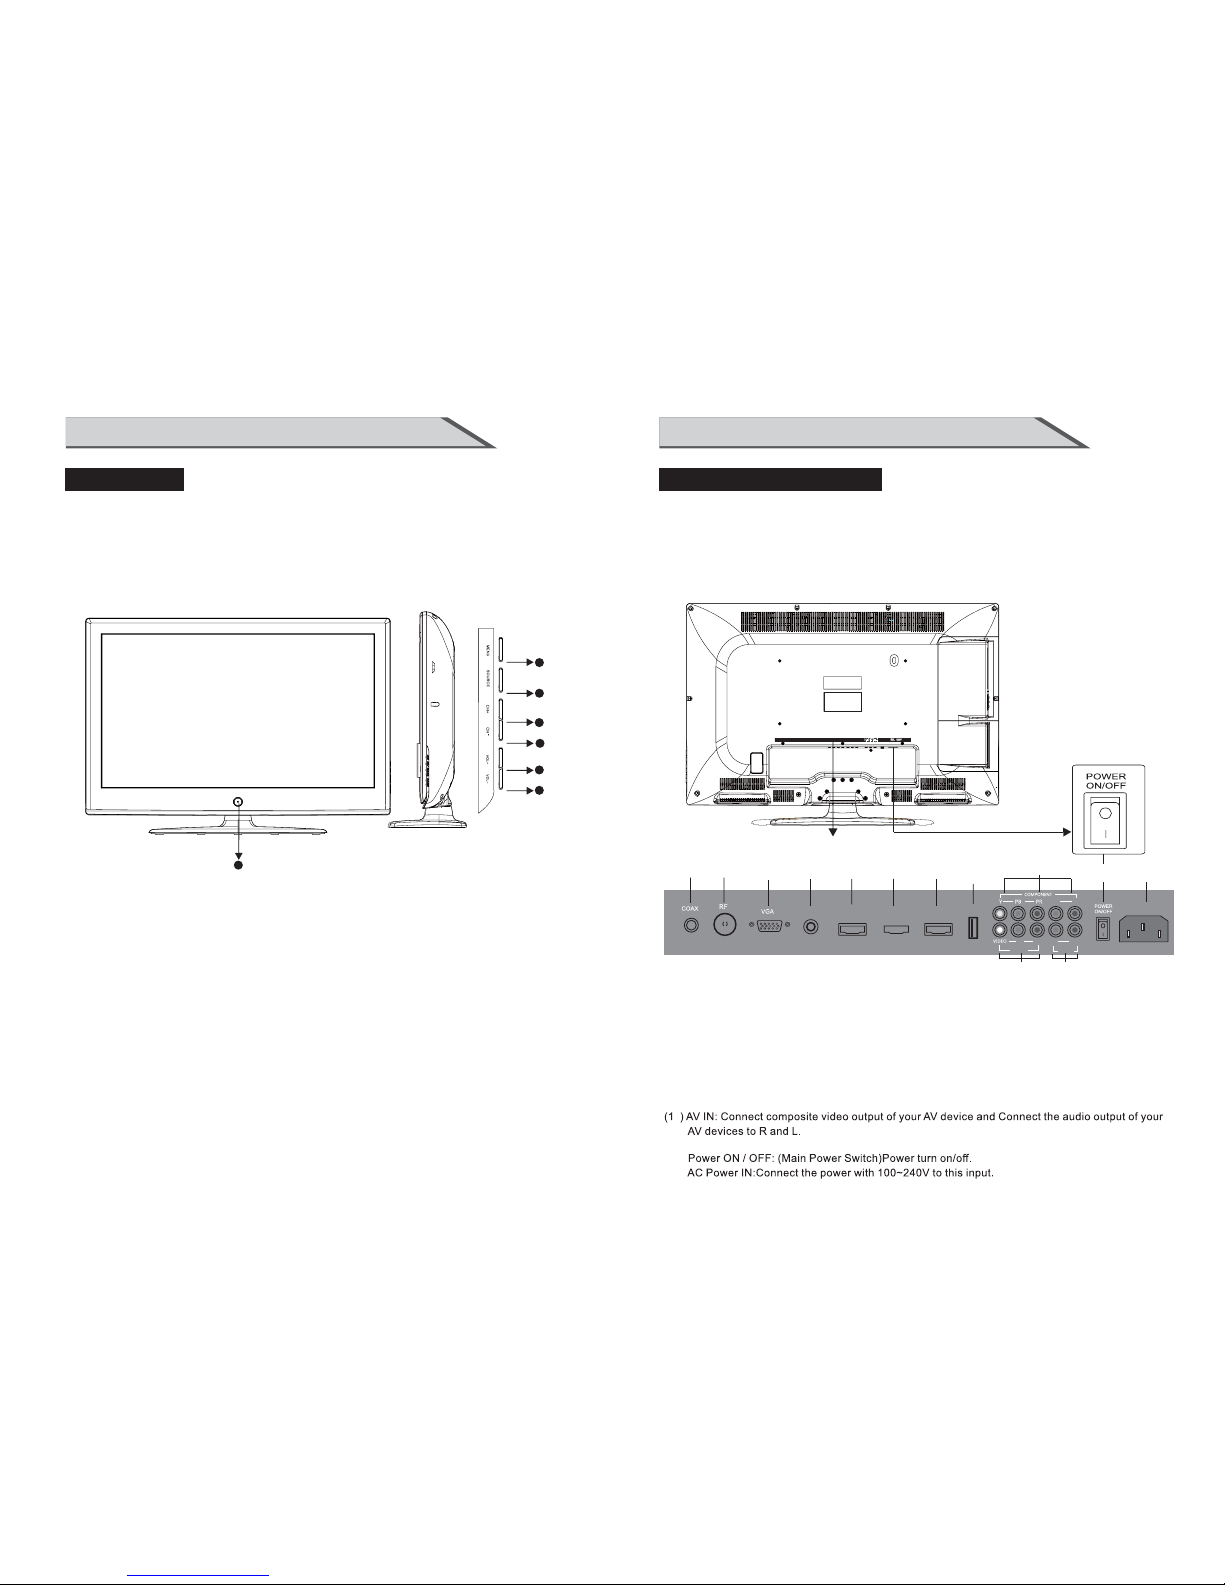
INSTRUCTION
CONTROLS
This manual explains the features available on the model of LCD TV.
Ƶ
This is a simplified representation of a front panel. Here shown may be somewhat
different from your TV.
(1): (
(2): (
VOL-) Press Volume- to decrease the volume.
VOL+) Press Volume+ to increase the volume.
(3): (
CH-) Press the button to down the channel.
(4): (
CH+) Press the button to up the channel.
(5): (
SOURCE) Press this button to selectAV source orTV source.
(6): (
MENU) Press this button to display the OSD menu.
When the OSD menu is on, press this button to exit the menu.
(7): (POWER) Press this button to st
andby mode.
Indicator.
Remote control sensor window.
Right Side Panel Control
Rear Connection Panel
(07)
(08) USB:InputUSBdeviceinput
(06)
HDMI1 Input: Connect HDMI signal.
HDMI2 Input: Connect HDMI signal.
HDMI3 Input: Connect HDMI signal.
(09)
YPBPR(Y:GREEN, PB:BLUE,PR:RED): Connect the component image output
o
f your AV devices here. Then Connect audio output of yourAV devices to R and L.
(05)
(04)
VGA Input: Connect PC VGA signal output.
(03)
RF: Antenna Input (75 ohm).
(02)
PCAUDIO I
AU DI O OUT: Analog Audio out.
nput Connect to PC audio output of the computer .
(01)
2
4
3
1
HDMI2
HDMI3
6
USB
9
10
7
8
HDMI1
5
11
L R
AV IN
AUDIO OUT
L R
L
R
7
2
1
3
6
4
5
12 13
2
(1)
1(1
)
3(1
)
COAX:Connects to the audio jack on the digital/standard 5.1 audio system.
AC 100-2 40V
~50/60HZ
0
PC AUDIO
COAX RF VGA PC-AUDIO HDMI1 HDMI2
HDMI3
USB
P
b
PrY R L
R L
AUDIOOUT
VIDEO R L
AV IN
COMPONENT
AC100-240V
~50/60HZ
POWER
ON/OFF
L
:
Page 7
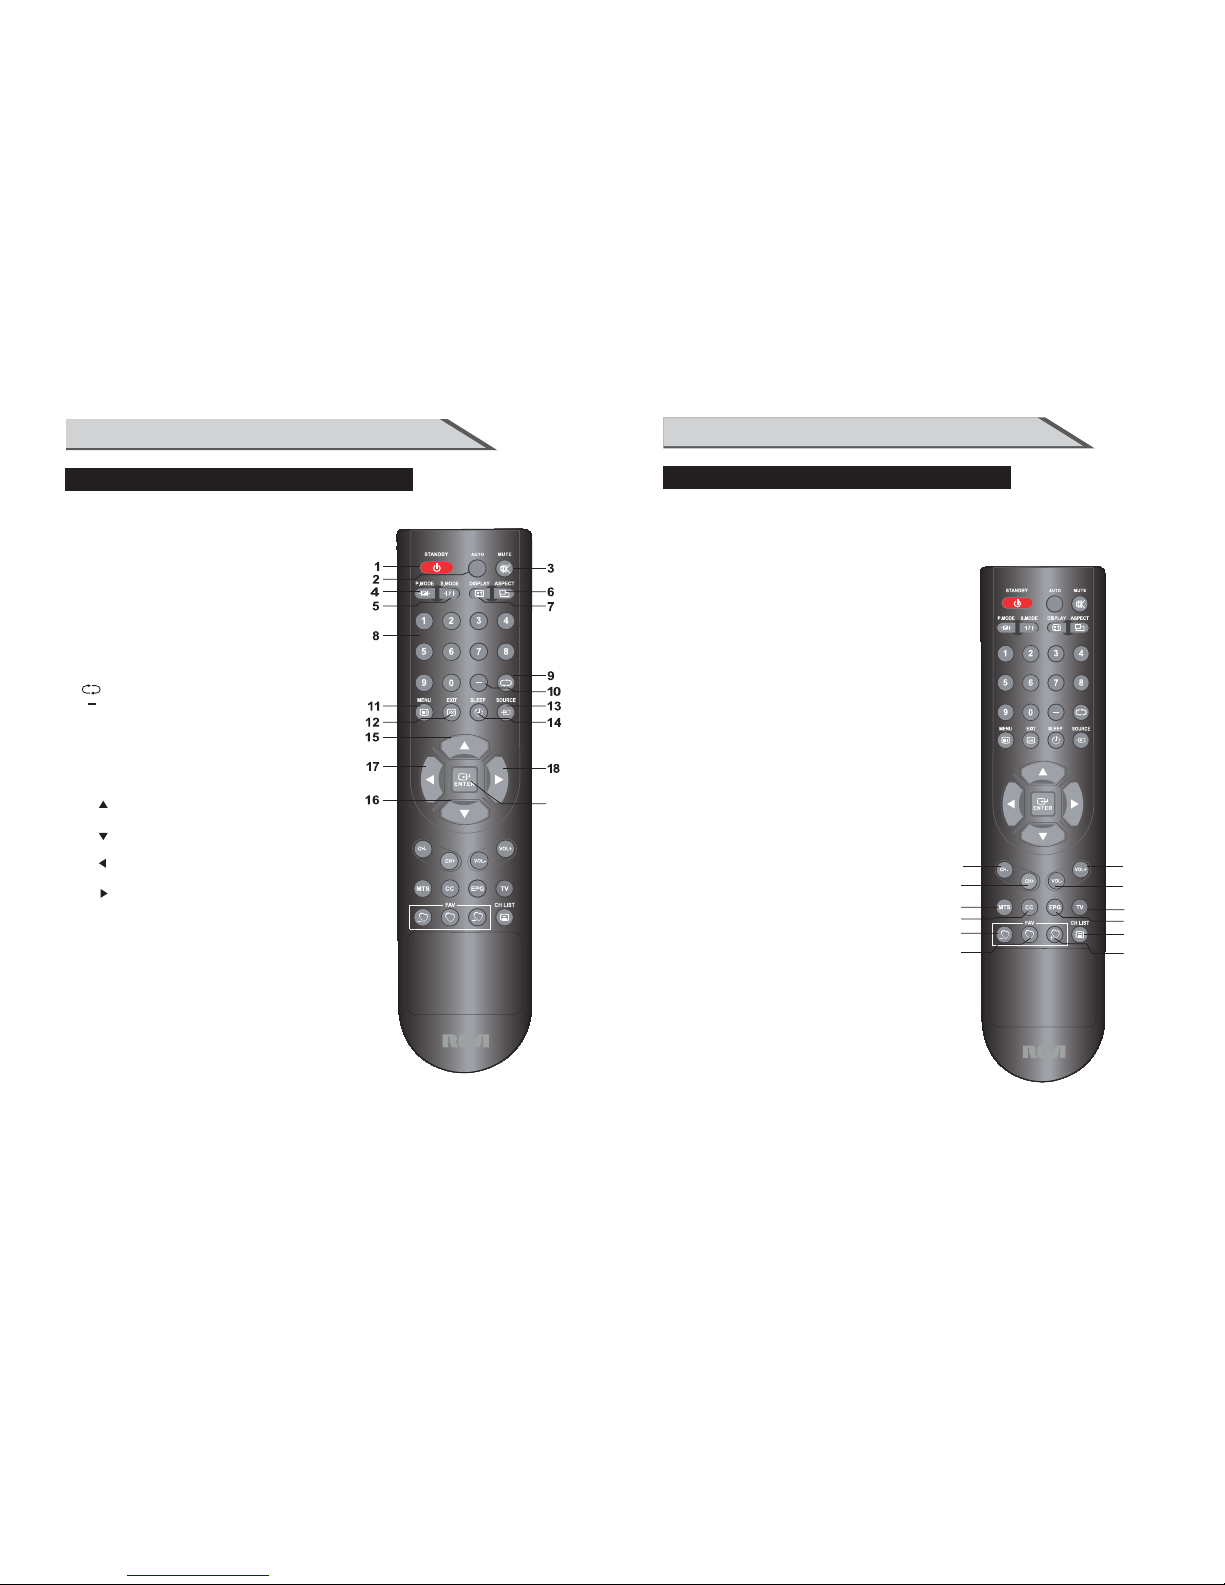
REMOTE CONTROL KEY FUNCTIONS
INSTRUCTION
(20) CH- button: Changes the channels down.
(21) CH+ button: Changes the channels up.
(22) VOL- button: Adjusts the volume down.
(23) VOL+ button: Adjusts the volume up.
(24) MTS button: Press to select the audio channels.
(25) CC button: Press to display the closed caption.
(26) EPG button: Enter Electronic Program Guide.
(27) TV button: Press the button to select the TV input.
(28) FAV- button: Changes the Favorite channels down.
(29) FAV button:
(30) FAV+ button: Changes the Favorite channels up.
(31) CH LIST button: TV Channel List button.
26
30
29
31
24
25
27
28
20
22
23
21
11
Add/Erase function for favorite.
10
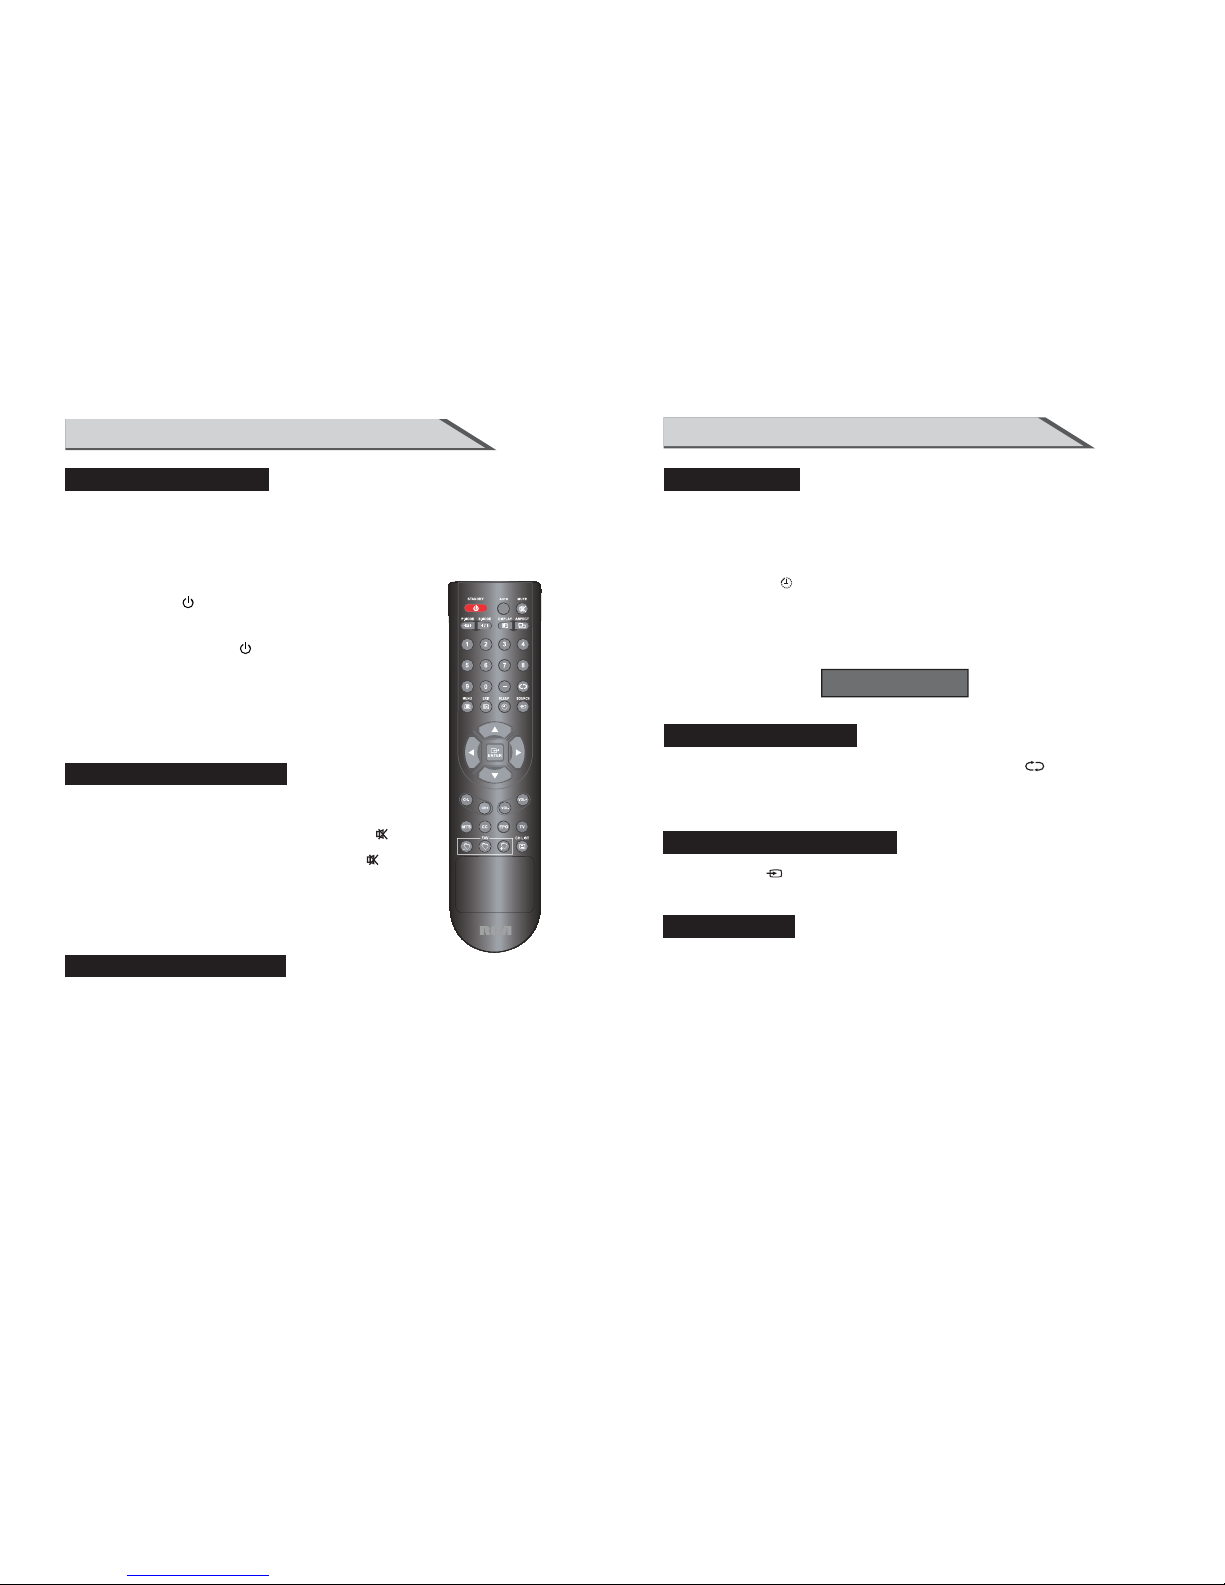
(1) STANDBY button
: Switches the set on from power on or off to power.
(2) AUTO button: Press to pc source picture auto adjust.
(3) MUTE button: Press to eliminate or restore the TV sound.
(4) P.MODE button:
Press to select preset picture mode.
(5) S.MODE button: Press to select Sound mode button.
(6) ASPECT button:
Press to select picture mode 4:3, 16:9 etc.
(7)
DISPLAY button: Press to display current status,
TV channel,
input source.
(8) Numerical buttons:
Press number buttons for direct access TV channels.
(9) button:
Press to return to previous channel.
(10) button:
Select sub channel of each
channel in DTV mode.
(11) MENU button: LCD menu selection.
(12) EXIT button: Exit the OSD menu (On-screen display).
(13) SOURCE button:
Press to display all possible input sources
(14) SLEEP button: Sets the sleep timerDŽ
(15) " "button: When OSD menu is on, press this button
to move the selection focus up or change settings.
(16) " "button: When OSD menu is on, press this button
to move the selection focus down or change settings.
(17) " "button: When OSD menu is on, press this button
to move the selection focus left or confirm the settings.
(18) " "button: When OSD menu is on, press this button
to move the selection focus right or confirm the settings.
(19) " ENTER "button: Press the button to confirm the operation.
REMOTE CONTROL KEY FUNCTIONS
INSTRUCTION
19
Page 8

13
INSTALLATION
(1)Open the battery compartment cover on the back side
(2) Inser t two 1.5 V batte ries of AA A type with c orrec t polar ity
(3) Close t he batt ery com partm ent cov er on the b ack sid e
Notes on using the Remote control.
Do not strike or drop the remote.
Do not expose the remote control to liquids and do not
place it in humid environment.
Do not install or place the remote control in direct sunlight.
The heat may damage the remote control.
INSTALLING BATTERIES
Notes on Using Batteries
The use of the wrong type of batteries may cause chemical
leaks and/or explosion.
Please note the following:
Always ensure that the batteries are inserted with the
positive and negative terminals in the correct direction
as shown in the batteries compartment. Different types
of batteries have different characteristics. Do not mix
different types. Do not mix old and new batteries.
Mixing old and new batteries will shorten battery life
and /or cause chemical leaks from the old batteries.
When batteries fail to function, replace them immediately.
Chemicals which leak from batteries may cause skin
irritation. If any chemical matter seeps out of the batteries,
wipe it up immediately using a dry cloth.
Due to varying storage conditions, the battery life for the
batteries included with your unit may be shortened.
If the remote control is not used for a long period of
time, remove the batteries.
12
INTRODUCTION
This is the code for remote control of LCD,if you want to change to a
universal remote control, you can edit this code into your universal remote control.
REMOTE CONTROL KEY FUNCTIONS
Universal remote code
Not included.
The universal code for this remote is: 2295.
Page 9
15
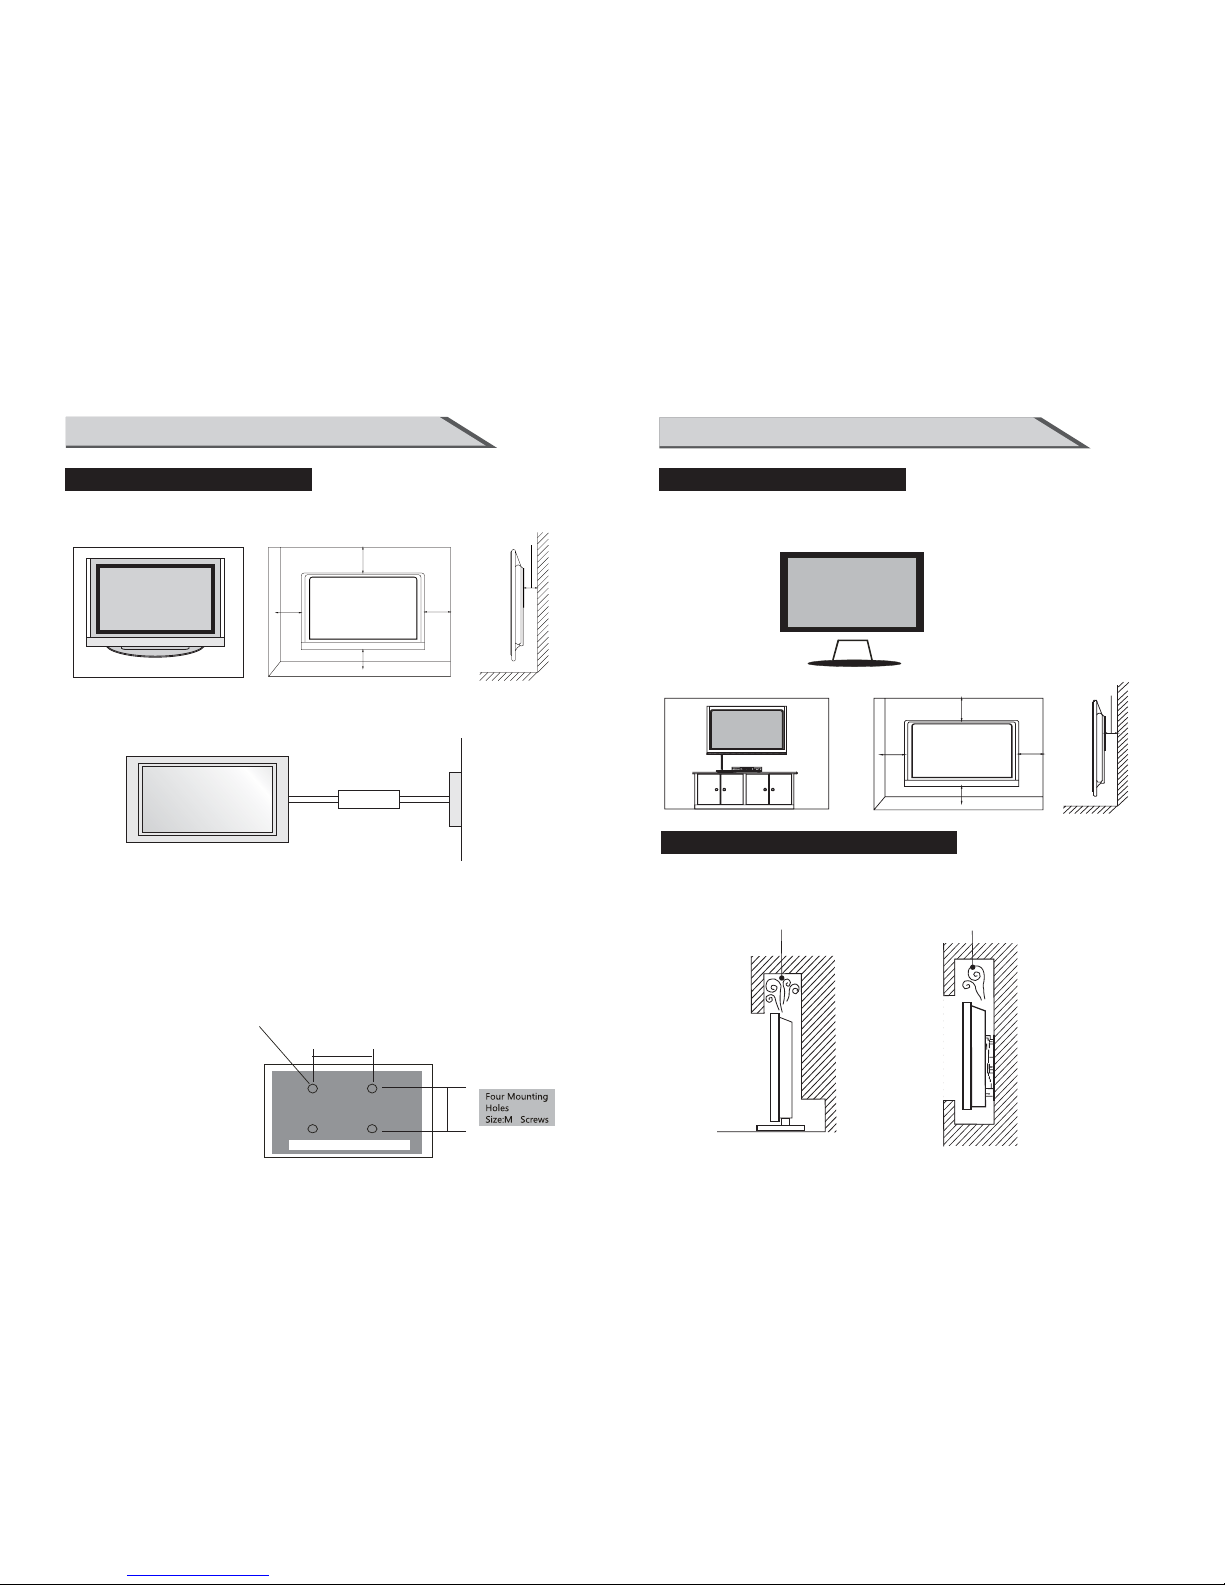
INSTALLATION
(1) Keep theTV stand for may be future use.
(2) Don’t set the TV set on shelves, carpets, beds, or closets.
(3) Don’t cover the TV with curtain or paper.
(4) Leave ventilation space to avoid the following:
No good for ventilation No good for ventilation
(3)For proper ventilation, allow a clearance of 10” on each side from the wall.
b. Wall Mount: Horizontal installation
STANDARD INSTALLATION
10inches
10inches
10inches
10inches
(2) Remove the table stand of the TV when install the TV on a wall as follow:
NOTES OF WALL INSTALLATION
14
INSTALLATION
STANDARD INSTALLATION
This is the default installation way of the TV.
10inches
10inches
10inches
10inches
10inches
Ensure that you connect the earth ground wire to prevent possible electric shock.
If grounding methods are not possible, have a qualified electrician install a
separate circuit breaker.
Do not try to ground the unit by connecting it to telephone wires, lightening rods or gas pipes.
a. Desktop Pedestal Installation
ƵThe TV can be installed in various ways such as on a wall, or on a desktop etc.
ƵThe TV is designed to be mounted horizontally.
Power
Supply
Short-Circuit
Breaker
(1) Secure the wall brackets with the bolts (not provided as parts of the product, must
purchase separately) on the wall. Match the height of the bracket that is mounted on
the wall. The wall bracket is of nomal dimension. Please see the position of the wall
brackets bolts as follow picture .The actual dimension of the wall brackts bolt should
according to the products.
The wall brackets bolt position
b. Wall Mount: Horizontal installation
400mm
200mm
5
Page 10
17
CONNECTIONS & SETUP
1. Connect the AV jacks between TV and external equipment. Match the j ac k co lo rs
(Vi de o = yellow, Audio Left = wh ite, an d Audio Rig ht = red) .
2. Se lect AV sou rc e with using the SO URCE/ b utton o n the rem ote con trol.
3. Operate the corresponding external equipment. Refer to external equipment
operating guide.
EXTERNAL EQUIPMENT CONNECTIONS
Video Game Set
PHILIPS
DRIVE
TURBO
Camcorder
AV
USB CONNECTION
USB
Note:Can only support MP3 format of music
16
CONNECTIONS & SETUP
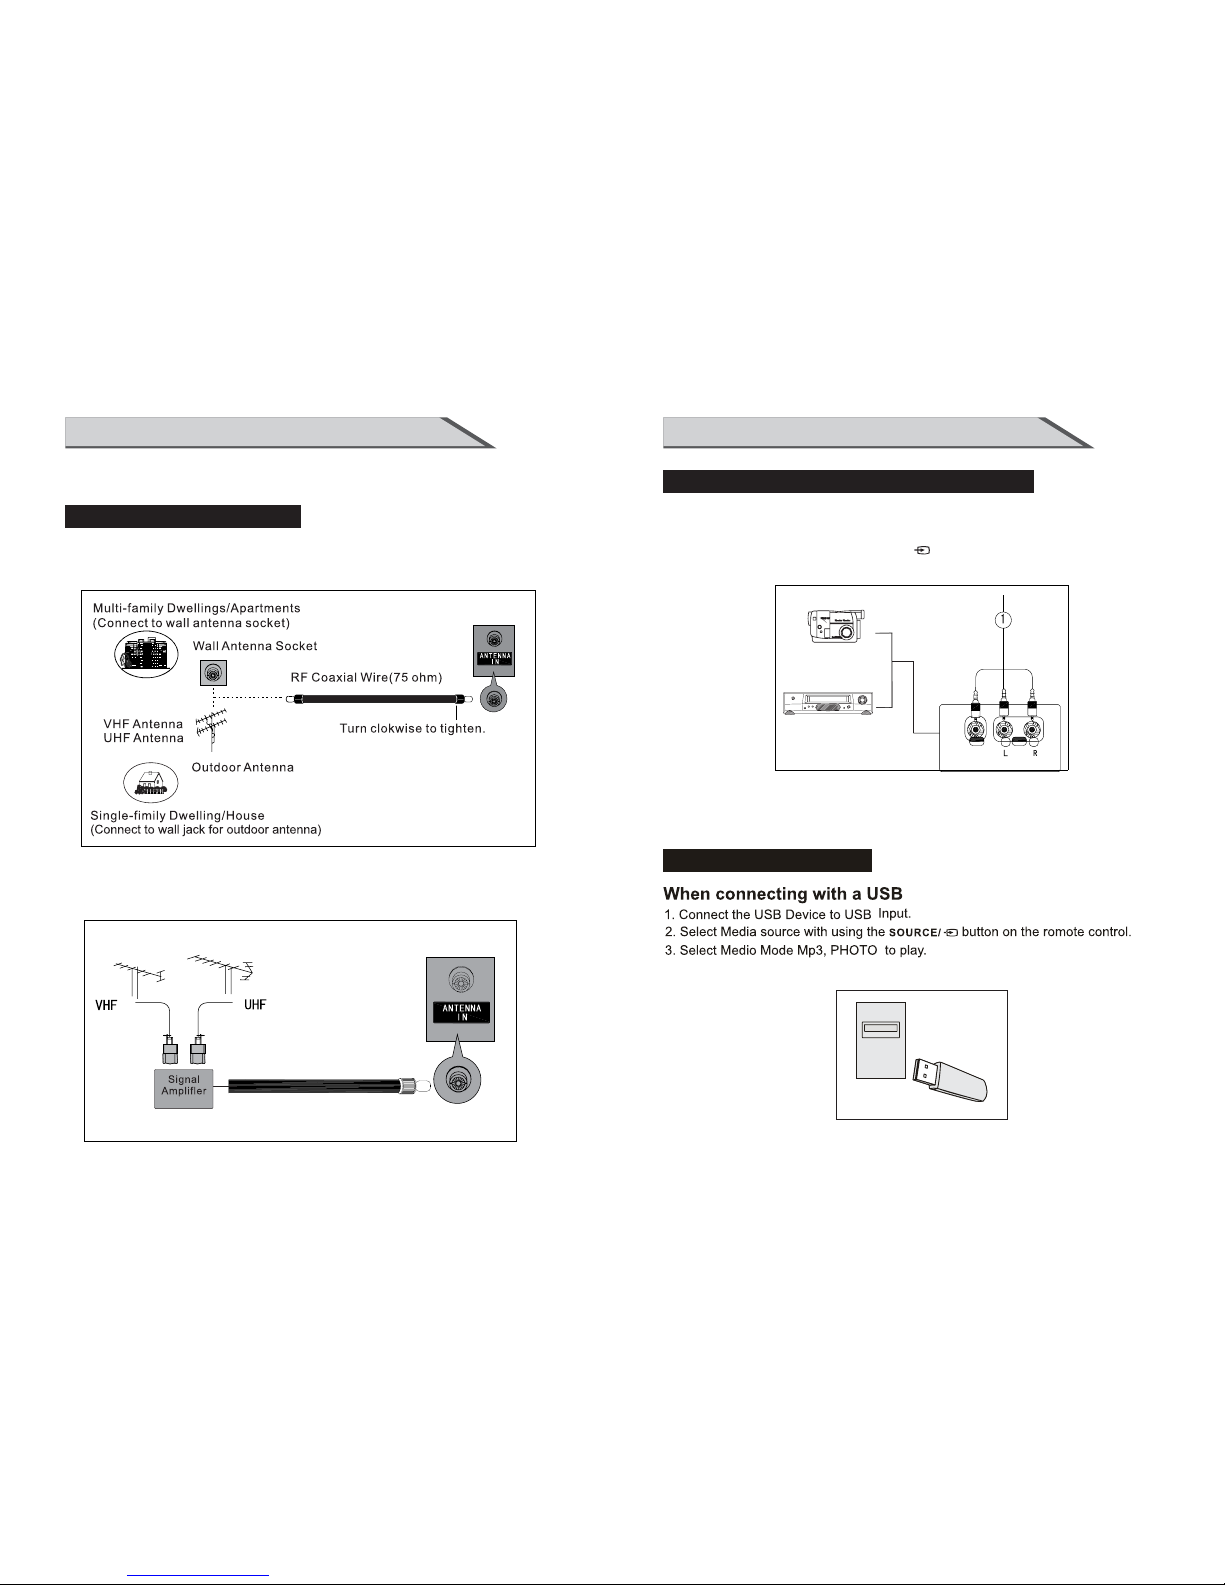
ANTENNA CONNECTION
■F or o pt imum picture qu ality, a dj ust antenna dir ectio n.
■An antenna cable and converter are not supplied.
■
you have finished connecting all equipment.
To preve nt th e equipment dam age , nev er plug in any p owe r cor ds until
■In poor signal areas, to get better picture quality, install a signal amplifier
to the antenna as shown below.
■If signal needs to be split for two TVs, use an antenna signal splitter for connection.
Page 11
19
CONNECTIONS & SETUP
YPBPR CONNECTION
DVD
YPbPr
L
R
Y=GREEN, Pb=BLUE, Pr=RED
1. Connect the video outputs (Y, PB, PR) of the DVD to the
YpbPr jacks on the set
2. Connect the audio outputs of the DVD to the Audio Input (L/R)
jacks on the set.
3. Turn on the DVD player, insert a DVD.
4. Select YPbPr source with using the SOURCE/ button on the remote control.
5. Refer to the DVD player's manual for operating instructions.
When connecting with a component cable(VGA)
18
CONNECTIONS & SETUP
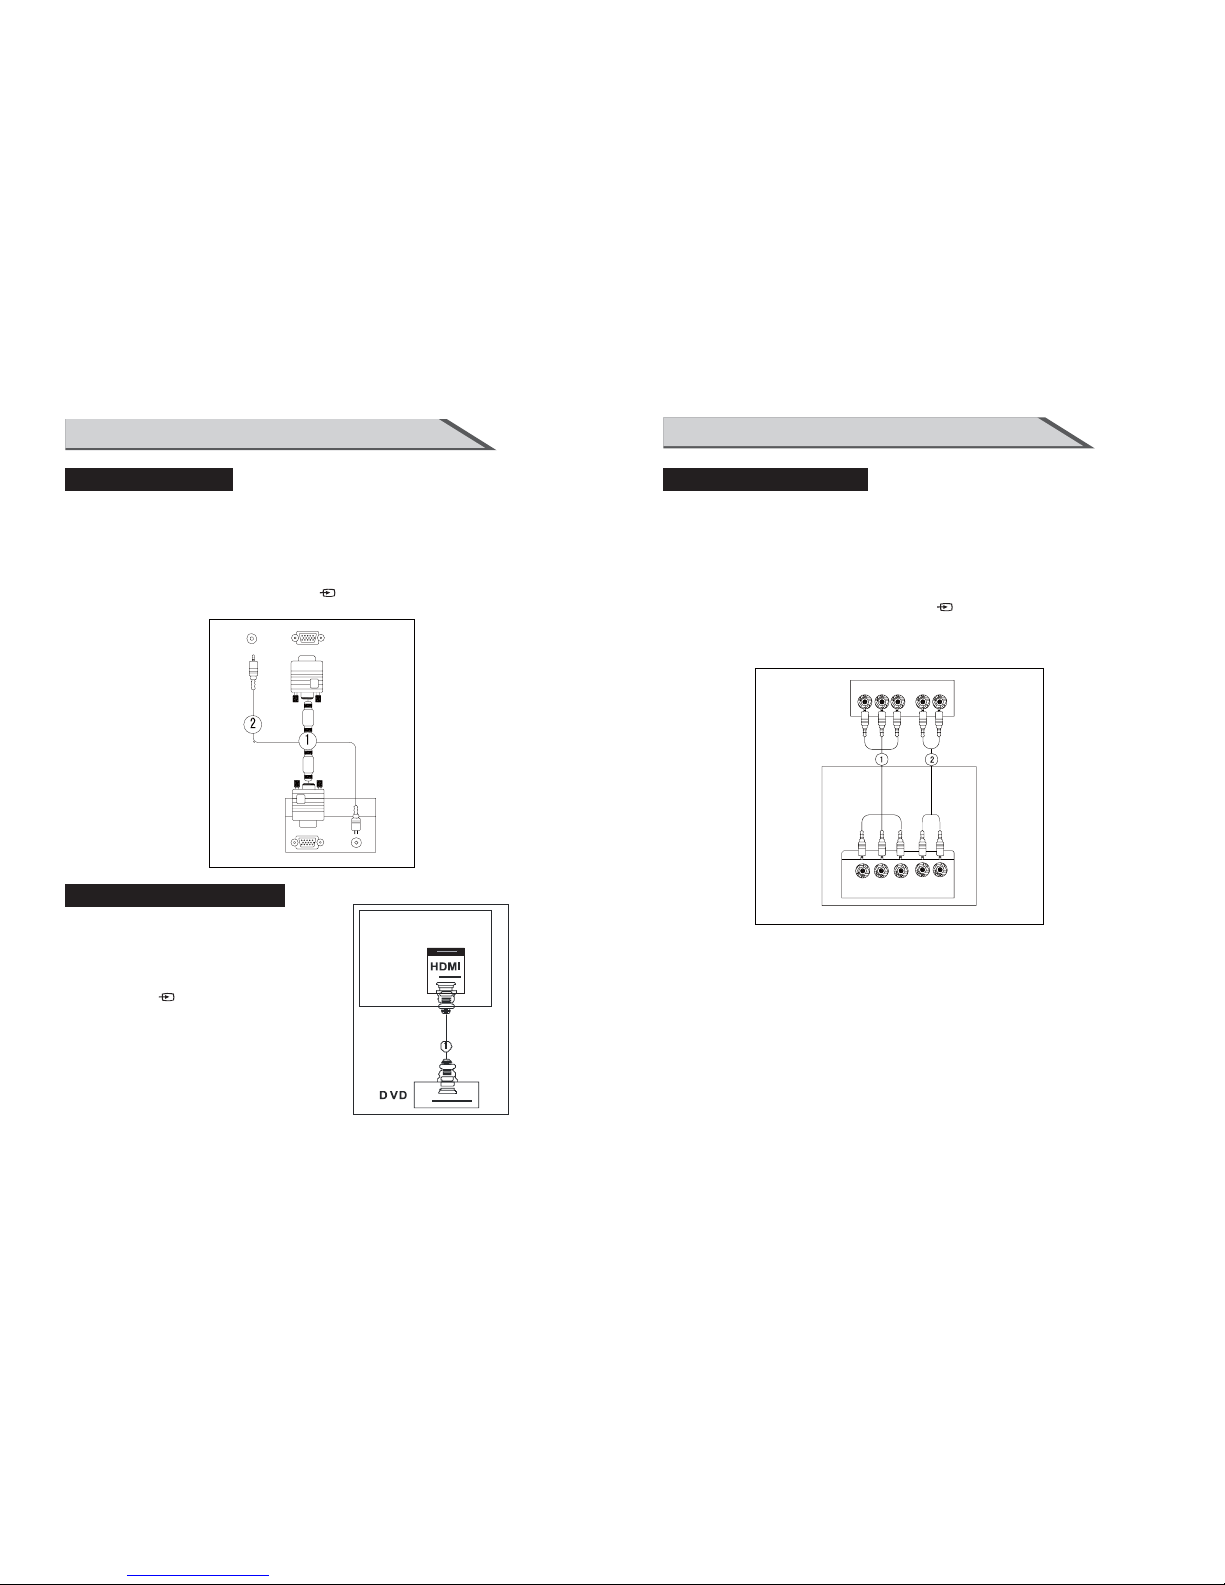
1. Connect theVGA output of the PC to the PC VGA Input jack on the set.
2. Connect the audio outputs of the PC to the PC Audio Input jack on the set.
3. Turn on the PC and the set.
4. Select PC source with using the SOURCE/ button on the remote control.
5. Refer to the PC manual for operating instructions.
PC CONNECTION
When connecting with a D-sub 15 pin cable(VGA)
PC
1. Connect the HDMI output of the DVD to
the HDMI Input jack on the set.
2. Select HDMI source with using
the SOURCE/ button on the remote control
3. Refer to the DVD player's manual for
operating instructions.
When connecting with a HDMI cable
HDMI CONNECTION
Page 12
21
You don't have to remember to switch the set off before you go to sleep.
The sleep timer automatically switches the set to standby after the
preset time has elapsed.
Press the SLEEP/ button on the remote control repeatedly
to select the number of minutes.
The display will appear on the screen followed by circle,
OFF, 15, 30, 60, 90, and 120 minutes.
When you are TV programs ,you can press the
button on
the remote control to return to the previous channel.
watching
SLEEP TIMER
RETURN FUNCTION
Press button on the remote control to the source menu.
The source menu rank as: TV - AV - YPbPr - HDMI1 - PC - Media .
SOURCE/
HDM I2 - HD MI3 -
SOURCE INPUT SWITCH
BASIC OPERATION
Sleep Timer: Off
Press MENU to display the main menu or return to the previous menu or close the main
menu.
PresVŻ/ŹW o highlight the desired menu icon, and press ENTER to select.
If no buttons are pressed, the menu will close automatically after about 10 seconds.
Main Menu
20
BASIC OPERATION
If your TV will be turned on, you will be able to use its features.
Turning on the TV
When the indicator illuminates red is standby mode.
Press the STANDBY button on the remote control,
after the TV initialization finished,
the indicator turns to green. It means the TV is in power mode.
When you press the STANDBY/ button on the remote
control once again, the power/stand-by Indicator illuminates red
in standby mode.
If you intend to be away on vacation, disconnect the power
plug from wall power outlet.
1. Press the VOL +/VOL- but
ton on the control panel
VOL +/VOL- button on the remote control to adjust the volume.
2. If you want to switch the sound off, press the MUTE/ button
on the remote control.
3. You can resume the sound by pressing the MUTE/ button
on the remote control.
or the
Press the +/ - button on the control panel or the Numerical
on the remote control.
CH CH keys
TURNING THE TV ON
VOLUME ADJUSTMENT
PROGRAM SELECTION
/
First,You connect the power cord into the power socket ,
make sure the powe cord is fully inserted into the unit . Then
press the power ON / OFF switch to "ON" position as shown.
Page 13

23
OSD OPERATION
SCREEN SIZE
Hig hligh t the ite m and Pre ss◄/► to sele ct. Movie/Dynamic/Standard/User.
Brightness/Contrast/Color/Tint/Sharpness
Picture Mode
Hig hligh t the it em and p ress ►, and a pr oc ess b ar appears ,
the n press ◄ /►to ad just th e value .
Tint is availa ble whe n analog TV o r NT SC-system AV .
Pre ss MENU t o back th e Pictu re Sett in gs m en u.
ADJUSTING THE VALUES
Scr een Siz e
Press ◄/►to selet the display aspect ratio till the picture is fit onto the screen.The
options are different according to different input source.
PC Wide /Dot by Dot.
Dot by Dot means NOT any scaling to original input pixels size.
AV/YPbPr/HDMI/TV Normal/Wide/Cinema/Zoom.
.
Zoo m is suit able to v iew the a nalog T V wh ich has wide(16 :9) con tent on t he 16:9 panel.
Gen erall y each as pect ra tio is su itabl e for one i nput fo rmat.
For e xampl e Norma l is suit able to w atch co mmon TV p ro gram.
Wide will do horizontal scaling on the wide panel.
Cin ema is fo r the 2.3 9:1(p erhap s marke d as 2.40 :1 on the d isc) film
22
OSD OPERATION
PICTURE MENU
Press ▼/▲ to highlight one of the following options, then press ENTER or ► to e nt er
nex t sub-m enu to ad just it .
Pre ss EXIT t o cl ear on-scre en menu or ME NU back t o the pre vious menu.
Whe n Pictu re Mode i s set to Us er, the following settings can be manually adjusted.
Pre ss PMOD E short cut but ton on th e remot e contr ol to select pic ture mo de directly.
PICTURE SETTINGS
Page 14

25
Press V to highlight the item and press ENTER oUŹto display the sub-menu as
following.
Dynamic Contrast Off/Low/Medium/High
The system will adjust the luminance curve by analyzing the picture content
dynamically.
Film Mode Off/On
For the 2:2 or 3:2 format signal of cinema , enable special pixel process to reduce the
flick of moving area.
Noise Reduction Off/Low/Medium/High
You can clear up analog TV signal by reducing the dot noise. This feature is not
available at PC or Media source.
MPEG Noise Reduction Off/Low/Medium/High
Similar with the Noise Reduction, you can set to reduce the block noise.
OSD OPERATION
ADVANCED PICTURE SETTINGS
COLOR TEMPERATURE
PresVŻ/ŹW o select the Color Temperature that you feel comfortable.
Normal Basically will be accepted by most people.
Cool means a high color temperature that will feel cool.
Warm means a low color temperature that will feel warm.
24
OSD OPERATION
PC SETTINGS
Auto Adjust
Automatically adjust Clock, Phase, H-Position and V-Position settings. In order to get
a good result, you should open a“filling the screen”picture before executing Auto
Adjust.
Horizontal Position Shift the screen slightly to left or right .
Vertical Position Shift the screen slightly up or down.
Clock
Adjust the DB15 picture signal sampling clock rate.
Phase Adjust the DB15 picture signal sampling phase. It maybe affect the definition .
Wrongvalue maybe result the interference.
Reset Reset the par
ameters of current menu to default value.
PC Settings Menu is aviliable only in PC DB15 or DVI mode. When DVI signal input,
only Horizontal Position and Vertical Position can be adjusted.
Press V to highlight one of the following options, then press ENTER to select it.
Low
Page 15

27
Surround Mode
Set to enjoy the virtual surround sound. Press ENTER to set or cancel.
AVL
Auto Volume Level. Press ENTER to set or cancel. When AVL is set on, it will limit the
sound being heard when sudden changes involume occur during commercial breaks or
channel changes. Usually be enabled at night.
Analog Sound
Available at analog TV channels. SAP/Stereo/ Mono Set the preferred sound track of
analog channels. Stereo and SAP exist on some channels. Generally SAP is a second
language sound or help the people with hearing impair.
Digital Sound
Available at digital TV channels. English/French/Spanish Set the preferred sound track
of digital channels. French and Spanish exist on some channels.
OSD OPERATION
EQUALIZER SETTINGS
Mode Off/Rock/Pop/Jazz/User(only in User mode,the following can bemanually adjusted.)
1 Set Mode to User.
2 Press to selectthe first(100Hz) item,then press Ż/Ź to selectthe band to be turned.
3 Press V toadjust the value.
Adjust Equalizer Settings
Based on your favorites about which frequency band need to be adjusted, make small
adjustment with certain frequency band at a time. Suggest NOT making too large
changes.
26
OSD OPERATION
SOUND MENU
Sound Mode Standard/Dynamic/Soft/User
Only in User mode, the follow items can be adjusted.
Bass Adjust thelow frequency bandresponse.
Treble Adjust the high frequency band response.
Balance Adjust the level of soundcoming from theleft or rightspeaker.
Adjust the Bass/Treble/Balance
1 Set Sound Mode to User.
2 Highlight the item and presVŻ/ŹW o display
the sub-menu, then presVŻ/ŹWo adjust the value.
Press V to highlight one of the following options, then press ENTER or Źto enter
next sub-menu to adjust it.
Press EXIT to clear on-screen menu or MENU back to the previous menu.
SOUND SETTINGS
Stereo
English
Digital Audio Output
digital audio output
raw
off
,
Page 16

29
OSD OPERATION
Set to Air or Cable according to your antenna source. When set to Air, TV can catch
8VSB broadcasting signal. When set to Cable, TV can catch analog an d cle ar
64QAM/256QAM broadcasting signal.
CHANNEL SETTINGS
Change the settings
Skip & F avo rit e
1 Press ▼/▲ to sel ect the c hanne l you wan t to set.
2 Pre ss ◄/► to h ighli ght cor respo nding i tem, an d press ENTER to set or cancel.
Label
1 Pre ss ▼/▲ to sel ect the c hanne l and ENT ER to ent er the ed it stat e.
2 Pre ss ▼/▲ to select the char act er, pre ss ◄/► to move the cur sor. Total seven letters.
Skip Set th e ch annel to be ski pped when
usi ng CH+/ C - to vi ew c hannels.
Favorite
Set t he chan nel to yo ur favo rite li st.
Label Rena me l abel of the chann el.
H
SIGNAL TYPE
AUTO CHANNEL SEARCH
It wi ll sear ch anal og chan nels fi rst, th en digita l chann els.
Before execute auto channel search, please confirm your antenna type is Air o r
Cable.Wrong setting of Signal Type maybe cause finding no channel. Found numbers
do no t inclu de encr yptio n programs.
28
OSD OPERATION
CHANNEL MENU
Note: The m en u is available on ly at TV so ur ce .
The list shows channels that you set as favorite.
FAVORITE LIST
CHANNEL LIST
“AB C”: Lab el of the C hanne l
Press ▼/▲ to high light a c hanne l and press
ENT ER to vie w it.
Press ▼/▲ to highlight one of the following options, then press ENTER or ► to e nt er
nex t sub-m enu to ad just it .
Pre ss EXIT t o cl ear on-scre en menu or ME NU back t o the pre vious m enu.
Page 17

31
OSD OPERATION
US V-CHIP
MOVIE RATING
This system defines the rating control wh ich come from M PAA ru le s.
Rating
Define
G
PG
PG-13
R
NC-17
X
General audience. All ages admitted.
Parental guidance suggested. Some material may not be suitable for children.
Parents strongly cautioned. Some material may be inappropriate for children under 13.
Restricted. Children under 17 require accompanying parent or adult guardian.
No on e 17 and un der admit ted.
Adult audience only.
For the United States, the rating setting basically include the following options: Movie
Rating,TV Rating.
MOVIE RATING
30
OSD OPERATION
PARENTAL CONTROL
Note: The d ef ault user passw ord is “0 000”.
Keypad Lock
Set to prevent it from being used by young children, or other unexpected usage.
Source Lock
Set to lock the using of specified so ur ce .
Lock Parental Control
The following items are only available if the password input is correct.
V-CHIP
Include below settings:
US V-Chip,Canada V-Chip,Block UnRated,Downloadable Rating,Clear Downloadable
Data
.
Block UnRated Show Control whether lock the program that have not any valid rating
flag.
Downloadable Rating Control the RRT5 setting which are valid only at some digital
cablechannels.
Clear Downloadable Data Select to cl ear the previous downloadable rating data.
Page 18

33
OSD OPERATION
Canada V-CHIP
For Canada, the rating setting include the following options: English Rating,French
Rating.
English Rating
These ratings are for programs which are using English rating system.
Rating
Defi ned a s
C
Children
C8+
Chi ldren 8 y ears an d older
G
General programming
PG
Parental guidance
14+
Vie we rs 14 and older
18+
Adult programming
Rating
Defi ned a s
G General
8 ans +
Not r ecomm ended f or youn ger
children
13 an s+
Not recommended for children
und er age 13
16 an s+
Not r ecomm ended f or ages
under 16
18 an s+
Thi s progr am is res trict ed to
adults
French Rating
The r ating s are for p rogra ms whic h are usi ng Fren ch rati ng system.
32
OSD OPERATION
TV RATING
The TV rating compose of two aspects: age-based and content-based.
Age
Define
TV-Y
TV-Y7
TV-G
TV-PG
TV-14
TV-MA
General audience
Parental guidance suggested
Parents strongly cautioned
Retricted
No on e 17 and un der admit ted
Adu lt audi ence on ly
Content
Define
FV
D
L
S
V
Fantasy violence
Suggestive dialogue
Strong language
Sexual situations
Violence
Note: The content ratings will increase depending on the level of the age-based
rating. For example, a program with a TV-PG V(violence) rating may contain moderate
violence, while a TV-14 V(violence) rating may contain intense violence. So locking a
higher level option will automatically cause locking the options that has mor e sens it iv e
level.
TV RATING
Page 19

OSD OPERATION
SETUP MENU
Closed Caption(CC) Include below :
Caption Display On/Off.
Analog Caption Type
Select from below closed-caption modes for analog programs.
CC1,2,3,4 Displays corresponding caption channel of a analog program.(Usually be
set to CC1 for most programs.)
Text1,2,3,4 Displays corresponding text service channel of a analog program.
Digital Caption Type
Applies only to digital channels with closed caption.
Service1,2,3,4,5,6 These are different service data channels.
Digital CC Preset
Default/Custom If set to Custom, Digital CC Style is available.
Digital CC Style
Menu Language
Set the menu language: English/French/Spanish.
Clock
Set the Time Zone/Auto Clock/Day of time/Daylight Saving.
35
34
OSD OPERATION
CHANGE PASSWORD
At first you should enter the correct old password then enter new password twice.
Press V to select the source you want to lock, then press ENTER to set it to lock. If
anyone want to use this source, the password is needed.
SOURCE LOCK
SOURCE LOCK
1
2
3
Page 20

OSD OPERATION
CLOCK
Time Zone
Hawaii/Alaska/Pacific/Central/Mountain/Eastern/Samoa/Newfounland/Altantic
Auto Clock
If s et it to ON , th e TV wi ll sync the lo ca l c lock accor ding t o the DTV broadcasting time
automatically. Otherwise you can set the time manually.
Setu p Ti me
Set Au to Cloc k to Off, t he n you can set the tim e manua lly .
Note: In th e case of l oss of po wer, the c lock se tting w ill be lo st.
Day of Wee k
The T V wi ll calculate cu rrent d ay of wee k according to the time.
Daylight Saving Time
When Auto Clock set to ON, this item is available to enable daynight saving option or
not.
37
36
OSD OPERATION
DIGITAL CC STYLE
CC Siz e Small/Standard/Large/Default
CC Font Style0~7,Default
CC Opacity Flashing/Default/Solid/Translucent/Transparent/Default
Text Color Blue/Yellow/Red/Black/White/Green/Magenta/Cyan/Default
CC Background Opacity Flashing/Solid/Translucent/Transparent/Default
CC Background Color Blue/Yellow/Red/Black/White/Green/Magenta/Cyan/Default
Thi s menu is v alid on ly for di gital c losed cap tion of d igita l channels.
Page 21

39
OSD OPERATION
Media
Select one and press ENTER to play the music, and information abo ut the music appe ars.
Press to play the previous music.
Pre ss to pla y or paus e.
Pre ss to pla y the nex t music .
Pre ss to sto p.
Basic Operation:
Music
Pre ss SOUR CE and se lect Me dia inp ut sour ce, the n inser t USB sto rage de vice, a nd the
mai n menu wi ll disp lay.
Now Playi ng Pres s to view t he musi c now pla ying.
38
OSD OPERATION
OHTERS MENU
Blue Back
Set the screen background color blue or not when no valid signal input. When analog
TV in put and h as no sig nal, sn ow nois e will disp lay if th is option is cleared.
No Sig na l Pow er O ff
If it i s set, TV w il l automatical ly ente r stand by afte r 10 minu te s wi th out signal input.
No Operation Power Off
If it is set, TV will automatically enter standby after 3 hour s witho ut any op erati on.
All Reset
When you highlight the item, the system will note you that”Attention! If [All Reset] was
exe cuted , TV s ys te m is r eset”, and if you are sure to reset, press ENTER to reset .
Audio Only
When you highlight the item, the system will note you that “Attention! Hold on power
key 3 second to restore video”, and if you are sure not need to view (backlight is turned
off ), press ENTER to confirm. As the at tention, i f you w an t to wake up the video, please
hold on the power button for 3 sec on ds.
Page 22

41
OSD OPERATION
Slideshow Interval 1S/5S/10S
Slideshow Effect
Wip e Left/ Wipe Up /Wipe D own/C omb Sid e/Com b UpDown/ Check er/Mo saic/Fade
Blind Right/Blind Left/Blind Up/Blind Down/
Box in/Box out/Slide in Right/Slide in Left/Slide in Up/Slide in Down/Slideshow
Repeat/OFF
Slideshow Repeat On/Off
Musi c Pl ay Mo de P la y All /R on dom/Once
Music Play Repeat On/Off
Musi c Auto P la y On/O ff
Media Setting
40
Select one and press ENTER to view the photo, and you will see the
detail information for this photo at the lower left-corner, Suc h as name ,
size, and other information.
Zoom in/out and move the photo:
1 Pre ss ENTE R, and th e moving-icon appears on the photo.
2 Pre ss ENTE R again , and the p hoto wi ll zoom o ut, the n you can m ove the p hoto
controlling▼/▲/◄/►.
3 Pre ss EXIT t o zo om in and quit.
Information about the photo:
Note: The information will disappear after seconds.
OSD OPERATION
Photo
Page 23

43
APPENDIX
TROUBLESHOOTING
Non-defect Judgment
Attempt the foll ow ing steps to diag no se t he symptom you ha ve s ee n. If the
symptom couldn’t be corrected, please contact the dealer.
Check PartsPhenomena
The display monitor's
panel goes hot.
Unusual dots
Stripes on screen
Flicker fluctuate
(only in PC source)
The top of the monitor
gets hot.
LCD TV takes inside lighten phosphor. It may increase the
temperature of the screen in some occasions. It's not a defect.
Black dots and Bright points may appear on the LCD screen.
This is a structural property of the LCD panel and is not a defect.
Adjust the impulse phase may decrease stripes.(RGB in)
1.Frequency from PC is below 75Hz, enhance it.
But the picture may be less bright.
2.Turn on the upright filter. But it may descend
the upright resolution.
It may occur during long-time working. It's not a defect.
42
TROUBLESHOOTING
Attempt the following steps to diagnose the symptom you have seen. If the
symptom couldn’t be corrected, please contact the dealer.
The Sy mp tom o f Tro uble
Possible causes
Correct measures
Symptom
There are spots on the
screen, and the sound
is not clear when you
watch TV.
The picture is doubled
or tripled,
but sound is good.
Disturb Intermittent
No picture & No sound
1. The antenna cables may be
disconnected.
2. The antenna cables may be
disconnected or cankered.
3. The antenna cables may be
weak.
4. The weather is bad.
5. The transmitter is wrong.
1. The antenna cables may be
weak.
2. The television could not
tune correctly.
3. The weather is bad
4. The transmitter is wrong.
5. Television input incorrectly.
Your unit is being affected by
other television, automobiles,
fluorescent lamps,
portable radio.
1. Television is under AV mode.
2. The picture and volume are
set to minimum.
3. The television is under sleep
mode or electricity-saving mode.
1. Connect antenna cables
again or change the plug.
2. Connect antenna cables
again or change new cables.
3. Adjust antenna again.
4. There is no need to correct.
5. Check with local operator.
1. Adjust antenna again.
2. Search channels again or
adjust television.
3. There is no need to correct.
4. Check with local operator.
5. Check the outside devices.
Check the shield contains of
television and put the
television as far away as
possible through cables.
1. Check the picture/sound
control (enter main menu).
2. Make sure power in on.
NOTE : Consumer should not repair by yourself, high-voltage is in unit, please
request professional technician to help.
APPENDIX
Page 24

44
APPENDIX
PRODUCT SPECIFICATION
Radio frequency
(RF)
Input impedance: 75ȍ (un balance)
Incept system: NTSC/ATSC
Model
Resolution
Viewing size(mm)
PC best Mode
Sound output
Work˖5ᲇ-35 Store˖ 15 -60ᲇ - ᲇᲇ
Power consumption
Environment
conditions
Temperature
Relative humidity
Work˖20ˁ 80ˁ S to re˖20ˁ 90ˁ- -
Stand by power consumption
Power input
PC input
(VGA)
RGB Input impedance˖75ȍ
RGB Input range˖0.7±0.15Vp-p
RGB Input supported format: support resolution 640X480 (60Hz)
800X600 (60Hz) 1024X768 (60Hz) 1920X1080 (60Hz)
Audio (L /R) Input impedance˖20Kȍ
Audio (L /R) Input range˖500mVrms
RLC4036A
1920 X 1080
178(H )X 178(V)
1920 X 1080 @60Hz
10W +10W 8¡
ζ200W
ζ1W
AC 100-240V 50/60HZ
YPbPr
input
Y, PB/ CB, PR/CR Input impedance:
Y, PB/ CB, PR/CR Input range: Y: 1 ± 0.3 Vp-p
PB/PR (CB/CR): 0.7 ± 0.3 Vp-p
Audio(L/R) Input impedance: 20kȍ
Audio(L/R) Input range: 500mVrms
Input supported format: 480i, 480p, 576i, 576p, 720p, 1080i,1080p
75ȍ
HDMI
input
Input supported format: 480i, 480p, 576i, 576p, 720p, 1080i, 1080p
Video
input
(AV)
CVBS input impedance᧶75
CVBS input range᧶1±0 .3Vp-p
Audio( L/R) i nput impedance᧶20K
ȍ
Audio( L/R) i nput range᧶500mVrms
CVBS input supported format᧶NTSC
ȍ
Page 25

40
LCD
RLC4036A
Page 26

USB
MENU PRINCIPAL.................................................. .................................................. ...... 21
OPTIONS DE MENU D’IMAGE ............................................... .................................... 22~25
OPTIONS DE MENU DE SON ........................ .................................................. ...........26~27
OPTIONS DE MENU DE CANAL ............................................... .................................. 28~29
OPTIONS DE MENU PARENTAL............................................... .................................. 30~34
OPTIONS DE MENU DE CONFIGURATION.................................................................. 35~37
AUTRES OPTIONS DE MENU ............................................... .......................................... 38
OPTIONS DE MENU DE MEDIA ............................................... ................................... 39~41
42 43
.....44
~
Page 27

LCD
Page 28

( pour la télécommande )
Page 29

Page 30

LCD
LCD.
(1)
(2)
(3)
(4)
(5)
(6)
(7)
USB: entrée l’entrée du périphérique USB.
Connexion du panneau arrière
Contrôle panneau latéral droit
7
2
1
3
6
4
5
2
4
3
1
HDMI2
HDMI3
6
USB
9
10
7
8
HDMI1
5
11
L R
AV IN
AUDIO OUT
L R
L
R
12 13
AC 100-2 40V
~50/60HZ
PC AUDIO
1
2
3
1AC Power In : Entrer courant AC 00-240v.
ON/OFF:
AU DI O OUT: Un Audio out alog.
(Interrupteur principal) Puissance allumer / éteindre.
COAX RF VGA PC-AUDIO HDMI1 HDMI2
HDMI3
USB
P
b
PrY
R L
R L
AUDIOOUT
VIDEO RL
AV IN
COMPONENT
AC100-240V
~50/
60HZ
POWE
R
ON
/OFF
Se connecter à la sortie audio du PC sur l'ordinateur
Page 31

26
30
29
31
24
25
27
28
20
22
23
21
11
(1) Bouton STANDBY: Brancher la TV de l'alimentation puissance ou à l'extérieur au pouvoir.
(2)
Bouton AUTO:Appuyez sur pc image source à réglage automatique.
(3) Bouton MUET: Pressez à éliminer ou à rétablir le son de la TV.
(4) Bouton MODE d'image: Appuyez sur pour sélectionner l'image en mode preset.
(5) Bouton MODE de son: Appuyez sur ce bouton pour sélectionner le mode de son bouton.
(6) Bouton ASPECT: Appuyez sur ce bouton pour sélectionner l'image en mode 4:3, 16:9 etc
(7) Bouton DISPLAY:Appuyez sur ce bouton pour afficher l'état
actuel, la chaîne TV, la source d'entrée.
(8) Boutons numériques: Appuyez sur les boutons pour l'accès
direct aux chaînes de télévision.
(9) Boutons : Appuyez sur ce bouton pour
revenir au canal précédent.
(10) Boutons : appuyez sur le bouton pour l'entrée directe
dans le programme à chiffres 2 ou chiffre 3.
(11) Bouton MENU: LCD menu.
(12) Sortie: Quitter le menu OSD (sur l'écran d'affichage ).
(13) Bouton SOURCE: Appuyez sur bouton pour afficher toutes
les sources d'entrée
(14) Bouton SOMMEIL: mettez la durée du sommeil.
(15) Bouton “ ”: lorsque le menu OSD est en marche,
appuyez sur ce bouton pour faire marcher le foyer de
sélection en haut ou changer la disposition.
(16) Bouton " ": lorsque le menu OSD est en marche,
appuyez sur ce bouton pour faire marcher le foyer de
sélection en bas ou changer la disposition.
(17) Bouton " ": Lorsque l'OSD menu est en marche,
appuyez sur ce bouton pour déplacer la sélection à
gauche ou à confirmer les paramètres.
(18) Bouton " ": Lorsque l'OSD menu est en marche,
appuyez sur ce bouton pour déplacer la sélection à
droite ou à confirmer les paramètres.
(19) Bouton « entrée » appuyez sur ce bouton pour confirmer l'opération.
10
FONCTIONS PRINCIPLES DE LA TELECOMMANDE
INTRODUCTION
FONCTIONS PRINCIPLES DE LA TELECOMMANDE
INTRODUCTION
(20) Bouton CH-: Changez la chaîne en avant.
(21) Bouton CH +: Changez la chaîne en arrière.
(22) Bouton VOL-: Permet d'augmenter le volume.
(23) Bouton VOL +: Permet d'atténuer le volume.
(24) Bouton MTS: Appuyez sur ce bouton pour sélectionner les chaînes audio.
(25) Bouton CC: Appuyez sur ce bouton pour afficher le sous-titrage.
(26) Bouton EPG: Entrer un guide électronique des programmes.
(27) Bouton TV: Appuyez sur ce bouton pour sélectionner l'entréeTV.
(28) FAV- bouton: Changements à la Favorite canaux;
(29) FAV bouton: Fonction d’Ajouter / Effacer pour le favori.
(30) FAV + bouton: Permet de changer la place des chaînes favorites;
(31) CH LIST bouton: TÉLÉVISION Channel List bouton.
19
Page 32

LCD
Page 33

400mm
200mm
5
Page 34

1.Connectez le périphérique USB à l’entrée USB.
2.Sélectionnez la source de Média à l’utilisation du bouton SOURCE/ su r la télécommande.
3.Sélectionnez le mode Mp3, PHOTO pour mettre en marche.
USB
USB
Note: il ne peut en charge du format MP3 de la musique.
Page 35

Page 36

HDMI2 - HDMI3
STANDBY
STANDBY
STANDBY
1
Tout d'abord, vous branchez le cordon d'alimentation dans la prise
électrique, assurez-vous que le cordon d'alimentation est
complètement inséré dans la presse unit.Then la puissance
interrupteur ON / OFF sur "ON" comme indiqué.
Page 37

OPERATION OSD
MENU D’IMAGE
Appuyez sur ▼/▲ pour mettre en surbrillance l'une des options suivantes, puis
appuyez sur ENTRER ou ► pour entrer dan s le sous -menu s uivant pour le régler.
Press EXIT to clear on-screen menu or MENU back to the previous menu.
Appuyez sur SORTIR pour effacer le menu à l'écran ou appuyez sur MENU pour
ret ourne r au menu p récéd ent.
22
Lor sque le m ode d’i mage est ré glé sur l 'Util isate ur, les pa ramètres suivants peuvent
être ajustés manuellement. Appuyez sur le bouton PMODE raccourci sur la
télécommande pour sélectionner le mode d’image directement.
OPERATION OSD
23
TAILLE DE L’ECRAN
REGLAGE DE L’IMAGE
Met tre en su rbril lance l 'élém ent et ap puyez s ur ◄/► po ur séle ction ner. Film /
Dyn amiqu e / Stand ard / Uti lisat eur.
Bril lan ce / Contraste / Couleur / Tein te / Ne tte té
Mode d'Image
Mettez en surbrillance l'élément et appuyez sur ►, et une
barre de progression s'affiche,puis appuyez sur ◄/► pour
ajuster la valeur.
La teinte est disponible lorsque la TV analogique ou AV de
système NTSC.
Appuyez sur MENU pour retourner au menu de
Configurations d’Image.
REGLAGE DES VALEURS
Tail le d e l' éc ra n
Appuyer sur◄/► pour sélectionner le format d’image jusqu'à ce que la photo s’adapte
à l’é cran. L es opti ons son t diffé re ntes selon la sou rce d'e ntrée différente.
PC La rge / Poi nt par po int.
Point par Point signifie pas d’expansion à la ta il le d e pixel d’entré e originale.
AV / YPb Pr / H DMI / TV No rmal / La rge / Cin éma / Zoo m
Zoom est adapté pour regarder la TV analogique, qui a un contenu large (16:9) sur le
panneau de 16:9.
En général, chaque format d’image est adapté à un f or ma t d' entrée.
Par exemple Normal convient de regarder les émissions télévisées communes.
Large fera une expansion horizontale sur le panneau large.
Le cinéma est pour le film 2.39:1 (peut-être marqué comme 2.40:1 sur le disque) .
Brillance
Page 38

Faible
Page 39

Sortie audio digitale: PCM,original et
.
Sortie audio digitale
Sortie audio digitale
PCM
Page 40

29
28
OPERATION OSD
Sélectionnez Air ou Câble en fonction de votre source d'antenne. Lorsque vous
sélectionnez Air, la télévision peut recevoir le signal de radiodiffusion 8VSB. Lorsque
vous sélectionnez Câble, la télévision peut capturer le signal de radiodiffusion
64Q AM/25 6QAM an alogi que et cl air.
REGLAGE DU CANAL
Modifier les paramètres
Saut er & Fa vor is
1 App uyez su r▼/▲pour sé lecti onner l e canal q ue vous sou haite z défin ir.
2 App uyez su r ◄/►po ur mett re en sur brill ance l’élément correspondant,
et appuyez sur ENTRER pour activer ou désactiver.
Label
1 Press ▼/▲ to sel ect the c hanne l and ENT ER to ent er the ed it stat e.
2 Pre ss ▼/▲ to select the character, press ◄/► to move the cursor. Total seven letters.
Saut er Ré glez le canal à sau ter en ut ilisa nt
CH + / CH - p our voi r les can aux.
Favoris
Rég lez le ca nal dan s votre l iste de f avori s.
Label Rena me l abel of the chann el.
TYPE DE SIGNAL
Balayage automatique de canal
Il va chercher les canaux analogiques en premier, puis l es cana ux numériques.
Avant d'exécuter le balayage automatique de canal, confirmez que votr e t yp e
d'antenne est Air ou Câble. Si le type de signal est incorrect, il risque de ne pas trouver
le canal. Les numéros trouvés ne comprennent pas les programmes de cryptage.
OPERATION OSD
MENU DE CANAL
Note: Le menu est disponible uniquement à la so ur ce TV.
La li ste aff ic he les canaux que v ous déf iniss ez
comme favoris.
LISTE DES FAVORIS
CHANNEL LIST
“ABC”: Label du canal
Appuyez sur ▼/▲ pour sélec tionn er un can al
et ap puyez s ur ENTR ER pour l e voir.
Appuyez sur ▼/▲ pour sélectionner l'une des options suivantes, puis appuyez sur
ENT RER ou ► po ur entr er dans l e sous- menu su ivant p our le ré gler.
Appuyez sur SORTIR pour effacer le menu à l'écran ou sur MENU pour retourner au
menu précédent.
Page 41

OPERATION OSD
OPERATION OSD
CONTROLE PARENTAL
Note: Le m ot de passe de l’ut ilisa teur pa r défau t est de «0 000».
VERROUILLAGE DU CLAVIER
Régler pour empêcher d'être utilisé par de jeunes enfants ou tout autre usage
inattendu.
VERROUILLAGE DE SOURCE
Régler pour verrouiller la source spécifiée utilisée.
US V-CHIP
RATING DE F LMI
Ce sy stème d éfini t le cont rôle de rating, q ui vien t de règl es MPAA.
Rating
Défin
ies comme
G
PG
PG-13
R
NC-17
X
Aud ience s génér ales, con venan t à tous le s âges
Surveillance parentale recommandee. Certains documents
peuvent être inappropriés pour les enfants.
Fortement prevenu par parents.Certains documents seraient
ina pprop rié pou r les enf ants de m oins de 1 3 ans
Res trein te les en fants m oins de 1 7 ans néc essit ant l’a ccomp agnement
d’un parent ou d’un tuteur adulte pour l'affichage dans les cinémas.
Nul enfant de 17 ans ou moins admis en salle de cinéma.
Pour les États-Unis, l
e réglage comprend essentiellement les options suivantes: Film
Rating,Rating TV..
31
30
Contrôle Parental de Verro uil la ge
Les éléments suivants ne sont disponibles que si le mot de passe entré est correct.
V-CHIP
Incluant les paramètres ci-dessous:
V-Chip Etats-Unis, V-Chip Canada, bloc retranché, Classement téléchargeable,
Données claires téléchargeables.
Bloc Retranché est de verrouiller le programme qui n'a pas toute notation valide
Classification Téléchargeable est de contrôler les confugurations RRT5 qui
sont valables uniquement à certaine s canau x numériques.
Données claires téléchargeables sélectionner pour effacer les données
précédentes de classification téléchargeable
Seule audience adulte.
Page 42

OPERATION OSD OPERATION OSD
TV RATING
La TV r at ing compose deu x aspec ts: bas é sur l'â ge et bas é sur le co ntenu .
Grade
Définie comme
TV-Y
TV-Y7
TV-G
TV-PG
TV-14
TV-MA
Pou r tous le s enfan ts
Pou r les enf ants pl us âgés
Audience générale
Surveillance parentale
recommandée
For temen t préve nu par pa rents
Seu le audi ence mûre
Contenu
Définie comme
FV
D
L
S
V
Vio le nce fantasque
Dialogue suggestive
Langage forte
Situations sexuelles
Violence
Note: Le contenu de ratin gs v a augmenter en fonction du niveau de la fonction de
l'âge Par exemple, un programme avec un rating TV- PG V (Violence) p eu t co nteni r des
violences modérés 18 ans + Ce programme est limité aux la violence, tandis que TV-14
V (violence) peut contenir une violence intense. Alors le verrouillage d'une option de
niveau supérieur entraînera automatiquement les options de blocag e qui a un niveau
plus sensible.
V-CHIP Canadian
Pour le Canada, le réglage de rating comprend les options suivantes: Rating anglais,
Rating français
Rati ng en a ngl ais
Ces ratings sont pour les programmes qui utilisent le système de rating en anglai s.
Rating
C
C8+
G
La programmation générale
PG
L'orientation parentale
14+
18+
Rating
G
8 ans +
13 an s+
16 an s+
18 an s+
Ces ratings sont pour les programmes qui utilisent le système de rating en frança is.
33
32
Rati ng en f ran çai s
Description
Description
Enfant
Pou r l’enf ant de 8 an s ou plus
Aud ience s de 14 ans o u plus
Programme adulte
La programmation générale
Pas p our les j eunes e nfant s
Pas convenant aux enfants
moi ns de 13 an s
Pas convenant aux enfants
moi ns de 16 an s
Programme adulte
Page 43

1
2
3
Page 44

OPERATION OSD
OPERATION OSD
STYLE DE DIGITAL CC
Taille CC P etit / Standard / G rand / pa r défau t
Ecriture CC Style 0 ~ 7, par défau t
Opac it é CC clignotan t / par déf aut / Sol ide / tra nslucide / tr an sp arent / par défau t
Couleur de texte bleu / j aune / ro uge / noi r / blanc / v ert / mag enta / cy an / par
défaut
Opac it é de fo nd C C cl ignotan t / Solid e / translucide / tr an sp ar ent / par défaut
Couleur de fond CC bleu / j au ne / r ouge / noir / blanc / v ert / mag enta / cy an / par
défaut
Ce menu est valable uniquement pour le sous-titrage digital de canaux numériques.
MINUTERIE
Zone d e Mi nut er ie
Haw aii / Alas ka / Paci fique / C entra l /Mont agne / Es t / Samoa / Ter re -n euve / Atlantiqu e
Horloge Automatique
Si elle est activée, la TV se synchronise l'horloge locale en fonction du temps de
diffusion numérique automatiquement. Sinon, vous pouvez régler l'heure
manuellement.
Configuration de l'heure
Rég lez l'h orlog e automatique en arrêt, vous pouvez régler l'heure manuellement.
Note: Dan s le cas d' une per te de pui ssanc e, le rég lage de l 'horl oge sera perdu.
Jour d e la s ema in e
Le TV peut calculer le jour courant de la semaine en fonction du temps.
Heure d'été
Lorsque l'horloge automatique est mise en Marche, cette option est disponible pour
act iver l' optio n de sauv egard e jour et n uit ou pa s.
37
36
Page 45

OPERATION OSD
AUTRES OPTIONS DE MENU
Bleue Noire
Régler la couleur de fond d'écran bleue ou si aucun signal d'entrée valide. Lorsque TV
analogique est entré et n'a pas de signal, le bruit de la neige s'affiche si cette option est
désactivée.
Aucune alimentation de signal
Si elle est définie, TV se met automatiquement en veille après 10 minutes sans signal
d'entrée.
Aucune alimentation de fonctionnement
Si elle est définie, TV se met automatiquement en veille au bout de 3 he ur es sans
aucune opération.
Toute réinitialisation
Lorsque vous sélectionnez l'élément, le système vous noter que "Attention! Si [Toute
réinitialisation] a été exécutée, le système TV est réinitialisé », et si vous êtes sûr de
réinitialisation, appuyez sur ENTRER pour réinitialiser.
Audio unique
Lorsque vous sélectionnez l'élément, le système vous noter que « Attention! Appuyez
sur le bouton marche / arrêt pendant 3 secondes pour rétablir la vidéo» et si vous
n’avez pas besoin d'afficher (le voyant de fond est éteint), appuyez sur ENTRER pour
confirmer. Comme l'attention, si vous voulez vous réveiller la vidéo, maintenez sur le
bouton d'alimentation pendant 3 secondes .
38
39
OPERATION OSD
Media
Sél ectio nnez l' une et ap puyez s ur ENTR ER pour jou er la mus ique, e t les inf ormat ions
suivantes sur la musique apparaissent.
pour lire la musique précédente.
pou r lire ou m ettre e n pause .
pour lire la musique suivante.
pour arrêter.
Basic Operation:
Musique
App uyez su r SOURC E et séle ction nez la so urce d' entré e de Médi a, puis i nsére z le
périphérique de stockage USB et le menu principal s'affiche.
Fon ction nemen t en cour s, pour v oir la mu sique e n cours.
Page 46

40
41
OPERATION OSD
Diaporama Intervalle 1S/5S/10S
Effe t de D iap or ama
Ess uyez ga uche / Es suyer / e ssuye r Side pe igne / Up Down Pe igne / / Ch ecker /
Mos aïque / F ade Dro it Blin d / Blind g auche / s tore / Bl ind Dow n / Box dan s des Box /
Fai tes gli sser à droite / à g auche d ans Sli de / Glis ser Up / Do wn Glis ser / dia porama
Rép étiti on / OFF
Répétition de diaporama Marc he / Arrêt
Mode d e fo nct io nneme nt de mus iq ue Tout /Rondom / Un e fois
Music Play Repeat Marc he / Arrêt
Musi c Auto P la y Marc he / Arrêt
Réglage du Media
Sélectionnez l’une des photos et appuyez sur ENTRER pour afficher l a photo ,
et vo us verr ez les in forma tions d étail lées su r cette p hoto en b as à coin g auche,
com me le nom , µ la tail le, et d' autre s infor matio ns.
Zoom avant / ar riè re e t dép lacement de la photo:
1 Appuyez sur ENTRER, et le déplacement-icône apparaît sur la photo.
2 Appuyez de nouveau sur ENTRER, et la photo zoome arrière, vous pouvez déplacer
la photo contrôle▼/▲/◄/►.
3 Appuyez sur SORTIR pour zoomer avant et quitter.
Informations sur la photo:
Note: Les informations disparaissent après quelques secondes.
OPERATION OSD
Photo
Page 47

43
42
LCD
LCD
Page 48

44
1920 X 1080
178 (H )X 178(V)
1920 X 1080 @60Hz
10W +10W 8
ζ200W
ζ1W
RLC4036A
1920X1080(60Hz)
AC 100-240V 50/60HZ
 Loading...