

Page 1
RLC1906
19” NTSC
LCD TV
READ CAREFULLY BEFORE OPERATION
o
.
f
c
n
N
I
o
,
r
a
c
t
i
h
r
e
m
A
h
e
n
R
i
l
a
n
V
U
d
T
C
US
Page 2

1
CONTENTS
..............................................................................................03~07
....................................................................................................................01
...............................................................................................................02
......................................................................................................................08
.......................................................................................................21
........................................................................................................22
..................................................................................................................22
....................................................................................................09
..................................................................................................13
.................................................................................................22
....................................................................................................21
....................................................................................................21
ACCESSORIES
TROUBLESHOOTING
PRODUCT SPECIFICATION
CONTROLS
CONNECTION OPTION
REMOTE CONTROL KEY FUNCTIONS
INSTALLING BATTERIES
TURNING THE TV ON
VOLUME ADJUSTMENT
PROGRAM SELECTION
SLEEP TIMER
RETURN FUNCTION
SOURCE INPUT SWITCH
STANDARD INSTALLATION
STANDARD INSTALLATION
NOTES OF WALL INSTALLATION
APPENDIX
INSTRUCTION
BASIC OPERATION
OSD OPERATION
INSTALLATION
CONTENTS
CONTENTS
ACCESSORIES
SAFETY INSTRUCTION
SAFETY INSTRUCTION
.................................................................................................29~30
.........................................................................................31
...............................................................................................15
...............................................................................................14
VIDEO menu options
AUDIO menu options
TV menu options
Function menu options
PC menu options
..........................................................................10~12
.......................................................................................16
...............................................................................................................27
.................................................................................................26
..............................................................................................................28
...........................................................................................23~24
........................................................................................................25
................
.................................................................................................17
...........................................................................18
ANTENNA CONNECTION
EXTERNAL EQUIPMENT CONNECTIONS
S-VIDEO CONNECTION
PC CONNECTION
HDMI CONNECTION
YPBPR CONNECTION
EARPHONE CONNECTION
CONNECTIONS & SETUP
............................................................................................................19
......................................................................................................20
...............................................................................................20
........................................................................................................19
....................................................................................................18
Page 3

3
SAFETY INSTRUCTION
This LCD TV is engineered and manufactured to comply with the international
safety standards. The same as other electrical equipments,all the safety and
operating instructions should be read before the appliance is operated.
About Symbols
This manual includes different kinds of symbols. To ensure the correct using,
as well as to avoid danger to users and others, the following introductions
should be adhered to.
No Operations when Problems Occur
No Entry of Liquid or Object
If any event out of the ordinary, such as smoking, smell, no picture,
no voice, over loud voice, damage of part or cable, and inside of liquid or
other things, there might be fire or electrical shock. Under such occasions,
please unplug the TV set, make sure there is no smoke or smell, and get
contact with the dealer. DO NOT repair it by yourself, or there might be hurt
to human body.
There might be fire or electrical shock if liquid or other object get inside the
appliance. Please pay more attention to your children. If it happens, please
unplug the TV set, make sure there is no smoke or smell, and get contact
with the dealer.
This is a WA RNIN G symbol. If the users ignore this warning, there might be
personal damage or even death due to incorrect operation.
This is an ATTENTION symbol. If the users ignore this warning, there might
be damage to the person or to the appliance due to incorrect operation.
Ensure that the following accessories are included with your TV.
If an accessory is missing, please contact the dealer where you
purchased the product.
ACCESSORIES
User Manual
Remote control
Batteries
■ Keep the TV away from rain and moisture.
■ Do not set liquids, including flower vases
and vessels filled with chemicals or water etc.
On top of the TV or around it.
■ Do not set metal or tinder on top of
the TV or around it.
2
RLC1906
19” NTSC
LCD TV
READ CAREFULLY BE FORE O PERATION
.
o
c
f
n
I
N
a
o
,
c
t
r
A
e
r
h
i
m
a
l
n
R
i
h
e
n
V
U
d
T
C
US
Page 4

5
This appliance shall be connected to a mains socket outlet with a protective earthing
connection. If the provided plug does not fit into your outlet, consult an electrician for
replacement of the obsolete outlet. Take care of the cord, or there might be fire or
electrical shock due to broken cord. Please make sure that the cord is not over hot,
pressed, or tensed. If the cord has problem (the core string emerges or the cord breaks),
please get contact with the dealer.
Connect to Earthing Connection
■ Never allow heavy objects such as the TV set itself to be placed on the power cord. Never
cover the cord with table cloth, for it may lead you to set heavy object on the
cord duo to ignorance.
■ When removing the power plug from the socket, always hold
onto the plug, never pull by the cord.
■ Don’t set the cord next to heaters.
■ Don’t touch the plug right after it is unplugged to avoid electrical shock.
■ Don’t touch the plug during lightning.
■ Don’t allow cord to become knotted or tangled.
■ Protect the power cord from being walked on or pinched particularly at plugs, convenience
receptacles, and the point where they exit from the apparatus.
4
There is high voltage subassembly inside the TV set, which may cause fire or
electrical shock during repair.
There will be damage if the TV drops or breaks.
Don’t interfere with its proper ventilation when the TV is working or has just been
unplugged, or the display may be spoiled or life shortened due to over heating. In order
to keep proper ventilation, please allow a clearance of 10 inches on each side from the wall.
This appliance should not be exposed to dripping or broken. Continuous use
might cause fire or electrical shock. If the panel gets broken, please unplug
the TV set, and get contact with the dealer.
Don’t Remove or Rejigger the TV Set
Set the TV on Balanced Spot
Ventilation
NO Quiver or Concussion on TV Set
■ DO NOT remove cover ( or back ).
■ Don’t set the TV on uneven, oblique, or shacking surface.
■ Don’t set any object around the ventilation openings of the appliance.
■ Don’t block the ventilation openings.
■ No inversion of the screen.
■ Don’t cover the appliance with table cloth.
■ Don’t set the appliance on carpet, bedding, or near to curtain.
Unbefitting power sources may cause fire or electrical shock. The appliance
should be connected to a power supply of the type described in the operating
instructions or as marked on the appliance.
Incorrect connection of power cord may cause fire or electrical shock.
Power Sources
Power Cord Connection
■ Power supply cord should adapt to the socket outlet.
■ Don’t touch the cord with wet hands.
■ Please check the pontes if it is clean ( no dust ) before use.
If it is not, please do the cleaning with dry and soft fabric.
■ Fix the power cord steadily in to the socket outlet to avoid it
becoming flexible, or it may have malfunction.
■ Don’t cut off the cord, for it may debase the performance. If you want to lengthen it,
please make an appropriate one or get contact with the dealer.
■ If you want to change the fuse in the connector plugs, please change it with the
same resistance and model.
Dispose the Batteries Carefully
■ Incorrect disposal of batteries may cause fire or human damage, and even explosion.
■ Don’t throw batteries into fire or water.
■ Keep the batteries far away from fire or heat.
■ Keep the batteries under cool and dry environment.
■ Match the batteries to the (+) and (-) marks in the battery compartment.
■ Don’t charge up the batteries.
■ Don’t impact the batteries.
■ Please use the batteries that are appointed in the user’s manual.
■ Please treat the used batteries with the observance of the local law.
If you set the appliance under moisture or dust environment, it might cause
fire or electrical shock due to lampblack or erosive gas.
Keep the TV Set away from Moisture and Dust
■ Don’t set the TV in kitchen, places nearby heaters, or places of lampblack and
moisture. For heat from high temperature may affect the display or other
components, and cause distortion, meltage, and fire.
■ Don’t set the TV, remote control, or other components under sun or near heaters.
■ Don’t set the TV where the difference in temperature is great.
SAFETY INSTRUCTIONSAFETY INSTRUCTION
Page 5
Please watch TV indoors where there is proper brightness. Please make sure
the sunlight will not fall directly on the picture screen. Please relax your eyes
every now and then by taking an overlook.
Before cleaning, please turn off the TV and unplug the power cord.
Clean the screen with a soft cloth moistened in warm water.
A mild soap may be used if the screen is extremely dirty.
Dry the screen with a soft cloth after cleaning.
Clean the TV and control panel with a soft cloth. A mild soap may be used if the
screen is extremely dirty. Dry them with a soft cloth after cleaning. Choose
the right cleanser, or it may fade the TV set, or make it scratched or cracked.
Watching TV
How to Clean the Picture Screen
How to Clean the TV Set
To Avoid Wireless Receiver
This TV set is designed to comply with the EMI standard to avoid problems of wireless receiver.
■ Set the TV far away from wireless receiver.
■ Adjust the wireless’s antenna to avoid interference on TV;
■ Make sure the TV set is out of interference with the wireless;
■ The antenna should use coaxial line.
■ Turn off all the equipments, except the TV set to check if the TV interferes
the wireless receiver;
■ If the problem occurs, please check all the notes above.
6
Don’t Set the TV in the places below:
■ Under sun or near heaters.
■ Places where difference in temperature goes great.
■ Places that have bad ventilation.
■ Near fire.
■ Moist places such as bathroom.
■ Places that human walks frequently or places where are quivering fiercely.
■ Places where is deflective or unbalanced.
SAFETY INSTRUCTION
7
SAFETY INTRODUCTIONS
Notes of Cable Connection
■ Make sure that all cables, including connector plugs, extend lines, and connecting cables between
equipments are specify by the manufacturer. Before changing the connection, please turn off
the power and unplug the power cord.
■ The power cord should not be the same one as other equipments.
■ Use plugs with a protective earthing connection.
Notes of Transportation
Other Notes
Notes on Installation
Please handle with care during transportation. Please use the original carton,
or it may damage the TV set. Please retain the original carton.
■ The sensor of remote control will not work if the lights, such as sunlight or bright indoor
illumination fall directly on it. Make sure that there is no interference from wireless, or it
may cause distortion of the picture or unusual sound. There should no equipment like
mobile telephone or wireless receiver.
Impacts on remote control may lead to trouble.
Handle the remote control with care
■ Please don’t throw the remote control;
■ Don’t set heavy object on remote control.
■ Please dispose the appliance with the observance of the local law.
■ Do be ware of all electrical equipments.
■ Never use wooden screws and bracket to fix. Use those that are specified by the manufacturer.
■ Use only the stand, tripod, bracket, or table specified by the manufacturer, or sold with the
apparatus. Use caution when moving the apparatus.
■ Pleas follow all the operating instructions of the wall or ceiling mounting.
■ Use only the attachments/accessories specified by the manufacturer.
■ If you have any questions on installation, operation, or safety, please call the dealer.
Page 6
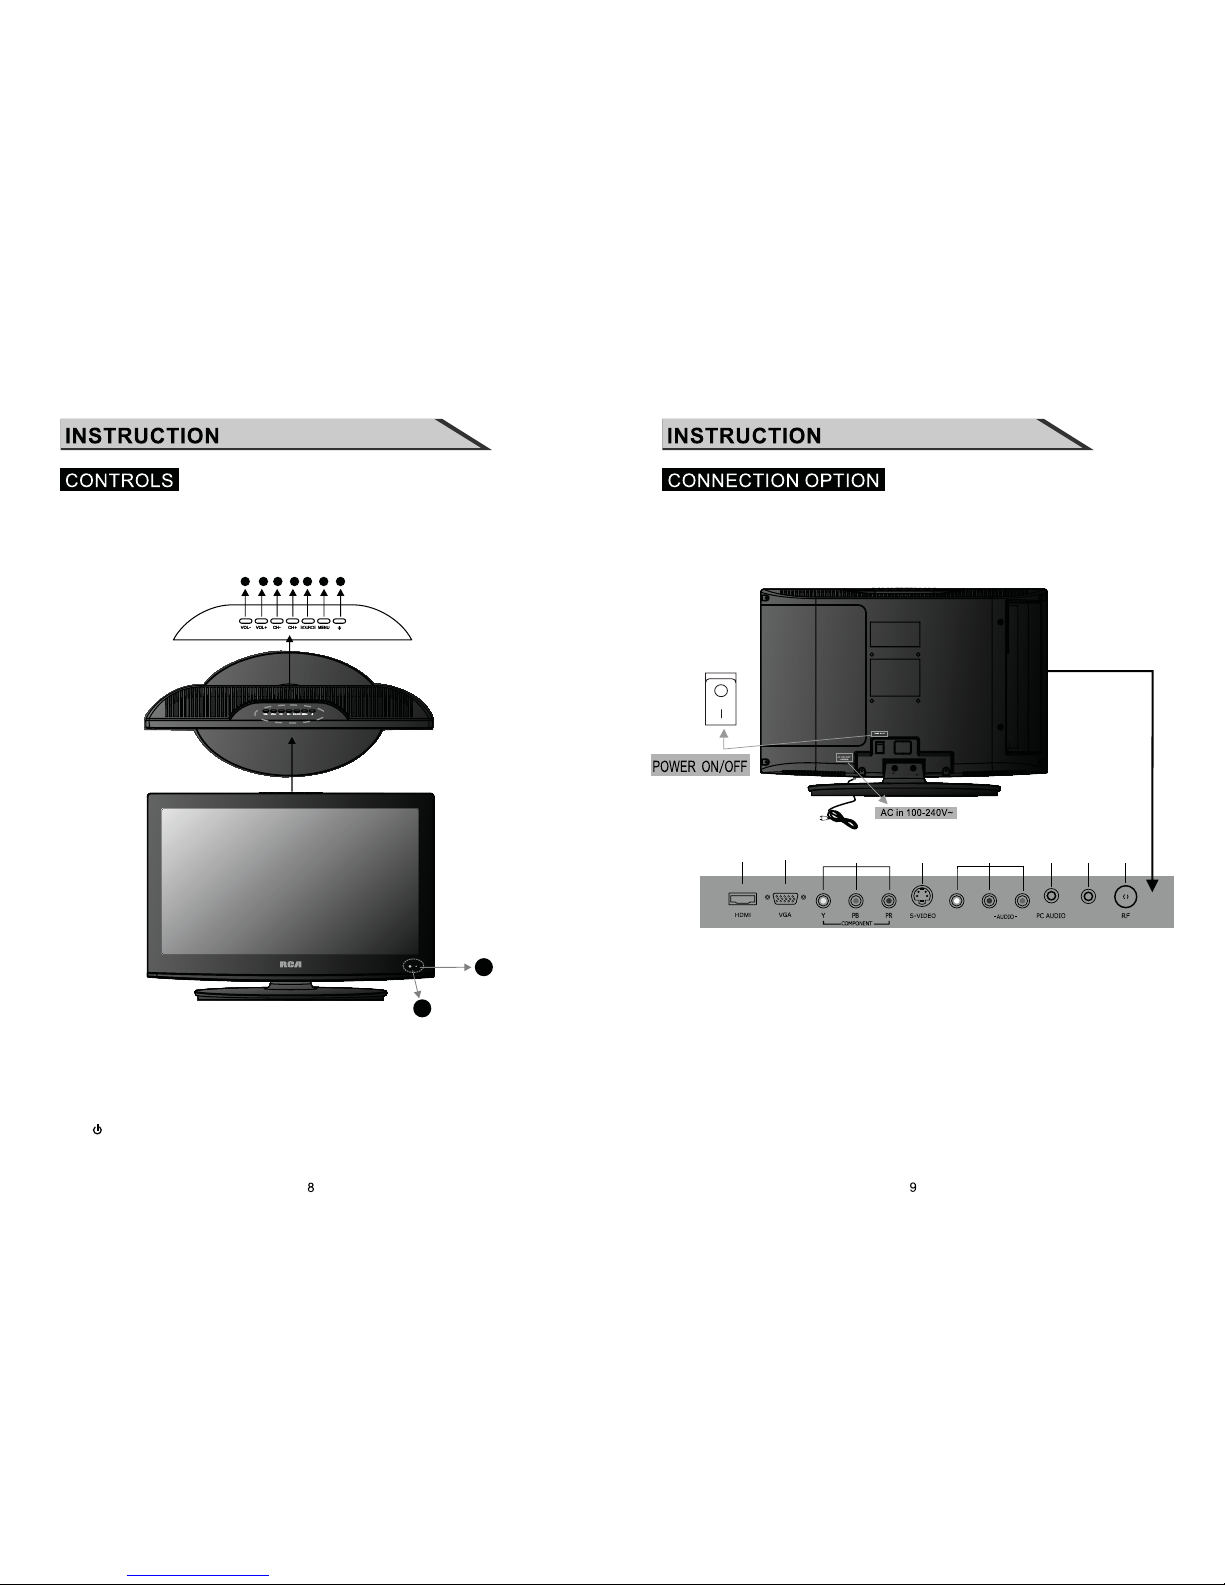
Back Connection Panel
This is the back panel LCD TV
■ This is a simplified representation of a back panel.
Here shown may be somewhat different from your TV.
This manual explains the features available on the model of 19 inch LCD TV.
Front Panel Controls
■ This is a simplified representation of a front panel. Here shown may be somewhat
different from your TV.
(1): (VOL-) Press Vol ume- to decrease the volume.
(2): (VOL+) Press Volume+ to increase the volume.
(3): (CH-) Press the button to down the channel.
(4): (CH+) Press the button to up the channel.
(5): (SOURCE) Press this button to select AV source or TV source.
(6): (MENU) Press this button to display the OSD menu.
When the OSD menu is on, press this button to exit the menu.
(7): ( ) Press this button to standby mode.
(8): Indicator.
(9): Remote control sensor window.
(01) HDMI Input: Connect HDMI signal.
(02) PC VGA Input: Connect PC VGA signal output.
(03)
YPBPR(Y:GREEN, PB:BLUE, PR:RED) Video Input: Connect the component image output
of your AV devices here. Then Connect audio output of your AV devices to R and L.
(04) S-VIDEO Input: Connect S-video output of your AV device.
(05) AV Input: Connect composite video output of your AV device and Connect
the audio output of your AV devices to R and L.
(06) PC AUDIO Input: Connect PC audio input.
(07) EARPHONE output: Connect to headphone output(
3.5mm).
(08) RF: Antenna Input (75 ohm).
(09) AC100~240V: AC 100~240V to this input.
(10) POWER
ON/OFF: (Main Power Switch) Power turn on/off.
L R
EARPHONE
9
8
2
1
3
6
4
7
5
VIDEO
1
2
3
4
5
6
7
8
/
9
10
Page 7
11
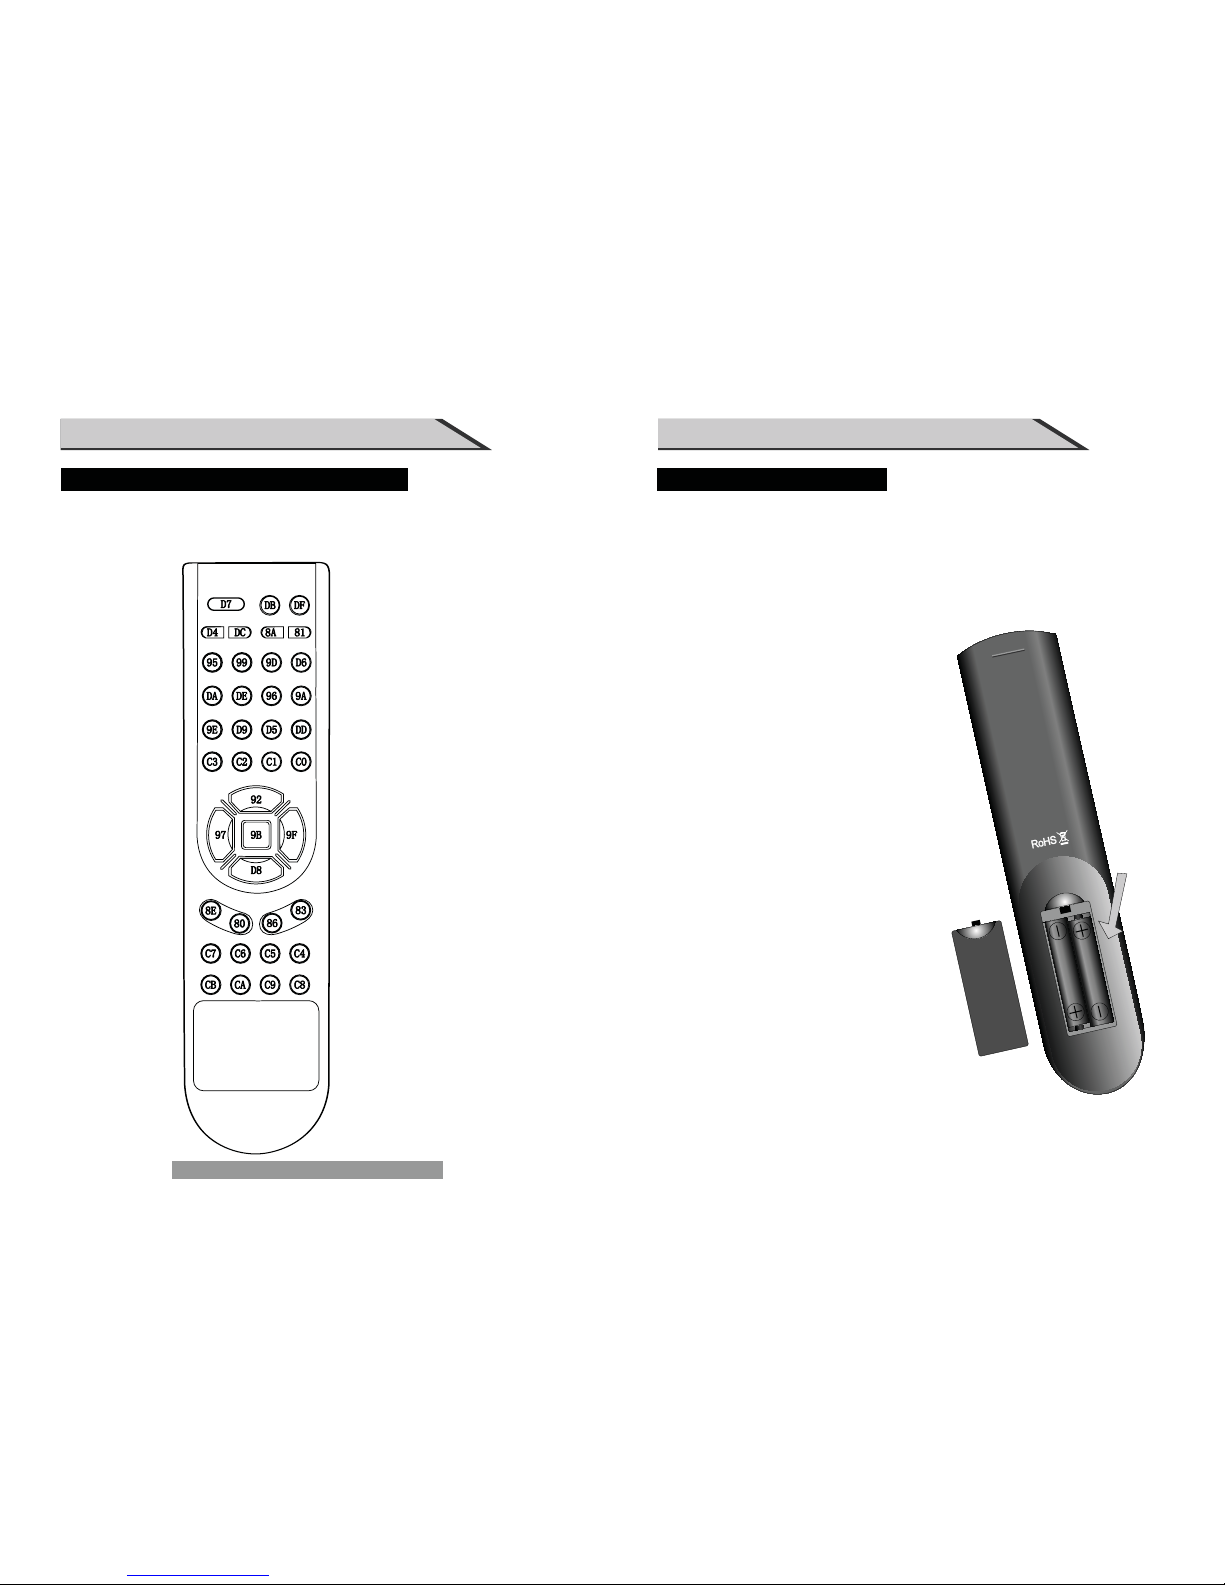
REMOTE CONTROL KEY FUNCTIONS
INSTRUCTION
10
REMOTE CONTROL KEY FUNCTIONS
INSTRUCTION
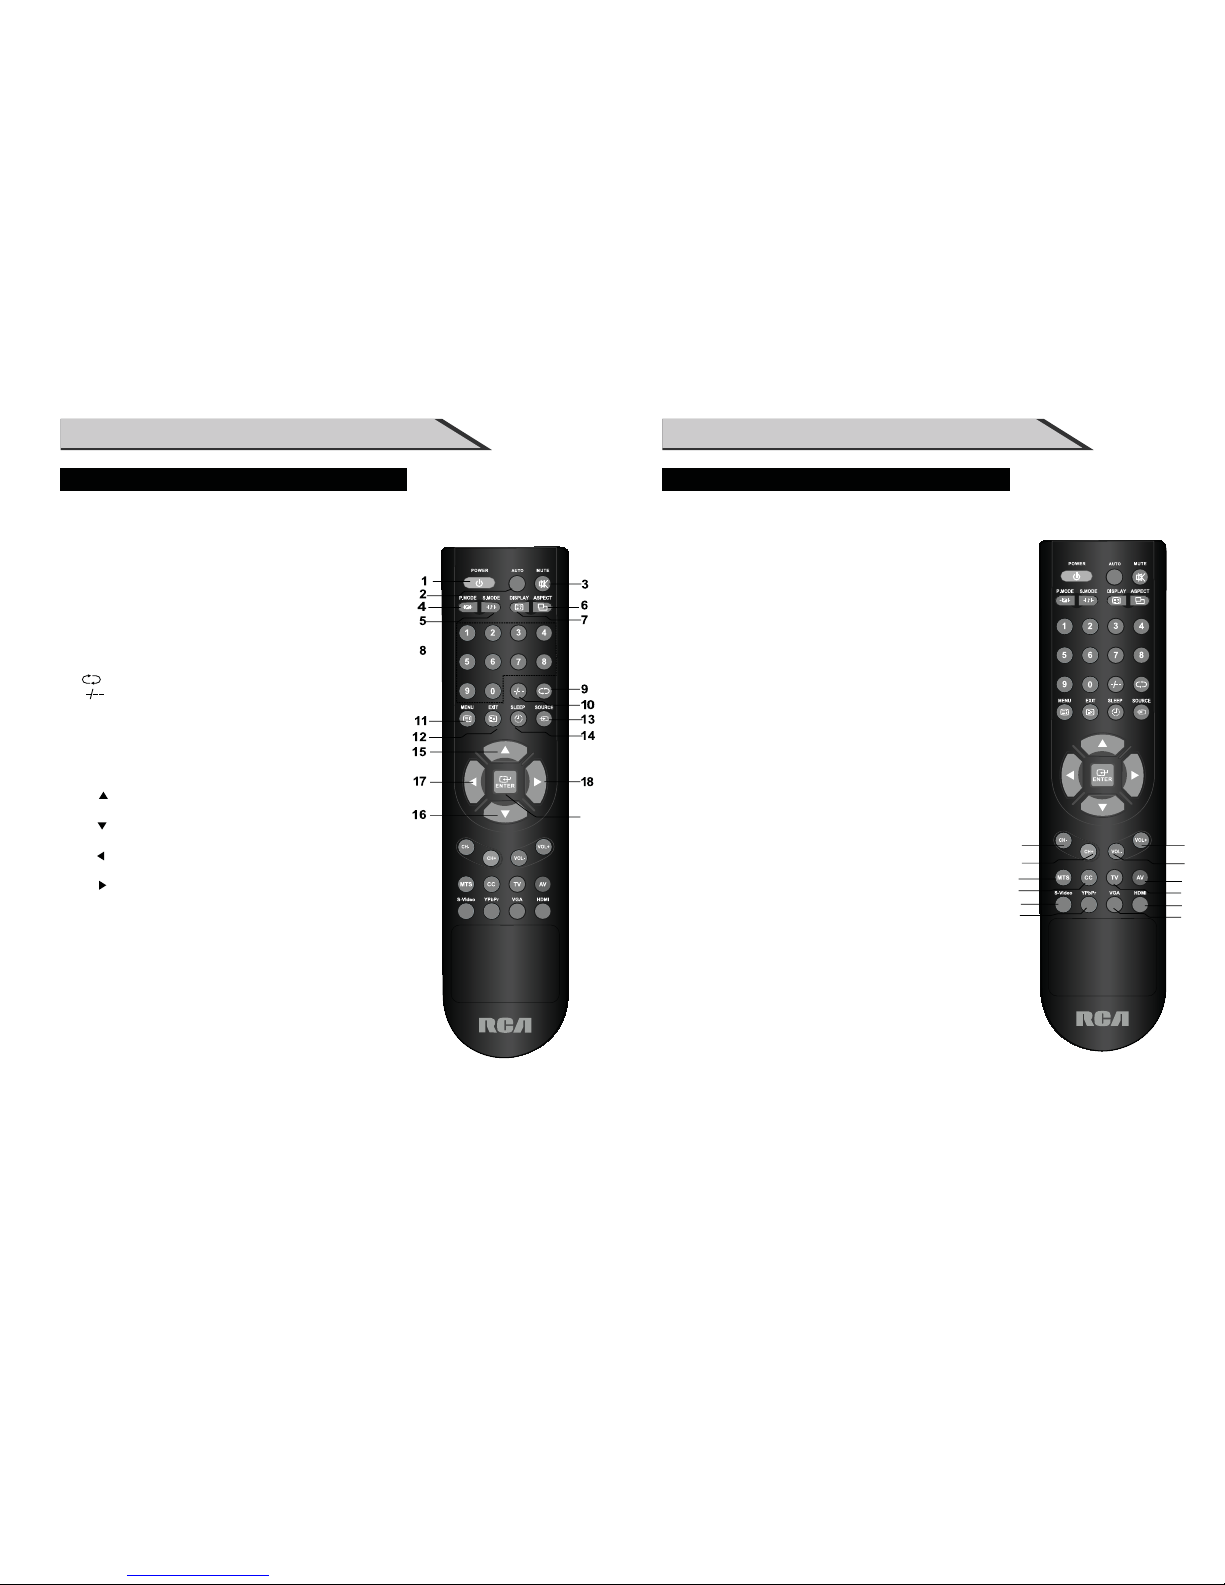
(1) POWER button: Switches the set on from power on or off to power.
(2) AUTO button: Press to pc source picture auto adjust.
(3) MUTE button: Press to eliminate or restore the TV sound.
(4) P.MODE button:
Press to select preset picture mode.
(5) S.MODE button:
Press to select Sound mode button.
(6) ASPECT button:Press to select picture mode 4:3, 16:9etc.
(7)
DISPLAY button: Press to display current status,
TV channel ,input source.
(8) Numerical buttons:
Press number buttons for direct access TV channels.
(9) button:
Press to return to previous channel.
(10) button: Direct input numerical button
for 2 digit or 3 digit program.
(11) MENU button: Menu selection.
(12) EXIT button: Exit the OSD menu (On-screen display).
(13) SOURCE button:
Press to display all possible input sources
(14) SLEEP button: Sets the sleep timer。
(15) " "button: When OSD menu is on, press this button
to move the selection focus up or change settings.
(16) " "button: When OSD menu is on, press this button
to move the selection focus down or change settings.
(17) " "button: When OSD menu is on, press this button
to move the selection focus left or confirm the settings.
(18) " "button: When OSD menu is on, press this button
to move the selection focus right or confirm the settings.
(19) " ENTER "button: Press the button to confirm the operation.
(20) CH- button: Changes the channels down.
(21) CH+ button: Changes the channels up.
(22) VOL- button: Adjusts the volume down.
(23) VOL+ button: Adjusts the volume up.
(24) MTS button: Press to select the audio channels.
(25) CC button: Press to display the closed caption.
(26) AV button:Press the button to select the AV input.
(27) TV button:Press the button to select the TV input.
(28) S-Video button:Press the button to select the S-Video input.
(29) YPbPr
button: Press the button to select
the
YPbPr input .
(30) HDMI
button: Press the button to select
the HDMI input
(31) VGA
button: Press the button to select
the VGA input
.
19
24
25
22
23
26
27
20
21
28
29
30
31
Page 8
13
12
INSTRUCTION
INSTALLING BATTERIES
(1)Open the battery compartment cover on the back side
(2)Insert two 1.5V batteries of AAA type with correct polarity
(3)Close the battery compartment cover on the back side
Notes on using the Remote control.
Do not strike or drop the remote.
Do not expose the remote control to liquids and do not
place it in humid environment.
Do not install or place the remote control in direct sunlight.
The heat may damage the remote control.
Notes on Using Batteries
The use of the wrong type of batteries may cause chemical
leaks and/or explosion.
Please note the following:
Always ensure that the batteries are inserted with the
positive and negative terminals in the correct direction
as shown in the batteries compartment. Different types
of batteries have different characteristics. Do not mix
different types. Do not mix old and new batteries.
Mixing old and new batteries will shorten battery life
and /or cause chemical leaks from the old batteries.
When batteries fail to function, replace them immediately.
Chemicals which leak from batteries may cause skin
irritation. If any chemical matter seeps out of the batteries,
wipe it up immediately using a dry cloth.
Due to varying storage conditions, the battery life for the
batteries included with your unit may be shortened.
If the remote control is not used for a long period of
time, remove the batteries.
INTRODUCTION
This is the code for remote control of RLC1906,if you want to change to a
universal remote control, you can edit this code into your universal remote control.
REMOTE CONTROL KEY FUNCTIONS
Universal remote code
Not included.
The universal code for this remote is: 2295.
Page 9
15
14
INSTALLATION
(1) Secure the wall brackets with the bolts (not provided as parts of the product, must
purchase separately) on the wall. Match the height of the bracket that is mounted on
the wall. The wall bracket is of nomal dimension. Please see the position of the wall
brackets bolts as follow picture .The actual dimension of the wall brackts bolt should
according to the products.
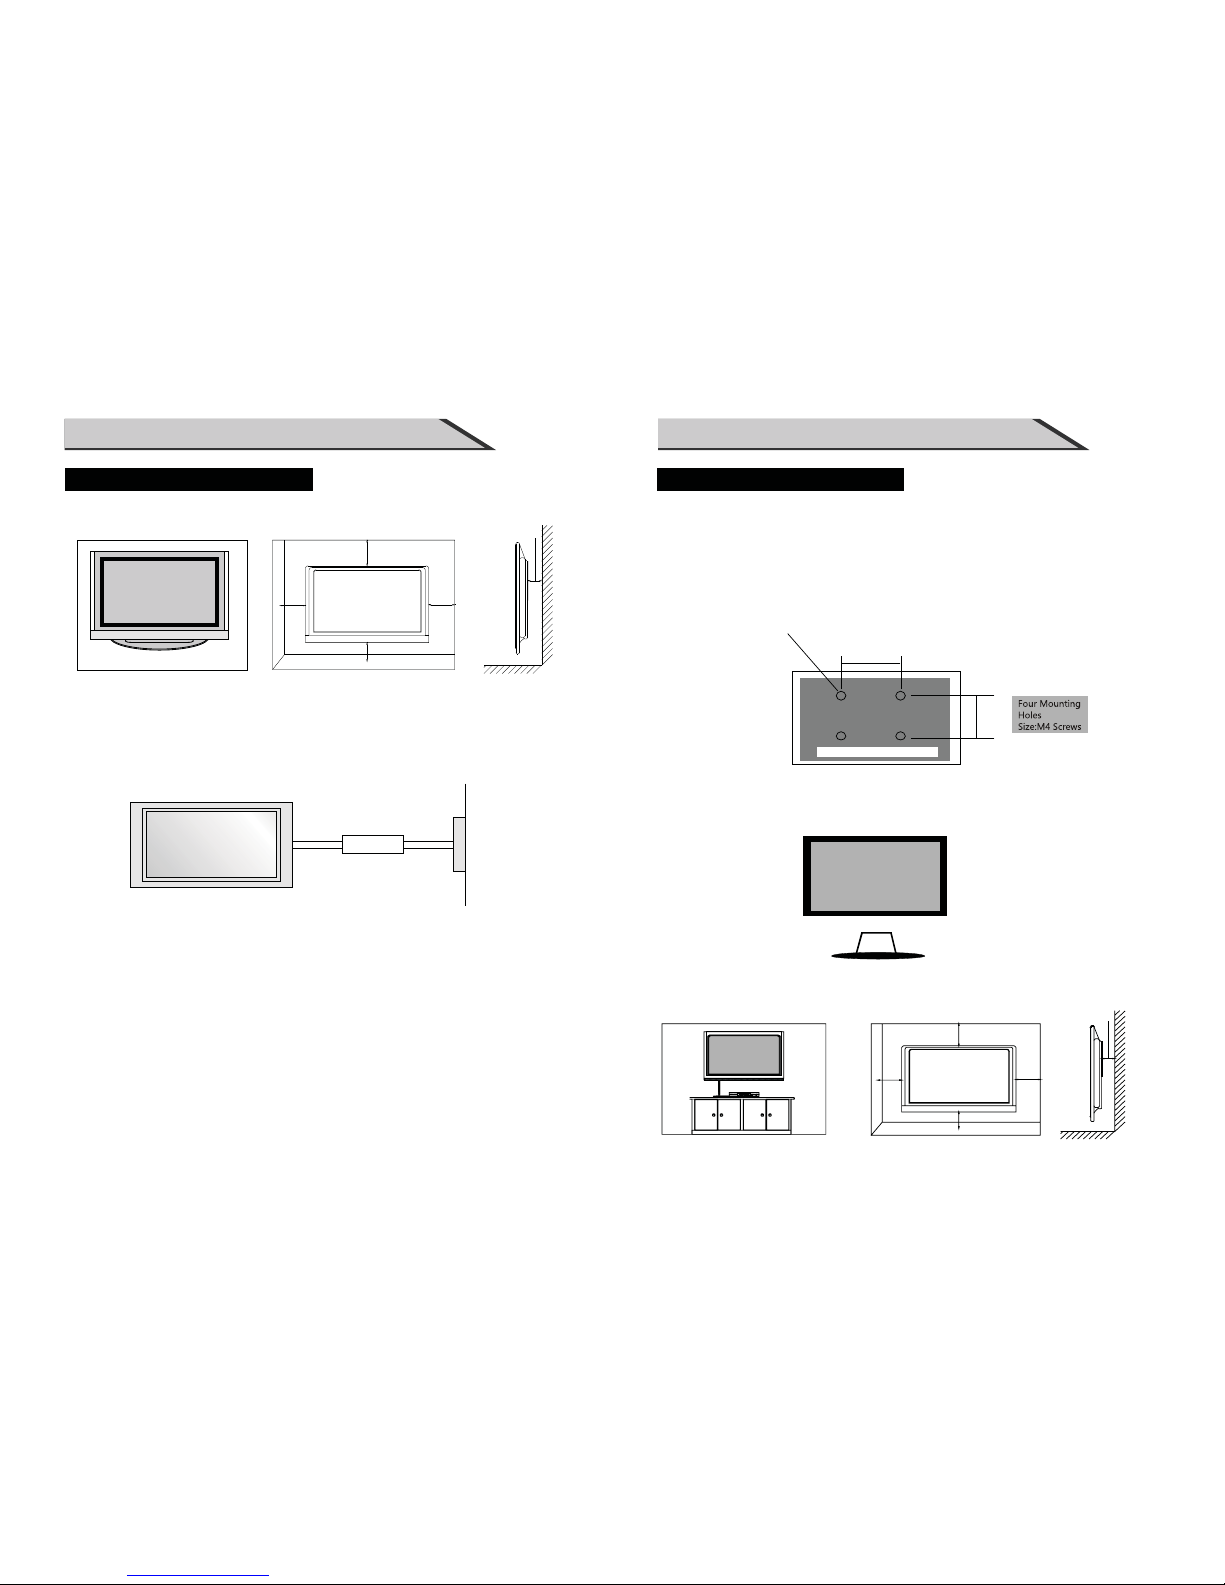
b. Wall Mount: Horizontal installation
STANDARD INSTALLATION
(2) Remove the table stand of the TV when install the TV on a wall as follow:
(3)For proper ventilation, allow a clearance of 10” on each side from the wall.
The wall brackets bolt position
10inches
10inches
10inches
10
inches
75mm
75mm
This is the default installation way of the TV.
10inches
10inches
10inches
10inches
10inches
Ensure that you connect the earth ground wire to prevent possible electric shock.
If grounding methods are not possible, have a qualified electrician install a
separate circuit breaker.
Do not try to ground the unit by connecting it to telephone wires, lightening rods
or gas pipes.
a. Desktop Pedestal Installation
STANDARD INSTALLATION
■The TV can be installed in various ways such as on a wall, or on a desktop etc.
■The TV is designed to be mounted horizontally.
Power
Supply
Short-Circuit
Breaker
INSTALLATION
Page 10
CONNECTIONS & SETUP
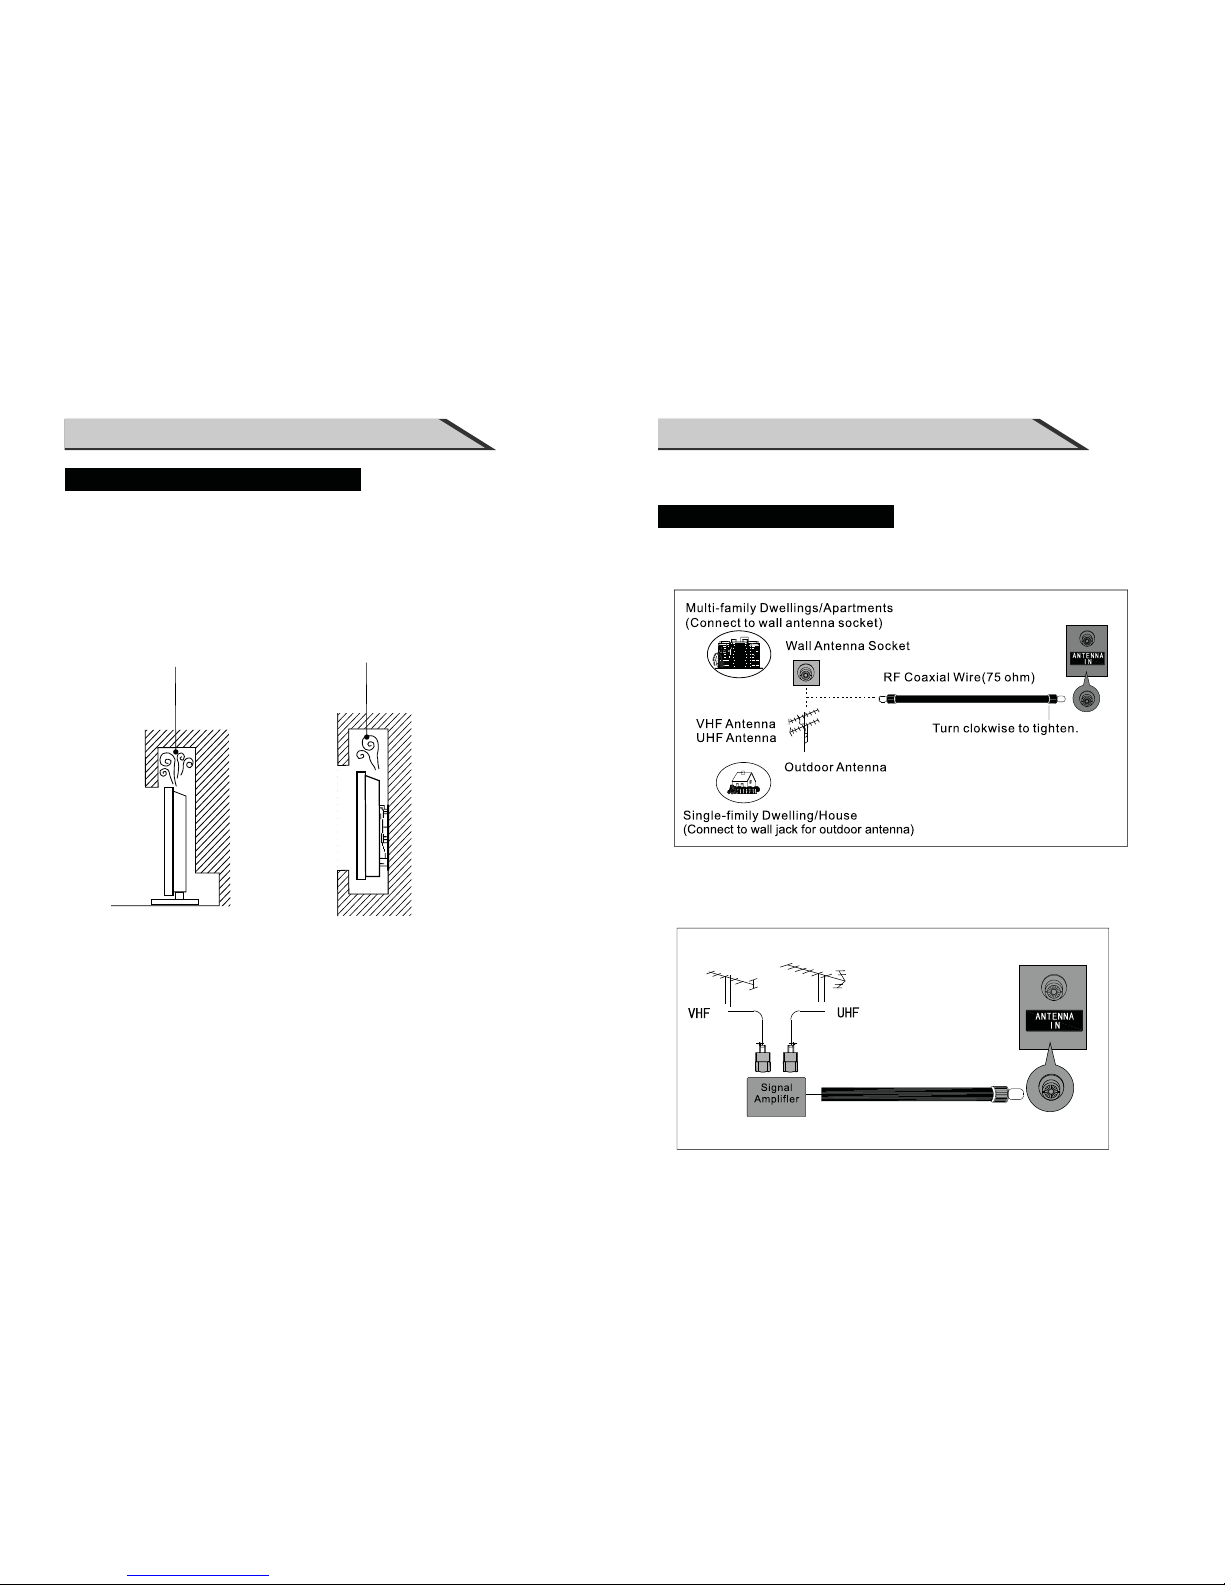
ANTENNA CONNECTION
■For optimum picture quality, adjust antenna direction.
■An antenna cable and converter are not supplied.
■To prevent the equipment damage, never plug in any power cords until
you have finished connecting all equipment.
16
■In poor signal areas, to get better picture quality, install a signal amplifier
to the antenna as shown below.
■If signal needs to be split for two TVs, use an antenna signal splitter for connection.
17
INSTALLATION
(1) Keep the TV stand for may be future use.
(2) Don’t set the TV set on shelves, carpets, beds, or closets.
(3) Don’t cover the TV with curtain or paper.
(4) Leave
ventilation space to avoid the following:
No good for ventilation No good for ventilation
NOTES OF WALL INSTALLATION
Page 11
19
1818
CONNECTIONS & SETUP
1. Connect the HDMI output of the DVD to
the HDMI Input jack on the set.
2. Select HDMI source with using
the SOURCE/ button on the remote control
3. Refer to the DVD player's manual for
operating instructions.
1. Connect the VGA output of the PC to the PC VGA Input jack on the set.
2. Connect the audio outputs of the PC to the PC Audio Input jack on the set.
3. Tur n on the PC and the set.
4. Select PC source with using the SOURCE/ button on the remote control.
5. Refer to the PC manual for operating instructions.
PC
When connecting with a HDMI cable
HDMI CONNECTION
(HDMI cable not included)
PC CONNECTION
When connecting with a D-sub 15 pin cable(VGA)
CONNECTIONS & SETUP
1. Connect the AV jacks between TV and external equipment. Match the jack colors
(Video = yellow, Audio Left = white, and Audio Right = red).
2. Select AV source with using the SOURCE/ button on the remote control.
3. Operate the corresponding external equipment. Refer to external equipment
operating guide.
EXTERNAL EQUIPMENT CONNECTIONS
Video Game Set
PHILIPS
PHILIPS
DRIVE
DRIVE
TURBO
TURBO
Camcorder
AV
S-VIDEO CONNECTION
1. Connect the S-VIDEO output of the DVD to the S-VIDEO input on the set.
2. Connect the audio outputs of the DVD to the Audio Input (L/R) jacks on the set.
3. Tur n on the DVD player, insert a DVD
4. Select S-VIDEO source with using the SOURCE/ button on the remote control.
5. Refer to the DVD player's manual for operating instructions
When connecting with a S-VIDEO cable (cable not included)
DVD
Page 12

21
20
If your TV will be turned on, you will be able to use its features.
Press the CH +/CH- button on the control panel or the Numerical keys
on the remote control.
TURNING THE TV ON
VOLUME ADJUSTMENT
PROGRAM SELECTION
BASIC OPERATION
First, connect power cord correctly. When the indicator
illuminates red is standby mode.
Press the POWER / button on the remote control then the
indicator illuminates orange, after the TV initialization finished,
the indicator turns to green. It means the TV is in power mode.
When you press the POWER / button on the remote
control once again, the power/stand-by Indicator illuminates red
in standby mode.
If you intend to be away on vacation, disconnect the power
plug from wall power outlet.
Tur n in g on the TV
1. Press the VOL +/VOL- button on the control panel or the
VOL +/VOL- button on the remote control to adjust the volume.
2. If you want to switch the sound off, press the MUTE/ button
on the remote control.
3. Yo u can resume the sound by pressing the MUTE/ button
on the remote control.
CONNECTIONS & SETUP
TV
1. Connect the 3.5 mm earphone plug into the
headphone socket of the unit on left side.
2. Unplug the earphone will resume the
sound from the loudspeakers.
EARPHONE
EARPHONE CONNECTION
DVD
YPbPr
L
R
Y=GREEN, Pb=BLUE, Pr=RED
1. Connect the video outputs (Y, PB, PR) of the DVD to the
YPbPr jacks on the set
2. Connect the audio outputs of the DVD to the Audio Input (L/R)
jacks on the set.
3. Tur n on the DVD player, insert a DVD.
4. Select YPbPr source with using the SOURCE/ button on the remote control.
5. Refer to the DVD player's manual for operating instructions.
YPBPR CONNECTION
When connecting with a component cable
Page 13

22
23
OSD OPERATION
MENU
VIDEO menu options
CH
Scale
Full
You don't have to remember to switch the set off before you go to sleep.
The sleep timer automatically switches the set to standby after the
preset time has elapsed.
Press the SLEEP/ button on the remote control repeatedly
to select the number of minutes.
The display will appear on the screen followed by close,
Off, 15, 30, 45, 60, 90 and 120 minutes.
When you are looking TV programs ,you can press the button on
the remote control to return to the previous channel.
SLEEP TIMER
RETURN FUNCTION
BASIC OPERATION
SOURCE INPUT SWITCH
Off
1. Press SOURCE/ button on the remote control to the source menu.
The source menu rank as: TV - AV - S-VIDEO - YPBPR - VGA - HDMI.
2. Press button on the remote control to select the source in the menu.
When the bar means the covering source selected
,
▼ / ▲
highlighted
then press
/ to confirm.ENTER
TV
AV
S-VIDEO
YPBPR
VGA
HDMI
Page 14

25
24
OSD OPERATION
AUDIO menu options
MENU
CH
OSD OPERATION
VIDEO menu options
Scale
Shows the size of images as: 16:9, 4:3, FULL.
Page 15

27
26
OSD OPERATION
Function Menu Options
MENU
Function
CC
Off
Parental Guide
Color Temp
.
Normal
CH
User/ Normal/ Warm/
MENU
CC
Allows you to select the CC among: Off,CC1,CC2,CC3,CC4,T1,T2,T3,T4.
Parental Guide
Parental Guide
Please Input password
----
The initial password is 0000.
Color temp.
Adjusts color components independently to achieve a warm or cool effect:
Cool.
Selects to display all on-screen menus in your language of choice :
Eng lish/ Fra nçais /Es pañol .
OSD OPERATION
TV Menu Options
TV
MENU
TV
CH
Allows you to select antenna between Air and Cable. If you select “Cable”, the following
items(Favorite, Show/Hide, Channel NO., Channel Label and DTV Signal) are unable to use.
Air/Cable
Blue Back
Off
Blue Back
Select On or Off of blue back ground under no signal.
Page 16

29
28
OSD OPERATION
PC Menu Options
MENU
Adjust
CH
The PC menu includes the following options :
Allow you to use a nd button to adjust the H Position.
Allow you to use and
bu tton to adjust the V Position.
Allow you to prolong the image.
Allow you to adjust the definition.
Select “ ”and press , the unit will automatically adjust all
items to achieve a best effect.
H - Position
V - Position
Clock
Phase
Auto adjust
Auto adjust
-
-
Page 17

30
APPENDIX
Radio frequency
(RF)
Input impedance: 75Ω(not balance)
Incept system: NTSC-M
Model
Resolution
Viewing size(mm)
PC best Mode
Sound output
Work:5℃ -35℃ Store:-15℃-60℃
Power consumption
Environment
conditions
Temperature
Relative humidity
Work:20%-80% Store:20%-90%
Stand by power consumption
Power input
PC input
(VGA)
RGB Input impedance:75Ω
RGB Input range:0.7±0.15Vp-p
RGB Input supported format: support resolution 1360X768 (60Hz)
Audio (L /R) Input impedance:20KΩ
Audio (L /R) Input range:500mVrms
RLC1906
1366 X 768
1360 X 768 @60Hz
﹤45W
﹤1W
YPbPr
input
Y, PB/ CB, PR/CR Input impedance: 75Ω
Y, PB/ CB, PR/CR Input range: Y: 1 ± 0.3 Vp-p
PB/PR (CB/CR): 0.7 ± 0.3 Vp-p
Audio(L/R) Input impedance: 20kΩ
Audio(L/R) Input range: 500mVrms
Input supported format: 480i, 480p, 576i, 576p, 720p, 1080i,1080p
HDMI input
Input supported format: 480i, 480p, 576i, 576p, 720p, 1080i, 1080p
Video
input
(AV)
CVBS input impedance:75Ω
CVBS input r ang e:1±0.3V p-p
Audio(L/R) input impedance:20KΩ
Audio(L/R) input range:500mVrms
CVBS input supported format:PAL, NTSC
409.8H X 230.4V
3W + 3W 4Ω
S-VIDEO
input
Input impedance:75Ω
Input range: (Y: 1±0.3 Vp-p C ( Burst ):0.3±0.15Vp-p)
Input supported format: NTSC
Audio (L/R) Input impedance :20K Ω
Audio (L/R) Input range :500mVrms
100-240V~ 50/60H z
Non-defect Judgment
Attempt the following steps to diagnose the symptom you have seen. If the
symptom couldn’t be corrected, please contact the dealer.
Check Parts
LCD TV takes inside lighten phosphor. It may increase the
temperature of the screen in some occasions. It's not a defect.
Black dots and Bright points may appear on the LCD screen.
This is a structural property of the LCD panel and is not a defect.
Adjust the impulse phase may decrease stripes.(RGB in)
1.Frequency from PC is below 75Hz, enhance it.
But the picture may be less bright.
2.Turn on the upright filter. But it may descend
the upright resolution.
It may occur during long-time working. It's not a defect.
Phenomena
The display monitor's
panel goes hot.
Unusual dots
Stripes on screen
Flicker fluctuate
(only in PC source)
The top of the monitor
gets hot.
31
Page 18

LIRE ATTENTIVEMENT AVANT DE FONCTIONNEMENT
19” NTSC LCD TÉLÉ
LCD TÉLÉ
RLC1906
o
.
f
c
n
N
I
o
,
r
a
c
t
i
h
r
e
m
A
h
e
n
R
i
l
a
n
V
U
d
T
C
US
Page 19

1
SOMMAIRE
MIS EN MARCHE DE LA TV
AJUSTEMENT DU VOLUME
SELECTION DE PROGRAMMES
DUREE DE MISE EN VEILLE
FONCTION DE RETOUR
INTERRUPTEUR DE LA SORTIE DE SOURCE
OPERATION DE BASE
CONNEXION DES ANTENNES
CONNEXION DES EQUIPEMENTS EXTERNES
CONNEXION S-VIDEO
CONNEXION PC
CONNEXION HDMI
CONNEXION YPbPr
CONNEXION DES ECOUTEURS
CONNEXIONS ET MIS EN PLACE
......................................................................................................................08
..........................................................................10~12
....................................................................................................09
..................................................................................................13
CONTROLE
OPTIONS DE CONNEXIONS
FONCTIONS PRINCIPALES DE LA TELECOMMANDE
INSTALLATION DE BATTERIES
INTRODUCTION
....................................................................................................................01
...............................................................................................................02
...........................................................................................16
...............................................................................................20
...................................................................................................21
.............................................................................................21
....................................................................17
......................................................................................................17
..............................................................................................................18
.........................................................................................................19
........................................................................................19
.....................................................................21
..............................................................................................20
........................................................................................20
ACCESSORIES
Options de menu VIDIO
Options de menu AUDIO
Options de menu de TV
Options de menu de fonction
Options de menu PC
INSTALLATION DEBOUT
INSTALLATION MURALE
OPERATION ODS
INSTALLATION
CONTENUS
CONTENUS.
ACCESSORIES
.............................................................................................................28~29
...................................................................................30~31
..........................................................................................................25
..............................................................................................26
.........................................................................................................27
...........................................................................................22~23
....................................................................................................24
............
..................................................................................................15
..............................................................................................14~15
..........................................................................................................18
...........................................................................................03~07
CONSIGNE DE SECURITE
CONSIGNE DE SECURITE
DÉPANNAGE
SPECIFICATION DE PRODUITS
ANNEXE
Page 20

3
2
Veiller à ce que les accessoires suivants sont inclus avec votre téléviseur.
Si un accessoire est manquant, s'il vous plaît contactez le vendeur auprès
duquel vous avez acheté le produit.
ACCESSORIES
Manuel de l'utilisateur
Télécommande
Batteries(AAA)
CONSIGNE DE SÉCURITÉ
C'est un symbole d'avertissement. Si les utilisateurs ignorent cet avertissement, il peut y avoir
des dommages personnels ou même la mort due à un fonctionnement incorrect. Il s'agit d'un
symbole d'ATTENTION. Si les utilisateurs ignorent cet avertissement, il peut y avoir des
dommages à la personne ou à l'appareil en raison d'une.
Ce téléviseur LCD est conçu et fabriqué en conformité avec les normes de sécurité
internationales, ainsi que d'autres équipements électriques, toutes les consignes de sécurité
et de fonctionnement doivent être lues avant d'utiliser l'appareil.
Sur les symboles
Ce manuel comprend les différents types de symboles.
Pour garantir une bonne utilisation, et éviter un danger pour les utilisateurs et les autres,
les présentations suivantes doivent être respectées.
Sans l'opération lorsque des problèmes se produisent
Sans l'entrée de liquide ou d'objets
Lorsqu'un phénomène anormal se produit, comme la fumée, l'odeur, pas d'image, pas de voix,
la voix plus lourde, des dommages de pièces ou de câble, et de la liquide à l'intérieur ou
d'autres choses, il pourrait y avoir un incendie ou un choc électrique. Dans de telles occasions,
s'il vous plaît débranchez le téléviseur, assurez qu'il n'y a pas de fumée ou d'odeur,
et prenez un contact avec le fournisseur. NE PA S le réparer par vous-même, or, il pourrait
blesser le corps humain.
Il y aurait un incendie ou un choc électrique si la liquide ou d'autres objets pénètrent dans
l'appareil. S'il vous plaît accordez plus d'attention à vos enfants.
Si cela se produit, s'il vous plaît débranchez le téléviseur, assurez qu'il n'y a
pas de fumée ou d'odeur, et prenez le contact avec le fournisseur.
C'est un symbole d'avertissement. Si les utilisateurs ignorent cet avertissement, il peut
y avoir des dommages personnels ou même la mort due à un fonctionnement incorrect.
Il s'agit d'un symbole d'ATTENTION. Si les utilisateurs ignorent cet avertissement,
il peut y avoir des dommages à la personne ou à l'appareil en raison d'une.
■ Garder la TV hors de la pluie et l'humidité.
■ Ne pas mettre de liquide, incluant les vases à fleurs et les bateaux remplis de produits chimiques
ou de l'eau etc. dessus en haut de la TV ou autour de lui.
■ Ne pas installer le métal ou les matière
inflammables sur le dessus de la TV ou autour de lui.
LIRE ATTENTIVEMENT AVANT DE FONCTIONNEMENT
19” NTSC LCD TÉLÉ
LCD TÉLÉ
RLC1906
.
o
c
f
n
I
N
a
o
,
c
t
r
A
e
r
h
i
m
a
l
n
R
i
h
e
n
V
U
d
T
C
US
Page 21

545
Cet appareil doit être connecté à la prise de la douille avec une connexion de la terre
protectrice. Si la fiche fournie ne rentre pas dans la prise, consultez un électricien pour
remplacer la prise obsolète. Prenez soin du cordon, il pourrait y avoir un incendie ou de
choc électrique dus à la rupture de câble. Assurez-vous que le cordon ne serait pas trop
chaud, pressé ou tendu. Si des problèmes ont lieu sur le cordon (la ficelle du centre
surgit ou le câble se brise), s'il vous plaît, contactez avec le fournisseur.
Connexion à la terre
■ Ne jamais laisser des objets lourds tels que la télévision elle-même s'installer sur le cordon
d'alimentation. Ne pas couvrir le cordon avec la nappe, il peut vous conduire à mettre des
objets lourds sur le cordon du à l'ignorance.
■ Lors de la suppression de la fiche d'alimentation de la prise de courant, toujours
tenir la prise, ne jamais tirer par le cordon.
■ Ne pas placer le cordon à côté des appareils de chauffage.
■ Ne pas toucher la prise juste après qu' il soit débranché, afin d'éviter un choc électrique.
■ Ne pas toucher la prise lors de la foudre.
■ Ne pas laisser le cordon devenir noué ou enchevêtré.
■ Assurer que le cordon d'alimentation ne sera pas piétiné ou pincé, en particulier au niveau
des prises, des prises de courant commodes et au lieu où ils sortent de l'appareil.
4
Il existe la haute tension à l'intérieur de la télévision, qui pourrait causer un incendie ou
un choc électrique lors de la réparation.
Il y aura des dommages si la TV tombe ou casse.
Ne pas interférer la ventilation adéquate lorsque la TV est en fonctionnement ou vient d'être
débranché, ou l'affichage peut être abîmé ou de la vie raccourcie à cause de la surchauffe.
En vue de maintenir une ventilation adéquate, laissez un dégagement de 10 pouces de
chaque côté de la paroi.
Cet appareil ne doit pas être exposé à des égouttements ou cassé. L'utilisation continue
peut provoquer un incendie ou un choc électrique. Si le panneau est brisé, débranchez
la TV, et prenez le contact avec le fournisseur.
Ne pas supprimer ou jeter la TV
Régler la TV sur le lieu équilibre
Ventilation
Sans vibration ou concussion sur la TV
■ NE PAS retirer le couvercle (ou dos).
■ Ne pas installer la TV dans la surface inégale, oblique, instable.
■ Ne pas installer n'importe quel objet autour des ouvertures de la ventilation de l'appareil.
■ Ne pas bloquer les ouvertures de la ventilation.
■ Ne pas inverser l'écran.
■ Ne pas couvrir l'appareil avec nappe.
■ Ne pas installer l'appareil sur le tapis, le drap et la couverture ou à proximité du rideau.
Les sources d'alimentation inaptes peuvent provoquer un incendie ou un choc électrique.
L'appareil doit être connecté à une alimentation du type décrit dans les instructions de
fonctionnement ou comme indiqué sur l'appareil.
La mauvaise connexion du cordon d'alimentation peut causer un incendie ou un choc électrique.
Sources d'alimentation
Connexion du cordon d'alimentation
■ Les cordons d'alimentation doivent s'adapter à la prise de la douille.
■ Ne pas toucher le câble avec les mains mouillées.
■ Vérifier les joints s'ils sont propres (pas de poussière) avant l'utilisation.
S'ils ne le sont pas, faisiez le ménage avec le tissu sec et doux.
■ Fixer le cordon d'alimentation fermement à la prise de la douille pour éviter de
devenir flexible, ou il peut produire un défaut de fonctionnement.
■ Ne pas couper le cordon, il peut abaisser la performance. Si vous voulez le prolonger,
faisiez un cordon approprié ou obtenir un contact avec le fournisseur.
■ Si vous voulez changer le fusible dans la fiche du connecteur, le changez avec la
même résistance et le modèle.
Traiter les batteries soigneusement
■ L'élimination incorrecte des batteries peut causer un incendie ou un dommage à l'homme,
et même une explosion.
■ Ne pas jeter les batteries dans le feu ou l'eau.
■ Garder les batteries loin du feu ou de la chaleur.
■ Ne pas récupérer les piles avec des pinces métalliques.
■ Conserver les piles dans un lieu frais et sec.
■ Mettre les batteries à la marque (+) et (-) dans le compartiment de batterie.
■ Ne pas charger, démonter ou joindre les batteries.
■ Ne pas serrer les batteries.
■ Utilisez les batteries qui sont désignées dans le manuel de l'utilisateur.
■ Nettoyez les substances dans les batteries, si elles tombent en panne, et changez une
nouvelle paire. Si les substances collent à vos vêtements, nettoyez avec de l'eau
tout complètement.
■ Traiter les batteries usées en respectant la législation locale.
Si vous mettre l'appareil dans un environnement humide ou avec la poussière, il pourrait
provoquer un incendie ou un choc électrique en raison de noir de fumée ou de gaz érosif.
Garder la TV loin de l'humidité et de la poussière
■ Ne pas installer la TV dans la cuisine, les endroits à proximité des appareils de chauffage
ou les lieux de noir de fumée et de l'humidité. La chaleur de haute température peut
affecter l'affichage ou d'autres composants, et provoquer la distorsion, la fusion, et le feu.
■ Ne pas installer la TV, la télécommande, ou d'autres composants sous le soleil ou près
des appareils de chauffage.
■ Ne pas installer la TV où la différence de température est grande.
CONSIGNE DE SÉCURITÉCONSIGNE DE SÉCURITÉ
Page 22

6
7
■ Le capteur de la télécommande ne fonctionnera pas si la lumière, comme la lumière du soleil
ou de l'éclairage intérieur lumineux tomber directement sur elle. Assurez-vous qu'il n'y ait pas
d'ingérence de sans-fil, ou mai, il provoque une distorsion de l'image ou de bruit inhabituel. Il ne devrait,
comme les équipements de téléphonie mobile ou de récepteur sans fil.
mpacts sur la télécommande mai conduire à des problèmes.
Manipuler la télécommande avec précaution
■ S'il vous plaît ne pas jeter la télécommande.
■ Ne placez pas d'objets lourds sur la télécommande.
Regardez la télévision à l'intérieur où il y a une bonne luminosité. Assurez-vous que
la lumière du soleil ne tombe pas directement sur l'écran d'image. Relaxez-vous vos
yeux de temps en temps en prenant des repos.
Nettoyer la TV et le panneau de contrôle avec un chiffon doux. Un savon doux peut être
utilisé si l'écran est très sale. Sécher-les avec un chiffon doux après le nettoyage. Choisir
le bon détergent, or, il pourrait causer la fade de la télévision ou l'éraflure ou la fissure.
Regarder la TV
Comment nettoyer la TV
Eviter le récepteur sans fil
Cette TV est conçu pour se conformer à la norme de l'IME (interférence électrique
magnétique) pour éviter les problèmes du récepteur sans fil.
■ Mettre la TV loin du récepteur sans fil.
■ Ajuster l'antenne sans fil pour éviter les interférences sur la TV.
■ S'assurer que la TV est hors d'une interférence sans fil.
■ L'antenne doit utiliser la ligne coaxiale.
■ Éteindre tous les équipements, à l'exception de la télévision pour vérifier si la TV interfère
le récepteur sans fil.
■ Si le problème se produit, vérifiez toutes les notes ci-dessus.
Ne pas installer la TV dans les lieux ci-dessous:
■ Sous le soleil ou près des appareils de chauffage.
■ Endroits où la différence de température est grande.
■ Lieux avec une ventilation mauvaise.
■ Lieux près du feu.
■ Lieux humides tels que salle de bains.
■ Lieux où l'homme marche fréquemment ou lieux où sont grandement tremblants.
■ PEndroits ou déséquilibrés.
CONSIGNE DE SÉCURITÉ
Avant le nettoyage, éteignez la TV et débranchez le cordon d'alimentation. Ne pas frapper
ou gratter l'écran avec de fortes et dures objets. Nettoyer l'écran avec un chiffon doux
imbibé d'eau tiède. Un savon doux peut être utilisé si l'écran est très sale.
Sécher l'écran avec un chiffon doux après le nettoyage.
Comment nettoyer l'écran d'image
CONSIGNE DE SÉCURITÉ
Notes de la connexion de câble
■ S'assurer que tous les câbles, y compris la fiche de connecteur, les lignes prolongées, et la
câble de connexion entre les équipements sont spécifiés par le fabricant. Avant de changer
la connexion, mettez l'appareil hors tension et débranchez le cordon d'alimentation.
■ Le cordon d'alimentation ne doit pas être la même que d'autres équipements.
■ Utiliser la fiche avec une connexion protectrice à la terre.
Notes du Transport
Manipulez avec soin pendant le transport. En outre, utilisez le carton et la matière d'enveloppe
originale, or, il peut endommager la TV. Gardez le carton et la matière d' enveloppe originale.
Notes sur l'installation
■ Ne jamais utiliser des vis en bois et des supports pour fixer en place. Utiliser ceux qui sont
spécifiés par le fabricant.
■ Utiliser uniquement le chariot, le stand, le trépied ou la table spécifiés par le
fabricant ou vendus avec l'appareil. Lorsque vous utilisez un chariot, soyez prudent lorsque
vous déplacez l'appareil sur le chariot pour éviter les blessures en cas de renversement.
■ Suivez toutes les instructions de fonctionnement sur le montage sur le mur ou au plafond.
■ Utilisez uniquement les fixations / accessoires spécifiés par le fabricant.
■ Si vous avez des questions sur l'installation, le fonctionnement ou la sécurité,
appelez le fournisseur.
Autres Notes
■ Jetez l'appareil avec le respect de la législation locale.
■ Attention à tous les équipements électriques.
Page 23

9
8
INTRODUCTION
Ce manuel explique les fonctions disponibles sur le modèle de 19 pouces LCD TV.
Contrôle du panneau avant
■ Il s'agit d'une représentation simplifiée d'un panneau avant. Ici ce qui est montré peut
être un peu différent de celui de votre TV.
CONTROLE OPTIONS DE CONNEXION
INTRODUCTION
Connexion de panneau arrière
C'est le panneau arrière de TV LCD
■ Il s'agit d'une représentation simplifiée d'un panneau arrière.
Ici ce qui est montré peut être un peu différent de celui de votre TV.
(1): (VOL-)- Appuyez sur la touche de volume - pour atténuer le volume.
(2): (VOL +) Appuyez sur la touche de volume + pour augmenter le volume.
(3): (CH-) Appuyez sur la touche pour marcher en avant le canal.
(4): (CH +) Appuyez sur la touche pour faire marcher en arrière le canal.
(5): (SOURCE) Appuyez sur le bouton pour sélectionner la source AV ou la source TV.
(6): (MENU) Appuyez sur le bouton pour afficher le menu OSD.
Lorsque le menu OSD est , appuyez sur ce bouton pour quitter le menu.
(7): ( ) Appuyez sur le bouton pour la mode mis en veille.
(8): Indicateur.
(9): Fenêtre du capteur de télécommande.
(01) Entrée HDMI: Connectez le signal HDMI.
(02) Entrée PC VGA: Connectez un signal de sortie PC VGA.
(03) Entrée vidéo YPBPR: Connectez la sortie de l'image composante de votre appareil
audio/vidéo ici. Branchez ensuite la sortie audio de votre appareil audio/vidéo à la R et L.
(04) Entrée S-VIDEO: Connectez la sortie S-vidéo de votre appareil AV.
(05) Entrée AV: Connectez la sortie vidéo composite de votre appareil Vidéo et de
connecter la sortie audio de votre appareil audio / vidéo à la R et L.
(06) Entrée AUDIO PC: Connectez l'entrée audio PC.
(07) Sortie d'ÉCOUTEUR: Connectez à la sortie de la téléphone mobile.
(08) RF: Entrée antenne (75 ohm).
(09) AC100~240 V: AC 100~240 V avec cette entrée.
(10) POWER ON/OFF: Marche/ Arrêt d'alimentation.(Interrupteur d'alimentation)
9
8
2
1
3
6
4
7
5
L R
EARPHONE
VIDEO
1
2
3
4
5
6
7
8
/
9
10
Page 24

11
10
FONCTIONS PRINCIPLES DE LA TELECOMMANDE
INTRODUCTION
FONCTIONS PRINCIPLES DE LA TELECOMMANDE
INTRODUCTION
(1) Bouton POWER: En cours d'enclenchement / bouton de marche ON.
(2)
Boutons AUTO: Appuyez sur pc image source à réglage automatique.
(3) Bouton MUTE: Pressez à éliminer ou à rétablir le son de la TV.
(4) Bouton MODE d'image: Appuyez sur pour sélectionner l'image en mode preset.
(5) Bouton MODE de son: Appuyez sur ce bouton pour sélectionner le mode de son bouton.
(6) Bouton ASPECT: Appuyez sur ce bouton pour sélectionner l'image en mode 4:3, 16:9 etc
(7) Bouton DISPLAY: Appuyez sur ce bouton pour afficher l'état
actuel, la chaîne TV, la source d'entrée.
(8) Boutons numériques: Appuyez sur les boutons pour l'accès
direct aux chaînes de télévision.
(9) Boutons : Appuyez sur ce bouton pour
revenir au canal précédent.
(10) Boutons -/-- : appuyez sur le bouton pour l'entrée directe
dans le programme à chiffres 2 ou chiffre 3.
(11) Bouton MENU: LCD menu.
(12) Sortie: Quitter le menu OSD (sur l'écran d'affichage ).
(13) Bouton SOURCE: Appuyez sur bouton pour afficher toutes
les sources d'entrée
(14) Bouton SOMMEIL: mettez la durée du sommeil.
(15) Bouton “ ”: lorsque le menu OSD est en marche,
appuyez sur ce bouton pour faire marcher le foyer de
sélection en haut ou changer la disposition.
(16) Bouton " ": lorsque le menu OSD est en marche,
appuyez sur ce bouton pour faire marcher le foyer de
sélection en bas ou changer la disposition.
(17) Bouton " ": Lorsque l'OSD menu est en marche,
appuyez sur ce bouton pour déplacer la sélection à
gauche ou à confirmer les paramètres.
(18) Bouton " ": Lorsque l'OSD menu est en marche,
appuyez sur ce bouton pour déplacer la sélection à
droite ou à confirmer les paramètres.
(19) Bouton « entrée » appuyez sur ce bouton pour confirmer l'opération.
19
24
25
22
23
26
27
20
21
28
29
30
31
(20) Bouton CH-: Changez la chaîne en avant.
(21) Bouton CH +: Changez la chaîne en arrière.
(22) Bouton VOL-: Permet d'augmenter le volume.
(23) Bouton VOL +: Permet d'atténuer le volume.
(24) Bouton MTS: Appuyez sur ce bouton pour sélectionner les chaînes audio.
(25) Bouton CC: Appuyez sur ce bouton pour afficher le sous-titrage.
(26) Bouton AV:Appuyez sur ce bouton pour sélectionner l'entrée AV.
(27) Bouton TV:Appuyez sur ce bouton pour sélectionner l'entrée TV.
(28) Bouton S-Video:Appuyez sur ce bouton pour sélectionner l'entrée S-Video.
(29) Bouton YPbPr:Appuyez sur ce bouton pour sélectionner l'entrée YPbPr.
(30) Bouton HDMI:Appuyez sur ce bouton pour sélectionner l'entrée HDMI.
(31) Bouton VGA:Appuyez sur ce bouton pour sélectionner l'entrée VGA.
Page 25

INTRODUCTION
(1) Ouvrir le couvercle du compartiment à batterie à l'arrière
(2) Insérer les deux batteries de 1.5 V de type AAA en suivant correctement la polarité
(3) Fermer le couvercle du compartiment à batterie à l'arrière
Note sur l'utilisation de la télécommande
Si la télécommande n'est pas utilisée pendant une longue
période de temps, retirez les batteries.
Notes sur l'utilisation de la télécommande.
Ne pas frapper ou jeter la télécommande.
Ne pas exposer la télécommande aux liquides et ne
pas la placer en milieu humide.
Ne pas installer ou placer la télécommande sous la
lumière directe du soleil.
INSTALLATION DES BATTERIES
Notes sur l'utilisation de batterie
L'utilisation de batteries de mauvais type peut causer la fuite de produits chimiques
et / ou l'explosion.
Notez les points suivants:
Toujours s'assurer que les batteries sont insérées avec les
bornes positives et négatives dans la bonne direction,
comme indiqué dans le compartiment à batterie.
De différentes batteries ont des caractéristiques
différentes. Ne pas mélanger différents types. Ne
mélangez pas les anciennes et les nouvelles.
La mélange de l'ancien et du nouveau réduira la durée de
vie e de la batterie et / ou causera la fuite de produits
chimiques de batteries usées.
Lorsque les batteries ne fonctionnent pas, remplacez-les
immédiatement. La fuite de produits chimiques dans les
batteries peut provoquer une irritation du peau. Si le produit
chimique en question suinte de la batterie, essuyez-le
immédiatement avec un chiffon sec. En raison de différentes
conditions de stockage, la durée de vie de la batterie pour
les batteries fournies avec votre unité serait raccourcie.
Si la télécommande n'est pas utilisée pendant une longue
période de temps, retirez les batteries.
INSTALLATION
FONCTIONS PRINCIPLES DE LA TELECOMMANDE
Le code universel de détection à distance
Non inclus.
C’est le code pour la télécommande de RLC1906, si vous voulez passer à une télécommande
universelle, vous pouvez modifier ce code sur la télécommande universelle.
13
12
The universal code for this remote is: 2295.
Page 26

15
INSTALLATION
(1) Garder le support sur pied pour l’utilisation dans la future.
(2) Ne mettez pas le téléviseur sur les étagères, tapis, lits ou placards.
(3) Ne couvrent pas la TV avec un Rideau ou du papier.
(4) Laissé une espace aération suffisante afin d'éviter les éléments suivants:
Pas bon pour la ventilation Pas bon pour la ventilation
INSTALLATION MURALE
14
INSTALLATION
(1) Fixez le support mural avec les boulons ( les boulon ne sont pas fournis en tant que
parties du produit, il doit acheter séparément sur le mur. Ajuster la hauteur du support
qui est monté sur le mur.Le support mural est une dimension normale.
Vo ir la position de la paroi entre les boulons du support comme la figure de boulons
suivant: . La dimension réelle du support mural devrait s'accorder avec les produits.
Les instructions de l'installation détaillées sont disponibles auprès de votre
fournisseur, voir le montage du support sur le mur incliné et la guide d'installation et
de configuration.
(2) Retirez le socle de la télévision quand installer la TV sur un mur comme suit:
(3) Pour une bonne ventilation, permettre un dégagement de 4 "de chaque côté du mur.
La position des boulons du support mural
b. Montage sur le mur: installation horizontale
INSTALLATION DEBOUT INSTALLATION DEBOUT
75mm
75mm
Dimension de quatre trous
de montage:Vis M4
4inches
4inches
4inches
4inches
b. Montage sur le mur: installation horizontale
■ La TV peut être installée de différentes manières comme par exemple sur un mur,
ou sur table de travail, etc..
4inches
4inches
4inches
4inches
4inches
Assurez-vous que vous connectez le câble de terre pour éviter d'éventuels
chocs électriques. Si les méthodes de terre ne sont pas possibles, faire rappel à
un électricien qualifié pour installer un disjoncteur.
■ La TV conçue peut être montée horizontalement.
Power
Supply
Short-Circuit
Breaker
Ne tentez pas de mettre l'unité sur la terre en la connectant à des fils de téléphone,
à des tiges d'allégement ou à des conduites de gaz.
a.installation sur la table de travail piédestal
C'est le moyen défaut de l'installation de la TV.
Page 27

17
16
CONNEXION S-VIDEO
1. Connecter la sortie S-VIDEO du DVD à l'entrée S-VIDEO sur le plan.
2. Connecter les sorties audio du DVD à l'entrée audio (L / R) sur le plan.
3. Activer le lecteur de DVD, insérer un DVD
4. Sélectionnez S-VIDEO à l'utilisation de la source SOURCE / bouton
sur la télécommande.
5. Se référer au manuel du lecteur DVD pour les instructions de fonctionnement.
Lors de la connexion au câble S-VIDEO
CONNECTIONS & SETUP
CONNEXION DES EQUIPEMENTS EXTERNES
CONNEXION DES ANTENNES
■Pour une qualité d'image, ajuster la direction de l'antenne.
■Un câble de l'antenne et le convertisseur ne sont pas fournis.
■Pour éviter les dommages de l'équipement, ne jamais brancher le cordon
d'alimentation jusqu'à ce que vous arrivez à connecter tous les équipements.
CONNEXION ET MISE EN PLACE
■Dans les zones de signal, pour obtenir une meilleure qualité d'image, installer un
amplificateur de signal de l'antenne, comme indiqué ci-dessous.
■Si le signal doit être scindé pour deux téléviseurs, utiliser un séparateur de signal
d'antenne pour la connexion.
1. Connecter l'AV prises entre la télévision et un équipement externe. Mettre en accord les
couleurs de prise (Jaune = vidéo, audio gauche = blanc, et Audio Droite = rouge).
2. Sélectionner la source AV à l'utilisation du bouton de SOURCE / sur la télécommande.
3. Opérer les équipements externes correspondant. Se référer au guide de
l'opération d'équipements externes.
Maison famille multiple /habitation
Prise d'antenne mural
Câble coaxial FR
Serrer dans le sens positif
Antenne extérieur
Antenne VHF
Antenne UHF
Maison de single famille/habitation,
connecter à l'antenne extérieure
Video Game Set
PHILIPS
DRIVE
DRIVE
TURBO
TURBO
Camcorder
AV
DVD
Page 28

1. ConnecteR la sortie HDMI du DVD à la prise
d'entrée HDMI sur le plan.
2. Sélectionner la source HDMI à l'utilisation du
bouton SOURCE / sur la télécommande.
3. Se référer au manuel du lecteur DVD pour les
instructions de fonctionnement.
Lors de la connexion au câble HDMI
CONNEXION HDMI
CONNEXION ET MISE EN PLACE
CONNEXION PC
1. Connecter le sortie RGB du PC à la prise de l'entrée PC VGA sur l'appareil.
2. Connecter les sorties audio du PC à la prise d'entrée audio PC sur l'appareil.
3. Activer le PC et l'appareil.
4. Sélectionner la source PC à l'utilisation du bouton SOURCE/ sur la télécommande.
5. Se référer au manuel de PC pour les instructions d'utilisation.
Lors de la connexion avec un câble de broches D-sub 15
18
PC
19
CONNECTION ÉCOUTEUR
1. Connecter le sortie ÉCOUTEUR de la TV
à l'entrée d'ECOUTEUR sur l'appareil.
2. Activer le téléviseur, l'écouteur se faire
entendre, mais la haute parleur sans son.
Lors de la connexion au câble d'écouteur
CONNEXION ET MISE EN PLACE
1. Connecter les sorties vidéo (Y, PB, PR), du DVD aux prises YPbPr .
2. Connectez les sorties audio du DVD à l'entrée audio (L / R) de prises.
3. Activer le lecteur de DVD, insérer un DVD.
4. Sélectionnez la source YPbPr à l'utilisation du bouton de SOURCE/ sur
la télécommande.
5. Se référer au manuel du lecteur DVD pour les instructions de fonctionnement.
CONNEXION YPbPr
Lors de la connexion au câble composante
DVD
YPbPr
L
R
Y=GREEN, Pb=BLUE, Pr=RED
TV
Page 29

21
20
Appuyez sur le bouton CH+ / CH- sur le panneau de contrôle ou
le bouton numérique pour sélectionner un numéro de programme.
PROGRAMME DE SELECTION
Vous n'avez pas à vous rappeler à désaciver l'appareil avant d'aller dormir.
La minuterie passe automatiquement à la mise en veille après l'heure
prévue s'est écoulée.
Appuyer sur la bouton SLEEP/ sur la télécommande pour sélectionner
le nombre de minutes.
L'affichage apparaît sur l'écran, suivi de près, 15, 30, 45, 60, 90 et 120minutes.
DUREE DE MISE EN VEILLE
FONCTIONNEMENT DE BASE
Lorsque vous chercherez un programme TV, vous pouvez appuyer sur le
bouton sur la télécommande pour revenir au canal précédent.
FONCTION DE RETOUR
Interrupteur de la sortie de source
Si votre téléviseur est allumé, vous serez capable d'utiliser ses fonctionnalités.
Activer la TV
Tout d'abord, connecter le cordon d'alimentation correctement.
Lorsque l'indicateur s'allume en rouge, il est en mode mis en veille.
Appuyer sur le bouton POWER / sur la télécommande, puis le
voyant orange s'allume, après avoir terminé l'initialisation du
téléviseur, l'indicateur devient vert. Cela signifie que le téléviseur
est en mode de puissance.
Lorsque vous appuyez sur le bouton POWER / sur la
télécommande une fois de plus, l'indicateur POWER / mise en
veille s'allume en rouge en mode mis en veille.
Si vous avez l'intention d'être en vacances, débranchez le câble
d'alimentation de la prise électrique murale.
Activer la TV
Réglage du volume
FONCTIONNEMENT DE BASE
1. Appuyez sur le bouton VOL+ / VOL- sur le panneau de
contrôle ou le bouton VOL+ / VOL- sur la télécommande
pour régler le volume.
2. Si vous voulez éliminer le son, appuyez sur le bouton
MUET / sur la télécommande.
3. Vous pouvez annuler cette fonction en appuyant sur le
bouton MUET/ sur la télécommande.
1. Appuyez sur le bouton SOURCE / sur la télécommande au menu de source.
Le menu de source se classe comme suit:
TV - AV - S-Video -YPBPR - VGA - HDMI.
2. Appuyez sur le bouton ▼ / ▲ sur la télécommande pour sélectionner la source
dans le menu. Lorsque la barre est devenue rouge, ce qui montre que la source est
sélectionnée, puis appuyez sur pour confirmer .
ENTER /
Off
TV
AV
S-VIDEO
YPBPR
VGA
HDMI
Page 30

23
22
OPERATION d'OSD OPERATION d'OSD
MENU
1. Utiliser ▼ / ▲ pour sélectionner ce que vous voulez et ajuster le menu Vidéo
2. Appuyer bouton ◄ / ► pour ajuster (d'après le conseil ci-dessus)
3. Si vous être contents de votre ajustement, appuyez MENU/ .
Mode image
Luminosité
Contraste
Couleur
Netteté
Teinte
Image
Sélect ionner Sort ir
Options du menu VIDIO
Appuyez sur MRNU sur le panneau avant ou Menu / sur la télécommande, puis utilisez
▼ / ▲ pour sélectionner le menu VEDIO.
Appuyez ► ou sur le bouton d'ENTREE pour entrer (voir la figure suivante).
u
Scale
Full
CH
Options de menu VUDIO
Mode image
Sélectionner le type de l'image for votre besoin visuel en choisissant le Mode d'image
sur le menu d'image. Vous pouvez sélectionner directement en appuyant sur le bouton
P.MO D E / sur la télécommande.
Luminosité
Appuyez sur le bouton ▼ / ▲ , puis utilisez ◄ / ► pour ajuster la luminiorité de l'image.
Contraste
Appuyez sur le bouton ▼ / ▲ , puis utilisez ◄ / ► pour ajuster la contraste de l'image.
Couleur
Appuyez sur le bouton ▼ / ▲ , puis utilisez ◄ / ► pour ajuster la saturation de l'image.
Netteté
Appuyez sur le bouton ▼ / ▲ , puis utilisez ◄ / ► pour ajuster l'acuité de l'image.
Teinte
Ajustez la teinte de l'image ( seulement utilisé dans le mode NTSC)
Scale
Vous permet de choisir entre le Scale:
16:9, 4:3, FULL.
Page 31

OPERATION d'OSD OPERATION d'OSD
Appuyez sur MRNU sur le panneau avant ou Menu / sur la télécommande, puis utilisez
▼ / ▲ pour sélectionner le menu AUDIO.
Appuyez ► ou sur le bouton d'ENTREE pour entrer (voir la figure suivante).
Options du menu AUDIO
CH
Options de menu de TV
Appuyez sur MRNU sur le panneau avant ou Menu / sur la télécommande, puis utilisez
▼ / ▲ pour sélectionner le menu TV.
Appuyez ► ou sur le bouton d'ENTREE pour entrer (voir la figure suivante)
TV
25
24
Mode Sound
Volume
Grave
Aigu
Balance
1. Utiliser ▼ / ▲ pour sélectionner ce que vous voulez et ajuster le menu Sound.
2. Appuyer bouton ◄ / ► pour ajuster (d'après le conseil ci-dessus)
3. Si vous être contents de votre ajustement, appuyez MENU/ .
Mode Sound
Vous pouvez sélectionner le type du son for votre besoin d'écoute en choisissant le
Mode d'image sur le menu de son. Vous pouvez sélectionner directement en appuyant
sur le bouton S.MODE/ sur la télécommande.
Volume
Ajuster le volume du son
Vous pouvez aussi utiliser le bouton VOL+/- pour augmenter ou baisser la tonalité.
Grave
Appuyez sur le bouton ▼ / ▲ , puis utilisez ◄ / ► pour augmenter ou baisser la tonalité basse.
Aigu
Appuyez sur le bouton ▼ / ▲ , puis utilisez ◄ / ► augmenter ou baisser la tonalité haute.
Balance
Appuyez sur le bouton ▼ / ▲ , puis utilisez ◄ / ► pour ajuster la sortie audio entre la
haute-parleur droite et gauche.
MENU
Sélect ionner Sort ir
u
Synto. Auto
Appuyez le bouton ►, la TV commence à une recherche automatique, lors ce dernier a
fini, la TV présentera la première station re ue
Réglage Fin
Appuyez le bouton pour atténuer l'air, appuyez le bouton pour l'élever.
Supprimer
Certains canaux reçus ne peuvent vous plaire pas, vous pouvez les supprimer avec l'aide
de la fonction de saut. Lors le saut pour un canal particulier, ce dernier sera omis, en
appuyant sur les boutons CH +/-, vous pouvez le faire aussi avec les boutons numériques.
Air/Cable
Certains canaux re us ne peuvent vous plaire pas, vous pouvez les supprimer avec l'aide
de la fonction de saut. Lors le saut pour un canal particulier, ce dernier sera omis, en
appuyant sur les boutons CH+/-, vous pouvez le faire aussi avec les boutons numériques.
1. Utiliser ▼ / ▲ pour sélectionner ce que vous voulez et ajuster le menu TV.
2. Appuyer bouton ◄ / ► pour ajuster (d'après le conseil ci-dessus)
3. Si vous être contents de votre ajustement, appuyez MENU/ .
Synto. Auto
Réglage Fin
Supprimer
Air/Cable
MENU
Sélect ionner Sort ir
u
CH
Page 32

27
OSD OPERATION
26
OPERATION d'OSD OPERATION d'OSD
CC
Vous permet de choisir entre le CC: Off, CC1, CC2, CC3, CC4, T1, T2, T3, T4.
Guide parentale
Sélectionner Guide parentale , appuyez le bouton ► pour entrer dans le sous-menu.
Le mot de passe initial est 0000.
enter mot de passe
----
MENU
Guide parentale
Sélectionner Guide parentale , appuyez le bouton ► pour entrer dans le sous-menu.
Le mot de passe initial est 0000.
Sortir
Rêinitialiser
Sélectionner Rêinitialiser , appuyez le bouton ► pour la mise en place
Langue
Sélectionner le langue de menu OSD.
Appuyez sur MRNU sur le panneau avant ou Menu / sur la télécommande, puis utilisez
▼ / ▲ pour sélectionner le menu VEDIO.
Appuyez ► ou sur le bouton d'ENTREE pour entrer (voir la figure suivante)
Options de menu de fonction
1. Utiliser ▼ / ▲ pour sélectionner ce que vous voulez et ajuster le menu Setup.
2. Appuyer bouton ◄ / ► pour ajuster (d'après le conseil ci-dessus)
3. Si vous être contents de votre ajustement, appuyez MENU/ .
Langue
Fra nçais
MENU
Sélect ionner Sort ir
u
CH
Off
CC
Guide parentale
Rêinitialiser
Color Temp
.
Normal
User/ Normal/ Warm/
Color temp.
Vous permet de choisir entre le Color temp:
Cool.
Appuyez sur MRNU sur le panneau avant ou Menu / sur la télécommande, puis utilisez
▼ / ▲ pour sélectionner le menu AUDIO.
Appuyez ► ou sur le bouton d'ENTREE pour entrer (voir la figure suivante).
1. Utiliser ▼ / ▲ pour sélectionner ce que vous voulez et ajuster le menu Sound.
2. Appuyer bouton ◄ / ► pour ajuster (d'après le conseil ci-dessus)
3. Si vous être contents de votre ajustement, appuyez MENU/ .
H-Position
V
-Position
Horloge
Phase
Auto
MENU
Sélect ionner Sort ir
u
CH
H/ V-Position : ajuster la position horizontale verticale de l'écran.
Horloge: ajuster la fréquence pixel de l'horloge jusque l'image est maximisée pour l'écran.
Phase: ajuster la phase de l'horloge relative au signal synchronisé,
jusque une image stable est obtenue.
Auto: appuyer le bouton pour mettre en place
automatiquement les paramètres de l'écran.
Options de menu PC
Ecran bleu
Off
Ecran bleu
Select On or Off of blue back ground under no signal.
Page 33

ANNEXE
DÉPANNAGE
Essayer les étapes suivantes pour diagnostiquer le problème que vous avez vu.
Si le problème ne pouvait pas être corrigé, s'il vous plaît contactez le fournisseur.
Le symptôme de problèmes
Causes possibles
Mesures
Symptôme
Il y a des taches sur
l'écran et le son n'est pas
clair lorsque vous
regardez la télévision.
L'image est doublée
ou triplée, mais le son
est bon.
Dérange intermittente
Il n'y pas d'image et
pas de son.
1. Les câbles d'antenne
pourraient être déconnectés.
2. Les câbles d'antenne pourraient
être déconnectés ou abîmés.
3. Les câbles d'antenne pourraient
être faibles.
4. La météo est mauvaise.
5. L'émetteur est mauvais.
1. Les câbles d'antenne
pourraient être faibles.
2. La télévision ne peut pas
être réglée correctement.
3. La météo est mauvaise
4. L'émetteur est mauvais.
5. L'entrée de la télévision
est incorrecte.
Votre unité est affectée par
d'autres télévisions, automobiles,
lampes fluorescentes,
radio portable.
1. La télévision est en mode AV.
2. L'image et le volume sont
fixés au minimum.
3. La télévision est en mode
veille ou mode d'économie
d'électricité.
1. Connecter les câbles d'antenne
de nouveau ou modifier la fiche.
2. Connecter les câbles d'antenne
de plus ou changer à nouveau
de nouveaux câbles.
3. Ajuster l'antenne de nouveau.
4. Il n'est pas nécessaire de corriger.
5. Vérifier auprès de l'opérateur local.
1. Ajuster l'antenne de nouveau.
2. Rechercher de nouveau
ou modifier les chaînes
de télévision.
3. Il n'est pas nécessaire
de corriger.
4. Vérifier auprès de
l'opérateur local.
5. Vérifier l'extérieur du dispositif.
Vérifier le contenu du bouclier
de la télévision et mettre la
télévision, aussi loin que
possible de câbles.
1. Vérifier l'image / le contrôle
de son (entrer dans le menu
principal).
2. Assurer la mise en marche.
NOTE : Le consommateur ne doit pas réparer cet appareil par lui-même, comme la
haute tension y existe. Faites rappel au professionnel pour la réparation si nécessaire.
Jugement non -défaut
Essayer les étapes suivantes pour diagnostiquer le problème que vous avez
vu. Si le problème ne pouvait pas être réglé, contactez le fournisseur.
Parts examinésPhénomène
Le panneau d'affichage
du moniteur est chaud.
Points anormaux
Rayures sur l'écran
Flicker fluctué
(seulement dans la
source PC)
Le haut de l'écran
devient chaud.
TV LCD prend à l'intérieur de légers phosphors. Il pourrait
augmenter la température de l'écran en quelques occasions.
Ce n'est pas un défaut.
Les points noirs et lumineux pourraient apparaître sur l'écran LCD.
Il s'agit d'une propriété structurelle du panneau LCD et ce n'est
pas un défaut.
Régler la phase d'impulsion peut diminuer des rayures. (En RGB)
1. 1.La fréquence à partir d'un PC est inférieur à 75 Hz,
l'améliorer. Mais l'image peut être moins brillant.
2. Activer la filtre verticale. Mais il peut descendre la
résolution verticale.
Il se produit au cours d'un long travail. Ce n'est pas un défaut.
ANNEXEANNEXE
DÉPANNAGEDÉPANNAGE
29
28
Page 34

RLC1906
SPECIFICATION DE PRODUCT
Modèle
Résolution
Affichage de la taille (mm)
Mode PC meilleur
Production de son
Tra va il :5℃-35℃ Stockage:-15℃-60℃
Consommation d'énergie
Conditions
d'environnement
Température
Humidité relative
Tra va il :20%-80% Stockage:20%-90%
Stand de la consommation d'énergie
Alimentation électrique
Entrée PC
(VGA)
Radio fréquence
(RF)
Entrée d'impédance RGB: 75Ω
Niveau d'entréRVB: 0,7 ± 0.15Vp-p
Format d'entrée supporté RVB: résolution 1360x768 (60Hz)
Audio (L / R) entrée d'impédance: 20KΩ
Niveau d'entrée Audio (L / R): 500mVrms
3W +3W 4Ω
﹤1W
Entrée d'impédance: 75Ω (non- balance)
Système de réception NTSC.
ANNEXE
﹤45W
1360 X 768 @60Hz
409.8H X 230.4V
1366 X 768
Entrée
YPbPr
Entrée d'impédance Y, PB / CB, PR / CR: 75Ω
Niveau d'entrée Y, PB / CB, PR / CR: Y: 1 ± 0,3 Vp-p
PB / PR (CB / CR): 0,7 ± 0,3 Vp-p Entrée d'impédance Audio (L / R): 20kΩ
Niveau d'entrée Audio (L / R): 500mVrms
Format d'entrée supporté: 480i, 480p, 576i, 576p, 720p, 1080i, 1080p
Entrée
S-VIDEO
Entrée
HDMI
Entrée d'impédance: 75Ω
Niveau d'entrée: (Y: 1 ± 0,3 Vp-p C (Burst): 0,3 ± 0.15Vp-p)
Format d'entrée supporté: NTSC
Entrée d'impédance Audio (L / R): 20KΩ
Niveau d'entrée Audio (L / R): 500mVrms
Format d'entrée supporté: 480i, 480p, 576i, 576p, 720p, 1080i, 1080p
Entrée
vidéo
(AV)
Entrée d'impédance CVBS: entrée CVBS 75Ω
Niveau d'entrée: 1 ± 0.3Vp-p
Entrée d'impédance audio (L / R) : 20KΩ audio (L / R),
Niveau d'entrée: 500mVrms
Format d'entrée supporté VIDEO: NTSC
SPECIFICATION DE PRODUCT
ANNEXE
31
30
100-240V~ 50/60H z
 Loading...