

Page 1

RACE6011-6COM
This product has been manufactured and sold under the responsibility of Curtis International Ltd.
RCA, the RCA logo, the two dogs (Nipper and Chipper) logo, are registered trademarks or
trademarks of Technicolor (S.A.) or its affiliates and are used under license by Curtis International Ltd.
Any other product, service, company, trade or product name and logo referenced herein are neither
endorsed nor sponsored by Technicolor (S.A.) or its Affiliates.
Page 2

INTRODUCTION
IMPORTANT SAFETY INSTRUCTION .......................................................................................
ELECTRICAL REQUIREMENTS
PACKING LIST ............................................................................................................................
INSTALLATION & ASSEMBLY INSTRUCTIONS .......................................................................
USING YOUR AIR CONDITIONER .............................................................................................
OPERATING YOUR AIR CONDITIONER
CARE AND CLEANING ...............................................................................................................
TROUBLESHOOTING .................................................................................................................
SPECIFICATION ..........................................................................................................................
WARRANTY CARD.......................................................................................................................19
...............................................................................................
..................................................................................
1
3
4
5
12
14
15
16
18
Page 3

1
Page 4

INTRODUCTION TO REFRIGERANTS R32
The refrigerants used for air conditioners are environmentally friendly hydrocarbons R32. This kind of erant is
combustible and odorless. Moreover, it can burn and explode under certain condition. However, there will be no
risk of burning and explosion if you comply with the following table to install your air conditioner in a room with
an appropriate area and use it correctly.
Compared with ordinary refrigerants, Refrigerant R32 is environmentally friendly and do not destroy the ozone
sphere and that its value of greenhouse effect is also very low.
Room area requests for air conditioner with Refrigerant R32
Refrigerant
R32
Capacity(Btu)
9K
12K
18K
24K
Room Area
Above 4m
Above 4m
Above 15m
Above 25m
2
2
2
2
Warnings
Please read the manual before installation, using, maintenance.
Do not use means to accelerate the defrosting process or to clean, other than those recommended by the
manufacturer.
Do not pierce or burn the appliance.
The appliance shall be stored in a room without continuously operating sources (for example: open flames,
an operating ignition gas appliance or an operating electric heater.)
Please contact the nearest after-sale service center when maintenance is necessary. At the time of
maintenance, the maintenance personnel must strictly comply with the Operation Manual provided by the
corresponding manufacturer and any non-professional is prohibited to maintain the air conditioner.
The handling, installation, storage, servicing and disposal must comply with the provisions of gas-related
national laws and regulations, and also national wiring regulation.
It is necessary to clear away the refrigerant in the system when maintaining or scrapping an air conditioner.
Be aware that refrigerants may not contain an odour.
This appliance is not intended for use by persons (including children) with reduced physical, sensory or
mental capabilities, or supervision or instruction concerning use of the appliance by a person responsible for
their safety.
Children should be supervised to ensure that they do not play with the appliance.
Unit operation limits: Outdoor side 61~110 , 80%RH; indoor side 61~90 , 80%RH.
2
Page 5

(6K-8K) 0-8 amps
(6K-8K) 10-amp
3
Page 6

(Only for E-star model)
4
Page 7

FIG. 1
8
INTERIOR
WALL
STOOL
SILL
OFFSET
EXTERIOR
WALL
5
Page 8

6
Page 9

REWORD: Top Rail and Sliding Panels at each side
are offset to provide the proper pitch of 5/16" to the
rear of the air conditioner.
3
FIG. 3
FIG. 4
FIG. 5
7
Page 10

Keeping
(It is suggested to keep a downward
angle so accumulated rain water can drain out from the
backside of the unit.)
FIG. 6
FIG. 7
FIG. 10
FIG. 11
FIG. 8
FIG. 12
FIG. 13
FIG. 9
8
Page 11

IG. 14
9
Page 12

INSTALLATION & ASSEMBLY INSTRUCTIONS
Introduction to Refrigerants R32
Before installing the appliance, you must read the manual carefully to get the safety
information and notes.
When filling the combustible refrigerant, any of your rude operations may cause serious
injury or injuries to human body or bodies and object or objects.
A leak test must be done after the installation is completed.
It is a must to do the safety inspection before maintaining or repairing an air conditioner
using combustible refrigerant in order to ensure that the fire risk is reduced to minimum.
It is necessary to operate the machine under a controlled procedure in order to ensure
that any risk arising from the combustible gas or vapor during the operation is reduced to
minimum.
Requirements for the total weight of filled refrigerant and the area of a room to be equipped
with an air conditioner (are shown as in the following Tables GG.1 and GG.2)
The maximum charge and the required minimum floor area
m = (4 m ) x LFL , m = (26 m )) x LFL, m = (130 m )x LFL
12 3
Where LFL is the lower flammable limit in kg/ m , R32 LFL is 0.306 kg/ m.
For the appliances with a charge amount m < M m :
The maximum charge in a room shall be in accordance with the following:m = 2. 5 x (LFL) x h x (A)
The required minimum floor area Amin to install an appliance with refrigerant charge M (kg)
shall be in accordance with following: A = (M/ (2.5 x (LFL)x h))
Where:
m is the allowable maximum charge in a room, in kg;
max
M is the refrigerant charge amount in appliance, in kg;
Amin is the required minimum room area, in m2;
A is the room area, in m ;
LFL is the lower flammable limit, in kg/m ;
h is the installation height of the appliance, in meters for calculating m or A , 1.8 m for wall mounted;
0 max min
33 3
33
12
min 0
2
3
(5/4) 2
Table GG.1 Maximum charge (kg)
Category
LFL
(kg/m )
h
0
3
(m)
Floor area(m )
max 0
2
(5/4) 1/2
Category
LFL
3
(kg/m )
h
0
(m)
Table GG.2 Minimum room area (m )
Charge amount (M) ( kg)
Minimum room area(m )
10
2
2
Page 13

INSTALLATION & ASSEMBLY INSTRUCTIONS
Introduction to Refrigerants R32
1. Site Safety
Open Flames Prohibited Ventilation Necessary
2. Operation Safety
Open Flames Prohibited
Mind Static Electricity
Must Wear Protective Clothing and anti-static gloves
Don't use mobile phone
3. Installation Safety
Refrigerant Leak Detector
Appropriate Installation Location
The left picture is the schematic diagram of a refrigerant leak detector.
Please note that:
1. The installation site should be in a well-ventilated condition.
2. The sites for installing and maintaining an air conditioner using Refrigerant R32 should be free from open fire
or welding, smoking, drying oven or any other heat source higher than 548 which easily produces open fire.
3. When installing an air conditioner, it is necessary to take appropriate anti-static measures such as wear anti static clothing and/or gloves.
4. It is necessary to choose the site convenient for installation or maintenance wherein the air inlets and outlets of
the indoor and outdoor units should be not surrounded by obstacles or close to any heat source or combustible
and/or explosive environment.
5. If the indoor unit suffers refrigerant leak during the installation, all the personnel should go out till the refrigerant
leaks completely for 15 minutes. If the product is damaged, it is a must to carry such damaged product back to
the maintenance station and it is prohibited to weld the refrigerant pipe or conduct other operations on the user's
site.
6. It is necessary to choose the place where the inlet and outlet air of the indoor unit is even.
7. It is necessary to avoid the places where there are other electrical products, power switch plugs and sockets,
kitchen cabinet, bed, sofa and other valuables right under the lines on two sides of the indoor unit, and also
prevent mechanical damage from occurring.
11
Page 14

1
1. When the timer is not in use,
Digital Display:
the operation mode and the set temperature will
be display. Time will be displayed under the timer
setting.
and Button:2. Use these buttons on the
control panel and remote to increase or decrease
the Set Temperature or Timer.
Temperature range: 61 ~88 or 16 ~31 .
8
5
9
4
3. Turn the air conditioner on and
Power Button:
off.
Press the mode button to cycle
2
4. Mode Button:
through the various modes: Cool, Dry, Fan and
Auto.
7
6
3
12
Page 15

Cool Mode: The cooling function allows the air
conditioner to cool the room and at the same time
reduces air
humidity
. Press the MODE button to
activate the cooling function. To optimize the
function of the air conditioner, adjust the
temperature and the speed by pressing the button
indicated.
Dry Mode: This function reduces the humidity of
the air to make the room more comfortable. Press
the MODE button to set the DRY mode. An
automatic function of alternating cooling cycles
and air fan
is activated.
Fan Mode: This function only works when the air
conditioner is vented. Press the MODE button to
set the F
AN mode. With pressing the FAN SPEED
button, the speed changes in the following
sequence: Hi, Med and Lo in FAN mode.
Auto Mode: In AUTO mode the unit automatically
chooses the mode of operation (COOL,DRY or
FAN).In this mode the temperature will be set
according to the room temperature (tested by the
temperature sensor which is incorporated in the
indoor unit.).
Use these buttons on the control
5. Timer Button:
panel and remote to set the Timer.
Timer Off: The timed stop is programmed by
pressing TIMER button. Set the rest time by
pressing the button or until the rest
time displayed is to your then press TIMER
liking
button again.
Timer On: When the unit is off, press TIMER
button , set the temperature with
pressing the button or . Press TIMER
button , set the rest time with
a second time
pressing the button or . Press TIMER
button , confirm the setting, then
automatically switch on and will show on the display.
a third time will
Note: It can be set to automatically turn off or on in
0.5-24 . Each press of the
hour increments
buttons will increase or decrease the timer.
The Timer can be set in 0.5 hours increment below
10 hours and 1 hour increment for 10 hours or
above.
The SET light will turn on while setting.
To cancel the function, press the TIMER button
set
again.
When the unit is in ECO mode, the
6. Eco Button:
light will turn on. In ECO mode, the unit will
turn off once the room is cooled to the user set
temperature. Fan will also be off at this point.
The unit will turn back on when the room
temperature rises above the user set temperature.
Before the compressor , starts the fan motor will
run for a while, then it will stop for a while, and will
repeat to provide a much more comfortable feeling
and save energy.
7. Sleep Button:
Press the SLEEP button, all of the
display lights will turn off after a while, but the
Sleep light is always on. In SLEEP mode, the air
conditioner will automatically adjust the
temperature and fan speed to make the room
more comfortable during the night. The set
temperature will automatically raise every 30-60
minutes, and at most change six times until the
set temperature is 81 or 82 .
Press the FAN SPEED button
8. Fan Speed Button:
to choose the fan speed options. You can choose
Hi, Med, Lo or auto speed in COOL mode
or
choose Hi, Med, Lo in FAN mode.
9.
When the Filter Check light is off,
Filter Button:
it is to press the Filter Check button.
not necessary
When the Filter Check light is on, can turn off
you
the light by pressing the Filter Check button. After
the fan motor works for 500 total hours, the Filter
Check light will turn on to remind the user to clean
the filter.
10.
To direct the airflow, use the
Directional Louvers:
horizontal wheel to control the horizontal direction
and use the air deflectors to control the vertical
direction.
horizontal wheelair deflector air deflector
13
Page 16

1
3
4
5
6
3
2
7
8
9
10
Use these buttons on the control panel
5. Timer:
and remote to set the Timer.
Timer Off: The timed stop is programmed by
pressing TIMER button. Set the rest time by
pressing the button or until the rest
time displayed is to your demand then press
TIMER button again.
Timer On: When the unit is off, press TIMER
button at the first time, set the temperature with
pressing the button or . Press TIMER
button at the second time, set the rest time with
pressing the button or . Press TIMER
button at the third time, confirm the setting, then
the rest time to next automatical switching-on
could be read on the display of the machine.
Note:
It can be set to automatically turn off or on
in 0.5-24 hours. Each press of the
buttons will increase or decrease the timer. The
Timer can be set in 0.5 hours increment below
10 hours and 1 hour increment for 10 hours or
above. The SET light will turn on while setting.
To cancel the set function, press the TIMER
button again.
1.
Turn the air conditioner on and off.
Power:
2.
Press the COOL button to COOL mode.
Cool:
and :3.
Use these buttons on the control
panel and remote to increase or decrease the
Set Temperature or Timer. Temperature range:
61 ~88 or 16 ~31 .
Press the SLEEP button, all of the
4. Sleep:
display lights will turn off after a while, but the
Sleep light is always on. In SLEEP mode, the air-
conditioner will automatically adjust the temperature and fan speed to make the room more comfortable during the night. The set temperature will
automatically raise every 30-60 minutes
and at most change six times until the set
temperature is 81 or 82 .
In AUTO mode the unit automatically
6. Auto Mode:
chooses the mode of operation(COOL,DRY or
FAN). In this mode the temperature will be set
automatically according to the room temperature
(tested by the temperature sensor which is
incorporated in the indoor unit.).
Press the FAN SPEED button to
7. Fan Speed:
choose the fan speed options. You can choose
Hi, Med, Lo or auto speed in COOL mode and
choose Hi, Med, Lo in FAN mode.
To press the DISPLAY button, it can
8. Display:
switch off/on all lights or LED display.
When the unit is in ECO mode, the light
9.
Eco:
will turn on. In ECO mode, the unit will turn off
once the room is cooled to the user set temperature.
The unit will turn back on when the room
temperature rises above the user set temperature.
Before the compressor starts, the fan motor will
run for a while, then it will stop for a while, and will
repeat to provide a much more comfortable feeling
and save energy.
10.
Fan Only:
Press the Fan Only button to FAN
ONLY mode.
14
Page 17

15
FIG. 15
15
Page 18

161718
Page 19

Page 20

SPECIFICATION
RCA Model
Power supply Ph-V-Hz 1Ph, 115V-, 60Hz
RATED Capacity
RATED Input W 492
Cooling
RATED Current A 4.5
Standby power W 1.25
Max. input consumption W 690
Max. current A 6.5
Starting current A 21
Refrigerant type (R32) g 265
Refrigerant type (R32) ozs R32/9.35
Design pressure(145psi=1MPa )(L/H) psi 360/915(2.5/6.3MPa)
indoor
(cooling/heating)
Operation temp
outdoor
(cooling/heating)
Application area (Cooling EPA) sp.ft 151-250
Btu/h 6000
℃
℉
℃
℉
RACE6011-6COM
16-31/---
61℉-88
18-43/---
64℉-109
℉
℉
Dimension(W*D*H)
Packing (W*D*H)
Net/Gross weight
mm 406x386x318
in 15.98x15.2x12.52
mm 461x428x402
in 18.15x1
Kg 19.5/22.1
lbs 43/48.72
6.85x15.82
Page 21

16
Page 22

For service assistance and product information, please call: 1-800-968-9853.
Curtis International Ltd.
7045 BECKETT DRIVE, UNIT 15, MISSISSAUGA, ON, L5S 2A3 www.curtisint.com
Page 23

Modèle
RACE6011-6COM
Climatiseur de fenêtre électronique
Mode d'emploi
Ce produit a été fabriqué et vendu sous la responsabilité de Curtis International Ltd.
RCA, le logo RCA, le logo des deux chiens (Nipper et Chipper), sont des marques déposées ou des
marques commerciales de Technicolor (S.A.) ou de ses affiliés et sont utilisés sous licence par
Curtis International Ltd.
Tout autre produit, service, société, nom commercial ou produit et logo référencés ici ne sont ni
approuvés ni sponsorisés par Technicolor (S.A.) ou ses affiliés.
Page 24

PREAMBULE
INSTRUCTION IMPORTANTE DE SÉCURITÉ................................................................
EXIGENCES ÉLECTRIQUES.........................................................................................
LISTE D’EMBALLAGE...................................................................................................
INSTRUCTIONS D'INSTALLATION ET D'ASSEMBLAGE................................................
UTILISATION DE VOTRE CONDITIONNEUR D'AIR.......................................................
FONCTIONNEMENT DE VOTRE CONDITIONNEUR D'AIR.............................................
ENTRETIEN ET NETTOYAGE.......................................................................................
DÉPANNAGE...............................................................................................................
SPÉCIFICATION..........................................................................................................
GARTE DE GARANTIE.......................................................................................................................19
1
3
4
5
12
14
15
16
18
Page 25

INSTRUCTION IMPORTANTE DE SÉCURITÉ
Avant d'installer et d'utiliser votre climatiseur, s’il vous plaît lire attentivement ce manuel. Conservez ce manuel dans un endroit sûr
pour référence ultérieure. Votre sécurité et la sécurité d'autrui sont très importantes pour nous. S’il vous plaît payer attention à tous les
messages de sécurité décrits dans ce manuel du propriétaire.
AVERTISSEMENT: Pour rédui re le risque d'incendie, de choc électrique ou de blessures lors de l'utilisation de votre climatiseur,
suivez les précautions de base suivantes.
Brancher la prise de terre à 3 broches.
Ne retirez pas la broche de terre.
N'utilisez pas l'adaptateur secteur
Il s'agit d'un symbole d'alerte de sécurité.
Ce symbole vous informe des dangers potentiels qui peuvent nuire à vous ou à d'autres
personnes, voire causer la mort.
Tous les messages de sécurité suivront directement le symbole d'alerte de sécurité et / ou
les mots "DANGER" ou "WARNING".
PELIGRO
ADVERTENCIA
Tous les messag es de sécurité vous alertent sur les dangers potentiels, la façon de réduire les risques
de blessures et ce qui peut arriver si les instructions ne sont pas suivies correctement.
N'utilisez pas une rallonge.
Débrancher le climatiseur avant l'entretien
Utiliser deux personnes ou plus pour
déplacer et installer le climatiseur
Le fait de ne pas suivre
immédiatement ces instructions peut
causer des blessures graves ou même
la mort.
1
Page 26

INTRODUCTION AUX RÉFRIGÉRANTS R32
Réfrigérant
Capacité (Btu)
Aire de la pièce
≤ 9 K
400 à 500 pi²
≤ 12 K
450 à 550 pi²
Veuillez lire le manuel avant l’installation, l’utilisation et la maintenance.
HR.
Les réfrigérants utilisés pour les climatiseurs sont des hydrocarbures R32 respectueux de l’environnement. Ce
type de réfrigérant est inflammable et inodore. De plus, il peut brûler et exploser sous certaines conditions.
Cependant, il n’existe aucun risque de combustion ou d’explosion si vous respectez le tableau ci-dessous pour
installer votre climatiseur dans un endroit approprié de la pièce et que vous l’utilisez correctement.
Contrairement aux réfrigérants classiques, le réfrigérant R32 est respectueux de l’environnement,
pas à la destruction de la couche d’ozone et dégage peu de gaz à effet de serre.
ne participe
Exigences relatives à l’aire de la pièce accueillant le climatiseur avec le
réfrigérant R32
R32
≤ 18 K 750 à 850 pi²
≤ 24 K Au-delà de 1 000 pi²
Avertissements
N’utilisez pas d’outils pour accélérer le processus de dégivrage ou pour nettoyer autres que ceux
recommandés par le fabricant.
Ne percez ou ne brûlez pas l’appareil.
L’appareil doit être stocké dans une pièce sans sources d’inflammation continuellement allumées (par
exemple, des flammes nues, un appareil fonctionnant au gaz ou un chauffage électrique en marche).
Veuillez prendre contact avec le service après-vente le plus proche si une opération de maintenance est
nécessaire. Au moment de la maintenance, le personnel doit respecter scrupuleusement le manuel
d’utilisation fourni par le fabricant correspondant et toute personne non professionnelle ne doit pas effectuer
d’opération de maintenance sur le climatiseur.
La manipulation, l’installation, l’entreposage, l’entretien et la mise au rebut doivent respecter les exigences
des lois et réglementations nationales relatives au gaz ainsi que celles de la réglementation des installations
électriques.
Lors de la maintenance ou du démontage d’un climatiseur, il est nécessaire de retirer le réfrigérant du
système. Sachez que les réfrigérants peuvent ne pas avoir d’odeur.
L’appareil n’est pas conçu pour être utilisé par des personnes (enfants y compris) présentant des capacités
physiques, sensorielles ou mentales réduites, ou par des personnes responsables de leur sécurité qui
superviseraient ou leur indiqueraient la marche à suivre concernant l’utilisation de l’appareil.
Les enfants doivent être surveillés afin de s’assurer qu’ils ne jouent pas avec l’appareil.
Limites de fonctionnement de l’appareil : Partie externe 61~110 °F, 80 % HR, partie interne 61~90 °F, 80 %
2
Page 27

EXIGENCES ÉLECTRIQUES
ADVERTENCIA
Les cotes électriques de votre climatiseur sont indiquées sur le modèle e l'étiquette
du numéro de série situé sur le côté avant gauche de l'appareil (face àl'avant).
Les exigences électriques spécifiques sont listées dans le tableau ci - dessous.
Suivez les exigences ci - dessous pour le type de fiche du cordon d'alimentation.
Exigences de câblage Cordon d'alimentation
Peligro descarga eléctrica
Enchufe a un tomacorriente de tres extremidades con
salida a tierra.
No retire la extremidad de conexión a tierra.
No utilice un adaptador.
No utilice un cable de extensión.
Si no se sigue estas instrucciones, se podría causar
lesiones graves o hasta la muerte.
• 15 volts (103min. - 127max.).
• (6K - 8K) 0-8 Ampères.
• (6K - 8K) Fusible temporisé de 10 ampères ou
disjoncteur.
• Utiliser uniquement sur un seul circuit de sortie.
Méthode de la mise à la terre recommandée
Pour votre sécurité personnelle, ce climatiseur doit être mis à la terre. Cet appareil de
avec prise de terre. Pour
conformément à tous les codes et ordonnances locaux. Si une sortie à 3 broches n'est pas disponible, il incombe au client d'avoir une prise à 3
broches correctement connectée par un électricien qualifié.
C'est la responsabilité du client:
• Contacter un électricien qualifié.
• Pour assurer que l'installation électrique est adéquate et
conforme au National Electrical Code, ANSI / NFPA 70 dernière édition, et tous les codes et ordonnances locaux.
minimiser la possibilité de choc électrique, le cordon doit être branché sur une prise à 3 broches et mis à la terre
Des exemplaires des normes énumérées peuvent être obtenus
climatisation est équipé d'un cordon d'alimentation à 3 broches
auprès de:
Association de protection nationale contre les incendies
Un parc Batterymarch
Quincy, Massachusetts 02269
Cordon et fiche d'alimentation LCDI
Ce climatiseur est équipé d'un cordon d'alimentation LCDI (détection et interrompre de courant de fuite) requis par UL. Ce cordon d'alimentation
contient de l'électronique de pointe qui détecte le courant de fuite. Si le cordon est endommagé et que des fuites se produisent, l'alimentation sera
déconnectée de l'appareil.
Les boutons de test et de réinitialisation de la prise LCDI sont utilisés pour vérifier si la fiche fonctionne correctement. Pour tester la prise:
1. Brancher le cordon d'alimentation dans une prise de terre à 3 broches.
2. Appuyer RESET (sur certaines unités, un voyant vert s'allume).
3. Appuyer le bouton TEST, le circuit doit déclencher et couper toute l'alimentation du climatiseur (sur certaines unités, un feu vert peut s'éteindre) .
4. Appuyer le bouton RESET pour l'utiliser. Vous entendrez un clic et l'A/C n'est pas prêt à l'utilisation.
REMARQUES:
• Le bouton RESET doit être activé pour une utilisation correcte.
• Le cordon d'alimentation doit être remplacé s'il ne parvient pas à déclencher lors
que vous appu yer la touche TEST et que l'appareil ne réinitialise pas.
• N'utilisez pas le cordon d'alimentation comme interrupteur ON/OFF. Le cordon
d'alimentation est conçu comme un dispositif de protection.
• Un cordon d'alimentation endommagé doit être remplacé par un nouveau cordon
d'alimentation.
• Le cordon d'alimentation contient de nouvelles pièces pouvant être réparées par
l'utilisateur.L'ouverture du boîtier inviolable annule toutes les garanties et les
réclamations de performance.
REMARQUE: Le cordon d'alimentation et la fiche de votre appareil peuvent
différer de celle affichée.
3
Page 28

LISTA DE EMPAQUE
IMAGE PARTIE QUANTITÉ
Climatiseur à fenêtre
Télécommande
Rail de montage supérieur
(avec éponge)
Cadre de verrouillage
Panneaux de remplissage (avec
la remarque "Gauche" et "Droite"
sur la face avant)
Asegurador de alféizar
(dos agujeros)
Sceau de fenêtre
(Sponge)
3/8” Vis
1/2” Vis
3/4” Vis
Joint de fenêtre en mousse
(éponge mince pour sauvegarde
en utilisant)
Bande isolante (éponge)
(pour le modèle E-star)
4
Page 29

DECLARATION
TOUTES LES INFORMATIONS ET LES SPÉCIFICATIONS TECHNIQUES PRESENTES DANS LE MANUEL
DE L'UTILISATEUR SONT LA PRÉSENTATION DU FABRICANT.
INSTRUCTIONS D'INSTALLATION ET D'ASSEMBLAGE
Un certain montage est nécessaire pour votre nouvel appareil de climatisation. S’il vous plaî lire attentivement ces instructions.
1. Ce climatiseur est conçu pour être in stallé dans une fenêtre
double-pendulaire standard avec une largeur de fenêtre comprise
entre 23' et 36 '(584 mm - 914mm).
2. Le climatiseur peut être installé sans les panneaux d'accordéon pour
s'adapter à une ouverture étroite de la fenêtre. Voir les dimensions de
la fenêtre.
3. Le Lower Sash (la partie inférieure de la fenêtre qui se déplace vers
le haut et vers le bas) doit permettre un dégagement vertical de 14.5’
lorsqu'il est ouvert (voir la FIG.1).
4. Toutes les pièces de support doivent être fixées sur du bois ferme,
de la maçonnerie ou du métal.
5. La prise électrique doit être à la portée du cordon d'alimentation.
FIG. 1
23" to 36"
584 mm to 914 mm
MUR
EXTÉ
RIEU
R
MUR
D'INTÉRIE
UR
SILL DE
STOOL
DÉCALAGE
REMARQUE: Conserver les instructions d'emballage et
d'installation du produit pour référence ultérieure. Conserver
le climatiseur dans la boîte du produit lorsqu'il n'est pas utilisé
pendant une période prolongée.
14 1/2" min
(368mm)
5
Page 30

Assemblage de top rail
Le top rail doit être assemblé avant d'installer le climatiseur dans la fenêtre.
Outils nécessaires: Tournevis cruciforme.
Top Rail Hardware QTY
3/8"
Vis
Top
Rail
Fixation du top rail au climatiseur
1. Retirer le climatiseur de la boîte et placez-le sur une surface plane et dure.
2. Retirer le top rail du haut du matériau d'emballage comme indiqué sur la Fig. A.
3. Aligner le trou dans le top rail avec ceux dans le haut de l'unité comme indiqué
sur la Fig. B.
Rail supérieur
UR
Boîte de
fond
4. Fixer le top rail à l'unité avec les vis 3/8 "comme indiqué sur la Fig.C.
MISE EN GARDE
Lors de la manipulation de l'appareil, veillez à éviter l
es coupures des bords métalliques tranchants et
des ailettes en aluminium sur les bobines avant
et arrière.
REMARQUE: pour des raisons de
sécurité, toutes les 4 vis doivent
être utilisées pour fixer le top rail.
6
Page 31

MATÉRIEL DE MONTAGE
3/4" Vis
1/2" Vis
Comment installer
REMARQUE: le top rail et les panneaux coulissants de
chaque côté sont décalés pour fournir le pas correct à
l'arrière (5/16 "). Ceci est nécessaire pour l'utilisation et le
drainage correct de l'eau condensée. Si vous n'utilisez
pas les panneaux latéraux pour quelque raison que ce soit ,
Ce pas vers l'arrière doit être maintenu!
Cadre
verrouillé
Sangle
verrouillé
OUTILS NÉCESSAIRES:
• Tournevis cruciforme
• Forage (si des trous pilotes sont
nécessaires)
MISE EN GARDE
Lors de la manipulation de l'unité, veillez à éviter les
coupures de bords métalliques tranchants et des
ailettes en aluminium sur les bobines avant et
arrière.
Placer l'unité sur le sol, un banc ou une table. Il existe
un panneau de remplissage de fenêtre gauche et
droite-assurez-vous d'utiliser le panneau approprié pour
chaque côté. Lorsqu'il est installé, la bride pour fixer le
panneau enplace sur le seuil de la fenêtre fera face à la pièce.
A. Tenez le panneau d'accordéon d'une main et retirez
délicatement le centre pour libérer l'extrémité ouverte. Voir la
Figure 3.
FIG. 3
B. Glisser l'extrémité libre du panneau dans l'armoire comme
indiqué sur les Figures 4. Glisser le panneau vers le bas. Veillez
à laisser suffisamment d'espace pour glisser le haut et le bas du
cadre dans les rails de l'armoire.
FIG. 4
C. Une fois que le panneau a été installé sur le côté de l'armoire,
assurez-vous qu'il se trouve bien dans le cadre du châssis en
effectuant de légers ajustements. Glisser les extrémités
supérieure et inférieure du cadre dans les rails supérieur et
inférieur de l'arm oire Figure 5.
FIG. 5
D. Glisser le panneau tout le chemin et répétez sur l'autre côté.
7
Page 32

Garder une prise ferme sur le climatiseur, placer
soigneusement l'unité dans l'ouverture de la
fenêtre, de sorte que le bas du cadre du climatiseur
soit contre le seuil de la fenêtre (FIG.6). Fermer soigneusement
la fenêtre derrière le top rail de l'unité. (Il est suggéré de garder
un angle descendant ainsi accumulée de l'eau de pluie peut
drainer de l'arrière de l'unité.)
FIG. 6
Étendre les pannea ux latéraux contre le cadre de la
fenêtre (FIG.7).
FIG. 7
Tourner les vis de blocage de 1/2”(12.7mm) à travers
les trous du cadre dans le cadre de la fenêtre
( FIG.10/11).
FIG. 10
FIG. 11
Placer le verrouillage de trame entre les extensions
de trame et le seuil de fenêtre comme illustré (FIG.8).
Visser les vis de verrouillage de 3/4"(19 mm) à travers
la fameuse serrure et dans le seuil(FIG.9). REMARQUE: Pour
éviter que le seuil de la fenêtre ne se fende, percez les trous
avant de 1/8" (3 mm) avant de tester les vis.
FIG. 8
Pour fixer le châssis inférieur en place, fixez le
verrouillage du châssis à angle droit avec une
vis de 3/4 "(19 mm) comme illustré (FIG.12).
FIG. 12
Couper le joint en mousse et insérer dans l'espace
entre les châssis supérieur et inférieur (FIG.13).
FIG. 13
FIG. 9
8
Page 33

Si AC est bloqué par la fenêtre de
UTILISATION DU CLIMATISEUR
tempête
Ajouter le bois comme indiqué sur la FIG.14, ou enlever
la fenêtre de tempête avant que le climatiseur ne soit
installé.
FIG. 14
CEINTURE
FENÊTRE
D’ORAGE
CADRE OU
AUTRE
OBSTRUCTION
Si le cadre de la fenêtre de tempête doit rester, assurer
que les trous de vidange ou les fentes ne sont pas
calfeutés ou peint à la fermeture. Accumulé. L'eau de
pluie ou la condensation doit être autorisée à s'écouler.
ÉPAISSEUR DU
TABLEAU COMME
RÉMUNÉRÉ POUR
UN PASSAGE
ADAPTÉ À
ARRIÈRE, DANS
TOUTE LA PLAGE
ENTIÈRE. FIXER
AVEC DES MAILS
OU DES VIS.
L'utilisation de votre climatiseur vous aide à obtenir les
meilleurs résultats possibles.
Cette section explique le bon fonctionnement du
climatiseur.
IMPORTANT:
• Si vous éteignez le climatiseur, attendez au moins 3
minutes avant de le réactiver. Cela empêche le
climatiseur de souffler un fusible ou de déclencher un
disjoncteur.
• N'essayez pas de faire fonctionner votre climatiseur
en mode de refroidissement lorsque la température
extérieure est inférieure à 65°F(18°C). La bobine de
l'évaporateur intérieur se congèle et le climatiseur ne
fonctionnera pas correctement.
REMARQUE: En cas de panne de l'alimentation, votre
climatiseur fonctionnera aux réglages précédents lorsque
l'alimentation sera rétablie.
Suppression de l'alimentation AC
de la fenêtre
• Éteigner AC et débrancher le cordon d'alimentation.
• Retirer le joint de châssis entre les fenêtres et dévisser
le verrouillage de sécurité.
• Retirer les vis installées à travers le cadre et le
verrouillage du cadre.
• Fermer (glisser) les panneaux latéraux dans le cadre.
• Maintenir une prise ferme sur le climatiseur, relever le
châssis et soigneusement "remuer" l'air conditionné vers
l'arrière pour évacuer l'eau de condensation dans la base
de l'unité. Veillez à ne pas renverser d'eau restante tout
en soulevant l'unité de la fenêtre. Conserver les pièces
AVEC climatiseur
9
Page 34

INSTRUCTIONS D’INSTALLATION ET D’ASSEMBLAGE
Avant d’installer l’appareil, vous devez lire attentivement le manuel afin de prendre
Taux d’occupation du sol (m2)
Introduction aux réfrigérants R32
connaissance des informations et remarques relatives à la sécurité.
Lors du remplissage du réfrigérant, toute manipulation brusque pourrait conduire à une ou
plusieurs blessures sévères ou à des dommages graves sur un ou plusieurs objets.
Une épreuve de fuite doit être réalisée une fois l’installation terminée.
Pour garantir un niveau de risque minimal, il est impératif de réaliser une inspection de
sécurité avant de procéder à une opération de maintenance ou de réparation d’un
climatiseur utilisant du réfrigérant inflammable.
Il est nécessaire d’activer l’appareil en suivant une procédure de contrôle afin de réduire
au maximum tout risque lié au gaz inflammable ou aux vapeurs émanant de l’appareil
pendant l’opération.
Les exigences relatives à la charge totale de réfrigérant et à l’aire de la pièce accueillant un
La charge maximale et le taux d’occupation du sol minimum requis
m1 = (4 m3) x LII, m2 = (26 m3) x LII, m3 = (130 m3) x LII
Où la LII (limite inférieure d’inflammabilité) est exprimée en kg/m
Pour les appareils dont le volume de charge correspond à m
La charge maximale dans une pièce doit respecter ce qui suit : m
Le taux d’occupation du sol minimum requis Amin pour installer un appareil avec une charge de réfrigérant en M (kg)
doit respecter ce qui suit : A
= (M/[2,5 x (LII)
min
(5/4)
x h0])2
Où :
est la limite de charge autorisée dans une pièce, en kg;
m
max
M est le volume de charge de réfrigérant dans l’appareil, en kg;
Amin est le taux d’occupation du sol minimum requis de la pièce, en m²;
2
A est l’aire de la pièce, en m
LII est la limite inférieure d’inflammabilité, en kg/m
h
est la hauteur d’installation de l’appareil, en mètres, pour calculer m
0
;
3
;
3
, La LII du R32 est de 0,306 kg/m3.
< M ≤ m2 :
1
= 2,5 x (LII)
max
max
ou A
(5/4)
x h0 x (A)
, 1,8 m pour les appareils montés au mur;
min
1/2
Tableau GG.1 Charge maximale (kg)
Catégorie LII (kg/m3)
h0 (m
)
4 7 10 15 20 30 50
0,6 0,68 0,9 1,08 1,32 1,53 1,87 2,41
1 1,14 1,51 1,8 2,2 2,54 3,12 4,02
R32 0,306
1,8 2,05 2,71 3,24 3,97 4,58 5,61 7,254
2,2 2,5 3,31 3,96 4,85 5,6 6,86 8,85
Tableau GG.2 Taux d’occupation du sol minimum (m2)
Catégorie
LII (kg/m
3
)
h0 (
m)
Taux d’occupation du sol minimum (m2)
1,224 kg 1,836 kg 2,448 kg 3,672 kg 4,896 kg 6,12 kg 7,956 kg
0,6 29 51 116 206 321 543
R32 0,306
1 10 19 42 74 116 196
1,8 3 6 13 23 36 60
2,2 2 4 9 15 24 40
Volume de charge (M) (kg)
10
Page 35

INSTRUCTIONS D’INSTALLATION ET D’ASSEMBLAGE
2. Sécurité de fonctionnement
Flammes nues interdites
L’illustration de gauche est un schéma d’un détecteur de fuite.
Introduction aux réfrigérants R32
1. Sécurité du site
Flammes nues interdites Ventilation obligatoire
Attention électricité statique Vêtements de protection et gants antistatiques obligatoires N’utilisez pas de téléphone mobile
3. Sécurité d’installation
Détecteur de fuite de réfrigérant
Lieu d’installation approprié
Veuillez noter que :
1. Le lieu d’installation doit être correctement ventilé.
2. Les sites d’installation et de maintenance d’un climatiseur utilisant le réfrigérant R32 doivent être exempts de
flammes nues ou de soudage, de fumée, de four de séchage ou toute autre source de chaleur excédant
548 °C qui pourrait facilement produire une flamme nue.
3. Lors de l’installation d’un climatiseur, il est nécessaire de prendre des mesures antistatiques appropriées telles
que le port de vêtements ou de gants antistatiques.
4. Il est essentiel de choisir un lieu adapté à l’installation ou à la maintenance où les admissions et évacuations d’air
des unités intérieures et extérieures ne sont pas entourées d’obstacles ou proches de toute source de chaleur ou
d’un environnement inflammable et/ou susceptible d’exploser.
5. Si l’unité intérieure présente une fuite de réfrigérant lors de l’installation, l’ensemble du personnel doit quitter les
lieux pour une durée de 15 min, jusqu’à la fin de la fuite. Si l’appareil est endommagé, il est impératif de le faire
parvenir à la station de maintenance et il est interdit de souder le tuyau du réfrigérant ou de réaliser toute autre
opération chez l’utilisateur.
6. Il est nécessaire de choisir un lieu où l’admission et l’évacuation d’air de l’unité intérieure sont égales.
7. Il est essentiel d’éviter les lieux où d’autres appareils électriques, des prises d’alimentation et de courant, des
armoires de cuisine, un lit, un canapé ou autres objets de valeur se trouvent juste en dessous des câbles des
deux côtés de l’unité intérieure. Il est également nécessaire d’éviter tout dommage matériel.
11
Page 36

UTILISATION DE VOTRE
CONDITIONNEUR D'AIR
Panneau de commande électronique
et télécommande
REMARQUE: Cet écran affiche toujours la température de la
pièce en mode ventilateur, sauf lors du réglage de la minuterie.
1
Sons d'opération normaux
• Vous pouvez entendre un bruit de ping causé par l'eau qui
frappe le condenseur, les jours pluvieux ou lorsque l'humidité
est élevée. Cette fonction de conception permet d'éliminer
l'humidité et d'améliorer l'efficacité.
• Vous pouvez entendre le contact du thermostat lorsque le
compresseur s'allume ou s'éteint.
• L'eau se rassemblera dans le moule de base pendant la pluie
ou les jours de forte humidité. L'eau peut déborder et goutter
de l'extérieur de l'unité.
• Le ventilateur peut fonctionner même lorsque le compresseur
n'est pas allumé.
1. Affichage numérique: sans réglage de la minuterie, le mode
de fonctionnement est Cooling, Dry, Fan et Auto, et la
température réglée s'aff iche.
L'heure s'affiche sous le réglage de la minuterie.
2. et Bouton: Utiliser ces boutons sur le panneau de
commande et la télécommande pour augmenter ou diminuer la
température réglée ou la minuterie.
Plage de température: 61°F ~ 88°F ou 16°C ~31°C.
8
5 7
9
Contrôles de l'air conditionné
3. Bouton d'alimentation: Allumez et éteignez le climatiseur.
4
4. Bouton Mode: Appuyer le bouton de mode pour parcourir les
différents modes: Cool, Dry, Fan et Auto.
2
6
3
12
Page 37
UTILISATION DE VOTRE
CONDITIONNEUR D'AIR
Panneau de commande électronique
et télécommande
Cool Mode: La fonction de refroidissement permet au
climatiseur de refroidir la pièce et, en même temps, réduit
l'humidité de l'air. Appuyer la touche MODE pour activer la
fonction de refroidissement. Pour optimiser la fonction du
climatiseur, réglez la température et la vitesse en appuyant sur
le bouton indiqué.
Dry Mode: Cette fonction réduit l'humidité de l'air pour rendre la
pièce plus confortable. Appuyer le bouton MODE pour régler le
mode DRY. Une fonction automatique des cycles de
refroidissement alternatifs et du ventilateur est activée.
Fan Mode: Le conditionneur fonctionne uniquement en
ventilation. Appuyer le bouton MODE pour régler le mode FAN.
En appuyant sur la touche FAN SPEED, la vitesse change dans
l'ordre suivant: Hi, Med et Lo en mode FAN. La télécommande
indique également la vitesse réglée dans le mode de
fonctionnement précédent.
6. Eco Button: Lorsque l'appareil est en mode ECO, le voyant
s'allume. En mode ECO, l'appareil s'éteint une fois que la pièce
est refroidie à la températ ure réglée par l'utilisateur.
L'appareil se
remet en route lorsque la température ambiante augmente au dessus de la température réglée par l'utilisateur. Avant que le
compresseur ne soit vedette, le moteur du ventilateur
fonctionnera pendant un moment, puis il s'arrêtera pendant un
certain temps et répétera pour offrir une sensation beaucoup
plus confortable et économiser de l'énergie.
7. Sleep Button:
Appuyer le bouton SLEEP
le Sleep Light s'allume après quelque temps et tous les
voyants de gauche seront éteints. En mode SOMMEIL, le
climatiseur ajustera automatiquement la température et la
vitesse du ventilateur pour rendre la pièce plus confortable
pendant la nuit. La température réglée augmentera
automatiquement toutes les 30 - 60 minutes et au plus
changera six fois jusqu'à ce que la température réglée soit de
81 or 82 . Et chaque temps de fonctionnement dépend de la
température réglée.
Auto Mode:
le mode de fonctionnement (COOL, DRY ou FAN). Dans ce
mode, la température sont réglées automatiquement en fonction
de la température ambiante (testé par le capteur de température
incorporé L'unitéintérieure).
5. Timer Button: Utiliser ces boutons sur le panneau de
commande et la télécommande pour régler la minuterie.
Timer Off: l'arrêt programmé est programmé en appuyant sur
le bouton TIMER. Réglez le temps de repos en appuyant sur la
touche "∧" ou "V" jusqu'à ce que l'heure de repos affichée
correspond à votre demande, puis appuyez de nouveau sur le
bouton TIMER.
Timer On: Lorsque l'appareil est éteint, appuyer la touche
TIMER pour la première fois, réglez la température en appuyant
sur la touche " ∧" ou "V". Appuyer la touche TIMER à la
deuxième heure, réglez la durée de repos en appuyant sur la
touche " ∧ " ou "V". Appuyer la touche TIMER à la troisième fois,
confirmez le réglage, puis la durée de repos à la prochaine mise
en marche automatique peut être lue sur l'affichage de la
machine.
En mode AUTO, l'appareil choisit automatiquement
.
8. Fan Speed Button: Appuyer le bouton FAN SPEED pour
choisir les options de vitesse du ventilateur. Vous pouvez choisir
Hi, Med, Lo ou la vitesse automatique en mode COOL et choisir
Hi, Med, Lo en mode FAN.
9. Filter Button: Lorsque le voyant vérification du filtre est éteint,
il est inutile d'appuyer sur le bouton Vérifier le filtre. Lorsque le
témoin Vérificateur de filtre est allumé, il peut éteindre la lumière
en appuyant sur le bouton Vérifier le filtre. Après que le moteur
du ventilateur fonctionne pendant 500 heures totales, le témoin
de vérification du filtre s'allume pour rappeler à l'utilisateur de
nettoyer le filtre.
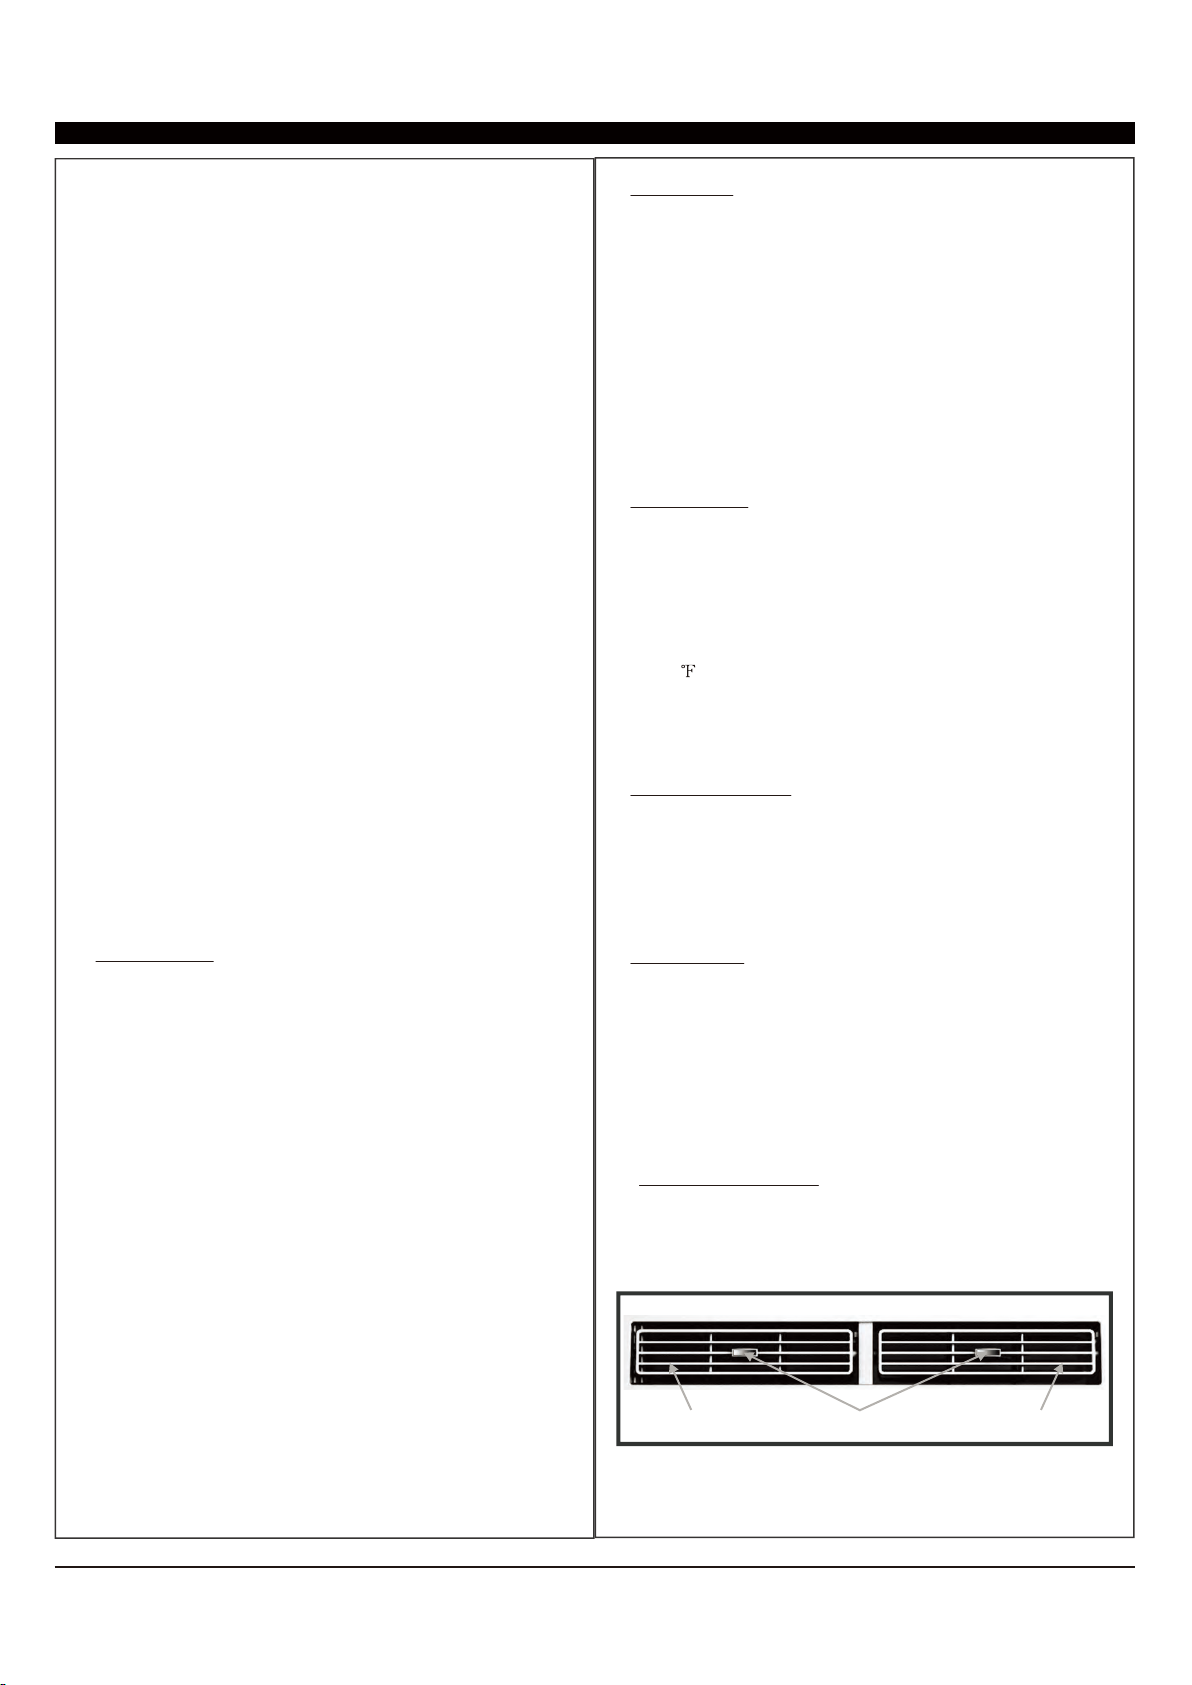
10. Directional Louvers: Pour diriger le flux d'air, roue
horizontale pour contrôler la direction horizontale, déflecteur
d'air pour contrôler la direction verticale.
Remarque: Il peut être configuré pour éteindre ou allumer
automatiquement en 0.5 - 24 heures. Chaque pression sur les
boutons "∧" "V" augmente ou dimin ue la minuterie. La
minuterie peut être réglée en 0,5 heure incrémentée en dessous
de 10 heures et 1 heure d'incrémentation pendant 10 heures ou
plus. Le voyant SET s'allume pendant le réglage. Pour annuler
la fonction réglée, appuyez à nouveau sur la tou che TIMER.
Roue horizontaleDéflecteur d'air Déflecteur d'air
13
Page 38

FONCTIONNEMENT DE VOTRE CONDITIONNEUR D'AIR
5.
TÉLÉCOMMANDE
1
3
4
2
7
Timer: Utiliser ces boutons sur le panneau de commande et l
a télécommande pour régler la minuterie.
Timer Off: L'arrêt programmé est programmé en appuyant sur le
bouton TIMER. Réglez le temps de repos en appuyant sur la
touche "∧" ou "V" jusqu'à ce que l'heure de repos affichée
correspond à votre demande, puis appuyez de nouveau sur le
bouton TIMER.
Timer On: Lorsque l'appareil est éteint, appuyerla touche TIMER
pour la première fois, réglez la température en appuyant sur la
touche "∧" ou "V". Appuyer la touche TIMER à la deuxième heure,
réglez la durée de repos en appuyant sur la touche "∧" ou "V".
Appuyerla touche TIMER à la troisième fois, confirmez le réglage,
puis la durée de repos à la prochaine mise en marche automatique
peut être lue sur l'affichage de la machine.
5
8
9
6
10
3
1. Power: Allumeret éteigner le climatiseur.
2. Cool: Appuyer le bouton COOL en mode COOL.
3. et : Utiliser ces boutons sur le panneau de commande
et la télécommande pour augmenter ou oré L'unité diminuer la
températ ure réglée ou la minuterie.
Plage de température: 61°F - 88°F ou 16°C ~ 31°C.
Remarque: Il peut être configuré pour éteindre ou allumer
automatiquement en 0.5 - 24 heures. Chaque pression sur les
boutons "∧" "V" augmente ou diminue la minuterie. La minuterie
peut être réglée en 0.5 heure in crémentée en dessous de 10
heures et 1 heure d'incrémentation pendant 10 heures ou plus.
Le voyant SET s'allume pendant le réglage. Pour annuler la
fonction réglée, appuyez à nouveau sur la touche TIMER.
6.
Auto Mode:
automatiquement le mode de fonctionnement (COOL,
DRY ou FAN). Dans ce mode, la température sont
réglées automatiquement en fonction de la température
ambiante (testé par le capteur de température
incorporé L'unitéintérieure).
7.
Fan Speed: Appuyer le bouton FAN SPEED pour choisir les
options de vitesse du ventilateur. Vous pouvez choisir Hi, Med,
Lo ou la vitesse automatique en mode COOL et choisir Hi, Med,
Lo en mode FAN.
8.
Display: Pour appuyer sur le bouton DISPLAY, il peut éteindre/
allumer toutes les lumières ou les LED.
En mode AUTO, l'appareil choisit
4.
Sleep:
Appuyer le bouton SLEEP, le Sleep Light
Lorsque le climatiseur est en mode ECO,
s'allume après quelque temps et tous les voyants de gauche
seront éteints. En mode SOMMEIL, le climatiseur ajustera
automatiquement la température et la vitesse du ventilateur
pour rendre la pièce plus confortable pendant la nuit. La
température réglée augmentera automatiquement toutes les
30 - 60 minutes et au plus changera six fois jusqu'à ce que
la température réglée soit de 81 or 82 . Et chaque temps
de fonctionnement dépend de la température réglée.
Taille de la batterie: AAA - REMARQUE: Ne mélangez pas les batteries usées et nouvelles ou de différents types
des batteries AAA.
9. Eco:
le voyant s'illuminera. En mode ECO, l'appareil s'arrêtera une
fois que la température de la pièce atteint la température
réglée.
L'appareil se remettra en marche une fois que la température
ambiante sera plus élevée que le réglage de température.
Avant que le compresseur ne se mette en marche,
du ventilateur fonctionnera pendant un certain temps, puis
s'arrêtera. Il fonctionnera ainsi de façon intermittente pour
plus de confort et pour une économie d'énergie.
10.
Fan Only: Appuyer le bouton Fan Only pour le mode FAN
ONLY.
14
Page 39

ENTRETIEN ET NETTOYAGE
Nettoyer votre climatiseur pour garder le regard neuf et
pour minimiser l'accumulation de poussière.
Nettoyage du filtre à air
Le filtre à air doit être vérifié au moins une fois par mois
pour voir s'il faut nettoyer. Les particules piégées et la
poussière peuvent s'accumuler dans le filtre et peuvent
diminuer le débit d'air et provoquer l'accumulation de
givre dans les bobines de refroidissement. Pour nettoyer
le filtre à air:
1. Retirer le filtre en retirant les embouts de la porte du
filtre à l'avant de l'appareil. (Voir la FIG.15).
2. Laver le filtre à l'aide de savon à vaisselle liquide et
d'eau chaude. Rincer soigneusement le filtre. Agiter
doucement le filtre pour enlever l'excès d'eau.
3. Laisser le filtre sécher complètement avant de le placer
dans le climatiseur.
4. Si vous ne souhaitez pas laver le filtre, vous pouvez
aspirer le filtre pour enlever la poussière et d'autres
particules.
Nettoyage du cabinet
Pour nettoyer l'armoire du climatiseur:
• Débrancher le climatiseur pour éviter tout risque de choc
ou d'incendie. L'armoire et le panneau avant du
climatiseur peuvent être dépoussiérés avec un chiffon
exempt d'huile ou lavés avec un chiffon imbibé dans une
solution d'eau chaude et d'un savon liquide doux. Rincer
soigneusement avec un chiffon humide et essuyer.
• N'utilisez jamais de nettoyants agressifs, de cire ou de
vernis sur le devant de l'armoire.
• Assurez-vous d'essuyer l'excès d'eau du chiffon avant
de nettoyer les commandes. L'excès d'eau dans ou autour
des commandes peut endommager le climatiseur.
Stockage d'hiver
Pour stocker le climatiseur lorsqu'il n'est pas utilisé
pendant une période prolongée, retirez-le soigneusement
de la fenêtre conformément aux instructions d'installation
et recouvrez-le avec du plastique ou placez-le dans la
boîte d'origine
FIG. 15
Usure normale
Pour minimiser l'usure de l'air conditionné, attendez au
moins 3 minutes avant de changer de mode. Cela aidera
à empêcher le compresseur de surchauffer et le circuit de
déclenchement.
15
Page 40

DÉPANNAGE
PROBLEMA POSIBLES CAUSAS SOLUCIONES
Le climatiseur ne démarre pas
Le climatiseur est débranché.
Le fusible est soufflé / le disjoncteur
est déclenché.
Panne de puissance.
L'interrupteur courant est déclenché.
• Assurer que la fiche du climatiseur est
enfoncée dans la prise de courant.
• Vérifier le fusible de la maison / boîte de
disjoncteur et remplacez le fusible ou
réinitialisez le disjoncteur.
• L'appareil redémarre automatiquement
lorsque l'alimentation est rétablie.
• Il y a un délai de protection (environ 3
minutes) pour empêcher le
déclenchement de la surcharge du
compresseur. Pour cette raison, l'appareil
peut ne pas démarrer le refroidissement
normal pendant 3 minutes après son
retour.
• Appuyer le bouton RESET situé sur la
fiche du cordon d'alimentation.
• Si le bouton RESET ne reste pas engagé,
arrêter l'utilisation du climatiseur et
contacter un technicien qualifié.
Le climatiseur ne refroidit pas
comme il se doit
L'air conditionné se gèle
La télécommande ne fonctionne
pas (si elle est incluse avec votre
climatiseur)
Le flux d'air est limité.
Le contrôle de la température peut ne
pas être réglé correctement.
Le filtre à air est sale.
La chambre peut être trop chaude.
L'air froid échappe.
Les bobines de refroidissement sont
gelées.
La glace bloque le flux d'air et arrête le
climatiseur de refroidir la pièce.
Les batteries sont insérées de manière
incorrecte.
Les batteries peuvent être mortes.
• Assurer qu'il n'y a pas de rideaux, de
stores ou de meubles qui bloquent l'avant
du climatiseur.
• Tourner la molette TEMP à un nombre
plus élevé.
• Nettoyer le filtre. Consulter la section
Nettoyage et entretien du manuel.
• Veillez à laisser refroidir la pièce après
avoir allumé le climatiseur.
• Vérifier les registres de four ouvert et les
retours d'air froid.
• Voir "Air Conditioner Freezing Up" ci dessous.
• Régler la molette MODE sur HIGH FAN
ou HIGH COOL et régler la molette TEMP
sur 1 ou 2.
• Vérifier la position des batteries.
• Remplacer les batteries.
16
Page 41

DÉPANNAGE (SUITE)
PROBLÈME CAUSES POSSIBLES SOLUTIONS
L'eau coule dehors
L'eau coule dans la chambre
L'eau se rassemble dans le
moule de base
Météo chaude et humide.
Le climatiseur n'est pas correctement
incliné à l'extérieur.
L'humidité retirée de l'air s'écoule dans
le moule de base.
• C'est normal.
• Pour un bon drainage de l'eau,
assurez-vous que le climatiseur est
légèrement incliné vers le bas de
l'avant de l'appareil vers l'arrière.
• Ceci est normal pour une courte
période dans des zones à faible
humidité et à une température normale
pendant une période plus longue dans
des zones à forte humidité.
17
Page 42

SPÉCIFICATION
Modèle RCA
RACE6011-6COM
Source de courant Ph-V-Hz 1Ph, 115V-, 60Hz
Capacité nominale Btu/h 6000
Entrée nominale W 492
Refroidissement
Courant nominal A 4.5
Alimentation de secours W 1.25
Max. consommation d'intrants W 690
Max. actuel A 6.5
Courant de démarrage A 21
Type de réfrigérant (R32) g 260
Type de réfrigérant (R32) ozs R32/9.35
Pression de conception(145psi=1MPa )(L/H) psi 360/915(2.5/6.3MPa)
intérieur
Température de
fonctio nnement
Domaine d'application (EPA de refroidissement)
extérieur
℃
℉
℃
℉
sp.ft 151-250
16-31/---
61℉-88
43/---
18-
64℉-109
℉
℉
Dimension(W*D*H)
Emballage (W*D*H)
Poids net / brut
mm 406x386x318
in 15.98x15.2x12.52
mm 461x428x402
in 18.15x16.85x15.82
Kg 19.5/22.1
lbs 43/48.72
18
Page 43

19
Page 44

 Loading...