

Page 1

XXXXX
XXXX
Instruction Manual
Model XXXXXX
Place photo here
TEMPLATE
Note Red items, delete or alter as required throughout.
Please read these instructions carefully and retain for future reference.
32” WIDE SCREEN
COLOUR TELEVISION
Model RCA -32E88
Page 2
1
Help line
For assistance during normal working hours (9am-5pm, Mon-Fri, New Zealand local time) call
Oriental Pacific International Ltd.
NZ call: 0800 89 85 80
Email: service@orientalpacific.com
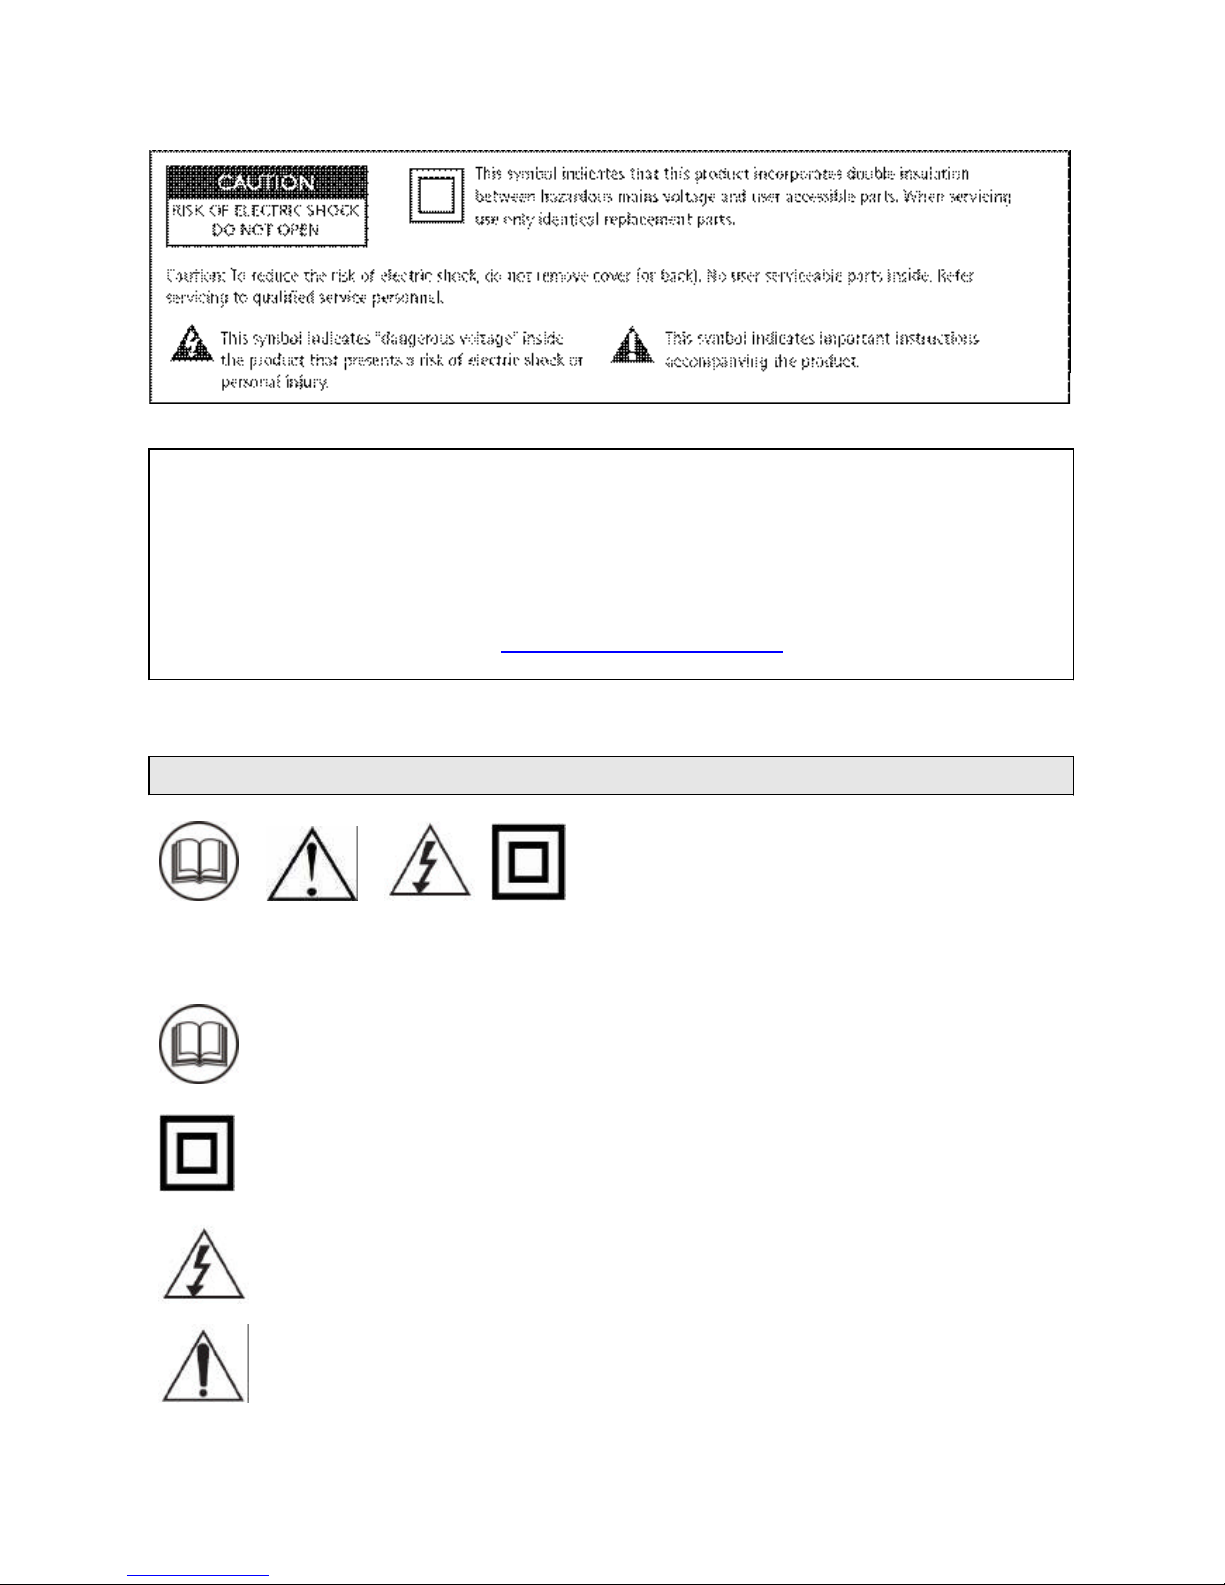
SYMBOLS
The graphic symbols used in this manual or on the back cover of the set mean the
following:
Read this manual in full before use.
Class II Double insulated Appliance
The lightning flash symbol is intended to alert the user to the enclosures that
contain hazardous voltages.
The exclamation symbol is intended to alert the user to the presence of
important operating and maintenance (servicing) instructions in the literature
accompanying the appliance.
Page 3

2
IMPORTANT SAFEGUARDS
When using any electrical apparatus always observe safety regulations and use
basic safety precautions to reduce the risk of fire, electric shock and personal
injury, including the following
Read, Keep and Follow these instructions, heeding all Warnings.
WARNING! No objects filled with liquid, such as vases, shall be placed on this equipment or in any
position where liquid may fall into this equipment or any other electrical apparatus.
WARNING! Do not insert any objects into any openings of this equipment or any other electrical
apparatus.
WARNING! Do not use this apparatus near water. To avoid the risk of fire or electric shock, do not
expose this apparatus to rain or moisture. The apparatus shall not be exposed to dripping or
splashes and is strictly for indoor use only.
WARNING! Not for use in Tropical humid climates.
WARNING! Do not immerse in any liquid whilst in use or cleaning. Clean only with a damp cloth,
dry with a dry towel. Do not use harsh abrasives as these may damage the plastic parts.
WARNING! DO NOT block any ventilation openings. Keep away from curtains, newspapers and
restricted areas. Install in accordance with any specific manufacturer’s instructions. Always allow a
sufficient gap around the apparatus to avoid overheating.
WARNING! Do not install near any heat sources such as radiators, gas heaters, stoves or other
apparatus (including amplifiers) that produce heat. Do not leave in direct sunlight.
WARNING! Do not place any naked flame source, such as lighted candles on any electrical
apparatus.
WARNING! Connect to a suitable 230-240V ~ 50 Hz power supply only.
WARNING! Keep out of reach of young children. This apparatus is not suitable for use by young
children or infirm persons without supervision. Young children must be supervised to ensure that
they do not play with the apparatus. Ensure young children have enough knowledge to operate the
equipment safely if they do have access to this equipment.
WARNING! Do not abuse or damage a power cord. If any power cord is damaged, it must be
replaced by the manufacturer, its service agent or a similarly qualified person in order to avoid a
hazard. A replaceable cord must be replaced with an authorised replacement from an authorised
service agent only.
WARNING! Only use attachments/accessories specified by the manufacturer.
WARNING! Unplug completely from the power source this apparatus during lightening storms or
when unused for long periods of time.
WARNING! Attention is drawn to the environmental aspects of disposing of any battery.
WARNING! Refer all servicing to qualified personnel. Servicing is required when the apparatus
has been damaged in any way, such as when the power supply cord or plug is damaged, liquid
has been spilled or objects have fallen into the apparatus, the apparatus has been exposed to rain
or moisture, does not operate normally, or has been dropped.
WARNING! For household use only, this apparatus is not intended for commercial use.
WARNING! If this apparatus is to be used by a third party, please supply these instructions with it.
WARNING! No liability will be accepted for any personal injury or damage caused by failure
to follow these instructions.
Page 4

3
CLEANING
WARNING! Before you attempt to clean the television screen or cabinet, always disconnect the
appliance from the mains power and remove the plug from the main power outlet.
Clean the television with a soft dry cloth only. Never use any harsh chemical cleaning
agent or water as this may damage the television.
WARNING! Never allow water splashes to enter the appliance. Do not immerse in water.
WARNING! Never remove the rear cover. Do not attempt to service this equipment.
Page 5

TABLE OF CONTENTS
1. INTRODUCTION
1.1 FEATURES
1.2 PRECAUTIONS
1.3 DESCRIPTION OF CONTROL
KEYS & CONNECTIONS
1.3.1 FRONT VIEW
1.3.2 EXPLANATION OF JACKS
1.4 OPERATION OF REMOTE CONTROL
1.4.1 DESCRIPTION OF
REMOTE CONTROL KEYS
1.4.2 INSTALLATION OF BATTERIES
1.4.3 EFFECTIVELY USING THE
REMOTE CONTROL
2. CONNECTIONS
2.1 INSTALLATION OF
ANTENNA
2.2 POWER CONNECTION
2.3 EXTERNAL CONNECTION
4.
TIMER FUNCTION
4.1
4.2
4.3
CLOCK
ON-TIMER
OFF-TIMER
1.
INTRODUCTION
1.1 FEATURES
Color
Systems
-
PAL/NTSC3.58 & NTSC 4.43
Sound systems
-
BG
Preset Programs - 100
Preset Method - AutoSearch,Manual Store,
Fine Tune
Tuning Method - FS
Voltage Range - 230-240V ~, 50Hz
Display -
English
Functions select - Pop up menu
Remote Control - Full Function Infra-red Remote
Controller
AV I/O - 3 RCA-type AV Input
- RCA-type AV output
Useful functions
- Sleep Timer (15-240min.)
- Auto Off (after 15 min with
no signal)
- Blue Background
selection (while no signal)
- 3 Default ,1 User Picture
Settings
- Channel Skip
- AV Stereo
1
- ESS & EPS
- YUV INTPUT1
6.
PROBLEMS OF PICTURE
PROBLEMS OF OPERATION
7.
5. SPECIAL FUNCTIONS
5.1
5.2
5.3
5.4
5.5
5.6
5.7
5.8
5.9
SVM SETTING
BLUE BACK SETTING
PICTURE ROTATION
PICTURE ENHANCEMENT
FAVORITE CHANNEL SETTING
TETRIS GAME
CALENDAR
PARENTAL GUIDE
NOTEBOOK
-
Game
- Notebook
- Calendar
- Favorite Channel Setting
2
3.
GENERAL OPERATIONS
- Program Prearrange
-
On/Off Timer
- S-VIDEO INTPUT1
- Program Swap
- Child Lock
3. 1
3. 2
3. 3
3. 4
3. 5
3. 6
3. 7
3. 8
3. 9
3. 1 0
3. 1 1
3. 1 2
AUTO SEARCH
MANUAL SEARCH
FINE TUNING
CHANNEL SWAP
CHANNEL SKIP
CHANNEL NAME SETTING
COLOUR SYSTEM SELECTI ON
PICTURE ADJUSTMENT
PRESENT PICTURE MODE
SOUND ADJUSTMENT
EQUALISER SELECTION
SOUND MODE SELECTION
TROUBLES H OOTING
6.1
6.2
SPECIFIC A TIONS
- TELETEXT
- Nicam
Page 6
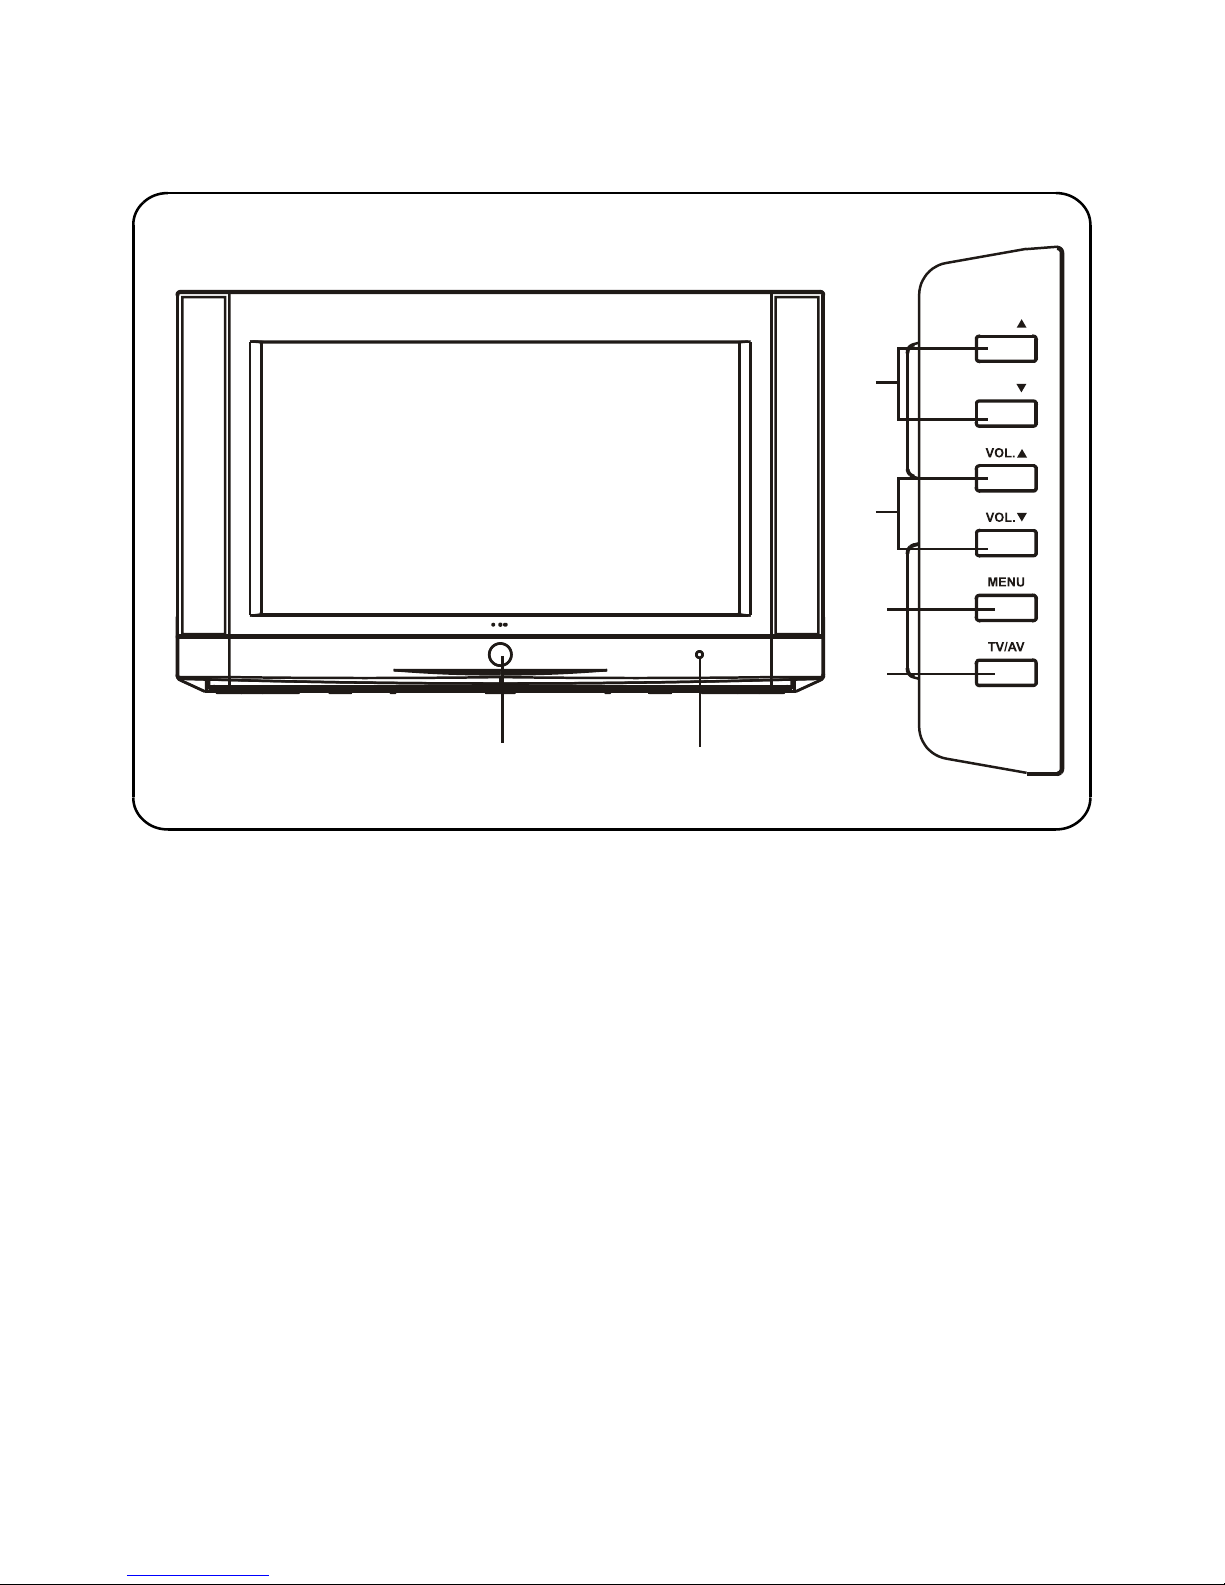
1
1. POWER button
Turn the TV on or off.
2. SENSOR
Receive infra-red signals from the
remote.
3. PROGRAM UP/DOWN buttons
Select channel numbers.
1.3 DESCRIPTION OF CONTROL KEYS & CONNECTIONS
1.3.1 FRONT VIEW
4. VOLUME UP/DOWN buttons
Press to decrease/increase the
volume.
5. MENU button
Press to display the main menu.
6. TV/AV button
Choose between TV programming
and the AV input.
3
PRO.
PRO.
2
4
5
6
3
Page 7
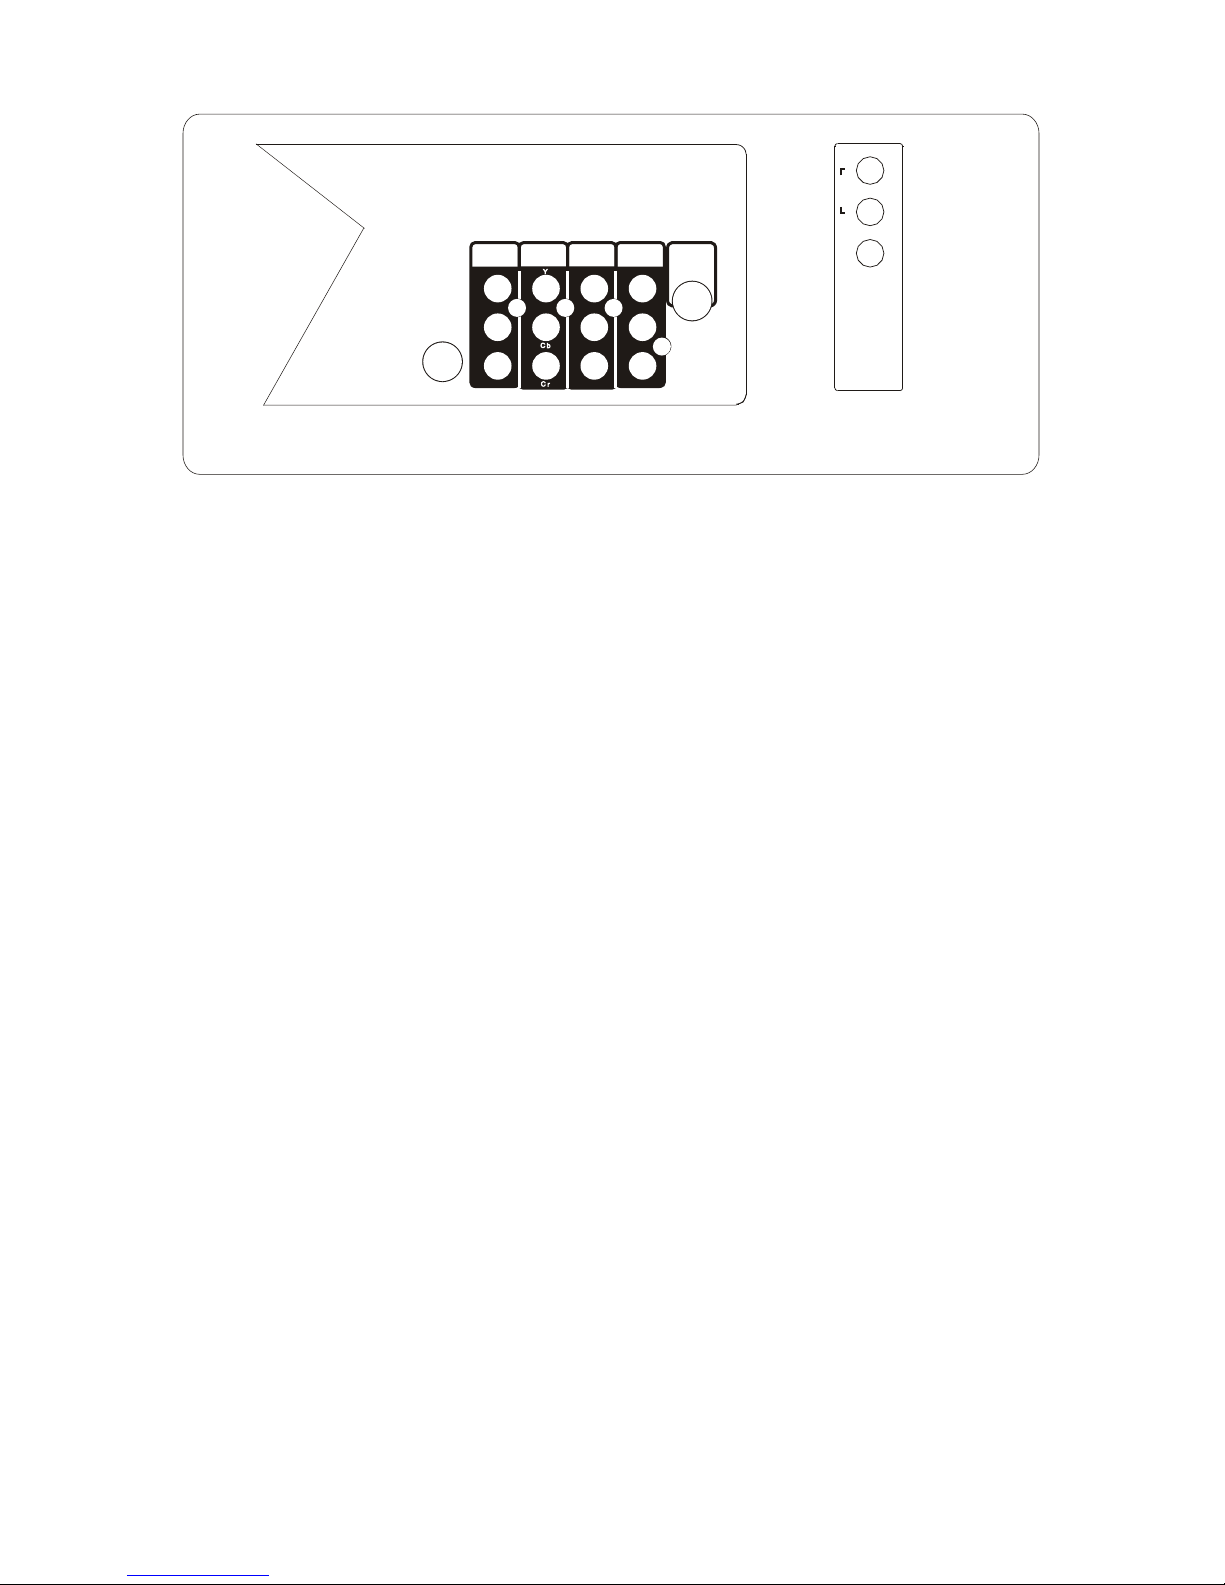
AUDIO-R
1.3.2 EXPLANATION OF JACKS
Y
75OHM
ANTENNA
INPUT
S-VIDEO
C
b
C
r
AV
OUTPUT
YUV
INTPUTAVINPUT2
AV
INPUT3
VIDEO
AUDIO-L
AUDIO-R
VIDEO
AUDIO-L
(MONO)
AUDIO-R
VIDEO
AUDIO-L
AUDIO-R
Rear panel
Side AV input
(AV IN1)
75 OHM ANTENNA INPUT Lets you connect a coaxial cable to receive the signal from the antenna or
cable.
Y, Cb, Cr Provides optimum picture quality because the video is separated into three signals. Use three
video grade cables for the connection. When using this connection make sure to connect left and right
audio cables to the AUDIO input jacks.
Press TV/AV to choose the video input channel. Choose YUV to view material playing on equipment
connected to the component inputs.
R (RIGHT) AUDIO Provides right audio connection. The right audio connector is usually red.
Press TV/AV to choose the video input channel. Choose AV1 to view material playing on equipment
connected to the front AV inputs or AV2 (AV3) to view material playing on equipment connected to the
rear AV inputs.
L (LEFT) AUDIO Provides left audio connection. The right audio connector is usually white.
Press TV/AV to choose the video input channel. Choose AV1 to view material playing on equipment
connected to the front AV inputs or AV2 (AV3) to view material playing on equipment connected to the
rear AV inputs.
VIDEO Provides composite video connection. The video connector is usually yellow.
Press TV/AV to choose the video input channel. Choose AV1 to view material playing on equipment
connected to the front AV inputs or AV2 (AV3) to view material playing on equipment connected to the
rear AV inputs.
S-VIDEO IN Provides better picture quality than the standard video jack (the yellow jack) because the
color part of the signal is separated from the black and white part of the picture. When using S-VIDEO IN,
make sure to connect left and right audio cables to the L and R AUDIO Input jacks.
Press TV/AV to choose the video input channel. Choose S-VIDEO to view material playing on equipment
connected to the S-VIDEO jack.
AUDIO/VIDEO OUTPUT Lets you connect an amplifier or audio receiver for improved sound quality.
Press TV/AV to choose the audio and video that is sent to the output jacks.
4
VIDEO
AV IN 1
AUDIO
L
(MONO ) R
Page 8

5
1.4 OPERATION OF REMOTE CONTROL
1.4.1 DESCRIPTION OF REMOTE CONTROL KEYS
1. STANDBY BUTTON
When the main power is on, to turn the TV set
on or off.
2. TV/AV BUTTON
To switch between TV program and AV input
sources.
3. MUTE BUTTON
To temporarily turn off the sound, and to
restore it by pressing once again.
4. NOTEBOOK BUTTON
To activate the notebook function.
5. *
INDEX
/ DISPLAY/ DELETE BUTTON
*
Press to go to the INDEX page.
To display the current channel number
& name, color & sound mode. Press again
to display the current time on the screen.
Press to remove a menu from the screen.
In the input field of the on-screen menus
including Notebook, press to delete the
unwanted text.
6. *
RED / 4:3/16:9 / INSERT BUTTON
7. *
GREEN
/ FAVORITE BUTTON
*
To accessTELETEXT page corresponding
to GREEN key.
To browse the favorite channels preset in
Favorite channel list. This function will not
work if you have not set any favorite chanel.
8. *
YELLOW
/ RECALL BUTTON
*
To accessTELETEXT page
corresponding
to YELLOW key.
Press to toggle between the crrent channel
and the previous channel.
9. *
CYAN
/ EXIT BUTTON
*
To accessTELETEXT page corresponding
to CYAN key.
Press to exit the on-screen menu directly.
10. -/-- BUTTON
11. CAPS
BUTTON
Press to toggle the entry mode between
uppercase and lowercase letters.
12. *
TXT
BUTTON
Press to activate TELETEXT and page 100
will be displayed on the screen first. Press
this buttonagainto go backto TV mode.
Press to toggle between 1-digit and 2-digit
mode before you enter the channel number.
*
To access TELETEXT page corresponding
to REDkey.
Press to toggle the picture format between 4:3
and 16:9 (4:3 is the standard format for the TV.
MUTE
TV/AV
S.EFFECT
ESS/EPS
DVB
PICTURE
NOTEBOOK
RED
4:3/16:9/INS.
SLEEP
GAME
-/--
INDEX
DISPLAY/DEL.
ABC
DEF
YZ
STU
VWX
PQR
GHI JKL MNO
CYAN
NICAM
CAPS TXT
CALENDAR
GREEN
FAVORITE
YELLOW
RECALL
EXIT
REVEAL
CLOCK MIX
SIZE
HOLD
UPDATE
SUBPAGE
,!:
16:9 is to enlarge the picture to fill out the entire
screen area, eliminating the letter box
effect. Select 16:9 when you watch movies from
a DVD player.)
Page 9

6
17. PICTURE BUTTON
Press repeatedly to select picture mode among
Mild, Normal, Dynamic and PP.
18. PROGRAM UP/DOWN BUTTON
Press to select the previous or next channel
number.
19. VOLUME UP/DOWN BUTTON
Press to increase or decrease the volume of
TV.
Press VOLUME UP/DOWN to enter some
submenus or adjust some controls.
20. MENU BUTTON
Press to display the on-screen menu.
Press repeatedly to exit menu.
21. SOUND EFFECT BUTTON
22. *
*SIZE / ESS / EPS BUTTON
Press to toggle among 3 different series
Under TELETEXT mode: single height
full page, double height top of page and
double height bottom of page.
14. CALENDAR BUTTON
Press to enter or exit Calendar directly.
15. GAME BUTTON
Press to enter or exit Game directly.
16. NUMBER BUTTON
Press to select channel number directly.
Press to enter a letter, a digit or a symbol in
some functions.
Press repeatedly to select sound effect mode
among PP, Music, Speech and Theatre.
To cancel the sleeptimer, press SLEEP button
repeatedly until "OFF" appears.
23. *
HOLD
BUTTON
*
With this toggle command, the hold function
can be switched on or off. When HOLD is
switched on, the message " " will be
displayed on the up-left
corner of the screen
insteadof currentpagenumberorsubcode,and
the pagesearchingwillstop.
24. *
UPDATE
BUTTON
25. DVB BUTTON
Press to turn on or off the DVB (Dynamic
Virtual Bass) function.
26. NICAM BUTTON
To directly change the mode of NICAM, you
can choose MONO, STEREO, DUAL I or
27. *
MIX
BUTTON
The MIX mode results in a combined display
of TV picture and 10 pages TELETEXT page.
28. *
REVEAL/CLOCK
BUTTON
*
This function reveals or conceals the hidden
10 PagesTELETEXT page information.
Most other commands will conceal the
information again.
* In normal TV mode, the TV displays the
currenttime whichis derivedfromTELETEXT
in the upper right corner of the screen.
29. *
SUBPAGE
BUTTON
*
This function toggles the 10 Pages
TELETEXT page between normal PAGE
* If you like to seea certainpagewhichyou
haveknownthe pagenumber,but you don t
wantto spendtimewaitingfor it, youcan
use UPDATE command,whichwill turn
TELETEXT dispaly to TV picture. Then you
can enterthe pagenumberyou want.
Whenthe pageis found,the pagenumber
will appearin theup-leftcornerof thescreen.
PressUPDATE key againyou will get the
pageimmediately.
13. SLEEP BUTTON
To set the sleep timer from 240 to 15 minute
by pressing the SLEEP button repeatedly.
To display the remaining time, press SLEEP
button once.
Press to select ESS / EPS modes among
FF, Spatial Stereoand Pseudo Stereo.
mode and SUBCODE mode.
DUAL II.
Page 10

2. CONNECTIONS
7
2.2 POWER CONNECTION
2.1 INSTALLATION OF ANTENNA
75 OHM
ANTENNA INPUT
A combination antenna receives normal broadcast channels. Your connection is easy since you will
connect the antenna to the 75 OHM ANTENNA INPUT jack on the rear of the TV.
If your antenna has a round cable (75 ohm) on the end, then you are ready to connect it to the TV.
Go to the next step. If your antenna has flat twin-lead wire (300 ohm), you first need to attach the
antenna wires to the screws on a 300 to 75 ohm adapter (not supplied with your TV).
Plug the round end of the adapter or antenna cable onto the 75 OHM ANTENNA INPUT jack on the
rear of the TV. If the round end of the antenna cable is threaded, screw it down tight.
75-ohm
Coaxial Cable
flat twin-lead wire
300 to 75 ohm
adapter
Plug the TV s power cord into a power outlet and turn on the TV. Refer to AUTO SEARCH to set up
your available TV channels.
Note:
If you have separate UHF and VHF antennas, you need an optional combiner to connect the antennas
to the TV.
VHF/UHF
Combination Antenna
UHF Antenna
VHF Antenna
Page 11

Y
75OHM
ANTENNA
INPUT
S-VIDEO
C
b
C
r
AV
OUTPUT
YUV
INTPUTAVINPUT2
AV
INPUT3
VIDEO
AUDIO-L
AUDIO-R
VIDEO
AUDIO-L
(MONO)
AUDIO-R
VIDEO
AUDIO-L
AUDIO-R
Rear panel
Side AV input
(AV IN1)
VIDEO
AV IN 1
AUDIO
L(MO NO) R
2.3 TV + VCR + DVD CONNECTION
Connect the audio cables (white and red) to the R and L AUDIO jacks on the TV and the Audio output
jacks on the VCR (or other component). Match the cable color to the jack color.
If your component has Component Output jacks YUV (Y, Cr, Cb), connect three video grade cables to
the Y, Cr, Cb jacks on the component and to the Y, Cr, Cb jacks on the TV. If your component doesn’t
have these jacks, go to the next step.
If your component has an S-VIDEO jack, connect an S-VIDEO cable to the S-VIDEO jack on the back
of the TV and to the S-VIDEO jack on the component. If your component doesn’t have an S-VIDEO jack,
go to the next step.
Connect a video cable (yellow) to the VIDEO INPUT jack on the TV and to the VIDEO OUT jack on your
VCR (or other component).
Turn on the TV and the component.
Press the TV/AV button repeatedly until the correct video input channel appears in the upper right corner
of the TV screen. For front inputs choose AV1, for rear AV inputs choose AV2 or AV3. This model has
component jacks (Y, Cb, Cr), choose YUV as your video input channel.
Notes:
Use either S-VIDEO jack or VIDEO INPUT 3 jacks. Do not use both at the same time for the same piece
of equipment. This would interfere with the picture display.
S-VIDEO and AV INPUT 3 are sharing the same audio input.
YUV INPUT and AV INPUT 2 are sharing the same audio input.
The basic component (VCR, DVD player etc.) to TV connection is described below. For other hookup, refer
to your component’s instruction manual.
8
2. CONNECTIONS
Page 12

9
Icon and the corresponding main menu
Picture Sound Setup
Clock Tune
3.1 AUTO SEARCH
All the active channels will be stored automatically from channel No.
1 and upward in order.
• Press MENU to display the on-screen menu.
• Press PROGRAM UP/DOWN to select the main menu Tune.
• Press VOLUME UP to enter the Tune submenu.
• Press PROGRAM UP/DOWN to select Auto Search.
• Press VOLUME UP to start the auto searching, and then all available
channels will be stored from No. 1 and upward in order. Auto
searching will stop after all the frequency bands are searched, and
the program of the first searched, channel 1, will show. If you want
to exit auto search, just press EXIT to directly quit menu.
3. GENERAL OPERATIONS
Tune
Program
Frequency
Manual Search
Skip
Colour
Name
36
Off
Auto
( )
503. 25M
Auto Search
MENU
EXIT
Tune
Program
Frequency
Skip
Colour
Name
36
Auto
( )
503. 25M
Auto Search
Manual Search
Tune
Program
Frequency
Manual Search
Skip
Colour
Name
36
Off
Auto
( )
503. 25M
Auto Search
Off
MENU
EXIT
SEARCHING...
MENU
EXIT
SEARCHING...
Tune
Program
Frequency
Manual Search
Skip
Colour
Name
36
Off
Auto
( )
503. 25M
Auto Search
MENU
EXIT
Note:
When auto search is finished, sound of beep can be heard.
3.2 MANUAL SEARCH
To preset the TV channel to your desired position number, manual
searching should be used.
• Select a channel using the number buttons, e.g. 36.
• Press MENU to display the on-screen menu.
• Press PROGRAM UP/DOWN to select the main menu Tune.
• Press VOLUME UP to enter the Tune submenu.
• Press PROGRAM UP/DOWN to select Manual Search.
• Press VOLUME UP to start manual channnel searching upward or
downward from the current position of this channel and current
frequency.
• When an available channel is searched, the searching will stop. If
the searched channel is not as you desired, repeat the above step
to search again.
• To stop manual searching, press MENU button to go back to the
previous menu.
• When you finish manual channel searching, press EXIT to quit menu,
or menu will disappear after a few seconds without any further action.
50
50
50
On
Normal
PP
Brightness
Colour
Contrast
Sharpness
Tint
Combfilter
Color Temp.
Picture Mode
Picture
50
50
MENU
EXIT
Picture Enhance
Off
Page 13

10
3.3 FINE TUNING
Fine tuning function may impove the receiving quality of some weak/
unstable channels by adjusting the channel frequency manually.
• Select a channel using the number buttons, e.g. 36.
• Press MENU to display the on-screen menu.
• Press PROGRAM UP/DOWN to select the main menu Tune.
• Press VOLUME UP to enter the Tune submenu.
• Press PROGRAM UP/DOWN to enter Frequency.
• Press VOLUME UP to enter Frequency adjustment field.
• Press VOLUME UP/DOWN button to fine tune the channel upward
or downward until satisfied picture and sound quality are achieved.
• Press EXIT to quit menu, or menu will disappear after a few seconds
without any further action.
3.4 PROGRAM SWAP
After the auto or manual search, you may want to rearrange the
program numbers in which the channels are stored. In this case,
program swap function may be useful to you.
• Press MENU to display the on-screen menu.
• Press PROGRAM UP/DOWN to select the main menu Setup.
• Press VOLUME UP to enter the Setup submenu.
• Press PROGRAM UP/DOWN to select PRO. Swap.
• Press VOLUME UP to enter PRO. Swap.
• Press PROGRAM UP/ DOWN to select Program 1, then press
VOLUME UP to highlight the program number position and use
number buttons to enter the program number, e.g. 30. Use the same
method to enter the program number in the next line, e.g. 22. That
means these two programs will be switched.
• Then press the PROGRAM UP/DOWN button to select Swap and
press VOLUME UP to finish the setting.
• If you want to set other channel, repeat the above procedure.
• Press EXIT to quit menu, or menu will disappear after a few seconds
without any further action.
3.5 CHANNEL SKIP
You can add or erase channels from the list in the TV’s memory. Select
a channel you want to remove from or add to the channel memory, e.
g.36.
• Press MENU to display the on-screen menu.
• Press PROGRAM UP/DOWN to select the main menu Tune.
• Press VOLUME UP to enter the Tune submenu.
• Press PROGRAM UP/DOWN to select Skip.
• Press VOLUME UP to display the features of Skip.
• Press PROGRAM UP/DOWN to select On or Off. If you select Off,
the channel will be available when you press PROGRAM UP/DOWN
to move through channels. Choosing On will remove the channel
from the TV’s memory.
• Press EXIT to quit menu, or menu will disapear after a few seconds
without any further action.
Tune
Program
Manual Search
Skip
Colour
Name
36
Auto
( )
Auto Search
Frequency 503. 25M
Off
MENU
EXIT
0-9
3. GENERAL OPERATIONS
Frequency
36
Off
On
( )
503. 25M
Tune
Program
Manual Search
Skip
Colour
Name
Auto Search
MENU
EXIT
PRO. Swap
22
30Program 1
Program 2
Swap
MENU
EXIT
0-9
Off
Off
Rotate
Parent Guide
Favorite
Setup
Blue Back
Game
Calendar
PRO. Swap
MENU
EXIT
0
SVM
Page 14

11
3.6 CHANNEL NAME SETTING
After storing all the available local channels into your TV set, you can
use this function to give a name to each channel as you like. Select a
channel and then follow the steps below:
• Press MENU to display the on-screen menu.
• Press PROGRAM UP/DOWN to select the submenu Tune.
• Press VOLUME UP to enter the Tune submenu.
• Press PROGRAM UP/DOWN to select Name.
• Press VOLUME UP to select the name input field.
• Press CAPS button to toggle between the entry modes of uppercase
and lowercase letters, then enter a name for the selected channel
using the number buttons, e.g. CCTV. (Only five letters can be input)
• Press EXIT to quit menu, or menu will disappear after a few seconds
without any further action.
3.7 COLOUR SYSTEM SELECTION
This feature allows you to select suitable receiving system for the
specific broadcasting system in your area.
• Press MENU to display the on-screen menu.
• Press PROGRAM UP/DOWN to select the submenu Tune.
• Press VOLUME UP to enter the Tune submenu.
• Press PROGRAM UP/DOWN to select Colour.
• Press VOLUME UP to display the features of Colour (Auto, PAL,
N3.58 and N4.43).
• Press PROGRAM UP/DOWN to select the desired colour system.
• Press MENU to go back to the Tune submenu.
• Press EXIT to quit menu, or menu will disappear after a few seconds
• without any further action.
Notes:
• Colour system: If Auto is selected, the respective colour system will
be automatically selected according to the transmission system. If
the reception is poor at Auto mode, select your desired colour system
manually.
3. GENERAL OPERATIONS
CCTV
Tune
Program
Frequency
Manual Search
Skip
Colour
36
Off
Auto
503. 25M
Name
Auto Search
( )
MENU
EXIT
0-9
Name
36
Off
Auto
PAL
503. 25M
Auto Search
N3.58
N4.43
Tune
Program
Frequency
Manual Search
Skip
Colour
MENU
EXIT
Page 15

12
3.8 PICTURE ADJUSTMENT
To adjust your TV picture, select a channel and follow the steps below:
• Press MENU to display the on-screen menu.
• Picture is highlighted. Press VOLUME UP to enter the Picture submenu.
• Press PROGRAM UP/DOWN to highlight your choice: Brightness,
Colour, Contrast, Sharpness, Tint.
• Press VOLUME UP/DOWN to increase or decrease the element you
choose.
• Press PROGRAM UP/DOWN to go on selecting Combfilter (or Color
Temp.).
• Press VOLUME UP to display the features of Combfilter (or Color
Temp.).
• Press PROGRAM UP/DOWN to select On or Off for Combfilter (or set
Color Temp. to Normal, Warm or Cool).
• Press EXIT repeatedly to quit menu, or menu will disappear after a
few seconds without any further action.
Notes:
• Brightness: Brightens the darkest parts of the picture.
• Colour: Is used to add or reduce the colour.
• Contrast: Is used to adjust the distinction between the black and the
white parts of the picture.
• Sharpness: Improve picture details.
• Tint: Obtains natural skin tones of NTSC picture. This feature is only
selectable on NTSC and YUV input mode.
• Combfilter: This TV set has adopted one-chip multi-standard adaptive
Comb Filter, which provides unprecedented high resolution and vivid
picture.
• Color Temp.: You can select Normal, Warm or Cool picture preference.
(Normal will keep the whites white; Warm will keep the whites reddish
and Cool will keep the whites bluish.)
3.9 PRESET PICTURE MODE
This function enables you to choose preset video settings for different
types of programs and viewing conditions. Most picture settings are
preset at the factory to automatically adjust the TV’s Brightness. Colour,
Contrast, and Sharpness.
• Press MENU to display the on-screen menu.
• Picture is highlighted. Press VOLUME UP to enter the Picture submenu.
• Press PROGRAM UP/DOWN to select Picture Mode.
• Press VOLUME UP to display the features of Picture Mode.
• Press PROGRAM UP/DOWN to select Mild, Normal, Dynamic or PP.
• Press EXIT to quit menu, or menu will disappear after a few seconds
without any further action.
Note:
• The personal setting (PP) is what you specify with the picture
adjustments as described above. PP is the only picture setting you
can change while all others are preset at the factory.
50
Brightness
50
50
50
50
On
Tint
Combfilter
Brightness
Colour
Contrast
Sharpness
Picture
50
Normal
Warm
Cool
Color Temp.
Picture Mode
MENU
EXIT
Picture Enhance
Off
50
50
50
50
Mild
Normal
Dynamic
PP
50
Combfilter
Color Temp.
Picture Mode
Tint
Brightness
Colour
Contrast
Sharpness
Picture
MENU
EXIT
Picture Enhance
Off
50
50
50
50
On
Normal
PP
Tint
Combfilter
Color Temp.
Picture Mode
Brightness
Colour
Contrast
Sharpness
Picture
50
MENU
EXIT
Off
Picture Enhance
3. GENERAL OPERATIONS
Page 16

13
3.10 SOUND ADJUSTMENT
To adjust your TV sound, select and use the sound menu controls.
• Press MENU to display the on-screen menu.
• Press PROGRAM UP/DOWN to select Sound.
• Press VOLUME UP to enter the Sound submenu.
• Press PROGRAM UP/DOWN to highlight your choice: AVL, Loudness,
DVB, Balance, Equaliser or Sound Mode.
• Press VOLUME UP to display the features of your choice, e.g. AVL.
• Press PROGRAM UP/DOWN to select On or Off for AVL.
• Press EXIT to quit menu, or menu will disappear after a few seconds
without any further action.
Notes:
• AVL(Auto Volume Levelling): When On, AVL will level out the sudden
volume changes caused by commercial beaks or channel changes.
• DVB(Dynamic Virtual Bass): Is used to turn DVB function on or off.
• Balance:Adjusts the level of the sound coming from the left and right
speakers of TV.
• Equaliser: Sets desired sound tone.
3.11 EQUALISER SELECTION
You can enter Equaliser to adjust the sound to your desired level.
• Press MENU to display the on-screen menu.
• Press PROGRAM UP/DOWN to select Sound.
• Press VOLUME UP to enter the Sound submenu.
• Press PROGRAM UP/DOWN to highlight Equaliser.
• Press VOLUME UP to display the features of Equaliser.
• Press PROGRAM UP/DOWN to select the frequency you want to
adjust: 100HZ, 300HZ, 1KHZ, 3KHZ and 8KHZ.
• Press VOLUME UP to adjust the setting to your deired level.
• Press MENU to go back to the previous menu. Press PROGRAM
UP/DOWN to highlight Reset. Then all of the levels will be set to 50%
automatically.
3.12 SOUND MODE SELECTION
You can preset sound mode (PP, Music, Speech or Theatre) to best
suit your current programming.
• Press MENU to display the on-screen menu.
• Press PROGRAM UP/DOWN to select Sound.
• Press VOLUME UP to enter the Sound submenu.
• Press PROGRAM UP/DOWN to select Sound Mode.
• Press VOLUME UP to display the features of Sound Mode.
• Press PROGRAM UP/DOWN to select PP, Music, Speech or Theatre.
• Press EXIT to quit menu, or menu will disappear after a few seconds
without any further action.
Sound
AVL Off
PP
Theatre
Speech
Music
Sound Mode
Off
0
DVB
Balance
MENU
EXIT
Equaliser
Loudness
Off
Off
PP
AVL
Loudness
DVB
Sound Mode
Sound
Off
Off
Off
0
PP
Off
On
DVB
Balance
Sound Mode
Sound
AVL
Loudness
0Balance
MENU
EXIT
MENU
EXIT
Equaliser
Equaliser
100
Equaliser
Adjust
Reset
MENU
EXIT
300
1K
3K 8K
3. GENERAL OPERATIONS
Page 17

14
4. TIMER FUNCTION
4.1 CLOCK
Follow the following steps to set the clock:
• Press MENU to display the on-screen menu.
• Press PROGRAM UP/DOWN to select Clock.
• Press VOLUME UP to enter the Clock submenu.
• Press PROGRAM UP/DOWN to select Clock.
• Press VOLUME UP to highlight hour position in red, and then use
the number buttons to set the hour.
• Press VOLUME UP to highlight minute position in red, and then use
the number buttons to set the minute.
• Press EXIT to quit menu, or menu will disappear after a few seconds
without any further action.
4.2 ON-TIMER
To turn on the TV to a specific channel at a specific time, use the Ontimer. Before you begin, set the clock correctly.
• Press MENU to display the on-screen menu.
• Press PROGRAM UP/DOWN to select the submenu Clock.
• Press VOLUME UP to enter the Clock submenu.
• Press PROGRAM UP/DOWN to select On PRO..
• Press number buttons (or PROGRAM UP/DOWN) to enter a channel
number. This will be the channel to which the TV turns on at the
specifiic time.
• Press PROGRAM UP/DOWN to select the first On Time.
• Press VOLUME UP display the features of On Time. Then press
PROGRAM UP/DOWN to select Off, Once or Daily.
(If you select Once, the timer will turn on the TV one time within the
next 24 hours only. If you select Daily, the timer will turn on the TV at
the same time and to the same channel every day. Choose Off to
cancel the On-timer.
• Press MENU to go back to the submenu of Clock. Then press
PROGRAM UP/DOWN button to select the next On Time.
• Press VOLUME UP to highlight hour position in red, and then use
the number buttons to set the hour.
• Press VOLUME UP to highlight minute position in red, and then use
the number buttons to set the minute.
• Press EXIT to quit menu, or menu will disappear after a few seconds
without any further action.
4.3 OFF-TIMER
To turn off the TV at a specific time every day, use the Off-timer. Before
you begin, you must set the clock correctly.
• Press MENU to display the on-screen menu.
• Press PROGRAM UP/DOWN to select the submenu Clock.
• Press VOLUME UP to enter the Clock submenu.
• Press PROGRAM UP/DOWN to select the first Off Time.
Clock
Clock
Off Time
Off Time
On Time
On Time
On PRO.
1
- - : - -
Off
- - : - -
- - : - -
Off
MENU
EXIT
0-9
Clock
Clock
Off Time
Off Time
On Time
On Time
On PRO.
- - : - -
Off
- - : - -
Off
1
- - : - -
MENU
EXIT
0-9
-/--
Clock
Clock
Off Time
Off Time
On Time
On Time
On PRO.
Daily
Off
Once
- - : - -
- - : - -
Off
MENU
EXIT
Clock
Clock
Off Time
Off Time
On Time
On Time
On PRO.
- - : - -
1
- - : - -
Daily
Off
Once
MENU
EXIT
Page 18

15
• Press VOLUME UP display the features of Off Time. Then press
PROGRAM UP/DOWN to select Off, Once or Daily.
(If you select Once, the timer will turn off the TV once only. If you
select Daily, the timer will turn off the TV at the same time every day.
Choose Off to cancel the Off-time.
• Press MENU to go back to the submenu of Clock. Then press
PROGRAM UP/DOWN button to select the next Off Time.
• Press VOLUME UP to highlight hour position in red, and then use
the number buttons to set the hour.
• Press VOLUME UP to highlight minute position in red, and then use
the number buttons to set the minute.
• Press EXIT to quit menu, or menu will disappear after a few seconds
without any further action.
4. TIMER FUNCTION
5. SPECIAL FUNCTION
5.1 SVM SETTING
This function (Scan Velocity Modulation) enables to improve the picture
quality.
• Press MENU to display the on-screen menu.
• Press PROGRAM UP/DOWN to select Setup.
• Press VOLUME UP to enter the Setup submenu.
• Highlight SVM with PROGRAM UP/DOWN and then press VOLUME
UP to display the features of SVM.
• Press PROGRAM UP/DOWN to set SVM to Off, Weak or Strong
mode.
• Press EXIT to quit menu, or menu will disappear after a few seconds
without any further action.
5.2 BLUE BACK SETTING
If this function is set to On mode, a solid blue screen will be displayed
when no signal is received.
• Press MENU to display the on-screen menu.
• Press PROGRAM UP/DOWN to select Setup.
• Press VOLUME UP to enter the Setup submenu.
• Press PROGRAM UP/DOWN to select Blue Back.
• Press VOLUME UP to display the features of Blue Back.
• Press PROGRAM UP/DOWN to set Blue Back to On or Off mode.
• Press EXIT to quit menu, or menu will disappear after a few seconds
without any further action.
Game
Calendar
Favorite
Parent Guide
Weak
Strong
Rotate
Setup
Blue Back
PRO. Swap
MENU
EXIT
SVM Off
Game
Calendar
Favorite
Parent Guide
Off
On
Rotate
Setup
Blue Back
PRO. Swap
MENU
EXIT
SVM
Off
Page 19

16
5. SPECIAL FUNCTION
5.3 PICTURE ROTATION
Due to the geomagnetic effect, the picture will slant horizontally. You
can adjust it as follows:
• Press MENU to display the on-screen menu.
• Press PROGRAM UP/DOWN to select Setup.
• Press VOLUME UP to enter the Setup submenu.
• Press PROGRAM UP/DOWN to select Rotate.
• Press VOLUME UP to adjust the gradient of the picture until you get
the satisfied display.
• Press EXIT to quit menu, or menu will disappear after a few seconds
without any further action.
5.4 PICTURE ENHANCEMENT
Unstable or poor quality video pictures may be improved by using this
feature.
• Press MENU to display the on-screen menu.
• Press PROGRAM UP/DOWN to select Picture.
• Press VOLUME UP to enter the Picture submenu.
• Press PROGRAM UP/DOWN to select Picture Enhance.
• Press VOLUME UP to display the features of Picture Enhance.
• Press PROGRAM UP/DOWN to select Off, Middle or High.
• Press EXIT to quit menu, or menu will disappear after a few seconds
without any further action.
5.5 FAVORITE CHANNEL SETTING
You can store five channels you prefer into the Favorite list and recall
these channels easily by pressing FAVORITE button on the remote
control.
• Press MENU to display the on-screen menu.
• Press PROGRAM UP/DOWN to select the submenu Setup.
• Press VOLUME UP to enter the Setup submenu.
• Press PROGRAM UP/DOWN to select Favorite.
• Press VOLUME UP to display the features of Favorite.
• Press PROGRAM UP/DOWN to FAV.1 (or FAV.2, FAV.3, FAV.4, FAv.
5), then press VOLUME UP to enter the channel number input filed.
• Press the -/-- to select the 1-digit or 2-digit channel number, then
input the channel number using the number buttons. You can also
delete unwanted digits with DELETE button and reset the favorite
channel number again.
• Press EXIT to quit menu, or menu will disappear after a few seconds
without any further action.
Game
Calendar
Favorite
Parent Guide
Weak
Strong
Rotate
Setup
Blue Back
PRO. Swap
MENU
EXIT
SVM Off
50
50
50
50
Middle
Off
High
PP
50
Combfilter
Color Temp.
Picture Mode
Tint
Brightness
Colour
Contrast
Sharpness
Picture
MENU
EXIT
Picture Enhance
Off
0
Setup
Blue Back
Rotate
Parent Guide
Game
Calendar
Favorite
FAV. 1
FAV. 2
FAV. 3
FAV. 4
FAV. 5
- -
Favorite
- -
- -
- -
- -
PRO. Swap
MENU
EXIT
MENU
EXIT
0-9
-/--
DEL
SVM
Off
Game
Calendar
Favorite
Parent Guide
On
0Rotate
Setup
Blue Back
PRO. Swap
MENU
EXIT
SVM
Off
Page 20

17
5.6 TETRIS GAME
Tetris is deceptively simple, yet, completely addictive. Small shapes
called Tetraminoes fall from the top of the Playfield to the bottom.
Players must rotate the Tetraminoes by PROGRAM UP as they
fall, and fit them together to complete horizontal lines. When the
player fills an entire line with blocks, that line will be removed from
the screen.If the player cannot complete lines, the blocks will
eventually rise up to the top of the screen and the game ends.
• Press MENU to display the on-screen menu.
• Press PROGRAM UP/DOWN to select the submenu Setup.
• Press VOLUME UP to enter the Setup submenu.
• Highlight Game with PROGRAM UP/DOWN and then press
VOLUME UP to enter Game directly .
• Play game with PROGRAM UP/DOWN & VOLUME UP/DOWN.
• Press EXIT to quit menu, or menu will disappear after a few
seconds without any further action.
Note:
• Do not play game in Zoom or Subtitle mode.
5.7 CALENDAR
This feature enables you to look up the date easily.
• Press MENU to display the on-screen menu.
• Press PROGRAM UP/DOWN to select the submenu Setup.
• Press VOLUME UP to enter the Setup submenu.
• Press PROGRAM UP/DOWN to select Calendar.
• Press VOLUME UP to display the features of Calendar.
• Press VOLUME UP to select year (month or day) position .
• Press PROGRAM UP/DOWN to select the desired year (month
or day).
• Press EXIT to quit menu, or menu will disappear after a few
seconds without any further action.
5. SPECIAL FUNCTION
Off
0Rotate
Parent Guide
Setup
Blue Back
Game
Calendar
Favorite
PRO. Swap
MENU
EXIT
SVM
Off
MENU
EXIT
Calendar
2004 / 08 / 10
S M T W T F S
15 16 17 18 19 20 21
22 23 24 25 26 27 28
29 30 31
8 9 10 11 12 13 14
1
2 3 4 5 6 7
When the button is pressed, sound of beep can be heard.
Off
0Rotate
Parent Guide
Favorite
Setup
Blue Back
Game
Calendar
PRO. Swap
MENU
EXIT
SVM
Off
Page 21

18
5. SPECIAL FUNCTION
Disable
8
Off
Parent Guide
Channel Lock
Program
Channel Lock
Child Lock
Change PWD.
Off
MENU
EXIT
0-9
-/--
Disable
8
Off
Parent Guide
Channel Lock
Program
Channel Lock
Child Lock
Change PWD.
On
MENU
EXIT
Disable
Off
Parent Guide
Channel Lock
Program
Channel Lock
Child Lock
Change PWD.
Off
MENU
EXIT
Enable
Disable
8
Off
Parent Guide
Channel Lock
Program
Channel Lock
Child Lock
Change PWD.
Off
MENU
EXIT
On
Game
Calendar
Favorite
Setup
Blue Back
Parent Guide
Off
- - - -
PRO. Swap
MENU
EXIT
0-9
SVM
Off
Rotate
0
5.8 PARENTAL GUIDE
Using this function, you can lock the channels you think inappropriate
for children to watch. If you want to lock the channels, you must enter
the password firstly.
• Press MENU to display the on-screen menu.
• Press PROGRAM UP/DOWN to select the main menu Setup.
• Press VOLUME UP to enter the Setup submenu.
• Press PROGRAM UP/DOWN to select Parent Guide.
• Press VOLUME UP to highlight the password position and use number
buttons to enter a password (0000 is the default code of the TV).
Then the features of Parental Guide are displayed on the screen.
• Press PROGRAM UP/DOWN to select the first Channel Lock, then
press VOLUME UP/DOWN to select Disable or Enable. If Enable is
highligted, Frequency, Manual Search & Auto Search in Tune menu
will be unable to use.
Note:
• You can use the smart code 5898 to enter the Parent Guide menu
instead of the default code 0000 or the new password you have set.
If you want to lock a program, following the steps below:
• Press PROGRAM UP/DOWN to select Program, and then enter a
channel number with number buttons eg. 8. This is the channel you
want to lock.
• Press MENU to go back to the previous menu, and then press
PROGRAM UP/DOWN to select the second Channel Lock.
• Press VOLUME UP to display the features of Channel Lock and then
press PROGRAM UP/DOWN to select On or Off. When On is
selected, it means you want to lock this channel. Repeat the above
steps to set other channels you want to lock.
• Press MENU to go back to the previous menu, and then press
PROGRAM UP/DOWN to select the first Channel Lock.
• Press VOLUME UP to display the features of Channel Lock and then
press PROGRAM UP/DOWN to select Disable or Enable. When
Enable is selected, all the channels you select to be locked will be
enabled.
If you want to prevent the children against all channels, go on
with the following steps:
• Press MENU to go back to the previous menu, and then press
PROGRAM UP/DOWN to highlight Child Lock.
• Press VOLUME UP to display the features of Child Lock and then
press PROGRAM UP/DOWN to select On or Off. When On is
selected, the buttons on the front panel of the TV will be disabled.
When turning on the TV, “ INPUT PASSWORD” appears on the
screen. One has to input the password, then all buttons become active
again.
Page 22

19
If you want to change the password, go on with the following
steps:
• Press MENU to go back to the previous menu, and then press
PROGRAM UP/DOWN to select Change PWD.
• Press VOLUME UP and then New PWD. is highlighted. Use the
number buttons to enter a new password and finally enter the same
digit again to confirm.
5.9 NOTEBOOK
This feature enables you to store personal messages.
• Press NOTEBOOK to display Notebook window directly.
• Press CAPS to toggle the entry mode between uppercase or
lowercase letters.
• Use number buttons to enter letters, numbers or some special
symbols.
• Press DEL(ETE) to delete the unwanted text.
• Press INS(ERT) to select INS(ERT) or OVR(overwrite) on the screen
and then use number buttons to insert or overwrite the letter or
number in the text.
• Press PROGRAM UP/DOWN to select MESSAGE, and then press
VOLUME UP/DOWN to select ON or OFF. If you select ON, the
Notebook window with the stored message will be displayed on the
screen first when the TV is turned on. Meanwhile, you can hear the
sound of beep.
• If you want to display the message at a specified time, go on selecting
--:--, enter the time using VOLUME UP/DOWN button, e.g.7:30, then
set MESSAGE to ON. It means that the Notebook window with the
stored message will be automatically displayed on the screen at
7:30. Meanwhile, you can hear the sound of beep.
5. SPECIAL FUNCTION
OVR CAPS
Notebook
F
- - : - -
MESSAGE OFF
- - - -
Change PWD.
New PWD.
Confirm
MENU
EXIT
0-9
Page 23

6. TROUBLESHOOTING
6.1 PROBLEMS OF PICTURE
The most common types of picture problems are as follows:
IGNITION
Black spots or horizontal streaks appear, or
the picture flutters or drifts. This is usually
caused by interference from car ignition
system, neon lamps, electric drills, or other
electrical appliances.
GHOSTS
Ghosts are caused by the television signal
following two paths. One is the direct path, the
other is reflected from tall buildings, hills, or
other objects. Changing the direction or
position of the antenna may improve the
reception.
SNOW
If the antenna is located in the fringe area of a
television signal where the signal is weak, the
picture may be marred by dots. When the
signal is extremely weak, it may be necessary
to install a special antenna to improve the
reception.
RADIO FREQUENCY
INTERFERENCE
This interference produces moving ripples or
diagonal streaks, and in some cases, loss of
contrast in the picture.
CRT DEGAUSSING
If the TV screen has been magnetized with
impropercolourappearing on the particular area
of screen,power off the TV (or unplug AC cord).
After10 minutes, turnon the mainpower(orplug
in AC cord). Repeat the above process until
improper colour disappear.
20
Page 24

6.2 PROBLEMS IN OPERATION
If this unit does not seem to operate properly, check the POSSIBLE CAUSES below.
SYMPTOM
NO POWER
NO TV RECEPTION
NOISY PICTURE
NO REMOTE CONTROL OPERATION
NORMAL PICTURE, NO SOUND
NO PICTURE, NORMAL SOUND
NO COLOUR
POSSIBLE CAUSES
The power cord is not connected.
The POWER BUTTON on the main unit is off.
The antenna connector is not connected, or wires are broken.
The appropriate colour system is not selected.
The TV is not fine-tuned correctly.
The antenna is not adjusted correctly.
Possible station trouble.
Possible local interference
The batteries need to be replaced.
Polarities of the batteries are incorrect.
Main power is not on.
Something may interfere the path to remote sensor.
Volume is set to min., press VOL.
button.
Volume is set to mute, press MUTE button.
Possible chassis problem.
Brightness & Contrast may be set to min.
TV station problem.
Select other colour systems.
Colour may be set to min..
Program may be in black and white.
Cables are incorrectly connected to external equipment.
Cables are incorrectly connected to external equipment.
.
.
21
6.
TROUBLESHOOTING
Page 25

4
SPECIFICATIONS
Description
32” Wide Screen Colour Television
Power input
AC230-240V 50Hz
Power consumption
110W
TV system
PAL BG (NTSC Playback)
Language of OSD
English
Function adjust
MENU display
Channel memory
100 (0-99)
Picture tube
32” (76cm)
Net weight
54Kg
Dimensions
Body size:
540x910x565mm (WxDxH)
Note: Design and specifications are subject to change without prior notice for the purpose of performance improvement.
Packing List
1. Television set – one set
2. Remote control Handset – one set (with two size AA batteries)
3. User’s guide – one pc
72-LE88C5-E029A
 Loading...