

Page 1
USER G
UIDE
RC9002
Clock Radio with iPod Dock
SUN
Page 2
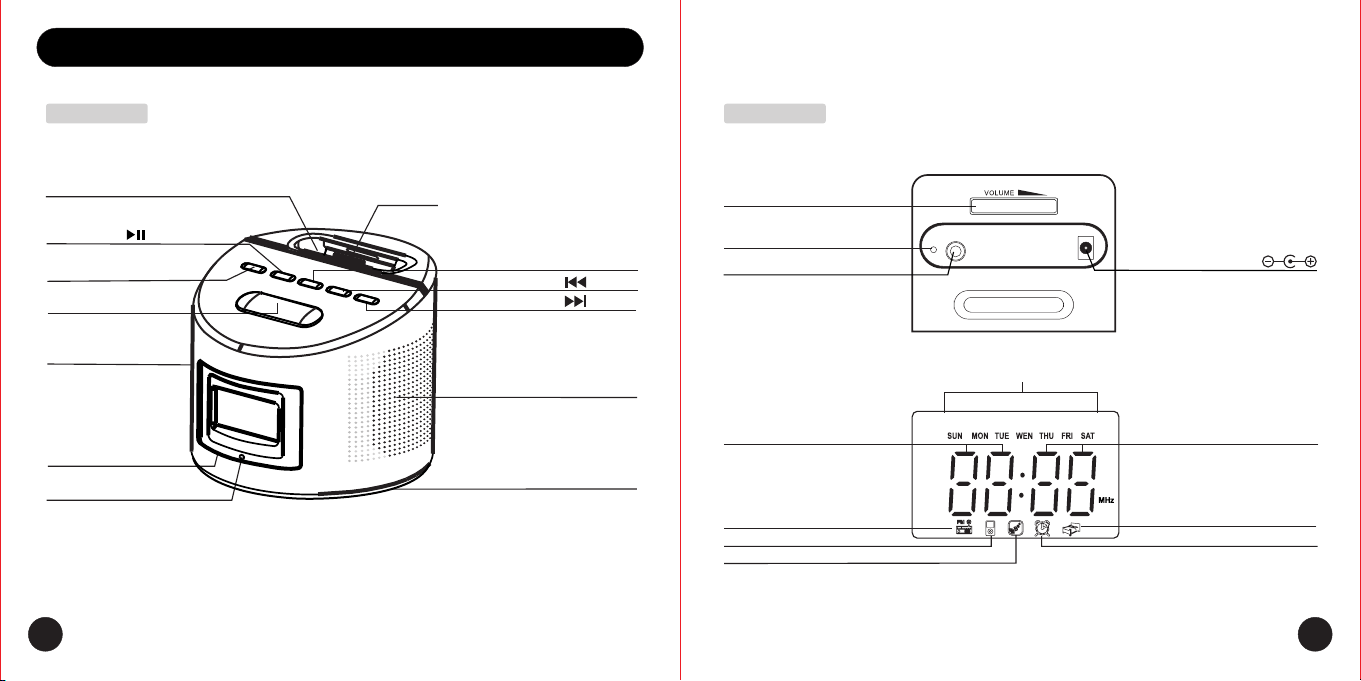
Location of controls and functions
Front View
iPod Dock
Clock/Play Button
Standby on/
Source Button
Snooze Button
Left Speaker
LCD Display
Power Indicator
1
iPod Pin Connector
Alarm/Display Button
_
Set( )/Tuning Button
Set(+)/Tuning Button
Right Speaker
Battery Compartment
(underneath)
Rear View
VOLUME Adjust wheel
FM ANT
AUX IN Socket
Hour Indicator
FM Icon
iPod Icon
Buzzer On Icon
WEEKDAY Indicator
DC IN 6V
Socket
Minute Indicator
Snooze On Icon
Alarm On Icon
2
Page 3

Power operation
Function operation
Battery Installation
1. Install 4 AA size batteries into the the battery compartment on the underside
of the unit. Be sure to observe the polarity markings shown on the inside of
the compartment. Always replace old batteries with the same size and type.
2.In the event of mains power faiure,the time is maintained by the batteries.
AC Power Supply Connection
1. Insert the small round end of the mains adaptor into the DC
input socket on the rear of the unit.Connect the 3 pin adaptor to a
suitable wall socket and switch on.
Note :
When using battery power, always switch the unit to standby mode
before connecting the mains adaptor.
To turn the Clock Radio ON, press and hold the STANDBY/ON button.
The red power indicator will turn on.
To turn the Clock Radio OFF, press and hold the STANDBY/ON button
again.
3
Setting the clock
1.In standby mode,press and hold the CLOCK button until the HOUR
digits flash in the display. Press the SET+/SET- buttons to set the hour
digit. Press the CLOCK button to confirm.
2.The MINUTE digits will flash. Press the SET+/SET- buttons to set the
minute digit.Press the CLOCK button to confirm.
3.The Day lndicator will flash.Press the SET+SET- buttons to select the
desired weekday (MON to SUN), then press the CLOCK button to confirm
the day.
4.When setting the CLOCK or alarm time, the display will return to the
previous mode if no buttons are pressed after 5 seconds and the last
selected value will be saved.
Setting the alarm
1. In standby mode press and hold the ALARM button until the hour digits flash in
the display. The alarm icon will also flash.
Press the SET+/SET- buttons to set the hour digit. Press the
confirm.
2. The MINUTE digits will flash. Press the SET+/SET-buttons to set
And then press the ALARM button to confirm.
3. The day icons will flash. Use the SET+/SET- buttons to select either 5 day alarm
or 7 day alarm mode. Press the
4. The alarm mode icon will flash. Press the SET+/ SET- buttons to select
either Radio,iPod or Buzzer
5. Press the ALARM button to confirm. The display will return to clock mode.
ALARM button to confirm.
alarm mode.
ALARM button to
the minute digit.
4
Page 4

Setting the alarm
1. Press the ALARM button to activate or deactivate the alarm mode. When the
alarm is activated, the alarm icon will show in the display.
2.If the alarm is set to iPod, the last song selected will play at the set time. If the iPod
is not docked and the alarm is set to iPod mode, the buzzer will sound.
3.If the alarm is set to Radio, make sure that the radio is tuned to a station and the
volume is set to a desired level before turning off the unit.
4.If the alarm is set to buzzer, the alarm will sound at a preset level.
5.Press and hold the STANDBY button to reset the ALARM function.
Aux in mode
Press the SOURCE button to select AUX ` `
1. In mode. will be shown in the
display.
2. Connect an audio lead to the Aux In socket on the rear of the unit. Connect the
other end to the headphone or Line Out socket of your auxiliary device.
3. Play the content of your auxiliary device and the sound will be heard through the
speakers of the Clock Radio.
4. Adjust the sound using the volume control wheel on the rear of the unit.
AUX
Alarm operation
1. When the alarm time is reached, the ALARM icon flashes.
2. Either Radio, iPod or Buzzer will sound depending on the mode previously
3. Press the SNOOZE button to silence the alarm temporarily for approximately 9
minutes. The Snooze function is repeatable for the next 120 minutes, The Snooze
` ` icon shows in the display.
4. Press the ALARM button to cancel the Snooze function and reset the Alarm. The
Alarm icon ` ` turns on. The alarm will sound again tomorrow at the same time.
5. The alarm will be reset automatically after 120 minutes if no
5
key is pressed.
selected.
Listening to your iPod
1. Carefully dock your iPod into the compartment on the top of the unit.
2. Make sure that you are using the correct dock adaptor for your iPod and that it is
properly docked into the unit. Failure to do so may damage your iPod or the
connecting pins.
3. Press the SOURCE button to select iPod mode. The iPod icon ` ` will show in
the display.
4. Press the PLAY/PAUSE button to play or pause the tracks on your iPod.
5. Press the or buttons to skip to the next or previous track.Press and hold
the or buttons to fast forwards or backwards through the
current track.
6
Page 5

Tuner mode
6. To adjust the volume of the iPod track, rotate the volume control wheel on the rear
of the unit.
When your iPod is connected into the dock, it will automatically charge.
Charging will take place when using any of the modes and when the unit is in
standby.
●If you are charging your iPod in STOP mode, the recharging time is shorter.
●If you are charging your iPod in PLAYBACK mode, the recharging time is
longer.
7
1. Press the SOURCE button to select Tuner mode. The radio icon` `will show in
the display. The LCD will show the current radio frequency in MHz.
2. For optimum reception, fully extend the wire aerial on the rear of the unit.
Tuning to radio stations
1. Press the TUNING + / TUNING - buttons to adjust the radio frequency.
Press and hold the TUNING + / TUNING - buttons to scan up or down the
waveband for the next strongest radio station.
Trouble S
1. In the event that this unit stops working, disconnect the mains adaptor, batteries and
any connected accessory (iPod, Auxiliary device etc.) Allow the unit to stand for one
minute before switching back on.
hooting
8
Page 6

Warnings
General safety
This Clock Radio has been designed and manufactured to meet European
safety standards ,but like any electrical equipment,care must be taken if you
are to obtain the best results and safety is to be assured.
Do read these operating instructions before you attempt to use the Clock
Radio.
Do ensure that all electrical connections (including the mains plug. extension
leads and interconnections between pieces of equipment) are properly made
in accordance with the manufacturer’s instructions.
Switch off and remove the mains plug when making or changing any
connections.
Do consult your dealer if you are ever in doubt about the installation operation
or safety of your Clock Radio.
Don’t continue to operate the Clock Radio if you are ever in doubt about it
working normally ,or if it is damaged in any way. Switch it off withdraw the plug
from the mains and consult your dealer.
Don’t remove any fixed covers as this may expose you to dangerous voltages.
Don’t leave the Clock Radio switched.on when it is unattended for long
periods of time, unless it is specifically stated that it is designed for
unattended operation or has a standby mode.
Make sure that other people in your household are conversant with the Clock
Radio.
Don’t obstruct the ventilation vents on the Clock Radio, for example with
curtains or soft furnishings.
9
Overheating will cause damage and shorten the life of the product.
Don’t allow electrical equipment to be exposed to rain or moisture.
Store the Clock Radio in a clean, dry environment.
Do not use any cleaning solutions on the Clock Radio.
Electrical safety
Read these electrical safety instructions carefully before connecting the
adapter to the mains supply.
This Clock Radio is supplied with a mains adapter which has been designed
for indoor use only.
The mains adapter is a sealed unit.
There are no user serviceable parts inside and it does not require any
electrical adjustments.
Do not attempt to open the mains adapter.
If the mains adapter becomes damaged, or fails to operate your Clock Radio,
it must be replaced and disposed of in a safe and environmentally protective
way.
The mains adapter is designed to operate on 240V AC 50Hz power supply.
Connecting it to any other power sources may damage the adapter and the
Clock Radio.
10
Page 7

Specifications
12hr clock display
Batteries: "AA"Size(SUM-3/R6)X4
Power output: 2 X 400mW
Power supply: DC 6V 800mA
Dimension: 100mm H X 120mm Diameter
Compatibility
iPod version supported
iPod Classic
Series
iPod Classic 80GB
iPod Classic 120GB
iPod Classic 160GB
Fitting bracket
iPod Touch
Series
iPod Touch 8GB
iPod Touch 16GB
iPod Touch 32GB
iPod
Video &Photo
Series
iPod Photo 30GB
iPod
Series
iPod 3Gen
iPod 4Gen
iPod 5Gen
iPod mini
Series
iPod nano
Series
iPod nano 16GB
Custome r Service Su pport
Distrib uted in Australia by:
Montage Pty Ltd
PO Box 178
Ashburton
Vic 3147
For Produ ction Sevi ce and Suppo rt
Pls. cont act
Montage 1800 686 079
11
12
 Loading...