

Page 1
digital video disc player
the ultimate movie experience!
Bgc_IVED sEP3 0 l_
OCA
user'smanual
RC5200P
Page 2
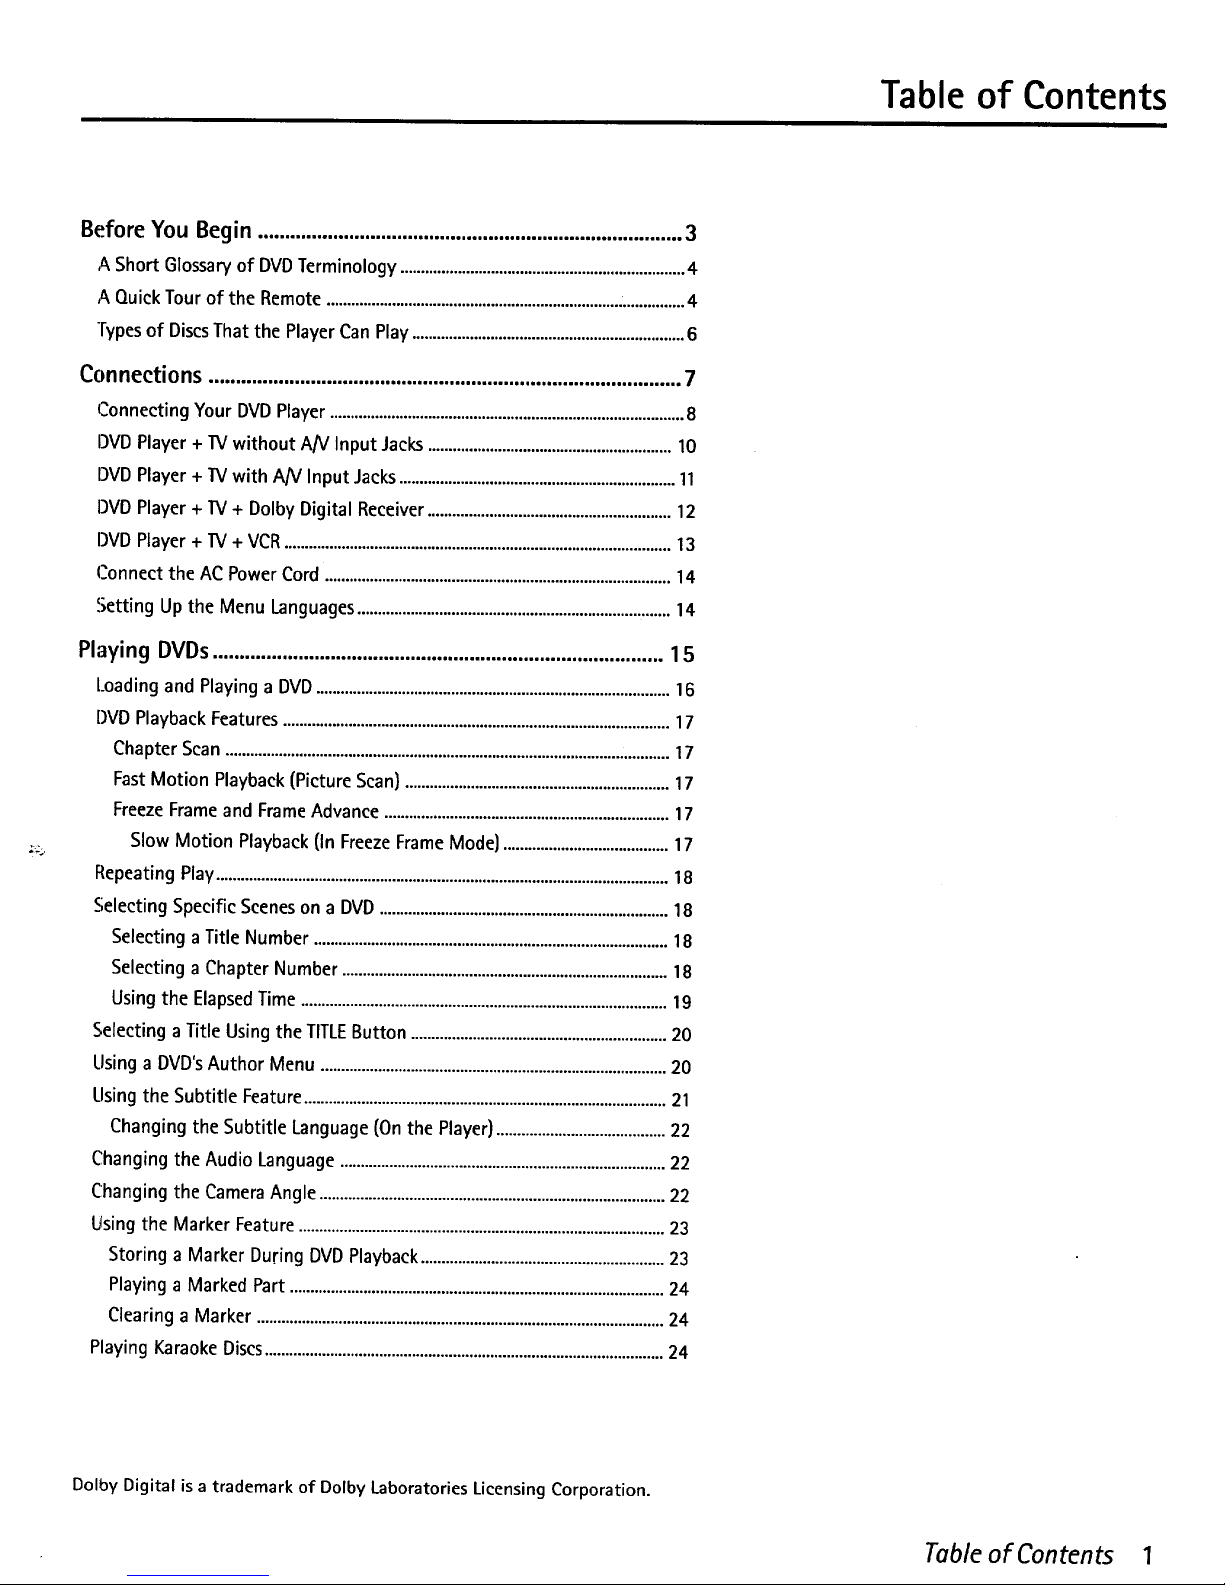
Table of Contents
Before You Begin ...............................................................................3
A Short Glossary of DVD Terminology .....................................................................4
A Quick Tour of the Remote .......................................................................................4
Types of DiscsThat the Player Can Play ..................................................................6
Connections ........................................................................................ 7
Connecting Your DVD Player ......................................................................................8
DVD Player + 13/without AN Input Jacks ...........................................................10
DVD Player + 1V with AN Input Jacks...................................................................11
DVD Player + 1V + Dolby Digital Receiver ...........................................................12
DVD Player + TV + VCR..............................................................................................13
Connect the AC Power Cord ....................................................................................14
Setting Up the Menu Languages ............................................................................14
Playing DVDs .................................................................................... 15
Loading and Playing a DVD......................................................................................16
DVD Playback Features ..............................................................................................17
Chapter Scan ............................................................................................................17
Fast Motion Playback (Picture Scan} ................................................................17
Freeze Frame and Frame Advance .....................................................................17
Slow Motion Playback {In Freeze Frame Mode} ........................................17
Repeating Play ..............................................................................................................18
Selecting Specific Scenes on a DVD ......................................................................18
Selecting a Title Number ......................................................................................18
Selecting a Chapter Number ...............................................................................18
Using the Elapsed Time .........................................................................................19
Selecting a Title Using the TITLEButton ..............................................................20
Using a DVD's Author Menu ....................................................................................20
Using the Subtitle Feature ........................................................................................21
Changing the Subtitle Language {Onthe Player} .........................................22
Changing the Audio Language ...............................................................................22
Changing the Camera Angle ....................................................................................22
Using the Marker Feature .........................................................................................23
Storing a Marker During DVD Playback ...........................................................23
Playing a Marked Part ...........................................................................................24
Clearing a Marker ...................................................................................................24
Playing Karaoke Discs .................................................................................................24
Dolby Digital is a trademark of Dolby Laboratories Licensing Corporation.
Table of Contents 1
Page 3
There's Always a Catch
Because DVD is a new technology, we recommend that
you take some time right now to read through this
manual and familiarize yourself with the player..
I Know, You Really Want to Get Going
I know that you'd rather use your DVD player than read
about it, so I've divided this manual up into sections
that address how to use each type of disc that you can
play on your player: DVDs, Audio CDs, and Video CDs.
So, you don't have to read all of the book at once.
Read the First Two Sections First
The first two sections, "Before You Begin" and
"Connections" include key information to get you
started in the right direction. I suggest that you read at
least these two sections before you do anything; then
you can go back to the sections that discuss the
features as you want to use them.
Page 4
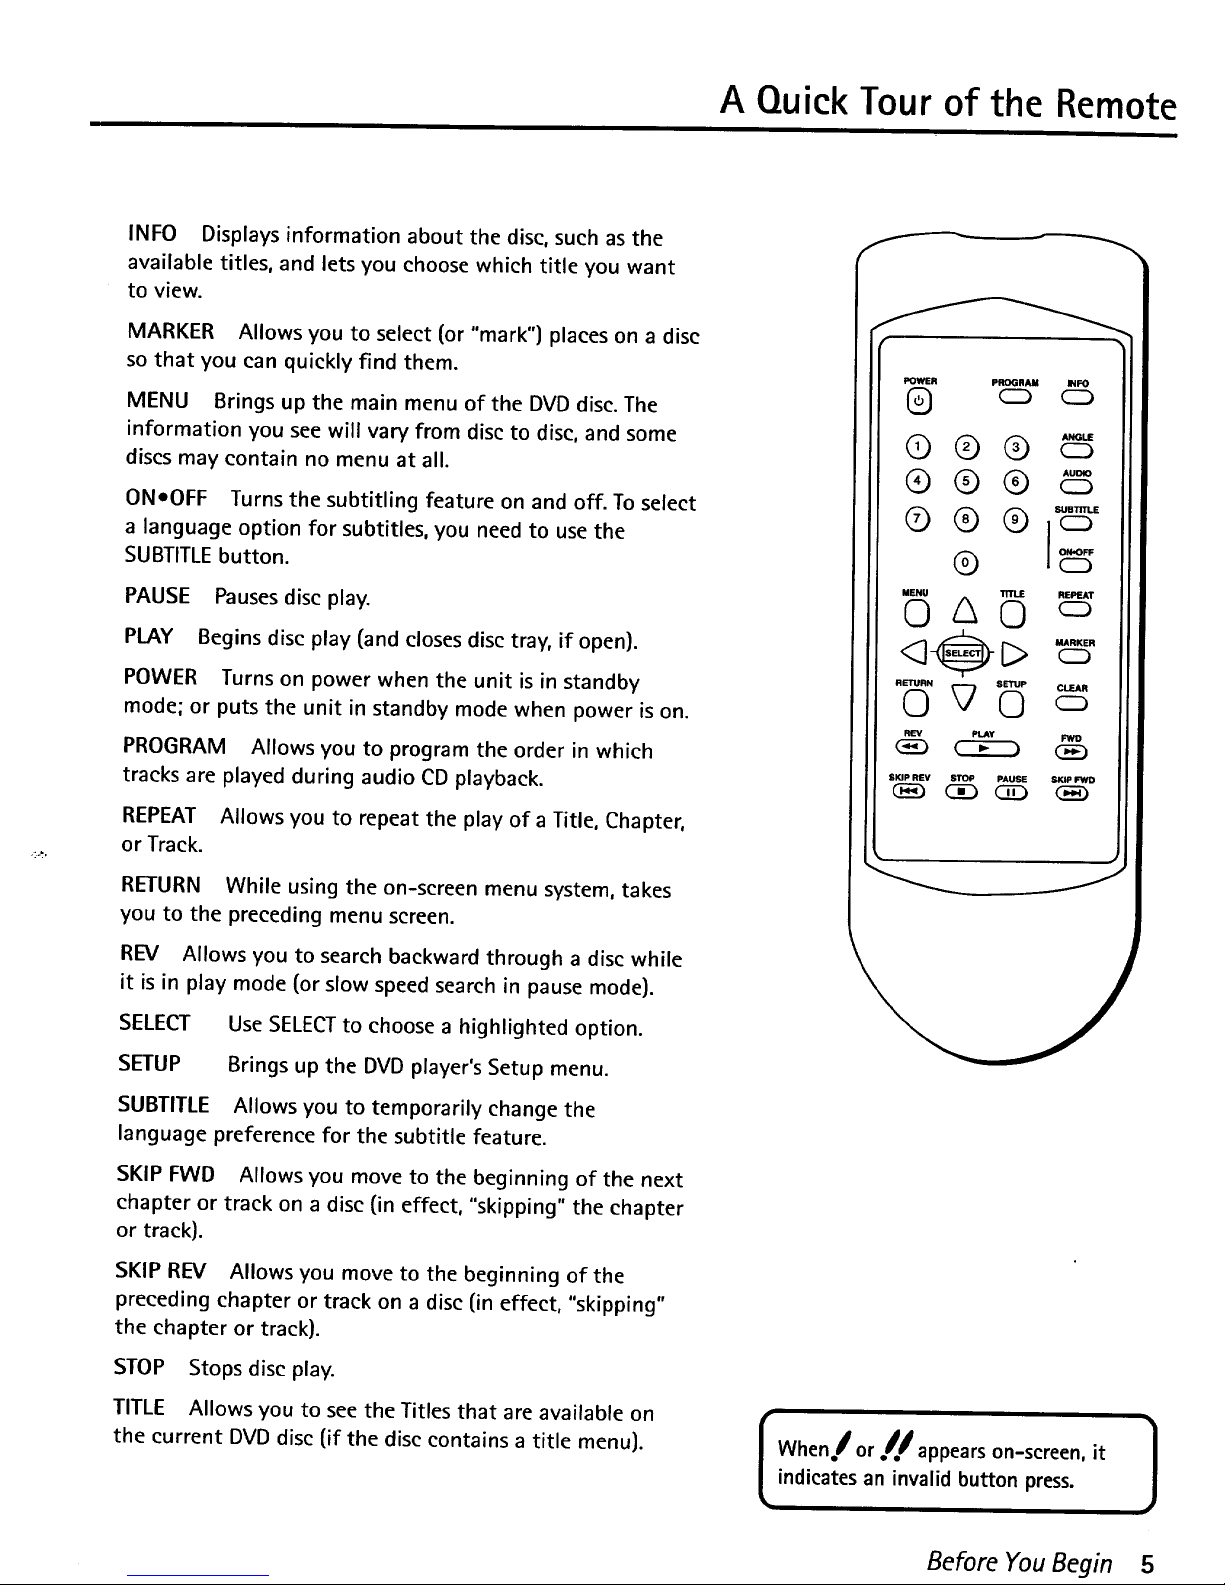
A Quick Tour of the Remote
INFO Displays information about the disc, such as the
available titles, and lets you choose which title you want
to view.
MARKER Allows you to select (or "mark") places on a disc
so that you can quickly find them.
MENU Brings up the main menu of the DVD disc. The
information you see will vary from disc to disc, and some
discs may contain no menu at all.
ONeOFF Turns the subtitling feature on and off. To select
a language option for subtitles, you need to use the
SUBTITLE button.
PAUSE Pauses disc play.
PLAY Begins disc play (and closes disc tray, if open).
POWER Turns on power when the unit is in standby
mode; or puts the unit in standby mode when power is on.
PROGRAM Allows you to program the order in which
tracks are played during audio CD playback.
REPEAT Allows you to repeat the play of a Title, Chapter,
or Track.
RETURN While using the on-screen menu system, takes
you to the preceding menu screen.
REV Allows you to search backward through a disc while
it is in play mode (or slow speed search in pause mode).
SELECT Use SELECTto choose a highlighted option.
SETUP Brings up the DVD player's Setup menu.
SUBTITLE Allows you to temporarily change the
language preference for the subtitle feature.
SKIP FWD Allows you move to the beginning of the next
chapter or track on a disc (in effect, "skipping" the chapter
or track).
SKIP REV Allows you move to the beginning of the
preceding chapter or track on a disc (in effect, "skipping"
the chapter or track).
STOP Stops disc play.
TITLE Allows you to see the Titles that are available on
the current DVD disc (if the disc contains a title menu).
_W£R PROGRAM INFO
® ® ®
®® ® "6
MENU TITLE REPEAT
<3@ L>
R_N _ 0 C_SETUP CLEAR
SKIP REY STOP PAUSE S_P _
I hen! or//appears on-screen, it }
indicates an invalid button press.
Before You Begin 5
Page 5
A Few Things You should Know
Before you connect your DVD player, there are a few
things that you need to know.
Protect YourComponents from PowerSurges
• Connect all components before plugging any power
cords into the wall outlet.
Always turn off the DVD player, TV and other
components before you connect or disconnect any
cables.
Position CablesCorrectly to Avoid Audio Hum or
Interference
Insert all cable plugs firmly into their jacks.
Place the audio/video cables to the sides of the TV's
back panel instead of straight down the middle after
you connect your components.
Try not to coil any twin-lead cables and keep them
away from the audio/video cables as much as
possible.
• Make sure all antennas and cables are properly
grounded.
ProtectYour Components from Overheating
Do not block ventilation holes in any of the
components. Arrange the components so that air
can circulate freely.
• Do not stack components.
• Allow adequate ventilation when placing your
components in a stand.
Page 6
Connecting Your DVD Player
Choosing a Connection
The following pages show examples of connections commonly
used to connect the DVD player with a IV and other
components. Refer to your TV, VCR, or Dolby Digital Receiver
owner's manual for more information on hooking up your
specific components.
DVD Player + TV without A/V Input Jacks................................10
If your television only has antenna (RF) inputs, you will need to
get an RF converter in order to connect the DVD player. This
connection gives you a good quality picture and sound.
DVD Player + TV with AN Input Jacks (and/or S-Video) ........ 11
If your television has A/V input jacks use them to connect your
DVD for better quality picture and sound. (For the best quality
picture, use the S-Video input if your television has one.)
T_
DVDPlayer + Stereo Amplifier/Receiver + TV......................... 12
If your television has an S-Video input, and you have a Dolby
Digital Receiver (with optical-type input jack), use this
connection to get the best quality picture and sound.
DVDPlayer + TV + VCR.............................................................13
If you want to include a VCR in your connection scheme, this
shows you one possible connection.
Finishing the Connection
After you have connected all of the components, you will need
to attach the power cord, and set the on-screen menu
language (see page 14 for more information).
Don't Forget to Plug It In ]
After you've connected the components,
don't forget to plug in the DVD player.
Connections 9
Page 7
DVD Player + 13/with AN Input Jacks
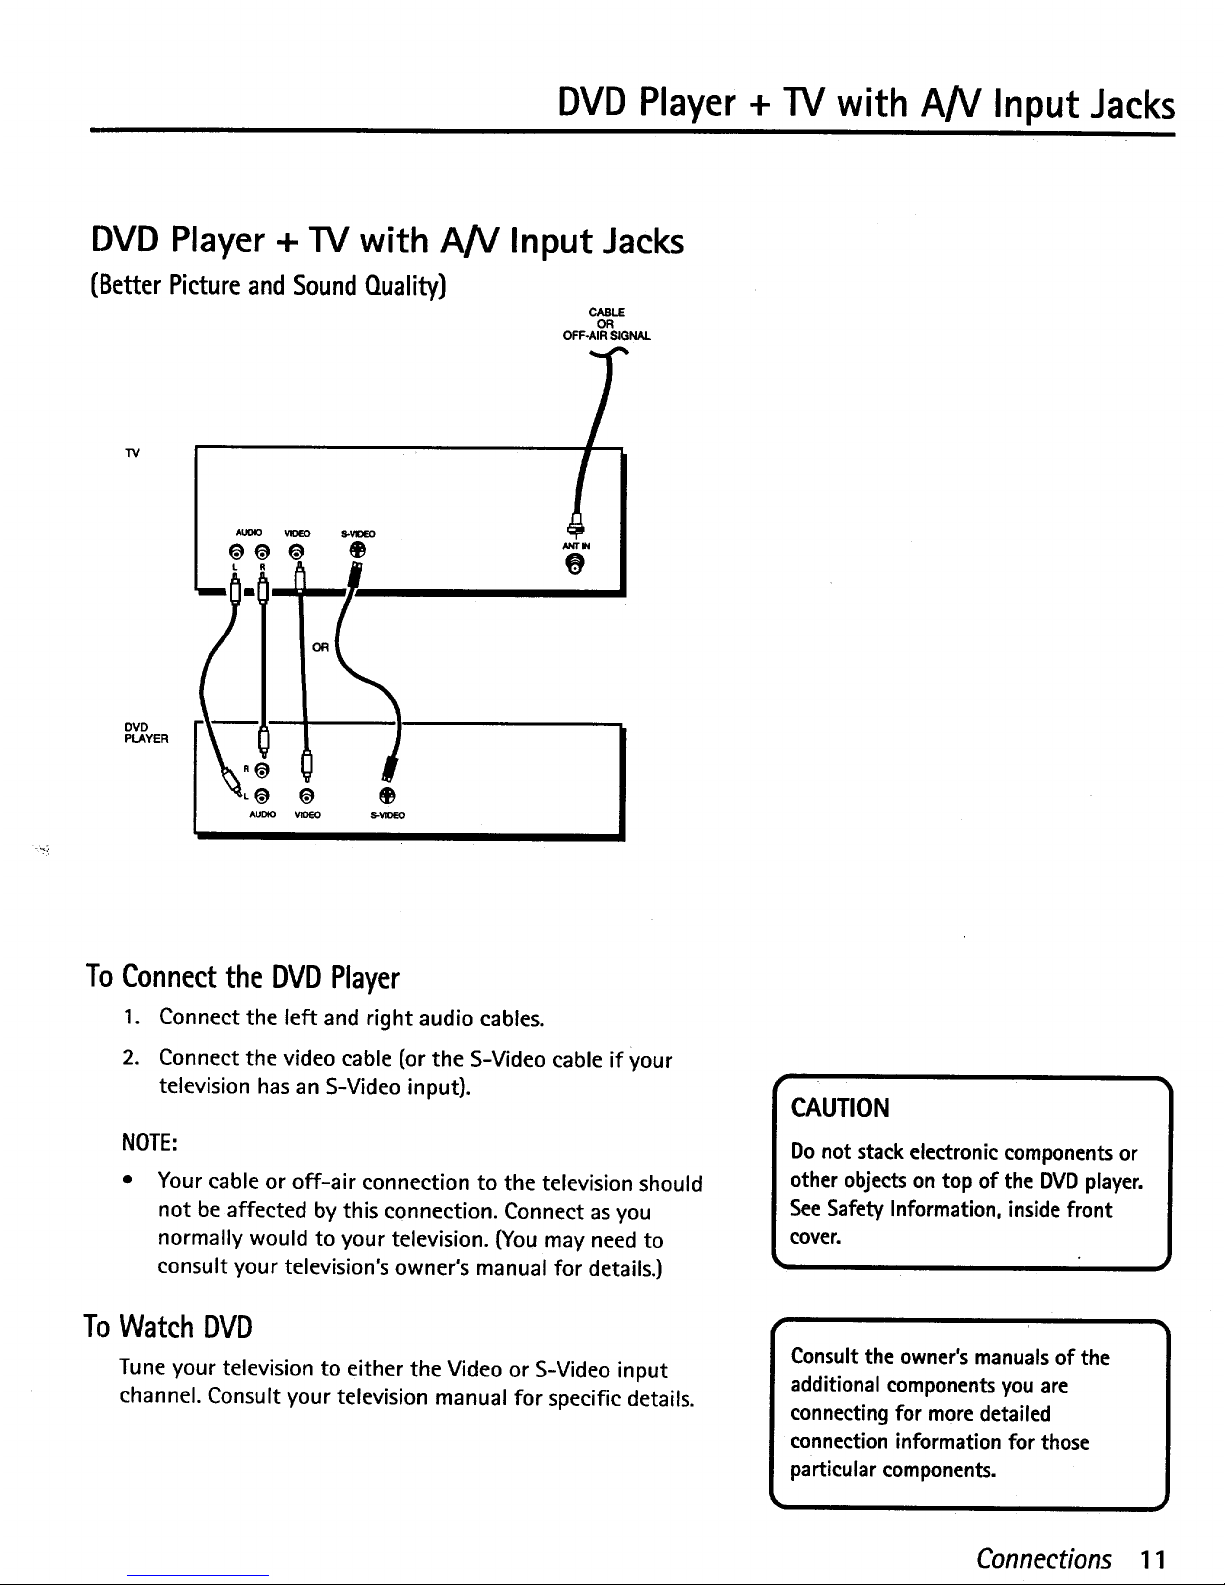
DVD Player + TV with A/V Input Jacks
(Better Picture and SoundQuality)
CABLE
OR
OFF-AIR SIGNAL
W
At_K) VIDEO S-VIDEO
OO O @
DVD
PLAYER
o o @
ToConnectthe DVDPlayer
1. Connect the left and right audio cables.
2. Connect the video cable (or the S-Video cable if your
television has an S-Video input).
NOTE:
Your cable or off-air connection to the television should
not be affected by this connection. Connect as you
normally would to your television. (You may need to
consult your television's owner's manual for details.)
ToWatch DVD
Tune your television to either the Video or S-Video input
channel. Consult your television manual for specific details.
CAUTION
Do not stack electronic components or
other objects on top of the DVD player.
See Safety Information, inside front
cover.
r •
Consult the owner's manuals of the
additional components you are
connecting for more detailed
connection information for those
particular components.
Connections 11
Page 8
DVD Player + TV + VCR
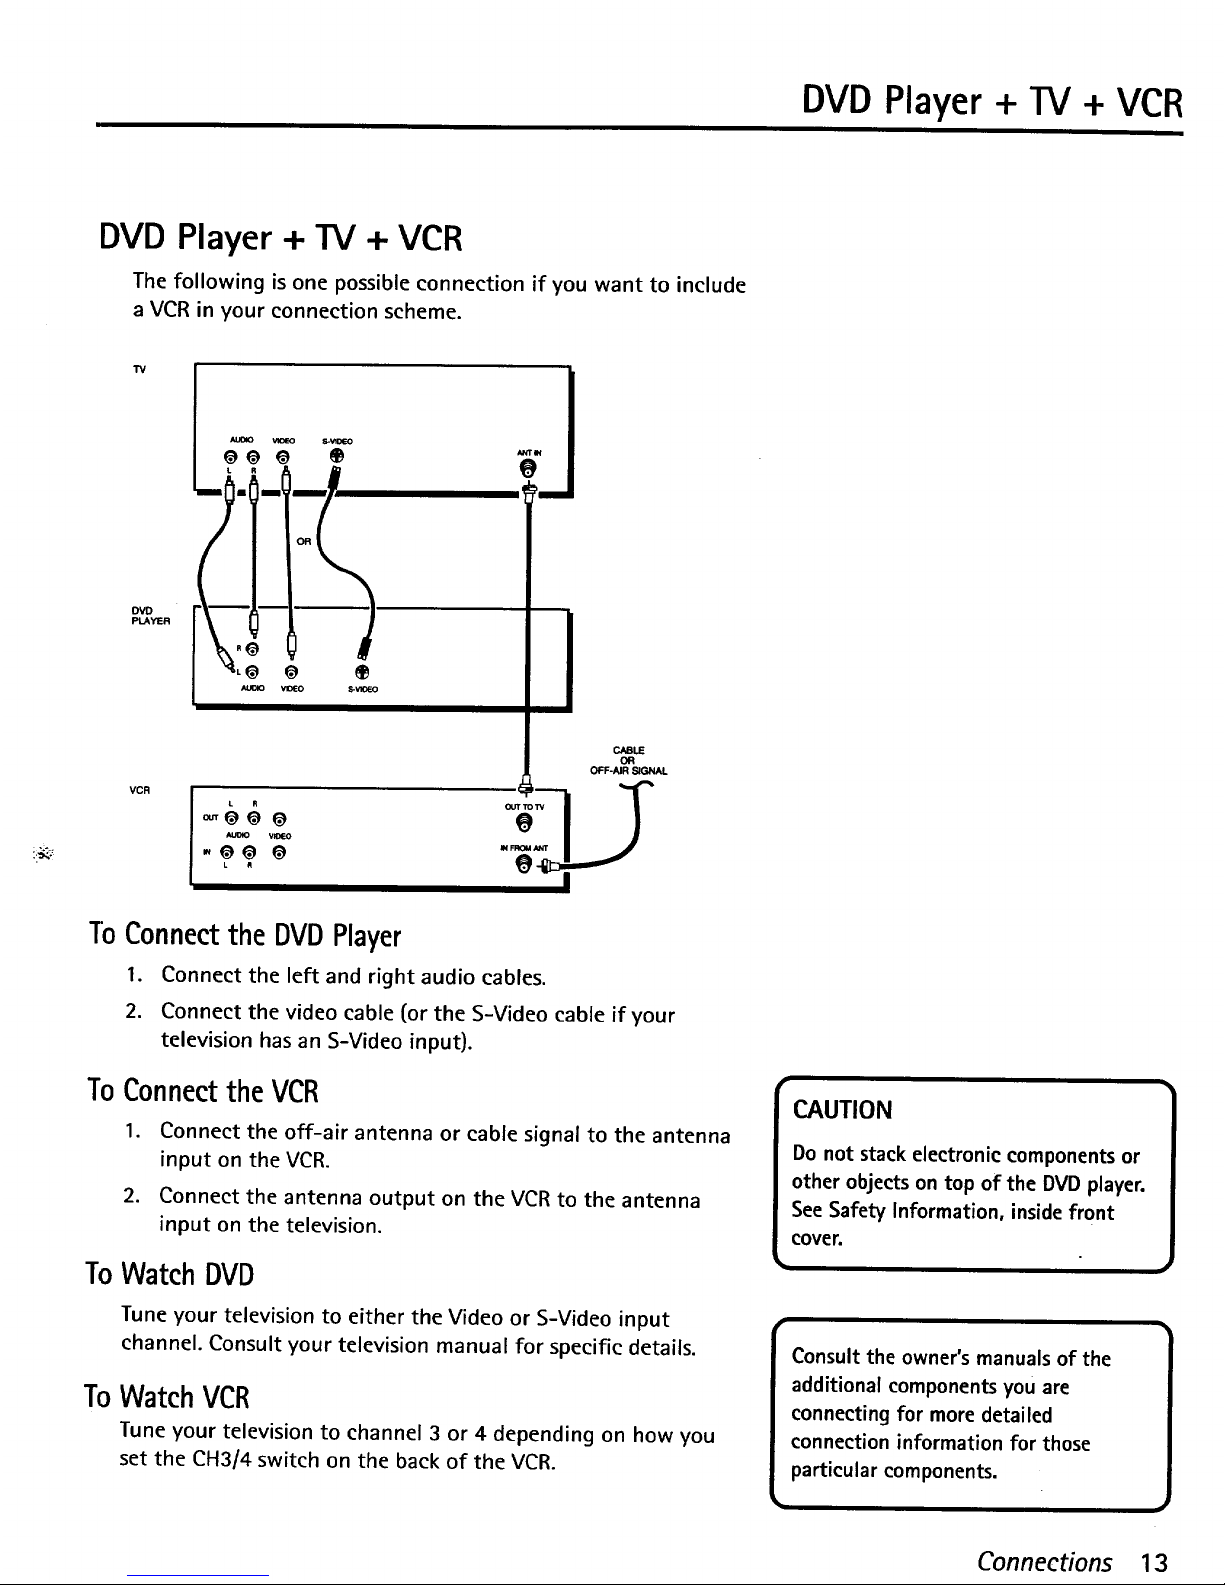
DVD Player + TV + VCR
The following is one possible connection if you want to include
a VCR in your connection scheme.
TV
DVD
PLAYER
VCR
To Connect the DVDPlayer
I. Connect the left and right audio cables.
2. Connect the video cable (or the S-Video cable if your
television has an S-Video input).
To Connectthe VCR
1. Connect the off-air antenna or cable signal to the antenna
input on the VCR.
2. Connect the antenna output on the VCR to the antenna
input on the television.
ToWatch DVD
Tune your television to either the Video or S-Video input
channel. Consult your television manual for specific details.
ToWatch VCR
Tune your television to channel 3 or 4 depending on how you
set the CH3/4 switch on the back of the VCR.
CAUTION
Do not stack electronic components or
other objects on top of the DVD player.
See Safety Information, inside front
cover.
Consult the owner's manuals of the
additional components you are
connecting for more detailed
connection information for those
particular components.
Connections 13
Page 9
A New Way of Looking At Things
In this section you learn how to useyour DVD player to
play Digital Video Discs(DVDs for short).
As a little up-front information, you should know that
although some of the remote buttons look the same as
those you would usewith a VCR or CD player, the
functions work somewhat differently. So, take some
time now to find out how to play DVDs, and then you can
sit back and enjoy all of the features it has to offer you.
Also Keep In Mind...
In order for some of the player's features to work, the
DVDs that you use must be encoded with specific
information. For example, a disc must contain subtitles
in order for the player to show them to you.
Regional Coding
Both the DVD player and the discs are coded by region.
These regional codes must match in order for the disc to
play. If the codes do not match, you the disc will not
play.This player's regional code is Locale #1.
Page 10

DVD Playback Features
DVD Playback Features
Several options are available during DVD playback.
ChapterScan
Because the DVD is divided into Chapters, you can skip through
a disc's contents one chapter at a time.
• Press and release SKIP REV to go to the beginning of the
preceding Chapter.
• Press and release SKIP FWD to go to the beginning of the
next Chapter.
FastMotion Playback(Picture Scan)
To scan through a section of the disc during playback, use the
Picture Scan feature:
.
.
3.
Press the REV or FWD button during playback to search
through a disc.
Press the button a second time to search at a faster speed.
Press PLAY to resume normal playback.
Note:
• This feature may not work with all discs.
Playback
buttons
Q c_ cD
® ® ® '_'
/_0 _
<I-@D -'_
REV PI_Y
SK_ REV STOP _USE SKIP FWO
FreezeFrameand FrameAdvance
1. Press PAUSE once to freeze playback.
2. Each subsequent press of the PAUSE button advances the
picture one frame at a time.
3. Press PLAY to resume normal playback.
Slow Motion Playback(In Freeze Frame Mode)
While the disc is in freeze frame mode, you can invoke either
forward or backward slow motion playback.
• Press REV for backward slow motion playback.
• Press and hold FWD for forward slow motion playback.
• Press PLAY to resume normal playback.
Slow Motion Backward
Because of the nature of MPEG2 video,
searching backward does not provide as
clear a picture as searching forward,
and the picture may appear "jumpy."
Playing DVDs 17
Page 11

Selecting for Specific Scenes on a DVD
TITLE 1 CHAPTER
TIME 38:20
Enter a new chapter number and press PLAY.
3. Use the digits on the remote to enter a different chapter
number.
4. Press PLAY to begin playing the selected chapter.
Notes for Title/Chapter Select:
• If you select a number that does not exist on the DVD, the
message "NUMBER OUT OF RANGE" appears.
• This feature does not function when using a DVD without
multiple title or chapter numbers.
Using the ElapsedTime
I. Press the INFO button during disc playback.
2. Use the arrows to highlight the time value.
TITLE 1 CHAPTER 5
Digits --
Arrows and--
Select button
Info button
®®
00
®
OlVlO
TIME
Use the arrows to highlight the time value.
3. Use the digits on the remote to enter the elapsed playing
time from which you want to start.
4. Press PLAY to start playback at the elapsed time indicated.
Note:
• Some discs might not display the elapsed time, and thus
cannot be searched using this feature.
Playing DVDs 19
Page 12

Using the Subtitle Feature
SUBTITLE
1. ENGLISH
[2. FRENCH I
3. SPANISH
.
Frenchis selected.
Use the arrows to highlight a subtitle language (from the
Subtitle menu), and then press SELECT.
Subtitling for this DVD will now appear in French.
Notes:
The Author menu is disc dependent, and its operation may
vary from disc to disc.
If the DVD is removed from the disc tray, or the player is
turned off, these setting are returned to the initialized
settings.
Subtitle
ONoOFF
button
Up/Down
arrows
Using the Subtitle Feature
When a DVD is recorded with subtitles, you can use the ,
Subtitle feature to view the subtitles on-screen. The ON-OFF
button on the remote (located beneath the SUBTITLE button),
turns subtitling on or off. If the DVD has been recorded with
subtitles, they will appear on-screen.
I ake sure that the player'ssubtitle ]
feature is turned on, or the subtitling
will not appear on-screen.
Playing DVDs 21
Page 13

Usingthe Marker Feature
Notes:
• This feature does not work when a DVD has not been
recorded with a multi-camera angle system.
• You can identify the section on a DVD that contains the
multi-camera angles by a mark that appears at the
beginning of each section.
Using the Marker Feature
Use the Marker feature to select [or mark) parts of a DVD so
that you can quickly find the section at a later time. This
feature can be used during DVD playback.
Storing a Marker DuringDVDPlayback
1. Press the MARKER button at the point during playback that
you want to mark.
The Marker display appears on-screen.
MARKER
,
PRESS SELECT TO MARK
The Marker display screen.
Press the SELECTbutton to place a mark. You can place as
many as three markers on a disc.
MARKER
PRESS SELECT TO MARK
POWER I=_IOAMa
(3 cD
®®® _
<I-_D "-'
IIKIPI_v STOP PAUSE SK_ I=WO
m Marker button
Clear button
Marker I has been placed
Playing DVDs 23
Page 14

,Just Like Your CD Player
Your DVD player can play Audio Compact Discs, as well
as DVDs. If you've used a CD player before, you will
probably notice that your DVD player has a lot of the
same features as a CD player.
This section gives you all the information you need to
know to play Audio CDs on your DVD player.
Page 15

Audio CD Playback Features
RepeatingPlay
• Press the REPEAT button once to repeat the current track.
• Press REPEATa second time to repeat all tracks.
• Press REPEATa third time to resume normal playback.
SelectingaSpecificTrack
1. Press the INFO button.
TRACK
.
3.
TIME 11:26
Enter the track number you want to hear.
Use the digit buttons to enter the desired track.
Press PLAY to begin playback.
Note:
• You can also use the digit buttons on the remote to enter a
track number directly.
• If you select a number that does not exist on the disc, the
message "NUMBER OUT OF RANGE" is displayed.
Q C_ C_-
®®®
ll_l"llfll'l.if
@oo12
® o
REV Pt_¥ i=_3
SKP REV STOP PAUSE $1OP Inwg
Info button
Repeat
button
Play button
TRACK []
NUMBER OUT OF RANGE
TIME 11:26
The "Number out of Range" message means that the
track does not exist on the disc.
Playing Audio Compact Discs 27
Page 16

What's a Video CD?
The Video CD format is similar to DVD in that Video
CDs can contain movies. The big difference is in the
amount of information that can be stored on a
single CD.
This section gives you all the information you need
to know to play Video CDs on your DVD player.
_DIGITALVIDEO]
Page 17

Video CD Playback Features
.
2.
3.
Use the digits on the remote to select a title.
Press SELECTto begin playback the selected title.
Press RETURN to stop playback and return to the menu;
Or
Press STOP to stop CD playback, and remove the menu
from the screen.
Bypassing Playback Control
If a Video CD has Playback Control, you can bypass the menu
by following these steps when you first load the disc:
1. Press STOP to put the player in Stop mode.
2. Use the digits to enter the desired track number, and then
press PLAY.When playback begins, the disc will respond as
if it is not in playback control mode.
Note:
• To resume playback control mode, press STOP, and then
press MENU.
Video CD Playback Features
The DVD player gives you several options when playing Video
CDs, including skipping tracks, repeat play, and programmed
playback.
Select
button_
Returnm
button
Skip buttons
Skipping Tracks
To skip forward to the beginning of the next track on a
Video CD, press the SKIP FWD (_,_I) button.
To skip backward to the beginning of the preceding track
on a Video CD, press the SKIP REV (1_) button.
Note:
• For some Video CDs, the SKIP buttons may bring up the
menu screen instead.
• The Skip feature does not work while a Video CD is in
playback control mode.
Playing Video CDs 31
Page 18

Video CD Playback Features
Changingthe Audio ChannelOutput
You can change the channel output from the player by using
the AUDIO button and the up arrow on the remote control.
Note that you must be playing a stereo Video CD.
I. Press AUDIO.
2. Press the Up Arrow to scroll through the audio output
options (see diagram below).
Left-channel audio Right-channel audio
I I I''.......
through both apeakera "_
Note:
• Use the Down Arrow to scroll backward through the Audio
Channel Output options.
Program Playback
Program playback lets you set up a specific order for the
playback of tracks on a disc.
If a disc has Playback control, you must bypass the playback
control before you can program tracks (see "Bypassing
Playback Control
I. Press the PROGRAM button (while in stop mode) to bring
up the program playback menu.
PROGRAM PLAYBACK
SELECT TRACK
1 6 11 16
2 7 12 17
3 8 13
4 9 14
5 10 15
PRESS PLAY TO START
The Program Playback menu for an video CD.
2. Use the arrow buttons on the remote to highlight a track
number.
Program
button
Arrows and--
Select button
I
FOWER F_OOAAI4
Q o c:_
®®®
lurmrlJi
_ _Pf.AT
OlVlO
Playing Video CDs 33
Page 19

Putting You In Control
The Setup menu lets you customize your DVD
player by allowing you to set up a rating level,
select various language preferences, and even
adjust the player to the type of television screen
you have (i.e. wide-screen).
To access the Setup menu, press the SETUP
button on the remote control.
•...:
Page 20

Selecting the Initial Audio Language
Unlockingthe RatingLevel
In order to unlock the rating level, you need to enter the
four-digit password.
RATING
LEVEL IS SET AT 3
PASSWORD IS NEEDED
TO CHANGE THE LEVEL
PRESS RETURN TO EXIT
You need to enter the 4-digit password before you
can change the rating leveL
Selecting the
::->_
Initial Audio Language
A DVD may contain the audio portion of the disc in a variety of
languages. Use the Audio menu to select an initial language in
which you want to hear a DVD's audio.
1. Press the SETUP button on the remote control.
2.
SETUP
_) RATING LEVEL 1 I_
I_)AUDIO I ENGLISH
_) SUBTITLE ENGLISH
_)TV SCREEN 4 : 3
_)OSD DISPLAY ON
_) MENU LANGUAGE ENGLISH
PRESS RETURN TO EXIT
Select AUDIO from the Setup menu.
Use the arrows on the remote to highlight "AUDIO" and
then press SELECT.
I_VI£R PROGRAM INFO
Q cD cD
®®® _'_
_ nE_.AT
CD
CD
Q
SKIPREV STOP PAm_ _J_ FWD
Audio
button
Arrows and
Select button
Setup
button
Using the Setup Menu 37
Page 21

Selecting the TV Screen Setting
SUBTITLE LANGUAGE
PREFERENCE
AUTOMATIC
ENGLISH
FRENCH
SPANISH
OTHER * * * °
PRESS RETURN TO EXIT
Select an initial subtitle language setting.
.
Use the arrows on the remote to highlight a language, and
then press SELECT.
If the language you want is not listed, select "OTHER," enter
the appropriate code from the list of language codes at the
end of this chapter, and then press SELECT.
Notes:
Some discs may not contain the language you select as
your initial language; in that case the disc will use its top-
priority language setting.
Make sure that the subtitle feature is on in order to view
subtitling. You can temporarily change the initial subtitling
setting by using the SUBTITLE button on the remote control
(see "DVD Playback Features").
Selecting the TV Screen Setting
Depending on the type of television you have, you may want
to adjust the screen setting (aspect ratio).
I. Press the SETUP button on the remote control.
Q cD c_
®®®
®
(22)
CD
s_oPREV STOP MUSE SKIP FWO
Subtitle
buttons
Arrows and
Select button
Setup
button
.
SETUP
RATING LEVEL 1 l_
_AUDIO ENGLISH
_SUBTITLE ENGLISH
I_TVSCREENI 4:3
_OSD DISPLAY ON
_MENU LANGUAGE ENGLISH
PRESS RETURN TO EXIT
Select IV SCREENfrom the Setupmenu.
Use the arrows on the remote to highlight "IV SCREEN"
and then press SELECT.
Automatic Subtitling
If you set the Subtitle Language to
"Automatic," the subtitling feature
automatically turns off when the initial
audio language setting is available on
the disc. If the initial audio language is
not available, then subtitling in that
language appears (if available on the
disc).
UsingtheSetupMenu 39
Page 22

Changing the Menu Language
2. Use the arrows on the remote to highlight "OSD DISPLAY"
and then press SELECT.
OSD DISPLAY
ON
OFF
_:_
.
PRESS RETURN TO EXIT
Select a TV screen setting to match your television..
Use the arrows on the remote to highlight "ON" or "OFF,"
and then press SELECT.
Changing the Menu Language
Use this feature to change the language for the on-screen
menu system for the player, and for discs.
1. Press the SETUP button on the remote control.
.
SETUP
(_) RATING LEVEL 1 E_
_) AUDIO ENGLISH
_) SUBTITLE ENGLISH
_)TV SCREEN 4 : 3
_-_OSD DISPLAY ON
I_MENULANGUAGEI ENGLISH
PRESS RETURN TO EXIT
Select MENU LANGUAGE from the Setup menu.
Use the arrows on the remote to highlight "MENU
LANGUAGE" and then press SELECT.
O c_
®®®
_Jiil'ml.E
e®®12
® o
c_
¢z)
o
Iqk'V IITOP PAUSE KIP FIR
Arrows and
Select button
Setup
button
Using the Setup Menu 41
Page 23

LanguageCodes
Don't forget to press the SELECT button after you enter the code.
Language Code Language Code Language Code
Abkhazian 6566
Afar 6565
Afrikaans 6570
Albanian 8381
Ameharic 6577
Arabic 6582
Armenian 7289
Assamese 6583
Ayrnara 6588
Azerbaijani 6590
Bashkir 6665
Basque 6985
Bengali; Bangla 6678
Bhutani 6890
Bihari 6672
Bislama 6673
Breton 6682
Bulgarian 6671
Burmese 7789
Byelorussian 6669
Cambocian 7577
Catalan 6785
Chinese 9072
Corsican 6779
Croatian 7282
Czech 6783
Danish 6865
Dutch 7876
English 6978
Esperanto 6979
Estonian 6984
Faroese 7079
Fiji 7074
Finnish 7073
French 7082
Frisian 7089
Galician 7176
Georgian 7565
German 6869
Greek 6976
Greenlandic 7576
Guarani 7178
Gujarati 7185
Hausa 7265
Hebrew 7387
Hindi 7273
Hungarian 7285
Icelandic 7383
Indonesian 7378
Interlingua 7365
Interlingue 7369
Inupiak 7375
Irish 7165
Italian 7384
Japanese 7465
Javanese 7487
Kannada 7578
Kashmiri 7583
Kazakh 7575
Kinyarwanda 8287
Kirghiz 7589
Kirundi 8278
Korean 7579
Kurdish 7585
Laothian 7679
Latin 7665
Latvian, Lettish 7686
Lingala 7678
Lithuanian 7684
Macedonian 7775
Malagsy 7771
Malay 7783
Malayalam 7776
Maltese 7784
Maori 7773
Marathi 7782
Moldavian 7779
Mongolian 7778
Naru 7865
Nepali 7869
Norwegian 7879
Occitan 7967
Oriya 7982
Oromo (Alan} 7977
Panjabi 8065
Pashto, Pushto 8083
Persian 7065
Polish 8076
Portuguese 8084
Quechua 8185
Rhaero-Romance 8277
Romanian 8279
Russian 8285
Samoan 8377
Sangho 8371
Sanskrit 8365
Scots Gaelic 7168
Serbian 8382
Servo-Croatian 8372
Sesotho 8384
Setswana 8478
Shona 8378
Sindhi 8368
Singhalese 8373
Siswati 8383
Slovak 8375
Slovenian 8376
Somali 8379
Spanish 6983
Sundanese 8385
Swahili 8387
Swedish 8386
Tagalog 8476
Tajik 8471
Tamil 8465
Tatar 8484
Telugu 8469
Thai 8472
Tibetan 6679
Tigrinya 8473
Tonga 8479
Tsonga 8483
Turkish 8482
Turkmen 8475
Twi 8487
Ukrainian 8575
Urdu 8582
Uzbek .8590
Vietnamese 8673
VolapOk 8679
Welsh 6789
Wolof 8779
Xhosa 8872
Yiddish 7473
Yoruba 8979
Zulu 9085
Using the Setup Menu 43
Page 24

About the DVD Player
This section includes extra information about the DVD
player, including a description of the front panel and
front panel display, the back panel, and some basic use
and care guidelines.
Troubleshooting
This short troubleshooting section will hopefully solve
any problems that you might encounter with your DVD
player.
Limited Warranty
The Limited Warranty includes information on getting
service for you DVD player.
Page 25

BackPanel
Front Panel Display
® ® ®
®®®
1. Displayed
2.
3.
®
I
PROG,
88: 881
i
12345 ]
678910
11121314
i;
® _ ®
when the Video CD is played using the menu (for example, with playback control).
Indicates the play modes or the title number of a DVD.
Indicates the chapter number for a DVD.
Indicates the track number for an Audio or Video CD.
4. Indicates repeat play modes: (:_3 indicates chapter or track repeat. ALL(___)indicates all disc repeat.
5. Indicates Program Playback mode.
6. Indicates that a DVD is loaded.
7. Indicates that a Video CD or CD (audio) is loaded.
8. Indicates Playback mode.
9. Indicates that the Angle feature is activated.
10. Indicates time (i.e. elapsed time of playback).
11. Shows the chapters or track numbers on a disc.
12. Indicates that a disc contains 15 or more chapters or tracks. If the 15th (or subsequent) chapter or track
is played, this indicator is lit.
Back Panel
AC IN
DIGITALOUT I_
0
I
.O
• O O
AUDIO VIDEO S-VIDEO
II I
O ®® ® ®
I. DIGITAL OUT Use to connect to a Dolby Digital receiver for best sound quality.
2. AUDIO (R / L) Connect to the audio inputs on your television.
3. VIDEO Connect to the video input on your television for a good quality picture.
4. S-VIDEO Connect to the S-Video input on your television for the best picture quality.
5. AC IN Connect the AC power cord here.
Reference 47
Page 26

Care and Maintenance
Self-Diagnostic Message
Ull
H --
F--
Problem/Solution
The disc is dirty. Wipe the discwith a soft cloth.
When you see a code that begins with "H" or "F" it means that the unit is not
functioning properly. Turn the unit off and on again by pressing the POWER
button twice, or unplug the AC power cord from the wall outlet, and then plug
the unit back in. This will make the unit operate normally if external electrical
influences such as lightening or static electricity have affected the operation of
the unit.
Handling Cautions
* Before connecting other components to this player, be sure to turn them all off.
• Do not move the player while a disc is being played, or the disc may be scratched or broken, and the
player's internal parts may be damaged.
• Do not put a flower vase filled with water or any small metal objects on the player.
• Be careful not to put your hand into the disc tray.
• Do not place anything other than the disc in the disc tray.
• Exterior influences such as lightning and static electricity can affect normal operation of this player. If
this occurs, turn the player off and on again with the POWER button, or disconnect and then reconnect
the AC power cord to the AC power outlet. The player will operate normally.
• Be sure to remove the disc and turn off the player after use.
• Disconnect the AC power cord from the AC outlet when you don't intend to use the player for long
periods of time.
Maintenance of Cabinet
For safety reasons, be sure to disconnect the AC power cord from the AC outlet.
• Do not use benzene, thinner, or other solvents for cleaning.
• Wipe the cabinet with a soft cloth.
Formation of Condensation
Due to sharp changes in temperature and humidity, condensation may form if warm air comes in contact
with any cold parts inside the player.
• When condensation forms inside the player, the player may not operate correctly. If this occurs, leave
the player at room temperature until the inside of the player becomes dw and operational.
• If condensation forms on a disc, wipe the disc with a soft and dry cloth by moving the cloth from the
center hole toward the outer edge.
Reference 49
Page 27

Limited Warranty
• Evidence of purchase date such as a bill of sale, to verify your unit's warranty eligibility.
• A brief note describing your unit's problem.
• Your name, address and phone number.
Thomson assumes no responsibility of warranty shipments from the customer to the factory if not shipped in the
manner prescribed by Thomson.
Return transportation, storage, handling and insurance costs are your responsibility. We accept no responsibility
in case of damage or loss.
To receive a replacement unit after we have received your unit:
• Write the RA number on the outside of the carton used to return the unit. Make sure you insure your shipment in
case of damage or loss.
• Carefully pack the unit using the original box and packing material if possible. Please retain all accessories that
were included with your unit such as the remote control hand unit.
• Include with the shipment:
1. Evidence of purchase date such as a bill of sale, to verify your unit's warranty eligibility.
2. A brief note describing your unit's problem.
3. Your name, address and phone number.
• Include a cashier's check or money order for payment if there are any out of warranty labor or parts
charges which were indicated by the representative, and you elect not to use your credit card.
• After we receive your product, a new or refurbished unit will be shipped to you.
What
Your Warranty DoesNot Cover:
Acts of God, such as but not limited to lightning damage.
Adjustment of customer controls.
Damage from misuse or neglect.
A unit that has been modified or incorporated into other products or is used for institutional or other commercial
purposes.
Batteries.
Units purchased or serviced outside the U.S.A.
Shipping damage if the unit was not packed and shipped in the manner prescribed by Thomson.
Storage fees may be charged by the exchange point if you fail to pickup the replacement unit in a timely manner.
ProductRegistration:
• Please complete and mail the Product Registration Card packed with your DVD product. It will make it easier to
contact you should it ever be necessary. The return of the card is not required for a warranty coverage.
How State Law Relatesto Warranty:
• This warranty gives you specific legal rights and you may have other rights that vary from state to state.
If You PurchasedYour Product Outsidethe United States:
• This warranty does not apply. See your dealer for warranty information.
Reference 51
Page 28

 Loading...