

Page 1

USER'S
GUIDE
CO kO R
TV
Page 2
Important Information
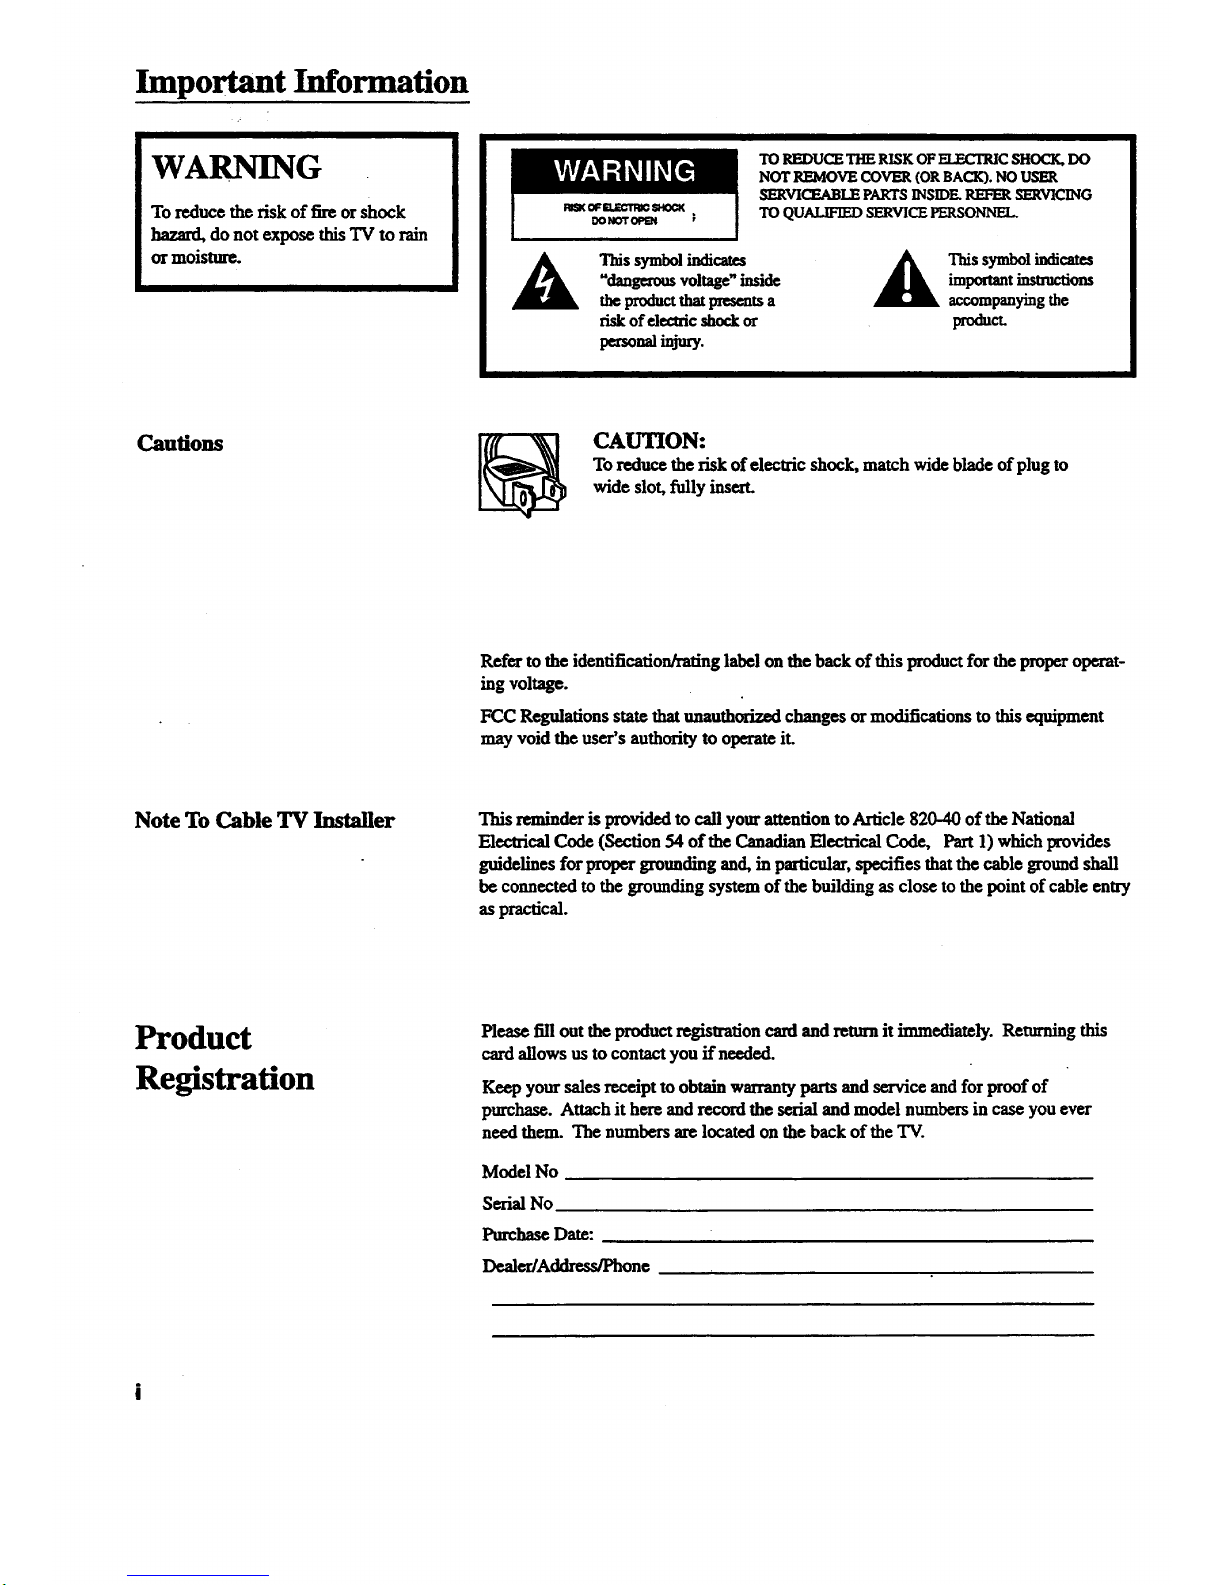
WARNING
Toreduce the risk of fire or shock
hazard, do not expose this TV to rain
ormoisture.
TO REDUCE THE RISK OF ELF_.CrRICSHOCK, DO
NOT REMOVE COVER (OR BACK). NO USER
SERVICEABLE PARTS INSIDE. REFER SERVICING
TO QUALIFIED SERVICE PERSONNEL.
A This symbolindicates _ Thissymbolindicates
"dangc0rousvoltage"inside _k importantinsu'uctions
theproductthatpresentsa accompanyingthe
riskof electricshockor product.
peno iny=y.
Cautions
CAUTION:
To reduce the risk of electric shock, match wide blade of plug to
wide slot, fiflly insert.
Refer to the identification/rating label on the back of this productfor the proper operat-
ing voltage.
FCC Regulations statethatunauthofizod changes or modifications to this equipment
may void the user's authority to operate iL
Note To Cable TV Installer This reminderisprovidedtocall yourattention to Article 820-40 of the National
Electrical Code (Section 54 of the CanadianElectricalCode, Part 1) whichprovides
guidelines for proper grounding and,in particular,specifies thatthecable ground shall
be connected to the grounding system of the building as close to the point of cable entry
as practical.
Product
Registration
Please fill out the product registration card and return it immediately. Returning this
allows us to contact you ff needed.
Keep your sales receipt to obtain warrantyparts and service and for proof of
purchase. Attachit here and record the serial andmodel numbersin case you ever
need them. The numbers are located on the back of the TV.
Model No
Serial No
PurchaseDate:
Denier/Address/Phone
Page 3

Introduction
Thank you for choosing RCA
Your television is designed for long
life and superior operation. Despite its
sophistication, your new TV is
amazingly simple to operate because it
has so many automatic features.
Table of Contents
Getting Started
First-Time Operation .................................................................. 2-3
Controlling Your TV
Front Panel and Headphone Jack................................................... 4
On-Screen Displays...................................................................... 5
Remote Operation .......................................................................... 6
Operating Features
VIDEO Menu ................................................................................. 7
SETUP Menu ................................................................................. 8
Languages (English, French, Spanish) .......................................... 8
Sleep Timer Operation ................................................................... 9
Alarm Timer Operation ............................................................... 10
Autoprogramming Channel Memory .......................................... 11
Editing Channel Memory ............................................................. 11
Connecting Your TV
Antenna/Cable Information ......................................................... 12
Dipole Antenna Connection ......................................................... 12
FM Radio Operation ..................................................................... 13
Home Antenna Connections ........................................................ 14
CabIe-TV Connections ................................................................ 15
Cable-TV Operation .................................................................... 16
Mounting Your TV .................................................................. 17-19
Caring for Your TV
Cleaning & Care " 20
Accessories
Accessories .................................................................................. 21
Order Form ............................................................................. 21-22
Trouble Checks ......................................................................... 23
Limited Warranty ....................................................................24
1
Page 4
Getting Started
First-T'nneOperation
The steps below will help you get your TV connected and working quickly.
Page numbers are also listed for more details.
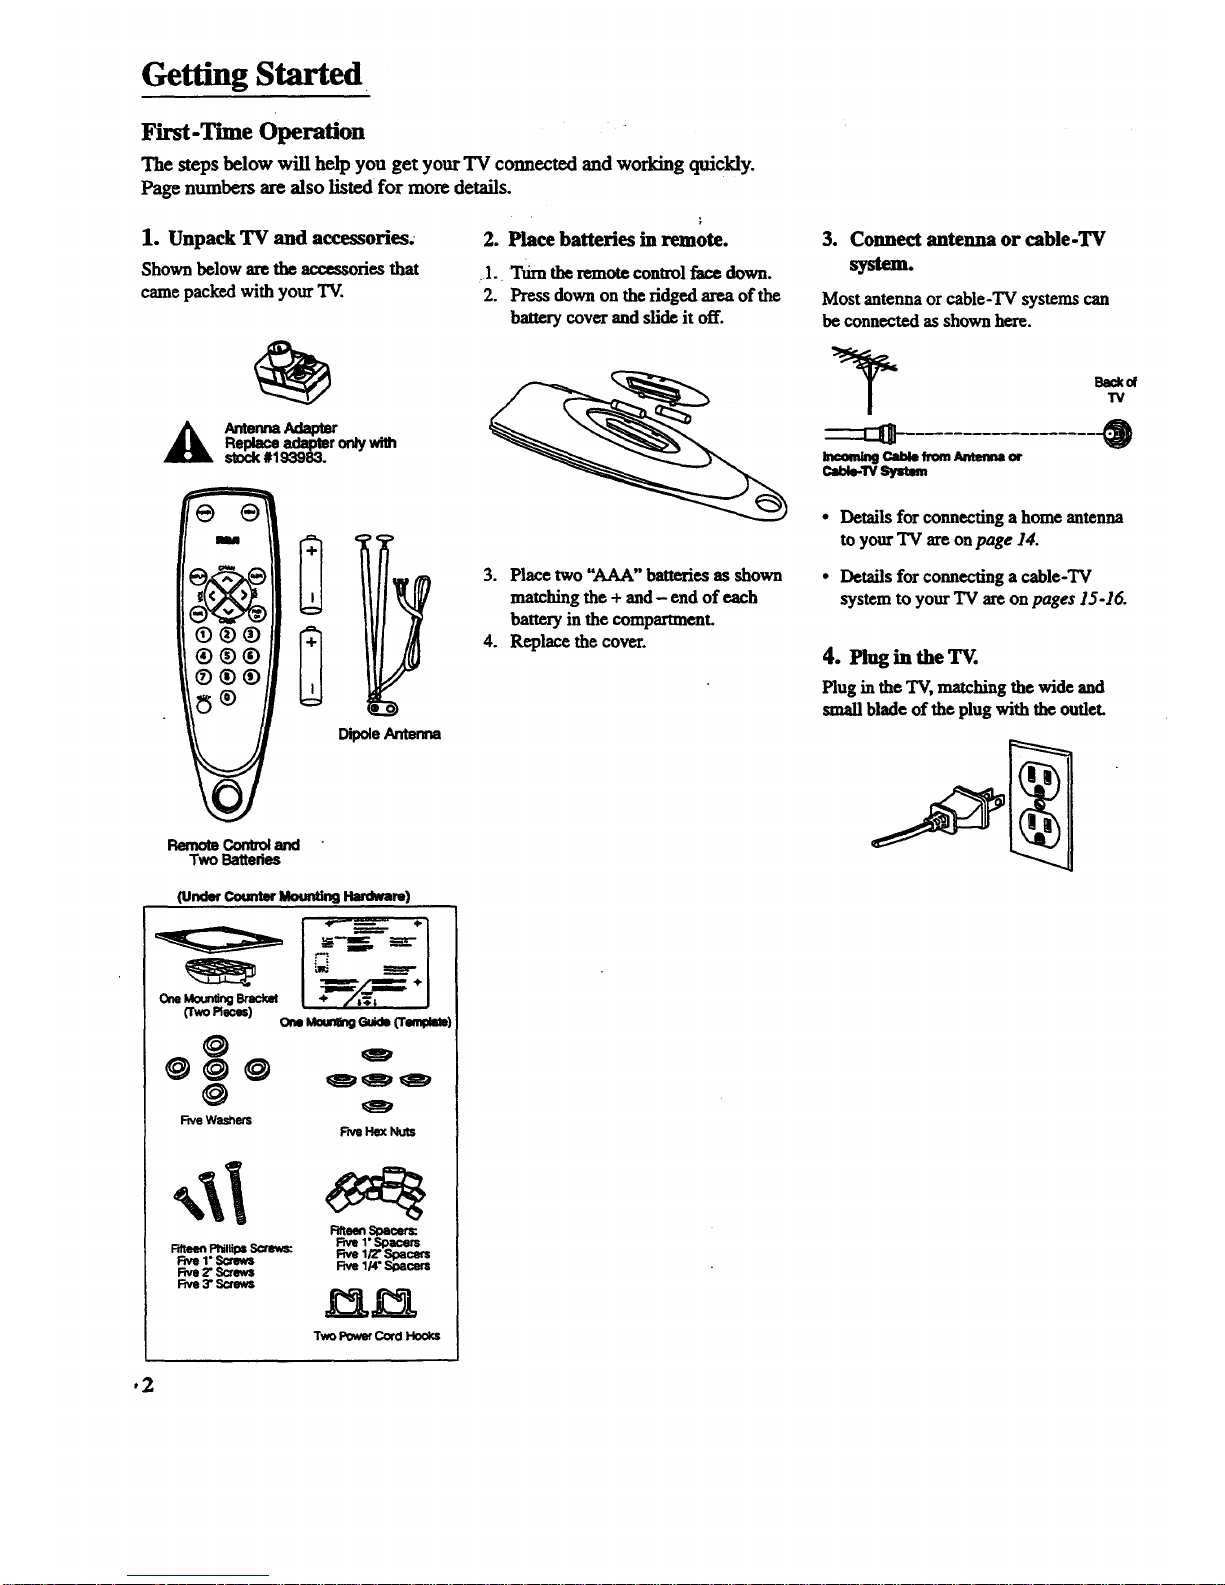
1. Unpack TV and accessories.
Shown below are the accessories that
came packed with your TV.
A a l_ter
Replaceadapteronly
stock #193983.
2. Place batteries in remote.
rl. Tm'ntheremote control face down.
2. Press down on the ridged area of the
battery cover and slide it off.
e e
I[(( ]K >P
®®®
®®®
RemoteContloland
Two Batteries
DipoleAntenna
3. Place two "AAA" batteries as shown
matching the + and - end of each
battery in the compartment.
4. Replace the cover.
(uneercotm_ titan9 Han_n)
Om_ Brac_ +
ffwoReck)
omMoun_Gulds('r_)
Fwe Hex Nuts
@
@@@
@
Five Washers
Rfteen PhillipsScrews:
Rye 1",_mv_
Rye 2" Scmv4
Five 3" ,Screws
l:_fteen_ac:ers:
i"_acers
_0 1/2" Spacers
I/4"Spacers
3. Connect antenna or cable-TV
system.
Most antenna or cable-TV systems can
be connected as shown here.
Ba_of
"IV
Ineom_ P_tl_ _)m Antemm m
Cal_e-ws_lmm_
Details for connecting a home antenna
to your TV are on page 14.
Details for connecting a cable-TV
system to your TV are on pages 15-16.
4. Plug in the TV.
Plug in the TV, matching the wide and
small blade of the plug with the outlet.
02
Page 5
Getting Started
First-Time Operation
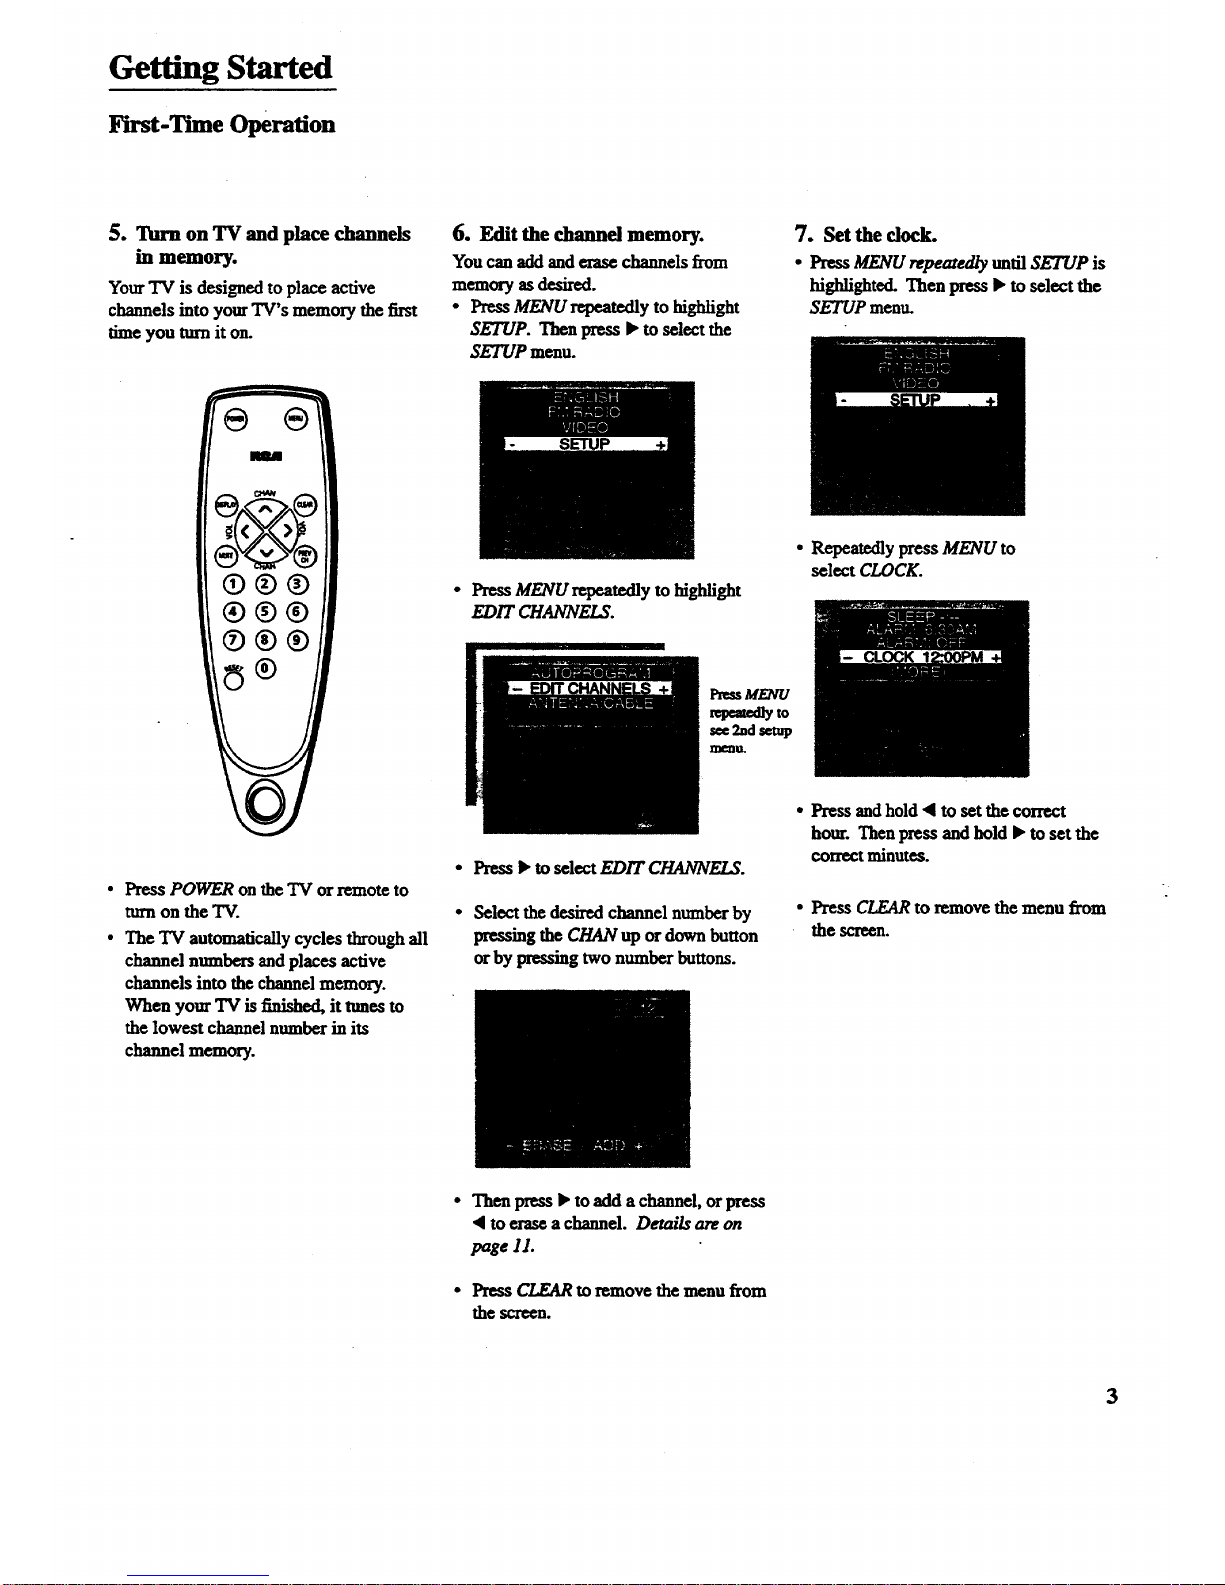
5. Turn on TV and place channels
in memory.
Your TV is designed to place active
channels into your TV's memory the first
time you nun it on.
®®®
®®®
®®®
• Press POWER on the TV or remote to
turn on the TV.
• The TV automatically cyclesthrough all
channel numbers and places active
channels into the channel memory.
When your TV is finished, it tunes to
the lowest channel numberin its
channel memory.
6. Edit the channd memory.
You canaddand erase channels from
memory as desired.
• Press MENU repeatedly to highlight
SETUP. Then press • to select the
SETUP menu.
• Press MENU repeatedly to highlight
EDIT CHANNELS.
i_ss MENU
tqgledly to
see 2nd setup
INl_ln.
• Press • to select EDIT CHANNELS.
• Select the desired channel numberby
pressing the CHAN up or down button
orby pressing two number buttons.
7. Setthe dock.
• Press MENU repeazed/y until SETUP is
highlighted. Then press • to select the
SETUP menu.
• Repeatedly press MENU to
select CLOCK.
• Press and hold _1to set the correct
hour. Thenpress and hold • to set the
correctminutes.
• Press CLEARto remove the menu from
the screen.
• Then press • to add achannel, orpress
• to erase a channel. Details are on
page 11.
• Press CLEAR to remove the menu from
the screen.
3
Page 6

Controlling Your TV
Front Panel and Headphone Jack
Shown here are the front-panel buttons.
f
m
f h
*oooO0000000000000000
::::_oooooooooooo
o0ooo000oo00
*°°eooooooooo00000000
*°°cO0000000000000000
:::°O0000000000000000
"0.:_00000000000000
*Ooo0._0°°00000000000
_00000000
; I
0 (.866
I I
Remote Sensor
Remote Sensor
• When using the remote control, point it toward this sensor.
MENU Button
• Press repeatedly until the item you want is highlighted, then
press • or ,q to enter the menu.
• Press repeatedly tomove down each menu screen and then
press • or • to adjust each setting.
• To mute the TV, press once and then press •.
CHAN • and • Buttons (Channel Up and Down)
• Press Channel up to see the next higher channel in memory.
• Press Channel down to see the next lower channel in memory.
• You can add or erase channels in memory as desired. Detai/s
are on page 11.
VOL Buttons (Volume Up and Down)
(Also • and 4 Buttons)
• Press VOL • to increase volume, orpress VOL • to
decrease volume.
• Press • or • to adjust the setting of an item that is highlighted
in the menu.
• The volume display will automatically appear on the screen
when you press the VOL buttons.
POWER Button
* Press to turnthe TV on or off.
(t_) Headphone Jack (Located on Back of TV)
• Youcan plug an optional set of headphones into this jack for
privatelistening. When headphones are attached, the sound
comes through the headphones instead of the TV speaker.
• If the plug on your headphones does not fit the jack, adapters
are available at your local electronics supply store.
4
Page 7
Controlling Your TV
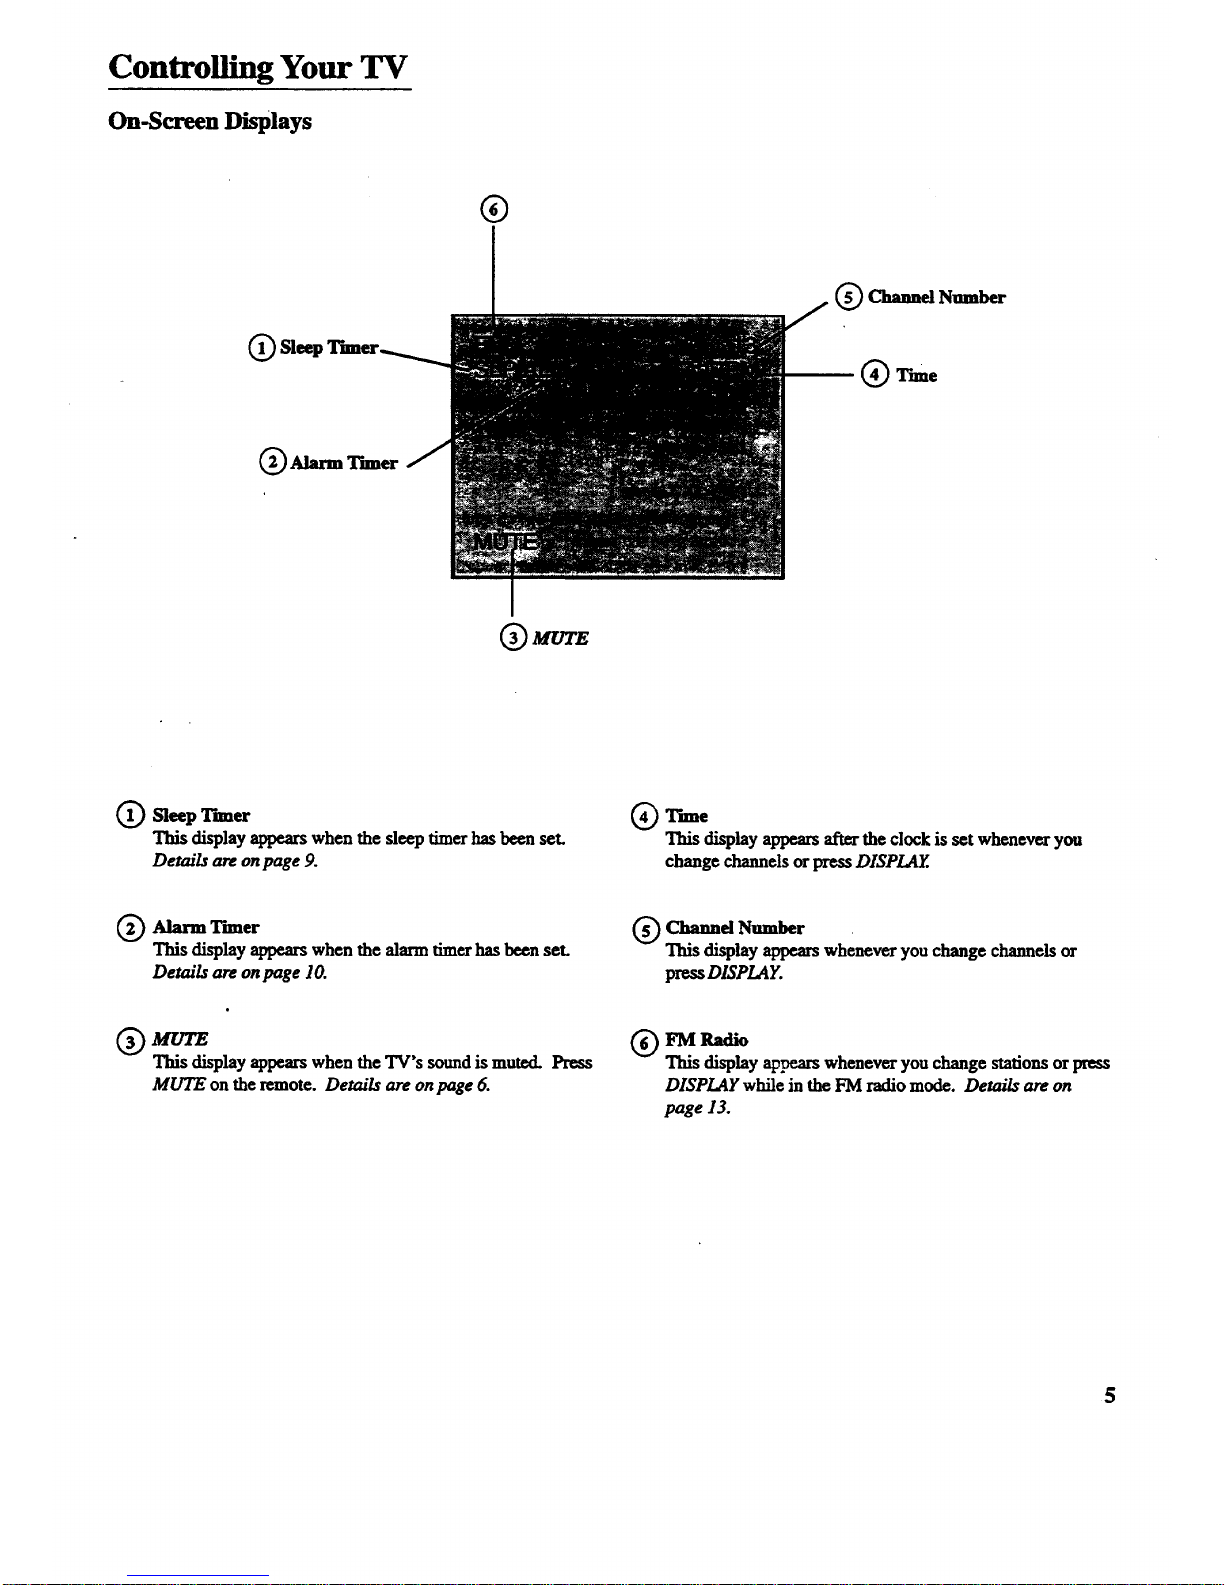
On-Screen Displays
®
(_) Sleq
(_) Alarm Timer
Q Channd Number
mQ
(_ MT.r/'E
Q Sleep T'nner
This display appears when the sleep timerhas been set.
Details are on page 9.
(_ Time
This disphy appears after the clock is set whenever you
change channels or press DISPLAY..
Q Alarm Thner
This display appears when the alarm timer has been set.
Details are on page 10.
Q Channd Number
display appears whenever you change channels or
press DISPLAY.
Q UYE
This display appears when the TV's sound is muted. Press
MUTE on the remote. Details are on page 6.
(_ FM Radio
This display ap1_ars whenever you change stations or press
DISPLAY while in the FM radio mode. Details are on
page 13.
5
Page 8
Controlling Your TV
Remote Operation
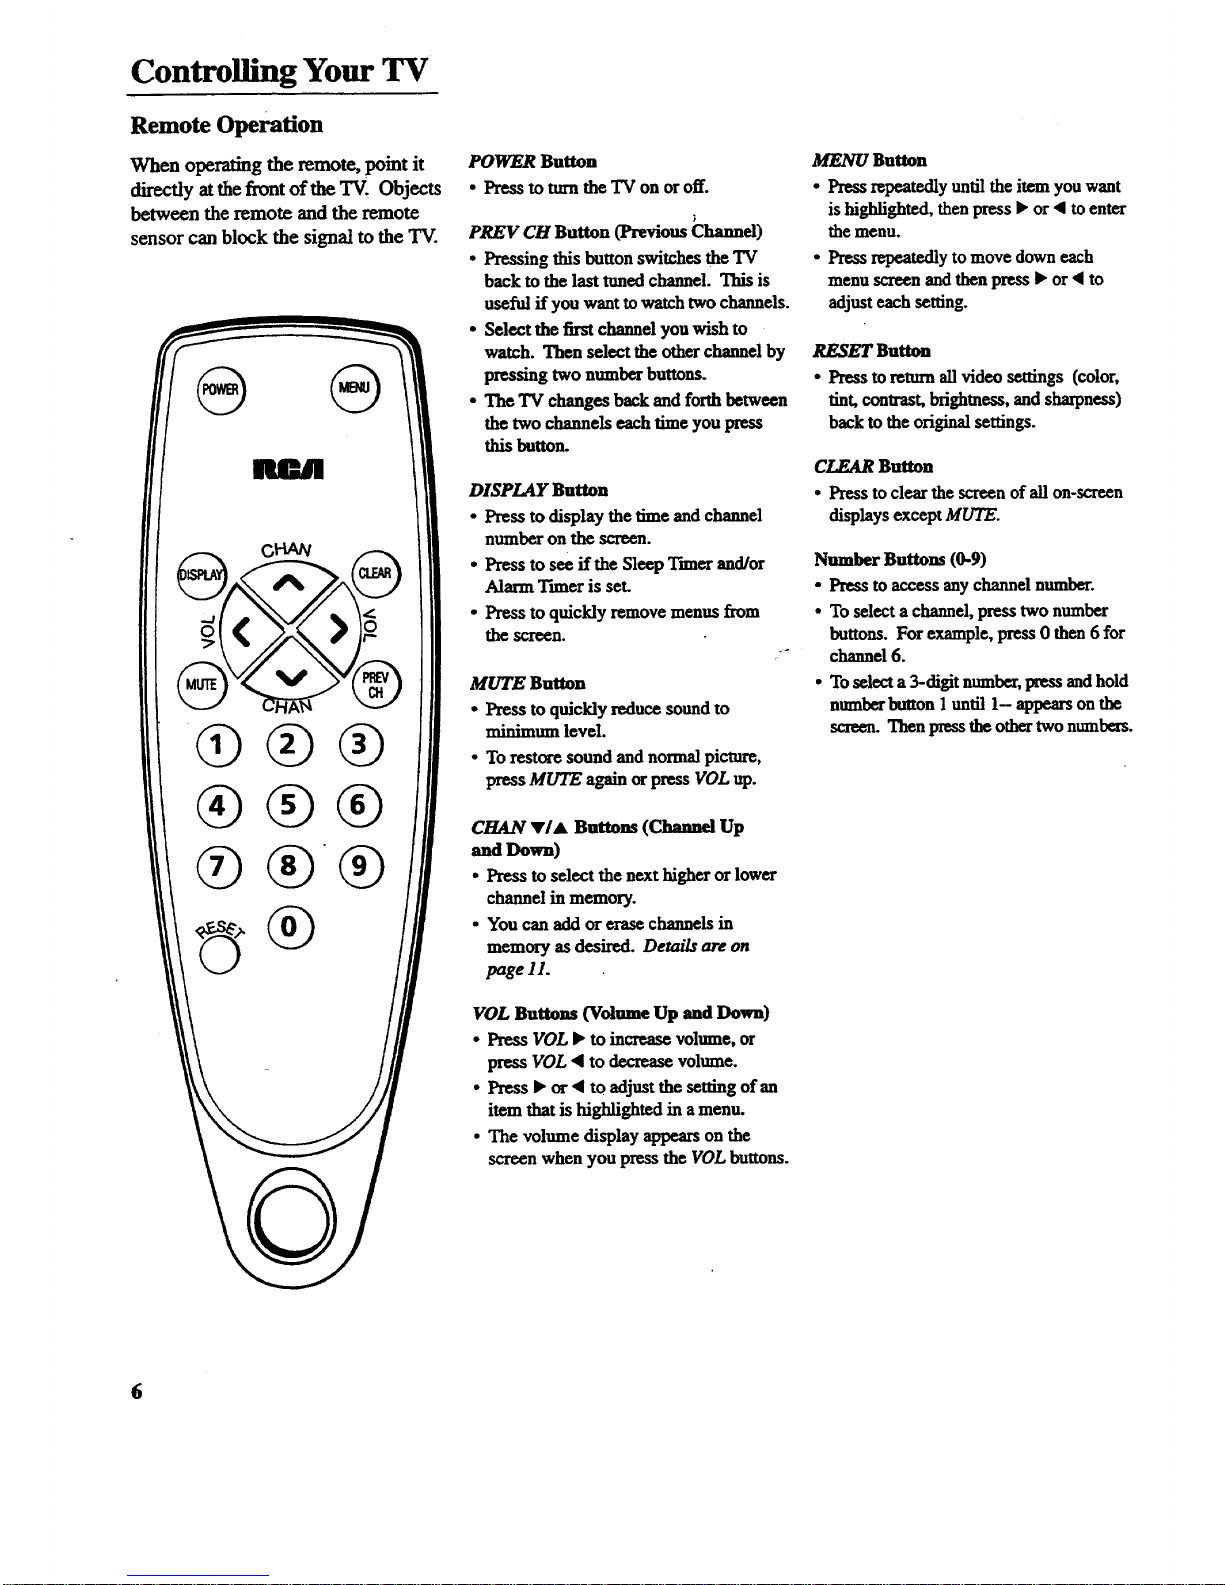
When operating the remote, point it
directly at the front of the TV, Objects
between the remote and the remote
sensor can block the signal to the TAr.
i
POWER Button
• Press totnm the TV on oroff.
PREV CH Button (Previous Channel)
• Pressing this button switches the TV
back to the last tuned channel. This is
useful if you want to watch two channels.
• Select the first channel you wish to
watch. Then select the other channel by
pressing two number buttons.
• The TV changes back and forth between
the two channels each time you press
this button.
DISPLAY Button
• Press to display the time and channel
number on the screen.
• Press to see ff the Sleep Timer and/or
Alarm Tnner is set.
• Press to quickly remove menus from
the screen.
MUTE Button
• Press to quickly reduce sound to
minimum level.
• To restore sound and normal picture,
press MUTE again or press VOL up.
CHAN •1• Buttons (Channel Up
and Down)
• Press to select the next higher or lower
channel in memory.
• You canaddor erasechannels in
memory as desired. Details are on
page 11.
VOL Buttons (Volume Up and Down)
• Press VOL • to increase volume, or
press VOL • to decrease volume.
• Press • or • to adjust the setting of an
item thatis highlighted in amenu.
• The volume display appears on the
screen when you press the VOL buttons.
MENU Button
• Press repeatedly until the item you want
is highfighted, then press • or • to enter
the menu.
• Press repeatedly to move down each
menu screen and then press • or • to
adjust each setting.
RESET Button
• Press to return all video settings (color,
tint, contrast, brightness, and sharpness)
back to the original settings.
CLEAR Button
• Press to clear the screen of all on-screen
displays except MUTE.
Number Buttons (0-9)
• Press to access any channel number.
• To select a channel, press two number
buttons. For example, press 0 then 6 for
channel 6.
• To select a 3-digit number, press and hold
number button 1 until 1- appears on the
screen. Then press the other two numbers.
6
Page 9

Operating Features --
VIDEO Menu
Press MENU until VIDEO is highlighted. Then press • to select the
VIDEO menu. Press MENU to move down the menu and • and • to
adjust each function.
M
MENU to
select
VIDEO
Press•
forlst
VIDEO
Menu
Screen
The VIDEO RESET function changes all the video functions (color, tint,
contrast, brightness, sharpness) back to the factory settings. Press • or •
to reset the video functions. RF_ETappears on the TV screen momen=
tarily while the functions arebeing adjusted.
Press
MENU
untilthe
second
VIDEO
Menu
appears
The COLOR function adjusts the amount of color in the picture. Press • or
• to select COLOR, then press • to increase or press < to decrease color.
The T/NT function adjusts the color of flesh tones. Press • or • to select
.T/NZ. Press • to add more green tint or press < to addmore red tint.
The CONTRAST function adjusts the overall brightness and contrast of
the picture. Press • or • to select CONTRASZ. Press • to increase or
press • to decrease contrast.
The BRIGHTNF__ function adjusts the brightness of the dark portions
of the picture. Press • or • toselect BRIGHTNESS. Press • to
:increase or press • to decrease brightness.
The SHARPNESS function adjusts picture sharpness. Press • or • to
select SHARPNESS. Press • to increase orpress • todecrease.
These functions are displayed individually at the bottom of the screen
once they have been selected. The setting can be adjusted at thattime
by pressing either the • or • button.
7
Page 10

Operating Features
SETUP Menu
Press MENU until SETUP is highlighted. Then press _ to select the
SETUP menu. Press MENU to move down the menu and • and • to
adjust each f_mction.
1st
SETUP
Menu
Sa_en
By setting the Sleep function, you programyour TV to turnitself off after a
certain period of time. This is useful whenever you want to watch "IV for an
houror so before going to deep. Press the • or • button to select the length
[of time you want the TV to stay on. Details are onpage 9.
You can program your TV to turn itself on at a specific time by setting the
A/ARM lime function and turning theALARM: ON/OFF function ON.
Details are on page 10.
The ALARM: ON/OFF function lets you nun the alarm on oroffby pressing
the • or • button. Details are on page 10.
After setting the CLOCK function, the time is displayed on the"IV screen
whenever you change channelsorpress DISPLAY. Press and hold • to set
the correcthours and • to set the correct minutes. Details are on page 3.
Press
MENU
mm'lthe
second•
SETUP
Menu
appears
When you press • or • tostart the AUTOPROGRAM function, the TV
cycles through all channels andplaces only the active channels for your area
in its channel memory. The channel memory is the list of channels the TV
stops on when you press CHAN up or down. Derails are on page I1.
The ED/T CHANNE/_ function allows you to edit the channel memory by
adding or erasing channels. Details are on page 11.
_TheANTENNA: CABI£/AIR function tells your TV whether you have cable
ora home antenna connected to iL The "IVadjusts this function for you
when you startthe AUTOPROGRAM function. If you wish to adjust it
manually, press • or • to switch between the CABLE and A/R setting.
Languages
The on-screen displays in this TV can
be displayed in three languages:
English, French, and Spanish. When
you select a language, most of the
displays will be shown on the screen
in your preferred language.
Selecting a Language
1. Press MENU once to bring up the
main menu and highlight ENGLISH.
2. Press • or • to select FRANCAI$
(French), ESPANOL (Spanish),
orENGLISH.
FRANCAIS
Page 11

Operating Features
Sleep Timer Operation
By setting the Sleep Timer, you can
program your TV to turn itself off
after a certain period of time (up to
four hours). This is useful whenever
you want to watch TV for an hour or
so before going to sleep.
Setting the Sleep Timer
1. Press MENU until SETUP is
highlighted. Then press • to select the
SETUP menu.
4. When the Sleep Tnner is turned on, the
letters SLP appear on the screen
whenever you change channels or
stations orpress DISPLAY.
2. Press I,"to select the length of lime you
want the TVto stay on. Each press of the
• button adds 30 minutes. Each press
of the • button subtracts 30 minutes.
5. Repeat step 1 to see the amount of time
remaining before the TV shuts itself off.
reffi_at_
3. When finished, the display disappears
from the screen in a few seconds. To
make it disappear more quickly, press
CLEAR on the remote.
6. When theSleep T'nnercounts down to
one minute, the Sleep Tnner display
appearson the screen. When this display
appears, press CLEAR to cancel the
Sleep Ttmer ff you want the TV to
remain on.
Cancelling Sleep Timer
Press MENU until SETUP is highlighted.
Then press • to select the SETUP menu.
Press the • buttonuntil the screen
shows '%2- -".
9
Page 12

Operating Features
AlarmTimerOperation
TheTV can be programmedto mm
itself on at a specific time within a
24-hour period by setting the Alarm
T'nner. This is useful for using the TV
as an alarm clock. Instead of waking
up to a buzz, wake up to a favorite TV
program. You may also set the timer
for a special program that you might
otherwise forgeL
Once you set the Alarm Tnner, the "IV
tarns on at the preset time, stays on for
one hour, and then shuts off. You may
need to adjust the channel and volume
level before activating the Alarm
Timer. The Alarm Tnner turns on the
TV to the "IV channel station and the
volume level that was selected the last
time the TV was on.
Setting the Alarm Tnner
1. Press MENU until SETUP is higtv
lighted. Then press • to select the
SETUP menu.
2.PressMENU untilALARM isli]ghfight-
ed.Press4 toselectthecorre_hourand
press P" to select the correctminutes.
3. After you set the ALARM time, press
MENU toselect ALARM: ONIOFF.
Press • or 4 to switch this setting to
the ON position.
4. When the Alarm Tuner is turnedon,
the letters ALM appear on the screen
whenever you change channels or
press DISPLAY.
.
.
The "IVturns on atthe preset time and
automatically sets the Sleep Tuner to 1
hour (60 minutes). It operates for 60
minutes then shuts off.
To turn the TV offbefore the 60
minutes is up,just press POWER on
the TV or the remote. If you wish to
watch "IV longer than60 minutes, then
cancel the Sleep Tuner by setting it
to "-:-'. Details are on page 9.
Turning the Alarm On and Off
I. Press MENU until the ALARM: ON/
OFF functionis selected.
I Press• or 4 to switch between ON
and OFF.
_0
Page 13

Operating Features
AutoPrvgramm_g Channel Memory
The Channel Memory is the fist of TV
channel numbers your TV will stop on
when you press the CHAN up or down
button. You can program any list of
channels into the channel memory
although your 'IV is so automatic that
you will probably never need to
manually operate this feature. If you
do, follow the instructions at the right.
1. Connect home antenna(s) or cable to
your SeL
2. Press MENU until SETUP is higldight-
ed. Press • to select the SETUP menu.
Editing Channel Memory
Follow these instructions to ezase and add
channels.
1. Press MENU until SETUP is ldgh_ght-
ed. Press • to select the SETUP menu.
The first time you turn on the TV, it
cycles through all channels and places
active channels into the channel
memory. You can then add or erase
channels as desired by following the
instructions in the "Editing Channel
Memory" section at the fight.
3. Repeatedly press MENU until
AUTOPROGRAM is highlighted.
2. Repeatedly press MENU until ED/T
CHANNELS is highlighted. Press •
to Select ED/T CHANNE!_.
Notes:"
• Signals from scrambled cable channels and
some cablechannelshavingunusualsignal
conditionsmaynotbe autoprogrammed.
• TopreventtheTV fromlosing its channel
memory, make sure the outlet you plug your
TV into is "on" all the time. Do not plug the
TV into an outlet that can be mined on and
off by a wall switch. Also do not plug theTV
into an outlet on the back of another device
(such as a cable-TV converter box) that is
turned off when the deviceis mined off.
• If there is an extended pow_ failure, your
"IVwill automatically reprogram active
channels the first time you txtrnit onafl_
the powe_f_u_e.
2ad
SETUP
Mean
4. Press • to begin AutoProgramn_g.
The TV cycles through all channels
and places only active channels
into memory.
2_ad
5ETFP
Mean
3.
Selectthechannelnumberby pressing
CHANup ordownor two number
buttonson theremote.
When "•" appearsnext to the channel
number, the channel is in the channel
lisL Press < to erase the channel.
When ", " appearsnext to the channel
number, the channelis not in the
chaunellist. Press• to add thechanneL
5. When the"IV finishes cycling, you can
check the channels in memory by
pressing CHAN up or down.
11
Page 14

Connecting Your TV
Antenna/Cable Information
Most modern TV antennas receive both
VHF (VeryHigh Frequency) and UHF
(Ultra High Frequency) channels.
Channels 2-13 areVHF channels, and
channels 14-69 are UHF channels.
_uJ
Indoor
Antenna
Outdoor
Antenna
Inmost situations you will get better
picture quality if you use an outdoor
antenna or connect your TV to acable-TV
system. If this is not possible, connect the
indoor antenna suppfied with your TV.
Cable-TV derivers both VHF and UHF
channels and other channels not available
from your antenna.
Shown below are two basic types. of
antenna cables. Signals from a home
antenna may be conducted through either
type. Cable-TV signals, however, are
always conducted through round, 75-ohm
coaxialcable.
Types of Antenna Cables
Flat300-ohm
twin-leadcable
coaxialcable
Slip.on End
Scmw-onEnd
Use the connectorshownbelow to connect
your antenna or cable-TV system to the
back of the TV.
Antenna '__N
Connector tit
IMPORTANT NOTE: Antenna
connector, nut, and washer must be in
place when TV is in use.
• Fonow the instructions below if you
intend to connect the indoor antenna
supplied with your TV.
-Or-
* Follow the instructions on page 14 if
you intend to connect an indoor or
outdoor antenna to your TV.
-or-
• Follow the instructions on page 15 ff
you intend to connect a cable-"IV
system to your TV.
Dipole Antenna Connection
Follow the steps to connect the indoor antenna supplied with
your TV (only if you do not connect an outdoor antenna or a
cable-TV system).
Q Insert the antenna base into the pocketed slot on the back
of your set. Stand atthe back of your set with the antenna
twin-lead facing you, and press the base of the antenna
into the slot until it locks in place.
Q Connect the ends of the twin-lead theAntenna
to
Adapter
(supplied).
Q onnect the Antenna Adapter to the AN2ZNNA connector
on the back of the "IV.
Q Later, after you've turnedon the TV, adjustthe length and
position of the antenna rods for best reception.
• For viewing VHF channels, extend the rods fully.
• For viewing UHF channels, shorten the rods for
best reception.
Slot
Antenna Adapter
(Suppled)
Dipole Antenna (Supplied)
®
Twin Leaa
12
Page 15

Operating Features
FM Radio Operation
The FM radio is designed to work on
either cable-TV or a home antenna. If
your TV is connected to cable-TV, the
radio will only work if your cable
company broadcasts the FM radio
signals. If your TV is connected to a
home antenna system, you will be able
to receive those channels broadcast in
your area.
The radio can be used along with the
sleep timer and alarm timer. Listen to
music before going to sleep or wake
up to music. Details for "Setting the
Sleep Tuner" are on page 9 and
"Setting the Alarm" are on page 10.
You can also program up to six of your
favorite radio stations into memory so
you'll be able to quickly select them.
Number buttons 1 through 6 on the
remote control can be programmed to
automatically select favorite channels.
Operating Radio
1. Turn on the TV. Press MENU until
FM RADIO is highlighted.
2.
When TV appears in the menu, you
are in the radio mode. When FM
RADIO appears in the menu, you are
in the TV mode.
Press CHAN up or down to select the
next available station. If the station
you want to tune is not strong enough
for the radio to lock in on it, you can
select FM MANUAL from the radio
menu. Pressing • or • will step
through each frequency one at a time.
3. Press VOLUME • or • to adjust
the volume.
_g Radio Stations
into Memory
°
Select the radio station you want to
put into memory by pressing CHAN
up or down. If the station cannot be
locked in when you press the CHAN
buttons, you can select FM MANUAL
from the radio menu. Pressing • or
• will step through each frequency
one at a time.
.
When the station you want to program
appears on the TV screen, firstpress
number 0 to highlightthe station
number, and then press number 1.
The radio station is now assigned to
number I and canbe selected when-
ever you press number I when the
"IVis in the radiomode.
Number buttons 2, 3, 4, 5, and 6 can
also be assigned to specific radio
stations. R_peat steps 1 and 2 above
to assign the numbers.
Tuning the National Weather
Service (air antenna only)
The TV must be connectedto an antenna
(not cable-TV) and the ANTENNA
function must be setto A/R. Details for
changing thisfunction are on page 1Z
NWS is located between the highest and
lowest number on the radio scale. When
NWS cannot be located using the CHAN
buttons, you may need to use the • or •
button.
13
Page 16

Connecting Your TV
Home Antenna Connections
Follow one of the steps below to connect an indoor or outdoor antenna to your TV (not a cable-TV system).
r
A f the antenna cable coming from your home antenna is a 75-ohm round coaxial cable that carries only VHF (channels 2-13),
only UHF (channels 14-69), orVHF and UHF channels, connect it to your set like this:
Cable ,.rm.,
From ,am I _ of
Home _ IL_ TV
Antenna VltForUHFOnly
or
VHF/UHF Combination
-OR-
B If the antenna cable coming from your home antenna is a 300-ohm flat twin lead that carries only VHF (channels 2-13),
only UI-IF(channels 14-69), or VI-IFand UHF channels, connect it to your set like this:
.
D
Cable
From
Home
Antenna
of
TV
VHForUHFOnly
or Adapter
VitFIUHF Combination (supplied)
-OR-
If the antenna cables coming from your home antenna(s) are a 75-ohm round coaxial cable that carries V'HF (channels 2-13)
and a 300-ohm flattwin-lead cable for UHF (channels 14-69), connect them to your set like this:
UHF
Cables
From and
Home
Antenna(s) VI-IF [
Note: Be sure to connect the UHF antenna cable to the
UHF screws on the Antenna Mixer and the VHF ante_ma
cable to the screws marked VHF.
Antenna Mixer"
Transformer* (use only #193984)
(such as #AH011)
-OR-
If the antenna wires coming from your home antenna(s) are two 300-ohm flat twin-lead cables as shown here, connect them
to your set like this:
Cables UHF
From
Home and
Antenna(s) VHF
PU_On
_[_._-" AntennaMixer*
(me on_t_ s,_e4)
Note: Be rare to connect the UHF _ cable to the UHF screws on the Anlrama
Mix,'r and the VHF antenna cable to the screws marked VHF.
lq
Optional accessory available from your dealer. Only use Antenna Mixer (Stock #193984).
Page 17

Connecting Your TV
Cable-TV Connections
Follow one of these steps to connect a cable-TV system to your TV instead of a homeamenna. Since cable-TV systems
vary, you may wish to consult your local cable,TV company for additional informaficm.
A Follow this diagram ff your cable company does not require a cable box (no scramble! dmrmels):
m
Back
Incoming ,,.._ _ of
Cable r I _LP'
TV
B Follow this _agram if your cable company requires a cable box thatcan be controlled by _emote control:
m
Cable i_ _ TV
Rememberto umeNmrTVto the
outputchannelofdiecablebox (usually
2, 3, or4) whemsdming channels viathecablebox.
CAILE ItOX
C Follow this diagram ff your cable company requires a cable box that cannot be controlkd by remote control:
©
Cable
_rm.a Back
® © © ®
Note: Theseopdomd accessories(2-way TV
splinerC_,A/B switch_), andthreecoral
m
cables_)) areavailableasa kit under c_u_
#Att041BL._
The "A"position on the A/B switch lets you select all
non-scrambled channels by the TV's remote.
The "B"position allows you to select scrambled channels
via the cable box. Rememberto tune your TV to the
output channel of thecable box (usually 2, 3, or 4)
when selecting channels via the cable box.
*Optionalaccessoriesareavailablefrommostdealersorelectronics supplystores.
15
Page 18

Connecting Your TV •
Cable-TV Operation
Your new TV is designed to receive up
to 181 TV channels, including 125
non-scrambled cable channels (see
chart below). To use this TV on a
cable-TV system, confirm that the
cable-TV system is properly
connected to your TV. Since cable
systems vary, you may wish to consult
your local cable-TV company for
additional information.
If your cable-TV company follows
EIA/NCTA channel-identification
standards, most of the channels
offered by your cable company will be
identified by channel numbers that are
identical to those on your TV. For
example, ff your cable-TV system has
programs on cable channel 20, you can
choose this channel by selecting
channel 20 on your TV.
Some cable-TV companies do not
follow the EIA/NCTA standards and
instead assign their own channel
identification. For example, some use
the standardbroadcast channel
numbers (2-13) for channels 2-13, but
identify their otherchannels with
letters. If your cable company does
not follow the EIA/NCTA standards,
ask them for across reference that
shows to which channels you should
tune your TV to receive their cable-
TV channels.
Scrambled Cable-TV Channels
Some cable companies offer "premium-
pay" channels in which the signal is
scrambled. Descxambfing these signals
for normal viewing may require the
use of a cable box which is generally
provided by the cable company.
How you connect the cable box to
your TV depends upon whether or not
the cable box can be controlled by
remote control. If your cable box is
remote controllable, you will want to
connect it as shown in Diagram B on
the previous page.
If your cable box cannot be controlled
by remote control, you will still be
able to remotely control
"unscrambled" channels with the
connection shown in Diagram C on
the previous page.
16
The chartbelow lists the "total" channel andcable capability Count.
• Low VHF A-8 (Channel 01) ] -- [ 1
• VI-IF (Channels 2-13) *
• UHF (Channels 14-69)
• Low Midband A-5 through A-1 (Channels 95-99)**
• Midband (Channels 14-22 or A-I)
• Superband (Channels 23-36 or J-W)
• Hyperband (Channels 37-64 or W+I to W+28)
• Ultraband (Channels 65-94 and 100-125 or
W+29 to W+84)
Total*
12"
56
68
12"
5 **
9
14
28
56
125
* VHF is only counted once in total channel count because you can receive channels 2-13 on
both "off-air" and "cable" channels. "Fnerefcurethe total channel count for"off-mr" and
"cable" is 181 channels(68+125-12ffi181).
** Channels 95, 96, and 97 are not applicable in Canada. Therefore, the total number in Canada
is 178.
Page 19

Connecting Your TV
Mounting Your Television
Follow these instructionsif you wantto mount your TV undera cabinet:
Tools Required:
• Rule or tape measure
• Phillips screwdriver
• Pencil
• Blade screwdriver
• Drill and 1/4" drill bit
• Drill Countersink Anachmcnt (Optional)
Mounting Considerations:
• Make sure the bottom of the cabinet you select is strong enough to support a"lS/.
• Allow adequateroom for ventilation, room to swivel, access to controlknobsand
space for the antenna.
• Mount _ near an AC outlet.
• Do notuseareadirectlybeneathTV forcooking.
• Before mounting, turn the set on to check reception in the area you have selected (if
reception is poor try another location).
Mounting Instructions:
1. Prepare cabinet by removing items f_om counter and cabinet. Clean underside of
cabinet where "IVis to be mounted. "
2. Cut out the mounting guide and screw guide
•Cut out the guides on the lines indicated.
•The size of the mounting guide and the screw hole positions are identical to the top
of the mounting bracket.
3. Potion mounting guide
•Position the mounting guide on the underside of cabinet 3/4 inch back fi'omthe
cabinet's front edge.
• Position the mounting guide in the desired location andtape itto the bottom of the
cabinet. Be sumthe location is afiat surface
Notes:.Some kitchencabinetshavefrontoverhangsasshown here. Ifthethicknessofthe
ovm'hangexceeds 3/4 inch,tapethe mountingguide as dose to the cabinet'sfrontedge as
possible. Thefartherbackyoumountthe"IV,the less you willbe ableto swivelit to the left
andfight (if cabinetis nearwall).
TheTV will protrudeabout3"fromthe cabinetwhen themountingguideis positioned3/4"
backfromthe cabinet'sfrontedge_
]m__ _t!_!the brac_t into ;_,'IW until .d_i-_tiS mo_i_ a
ii
:: .
•Youmay::wanttO,stm th_!diillholes
withanailoranawl.: _°
.....- ._ii..... . " ::'/, -:::::_; ;'
: :':Splintcx72n:g:_: _i;_: ifX_ _
locatiOns:onthe_iof the ,= :
_t,: ......
• : "
• _i : ., "_:/ =
• Ifyo_,:.have a.c_Oun_!.!;::::__!:":::i']!;.:.: .
_e !_,31ing::throagh::a:::Wo_ cabineh
._ ........::....,.:_::.:. _,._.._- .._:...:.[_.._.._.:: _.-..:
-,,;:-:i-bOf_i__.-tm_g._i__-_:.: :
;.':...>:;:...:;.:." ._:.::i.--__:'._.- -:...:'i_.':_..:_.--_i_:..::::,:'.
Cabinet Overhang
MountingBracket
17
Page 20

Connecting Your TV
4. Drill holes in cabinet
• Drill I/4-ineh diameterholes through the underside of the cabinet bottom using the
five circles on the mounting guide as a guide.
5. Remove mounting guide and drill shavings
Remove the mounting guide and clean the drill shavings from inside andunder the
cabinet.
6. Sdect spacersif required
• The spacers slip over the ends of the screws and allow you to mount the TV below
the edge of the cabinet's overhang.
• If your cabinet does not have an overhang, you probably will not need to use any
spacers.
• If your cabinet has an overhang, select the proper length spacer(s) so the TV will
clear the overhang when swiveled.
• Two or three spacers can be used together to make lengths of 1/4" to 1-3/4" at 1/4"
increments. Refer to the chartbelow to select the proper spacers:
7. Select proper length of screws
• Only five screws are needed. The size you need depends upon your type of cabinet.
• Holding the selected spacers for one of the screw holes under the cabinet, install a
washer and screw inside the cabinet using one of the three lengths of screws
provided.
Note: A visual description of these parts is on page 2.
Less than 1" None Required
1" to 1-1/4" 1/4" Spacers
1-1/4" to 1/2" 1/2" Spacers
1-1/2" 1-3/4" 3/4" Spacers
1-3/4" to 2" 1" Spacers
3/4"
8. Position mounting bracket under cabinet
• Position the mounting bracket under the cabinet as shown and match the screw
holes.
9. Attach mounting bracket to cabinet
• First mount one corner of the bracket. Hold the bracket and spacer(s) in place and
insert the screw from the inside of the cabinet down through washer and drilled
hole ordown through countersink and drilled hole.
Note: The washersmustbe usedon metalcabinetsandonwoodcabinetsif you do not
countersinkthedrilledholes.
• Position the washerfiat-side down and place screw into screw hole, through the
spacer(s) and through the screw hole in the mounting bracket.
• Place a nut into the cylinder at the bottom of the mounting bracketscrew hole.
Hold nut in place (if necessary, use the top of a pencil). While maintaining upward
pressure on the mounting bracket, finger tighten the screw. Do nottighten firmly
until all five screws have been started.
• Align each of the remaining mounting bracket screw holes with the drilled holes
and properly position the selected spacers. Install washers, screws, and nuts as
previously described. Now, finish tightening the five screws butdo not overtighten
them.
• -,.. .,, " • _. " .... -:::_ : " "" : .:': .:_.'" ": ...'V.'i_";:.:.':=.':; ;=_'::' - ".:-.,'---::_':_.'..-,."..-(:.:=.-::'7_:_:_.!," :::: "::
_fion: If the:_V_!m0 _it:w_l not_w _he n_ far enoi_gt_:to_::
eouldltititwbeniswiveled.: _: :, ..... : : =:_,:::::
................ .. ......... . ......... :. ...... . ... •
1/4"to3/4"for
ProperMounting
:
_8
Page 21

Connecting Your TV
10. (Optional)AttachSupplied Antenna to Bottom of TV
Ifyou have attached the suppfied dipole antenna to the top of your TV, you will need
to attach it to the bottom of your TV before mounting it. If you have connected
another type of antenna, skip to step 11
If the dipole antenna is at_hed to the top of the "IV, you can remove it by
grasping the base and lifting it up and off.
Insert the antenna base into the pocketed slot on the bottom of your TV. Press
the base of the antenna into the slot until it locks in #ace.
Connect the ends of the twin-lead to tim antenna adapter (supplied).
Connect the antenna adapter to the round antenna connector on the back of the
TV.
Later, after you have turned on the "IV, adjust the length and position of the
antenna for best reception.
• For viewing VHF channels 2-13, extend the rods fully.
• For viewing UHF channels 14-69, shorten the rods for best reception.
• For listening to the radio, if necessary, adjust the antenna rods for best
reception.
®
®
®
11. Slide TV onto Bracket
Slide the TV onto the mounting hook of the bracket and push it all the way back
until.the hook on the bracket locks into the back of the TV.
Secure the TV in the bracket by sliding the locking tab on the back of the bracket
into the bracket assembly. You should hear a click sound when the sliding tab is
locked into position.
I
Warning: make sure the locking slide is pushed fully into the locked position. |
Failure to lock the sliding tab into position may allow the TV to fall off the bracket
I
causing personal injury or damage to the TV. Push the sliding tab into the bracket
assembly until you hear a click.
at
• To remove the"IV,slidethelockingtaboutof thebracketassembly.
• Liftthe"IV up and gentlypullforward.
Note: The TV must be slightly below the cabinet ovm'hangwhen installed in the bracket.
Some clearance is necessary so the TV can be easily rotatedto thedesired viewing angle or
removed for portable use.
I :
\
\
12. Attach AC Power Cord
• Fn'st attach the AC power cord to the 4-prong connector on the back of the TV.
• Then extend the cord and plug it into an electrical outlet.
13. Attach Cord Hooks
• You can use the cord hooks to hold the cord out of the way.
• For the most attractive appearance, place the cord hooks at the back edge of the
cabinet (on or next to the wall) directly above the outlet to be used.
• Toattach the cord hooks, peel off the adhesive backandattach the hooks to a
clean, dry surface on underside of cabinet or back wall.
• Use the cord tie that is attached to the power cord to wrapand tie excess cordout
of sight.
19
Page 22

Caring for Your TV
Cleaning and Care
Dust TV as required, using a soft cloth or the dusting
attaclnnent of your vacuum cleaner. Occasionally vacuum
the ventilation slots in the cabinet to help assure adequate
ventilation. Take care not to scratch the plastic surfaces.
If your TV's cabinet has a textured finish, do not use
furniture polish. Because textured finishes are porous,
using furniture polish will mar their appearance. They .can
be easily cleaned with a damp, soft cloth. • -
To clean the screen, you can wipe it with a damp, soft cloth.
Then dry it with a soft cloth. (A mild soap may be used on
the screen if it is extremely dirty.) Be sure to lure off the
TV before cleaning the screen, and do not allow liquid to
run down the screen and inside the TV.
A special antistatic cleaning and polishing solution
(AH035) is available for use on most TV screens and non-
textured cabinets. This non-abrasive formula imparts
brilliance, repels static, and resists fingerprints. Lint-free
polishing cloths are included.
...: .._..._.._ :.:._ ...... _:- .. _.._. ...... .°....... ...: . . . _ . • ..... .. _........
' ::.i_i._:_i.:::.:.._::.!Tki::_i:._,:/.:_77::__.;_i_:. • : :.:_!i::'-_-_::.:_:::._:_:._?_:::::.!_;.i-._i!,:iii:::... :)_iii.._
2O
Page 23

Accessories
Remote Control
This is the remote that came packed
with your TV. You can use the
orderform to order it direct by mail
if desired.
Optional Remote
This remote not only controls your
TV but can also control most brands
of remote-controllable VCRs, cable
boxes, and audio equipment.
233S44
RCUIe0
Dipole Antenna
Designed to attach to the back of
yourTV. Can be used for both VI-IF
and_ channels. 198792
Antenna Cables
Screw:on Antenna Cable
Attaches to the round antenna
connectors (called 75-ohm F-type)
on the back of your VCR or TV.
The ends screw onto the connectors
for a secure connection.
Push-on Antenna Cable
Attaches to the round antenna
connectors (called 75-ohm F-type)
on the back of your VCR or TV.
Ends push on for a quick
connection.
Geki-TiplmlCables
AHe6_ (6-ft)
AHe66G(10-n)
Note: All specifications and descriptions of accessories are
subject to change without notice.
Ante_Adap_
AnteuaaMixer
Re_uffiaeat Rmme Con_ (CY.X231Q
Transfe_me_
Clemenq_hl_
Sac-on AnteanaCable(3-ft)
A-BSwitch
CableConnectionKit
Gold-Tq_d _ Cable(6-f¢)
Gold-'rippedAnema Cable(10-_)
Di_ Aatema
OptimalRemoteConffol
Accessory Order Form
Book No. 2056893B
Part No.
193983
193984
233544
AH011
AH035
AII0Y/
AH041
AH041BL
AH065G
AH066G
198792
RCUI00
$10.73
$ 34.95
$ 1.901
$ 6.95
$ 3.95
$14.95
$19.95
$ 6.99
$ 8.99
$ 9.95
$34.95
Pricesaresubjecttochange withoutnotice.
Total Merchandise ($I0 Minimmn Order) .......
Sales Tax ....................................................
Wearen:quin_dby lawto collecttl_ _"
salestaxfor each individualsuite,county,and
localitytowhich themm:hand_ is beingsent.
Shipping, Handling, and Insurance ..................
TotalAmount Enclosed ....................................
Use VISA or _ lz'efembly. Money order
or check must be in U.S. cm-m_ only. No COD
or CASH.
$ 5.00
$
_o
o
1
i
All ac_s_des m s_jea to a_ilabifity.
Whereapplicable,wewin _J3ipa s_,_ling modeL
21
Page 24

Accessories
Chargeyour orderon your VISA
orMasmCard by
filling in below
USE YOUR CREDIT CARD
IMPORTANT: Copy complete a,cotmtnumber
from your VISA card
F-F-Y- FTT-] FT- F-FT-]
F-NFT-]
IMPORTANT: Copy complete account number
from your
I III IVITI-1FI-T- FF7-I-1
CopyNmb_
above your
BOll
Maste_7.a_
Vl-1
exputs:
AUTHORIZED SIGNATURE
Prices are subject to change without notice.
Name"
Street:
City:.
State:
PLEASE
I
Printortype yournameand
addressclearly.Thiswillbe your
A complete and omrect order will
save you days of waiting.
Dim.]
I
I
1
Apt=
Zip:
Please make sure thatboth sides of this form have
been filled out completely.
_2
United States and Ca_da Orders
Orderby phone using your Visa or Mast_ Call the ton-free
numberlisted below between SAM and 8PM Eastern Standard
Ttm_. Use this number only to place an order for accessory
items listed on this order form.
1- 800-338 - 0376
Most orders are shipped UPS within 72 hours of receipt. Ifit is
not possible to ship within 30 days, we will notify you.
For mail order, detach and mail the completed order form with
credit card information, money order, or check in U.S. currency
(made payable to Thomson Consumer Electronics)to the
following address:
Video Accessories
P.O. Box 8419
Ronks, PA 17573
For more information on these accessories write to the
following address:
Video Accessories Customer Service
Thomson Consumer Electronics
DisUibutor & Special Products
2000 Clement* Bridge Rd
Depfford, NJ 08096-2088
t
I
i
o
o
.x=
o
International Orders
This offer is valid only in the 50 United States and Canada.For
international orders, please send your request for quota"on (not
an order) to:
i
I
!
i
i
i
i
1
International Customer Service
Thomson Consumer Electronics
Distributor & Special Products
2000 Clement, Bridge Rd
Depfford, NJ 08096-2088 USA
Page 25

Trouble Checks
TV Trouble
"IVwill not tm'non
Controls don't work
Intermittent or no remote
Turnsoff while playing
Checks and Adjustments [
* Check to make sure it is plugged in.
• Check the wall receptacle (or extension cord) to make sure it is "five" by plugging in
something else.
• Maybe batteries in remote are "dead". Try using pOWER buttonon TV.
• Maybe remote control was not aimed at remote sensor.
• Make sure power cord is fully inserted into backof TV.
• Try unplugging set for two minutes and then turning it on again.
• Make sure power cord is fully inserted into back of TV.
• Maybe something is between the remote and the remote sensor.
• Maybe batteries inremote are weak or dead. Try replacing batteries.
• Maybe batteries areinstalledincorrectly. Tryreplacing batteries correctly.
• Remove batteries and hold down one or more buttons for several seconds. Install the
batteries and try remote.
• Sleep TLmerfunction may be activated.
• If TV turned on because of alarm, it will automatically turnoff afterone hour.
• Electronic protection circuit may have been activated because of apower surge. Wait
30 seconds and then turnon again.
• Make sure power cordis fully inserted into back of'IV.
Turnson unexpectedly •Alarm function may be set.
Blank screen • Try another channel.
No sound, picture okay • Maybe sound is muted. Try pressing VOL up button to restore sound.
• If headphones areconnected,sound from TV speakers will be muted.
Can't select certain channel
No picture, no sound
Sound okay, picture poor
• Channel may not be in channel memory. Try using number buuons.
• If nsing VCR, check to make sure TV/VCR switch on VCR is in con'ect position.
• To select cable-TV channels over 99 (up to 125), press and hold number button 1 until
1- appears on the screen. Then press the other two numbers.
"-ifwatching VCR connected through anteuna input, make sure TV is tunedto channel 3
or 4-same as CH3/CH4 switch onVCR. Also check to make sureTVNCR switch on
VCR is in correctposition.
• Check antenna connections.
•Tryadjusting SHARPNESS function to improve weak signals.
Picture okay, sound poor -Try another channel.
Impropercolor in one ormore areas -Try unplugging set for aminimum of 15 minutes and then turningit on again. For best
of the picture results you should place the set in the position you will be watching it before you plug
it back in.
23
Page 26

Limited Warranty
What your warranty covers:
• Any defect in material or workmanship.
For how long after your purchase:
• 90 days for labor charges.
• One year for parts.
• Two years for picture tube.
(The warranty period for rental units begins with the first rental or 45 days from
the date of shipment to the rental firm, whichever comes first.)
What we will do:
• Pay any Authorized RCA Television Servicenter the labor charges to repair
your television.
• Pay any Authorized RCA Television Servicenter for the new or, at our option,
refurbished replacement parts and picture tube required to repair your television.
How you get service:
• For screen sizes 20" and smaller: Take your RCA television to any Authorized
RCA Television Servicenter, and pick up when repairs are complete.
• For screen sizes larger than 20": Request home service from any Authorized
RCA Television Servicenter.
• To identify your nearest Authorized RCA Television Servicenter, ask your
dealer, look in the Yellow Pages, or call 1-800-336-1900.
• Show the service technician your evidence of purchase date or first rental,
What your warranty does not cover:
• Acts of God, such as but not limited to lightning damage.
• Customer instruction. (Your Owner's Manual clearly describes how to install,
adjust, and operate your television. Any additional information should be
obtained from your dealer.)
• Installation and related adjustments.
• Signal reception problems not caused by your television.
• Damage from misuse or neglect.
• Batteries.
• Customer replacable fuses.
• Images burnt onto the screen.
• A television that has been modified or incorporated into other products or is
used for institutional or other commercial purposes.
• A television purchased or serviced outside the U.S.A.
Product Registration:
• Please complete and mail the Product Registration Card packed with your set.
It wil] make it easier to contact you should it ever be necessary. The return of
the card is not required for warranty coverage.
How state law relates to this warranty:
• This warranty gives you specific legal rights, and you also may have other
rights that vary from state to state.
What if you purchased your television outside the U.S.A.:
• This warranty does not apply. See your dealer for details.
24
Page 27

25
Page 28

If your TV needs service, please contact your dealer or the nearest servicenter. Please do
not send any products to the Indianapofis address listed below or on the box. This only
adds delays for service of your TV. For service information refer to the warranty page.
_ I_W_ON COW6tM_ mE¢_OWgS
10330 N. Meridian Street
Indianapolis, IN 46290
_1996 Thomson Consumer Electronics, Inc.
Trademark(s) eRegistered
Printed in the U.S.A.
TOCOM # 2056893B
 Loading...