

Page 1
user manual
manual de usario
DTA800B1
www.1800customersupport.com/RCA
It is important to read this instruction book prior to using your new product for the rst time.
Es importante leer este manual antes de usar por vez primera su equipo.
Page 2
FCC information
RCA
RCA
DTA800B1
DTA800
Equipment tested for
compliance as a
complete unit
This device complies with part 15 of the FCC Rules.
Operation is subject to the following two conditions:
(1) This device may not cause harmful interference,
and (2) this device must accept any interference
received, including interference that may cause
undesired operation.
This equipment has been tested and found to
comply with the limits for a Class B digital device,
pursuant to part 15 of the FCC Rules. These limits are
designed to provide reasonable protection against
harmful interference in a residential installation. This
equipment generates, uses and can radiate radio
frequency energy and, if not installed and used in
accordance with the instructions, may cause harmful
interference to radio communications.
However, there is no guarantee that interference will
not occur in a particular installation. If this
equipment does cause harmful interference to radio
or television reception, which can be determined by
turning the equipment o and on, the user is
encouraged to try to correct the interference by one
or more of the following measures:
• Reorient or relocate the receiving antenna.
• Increase the separation between the equipment
and receiver.
• Connect the equipment into an outlet on a circuit
dierent from that to which the receiver is
connected.
• Consult the dealer or an experienced radio/TV
technician for help.
WARNING: Changes or
expressly approved by the party responsible for
compliance could void the user's authority to operate
the equipment.
modications to this
unit
not
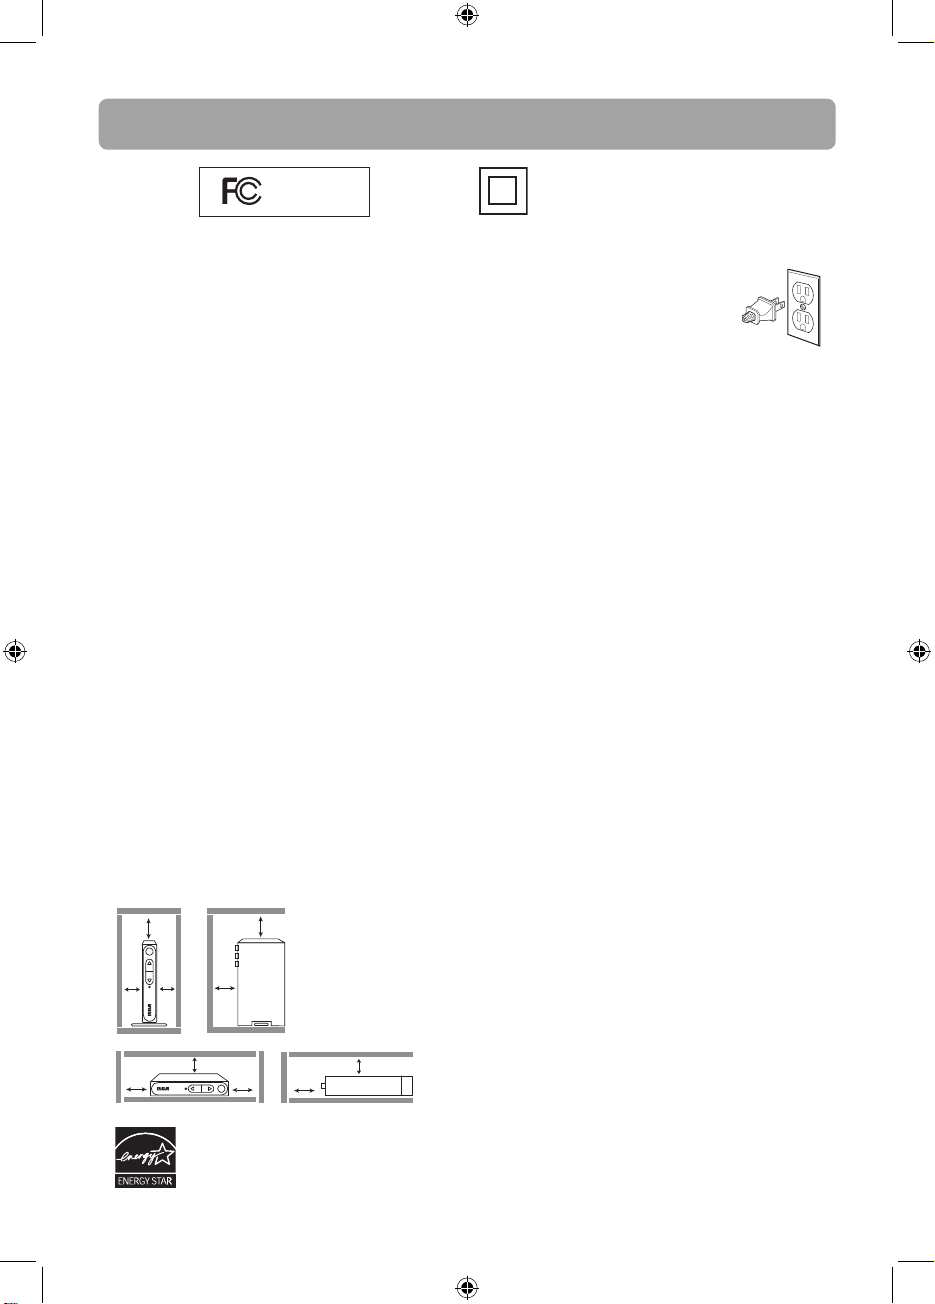
Ventilation
Y ou must a dequ ate ly ventila te the pr odu ct. Mak e
sur e the re is ade quat e space ar oun d the u nit to
provid e prop er air f low f or ve ntila tio n. See di agra m.
10 cm
7 cm
10 cm
10 cm
This conve rter box has ea rned the
EN ERG Y STAR.
7 cm
10 cm
10 cm
7 cm
7 cm
10 cm
This symbol indicates that this product
incorporates double insulation between
the hazardous mains voltage and user
accessible parts.
For your safety
The AC power plug is polarized (one
blade is wider than the other) and
only ts into AC power outlets one
way. If the plug won’t go into the
outlet completely, turn the plug over
and try to insert it the other way. If it still won’t
t, contact a quali ed electrician to change the
outlet, or use a dierent one. Do not attempt to
bypass this safety feature.
Removing the power plug is the only way to
completely remove power from your product.
Make sure the power plug remains easily
accessible.
For your records
Keep your sales receipt for proof of purchase to
obtain warranty parts and service.
In the event that service should be required, you
may need both the model number and the serial
number. In the space below, record the date and
place of purchase, and the serial number:
Date of Purchase :
Place of Purchase :
Serial No. :
Important battery
precautions
Any battery may present a risk of re, explosion,
or chemical burn if abused. Do not try to charge
a battery that is not intended to be recharged, do
not incinerate, and
• Non-rechargeable batteries, such as alkaline
batteries, may leak if left in your product for a
long period of time. Remove the batteries from
the product if you are not going to use it for a
month or more.
• If your product uses more than one battery, do
not mix types and make sure they are inserted
correctly. Mixing types or inserting incorrectly
may cause them to leak.
• Discard any leaky or deformed battery
immediately. They may cause skin burns or
other personal injury.
• Do not expose batteries to excessive heat (for
example, by leaving them in sunlight or close
to re).
• Please help to protect the environment by
recycling or disposing of batteries according to
federal, state, and local regulations.
do not puncture.
2
DTA800B1_IB_EN_E_V3
Page 3
Important safety instructions
Please read and save for
future reference
Som e o f the f oll owi ng inf orm atio n may no t appl y t o your
par ticu lar pr oduct ; how ever, a s w ith an y elect roni c pr odu ct,
pre caut ions sho uld be ob served d urin g hand ling a nd use.
Re ad the se instr uctio ns.
K eep the se instr uctio ns.
He ed all w arn ings.
Foll ow al l instr uctio ns.
Do no t use thi s a ppar atu s n ear w ate r.
Cle an onl y w ith d ry cloth .
Do no t block any ven tila tion o peni ngs. In stall i n a ccord ance
wi th the m anuf act urer ´s instr uctio ns.
Do no t insta ll nea r any he at sou rces such as ra diat ors, h eat
reg ister s, stove s, or oth er ap para tus (in cludi ng amp lifi e rs)
tha t pro duce he at.
Do no t def eat t he saf ety pur pose of the po lari zed or
gro und ing-t ype plu g. A po lari zed pl ug has tw o bla des wit h
one w ide r than t he ot her. A gr oun ding ty pe plug h as two
bla des and a t hird g rou ndin g p ron g. The w ide bl ade or t he
thi rd pro ng ar e p rovi ded fo r your sa fet y. If the p rovid ed
plu g does no t fi t int o your o utle t, consu lt an el ectri cian f or
rep lacem ent o f the ob solet e outl et.
Pro tect th e pow er cord f rom b eing w alk ed on or p inche d
par ticu larl y a t plug s, conve nien ce r ecept acle s, and th e poin t
wh ere th ey exit f rom t he app ara tus.
On ly use att achm ents/acce ssorie s spe cifi e d b y the
ma nuf actur er.
Use only wit h t he ca rt, stand, tr ipod, bra cket, or tab le specied
by the manu factur er, o r so ld w ith the
appa ratus. W hen a cart is used, use caution
whe n m oving the cart/app aratu s combi nation
to avoid inj ury from tip -over.
Un plug th is appa rat us duri ng ligh tnin g
stor ms or wh en unu sed fo r long p erio ds o f
tim e.
Re fer a ll servi cing to qu alif i ed serv ice perso nnel . Servi cing
is req uire d whe n t he ap para tus ha s be en da mage d in any
wa y, such as pow er-su pply cor d o r plug i s d amag ed, li quid
ha s be en spill ed or ob jects ha ve fal len in to the a ppar atu s,
the a ppa ratu s h as been e xpose d t o rai n or moi sture , does
not o per ate no rma lly, or ha s b een dr opped .
Portable Cart Warning
Al way s le ave suf fi cie nt space a rou nd the pr odu ct for
ven tila tion . Do not p lace pr oduct i n or on a be d, rug , in a
boo kcase o r cabin et tha t may pr even t air f l o w thr ough v ent
ope ning s.
Do no t place l ight ed cand les, cig aret tes, cig ars, e tc. on th e
pro duct.
Con nect po wer co rd onl y t o AC po wer so urce as ma rke d on
the p rodu ct.
Car e should b e t ake n so that o bjects do no t fal l i nto th e p rodu ct.
Do no t att empt t o disasse mble th e cabin et. Th is prod uct
doe s n ot cont ain cu stome r service able co mpon ents.
W here t he ma in plug o r an ap plian ce coupl er is used a s th e
disco nnect d evice, the di sconne ct device sh all re main r eadi ly
ope rab le.
EN
If your product operates on
batteries
Ad here t o the f ollo win g preca utio ns:
A. Any ba tte ry may le ak el ectro lyte if mixe d w ith a d iff eren t
bat ter y t ype, i f inser ted in corre ctly, or i f all ba tter ies ar e not
rep laced a t the sa me time .
B. An y batt ery ma y l eak e lectr olyt e or expl ode if d ispose d o f in
fi r e or an a ttem pt is made t o char ge a bat ter y n ot int ende d
to be r echa rged .
C. Disca rd lea ky bat teri es imme diat ely. Lea kin g batt erie s ca n
cau se sk in bu rns or ot her pe rsona l inju ry. Wh en disca rdin g
bat ter ies, be sur e to disp ose of t hem in th e prop er ma nner,
acco rdin g t o your st ate /pr ovinci al and l ocal re gula tion s.
D. Battery shall not be exposed to excessive heat such as sunshine, re
or the like.
]
Additional safety information
Ap para tus sha ll not be e xpose d to dri pping o r splash ing an d
no ob jects fi l led wi th liq uids, su ch a s v ases, sha ll be pla ced
on th e appa rat us.
Contents
Box contents ................................... 4
Setting up ......................................... 4
Program the supplied remote
control ............................................... 6
General controls ............................ 7
Menu settings ................................. 8
WARNING :
TO PREVENT FIRE OR ELECTRICAL
SHOCK HAZARD, DO NOT EXPOSE THIS PRODUCT
TO RAIN OR MOISTURE.
Display 16:9 contents .................. 11
Watching non-digital over-the-air
TV broadcasts ................................. 12
Closed captioning on the
Converter Box ..................................12
More information ......................... 13
DTA800B1_IB_EN_E_V3
3
Page 4
Box contents
The following items are included:
RCA Digital TV Converter Box
Quick Start
Guide
User Manual
(this booklet)
RF coaxial cable
+ -
+ -
2 AAA Batteries
Remote control
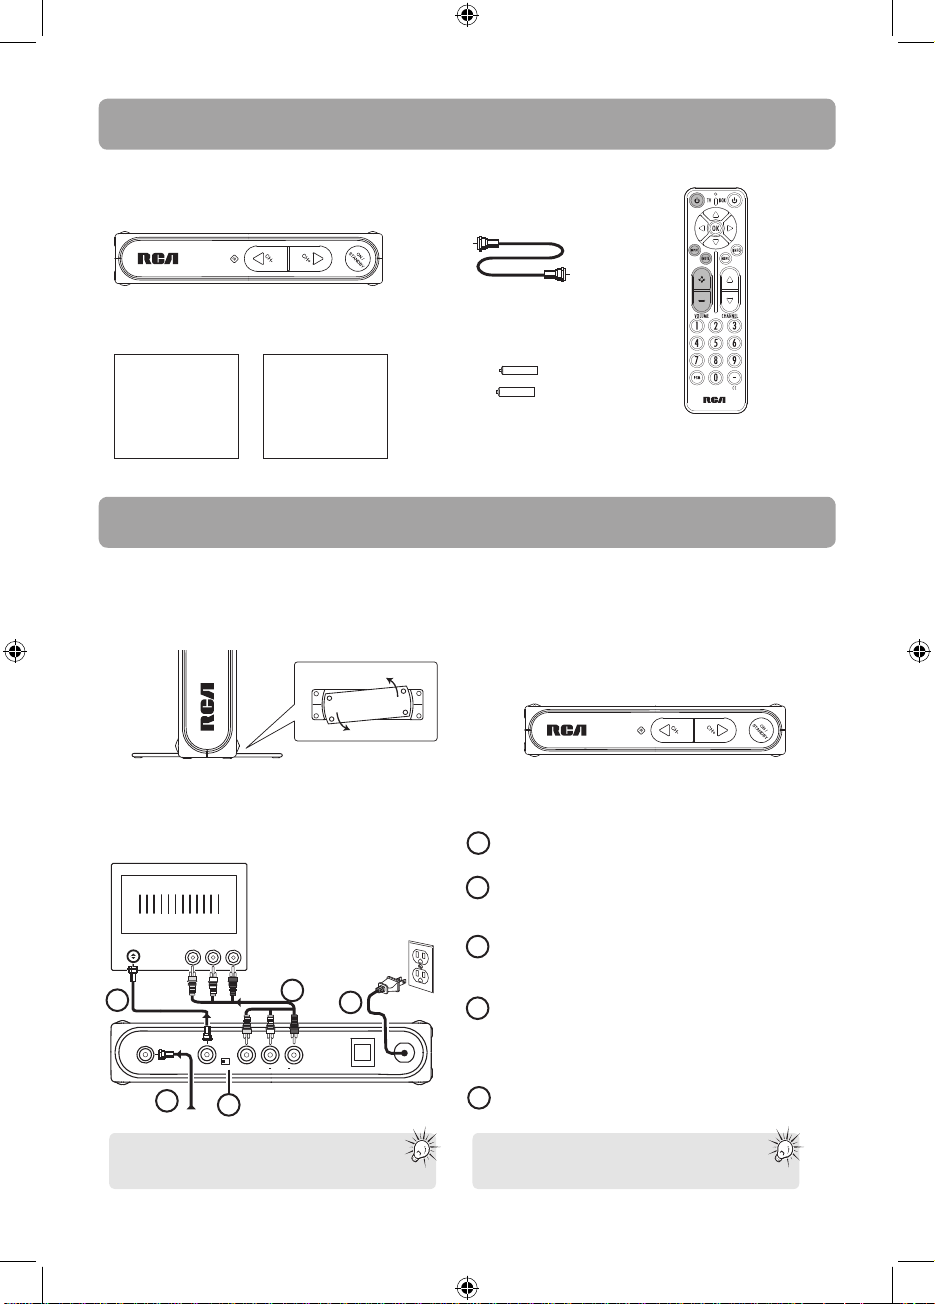
Setting up
Step 1: Installation
The Converter Box can be installed either horizontally or vertically. The left side of the
Converter Box can be rotated as a stand for vertical installation.
Bottom view
Vertical installation (recommended)
Step 2: Connections
Option 1: Basic connection to TV
TV
ANTENNA
2
ANTENNA IN
From antenna
Tip: Using the optional Audio/Video cable
connection provides better picture quality
in case your TV set has Audio/Video input available.
AUDIO IN
L R
VIDEO IN
4
(Optional)
OUTPUT
CH3
CH4
AUDIO
VIDEO
TO TV
1
L
3
5
R
SMART ANTENNA IN
AC~120V
AC120V
60Hz
Horizontal installation
Connect your existing antenna cable to the ANTENNA IN jack
1
of the Converter Box.
2
Connect the RF coaxial cable (supplied) from the OUTPUT TO
TV jack of the Converter Box to the ANTENNA jack of the TV
set.
3
Slide the CH3/CH4 selector on the back of the Converter Box to
the channel that is not in use in your area. The Converter Box
will send its video signal to either Channel 3 or 4 on your TV.
4
Connect the Audio/Video cables (not supplied) from the Audio
/Video OUT jacks (yellow, white, red) of the Converter Box to
the Audio/Video IN jacks on the TV set. If there are more than
two sets of Audio/Video jacks on the TV set, connect only either
INPUT1 or INPUT2 to those of your converter box.
5
Connect the AC power cable of the Converter Box to a
suitable wall outlet.
Note: You may choose to connect the RF coaxial
cable to TV, or Audio/Video cables to TV,
or both the RF coaxial cable and AV cables to TV.
4
DTA800B1_IB_EN_E_V3
Page 5
Setting up (continue)
O p t i o n 2 : I f y ou also need to connect your VCR
TV
ANTENNA
ANTENNA OUT
ANTENNA IN
Note:
The SMART ANTENNA IN jack lets you connect
a Smart Antenna. Refer to the antenna’s user manual
for proper connection.
Smart Antenna provides improved reception. For more
information, please consult your TV dealer.
ANTENNA IN
2
1
3
4
CH4
CH3
5
OUTPUT
CH3
CH4
TO TV
From antenna
VCR
VIDEO
AUDIO
L
R
Back of the RCA converter box
SMART ANTENNA IN
6
AC120V
AC~120V
Connect your existing antenna cable to the ANTENNA IN jack
1
of the Converter Box.
Connect the RF coaxial cable* (supplied) from the OUTPUT TO TV
2
jack of the Converter Box to the ANTENNA IN jack of the VCR.
Connect the RF coaxial cable* (not supplied) from the
3
ANTENNA OUT jack of the VCR to the ANTENNA IN jack of the
TV set.
Slide the CH3/CH4 selector on the back of the VCR to the
4
channel that is not in use in your area. The VCR will send its
video signal to either Channel 3 or 4 on your TV.
Slide the CH3/CH4 selector on the back of the Converter Box to
5
the channel that is not being used by the VCR; e.g., if you set the
VCR selector to CH3, slide the Converter Box selector to CH4.
Connect the AC power cable of the Converter Box to a
6
suitable wall outlet.
* You can also use Audio/Video cables (similar to option 1) if
the connection jacks are available on the VCR and TV.
EN
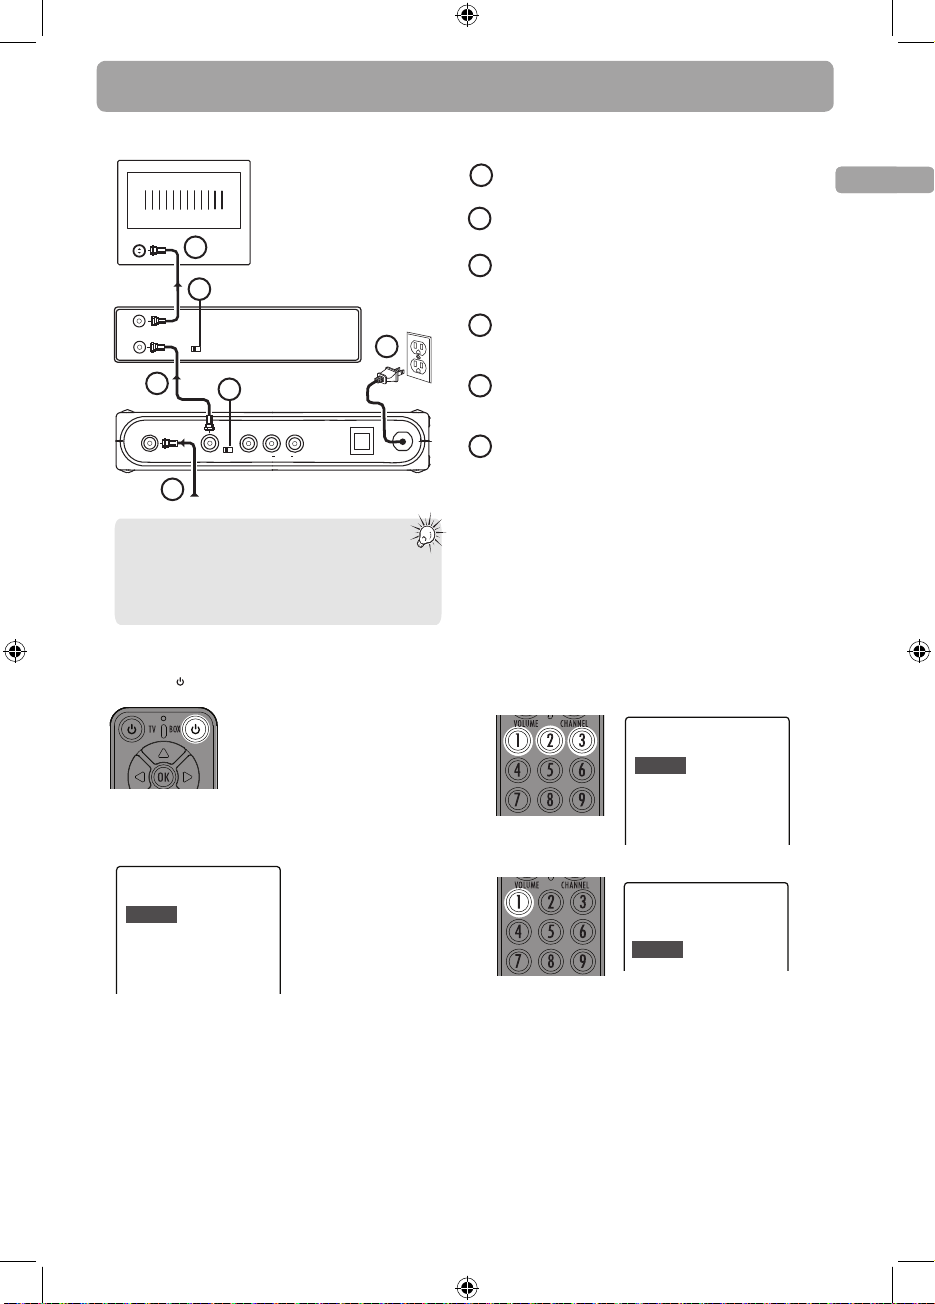
Step 3: Initial setup of the Converter Box
1. Press BOX on the remote control to turn on the
Converter Box. The green indicator on front panel will turn ON.
• Make sure your TV is on the correct channel (either 3 or 4)
or INPUT or VIDEO mode.
Refer to your TV manual for further instructions.
• The following screen can be seen on your TV when the
correct channel is chosen.
Language
Choose the language to be used in the menu system.
English - 1
Menu text is displayed in English.
Español - 2
El texto del menú se exhibe en
español.
Français - 3
Le texte des menus est affiché en
français.
• If you cannot see the above screen on your TV set, check if :
a) the converter box has been turned on,
b) your TV is on the correct channel (either 3 or 4) or INPUT
or VIDEO mode. Refer to your TV manual for further instructions.
c) you have correctly connected the TV set with the
Converter Box.
• If you still do not see the above screen, follow the following
steps to reset the Converter Box to factory reset status:
- From the “No Signal” screen, press MENU key ;
- Press “5”, “6”, “2” then you should see the above screen
and please continue the setup.
2. Press 1 (for English),
3. Press 1 to start automatic channel search.
• When the scan nishes, the Channel List menu displays the
• Reposition the antenna and perform the automatic
channel scan again if you cannot nd all available
channels by pressing MENU key.
• The Converter Box is also compatible with Smart Antennas
which can provide improved reception over standard indoor
• If a Smart Antenna is connected, press 1 for Quick Scan or
select the menu language.
2 (for Spanish) or 3 (for French) to
Language
Choose the language to be used in the menu system.
English - 1
Menu text is displayed in English.
Español - 2
El texto del menú se exhibe en
español.
Français - 3
Le texte des menus est affiché en
français.
Channel Scan
Channel scan will search for channels available in your
area. You may have to re-adjust the antenna and
retry the scan to capture all available channels.
Start channel search.
Begin - 1
found channels.
antennas.
2 for Full Scan. A full scan with Smart Antenna may take
around 40-50 minutes.
5
DTA800B1_IB_EN_E_V3
Page 6
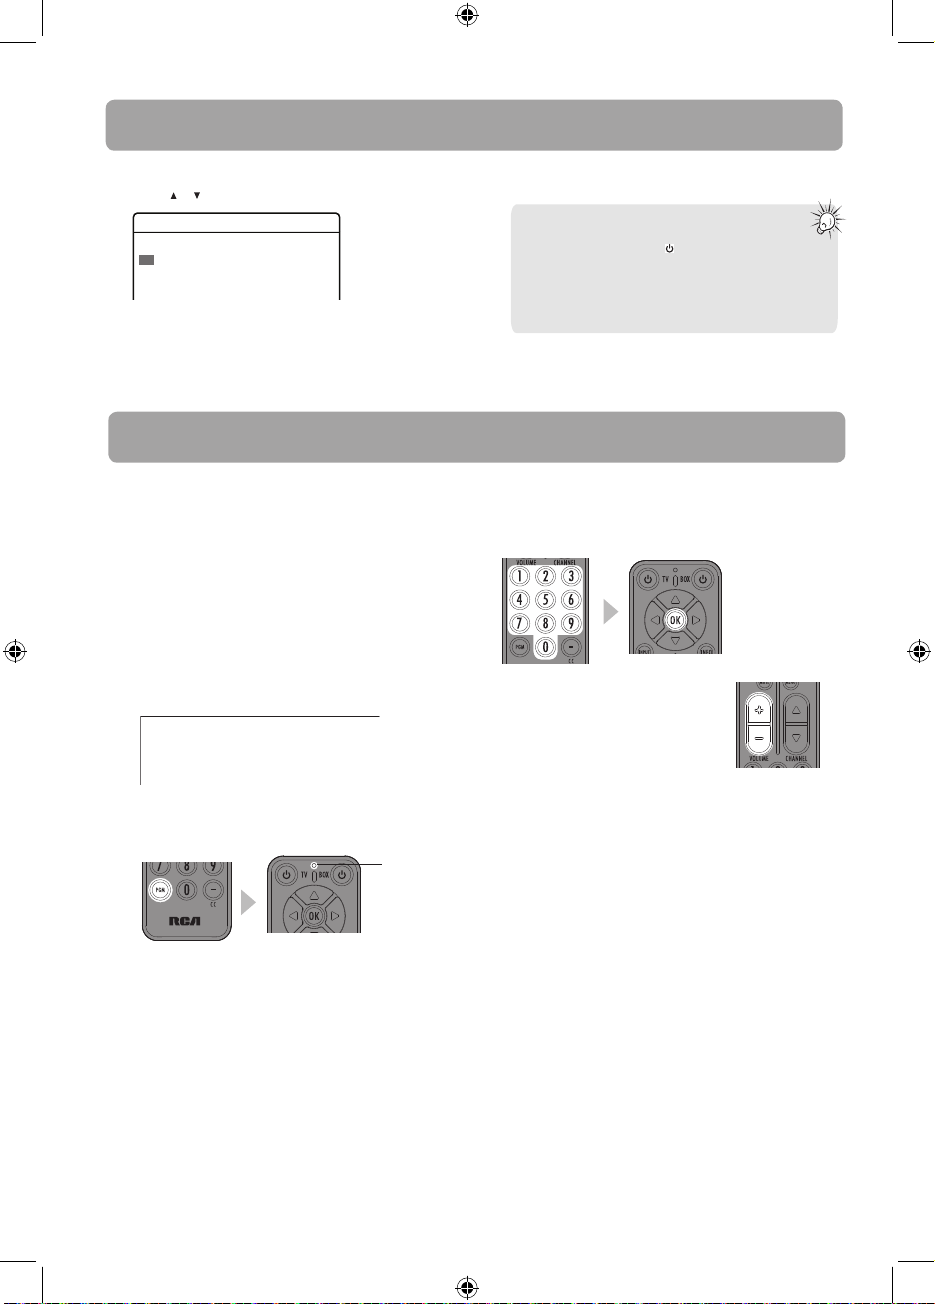
Setting up (continue)
4. The Channel List is displayed once scanning is nished.
or to select channel and
Press
Channel List
Channel What's on Now What's on Next
2-1 KTVU Stored Current program Next program
2-2 KTVU Stored Current program Next program
4-1 KRON Stored Current program Next program
OK to start viewing.
• You may also hide unwanted channels,
refer to “Channel List” on page 8 for
details.
Program the supplied remote control
You can control TV sets of all major brands
after programming the Converter Box
remote control with the PGM key. RCA
TV sets can be controlled directly without
programming. Refer to the steps below and
the separate Program Code leaet to guide
you through the programming.
1. Refer to the Program Code at the last page
of this booklet. Look for the brand of your
TV set and a 3-digit program code next to
it. There may be more than one program
code available. Choose any one of them.
Program codes/Códigos de programa
Admiral 002, 128, 183, 189
Advent 191, 258, 260, 275
Adventura 129
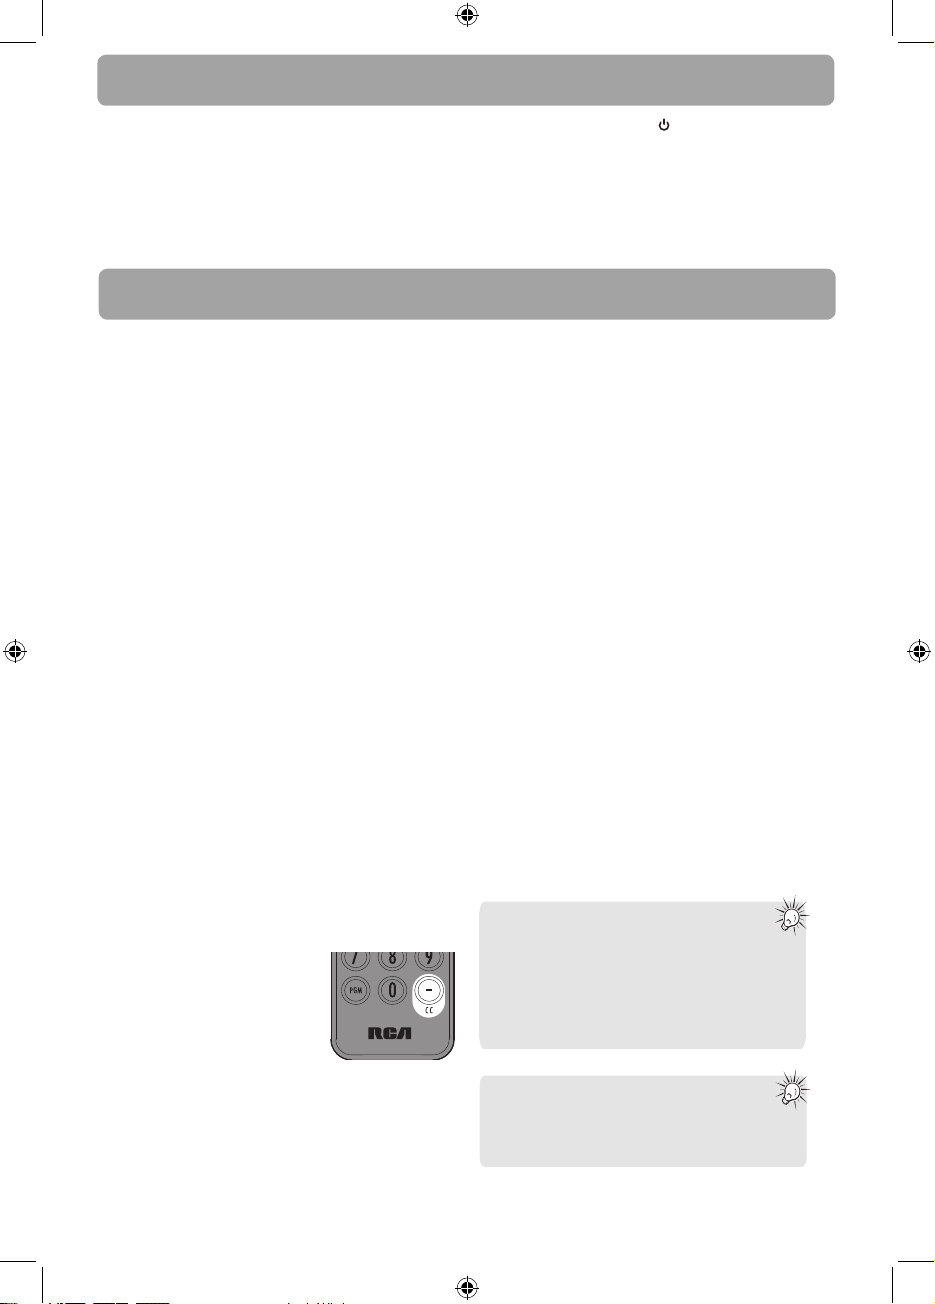
2. Press PGM on the remote control. The
signal indicator on it remains lit.
signal
indicator
3. Enter the 3-digit program code with the
4. Press the volume keys on this
• If you fail to control your TV set,
• If the signal indicator remains lit after
• You can still use your TV remote control
Your Converter Box is now ready for use!
Tip:
To continue to view non-digital TV broadcasts,
if available, press the BOX on your remote to place the
__________
Converter Box in stand-by mode (amber light), then switch
your TV to channel 3 or 4 (depending on which channel the
Converter ‘s CH3/CH4 selector switch is set to).
You must have the RF coaxial cable connected to your
TV input, in order to watch non-digital TV broadcasts.
number keys. Press
The signal indicator will be o when the
program is done.
remote control to check if
they can adjust the volume
of your TV set.
repeat steps 2 to 4 to program again. Try
another program code if there is more
than one for your TV brand.
blinking four times, you may have
entered the wrong code. Repeat steps 3
to 4 to program again. Make sure you
have correctly entered the code.
to turn on your TV set, select input
source and control the volume.
OK
for conrmation.
6
DTA800B1_IB_EN_E_V3
Page 7
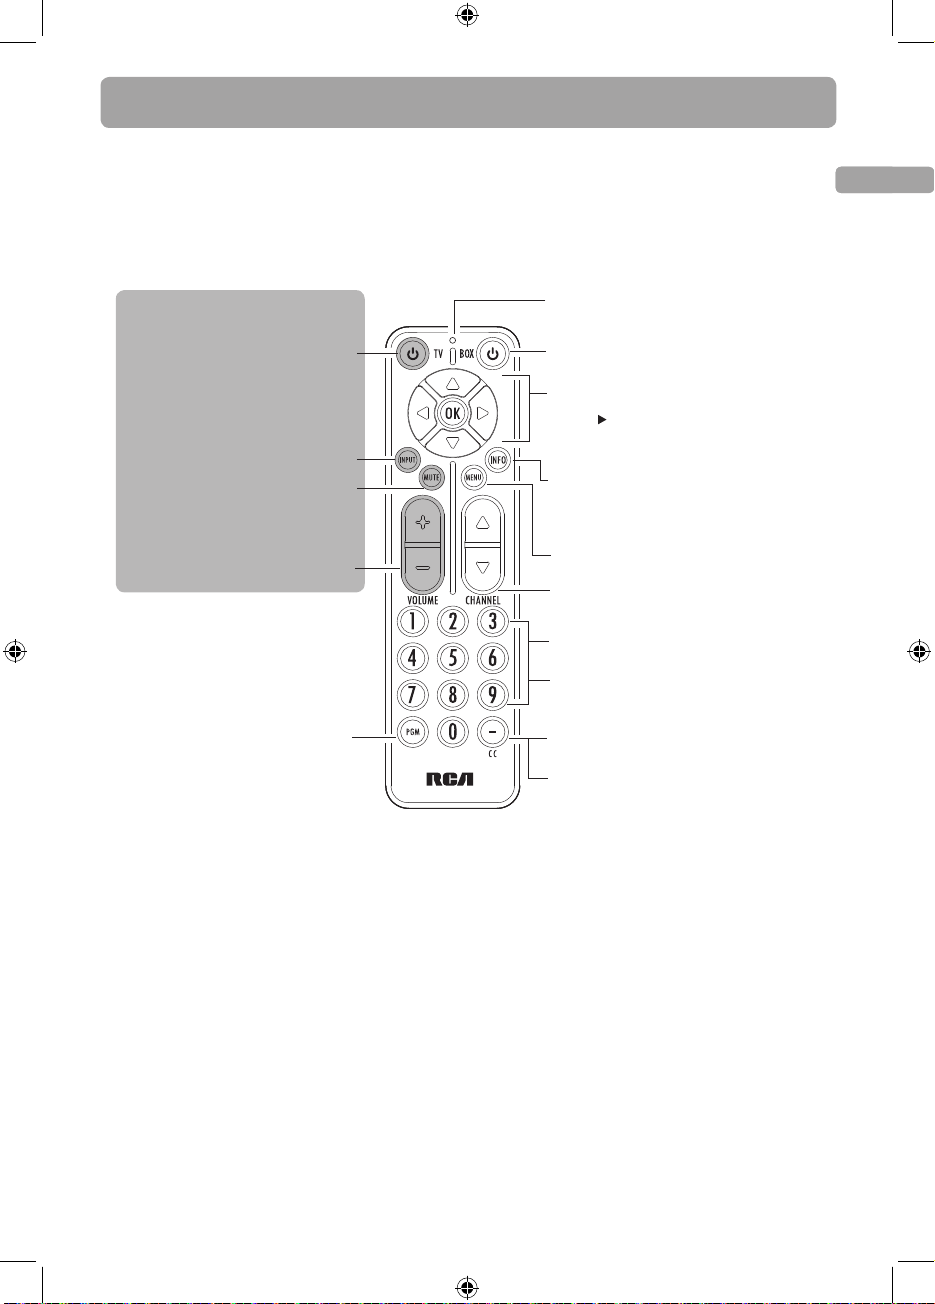
General controls
• The keys on the Converter Box remote control are divided into two parts. The keys
shown in white in the diagram below control the Converter Box, while the grey keys
control your TV set.
• You can control TV sets of all major brands after programming this remote control with
the PGM key. RCA TV sets can be controlled directly without programming. Refer to
“Program the supplied remote control” section for details.
EN
TV controls ONLY
Turns the TV on or o
Selects CH3, CH4 or
AV INPUT channels on the TV
Mutes or restores sound
output from the TV (if the TV
supports this function)
Adjusts the TV volume
Programs the remote control so
that it can control your TV set.
Refer to “Program the supplied
remote control” for details
Insert 2 “AAA” batteries
prior to use.
Signal indicator
Turns the converter box on or o
Navigates through the converter
box menus (e.g., to move right,
press
)
Press OK to conrm menu selections
Shows or hides channel information
(it is possible to receive some programs from
dierent time zones, the time information
might be wrong in this case)
Shows or hides the main menu
Selects the previous or next channel
Selects channels by inputting the
channel number
Shortcut keys to access functions
in the main menu
Displays closed captioning from
the converter box
Inputs a dash (e.g., 12-1) while
selecting an ATSC channel with the
number keys (0-9)
7
DTA800B1_IB_EN_E_V3
Page 8
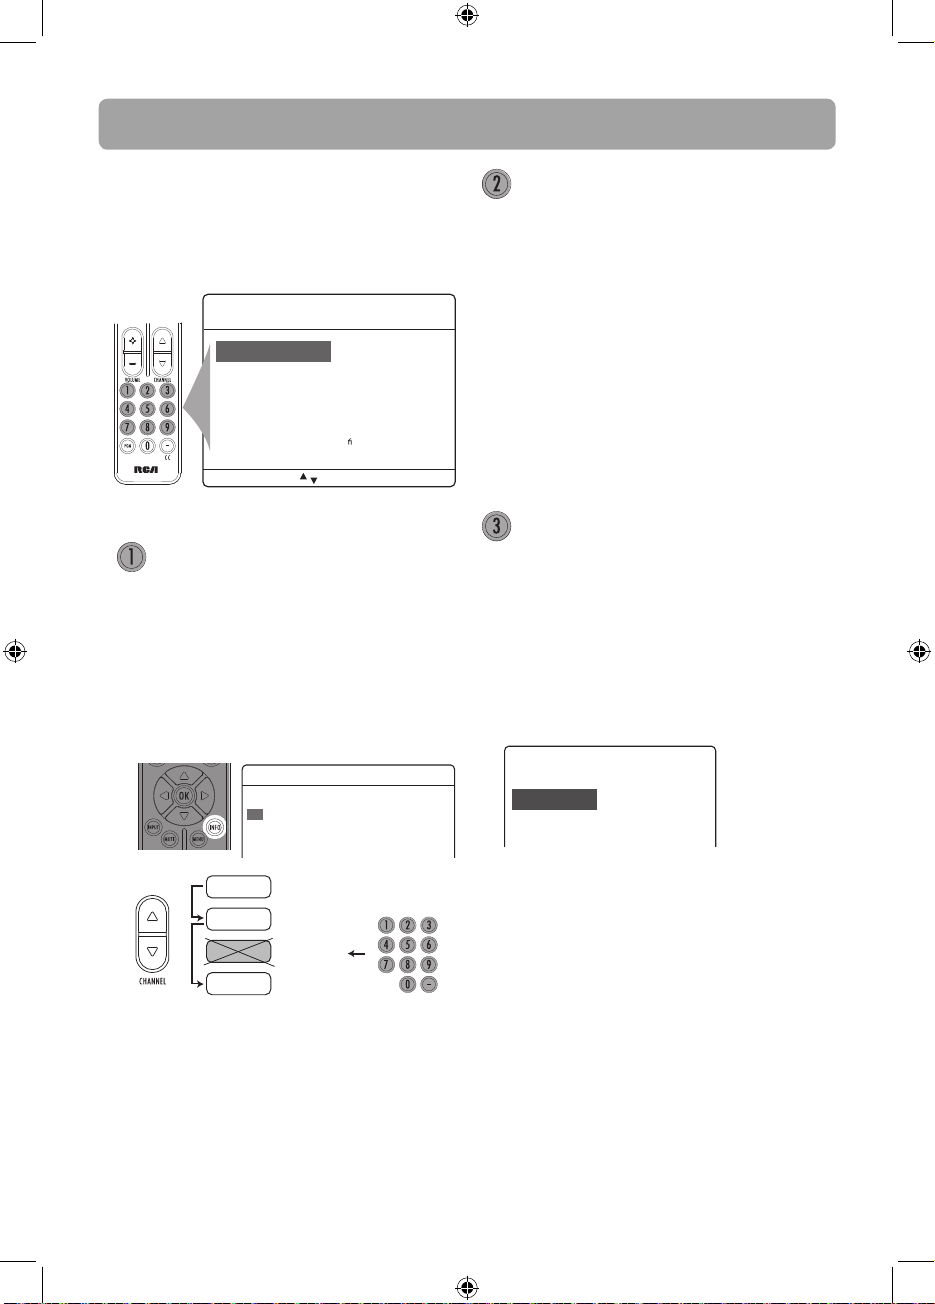
Menu settings
The main menu lets you access more
features of the converter box. Press MENU
to show or hide the menu. When the menu
is displayed, press the number keys on the
remote control to access the corresponding
menu item directly.
Main Menu
Ratings - 3
See what's on and what's next.
Adjust audio and video settings.
Set V-Chip rating limits.
Captions Fonts and Colors.
guration.
Con
Channel List - 1
AV Settings - 2
Closed Captioning - 4
Settings - 5
[Menu] Exit, [ ] Move, [OK] Choose
Shortcut keys
Shortcut key
Channel List
• Lists the available TV channels and the
programs playing on each channel.
• To change channels, select a channel
number and press OK .
• To skip past a channel when pressing the
CHANNEL button, select “Stored” next
to the channel name and then press OK .
The status changes to “Skipped”.
Channel List
Channel What's on Now What's on Next
2-1 KTVU Stored Current program Next program
2-2 KTVU Stored Current program Next program
4-1 KRON Stored Current program Next program
Select
“Stored”
channels
12-1
12-2
12-3
12-4
Stored
Stored
Skipped
Stored
Select any channels
including “Skipped” ones
Shortcut key
AV Settings
• Change the video display and sound
output formats.
• Press 1 for Picture or 2 for Audio
Controls.
– Picture : Press 1 for Widescreen or 2
for Fullscreen .
– Audio Controls : Press 1 for Stereo, or
2 for Alternate Audio (for bilingual
programs). When Alternate Audio
is selected, press OK on the remote
control to switch between main and
alternate languages while watching
TV.
Shortcut key
Ratings
• This feature enables you to restrict access
to certain TV programs whose content
may be deemed unsuitable for your
children. Viewing is restricted unless
the password (initial default password:
0000) that you have chosen is entered.
Password is also required before entering
the rating menu.
• Three sub-menus are available:
Ratings
Lock/Unlock - 1
Rating Limits - 2
Change PIN - 3
Turn ON/OFF rating enforcement
Set rating limits
Change password number
• Press 1 for Lock/Unlock: to activate or de-
activate the rating feature.
– Lock/Unlock : Press 1 to select OFF (to
de-activate the rating feature, even
if you have dened certain settings
in the Rating Limits menu) or press
2 to select ON (to activate the rating
feature) or press 3 to select ON/
Enable (to activate the rating feature
and enable downloadable ratings).
8
DTA800B1_IB_EN_E_V3
Page 9
Menu settings
• Press 2 for Rating Limits
Rating Limits
Movies - 2
TV shows and made for TV Movies
Motion picture movies
Downloaded rating systems
TV Shows - 1
Custom - 3
– Rating Limits: Press 1 for TV Shows ,
press 2 for Movies , press 3 for Custom
(only available when ON/Enable is
selected in Lock/Unlock menu)
• TV Shows: To change the TV
parental ratings by pressing OK
against desired rating level. A
padlock icon tells you whether or
not a rating level is locked.
TV-Y
TV-Y7
TV-G
TV-PG
TV-14
TV-MA
DDL
S
L
S
L
S
FV
V
V
V
– In the above example, all TV
programs rated above TV-PG
require the password for viewing.
• Movies: To change the movie
parental ratings by pressing
OK
against desired rating level. A
padlock icon tells you whether or
not a rating level is locked.
G - 1
PG - 2
PG-13 - 3
R - 4
NC-17 - 5
– In the above example, all movies
rated PG or above require the
password for viewing.
• Custom: To update the current TV
show and Movies ratings when new
releases are available.
– Press the corresponding number key
to select the program restrictions.
They include: Entire Audience (1),
Dialogue (2), Language (3), Sex (4),
Violence (5), Children (6), Fantasy
violence (7), MPAA (8).
• Press 3 for Change PIN
• To change the password for ratings.
EN
• The initial default password is “0000”,
you must change it and create your own
password to activate the rating settings.
After the rating settings are done, do
not forget to activate them by selecting
ON in the Lock/Unlock menu.
Parental Controls, popularly known as the “V-Chip,”
depend on information sent by broadcasters about
c programs. Two ratings systems are available for
speci
you to use to screen inappropriate content for your
family.
TV shows can be rated by broadcasters based on the
following Age and Content-based Guidelines:
• TV-Y (All Children – This program is designed to be
appropriate for all children.)
• TV-Y7 (Directed to Older Children – This program
is designed for children age 7 and above.) The
program may contain fantasy violence (FV).
• TV-G (General Audience – Most parents would
this program suitable for all ages.)
• TV-PG (Parental Guidance Suggested – This
program contains material that parents may
unsuitable for younger children.) The program may
contain one or more of the following: moderate
violence (V), some sexual situations (S), infrequent
coarse language (L), or some suggestive dialogue
(D).
• TV-14 (Parents Strongly Cautioned – This program
contains some material that many parents would
nd unsuitable for children under 14 years of age.)
Parents are strongly urged to exercise greater care
in monitoring this program and are cautioned
against letting children under the age of 14 watch
unattended. This program contains one or more
of the following: intense violence (V), intense
sexual situations (S), strong coarse language (L), or
intensely suggestive dialogue (D).
• TV-MA (Mature Audience Only – This program is
designed to be viewed by adults and therefore
may be unsuitable for children under 17.) This
program contains one or more of the following:
graphic violence (V), explicit sexual activity (S), or
crude indecent language (L).
9
DTA800B1_IB_EN_E_V3
Page 10
Menu settings
Some programmers use the Movie Ratings (MPAA)
System to rate TV shows on the same scale as
motion pictures:
• A G -rated motion picture contains nothing in
theme, language, nudity, sex, violence or other
matters that would oend parents whose
younger children view the motion picture.
• A PG -rated motion picture should be investigated
by parents before they let younger children
attend.
• A PG-13 rating is a sterner warning to parents to
determine whether their children under age 13
should view the motion picture, as some material
might not be suited for them.
• An R -rated motion picture contains some adult
material.
• An NC-17 rated motion picture is one that
most parents would consider too adult for their
children.
For more information about TV ratings, visit:
www.PauseParentPlay.org
Shortcut key
Closed Captioning
• Lets you change the closed caption
appearance (size, font, text color, text
opacity, background color, background,
edge eect and edge color).
• Press 1 (Font Options) to change font
size, color and eects, 2 (Back Options)
to change background size, color and
eects or 3 (Default) to reset to default
settings.
• Only digital closed captions can be changed.
• For more information, see “Advantages of
closed captioning on the Converter Box”.
Shortcut key
Settings
• Five sub-meus are available:
Settings
Channel Scan - 1
Language - 2
Power Saver - 3
Antenna - 4
Time
System Reset - 6
• Press 1 for Channel Scan
– To start automatic channel scan.
– To scan more channels (Scan Add) after
adjusting your antenna
– Enable the “Scan Add” option if you only
want to scan more channels with keeping
existing channel list.
• Press 2 for Language
– To select the menu language.
• Press 3 for Power Saver
– An energy saving feature to turn o
the converter box automatically after 4
(default), 8 or 12 hours according to your
selection. Select OFF to de-activate this
feature.
– The timer is only active when the
converter box remains idle (i.e. no
key activation). Once any “Box” key is
pressed, the timer will be reset.
– If you have set up timer recordings for
TV programs, make sure the converter
box will not turn o automatically
before the recordings
• Press 4 for Antenna
– To show the signal strength for receiving
broadcast from a TV station. If signal is
weak, you may need to reposition the
antenna.
• Press 5 for Time Zone
– To select your local time zone
– To enable or disable Daylight Saving Time.
• Press 6 for System Reset
– To restore all settings to factory defaults.
Search for valid channels.
Select language used in menu.
Turns off power automatically.
Signal strength meter.
Setting of local time.
Z
one - 5
Return system to factory settings.
nish.
10
DTA800B1_IB_EN_E_V3
Page 11

Display 16:9 contents
EN
11
DTA800B1_IB_EN_E_V3
Page 12
Watching non-digital over-the-air TV broadcast
To continue to view non-digital TV broadcasts, if available, press the BOX on your remote to
place the Converter Box in stand-by mode (amber light), then you can tune your TV to any
available non-digital channels (refer to your TV controls).
You must have the RF coaxial cable connected to your TV input, in order to watch non-digital
TV broadcasts. Note that most non-digital TV broadcasts will cease to be available after
Feb 17th 2009.”
Closed captioning on the Converter Box
Closed captions allow people who are
deaf or hard of hearing to enjoy TV
programming. Captions are also a helpful
tool for those learning English or watching
TV in a noisy environment.
The Converter Box provides two ways for
you to view captions. You should choose
one method or the other.
Method 1
First, you can continue receiving standard
TV captions (basic white text on a black
background) through your analog TV
set. The Converter Box will automatically
send the closed-captioning information
to your television for the TV to decode
and display. All you need to do is turn ON
the closed captioning function on your
TV as you always have (if your TV has this
capability, as newer TV sets do.)
Method 2
Alternatively, the Converter Box can be
used to decode captions and display them
on your TV screen. If you use this method,
you will be able to enjoy the enhancements
made possible by digital technology.
To use the converter box to display closed
captions:
1. Turn OFF your television’s closed-caption
decoder.
2. Turn on the Converter
Box’s captioning
decoder by pressing the
CC button at the lower
right-hand side of the
remote control.
• When you use the converter box to
display closed captions in this way, you
can choose di
captions, depending on what information
broadcasters are sending.
erent types (languages) of
Advantages of closed
captioning on the Converter
Box
Using the Converter Box to decode captions
gives you more choices and more exibility
when viewing captions on digital TV
shows. If you choose this method, you can
personalize your captions by making the
following choices:
• Choose text size for standard, large, and
small-sized captions
• Select dierent types of fonts
• Choose between eight background colors
and foreground colors for the captioning
text (white, black, red, green, blue,
yellow, magenta, and cyan)
• Make the caption background
transparent, translucent, solid, or ashing
• Set edges of font characters with raised
edges, depressed edges, uniform edges,
left shadow or right shadow
Each of these enhancements to standard
digital captions can be accessed from the
main menu of the Converter Box by pressing
the MENU button. Please refer to the next
section “Menu settings” for details.
To use Closed Captioning, please rst try
turning ON Closed Captioning feature on your
TV (this setting can normally be found in TV’s
setup menu). If not satised with the results, try
turning OFF Closed Captioning feature on your
TV, and turning ON Closed Captioning feature
on your Converter Box.
Tip:
DO NOT enable closed captions on both TV
and the converter box. Otherwise, both
captions will be overlapped.
12
DTA800B1_IB_EN_E_V3
Page 13

More information
Troubleshooting tips
Unit does not work.
• Unplug the AC power cord and plug it
back in.
No picture on the TV screen.
• Make sure the converter box is turned on.
• Make sure the connections between the
converter box and TV are properly done.
• Choose dierent channels or video inputs
on the TV set until the picture appears.
No sound.
• Make sure the connections between the
converter box and TV are properly done.
• Make sure the TV sound is not muted.
Remote control does not work.
• Make sure the batteries are inserted
correctly.
• Replace the batteries if they are
exhausted.
• Remove any obstacles between the
remote control and the converter box.
• If the remote control works with the
converter box but does not work with
your TV, reprogram the remote control,
following the steps in “Program the
remote control”.
Weak signal or channel not available.
• Try to reposition the antenna. If the
signal is still weak, a more powerful
antenna may be required to boost
reception for the Digital TV signal. A
Smart Antenna is recommended.
The TV is newly changed to an RCA
TV set and the remote control cannot
control it.
• Reprogram the remote control, following
the steps in “Program the remote
control”.
Smart Antenna is newly connected and
channel scan is required.
• In the menu, press 5 for Settings and
then press 1 for Channel Scan.
TV cannot receive analog channels
• Turn o the converter box (pass through
mode) and conrm cables are connecting
correctly.
Customer service and
technical support
www.1800customersupport.com/RCA
EN
Cannot watch a bilingual TV program in
its secondary language.
• Make sure you have correctly selected
the audio settings. Refer to AV settings
in the main menu.
Forgot password.
• Choose “ Ratings ” in the main menu
and input the master password “3308”.
Create a new password. (The master
password cannot be used to unlock
programs for viewing.)
Converter Box has turned o
The
suddenly.
• Check if Auto Power Down Timer is
activated in the main menu. It is set to
4 hours by default.
Technical specications
Power supply: AC 120V/60Hz
Power consumption: <1W (standby)
<7W (operating, HD mode)
Remote reception distance: >8m from front
RF freq. range: 57MHz – 830MHz
RF channel range: CH2 – CH69
RF sensitivity: -83dBm to -5dBm
RF impedance 75 ohms
Output channel: CH3/CH4, selectable
Video system: NTSC
Video output: 1V peak-to-peak
Video output impedance: 75 ohms
Audio output impedance: 600 ohms
Unit size (L x W x H): 190 x 140 x 38mm
Net weight: 0.4kg
Dolby and the double-D symbol are trademarks of Dolby
Laboratories. Manufactured under License from Dolby
Laboratories.
DTA800B1_IB_EN_E_V3
13
Page 14

Limited w arranty
AVC MULTIMEDIA (“AVC”) makes the following limited warranty. This limited warranty extend to the original consumer
purchaser and is limited to non-commercial use of the product.
One Year Parts & Labor Warranty
AVC products purchased in the United States are warranted to be free from defects in materials or workmanship for a
period of one year from the date of their original retail purchase. If the unit fails to conform to this warranty, we will
service the product using new or refurbished parts and products, at AVC’s sole discretion.
During a period of one year from the eective warranty date, AVC will provide, when needed, service labor to repair a
manufacturing defect at its designated Service Center. To obtain warranty service in the Untied States, you must rst call
our Customer Support Center at 1-866-444-5746 or 1-800-252-6123, during the hours listed in the box below .
The determination of service will be made by AVC Customer Support. PLEASE DO NOT RETURN YOUR UNIT TO AVC
WITHOUT PRIOR AUTHORIZATION. New or remanufactured replacements for defective parts or products will be used for
repairs by AVC at its designated Service Center for one year from the eective warranty date. Such replacement parts or
products are warranted for an additional one year from the date of repair or replacement. The Customer will be required
to ship the
unit to the Service Center indicated at the time Customer Support is contacted to make the necessary repairs.
The customer is responsible for all transportation charges to the service facility.
Packaging and Shipping Instruction
When you send the product to the AVC service facility you must use the original carton box and packing material or an
equivalent as designated by AVC.
LIMITED WARRANTY
Your Responsibility
1) You must retain the original sale receipt to provide proof of purchase.
2) These warranties are eective only if the product is purchased and operated in the U.S.A. or Canada.
3) Warranties extend only to defects in material or workmanship, and do not extend to any product or parts which have
been lost or discarded, or damage to product or parts caused by misuse, accident, improper operation or maintenance,
or use in violation of instructions provided with the product, or to product which has been altered or modied without
authorization of AVC , or to products or parts thereof which have had the serial number removed or changed.
Out of Warranty
In the event your product requires repair after the limited warranty period has expired, please contact our Customer
Support Center at 1-866-444-5746, 1-800-252-6123 or
Hours: Monday–Thursday: 9am–7pm, Friday: 9am–5pm, Saturday: 9am–NOON Eastern time.
Important:
You are responsible
Returns Center.
All warranties implied by state law, including the implied warranties of merchantability and tness for a particular
purpose, are expressly limited to the duration of the limited warranties set forth above. With the exception of any
warranties implied by state law as hereby limited, the foregoing warranty is exclusive and in lieu of all other warranties,
guarantees, agreements and similar obligations of manufacturer or seller with respect to the repair or replacement of any
parts. In no event shall AVC be liable for consequential or incidental damages.
No person, agent, distributor, dealer or company is authorized to change, modify or extend the terms of these warranties
in any manner whatsoever. The time within action must be commenced to enforce any obligation of AVC arising under
the warranty or under any statute, or law of the United States or any state thereof, is hereby limited to one year from
the date of purchase. This limitation does not apply to implied warranties arising under state law.
This warranty gives you specic legal rights and you may also have other rights, which may vary, from state to state. Some
states do not allow limitation on how long an implied warranty lasts, when an action may be brought, or the exclusion or
limitation of incidental or consequential damages, so the above provisions may not apply to you.
For more information on other products and services, please visit our web site at
for any transportation, shipping or insurance relative to the return of product to our Product
www.1800customersupport.com/RCA
Important:
Also keep your "Bill of Sale" as proof of purchase.
Model no. ................................................................................ Product name ............................................................................................................................
Type of set ..............................................................................................................................................................................................................................................
Serial no. .................................................................................. Invoice no. ...................................................................................................................................
Date purchased .................................................................... Dealer name ................................................................................................................................
FOR SERVICE AND REPAIR, PLEASE VISIT
Specications and external appearance are subject to change without notice.
www.1800customersupport.com/RCA
www.1800customersupport.com/RCA
14
DTA800B1_IB_EN_E_V3
Page 15

Page 16

Información FCC
RCA
RCA
DTA800B1
DTA800
Equipo probado para
cumplimiento como una
unidad completa
Este aparato cumple con la Parte 15 de las Normas
FCC. El funcionamiento de la unidad está sujeto a las
dos condiciones siguientes: (1) Este aparato no puede
provocar interferencias perjudiciales y (2) este aparato
debe aceptar toda interferencia que reciba incluso
aquellas que provoquen un funcionamiento incorrecto.
Este aparato ha sido puesto a prueba y se ha vericado
que cumple con las restricciones de los equipos
digitales clase B, en conformidad con el Capítulo 15 del
Reglamento de la FCC. Dichas restricciones están
diseñadas para proporcionar la debida protección
contra
interferencia dañina en las instalaciones
residenciales. Este equipo genera, usa y puede irradiar
energía de frecuencias radiales y, de no instalarse y
usarse según las instrucciones, puede causar
interferencia dañina para las comunicaciones de radio.
No obstante, no hay garantía de que en una
instalación especíca no se produzca interferencia. Si
este equipo causara interferencia en la recepción de la
radio o la televisión (lo quer se puede determinar
encendiendo y apagando el equipo), le sugerimos al
usuario que intente corregir dicha interferenci
adoptando una o más de las siguientes medidas:
• Reoriente o ubique en otro lugar la antena de
recepción.
• Aumente la distancia que separa al equipo del
receptor.
• Conecte el equipo a un enchufe de pared que se
encuentre en un circuito diferente a donde tenga
conectado el receptor.
• Pida ayuda al vendedor o a un técnico de radios y
televisores con experiencia.
ADVERTENCIA : los cambios o modicaciones que se
hagan a esta unidad, que no estén expresamente
aprobados por la parte responsable de hacer cumplir las
reglas de funcionamiento de este aparato, pueden
anular la autoridad del usuario para operar este equipo.
Ventilación
De berá pr opor cion ar ve nti lació n ad ecua da a est e
pro ducto. A segúr ese que haya un espa cio a decua do
alr ededo r de la Gra badora de discos DV D de modo d e
bri ndar e l f l ujo de air e necesar io para la ve ntila ción.
Ve a el diagram a.
10 cm
10 cm
7 cm
10 cm
7 cm
10 cm
10 cm
7 cm
10 cm
a,
7 cm
Este símbolo indica que este producto
incorpora un aislamiento doble entre los
peligrosos voltajes principales y las piezas
accesibles al usuario.
Para su seguridad
La clavija de corriente CA está polarizada
(una cuchilla es más ancha que la otra) y
sólo se adapta a tomas de corriente CA
de una manera. Si la clavija no encaja
dentro de la toma de corriente por
completo, voltee la clavija y trate de
insertarla de la otra forma. Si aun no encaja, contacte
a un electricista cali cado para cambiar la toma de
corriente, o use una diferente. No intente pasar por
alto esta característica de seguridad.
La única forma de quitar por completo la corriente de
su producto es retirar el cable de corriente. Asegúrese
de que el cable de corriente permanezca fácilmente
accesible.
Para su registro
En el caso de requerir servicio, usted puede necesitar
tanto el número de modelo como el número de serie.
En el espacio a continuación, registre la fecha y lugar
de compra, y el número de serie:
Fecha de Compra:
Lugar de Compra:
No de Serie:
Precauciones importantes
para la batería
• Cualquier batería puede presentar un riesgo de
fuego, explosión o quemadura química si es mal
tratada. No trate de cargar una batería que no
esté diseñada para ser recargada, no incinere y no
perfore.
• Baterías
• Si su producto usa más de una batería, no
• Deseche inmediatamente cualquier batería
• No exponga las baterías a calor excesivo (por
• Por favor ayude a proteger el ambiente reciclando
no recargables, tales como las baterías
alcalinas, pueden tener fugas si son dejadas en su
producto por un largo periodo de tiempo. Retire
las baterías del producto si usted no lo va a usar
por un mes o más.
mezcle tipos y asegúrese de que estén insertadas
correctamente. Mezclar tipos de baterías o
insertarlas incorrectamente puede causar que
tengan fugas.
con fugas o deformada. Ellas pueden causar
quemaduras de la piel u otra lesión personal.
ejemplo, dejándolas a la luz del sol o cerca del
fuego).
o eliminando las baterías de conformidad con las
regulaciones federales, estatales y locales.
Este convert idor cu enta co n la norma
EN ERG Y STAR.
2
Page 17

IMPORTANTE INSTRUCCIONES DE SEGURIDAD
FAV OR DE GU ARDA R ESTO PARA UN A
RE FERENCIA FUTURA
Alguna de la siguiente información quizá no se aplique a su
producto en particular. Sin embargo, como con cualquier producto
electrónico, se deben tomar precauciones durante su manejo y uso.
• Lea estas instrucciones.
• Conserve estas instrucciones.
• Tome en cuenta todas las advertencias.
• Siga todas las instrucciones.
• No use este aparato cerca del agua.
• Limpie solamente con un paño seco.
• No bloquee ninguna de las aperturas de ventilación. Instale
de acuerdo con las instrucciones del fabricante.
• No instale cerca de fuentes de calor tales como radiadores,
registros de calor, estufas, u otros aparatos (incluyendo
ampli cadores) que produzcan calor.
• No elimine el propósito de seguridad de la clavija polarizada
o del tipo a tierra. Una clavija polarizada tiene dos cuchillas,
una más ancha que la otra. Una clavija del tipo a tierra
tiene dos cuchillas y una tercera punta para conexión a
tierra. La cuchilla ancha o la tercera punta son suministradas
para su seguridad. Si la clavija suministrada no se adapta
dentro de su toma de corriente, consulte a un electricista
para que reemplace la toma de corriente obsoleta.
• Proteja el cable de corriente de pisotones o machucones
particularmente en las clavijas, receptáculos de conveniencia,
y en punto donde salen
solamente accesorios/aditamentos especi cados por el
• Use
fabricante.
• Use solamente con el carro, soporte, trípode,
consola, o mesa especi cados por el fabricante,
o vendidos con el aparato. Cuando se utiliza
un carro, tenga precaución al mover la
combinación de carro/aparato para evitar
lesión ocasionada por volcadura.
• Desconecte este aparato durante tormentas eléctricas o
cuando no sea utilizado por largos períodos de tiempo.
Re era todo el servicio a personal de servicio cali cado. El
•
servicio es requerido cuando el aparato ha sido dañado de
alguna forma, tal como daño a la clavija o al cable de
corriente, cuando se ha derramado líquido o han caído
objetos dentro del aparato, el aparato ha sido expuesto a
via o humedad, no funciona normalmente, o ha sido tirado.
llu
INFORMACION ADICIONAL DE SEGURIDAD
•
El aparato no debe quedar expuesto a goteos o salpicaduras de
líquidos, y, por lo tanto, no se deben colocar sobre el aparato
objetos que contengan líquidos, como por ejemplo vasos.
• Siempre deje su ciente espacio para ventilación alreadedor
del producto. No ponga el producto en la cama, alfombra,
•
librero o gabinete que pueda obstruir la corriente de aire a
del aparato.
]
Portable Cart Warning
través de apeturas de ventilación.
• No pongan velas, cigarillos o cigarros encendidos encima de
producto.
• Conecte sólo en receptáculos de corriente alterna como esta
indicado en el producto.
• Tome precauciones para evitar que caigan objetos dentro
del producto.
• Carros y Estantes–El artefacto deberá ser usado sólo con
carros y estantes que hayan sido recomendados por el
fabricante.
• Cada vez que el enchufe principal o el conectador del
aparato se usen como dispositivo de desconexión, dicho
dispositivo de desconexión
funcionamiento.
SI SU PRODUCTO FUNCIONA CON PILAS,
haga caso a las precauciones siguientes:
A. Electrólito puede gotear de cualquier pila si está si está
mezclada con una pila de un tipo diferente, si ha sido
insertada incorrectamente, o si no se reemplazan todas las
pilas al mismo tiempo.
B. Cualquier pila puede explotar o gotear electrólito si se echa
en un fuego o si trata de cargar una pila no recargable.
C. Deseche inmediatemente pilas con fuga. Estas pueden causar
quemaduras a la piel otra herida personal. Cuando deseche
las baterías asegúrese de deshacerse de ellas en una manera
apropiada, de acuerdo con las regulaciones locales o del
estado.
D. La baterías no debe exponerse al calor excesivo como es
el caso de la luz del sol, fuego o similares
debe estar siempre listo para su
ADV ERTENCIA:
PARA PREV ENIR FUEGO O SHOCK ELÉCTR ICO, NO
EX PON GA EL PR ODU CTO A LLU VIA O H UM EDA D.
E
Contenido
Contenido de la caja ........... 4
Con guración ........................... 4
Programe el control remoto
suministrado
Controles generales .............. 7
Con guraciones de Menú .... 8
............................... 6
Visualización de
contenidos 16:9
................... 11
Cómo visualizar una transmisión
televisiva aérea no digital
..... 12
Subtítulos en el
Convertidor ............................ 12
Más información .................. 13
3
Page 18

Contenido de la caja
Se incluyen los siguientes elementos:
Convertidor para TV Digital RCA
Guía de Inicio
Rápido
Manual del
Usuario (este
folleto)
Cable coaxial RF
Control remoto y 2
baterías “AAA”
Conguración
Paso 1: Instalación
El Convertidor puede ser instalado en forma horizontal o vertical. El lado izquierdo del
Convertidor puede ser rotado como un soporte para instalación vertical.
Vista inferior
l (Recomendado)acitrev nóicalatsnI
Paso 2: Conexiones
Opción 1: Conexión básica al televisor
TV
ANTENA
2
ANTENNA IN
de la antena
Consejo: Usar el cable opcional para conexión de
Audio/Video suministra una mejor calidad de imagen
en caso de que su televisor tenga una entrada de Audio/
Video disponible.
4
AUDIO IN
L R
VIDEO IN
4
(Opcional)
OUTPUT
CH3
CH4
AUDIO
VIDEO
TO TV
1
L
3
5
R
SMART ANTENNA IN
AC~120V
CA120V
60 Hz
Conecte su cable de antena al receptáculo de entrada
1
(ANTENNA IN) del Convertidor.
Conecte el cable coaxial RF (suministrado) del receptáculo de
2
salida a TV (OUTPUT TO TV) del Convertidor al receptáculo de
entrada de ANTENA del receptor de TV.
Deslice el selector CH3/CH4 en la parte posterior del
3
Convertidor al canal que no esté en uso en su área. El
Convertidor enviará su señal de video ya sea al canal 3 o al 4
en su TV.
Conecte los cables de Audio/Video (no suministrados) desde
4
Audio/Video OUT (amarillo, blanco, rojo) del Convertidor
hasta Audio/Video IN del televisor.
5
Conecte el cable de corriente CA del Convertidor a una toma
de pared adecuada.
Nota: Usted puede elegir conectar el cable coaxial RF
al televisor, o los cables de Audio/Video al
televisor, o ambos cables coaxiales RF y AV al televisor.
latnoziroh nóicalatsnI
+ -
+ -
Page 19

Conguración
Opción 2: Si usted también debe conectar su VCR
Conecte su cable de antena al receptáculo
1
TV
ANTENNA
ANTENNA OUT
ANTENNA IN
2
ANTENNA IN
1
3
4
CH4
CH3
5
OUTPUT
CH3
VIDEO
CH4
TO TV
de la antena
CA 120V
VCR
60 Hz
6
AUDIO
L
R
SMART ANTENNA IN
AC~120V
Nota: El receptáculo SMART ANTENNA IN
le permite conectar una Antena Inteligente
(Smart Antenna).
Reérase al manual de usuario para la
conexión adecuada.
Una Antena Inteligente (Smart Antenna)
suministra una mejor recepción
Para más información, por favor consulte
el distribuidor de su televisor.
de entrada (ANTENNA IN) del Convertidor
Conecte el cable coaxial* RF (suministrado)
2
del receptáculo de salida a TV (OUTPUT
TO TV) del Convertidor al receptáculo de
entrada de ANTENA de la VCR.
Conecte el cable coaxial* RF (no
3
suministrado) del receptáculo de salida
de antena (ANTENNA OUT) de la VCR al
receptáculo de entrada de ANTENA del
receptor de TV.
Deslice el selector CH3/CH4 en la parte
4
posterior de la VCR al canal que no esté en
uso en su área. La VCR enviará su señal de
video ya sea al canal 3 ó al 4 en su TV.
Deslice el selector CH3/CH4 en la parte
5
posterior del Convertidor al canal que no
esté siendo usado por la VCR; por ejemplo,
si usted coloca el selector VCR en la posición
CH3, deslice el selector del Convertidor a la
posición CH4.
Conecte el cable de corriente CA del
6
Convertidor a una toma de pared adecuada.
* Usted puede usar cables de Audio/Video
(similar a la opción 1) si hay disponibles
receptáculos de conexión en la VCR y TV.
E
Paso 3: Conguración inicial del Convertidor
1. Presione BOX
control remoto
en el
para
encender el Convertidor.
Se encenderá el indicador
verde del panel frontal.
• Asegúrese de que su televisor esté en el canal
correcto (sea 3
ó 4) o en INPUT o modo VIDEO.
Reérase al manual de su televisión para
instrucciones adicionales.
• La siguiente
pantalla puede
ser vista en su
TV cuando el
canal correcto
es seleccionado.
Language
Choose the language to be used in the menu system.
English - 1
Menu text is displayed in English.
Español - 2
El texto del menú se exhibe en
español.
Français - 3
Le texte des menus est affiché en
français.
• Si no puede ver la pantalla anterior en su
televisor, verifque si:
a) El convertidor está encendido,
b) Su televisor está en el canal correcto (sea
el 3
ó 4) o en INPUT o modo VIDEO,
Reérase al manual de su televisor para
más instrucciones.
c) Ha conectado el televisor correctamente
al convertidor.
• Si aún no ve la pantalla anterior, siga los pasos
presentados a continuaci
ón para reiniciar el
Convertidor a su estado predeterminado:
a) Desde la pantalla “
b) Oprima “5”,“6”,2” después deberá ver la pantalla
anterior y por favor
2. Presione 1 (para Inglés), 2
(para Español) o 3 (para
Francés) para seleccionar el
idioma de menú.
3. Presione 1 para iniciar la
búsqueda automática de canal.
• Cuando la exploración termina, el menú Lista de
Canales muestra los canales que se encontraron.
• Vuelva a posicionar la antena y realice un escaneo
automática de canales si no puede encontrar todos
los canales disponibles al oprimir la tecla MENU.
• El Convertidor también es compatible con las Antenas
Inteligentes (Smart Antennas), las cuales pueden
suministrar una mejor recepción que las antenas
interiores estándares.
• Si se conecta una Antena Inteligente, presione
Exploración Rápida o 2 para Exploración Completa.
Una Exploración Completa con Antena Inteligente
puede llevarse alrededor de 40-50 minutos.
Ninguna Señal
”, oprima la tecla MENU;
continúe con la configuración.
Exploración del Canal
La exploración del canal buscará para los canales
disponibles en su área. Usted puede tener que reajustar
la antena y revise la exploración para capturar todos los
canales disponible.
Comience la búsqueda del canal.
Comience - 1
1 para
5
Page 20

Conguración
e
4. La Lista de Canales se muestra después de la exploración,
presione
comenzar a verlo.
Canal Presentandose Por Presentarse
2-1 KTVU Guardados Current program Next program
2-2 KTVU Guardados Current program Next program
4-1 KRON Guardados Current program Next program
ó para resaltar un canal y presione OK para
Lista de Canales
¡Su Convertidor está listo para usarse!
Consejo:
Para seguir visualizando transmisiones de televisón no
digitales, si están disponibles, oprima BOX en su control remoto
para colocar el convertidor en modo de espera (luz ámbar),
después sintonice su televisor en cualquier canal no digital
disponible (reérase a los controles de su televisor).
Usted deberá tener un cable coaxial RF conectado a la entrada de
su televisor para poder visualizar transmisiones de televisión no
digitales.
• Usted puede también ocultar canales no
deseados, para detalles reérase a “Lista
de Canales” en la página.
Por favor lea el Manual del Usuario para detalles
adicionales sobre el uso del Convertidor.
Programe el control remoto suministrado
Usted puede controlar receptores de
TV de las principales marcas después de
programar el control remoto del convertidor
con la tecla PGM. Los receptores de TV
RCA se pueden controlar directamente
sin programación. Para guiarse a través
de la programación re érase a los pasos
a continuación y al folleto Código de
Programa.
1. Consulte el
folleto Código
de Programa que
se suministra por
Program codes/Códigos d
Admiral 002, 128, 183, 189
Advent 191, 258, 260, 275
separado. Busque la marca de su receptor
de TV y un código de programa de 3
dígitos junto a ella. Puede haber más de
un código de programa disponible. Elija
alguno de ellos.
2. Presione PGM en el control remoto.
El indicador de señal en el control
permanece iluminado.
indicador de
señal
4. Presione las teclas de
volumen en este control
remoto para checar si puede
ajustar el volumen de su
receptor de TV.
• Si no se puede controlar su receptor
de TV, repita los pasos del 2 al 4 para
realizar la programación otra vez. Intente
con otro código de programa si hay más
de uno para la marca de su TV.
• Si el indicador de señal permanece
iluminado después de parpadear cuatro
veces, usted ha ingresado el código
incorrecto. Repita los pasos 3 a 4 para
realizar la programación otra vez.
Asegúrese de ingresar el código correcto.
• Usted todavía puede usar el control
remoto de su TV para encender su
receptor de TV, seleccionar la fuente de
entrada y controlar el volumen.
• Para mejorar la recepción de señal de TV,
se recomienda una Antena Inteligente
opcional que sea compatible para
conexión con el Convertidor.
3. Ingrese el código de programa de 3
dígitos con las teclas numéricas. Presione
OK para con rmar. El indicador de señal
se apagará cuando la programación se
haya realizado.
6
Page 21

Controles generales
• Las teclas en el control remoto del convertidor están divididas en dos partes. Las teclas
que se muestran en blanco en el diagrama siguiente controlan el convertidor, en tanto
que las teclas grises controlan su receptor de TV.
• Usted puede controlar receptores de TV de las principales marcas después de programar
este control remoto con la tecla PGM. Los receptores de TV RCA pueden ser controlados
directamente sin programación. Para detalles re érase al “Paso 3: Programación del
Control Remoto” en la sección “Con guración”.
E
Controles de TV SOLAMENTE
Enciende o apaga la TV
Selecciona los canales CH3,
CH4 ó AV INPUT en la TV
Silencia o restaura la salida de
sonido de la TV (si la TV
soporta esta función)
Ajusta el volumen de TV
Programa el control remoto
de manera que pueda
controlar su receptor de TV.
Para detalles re érase a
“Paso 3: Programación del
control remoto”
Inserte 2 baterías “AAA” antes de usarlo
Indicador de señal
Enciende o apaga el convertidor
Navega a través de los menús del
convertidor (por ejemplo, para
mover a la derecha, presione
Presione OK para con rmar las
selecciones de menú
Muestra u oculta información del
(es posible recibir algunos programas
canal
desde diferentes husos horarios)
Muestra u oculta el menú principal
Selecciona el canal previo o
siguiente
Selecciona canales ingresando
las teclas de acceso rápido a
funciones en el menú principal
Muestra los subtítulos del
convertidor
Ingresa un guión (por ejemplo,
12-1) mientras selecciona un canal
ATSC con las teclas numéricas (0-9)
)
7
Page 22

Con guraciones de menú
El menú principal le permite acceso a más
características del convertidor. Presione
MENU para mostrar u ocultar el menú.
Cuando el menú se visualice, presione las
teclas numéricas en el control remoto para
accesar directamente el elemento de menú
correspondiente.
Menu principal
Vea cuál está encendido y cuál
es siguiente.
Ajuste de las configuraciones de
audio y video.
Fije los limites del grado de
V-Viruta.
Subtítulos.
Configuraciones.
teclas de acceso
rápido
Tecla de acceso rápido
Lista de Canales - 1
Conguraciones AV - 2
Grados - 3
Subtítulos - 4
Disposición - 5
[Menu] Salida, [ ] Muévase, [OK] Elija
Lista de Canales
• Lista los canales de TV disponibles y los
programas que se están reproduciendo
en cada canal.
• Para cambiar canales, seleccione un
número de canal y presione OK.
• Para saltar después de un canal al
presionar el botón CHANNEL, seleccione
“Guardado” a un lado del nombre del
canal y luego presione OK. El status
cambia a “Saltado”.
Lista de Canales
Canal Presentandose Por Presentarse
2-1 KTVU Guardados Current program Next program
2-2 KTVU Guardados Current program Next program
4-1 KRON Guardados Current program Next program
Guardados
Seleccione canales
“Guardados”
12-1
12-2
12-3
12-4
Stored
Guardados
Stored
Saltados
Skipped
Guardados
Stored
Seleccione algunos canales
que incluyan unos “Saltados”
8
Tecla de acceso rápido
Con guraciones AV
• Cambio de los formatos de salida de
audio y visualización de video.
• Presione 1 para Cuadro ó 2 para
Controles de Audio .
– Cuadro : Presione 1 para Panoramico
(Pantalla Panorámica) ó 2 para
Pantalla Lleno (Pantalla Completa).
– Controles de Audio : Presione 1 para
Estereofonia, ó 2 para Audio Alterno
(para programas bilingües). Cuando
esté seleccionado Audio Alterno ,
presione OK en el control remoto para
alternar entre el idioma principal y el
idioma alterno mientras ve la TV.
Tecla de acceso rápido
Grados
• Esta característica le permite restringir
el acceso a ciertos programas de TV
cuyo contenido puede ser considerado
inadecuado para sus hijos. No se podrá
ver a menos que se ingrese la clave de
acceso (clave de acceso predeterminada
inicial: 0000) que usted haya elegido.
La clave de acceso es también
requerida antes de ingresar al menú de
clasi cación.
• Tres submenús están disponibles:
Grados
Trábese/Abra - 1
El Grado se Limita - 2
Cambie el Perno - 3
Dé vuelta a la aplicación
CON/DESC del grado.
Fije los limites del grado.
Cambie el número de la
contraseña.
• Presione 1 para Trábese/Abra : para
activar o desactivar la característica de
clasi cación.
– Trábese/Abra : Presione 1 para
seleccionar Apagado (para desactivar
la característica de clasi cación, aún si
usted ha de nido ciertas selecciones
en el menú Límites de Clasi cación) o
presione 2 para seleccionar Encendido
(para activar la característica de
clasi cación) o presione 3 para
seleccionar ON/Encendido (para
activar la característica de clasi cación
y habilitar clasi caciones para ser
descargadas).
Page 23

Con guraciones de menú
• Presione 2 para Límites de Clasi cación
El Grado se Limita
Demostraciones de la TV y
TV - 1
hecho para la películas de la TV.
Películas - 2
Personalizar - 3
Películas de la pelíula.
Los grados por edades
descargados.
– El Grado se Limita : Presione 1 para
TV , presione 2 para Películas, presione
3 para Personalizar (sólo disponible
cuando ON/Encendido se selecciona en
el menú Trábese/Abra )
• TV : para cambiar las clasi caciones
paternas de TV presionando OK
contra el nivel de clasi cación
deseado. Un ícono de candado
le indica sí o no un nivel de
clasi cación está bloqueado.
TV-Y
TV-Y7
TV-G
TV-PG
TV-14
TV-MA
DDL
L
L
FV
S
V
S
V
S
V
– En el ejemplo anterior, todos los
programas de TV clasi cados por
arriba de TV-PG requieren la clave
de acceso para poder verse.
• Películas : para cambiar las
clasi caciones paternas de películas
presionando OK contra el nivel de
clasi cación deseado. Un ícono de
candado le indica sí o no un nivel
de clasi cación está bloqueado.
G - 1
PG - 2
PG-13 - 3
R - 4
NC-17 - 5
– En el ejemplo anterior, todas las
películas clasi cadas PG o por arriba
requieren la clave de acceso para
poder verse.
• Personalizar : para actualizar las
clasi caciones de show de TV y las
clasi caciones de Películas actuales
cuando nuevas versiones estén
disponibles.
– Presione la tecla numérica
correspondiente para seleccionar las
restricciones de programa.
Incluyen: Audiencia Total (1),
Diálogo (2), Idioma (3), Sexo (4),
Violencia (5), Niños (6), Fantasía, (7)
Violencia, (8) MPAA.
• Presione 3 para Cambie el Perno
• Para cambiar la clave de acceso para
clasi caciones.
• La clave de acceso predeterminada inicial
es “0000”, usted debe cambiarla y crear
su propia clave de acceso para activar las
selecciones de clasi cación.
Después de establecer las clasi caciones,
no olvide activarlas seleccionando ON
en el menú Bloquear/Desbloquear .
Los Controles Paternos, popularmente conocidos como
el “Chip anti-violencia,” dependen de la información
enviada por las emisoras respecto de programas
especí cos. Los sistemas de clasi cación están
disponibles para que usted ltre contenido inapropiado
para su familia.
Los shows de TV pueden ser clasi cados por las
difusoras en base a los siguientes lineamientos que
consideran Edad y Contenido:
• TV-Y (Para Todos los Niños - este programa está
diseñado para ser apropiado para todos los niños)
• TV-Y7 (Dirigido a Niños de Más Edad – este
programa está diseñado para niños de 7 años de
edad y más. El programa puede contener violencia
de fantasía (FV)).
• TV-G (Audiencia General – la mayoría de los padres
encontraría este programa adecuado para todas las
edades).
• TV-PG (Se Sugiere Guía Paterna - este programa
contiene material que los padres pueden
encontrar inadecuado para jóvenes de menor
edad). El programa puede contener uno o más
de los siguientes: violencia moderada (V), algunas
situaciones sexuales (S), lenguaje vulgar no
frecuente (L), o algún diálogo sugerente (D).
• TV-14 (Fuerte Advertencia a los Padres –
Este programa contiene algún material que
muchos padres encontrarían inadecuado para
niños menores de 14 años de edad). Se pide
vigorosamente a los padres ejercer mayor cuidado
en el monitoreo de este programa y se les advierte
contra el permitir que niños menores de 14 años la
vean sin compañía. Este programa contiene una o
más de las siguientes situaciones: violencia intensa
(V), situaciones sexuales intensas (S), lenguaje
fuertemente vulgar (L), o diálogo intensamente
sugerente (D).
E
9
Page 24

Con guraciones de menú
• TV-MA (Sólo Audiencia Madura – este programa
está diseñado para ser visto por adultos y por lo
tanto puede ser inadecuado para niños menores
de 17 años de edad). Este programa contiene
una o más de las siguientes situaciones: violencia
grá ca (V), actividad sexual explícita (S), o
lenguaje indecente y vulgar (L).
Algunos programadores usan el Sistema de
Clasi caciones de Películas (MPAA) para clasi car
shows de TV en la misma escala que películas de
acción:
• Una película de acción clasi cada como G no
contiene nada en temática, lenguaje, desnudez,
sexo, violencia y otros asuntos que pudieran
ofender a los padres cuyos niños más jóvenes
vean una película de acción.
• Una película de acción clasi cada como PG
debería ser investigada por los padres antes de
permitir que sus hijos más jóvenes la vean.
• Una película de acción clasi cada como PG-13
es una advertencia más severa a los padres para
determinar si sus hijos menores de 13 años de
edad podrían ver una película de acción, ya que
algún material podría no ser apropiado para
ellos.
• Una película de acción clasi cada como R
contiene algo de material para adultos.
• Una película de acción clasi cada como NC-17 es
una que la mayoría de los padres considerarían
como demasiado adulta para sus hijos.
Para más información sobre clasi caciones de TV,
visite: www.PauseParentPlay.org
Tecla de acceso rápido
Subtítulos
• Le permite cambiar la apariencia de los
subtítulos (tamaño, fuente, color de
texto, opacidad de texto, color de fondo,
fondo, efecto de borde, y color de
borde).
• Presione 1 (Opciones de Fuente) para
cambiar el tamaño, color y efectos de
la fuente, 2 (Opciones de Fondo) para
cambiar el tamaño, color y efectos
del fondo ó 3 (Predeterminado)
para restaurar las con guraciones
predeterminadas.
• Solamente se pueden modi car los
subtítulos digitales.
• Para más información, vea “Ventajas al
usar subtítulos en el Convertidor”.
10
Tecla de acceso rápido
Disposición
• Cinco submenús están disponibles:
Disposición
Canales - 1
Lengua - 2
Energía - 3
Antena - 4
Zona Horaria - 5
Reajuste - 6
Búsqueda para los canales
válidos.
Lengua selecta usada en menú.
Dé vuelta automáticamente
apagado al sistema.
Metro de la fuerza de la señal.
Para seleccionar su zona horaria
local.
Sistema de vuelta a los ajustes de la
fábrica.
• Presione 1 para Canal
– Para iniciar la exploración automática de
canal.
– Para escanear más canales (Scan Add)
después de ajustar su antena.
– Active la opción “Scan Add” sólo si desea
escanear más canales manteniendo la
lista de canales existente.
• Presione 2 para Lengua
– Para seleccionar el idioma de menú.
• Presione 3 para Energía
– Una característica de ahorro de
energía para apagar automáticamente
el Convertidor después de 4 (valor
predeterminado), 8 ó 12 horas de
acuerdo a su elección. Seleccione
Apagado para desactivar esta
característica.
– El temporizador está activo solamente
cuando el convertidor permanece sin
actividad (por ejemplo sin activación
de tecla). Una vez que alguna tecla
del convertidor sea presionada, el
temporizador se reiniciará.
– Si usted ha establecido grabaciones con
temporizador para programas de TV,
asegúrese de que el convertidor no se
apagará automáticamente antes de que
las grabaciones terminen.
• Presione 4 para Antena
– Para mostrar la potencia de señal para
recepción de la
transmisión de una
estación de TV. Si la señal es débil, puede
ser que usted necesite colocar la antena
en otra posición.
• Presione 5 para Zona Horaria
– Para seleccionar su zona horaria local
– Para activar o desactivar el Horario de
Verano.
• Presione 6 para Reajuste
– Para reiniciar todas las con guraciones a
los valores predeterminados de fábrica.
Page 25

Visualización de contenidos 16:9
E
11
Page 26

Cómo visualizar una transmisión
televisiva aérea no digital.
Para seguir visualizando transmisiones de televisión no digitales,
oprima
BOX
en su control remoto para colocar el convertidor en modo de espera
si están disponibles,
(luz ámbar), después sintonice su televisor en cualquier canal no digital disponible
(reérase a los controles de su televisor).
Usted deberá tener un cable coaxial RF conectado a la entrada de su televisor
para poder visualizar transmisiones de televisión no digitales.
Subtítulos en el Convertidor
Los subtítulos permiten a las personas con
problemas auditivos o sordera disfrutar
la programación de la TV. Los subtítulos
también son una herramienta de ayuda para
aquellos que aprenden Inglés o ven la TV en
un ambiente ruidoso.
El Convertidor le proporciona dos formas
para ver los subtítulos. Usted deberá elegir
un método o el otro.
Método 1
Primero, usted puede continuar recibiendo
subtítulos de TV estándar (texto blanco
básico sobre fondo negro) a través de su
receptor de TV analógica. El convertidor
enviará automáticamente la información
de subtítulos a su televisión para que la TV
decodi que y visualice. Todo lo que usted
necesita hacer es activar la función de
subtítulos en su TV como siempre lo hace
(si su TV tiene esta capacidad, como los
receptores de TV más nuevos la tienen).
Método 2
Alternativamente, el Convertidor puede
ser usado para decodi car subtítulos y
visualizarlos en la pantalla de su TV. Si usted
usa este método, podrá disfrutar de las
mejoras aportadas por la tecnología digital.
Cómo usar el convertidor para visualizar
subtítulos:
1. Apague el decodi cador de subtítulos de
su televisión.
2. Active el decodi cador
de subtítulos del
convertidor presionando
el botón CC en el lado
inferior derecho del
control remoto.
• Cuando usted use el convertidor para
visualizar subtítulos en esta forma,
puede
elegir diferentes tipos (idiomas)
de subtítulos, dependiendo de qué
información envían las emisoras.
12
Ventajas al usar subtítulos en
el Convertidor
Usar el Convertidor para decodi car
subtítulos le da más opciones y exibilidad
al visualizar subtítulos en shows de TV
digital. Si usted usa este método, puede
personalizar sus subtítulos seleccionando las
siguientes opciones:
• Seleccione el tamaño de texto para
subtítulos de tamaño estándar, grande y
pequeño
• Seleccione diferentes tipos de fuentes
• Seleccione entre ocho colores de fondo
y colores de primer plano para el texto
de subtítulos (blanco, negro, rojo, verde,
azul, amarillo, magenta, y azul ciano)
• Puede hacer el fondo de subtítulos
transparente, traslúcido, sólido, o
parpadeante
• Puede establecer los bordes de los
caracteres de fuentes con los contornos
elevados, deprimidos, uniformes, con
sombra a la derecha o a la izquierda
Cada una de estas mejoras a los subtítulos
digitales estándar se puede accesar
desde el menú principal del Convertidor
presionando el botón MENU. Para detalles
favor de referirse a la siguiente sección
“Con guraciones de menú”.
Consejo:
NO
televisor y en el convertidor a la vez.
De lo contrario, podrían solaparse
ambos subtítulos.
active los subtítulos en el
Page 27

Más información
Tips para solución de
problemas
La unidad no funciona.
• Desconecte el cable de corriente CA y
vuelva a conectarlo.
No hay imagen en la pantalla de la TV.
• Asegúrese de que el convertidor esté
encendido.
• Asegúrese de que las conexiones entre el
convertidor y la TV sean las correctas.
• Elija diferentes canales o entradas de
video en el receptor de TV hasta que la
imagen aparezca.
No hay sonido.
• Asegúrese de que las conexiones entre el
convertidor y la TV sean las correctas.
• Asegúrese de que el sonido de la TV no
esté silenciado.
El control remoto no funciona.
• Asegúrese de que las baterías estén
insertadas correctamente.
• Reemplace las baterías si están agotadas.
• Retire cualquier obstáculo entre el
control remoto y el convertidor.
• Si el control remoto funciona con
el convertidor pero no con su TV,
reprograme el control remoto, siguiendo
los pasos en “Programación del control
remoto”.
No se puede ver un programa de TV
bilingüe en su idioma secundario.
• Asegúrese de haber seleccionado
correctamente las con guraciones de
audio. Re érase a las con guraciones AV
en el menú principal.
Clave de acceso olvidada.
• Elija “Clasi caciones” en el menú
principal e ingrese la clave de acceso
maestra “3308”. Cree una nueva clave
de acceso. (La clave de acceso maestra
no puede ser usada para desbloquear
programas para verlos).
principal. De forma predeterminada está
establecido en 4 horas.
Señal débil o canal no disponible.
• Trate de colocar en otra posición la
antena. Si la señal es débil todavía,
puede ser que una antena más potente
sea requerida para ampli car la
recepción de la señal de TV Digital. Se
recomienda una Antena Inteligente.
La TV se cambió recientemente por un
receptor de TV RCA y el control remoto
no puede controlarlo.
• Reprograme el control remoto, siguiendo
los pasos en “Programación del control
remoto”.
La Antena Inteligente está recién
conectada y se requiere la exploración
de canales.
• En el menú, presione 5 para
Con guraciones y luego presione 1 para
Exploración de Canal.
• Active la opción “Scan Add” sólo si desea
escanear más canales manteniendo la
lista de canales existente.
Servicio al Cliente y soporte
técnico
www.1800customersupport.com/RCA
Especi caciones técnicas
Suministro de energía: CA 120V/60 Hz
Consumo de energía: <1 W (en espera),
<7 W (funcionando, modo HD)
Distancia de recepción remota: >8 m desde
el frente
Rango de frecuencia RF: 57MHz - 830MHz
Rango de canal RF : CH2 – CH69
Sensibilidad RF: -83 dBm a -5 dBm
Impedancia RF 75 ohms
Canal de salida: CH3/CH4, seleccionable
Sistema de video: NTSC
Salida de video: 1V pico a pico
Impedancia de salida de video: 75 ohms
E
El Convertidor se ha apagado
repentinamente.
• Cheque si el Temporizador de Apagado
Automático está activado el menú
Dolby y el símbolo de la doble D son marcas registradas
de Dolby Laboratorios. Fabricado bajo licencia de Dolby
Laboratories.
13
Page 28

Garantía limitada
AVC MULTIMEDIA (“AVC”) ofrece la siguiente garantía limitada, la cual se extiende al comprador-consumidor original y
está limitada al uso no comercial del producto.
Garantía de repuestos y reparaciones por Uno Año
Los productos AVC que se hayan comprado en los Estados Unidos tienen una garantía de uno año a partir de la fecha
original de compra en caso de presentar defectos en los materiales o en su fabricación. Si la unidad no se encuentra en
conformidad a esta garantía, nosotros repararemos el producto usando piezas y productos nuevos y reparados, según lo
estime AVC únicamente.
Durante un período de uno año a partir de la fecha efectiva de la garantía, AVC proporcionará, cuando sea necesario,
mano de obra de reparación para reparar defectos de fabricación en su centro de reparaciones designado. Para obtener
los servicios de la garantía en los Estados Unidos, usted deberá llamar primero a nuestro Centro de
Cliente al 1-866-444-5746 o 1-800-252-6123 durante las horas que se indican en el recuadro más abajo. La
decisión de si bien usted está facultado para recibir estos servicios la tomará la ocina de Respaldo al Cliente de AVC POR
FAVOR NO DEVUELVA ESTA UNIDAD A AVC SIN CONTAR CON AUTORIZACIÓN PREVIA. En los centros designados
para reparaciones y por un período de uno año a contar de la fecha de efectividad de la garantía, AVC utilizará piezas o
productos de recambio nuevos o refabricados al efectuar reparaciones de productos o piezas defectuosas. Dichos productos
o piezas de recambio cuentan con una garantía adicional de uno año a contar de la fecha del cambio o de la reparación.
Para
poder hacer las reparaciones que sean necesarias, el cliente deberá enviar la unidad al centro de reparaciones que se
le indique al contactarse con la ocina de respaldo al cliente. El cliente es responsable por todos los gastos de envío al
centro de reparaciones.
Instrucciones para envolver la unidad y para su envío
Cuando usted envíe el producto al centro de reparaciones de AVC , usted debe utilizar la caja de cartón y el material de
embalaje original o un tipo de embalaje equivalente, según lo establezca AVC.
Servicio para el
Su responsabilidad
GARANTÍA LIMITADA
1)
Usted debe guardar la boleta de venta original como prueba de su compra.
2) Estas garantías sólo son efectivas si el producto ha sido comprado y puesto a funcionar en Estados Unidos o Canadá.
3) Las garantías sólo se extienden en caso de materiales o de fabricación defectuosa y no se extiende a productos o piezas
que se hayan perdido o tirado a la basura, ni a productos o piezas dañadas a causa del mal uso de la unidad, de
accidentes, del funcionamiento o mantenimiento inapropiados del equipo, así como tampoco en caso de no haber seguido
las instrucciones que acompañan este producto, o de haber modicado o alterado el
o
de haber quitado o cambiado el número de serie de las piezas o del producto.
Fuera de la Garantía
En caso que su producto necesite ser reparado y que el período de garantía ya haya expirado, sírvase contactarse con el Centro
de Ayuda al Cliente en el fono
Hora: Lunes–Jueves: 9am–7pm, Viernes: 9am–5pm, Sábado: 9am–NOON Eastern time.
Importante: Usted se hace responsable de cualesquier gastos por razones de transporte, envío o seguro relacionados
con la devolución del producto al Centro de Devoluciones de Productos.
Todas las garantías implícitas según la ley de un estado, incluidas las garantías implícitas de comercialización y de aptitud
para un propósito especíco, están limitadas expresamente a la duración de la garantía limitada expuesta más arriba. Con
la excepción de cualesquiera garantías implícitas según la ley de un estado, que por la presente quedan limitadas, la
garantía precedente tiene carácter de exclusiva y predomina sobre las demás garantías, cauciones, acuerdos y obligaciones
similares del vendedor o del fabricante con respecto a la reparación o al reemplazo de cualesquier partes del aparato.
AVC en ningún
la indicada en la garantía limitada de este aparato.
Ninguna persona, agente, distribuidor, comerciante ni empresa está autorizada para cambiar, modicar o extender los
términos de estas garantías en ninguna manera, cualquiera que ésta fuese. El tiempo dentro del cual se debe iniciar una
acción para hacer cumplir cualquier obligación de AVC que surja en virtud de la garantía o de cualquier estatuto o ley de
Estados Unidos o de cualesquier de sus estados, queda aquí limitado a uno año a contar de la fecha de adquisición del
producto. Esta restricción no se aplica a las garantías implícitas planteadas en virtud de la ley de un estado.
Esta garantía le brinda derechos legales especícos y puede que usted también tenga otros derechos que pueden variar,
dependiendo del estado. Algunos estados no ponen límite en cuanto a la duración de una garantía implícita, a cuándo se
puede tomar acción, o a la exclusión o limitación de los daños fortuitos o consiguientes, de modo que
es posible que las disposiciones anteriores no sean aplicables en su caso.
Para mayor información
dirección:
Importante: Guarde su “Boleta de venta” como prueba de su compra.
N° de modelo
caso se hará responsable de daños fortuitos ni de daños resultantes de cualquier otra situación que no sea
www.1800customersupport.com/RCA
........................................
1-866-444-5746, 1-800-252-6123 o www.1800customersupport.com/RCA
acerca de otros productos y servicios, sírvase contactar nuestra página de internet en la siguiente
Nombre del producto
Tipo de aparato ............................................................................................................................
N° de serie
Fecha de compra .
PARA SERVICIO Y REPARACIÓN, POR FAVOR VISTITA
Estas especicaciones y la apariencia externa de este aparato están sujetas a cambio sin previo aviso.
............................................
.................................
N° de recibo
Nombre del comerciante .
www.1800customersupport.com/RCA
producto sin la autorización de AVC ,
................................................
...............................................................
..........................................
14
Page 29

Program codes/Códigos de programa
Admiral 002, 128, 183, 189
Advent 191, 258, 260, 275
Adventura 129
Aiko 014, 182
Aiwa 289, 290
Akai 003, 177, 195, 201, 202, 295
Albatron 218
Alleron 036
America Action 186
Amtron 186
Anam 186
Anam National 141, 142, 186
AOC 005, 130, 143, 177, 260, 274, 275
Apex 053, 172, 184, 192, 232, 250, 280
Audiovox 182, 186, 188, 207, 223, 234
Aventura 185
Belcor 274
Bell & Howell 002, 037, 198
Benq 204, 306
Bradford 186
Brillian 236, 237, 238
Brockwood 274
Broksonic 186, 189, 200
Candle 005, 007, 129, 177, 274
Carnivale 177
Carver 181
Celebrity 003, 175
Celera 053, 192
Centurion 008
Changhong 053, 192
Citizen 005, 007, 014, 037, 080, 148, 177, 182, 186, 195,
198, 274
Clarion 186
Colortyme 005, 009, 274
Commercial Solutions 178
Concerto 005, 274
Contec 186
Contec/Cony 186
Craig 186
Crosley 181
Crown 045, 186
CTX 304
Curtis Mathes 001, 005, 013, 037, 080, 148, 156, 159, 177,
178, 181, 183, 188, 195, 196, 198, 199, 202, 205, 229,
274, 295
CXC 186
Cytron 309
Daewoo 005, 014, 015, 016, 095, 140, 182, 188, 201, 207,
233, 260, 274, 275
Daytron 005, 274
Dell 181
Denon 196
DiamondVision 243
Dimensia 001
Dumont 176, 245, 274
Durabrand 173, 185, 186, 189, 274
Dwin 183, 212, 214
Electroband 003, 175
Electrograph 193
Electrohome 003, 005, 017, 018, 274
Emerson 005, 019, 020, 021, 022, 023, 024, 025, 026, 027,
028, 029, 030, 031, 032, 033, 034, 035, 036, 037, 093,
132, 140, 149, 157, 161, 169, 174, 185, 186, 189, 198,
200, 207, 274
Envision 005, 177, 215, 274
ESA 185, 202
Fisher 037, 198
Fujitsu 036
Funai 036, 139, 185, 186
Futuretech 186
Gateway 193, 204
GE 21, 001, 005, 018, 039, 040, 053, 063, 122, 123, 135,
149, 163, 178, 179, 188, 229, 232, 249, 250, 274
Gibralter 042, 176, 177, 245, 274
Go Video 224
Goldstar 005, 041, 042, 116, 117, 177, 260, 274, 275
Grunpy 036, 186
Haier 173, 242
Hallmark 005, 274
Harman/Kardon 181
Harvard 186
Havermy 183
Hello Kitty 188
Hisense 190
Hitachi 005, 043, 044, 100, 101, 102, 103, 105, 107, 110,
111, 112, 155, 165, 166, 167, 168, 169, 196, 248, 274,
276, 284
IMA 186
Innity 045, 181
Insignia 189, 244, 309
Inteq 176
Janeil 129
JBL 045, 181
JC Penney 001, 005, 007, 018, 039, 040, 042, 053, 063, 079,
080, 135, 163, 260, 274, 275
JCB 003, 175
Jensen 005, 191, 258, 260, 274, 275, 309
JVC 040, 044, 046, 047, 048 ,118, 119, 136, 157, 180, 263,
264, 271, 287, 292, 296
Kawasho 003, 005, 274
KEC 186
Kenwood 005, 177, 274
KLH 053, 192, 232
Kloss Novabeam 049, 050, 129, 186
Konka 194
KTV 051, 132, 177, 186
LG 221, 260, 274, 275
Loewe 045
Logik 002
Luxman 005, 274
LXI 001, 005, 037, 045, 052, 053, 135, 147, 163, 178, 181,
184, 198, 274
Magnavox 005, 007, 045, 049, 050, 054, 055, 064, 097,
098, 099, 153, 154, 160, 170, 174, 177, 181, 210, 230,
234, 252, 253, 258, 259, 272, 274, 283
Majestic 002
E
Page 30

Marantz 005, 043, 045, 057, 177, 181, 220, 230, 274
Matsushita 187
Maxent 193
Megatron 005, 043, 196, 274
Memorex 002, 005, 037, 139, 185, 189, 197, 198, 260, 274,
275, 283
MGA 005, 018, 058, 177, 197, 260, 274, 275
Midland 040, 135, 163, 176, 178, 179, 245
Minutz 039
Mitsubishi 005, 018, 058, 094, 183, 197, 217, 260, 262,
274, 275
Monivision 218
Montgomery Ward 002
Motorola 128, 183
MTC 005, 080, 177, 195, 260, 274, 275
Multitech 186
Multivision 061
NAD 005, 052, 053, 137, 155, 184, 274, 291
NEC 005, 009, 177, 206, 260, 274, 275
Net-TV 193
Nikko 005, 014, 177, 182, 274
Norcent 190
NTC 014, 182
Olevia 239, 240
Onwa 186
Optimus 137,155, 187, 198, 199
Optoma 225
Optonica 071, 128, 183
Orion 029, 189, 200
Panasonic 040, 045, 125, 179, 187, 254, 257, 288, 299, 301
Penney 001, 177, 178, 179, 184, 195, 229, 274
Philco 005, 007, 045, 049, 050, 054, 177, 181, 260, 274,
275, 283
Philips 007, 045, 049, 050, 054, 062, 063, 064, 065, 181,
185, 209, 230, 252, 258, 261, 267, 269, 272, 273, 274,
277, 278, 281, 285, 286, 297, 300, 305
Philips Magnavox 181, 185, 230, 253, 258, 270, 273, 279
Pilot 177, 274
Pioneer 005, 066, 067, 068, 137, 155, 169, 171, 199, 274,
291, 294
Polaroid 053, 192
Portland 005, 014, 182, 260, 274, 275
Price Club 080
Prima 191, 258, 260, 275
Princeton 211
Prism 040, 179
Proscan 001, 135, 163, 178, 229, 249
Proton 005, 069, 205, 274
Proview 241
Pulsar 176, 245, 274
Quasar 040, 051, 070, 125, 179, 187, 254, 257
Radio Shack 001, 037, 177, 178, 186, 198, 274
Radio Shack/Realistic 001, 005, 037, 071, 186, 198, 274
RCA 000, 001, 005, 072, 073, 074, 075, 076, 077, 078, 135,
138, 140, 144, 150, 156, 159, 162, 163, 169, 171, 178,
229, 246, 249, 260, 274, 275, 293, 302
Realistic 001, 037, 177, 186, 198, 274
Runco 176, 177, 206, 245
Sampo 005, 177, 193, 274
Samsung 005, 013, 079, 080, 145, 177, 195, 202, 213, 216,
227, 255, 256, 260, 266, 274, 275, 282, 295
Sansui 189
Sanyo 037, 082, 083, 124, 198, 268, 274
Scotch 005, 274
Scott 005, 020, 029, 036, 186, 200, 274
Sears 001, 005, 036, 037, 047, 052, 053, 084, 135, 139, 163,
178, 181, 184, 185, 198, 232, 274
Sharp 005, 021, 071, 085, 087, 092, 128, 183, 208, 274, 298
Sheng Chia 183
Shogun 274
Signature 002, 019
Simpson 007
Sony 003, 146, 151, 152, 175, 228, 247, 251, 303, 308
Soundesign 005, 007, 036, 186, 274
Squareview 139, 185
SSS 186, 274
Starlite 186
Studio Experience 218
Superscan 183
Supre-Macy 129
Supreme 003, 175
SVA 242
Sylvania 005, 007, 045, 049, 050, 054, 055, 064, 088, 121,
139, 174, 177, 181, 185, 274, 307
Symphonic 027, 139, 185, 186
Syntax 239, 240
Tandy 128, 183
Tatung 204
Technics 040, 179, 187
Techview 219
Techwood 005, 040, 179, 274
Teknika 002, 005, 007, 014, 036, 055, 080, 125, 181, 182,
186, 195, 197, 260, 274, 275
Telefunken 202, 295
TMK 005, 274
TNCi 176
Toshiba 037, 052, 053, 080, 090, 121, 184, 195, 198, 231,
232, 265, 274
TVS 189
Universal 039, 063
V Inc. 235
Vector Research 177
Victor 047, 136, 180
Vidikron 181
Vidtech 005, 260, 274, 275
Viewsonic 193, 222, 235
Viking 129
Vizio 204, 235
W ards 001, 002, 005, 020, 027, 036, 039, 045, 049, 050,
054, 055, 063, 064, 071, 091, 177, 181, 231, 260, 274,
275, 291
W aycon 184
W estinghouse 175, 188, 226, 235
White Westinghouse 140, 189, 207
Yamaha 005, 177, 260, 274, 275
Zenith 002, 113, 114, 115, 176, 182, 189, 245, 248, 274
Page 31

Page 32

©2008 AVC Multimedia
Trademark(s)®Registered
Marca(s)®Registrada(s)
DTA800B1 IB EN/E V3
 Loading...