

Page 1

Satellite Receiver
User’s Guide
Changing Entertainment. Again.
Page 2
Important Information
Cautions
Do not stack electronic components or other objects on top of the
Digital Satellite Receiver. The slots on top of the receiver must be left
uncovered to allow proper airflow to the unit. Blocking the airflow to
the unit could impair performance or damage your receiver and other
components.
Remove any sales or promotional materials attached to the product.
Do not stack the digital satellite receiver on top of a “hot component”
such as an audio power amplifier.
FCC Regulations state that unauthorized changes or modifications to
this equipment may void the user’s authority to operate it.
Note to Cable TV Installer:
This reminder is provided to call your attention to article 820-40 of the
National Electrical Code (Section 54 of the Canadian Electrical Code, Part
1) which provides guidelines for proper grounding and, in particular,
specifies that the cable ground shall be connected to the grounding
system of the building as close to the point of cable entry as practical.
Note to Satellite Dish Installer:
This reminder is provided to call your attention to articles 810 and 820
of the 1999 National Electrical Code. Refer to article 810, in particular
to 810-1 and 810-15, for required grounding of the metal structure of
the Dish Antenna. Refer also to the 810-2 which, by reference to article
820, requires that the satellite dish coaxial cable shield be connected to
the grounding system of the building as close to the point of cable
entry as practical.
Care and Cleaning:
Use a soft cloth or dusting attachment of your vacuum cleaner to dust
your digital satellite receiver. Remove dust from the ventilation holes on
the top and bottom.
Plastic surfaces are easily scratched and can be marred by alcohol and
various solvents. Avoid excessive use of oil-based furniture polishes
since the materials used in the cabinet will accumulate more dust. A
non-abrasive, anti-static cleaner/polisher is recommended.
Product Registration
Please fill out the product registration card (packed separately) and
return it immediately, or register online at rca.com. Returning the card
allows us to contact you if needed.
Product Information
Keep your sales receipt to obtain warranty parts and service and for
proof of purchase. Attach it here and record the serial and model
numbers in case you need them. These numbers are located on the
product.
Model No. ______________________________________________
Serial No. _______________________________________________
Purchase Date: __________________________________________
Dealer/Address/Phone: ____________________________________
WARNING
To reduce the risk of fire or electric shock, do not expose this product
to rain or moisture. The apparatus shall not be exposed to dripping or
splashing. No objects filled with liquids, such as vases, shall be placed
on the apparatus.
CAUTION
RISK OF ELECTRIC SHOCK.
DO NOT OPEN.
This symbol indicates "dangerous voltage" inside the product
that presents a risk of electric shock or personal injury.
This symbol indicates important instructions accompanying
the product.
Caution: To reduce the risk of electric
shock, do not remove cover (or back). No
user serviceable parts inside. Refer
servicing to qualified service personnel.
IMPORTANT NOTICE:
This device incorporates an anticopy process technology that is
protected by U.S. patents and other intellectual property rights. The
anticopy process is licensed for non-commercial, home use only.
Reverse engineering or disassembly is prohibited.
Important Safety Instructions
1. Read these instructions.
2. Keep these instructions.
3. Heed all warnings.
4. Follow all instructions.
5. Do not use this apparatus near water.
6. Clean only with dry cloth.
7. Do not block any ventilation openings. Install in accordance with the
manufacturer’s instructions.
8. Do not install near any heat sources such as radiators, heat registers,
stoves, or other apparatus (including amplifiers) that produce heat.
9. Do not defeat the safety purpose of the polarized or grounding-type
plug. A polarized plug has two blades with one wider than the other. A
grounding type plug has two blades and a third grounding prong. The
wide blade or the third prong is provided for your safety. If the provided
plug does not fit into your outlet, consult an electrician for replacement
of the obsolete outlet.
10. Protect the power cord from being walked on or pinched particularly
at plugs, convenience receptacles, and the point where they exit from the
apparatus.
11. Only use attachments/accessories specified by the manufacturer.
12. Use only with the cart, stand, tripod, bracket, or table
specified by the manufacturer, or sold with the apparatus.
When a cart is used, use caution when moving the cart/
apparatus combination to avoid injury from tip-over.
13. Unplug this apparatus during lightning storms or when unused for
long periods of time.
14. Refer all servicing to qualified service personnel. Servicing is required
when the apparatus has been damaged in any way, such as power-supply
cord or plug is damaged, liquid has been spilled or objects have fallen
into the apparatus, the apparatus has been exposed to rain or moisture,
does not operate normally, or has been dropped.
Page 3

Table of Contents
Chapter 1: Connections & Setup
Things To Consider Before You Connect Components................ 2
Choose Your Connection................................................................ 2
Insert Your Access Card ................................................................. 2
Excellent Connection ..................................................................... 3
Very Good Connection ................................................................... 4
Basic Connection ............................................................................ 5
Advanced Audio (Optical Digital Audio Output Connection) .... 6
Jacks and Cables............................................................................. 6
Satellite Receiver Rear Panel ........................................................ 7
Place Batteries in the Remote Control ........................................ 8
Plug in and Turn on the Receiver ................................................. 8
Wait for the Receiver to Download
ADVANCED PROGRAM GUIDE™ Data ....................................... 8
Using Highlight and Select............................................................ 9
Complete the Assisted Setup ........................................................ 9
Order Programming........................................................................ 9
Chapter 2: Using the Remote Control
Remote Control Buttons .............................................................. 10
Top of the Digital Satellite Receiver .......................................... 11
Programming the Remote Control .............................................. 11
Testing the Remote Control .............................................................. 11
Using Automatic Code Search ......................................................... 11
Using Direct Entry ............................................................................... 12
Operating Other Components ..................................................... 12
Modes of Operation ............................................................................12
Controlling a Second RCA Satellite Receiver...............................12
Chapter 3: Satellite Receiver Features
The Program Guide....................................................................... 15
Displaying the Toolbar........................................................................ 15
The Channel Banner ..................................................................... 16
The DIRECTV INTERACTIVE™ Feature ......................................... 17
Displaying On-screen Guides ...................................................... 17
The Detail Guide ................................................................................... 17
The Grid Guide ......................................................................................17
Getting Around In the Guides ..................................................... 18
More Details .......................................................................................... 19
Additional Program Guides ......................................................... 19
The Channel Guide ..............................................................................19
The Logo Guide ..................................................................................... 19
The Suggestion Guide ......................................................................... 20
The Category Guide ............................................................................. 20
The AlphaSort™ Guide ........................................................................21
The Scout™ Guide ................................................................................21
The Profile Guide.................................................................................. 21
The Guide Toolbar ........................................................................ 22
Chapter 4: Using On-Screen Menus
Using the Menu System............................................................... 23
Main Menu Items ......................................................................... 24
The Program Guide....................................................................... 24
Messages ....................................................................................... 25
Mail .......................................................................................................... 25
Caller ID .................................................................................................. 25
Using the Purchases Menu .......................................................... 27
Reviewing and Canceling Upcoming Purchases .........................27
Spending Limits .................................................................................... 27
Pay Per View Programs ....................................................................... 27
Timers ............................................................................................ 28
User Profiles .................................................................................. 29
Creating and Editing User Profiles .................................................. 29
Creating a Profile Channel List ........................................................29
Setting the Rating Limit ....................................................................30
Viewing Hours ...................................................................................... 30
Setting Up Spending Limits ..............................................................30
Locking a User’s Profile ...................................................................... 31
Locking the System .............................................................................31
Unlocking the System......................................................................... 32
Choosing Your Profile ......................................................................... 32
Personal Settings.......................................................................... 32
Name .......................................................................................................32
Guide Settings .................................................................................33
Channel Banner .................................................................................... 33
Color Scheme ...................................................................................33
Translucency .....................................................................................33
Animation ......................................................................................... 33
Edit Fetch ..........................................................................................33
INFO Message ..................................................................................34
System Setup ................................................................................ 34
Assisted Setup ..................................................................................34
Receiver Index ...................................................................................... 34
Receiver Options ..................................................................................34
Dish Pointing ......................................................................................... 36
System Test............................................................................................37
System Info............................................................................................37
System Upgrades ................................................................................. 37
New Access Card ................................................................................. 37
Alternate Data ......................................................................................37
Interactive ..................................................................................... 37
Chapter 5: Other Information
Troubleshooting ............................................................................ 38
Running the System Test ................................................................... 40
Fine-Tuning the Signal ....................................................................... 40
Finding the TV’s Video Line Input....................................................40
Limited Warranty ......................................................................... 41
Accessory Information ................................................................. 44
Index .............................................................................................. 45
1
Page 4
Chapter 1: Connections & Setup
Things To Consider Before You Connect Components
Protect Your Components from Power Surges
• Connect all components before plugging any power cords into the wall outlet.
• Always turn off the digital satellite receiver, TV and other components before you connect or disconnect any cables.
Position Cables Correctly to Avoid Audio Hum or Interference
• Insert all cable plugs firmly into their jacks.
• Place the Audio/Video (A/V) cables to the sides of the TV’s back panel instead of straight down the middle after you connect your components.
• Try not to coil any twin-lead cables and keep them away from the A/V cables as much as possible.
• Make sure all antennas and cables are properly grounded. See the inside front cover of this book for more information.
Protect Your Components from Overheating
• Do not block ventilation holes in any of the components. Arrange the components so that air can circulate freely. Remove any sales or
promotional materials attached to the product.
• Do not stack components.
• Allow adequate ventilation when placing components in a stand.
• Place an amplifier or receiver on the top shelf of the stand so heated air rising from it will not flow around other components.
Choose Your Connection
There are several ways to connect your digital satellite receiver depending on the components you want to connect and the quality of the signal you
want to achieve. The next four pages show three options for connecting your satellite receiver to your other components, plus instructions for
connecting your satellite receiver to a digital audio receiver. Choose the connection that most closely matches your components in order to get the
best signal you can. For example, if your TV has an S-Video input, use the Excellent Connection shown on the next page as a guide. If your TV only has
an RF coaxial input, use the Basic Connection shown on page 5 as a guide.
Page 6 shows the kinds of cables you’ll use to make connections.
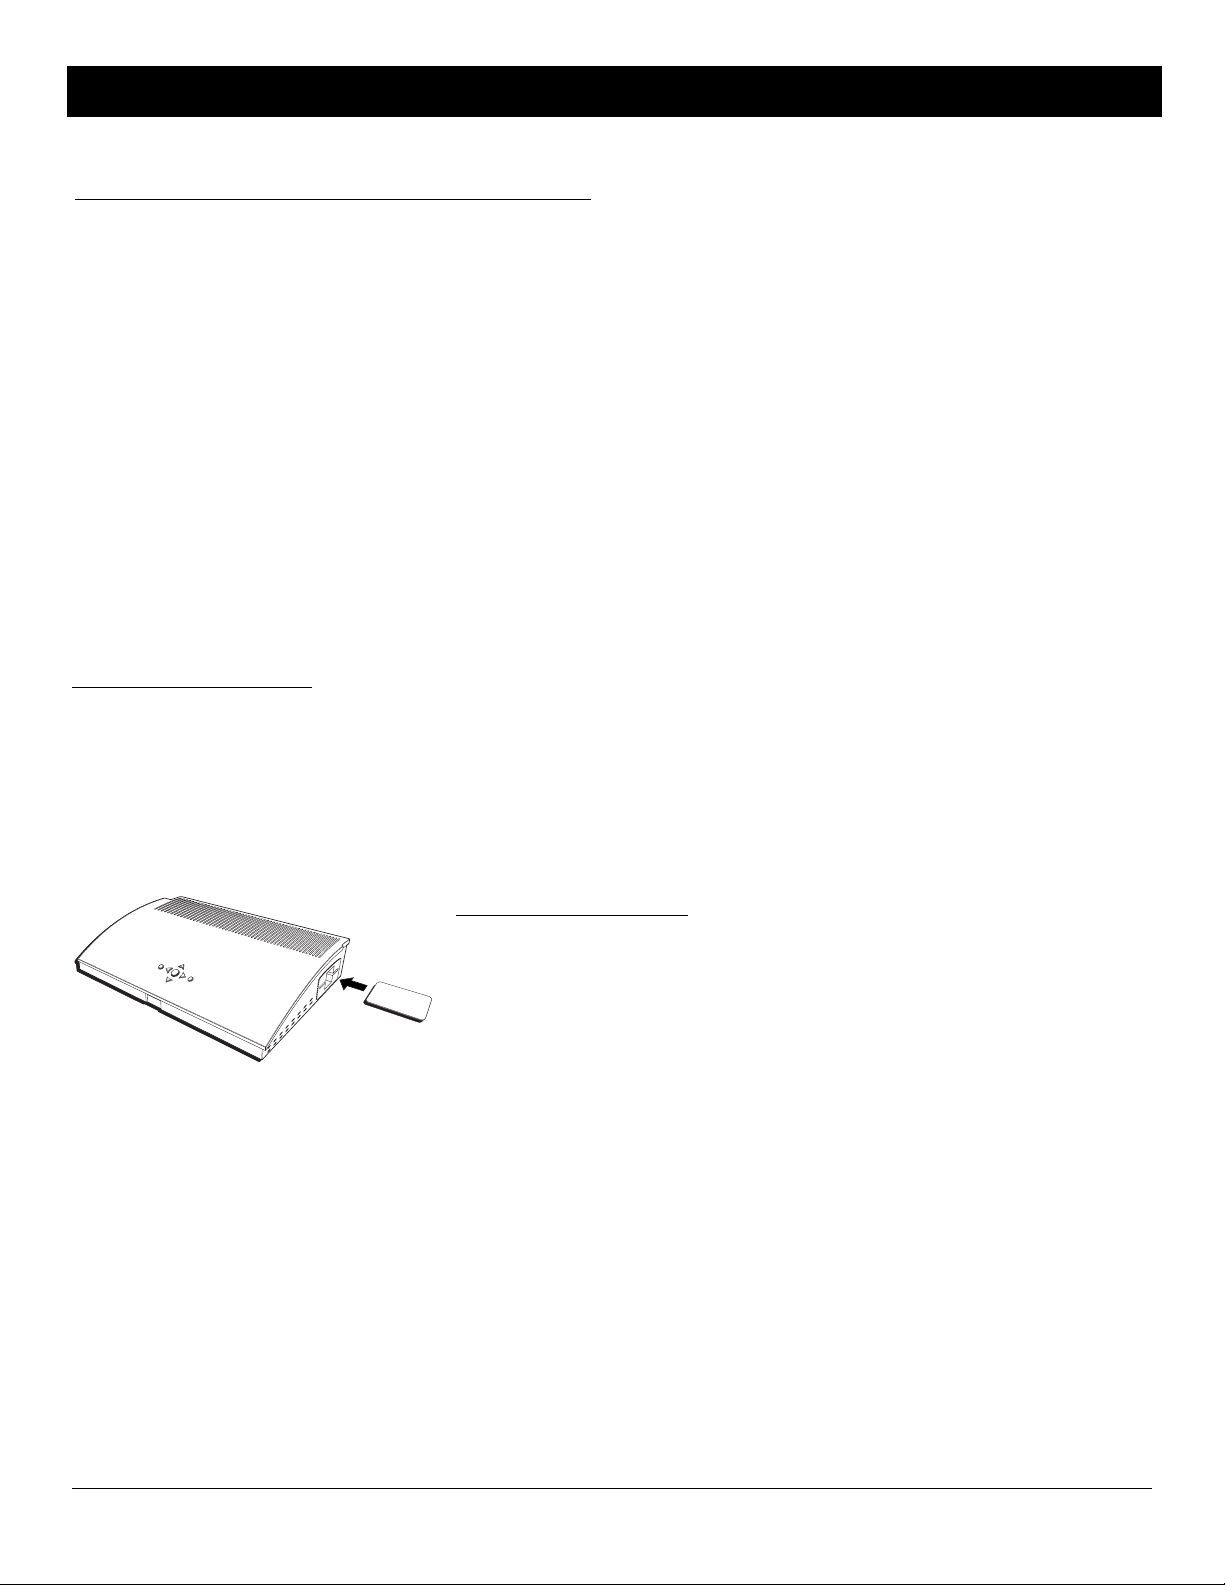
Insert Your Access Card
Find the access card in the material that came with your receiver. Make sure the card is facing
up, and fully insert it into the slot on the right side of your satellite receiver.
2 Chapter 1
Illustrations contained in this document are for representation only.
Page 5

CR
Digital Satellite Receive
r
S
s
a
dular
k
O
O
OM
S
o
PHONE
S-VIDEO
V
Note: Your VCR and TV back panels may not look exactly
like the ones illustrated.
5
VIDEO
7
AUDIO
Connections & Setup
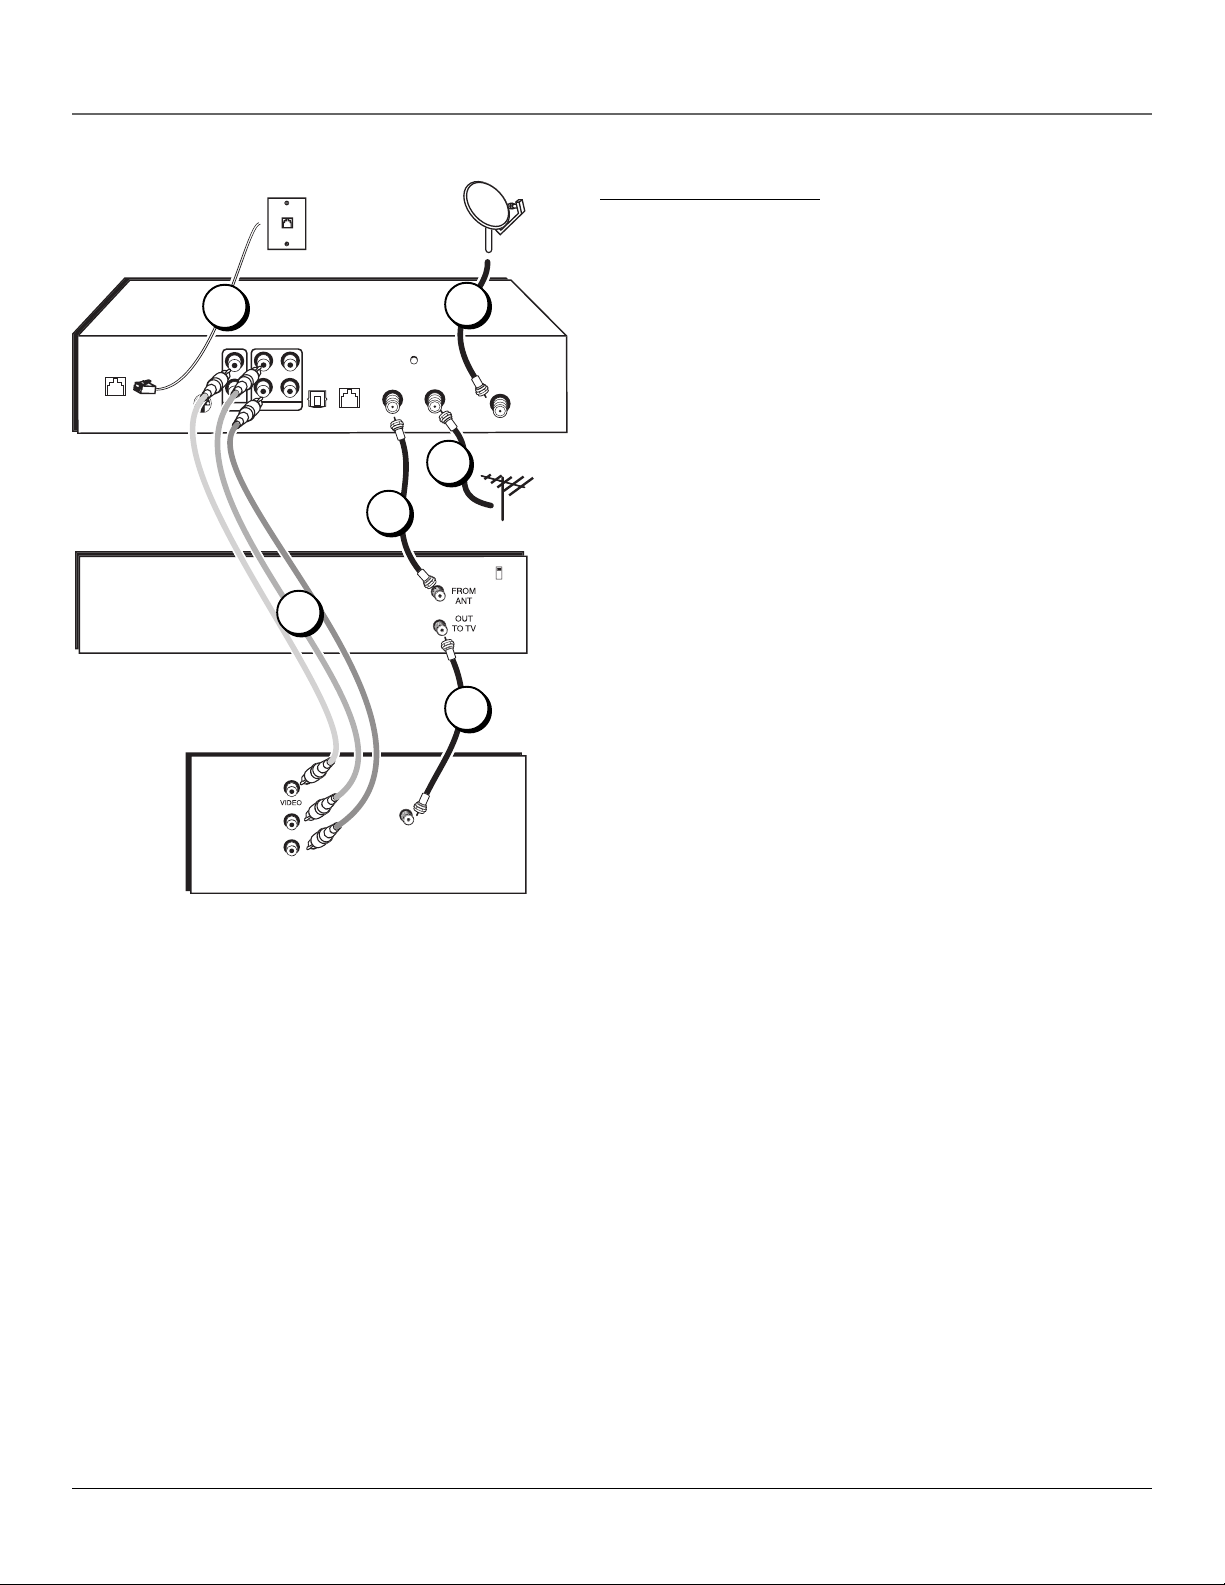
Excellent Connection
RJ11
mo
phone jac
– R –
– L –
DIGITAL
AUDIO
LOW SPEED
DATA
6
AUDI
VIDE
-Vide
OUT TO TV
2
Di
FR
atellite
h Antenn
GROUND
IN FROM ANT
4
3
1
SATELLITE IN
Cable or
Off-air
Antenna
CH3
CH4
Using S-Video and A/V jacks and cables to connect to the TV,
RF coaxial cables to connect the VCR
This connection provides the best picture quality, surpassing that of A/V
cables. The S-Video cable, which carries video information only, requires that
audio cables also be used for sound.
What you will need (see page 6 for descriptions of these cables):
• Two (2) RF coaxial cables
• Two (2) A/V cables
• One (1) S-Video cable
• One (1) telephone line cord
• Coaxial cable lines fed from a digital satellite antenna and a standard TV
antenna (or cable line)
Making the Connection
1. Connect the satellite dish antenna feed (RG-6 coaxial cable) to the
SATELLITE IN jack on the satellite receiver.
2. Connect one end of an RF coaxial cable to the OUT TO TV jack on the
satellite receiver, and the other end to the antenna input jack on the VCR.
Note: If your VCR has A/V input jacks, you can use A/V cables to connect the
satellite receiver’s second A/V jacks to the A/V jacks of the VCR instead of using
the RF coaxial cable.
3. Connect one end of an RF coaxial cable to the antenna output jack on the
VCR, and the other end to the TV’s antenna input jack.
4. Connect the cable or off-air antenna feed (RF coaxial cable) to the IN
FROM ANT jack on the satellite receiver.
5. Connect one end of the supplied telephone line cord to the PHONE JACK
on the back of the satellite receiver, and the other end to an RJ11-type
modular phone jack (the most common type of phone jack).
6. Connect two ends of the supplied A/V cables to AUDIO R and L jacks on
the satellite receiver, and the other ends to the corresponding audio
input jacks on the TV.
Note: Make sure you connect jacks by their labels. For example, AUDIO R on the
digital satellite receiver should be connected to TV’s right audio input jack, L
Audio to L Audio, etc.
If your TV only has one audio input jack, use the satellite receiver’s AUDIO L jack
to make the connection.
7. Connect one end of the supplied S-Video cable to the satellite receiver,
and the other end to the S-Video input jack on the TV.
Go to Page 6
Using Your Components
To watch DIRECTV® programming:
Tune the TV to its S-Video line input (if you have difficulty finding your TV’s S-Video line input, see your TV’s User’s
Manual or page 40 in this manual). Then tune the satellite receiver to the desired channel.
To record DIRECTV programming:
Tune the satellite receiver to the desired channel. Then set your VCR to record on the proper input channel (video
line input if using A/V cables to connect the VCR to the satellite receiver, channel 3 or 4 if using RF coaxial cable).
To view VCR recordings:
Tune the TV to channel 3 or 4 (whichever is set on the VCR as its output channel). Begin VCR playback as usual.
DIRECTV programming is subject to the terms and conditions of the DIRECTV Customer Agreement; a copy is provided at DIRECTV.com and with your first bill.
See page 9 for more information.
Chapter 1 3
Page 6
Connections & Setup
CR
r
S
a
ar
k
O
OM
RJ11
modul
phone jac
Digital Satellite Receive
5
VIDEO
AUDIO
– R –
– L –
DIGITAL
AUDIO
LOW SPEED
DATA
PHONE
S-VIDEO
V
6
AUDI
Note: Your VCR and TV back panels may not look exactly
like the ones shown.
Dish Antenn
OUT TO TV
2
FR
GROUND
IN FROM ANT
atellite
1
4
3
SATELLITE IN
Cable or
Off-air
Antenna
CH3
CH4
Very Good Connection
Using A/V jacks and cables to connect to the TV,
RF coaxial cables to connect the VCR
This connection provides better picture quality than RF coaxial cables and is
recommended for use with TVs that do not have S-Video input jacks.
What you will need (see page 6 for descriptions of these cables):
• Two (2) RF coaxial cables
• Three (3) Audio/Video cables
• One (1) telephone line cord
• Coaxial cable lines fed from a digital satellite antenna and a standard TV
antenna (or cable line)
Making the Connection
1. Connect the satellite dish antenna feed (RG-6 coaxial cable) to the
SATELLITE IN jack on the satellite receiver.
2. Connect one end of an RF coaxial cable to the OUT TO TV jack on the
satellite receiver, and the other end to the antenna input jack on the
VCR.
Note: If your VCR has A/V input jacks, you can use A/V cables to connect the
satellite receiver’s second set of A/V output jacks to the A/V jacks of the VCR
instead of using the RF coaxial cable.
3. Connect one end of an RF coaxial cable to the antenna output jack on
the VCR, and the other end to the TV’s antenna input jack.
4. Connect the cable or off-air antenna feed (RF coaxial cable) to the IN
FROM ANT jack on the satellite receiver.
5. Connect one end of the supplied telephone line cord to the PHONE JACK
on the back of the satellite receiver, and the other end to an RJ11-type
modular phone jack (the most common type of phone jack).
6. Connect the ends of the supplied A/V cables to the satellite receiver’s
AUDIO and VIDEO jacks, and the other ends to the corresponding AUDIO
and VIDEO input jacks on the TV.
Notes: Make sure you connect jacks and cables corresponding to their labels.
For example, AUDIO R output on the digital satellite receiver should be
connected to AUDIO R input on the TV, VIDEO out to VIDEO in, etc.
If your TV only has one audio input jack, use the satellite receiver’s AUDIO L
jack to make the connection.
Go to Page 6
Using Your Components
To watch DIRECTV® programming:
Tune the TV to its video line input (if you have difficulty finding your TV’s video line input, see your TV’s User’s Manual or
refer to the instructions on page 40 in this manual). Then tune the satellite receiver to the desired channel.
To record DIRECTV programming:
Follow the steps in the previous step, then tune the satellite receiver to the desired channel. Set your VCR to record on its
proper input channel (channel 3 or 4).
To view VCR recordings:
Tune the TV to channel 3 or 4 (whichever is set on the VCR as its output channel). Begin VCR playback as usual.
4 Chapter 1
Page 7
CR
Digital Satellite Receive
r
S
s
a
dular
k
OM
PHONE
S-VIDEO
V
TV
5
VIDEO
AUDIO
Connections & Setup
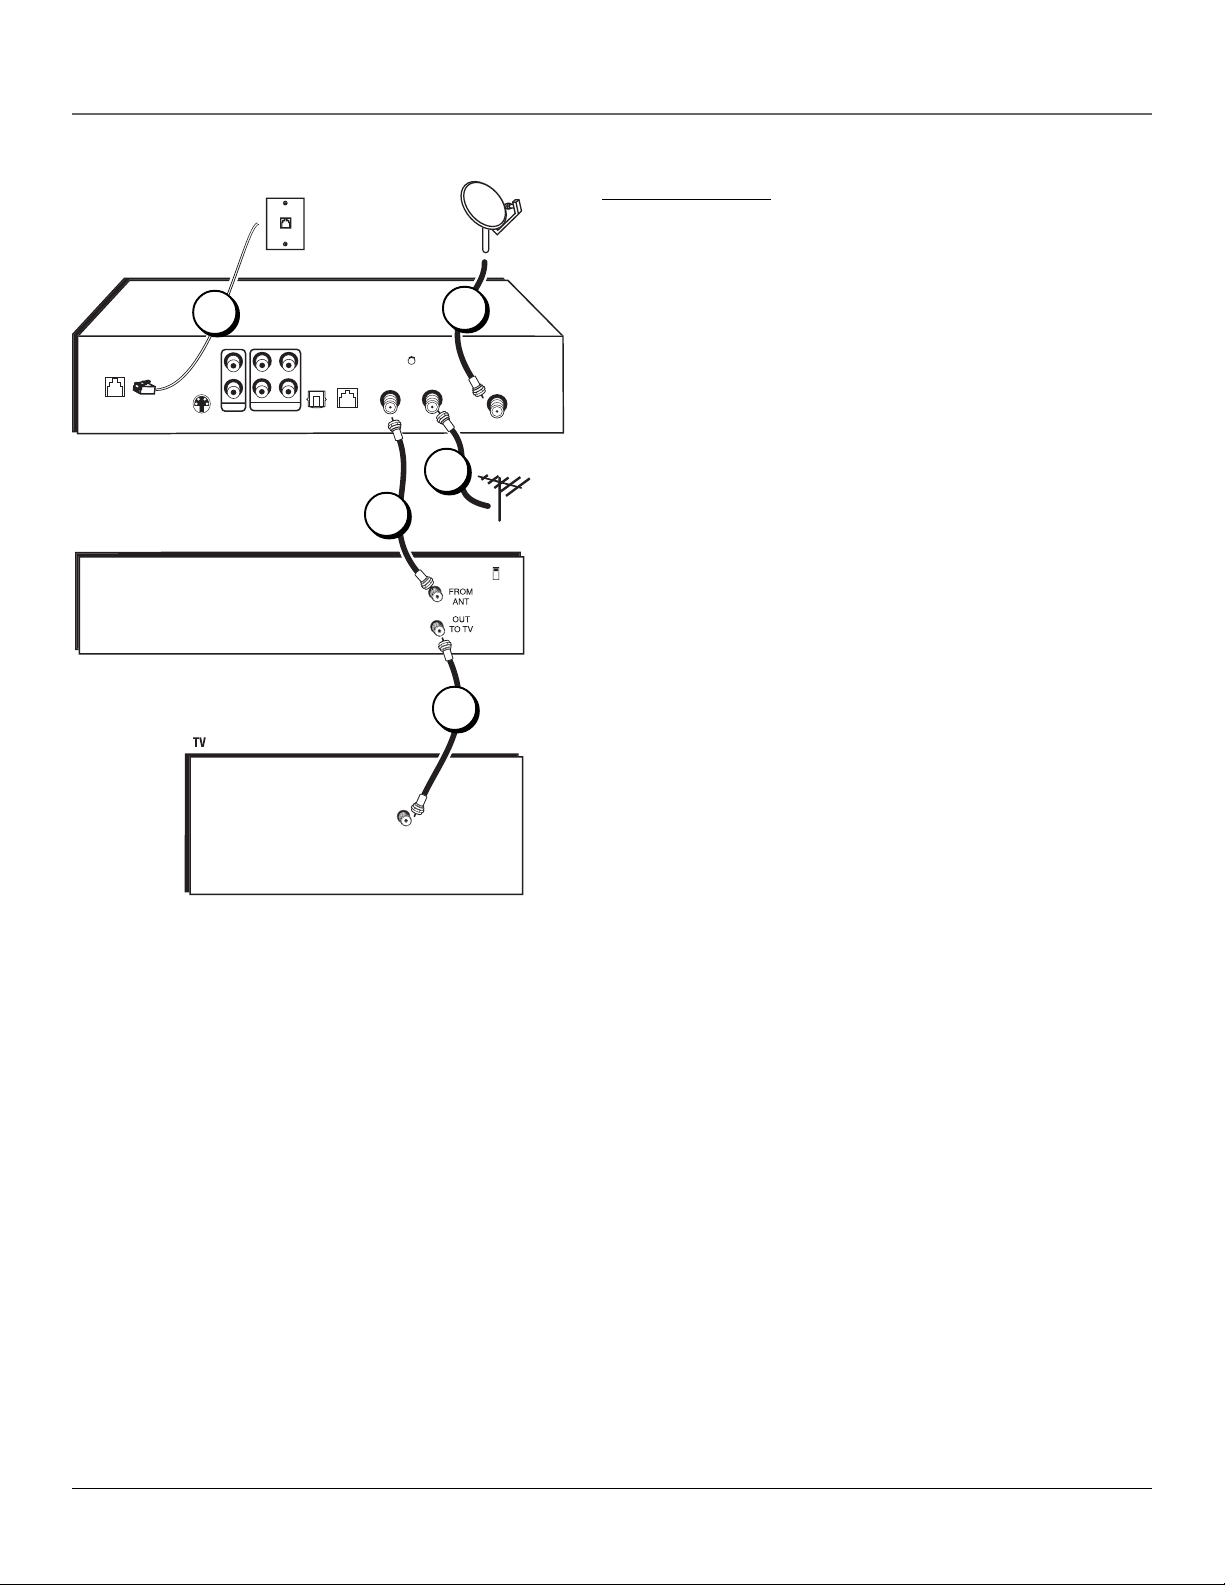
Basic Connection
RJ11
mo
phone jac
– R –
– L –
DIGITAL
AUDIO
LOW SPEED
DATA
OUT TO TV
2
Di
GROUND
atellite
h Antenn
IN FROM ANT
4
3
1
SATELLITE IN
Cable or
Off-air
Antenna
CH3
CH4
Using RF Coaxial cables for all connections
This connection provides standard picture quality. This connection is only
recommended for use with TVs that do not have S-Video or A/V input jacks.
What you will need (see page 6 for descriptions of these cables):
• Two (2) RF coaxial cables
• One (1) telephone line cord
• Coaxial cable lines fed from a digital satellite antenna and a standard TV
antenna (or cable line)
Making the Connection
1. Connect the satellite dish antenna feed (RG-6 coaxial cable) to the
SATELLITE IN jack on the satellite receiver.
2. Connect one end of an RF coaxial cable to the OUT TO TV jack on the
satellite receiver, and the other end to the antenna input jack on the
VCR.
3. Connect one end of an RF coaxial cable to the antenna output jack on
the VCR, and the other end to the TV’s antenna input jack.
4. Connect the cable box or off-air antenna feed (RF coaxial cable) to the
IN FROM ANT jack on the satellite receiver.
5. Connect one end of the supplied telephone line cord to the PHONE JACK
on the back of the satellite receiver, and the other end to an RJ11-type
modular phone jack (the most common type of phone jack).
Go to Page 6
FR
Note: Your VCR and TV back panels may not look exactly
like the ones shown.
Using Your Components
To watch DIRECTV® programming:
Tune the TV to the satellite receiver’s output channel (either channel 3 or 4).
Note: You can change the satellite receiver’s output channel by pressing the remote control’s DIRECTV button, then the MENU button,
then select System Setup, then Receiver Options, and finally select Output Channel. Use the remote control’s arrow and SELECT
buttons to highlight and select the desired output channel. Tune the TV to that channel to see the satellite receiver’s picture.
To record DIRECTV programming:
Follow the directions in the previous step, then set your VCR to record on its proper input channel (channel 3 or 4 if
using RF coaxial cable to make the connection, Video Line Input if using A/V cables to connect the VCR to the
satellite receiver).
To view VCR recordings:
Tune the TV to channel 3 or 4 (whichever is set on the VCR as its output channel). Begin VCR playback as usual.
Chapter 1 5
Page 8
Connections & Setup
Receiver or Decoder
with Optical Input
DIGITAL
AUDIO
INPUT
Advanced Audio (Optical Digital
Audio Output Connection)
Cables: Optical Digital Audio
Your digital satellite receiver has a PCM digital audio output
Digital Satellite Receiver
PHONE
S-VIDEO
VIDEO
– R –
– L –
AUDIO
DIGITAL
AUDIO
LOW SPEED
DATA
OUT TO TV
GROUND
IN FROM ANT
SATELLITE IN
jack. This can be connected to an external Digital Audio
Receiver/Decoder equipped with a compatible digital audio
input.
Note: Your digital audio receiver’s back panel may not look exactly like the
one pictured.
This satellite receiver’s digital output jack outputs digital audio signals
in PCM format. It is designed for connection to an external digital
audio receiver/ decoder.
Making the Connection
Connect one end of the optical cable to the DIGITAL AUDIO output jack on the satellite receiver, and to the digital audio input jack on your digital
audio receiver/decoder.
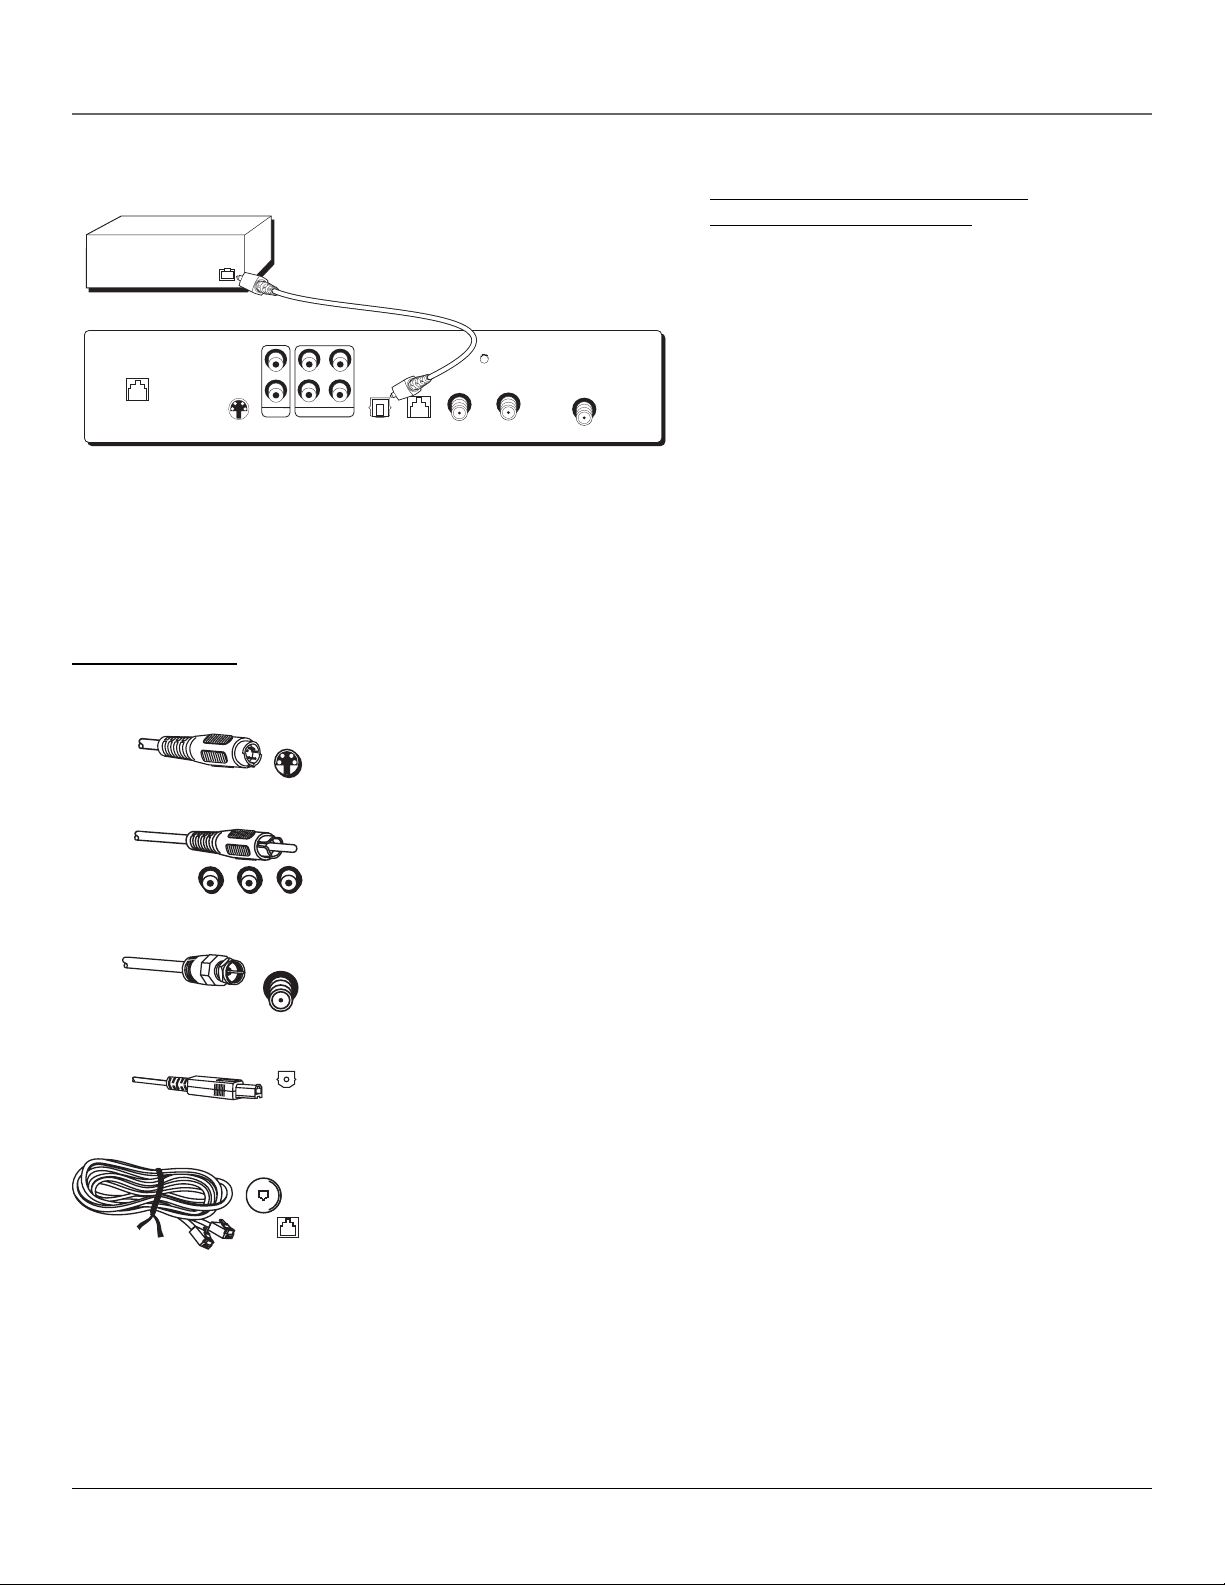
Jacks and Cables
Below is a description of the jacks and cables you can use to make connections. Not all cables come with your digital satellite receiver.
S-Video Jack and Cable
S-Video jacks/cables provide this receiver’s best picture quality. Remember to connect the left and right audio
S-VIDEO
cables to the TV because the S-Video cable carries only the picture signal, not the sound.
LR
VIDEO AUDIO
ANTENNA IN
Audio/Video (A/V) Jack and Cable (RCA-type)
Audio/Video (A/V) cables provide good picture quality and stereo sound, and should be used if your TV has no Svideo jacks. The digital satellite receiver’s A/V jacks are color coded (yellow for video, red for right audio, and
white for left audio). If your TV has only one input for audio (mono), connect it to the left (white) audio jack on
the satellite receiver.
RF Jack and Coaxial Cable (F-type)
RF jacks provide good picture and mono sound quality. They should be used if A/V connections are not available
on your TV. RF jacks are used for off-air antenna and cable feed connections. The RF jacks on the receiver are
labeled IN FROM ANT and OUT TO TV. The coaxial cable supplied with your system is used to connect the receiver
to your TV/VCR’s antenna input jack.
Digital Audio Output
DIGITAL
AUDIO
If you own an A/V receiver that includes a PCM-compatible decoder, use a digital audio cable (not included) to
connect the satellite receiver to your external A/V receiver/decoder.
Telephone Jack and Cord
The telephone line cord is required to connect your satellite receiver to a telephone line if you choose to
subscribe to DIRECTV
will need an RJ11-type modulator jack (the most common type of phone jack) which might look like one of those
PHONE
pictured here. If you don’t have a modular jack, call your local telephone company to find out how to get one
installed.
®
programming. The phone line connection is used to periodically call out to DIRECTV. You
6 Chapter 1
Page 9

Connections & Setup
Satellite Receiver Rear Panel
This diagram illustrates each of the back panel jacks found on
your digital satellite receiver. When working with cables, be
sure to connect corresponding outputs and inputs (Video out
to Video in, Right Audio out to Right Audio in, etc.).
PHONE
S-VIDEO
VIDEO
– R –
– L –
AUDIO
DIGITAL
AUDIO
LOW SPEED
DATA
OUT TO TV
GROUND
IN FROM ANT
SATELLITE IN
For more information on the function of the back panel jacks
and many other features of your digital satellite receiver, press
the MENU button and select System Setup from the Main
menu, then select Receiver Index.
Back Panel Jacks (in alphabetical order)
AUDIO (R and L) Audio cables offer better sound quality than RF coaxial cables. Connect a second set of audio cables to another component, such
as a VCR or stereo.
DIGITAL AUDIO Connects the satellite receiver’s audio to a PCM-capable receiver or decoder. This audio connection typically provides the best sound
quality. Use an optical digital audio cable to make this connection.
IN FROM ANT Connect a standard TV antenna or cable feed to the satellite receiver using this jack. You can then switch between the satellite
receiver’s signal and the TV/cable feed using the remote control’s ANTENNA button to toggle between the two.
LOW SPEED DATA This port allows you to connect your digital satellite receiver to future services and accessories as they become available. A
shielded cable and additional hardware may be required.
OUT TO TV Connects the satellite receiver to your TV or VCR using RF coaxial cable. This jack provides the most basic connection, carrying average
sound and video quality.
PHONE Connects the satellite receiver to a telephone line. The digital satellite receiver requires a telephone line connection to periodically
communicate with your program provider.
SATELLITE IN Use to connect the satellite receiver to the satellite dish antenna.
S-VIDEO Provides better picture quality than VIDEO or RF coaxial cable jacks. If your TV has an S-Video jack, use it along with the audio jacks (S-
Video only carries picture information, not sound) to connect to your TV.
VIDEO Provides better picture quality than the OUT TO TV jack. Connect the second VIDEO jack to another device, such as a VCR. You must also
connect the AUDIO cables when using the VIDEO connection.
Chapter 1 7
Page 10
Connections & Setup
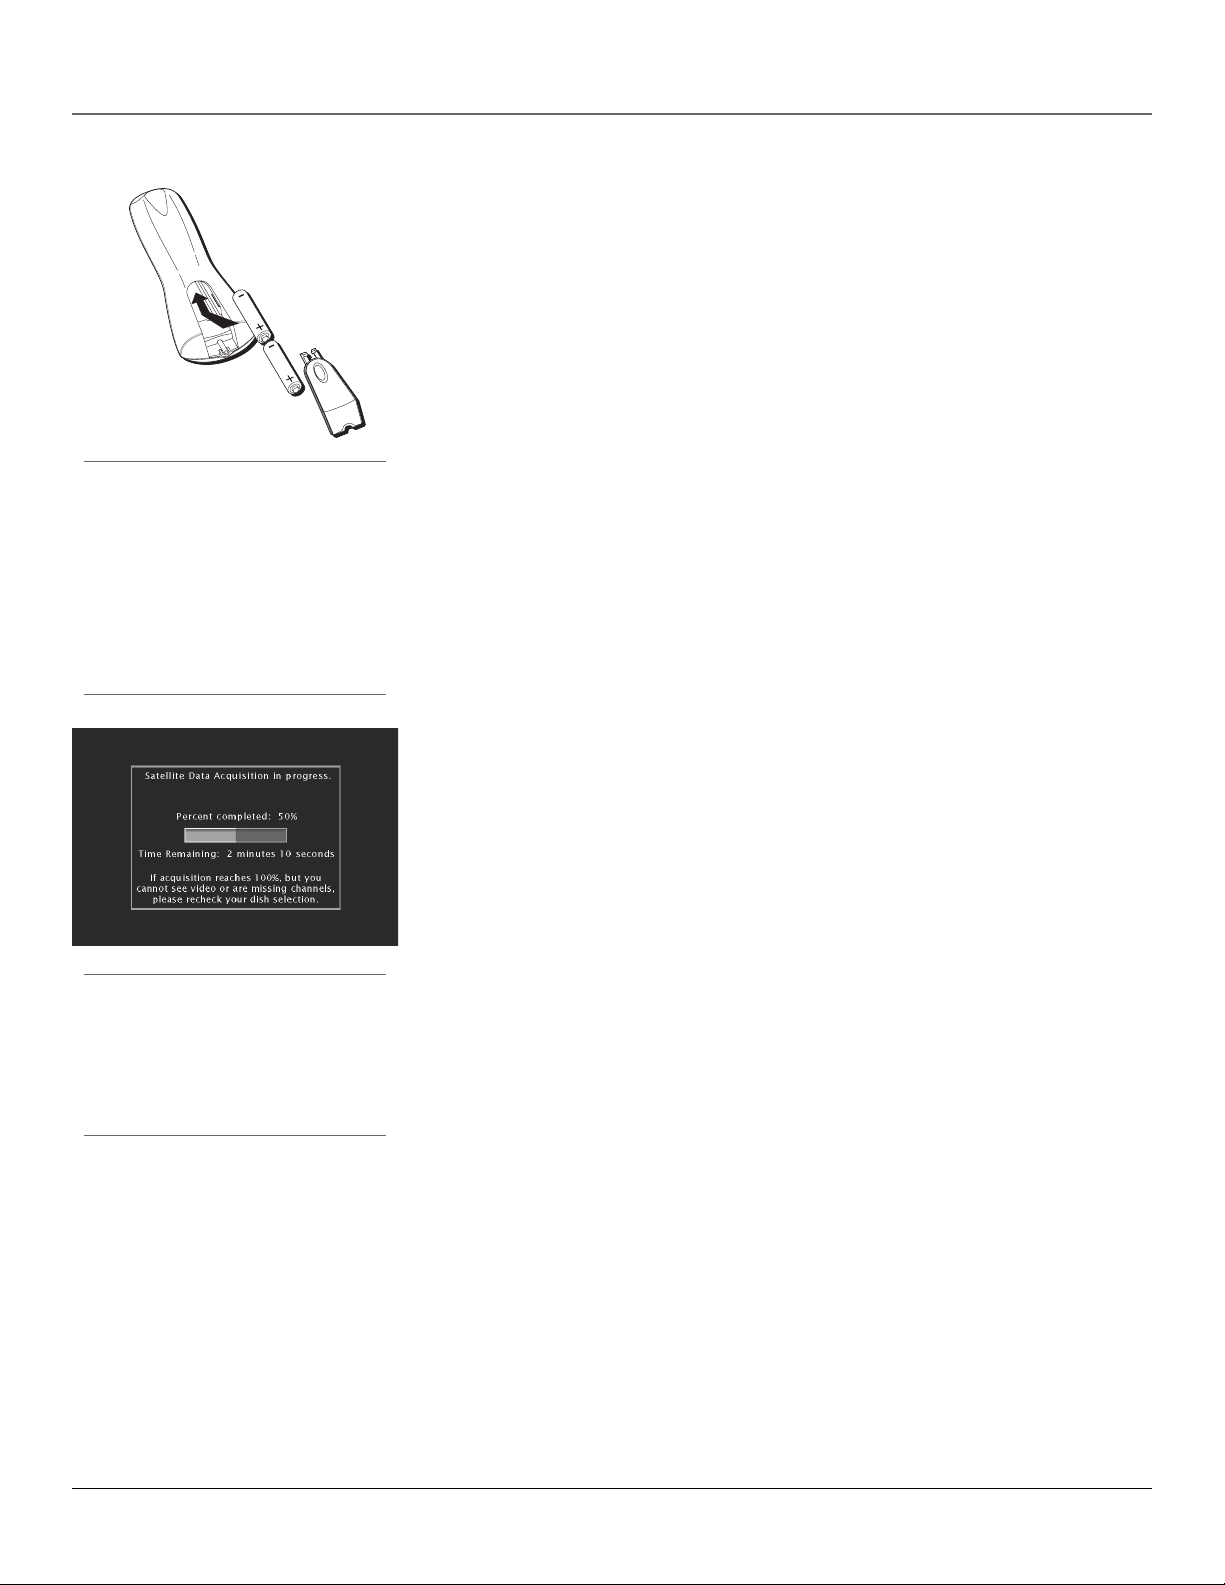
Place Batteries in the Remote Control
Follow these steps whenever you need to install or change the batteries in your digital satellite
receiver’s remote control.
Note: When replacing old batteries, you may need to reprogram the remote control to operate other devices.
Avoid pressing any of the remote control buttons while you’re replacing old batteries. If you press a remote control
button while replacing batteries, you will need to reprogram the remote control to operate other devices.
1. Remove the cover from the battery compartment.
2. Insert batteries in the battery compartment, matching
the + and – end of each battery.
3. Replace the cover.
Note:
The message “Searching for Satellite Signal” might
appear briefly at the bottom of your screen when
you turn on your satellite receiver for the first time.
This is normal.
If this message stays on the screen for more than
one minute, check your receiver’s on-screen signal
meter to make sure your antenna is receiving the
strongest possible satellite signal. See “Signal
Meter” on page 36 for more information.
Note
The Satellite Data Acquisition screen will also
appear when:
• your unit loses power (either from a power
outage or being unplugged)
• your unit loses the satellite signal for an
extended period of time.
Plug in and Turn on the Receiver
Plug the end of the power cord into the wall outlet. Be sure to insert the plug completely.
To turn on the satellite receiver, press the DIRECTV button on the remote control or the POWER
button on the front panel. If your TV brand is RCA, GE, or Proscan, press the TV button on the remote
control to turn on the TV. If your TV brand is not RCA, GE, or Proscan, see page 11 in the next section,
Using the Remote Control, for details on programming the satellite receiver’s remote control to
operate your TV.
Wait for the Receiver to Download ADVANCED PROGRAM GUIDE™ Data
The first time you connect a receiver to a satellite antenna you’ve already installed and pointed
correctly, the receiver starts to gather information for the program guide.
After you turn on your receiver and tune your TV to the correct video input channel, a progress bar
appears indicating that the receiver is gathering this program guide information.
To prevent any damage to your TV screen, the progress bar disappears after 2 minutes (the screen
goes blank).
Note: When the progress bar reaches 100%, there might be a delay before you actually see video on the screen.
If the screen stays blank for more than 2 to 3 minutes, you need to reset the receiver.
To reset the receiver:
1. Unplug the satellite receiver’s power cord from the power outlet.
2. Wait a few seconds, and plug the power cord back into the outlet.
3. Turn on the receiver and wait for it to download program guide information.
8 Chapter 1
Page 11
ON OFF
VCR
AUX2
CH
GO
ACK
SKIP
MUTE
O
MENU
CLEAR
GUIDE
AUX1
VOL
CH -
C
(-)
S
CT
DIRECT
V
H
L
FET
Arrow
buttons
B
INF
ELE
MENU
button
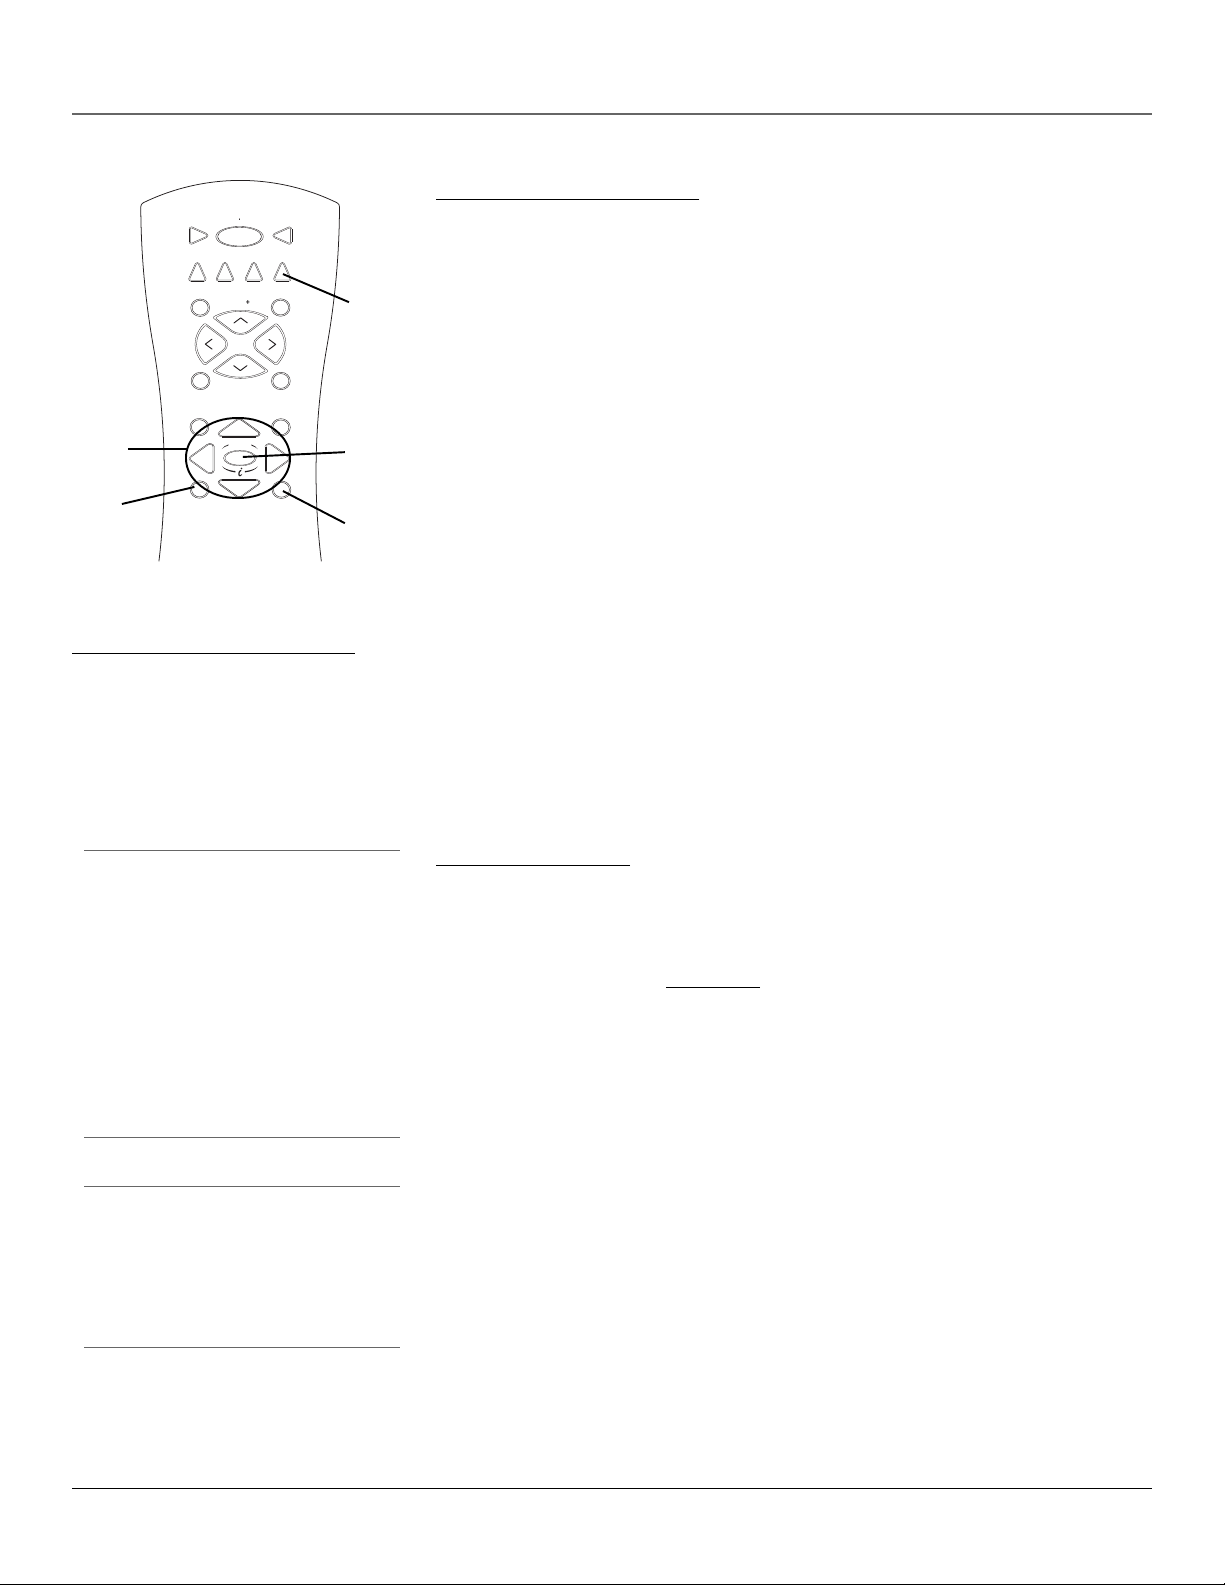
Complete the Assisted Setup
DIRECTV
button
SELECT
button
CLEAR
button
Connections & Setup
Using Highlight and Select
All on-screen menus can be handled the same way, using highlight and select navigation.
Highlight and select navigation has two steps:
1. Use the arrow buttons (up, down, left, and right) on the remote control to highlight different
choices on the screen.
2. Press SELECT to select the highlighted item.
Note: When a highlighted on-screen menu choice has a number beside it, you can also press the corresponding
number button on the remote control to select it.
Once you know how to navigate on-screen menus, you can complete the Assisted Setup (see the
next step) and explore the menu system.
To display the on-screen menu system, press the remote control’s DIRECTV button, then press the
MENU button.
Note: Don’t worry about getting stuck inside a menu. Pressing the CLEAR button on the remote control takes you
out of the menu system and back to the program you were watching.
If you installed your satellite dish antenna yourself, you may have already used the Assisted Setup to find dish-pointing coordinates, acquire and finetune the signal, and run a system test.
If you need to run the setup again, select System Setup from the Main menu, then select Assisted Setup.
To check your dish-pointing coordinates or run the signal strength meter, display the Main menu, then select System Setup, and finally Dish Pointing.
Tip
When you order programming, you need to know your
access card and receiver ID numbers. To get these
numbers, select System Setup from the Main menu,
then System Test.
Wait for the system to run all of its tests. The access
card and receiver ID numbers are displayed at the end
of the system test.
Write the access card and receiver ID numbers in the
space below for easy reference:
Order Programming
After you have installed your DIRECTV® System, you should contact DIRECTV to order DIRECTV®
programming.
With this receiver and the proper satellite dish antenna, you may be able to subscribe to local
channels from DIRECTV in certain areas. Additional equipment may be required in some markets.
Check with your retailer or visit
DIRECTV in your area.
ACTIVATION OF PROGRAMMING MAY BE SUBJECT TO CREDIT APPROVAL AND REQUIRES VALID
SERVICE ADDRESS, SOCIAL SECURITY NUMBER AND/OR MAJOR CREDIT CARD. DEPOSIT OR
PREPAYMENT MAY BE REQUIRED. Professional and collegiate sports subscriptions sold separately.
Eligibility for local channels based on service address within certain designated market areas as
DIRECTV.com for information on availability of local channels from
defined by Nielsen Media Research, Inc. In some areas served by members or affiliates of the
National Rural Telecommunications Cooperative, local channels may be available from DIRECTV
rather than the NRTC member or affiliate. Programming, pricing, terms and conditions subject to
change. Hardware and programming sold separately. Pricing is residential. Taxes not included.
Equipment specifications and programming options may vary in Alaska and Hawaii. DIRECTV
Important!
If local channels are available in your area and you
decide to subscribe, the receiver will need to download
all of your program guide information again. This
might take a few minutes. See “Wait for the Receiver
to Download ADVANCED PROGRAM GUIDE™
Information” on page 8 for more information.
services not provided outside the U.S. DIRECTV programming is sold separately and independently
of DIRECTV System hardware. A valid programming subscription is required to operate DIRECTV
System hardware. Receipt of DIRECTV programming is subject to the terms of the DIRECTV
Customer Agreement; a copy is provided at DIRECTV.com and in your first bill. Activate your
DIRECTV
®
programming today at 1-800-DIRECTV (1-800-347-3288).
Chapter 1 9
Page 12

Chapter 2: Using the Remote Control
STOPPAUSE
ON OFF
CR
AUX2
CH
GO
ACK
SKIP
MUTE
O
MENU
CLEAR
GUIDE
A
A
3
5
6
7
8
9
0
WHO INPUT
AUX1
VOL
CH -
C
(-)
V
Remote Control Buttons
ON•OFF Turns the component you are
controlling on or off. When pressed twice
VCR When programmed, tells the remote to
control the VCR. This button lights up when you
press a valid button in VCR mode (see Modes of
Operation on page 12 for more details).
AUX1 Turns on a second RCA satellite receiver.
AUX1 can also be programmed to control an
auxiliary component. This button lights up when
you press a valid button in AUX1 mode (see Modes
of Operation on page 12 for more details).
DVD When programmed, tells the remote to
operate the DVD player. This button lights up when
you press a valid button in DVD mode (see Modes
of Operation on page 12 for more details).
MUTE When programmed to control a TV or
audio receiver, this button reduces that
component’s volume to its minimum level. Press
again to restore the volume.
CH + and CH - Use to scan up and down
through the channels in the current channel list.
In the program guide or menu system, use the CH
buttons to page up and down a screen at a time.
FETCH In the program guides, displays the guide
toolbar at the bottom of the screen. During
normal viewing, displays the Fetch menu with up
to eight different actions, or executes a single
task- depending on the preferences set.
GUIDE Brings up the program guide. Subsequent
presses of the GUIDE button switch between the
Detail and Grid guide formats.
SELECT/i (interactive) Selects a highlighted
choice if you are in the menu system. Also brings
up the password challenge and purchase offer
screens outside of the menu system.
Press the SELECT button when the DIRECTV
INTERACTIVE
™
icon ( ) appears during interactive
programs and commercials. Pressing SELECT
displays more information and offers the chance
to interact with what is displayed on screen.
MENU Displays the Main menu. When using the
remote control to operate other components, the
MENU button might also bring up that
component’s menu system.
within two seconds, all components that
are on are turned off (this feature only
works with most RCA, GE, and Proscan
products). The component keys also light
up, one after another, counterclockwise in
a circle.
V
H
L
FET
DIRECT
INF
NTENN
TV When programmed, tells the remote to
control the TV. This button lights up when you
press a valid button in TV mode (see Modes of
Operation on page 12 for more details).
AUX2 Turns on a compatible RCA amplifier/
audio receiver. AUX2 can be programmed to
control an auxiliary component. This button lights
up when you press a valid button in AUX2 mode
(see Modes of Operation on page 12 for more
details).
DIRECTV Tells the remote to control the digital
satellite receiver. This button lights up when you
press a valid button in DIRECTV mode (see Modes
of Operation on page 12 for more details).
SKIP Activates the commercial skip mode on
some RCA, GE, and Proscan products that offer
Commercial Skip feature. See the user’s manual
that came with your TV for more information.
B
Activates the search function on some RCA, GE, or
ProScan VCRs (when the remote is in VCR mode).
VOL up and down When programmed, adjusts
the audio volume of your TV or audio receiver.
GO BACK Moves you back and forth between
the last two selected channels. In the menu
system, returns you to the previous screen.
INFO Brings up the on-screen channel banner. In
the program guides, INFO gets information about
the highlighted program or channel. In the menu
system, INFO displays context-sensitive help for
highlighted control elements.
Arrows Moves the on-screen highlight up, down,
left, or right.
CLEAR Removes the on-screen displays and
returns you to normal viewing.
Digit Buttons (0 - 9) Tune directly to a specific
channel. In the menu system, use 1-9 to select
menu items, or use 0 to return to the previous
menu screen.
WHO•INPUT Press one or more times to scroll
through the user profiles. When using the remote
control to operate an RCA, GE, or PROSCAN TV (in
TV mode), press the WHO•INPUT button one or
more times to scroll through the available video
input sources.
Transport Buttons (REVERSE, PLAY,
FORWARD, RECORD, STOP, PAUSE) In
on-screen guides, PLAY advances the
display one page, FORWARD advances the
display 6 hours and REVERSE moves time
backward 6 hours. When the remote
ANTENNA In TV mode, toggles between the
satellite and standard TV/cable signals when the
satellite receiver is connected to the TV using the
OUT TO TV jack. In VCR mode, functions as a TV/
VCR input button.
control is programmed, these buttons also
control an auxiliary component, such as a
VCR or DVD player (when the remote is in
the correct mode).
Note: The component key corresponding to the mode you’re in flashes when the remote batteries are low and you press a button on the remote. A warning banner may also
appear on-screen when you press a remote button and your batteries are low (if you’re watching satellite programming).
10 Chapter 2
Page 13
Using the Remote Control
STOPPAUSE
ON OFF
CR
AUX2
CH
GO
ACK
SKIP
MUTE
O
MENU
CLEAR
GUIDE
A
A
3
5
6
7
8
9
0
WHO INPUT
AUX1
VOL
CH -
C
(-)
V
Top of the Digital Satellite Receiver
This diagram illustrates the buttons on the top (also referred to as the front panel) of the digital
satellite receiver. For more information on the function of the front panel buttons and many
other features of your digital satellite receiver, press the MENU button and select System Setup
from the Main menu, then select Receiver Index.
M
POWER
E
N
Front Panel Buttons
POWER Use to turn your digital satellite receiver on for viewing or off when you are not viewing it. Your receiver will still be able to download
software upgrades and receive messages from program providers when it is off.
MENU / SELECT Use this button to display the Main menu, password challenge screen or purchase offer screen. If you are already in the menu
system, pressing this button selects the highlighted item.
Arrows Use the navigation arrows to move the on-screen highlight up, down, left, or right.
INFO Use this button to display the channel banner. Press twice to display additional program information, when available. While in the menu
system INFO also summons context sensitive help about a highlighted menu item.
T
C
E
L
E
U
S
/
INFO
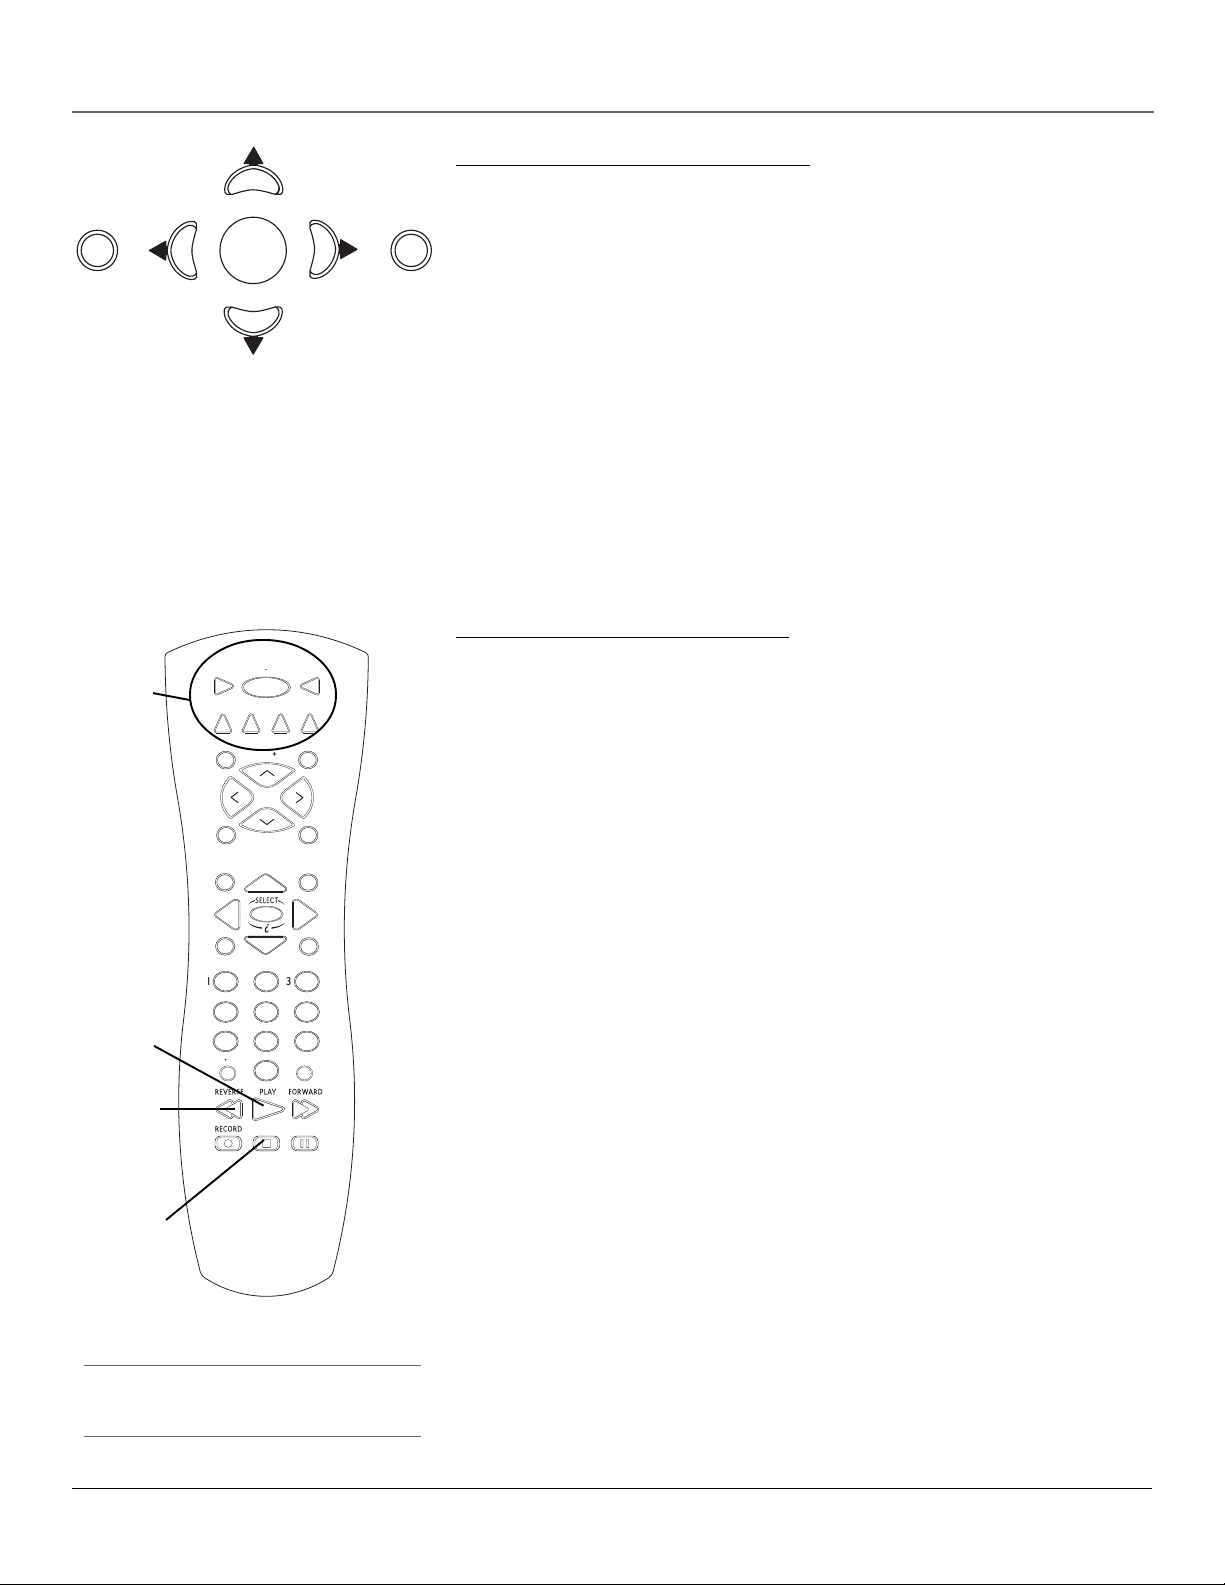
Programming the Remote Control
V
Component
buttons and
DIRECT
ON•OFF
button
H
L
FET
B
INF
PLAY
button
NTENN
REVERSE
button
STOP
button
Note:
The DIRECTV button cannot be programmed.
The digital satellite receiver’s remote can be programmed to control most brands of remote
controllable components. The remote is already programmed to control most RCA, GE and
Proscan components; it may need to be programmed to control other manufacturers’ brands.
Testing the Remote Control
To determine whether the universal remote control needs to be programmed, turn a component
on, such as a VCR, point the remote at the VCR, and press the VCR button. Then press the
ON•OFF or CH + and CH - buttons to see if the VCR responds to the remote commands. If not,
the remote needs to be programmed.
There are two ways to program the remote control: Automatic Code Search or Direct Entry.
Using Automatic Code Search
The following instructions can be used to program the remote to control many of the
components connected to your TV. If you want to exit the automatic code search without
programming any of your components, press the CLEAR button until the component button
you’re trying to program turns off.
1. Turn on the component you want to control (VCR, satellite receiver, etc.)
2. Press and hold the button you want to program. While holding the component button, press
and hold ON•OFF until all of the component buttons (VCR, DVD, TV, DIRECTV, AUX1 and
AUX2) flash. Then, release both buttons.
Note: The AUX1 and AUX2 buttons will only search through the codes for their default type of
component during the automatic code search – satellite receivers for AUX1 and audio components for
AUX2. If you want to use these buttons for a different type of component – for example, a DVD player
for AUX1 – then use direct entry to program these buttons. See the next page for more information.
3. Point the remote at the component, press and release PLAY, then wait five seconds or until
the component button you’re trying to program stops flashing.
At this point the remote control is searching for the correct code to program, so keep
pointing it at the component. If, after five seconds, the component you want to control does
not turn off, press and release PLAY again to tell the remote to search the next set of codes.
Continue pressing and releasing PLAY until the component turns off or until the all of the
component buttons on the remote flash 4 times in unison. If the component has not turned
off by the time all the component buttons on the remote control flash 4 times in unison,
then the remote cannot control that particular component.
If the component you want to control does turn off:
1. Press and release REVERSE, then wait two seconds. Repeat this step until the component
turns back on.
2. To finish, press and hold STOP until the component button you’re trying to program on the
remote control turns off. This saves the code to that button.
Chapter 2 11
Page 14

Using the Remote Control
ON OFF
CR
AUX2
V
AUX1
C
Important:
This remote may not be compatible with all models of all
brands of components. It also may not operate all
functions of the remote that came with your component.
Note:
The DIRECTV button cannot be programmed.
Component buttons
V
DIRECT
H
Using Direct Entry
1. Turn on the component to be programmed.
2. Look up the brand and code number(s) for the component on the code list at the end of this
section.
3. On your remote control, press and hold the component button you want to program.
4. While pressing the component button, enter a code from the code list. If all of the
component buttons flash 4 times in unison, then the code you’ve entered is not the right
kind of code for that button (see pages 13-14 to see which buttons can be programmed to
control the component you want).
5. Release the component button, point the remote at the component and then press ON•OFF
to see if the component responds to the remote control commands. If it doesn’t, try pressing
the component button and then ON•OFF (or other buttons on the remote) again.
6. If you get no response, repeat these steps using the next code listed for your brand, until the
component responds to the remote control commands.
Operating Other Components
Once the remote has been programmed successfully, you are ready to use it to operate your
components.
To Operate the Component:
1. Press the component button (TV, VCR, DVD, DIRECTV, AUX1, or AUX2) to set the remote to
control the component.
2. Press ON•OFF to turn the component on or off.
3. Use the remote control buttons that apply to that component. The component button on
your remote lights up when you press valid buttons while in that component’s mode.
Note: Your remote’s buttons might operate differently for other components, especially when you’re
using another component’s menu system.
Tip:
If something unexpected happens (or if nothing happens)
when you press a remote control button, check which
component button lights up when you press that button.
If the wrong component button lights up, press the
component button the corresponds to the component you
want to control – this puts the remote control in the right
mode. Now that the remote is in the correct mode, press
the button you were pressing before.
Modes of Operation
Because this universal remote can control several different components (DVD player, VCR, cable
box, etc.) it uses operational modes triggered by the component buttons. For example, if you
want the remote control to operate the TV, press the TV button to put the remote into TV mode.
If you want the remote to operate the VCR, press the VCR button.
The button corresponding to the mode the remote is in lights up when you press any button that
works in that mode. For example, if you’re in TV mode and you press the VOL+ button, the TV
button lights up. This tells you that the command to increase the volume is being sent to the TV
(and not the satellite receiver, for example).
Controlling a Second RCA Satellite Receiver
The remote can control two RCA satellite receivers. From the Main menu, select System Setup,
then Receiver Options, then Remote Setup. Then follow the on-screen instructions. By default,
the DIRECTV button is used to control the first RCA satellite receiver and the AUX1 button is
used to control the second RCA satellite receiver.
If your second receiver is an RCA, GE, or Proscan and you want to control it using the AUX1
button, use code 5001. Code 5000 is used by the DIRECTV button.
If you want to control a second non-RCA satellite receiver, use the AUX1 or AUX2 buttons. See
the Using Automatic Code Search section on the previous page for more information.
12 Chapter 2
Page 15

Code List
TV
(programmable to the TV, AUX1 and AUX2 buttons)
Abex ................................................................................... 1172
Admiral ......................................................... 1001, 1173, 1211
Adventura .......................................................................... 1174
Aiko .................................................................................... 1016
Akai ................................................................................... 1002
Alleron .............................................................................. 1046
Amtron .............................................................................. 1038
Anam National ....................... 1003, 1038, 1192, 1193, 1194
AOC ..................... 1004, 1005, 1006, 1007, 1175, 1176, 1195
Audiovox .......................................................................... 1038
Belcor ................................................................................ 1004
Bell & Howell ............................................... 1001, 1083, 1162
Bradford ............................................................................ 1038
Brokwood ......................................................................... 1004
Candle ................................................ 1004, 1006, 1008, 1174
Celebrity ........................................................................... 1002
Centurion .......................................................................... 1009
Citizen ...... 1004, 1006, 1008, 1016, 1038, 1105, 1171, 1174,
Colortyme ..................................................... 1004, 1006, 1010
Concerto ................................................................. 1004, 1006
Contec/Cony ...................................... 1012, 1013, 1014, 1038
Craig .................................................................................. 1038
Crown ...................................................................... 1038, 1171
Curtis Mathes .............. 1000, 1004, 1006, 1015, 1105, 1162,
CXC ................................................................................... 1038
Daewoo .............. 1004, 1005, 1006, 1016, 1017, 1018, 1127,
Daytron ......................................................... 1004, 1006, 1171
Dimensia ........................................................................... 1000
Dumont ................................................................... 1004, 1151
Electroband ...................................................................... 1002
Electrohome ................. 1003, 1004, 1006, 1019, 1020, 1022
Emerson ............ 1004, 1006, 1012, 1023, 1024, 1025, 1026,
1027, 1028, 1029, 1030, 1031, 1032, 1033, 1034, 1035,
1036, 1037, 1038,1039, 1041, 1042, 1043, 1044, 1046,
1047, 1123, 1124, 1162, 1171, 1177, 1179, 1191, 1208
Envision .................................................................. 1004, 1006
Fisher ....................................... 1048, 1049, 1051, 1162, 1180
Fujitso ............................................................................... 1046
Funai ....................................................................... 1038, 1046
Futuretec ........................................................................... 1038
GE .1000, 1003, 1004, 1006, 1022, 1052, 1054, 1055, 1087,
Gibralter .................................................................. 1004, 1151
Goldstar ... 1004, 1005, 1006, 1012, 1019, 1056, 1057,1058,
Grundy .......................................................... 1038, 1046, 1171
Hallmark ................................................................. 1004, 1006
Harvard ............................................................................. 1038
Hitachi .... 1004, 1006, 1012, 1013, 1014, 1059, 1060, 1061,
1135, 1136, 1137, 1138, 1139, 1140, 1141, 1142, 1143,
IMA ................................................................................... 1038
Infinity .............................................................................. 1062
JCPenney 1000, 1004, 1005, 1006, 1008, 1022, 1052, 1054,
1058, 1063, 1064, 1072, 1087, 1105, 1128, 1171, 1172,
Janeil .................................................................................. 1174
JBL ..................................................................................... 1062
JCB .................................................................................... 1002
Jensen ..................................................................... 1004, 1006
JVC .......... 1012, 1013, 1014, 1054, 1060, 1065, 1066, 1067,
Kawasho ...................................................... 1002, 1004, 1006
Kenwood ...................................................... 1004, 1006, 1019
Kloss Novabeam ............................... 1068, 1069, 1174, 1183
KTV ..................................................... 1038, 1070, 1171, 1177
Loewe ................................................................................ 1062
Logik ................................................................................. 1083
Luxman ................................................................... 1004, 1006
LXI ................................ 1000, 1006, 1049, 1062, 1071, 1072,
Magnavox ................... 1004, 1006, 1008, 1019, 1062, 1068,
Majestic ............................................................................. 1083
Marantz .............................................. 1004, 1006, 1062, 1078
Megatron ................................................................ 1006, 1059
Memorex ................................. 1001, 1006, 1082, 1083, 1162
1164, 1165, 1166, 1167, 1168, 1181, 1213
1155, 1156, 1171, 1172
1144, 1145,1146, 1148, 1150, 1179, 1198, 1199
1157,1158, 1159, 1182
1073, 1162, 1181, 1207
1069, 1075, 1076, 1077, 1088, 1130, 1131,
1132, 1133, 1134, 1183, 1219, 1235
1177
1171, 1212
1171, 1196
1181, 1201
MGA ............................. 1004, 1005, 1006, 1019, 1022, 1051,
Midland ..................................... 1054, 1151, 1171, 1172, 1181
Minutz ............................................................................... 1052
Mitisubishi ......... 1004, 1005, 1006, 1019, 1022, 1051, 1079,
Montgomery Ward .......................................................... 1083
Motorola ................................................................. 1003, 1173
MTC .................................................... 1004, 1005, 1006, 1105
Multitech .......................................................................... 1038
Multivision ........................................................................ 1084
NAD ..................................................... 1006, 1071, 1072, 1185
NEC .......................................... 1003, 1004, 1005, 1006, 1200
Nikko ....................................................................... 1006, 1016
NTC ..................................................................................... 1016
Onwa ................................................................................. 1038
Optimus .............................................................................. 1185
Optonica ................................................................. 1095, 1173
Orion ....................................................................... 1035, 1191
Panasonic ................................ 1003, 1054, 1062, 1170, 1214
Philco ........................... 1003, 1004, 1005, 1006, 1008, 1012,
Philips ............... 1003, 1004, 1008, 1012, 1019, 1062, 1068,
Pilot ......................................................................... 1004, 1171
Pioneer ................1004, 1006, 1090, 1091, 1092, 1179, 1185
Portland ................................... 1004, 1005, 1006, 1016, 1171
Price Club .......................................................................... 1105
Prism ................................................................................. 1054
Proscan ................................................................... 1000, 1181
Proton ................................................ 1004, 1006, 1012, 1093
Pulsar ...................................................................... 1004, 1151
Quasar ................................................ 1003, 1054, 1070, 1094
Radio Shack/Realistic .......... 1000, 1004, 1006, 1012, 1038,
RCA ................... 1000, 1003, 1004, 1005, 1006, 1007, 1019,
1096, 1098, 1099, 1100, 1101, 1102, 1103, 1129, 1179,
Runco ................................................................................. 1151
Sampo ................................................ 1004, 1006, 1171, 1172
Samsung ............ 1004, 1005, 1006, 1012, 1015, 1019, 1104,
Samsux .............................................................................. 1171
Sansui ................................................................................ 1191
Sanyo ............................ 1004, 1048, 1049, 1080, 1107, 1108,
Scotch ............................................................................... 1006
Scott ................... 1004, 1006, 1012, 1024, 1035, 1038, 1046
Sears ........ 1000, 1004, 1006, 1013, 1014, 1019, 1046, 1048,
Sharp ............................. 1004, 1006, 1012, 1029, 1095, 1111,
Shogun .............................................................................. 1004
Signature ...................................................... 1001, 1083, 1115
Simpson ............................................................................ 1008
Sony .................................................. 1002, 1205, 1216, 1218
Soundesign ............................. 1004, 1006, 1008, 1038, 1046
Squareview ........................................................................ 1189
SSS .......................................................................... 1004, 1038
Starlite .............................................................................. 1038
Supre-Macy ....................................................................... 1174
Supreme ............................................................................ 1002
Sylvania .......................1004, 1006, 1008, 1019, 1062, 1068,
Symphonic ................................................... 1033, 1038, 1189
Tandy ................................................................................. 1173
Tatung ............................................................................... 1003
Technics ............................................................................ 1054
Techwood..................................................... 1004, 1006, 1054
Teknika ... 1004, 1005, 1006, 1008, 1012, 1013, 1014, 1016,
Telecaption ........................................................................ 1117
TMK ......................................................................... 1004, 1006
Toshiba ........................... 1049, 1071, 1072, 1105, 1109, 1117,
Totevision .......................................................................... 1171
Universal ................................................................. 1052, 1087
Victor ...................................................................... 1066, 1182
Vidtech ......................................................... 1004, 1005, 1006
Viking ................................................................................ 1174
Wards ................ 1000, 1001, 1004, 1005, 1006, 1019, 1024,
Yamaha .............................................. 1004, 1005, 1006, 1019
Zenith ........ 1004, 1083, 1151, 1152, 1153, 1154, 1210, 1217
1019, 1062, 1068, 1069, 1075, 1077, 1183
1069, 1075, 1076, 1086, 1087, 1088, 1089
1049, 1095, 1162, 1171, 1172
1181, 1187, 1188, 1190, 1202, 1203, 1215, 1233
1105, 1106, 1171, 1172, 1204
1049, 1051, 1066, 1071, 1072, 1109, 1110, 1162,
1112, 1113, 1122, 1171, 1173
1069, 1075, 1076, 1077, 1088, 1116, 1161, 1183
1038, 1046, 1076, 1082, 1083, 1105, 1170, 1171
1033, 1046, 1052, 1062, 1068, 1069, 1075,
1076, 1083, 1087, 1088, 1095, 1119, 1120
1079, 1080, 1082
1080, 1081, 1082, 1125
1162, 1169, 1180
1180, 1181, 1189
1118, 1160, 1162
VCR
(programmable to the VCR, AUX1 and AUX2 buttons)
Admiral ........................................................................ 2132
Adventura .................................................................... 2026
Aiko ............................................................................. 2027
Aiwa ............................................................................. 2026
Akai ........ 2003, 2004, 2005, 2007, 2008, 2111, 2112, 2113
American High ............................................................ 2021
Asha ............................................................................. 2013
Audio Dynamics ................................................ 2009, 2010
Audiovox ..................................................................... 2014
Beaumark .................................................................... 2013
Bell & Howell ............................................................. 2011
Broksonic .......................................................... 2012, 2025
Calix ............................................................................. 2014
Candle ............. 2013, 2014, 2015, 2016, 2017, 2018, 2019
Canon ...................................................... 2021, 2022, 2114
Capehart ............................................................ 2020, 2110
Carver .......................................................................... 2062
CCE .................................................................... 2027, 2061
Citizen .... 2013, 2014, 2015, 2016, 2017, 2018, 2019, 2027
Colortyme ....................................................................2009
Colt .............................................................................. 2061
Craig .............................................. 2013, 2014, 2023, 2061
Curtis Mathes ...................... 2000, 2009, 2013, 2016, 2018,
Cybernex ..................................................................... 2013
Daewoo . 2015, 2017, 2019, 2025, 2026, 2027, 2028, 2110
Daytron ........................................................................ 2110
DBX ................................................................... 2009, 2010
Dimensia ........................................................... 2000, 2131
Dynatech ..................................................................... 2026
Electrohome ...................................................... 2014, 2029
Electrophonic .............................................................. 2014
Emerson .......... 2012, 2014, 2015, 2021, 2024, 2025, 2026,
2029, 2030, 2031, 2032, 2033, 2034, 2035, 2036,
2037, 2038, 2039, 2040, 2041, 2042, 2044, 2045,
Fisher ..... 2011, 2023, 2048, 2049, 2050, 2051, 2052, 2118
Fuji ..................................................................... 2021, 2119
Funai ............................................................................ 2026
Garrard ........................................................................ 2026
GE ....................................... 2000, 2001, 2013, 2021, 2022,
Goldstar ......................................... 2009, 2014, 2018, 2054
Gradiente ..................................................................... 2026
Harley Davidson ......................................................... 2026
Harman Kardon .......................................................... 2009
Harwood ..................................................................... 2061
Headquarter ................................................................ 2011
Hi-Q .............................................................................2023
Hitachi ............. 2055, 2056, 2057, 2107, 2111, 2120, 2122
Instant Replay ............................................................. 2021
JCPenney ........ 2009, 2010, 2011, 2013, 2014, 2021, 2022,
JCL ............................................................................... 2021
Jensen ...................................................... 2055, 2056, 2111
JVC ............................. 2009, 2010, 2011, 2018, 2111, 2123
Kenwood ......... 2009, 2010, 2011, 2016, 2018, 2111, 2123
KLH .............................................................................. 2061
Kodak ................................................................ 2014, 2021
Lloyd ............................................................................2026
Logik ............................................................................2061
LXI ............................................................................... 2014
Magnavox ........................... 2021, 2022, 2062, 2063, 2104,
Magnin ......................................................................... 2013
Marantz .. 2009, 2010, 2011, 2016, 2018, 2021, 2062, 2064
Marta ............................................................................ 2014
Masushita ..................................................................... 2021
MEI .............................................................................. 2021
Memorex ............................ 2011, 2013, 2014, 2021, 2023,
MGA ......................................................... 2029, 2065, 2113
MGN Technology ........................................................ 2013
Midland ........................................................................ 2053
Minolta ..................................................... 2055, 2056, 2107
Mitsubishi ....... 2029, 2055, 2056, 2065, 2066, 2067, 2068,
2069, 2070, 2071, 2072, 2073, 2074, 2106, 2113, 2123
Montgomery Ward ............................................ 2075, 2132
Motorola ............................................................ 2021, 2132
MTC ................................................................... 2013, 2126
Multitech .............................. 2013, 2016, 2026, 2053, 2061
2046, 2047, 2065, 2113, 2116, 2117, 2130
2055, 2056, 2058, 2059, 2060, 2107, 2118
2021, 2022, 2024, 2115, 2131
2053, 2115, 2120, 2131
2105, 2108, 2124
2026, 2104, 2132
Continues on next page...
Chapter 2 13
Page 16

Code List
NEC ....... 2009, 2010, 2011, 2016, 2018, 2064, 2076, 2078,
Nikko ........................................................................... 2014
Noblex ......................................................................... 2013
Olympus ...................................................................... 2021
Optimus ............................................................. 2014, 2132
Optonica ...................................................................... 2096
Panasonic .................. 2021, 2022, 2109, 2125, 2126, 2127
Pentax .................................. 2016, 2055, 2056, 2107, 2120
Pentex Research .......................................................... 2018
Philco ............................................. 2021, 2022, 2062, 2063
Philips ............................................ 2021, 2062, 2096, 2124
Pilot .............................................................................. 2014
Pioneer ................................ 2010, 2055, 2080, 2081, 2123
Portland ......................................... 2016, 2017, 2019, 2110
Proscan .................................................... 2000, 2001, 2131
Protec ........................................................................... 2061
Pulsar ........................................................................... 2104
Quarter ........................................................................ 2011
Quartz .......................................................................... 2011
Quasar ..................................................... 2021, 2022, 2125
Radio Shack/Realistic ......... 2011, 2013, 2014, 2021, 2022,
Radix ............................................................................ 2014
Randex ......................................................................... 2014
RCA ..................................... 2000, 2001, 2003, 2013, 2021,
2055, 2056, 2082, 2083, 2084, 2085, 2086, 2087, 2088,
2089, 2090, 2091, 2107, 2115, 2120, 2125, 2131, 2133
Ricoh ............................................................................ 2128
Runco .......................................................................... 2104
Samsung .................... 2005, 2013, 2015, 2033, 2053, 2112
Sanky ................................................................. 2104, 2132
Sansui ............................................ 2010, 2092, 2111, 2123
Sanyo ....................................................... 2011, 2013, 2023
Scott ....... 2012, 2015, 2025, 2032, 2038, 2065, 2093, 2116
Sears ............... 2011, 2014, 2021, 2023, 2048, 2049, 2050,
Sharp ................ 2017, 2029, 2094, 2095, 2096, 2097, 2132
Shintom ......................................... 2004, 2056, 2061, 2098
Shogun ........................................................................ 2013
Signature ...................................................................... 2132
Singer ....................................................... 2021, 2061, 2128
Sony ............................................... 2004, 2098, 2099, 2119
STS ..................................................................... 2021, 2107
Sylvania ........... 2021, 2022, 2026, 2062, 2063, 2065, 2124
Symphonic ................................................................... 2026
Tandy ........................................................................... 2011
Tashiko ........................................................................ 2014
Tatung .......................................................................... 2111
Teac ......................................................... 2026, 2085, 2111
Technics ............................................................. 2021, 2109
Teknika ................................ 2014, 2021, 2026, 2100, 2129
TMK ......................................................... 2013, 2024, 2047
Toshiba ............ 2015, 2049, 2051, 2055, 2065, 2093, 2116
Totevision .......................................................... 2013, 2014
Unitech ........................................................................ 2013
Vector Research............................. 2009, 2010, 2015, 2016
Victor ........................................................................... 2010
Video Concepts ................... 2009, 2010, 2015, 2016, 2113
Videosonic ................................................................... 2013
Wards .... 2013, 2014, 2015, 2021, 2023, 2026, 2029, 2055,
2056, 2061, 2096, 2101, 2102, 2103, 2107, 2116, 2132
XR-1000 ................................................... 2021, 2026, 2061
Yamaha ................................ 2009, 2010, 2011, 2018, 2111
Zenith .................................. 2004, 2098, 2104, 2119, 2128
2023, 2026, 2029, 2049, 2050, 2096, 2132
2051, 2055, 2056, 2107, 2118
2079, 2111, 2123
DVD
(programmable to the DVD, AUX1 and AUX2 buttons)
Aiwa ............................................................................. 3009
Apex .................................................................. 3023, 3024
GE ................................................................................ 3000
Hitachi ......................................................................... 3008
JVC ..................................................................... 3002, 3010
Konka ................................................................ 3011, 3012
Magnavox .................................................................... 3003
Mitsubishi .................................................................... 3004
Panasonic .................................................................... 3013
Philips ............................................ 3003, 3019, 3021, 3022
Pioneer ........................................................................ 3005
Proscan ........................................................................ 3000
RCA .................................................................... 3000, 3001
Samsung ...................................................................... 3025
Sanyo ........................................................................... 3014
Sony ......................................................... 3006, 3015, 3016
Toshiba .................................................... 3007, 3017, 3020
Zenith .......................................................................... 3018
RCA & Dimensia Audio Components
(programmable to the AUX1 and AUX2 buttons)
AM/FM ............................................................... 4003, 4270
Aux .............................................................................. 4004
CD ............................................................ 4007, 4190, 4211
Phono .......................................................................... 4005
Tape ............................................................................. 4006
Audio Receivers
(programmable to the AUX1 and AUX2 buttons)
Aiwa ....... 4261, 4262, 4263, 4264, 4265, 4266, 4267, 4277
Denon .......................................................................... 4283
Harmon Kardon .......................................................... 4276
JVC ............................................................................... 4268
JVL ............................................................................... 4276
Kenwood ..................................................................... 4269
Onkyo .......................................................................... 4278
Optimus .......................................................................4284
Panasonic .......................................................... 4279, 4280
Pioneer ........................................................................ 4275
RCA .............................................................................. 4270
Sherwood .................................................................... 4282
Sony ......................................................... 4271, 4272, 4281
Technics ............................................................. 4279, 4280
Wards ........................................................................... 4275
Yamaha .............................................................. 4274, 4275
Cable Boxes
(programmable to the AUX1 and AUX2 buttons)
ABC ...................................... 5002, 5003, 5004, 5006, 5053
Antronix ............................................................. 5008, 5009
Archer ...................................................... 5008, 5009, 5010
Cabletenna .................................................................. 5008
Cableview .................................................................... 5008
Colour Voice...................................................... 5012, 5013
Comtronic .................................................................... 5014
Contec ......................................................................... 5016
Eastern ......................................................................... 5017
GC Electronics ............................................................. 5009
GE ...................................................................... 5000, 5001
Gemini ............................................................... 5018, 5019
General Instrument ..................................................... 5003
Hamlin ....................... 5020, 5021, 5022, 5028, 5035, 5045
Hitachi ......................................................................... 5003
Jerrold ........................ 5003, 5018. 5023, 5024, 5046, 5053
Magnavox .................................................................... 5025
Memorex ..................................................................... 5026
Movie Time ................................................................. 5027
NEC .............................................................................. 5005
NSC .............................................................................. 5027
Oak .................................................................... 5016, 5029
Panasonic .......................................................... 5048, 5052
Philips ................................. 5011, 5012, 5013, 5015, 5019,
Pioneer .............................................................. 5033, 5034
Proscan .............................................................. 5000, 5001
RCA ................................................ 5007, 5047, 5049, 5052
Realistic ........................................................................ 5009
Regal .................................................................. 5022, 5035
Regency ....................................................................... 5017
Rembrandt ................................................................... 5003
Samsung ...................................................................... 5034
Scientific Atlanta ............................ 5006, 5036, 5037, 5038
Signal ........................................................................... 5018
Signature ...................................................................... 5003
Sprucer ........................................................................ 5052
Standard Components ...................................... 5039, 5044
Starcom .............................................................. 5018, 5053
Stargate ........................................................................ 5018
Starquest ...................................................................... 5018
Tocom................................................................ 5004, 5023
Tusa ............................................................................. 5018
TV86 ............................................................................ 5027
Unika ................................................................. 5008, 5009
United Cable ............................................................... 5053
Universal .................................................. 5008, 5009, 5010
Viewstar ............................................................. 5025, 5027
Zenith ................................................................ 5050, 5051
5025, 5030, 5031, 5032
Satellite Receivers
(programmable to the AUX1 and AUX2 buttons)
Dishnet ........................................................................ 5078
Echostar ....................................................................... 5089
GE ...................................................................... 5000, 5001
Proscan .............................................................. 5000, 5001
RCA ...................................... 5000, 5001, 5071, 5080, 5081
14 Chapter 2
Page 17

Chapter 3: Satellite Receiver Features
Active profile
Selectable Advertisements,
available when ads are
turned on in the guides
(highlight and select for
more information).
Current time and date
Program titles and
information
The Program Guide
The diagram on the left shows you the kind of information you see in the program guides.
You can access a toolbar at the bottom of the program guide by pressing the FETCH button
while in the guide (see the Toolbar section at the bottom of this page).
Displaying the Program Guide
You can quickly access the receiver’s Default Guide by pressing the GUIDE button on the remote.
To access other program guides, press MENU on the remote control and select Program Guides,
then the guide of your choice (Channel, Logo, Category, etc.). You can also access the receiver’s
default guide by selecting Go to Guide from the Program Guides menu.
To change the current user, press the remote control’s WHO•INPUT button while viewing
programming, then use the remote control’s arrow and SELECT buttons to select the desired
profile. You can also change the current profile by choosing Profile Guide from the Program
Guides menu.
Viewing
Suggestions
Category
Guide
Channel
Sort
Channel
Display
AlphaSort™
Scout™
Displaying the Toolbar
To display the toolbar in the grid and detail guides, press FETCH while you’re in the guide. The
diagram on the right shows you the options available in the toolbar.
To highlight the option you want, use the left and right arrows. To select the highlighted option,
press SELECT.
To clear the toolbar from the guide without making a selection, press FETCH again.
Chapter 3 15
Page 18

Satellite Receiver Features
The Channel Banner
The channel banner appears whenever you do one of the following:
• Tune to a channel.
• Press the remote control’s INFO, DIRECTV, or GO BACK buttons while watching programming.
• Press the up arrow, down arrow, or INFO on the satellite receiver’s front panel.
• Exit the on-screen menu system (except when you press the CLEAR button on your remote control).
The size of the banner depends on your choice in the Channel Banner Size control panel. The medium channel banner is
shown on this page. The full banner (the medium banner, plus a description of the program you’re watching if one’s
available) appears when you press INFO, regardless of your choice in the Channel Banner Size control panel.
On-screen icons represent frequently-used menu items. Some icons also change appearance to show the item’s status.
Use the arrow buttons and SELECT to choose an icon.
Program titles and information
System lock/unlock
Scout™
Interactive content indicator
MailboxAlphaSort™
Caller ID
Viewing
suggestions
Category Guide
Alternate audio
Alternate Audio
indicator
Active Profile
Main menu
Buttons of the Channel Banner
Main Menu icon Takes you to the Main menu.
Locked icon The system is locked. Spending, viewing and other limits cannot be accessed or changed. Selecting this icon displays a password
menu. Enter the correct system password to override settings.
Unlock icon The system is unlocked. Spending, viewing and other limits can be accessed or changed. Selecting this icon in the channel banner
displays the Lock System control panel.
Video Unlock icon A password has been entered to temporarily override the limits. The system will remain unlocked until the satellite
receiver is turned off or re-locked.
Program Unlock icon A password has been entered to override limits for a single program. After the program ends, or when the channel is
changed, limits are restored.
AlphaSort™ icon Enables you to sort titles alphabetically.
Scout™ icon Allows you to search for programs using key words.
Mail icon Displays the Mail screen. The icon will be white if you have an unread mail.
Telephone icon Displays the Caller ID list screen. The icon will be white if you have received a new call but have not accessed the Caller ID List
screen. It will be gray if you have accessed the Caller ID List screen.
Viewing Suggestions icon Displays the Viewing Suggestions menu.
Category Guide icon Lets you search for programs matching a particular category or subcategory.
Alternate Audio icon Cycles through the alternate audio choices.
16 Chapter 3
Page 19

Satellite Receiver Features
The DIRECTV INTERACTIVE™ Feature
Your digital satellite receiver includes DIRECTV INTERACTIVE, powered by Wink Communications®, a free service that gives
you the opportunity to interact with TV programming and advertising. You can use your remote control to get programrelated information, respond to free offers during commercials and even make purchases while you watch TV. To use this
feature, you must have your receiver plugged directly into a telephone outlet (or into a compatible wireless modem).
Whenever you see the DIRECTV INTERACTIVE icon (
TM
interactive window.
To learn more about the DIRECTV INTERACTIVE service:
1. Press MENU on the remote control (the Main menu appears).
2. Use the arrow buttons on the remote control to highlight Interactive.
3. Press SELECT/i to tune directly to the DIRECTV INTERACTIVE Center (channel 499) to get more information about the
following: Getting Started, Interactive Channels, Shopping Sign Up, Order History, Messages, Help & Settings, and
About DIRECTV.
© 2002 Wink Communications. All rights reserved. Wink Communications and the Wink logo are registered trademarks of Wink Communications, Inc.
Displaying On-screen Guides
Each time you press the remote control’s GUIDE button, a different type of program guide appears:
) appear, press the SELECT/i button on the remote control to open the
The Detail Guide
The Detail Guide shows six channels (four with the toolbar) in a time-and-channel format, with
program information for the highlighted program. A small window showing the program you
were watching before entering the program guides is displayed in the upper left hand corner
(you can preview other channels in the Detail Guide by highlighting channel numbers instead of
the program titles).
Notes: By default, the Detail Guide appears when you press GUIDE on the remote control. You can change the
default guide from the Detail Guide to the Grid Guide.
Select Personal Settings from the Main menu, then select the profile to be changed, then select Default Guide.
Use the remote control’s arrow buttons to highlight Grid Guide, then press the SELECT button to activate your
choice.
The Grid Guide
The Grid Guide shows nine channels (seven with the toolbar) in a time-and-channel format. A
small window showing the program you were watching before entering the program guides is
displayed in the upper left hand corner (you can preview other channels in the Grid Guide by
highlighting channel numbers instead of the program titles).
Chapter 3 17
Page 20

Satellite Receiver Features
STOPPAUSE
ON OFF
CR
AUX2
CH
GO
ACK
SKIP
MUTE
O
MENU
CLEAR
GUIDE
A
A
3
5
6
7
8
9
0
WHO INPUT
AUX1
VOL
CH -
C
(-)
V
Getting Around In the Guides
V
This section describes how to change channels and move around a program guide.
DIRECT
Digit Buttons (0–9)
You can point quickly to any channel in the program guide by entering the channel number with
H
L
the digit buttons (0–9). For example, to point to channel 228, press the digits 2-2-8, on the
remote control.
Scrolling Channel By Channel
The programs that you see on the TV screen make up one section—or page—of the total program
FET
B
INF
CH Buttons
guide. You can scroll one line at a time using the arrows: point to other times with the left and
right arrows; point to other channels with the up and down arrows.
Scrolling Page By Page
If you want to scroll up or down through the program guide faster, press the CH buttons on the
remote control. The highlight scrolls a page at a time.
NTENN
Arrow
Buttons
Digit Buttons
REWIND/
FORWARD
Buttons
Scrolling Forward and Reverse
To scroll forward one page at a time, press the remote control’s PLAY button while in DIRECTV
mode. To go forward or reverse by a 6-hour block of time, use the FORWARD and REVERSE
buttons on the remote control.
Note: Your digital satellite receiver can store up to three days of programming information. Getting all this
information can take up to 6 hours to download.
Tuning to a Program
To tune directly to a current program listed in the guide, point to the program and press SELECT.
To see information about a program in the guide, point to the program and press INFO.
Then, you can select:
• Tune Program to tune to that channel
• Remind Me to set up a Watch Timer, which will display a prompt when the program is about
to begin. If you aren’t already tuned to the correct channel when the program begins, the
Watch Timer will tune to the correct channel for you.
• Showings to see what other times the program is available.
• More Details opens another display with detailed information (if available).
The options available to you may vary according to the type of program you select.
Tip
For information on tuning to a PPV program, see page 27.
18 Chapter 3
Page 21

Tip
Your digital satellite receiver can store up to three days of
information, so retrieving data can take a little time.
It can take up to 6 hours to download all three days of
information when turning the system on after the Guide
information has been lost.
Satellite Receiver Features
More Details
There’s a variety of program information sent along with standard broadcast signals, and your
digital satellite receiver can display much of it (if available).
The More Details menu can offer information (if available) about Actors and Roles, the Director,
the Writer, Original Materials, the Production Studio, Awards, Keywords associated with the
program, and the original release Date and Run Length. Just use the remote control’s arrow and
SELECT buttons to highlight and select the desired button, and to display more information.
You can even use the displayed information in the More Details menu to look for matching
information in the stored guide programs, or to create search criteria for use with the Scout™
search feature of your digital satellite receiver.
To Access More Details:
1. Highlight a desired program in the on-screen guide and press the remote control’s INFO
button.
2. Highlight and select More Details.
Note: The More Details button is displayed in the Program Details menu only if more information is
available.
3. Highlight and select the desired on-screen information button to display the details on the
opposite side of the screen.
To search for other programs with similar information:
4. Highlight the desired information on the right side of the menu and press the remote
control’s SELECT button. This will display any other program stored in the on-screen guides
that shares the highlighted information.
To save your search as Scout Criteria:
5. After completing step 4, use the remote control’s arrow and SELECT buttons to select the
Save as Scout button. You will be given on-screen instructions to complete this task.
Additional Program Guides
The Program Guides menu gives you more guides to choose from besides the Detail and Grid Guides: the Channel
Guide, the Logo Guide, the Category Guide, the Viewing Suggestions Guide, AlphaSort and Scout. You can also
change the current profile from the Profile Guide in the Program Guides menu.
You can access these guides from the Main menu by selecting Program Guides.
The Channel Guide
Displays the programming schedule for the selected channel.
The Logo Guide
Displays channel logos for the current user’s channel list.
Continues on next page...
Chapter 3 19
Page 22

Satellite Receiver Features
The Suggestion Guide
Displays a list of programs based on programming that has been previously watched under that
user profile.
Viewing suggestions are created for each active user profile. You can view and change your
suggestions, or change the settings for the Viewing Suggestions feature from the Viewing
Suggestions control panel.
To Access the Viewing Suggestions Menu:
1. Press the remote control’s MENU button to display the Main menu.
2. Press 1 to select Program Guides.
3. Press the 4 button to choose Suggestion Guide.
4. Access desired viewing suggestions using the remote control’s arrow and SELECT buttons to
Customizing Viewing Suggestions
You can edit the themes that will appear in the Viewing Suggestions menu by applying different
“weights” to the topics. Increasing a topic’s weight increases the chance that programs with such
themes will appear in the Viewing Suggestions menu. Decreasing a theme’s weight will lessen
the chance that such themes will appear.
To Change the Weight of Themes and/or Topics:
1. Follow steps 1-3 above to display the Viewing Suggestions menu.
2. Press the 2 button to select Suggestions Setup.
3. Select the numbered Topic to edit, then use the remote control’s arrow and SELECT buttons
select.
Note: You can also access this menu by selecting the Viewing Suggestions icon in the Channel Banner
or at the bottom of the on-screen guides. See pages 15 and 21 for more information.
to select and adjust the weight given to that topic.
The Category Guide
Lets you search the guide for programs matching a particular category or subsequent
subcategory.
To search by category or subcategory:
1. Press the remote control’s MENU button to display the Main menu.
2. Press 1 to select Program Guides.
3. Press the 5 button to choose Category Guide.
4. Use the up and down arrows to highlight the category you’d like to search. Press SELECT to
select that category (the Category Search menu appears).
5. Use the up and down arrows to highlight the subcategory you’d like to search. Press SELECT
to select that subcategory.
You can select more and more specific subcategories (up to 4 levels) until you’ve reached the
system’s most specific search for that particular category. The system will then search for
programs, ads or channels matching your criteria and show you the results of its search.
Note: You can also access this menu by selecting the Category Guide icon at the bottom of the on-screen
guides. See pages 16 and 22 for more information.
20 Chapter 3
Page 23

Tip
On-screen icons represent the status of the Scout feature:
This icon (displayed in the Scout menu)
indicates that the information you
specified has been found.
The Scout icon in the Channel Banner and the on-screen
guides will have a white outline when a Scout search
returns information.
Satellite Receiver Features
The AlphaSort™ Guide
The AlphaSort Guide lists all the program titles stored in the current guide in alphabetical order.
Select AlphaSort from the Program Guides menu to search for specific program titles that are in
the stored program guide information in alphabetical order. Use the arrow buttons on the
remote control to highlight a character, then press SELECT.
For example, to search for the program Auto Racing, point to and select “A.” (Words like “The,”
“A,” and “An” appear at the end of a title.) All titles that begin with “A” appear in the AlphaSort
list. Next, enter the letter “U.” All titles beginning with “AU” appear in the list.
Continue to enter the specific title until it appears in the AlphaSort list. If you enter the wrong
character, select either Backspace or Clear.
Use the arrow buttons on the remote control to highlight the title you are looking for. Press the
SELECT or INFO button to see more information. The AlphaSort feature looks for titles from all
stored programming.
Note: When the digital satellite receiver is first plugged in or turned on after an extended power outage, there
will only be a few hours of Guide information for search features to work with. It can take several hours for all
three days of Guide data to be completely downloaded to your receiver.
The Scout™ Guide
The Scout Guide lets you assign “Scouts” to search the guide for specific program information,
such as actors’ names or program descriptions.
Select Scout from the Program Guide menu to view the available Scout menu items. Then, select
New Scout from the Scout menu (this button only appears if there is an empty Scout available).
Select Enter Text to set up the information the Scout feature will look for in the program guide.
Use the on-screen keyboard to enter the desired search parameters. You can also use the Select
Fields menu button to specify the type of information you are looking for.
For example, if you are interested in how to prepare food, enter a common term you think would
occur in program information, like “cooking.” When you have finished entering your topic select
Run Scout. If “cooking” appears within a program title or program description, the program will
be included in the Scout Results program list.
Once you have set up a Scout menu item, you can check its status by highlighting it. A
highlighted binoculars icon means that a Scout menu item has found results.
Scout continually searches for requested information whether the box is on or off. You can also
select Run Scout to do an immediate search after setting up a scout.
Check a Scout menu item’s results by selecting that Scout menu item. When you highlight and
select that Scout, the results are displayed on the right side.
The Profile Guide
The Profile Guide lets you change the current profile.
Chapter 3 21
Page 24

Satellite Receiver Features
The Guide Toolbar
The Detail and Grid Guides have a special toolbar you can access by pressing FETCH in those guides. This toolbar offers several ways of organizing and
searching through program guide information so that you can find the programs you want more quickly and easily, even if you don’t know their
names.
Viewing Suggestions
Displays the Suggestion Guide, which shows viewing suggestions for the active user profile
based on the kinds of satellite programs that profile has watched in the past.
You can view and change your suggestions, or change the settings for the Viewing Suggestions
feature from the Viewing Suggestions control panel. See The Suggestion Guide on page 20 for
more information.
Category Search
Displays the Category Guide, which lets you search the guide for programs matching a particular
category or subsequent subcategory. See The Category Guide on page 20 for more information.
Channel Sort
Sort the on-screen guides to display channels in either numeric or alphabetical order. When the
guide is sorted alphabetically, the 1-100 icon is displayed (select the icon to change the display
to numeric). When the guide is sorted numerically, an A-Z icon is displayed (select it to display
the guide alphabetically).
TIP: Accessing the Guide Toolbar
To get to the guide toolbar, press the FETCH button while
you’re in the guide. Then, use the left and right arrow
buttons to highlight the desired icon and press SELECT to
select it.
Channel Display
In the Grid Guide, you can choose to display each channel by its channel number or its call
letters. When the Grid Guide is displaying call letters, the 1-2-3 icon is displayed (select the icon
to change the display to channel numbers). When the Grid Guide is displaying channel numbers,
the A-B-C icon is displayed (select it to display call letters).
In the Detail Guide, both the channel numbers and the call letters are always displayed. The
Channel Display button switches which one is shown first.
AlphaSort™
Lists all the program titles stored in the current guide in alphabetical order. Select the AlphaSort
icon to search for specific program titles that are in the stored program guide information in
alphabetical order. Use the arrow buttons on the remote control to highlight a character, then
press SELECT. See The AlphaSort™ Guide on the previous page for more information.
Scout™
Lets you assign “Scouts” to search the guide for specific program information, such as actors’
names or program descriptions. See The Scout™ Guide on the previous page for more
information.
22 Chapter 3
Page 25

Chapter 4: Using On-Screen Menus
Using the Menu System
To display the Main menu, press MENU on the r emote contr ol.
To use the men u system, you need to use the r emote contr ol’s arrow buttons to highlight your
on-screen choice , then use the SELECT button to select it. In menus that use numbered choices,
you can use the r emote contr ol’s number buttons to select an item quickl y.
Tip: No Menus?
If the Main menu doesn’t appear when you press MENU,
the remote control might not be in DIRECTV mode. Try
pressing the DIRECTV button on the remote, and then
MENU.
Tip: Using On-screen Help
Press the remote control’s INFO button at any time for
more information.
On-screen Buttons and Context Help
The on-scr een men u system offers you mor e than one way to get more information or to
navigate within the system using the on-screen Go Back and Help (?) buttons at the top of most
menus.
Exiting a Screen
Ther e are three ways to exit a men u:
• Select the on-screen Go Back button and press the SELECT button on the r emote contr ol.
• Press the CLEAR button on the r emote contr ol. The on-scr een display clears from the scr een
and you return to TV vie wing.
• Press the GO B ACK button on the r emote contr ol. This r eturns the TV to its pr eceding display.
Getting Help
For an o verview of a displayed menu, use the r emote contr ol’s arrow and SELECT buttons to
select the on-scr een Help button ( ? ).
For details about a highlighted menu item (in what context an on-screen button is used, for
example), press the r emote contr ol’s INFO button and a popup windo w will tell you mor e.
Chapter 4 23
Page 26

Using On-Screen Menus
Main Menu Items
This section briefl y describes each of the options a vailable from the Main menu. Mor e
information about each men u and its features is included later in this chapter, and you can
always get mor e information when an item is highlighted by pressing the remote contr ol’s INFO
button.
Program Guides
Selecting this button will display a menu with a variety of different ways to view program guide
information.
Messages
This button is used to access the Caller ID inf ormation from your telephone compan y and mail
messages from DIRECTV .
Note: You must subscribe to Caller ID service from your telephone service provider in or der for the on-screen
Caller ID information to be displayed.
Purchases
Use this button to r eview or cancel upcoming purchases, review past purchases, and set spending
limits for sa ved profiles.
Timers
Schedule the digital satellite receiver to tune to a specific channel at a specific time.
Profiles
This button displa ys a menu where you can set system and user pass words, ratings limits,
spending limits, viewing hours, as well as create favorite channel lists.
Tip: Don’t Be Afraid to Explore
Once you’ve learned the basics, feel free to poke
around the menu system– exploring this system is
a great way to learn!
Remember to use you remote control’s arrow and
SELECT buttons to maneuver through menus.
And, so you don’t worry about getting lost in the
menus, you can press CLEAR at any time to leave
the menu system and return to regular system
viewing.
Personal Settings
Do y ou want to set up an individual profile’s personal settings or alter the look and f eel of an
existing profile? This button will take you to a men u where you can alter or set personal
preferences of your digital satellite receiver.
System Setup
Allows you to adjust to the wa y your system w orks, to get mor e information about system
features, get dish pointing coordinates, etc.
Interactive
Television br oadcasts typically carry a wealth of information and now you can access and
interact with it starting with this button. Selecting Interactive from the Main menu displays the
DIRECTV INTERA CTIVE™ system f or setting up interactive TV ser vice.
The Program Guide
Note: The program guide is described in detail in the previous chapter, Satellite Receiver Features, starting on
page 15.
Selecting Program Guides from the Main menu displays a menu with a variety of display options
available. You can go directly to the system default guide (Detail Guide or the Grid Guideaccording to your pr eferences). You can also select the Log o or Channel guide , the Vie wing
Suggestions or Categ ory guide, access the Scout™ or AlphaSort™ sear ch features, or change the
active profile.
Displaying Program Guides
In addition to selecting Program Guides in the Main menu, you can press the GUIDE button on
the remote contr ol. This b ypasses the Pr ogram Guides men u and directly displays the default
guide.
24 Chapter 4
Page 27

Using On-Screen Menus
Messages
The Messages menu lets you access messages or phone calls. If you select Mail, it shows you
messages that are sent from DIRECTV. For example, you may receive a message calling your
attention to a new service. If you select Caller ID, this menu shows you Caller ID information from
your telephone provider (if you subscribe to Caller ID service from your telephone company).
To tell if you have mail, you need to check the channel banner a vailable when you press the
remote contr ol’s INFO button. In the channel banner, the mailbox icon will be highlighted if you
have an unread message waiting.
Checking Your Mail
Select Messages from the Main menu, then Mail from the next menu. Or select the mailbo x icon
on the channel banner to view your mail.
1. Point to a message and press SELECT . The message is opened f or y ou to read.
2. Press SELECT again to close the message .
If you want to erase a message , point to Erase Message and press SELECT . When y ou exit
Messages, messages that aren’t erased ar e saved in memor y.
Note: The quickest way to check for messages is to press the INFO button on the remote control. This
will display the channel banner. With the channel banner displayed, use the remote control’s arrow
buttons to highlight the mail icon, then press the remote control’s SELECT button to access the Mail
Caller ID
Your digital satellite receiver is capable of displaying and storing Caller ID inf ormation pr ovided by your local telephone
company. To use this feature, you must have your receiver directly plugged into a telephone outlet (or a RC930
wireless modem) and you must subscribe to Caller ID or similar caller identification services from your telephone
company.
Your Caller ID enables y ou to:
• Identify callers before you answer the phone .
• View the time and date of each incoming call.
• Recor d the Caller ID inf ormation of up to 20 incoming calls sequentially.
Note: Only the last ten calls will be retained after a power outage.
• See who called while y ou wer e away.
Ther e are two ways to access the Caller ID men us: by selecting Messages from the Main menu, or b y pressing INFO on
the remote contr ol and selecting the telephone icon in the Channel Banner . The icon will be white if y ou have received a
new call but have not accessed the Caller ID List scr een. It will be gray if you have accessed the Caller ID List scr een.
menu.
Setting Up Caller ID
To set up y our Caller ID , go to the Main menu and select Messages, then select Caller ID Setup.
Use the up and do wn arrow and SELECT buttons to select y our pr eferences.
Caller ID Light Setting Caller ID Light to On causes the front panel light to flash if you r eceive
new calls while the digital satellite receiver is off. The light will flash until you turn the r eceiver
on.
Caller ID Message Setting Caller ID Message to On displays the on-scr een Caller ID banner
when a call is received. You may want to turn this feature off when you are recording manually
and do not want the on-scr een messages to a ppear on your r ecordings. Your calls will be stor ed
in the Caller ID List scr een even when Caller ID is turned off.
Caller ID Message Time-out Set the amount of time (from 1–30 seconds) that the Caller ID
banner will display when you have an incoming call. For this feature to w ork, make sure Caller ID
Message is set to On.
Continues on next page...
Chapter 4 25
Page 28

Using On-Screen Menus
Receiving Calls
When y our phone rings twice and Caller ID Message is set to On, a banner appears at the
bottom of the scr een temporaril y. To clear the caller ID banner fr om the scr een, press the CLEAR
button on the r emote contr ol.
The banner ma y include the phone number, date, and time; or the name, phone number, date,
and time. The banner information depends on the type of service your telephone company
provides.
The Caller ID banner will o ver ride closed ca ptioning at the bottom of the screen and will appear
for the amount of time selected in the Caller ID Setup scr een. The Caller ID banner will not be
displayed if you are in the menu system or a timer is activ e when you r eceive a call.
Note: If using your telephone and another call arrives, the new call’s information won’t appear in the banner or
be recorded in the Caller ID List screen unless you have type II service and a type II Caller ID box in your house.
Tip: When you have unread Caller ID calls:
The telephone icon in the channel banner will be
highlighted white.
If you’ve set the Caller ID Light to On in the Caller ID Setup
menu, the front panel light will flash (when the digital
satellite receiver is off).
Tip
If you’d like more information to appear in your Caller ID
banner and call list, or if you’d like to subscribe to Caller
ID, check with your local phone company about the
availability of different types of Caller ID service.
Message Indicators
The following is text that may appear in the incoming Caller ID banner and call list.
Out of Area The name and/or phone n umber of the incoming call is coming from outside the
local area.
Private Name The name of the incoming call is sent as “Block ed” from the phone compan y.
Private Number The phone n umber of the incoming call is sent as “Block ed” from the phone
company.
Unknown Name The name of the incoming call is not pr ovided by the telephone compan y or
the information is unr eadable.
Unknown Number The n umber of the incoming call is not provided by the telephone company
or the information is unr eadable.
Note: To clear the Caller ID banner from the screen, press CLEAR on the remote control.
The Caller ID List Screen
The digital satellite receiver can stor e up to 20 call entries in the Caller ID List scr een. When the
memor y is full, a new call automatically replaces the oldest call in memor y. The list also tells y ou
if you have received multiple calls from the same number.
To access the call list:
• Select Caller ID List from the Messages men u, or
• Press the INFO button on the r emote contr ol and select the
phone icon.
Deleting Calls
From the Caller ID List scr een, you can delete entries:
1. Highlight the call you wish to delete and pr ess SELECT .
2. A crumpled pa per icon appears to indicate that you wish to delete the call.
3. To permanentl y delete the call, exit the scr een. If you change your mind befor e exiting the
screen, highlight the call then press SELECT to r estor e it. The crumpled pa per icon should
disappear.
Tip: Don’t Forget About the CLEAR Button
Press the CLEAR button on the remote control to remove
the on-screen menus and return to normal viewing.
26 Chapter 4
Page 29

Using On-Screen Menus
Using the Purchases Menu
The Pur chases menu allows you to r eview upcoming and past purchases and set spending limits.
The list of pur chases may be longer than one scr een; use the up and down arrow buttons to see
more items. The displa y also shows the title , channel, date, time, and cost of each pr ogram.
Note: The Past Purchases list is updated as soon as a purchased program is viewed.
Reviewing and Canceling Upcoming Purchases
Highlight and select an upcoming purchase from the Future Purchases screen. You can review
the program description, as well as cancel an upcoming purchase.
Note: Only pay per view programs that were ordered from the satellite receiver and have not yet aired may be
cancelled.
Spending Limits
Use the Spending Limit option to indicate a per-event, and/or a monthly spending limit for
pay per view programs.
1. Select Spending Limit.
2. Select the user pr ofile you’d like to set a spending limit for, then use the digits or the ar row
buttons on the r emote contr ol to enter pr ogram spending-limit information.
After a spending limit is set and the system is lock ed, you must enter a pass wor d to purchase a
pay per view program that costs mor e than your spending limit allows.
Note: Spending limits are in effect only when the system is locked. See “Locking the System” on page 31 for
details.
Pay Per View Programs
Pay per view (PPV) pr ograms are DIRECTV® pr ograms that you can purchase—lik e a movie ticket—
if you subscribe to DIRECTV pr ogramming and have your digital satellite receiver connected to a
telephone line (see the instructions starting on page 2 for connection details ).
Continues on next page...
Chapter 4 27
Page 30

Using On-Screen Menus
Tip: Ordering PPV
If you want to order PPV programs using the on-screen
menus, you need to connect your digital satellite receiver
to a telephone line.
Tip: PPV Passwords
You may need to enter your four-digit password to order a
PPV program if it costs more than the spending limit you
set up in the Profiles or Purchases menu.
Previewing and Purchasing
You can preview and purchase DIRECTV® Pa y Per View mo vies and events if you subscribe to
DIRECTV® pr ogramming and have your digital satellite receiver connected to a telephone line .
To purchase a movie or event, you can take one of two actions:
• Tune to a PPV channel using the r emote contr ol’s CH buttons. When y ou find one, pr ess the
SELECT button to find mor e information and details about how to purchase the program.
• Highlight a PPV program in a program guide and press INFO . The Pr ogram Details scr een will
appear and give you mor e information about the pr ogram. Fr om this scr een you can also
purchase the program.
You can select:
• Tune Program to view that channel
• Buy Program to purchase the pr ogram
• Remind Me to be pr ompted just before the sho w is scheduled to star t.
• Showings to see when the pr ogram will air again.
• More Details to go to a menu that will display additional information about the pr ogram (if
available).
Note: The options available to you may vary according to the type of program you select.
Timers
The Timers f eature allows you to pr eset your digital satellite receiver to automatically tune to a
particular channel at a predetermined time .
To use the Timers f eature, select Timers from the Main menu. Select a Timer (1–16) and then use
the arrow buttons to complete the on-scr een details. When the inf ormation is complete , select
Continue.
Key
On-screen icons are a quick way to understand the timers:
Indicates that the timer is set.
Indicates that the timer is set for a PPV
program.
Indicates a timer conflict.
Indicates Interactive content.
Editing or Canceling a Timer
From the Timers scr een, select the Timer y ou want to edit or cancel, and then do the following:
• Use the ar rows buttons to edit the Timer , then select Continue.
• Select Clear Timer to cancel the timer.
• To watch the pr ogram daily or w eekly, edit that program’s Timer .
28 Chapter 4
Page 31

Using On-Screen Menus
User Profiles
Profiles allows you to set up different channel lists and limits for the different members of y our
family. A main profile (the Family Profile) and up to four separate pr ofiles can be created.
Individual settings that can be changed in the Profile Menu include the profile name, viewable
channel lists, ratings limits for TV and mo vies, viewing hours, spending limits, and profile locking.
Creating and Editing User Profiles
When y ou select Profiles from the Main menu, the first scr een you see pr esents a men u listing all
user pr ofiles (the Family Pr ofile and up to four individual profiles). You can personalize a default
profile (User 1, User 2, etc.), or edit a pr ofile you’ve already personalized.
To personalize or edit an individual user pr ofile:
1. Press the r emote contr ol’s MENU button to displa y the Main menu.
2. Pr ess the 5 button to select Profiles.
3. Highlight the desired user pr ofile.
Note: The highlighted User Profile’s settings are displayed in the panel on the right side of the screen.
4. Press the r emote contr ol’s SELECT button to select that pr ofile and enter profile editing
mode.
Setting the Name
The first step when cr eating a new profile is to set a name . This will be the name that a ppears in
the Profile list when you pr ess the WHO•INPUT button.
To set the profile name:
1. In the Edit Pr ofile menu, press the 1 button to select Name.
2. Use the r emote contr ols ar row and SELECT buttons to highlight and select the diff er ent
letters of the pr ofile name.
You can also use one of the pr eset profile names (Parents, Kids, Mom, Dad, etc.) sho wn at the
bottom of the scr een. Use the ar row and SELECT buttons to select the pr eset pr ofile name you
want.
Note: If you’ve set the menu language to Spanish, you can use additional special character keys (such as an
accent or a tilde) in the Profile Name. In order to use these characters, first select the accent, tilde, etc. Then,
select the letter that you’d like to add the accent, tilde, etc. to.
For example, if you want to use the character “ñ,” first choose the tilde, then choose “N” in the keyboard.
Copying Profile Settings
To make creating or editing a profile easier, your digital satellite receiver gives you the ability to
use the settings of a previously set pr ofile.
To cop y the settings of an existing profile:
1. In the Edit Pr ofile menu, press the 2 button to select Copy Settings.
2. Use the r emote contr ol’s arrow buttons to select the pr oper pr ofile to copy settings from.
3. Press the r emote contr ol’s SELECT button to select the desir ed pr ofile.
4. Use the r emote contr ol’s arrow and SELECT buttons to highlight and select the COPY button
at the bottom of the scr een.
Creating a Profile Channel List
1. Select Channel List from the Edit Profile menu.
2. Select Edit Channels.
3. Use the ar row buttons to highlight a channel, and press SELECT to r emove (or r eplace) the
check mark. Checkmarked items appear in the channel list.
Add or Delete All Channels
You might be able to save time when creating a channel list by using the Add All Channels
option or the Delete All Channels option before remo ving or adding individual channels.
Also , program pr oviders may make additional channels available. To prevent new channels from
appearing in a profile channel list, choose Delete All Channels and checkmark onl y the channels
you want to appear in the list.
Continues on next page...
Chapter 4 29
Page 32

Using On-Screen Menus
Important
You need to lock the system in order for rating limits,
channel limits, viewing hours, and spending limits to go
into effect.
After you lock the system, you need to enter the system
password to edit the limits. See “Locking the System,”
later in this section, for details.
Subscriptions
Selecting the Subscriptions button allows you to uncheck and r emove from the channel list all
channels you do not subscribe to . Use the r emote contr ol’s arrow and SELECT buttons to select
the desired on-screen menu buttons.
Note: This step may take several minutes to complete.
Setting the Rating Limit
The Rating Limit men u enables you to set a maxim um rating viewing limit for rated mo vies
(based on the MPAA rating system) and TV pr ograms. Unrated mo vies and TV pr ograms can also
be restricted from individual profiles.
1. In the Edit Profile menu, select Rating Limits.
2. Highlight the desired rating feature to set (Mo vie Ratings, TV ratings, or Not Rated Ev ents).
3. Press the r emote contr ol’s SELECT button.
4. Use the up and do wn arrow buttons to mo ve the rating selector to the highest rating you
want the active profile to view.
Notes: In the TV Ratings menu, you can customize aspects of certain ratings. For example, the TV-14
rating has four check boxes beside it. Each of these boxes can be checked or unchecked for greater
customizing.
The boxes beside certain TV ratings boxes stand for Fantasy Violence (FV), Dialogue/Adult Situations
(D), Language (L), Sex (S), and Violence (V).
After the Rating Limit is set and the system is lock ed, you must enter the system pass wor d to
watch programs with a rating higher than your limit.
Viewing Hours
Use the Viewing Hours option to limit the total amount of time, as well as the time of day, that
a user can watch programming.
1. In the Edit Profile menu, select Viewing Hours.
2. Use the digits on the r emote contr ol or point to the + or – buttons and pr ess SELECT to
complete the on-scr een sentence . Choose the da ys to view, how many hours can be viewed
each day (0–24 hours) and when pr ogramming can be viewed. Be sur e to lock the system f or
these limits to take effect.
Setting Up Spending Limits
Select the Spending Limit option to indicate a per-event and/or a monthly spending limit for
pay per view pr ograms.
1. Point to Spending Limit, and press SELECT .
2. Use the n umber buttons on the r emote contr ol to enter a single-program spending limit and
a monthly spending limit (if desired).
3. When all fields are set up cor rectly, the satellite receiver r eturns to the pr evious display.
Note: After Spending Limits are set and the system is locked, the system password will be required to
purchase a pay per view program that costs more than the set Spending Limits allow.
30 Chapter 4
Page 33

Using On-Screen Menus
Locking a User’s Profile
Users can be assigned a personal pass word to lock their pr ofile. When a pass wor d is assigned,
users m ust enter the password before they can view programs using that profile. Profile
passwor ds do not allo w access to , or editing of, the profile limits (you must enter the system
passwor d to edit profile limits).
Note: Each profile can be easily accessed using the WHO•INPUT button on the remote control.
To lock an individual profile:
1. In the specific profile edit mode, select Lock User.
2. Use the ar row or digit buttons to select each digit of the pass wor d.
Locking the System
Locking the system puts the ratings, spending, viewing, and channel limits you have set up for
each profile into effect. When y ou lock the system, no one can modify any of these settings
without first entering the four-digit system password.
1. In the Pr ofiles menu, select Lock System.
2. Use the ar rows or the digit buttons to enter a f our-digit system password.
3. Enter the pass wor d a second time to confirm it. The lock icon should be displa yed in the
channel banner.
Notes: After the system has been locked, you must enter the correct password in order to access the
Edit Profiles control panel.
If you forget a USER password, you need to unlock the system and then assign a new user password.
If you forget the SYSTEM password, contact the DIRECTV authorization center.
• Lock icon: All limits are in effect. No limits can be accessed or changed without first entering
the system pass word. The system pass word is also r equired to o verride limits.
Temporarily Unlocking the System
When y ou attempt to access a channel that is block ed by one or mor e limits (and the system is lock ed), you will be asked to override limits by entering
the four-digit system password.
If you enter the pass wor d to override a limit, you can choose whether the system r emains unlocked until you turn off the receiver, or whether the
system r emains unlocked for the duration of the pr ogram that exceeded one of y our limits.
When y ou turn the receiver back on after temporaril y unlocking it, the system will be lock ed, and the Family profile channel list will be selected. If you
want to re-lock the system without turning off the receiver, you can select the lock icon in the channel banner.
Continues on next page...
Chapter 4 31
Page 34

Using On-Screen Menus
Temporarily Unlocking the System from the Channel Banner
You can also temporaril y unlock the system from the channel banner. Press the r emote contr ol’s
INFO button and highlight the Lock icon in the channel banner . Make sur e to check the bo x
beside Unlock this program only, and enter the system pass wor d. This pr ogram is no longer
blocked, but all other settings remain in effect. The pr ogram unlock icon should be displa yed in
the channel banner.
Use the Lock and Unlock icons in the Channel Banner to lock or unlock the system. To access the Lock/Unlock Men u, press the INFO button on the
remote contr ol and use the ar row buttons to select the Lock icon. Use the r emote contr ol’s number buttons to enter the pr oper pass word and follow
on-screen instructions.
Unlock icon: The system is unlock ed. No limits ar e in effect. Spending, viewing and other limits can be accessed and changed.
Program Unlock icon: The system is lock ed, but no limits are in effect for the duration of the cur rent program because a pass wor d has been
entered to override the cur rent program’s limits. No limits can be accessed or changed without entering a pass word. After the pr ogram ends,
the system will r eturn to Lock status.
Video Unlock icon: The system is temporaril y unlocked with no limits in effect until the receiver is placed in standb y mode . A pass word has
been enter ed to override the system limits. No limits can be accessed or changed without entering the system pass wor d. When the system is
turned off, it will return to Lock status.
Permanently Unlocking the System
When the system is unlock ed, the channel, spending, viewing, and ratings limits that you set ar e no longer in effect. To unlock:
1. Highlight and select Unlock System in the Profiles menu.
2. Highlight and select Yes to confirm that you want to unlock the system. The unlock icon should be displa yed in the channel banner.
The system will r emain unlocked until you lock it again.
Note: Any time you permanently unlock the system you erase the old system password. When you lock the system again, you’ll be asked to enter a new password.
Choosing Your Profile
Each time you turn on the digital satellite receiver, the Family profile is selected by default, so
this should be the pr ofile with the most restrictive limits you want enforced across all profiles.
To select another profile:
1. Press the WHO•INPUT button to displa y a list of profiles.
2. Use the r emote contr ol’s arrow and SELECT buttons to select the desir ed pr ofile. Then enter
the four-digit passwor d to activate the profile. If the profile is not passwor d protected, you
can just press SELECT to activate it.
The channels, spending, rating and viewing limits associated with the chosen pr ofile will be
active only when the system is locked.
The activ e profile also affects what you see in the pr ogram guides. To change the current profile,
press the WHO•INPUT button. You can also change the current profile from the Program Guides
menu (select Profile Guide, then choose the pr ofile you want)
Personal Settings
The P ersonal Settings menu lets you customize the look and f eel of the active profile. Each of
the satellite system’s profiles can have individualized personal settings.
Note: If a personal profile is password protected, then that password must be entered before changing any of
the profile’s settings.
Once y ou have accessed the personal settings men u, select the desir ed profile. You will use the
remote contr ol’s arrow and SELECT buttons to mak e your selections.
The following sections explain your options when changing your personal pr eferences. Follow
the on-screen instructions to mak e changes to the system.
Name
Used to change the pr ofile display name. This name will be displa yed in the Profiles menus as
well as when the r emote contr ol’s WHO•INPUT button is pr essed.
Note: You can also change a profile’s name from the Profiles menu. See Setting the Name on page 29 for more
information.
32 Chapter 4
Page 35

Using On-Screen Menus
Guide Settings
Lets y ou choose which guide appears first when y ou press the GUIDE button on the r emote contr ol. The choices ar e
Grid Guide or Detail Guide.
Guide Settings also lets you choose whether the default guide is sor ted numerically by channel numbers or
alphabetically by channel names, as well as whether the Grid Guide sho ws each channel by its call letters or b y its
channel number.
Channel Banner
Lets y ou choose which size of channel banner y ou would like to a ppear when you change channels. The choices ar e
Full, Medium or Short. Larger channel banners sho w you mor e information, but they also co ver mor e of the screen.
Color Scheme
Lets y ou pick which colors a ppear in the guide and menu systems.
Translucency
Lets y ou choose ho w much you can see thr ough any on-screen displays that appear on top of what you’re watching
(for example , the Main Menu, not the Grid Guide). Use the r emote contr ol’s arrow buttons to access and slide the
indicator bar to mak e the screens mor e or less opaque .
Animation
Lets y ou select which graphics are displayed when you tune to an audio-only channel and also lets you select the
animation time-out.
TIP: Getting Help
If you ever have a question about the menu you are in,
select the on-screen help button (?). If you have a
questions about a highlighted menu item, press the
remote control’s INFO button.
Edit Fetch
Lets y ou choose a single function for the FETCH button on the r emote contr ol, or to bring up a
custom menu of up to 8 different features to choose fr om.
To create a custom Fetch menu:
1. Pr ess MENU to bring up the Main men u.
2. Select Personal Settings,
3. Select the desir ed profile (each profile can have a different Fetch Menu).
4. Select Edit Fetch.
5. Select Fetch Control.
6. Select Show Fetch Menu.
7. Select Fetch List from the Edit Fetch men u.
8. Choose up to eight menu items to include in your customized menu by checkmarking them
with the SELECT button.
9. Pr ess the left arrow button to confirm your selections and r eturn to the men u.
Once you’ve set up your Fetch list, you can access your customized menu whenever you want (in
DIRECTV mode) b y pr essing the FETCH button on the r emote contr ol.
To assign one function to the FETCH button:
1. Pr ess MENU to bring up the Main men u.
2. Select Personal Settings,
3. Select the desir ed profile (each profile can have a different Fetch Menu).
4. Select Edit Fetch.
5. Select Fetch Control.
6. Select Assign One Function.
7. Select Fetch List from the Edit Fetch men u.
8. Choose which men u item you would like to assign to the FETCH button b y pointing and
selecting.
9. Pr ess the left arrow button to confirm your selection and r eturn to the men u.
Once you’ve assigned your Fetch function, you can execute the assigned function whenever
you’re watching satellite programming (in DIRECTV mode) b y pressing the FETCH button on the
remote contr ol.
Chapter 4 33
Page 36

Using On-Screen Menus
INFO Message
A text block sa ying “Pr ess INFO to learn mor e” pops ups b y default whenever ther e is a brief
period of inactivity in a menu. This Personal Settings option allows y ou to turn the INFO Message
feature on or off.
System Setup
The System Setup men u allows you to get details about your system and is used to configur e
system options that ar e not pr ofile specific. Setup items that are global to the digital satellite
receiver include System Options and Dish P ointing.
Assisted Setup
This feature walks you thr ough a series of questions to set up y our system and get it to detect a
satellite signal.
Follow the on-screen instructions to set the system language , get instructions on men u
navigation, select the type of satellite dish antenna used, find your dish-pointing coordinates,
use the on-screen signal meter to fine-tune the dish position, and run a system test that
initiates diagnostic procedures on the satellite r eceiver system. You have the option to skip an y
of the steps.
Receiver Index
The Receiv er Index feature allows you to get detailed information about your digital satellite receiver.
The Receiv er Index has information about pr ogram guides, the menu system, the remote contr ol, the receiver’s front and back panels, along with a
glossary of words commonl y used when discussing digital satellite receivers and a list of answers to Fr equently Asked Questions about satellite
receivers.
Receiver Options
The Receiv er Options f eature allows y ou to set a default on-screen display language, choose a r eceiver output channel (the channel that the TV vie ws
satellite broadcasting), set up the r emote contr ol, select a default picture size, and set the time zone .
Use the r emote contr ol’s arrow and SELECT buttons to na vigate through these menus, or you can use the digit buttons on the r emote contr ol to select
a numbered on-screen item.
34 Chapter 4
Page 37

Using On-Screen Menus
Languages
This men u allows you to select men u and audio languages. You can choose betw een English and
Spanish for the menu language.
You can choose from a variety of audio languages to be heard if a program is simulcast in that
language. If that language is not available for that broadcast, the programming will be heard in
its default language.
Output Channel
This feature allows you to change the TV channel to which the satellite r eceiver br oadcasts its
signal. The default setting is channel 3, which means the TV must be tuned to channel 3 to see
the satellite receiver’s picture.
Note: If you used A/V cables to connect your digital satellite receiver to your TV, then you must use the TV’s
video line input to see the satellite broadcast.
Remote Setup
This allo ws you to choose which r emote contr ol button will contr ol the digital satellite receiver. You can choose betw een DIRECTV and A UX1 buttons.
The default is DIRECTV.
Use the r emote contr ol’s arrow and SELECT buttons to mak e your choice and follow the on-screen instructions.
Picture Size
Selecting Picture Size allows you to select the type of TV connected to the r eceiver. You can
choose between Normal (4X3) or Cinema (16X9). The default is Normal.
Time Zone
Using this feature allows you to set the local time zone and to enact a Da ylight-Saving time
option. Accurate time and time zone is necessar y for the Remind feature. Setting the time zone
is normally automatic, and generally does not r equire you to do anything.
Setting the time zone should only be done in rar e circumstances, such as if the program times
are wrong after the system card has been activated.
Note: You must select an entry in the Choose your time zone field before all menu items are displayed.
Multi-Switch Setup
This feature allows the satellite system to kno w if you have a multi-switch connected to the system and to determine what type of m ulti-switch is
used.
This feature should only be used in rar e circumstances, such as when instructed to do so b y DIRECTV .
Chapter 4 35
Page 38

Using On-Screen Menus
Tip
It is important to select the correct dish type. If you do
not, you will not receive the proper dish pointing
coordinates and you will not be able to take full
advantage of your DIRECTV® System.
LNBs
Dish Pointing
The Dish P ointing menu helps you set up your digital satellite receiver and optimize your
reception of the satellite signal.
Selecting Your Dish Antenna
It is impor tant to complete each of the following steps required for your satellite dish antenna.
If you do not, you will not receive proper dish pointing coor dinates and will not be able to take
full advantage of your digital satellite receiver.
Specify the type of dish you are using:
1. Press MENU on the r emote contr ol to bring up the Main menu.
2. Select System Setup, then Dish Pointing, then press SELECT to access the dish pointing
screen.
3. Select Dish is highlighted by default. Pr ess the SELECT or right ar row button to access the
information on the right-side panel.
4. Specify the type of dish you are using: a round satellite dish or an o val satellite dish with
two or thr ee LNBs (Lo w Noise Block-con ver ter). When the pr oper dish is highlighted, press
SELECT .
Note: Changing the dish type will delete all stored Guide information while the digital satellite
receiver gets the updated Guide data. While updating Guide information, advanced search features
such as the Scout™ and AlphaSort™ will only have a few hours of data from which to work.
Entering Your ZIP Code
This feature allows you to find dish-pointing coordinates from your local zip code .
1. In the Dish Pointing menu, use the r emote contr ol’s arrow buttons to select Enter ZIP Code.
2. Use the n umeric buttons on the r emote contr ol to enter in the pr oper ZIP code .
3. After entering the final digit, the receiver displays the dish-pointing coordinates. For
convenience, recor d the numbers in the spaces belo w.
Note: If you have a round satellite antenna, you will not see numbers for Tilt. Tilt applies only for
satellite antennas with more than one LNB.
An oval satellite dish with three LNBs (not
provided with all systems).
Tip
Azimuth is the side- to-side direction that the satellite
dish antenna is pointed.
Elevation is the up/down angle that the satellite dish
antenna is pointed.
Tilt is the circular rotation of the dish itself, like the
motion of a steering wheel.
Dish-pointing Coordinates
Elevation _______________ Azimuth ____________
Tilt (oval satellite dish only)_____________________
Select by City
Allows you to choose major cities fr om selected states to find dish-pointing coor dinates.
Enter Lat/Long
Allows you to find dish-pointing coordinates from latitude and longitude entries. Latitudes
between 20 and 55 can be enter ed, and longitudes between 65 and 125 can be enter ed.
Signal Meter
This feature allows you to determine the str ength of all available signals, one at a time. Ther e is a
separate test for each satellite from which your antenna receives information.
Note: After you finish installing the dish antenna and exit the Dish Pointing menu screens, the message
“Searching for Satellite Signal” might appear for a few seconds, followed by the Satellite Data Acquisition
screen. This is normal. Go to page 8, in the “Wait for the Receiver to Download ADVANCED PROGRAM GUIDE™
Data” section, for details.
36 Chapter 4
Page 39

Using On-Screen Menus
Tip
If your system fails a test, run the system test several
times before concluding that there is a problem.
Occasional fluctuations in the phone line or satellite
signal can give temporary false readings.
The “RSA Secure” logo ensures that only authorized
upgrades or modifications are delivered to your
digital satellite receiver.
System Test
This function allows y ou to perform a system-level diagnostic test on the satellite receiver. Ther e
are four sub-tests within this system test. Each one will display results after the testing for that
area is complete . The r eceiver’s ID and access car d numbers ar e also displayed in this menu.
Note: While the system is testing the signal, the video will temporarily blank out. When the tests are complete, a
summary display appears.
System Info
This function displays the model and serial n umbers of your r eceiver, along with its brand name
and a list of its features.
System Upgrades
Your digital satellite receiver is able to r eceive upgrades or modifications to some of its f eatures
and functions. These modifications will occur automaticall y, usually at times when your r eceiver
would likely be turned off. If your r eceiver is on when an upgrade or modification is sent, you
may experience a disruption in r eception for a minute or tw o. Your reception should r eturn to
normal after the modification is complete.
Note: Your receiver must be plugged in to receive any updates. Do not unplug your receiver while an update is
in progress. Please consult the System Upgrades Menu to find a schedule of upgrades or modifications planned
by DIRECTV.
New Access Card
Selecting the New Access Car d function allows you to update the digital satellite receiver with a
new access car d. This is necessar y on occasion when DIRECTV sends out a ne w card.
Alternate Data
Selects from among the available data channels.
Interactive
This function allows y ou to learn mor e about DIRECTV INTERA CTIVE™. It also allows you to setup
an account for the fr ee ser vice, review transactions and messages, and to change settings.
*RSATM Secure and the RSATM Secure logo are trademarks of RSA Data Security, Inc.
Chapter 4 37
Page 40

Chapter 5: Other Information
Troubleshooting
Many problems can be corrected by performing a simple reset of the digital satellite receiver. If you experience the following:
• Image freezes • Audio freezes
• Blank screen • Won’t respond to front panel or remote
try this: press and hold the POWER button on the front of the receiver for at least five seconds. If the problems persist, try unplugging the digital
satellite receiver for 15 seconds to 2 minutes and then plug it in again.
Running the System Test (later in this section) can also help you diagnose and solve many common problems.
Note: If you prefer, we can provide you with the name of an Authorized Service Representative who will visit your home for a fee to set up your digital satellite receiver and to
instruct you in its operation. For details about this service, call 1-888-206-3359 or visit rca.com.
Digital Satellite Receiver Problems
Screen goes blank during Satellite Data Acquisition
• This is normal. The progress bar times out after two minutes (see page 8 for details). If your screen is still blank for two minutes after the progress
bar times out, follow these steps to restart your receiver:
1. Unplug the satellite receiver’s power cord from the power outlet.
2. Wait a few seconds – then, plug in the satellite receiver again.
3. Turn on the receiver and wait for it to download program guide information.
Wrong picture
The digital satellite receiver and most VCRs let you toggle between signals. If you don’t see the signal you think you should be seeing, try using these
buttons to toggle between the signals:
• Press the TV/VCR button on the VCR remote or on the VCR’s front panel.
• Press the ANTENNA button on the remote control.
Taking either of the above actions lets you switch the source of the video signal from satellite signals to the off-air antenna or cable signal, and vice
versa.
Problems with Caller ID
• Typical wireless phone jacks do not transmit caller ID information. You need a special wireless phone jack to use with caller ID service. See the
user’s manual that came with the wireless phone jack to see if it transmits caller ID information. If it doesn’t, either connect the phone line
directly to a standard wall-mount phone jack or install a wireless phone jack that transmits caller ID information.
Light flashes on front panel
• You have unread Caller ID messages. Highlight and select Messages from the Main menu, and then select Caller ID List to see a list of sequential
Caller ID information. Once you access your messages, the L.E.D. will stop flashing.
Receiver will not turn on
• Check to make sure it is plugged in.
• Check the wall receptacle (or extension cord) to make sure it is “live” by plugging in something else.
• Maybe batteries in remote control are “dead.”
• Maybe remote control is not aimed at remote sensor.
• Unplug the receiver. Wait five minutes. Plug it in again.
Turns off while playing
• Electronic protection circuit may have been activated because of a power surge. Wait 30 seconds and then turn on again. If this happens
frequently, the voltage in your house may be abnormally high or low.
Satellite receiver turns on or changes channels unexpectedly
• A Timer may have been activated.
Blank screen
• Maybe the component connected to the input jacks is not turned on.
• Try another channel.
• Your satellite receiver may be hooked incorrectly to the TV. Press the INFO button on the satellite receiver’s front panel to see if the channel
banner appears. If it does not, check the Setup and Connections section for instructions about connecting your satellite receiver.
38 Chapter 5
Page 41

Other Information
Troubleshooting (continued)
Temporary loss of the satellite signal
• Your satellite system may be experiencing rain fade, a temporary loss of the satellite signal due to the signal’s inability to penetrate unusually
heavy rain clouds or rainfall. Rain fade is usually brief, lasting only as long as the heavy rain cloud condition persists. See the Satellite Systems
and Rain Fade throw-in sheet that came with your satellite receiver for more information.
Partial programming loss
• Your multiple LNB satellite antenna may be incorrectly configured. Change the dish type set in your receiver’s preferences. Press the MENU button
on the remote control, then select System Setup. In the next menus, select Dish Pointing, and then Select Dish. From the Select Dish display, make
sure the proper antenna is selected (round, or oval with 2 LNBs, or oval with 3 LNBs.
A battery icon appears in the lower left corner of the screen
• Your remote control’s batteries need to be replaced. If you don’t replace them soon, you might need to reprogram the remote.
Remote Control Problems
Problems with the remote control
• Maybe something is between the remote control and the remote sensor.
• Maybe the remote control is not in DIRECTV mode. Press the DIRECT button so the remote will control the digital satellite receiver.
• Maybe the batteries in the remote control are weak, dead or installed incorrectly. Try replacing batteries. (Note that when you replace the batteries
you may have to reprogram your remote to control other devices.) IMPORTANT: Don’t press any remote control buttons while replacing the
batteries unless you are resetting the remote! If you press a remote control button while replacing the batteries, you may need to reprogram
the remote to operate other devices. Reprogramming may also be required if dead or weak batteries have been allowed to remain in the
remote.
• The remote may need to be reset. Remove batteries; press and hold the 1 button for at least 60 seconds to drain the microprocessor inside the
remote control. Release number 1, replace the batteries, and (if necessary) reprogram the remote.
• If you’re entering a channel number that is less than four digits long, the receiver might wait two seconds before actually tuning to the channel.
• If you are trying to operate a device other than the digital satellite receiver that you have programmed the remote to control, make sure you press
the corresponding device button (DVD, VCR, etc.) first. The remote button for the component you’re trying to control should light up when you
press a valid button for that component. If it doesn’t, press the component button again to put the remote in that mode.
A remote control component button starts flashing
• The batteries in the remote control are running low and should be replaced soon. (Note that when you replace the batteries you may have to
reprogram your remote to control other devices.)
TV Problems
Blank screen
• Maybe the component connected to the input jacks is not turned on.
• Try another channel.
TV turns on or changes channels unexpectedly
• Your TV’s timer may have been activated.
Chapter 5 39
Page 42

Other Information
STOPPAUSE
ON OFF
VCR
AUX2
CH
GO
ACK
SKIP
MUTE
O
MENU
CLEAR
GUIDE
A
A
3
5
6
7
8
9
0
WHO INPUT
AUX1
VOL
CH -
C
(-)
V
Running the System Test
The System Test allows you to run a basic diagnostics check on your digital satellite receiver. If you are experiencing any trouble with your receiver, run
the system test. It will also allow you to get your access card and receiver ID numbers or to initiate diagnostic procedures on your digital satellite receiver.
First make sure that:
• all connections—jacks, cables, etc.—are correctly in place. See Chapter One, Setup and Connections, for more information,
• there are batteries in the remote control, and they are working correctly,
• the access card is installed in the digital satellite receiver.
Follow these steps to run the diagnostics system test on your digital satellite receiver.
1. Turn on your TV and the digital satellite receiver.
2. Press the DIRECTV button to put the remote control in satellite receiver-controlling mode, then press MENU to bring up the Main menu.
3. Select System Setup.
5. Select System Test.
6. If your system does not pass the system test, check any of these potential trouble areas: cabling, pointing the satellite dish, phone connection, and
access card.
7. If you continue to have problems, call RCA Customer Service at 1-800-679-4776.
You should run a system test several times before concluding that there is a problem. Occasional fluctuations in the phone line or satellite signal can
give temporary false readings.
Fine-Tuning the Signal
If you self-installed your satellite dish antenna, you may have already used the Assisted Setup to find the dish-pointing coordinates, acquire and finetune the signal, and run a system test.
If you need to run the Assisted Setup again, select System Setup from the Main menu, then select Assisted Setup.
If you just want to check your dish-pointing coordinates or run the signal strength meter, select System Setup from the Main menu, then select Dish Pointing.
TV
Button
WHO•
INPUT
Button
Finding the TV’s Video Line Input
Note: If your TV is connected with just coaxial cables, you only need to tune to channel 3 or 4.
DIRECT
H
L
FET
B
INF
NTENN
If you used audio/video cables to connect your TV to the digital satellite receiver, you must tune
your TV to the video input channel to view DIRECTV® programming and menus. There are just as
many ways to access a TV’s video input channel as there are brands and models of TVs. Below are
some things you can try.
• If your TV brand is RCA, GE, or PROSCAN, press TV on the remote control that came with your
digital satellite receiver. Then press the WHO•INPUT button on the remote.
• If your TV brand is not RCA, GE, or PROSCAN, consult your TV Owner’s Manual.
If you cannot find your TV Owner’s Manual, you will have to investigate. You might access the TV’s
video input channel by:
• pressing a button on the remote control
• finding it through the TV’s menu system
• tuning directly to it by pressing a specific channel number
• going through all channels in the list by pressing the channel up or down buttons on the TV.
The box below lists of some of the different ways manufacturers label the video input channel.
Video Line Input Variations
Button/switch
on th
e TV
V
IDEO
SIGNAL
VID
1
VID
2
S-V
ID
S-V
IDEO
Button on th
TV Remot
VID
LIN
V
ID
V
IDEO
S-V
INPU
SOURC
e
1
E
ID
T
E
AUX
e
Channel
00
9
0
9
1
9
2
VID
VID
#
1
2
40 Chapter 5
Page 43

Other Information
RCA® – DIRECTV® SYSTEM LIMITED WARRANTY
What your warranty covers:
• Defects in materials or workmanship.
For how long after your purchase:
• 90 days from date of purchase - Unit exchange, which includes parts and labor.
• 91 days to 1 year from date of purchase - Unit exchange, which includes parts only; you pay the labor.
• The warranty for rental units begins with the first rental or 45 days from date of shipment to the rental firm, whichever comes first.
What we will do:
• During the initial 90 days:
Exchange the defective portion of your system with a new or, at our option, refurbished unit.
• After the 90 days and within one year:
Exchange the defective portion of your system with a new or, at our option, refurbished unit. We will charge you a flat exchange cost to replace
the defective receiver. This charge covers the labor cost for its repair.
How you get service:
• Call 1-800-679-4776 and have your unit's date of purchase and model/serial number ready. The model/serial number information is on the back
of your receiver.
• A representative will troubleshoot your problem over the phone.
• If the representative determines that you should receive a replacement receiver you will be provided with a Service Request (SR) number and the
location of a nearby exchange point if one exists. No returns will be accepted without the SR number.
• If the representative determines that your antenna/dish is defective they will arrange for its repair or replacement.
• Proof of purchase in the form of a bill of sale or receipted invoice which is evidence that the product is within the warranty period must be
presented to obtain warranty service. For rental firms, proof of first rental is also required.
Option I:
1. Provide your Discover, MasterCard or Visa account number and expiration date to your phone representative. This is for security purposes only and
your account will not be charged at this time.
2. We will send you a replacement unit.
3. If you return the unit to us within 14 days from the date you were provided a SR number, only items not covered by warranty will be charged to
your account. If your unit is not received within 14 days, the suggested retail value of the receiver will be charged to your credit card. This amount
will be credited, less a handling fee, if the unit is subsequently received.
4. Ship your defective unit back to us using the replacement unit's carton. Shipping instructions will be included on the carton along with your SR
number which will allow you to easily ship the unit back to us. Make sure you insure your shipment in case of damage or loss. Include with the
shipment:
• Evidence of purchase date such as a bill of sale.
• A brief note describing your receiver problem.
• Your name, address and phone number.
Option II:
1. For a fee, we will send a replacement unit to our exchange point.
2. The exchange location will notify you of its arrival.
3. Take your unit and evidence of purchase date, such as a bill of sale, to the exchange location and you will be provided the new or refurbished unit.
Please retain all accessories such as the remote control hand unit and access card.
4. If the repairs are covered by your warranty, you will not be billed.
Thomson assumes no responsibility for warranty shipments from the customer to the factory if not shipped in the manner prescribed by
Thomson.
Continues on next page...
Chapter 5 41
Page 44

Other Information
Limited Warranty (continued)
To receive a replacement receiver after we have received your unit:
• Write the SR number on the outside of the carton used to return the unit. Make sure you insure your shipment in case of damage or loss.
• Carefully pack the unit using the original box and packing material if possible. Please retain all accessories that were included with your unit such
as the remote control hand unit and access card.
• Include with the shipment:
1. Evidence of purchase date such as a bill of sale.
2. A brief note describing your receiver problem.
3. Your name, address and phone number.
• The representative will advise the address to mail a cashier’s check or money order for payment if there are any out of warranty labor or parts
charges, and you elect not to use your credit card.
• After we receive your product, a new or refurbished unit will be shipped to you.
What your warranty does not cover:
• Customer instruction. (Your Owner's Manual describes how to install, adjust, and operate your unit. Any additional information should be obtained
from your dealer.)
• Acts of nature, such as but not limited to lightning damage.
• Adjustment of customer controls.
• Damage from misuse or neglect.
• A unit that has been modified or incorporated into other products or is used for institutional or other commercial purposes.
• Batteries.
• Units purchased, serviced or operated outside the continental U.S.A. and Alaska.
• For units intended for use in Alaska, this warranty does not cover installation or the dish antenna. It only covers the Digital Television System
receiver.
• Loss of programming.
• Installation.
• Shipping damage if the unit was not packed and shipped in the manner prescribed by Thomson.
• Storage fees may be charged by the exchange point if you fail to pick up the replacement unit in a timely manner.
Product Registration:
• Please complete and mail the Product Registration Card packed with your product. It will make it easier to contact you should it ever be
necessary. The return of the card is not required for warranty coverage.
Limitation of Warranty:
• THE WARRANTY STATED ABOVE IS THE ONLY WARRANTY APPLICABLE TO THIS PRODUCT. ALL OTHER WARRANTIES, EXPRESS OR IMPLIED
(INCLUDING ALL IMPLIED WARRANTIES OF MERCHANTABILITY OR FITNESS FOR A PARTICULAR PURPOSE) ARE HEREBY DISCLAIMED. NO
VERBAL OR WRITTEN INFORMATION GIVEN BY THOMSON INC., ITS AGENTS OR EMPLOYEES SHALL CREATE A GUARANTY OR IN ANY WAY
INCREASE THE SCOPE OF THIS WARRANTY.
• REPAIR OR REPLACEMENT AS PROVIDED UNDER THIS WARRANTY IS THE EXCLUSIVE REMEDY OF THE CONSUMER. THOMSON INC. SHALL NOT
BE LIABLE FOR INCIDENTAL OR CONSEQUENTIAL DAMAGES RESULTING FROM THE USE OF THIS PRODUCT OR ARISING OUT OF ANY BREACH
OF ANY EXPRESS OR IMPLIED WARRANTY ON THIS PRODUCT. THIS DISCLAIMER OF WARRANTIES AND LIMITED WARRANTY ARE GOVERNED
BY THE LAWS OF THE STATE OF INDIANA. EXCEPT TO THE EXTENT PROHIBITED BY APPLICABLE LAW, ANY IMPLIED WARRANTY OF
MERCHANTABILITY OR FITNESS FOR A PARTICULAR PURPOSE ON THIS PRODUCT IS LIMITED TO THE APPLICABLE WARRANTY PERIOD SET
FORTH ABOVE.
How state law relates to warranty:
• Some states do not allow the exclusion nor limitation of incidental or consequential damages, or limitations on how long an implied warranty
lasts, so the above limitations or exclusions may not apply to you.
• This warranty gives you specific legal rights, and you also may have other rights that vary from state to state.
If you purchased your product outside the United States:
• This warranty does not apply. See your dealer for warranty information.
42 Chapter 5
Page 45

Other Information
FCC Customer Information
This equipment complies with Part 68 of the FCC rules and the requirements adopted by the ACTA. On the back or bottom side of this
equipment is a label that contains, among other information, a product identifier in the format US:G95XXXXXXXXX. If requested, this
number must be provided to the telephone company.
A plug and jack used to connect this equipment to the premises wiring and telephone network must comply with the applicable FCC part 68
rules and requirements adopted by the ACTA. A compliant telephone cord and modular RJ11 plug is provided with this product. It is designed
to be connected to a compatible modular jack that is also compliant. See installation instructions for details.
The Ringer Equivalence Number (REN) is used to determine the number of devices that may be connected to a telephone line. Excessive RENs
on a telephone line may result in the devices not ringing in response to an incoming call. In most but not all areas, the sum of the RENs
should not exceed five (5.0). To be certain of the number of devices that may be connected to a line, as determined by the total RENs,
contact the local telephone company. The REN number is located on the label of this product.
If this digital satellite receiver (modem) causes harm to the telephone network, the telephone company will notify you in advance that
temporary discontinuance of service may be required. But if advance notice isn’t practical, the telephone company will notify the customer
as soon as possible. Also, you will be advised of your right to file a compliant with the FCC if you believe it is necessary.
The telephone company may make changes in its facilities, equipment, operations or procedures that could affect the operation of the
equipment. If this happens the telephone company will provide advance notice in order for you to make necessary modifications to maintain
uninterrupted service.
If trouble is experienced with this digital satellite receiver, for repair or warranty information please refer to the appropriate section of this
manual. This product is not user serviceable. If the equipment is causing harm to the telephone network, the telephone company may
request that you disconnect the equipment until the problem is resolved.
Connection to party line service is subject to state tariffs and may not be allowed. Contact the state public utility commission, public service
commission or corporation commission for information.
If your home has specially wired alarm equipment connected to the telephone line, ensure that the installation of this digital satellite
receiver (modem) does not disable alarm equipment, consult your Telephone Company or qualified installer.
FCC Declaration of Conformity
This device complies with Part 15 of the FCC Rules. Operation is subject to the following two conditions: (1) this device may not cause
harmful interference, and (2) this device must accept any interference received, including interference that may cause undesired operation.
Trade Name: RCA
Model(s): DRD435RH
Equipment Classification: TV Interface Device
Responsible Party: Thomson Inc.
10330 N. Meridian Street
Indianapolis, IN 46290
Telephone 1-(317) 415-4151
This equipment has been tested and found to comply with the limits for a Class B digital device, pursuant to Part 15 of the FCC Rules. These
limits are designed to provide reasonable protection against harmful interference in a residential installation. This equipment generates,
uses, and can radiate radio frequency energy and, if not installed and used in accordance with the instructions, may cause harmful
interference to radio communications. However there is no guarantee that interference will not occur in a particular installation. If this
equipment does cause harmful interference to radio or television reception, which can be determined by turning the equipment off and on,
the user is encouraged to try and correct the interference by one or more of the following measures:
• Reorient or relocate the receiving antenna.
• Increase the separation between the equipment and receiver.
• Connect this equipment into an outlet on a circuit different from that to which the receiver is connected.
• Consult the dealer or an experienced radio/TV technician for help.
Chapter 5 43
Page 46

Other Information
STOPPAUSE
TV
ON OFF
VCR
AUX2
CH
GO
ACK
SKIP
MUTE
O
MENU
CLEAR
GUIDE
A
A
1
3
5
6
7
8
9
0
WHO INPUT
AUX1
VOL
CH -
C
(-)
V
Accessory Information
There are various accessories available to complement your TV. Prices are subject to change without notice. All accessories are subject to availability.
A shipping and handling fee will be charged upon ordering, and we are required by law to collect the appropriate sales tax for each individual state,
country, and locality to which the merchandise is being sent.
How To Order
To place an order by phone, have your Visa, MasterCard or Discover Card ready and call the toll-free number listed below.
Use this number only to place an order for accessory items.
1-800-338-0376
You can buy some accessories on-line at
www.rca.com.
RG-6 Coaxial Burial Cable with
weatherproof “F” connectors (comes in a
variety of lengths)
12 ft., Part number DT12C
price: $14.95
25ft., Part number DT25C
price: $24.95
50 ft., Part number DT50C
price: $39.95
Weatherproof “F” Connectors (2)
Part number D905
price: $5.95
Audio/Video Cables
12 ft., Part number VH914
price: $14.95
S-Video Cable
12 ft., Part number DT12S
price: $19.95
SATELLITE
RECEIVER
SATELLITE IN
1
LHCP
17/18V
4-WAY MULTI-SWITCH
SATELLITE
RECEIVER
2
TVRO Bullet Amplifier
Part number D903
price: $22.95
Wireless Modem Jack
Part number RC930
price: $99.95
Eight outlet surge protection for cable TV,
T
E
S
E
R
F
F
O
satellite systems and other electronics
(comes with a $50,000 equipment guarantee)
Part number: SCTV4000
price: $39.95
SATELLITE IN
TV ANT
RHCP
IN
13/14V
MODEL D^6520
SATELLITE
SATELLITE
RECEIVER
RECEIVER
4
3
Multiswitch
Part number: D6520
price: $79.95
DIRECT
H
L
B
FET
INF
NTENN
Remote Control RCR160SBM1 is the remote
that came with your system.
Part number 257410
price: $30.30
Dual output LNB (replacement)
Part: DLNB2
price: $84.95
44 Chapter 5
Page 47

Index
A
A/V jacks and cables 6
Access card 2, 9, 37
Advanced Audio 6
AlphaSort™ 16, 21, 22
Alternate data 37
Animation 33
Arrows on remote 10
Assisted setup 9, 40
Audio hum 2
B
Batteries 8
Buttons 10
C
Cable box
code list 14
Caller ID
banner 26
list 26
receiving calls 26
Canceling purchases 27
Channel banner 16
Channel guide 19
Channel list 29
adding/deleting channels 29
delete channels 29
subscriptions 29
Channel sort 22
CLEAR button 10
Code list
cable box 14
remote control 13
satellite receiver 14
VCR 13
Color scheme 33
Connections 2, 7, 11
jacks and cables 6
D
Deleting calls 26
Deleting purchases 27
Detail guide 17
Digital audio out 6, 7
DIRECTV INTERACTIVE™ 17
Dish Pointing 36
by city 36
by latitude/longitude 36
coordinates 36
entering ZIP Code 36
signal meter 36
time zone 36
DVD button 10
E
Edit Fetch 33
Exiting menus 23, 26
F
Fetch 33
FETCH button 11
Front panel light 26
G
GO BACK button 11
Grid Guide 17
GUIDE button 10
I
I icon.
See DIRECTV INTERACTIVE
Icons 15, 28
INFO button 10
Interactive 24, 37
Interference 2
L
Languages 35
Locked icon 16
Locking
a profile 31
the system 30, 31
Logo guide 19
Look and feel 32
M
Mail
checking 25
deleting 25
Main Menu 24
icon 16
items 24
MENU button 10
Menus 23
exiting a screen 23
getting help 23
icons 28
profiles 29
program guides 24
timers 28
Messages 25
caller ID 26
More Details menu 19
Multi-Switch setup 35
MUTE button 10
O
On-screen buttons 23
Output channel 35
Overheating 2
P
Pay Per View programs 27
Personal settings 24, 32
animation 33
color scheme 33
default guide 32
edit Fetch 33
name 32
translucency 33
Picture size 35
Power surges 2
Problems, solving 38
Profiles 24
channel lists 29
menu 24, 29
rating limit 30
spending limits 30
viewing hours 30
Program guides 24
anatomy 24
channel guide 19
detail guide 17
diagram 15
displaying 15, 17
grid guide 17
logo guide 19
scrolling 18
tuning to a program 18
using 18
Purchases 24, 27
canceling 27
menu 24, 27
Pay Per View programs 27
previewing 28
reviewing 27
spending limits 27
R
Rating limit 30
Receiver options
multi-switch setup 35
output channel 35
picture size 35
remote setup 35
time zone 35
Recording 3, 4, 5
Remote control
buttons 10
codes 13
modes 12
programming 13
Reviewing purchases 27
RF jacks/cables 6
S
S-Video 6
Satellite receiver
code list 14
Scout™ 21, 22
icon 16
searching 21, 22
Scrolling 18
Signal meter 36
SKIP button 10
Sorting by
AlphaSort icon 21, 22
Scout icon 21, 22
Spending limits 27, 30
Subscriptions 30
Suggestions guide 20
System
info 37
lock 31
test 34, 40
unlock 31
System setup 24, 34
assisted setup 34
receiver index 34
System test 37
T
Telephone icon 16
Timers 24, 28
editing/caceling 28
setting up 28
Translucency 33
Troubleshooting 38
Tuning to a program 18
TV button 10
U
Unlock
icon 16
the system 31
Upgrades 37
User profiles 29
channel list 29
choosing 32
creating/editing 29
locking 31
rating limits 29
spending limits 30
viewing hours 30
V
VCR
code list 13
recording 10, 12
remote button 10
Video input channel 3, 4
Viewing hours 30
Viewing suggestions 22
Chapter 5 45
Page 48

If your digital satellite receiver needs service, please contact your dealer or
the nearest Service Center from the Yellow Pages. Please do not send any
products to the Indianapolis address listed in this manual or on the carton.
This will only add delays in service for your product.
Thomson Inc.
10330 North Meridian Street
Indianapolis, IN 46290
©2002 Thomson Inc.
Trademark(s)® Registered
Marca(s) Registrada(s)
DIRECTV and the Cyclone Design logo, ADVANCED PROGRAM GUIDE
and DIRECTV INTERACTIVE are trademarks of DIRECTV, Inc., a unit of
Hughes Electronics Corp., and are used with permission.
Printed in the USA
The software used to display images in this product is
based in part on the work of the Independent JPEG
Group.
TOCOM 1597136A
THOMSON
 Loading...