


Satellite Receiver
User’s Guide
Changing Entertainment. Again.
Important Information
WARNING
To reduce the risk of fire or
electric shock, do not expose
this product to rain or moisture.
Cautions
Note to Cable TV Installer: This reminder is provided to call your attention to article 820-40 of the
Do not stack electronic components or other objects on top of the
Digital Satellite Receiver. The slots on top of the receiver must be left
uncovered to allow proper airflow to the unit. Blocking the airflow to the unit
could impair performance or damage your receiver and other components.
Remove any sales or promotional materials attached to the product.
Do not stack the digital satellite receiver on top of a “hot component” such as
an audio power amplifier.
FCC Regulations state that unauthorized changes or modifications to this
equipment may void the user’s authority to operate it.
National Electrical Code (Section 54 of the Canadian Electrical Code, Part 1)
which provides guidelines for proper grounding and, in particular, specifies
that the cable ground shall be connected to the grounding system of the
building as close to the point of cable entry as practical.
CAUTION
RISK OF ELECTRIC
SHOCK. DO NOT OPEN.
This symbol indicates
"dangerous voltage" inside
the product that presents a
risk of electric shock or
personal injury.
Caution: To reduce the risk of electric shock, do
not remove cover (or back). No user serviceable
parts inside. Refer servicing to qualified service
personnel.
This symbol indicates
important instructions
accompanying the product.
Note to Satellite Dish Installer: This reminder is provided to call your attention to articles 810 and 820 of the
1999 National Electrical Code. Refer to article 810, in particular to 810-1 and
810-15, for required grounding of the metal structure of the Dish Antenna.
Refer also to the 810-2 which, by reference to article 820, requires that the
satellite dish coaxial cable shield be connected to the grounding system of the
building as close to the point of cable entry as practical.
IMPORTANT NOTICE: This device incorporates an anticopy process technology that is protected by
U.S. patents and other intellectual property rights. The anticopy process is
licensed for non-commercial, home use only. Reverse engineering or
disassembly is prohibited.
Care and Cleaning:
Product Registration
Please fill out the product registration card (packed seperately) and return it immediately. Returning the card allows us to
contact you if needed.
Product Information
Keep your sales receipt to obtain warranty parts and service and for proof of purchase. Attach it here and record the serial
and model numbers in case you need them. These numbers are located on the product.
Use a soft cloth or dusting attachment of your vacuum cleaner to dust your digital
satellite receiver. Remove dust from the ventilation holes on the top and bottom.
Plastic surfaces are easily scratched and can be marred by alcohol and various
solvents. Avoid excessive use of oil-based furniture polishes since the materials
used in the cabinet will accumulate more dust. A non-abrasive, anti-static
cleaner/polisher is recommended.
Model No.__________________________________________________________________________________________
Serial No. __________________________________________________________________________________________
Purchase Date:______________________________________________________________________________________
Dealer/Address/Phone: ______________________________________________________________________________
Introduction
Key Features Overview
Your digital satellite receiver is equipped with features that will add to your viewing experience.
The following information summarizes a few of these features. Chapter 3 provides more
information about the rest of the TV’s features and how to use them.
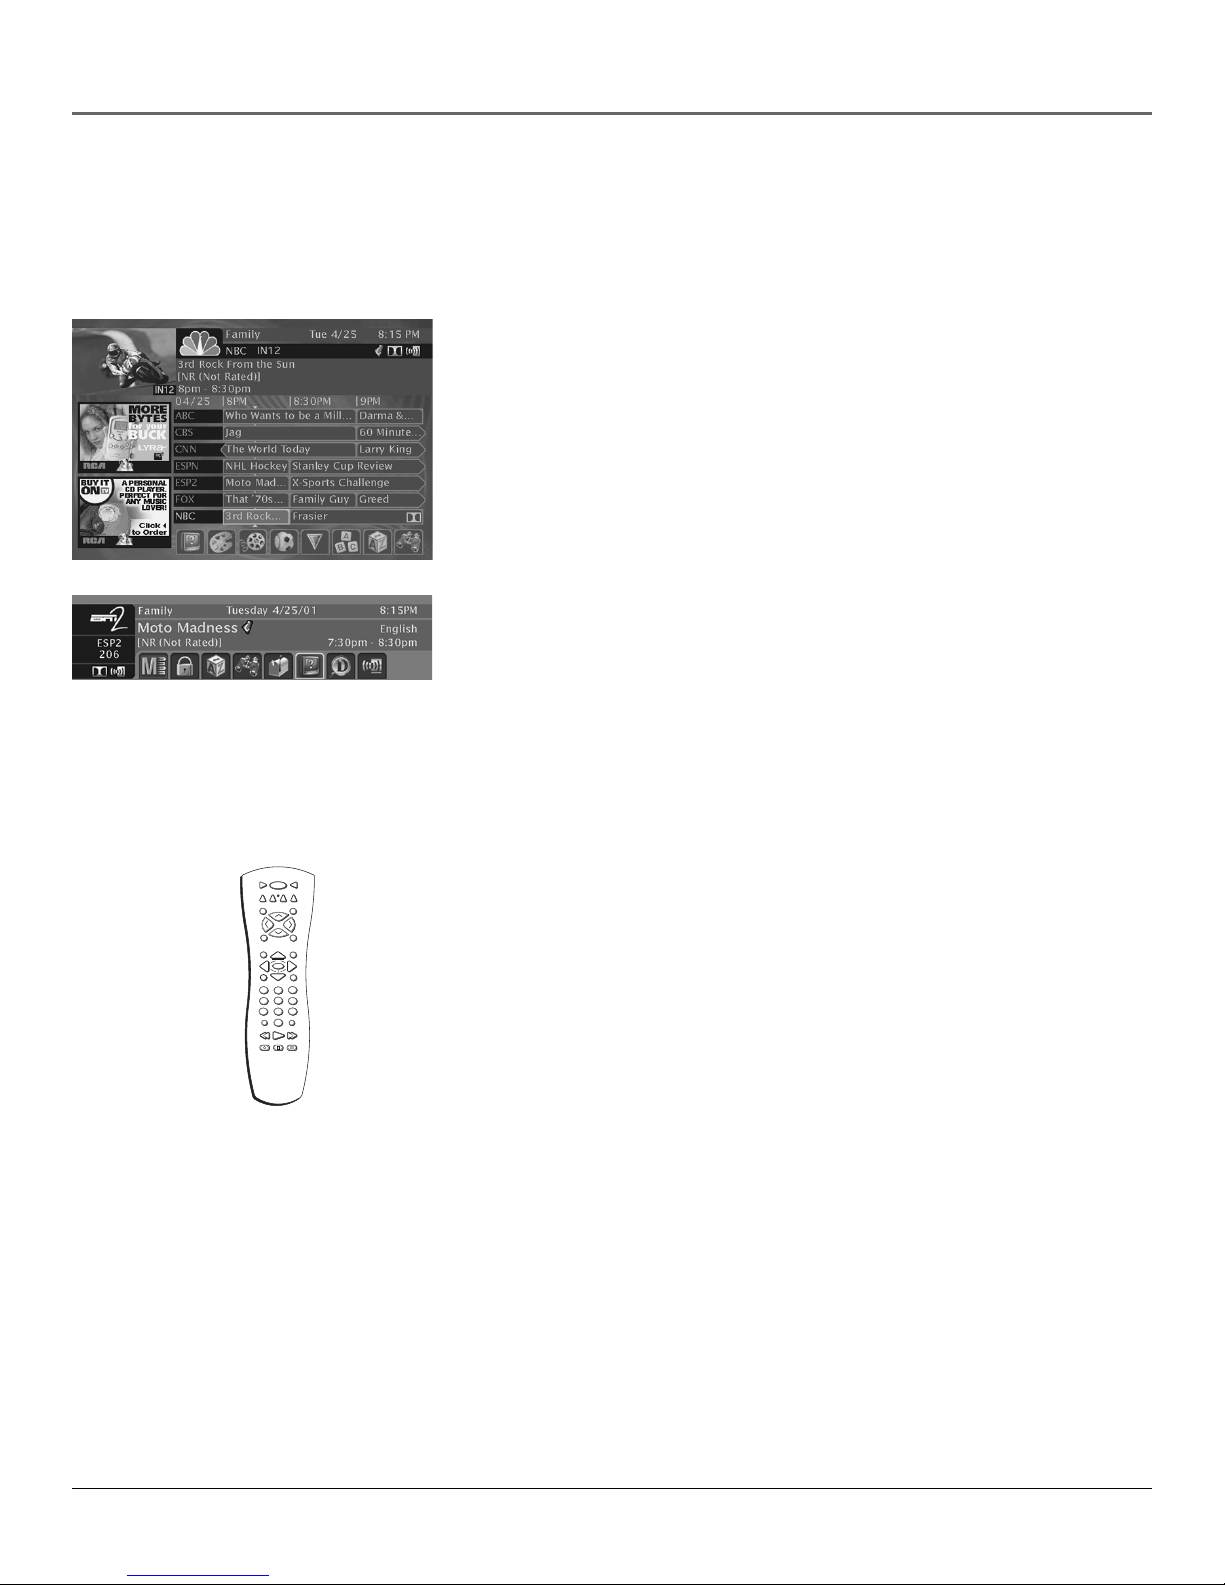
On-screen Program Guides
Description: Available on-screen guides include a new Advanced Program
Guide™ which stores up to seven days of programming information and a new
Advanced Program Guide® which lists five different channels of programming at
a glance.
Requirements: Complete the on-screen assisted setup. You’ll find detailed
instructions how to do this in Chapter 1, Connections & Setup.
Interactive Channel Banner
Description: A transparent banner at the top of the picture allows direct access
to the key features of the DIRECTV system including a way to display the Main
Menu, viewing suggestions, program details, The Guardian™ channel locking
system, on-screen message display, the Scout™ keyword/phrase and the
AlphaSort™ alphabetical search features, and alternate audio offerings.
Requirements: Press the INFO button on the remote control. Highlight
different icons using the remote control’s arrow buttons. Select the highlighted
icon using the remote control’s OK button.
ON • OFF
VCR1
TV
SAT
AUX
VCR2
DVD
SKIP
MUTE
CH +
V
L
O
O
L
V
CH -
FETCH
GO BACK
INFO
GUIDE
(-)
OK
MENU
CLEAR
3
2
1
4
5
6
89
7
WHO•INPUT
ANTENNA
0
PLAY FORWARDREVERSE
STOP PAUSE
RECORD
Universal Remote Control
Description: Provides complete satellite system operation, and primary
function control of most brands of remote-controllable TVs, VCRs, and cable
boxes.
Requirements: A remote-controllable device such as a VCR, cable box, etc.
The remote control may have to be programmed to operate your component if
it is not RCA, GE, or Proscan.
1

Introduction
DIRECTV INTERACTIVE™ powered by WINK
Communications
Description: An interactive television service that lets you access up-to-theminute news, sports, financial information, weather, program trivia, and
respond to free offers and even shop– all while you watch TV.
Requirements: Establish a free, secure Interactive TV account, then press the
OK/i button on the remote control whenever you see the Interactive logo ( )
appear on-screen. For more information, see page 30 in the Satellite System
Features chapter.
®
Software Upgrades via Satellite
Description: The digital satellite receiver is able to modify some of its features
and functions with downloaded RSA-secure upgrades or modifications. RSAsecure downloads ensure that only authorized upgrades are delivered to your
RCA digital satellite receiver.
Requirements: Consult the Upgrade Menu to find a schedule of upgrades or
modifications planned by DIRECTV. For more information, see page 58 in the
Using On-screen Menus chapter.
2

Table of Contents
Connections & Setup .................................................................................................... 5
Things To Consider Before You Connect Components............................................. 6
Choose Your Connection ........................................................................................... 7
Excellent Connection ...........................................................................................8
Very Good Connection ...................................................................................... 10
Good Connection ...............................................................................................12
Jacks and Cables................................................................................................. 14
Satellite Receiver Rear Panel .............................................................................15
Place Batteries in the Remote Control .................................................................... 16
Plug in and Turn on the Receiver ............................................................................ 16
Using Highlight and Select ...................................................................................... 17
Complete the Assisted Setup ................................................................................... 18
Order Programming ................................................................................................. 18
Using the Remote Control ......................................................................................... 19
Remote Control Buttons ..........................................................................................20
Top of the Digital Satellite Receiver........................................................................ 22
Programming the Remote Control ......................................................................... 23
Testing the Remote Control ..............................................................................23
Using Automatic Code Search ........................................................................... 23
Using Direct Entry ..............................................................................................24
Operating Other Components ..........................................................................24
Remote Control Codes....................................................................................... 25
Using the Satellite Receiver’s Features ..................................................................27
Anatomy of a Program Guide ................................................................................. 28
Displaying the Program Guide ..........................................................................28
Using The Channel Banner ................................................................................29
Buttons of the Channel Banner ..................................................................29
The DIRECTV INTERACTIVE™ Feature .............................................................. 30
Displaying On-screen Guides ...................................................................................30
The Detail Guide ................................................................................................30
The Grid Guide ...................................................................................................30
Getting Around In the Guides ................................................................................. 31
Scrolling Channel By Channel ........................................................................... 31
Scrolling Page By Page ...................................................................................... 31
Scrolling Forward and Reverse.......................................................................... 31
Tuning to a Program .......................................................................................... 32
More Details ................................................................................................. 32
Additional Program Guides .....................................................................................33
The Channel Guide ............................................................................................ 33
The Logo Guide.................................................................................................. 33
The Suggestions Guide ......................................................................................33
Sorting the Guides ................................................................................................... 34
Viewing Suggestions ......................................................................................... 34
Active Profile’s Preferences ...............................................................................35
Movies ................................................................................................................ 35
Sports ..................................................................................................................35
Channel Sort....................................................................................................... 36
AlphaSort™ ........................................................................................................ 36
Scout™ ............................................................................................................... 37
Down Arrow....................................................................................................... 37
3

Table of Contents
Using the Menu System .............................................................................................39
Using the Menu System ........................................................................................... 40
On-screen Buttons and Context Help ...............................................................40
Main Menu Items ............................................................................................... 41
The Program Guide ..................................................................................................42
Mailbox .....................................................................................................................43
Messages Waiting ..............................................................................................43
Checking Your Mail ..................................................................................... 43
Using the Purchases Menu ....................................................................................... 44
Reviewing and Canceling Upcoming Purchases............................................... 44
Spending Limits.................................................................................................. 44
Pay Per View Programs ...................................................................................... 45
Previewing and Purchasing ...............................................................................45
Timers ........................................................................................................................ 46
User Profiles .............................................................................................................. 46
Creating and Editing User Profiles.................................................................... 46
Locking the System ...................................................................................... 49
Program/Video Unlock ................................................................................ 50
Choosing Your Profile ........................................................................................ 51
Personal Settings ......................................................................................................51
Name .................................................................................................................. 51
Default Guide ................................................................................................. 52
Guide Sorting .....................................................................................................52
Color Scheme ..................................................................................................52
Translucency ................................................................................................... 52
Animation .......................................................................................................52
Edit Fetch ........................................................................................................ 53
INFO Help ........................................................................................................ 54
Reset ................................................................................................................ 54
System Setup ............................................................................................................ 54
Assisted Setup ................................................................................................. 54
System Index ...................................................................................................... 55
System Options .................................................................................................. 55
Dish Pointing ...................................................................................................... 57
System Test .........................................................................................................58
System Info ......................................................................................................... 58
Upgrades ............................................................................................................ 58
New Access Card ................................................................................................ 59
Alternate Data ................................................................................................... 59
Interactive ................................................................................................................. 59
Other Information ....................................................................................................... 61
Troubleshooting ....................................................................................................... 62
Finding the TV’s Video Line Input ........................................................................... 64
Running the System Test .......................................................................................... 65
Fine-Tuning the Signal ....................................................................................... 65
Limited Warranty ..................................................................................................... 66
Accessory Order Form .............................................................................................. 69
Glossary ..................................................................................................................... 71
Index .........................................................................................................................74
4

Chapter 1
Connections & Setup
Chapter Overview:
• Things to Consider Before You Connect
• Choose Your Connection
• Place Batteries in the Remote Control
• Assisted Setup
• Order Programming
Changing Entertainment. Again.
Graphics contained within this publication are for representation only
5

Connections & Setup
Things To Consider Before You Connect
Components
Protect Your Components from Power Surges
• Connect all components before plugging any power cords into the wall outlet.
• Always turn off the digital satellite receiver, TV and other components before you connect or
disconnect any cables.
Position Cables Correctly to Avoid Audio Hum or
Interference
• Insert all cable plugs firmly into their jacks.
• Place the Audio/Video (A/V) cables to the sides of the TV’s back panel instead of straight
down the middle after you connect your components.
• Try not to coil any twin-lead cables and keep them away from the A/V cables as much as
possible.
• Make sure all antennas and cables are properly grounded. Refer to the Safety Tips sheet
packed with your unit.
Protect Your Components from Overheating
• Do not block ventilation holes in any of the components. Arrange the components so that air
can circulate freely. Remove any sales or promotional materials attached to the
product.
• Do not stack components.
• Allow adequate ventilation when placing components in a stand.
• Place an amplifier or receiver on the top shelf of the stand so heated air rising from it will not
flow around other components.
6 Chapter 1

Connections & Setup
Choose Your Connection
There are several ways to connect your digital satellite receiver depending on the components you
want to connect and the quality of the signal you want to achieve. Please use the following chart
to determine which connection is best for you. Proceed to the appropriate page and connect your
satellite receiver. For more information about the relationship between cables, jacks, and the
quality of the signal, go to pages 14-15.
Component Signal Quality Jacks on the satellite receiver Cables needed* Go to...
Excellent S-VIDEO, AUDIO L and R S-video, audio/video page 8
Very Good VIDEO, AUDIO L and R audio/video page 10
TV
VCR
* Pictures of cables are on page 14.
Good OUT TO TV RF coaxial page 12
Good OUT TO TV RF coaxial page 12
Chapter 1 7
Connections & Setup
Digital Satellite Receiver
LOW SPEED
SATELLITE
DATA
IN
OUT TO TV
IN FROM ANT
S-VIDEO
VIDEO AUDIO
PHONE
JACK
5
Satellite Dish
Antenna
VCR
CH3
CH4
TV
2
IN
FROM
ANT
OUT
TO
TV
3
41
IN
FROM
ANT
AUDIO
VIDEO
Cable or
Off-air
Antenna
R
L
RJ11
modular
phone jack
6
7
S-Video
Note: Your VCR and TV back panels may not look
exactly like the ones illustrated.
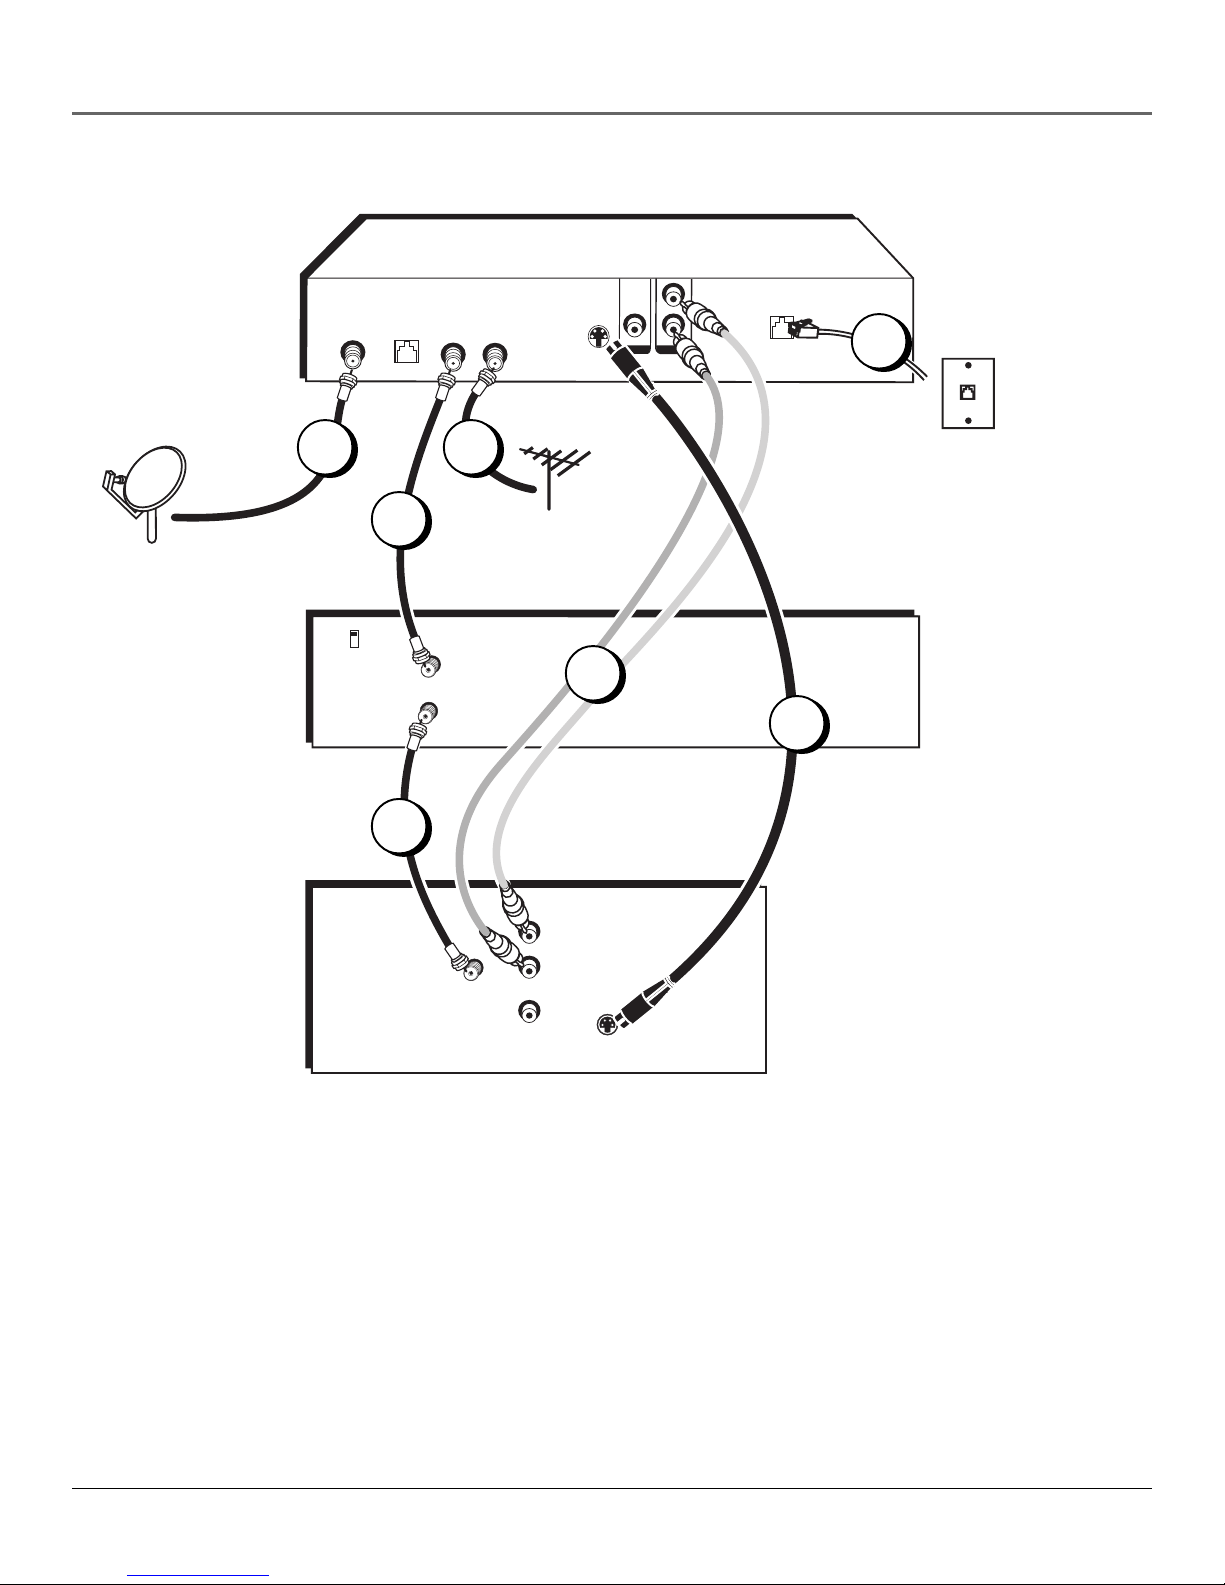
Excellent Connection
Using S-Video and A/V jacks and cables to connect to the TV,
RF coaxial cables to connect to the VCR
This connection provides this receiver’s best picture quality, surpassing that of A/V cables. The
S-Video connection, which carries video information only, requires that audio cables also be used.
8 Chapter 1

Connections & Setup
What you will need:
• Two (2) RF coaxial cables
• One (1) S-Video cable
• Two (2) Audio/Video cables
• One (1) telephone line cord
• Coaxial cable lines fed from a digital satellite antenna and a standard TV antenna (or cable feed)
Making the Connection
1. Connect the satellite dish antenna feed (RG-6 coaxial cable) to the SATELLITE IN jack on the satellite
receiver.
2. Connect one end of an RF coaxial cable to the OUT TO TV jack on the satellite receiver, and the
other end to the antenna input jack on the VCR.
3. Connect one end of an RF coaxial cable to the antenna output jack on the VCR, and the other end to
the TV’s antenna input jack.
4. Connect the cable or off-air antenna feed (RF coaxial cable) to the IN FROM ANT jack on the satellite
receiver.
5. Connect one end of the supplied telephone line cord to the PHONE JACK on the back of the satellite
receiver, and the other end to an RJ11-type modular phone jack (the most common type of phone
jack).
6. Connect two ends of the supplied A/V cables to the AUDIO R and L jacks on the satellite receiver,
and the other ends to the corresponding audio input jacks on the TV.
Note: Make sure you connect jacks by their labels. For example, AUDIO R on the digital satellite
receiver should be connected to TV’s right audio input jack, L Audio to L Audio, etc.
If your TV only has one audio input jack, use the satellite receiver’s AUDIO L jack to make the
connection.
7. Connect one end of the supplied S-Video cable to the satellite receiver, and the other end to the
S-Video input jack on the TV.
Go to Page 16
Using Your Components
To watch DIRECTV® programming:
Tune the TV to its S-Video line input (if you have difficulty finding your TV’s S-Video line input, see
your TV’s User’s Manual, or see page 64 in this manual). When the line input “channel” is found,
then you can tune the satellite receiver to a desired channel.
To record DIRECTV® programming:
Follow the directions in the previous step, then set your VCR to record on its proper input channel
(channel 3 or 4).
To view VCR recordings:
Tune the TV to channel 3 or 4 (whichever is set on the VCR as its output channel). Begin VCR
playback as usual.
Chapter 1 9

Connections & Setup
Digital Satellite Receiver
Satellite Dish
Antenna
1
VCR
CH3
CH4
TV
GROUND
SATELLITE
PHONE
LOW SPEED
DATA
IN
OUT TO TV
IN FROM ANT
S-VIDEO
VIDEO AUDIO
4
Cable or
2
IN
FROM
ANT
OUT
TO
TV
Off-air
Antenna
6
JACK
5
RJ11
modular
phone jack
3
R
L
AUDIO
IN
FROM
ANT
VIDEO
Note: Your VCR and TV back panels may not look exactly
like the ones illustrated.
Very Good Connection
Using A/V jacks and cables to connect to the TV,
RF coaxial cables to connect to the VCR
This connection provides better picture quality than RF coaxial cables and is recommended for
use with TVs that do not have S-Video input jacks.
10 Chapter 1

Connections & Setup
What you will need:
• Two (2) RF coaxial cables
• Three (3) Audio/Video cables
• One (1) telephone line cord
• Coaxial cable lines fed from a digital satellite antenna and a standard TV antenna (or cable feed)
Making the Connection
1. Connect the satellite dish antenna feed (RG-6 coaxial cable) to the SATELLITE IN jack on the satellite
receiver.
2. Connect one end of an RF coaxial cable to the OUT TO TV jack on the satellite receiver, and the other
end to the antenna input jack on the VCR.
3. Connect one end of an RF coaxial cable to the antenna output jack on the VCR, and the other end to
the TV’s antenna input jack.
4. Connect the cable or off-air antenna feed (RF coaxial cable) to the IN FROM ANT jack on the satellite
receiver.
5. Connect one end of the supplied telephone line cord to the PHONE JACK on the back of the satellite
receiver, and the other end to an RJ11-type modular phone jack (the most common type of phone
jack).
6. Connect the ends of the supplied A/V cables to the satellite receiver’s AUDIO and VIDEO jacks, and
the other ends to the corresponding AUDIO and VIDEO input jacks on the TV.
Note: Make sure you connect jacks and cables corresponding to their labels. For example, AUDIO R
output on the digital satellite receiver should be connected to AUDIO R input on the TV, VIDEO OUT
to VIDEO IN, etc.
If your TV only has one audio input jack, use the satellite receiver’s AUDIO L jack to make the
connection.
Go to Page 16
Using Your Components
To watch DIRECTV® programming:
Tune the TV to its video line input (if you have difficulty finding your TV’s video line input, see your
TV’s User’s Manual or refer to the instructions on page 64 in this manual). Then tune the satellite
receiver to the desired channel.
To record DIRECTV® programming:
Follow the steps in the previous step, then tune the satellite receiver to the desired channel. Set your
VCR to record on its proper input channel (channel 3 or 4).
To view VCR recordings:
Tune the TV to channel 3 or 4 (whichever is set on the VCR as its output channel). Begin VCR
playback as usual.
Chapter 1 11

Connections & Setup
Digital Satellite Receiver
Satellite Dish
Antenna
3
VCR
CH3
CH4
TV
GROUND
SATELLITE
PHONE
LOW SPEED
DATA
IN
OUT TO TV
IN FROM ANT
S-VIDEO
VIDEO AUDIO
4
Cable or
Off-air
1
IN
FROM
ANT
OUT
TO
TV
Antenna
JACK
5
RJ11
modular
phone jack
2
IN
FROM
ANT
Note: Your VCR and TV back panels may not look exactly
like the ones illustrated.
Good Connection
Using RF Coaxial cables for all connections
This connection provides standard picture quality. This is the only connection recommended for
TVs that have no S-Video or A/V input jacks.
12 Chapter 1

Connections & Setup
What you will need:
• Two (2) RF coaxial cables
• One (1) telephone line cord
• Coaxial cable lines fed from a digital satellite antenna and a standard TV antenna (or cable feed)
Making the Connection
1. Connect the satellite dish antenna feed (RG-6 coaxial cable) to the SATELLITE IN jack on the satellite
receiver.
2. Connect one end of an RF coaxial cable to the OUT TO TV jack on the satellite receiver, and the other
end to the antenna input jack on the VCR.
Note: If your VCR has A/V input jacks, you can connect the satellite receiver to the VCR using them
instead of the RF coaxial cable.
3. Connect one end of an RF coaxial cable to the antenna output jack on the VCR, and the other end to
the TV’s antenna input jack.
4. Connect the cable or off-air antenna feed (RF coaxial cable) to the IN FROM ANT jack on the satellite
receiver.
5. Connect one end of the supplied telephone line cord to the PHONE JACK on the back of the satellite
receiver, and the other end to an RJ11-type modular phone jack (the most common type of phone
jack).
Go to Page 16
Using Your Components
To watch DIRECTV® programming:
Tune the TV to the satellite receiver’s output channel (either channel 3 or 4).
Note: You can change the satellite receiver’s output channel by pressing the remote control’s SAT
button, then the MENU button, then select System Setup, then System Options, and finally select
Output Channel. Use the remote control’s arrow and OK buttons to highlight and select the
desired output channel. Tune the TV to that channel to see the satellite receiver’s picture.
To record DIRECTV® programming:
Follow the directions in the previous step, then set your VCR to record on its proper input channel
(channel 3 or 4 if using RF coaxial cable to make the connection, Video Line Input if using A/V
cables to connect the VCR to the satellite receiver).
To view VCR recordings:
Tune the TV to channel 3 or 4 (whichever is set on the VCR as its output channel). Begin VCR
playback as usual.
Chapter 1 13
Connections & Setup
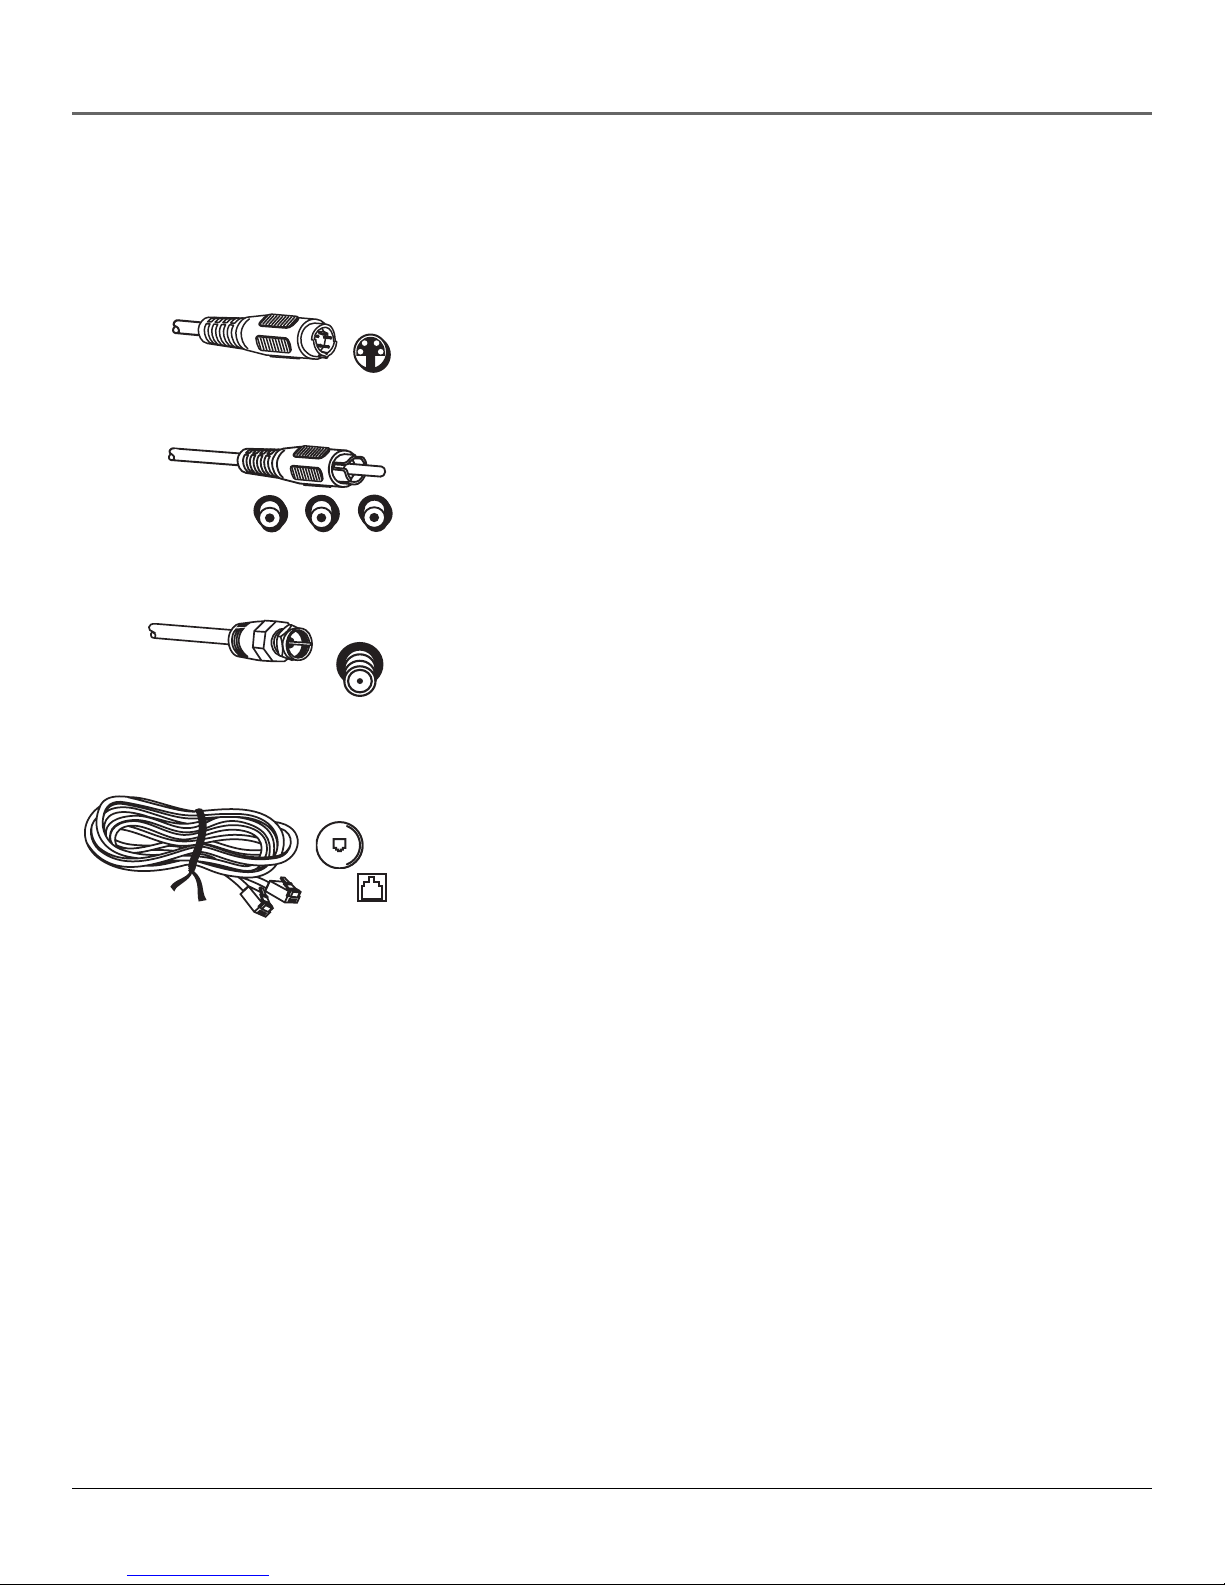
Jacks and Cables
Below is a description of the jacks and cables you can use to make connections. Not all cables
come with your digital satellite receiver.
S-Video Jack and Cable
S-Video jacks/cables provide this receiver’s best picture quality. Remember to
connect the left and right audio cables to the TV because the S-Video cable
carries only the picture signal, not the sound.
Audio/Video (A/V) Jack and Cable (RCA-type)
Audio/Video (A/V) cables provide good picture quality and stereo sound, and
should be used if your TV has no S-video jacks. The digital satellite receiver’s A/V
jacks are color coded (yellow for video, red for right audio, and white for left
audio). If your TV has only one input for audio (mono), connect it to the left
(white) audio jack on the satellite receiver.
RF Jack and Coaxial Cable (F-type)
RF jacks provide good picture and mono sound quality. They should be used if
A/V connections are not available on your TV. RF jacks are used for off-air
antenna and cable feed connections. The RF jacks on the receiver are labeled
IN FROM ANT and OUT TO TV. The coaxial cable supplied with your system is
used to connect the receiver to your TV/VCR’s antenna input jack.
VIDEO AUDIO
LR
ANTENNA IN
S-VIDEO
PHONE
Telephone Jack and Cord
The telephone line cord is required to connect your satellite receiver to a
telephone line if you choose to subscribe to **DIRECTV® programming. The
phone line connection is used to periodically call out to DIRECTV. You will
need an RJ11-type modulator jack (the most common type of phone jack)
which might look like one of those pictured here. If you don’t have a modular
jack, call your local telephone company to find out how to get one installed.
DIRECTV programming is subject to the terms and conditions of the DIRECTV Customer Agreement; a copy is provided at DIRECTV.com and with your first bill.
DIRECTV, the Cyclone Design logo, and Advanced Program Guide are trademarks of DIRECTV, Inc., a unit of Hughes Electronics Corp., and are used with permission.
14 Chapter 1
Connections & Setup
GROUND
SATELLITE
LOW SPEED
IN
DATA
OUT TO TV
IN FROM ANT
S-VIDEO
VIDEO AUDIO
PHONE
JACK
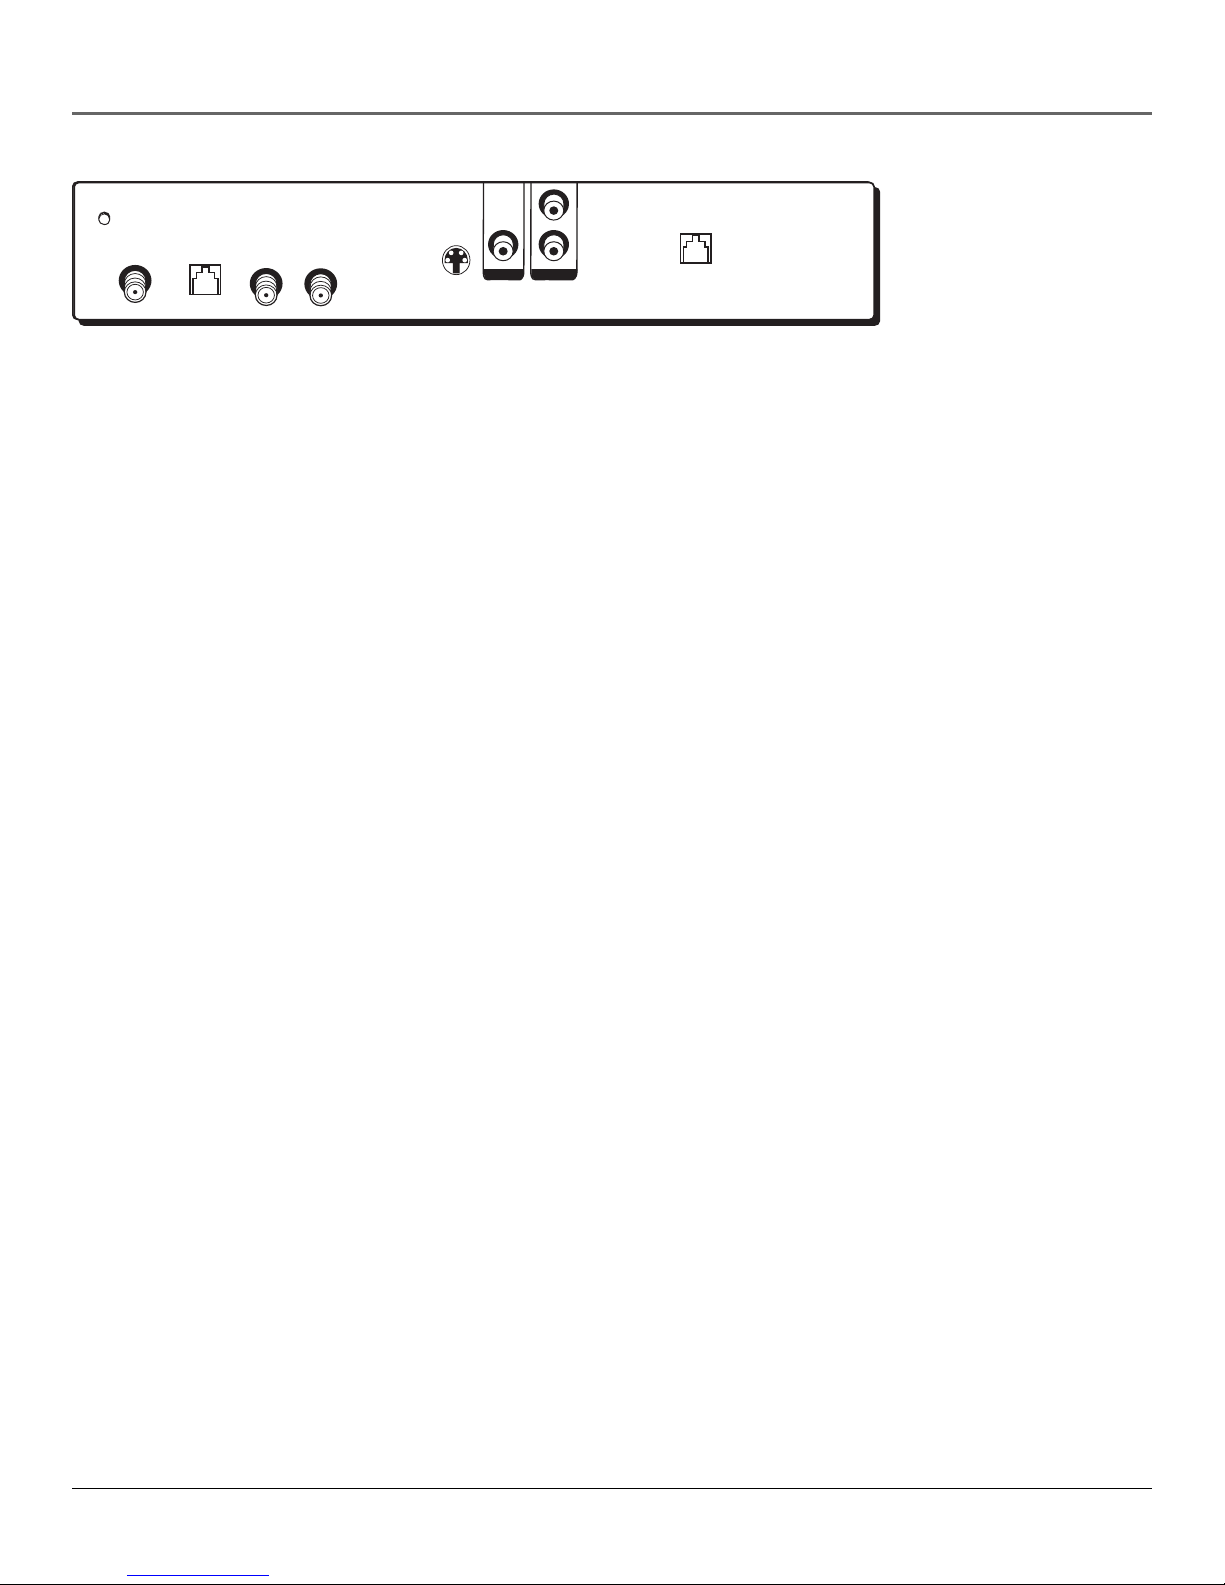
Satellite Receiver Rear Panel
This diagram illustrates each of the back panel jacks found on your digital satellite receiver. When
working with cables, be sure to connect corresponding OUTPUTS and INPUTS (Video OUT to
Video IN, Right Audio OUT to Right Audio IN, etc.).
For more information on the function of the back panel jacks and many other features of your
digital satellite receiver, press the MENU button and select System Setup from the Main menu, then
select System Index.
Back Panel Jacks (in alphabetical order)
AUDIO (R and L) Audio cables offer better sound quality than RF coaxial cables. Audio cables
break sound apart into two separate channels (right and left) for stereo sound.
Note: If your TV has only one audio input jack, connect it to the satellite receiver’s L AUDIO
(white) jack.
IN FROM ANT Connect a standard TV antenna or cable feed to the satellite receiver using this
jack. You can then switch between the satellite receiver’s signal and the TV/cable feed using the
remote control’s ANTENNA button to toggle between the two.
LOW SPEED DATA This port allows you to connect your digital satellite receiver to future
services and accessories as they become available. A shielded cable and additional hardware
may be required.
OUT TO TV Connects the satellite receiver to your TV or VCR using RF coaxial cable. This jack
provides the most basic connection, carrying average sound and video quality.
PHONE JACK Connects the satellite receiver to a telephone line. The digital satellite receiver
requires a telephone line connection to periodically communicate with your program provider.
SATELLITE IN Use to connect the satellite receiver to the satellite dish antenna.
S-VIDEO Provides better picture quality than Video or RF coaxial cable jacks. If your TV has
an S-Video jack, use it along with the audio jacks (S-Video only carries picture information, not
sound) to connect to your TV.
VIDEO Provides better picture quality than the OUT TO TV jack. You must also connect the
AUDIO cables when using the VIDEO connection.
Chapter 1 15
Connections & Setup
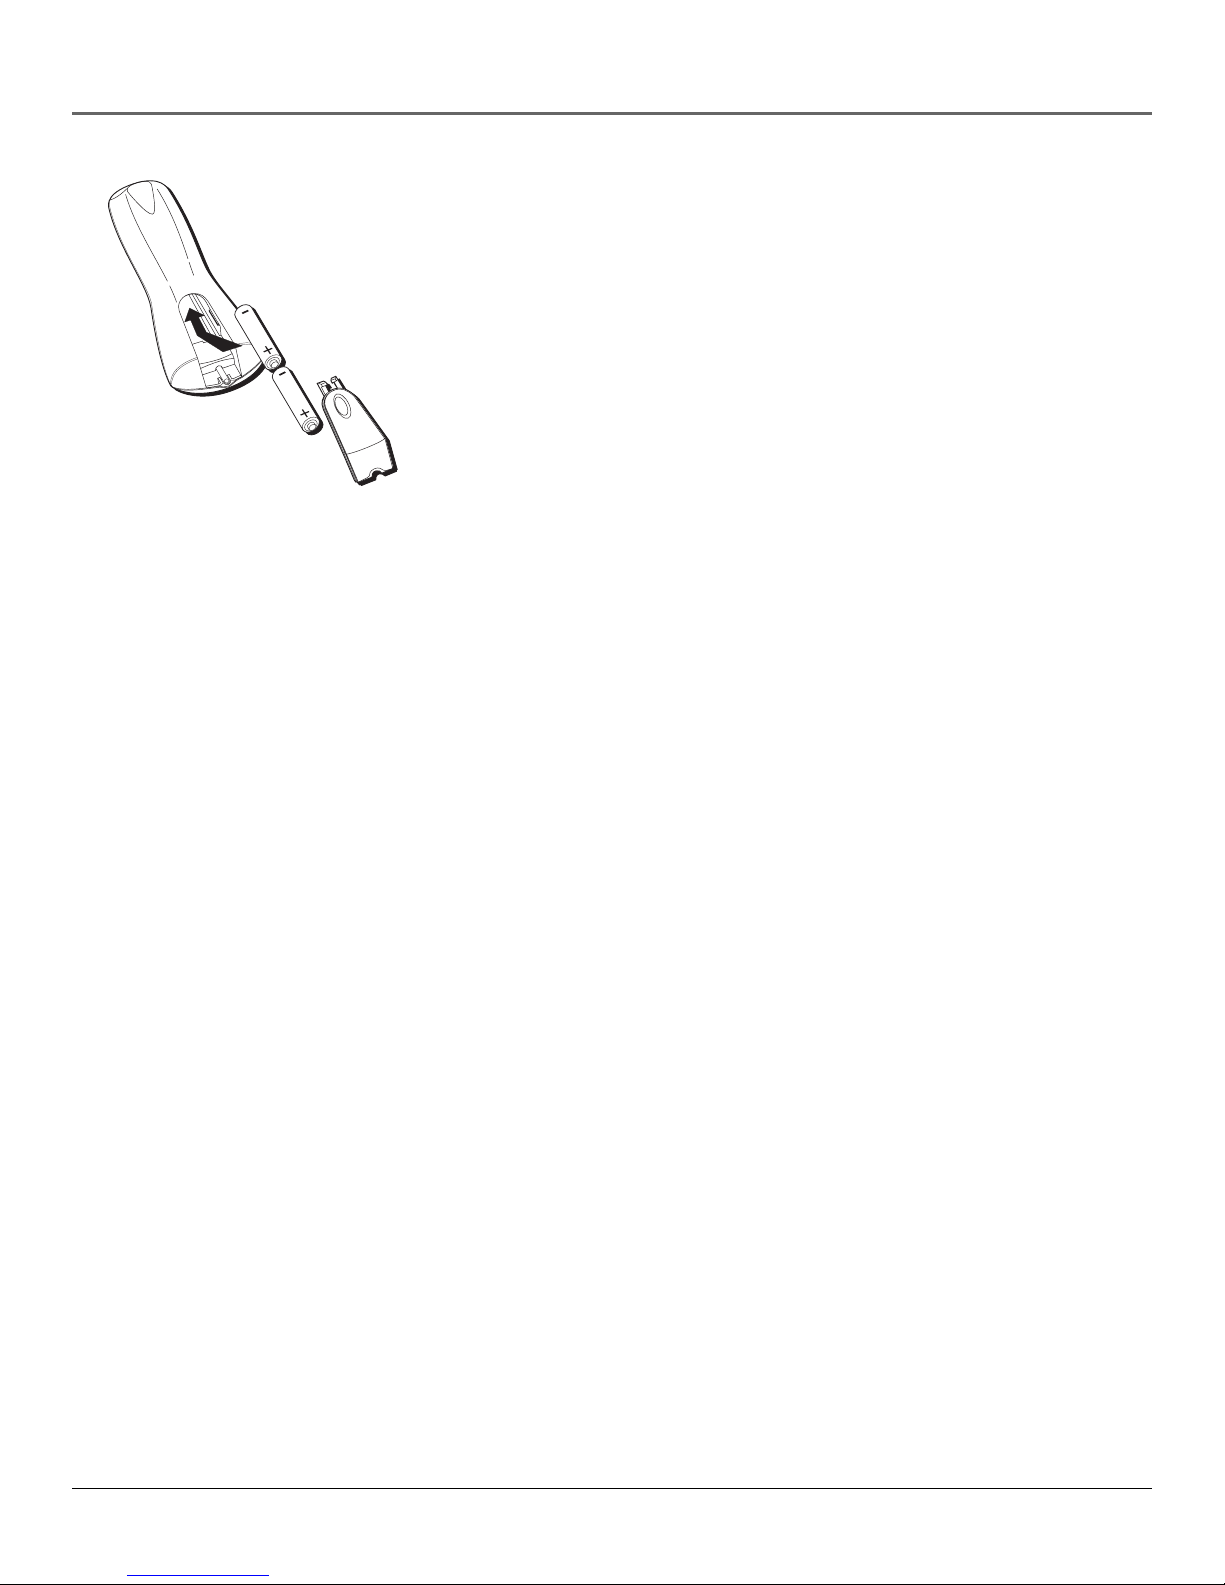
Place Batteries in the Remote
Control
Follow these steps whenever you need to install or change the batteries in
your digital satellite receiver’s remote control.
1. Remove the cover from the battery compartment.
2. Insert batteries in the battery compartment, matching
3. Replace the cover.
Plug in and Turn on the Receiver
Plug the end of the power cord into the wall outlet. Be sure to insert the plug
completely.
Note: When replacing old batteries, you may need to reprogram the
remote control to operate other devices.
the + and – end of each battery.
To turn on the satellite receiver, press the SAT button on the remote control or
the ON•OFF button on the front panel. If your TV brand is RCA, GE, or
Proscan, press the TV button on the remote control to turn on the TV. If your
TV brand is not RCA, GE, or Proscan, see page 23 in the next section, Using
the Remote Control, for details on programming the satellite receiver’s remote
control to operate your TV.
16 Chapter 1

Connections & Setup
Arrow
buttons
MENU
button
VCR1
DVD
MUTE
L
O
V
FETCH
GUIDE
MENU
1
4
7
WHO•INPUT
ON • OFF
VCR2
2
5
89
0
PLAY FORWARDREVERSE
CH +
CH -
OK
AUX
TV
SAT
SKIP
GO BACK
INFO
CLEAR
3
6
ANTENNA
Using Highlight and Select
All on-screen menus can be handled the same way, using highlight and
select navigation.
Highlight and select navigation has two steps:
1. Use the arrow buttons (up, down, left, and right) on the remote
V
O
L
button
OK
SAT
(-)
button
CLEAR
button
control to highlight different choices on the screen.
2. Press OK to select the highlighted item.
Note: When a highlighted on-screen menu choice has a number
beside it, you can also press the corresponding number button on
the remote control to select it.
Once you know how to navigate on-screen menus, you can complete
the Assisted Setup (see the next step) and explore the menu system.
To display the on-screen menu system, press the remote control’s SAT
button, then press the MENU button.
Note: Don’t worry about getting stuck inside a menu. Pressing the
CLEAR button on the remote control takes you out of the menu
system and back to the program you were watching.
RECORD
STOP PAUSE
Chapter 1 17

Connections & Setup
Complete the Assisted Setup
If you installed your satellite dish antenna yourself, you may have already used the Assisted
Setup to find dish-pointing coordinates, acquire and fine-tune the signal, and run a system test.
If you need to run the setup again, select System Setup from the Main menu, then select Assisted
Setup.
To check your dish-pointing coordinates or run the signal strength meter, display the Main
menu, then select System Setup, and finally Dish Pointing.
Order Programming
Tip
When you order programming, you
need to know your access card
number. To get the number, select
System Setup from the Main menu,
then System Test.
Wait for the system to run all of its
tests. The access card number is
displayed at the end of the system
test.
Write the access card number in the
space below for easy reference:
After you have installed your DIRECTV System, you should contact DIRECTV to
order DIRECTV
With this receiver and the proper satellite dish antenna, you may be able to
subscribe to local channels from DIRECTV in certain areas. Additional
equipment may be required in some markets. Check with your retailer or visit
DIRECTV.com for information on availability of local channels from DIRECTV in
your area.
Activation of programming may be subject to credit approval and requires valid
service address, social security number and/or major credit card. Programming
subject to change. You must be physically located in the U.S. to receive DIRECTV
service. DIRECTV services not available outside the U.S. DIRECTV® programming
is sold separately and independently of DIRECTV System hardware. A valid
programming subscription is required to operate DIRECTV System hardware.
Activate your DIRECTV® programming today at 1-800-DIRECTV (1-800-347-3288).
®
programming.
18 Chapter 1

Using the
Remote Control
Chapter Overview:
• Remote Control Buttons
• Buttons on Top of the Digital Satellite Receiver
Chapter 2
• Programming the Remote Control
• Using the Remote Control to Operate
Another Component
• Modes of Operation
• Controlling a Second Satellite Receiver
• Remote Control Codes
Changing Entertainment. Again.
Graphics contained within this publication are for representation only
19
Using the Remote Control
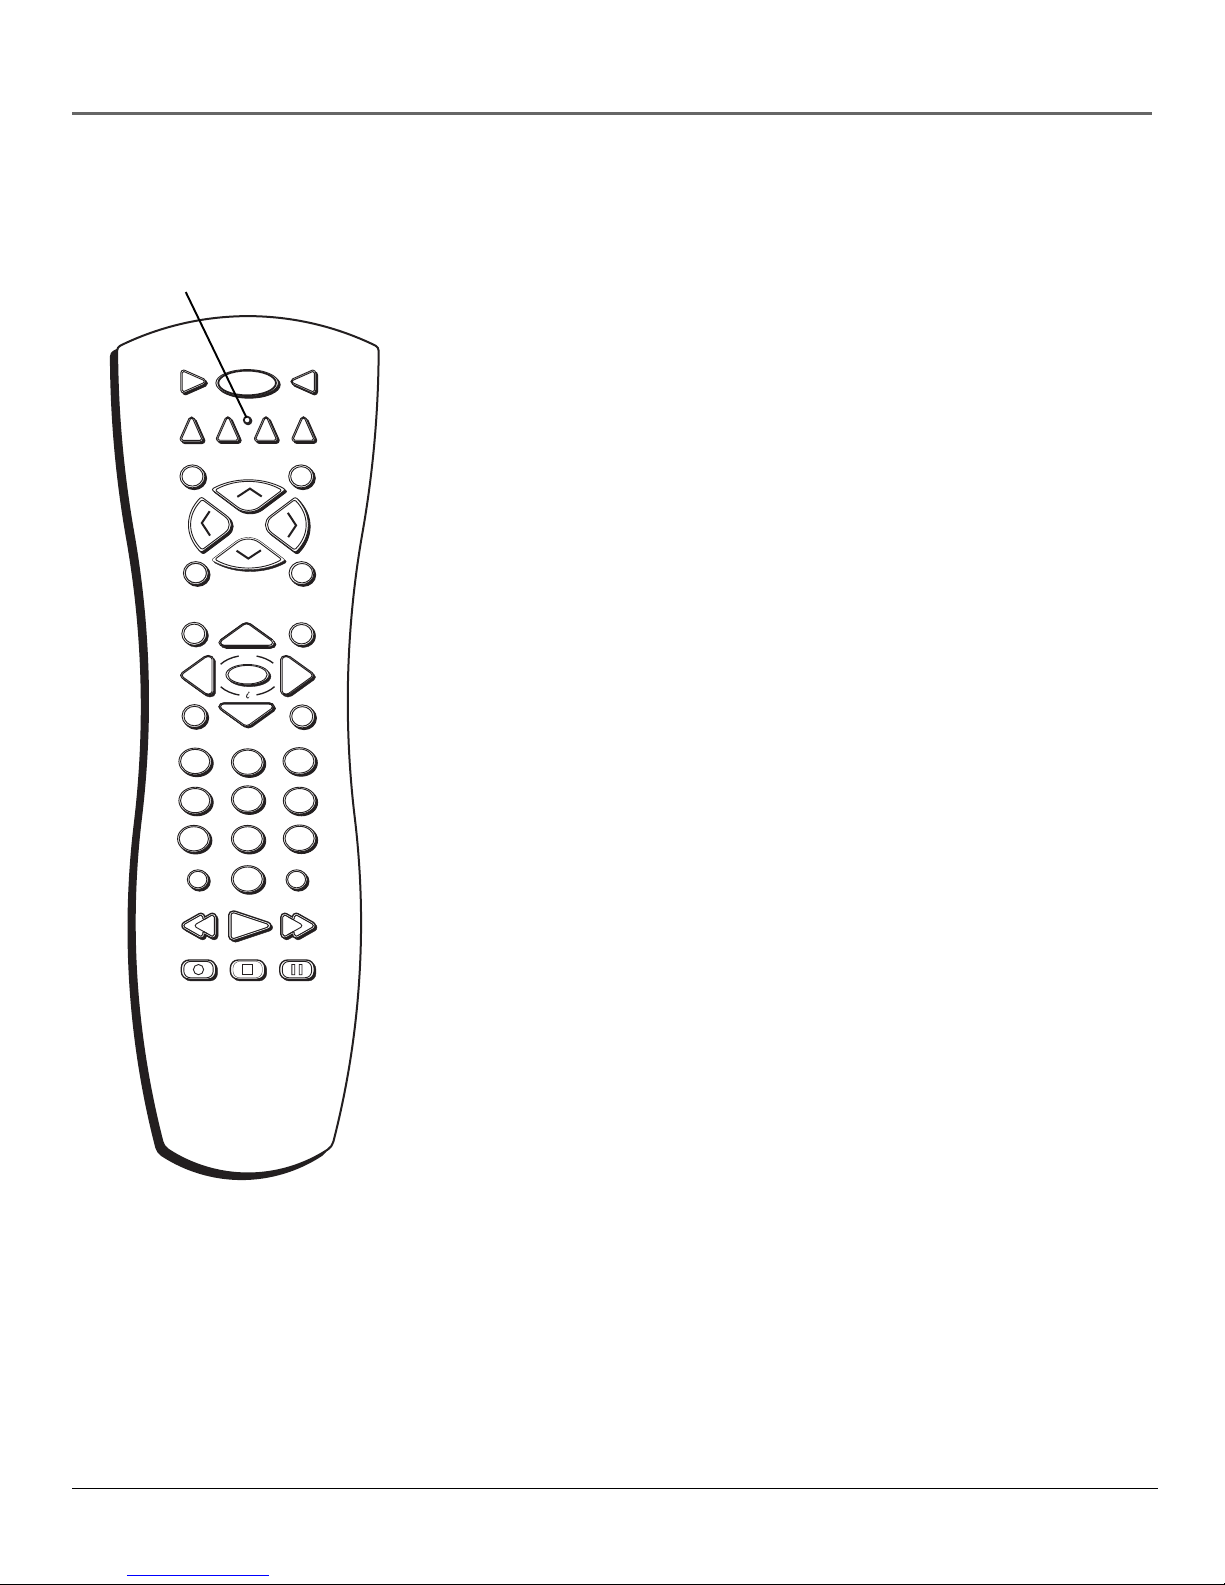
Remote Control Buttons
in Alphabetical Order
LED
VCR1
DVD
MUTE
L
O
V
FETCH
GUIDE
MENU
1
4
7
WHO•INPUT
RECORD
ON • OFF
VCR2
2
5
89
0
PLAY FORWARDREVERSE
STOP PAUSE
CH +
CH -
OK
AUX
TV
SAT
SKIP
GO BACK
INFO
CLEAR
3
6
ANTENNA
ANTENNA In TV mode, lets you toggle between the satellite and standard TV/
cable signals when the satellite receiver is connected to the TV using the OUT
TO TV jack. In VCR mode, ANTENNA functions as a TV/VCR input button.
Arrows Use the navigation arrows to move the on-screen highlight up, down,
left, or right.
AUX Turns on a compatible RCA amplifier/receiver or audio/video receiver.
This button can be programmed to control an RCA, GE, or Proscan auxiliary
component.
V
O
L
CH + (up) /- (down) Use to scan up and down through the channels in the
current channel list. If you are in the program guide or menu system, use the
CH +/- buttons to page up and down a screen at a time.
CLEAR Removes the on-screen displays and returns you to normal viewing.
Digit Buttons (0 - 9) Used to tune directly to a specific channel. If you are in
the menu system, use the digits to select menu items. In the menu system, use 0
(-)
to return to the previous menu screen.
DVD Tells the remote to operate the DVD player. Note that this button is only
functional with RCA, GE, and Proscan DVD players.
FETCH Displays the Fetch menu with up to eight different actions, or executes
a single task- depending on the preferences set.
GO BACK Moves you back and forth between the last two selected channels. In
the menu system, returns you to the previous screen.
GUIDE Brings up the program guide. Subsequent presses of the GUIDE button
switch between the Detail and Grid guide formats.
INFO Brings up the on-screen channel banner, password challenge, or
purchase offer screen. In the program guides, press to get information about the
highlighted program or channel. In the menu system, this button displays
context-sensitive help for highlighted control elements.
LED (Light-Emitting Diode) This light is illuminated with each valid button
press. When programming the remote control, it flashes or turns on or off to
indicate programming status.
MENU Displays the Main menu. When you are using the remote control to
operate an RCA, GE, or Proscan VCR (the remote is in VCR mode), the MENU
button functions as a Program button.
MUTE When the remote is programmed to control a TV, this button reduces
the TV’s volume to its minimum level. Press again to restore the volume.
20 Chapter 2

Using the Remote Control
OK/i (interactive) Selects a highlighted choice if you are in the menu system.
Press the OK button when the DIRECTV INTERACTIVE™ icon ( ) appears during interactive
programs and commercials. Pressing OK will display more information and offer the chance to
interact with what is displayed on screen.
ON•OFF Turns the component you are controlling on or off. When pressed twice within two
seconds, all components that are on will be turned off (this feature only works with most RCA,
GE, and Proscan products). You can also use the ON•OFF button on the top (front panel) of the
digital satellite receiver to turn the receiver on or off.
SAT Tells the remote to control the digital satellite receiver.
SKIP Used to activate the commercial skip mode on RCA. GE, and Proscan products that offer
Commercial Skip feature. Commercial Skip activates an on-screen timer. This feature allows you
to change channels (during a commercial break, for example), then be returned to the original
channel that was active when skip was first pressed when the timer reaches zero. Each press of
the SKIP button increases the timer by 30 seconds.
Transport Buttons (REVERSE, PLAY, FORWARD, RECORD, STOP, PAUSE) When in onscreen guides, PLAY advance the display two hours, FORWARD advances the display 12 hours
and REVERSE moves time backward 12 hours. When the remote control is programmed, these
buttons are also used to control an auxiliary component, such as a VCR or laserdisc player. Note
that if your VCR Controller is connected, the RECORD button can be used to schedule a timer
recording when using the Program Guide or to begin recording while watching a program (in VCR
mode).
TV When programmed, tells the remote to control the TV.
VCR1 When programmed, tells the remote to control the VCR.
VCR2 When programmed, tells the remote to control a second VCR.
VOL down and up When programmed, adjusts the audio volume of your TV.
WHO•INPUT Press the WHO button one or more times to scroll through the user profiles.
When you are using the remote control to operate an RCA, GE, or PROSCAN TV (in TV mode),
press the WHO•INPUT button one or more times to scroll through the available video input
sources.
Chapter 2 21
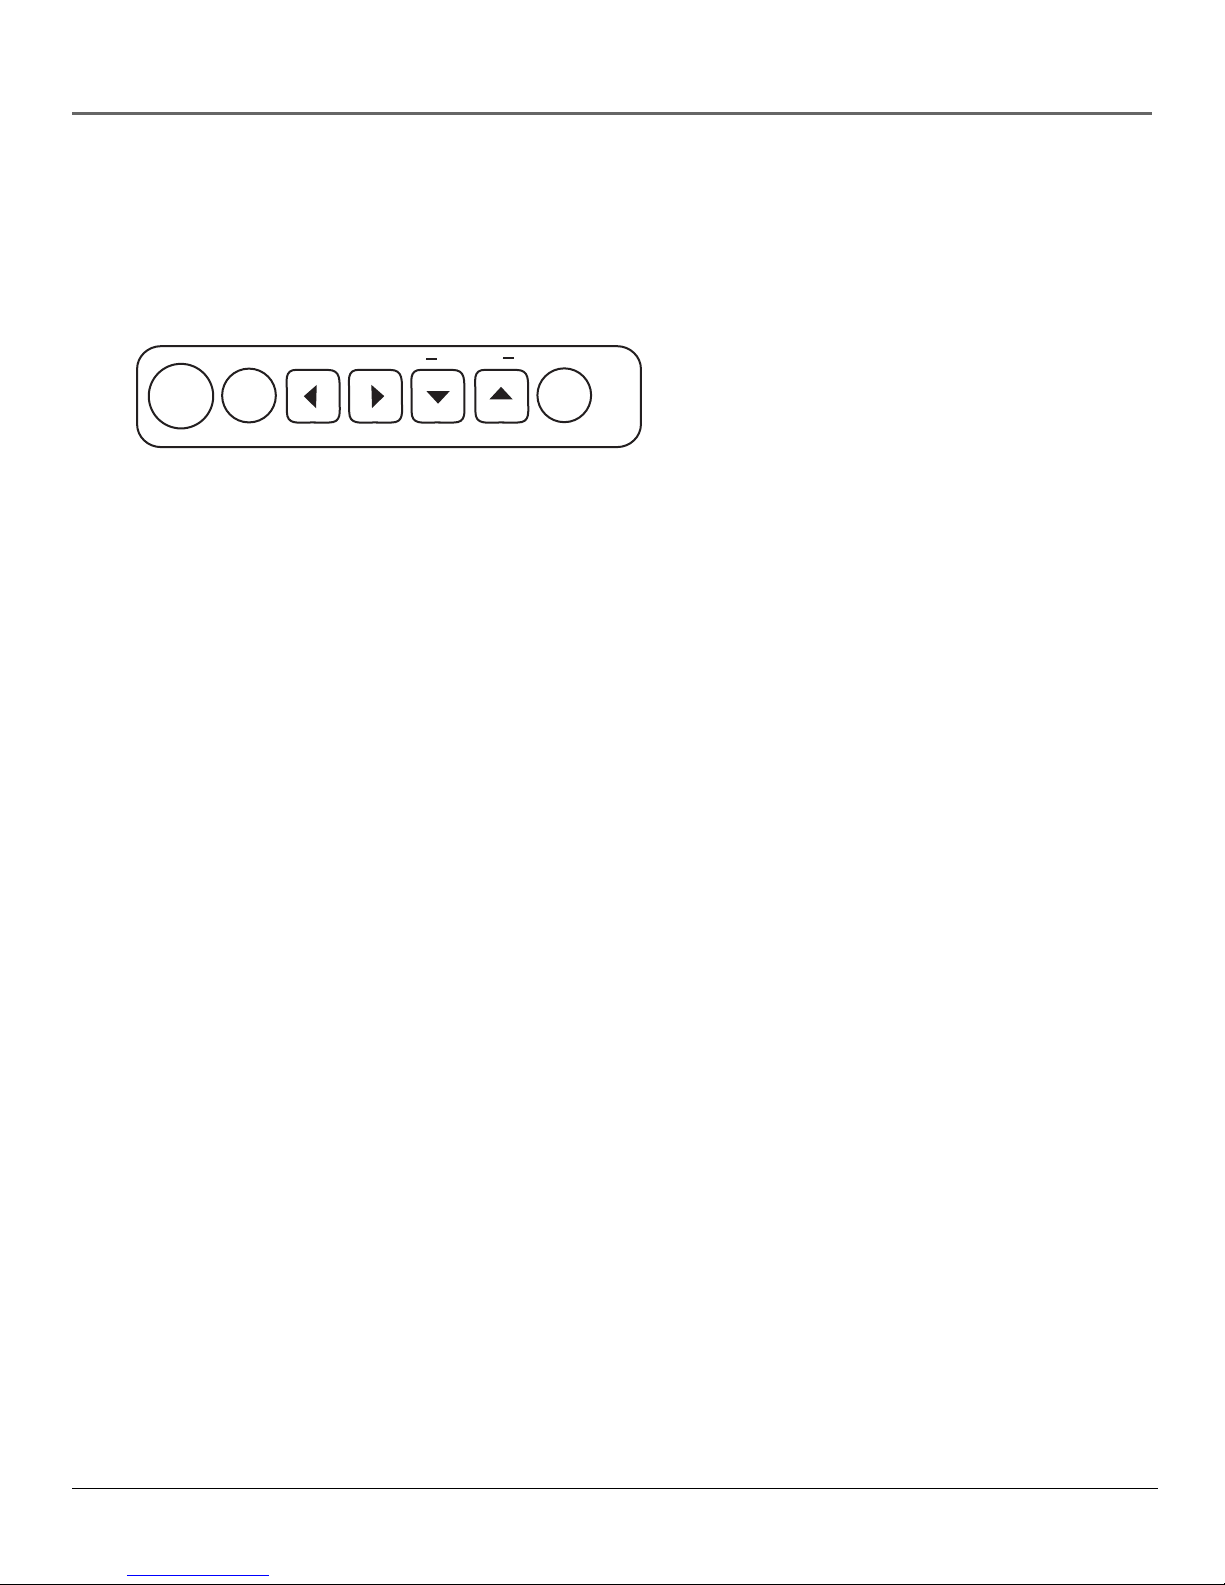
Using the Remote Control
Top of the Digital Satellite Receiver
This diagram illustrates the buttons on the top (also referred to as the front panel) of the digital
satellite receiver. For more information on the function of the front panel buttons and many other
features of your digital satellite receiver, press the MENU button and select System Setup from the
Main menu, then select System Index.
CHANNEL
ON •
OFF
Front Panel Buttons (Left to Right)
ON•OFF Use to turn your digital satellite receiver on for viewing or off when you are not
viewing it. Your receiver will still be able to download software upgrades and receive messages
from program providers when it is off.
MENU•OK Use this button to display the Main menu. If you are already in the menu system,
pressing this button selects the highlighted item.
Arrows Use the navigation arrows to move the on-screen highlight up, down, left, or right.
Channel Down and Up When you’re watching TV, use these buttons to change the channel.
INFO Use this button to display the channel banner, password challenge, or purchase offer
screen. Press twice to display additional program information, when available. While in the
menu system INFO also summons context sensitive help about a highlighted menu item.
MENU
OK
INFO
22 Chapter 2
 Loading...