

Page 1
Limited One-Year Warranty ANT3901
Amplified
Outdoor Antenna
VHF•UHF•FM
User’s Guide
universal
Designed for
elliptical DBS
satellite dish
antennas with
multi-satellite LNB
for sharp local
channel reception
ANT3901new 4/29/03 8:37 Page 1
Page 2
2
Table of Contents
Important Safety Precautions . . . . . . . . . . . . . . . . . . . . . . . . . .3
Lightning Protection . . . . . . . . . . . . . . . . . . . . . . . . . . . . . . . . .3
About Your New ANT3901 Outdoor TV Antenna . . . . . . . . .4
For Best Reception Results . . . . . . . . . . . . . . . . . . . . . . . . .4
Before You Begin . . . . . . . . . . . . . . . . . . . . . . . . . . . . . . . . . . . .4
Installing Your New ANT3901 Antenna . . . . . . . . . . . . . . . . .5
Step A: Installing the ANT3901 on Your Satellite Dish . . .5
Step B: Installing the Inside Diplexers . . . . . . . . . . . . . . .8
Step C: Setting Up Your TV to Use the ANT3901 . . . . . .9
Limited One-Year Warranty . . . . . . . . . . . . . . . . . . . . . . . . . .10
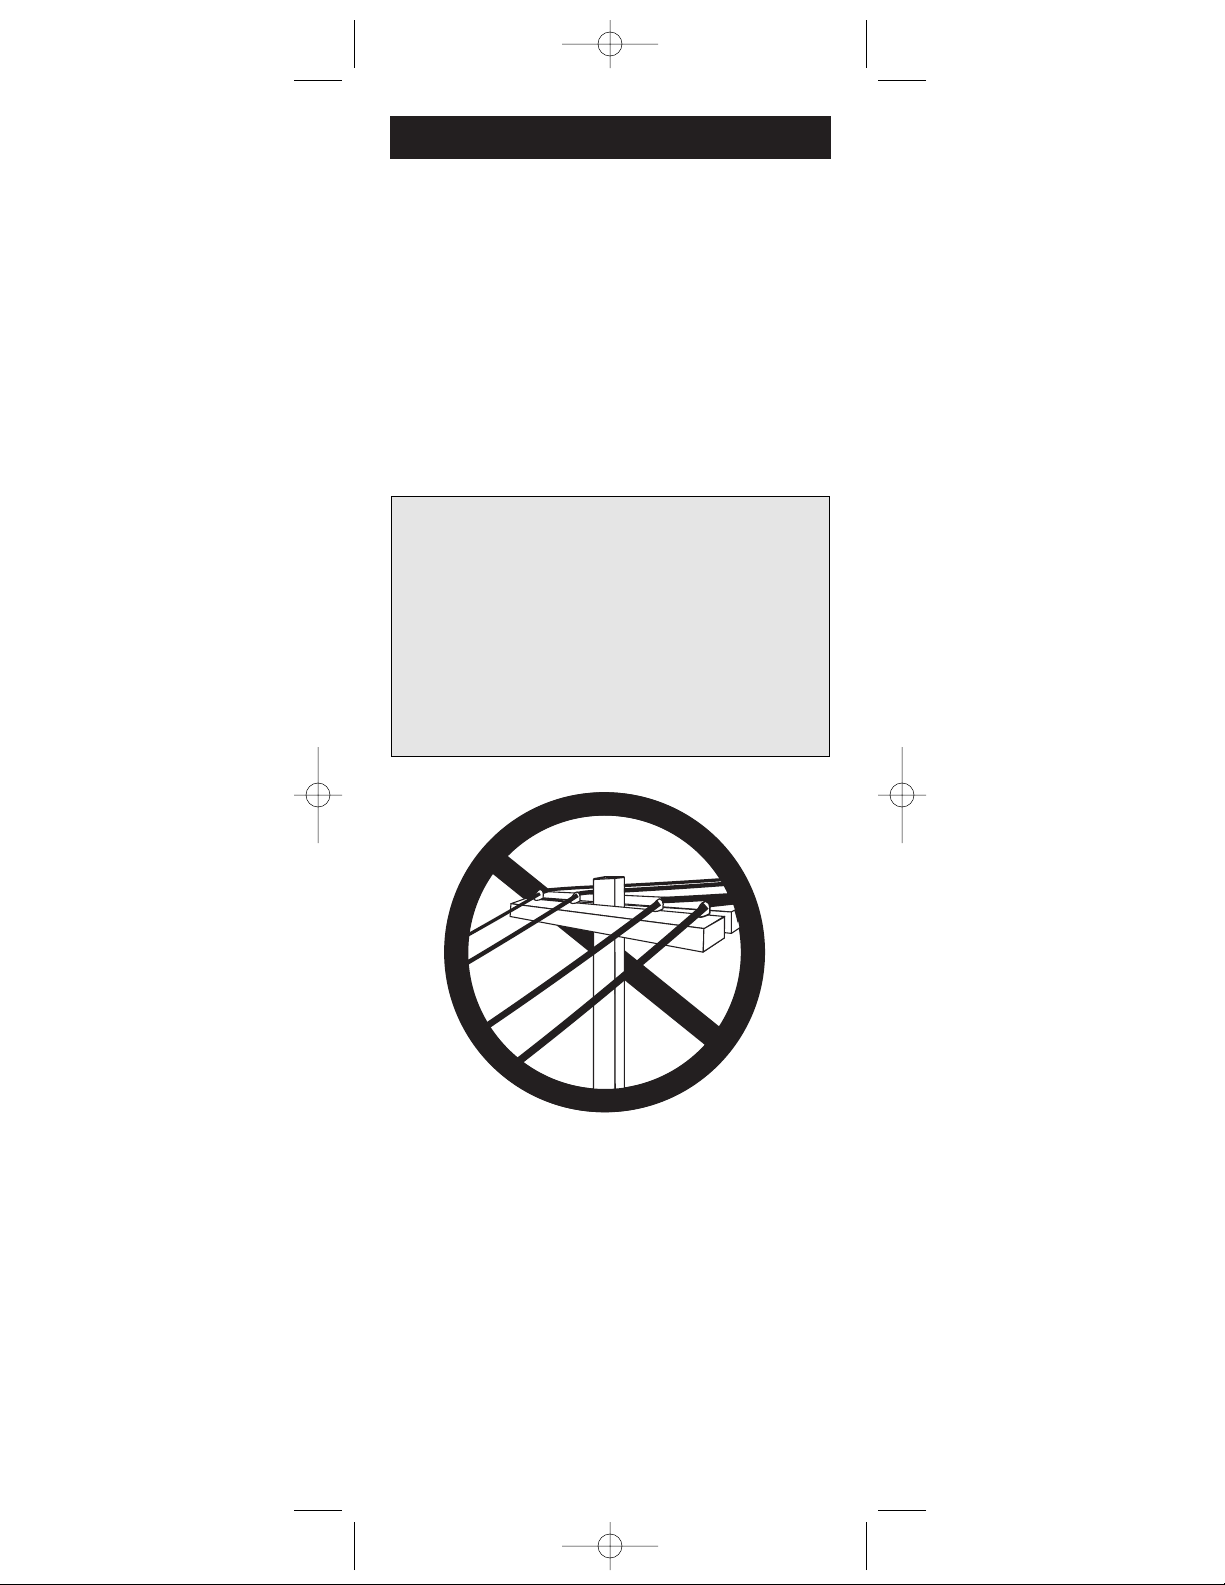
WARNING! Use extreme caution when installing or
removing an outdoor antenna that is located close to
overhead wires such as power lines, telephone lines or
cable TV lines. If any part of the antenna makes contact
with overhead power lines, touching the antenna or the
antenna cable can cause electrocution and death. If the
antenna is in contact with any type of overhead wires, call
your power company and ask them to send a qualified
technician to remove the antenna. Do not attempt to
remove it yourself!
ANT3901new 4/29/03 8:37 Page 2
Page 3
Important Safety Precautions
Lightning Protection
WARNING! Many do-it-yourself and professional antenna
installers are injured or killed each year by electric shock.
While anyone can see the obvious danger of falling, the most
resourceful sometimes fail to recognize overhead wires as
being potentially lethal. To touch any part of the antenna to
these overhead wires is the same as touching the wires with
your bare hand. A very serious shock is almost sure to result
when contacting an electrical wire, and, in the case of
primary wires on the tip of poles, the shock is similar to
being struck by a bolt of lightning. Many power wires are
within 20 to 25 feet of the ground and can easily be touched
by an assembled antenna.
Please read and follow these important
safety precautions.
• Get help from a qualified professional if removing an old
antenna and there is any doubt of clearing overhead wires.
• Never install the antenna outdoors at night or in inclement
weather conditions.
• Make sure the antenna downlead cable is connected
to suitable lightning arrestors.
• Make sure the antenna installation is secure.
Always plug your TV and other electronic devices into
a quality surge protector for maximum protection against
lightning and power surges.
• Do not try to guess which overhead wires carry
high voltage. Check with the power company.
• If you notice anything making contact with the overhead
wires, call the power company to have it removed safely.
• Do not run the downlead cable over power lines.
All outdoor antenna installations should be properly
grounded. To effectively protect the installations, the coaxial
cable(s) should be grounded before they enter the house.
The grounding of the coaxial cable is made using a “ground
block” and copper wire (not supplied). For information, and
the materials needed to ground your antenna installation,
visit your local electronics store.
3
ANT3901new 4/29/03 8:37 Page 3
Page 4
About Your New ANT3901
Outdoor TV Antenna
Before You Begin
The ANT3901 is the perfect complement for a multi-beam
satellite dish system. It picks up VHF and UHF signals
so that you can enjoy local programming at no extra cost,
along with your satellite programming.
The ANT3901 features an internal amplifier that minimizes
signal loss. The DBS receiver powers the amplifier, so no
additional power supply is required. Because ANT3901’s
antenna elements are manufactured to be weather-resistant,
they’ll perform at their best for many years to come.
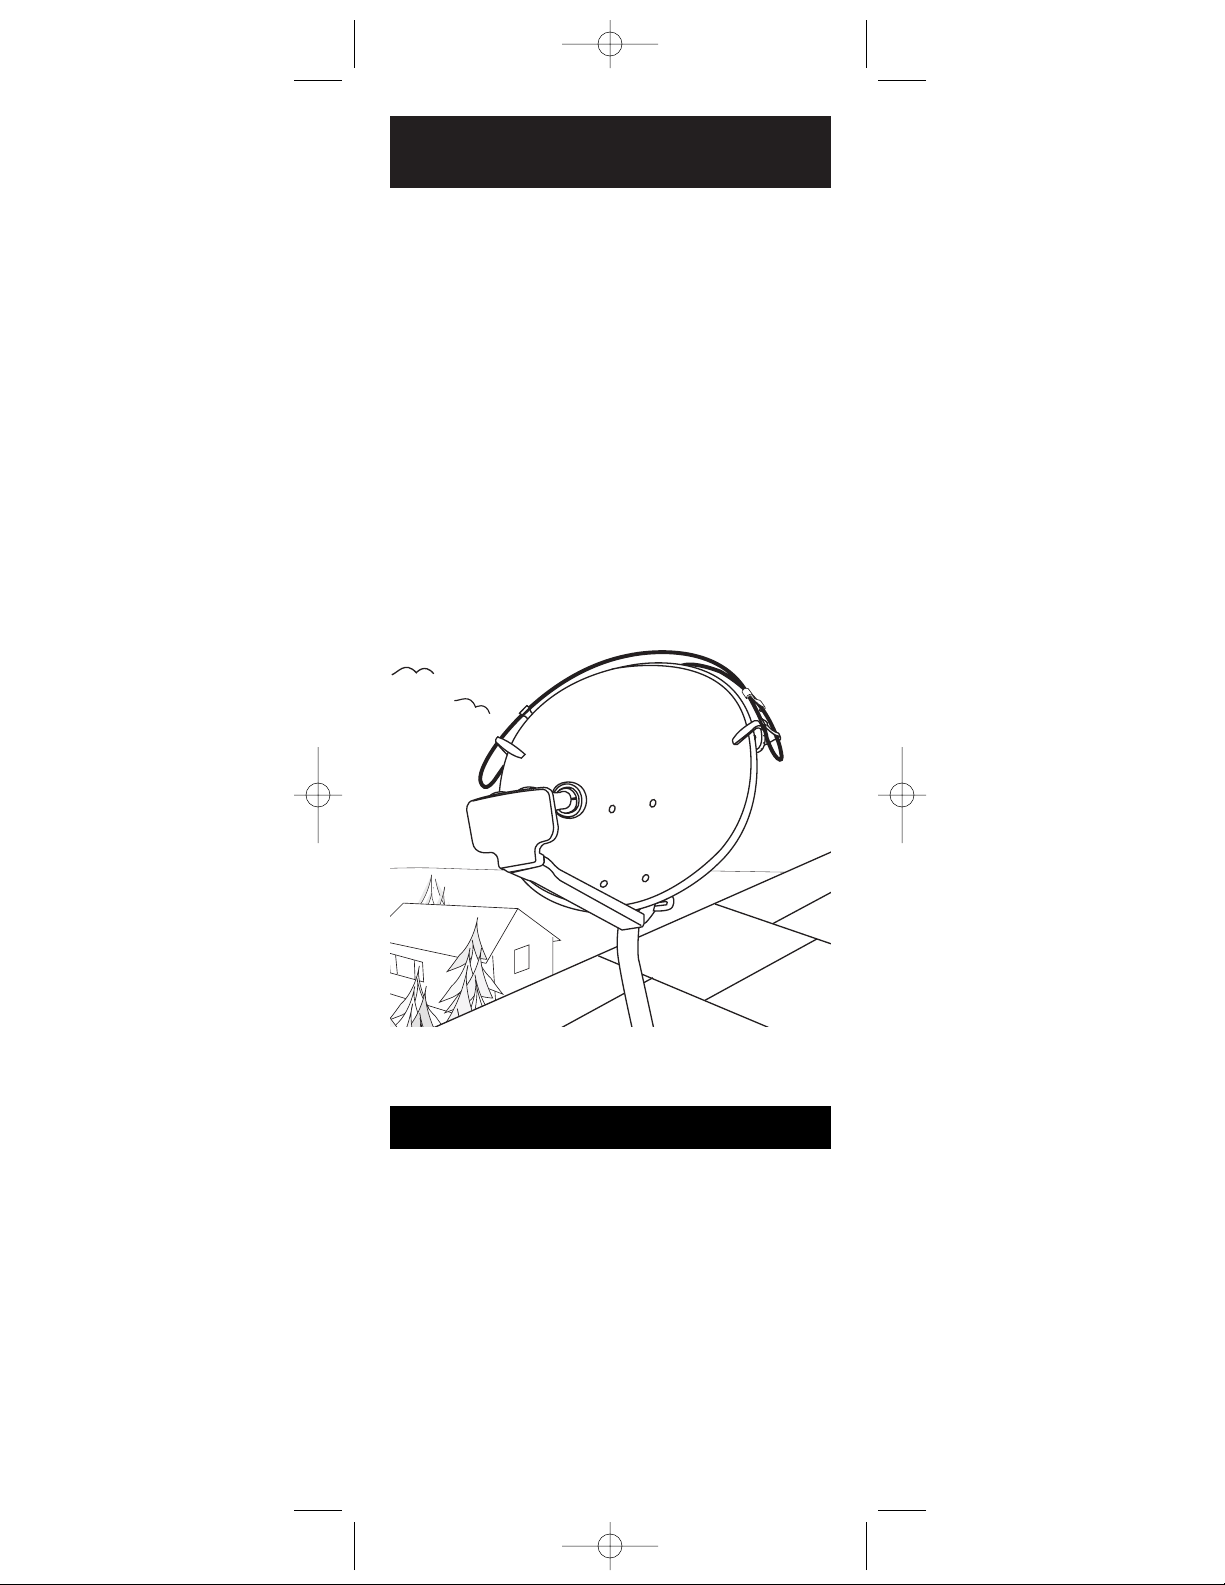
For Best Reception Results
For the best reception results, the satellite dish and antenna
combination should be high off the ground with minimal
signal obstructions. On the side of your house (close to
the roof), or on the roof itself generally offers the best
environment for reception.
Remember, you can always rotate the antenna
on the dish to adjust your reception.
Please take a moment to familiarize yourself with the various
elements in the ANT3901 package. Please make sure that
your package includes all of the necessary pieces (see Fig 1).
4
ANT3901new 4/29/03 8:37 Page 4
Page 5

Installing Your New
ANT3901 Antenna
The ANT3901 installation consists of three basic steps:
Step A: Installing the ANT3901 on your satellite dish.
Step B: Installing the inside diplexers.
Step C: Setting up your TV to use the ANT3901.
Please be sure to complete all of these steps before
attempting to watch local channels with your ANT3901.
Step A: Installing the ANT3901
on your satellite dish
Note: Some satellite dishes have integrated multi-switches.
The “TO RECEIVER” terminals are connected to the cables
coming from the bottom of the dish. Treat these cables as
the “TO RECEIVER” terminals of the multi-switch.
Note: For Dish Network owners; some Dish Network
installations use smaller SW21 multi-switches. Treat
these as one multi-switch with two “OUTPUT” or
“TO RECEIVER” terminals.
1. Make sure all satellite receivers are turned
off and unplugged from the electrical outlet.
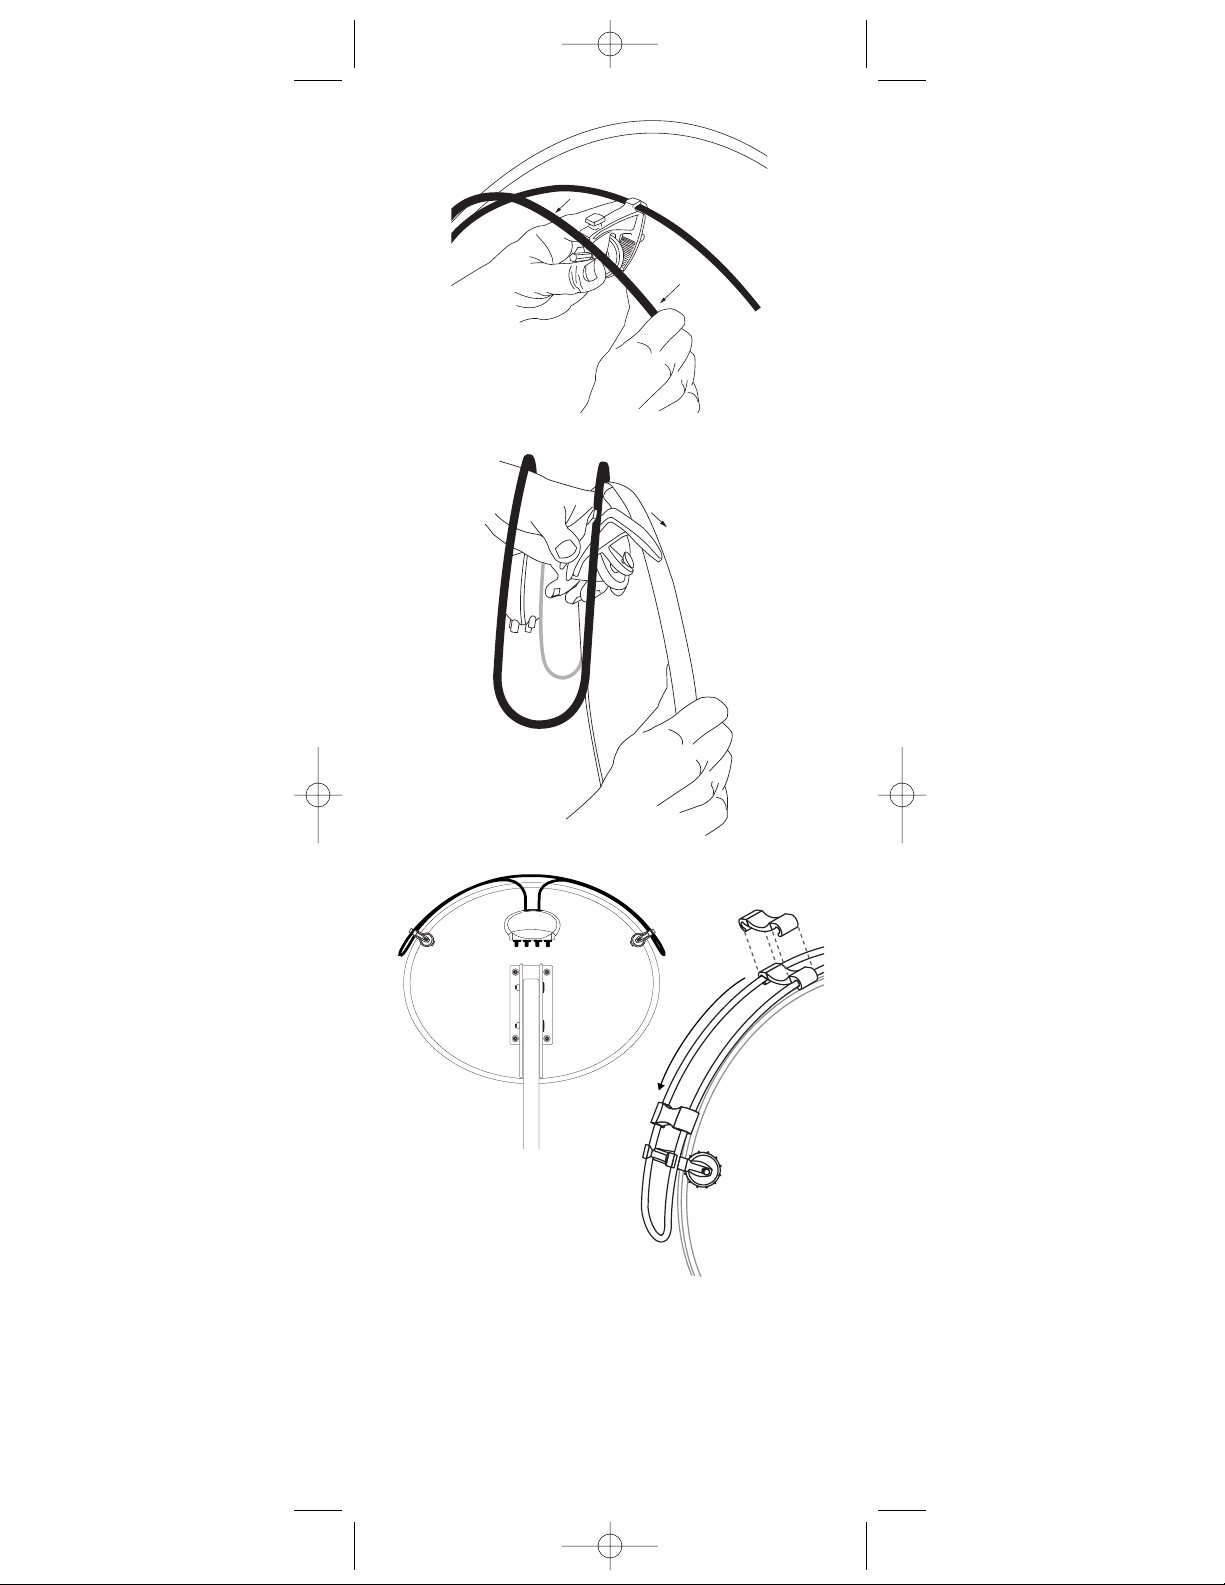
2. Unsnap the antenna from the back notch
of the mounting clamp (see Fig 2 on page 6).
3. Hold the antenna to the back of the dish so that the
circular housing is centered with the RCA logo facing
out (see Fig 4 on page 6).
4. Maneuver clamps over or around the edge
of the dish one at a time (see Fig 3 on page 6).
5. Snap the antenna back into the back notch
of the mounting clamp.
6. Tighten the clamps by turning
the thumb-wheel screw clockwise.
Note: We recommend the use of the enclosed security clips
for any dish. Snap the security clips onto the ANT3901 and
slide down towards the mounting clips (see Fig 4 on page 6).
5
Fig 1
ANT3901new 4/29/03 8:37 Page 5
Page 6
6
Fig 2
Fig 4
Fig 3
ANT3901new 4/29/03 8:37 Page 6
Page 7

7
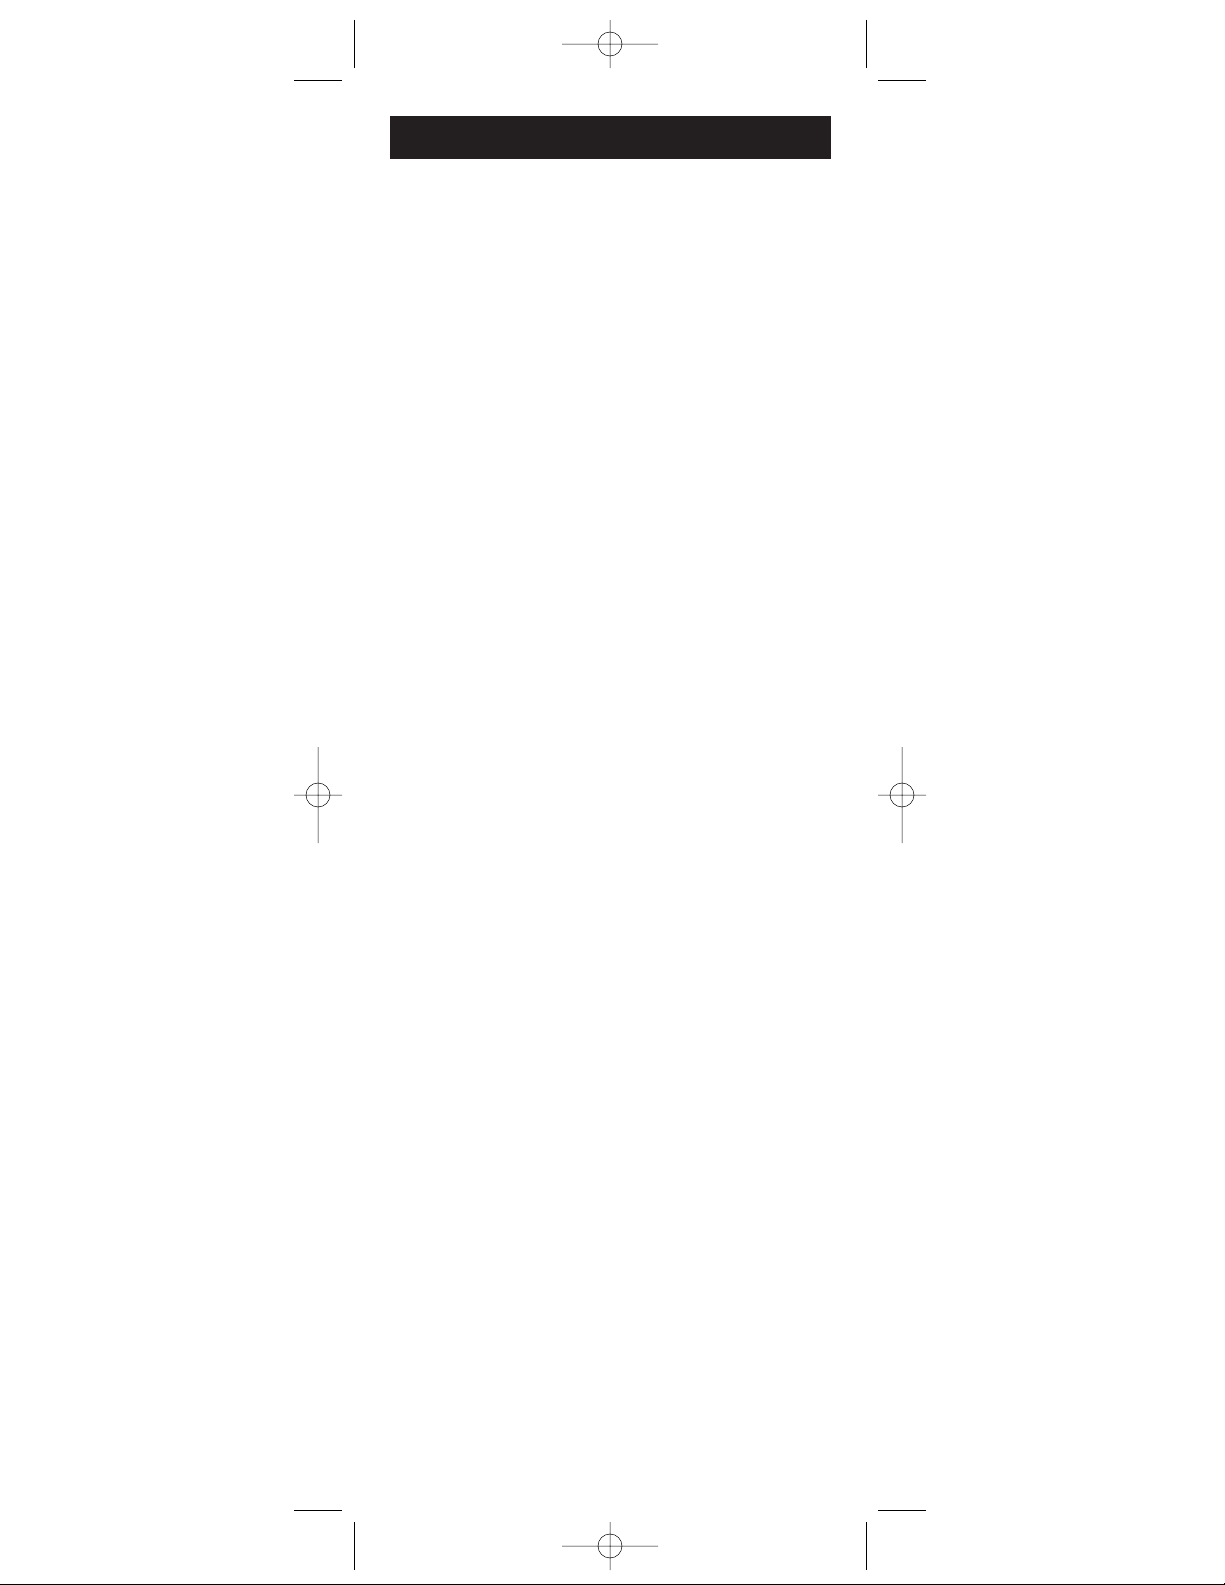
7. Disconnect the satellite cables from the “OUTPUT”
or “TO RECEIVER” terminals on your multi-switch.
8. Connect the satellite cables to the “OUT” 1-4 terminals
on the ANT3901 antenna (see Fig 5 on page 7).
9. Using the black 32”antenna cables, connect the “IN”
1-4 terminals of the ANT3901 to the “OUTPUT” or
“TO RECEIVER” terminals on your multi-switch
(see Fig 6 on page 7).
10. Continue to “Step B: Installing the Inside Diplexers”
(on page 8) and follow the remainder of the standard
installation procedure.
Fig 5
Fig 6
ANT3901new 4/29/03 8:37 Page 7
Page 8

8
Step B: Installing the inside diplexers
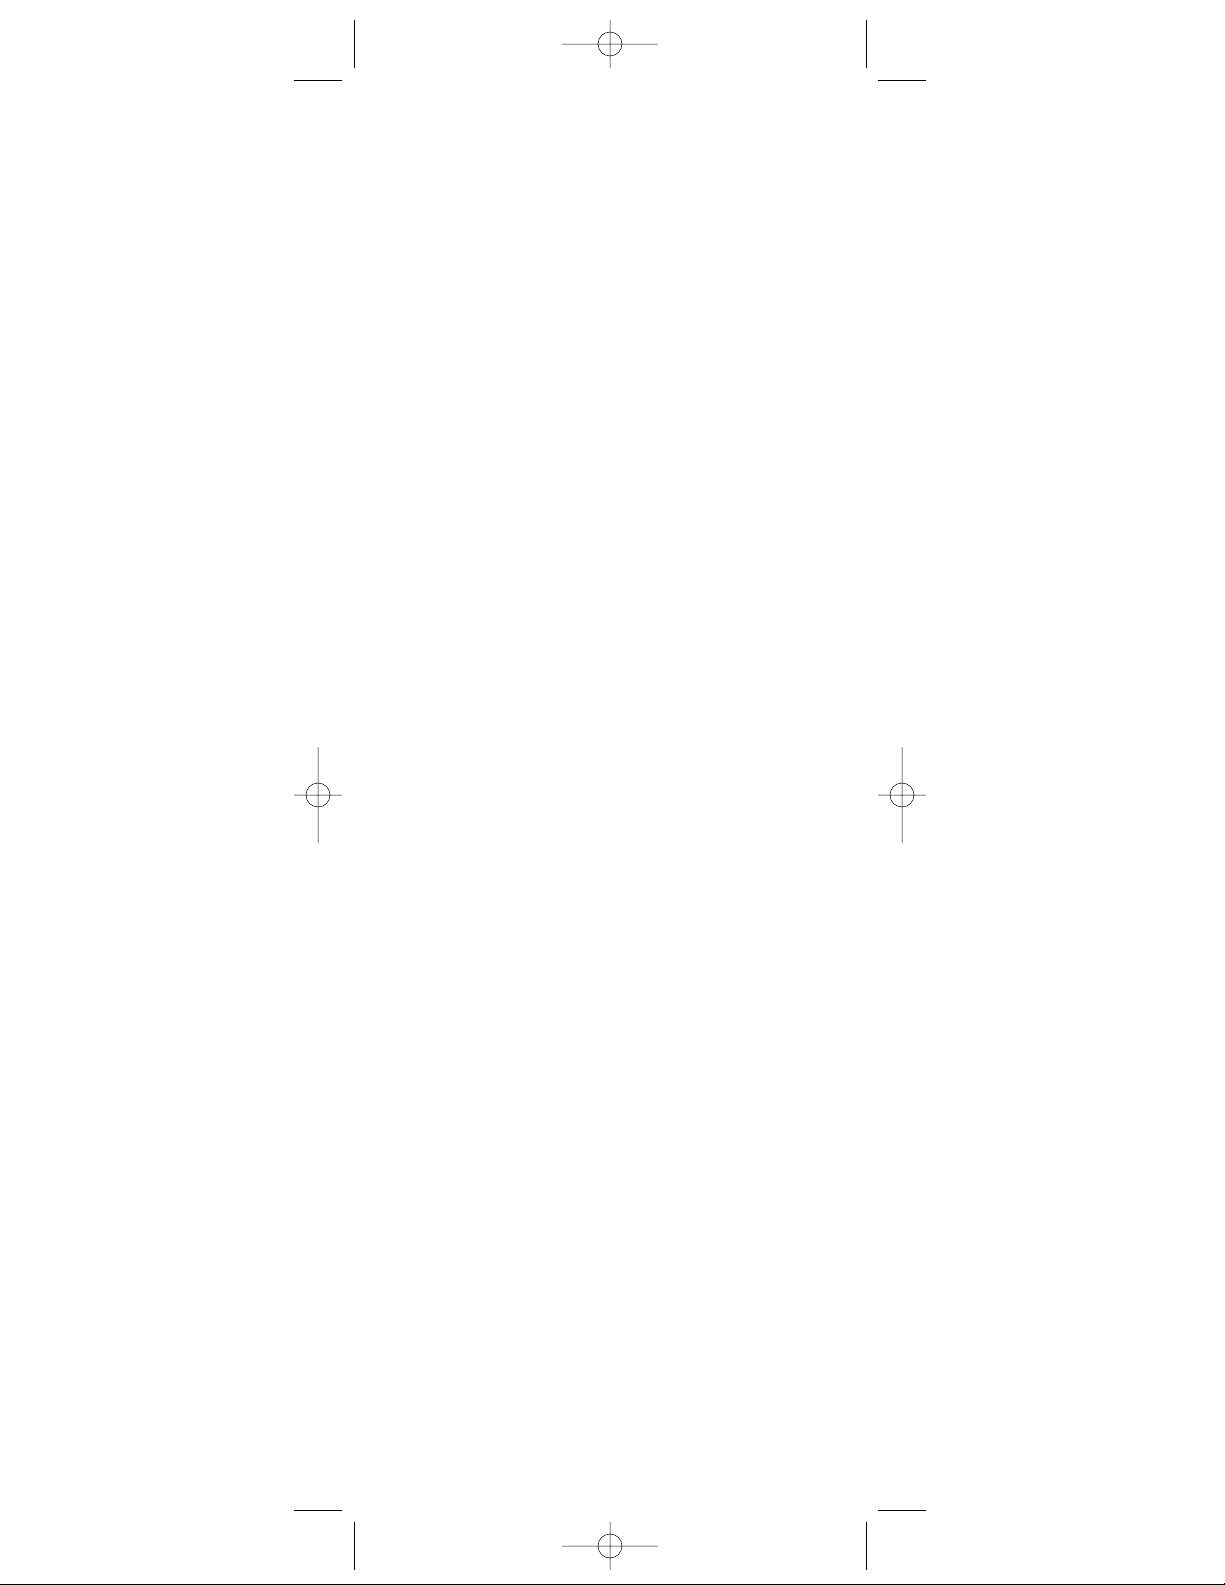
1. Disconnect the satellite cable from the
“SAT IN” terminal on your satellite receiver.
2. Connect the satellite cable to the terminal marked
“TV/SAT” on the inside diplexer (see Fig 7 on page 8).
3. Connect one of the supplied white 12” connector cables
from the terminal labeled “SAT” on the inside diplexer
to your satellite receiver’s “SAT IN” terminal (see Fig 8
on page 8).
4. Connect the other white 12” connector cable from the
terminal labeled “TV” on the inside diplexer to your
satellite receiver’s “ANT IN” terminal (see Fig 9 on
page 9).
5. Connect a coaxial cable (not supplied) from the satellite
receiver’s “TV OUT” terminal to your television or
VCR (see Fig 10 on page 9).
6. Repeat step for each satellite receiver.
7. Continue to “Step C: Setting Up Your TV to Use the
ANT3901” (page 9).
Fig 7
Fig 8
ANT3901new 4/29/03 8:37 Page 8
Page 9

9
Fig 9
Fig 10
Step C: Setting up your TV to use
the ANT3901
1. Access the menu of your TV and make sure the TV is in
ANT/AIR mode and not CABLE/CATV mode. Please refer
to your TV manual for the exact steps to change this option.
2. Access the menu of your TV and run the “Auto Channel
Search” option. Please refer to your TV manual for the
exact steps to change this option.
3. Turn on your DBS receiver and set to ANT, then tune your
TV to your favorite channel.
4. To fine tune local channel reception, rotate the ANT3901
antenna around the perimeter of the dish until you receive
the best possible picture. Tighten the clips so that the antenna
is firmly secured to the satellite dish in that position.
5. The ANT3901 is now ready to receive local programming.
Note: Satellite receiver should be off to view local channels.
ANT3901new 4/29/03 8:37 Page 9
Page 10
©2003 THOMSON INC.
10330 North Meridian Street
Indianapolis IN 46290
Made in China.
ANT3901 US IB REVA
Trademark(s) ®Registered.
Marca(s) Registrada(s).
www.rca.com
THOMSON INC. warrants that, for one year from date of
purchase, it will replace this product if found to be defective
in materials or workmanship. Return it postage prepaid to
the Product Exchange Center, 11721 Alameda Ave., Socorro,
TX 79927, for prompt, no-charge replacement with a current
equivalent. This replacement is THOMSON INC.’s sole
obligation under this warranty. THOMSON INC. will not be
responsible for any incidental or consequential damages or
for any loss arising in connection with the use or inability to
use this product. Some states do not allow the exclusion or
limitation of incidental or consequential damages, so the above
limitation or exclusion may not apply to you. This warranty
excludes defects or damage due to misuse, abuse or neglect.
This warranty gives you specific legal rights, and you may
also have other rights, which vary from state to state.
Limited One-Year Warranty
ANT3901new 4/29/03 8:37 Page 10
Page 11

ANT3901new 4/29/03 8:37 Page 11
Page 12
ANT3901new 4/29/03 8:37 Page 12
 Loading...