

Page 1

Mobile DVD/VCP Player
User's Guide
Changing Entertainment. Again.
7L400MDV
Page 2

Important Information
CAUTION
RISK OF ELECTRIC SHOCK
DO NOT OPEN
This symbol indicates that this product
incorporates double insulation between
hazardous mains voltage and user
accessible parts. When servicing use only
identical replacement parts.
This symbol indicates "dangerous
voltage" inside the product that
presents a risk of electric shock or
personal injury.
Note:
This DVD/VCP player is designed and manufactured to respond to the Region
Management Information. If the Region number of a DVD disc does not
correspond to the Region number of this DVD/VCP player, this DVD/VCP player
cannot play the disc. The Region number for this DVD/VCP player is Region No 1.
Refer to the identification/rating label located on the back panel of your product for its proper
operating voltage.
FCC Regulations state that unauthorized changes or modifications to this equipment may void the
user’s authority to operate it.
This symbol indicates
important instructions
accompanying the product.
CAUTION
THIS PRODUCT UTILIZES A
LASER. USE OF CONTROLS OR
ADJUSTMENTS OR
PERFORMANCE OF PROCEDURES
OTHER THAN THOSE SPECIFIED
HEREIN MAY RESULT IN
HAZARDOUS RADIATION
EXPOSURE. DO NOT OPEN
COVERS AND DO NOT REPAIR
YOURSELF. REFER SERVICING TO
QUALIFIED PERSONNEL.
WARNING
To reduce the risk of fire or
electric shock, do not expose this
product to rain or moisture. The
apparatus shall not be exposed
to dripping and splashing and no
objects filled with liquids, such as
vases, shall be placed on the
apparatus.
CLASS 1
LASER
PRODUCT
Product Registration
Please fill out the product registration card (packed separately) and return it immediately. Returning this card allows us to
contact you if needed.
Product Information
Keep your sales receipt to obtain warranty parts and service and for proof of purchase. Attach it here and record the serial
and model numbers in case you need them. The numbers are located on the product.
Model No. ____________________ Serial No. ____________________ Purchase Date: ________________________
Dealer/Address/Phone: ______________________________________________________________________________
Page 3

Important Information
FCC Statement: This equipment has been tested and found to comply with the limits of a Class B device, pursuant to Part 15 of the
FCC rules. These limits are designed to provide reasonable protection against harmful interference in a residential installation. This
equipment generates, uses and can radiate radio frequency energy and, if not installed and used in accordance with the instructions,
may cause harmful interference to radio communications. However, there is no guarantee that interference will not occur in a
particular installation. If this equipment does cause harmful interference to radio or television reception, which can be determined by
turning the equipment off and on, the user is encouraged to try to correct the interference by one or more of the following measures:
•Reorient or relocate the receiving antenna.
•Increase the separation between the equipment and receiver.
• Connect this equipment into an outlet on a circuit different from that to which the receiver is connected.
• Consult the dealer or an experienced radio/TV technician for help.
Industry Canada Statement:
• This Class B digital apparatus complies with Canadian ICES-003.
Cet appareil numérique de la classe B est conforme à la norme NMB-003 du Canada.
IMPORTANT SAFETY NOTE:
WHEN YOU SECURE THE PLAYER IN THE CAR YOU MUST STRAP IN THE PLAYER WITH THE LAP BELT IN THE
REAR SEAT. DO NOT USE EITHER SIDE SEAT BELT TO SECURE THE PLAYER. MAKE SURE THE BELT IS AS TIGHT
AS POSSIBLE, AS THE PLAYER COULD MOVE IF THE CAR MAKES ABRUPT STOPS AND/OR STARTS. YOU COULD
ENDANGER THE LIVES OF OCCUPANTS IF THE PLAYER IS NOT PROPERLY SECURED.
Things to Consider Before You Connect
Before looking at the specifics of the mobile DVD/VCP player, please take a moment to review the following precautions:
• When in a car, the mobile DVD/VCP player must be powered from the DC POWER jack on the back panel. The mobile DVD/
VCP player’s power should only be turned on when the car’s ignition is turned on.
Note: To prevent the car’s battery from discharging, disconnect the DC power cord from the cigarette lighter socket when not in
use.
•Use only the approved power cord supplied with your mobile DVD/VCP player. Always disconnect the power cord from the
lighter socket or wall outlet before disconnecting it from the player.
Important Information 1
Page 4

Table of Contents
Chapter 1: Connections and Setup
Installing the Player in the Car ................................... 3
Using the Player in a Hotel, Office, or Home ............ 3
Connecting to a TV ...................................................... 4
The Back of the Mobile DVD/VCP Player ................... 5
Buttons and Controls of the DVD/VCP Player ........... 6
Put Batteries in the remote......................................... 7
The Remote Control .................................................... 8
Chapter 2: Playing Videocassettes and Discs
Playing Videocassettes .............................................. 10
The Remote Control Buttons Used for
VCP Mode ............................................................ 10
DVD Basics.................................................................. 11
Regional Coding .................................................. 11
Using Different Menus ........................................ 11
Types of Discs Your DVD/VCP Player will Play .... 11
Loading and Playing Discs .................................. 12
Playback features ...................................................... 13
Fast Motion Playback .......................................... 13
Skipping tracks or Songs ..................................... 13
Skipping Chapters ............................................... 13
Zoom .................................................................... 13
Using a Disc Menu ..................................................... 14
Using the Status Banner ........................................... 15
Selecting a Chapter ............................................. 15
Changing the Audio Language .......................... 16
Changing the Subtitle Language ....................... 16
Changing the Camera Angle .............................. 16
Using the Repeat Feature ................................... 16
Chapter 2: Playing Videocassettes and Discs
(continued)
Using the A-B Repeat Feature ............................ 17
Changing Surround Sound ................................. 17
Playing Audio CDs ..................................................... 18
Using the Repeat Feature ................................... 18
Playing mp3 Discs ...................................................... 19
Selecting Folders and Songs ............................... 19
Skipping Songs .................................................... 20
Selecting a Play Mode ......................................... 20
Program Play ....................................................... 21
Deleting the Playlist...................................... 21
Using the Equalizer ............................................. 21
Chapter 3: DVD Menus
Using the DVD Setup Menu ....................................... 22
Display .................................................................. 22
OSD (On-Screen Display) Language ................... 24
Screen Saver ......................................................... 24
Disc Navigation .................................................... 25
Defaults ................................................................ 25
Sub Volume.......................................................... 25
Chapter 4: Other Information
Troubleshooting ......................................................... 26
Care and Maintenance .............................................. 28
Handling Cautions ..................................................... 28
Formation of Condensation ...................................... 29
Handling Discs ............................................................ 29
Cleaning Discs ............................................................ 29
Limited Warranty ....................................................... 30
2 Important Information
Graphics and illustrations contained in this document are for representation only.
Page 5

Chapter 1: Connections & Setup
Installing the Player in the Car
1. Rest the player in the center of a rear seat.
2. Insert the center seat’s (lap) safety belt through the player’s retainer holes.
Important Note: Secure the player with the lap seat belt as tight as possible so
that the player does not move around.
3. Fasten seat belt strap by inserting and passing it through the player’s two slot
openings.
4. Plug the DC power cable into the DC POWER jack on the back of the player.
Attach the other end of the cable to the car’s cigarette lighter socket or DC power
socket (consult your car owner’s manual for location).
Note: Make sure the car’s ignition is on before plugging the DC power cord into
the cigarette lighter socket.
5. Adjust the LCD screen for desired viewing.
6. If desired, connect headphones to either of the two PHONES jacks on the back of
the player.
Notes: When the player is not in use, the LCD screen should be closed firmly.
Using the Player in a Hotel, Office or Home
1. Place the bottom of the player carefully on a table or other resting surface.
2. Plug the jack end of the AC power adapter into the AC POWER jack on the back of the player. Attach the
other end of the AC adapter to a standard wall outlet. Make sure to insert the blades of the power cord fully
into the wall outlet.
3. Adjust the LCD screen for desired viewing.
4. If desired, connect headphones to either of the two headphone jacks on the back of the player.
Chapter 1 3
Graphics and Illustrations contained in this document are for representation only.
Page 6

Chapter 1: Connections & Setup
OUTPU
T
INPUT
V
I
D
R
E
O
O
I
PHONE
TV
(
back panel
D
S PHONE
EXTERNAL PANELEJECTDC POWE
L
U
A
R
12 V D
C
)
AUDI
L / MON
L
O
O
R
I
N
R
OUT
VIDE
O
V
I
R
D
E
O
O
I
D
U
A
L
CABLE
ANTENN
S
/
A
Connecting to a TV in a Hotel, Office or Home
1. Connect audio cables (white and red) to the Audio Input Jacks on the back of the TV (sometimes labeled AUDIO L/MONO and
R) and to the AUDIO OUTPUT jacks (L AUDIO R) on the DVD/VCP player.
2. Connect the video cable (yellow) to the Video Input Jack on the back of the TV and to the VIDEO OUTPUT jack on the DVD/
VCP player.
3. Connect the AC power cord to the AC POWER jack on the DVD/VCP player and plug the other end into the wall outlet.
4 Chapter 1
Page 7

OUTPU
Chapter 1: Connections & Setup
Tape slot
T
INPUT
V
I
D
E
O
PHONE
S PHONE
R
O
I
D
L
U
A
EXTERNAL PANELEJECTDC POWE
12 V D
R
C
V
I
D
E
O
R
O
I
D
U
A
L
S
The Back of the Mobile DVD/VCP player
Tape slot Insert videocassette tapes into this slot.
PHONES Connect headphones to listen to the sound.
Note: When either or both of the headphones are in use, there will be no sound coming from the speakers.
OUTPUT VIDEO Sends the video playing in the DVD/VCP player to another component such as a TV.
OUTPUT L/R AUDIO Sends the audio playing in the DVD/VCP player to another component, such as a TV or sends the sound
to powered (amplified) speakers.
EXTERNAL PANEL Sends the audio and the video that’s playing in the DVD/VCP player to a component that has a compatible
8-pin input jack, such as an external monitor.
Notes: For vehicle use, connect the mobile DVD/VCP player to a factory equipped compatible display. To determine if the display
is compatible, check the owner’s manual provided with your vehicle.
Damage can occur to the mobile DVD/VCP player if you do not use a compatible monitor with a compatible
8-pin input jack.
Chapter 1 5
Page 8
Chapter 1: Connections & Setup
EJECT Ejects the videocassette tape from the tape slot.
DC POWER Connect the AC adapter of the DC power cord to this jack from the car’s cigarette lighter
socket to give the unit power.
INPUT VIDEO Receives video from another component, such as a camcorder or an internet access device, so
you can see it on the DVD/VCP player’s LCD screen.
INPUT L/R AUDIO Receives audio from another component, such as a camcorder or an internet access
device, so you can hear what’s being played on the connected component.
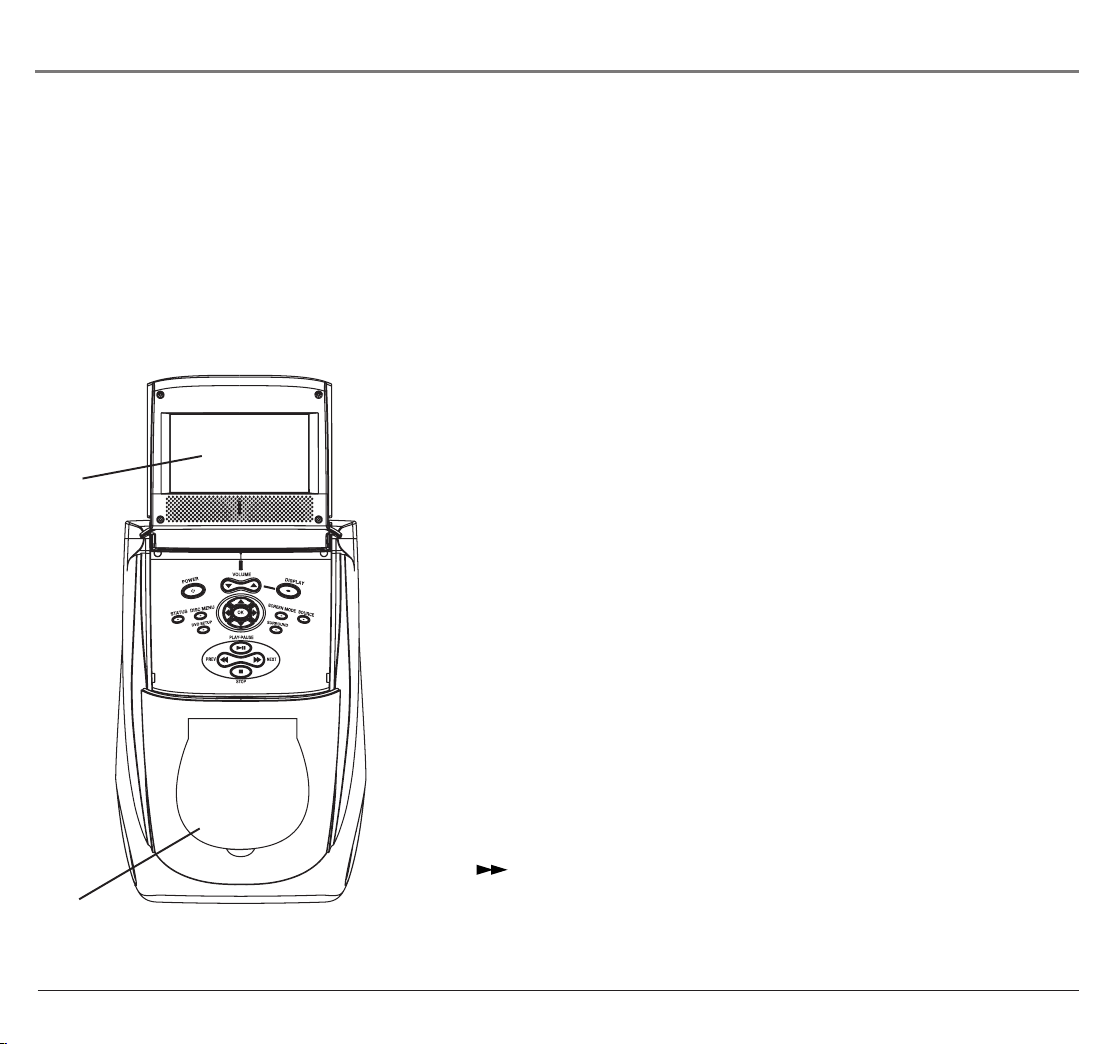
Buttons and Controls on the Mobile
DVD/VCP player
LCD
Screen
LCD Screen Video appears here (when watching a DVD disc).
Disc Compartment Open the lid to insert discs.
Buttons (listed alphabetically)
Arrow (up, down, left, right) buttons Use these buttons to access items on the LCD
screen.
DISC MENU Displays the disc menu. The content of the menu varies from disc to
disc.
DISPLAY Cycles through the display options by pressing repeatedly: brightness,
contrast, color, sharpness or tint. The level can then be adjusted by using the volume
up or down button.
DVD SETUP Displays the DVD/VCP player’s setup menu.
NEXT ( )Advances to the next chapter on a DVD disc, track on a CD or song
Disc
Compartment
on an mp3. Advances a video cassette tape.
6 Chapter 1
Page 9

Chapter 1: Connections & Setup
OK When a menu is on the screen, selects the item that is highlighted.
PLAY ( ) Begins play of a videocassette or disc.
POWER Turns the DVD/VCP player on or off.
PREV ( ) Goes to the previous chapter on a DVD disc, track on a CD or song on an mp3. Rewinds a
video cassette tape.
SCREEN MODE Selects 16:9 or 4:3 screen mode.
SOURCE Toggles between VCP or DVD mode.
STATUS Accesses the disc status banner.
STOP ( ) Stops disc play.
SURROUND Changes the Surround Sound options by pressing repeatedly: Surround Sound, 3D Surround
Sound, Hall Surround Sound or Surround Off.
VOLUME up and down buttons Increases or decreases the sound from the built-in speakers.
Put Batteries in the Remote
1. Remove the battery compartment cover on the remote.
2. Insert two new AAA batteries. Match the polarities (+ and -) on the batteries with the diagram on the
remote.
3. Put the battery compartment cover back on the remote.
Chapter 1 7
Page 10

Chapter 1: Connections & Setup
POWER
STATUS
ANGLE
SUBTITLE
AUDIO
SOURCE
DISC
MENU
RETURN
VCP POWER
PAUS E
VOLUME
SURROUND
EQ
142
5
8
7
ZOOM
0
ENTER
REPEAT
A-B
SLOW
SLOW
DISPLAY
EJECT
STOP REW FFWD
PLAY
+10
MUTE
SETUP
STOP
3
6
9
DVD
PLAY/
PAUS E
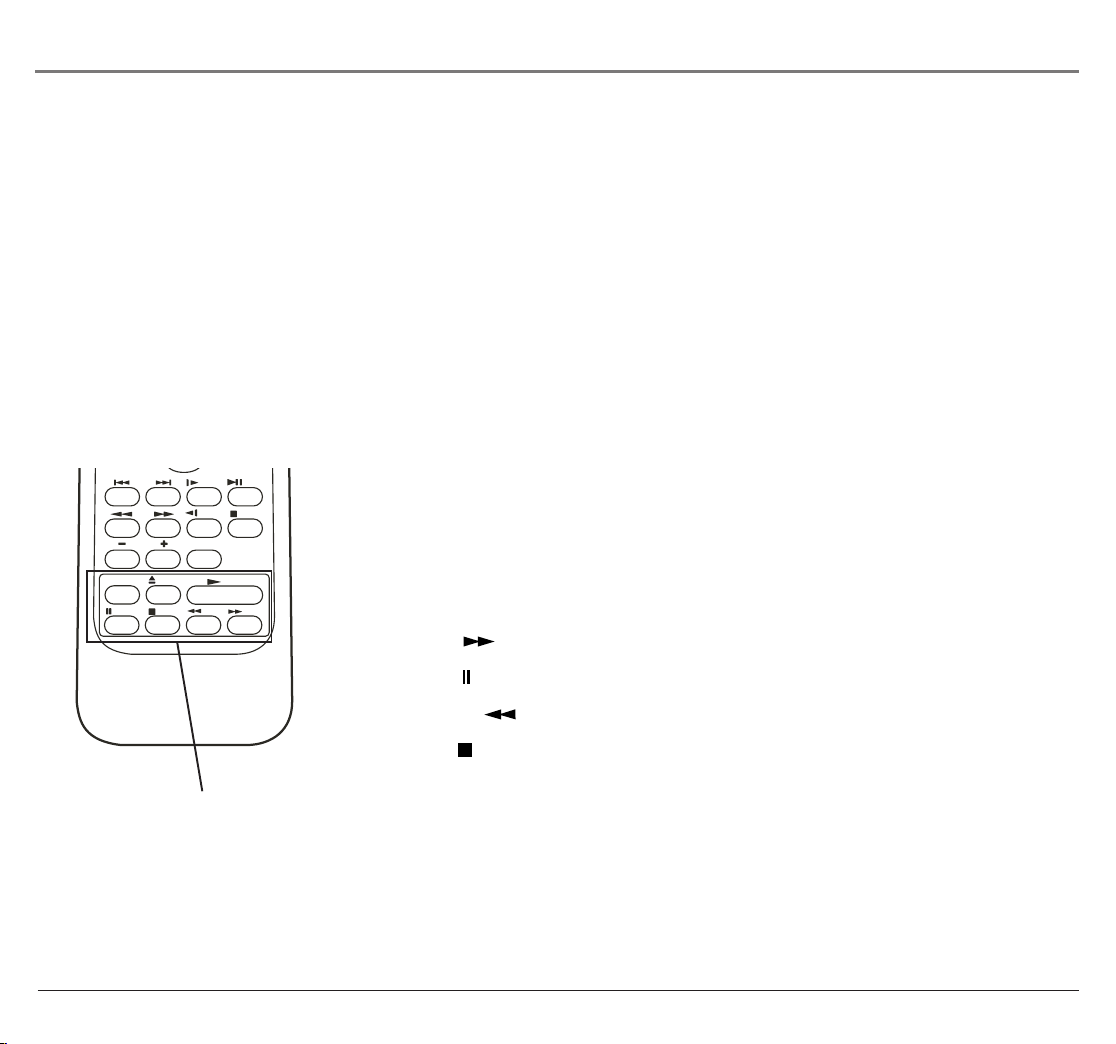
The Remote Control (buttons listed in alphabetical order)
(Fast Forward) Scans forward on a disc (DVD mode only).
(Fast Reverse) Scans backward on a disc (DVD mode only).
(Previous) Goes to the previous chapter on a DVD disc, track on a CD or song
on an mp3.
(Next) Advances to the next chapter on a DVD disc, track on a CD or song on an
mp3 (DVD mode only).
Arrow (up, down, left, right) buttons Use these buttons to access items on the LCD
screen.
A-B Sets the beginning and end of the section you want to repeat (DVD mode only).
ANGLE Displays and selects the camera angles. Each time you press the button, the
angle changes. The number of angles varies from disc to disc (DVD mode only).
AUDIO Displays the Audio language status banner (DVD mode only).
DISC MENU Displays the disc menu. The content of the menu varies from disc to
disc (DVD mode only).
DISPLAY Cycles through the display options by pressing repeatedly: brightness,
contrast, color, sharpness or tint. The level can then be adjusted by using the volume up
or down button.
DVD POWER Turns the DVD/VCP player on and off.
DVD SETUP Displays the player’s setup menu.
EJECT Ejects the videocassette tape from the tape slot at the back of the player
(VCP mode only).
ENTER When a menu is on the screen, selects the item that is highlighted.
EQ Changes the equalizer options for mp3 discs by pressing repeatedly: EQ TYPE,
displays the frequency levels, EQ ON, EQ OFF (DVD mode only).
8 Chapter 1
Page 11

Chapter 1: Connections & Setup
FFWD ( ) Fast forwards a video cassette tape (VCP mode only).
MUTE Reduces sound to an inaudible level.
PAUSE ( ) Switches between play and pause (DVD mode only).
PAUSE ( ) Pauses a video cassette tape (VCP mode only).
REPEAT Changes the REPEAT options by pressing repeatedly. The options vary depending on the type of
disc you are playing (DVD mode only).
RETURN Returns you to the previous chapter on a disc (DVD mode only).
REWIND ( ) Rewinds a videocassette tape (VCP mode only).
SLOW ( ) Plays a disc in slow, forward motion (DVD mode only).
SLOW( ) Plays a disc in slow, reverse motion (DVD mode only).
SOURCE Toggles between VCP and DVD mode.
STATUS Displays current disc information while the disc is playing (DVD mode only).
STOP ( ) Stops playback.
SUBTITLE Displays the subtitle language of the DVD disc (if the disc was created with subtitles). Each time
you press the button, the subtitle language changes.
SURROUND Changes the Surround Sound options by pressing repeatedly: Surround Sound, 3D Surround
Sound, Hall Surround Sound or Surround Off.
VCP POWER Turns the Video Cassette Player on and off (DVD mode only).
VOLUME up and down buttons Increases or decreases the volume.
ZOOM Zooms in on the picture when playing a DVD disc (DVD mode only).
Chapter 1 9
Page 12
Chapter 2: Playing Videocassettes and Discs
Playing Videocassettes
To Load and Play a Videocassette
1. Lift up the LCD screen and position it to your liking.
2. Press the POWER button on the unit or the VCP POWER button on the remote to turn on the unit.
3. Insert a videocassette into the tape slot on the back of the VCP/DVD player.
4. Press PLAY on the unit or the PLAY button on the bottom of the remote.
5. If there is a disc loaded in the DVD compartment, the player will default to DVD mode. Press SOURCE on the remote or the
unit to put the player into VCP mode.
PLAY/
SLOW
VOLUME
VCP POWER
PAUS E
PAUS E
SLOW
STOP
DISPLAY
EJECT
STOP REW FFWD
PLAY
The Remote Control buttons used for VCP mode
The buttons at the bottom of the remote control work only in VCP mode. Use these
buttons to control playback of the videocassette.
EJECT Ejects the videocassette tape from the tape slot at the back of the player (VCP
mode only).
FFWD ( ) Fast forwards a video cassette tape (VCP mode only).
PAUSE ( ) Pauses a video cassette tape (VCP mode only).
REWIND ( ) Rewinds a videocassette tape (VCP mode only).
STOP ( ) Stops playback .
VCP POWER Turns the Video Cassette Player on and off (DVD mode only).
Buttons used to control
videocassette playback
10 Chapter 2
Page 13

Chapter 2: Playing Videocassettes and Discs
DVD Basics
Regional Coding
Both the DVD/VCP player and the discs are coded by region. These regional codes must match in order for the disc to play. If the
codes don’t match, the disc won’t play. This unit’s code is region 1. Discs with other regional codes can’t be played in this unit.
Using Different Menus
Each disc is programmed with different features. There are two separate menu paths that you can use to access features: the disc’s menu
and the DVD’s status banner. Remember that a feature only works if the disc was programmed with that feature. For example, if you
choose subtitles, the subtitles only appear if the disc was created with subtitles.
• The Disc menu – The disc menu is part of each disc and is separate from the DVD’s status banner. The contents of each disc’s
menu vary according to how the disc was created and what features are included. Sometimes a disc’s menu appears automatically
when you insert the disc, or you can access it by pressing the DISC MENU button.
• The DVD’s status banner – The status banner appears across the top of the screen when a disc is playing. It can only be accessed
while you are playing a disc. It’s turned on and off with the STATUS button on the remote.
Types of Discs Your DVD Will Play
•DVD discs – Contain video.
•Audio discs – Contain musical or sound content only.
• mp3 discs – Contain audio files (for example, a CD-R with downloaded mp3 files).
Chapter 2 11
Graphics and Illustrations contained in this document are for representation only.
Page 14

Chapter 2: Playing Videocassettes and Discs
Loading and Playing Discs
Before you load a disc, make sure that it is compatible with the player. Note that the following discs CANNOT
be used with this player:
• Laserdisc
• CD-I, CD-ROM, DVD-ROM
•MiniDisc
• CD-G discs play audio only, not graphics
To Load and Play a Disc
1. Lift up the LCD screen and position it to your liking.
2. Press the POWER button to turn on the unit.
3. Press the button on the top of the player to open the disc tray. Place a disc gently into the tray with the
disc’s label facing up (double-sided discs have content on both sides, so you can place either side up).
The player reads the disc’s table of contents, and then one of following happens depending on how the disc was
programmed:
•No disc menu appears, a screen saver is displayed.
• The disc menu appears.
• The disc menu appears on the screen when you press PLAY/PAUSE.
• The disc starts playing automatically.
If no picture or screen saver is displayed, press the SOURCE button to put the player in DVD mode.
12 Chapter 2
Page 15

Chapter 2: Playing Videocassettes and Discs
Playback Features
Playback operations of DVDs and CDs vary among discs. Since this unit plays DVDs according to the disc
contents the software producers designed, some playback features may not be available. Refer to the instructions
packed with the DVDs for information.
Playback features aren’t usually available during the opening credits of a movie. If a playback feature isn’t
available, the invalid symbol (a hand icon) appears on the screen when you press a button.
Fast Motion Playback (Picture Scan)
To scan quickly through the disc when you’re playing it, use the Picture Scan feature.
1. Press the Fast Reverse ( ) or Fast Forward ( ) button when you’re playing a disc.
2. Press the button again to scan at a faster speed. Each time you press the button, the scanning speed
increases until you reach maximum scanning speed.
Skipping Tracks or Songs
When a CD or mp3 disc is playing, use the Previous ( ) or Next ( ) button to skip a track or song. Press
to advance to the next track or song. Press to go to the previous track or song.
Skipping Chapters
When a DVD disc is playing, use the Previous ( ) or Next ( ) button to skip to the next chapter. Press
to advance to the next chapter. Press to go to the previous chapter.
Zoom
When a DVD disc is playing, press the ZOOM button to zoom in on the picture. Each press zooms closer.
When you reach the maximum zoom, press ZOOM again to go to normal playback.
Chapter 2 13
Page 16

Chapter 2: Playing Videocassettes and Discs
Using a Disc Menu
A disc is capable of having an on-screen menu that is separate from the DVD’s on-screen
status banner. The disc menu might only contain a list of the titles and chapters, or it
may allow you to change features such as language and playback settings.
Although the content and operation of disc menus vary from disc to disc, the following
example will give you an idea of what to expect.
1. When the disc is first inserted and/or you press DISC MENU on the player or the
This is an example of a disc menu. The
menus on discs vary because the disc
menu is created by the disc’s author.
remote, the disc menu appears.
2. Press the up or down arrow button on the remote to highlight the section of the disc
menu you want to choose, and press ENTER. In the example on the left, Language
has been selected.
3. Press the up or down arrow button to select a language, and press ENTER.
4. Press PLAY/PAUSE to play the disc.
In this example, English is highlighted.
Press ENTER on the remote to play the
disc with English dialog.
14 Chapter 2
Page 17

Chapter 2: Playing Videocassettes and Discs
Using the Status Banner
While a disc is playing, press the STATUS button on the player or the remote to bring up the Status Banner.
The Status Banner shows the status of DVD features and allows you to change them while the disc is playing. If
nothing is selected after a few seconds, the banner disappears. The options below show you what happens when
you press the STATUS button.
Press STATUS 1 time Brings up the Status Banner and shows the current title, chapter and time.
Press STATUS 2 times Shows the current subtitle information.
Press STATUS 3 times Shows the current audio language and audio format.
Press STATUS 4 times Shows the current surround sound setting.
Press STATUS 5 times Shows the current angle setting.
Press STATUS 6 times Shows the current A-B repeat setting.
Press STATUS 7 times Shows the current repeat setting.
Press STATUS 8 times Turns the Status Banner off.
TITLE 01/12 CHAPTER 23 /42
00:00:18
The Status Banner
Chapter 2 15
Because DVD discs use digital technology, a title can be divided into individual chapters
(similar to tracks on a CD). You can skip to a specific chapter by using the Chapter feature
in the Status Banner.
1. While a disc is playing, press STATUS (the Status Banner appears).
2. Press the right arrow button to highlight the chapter number.
3. Press the up or down arrow button to go to the next or previous chapter. Press OK to
select the chapter you want to play.
Note: The Chapter feature only works on discs formatted with separate chapters.
Selecting a Chapter
Page 18

Chapter 2: Playing Videocassettes and Discs
AUDIO 2/3:AC-3 5.1 ENGLISH
The Audio Banner
Changing the Audio Language
Use the AUDIO button on the remote to change the Audio Language setting for the
current DVD disc. Press the AUDIO button consecutively to access different audio options.
As you access an option, the audio language and format change at that time.
Notes:
The audio feature only works if the disc was created with multiple languages.
Some discs allow you to change the audio format from the disc’s menu, if available.
Changing the Subtitle Language
Use the SUBTITLE button on the remote to change the subtitle language for the current DVD disc. Press SUBTITLE consecutively
to access the subtitle options. As you access an option, the subtitle language changes at that time. To turn subtitles off, press
SUBTITLE until the SUBTITLE OFF option appears.
Note: The subtitle feature only works if the disc was created with multiple subtitles.
Changing the Camera Angle
Some discs contain multiple angles of a particular scene or sequence. Press the ANGLE button on the remote to access the different
angles. As you access an angle, the angle changes at that time.
Note: The angle feature only works if the disc was created with multiple angles. Currently, very few region 1 discs have multiple angles.
Using the Repeat Feature
The default mode for the Repeat feature is OFF. Pressing the REPEAT button on the remote consecutively changes the repeat options:
• CHAPTER REPEAT ON
• TITLE REPEAT ON
• REPEAT OFF
As you access the repeat options, the repeat option changes at that time. For example, if you access CHAPTER REPEAT ON, the
chapter will start playing again from the beginning when you get to the end of the chapter. The selected repeat option loops repeatedly
until you turn it off.
16 Chapter 2
Page 19

Chapter 2: Playing Videocassettes and Discs
Using the A-B Repeat Feature
A-B Repeat lets you define a specific segment on the disc that you want to repeat. The A-B Repeat feature works
the same for all discs. For example, you might like watching the dogfight in the movie Top Gun. To watch this
scene over and over:
1. Find the spot on the disc that is a few seconds before the beginning of the scene you want to repeat.
2. Press the A-B button on the remote. This sets the A point (A TO B SET A appears).
3. When you get to the part of the disc that you want to be the end of the repeated segment (the B point),
press the A-B button again. This sets the end point (A TO B SET B appears). The segment repeats until you
turn Repeat off by pressing the A-B button again (A TO B OFF appears).
Changing Surround Sound
You can use this feature to add a surround sound effect to the audio. While a disc is playing, press
SURROUND. Pressing SURROUND on the remote or player consecutively changes the surround sound
options:
• SURROUND SOUND
• 3D SURROUND
• HALL SURROUND
• SURROUND OFF
As you toggle through the options, the surround sound changes at that time.
Chapter 2 17
Page 20

Chapter 2: Playing Videocassettes and Discs
Playing Audio CDs
Tip
You can also advance
to the next chapter by
pressing , or go to
the preceding chapter
by pressing .
When playing an audio CD, the Status Banner appears automatically. It displays the current track and the
amount of time for that track playing, the total amount of time on the disc and the current time running on the
disc. The options below show you what happens when you press the STATUS button.
Press STATUS once SINGLE ELAPSED appears along with the current track playing and the
time of that track.
Press STATUS twice SINGLE REMAIN appears along with the current track playing and the
amount of time left on the track.
Press STATUS 3 times TOTAL ELAPSED appears along with the current track playing and the
total time playing on the CD.
Press STATUS 4 times TOTAL REMAIN appears along with the current track playing and the
amount of time left on the CD.
Press STATUS 5 times Turns off the Status Banner.
Using the Repeat Feature
The default mode for the Repeat feature is OFF. Pressing REPEAT on the remote or player consecutively changes the repeat options:
• REP-ONE – repeats the track that is playing
• REP-ALL – repeats the disc that is playing
• REPEAT OFF
As you access the repeat options, the repeat setting changes automatically to match the setting that appears on the screen. For example,
if REP-ONE appears on the screen, the track that is playing will automatically start playing from the beginning once you reach the end
of that track. The selected repeat option loops repeatedly until you turn it off.
18 Chapter 2
Page 21

Chapter 2: Playing Videocassettes and Discs
Playing mp3 Discs
mp3 is a format for storing digital audio. An audio CD-quality song can be compressed into the mp3 format
with very little loss of quality, while taking up much less space. CD-R discs that have been encoded in mp3
format can be played on your DVD/VCP player.
Selecting Folders and Songs
When an mp3 disc is inserted in the player, the Disc Navigation screen appears automatically. You can change
folders and songs through Disc Navigation. The player plays the songs in the order they were burned onto the
disc.
1. If a disc is playing, press STOP. Press the up or down arrow button to go through the folder list on the
right side of the Disc Navigation screen.
2. Once the folder you want is highlighted, press ENTER (the folder list shifts to the left side of the screen
and the songs in the folder appear on the right).
3. Press the up or down arrow button to go through the song list and highlight the song you want. Press
ENTER to begin playback of the highlighted song.
While playing an mp3 disc, press the STATUS button on the remote to display the Status Banner. The options
below show you what happens when you press the STATUS button.
Press STATUS once CHAPTER REMAIN appears along with the amount of time left in the folder.
CHAPTER REMAIN and the time that is left remain on-screen until you press
STATUS again.
Press STATUS twice CHAPTER ELAPSED appears along with the amount of time the song has played.
CHAPTER ELAPSED and the time remain on-screen until you press
STATUS again.
Press STATUS 3 times OFF appears along with the amount of time the song has played. The time remains
on-screen until you press STATUS again to see the time left in the folder or you
press STOP.
Chapter 2 19
Page 22

Chapter 2: Playing Videocassettes and Discs
Skipping Songs
Use the Next ( ) button on the remote to move to the next song. Use the Previous ( ) button to move to
the beginning of the currently playing song. Press the button again to move to the previous song.
Selecting a Play Mode
You can choose what order the songs will play on a disc temporarily. The FOLDER play mode is the default. To
access the play mode options, press STOP if the disc is playing. Press the right arrow button until the PLAY
MODE option is highlighted. Use the up or down arrow to choose an option. The play mode options are:
SINGLE: plays the song you have chosen and stops disc play when the song is over.
REP-ONE: repeats the song you have chosen.
FOLDER: plays the folder in the order the songs were recorded.
FOLDER R: repeats the folder that is playing.
DISC: plays the entire disc.
RANDOM: plays all of the songs on the disc in random order.
SHUFFLE: plays the songs in random order (from within the selected folder).
PROG-END (Program End): plays the songs on the disc in the order you have programmed (you must
create a playlist to set the order you want the tracks on the disc to play). When you are creating a playlist,
this option changes to PROGRAM.
20 Chapter 2
Page 23

Chapter 2: Playing Videocassettes and Discs
Program Play
To use the program play option, you must create a playlist of songs in the order you want them to play.
Note: Once you begin adding songs from a folder to create your playlist, you cannot add songs from a different folder.
1. Choose the PROG-END option from the PLAY MODE menu.
2. Press OK (the option changes to PROGRAM).
3. Select the folder which contain the songs you want to program.
4. Add songs to the program list by highlighting a song and pressing ENTER. The song you have chosen and
the number of songs you have chosen appear at the top of the screen. For example, if you choose the
number five song within the folder and it is the first song you have chosen, PROGRAM P01:05 appears.
5. You can continue to add songs to the list from within the same folder by using the up or down arrow
button and then pressing ENTER to add it to the list.
6. When you are finished creating the list, press STOP to end the programming. Then press PLAY to begin
the program play mode.
Deleting the Playlist
To delete the entire playlist, press STOP while the disc is playing and select a different play mode.
Using the Equalizer
To access the equalizer, press the EQ button on the remote. The equalizer allows you to choose a specific sound
for an mp3 disc through the EQ TYPE option (the first screen that appears when you press EQ). Press PLAY
repeatedly to cycle through the settings which appear at the bottom of the EQ TYPE screen (PERSONAL
appears automatically when you access the EQ TYPE option). The other settings are: FLAT, CLASSIC, JAZZ,
ROCK, POPS, BALLAD, DANCE.
The PERSONAL equalizer setting allows you to adjust the decibels of each frequency (60 through 15K). Press
the left or right arrow button to select the frequency you want to adjust. Then use the up or down arrow button
to adjust the decibel (the decibel changes on the right side of the EQ TYPE screen).
Chapter 2 21
Page 24

Chapter 3: DVD Menus
Using the DVD Setup Menu
The DVD Setup Menu is the DVD/VCP player’s main menu. It contains features and options that let you
customize your DVD/VCP player.
SETUP MENU -- MAIN PAGE
TV DISPLAY
OSD LAN
G
SCREEN SAVER
SMART NAV
DEFAULTS
UB VOLUME
S
XIT SETUP
E
I
NORMAL /
NORMAL / LB
WID
PS
E
TV Display
The Display menu controls how the picture appears on the screen by adjusting the aspect
The default setting is WIDE.
ratio.
1. Press the DVD SETUP button (the SETUP MENU appears, with the TV
DISPLAY menu highlighted).
2. Press the right arrow button to access the TV DISPLAY options.
3. Press the up or down arrow button to change the display setting (settings are
described on the next page).
4. Once you have highlighted the setting, press ENTER.
5. Press DVD SETUP to exit the Setup Menu.
22 Chapter 3
Page 25

NORMAL/PS (Pan & Scan)
NORMAL/LB (Letterbox)
Chapter 3: DVD Menus
NORMAL/PS – Choose this setting if you want the movie to fill the entire screen. This
might mean that parts of the picture (the left and right edges) won’t be seen.
Most discs produced in a widescreen format can’t be cropped in this fashion. This means
the black bars will appear at the top and the bottom of the screen.
NORMAL/LB – Choose this setting if you want to see movies in their original aspect
ratio (height-to-width ratio). You’ll see the entire frame of the movie, but it will take up a
smaller portion of the screen vertically. The movie might appear with black bars at the
top and bottom of the screen.
WIDE – Choose this setting if your DVD/VCP player is connected to a widescreen TV.
If you choose this setting and you don’t have a widescreen TV, the images on the screen
may appear distorted due to vertical compression.
If you play a disc recorded in 4 x 3 format on a widescreen TV, the left and right side of
the screen will appear black.
WIDE
Chapter 3 23
Page 26

Chapter 3: DVD Menus
OSD (On-Screen Display) Language
Use this feature to change the language for the player’s on-screen menu system. The default is English.
1. Press DVD SETUP (the SETUP MENU appears).
2. Press the down arrow button until OSD LANG is highlighted (the on-screen display languages appear).
3. Press the right arrow button to access the OSD LANG options.
4. Press the up or down arrow button to highlight your preferred language.
5. Once you have chosen the language, press ENTER.
6. Press DVD SETUP to exit the Setup Menu.
Screen Saver
The screen saver is what appears after the player has not been active for a certain amount of time. The default is
set to off. To turn the screen saver on:
1. Press DVD SETUP (the Setup menu appears).
2. Press the down arrow button until SCREEN SAVER is highlighted (the screen saver options appear).
3. Press the right arrow button to access the SCREEN SAVER options.
4, Press the up arrow button to highlight ON, then press ENTER.
5. Press DVD SETUP to exit the Setup Menu.
To turn the screen saver back off, follow steps 1-3. Press the down arrow button to highlight OFF. Then press
DVD SETUP to exit.
24 Chapter 3
Page 27

Chapter 3: DVD Menus
Disc Navigation
The Disc Navigation screen appears automatically when you insert an mp3 into the player. The default is set to
on. To turn the Disc Navigation screen off:
1. Press DVD SETUP (the SETUP MENU appears).
2. Press the down arrow button until DISC NAVIGATION is highlighted (the options appear).
3. Press the right arrow button to access the DISC NAVIGATION options.
4. Press the up arrow button to highlight NO MENU, then press ENTER.
5. Press DVD SETUP to exit.
Note: If you turn Disc Navigation off, you won’t be able to access the mp3 play mode options.
To turn Disc Navigation back on, follow steps 1-3. Press the down arrow button to highlight WITH MENU.
Then press DVD SETUP to exit.
Defaults
Use the Default feature to reset ALL menu settings to the factory defaults.
1. Press DVD SETUP (the SETUP MENU appears).
2. Press the down arrow until DEFAULTS is highlighted (RESET appears).
3. Press the right arrow to highlight RESET, then press ENTER.
4. Press DVD SETUP to exit.
Sub Volume
Use the Sub Volume feature to boost or cut the decibels going into headphones or an amplifier.
1. Press DVD SETUP (the SETUP MENU appears).
2. Press the down arrow until SUB VOLUME is highlighted.
3. Press the right arrow to access the SUB VOLUME options.
4. Press the up or down arrow button to change the volume, then press ENTER.
5. Press DVD SETUP to exit.
Chapter 3 25
Page 28

Chapter 4: Other Information
Troubleshooting
If you are experiencing product operation problems, please review the troubleshooting section before you call for service. Refer to the Limited
Warranty for information on how to obtain repair service.
No power
•Try the POWER button on the unit.
•If using the DC power cable, make sure it is firmly connected to the DC POWER jack and to the car’s cigarette lighter. The car must be on.
•If using the AC adapter, make sure it is firmly connected to the DC POWER jack and to an outlet.
•Try unplugging the unit for a few minutes and then plugging it back in.
No sound, picture okay
•Press VOLUME up button to increase the sound.
•Maybe sound is muted. Press the MUTE button to restore sound.
•If using another source, check the audio cable connections.
•If the player is in pause mode, slow-motion or fast forward , no sound is heard during this time. Press PLAY to return to normal play mode
and to hear the sound.
•Make sure headphones are disconnected from player.
• Check the sub volume level.
No picture, sound okay
•If using another source, check the video cable connection.
•Adjust the brightness.
DVD Problems
Disc won’t play
•Insert a disc with the label side facing up.
• Check the type of disc you put into disc tray. This mobile DVD/VCP player only plays digital video discs, audio CDs and mp3s.
• Both the unit and the disc are coded by region. If the regional codes don’t match, the disc can’t be played. This mobile DVD/VCP player is
Region No. 1.
•Press the SOURCE button to make sure you are in DVD mode.
Play starts, but then stops immediately
• The disc is dirty. Clean it.
• Condensation has formed. Allow player to dry out.
•Disc is scratched or defective.
26 Chapter 4
Graphics and Illustrations contained in this document are for representation only.
Page 29

Chapter 4: Other Information
No sound or distorted sound.
•Make sure your mobile DVD/VCP player is connected properly. Make sure all cables are securely inserted into the appropriate jacks.
•If you connected an audio or audio/video component, make sure you chose the correct input setting on the receiver and unit.
Can’t advance through a movie
•You can’t advance through the opening credits and warning information that appear at the beginning of movies because the disc is
programmed to prohibit that action.
The invalid symbol (hand icon) appears on screen
• The feature or action cannot be completed at this time because:
– The disc’s software restricts it.
– The disc’s software doesn’t support the feature (e.g., angles).
– The feature is not available at the moment.
– You’ve requested a title or chapter number that is out of range.
Picture is distorted
• The disc might be damaged. Try another disc.
•It is normal for some distortion to appear during forward or reverse scan.
No forward or reverse scan
•Some discs have sections that prohibit rapid scanning, or title and chapter skip.
•If you try to skip through the warning information and credits at the beginning of a movie, you won’t be able to. This part of the movie is
often programmed to prohibit skipping through it.
•Make sure you are using the correct buttons on the remote: for DVD, the buttons are on the top half of the remote. For videocassettes, the
buttons are on the bottom of the remote.
Subtitle and/or audio language is not the one selected from the initial setting
•If the subtitle and/or audio language does not exist on the disc, the initial settings will not be seen or heard.
Camera angle cannot be changed
•Some discs don’t have the multi-camera angle system, and some discs only have it in certain parts of the movie.
Remote Control Doesn’t work
•Place the remote control extremely close to the sensor on your mobile DVD/VCP player.
•Maybe batteries are weak or dead. Put new batteries in the remote.
•Make sure you are using the correct buttons on the remote: for DVD, the buttons are on the top half of the remote. For videocassettes, the
buttons are on the bottom of the remote.
Chapter 4 27
Page 30

Chapter 4: Other Information
VCP Problems
No power
• Check to make sure all power cord connections are tight and plugged into an operating power source.
Rewind does not operate
• Check to make sure the tape is not already rewound.
•Make sure you are using the correct buttons on the remote: for DVD, the buttons are on the top half of the remote. For videocassettes, the
buttons are on the bottom of the remote.
The VCP makes noise when stopped
• The player is removing the tape from the playheads. A sound is normal. The head cylinder inside the player will continue to rotate for a few
minutes after you stop the unit.
Snowy or no picture during playback
• Check video cable connections between the player and any connected monitor.
•Try another tape.
Streaks in picture during normal playback
• Check to make sure the tape is of good quality and not worn out.
Will not play
• Check to make sure there is a tape in the player.
•Try ejecting and reinserting the tape.
• Check to make sure the tape is not broken.
Tape plays back in slow motion
•Press PLAY to return to normal playback.
Can’t record
• This unit doesn’t record, it only plays videocassettes and discs.
28 Chapter 4
Page 31

Chapter 4: Other Information
Care and Maintenance
Cleaning the Player
CAUTION: Turn OFF your Mobile DVD/VCP player before cleaning.
You can clean the player as required, using a soft lint-free cloth. Be sure to occasionally dust the ventilation slots in the cabinet to help
assure adequate ventilation.
The LCD screen may be cleaned with a soft, lint-free cloth as well. Take care not to scratch or mar the screen. If necessary, you may use
a cloth dampened with warm water. Never use strong cleaning agents, such as ammonia-based cleaners or abrasive powder. These types
of cleaners will damage the player.
While cleaning, do not spray liquid directly on the screen or allow liquid to run down the screen and inside the player. Also, avoid
placing drinks or vases with water on top of the player. This could increase the risk of fire or shock hazard or damage to the player.
Handling Cautions
•Before connecting other components to this player, make sure to turn all components off.
•Don’t put any container filled with liquid or any small metal objects on the player.
•Keep dirt from entering the player’s disc slot. Dust and grit are abrasive and cause excessive wear to the playback heads.
• The player might be damaged by improper storage or handling. Do not subject the player to swinging, shaking or dropping.
•Exterior influences such as lightning and static electricity can affect normal operation of this player. If this occurs, turn off the player and on
again, or disconnect and then reconnect the AC power cord to the AC power outlet.
•Be sure to remove the disc, turn off the player and close the LCD screen when not in use.
•Don’t place anything other than the disc in the disc slot.
•Do not store the player in temperatures below +4˚F (-15˚C) or above +149˚F (65˚C).
Chapter 4 29
Page 32

Chapter 4: Other Information
Formation of Condensation
•Due to sharp changes in temperature and humidity, condensation may form if warm air comes in contact with any cold parts inside the
player.
• When condensation forms inside the player, it may not operate correctly. If this occurs, leave the player at room temperature until the inside
of the player becomes dry and operational.
•If condensation forms on a disc, wipe the disc with a soft, dry cloth by moving the cloth from the center of the hole toward the outer edge.
Handling Discs
•Don’t touch the disc’s signal surfaces. Hold by the edges or by one edge and the hole in the center.
•Don’t affix labels or adhesive tape to label surfaces. Don’t scratch or damage the label.
•Do not use damaged (cracked or warped) discs.
Cleaning Discs
•Dirty discs can cause reduced video and audio performance. Always keep discs clean by wiping them gently with a soft cloth from the inner
edge toward the outer perimeter.
•If a disc becomes very dirty, wet a soft cloth in water, wring it out well. Wipe the dirt away gently, and remove any water drops with a dry
cloth.
•Do not use record-cleaning sprays or anti-static agents on discs. Also, never clean the discs with benzene, thinner, or other volatile solvents
which may cause damage to the disc surface.
30 Chapter 4
Page 33

Chapter 4: Other Information
Limited Warranty
What your warranty covers:
• Defects in materials or workmanship.
For how long after your purchase:
•1 year from date of purchase- Unit exchange, which includes parts and labor.
• The warranty for rental units begins with the first rental or 45 days from date of shipment to the rental firm, whichever comes first.
What we will do:
Exchange the unit with a new or, at our option, refurbished unit.
How you get service:
• Call 1-800-951-9582 and have your unit’s date of purchase and model/serial number ready. The model/serial number
information is on the back of your unit.
•A representative will troubleshoot your problem over the phone.
•If the representative determines that you should receive a replacement unit you will be provided with a Service Request (SR)
number and the location of a nearby exchange point if one exists. No returns will be accepted without the SR number.
To receive a replacement unit before you return yours:
Option I:
1. Provide your Discover, MasterCard or Visa account number and expiration date to your phone representative. This is for security
purposes only and your account will not be charged at this time.
2. We will send you a replacement unit.
3. If you return the unit to us within 14 days from the date you were provided a SR number, only items not covered by warranty will
be charged to your account. If your unit is not received within 14 days, the suggested retail value of the receiver will be charged to
your credit card. This amount will be credited, less a handling fee, if the unit is subsequently received.
4. Ship your defective unit back to us using the replacement unit’s carton. Shipping instructions will be included on the carton along
with your SR number which will allow you to easily ship the unit back to us. Make sure you insure your shipment in case of
damage or loss. Include with the shipment:
•Proof of purchase in the form of a bill of sale or receipted invoice which is evidence that the product is within the warranty period must be
presented to obtain warranty service. For rental firms, proof of first rental is also required.
•A brief note describing your receiver problem.
•Your name, address and phone number.
Chapter 4 31
Page 34

Chapter 4: Other Information
Option II:
1. For a fee, we will send a replacement unit to our exchange point.
2. The exchange location will notify you of its arrival.
3. Take your unit and evidence of purchase date, such as a bill of sale, to the exchange location and you will be provided the new or
refurbished unit. Please retain all accessories such as the remote control hand unit.
4. If the repairs are covered by your warranty, you will not be billed.
Thomson assumes no responsibility of warranty shipments from the customer to the factory if not shipped in the manner
prescribed by Thomson.
Return transportation, storage, handling and insurance costs are your responsibility. We accept no responsibility in case of damage
or loss.
To receive a replacement unit after we have received your unit:
• Write the SR number on the outside of the carton used to return the unit. Make sure you insure your shipment in case of damage
or loss.
• Carefully pack the unit using the original box and packing material if possible. Please retain all accessories that were included with
your unit such as the remote control hand unit.
•Include with the shipment:
1. Proof of purchase in the form of a bill of sale or receipted invoice which is evidence that the product is within the
warranty period must be presented to obtain warranty service. For rental firms, proof of first rental is also required.
2. A brief note describing your unit’s problem.
3. Your name, address and phone number.
• The representative will advise the address to mail a cashier’s check or money order for payment if there are any out of warranty
labor or parts charges, and you elect not to use your credit card.
• After we receive your product, a new or refurbished unit will be shipped to you.
What your warranty does not cover:
•Acts of nature, such as but not limited to lightning damage.
•Adjustment of customer controls.
• Damage from misuse or neglect.
•A unit that has been modified or incorporated into other products or is used for institutional or other commercial purposes.
•Batteries.
32 Chapter 4
Page 35

Chapter 4: Other Information
•Units purchased or serviced outside the U.S.A.
•Shipping damage if the unit was not packed and shipped in the manner prescribed by Thomson.
•Storage fees may be charged by the exchange point if you fail to pickup the replacement unit in a timely manner.
•Customer Instruction. (Your Owner’s Manual describes how to install, adjust, and operate your unit. Any additional information
should be obtained from your dealer.)
Product Registration:
•Please complete and mail the Product Registration Card packed with your product. It will make it easier to contact you should it
ever be necessary. The return of the card is not required for warranty coverage.
Limitation of Warranty:
• THE WARRANTY STATED ABOVE IS THE ONLY WARRANTY APPLICABLE TO THIS PRODUCT. ALL OTHER
WARRANTIES, EXPRESS OR IMPLIED (INCLUDING ALL IMPLIED WARRANTIES OF MERCHANTABILITY OR
FITNESS FOR A PARTICULAR PURPOSE) ARE HEREBY DISCLAIMED. NO VERBAL OR WRITTEN
INFORMATION GIVEN BY THOMSON INC., ITS AGENTS OR EMPLOYEES SHALL CREATE A GUARANTY OR
IN ANY WAY INCREASE THE SCOPE OF THIS WARRANTY.
• REPAIR OR REPLACEMENT AS PROVIDED UNDER THIS WARRANTY IS THE EXCLUSIVE REMEDY OF THE
CONSUMER. THOMSON INC. SHALL NOT BE LIABLE FOR INCIDENTAL OR CONSEQUENTIAL DAMAGES
RESULTING FROM THE USE OF THIS PRODUCT OR ARISING OUT OF ANY BREACH OF ANY EXPRESS OR
IMPLIED WARRANTY ON THIS PRODUCT. THIS DISCLAIMER OF WARRANTIES AND LIMITED WARRANTY
ARE GOVERNED BY THE LAWS OF THE STATE OF INDIANA. EXCEPT TO THE EXTENT PROHIBITED BY
APPLICABLE LAW, ANY IMPLIED WARRANTY OF MERCHANTABILITY OR FITNESS FOR A PARTICULAR
PURPOSE ON THIS PRODUCT IS LIMITED TO THE APPLICABLE WARRANTY PERIOD SET FORTH ABOVE.
How state law relates to warranty:
•Some states do not allow the exclusion nor limitation of incidental or consequential damages, or limitations on how long an
implied warranty lasts, so the above limitations or exclusions may not apply to you.
• This warranty gives you specific legal rights, and you also may have other rights that vary from state to state.
If you purchased your product outside the United States:
• This warranty does not apply. See your dealer for warranty information.
Service calls which do not involve defective materials or workmanship are not covered by this warranty. Costs of such service calls
are the sole responsibility of the purchaser.
Chapter 4 33
Page 36

Visit the RCA web site at www.rca.com
Please do not send any products to the Indianapolis address listed in this manual or on the carton. This will only
add delays in service for your product.
Thomson Inc.
10330 North Meridian Street
Indianapolis, IN 46290
©2003 Thomson Inc.
Trademark(s)® Registered
Marca(s) Registrada(s)
Printed in China
TOCOM 1623085A
THOMSON
Page 37

Lecteur DVD/LVC mobile
Guide de l’utilisateur
Transforme encore le divertissement.
7L400MDV
Page 38

Information importante
ATTENTION
RISQUE DE CHOC
ÉLECTRIQUE, NE
PAS OUVRIR
Ce symbole indique une « tension
dangereuse » dans le produit qui
présente un risque d’électrocution
ou de blessure.
Nota :
Ce lecteur DVD/LVC est conçu et fabriqué en fonction de l’application de
l’information de gestion régionale (RMI). Si le numéro de région d’un disque
DVD est différent de celui de ce lecteur DVD/LVC, l’appareil ne peut lire ce
disque. Le numéro de région de ce lecteur DVD/LVC est la Région n
Se reporter à l’étiquette d’identification/capacité nominale située sur le panneau
arrière du produit pour connaître la tension de fonctionnement adéquate.
Le règlement de la FCC stipule que toute modification non autorisée de ce produit
peut annuler le privilège d’utilisation de l’utilisateur.
Ce symbole indique que ce produit comporte
une double isolation entre la tension de
secteur dangereuse et les pièces accessibles
à l’utilisateur. Pour réparer, n’utilisez que
des pièces de rechange identiques.
Ce symbole indique des
instructions importantes
accompagnant le produit.
o
1.
ATTENTION
CE PRODUIT UTILISE UN LASER.
L’UTILISATION DES COMMANDES
OU DES RÉGLAGES OU L’EXÉCUTION DE PROCÉDURES AUTREMENT QUE DÉCRIT DANS CE
MANUEL POURRAIT CAUSER
UN RAYONNEMENT
DANGEREUX. NE PAS OUVRIR
LES COUVERCLES NI RÉPARER
SOI-MÊME. TOUTE RÉPARATION
DOIT ÊTRE FAITE PAR UN
TECHNICIEN SPÉCIALISÉ.
AVERTISSEMENT
Afin de réduire le risque
d’incendie et de choc électrique,
ne pas exposer ce produit à la
pluie ou l’humidité. Ne pas
exposer l’appareillage à de
l’écoulement et à des éclaboussures et ne placer dessus aucun
objet rempli de liquides, comme
des vases.
APPAREIL
AU LASER
Enregistrement du produit
Veuillez remplir la carte d’enregistrement du produit (emballée séparément) et la retourner immédiatement. Le renvoi de
cette carte nous permet de vous contacter si nécessaire.
DE CLASSE 1
Information sur le produit
Conservez votre facture comme preuve d’achat ainsi que pour obtenir des pièces ou un service sous garantie. Attachez-la
ici et inscrivez le numéro de série et de modèle au cas où vous en auriez besoin. Les numéros se trouvent sur le produit.
No de modèle ____________________ No de série ____________________ Date d’achat : ___________________________________
Détaillant / Adresse / Téléphone : __________________________________________________________________________________
Page 39

Information importante
Déclaration de la FCC : Cet équipement a été mis à l’essai et déclaré conforme aux limites prévues pour un appareil de classe B, conformément à la
partie 15 du règlement de la FCC. Ce règlement a pour but d’assurer une protection raisonnable contre le brouillage nuisible dans une installation
résidentielle. Cet équipement produit, utilise et peut émettre de l’énergie en radiofréquence et, s’il n’est pas installé et utilisé conformément aux
directives, il peut causer une interférence nuisible dans les communications radio. Cependant, il est impossible de garantir qu’aucune interférence
ne se produira dans une installation particulière. Si cet équipement cause un brouillage de la réception de radio ou de télévision (que vous pouvez
déterminer en éteignant puis en rallumant l’appareil), l’utilisateur est prié d’essayer de corriger l’interférence au moyen de l’une ou de plusieurs des
mesures suivantes :
• Réorientez ou déplacez l’antenne de réception.
• Éloignez davantage l’appareil du récepteur.
•Branchez cet appareil dans une prise d’un circuit différent de celui où est branché le récepteur.
• Consultez le concessionnaire ou un technicien expérimenté de radio / télévision.
Déclaration d’Industrie Canada :
• This Class B digital apparatus complies with Canadian ICES-003.
Cet appareil numérique de la classe B est conforme à la norme NMB-003 du Canada.
NOTA IMPORTANT SUR LA SÉCURITÉ :
LORSQUE VOUS FIXEZ SOLIDEMENT LE LECTEUR DANS LA VOITURE, VOUS DEVEZ L’ATTACHER AVEC LA CEINTURE DE
SÉCURITÉ VENTRALE, SUR LE SIÈGE ARRIÈRE. N’UTILISEZ PAS LES CEINTURES LATÉRALES POUR FIXER LE LECTEUR.
ASSUREZ-VOUS QUE LA CEINTURE EST AUSSI SERRÉE QUE POSSIBLE, CAR LE LECTEUR PEUT SE DÉPLACER SI LA VOITURE
EFFECTUE UN ARRÊT OU UN DÉPART BRUSQUE. VOUS POUVEZ METTRE EN DANGER LES VIE DES OCCUPANTS SI LE
LECTEUR N’EST PAS FIXÉ SOLIDEMENT.
Points à prendre en considération avant d’effectuer les connexions
Avant d’entrer dans les détails du lecteur DVD/LVC mobile, veuillez prendre quelques instants pour passer en revue les mesures de précaution suivantes :
• Lorsqu’il est utilisé dans une voiture, le lecteur DVD/LVC doit être alimenté à partir de la prise DC POWER située à l’arrière de l’appareil.
L’alimentation du lecteur DVD/LVC mobile doit être activée seulement après l’activation de l’allumage de la voiture.
Nota : Afin d’éviter que la batterie de la voiture ne se décharge, déconnectez le cordon d’alimentation c.c. de l’allume-cigare lorsque l’appareil n’est
pas utilisé.
•Utilisez seulement le bloc d’alimentation approuvé fourni avec votre lecteur DVD/LVC. Déconnectez toujours le cordon d’alimentation de
l’allume-cigare ou de la prise murale avant de débrancher le cordon d’alimentation du lecteur.
Information importante 1
Page 40

Table des matières
Chapitre 1 : Connexions et réglage
Installation du lecteur dans la voiture ................................. 3
Utilisation du lecteur dans un hôtel,
un bureau ou au foyer .......................................................... 3
Branchement à un téléviseur dans un hôtel,
au bureau ou au foyer .......................................................... 4
Arrière du lecteur DVD/LVC mobile...................................... 5
Boutons et commandes du lecteur DVD/LVC ...................... 6
Installation des piles dans la télécommande....................... 7
La télécommande .................................................................. 8
Chapitre 2 : Lecture de vidéocassettes et de disques
Lecture de vidéocassettes ................................................... 10
Touches de la télécommande utilisées pour le
mode LVC [VCP] ........................................................... 10
Éléments de base du lecteur DVD ...................................... 11
Codage régional ........................................................... 11
Utilisation des différents menus .................................. 11
Types de disques que peut lire votre
lecteur DVD ................................................................... 11
Chargement et lecture des disques ............................. 12
Fonctions de lecture ............................................................ 13
Lecture rapide (balayage de l’image).......................... 13
Saut de pistes ou de chansons ..................................... 13
Saut de chapitres .......................................................... 13
Zoom ............................................................................. 13
Utilisation d’un menu Disque ............................................. 14
Utilisation de la bannière d’état ......................................... 15
Sélection d’un chapitre ................................................ 15
Changement de la langue de l’audio .......................... 16
Changement de la langue des sous-titres ................... 16
Changement de l’angle de caméra ............................. 16
Utilisation de la fonction Répétition ........................... 16
Chapitre 2 : Lecture de disques (suite)
Utilisation de la fonction Répétition A-B .................... 17
Modification de l’ambiophonie ................................... 17
Lecture de CD audio ............................................................ 18
Utilisation de la fonction Répétition ........................... 18
Lecture de disques mp3 ...................................................... 19
Sélection de dossiers et de chansons ........................... 19
Saut de chansons .......................................................... 20
Sélection d’un mode de lecture ................................... 20
Lecture programmée .................................................... 21
Suppression de la liste de programmation .......... 21
Utilisation de l’égalisateur ........................................... 21
Chapitre 3 : Menus DVD
Utilisation du menu de réglage du lecteur DVD ............... 22
Affichage....................................................................... 22
(Affichage à l’écran) Langue........................................ 24
Économiseur d’écran .................................................... 24
Navigation sur disque................................................... 25
Valeurs par défaut ........................................................ 25
Volume des extrêmes graves ....................................... 25
Chapitre 4 : Autres informations
Dépannage.................................................................... 26
Soin et entretien ........................................................... 29
Précautions de manipulation ....................................... 29
Formation de condensation ......................................... 30
Manipulation des disques ............................................ 30
Nettoyage des disques ................................................. 30
Garantie limitée ............................................................ 31
Les illustrations et les graphiques contenus dans ce document servent uniquement à des fins de représentation.
2 Information importante
Page 41

Chapitre 1 : Connexions et réglage
Installation du lecteur dans la voiture
1. Posez le lecteur au centre du siège arrière.
2. Insérez la ceinture de sécurité (ceinture ventrale) du centre dans les trous de retenue.
Nota important : Fixez solidement le lecteur avec la ceinture ventrale aussi serré que
possible pour qu’il ne puisse bouger.
3. Attachez la ceinture en l’insérant et en la passant dans les deux ouvertures du lecteur.
4. Branchez le cordon l’alimentation c.c. dans la prise DC POWER sur le panneau arrière du
lecteur. Branchez l’autre extrémité du cordon dans la prise de l’allume-cigare ou prise
d’alimentation c.c. (consultez le manuel de l’utilisateur de la voiture pour identifier
l’emplacement).
Nota : Assurez-vous que l’allumage est activé avant de brancher le cordon d’alimentation c.c.
dans la douille de l’allume-cigare.
5. Ajustez l’ACL (afficheur à cristaux liquides) à l’angle de visionnement voulu.
6. Au besoin, connectez le casque d’écoute à l’une des deux prises de casque d’écoute
(PHONES) à l’arrière du lecteur.
Nota : Lorsque le lecteur n’est pas utilisé, l’ACL doit être solidement fermé.
Utilisation du lecteur dans un hôtel, un bureau ou au foyer
1. Placez avec précaution le lecteur sur une table ou sur une surface d’appui.
2. Branchez la fiche de l’adaptateur c.a. dans la prise AC POWER à l’arrière du lecteur. Connectez l’autre extrémité de
l’adaptateur c.a. à une prise murale standard. Assurez-vous d’insérer les lames du cordon d’alimentation à fond dans la
prise murale.
3. Ajustez l’ACL (afficheur à cristaux liquides) à l’angle de visionnement voulu.
4. Au besoin, connectez le casque d’écoute à l’une des deux prises de casque d’écoute à l’arrière du lecteur.
Chapitre 1 3
Les illustrations et les graphiques contenus dans ce document servent uniquement à des fins de représentation.
Page 42

Chapitre 1 : Connexions et réglage
OUTPUT
V
I
D
R
E
O
O
I
PHONES PHONESEXTERNAL PANEL EJECT DC POWER
D
L
U
A
12 V DC
INPUT
V
I
R
D
E
O
O
I
D
U
A
L
Téléviseur (panneau arrière)
L / MONO
L
AUDIO
R
IN
R
OUT
CABLE/
ANTENNA
au foyer
VIDEO
Branchement à un téléviseur dans un hôtel, au bureau ou
1. Connectez les câbles audio (blanc et rouge) dans les prises de sortie audio à l’arrière du téléviseur (parfois marquées AUDIO L/MONO et R) et
dans les prises de sortie AUDIO OUTPUT (L AUDIO R) du lecteur DVD/LVC.
2. Connectez le câble vidéo (jaune) dans la prise d’entrée vidéo à l’arrière du téléviseur et dans la prise de sortie VIDEO OUTPUT sur le lecteur
DVD/LVC.
3. Connectez le cordon d’alimentation c.a. dans la prise AC POWER à l’arrière du lecteur DVD/LVC et l’autre extrémité dans une prise secteur.
4 Chapitre 1
Page 43

OUTPU
Chapitre 1 : Connexions et réglage
Fente du lecteur
de vidéocassettes
T
INPUT
V
I
D
E
O
PHONE
S PHONE
R
O
I
D
L
U
A
EXTERNAL PANELEJECTDC POWE
12 V D
R
C
V
I
D
E
O
R
O
I
D
U
A
L
S
Arrière du lecteur DVD/LVC mobile
Fente de vidéocassette Insérez les vidéocassettes dans cette fente.
PHONES Connectez le casque d’écoute pour entendre le son.
Nota : Lorsque l’un ou l’autre casque d’écoute est utilisé, le son vers les haut-parleurs est coupé.
OUTPUT VIDEO Envoie la lecture vidéo du lecteur DVD/LVC dans un autre composant, comme un téléviseur.
OUTPUT L/R AUDIO Envoie la lecture audio du lecteur DVD/LVC vers un autre composant, comme un téléviseur ou envoie le son à
des haut-parleurs (amplifiés).
EXTERNAL PANEL Envoie l’audio et la vidéo en cours de lecture dans le lecteur DVD/LVC vers un composant doté d’une prise d’entrée
à huit broches compatible, comme un écran externe.
Nota : Lors d’une utilisation dans un véhicule, connectez le lecteur DVD/LVC mobile dans un afficheur compatible fourni par le fabricant.
Pour déterminer si l’afficheur est compatible, consultez le manuel fourni avec votre véhicule.
Vous pouvez endommager le lecteur DVD/LVC si vous n’utilisez pas un écran muni d’une prise d’entré à huit broches compatible.
Chapitre 1 5
Page 44

Chapitre 1 : Connexions et réglage
EJECT Éjecte la vidéocassette de la fente de cassette.
DC POWER Branchez l’adaptateur c.a. du cordon d’alimentation c.c. à cette prise de l’allume-cigare de la voiture pour
alimenter l’appareil.
INPUT VIDEO Reçoit la vidéo d’un autre composant, comme un camescope out un appareil d’accès à Internet, pour être
visionné sur l’ACL du lecteur DVD/LVC.
INPUT L/R AUDIO Reçoit l’audio d’un autre composant, comme un camescope ou un appareil d’accès à Internet, pour
permettre l’écoute de ce qui est lu par le composant connecté.
Boutons et commandes sur le lecteur
DVD/LVC mobile
ACL
ACL L’image (pendant la lecture d’un DVD) apparaît ici.
Compartiment à disque Ouvrez le couvercle pour insérer les disques.
Boutons (en ordre alphabétique)
Boutons de VOLUME haut et bas Augmentent ou abaissent le volume des haut-parleurs
intégrés.
DISC MENU Affiche le menu du disque. Le contenu du menu varie d’un disque à l’autre.
DISPLAY (Affichage) Permet de faire défiler les options en cycle lors de pressions répétées :
brillance, contraste, couleur, netteté, ou teinte. Le degré peut être réglé avec les boutons de
volume vers le haut ou vers le bas.
DVD SETUP Affiche le menu de réglage du lecteur DVD/LVC.
NEXT (
d’un CD ou à la chanson suivante d’un mp3. Avance sur la bande d’une vidéocassette.
Compartiment à
disques
) (Suivant) Avance au chapitre suivant d’un disque DVD, sur la piste suivant
6 Chapitre 1
Page 45

Chapitre 1 : Connexions et réglage
OK Lorsqu’un menu est affiché à l’écran, sélectionne l’article en surbrillance.
PLAY (
POWER (Alimentation) Allume ou éteint le lecteur DVD/LVC.
PREV (
précédente d’un mp3. Rembobine la bande d’une vidéocassette.
SCREEN MODE (Mode écran) Sélectionne le mode 16:3 ou 4:3.
SOURCE Alterne entre les mode DVD et LVC.
STATUS (État) Accède à la bannière d’état du disque.
STOP (
SURROUND (Ambiophonie) Modifie les options d’ambiophonie par des pressions répétées. Ambiophonie, Ambiophonie
3D, Ambiophonie de hall ou Ambiophonie désactivée.
Touches à flèche (haut, bas, gauche, droite) Utilisez ces boutons pour vous déplacer dans le système de menus sur l’ACL
(afficheur à cristaux liquides).
) (Lecture) Commence la lecture d’une vidéocassette ou d’un disque.
) (Précédent) Avance au chapitre précédent d’un disque DVD, à la piste précédente d’un CD ou à la chanson
) (Arrêt) Arrête la lecture du disque.
Installation des piles dans la télécommande
1. Enlevez le couvercle du compartiment à piles de la télécommande.
2. Insérez deux piles AAA neuves. Assurez-vous de bien suivre les indications de polarité
sur le diagramme (+ et -).
3. Replacez le couvercle du compartiment à piles sur la télécommande.
Chapitre 1 7
Page 46

Chapitre 1 : Connexions et réglage
La télécommande (touches en ordre alphabétique)
POWER
SURROUND
STATUS
ANGLE
SUBTITLE
AUDIO
SOURCE
142
7
ZOOM
EQ
3
6
5
8
9
+10
0
MUTE
(Avance rapide) Balaie vers l’avant sur un disque (mode DVD seulement).
(Recul rapide) Balaie vers l’arrière sur un disque (mode DVD seulement).
(Précédent) Passe au chapitre précédent d’un disque DVD, à la piste précédente d’un CD
ou à la chanson précédente d’un mp3.
(Suivant) Avance au chapitre suivant d’un disque DVD, à la piste suivante d’un CD ou à la
chanson suivante d’un mp3.
A-B Marque le début et la fin d’un segment que vous voulez répéter (mode DVD seulement).
DISC
MENU
RETURN
VCP POWER
PAUS E
VOLUME
ENTER
A-B
DISPLAY
EJECT
STOP REW FFWD
SLOW
SLOW
REPEAT
PLAY
SETUP
PLAY/
PAUS E
STOP
DVD
ANGLE Affiche et sélectionne des angles de caméra. Chaque fois que vous appuyez sur la
touche, l’angle change. Le nombre d’angles varie d’un disque à l’autre (mode DVD seulement).
AUDIO Affiche la bannière d’état de la langue de l’audio (mode DVD seulement).
DISC MENU Affiche le menu du disque Le contenu du menu varie d’un disque à l’autre (mode
DVD seulement).
DISPLAY (Affichage) Permet de faire défiler les options en cycle lors de pressions répétées :
brillance, contraste, couleur, netteté, teinte. Le degré peut être réglé avec les boutons de volume
vers le haut ou vers le bas.
DVD POWER (Alimentation DVD) Allume ou éteint le lecteur DVD/LVC.
DVD SETUP Affiche le menu de réglage du lecteur.
EJECT Éjecte la vidéocassette de la fente à l’arrière du lecteur (mode LVC [VCP] seulement).
ENTER Lorsqu’un menu est affiché, sélectionne l’article en surbrillance.
EQ Change les options de l’égaliseur pour les disques mp3 lors de pressions répétées : EQ TYPE
affiche le niveau de fréquence, EQ ON (activé), EQ OFF (désactivé) (mode DVD seulement).
FFWD (
) Fait avancer rapidement la bande de la vidéocassette (mode LVC [VCP]
seulement).
8 Chapitre 1
Page 47

Chapitre 1 : Connexions et réglage
MUTE (Silencieux) Abaisse le son à un niveau inaudible.
PAUSE (
PAUSE (
REPEAT (Répéter) Modifie les options de répétition par des pressions répétées. Les options varient selon le type de disque
lu (mode DVD seulement).
RETURN Revient au chapitre précédent sur un disque (mode DVD seulement).
REWIND (
SLOW (
SLOW (
SOURCE Alterne entre les mode DVD et LVC (VCP).
STATUS (État) Affiche l’information du disque en cours de lecture (mode DVD seulement).
STOP (
SUBTITLE (Sous-titres) Affiche la langue des sous-titres d’un disque DVD (si le disque a été créé avec des sous-titres).
Chaque nouvelle pression sur la touche change la langue.
SURROUND (Ambiophonie) Modifie les options d’ambiophonie par des pressions répétées. Ambiophonie, Ambiophonie
3D, Ambiophonie de hall ou Ambiophonie désactivée.
Touches à flèche (haut, bas, gauche, droite) Utilisez ces touches pour vous déplacer dans le système de menus sur l’ACL
(afficheur à cristaux liquides).
VCP POWER (Alimentation LVC) Active ou désactive le lecteur de vidéocassettes (mode DVD seulement).
) Alterne entre la lecture et la pause (mode DVD seulement).
) Effectue une pause de la bande de la vidéocassette (mode LVC [VCP] seulement).
) Rembobine une vidéocassette (mode LVC [VCP] seulement).
) (Lent) Lit le disque lentement vers l’avant (mode DVD seulement).
) (Lent) Lit le disque lentement vers l’arrière (mode DVD seulement).
) Arrête la lecture.
VOLUME touches vers le haut ou vers le bas Augmente ou abaisse le volume.
ZOOM Agrandit l’image pendant la lecture d’un disque DVD (mode DVD seulement).
Chapitre 1 9
Page 48

Chapitre 2 : Lecture de vidéocassettes et de disques
Lecture de vidéocassettes
Chargement et lecture d’une vidéocassette
1. Relevez l’ACL et placez-le selon vos besoins.
2. Appuyez sur le bouton POWER de l’appareil ou sur la touche VCP POWER de la télécommande pour allumer l’appareil.
3. Insérez une vidéocassette dans la fente située à l’arrière du lecteur DVD/LVC.
4. Appuyez sur le bouton PLAY de l’appareil ou sur la touche PLAY de la télécommande.
5. Si un disque est chargé dans le compartiment du DVD, le lecteur passe par défaut en mode DVD. Appuyez sur la touche SOURCE de la
télécommande pour passer en mode LVC [VCP].
PLAY/
SLOW
VOLUME
VCP POWER
PAUS E
PAUS E
SLOW
STOP
DISPLAY
EJECT
STOP REW FFWD
PLAY
Touches de la télécommande utilisées pour le mode LVC (VCP)
Les touches au bas de la télécommande servent uniquement pour le mode LVC (VCP). Utilisez ces
touches pour commander la lecture de la vidéocassette.
EJECT Éjecte la vidéocassette de la fente à l’arrière du lecteur (mode LVC [VCP] seulement).
FFWD (
seulement).
) Fait avancer rapidement la bande de la vidéocassette (mode LVC [VCP]
PAUSE (
REWIND (
STOP (
) Effectue une pause de la bande de la vidéocassette (mode LVC [VCP] seulement).
) Rembobine une vidéocassette (mode LVC [VCP] seulement).
) Arrête la lecture.
VCP POWER (Alimentation LVC) Active ou désactive le lecteur de vidéocassettes (mode DVD
seulement).
Touches utilisées pour
commander la lecture
de la vidéocassette
10 Chapitre 2
Page 49

Chapitre 2 : Lecture de vidéocassettes et de disques
Éléments de base du lecteur DVD
Codage régional
Le lecteur DVD/LVC et les disques comportent un code régional. Ces codes régionaux doivent correspondre pour effectuer la lecture du disque.
Si les codes ne correspondent pas, la lecture n’a pas lieu. Le code de ce lecteur est la région 1. Le disques des autres régions ne peuvent être lus
dans cet appareil.
Utilisation des différents menus
La programmation de chaque disque comporte des fonctions différentes. Vous pouvez utiliser deux parcours de menu différents pour accéder aux
fonctions : le menu du disque et la bannière d’état du lecteur DVD. N’oubliez pas qu’une fonction n’est disponible que si la programmation du disque
inclut cette fonction. Par exemple, si vous sélectionnez les sous-titres, les sous-titres n’apparaissent que si le disque a été créé avec des sous-titres.
• Le menu Disque – Le menu du disque fait partie de chaque disque et est différent de la bannière d’état du lecteur DVD. Le contenu de chaque
menu de disque varie selon la constitution du disque et les fonctions incluses. Parfois, le menu d’un disque apparaît automatiquement lorsque
vous l’insérez, ou vous pouvez y accéder en appuyant sur la touche ou le bouton DISC MENU.
• Bannière d’état du lecteur DVD – La bannière d’état apparaît en haut de l’écran pendant la lecture d’un disque. Vous ne pouvez y accéder que
pendant la lecture d’un disque. Pour l’afficher ou l’effacer, utilisez la touche STATUS de la télécommande.
Types de disques que peut lire votre lecteur DVD
•Disques DVD – Contiennent de l’information vidéo.
•Disques audio – Ont un contenu musical ou sonore seulement.
•Disques mp3 – Contiennent des fichiers audio (par exemple, un CD-R sur lequel on a copié des fichiers mp3 que l’on a préalablement
téléchargé).
Chapitre 2 11
Les illustrations et les graphiques contenus dans ce document servent uniquement à des fins de représentation.
Page 50

Chapitre 2 : Lecture de vidéocassettes et de disques
Chargement et lecture des disques
Avant de charger un disque, assurez-vous qu’il est compatible avec le lecteur. Notez que les disques suivants NE PEUVENT
PAS être utilisés avec ce lecteur :
•Disque laser
• CD-I, CD-ROM, DVD-ROM
•MiniDisc
•Seul l’audio est lu sur les disques CD-G et non les graphiques
Chargement et lecture d’un disque
1. Relevez l’ACL et placez-le selon vos besoins.
2. Appuyez sur la touche ou sur le bouton POWER pour allumer l’appareil.
3. Appuyez sur le bouton situé sur la partie supérieure de l’appareil pour ouvrir le plateau de disque. Placez avec
précaution un disque dans le plateau, étiquette vers le haut (les disques à double face contiennent de l’information sur
les deux côtés, de sorte que vous pouvez placer l’un ou l’autre vers le haut).
Le lecteur lit la table des matières du disque, puis l’une des fonctions suivantes est exécutée, selon la programmation du
disque :
•Aucun menu de disque n’apparaît, un économiseur d’écran est affiché.
• Le menu Disque apparaît.
• Le menu du disque apparaît à l’écran lorsque vous appuyez sur PLAY/PAUSE.
• La lecture du disque commence automatiquement.
Si aucune image et aucun économiseur d’écran n’apparaît, appuyez sur SOURCE pour faire passer le lecteur en mode DVD.
12 Chapitre 2
Page 51

Chapitre 2 : Lecture de vidéocassettes et de disques
Fonctions de lecture
Les fonctions de lecture de DVD et de CD varient d’un disque à l’autre. Étant donné que cet appareil lit les DVD
conformément au contenu du disque conçu par les producteurs de logiciels, certaines fonctions de lecture pourraient
ne pas être disponibles. Voyez les instructions accompagnant les DVD pour en savoir plus long.
Normalement, les fonctions de lecture ne sont pas disponibles pendant le générique d’ouverture d’un film. Si une fonction
de lecture n’est pas disponible, l’icône de non-validité (une icône de main) apparaît à l’écran lorsque vous appuyez sur la
touche correspondante.
Lecture rapide (balayage de l’image)
Pour parcourir rapidement le disque pendant la lecture, utilisez la fonction de balayage rapide.
1. Appuyez sur la touche de recul rapide (
2. Appuyez de nouveau sur la touche pour accélérer le balayage. Chaque nouvelle pression accroît la vitesse de balayage
jusqu’à ce que vous atteigniez la vitesse maximale.
) ou d’avance rapide ( ) pendant la lecture d’un disque.
Saut de pistes ou de chansons
Pendant la lecture d’un CD ou d’un disque mp3, utilisez les touches Précédente ( ) ou Suivante ( ) pour sauter une
piste ou une chanson. Appuyez sur pour passer à la piste ou à la chanson suivante. Appuyez sur pour passer à la
piste ou à la chanson précédente.
Saut de chapitres
Pendant la lecture d’un disque DVD, utilisez les touches Précédente ( ) ou Suivante ( ) pour passer au chapitre
suivant. Appuyez sur pour passer au chapitre suivant. Appuyez sur pour passer au chapitre précédent.
Zoom
Pendant la lecture d’un disque DVD, appuyez sur la touche ZOOM pour agrandir l’image. Chaque pression accroît
l’agrandissement. Lorsque l’agrandissement maximal est atteint, appuyez de nouveau sur ZOOM pour revenir à
la lecture normale.
Chapitre 2 13
Page 52

Chapitre 2 : Lecture de vidéocassettes et de disques
Utilisation d’un menu Disque
Un disque peut avoir un menu à l’écran distinct de l’affichage de la bannière d’état d’un DVD.
Le menu Disque pourrait ne contenir qu’une liste des titres et des chapitres ou il pourrait vous
permettre de changer certaines caractéristiques comme la langue et les réglages de lecture.
Même si le contenu et le fonctionnement des menus de disques varient de l’un à l’autre, l’exemple
suivant devrait vous préparer à toute éventualité.
1. À la première insertion du disque et (ou) lorsque vous appuyez sur DISC MENU sur le
lecteur ou sur la télécommande, le menu du disque apparaît.
Exemple de menu Disque. Les menus Disque
varient, car ils sont créés par l’auteur de
chaque disque.
2. Appuyez sur les touches à flèche vers le haut ou vers le bas pour mettre en surbrillance la
section désirée du menu Disque et appuyez sur la touche ENTER de la télécommande. Dans
l’exemple à gauche, l’option Langue a été sélectionnée.
3. Appuyez sur les touches à flèche vers le haut ou vers le bas pour sélectionner une langue, puis
sur la touche ENTER.
4. Appuyez sur PLAY/PAUSE pour lire le disque.
Dans cet exemple, English est en surbrillance.
Appuyez sur la touche ENTER de la télécom-
mande pour lire le disque avec des dialogues
en anglais.
14 Chapitre 2
Page 53

Chapitre 2 : Lecture de vidéocassettes et de disques
Utilisation de la bannière d’état
Pendant la lecture d’un disque, appuyez sur la touche STATUS de la télécommande ou sur le bouton correspondant à l’avant
du lecteur pour afficher la bannière d’état. La bannière d’état indique l’état des fonctions du lecteur DVD et vous permet de
les changer pendant la lecture du disque. Si aucune sélection n’est effectuée après quelques secondes, la bannière disparaît.
Les options ci-dessous indiquent le résultat d’un nombre différent de pressions sur la touche ou le bouton STATUS.
Une pression sur STATUS Affiche la bannière d’état, le titre et le chapitre en cours de lecture, de même que l’heure.
Deux pressions sur STATUS Affiche l’information courante sur les sous-titres.
Tr ois pressions sur STATUS Affiche la langue de l’audio et le format audio couramment utilisés.
Quatre pressions sur STATUS Affiche le réglage en cours de l’ambiophonie.
Cinq pressions sur STATUS Affiche le réglage d’angle courant.
Six pressions sur STATUS Affiche le réglage de répétition A-B en cours.
Sept pressions sur STATUS Affiche le réglage de répétion courant.
Huit pressions sur STATUS Efface la bannière d’écran.
Sélection d’un chapitre
TITRE 01/12 CHAPITRE 23 /42
00:00:18
La bannière d’état
Chapitre 2 15
Étant donné que les disques DVD utilisent une technologie numérique, un titre peut être divisé en
chapitres individuels (comme les pistes sur un CD). Vous pouvez passer à un chapitre particulier au
moyen de la fonction Chapitre de la bannière d’état.
1. Pendant la lecture, appuyez sur la touche STATUS (la bannière d’état apparaît).
2. Appuyez sur la touche à flèche vers la droite pour mettre en surbrillance le numéro de chapitre.
3. Appuyez sur les touches à flèche vers le haut ou vers le bas pour passer au chapitre suivant ou
précédent. Appuyez sur OK pour sélectionner le chapitre à lire.
Nota : La fonction Chapitre n’est disponible que sur les disques formatés en chapitres distincts.
Page 54

Chapitre 2 : Lecture de vidéocassettes et de disques
AUDIO 2/3:AC-3 5.1 ANGLAIS
La bannière de l’audio
Changement de la langue de l’audio
Utilisez la touche AUDIO de la télécommande pour changer le réglage de la langue de l’audio du
disque DVD en cours de lecture. Appuyez sur la touche AUDIO de façon consécutive pour accéder
aux différentes options de l’audio. La langue de l’audio et le format changent au moment où vous
accédez à une option.
Nota :
La fonction de langue de l’audio n’est disponible que si le disque a été créé avec plusieurs langues.
Certains disques vous permettent de changer de format audio à partir du menu du disque,
si disponible.
Changement de la langue des sous-titres
Utilisez la touche SUBTITLE de la télécommande pour changer le réglage de la langue des sous-titres du disque DVD en cours de lecture. Appuyez
sur SUBTITLE de façon consécutive pour accéder aux options de sous-titres. La langue des sous-titres change au moment où vous accédez à une
option. Désactivez les sous-titres en appuyant sur SUBTITLE jusqu’à ce que l’option SOUS-TITRES DÉSACTIVÉS apparaisse.
Nota : La fonction des sous-titres n’est disponible que si le disque a été créé avec plusieurs sous-titres.
Changement de l’angle de caméra
Certains disques contiennent des prises de vue sous plusieurs angles d’une scène ou d’une séquence particulière. Appuyez sur la touche ANGLE de la
télécommande pour accéder à des angles différents. L’angle change au moment où vous accédez à une angle.
Nota : La fonction d’angle n’est disponible que si le disque a été créé avec plusieurs angles. Pour le moment, très peu de disques de la région 1 ont
des menus de disque avec plusieurs angles.
Utilisation de la fonction Répétition
Par défaut, la fonction Répétition est DÉSACTIVÉE. Des pressions consécutives sur la touche REPEAT de la télécommande permettent de modifier
les options de répétition :
• RÉPÉTITION DE CHAPITRE ACTIVÉE
• RÉPÉTITION DE TITRE ACTIVÉE
• RÉPÉTITION DÉSACTIVÉE
Les options de répétition changent au moment où vous y accédez. Par exemple, si vous accédez à RÉPÉTITION DE CHAPITRE ACTIVÉE, le
chapitre commence à jouer de nouveau à partir du début lorsque vous atteignez la fin du chapitre. L’option de répétition sélectionnée s’exécute
jusqu’à ce que vous la désactiviez.
16 Chapitre 2
Page 55

Chapitre 2 : Lecture de vidéocassettes et de disques
Utilisation de la fonction Répétition A-B
Répétition A-B vous permet de définir sur le disque un segment particulier que vous voulez répéter. La fonction de
Répétition A-B est identique pour tous les disques. Par exemple, supposons que vous voulez regarder le combat aérien dans
le film Top Gun. Pour regarder cette scène à plusieurs reprises :
1. Repérez l’emplacement sur le disque qui est juste quelques secondes avant le début de la scène à répéter.
2. Appuyez sur la touche A-B de la télécommande. Cette action permet de mémoriser le point A (A-B MÉMORISER A
apparaît).
3. Lorsque vous arrivez à la fin du segment du disque que vous voulez répéter (le point B), appuyez de nouveau sur la
touche A-B. Cette action permet de mémoriser le point B (A-B MÉMORISER B apparaît). Le segment se répète tant
que la fonction de Répétition n’est pas désactivée en appuyant de nouveau sur la touche A-B (A-B DÉSACTIVÉ
apparaît).
Modification de l’ambiophonie
Vous pouvez utiliser cette fonction pour ajouter un effet ambiophonique à l’audio. Pendant la lecture du disque, appuyez sur
la touche ou le bouton SURROUND. Appuyer de façon consécutive sur la touche ou le bouton SURROUND modifie les
options de son :
• AMBIOPHONIE
• AMBIOPHONIE 3D
• AMBIOPHONIE DE HALL
• AMBIOPHONIE DÉSACTIVÉE
Les options d’ambiophonie changent au moment où vous y accédez.
Chapitre 2 17
Page 56

Chapitre 2 : Lecture de vidéocassettes et de disques
Lecture de CD audio
Conseil
Vous pouvez
également avancer au
chapitre suivant en
appuyant sur
ou revenir au chapitre
précédent en
appuyant sur .
Pendant la lecture d’un CD audio, la bannière d’état apparaît automatiquement. Elle affiche la piste en cours de lecture
et le temps de lecture pour chaque piste, le temps total sur le disque et le temps en cours de lecture. Les options ci-dessous
indiquent le résultat d’un nombre différent de pressions sur la touche ou le bouton STATUS.
Une pression sur STATUS ÉCHU SIMPLE apparaît avec la piste en cours de lecture et le temps pour cette piste.
Deux pressions sur STATUS RESTANT SIMPLE apparaît avec la piste en cours de lecture et le temps qui reste
pour cette piste.
Tr ois pressions sur STATUS TOTAL ÉCHU apparaît avec la piste en cours de lecture et le temps total échu pour
la lecture du CD.
Quatre pressions sur STATUS RESTANT TOTAL apparaît avec la piste en cours de lecture et le temps qui reste à
lire pour ce CD.
Cinq pressions sur STATUS Efface la bannière d’écran.
Utilisation de la fonction Répétition
Par défaut, la fonction Répétition est DÉSACTIVÉE. Appuyer de façon consécutive sur la touche ou le bouton REPEAT modifie les options de
répétition :
• RÉP-UN – répète la piste en cours de lecture
• RÉP-TOUT – répète le disque en cours de lecture
• RÉPÉTITION DÉSACTIVÉE
Les options de répétitions changent automatiquement pour correspondre aux réglages qui apparaissent à l’écran, à mesure que vous y accéder. Par
exemple, si RÉP-UN apparaît, la piste en cours de lecture commence automatiquement à jouer à partir du début lorsque vous avez atteint la fin de
cette piste. L’option de répétition sélectionnée s’exécute jusqu’à ce que vous l’arrêtiez.
18 Chapitre 2
Page 57

Chapitre 2 : Lecture de vidéocassettes et de disques
Lecture de disques mp3
mp3 est un format de compression de données numériques audio. Une chanson de qualité CD audio peut être compressée
en format mp3 avec une perte minimale de qualité, mais occupe beaucoup moins d’espace. Les disques CD-R codés en
format mp3 peuvent être lus sur votre lecteur DVD/LVC.
Sélection de dossiers et de chansons
Lorsque qu’un disque mp3 est inséré dans le lecteur, l’écran de navigation sur disque apparaît automatiquement. Vous
pouvez modifier les dossiers et les chansons à partir de la fonction de navigation sur disque. Le lecteur commence la lecture
des chansons dans l’ordre où elles sont gravées sur le disque.
1. Si un disque est en cours de lecture, appuyez sur STOP. Appuyez sur les flèches vers le haut ou vers le bas pour passer en
revue la liste des dossiers sur le côté droit de l’écran de navigation sur disque.
2. Après avoir mis en surbrillance le dossier de votre choix, appuyez sur ENTER (la liste des dossiers passe du côté gauche
et les chansons dans le dossier choisi apparaissent à droite).
3. Appuyez sur les touches à flèche vers le haut et vers le bas pour faire défiler la liste des chansons et mettre en
surbrillance celle de votre choix. Appuyez sur ENTER pour commencer la lecture de la chanson en surbrillance.
Pendant la lecture d’un disque mp3, appuyez sur la touche STATUS de la télécommande pour afficher la bannière d’état. Les
options ci-dessous indiquent le résultat d’un nombre différent de pressions sur la touche ou le bouton STATUS.
Une pression sur STATUS CHAPITRE RESTANT apparaît avec le temps restant pour ce dossier. CHAPITRE RESTANT
et le temps restant continuent d’apparaître à l’écran jusqu’à ce que vous appuyiez de nouveau
sur STATUS.
Deux pressions sur STATUS CHAPITRE ÉCHU apparaît avec le temps écoulé pour cette chanson. CHAPITRE ÉCHU
et le temps continuent d’apparaître à l’écran jusqu’à ce que vous appuyiez de nouveau
sur STATUS.
Tr ois pressions sur STATUS DÉSACTIVÉ apparaît avec le temps écoulé pour cette chanson. Le temps continue d’être
affiché à l’écran jusqu’à ce que vous appuyiez de nouveau sur STATUS pour voir le temps
restant pour ce dossier ou que vous appuyiez sur STOP.
Chapitre 2 19
Page 58

Chapitre 2 : Lecture de vidéocassettes et de disques
Saut de chansons
Utilisez la touche Suivant ( ) de la télécommande pour passer à la chanson suivante. Appuyez sur la touche Précédent
) pour revenir au début de la chanson en cours de lecture. Appuyez de nouveau sur pour passer à la chanson
(
précédente.
Sélection d’un mode de lecture
Vous pouvez choisir temporairement l’ordre de lecture des chansons sur un disque. Le mode de lecture DOSSIER est le
mode par défaut. Pour accéder aux options du mode de lecture, appuyez sur STOP si le disque est en cours de lecture.
Appuyez sur la touche à flèche vers la droite pour mettre en surbrillance MODE LECTURE. Utilisez les flèches vers le haut
ou vers le bas pour sélectionner une option. Les options du mode de lecture dont :
SIMPLE : Lit la chanson sélectionnée et arrête la lecture du disque lorsqu’elle est terminée.
RÉP-UN : Répète la chanson sélectionnée.
DOSSIER : Lit le dossier dans l’ordre d’enregistrement des chansons.
DOSSIER R : Répète la lecture du dossier en cours de lecture.
DISQUE : Lit l’intégralité du disque.
ALÉATOIRE : Lit au hasard toutes les chansons sur le disque.
MÉLANGE : Lit au hasard toutes les chansons (à l’intérieur du dossier sélectionné).
FIN-PROG (Fin de programme) : Lit les chansons du disque dans l’ordre que vous avez programmé (vous devez créer
une liste de programmation pour définir l’ordre désiré de lecture des chansons du disque). Lorsque vous créez une liste
de lecture, cette options passe à PROGRAMME.
20 Chapitre 2
Page 59

Chapitre 2 : Lecture de vidéocassettes et de disques
Lecture programmée
Pour utiliser l’option de lecture programmée, vous devez créer une liste de programmation qui vous permet de définir l’ordre
désiré de lecture des chansons.
Nota : Lorsque vous commencez à ajouter des chansons d’un dossier pour créer une liste de lecture, vous ne pouvez
ajouter des chansons d’un dossier différent.
1. Sélectionnez l’option FIN-PROG dans le menu MODE LECTURE.
2. Appuyez sur OK (l’option passe à PROGRAMME).
3. Sélectionnez le dossier qui contient les chansons que vous voulez programmer.
4. Ajoutez des chansons à la liste de programmation en mettant une chanson en surbrillance et en appuyant sur ENTER.
Les chansons sélectionnées et le nombre de chansons apparaissent en haut de l’écran. Par exemple, si vous avez choisi la
chanson numéro cinq du dossier et qu’elle est votre premier choix, PROGAMME P01:05 apparaît.
5. Vous pouvez continuer à ajouter des chansons à la liste à l’intérieur du même dossier en utilisant les touches à flèche
vers le haut et vers le bas et en appuyant sur ENTER pour les ajouter à la liste.
6. Lorsque vous avez terminé la création de votre liste, appuyez sur STOP pour terminer la programmation. Appuyez
ensuite sur PLAY pour démarrer le mode de lecture de la programmation.
Suppression de la liste de programmation
Pour supprimer toute la liste de lecture, appuyez sur STOP pendant que le disque est en cours de lecture et sélectionnez un
mode de lecture différent.
Utilisation de l’égalisateur
Pour accéder à l’égaliseur, appuyez sur la touche EQ de la télécommande. L’égaliseur vous permet de choisir un son
spécifique sur un disque mp3, à partir de l’option EQ TYPE (le premier écran qui apparaît lorsque vous appuyez sur EQ).
Appuyez plusieurs fois sur PLAY pour faire défiler les réglages affichés au bas de l’écran EQ TYPE (PERSONNEL apparaît
automatiquement lorsque vous accédez à l’option EQ TYPE). Voici les autres réglages : PLAT, CLASSIQUE, JAZZ, ROCK,
POP, BALLADE, DANSE.
Le réglage PERSONNEL de l’égaliseur vous permet de régler les décibels de chaque fréquence (de 60 à 15 K). Appuyez sur la
touche à flèche vers la gauche ou vers la droite pour sélectionner la fréquence à régler. Utilisez ensuite les touches à flèche
vers le haut et vers le bas pour régler les décibels (il changent sur le côté droit de l’écran EQ TYPE).
Chapitre 2 21
Page 60

Chapitre 3 : Menus DVD
Utilisation du menu de réglage du lecteur DVD
Le menu de réglage du lecteur DVD est le menu principal du lecteur DVD/LVC. Il contient des fonctions et options qui
vous permettent de personnaliser votre lecteur DVD/LVC.
MENU DE RÉGLAGE -- PAGE PRINCIPALE
AFFICHAGE
LANGUE AFFICHAGE
ÉCONOM. D’ÉCRAN
NAVI RAPIDE
VALEURS DÉFAUT
VOL. EXTR. GRAVES
QUITTER LE RÉGLAGE
NORMAL / PS
NORMAL / LB
LARGE
Affichage
Le menu d’affichage commande l’apparence de l’image à l’écran par le réglage du rapport hauteur /
largeur. Le réglage par défaut est 16:9 (LARGE).
1. Appuyez sur la touche DVD SETUP (le MENU DE RÉGLAGE apparaît, avec
AFFICHAGE TV en surbrillance).
2. Appuyez sur la touche à flèche vers la droite pour passer aux options AFFICHAGE.
3. Appuyez sur les touches à flèche vers le haut ou vers le bas pour afficher les réglages (ils sont
décrits à la page suivante).
4. Une fois que vous avez mis en surbrillance le réglage désiré, appuyez sur ENTER.
5. Appuyez sur DVD SETUP pour quitter le menu de réglage.
22 Chapitre 3
Page 61

NORMAL/PS (Panoramique et balayage)
NORMAL/LB (Boîte à lettres)
Chapitre 3 : Menus DVD
NORMAL/PS – Sélectionnez ce réglage si vous voulez que le film occupe la totalité de l’écran. Il se
peut que certaines parties de l’image (les bords gauche et droit) soient invisibles.
La plupart des disques produits en format élargi ne peuvent être recadrés de cette façon. Cela
signifie que les barres noires apparaîtront au haut et au bas de l’écran.
NORMAL/LB – Sélectionnez ce réglage si vous voulez voir les films dans leur format d’origine
(rapport hauteur / largeur). Vous verrez ainsi la totalité de l’image du film, mais elle occupera une
partie seulement de la hauteur de l’écran. Le film peut être encadré de barres noires au haut et au
bas de l’écran.
WIDE – Sélectionnez ce réglage si votre lecteur DVD/LVC est connecté à un téléviseur à grand
écran. Si vous sélectionnez ce réglage avec un téléviseur standard, les images à l’écran peuvent
sembler déformées à cause de la compression verticale.
Si vous visionnez un disque enregistré en format 4 x 3 sur un grand écran, les côtés gauche et droit
afficheront des barres noires.
WIDE
Chapitre 3 23
Page 62

Chapitre 3 : Menus DVD
(Affichage à l’écran) Langue
Utilisez cette fonction pour changer la langue du système de menus à l’écran du lecteur. La langue par défaut est l’anglais.
1. Appuyez sur DVD SETUP (le MENU DE RÉGLAGE apparaît).
2. Appuyez sur la touche à flèche vers le bas jusqu’à ce que AFFICHER LANG soit mis en surbrillance (l’affichage des
langues apparaît).
3. Appuyez sur la touche à flèche vers la droite pour passer aux options AFFICHER LANG.
4. Utilisez les touches à flèche vers le haut ou vers le bas pour mettre en surbrillance votre sélection.
5. Une fois que vous avez mis en surbrillance la langue désirée, appuyez sur ENTER.
6. Appuyez sur DVD SETUP pour quitter le menu de réglage.
Économiseur d’écran
L’économiseur d’écran apparaît lorsque le lecteur n’est pas utilisé pendant un certain temps. Par défaut, il est désactivé.
Pour l’activer :
1. Appuyez sur DVD SETUP (le menu de réglage apparaît).
2. Appuyez sur la touche à flèche vers le bas jusqu’à ce que ÉCONOMISEUR D’ÉCRAN soit mis en surbrillance (les
options de l’économiseur d’écran apparaissent).
3. Appuyez sur la touche à flèche vers la droite pour passer aux options ÉCONOMISEUR D’ÉCRAN.
4. Appuyez sur la touche à flèche vers le haut pour mettre en surbrillance ACTIVER et appuyez sur ENTER.
5. Appuyez sur DVD SETUP pour quitter le menu de réglage.
Pour désactiver l’économiseur d’écran, suivez les étapes 1 à 3. Appuyez sur la touche à flèche vers le bas pour mettre en
surbrillance l’option DÉSACTIVER. Appuyez ensuite sur DVD SETUP pour quitter.
24 Chapitre 3
Page 63

Chapitre 3 : Menus DVD
Navigation sur disque
L’écran de navigation sur disque apparaît automatiquement lorsque vous insérez un disque mp3 dans le lecteur. Par défaut, il
est activé. Pour désactiver l’écran de navigation sur disque :
1. Appuyez sur DVD SETUP (le MENU DE RÉGLAGE apparaît).
2. Appuyez sur la touche à flèche vers le bas jusqu’à ce que NAVIGATION SUR DISQUE soit en surbrillance (l’option apparaît).
3. Appuyez sur la touche à flèche vers la droite pour passer aux options de NAVIGATION SUR DISQUE.
4. Appuyez sur la touche à flèche vers le haut pour mettre en surbrillance SANS MENU et appuyez sur ENTER.
5. Appuyez sur DVD SETUP pour quitter.
Nota : Si vous désactivez la navigation sur disque, vous ne pourrez accéder aux options de lecture mp3.
Pour réactiver la navigation sur disque, suivez les étapes 1 à 3. Appuyez sur la touche à flèche vers le bas pour mettre en
surbrillance l’option AVEC MENU. Appuyez ensuite sur DVD SETUP pour quitter.
Valeurs par défaut
Utilisez la fonction Valeurs par défaut pour rétablir TOUTES les fonctions aux valeurs configurées à l’usine.
1. Appuyez sur DVD SETUP (le MENU DE RÉGLAGE apparaît).
2. Appuyez sur la touche à flèche vers le bas jusqu’à ce que VALEURS DÉFAUT soit en surbrillance (RÉINITIALISER
apparaît).
3. Appuyez sur la flèche vers le bas pour mettre en surbrillance RÉINITIALISER et appuyez sur ENTER.
4. Appuyez sur DVD SETUP pour quitter.
Volume des extrêmes graves
Utilisez la fonction de Volume des extrêmes graves pour augmenter ou réduire l’apport de décibels dans un casque d’écoute
ou un amplificateur.
1. Appuyez sur DVD SETUP (le MENU DE RÉGLAGE apparaît).
2. Appuyez sur la touche à flèche vers le bas pour mettre en surbrillance VOL. EXTR. GRAV..
3. Appuyez sur la touche à flèche vers la droite pour passer aux options de VOL. EXTR. GRAV.
4. Appuyez sur les touches à flèche vers le haut ou vers le bas pour changer le volume, puis sur la touche ENTER.
5. Appuyez sur DVD SETUP pour quitter.
Chapitre 3 25
Page 64

Chapitre 4 : Autres informations
Dépannage
Si vous avez des problèmes d’utilisation de ce produit, veuillez consulter la section Dépannage avant de loger un appel de service. Consultez la garantie
limitée pour savoir comment obtenir le service de réparation.
Absence de courant
• Essayez d’appuyer sur le bouton POWER sur l’appareil.
•Si vous utilisez un cordon d’alimentation c.c., assurez-vous qu’il est fermement branché à la prise DC POWER et dans celle de l’allume-
cigare de la voiture. La voiture doit être en marche.
•Si vous utilisez un adaptateur c.a., assurez-vous qu’il est fermement branché à la prise DC POWER et à une prise.
• Essayez de débrancher l’appareil pendant quelques minutes, puis de le rebrancher.
Pas de son, image normale
•Appuyez sur la touche VOLUME vers le haut pour augmenter le volume.
• Le son a peut-être été coupé. Appuyez sur la touche MUTE pour rétablir le son.
•Si vous utilisez une autre source, vérifiez les connexions du câble audio.
•Si le lecteur est en mode de pause, vitesse lente ou avance rapide, aucun son ne peut être entendu. Appuyez sur PLAY pour revenir au mode
de lecture normale et pour entendre le son.
• Assurez-vous que le casque d’écoute est bien débranché du lecteur.
• Vérifiez le volume des extrêmes graves.
Pas d’image, son normal
•Si vous utilisez une autre source, vérifiez les connexions du câble vidéo.
• Réglez la brillance.
Problèmes avec le lecteur DVD
Le disque n’est pas lu
•Insérez un disque avec l’étiquette vers le haut.
• Vérifiez le type de disque inséré dans le plateau de disque. Ce lecteur DVD/LVC mobile ne lit que les disques vidéo numériques, les CD
audio et les disques mp3.
• Le lecteur et les disques comportent un code régional. Si les codes régionaux ne correspondent pas, la lecture n’a pas lieu. Le code de ce
lecteur DVD/LVC est la Région n
•Appuyez sur la touche ou le bouton SOURCE pour vous assurer qu’il est bien en mode DVD.
La lecture commence, mais s’arrête immédiatement
• Le disque est sale. Nettoyez-le.
•Il s’est formé de la condensation. Laissez sécher le lecteur.
• Le disque est rayé ou défectueux.
26 Chapitre 4
Les illustrations et les graphiques contenus dans ce document servent uniquement à des fins de représentation.
o
1.
Page 65

Chapitre 4 : Autres informations
Absence ou distorsion de son
• Assurez-vous que le lecteur DVD/LVC mobile est connecté correctement. Vérifiez que tous les câbles sont bien insérés dans les prises
appropriées.
•Si vous avez connecté un composant audio ou audio/vidéo, assurez-vous que vous avez choisi le bon réglage d’entrée sur le récepteur et sur
l’appareil.
Impossible d’avancer rapidement dans un film
•Vous ne pouvez faire avancer rapidement le générique d’ouverture et les informations d’avertissement au début d’un film parce que le disque
est programmé de façon à interdire cette opération.
Le symbole de non validité (icône de main) apparaît
• La fonction ou l’opération ne peut être exécutée actuellement parce que :
- Le logiciel du disque l’interdit.
- Le logiciel du disque n’est pas compatible avec cette fonction (p. ex. angles).
- La fonction n’est pas disponible actuellement.
- Vous avez demandé un numéro de titre ou de chapitre inaccessible.
L’image est déformée
• Le disque pourrait être endommagé. Essayez-en un autre.
•Une certaine distorsion est normale pendant le balayage avant ou arrière.
Aucun balayage avant ou arrière
• Certains disques comportent des sections qui interdisent le balayage rapide ou le saut des titres et des chapitres.
•Si vous essayez de sauter les informations d’avertissement et le générique d’ouverture au début d’un film, vous ne pourrez le faire. Les disques
sont souvent programmés de façon à interdire le saut de cette partie du film.
• Assurez-vous d’utiliser les touches correctes sur la télécommande : les touches du DVD sont situées sur la moitié supérieure de la
télécommande. Les touches pour les vidéocassettes sont situées sur la moitié inférieure de la télécommande.
La langue des sous-titres et (ou) de l’audio n’est pas celle qui a été sélectionnée lors du réglage initial
•Si la langue des sous-titres et (ou) de l’audio n’existe pas sur le disque, la langue du réglage initial ne peut être lue ni entendue.
Impossible de changer l’angle de caméra
• Certains disques ne contiennent pas d’angles de caméra multiples et d’autres n’en contiennent que dans certaines parties du film.
La télécommande ne fonctionne pas
•Placez la télécommande très près du capteur à l’avant de votre lecteur DVD/LVC mobile.
• Les piles sont peut-être faibles ou à plat. Installez des piles neuves dans la télécommande.
• Assurez-vous d’utiliser les touches correctes sur la télécommande : les touches du DVD sont situées sur la moitié supérieure de la
télécommande. Les touches pour les vidéocassettes sont situées sur la moitié inférieure de la télécommande.
Chapitre 4 27
Page 66

Chapitre 4 : Autres informations
Problèmes avec le LVC
Absence de courant
• Vérifiez que toutes les connexions sont bien en place et raccordées à une prise de courant active.
Le rembobinage ne fonctionne pas
• Assurez-vous que la vidéocassette n’est pas déjà rembobinée.
• Assurez-vous d’utiliser les touches correctes sur la télécommande : les touches du DVD sont situées sur la moitié supérieure de la
télécommande. Les touches pour les vidéocassettes sont situées sur la moitié inférieure de la télécommande.
Le lecteur de vidéocassettes (LVC) fait du bruit à l’arrêt
• Le lecteur retire la vidéocassette des têtes de lecture. Ce son est normal. Les cylindres à l’intérieur du lecteur continuent de tourner pendant
quelques minutes après l’arrêt.
Image enneigée ou absente pendant la lecture
• Vérifiez les connexions de câble vidéo entre le lecteur et un moniteur.
• Essayez une autre vidéocassette.
Lignes dans l’image pendant la lecture normale
• Assurez-vous que la vidéocassette est de bonne qualité et non détériorée.
Le magnétoscope refuse de lire
• Assurez-vous qu’il y a une vidéocassette dans le lecteur.
• Essayez d’éjecter et de réinsérer la vidéocassette.
• Assurez-vous que la bande n’est pas brisée.
La lecture se fait au ralenti
•Appuyez sur PLAY pour revenir à la lecture normale.
Impossible d’enregistrer
• Cet appareil ne peut enregistrer, il peut seulement lire les vidéocassettes et les disques.
28 Chapitre 4
Page 67

Chapitre 4 : Autres informations
Soin et entretien
Nettoyage du lecteur
ATTENTION : ÉTEIGNEZ le lecteur DVD/LVC mobile avant de le nettoyer.
Vous pouvez nettoyer le lecteur, au besoin, en utilisant un chiffon doux non pelucheux. N’oubliez pas de dépoussiérer de temps à autre les fentes
d’aération du boîtier pour assurer une ventilation adéquate.
L’ A CL peut également être nettoyé avec un chiffon doux non pelucheux. Veillez à ne pas égratigner ni gâcher l’écran. Au besoin, vous pouvez utiliser
un chiffon imbibé d’eau chaude. N’utilisez jamais d’agents nettoyants puissants, comme les produits à base d’ammoniaque ou les poudres abrasives.
Ces nettoyants endommageront le lecteur.
Lors du nettoyage, ne vaporisez pas de liquide directement sur l’écran et ne laissez aucun liquide couler le long de l’écran ou à l’intérieur du lecteur.
Évitez également de placer des boissons ou des vases remplis d’eau au-dessus du lecteur. Ceci augmente le risque d’incendie, de choc électrique ou de
dommages au lecteur.
Précautions de manipulation
•Avant de connecter d’autres composant au lecteur, assurez-vous qu’ils sont tous éteints.
•Ne placez pas de contenants remplis de liquide ni de petits objets métalliques sur le lecteur.
•Ne laissez pas entrer de la saleté par la fente prévue pour le disque. Les grains et la saleté sont des matières abrasives et usent rapidement les
têtes de lecture.
•Une manipulation ou un entreposage inadéquats peuvent endommager le lecteur. Ne faites pas balancer ou tomber le lecteur et ne l’agitez pas.
• Les influences extérieures comme la foudre et l’électricité statique peuvent nuire au fonctionnement normal de ce lecteur. Dans ce cas,
éteignez et rallumez le lecteur ou déconnectez le cordon d’alimentation de la prise c.a. et reconnectez-le.
• Assurez-vous d’enlever le disque, d’éteindre le lecteur et de fermer l’ACL lorsqu’il n’est pas utilisé.
•Ne placez rien d’autre que des disques dans la fente du disque.
•Ne rangez pas le lecteur à des températures inférieures à -15 °C (+4 °F) ou supérieures à 65 °C (+149 °F).
Chapitre 4 29
Page 68

Chapitre 4 : Autres informations
Formation de condensation
•Suite aux changements brusques de température ou de taux d’humidité, de la condensation peut se former si l’air chaud vient en contact avec
des pièces froides à l’intérieur du lecteur.
• Lorsqu’il y a formation de condensation à l’intérieur du lecteur, il se peut qu’il ne fonctionne pas correctement. Dans ce cas, laissez le lecteur
à la température de la pièce jusqu’à ce que l’intérieur du lecteur soit sec et prêt à fonctionner.
• S’il y a formation de condensation sur un disque, essuyez-le avec un linge doux et sec, du centre vers les bords.
Manipulation des disques
•Ne touchez pas les surfaces de lecture des disques. Tenez-les par les bords ou par un bord et le trou central.
• N’apposez pas d’étiquettes ou de ruban adhésif sur la surface des étiquettes. Évitez d’égratigner ou d’endommager les étiquettes.
• N’utilisez pas de disques endommagés (craquelés ou tordus).
Nettoyage des disques
• Les disques sales peuvent réduire la qualité de la vidéo et de l’audio. Gardez toujours les disques propres en les essuyant soigneusement avec
un linge doux, du centre vers les bords.
•Si un disque devient très sale, trempez un linge doux dans de l’eau et tordez-le. Essuyez doucement la saleté et enlevez les gouttelettes avec un
linge sec.
• N’utilisez pas de nettoyants à disques en aérosol ou d’agents antistatiques sur les disques. De plus, ne nettoyez jamais les disques avec du
benzène, du diluant ou d’autres solvants volatils qui pourraient endommager la surface du disque.
30 Chapitre 4
Page 69

Chapitre 4 : Autres informations
Garantie limitée
Ce que couvre votre garantie :
• Les défauts de matériaux ou de fabrication.
Durée après l’achat :
•1 an à partir de l date d’achat – Échange d’article, qui inclut les pièces et la main-d’oeuvre.
• La période de garantie pour les appareils loués commence à la première location ou 45 jours après la date d’expédition à l’entreprise de location,
la première date prévalant.
Ce que nous ferons :
Nous remplacerons l’appareil par un neuf ou remis à neuf, à notre choix.
Pour obtenir le service :
•Appelez le 1 800 951-9582, en ayant sous la main la date d’achat et le numéro de modèle et de série de votre appareil. Le numéro de modèle et
de série se trouve à l’arrière de votre appareil.
•Un représentant essaiera de régler votre problème au téléphone.
•Si le représentant détermine que votre appareil doit être remplacé, il vous indiquera un numéro demande de service (SR) et l’adresse du point
d’échange le plus près de chez vous, s’il en existe un. Aucun retour ne sera accepté sans numéro de demande de service.
Pour recevoir un appareil de remplacement avant de retourner le vôtre :
Option I :
1. Indiquez votre numéro de compte MasterCard, Visa ou Discover ainsi que la date d’expiration à votre représentant au téléphone. Il s’agit
uniquement d’une mesure de sécurité n’entraînant aucun débit porté à votre compte.
2. Nous vous ferons parvenir un appareil de remplacement.
3. Si vous nous retournez l’appareil dans les 14 jours suivant l’obtention d’un numéro de demande de service (SR), seuls les articles non couverts en
vertu de la garantie seront portés à votre compte. Si nous ne recevons pas votre appareil dans les 14 jours, le prix de détail suggéré sera facturé à
votre carte de crédit. Ce montant sera crédité, moins des frais de manutention, si nous recevons l’appareil par la suite.
4. Retournez-nous votre appareil défectueux en utilisant le carton d’emballage de l’appareil de remplacement. Vous trouverez sur le carton des
directives d’expédition et le numéro de demande de service (SR) qui vous permettront de nous retourner facilement l’appareil. N’oubliez pas
d’assurer votre expédition en cas de dommage ou de perte. Joignez à l’expédition :
•Une preuve d’achat, comme une facture ou une quittance de facture qui indique que le produit respecte la période de la garantie, doit être
présentée pour obtenir un service sous garantie. Pour les entreprises de location, la preuve de la première location est également exigée.
•Une note décrivant brièvement le problème affectant votre lecteur.
•Vos nom, adresse et numéro de téléphone.
Chapitre 4 31
Page 70

Chapitre 4 : Autres informations
Option II :
1. Moyennant des frais, nous ferons parvenir un appareil de remplacement à notre point d’échange.
2. Le comptoir d’échange vous préviendra de son arrivée.
3. Apportez votre appareil et votre preuve de date d’achat, comme une facture, au comptoir d’échange et l’on vous remettra l’appareil neuf ou remis
à neuf. Veuillez conserver tous les accessoires comme, par exemple, la télécommande.
4. Si les réparations sont couvertes en vertu de votre garantie, vous n’aurez rien à payer.
Thomson n’accepte aucune responsabilité pour les expéditions du client à l’usine en vertu de la garantie, sauf si elles sont effectuées conformément
aux directives de Thomson.
Les frais de transport de retour, d’entreposage, de manutention et d’assurance sont à la charge du client. Nous n’acceptons aucune responsabilité
en cas de dommage ou de perte.
Pour recevoir un appareil de remplacement
• Inscrivez le numéro de demande de service (SR) sur l’extérieur du carton utilisé pour retourner l’appareil. N’oubliez pas d’assurer votre
expédition en cas de dommage ou de perte.
•Emballez soigneusement l’appareil en utilisant la boîte et le matériel d’emballage d’origine, si possible. Veuillez conserver tous les accessoires
inclus avec votre appareil comme, par exemple, la télécommande.
•Joignez à l’expédition :
1. Une preuve d’achat, comme une facture ou une quittance de facture qui indique que le produit respecte la période de la garantie, doit être
présentée pour obtenir un service sous garantie. Pour les entreprises de location, la preuve de la première location est également exigée.
2. Une note décrivant brièvement le problème affectant l’appareil.
3. Vos nom, adresse et numéro de téléphone.
• Le représentant vous indiquera l’adresse à laquelle poster un mandat bancaire ou postal aux fins de paiement en cas de frais de pièces ou de maind’œuvre non couverts en vertu de la garantie, si vous décidez de ne pas utiliser votre carte de crédit.
• Dès que nous aurons reçu votre appareil, nous vous en ferons parvenir un appareil neuf ou remis à neuf.
Ce que ne couvre pas votre garantie :
• Les cas de force majeure tels que, mais sans s’y limiter, les dommages par la foudre.
• Les réglages effectués par le client.
• Les dommages dus au mauvais usage ou à la négligence.
• Les appareils modifiés, incorporés à d’autres produits ou utilisés à des fins institutionnelles ou commerciales.
• Les piles.
après que nous ayons reçu votre appareil :
32 Chapitre 4
Page 71

Chapitre 4 : Autres informations
• Les appareils achetés ou réparés à l’extérieur des États-Unis.
• Les dommages pendant le transport, si l’appareil n’est pas emballé et expédié conformément aux directives de Thomson.
•Des frais d’entreposage peuvent être facturés par le comptoir d’échange à défaut de prendre livraison de l’appareil de remplacement dans un délai
raisonnable.
•Formation client. (Votre Manuel de l’utilisateur décrit l’installation, les réglages et le fonctionnement de votre appareil. Toute information
supplémentaire devrait être obtenue auprès de votre détaillant.)
Enregistrement du produit :
•Veuillez remplir et poster la carte d’enregistrement du produit qui accompagne votre produit. Nous pourrons alors vous contacter plus
facilement, si nécessaire. Le retour de la carte n’est pas obligatoire aux fins de la garantie.
Limitation de la garantie :
• LA GARANTIE ÉNONCÉE CI-DESSUS EST LA SEULE GARANTIE APPLICABLE À CE PRODUIT. TOUTE AUTRE GARANTIE
EXPRESSE OU IMPLICITE (Y COMPRIS TOUTE GARANTIE IMPLICITE DE QUALITÉ MARCHANDE OU D’ADAPTATION À
UN USAGE PARTICULIER) EST DÉCLINÉE PAR LA PRÉSENTE. AUCUNE INFORMATION DONNÉE VERBALEMENT OU PAR
ÉCRIT PAR THOMSON INC., PAR SES AGENTS OU PAR SES EMPLOYÉS NE CONSTITUERA UNE GARANTIE OU
N’ÉTENDRA LA PORTÉE DE LA PRÉSENTE GARANTIE.
• LA RÉPARATION OU LE REMPLACEMENT, TELS QU’OFFERTS PAR CETTE GARANTIE CONSTITUENT LE SEUL RECOURS
DU CONSOMMATEUR. THOMSON INC. NE SERA AUCUNEMENT RESPONSABLE DES DOMMAGES INDIRECTS OU
CONSÉCUTIFS RÉSULTANT DE L’UTILISATION DE CE PRODUIT OU DE L’INOBSERVATION DE QUELQUE GARANTIE
QUE CE SOIT IMPLICITE OU EXPLICITE POUR CE PRODUIT. CETTE EXONÉRATION DE GARANTIES ET LA PRÉSENTE
GARANTIE LIMITÉE SONT RÉGIES PAR LES LOIS DE L’ÉTAT D’INDIANA. SAUF POUR LES DISPOSITIONS PROHIBÉES PAR
LES LOIS APPLICABLES, TOUTE GARANTIE IMPLICITE DE QUALITÉ MARCHANDE OU D’ADAPTATION À UN USAGE
PARTICULIER RELATIVE À CE PRODUIT EST LIMITÉE À LA PÉRIODE DE GARANTIE APPLICABLE TELLE QUE DÉCRITE
CI-DESSUS.
L’effet des lois provinciales sur cette garantie :
• Certaines provinces ou juridictions ne permettent pas l’exclusion ou la limitation des dommages indirects ou consécutifs, non plus que les
limitations implicites quant à la durée d’une garantie, de sorte que les limitations ou exclusions énoncées ci-dessus pourraient être nulles dans
votre cas.
• Cette garantie vous confère des droits juridiques spécifiques qui s’ajoutent aux autres droits éventuels qui peuvent varier d’une province à l’autre.
Si vous avez acheté votre appareil à l’extérieur des États-Unis :
• Cette garantie est nulle. Renseignez-vous auprès de votre détaillant au sujet de la garantie.
Les visites de service ne concernant pas un défaut de matériau ou de fabrication ne sont pas couvertes en vertu de cette garantie. L’acheteur est
entièrement responsable des coûts de telles visites de service.
Chapitre 4 33
Page 72

Visit the RCA web site at www.rca.com
Nous vous prions de ne pas envoyer de produits à l’adresse d’Indianapolis indiquée dans ce manuel ou sur
l’emballage, ce qui ne ferait que retarder la réparation de votre produit.
Thomson Inc.
10330 North Meridian Street
Indianapolis, IN 46290
©2003 Thomson Inc.
Marque(s) de commerce déposée(s)®
Marca(s) Registrada(s)
Imprimé en Chine
TOCOM 1623085A
THOMSON
 Loading...