

Page 1
Worldwide Headquarters
Raytek Corporation
1201 Shaffer Road, PO Box 1820
Santa Cruz, CA 95061
Tel: 1 831 458 1110
Fax: 1 831 425 4561
www.raytek.com
European Headquarters
Raytek GmbH
Blankenburger Str. 135
D-13127 Berlin
Tel: 49 30 4 78 00 80
Fax: 49 30 4 71 02 51
®
RAYNGER
MX2
Raytek U.K.
P.O. Box 120
Milton Keynes
Buckinghamshire, MK1 1ZU
United Kingdom
Tel: 44 1908 63 08 00
Fax: 44 1908 63 09 00
Raytek Mexico
13 Poniente, 2313-2° Pisco
Col. la Piedad
72160 Puebla. Pue CP.
Mexico
Tel: 52 22 30 43 80
Fax: 52 22 30 44 38
Raytek China Company
Three Gorges Building Suite 206
N0.A11 Jiu Xian Qiao Road
Chao Yang District
Beijing, China 100016
Tel: 86 10 64 37 02 84
Fax: 86 10 64 37 02 85
Raytek France
5 Avenue du 1
Zae des Glaises
F-91120 Palaiseau
Tel: 33 164 53 15 40
Fax: 33 164 53 15 44
Raytek do Brasil
Rua Dr. Francisco Prestes Maia, 75
18040-650 Jd. Paulistano - Sorocaba - SP
Tel: 55 15 23 36 338
Fax: 55 15 23 36 826
Raytek Japan, Inc.
Honkomagome SO Building
1-1-17 Honkomagome
Bunkyo-ku
113-0021 Japan
Tel: 81 33822-5715
Fax: 81 33822-5712
er
Mai
HIGH PERFORMANCE
INFRARED THERMOMETER
Rev. D
01/1999
51401
Page 2

Introduction 1
Features 3
Functions User Interface 5
Display 7
Batteries 9
Measurement (Quick Start) 11
Measurement (Spot Size) 13
Laser On/Off 15
Emissivity 17
Emissivity (Adjust) 19
Mode (MIN-MAX values) 21
Setup (High Alarm) 23
Display (Graphic) 25
Settings 27
Appendix A - Troubleshooting 31
Appendix B - Maintenance 33
Appendix C - Laser Warning 37
Appendix D - Cautions 39
Appendix E - Emmissivity Table 43
Specifications 45
CE Conformity 51
NIST/DKD Certification 53
TABLE OF CONTENTS
Page 3

INHALTSVERZEICHNIS
Einleitung 1
Funktionen 3
Bedien-und Anzeigeelemente 5
Display 7
Batterie 9
Messen (Handhabung) 11
Messen (Meßfleck) 13
Laser An/Aus 15
Emissionsgrad 17
Emissionsgrad einstellen 19
Mode (Min/Max-Bereich) 21
Setup (High Alarm) 23
Display (Graphikbereich) 25
Einstellungen 27
Anhang A - Fehlerbehebung 31
Anhang B.-.Wartung 33
Anhang C - Laserwarnung 37
Anhang D - Vorsichtsmaßnahmen 39
Anhang E - Emissionsgradtabellen 43
Technische Daten 45
CE-Konformitätserklärung 51
NIST/DKD-Zertifikate 53
II
Page 4

Introduction 1
Fonctions 3
Fonctions - Touches des Fonction... 5
Affichage 7
Piles 9
Mesure - Manipulation 11
Mesure - Foyer de Mesure 13
Laser - marche/arrêt 15
Emissivite du materiau 17
Materiau - Definition de lemissivite 19
Mode - valeurs MIN/MAX 21
Réglage de larme haute 23
Affichage graphique 25
Réglages 27
Appendix A - Troubleshooting 31
Appendix B - Entretien 33
Appendix C - Laser avertissement 37
Appendix D - Mises en garde 39
Appendix E - Tableau demissivité 43
Caractéristiques techniques 45
CE Conformity 51
NIST/DKD Certification 53
TABLE DE MATIÈRES
III
Page 5

TABLA DE CONTENIDO
Introducción 1
Funciones 3
Funciones de los elementos... 5
Pantalla 7
Pilas 9
Medición - Manejo 11
Medición - Superficie de medición 1 3
Laser - conec./desc. 15
Emisividad 17
Emisividad - Ajuste del grado... 19
Mode - valores MIN/MAX 2 1
Ajuste alarma alta 23
Pantalla - Campo gráfico 25
Ajustes 27
Appendice A - Troubleshooting 31
Appendice B - Mantenimiento 33
Appendice C - Laser Precauciones 37
Appendice D - Precauciones 39
Appendice E - Emmissivity Table 4 3
Datos tecnicos 45
CE Conformity 51
NIST/DKD Certificacion 53
IV
Page 6

Introdução 1
Funções 3
Funções - Teclas de ..... 5
Mostrador 7
Baterias 9
Medição - uso rapido 11
Medição - Supefície abrangida pela... 13
Laser - ligar desligar 15
Emissividade do material 17
Pré-selecção da emissividade 19
Modo - valores MIN/MAX 21
Setup - Alarme de alta 23
Mostrador - quadro gráfico 25
Ajustes 27
Appendix A - Troubleshooting 31
Appendix B - Manutenção 33
Appendix C - Laser aviso 3 7
Appendix D - Cautions 3 9
Appendix E - Emmissivity Table 43
Dados técnicos 45
CE Conformity 51
Certificação NIST/DKD 53
INDICE
V
Page 7
Vii
10
12
14
16
18
20
22
24
26
30
32
36
38
42
49
52
54
2
4
6
8
VI
Page 8
Vii
10
12
14
16
18
20
22
24
26
30
32
36
38
42
49
52
54
2
4
6
8
VII
Page 9
VIII
Page 10

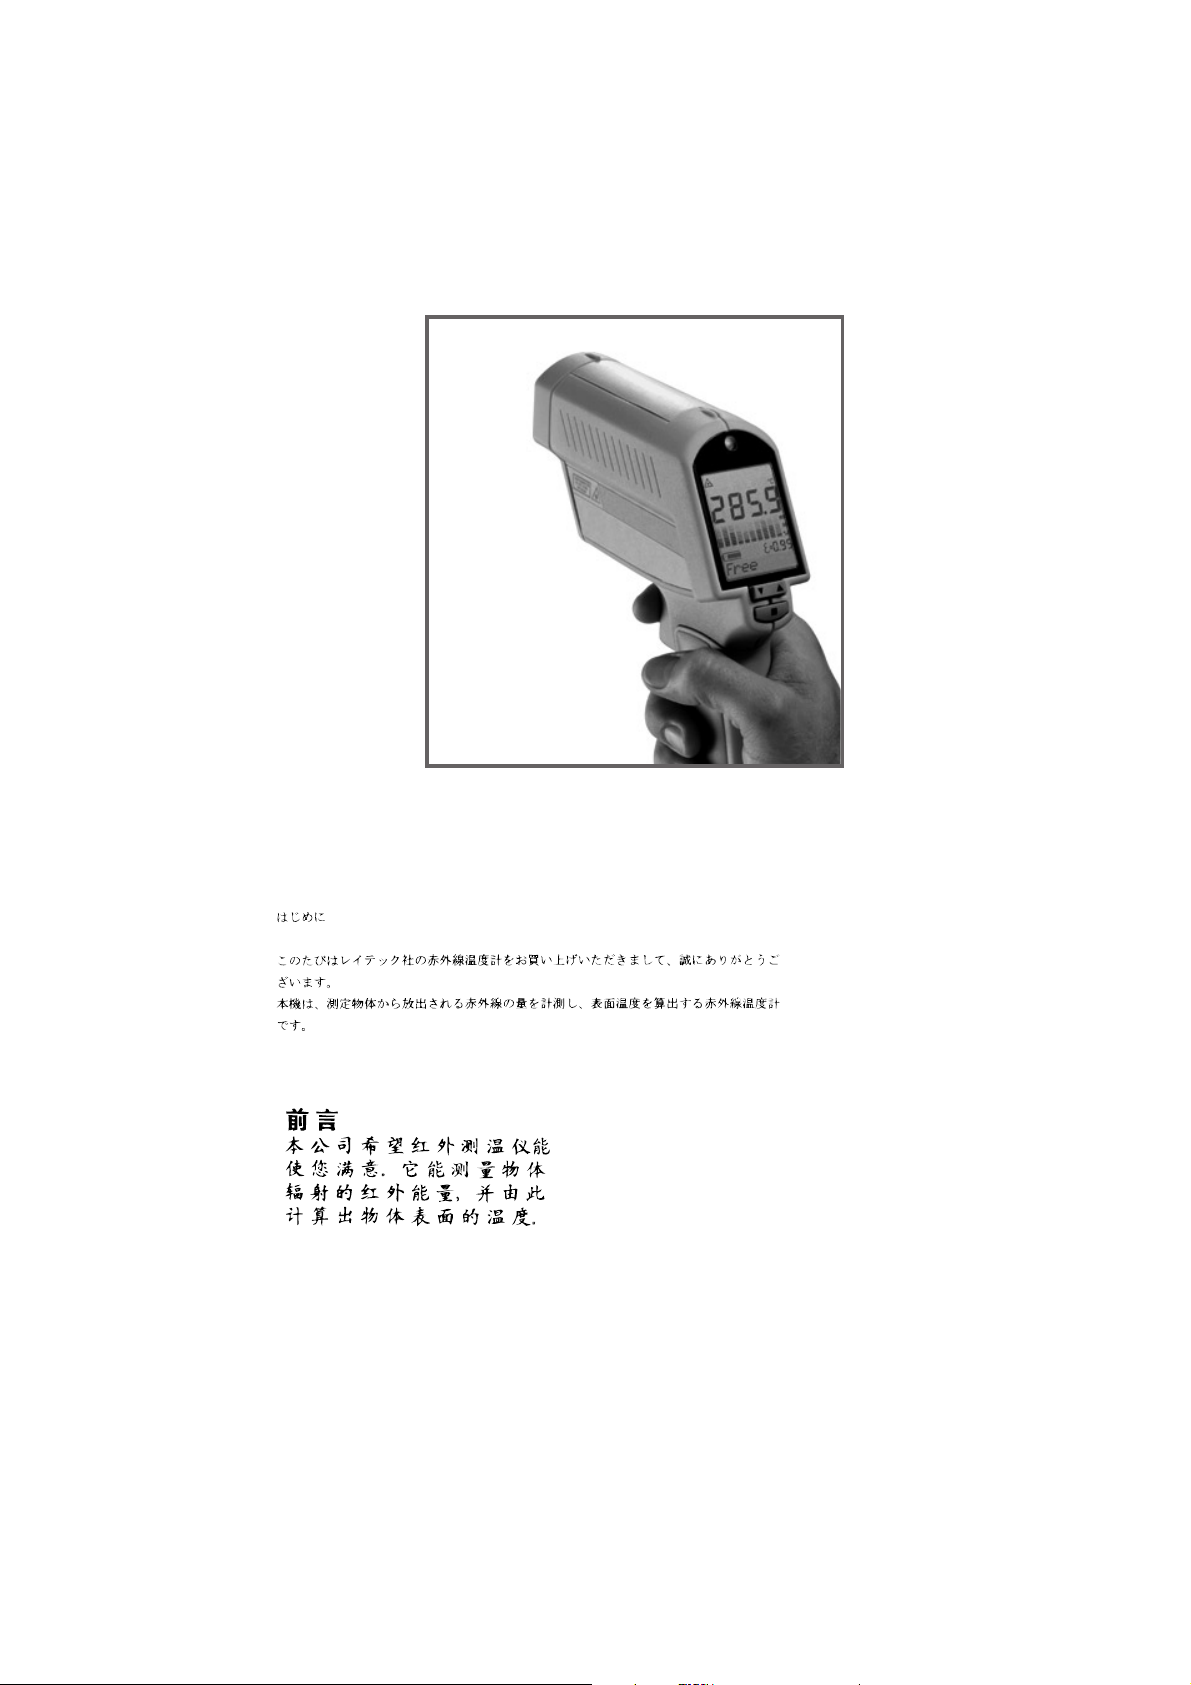
We hope you enjoy using your infrared
thermometer.
It measures the amount of infrared
energy emitted by a target object, and
calculates the temperature of that
object´s surface.
INTRODUCTION
Wir wünschen Ihnen viel Freude
mit Ihrem Infrarotthermometer!
Das Gerät mißt die Intensität der vom
Meßobjekt ausgehenden Infrarotstrahlung und berechnet daraus die
Oberflächentemperatur des
Meßobjekts.
Nous vous remercions davoir choisi
notre thermomètre infrarouge !
Cet instrument mesure lintensité du
rayonnement infrarouge émis par
lobjet à mesurer et calcule la
température de surface de celui-ci à
partir du résultat obtenu.
Esperamos que disprute usar su
termometro infrarojo!
El aparato mide la intensidad de la
radiación infrarroja emitida por el
objeto a medir en cuestión y partiendo de ello
calcula la temperatura de
su superficie.
Muito obrigado pela compra do nosso
termômetro infravermelho !
O aparelho mede a intensidade da
radiaçao infravermelha emitida pelo
objecto-alvo calculando daí a
temperatura da superfície do objecto.
EINFÜHRUNG
INTRODUCTION
INTRODUCCIÓN
INTRODUÇÃO
1
Page 11
2
Page 12

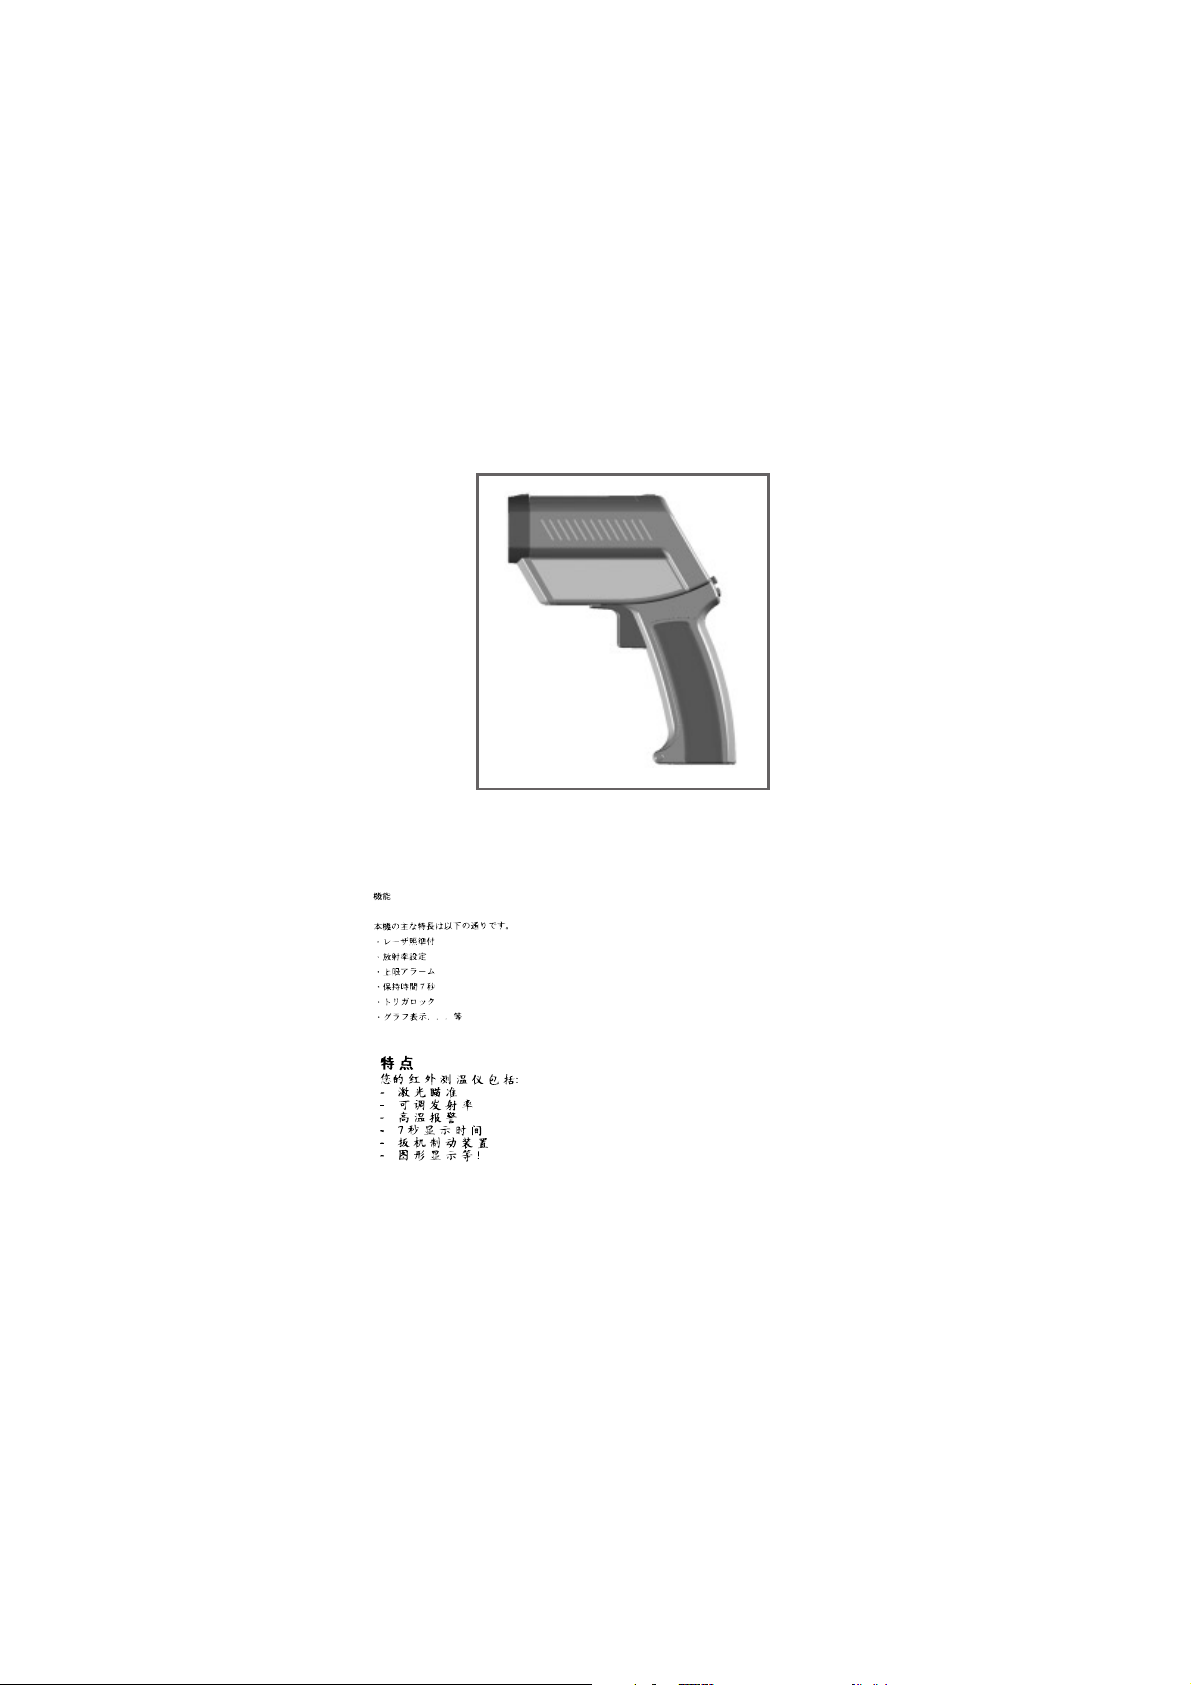
Your thermometer includes:
- Laser sighting
- Adjustable emissivity
- High Alarm
- 7 second hold
- Trigger lock
- Graphic display ... and more!
FEATURES
Dieses Thermometer bietet u. a.:
- Laser-Visierhilfe
- Einstellen des Emissionsgrads
- obere Alarmgrenze
- 7 Sekunden Haltezeit
- Arretierung der Meßtaste
- grafische Anzeige... und weitere!
Ce thermomètre est doté notamment
des fonctions suivantes :
- Visée laser
- Réglage de lémissivité
- Alarmes haute
- Affichage graphique...
Este termómetro le ofrece, entre otras
cosas:
- mira láser
- emisividad ajustable
- alarma Alta
- 7 second detener
- gatillo candado, ceradura
- visualización gráfica... ¡y más odavÌa!
Este termômetro oferece, entre outros:
- mira laser;
- ajuste da emissividade;
- alarme de temperatura máxima
- mostrador gráfico ... e outros!
FUNKTIONEN
FONCTIONS
FUNCIONES
FUNÇÕES
3
Page 13
4
Page 14

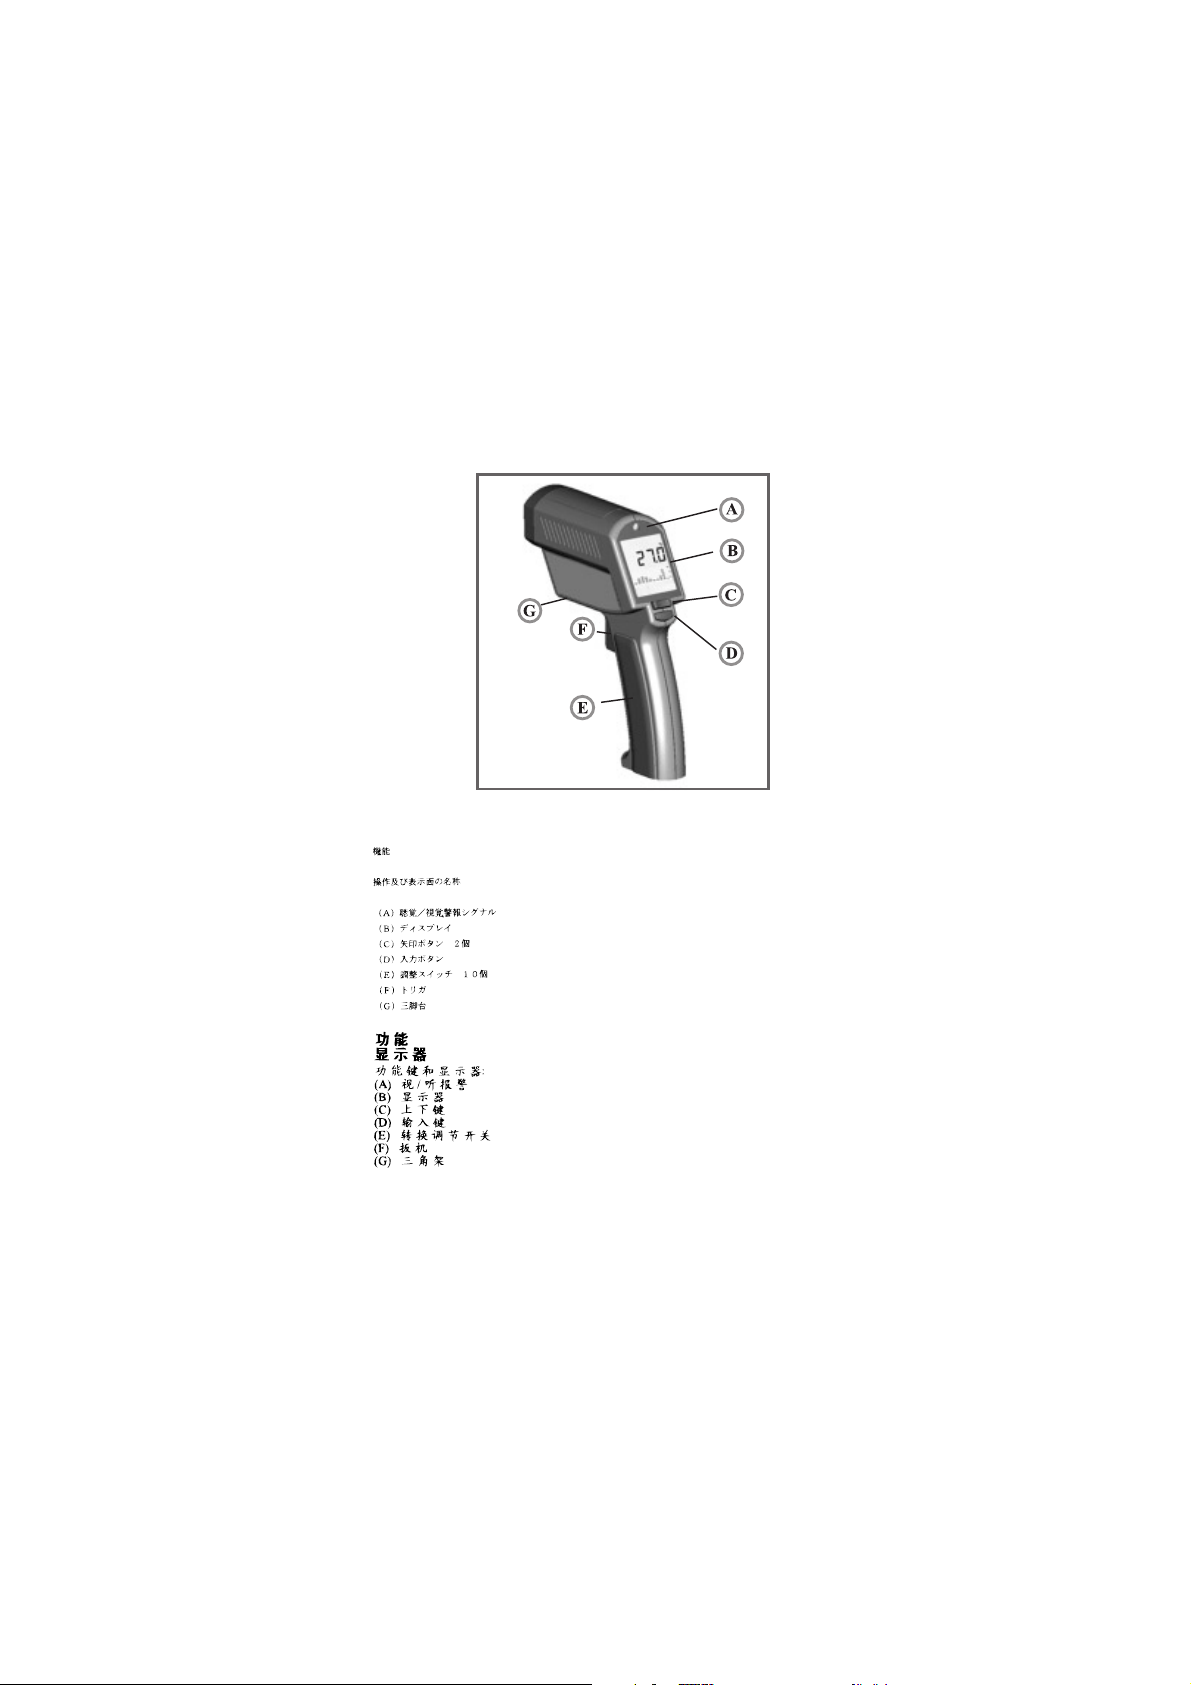
Function keys and display:
(A) Visual and audible Hi-Alarm
(B) Display
(C) Up and Down keys
(D) Enter
(E) Switches for adjustments
(F) Trigger
(G) Tripod mount
Bedien- u. Anzeige-Elemente:
(A) akust./opt. Grenzwertwarnung
(B) Display
(C) 2 Pfeiltasten
(D) Enter-Taste
(E) Einstellschalter
(F) Meßtaste
(G) Stativanschluß
Touches et affichage :
(A) Alarme sonore et visuelle
(B) Écran
(C) 2 touches de réglage
(D) Touche Enter
(E) commutateurs de réglage
(F) Gâchette
(G) Montage du trépied
De los elementos de mando y visualización
(A) Señal de aviso acús./ópt.
(B) Pantalla de visualización
(C) Teclas aumentar/disminuir
(D) Tecla Enter
(E) interruptores de preajuste
(F) Gatillo para medición
(G) montaje en tripie
Teclas de função e elementos de indicação
(A) sinal de alarme sonoro/visual;
(B) mostrador;
(C) 2 teclas de cursor (cima/baixo);
(D) tecla Enter
(E) interruptores de configuração;
(F) tecla de medição (gatilho)
(G) montura del tripode
FUNCTIONS
USER
INTERFACE
FUNKTIONEN
BEDIEN- UND
ANZEIGEELEMENTE
FONCTIONS
TOUCHES DE FONCTION
ET AFFICHAGE
FUNCIONES
DE LOS ELEMENTOS
DE MANDO
Y VISUALIZACIÓN
FUNÇÕES
TECLAS DE FUNÇÃO
E ELEMENTOS DE
INDICAÇÃO
5
Page 15
6
Page 16

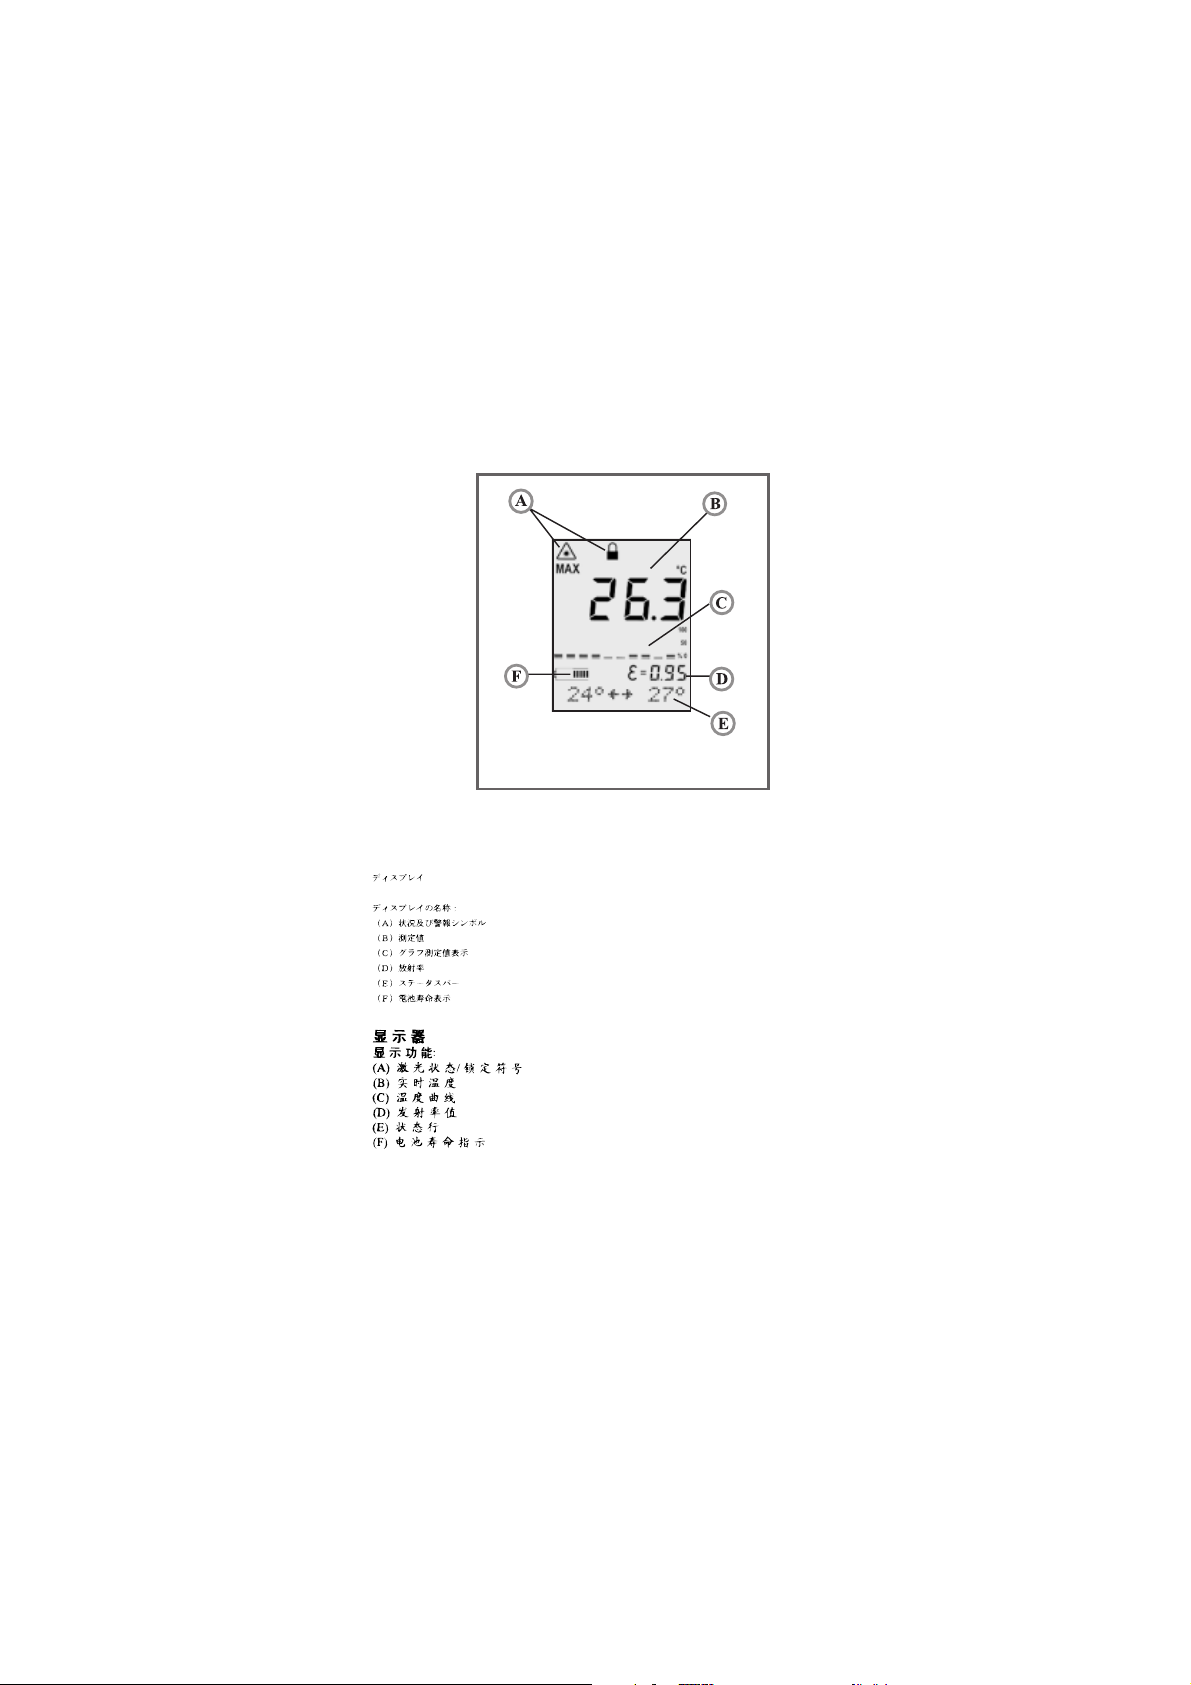
Displayed functions:
(A) Laser condition / Lock symbol
(B) Main temperature display
(C) Graphic display
(D) Emissivity value
(E) Status bar
(F) Battery life indicator
DISPLAY
Anzeigen im Display:
(A) Status- und Warnsymbol
(B) Meßwert
(C) Grafische Meßwertanzeige
(D) Emissionsgrad
(E) Statuszeile
(F) Batteriezustand
Composition :
(A) Symboles détat et davertissement
(B) Mesure
(C) Représentation graphique de la mesure
(D) Emissivité
(E) Ligne détat
(F) Niveau des piles
Visualización en la pantalla:
(A) Símbolos de estado y de aviso
(B) Valor de medición
(C) Señalización gráfica del valor de medición
(D) Valor de emisividad
(E) LÌnea de estado
(F) Estado de las pilas
Funções visualizáveis:
(A) símbolos de trava/condição do laser
(B) valor medido
(C) indicação gráfica do valor medido
(D) emissividade
(E) indicação de status
(F) indicação da carga da bateria
DISPLAY
AFFICHAGE
PANTALLA
MOSTRADOR
7
Page 17
8
Page 18

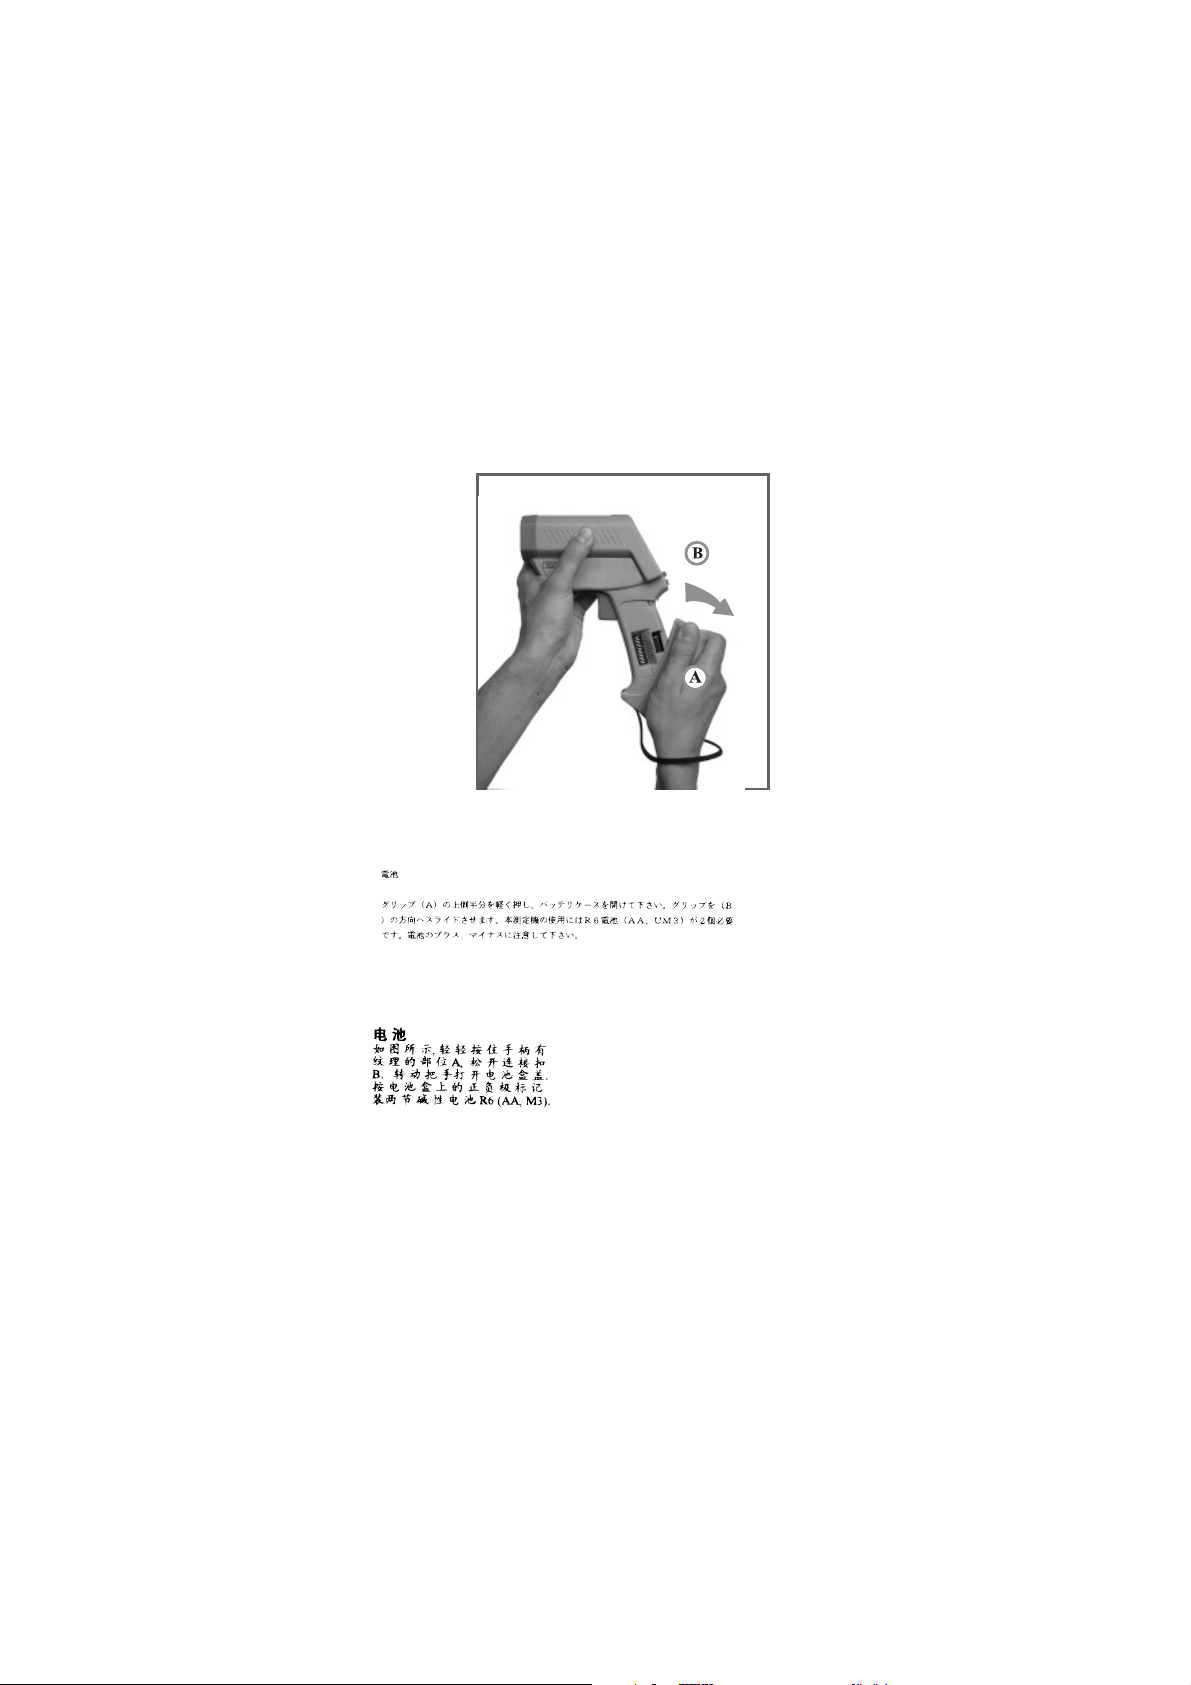
To open the battery compartment,
press gently on the top part of the
handle (A) to release the catch (B)
and pivot the grip as shown in the
figure. Orient the batteries (two alkaline R6 (AA, UM3)) as shown on the
housing.
BATTERIES
Öffnen Sie das Batteriefach durch
leichten Druck auf die oberen Griffhälften
(A). Klappen Sie den Griff auf (B). Zum
Betrieb des Meßgeräts benötigen Sie
zwei Batterien Typ R6, (AA, UM3).
Beachten Sie die korrekte Polung.
Ouvrir le compartiment à piles en
appuyant légèrement sur les moitiés
supérieures de la crosse (A). Faire
pivoter (B). Utiliser deux piles de
type R6 (AA, UM3). Respecter les
polarités.
Abra el compartimento de las pilas mediante
leve presión sobre la parte superior del lado
de la empuñadura (A). Entonces ha de
abatirse esta parte de la empuñadura (B). Para
el funcionamiento del aparato de medición
necesita usted 2 pilas del tipo AA, (R6, UM3).
Ponga atención en colocarlas con los polos
correctamente orientados.
Abra o compartimento da pilha pre-mindo
ligeiramente a parte superior
da coronha (A). Abra a tampa da
coronha (B). Coloque duas Baterias
de tipo R6 (AA, UM3). Observe a
posição correta dos polos.
BATTERIE
PILES
BATERIAS
BATERIAS
9
Page 19
10
Page 20

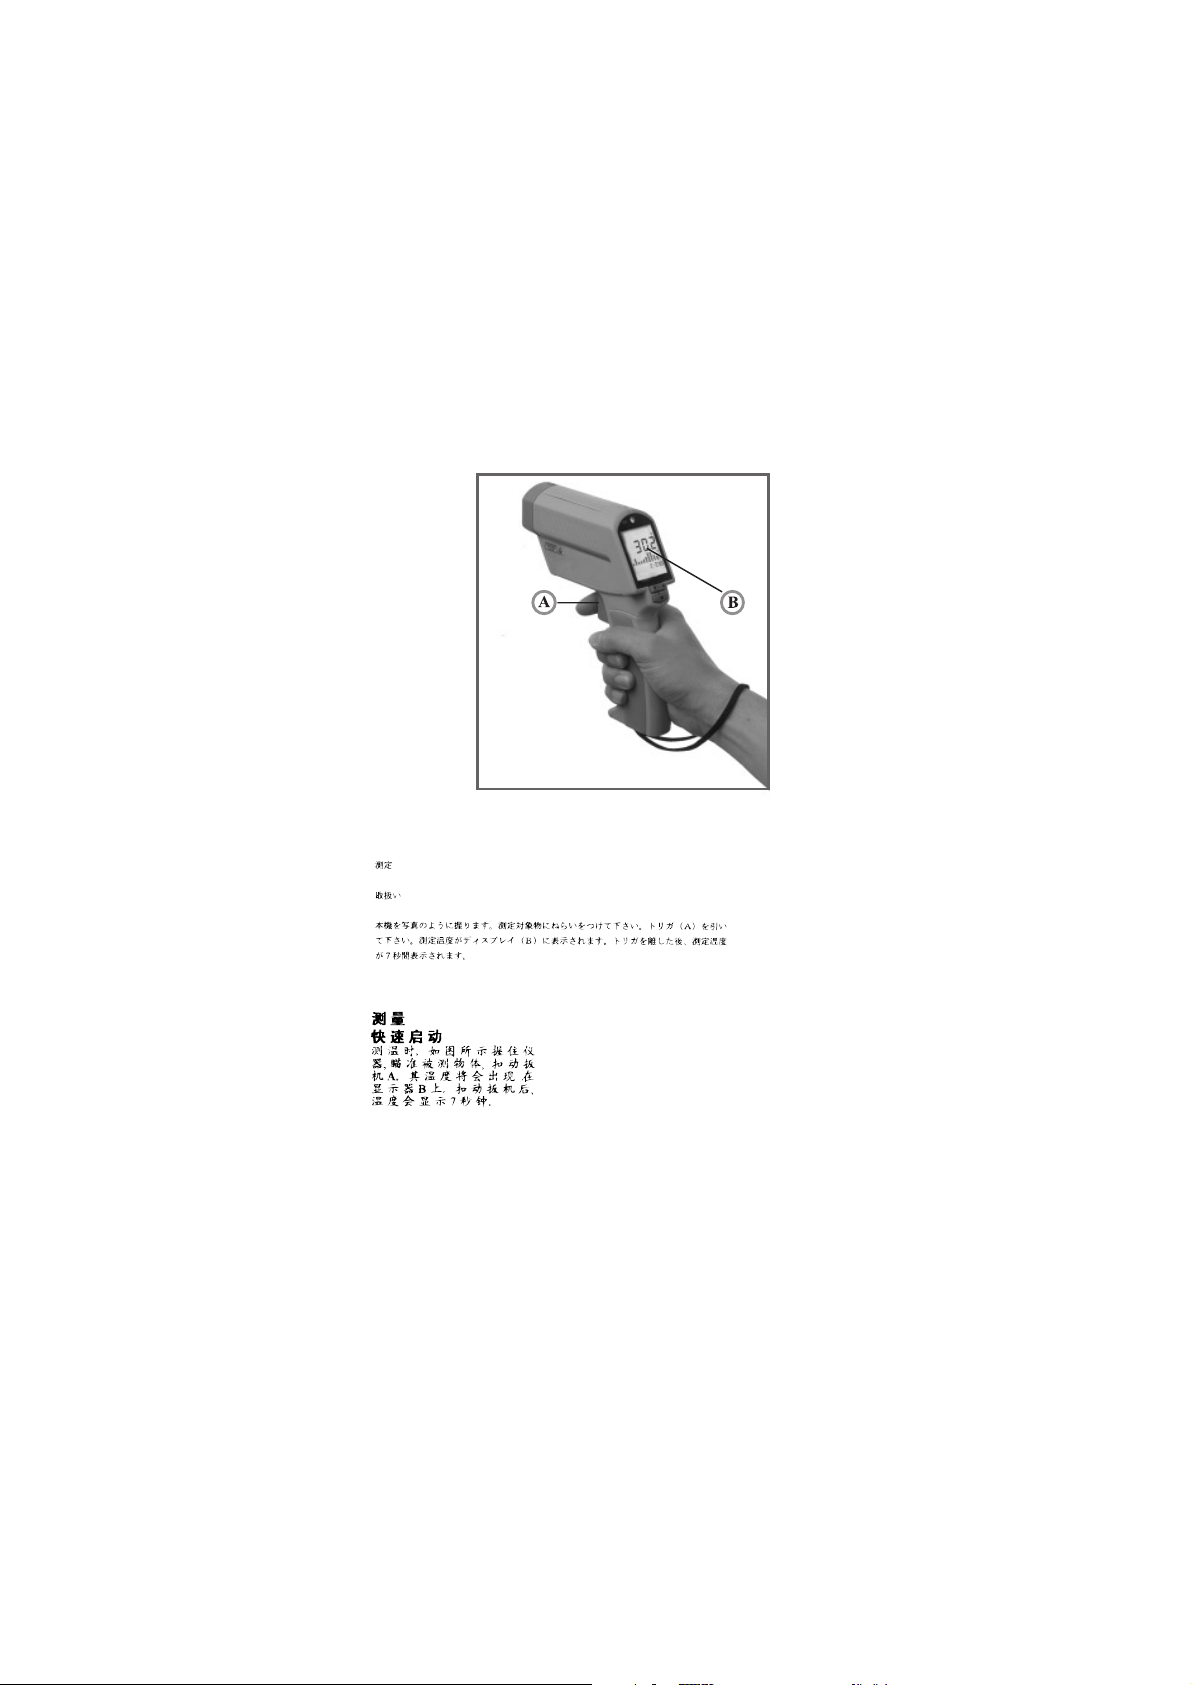
To take a temperature measurement,
hold the unit as shown. Aim at the
target. Pull the trigger (A). The
temperature of the object being measured
is shown on the display (B).The
temperature will be displayed for seven
seconds after trigger is released.
MEASUREMENT
QUICK START
Halten Sie das Gerät wie dargestellt.
Zielen Sie auf das zu messende
Objekt. Drücken sie die Meßtaste (A).
Die gemessene Temperatur wird auf dem
Display (B) angezeigt. Sie bleibt nach
Loslassen der Meßtaste für sieben Sekunden sichtbar.
Tenir linstrument comme indiqué sur
la photo. Viser lobjet et appuyer sur
la gâchette (A). La température est
affichée (B) aussi longtemps que lon
appuie sur la gâchette.
Sostenga el aparato como aquí se
muestra. Apunte al objeto que se haya
destinado para la medición. La
temperatura de el objecto que se esta
midiendo es desplegado en la pantalla (B).
La temperatura sera desplegada por 7
segundos despues de que el gatillo es
soltado.
Segure o aparelho como indicado na
figura. Aponte para o objeto a medir.
Pressione o gatilho (A). Enquanto
mantiver pressionado o gatilho (A),
serão indicados no mostrador (B) as
temperaturas medidas.
MESSEN
HANDHABUNG
MESURE
MANIPULATION
MEDICIÓN
MANEJO
MEDIÇÃO
USO RÁPIDO
11
Page 21
inches
m
dia 1 at 0
dia 0.76 at 46
dia 1.17 at 60
dia 2.30 at 100
dia 2.85 at 120
ø 58 mm at 2,50
ø 72 mm at 3,00
ø 29 mm at 1,50
ø 19 mm at 1,15
ø 25 mm at 0
12
Page 22

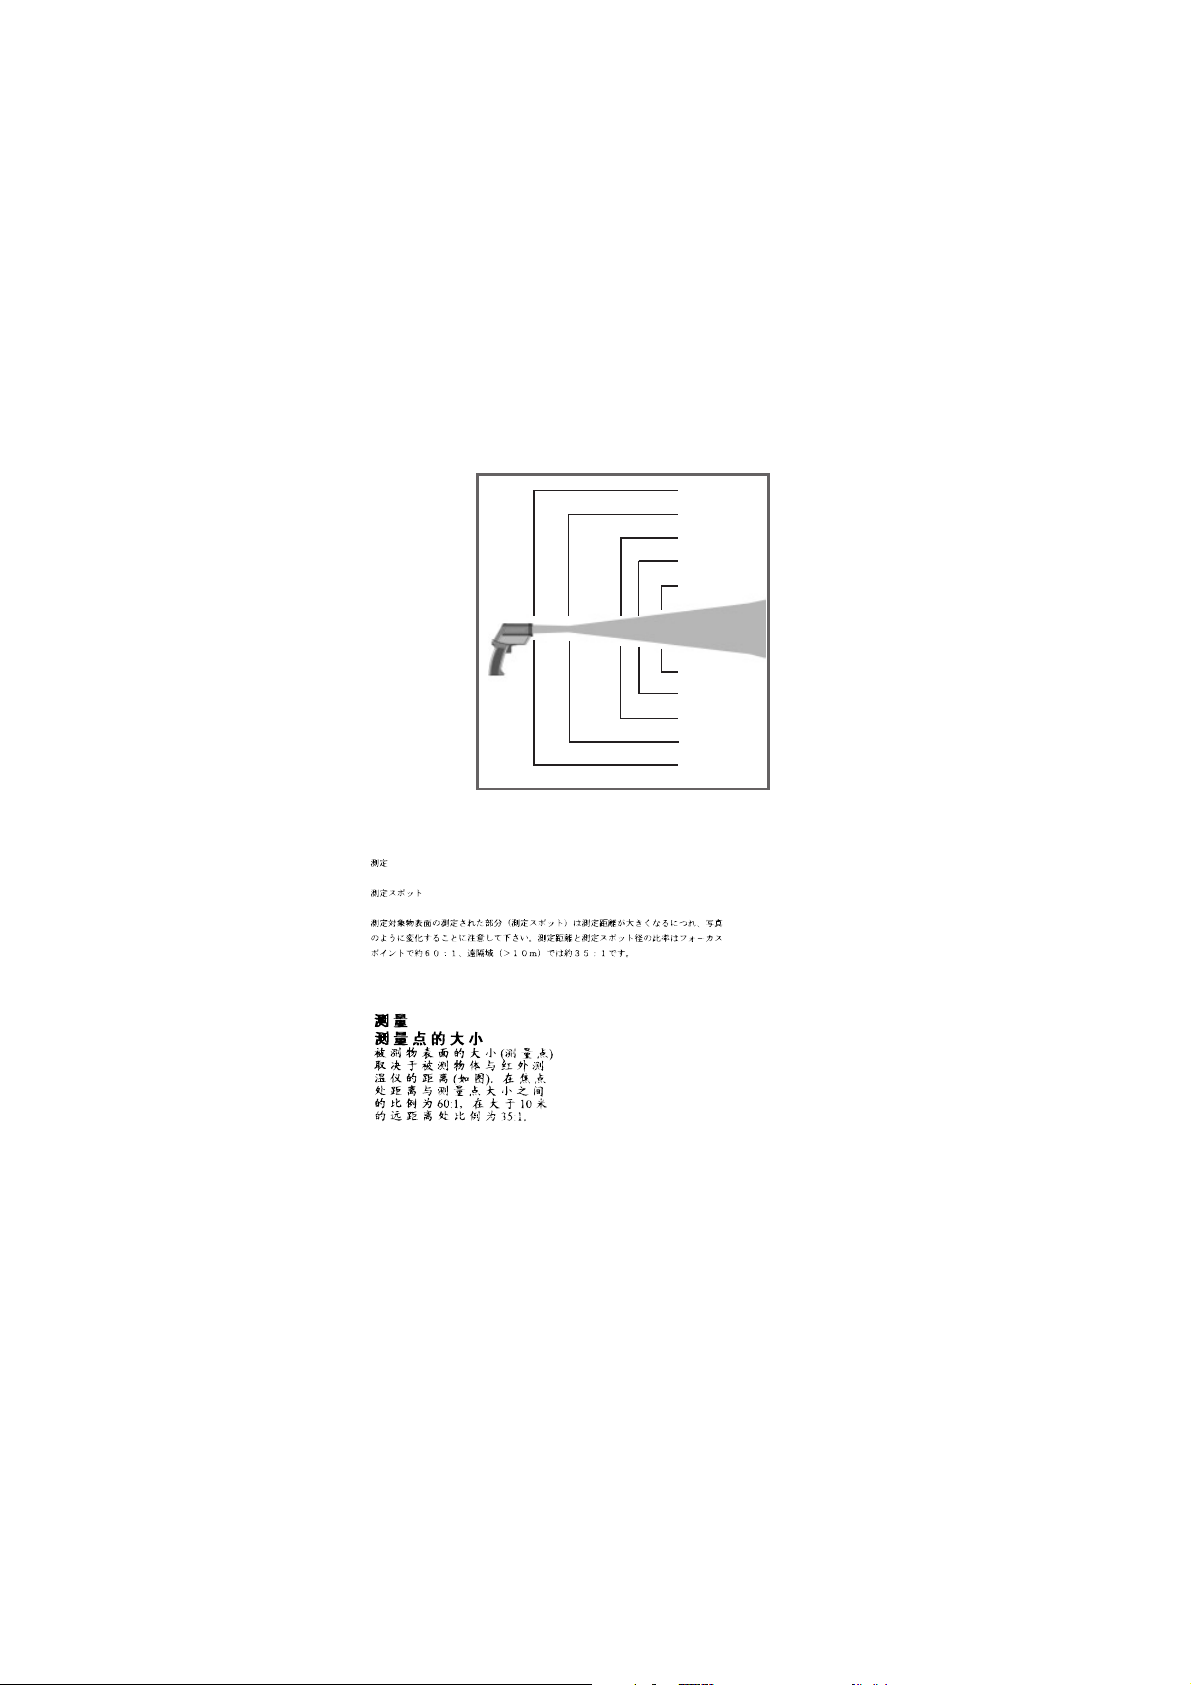
The measured spot size depends on
the distance between the object you
are measuring and the infrared thermometer. The relationship between
distance and spot size is 60:1 at the focus
point and 35:1 in the far field (>33ft/10m).
MEASUREMENT
SPOT SIZE
Beachten Sie, daß sich der gemessene Teil
der Objektoberfläche (Meßfleck) mit
zunehmender Meßentfernung
entsprechend der Abbildung ändert. Das
Verhältnis zwischen Meßentfernung und
Meßfleckdurchmesser beträgt etwa
60 : 1 im Scharfpunkt und 35:1 im
Fernfeld (>10 m).
La taille de la zone mesurée sur la
surface de lobjet (foyer de mesure)
augmente avec la distance de mesure
(photo). La taille réelle du foyer est
indiquée par le laser. Le rapport entre
distance et foyer de mesure est
Tenga en cuenta que la área medida de la
superficie del objeto aumenta al
aumentarse la distancia de medición
(figura). El láser muestra el tamaño de la
superficie de medición. La relación entre
la distancia de medición y la superficie de
medición es de aproximadamente 60 : 1,
35:1 canapo lejan (>10m).
Leve em consideração que a parte da
superfície abrangida pela medição (área
medida) aumenta quando a distância
entre o objeto e o aparelho aumenta
(fig.) O ponto luminoso deixado pelo
laser indica a dimensão real da área
medida. Arelação entre a distância e a
área medida corresponde a 60:1.
MESSEN
MESSFLECK
MESURE
FOYER DE MESURE
MEDICIÓN
SUPERFICIE DE
MEDICIÓN
MEDIÇÃO
SUPERFÍCIE
ABRANGIDA
PELA MEDIÇÃO
13
Page 23

14
Page 24

The laser circle shows the spot size that
includes the measured target. A laser
symbol (A) appears. The laser
automatically turns off if you release the
trigger.
LASER
ON/OFF
Das Laservisier erleichtert das
Anvisieren des Meßobjekts.
Die Meßfläche befindet sich innerhalb des
mit roten Lichtpunkten markierten Laserkreises. Ein Symbol (A) weist auf den eingeschalteten Laser hin.
Le visée laser permet de délimeter la
surface à mesurer. Les limites du foyer
de mesure sont visualisées par des points
lumineux rouges. Le voyant (A) sallume
lorsque le laser est en marche.
El elemento auxiliar de mira del láser
facilita la localización óptica del objeto a
medir. Unos puntos de luz roja marcan el
área de la superficie de medición del
objeto. El simbolo del láser (A) aparece en
la pantalla. El láser s apaga al liberar el
gatillo.
Amira laser facilita a visualização do
objecto a medir. Os pontos luminosos vermelhos indicam a dimensão da área
medida no objeto. O símbolo (A) indica
se o laser está ligado ou desligado.
LASER
AN/AUS
LASER
MARCHE/ARRÊT
LASER
CONEC./DESC.
LASER
LIGAR/
DESLIGAR
15
Page 25

16
Page 26

The amount of infrared energy radiated
by an object depends on its emissivity
and its temperature. The emissivity
depends on the material and its surface
characteristics. For more accurate readings, adjust the emissivity value for the
type of material being measured (see
Appendix E).
Die vom Meßobjekt ausgehende
Wärmestrahlung hängt von dessen
Temperatur und Emissionsgrad ab. Der
Emissionsgrad ist abhängig vom Material
und dessen Oberflächenzustand. Für eine
genaue Messung ist der entsprechende
Emissionsgrad einzustellen.
(siehe Anhang E)
La quantité dénergie émise par un
objet est liée à la nature du matériau
le constituant. Une bonne connaisUtiliser les touches fléchées (B)
pour modifier les valeurs en
vigueur (A).
EMISSIVITY
EMISS.
EMISSIONSGRAD
EMISSIVITE
DU MATERIAU
Por medio de la selección o introducción de
un grado de emisión es posible
tener en cuenta las características
tÌpicas del material en relación a la
emisión de rayos infrarrojos. De esta
manera queda garantizada la fiabilidad
de los resultados en la medición
de cada tipo de material.
A quantidade de energia térmica
emitida por um objeto depende da
emissividade do material. Para garantir
uma medição confiável, é necessário
selecionar o valor de emissividade
característico de cada material.
Na página seguinte descrevese o
método de seleção de material.
EMISIVIDAD
EMISSIVIDADE
DO MATERIAL
17
Page 27

18
Page 28

The display shows an emissivity value
(A). To set it to another value, use the Up
and Down keys (B).
See emissivity table (Appendix E).
The setup switch must be in the ON
position to adjust emissivity.
EMISSIVITY
ADJUST
EMISSIVITY
Die Meßwerte werden entsprechend
dem eingestellten Emissionsgrad
automatisch korrigiert. Die aktuelle Einstellung (A) ändern Sie mit den Pfeiltasten
(B). Siehe auch Emissionsgradtabelle im
Anhang E. Der Setup-Schalter im Batteriefach muß auf Position ON stehen.
Utiliser les touches fléchées (B)
pour modifier les valeurs en
vigueur (A).
Los valores de medición se corrigen
automáticamente en relación al grado
de emisión ajustado en cada caso.
El ajuste actual (A) lo modifica
Usted por medio de las teclas con
flecha (B).
Caso o material a ser medido não
conste na tabela interna, introduza o
valor de emissividade. Utilize as
teclas de cursor (B) para alterar a configuração actual (A).
EMISS.
EMISSIONSGRAD
EINSTELLEN
MATERIAU
DEFINITION
DE L’EMISSIVITE
EMISIVIDAD
AJUSTE DEL
GRADO DE
EMISIÓN
PRÉ-SELECÇÃO
DA
EMISSIVIDADE
19
Page 29
20
Page 30

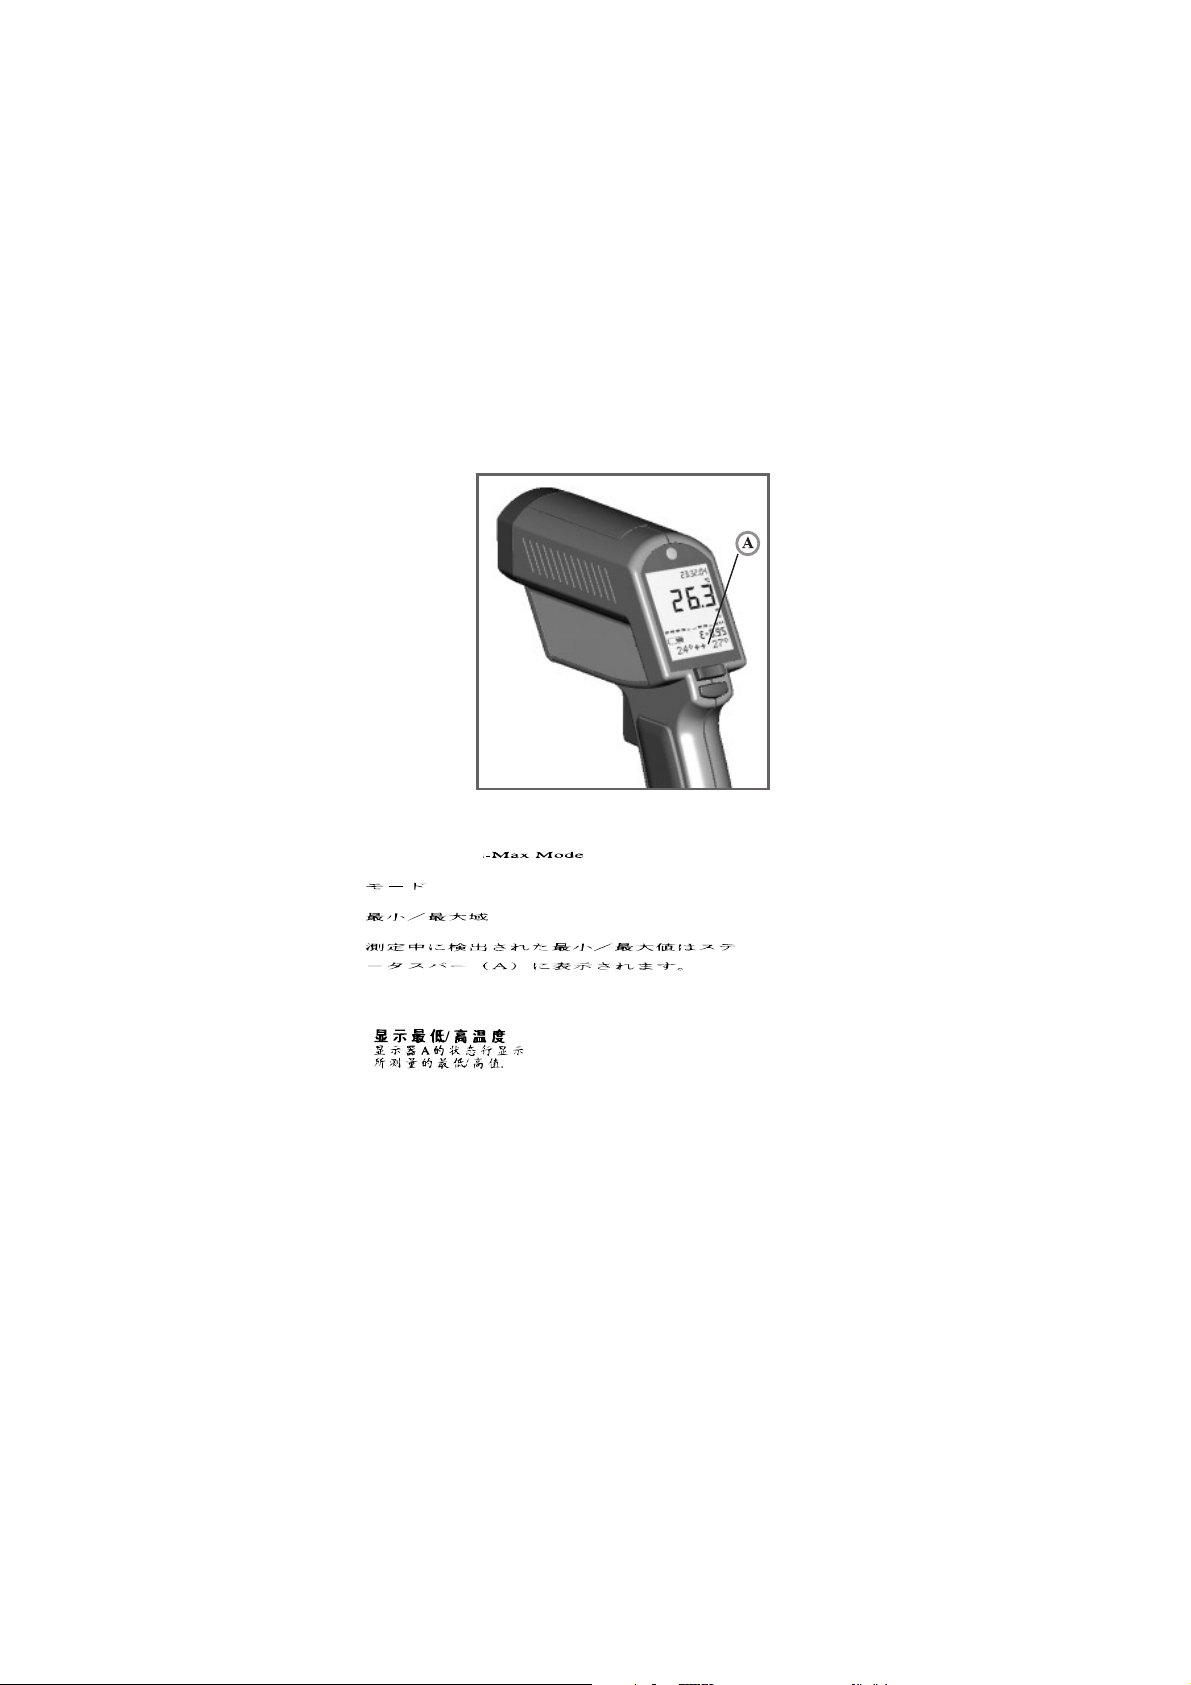
The minimum and maximum temperature
values during a measurement session are
shown at the bottom of the display (A)
except when adjusting the high alarm.
MODE
MIN-MAX
VALUES
Die während der Messung ermittelten
minimalen und maximalen
Temperaturwerte werden in der
Statuszeile angezeigt (A).
Pendant une prise de Température, la
valeur des températures maximum et
minimum est afficheé en haut de
lécran (A).
Los valores de temperatura mínimo y
máximo, durante la medición, se muestran
en la parte inferior de la pantalla (A).
Os valores das temperaturas mínima e
máxima são mostrados na parte inferior do
display (A).
MODE
MIN-MAX BEREICH
MODE
VALEURS MIN/MAX
MODO
VALORES MIN/MAX
MODO
VALORES
MIN/MAX
21
Page 31
22
Page 32

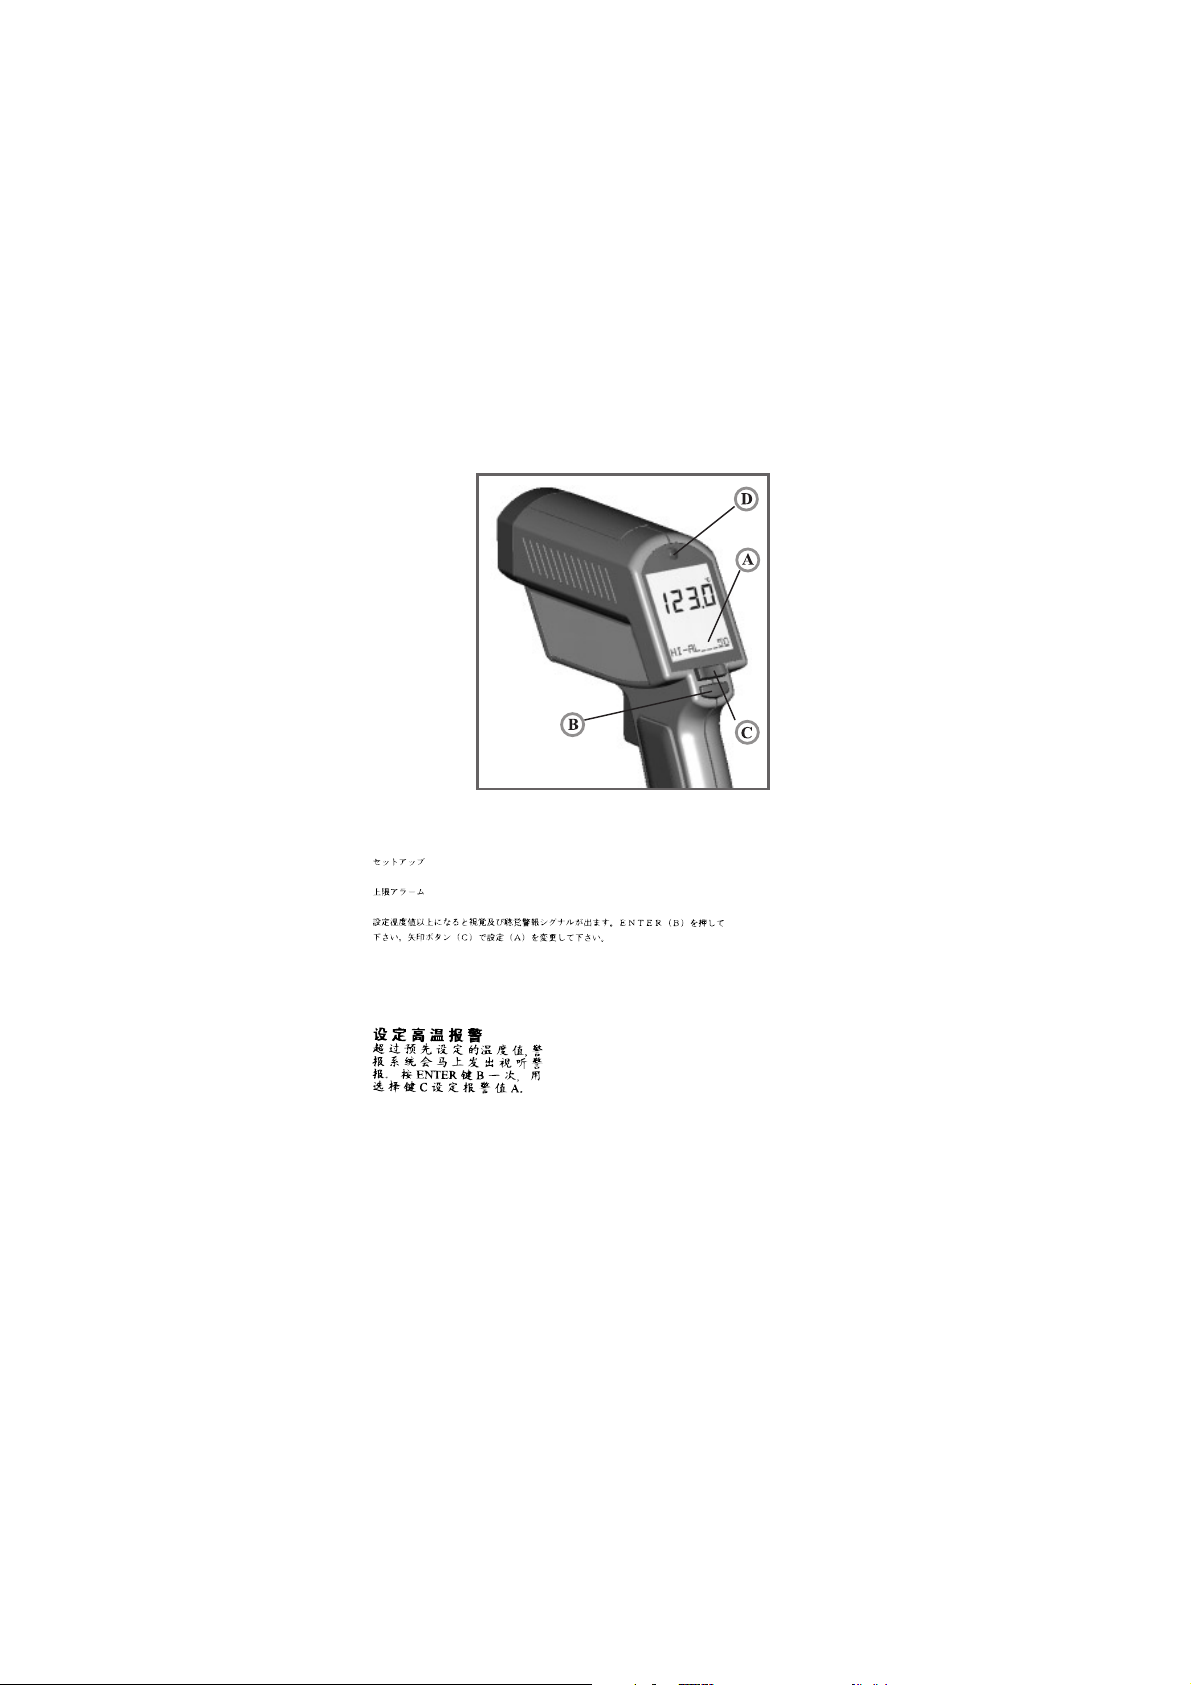
The high alarm feature (HiAl) generates a visual (LED (D) and laserflash) and
audible alarm if the temperature is above
the setpoint.
To set the alarm value (A), Press
ENTER (B) once and use the Up
and Down keys (C).
SETUP
HIGH ALARM
Einstellung des Temperaturwertes, bei
dessen Überschreitung ein optisches
(LED (D) und blinkender Laser) und
akustisches Warnsignal erfolgen soll.
Drücken Sie ENTER (B). Die aktuelle
Einstellung (A) ändern Sie mit den
Pfeiltasten (C).
Définition de la valeur limite au-dessus de laquelle se déclenche un signal
optique et acoustique dalarme.
Appuyer sur SETUP (A).
Utiliser les touches fléchées (C) pour
modifier le réglage actuel (B).
Ajuste del valor de la temperatura, si se
sobrepasa tiene tener lugar una señal de
aviso óptica y otra acústica. Para ajustar el
valor, pulse usted SETUP (A). El ajuste
actual (B) lo modifica Usted por medio de
las teclas con flecha (C).
Estabelece-se um valor de temperatura
que, ao ser ultrapassado, activa um alarme visual e sonoro. Pressione SETUP (A).
Para alterar o valor estabelecido (B), utilize
as teclas de cursor (C).
SETUP
HIGH ALARM
REGLAGE
DE L’ALARME HAUTE
AJUSTE
ALARMA ALTA
SETUP
ALARME DE ALTA
23
Page 33

24
Page 34

The graphic display (A) shows the
temperature as a moving bar graph. The last
ten measurements are shown. The minimum
and maximum temperature scale of the graph
is set automatically by the unit (Auto Range
Feature). Recall previous display by pushing
ENTER (B).
DISPLAY
GRAPHIC
DISPLAY
Der grafische Teil (A) des Displays
stellt die 10 zuletzt gemessenen Werte als
Trendanzeige dar. Der Meßbereich einer
Säule wird automatisch vom Gerät entsprechend der gemessenen MIN- und
MAX-Werte gesetzt (Auto Range Funktion). Rückruf des letzten Meßwertes
durch Drücken von ENTER (B).
La zone graphique (A) de lécran
représente les dix dernières mesures
sous forme de bargraph.
La parte gráfica (A) de la pantalla
representa los 10 últimos valores
medidos con el indicador de barras.
Aparte gráfica (A) do mostrador indicaos
últimos 10 valores medidos em
forma de barras.
DISPLAY
GRAPHIK-
BEREICH
AFFICHAGE
AFFICHAGE GRAPHIQUE
PANTALLA
CAMPO
GRÁFICO
MOSTRADOR
QUADRO
GRÁFICO
25
Page 35

26
Page 36

Change the settings in the unit by using
the DIP switches located in the battery
compartment (see BATTERIES section).
Lock: Trigger locked (on) or unlocked (off).
°C/°F: changes between °C and °F.
Buzzer: Audible alarm On or Off.
SETTINGS
Öffnen Sie das Batteriefach (siehe
BATTERIE). Nun können Sie die DILSchalter verstellen.
Lock: (ON) Meßtaste arretiert.
°C/°F: Umschalten der Anzeige
zwischen °C und °F
Buzzer: (ON) akustischer Alarm.
Ouvrir le compartiment à piles (cf.
PILES).
Lock : verrouillage de la gâchette.
°C/°F : température affichée
en °C ou en °F.
Buzzer : signal sonore.
Puede cambiar los ajustes de fábrica
en la pantalla usando los microinter-ruptores
(DIP) localizados en el com-partimiento de las
baterías (Ver la sección BATERIAS)
Lock: Trabar o destrabar el gatillo.
°C/°F: Cambiar de unidad entre °C y °F.
Buzzer: Alarma audible encendida ó
apagada.
Abra a tampa do compartimento das
baterias (ver BATERIA).
Lock: gatilho bloqueado.
°C/°F: comutação entre °C e °F.
Buzzer: sinal de alarme acústico.
EINSTELLUNGEN
RÉGLAGES
AJUSTES
AJUSTES
27
Page 37

Factory settings
Lock OFF
°C/°F US: °F Other: °C
Buzzer ON
Backlight ON
Set Default OFF
Setup ON
Laserflash ON
Laser ON
28
Page 38

Backlight: Backlight On or Off. If on backlight
activates automatically in low light conditions.
Set Default: Activates the factory defaults.
Setup: Setup HiAlarm and Emissivity activated.
Laserflash: The laser flashes in case of over-
ranging of the alarm values. Laser: activated
(ON), not activated (OFF).
SETTINGS
CONTINUED
Backlight: (ON) Displaybeleuchtung
automatisch bei schwachem Umgebungslicht.
Set Default: Aktivierung der Werksvorein-
stellungen. Setup: (ON) Aktiviert Emissionsgrad- und Alarmwertverstellung. Laserflash:
Die Lasermarkierung blinkt, wenn Alarmwerte
überschritten werden. Laser: (ON) Laser ist
eingeschaltet.
Backlight: Éclairage de lécran lors-que la
lumière ambiante est trop faible. Set
Default: Activation des paramètres réglés à
lusine qui prévalent sur les réglages définis
par lutilisateur. Setup: Toutes les touches
de fonction sont actives. Laserflash: le
faisceau laser clignote lorsque les valeurs
dalarme sont dépassées.
Backlight: Iluminación de trasfondo
encendida ó apagada. Set default: Activa los
ajustes de fábrica sobreescri-biendo los
ajustes actuales. Los ajustes de fábrica se
enlistan (Ver figura). Setup: Operación de
los demás botones. Laserflash: El indi-cador
láser parpadea en caso de presentar-selas
condiciones de alarma alta o baja.
Backlight: o mostrador é automaticamente
iluminado quando a luz ambiente não é
suficiente. Set Default: Ativa automática-
mente os valores ajustados na fábrica apagando os valores ajustados pelo usvario. Set-
up: teclas de função. Laserflash: o laser
começa a piscar quando ultrapassados os
valores limites.
EINSTELLUNGEN
FORTSETZUNG
RÉGLAGES
AJUSTES
AJUSTES
29
Page 39
30
Page 40

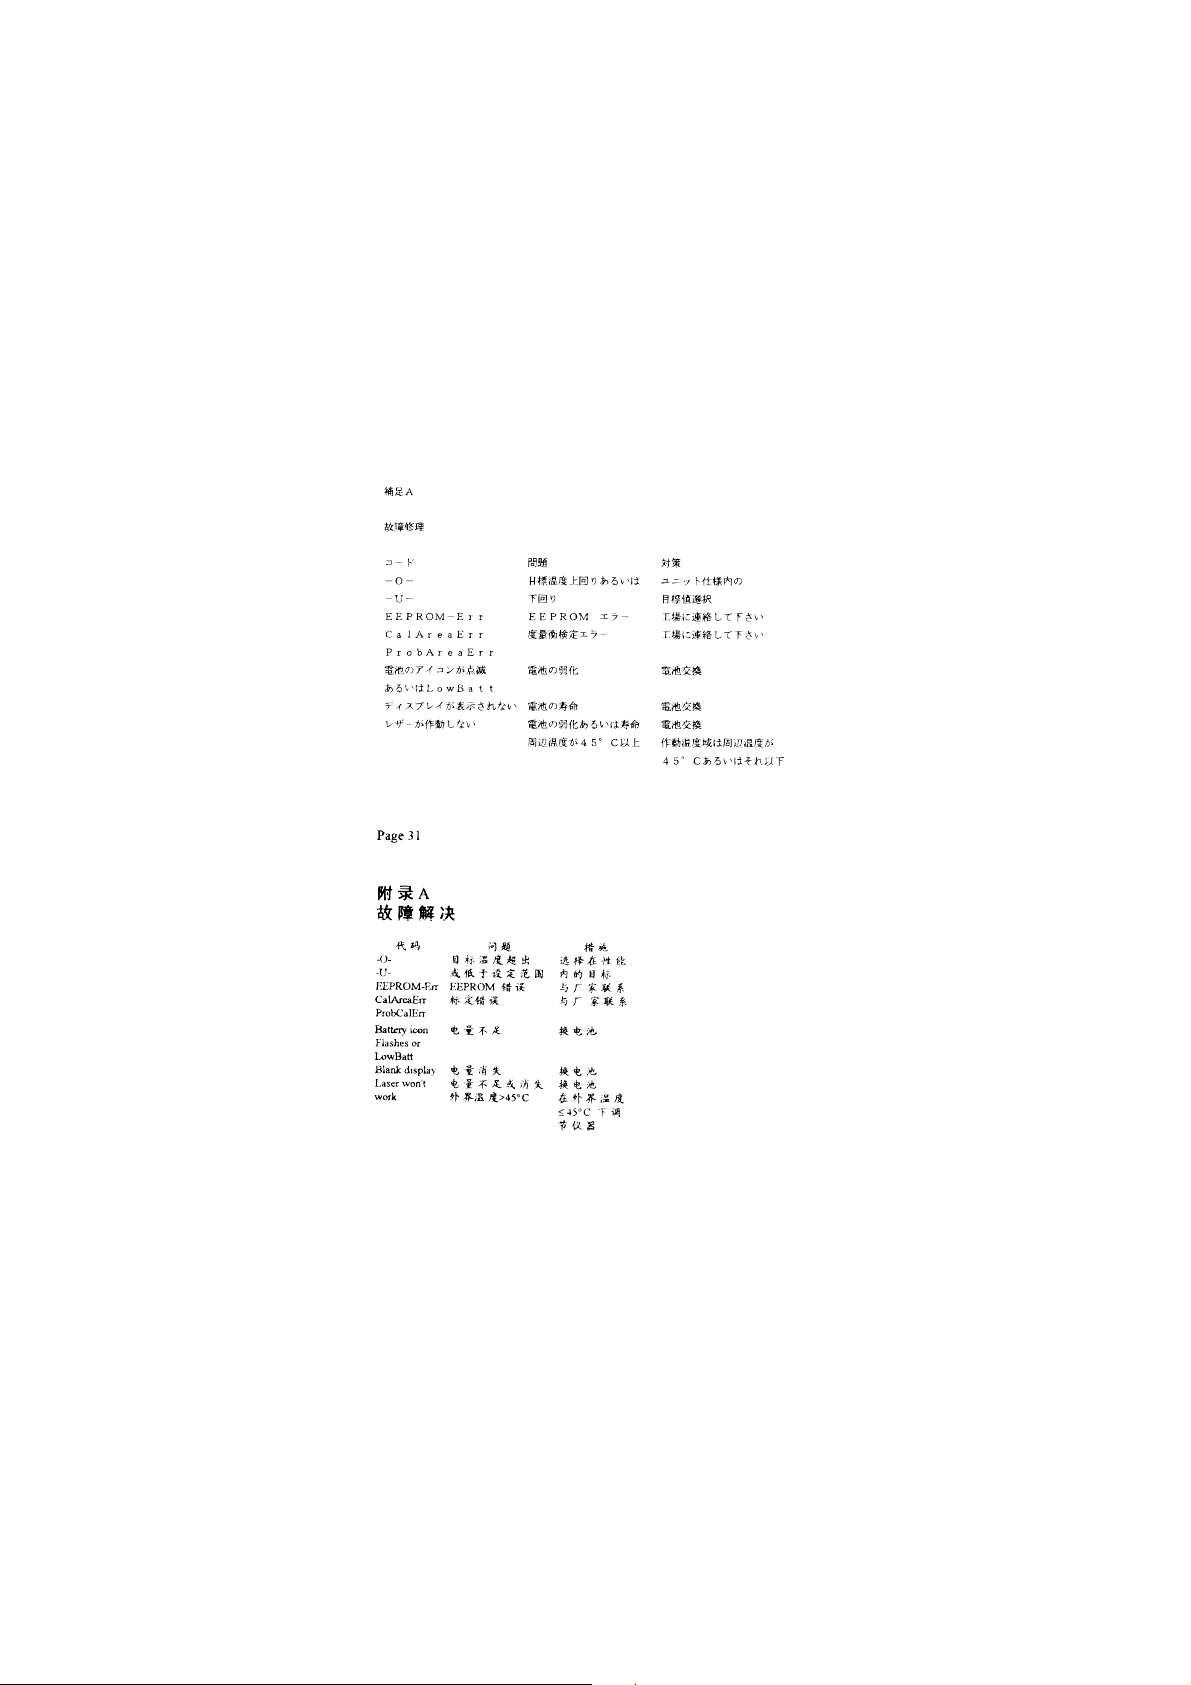
APPENDIX A
TROUBLE
SHOOTING
TROUBLESHOOTING
Code Problem Action
-O- Target temp. is over Select target within units
-U- or under range specs
EEPROM-Err EEPROM error Contact Factory
CalAreaErr Calibration errors Contact Factory
ProbCalErr
Battery icon Battery is low Replace batteries
flashes or
LowBatt on
Status line
Blank display Battery is dead Replace batteries
Laser wont Low or dead battery Replace batteries
work Ambient above 45°C Operate unit in 45°C
ambient or below
31
Page 41
32
Page 42

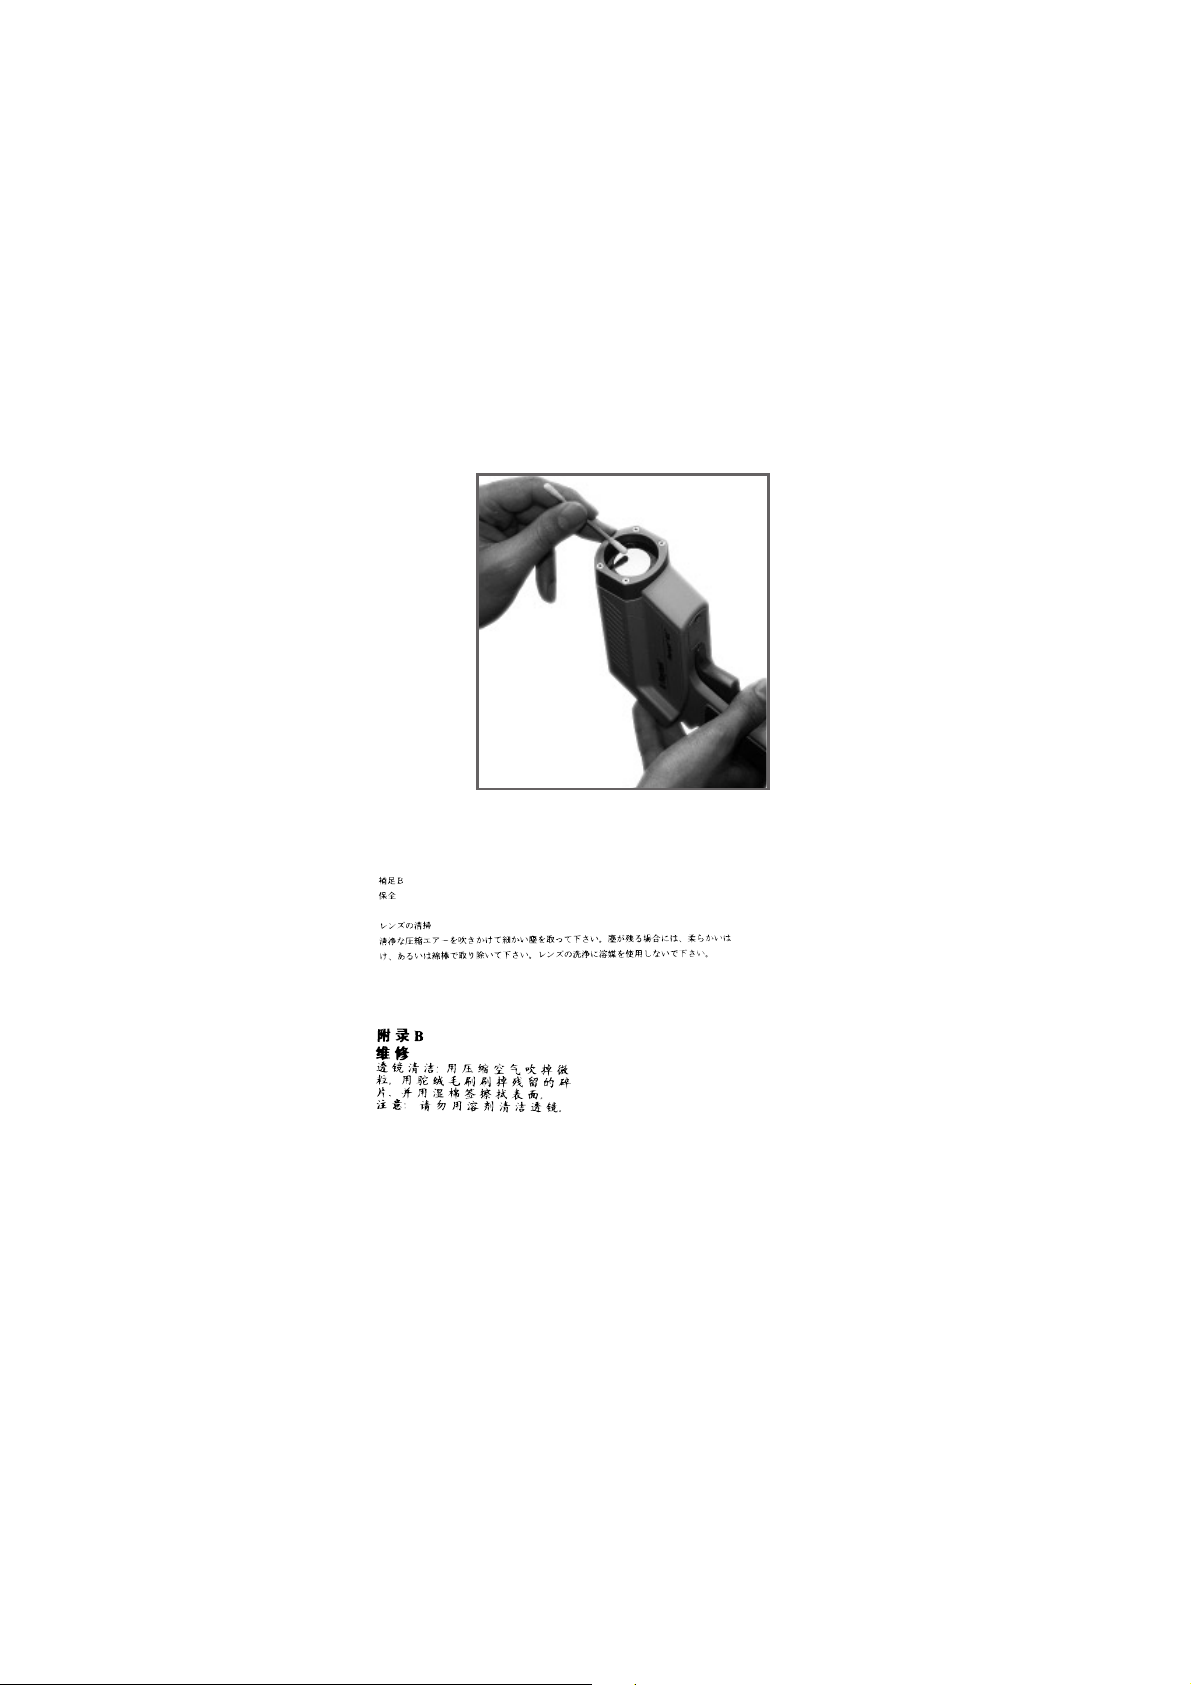
Lens Cleaning: Blow off loose particles using
clean compressed air. Brush remaining debris
away with a camels hair brush. Wipe the
surface with a moist cotton swab. The swab
may be moistened with water or a water based
glass cleaner. NOTE: DO NOT use solvents to
clean the plastic lens.
APPENDIX B
MAINTENANCE
Linsenreinigung: Lose Partikel mit sauberer Preßluft wegblasen. Verbleibende Feststoffe mit weichem Pinsel oder Wattestäbchen entfernen. Niemals Lösungsmittel zur Linsenreinigung verwenden!
Nettoyage de la lentille: Éliminez toutes les
particules avec de lair comprimé propre.
Nettoyez délicatement la surface avec un
coton-tige humide. Vous pouvez
humidifier le coton tige avec de leau.
REMARQUE: Nutilisez PAS de solvants
pour nettoyer la lentille en plastique.
Cuidado del lente: Elimine las partículas
sueltas con el uso de aire puro y
comprimido. Limpie la superficie
cuidadosamente con un palillo con
algodón húmedo. NOTA: NO debera
usarse disolventes para limpiar el lente.
Limpeza da Lente: Limpe as partículas
aderidas com ar comprimido limpo. Passe
um pincel fino e macio para retirar a sujeira
remanescente. Limpe a superfície
cuidadosamente com um chumaço de
algodão umidecido OBSERVAÇÃO: NÃO
use solventes para limpar as lentes.
ANHANG B
WARTUNG
APPENDIX B
ENTRETIEN
APENDICE B
MANTENIMIENTO
APENDICE B
MANUTENÇÂO
33
Page 43

34
Page 44

Case Cleaning: To clean the exterior
housing, use soap and water or a mild
commercial cleaner. Wipe with a damp
sponge or soft rag.
APPENDIX B
MAINTENANCE
Oberfläche vorsichtig mit feuchtem Baumwolltuch oder Wattestäbchen abwischen.
Befeuchtung mit Wasser oder auf Wasser
basierendem Glasreiniger vornehmen.
Nettoyage de létui: pour nettoyer létui,
utilisez de leau et du savon, ou un
nettoyant doux. Essuyez-le avec une
éponge humide ou un chiffon doux.
Cuidado de la unidad: Para limpiar la parte
exerior de la unidad, simpelmente utilice
agua y jabon o un limpiador comercial no
muy fuerte. Utilice una esponja húmeda o
un trapo suave.
Limpeza da Caixa: Para limpar externamente
a caixa do instrumento, use apenas água e
sabão ou um limpador comercial suave.
Umideça uma esponja ou pano macio.
ANHANG B
WARTUNG
APPENDIX B
ENTRETIEN
APENDICE B
MANTENIMIENTO
APENDICE B
MANUTENÇÂO
35
Page 45

36
Page 46

CAUTION!
Do not stare into beam!
Avoid indirect exposure via
reflective materials!
APPENDIX C
LASER
WARNING LABEL
Achtung!
Richten Sie den Laser nicht auf
Personen oder Tiere! Blicken Sie
nicht direkt in den Laserstrahl!
Attention !
Ne pas pointer le laser sur des personnes
ou des animaux ! Ne pas
exposer les yeux au rayon !
¡Cuidado!
¡No apunte con el láser hacia personas o
animales!
¡No mire usted directamente en el rayo
láser!
Atenção!
Não dirija o laser para pessoas ou
animais! Não olhe diretamente para o
raio laser!
ANHANG C
LASER
WARNLABEL
APPENDIX C
LASER
AVERTISSEMENT
APENDICE C
LASER
PRECAUCIONES
APENDICE C
LASER
AVISO
37
Page 47

38
Page 48

Keep away from EMF (electro-magnetic
fields). Avoid static electricity, arc
welders, induction heaters. Dont leave
the unit on or near objects of high
temperature.
APPENDIX D
CAUTIONS
Bringen Sie die Geräte nicht in die Nähe
starker elektromagnetischer Felder. Bewahren Sie das Gerät nicht in der Nähe
heißer Objekte auf.
Ne pas approcher le thermomètre de
champs électromagnétiques (EMF). Éviter
de lapprocher délectricité statique, de
soudeuses à arc, dappareils chauffants à
induction. Ne pas laisser le thermomètre
sur ou près dobjets ayant une
température élevée.
Mantenerlos alejados de campos
electromagnéticos. Evitar la electricidad
estática, soldadores de arco y
calentadores por inducción. No se debe
dejar la unidad sobre ni cerca de objetos
excesivamente calientes.
Mantenha distância de campos eletromagnéticos (EMFelectro-magnetic
fields). Evite eletricidade estática,
soldadoras de aço e aquecedores por
indução. Não deixe a unidade repousar
sobre ou próxima a objetos de temperatura
elevada.
ANHANG D
ACHTUNG
APPENDIX D
MISES EN GARDE
APENDICE D
PRECAUCIONES
APENDICE D
39
Page 49

40
Page 50

Avoid abrupt changes in temperature. If
this occurs, allow 40 minutes for thermal
stabilization before use to prevent the
possibility of inaccurate temperature
readings.
APPENDIX D
CAUTIONS
Vermeiden Sie abrupte Änderungen der
Umgebungstemperaturen. Falls diese
doch vorkommen sollten, geben Sie dem
Gerät 40 Minuten Zeit zur Anpassung.
Éviter les changements de températures
soudains. Si cela se produisait, pour éviter
des mesures erronées attendre 40 minutes
de stabilisation thermique.
Evitar cambios abruptos de temperatura.
Si esto ocurre, permita 40 min. para la
estabilización térmica antes de utilizar-se
para prevenir la posibilidad de obtener
lecturas de temperatura imprecisas.
Evite mudanças bruscas de temperatura.
Se isto ocorrer, espera cerca de 40 minutes
para a unidade estabilizar-se, prevenindo a
possibilidade de leituras imprecisas.
ANHANG D
ACHTUNG
APPENDIX D
MISES EN GARDE
APENDICE D
PRECAUCIONES
APENDICE D
41
Page 51

42
Page 52

APPENDIX E
EMISSIVITIES
Aluminum* Aluminium* Aluminium* Aluminio* Alumínio* 0.30
Asbestos Asbest Amiante Asbesto Asbesto 0.95
Asphalt Asphalt Asphalte Asfalto Asfalto 0.95
Basalt Basalt Basalte Basalto Basalto 0.70
Brass* Messing* Laiton* Latón* Latão* 0.50
Brick Ziegel Brique Ladrillo Tijolo 0.90
Carbon Kohlenstoff Carbone Carbono Carbono 0.85
Ceramic Keramik Céramique Cerámica Cerâmica 0.95
Concrete Beton Béton Hormigón Concreto 0.95
Copper* Kupfer* Cuivre* Cobre* Cobrer* 0.95
Dirt Schmutz Saleté Polvo Poeira 0.94
Food, Lebensmittel, Nourriture, Alimento, Alimentos, 0.90
frozen gefroren surgelée congelado congelados
Food, Lebensmittel, Nourriture, Alimento, Alimentos, 0.93
hot heiß chaude caliente quentes
Glass Glas Verre Vidrio Vidro 0.85
(plate) (Platte) (plaque) (placa) (prato)
Ice Eis Glace Hielo Gelo 0.98
Iron* Eisen* Fer* Hierro* Gelo 0.70
Lead* Blei* Plomb* Plomo* Chumbo* 0.50
Limestone Kalkstein Calcaire Piedra Pedra 0.98
Oil Öl Huile Aceite Óleo 0.94
Paint Farbe Peinture Pintura Tinta 0.93
Paper Papier Papier Pape Papel 0.95
Plastic** Kunststoff** Plastique** Plástico** Plástico** 0.95
Rubber Gummi Caoutchouc Caucho Borracha 0.95
Sand Sand Sable Arena Areia 0.90
Skin Haut Peau Piel Pele 0.98
Snow Schnee Neige Nieve Neve 0.90
Steel* Stahl* Acier* Acero* Aço* 0.80
Textiles Textilien Textiles Textiles Tecidos 0.94
Water Wasser Eau Agua Água 0.93
Wood*** Holz*** Bois*** Madera*** Madeira*** 0.94
caliza calcária
* oxidized; oxidiert; oxydé; oxidado; oxidado
** opaque, over 20 mils; lichtundurchlässig, über 50 µm; opaque, plus de 20 mils;
opaco, más de 20 mils; opaco, acima de 20 mils
** * natural; natürlich; naturel; natural; natural
43
Page 53

SPECIFICATIONS
Temperature Range - 30 to 900°C ( -25 to 1600°F)
Display Resolution 0.1°C (0.2°F)
Accuracy, ± 1% of reading or
Ambient derating < 0.05K/K or 0.05 %/K, whichever is greater at
Repeatability ±0.5% of reading or
Response Time (95%) 250 msec
Spectral Range 8 to 14 µm
Optical Resolution 60 : 1
Ambient Operating 0 to 50°C (32 to 122°F)
Range Laser max. 45°C (113°F)
Storage Temperature - 20 to 50°C (- 25 to 122°F)
Power 2 x 1.5 V Alkaline Type AA
Dimensions 200 x 170 x 50 mm
Tripod Mount 1/4-20 UNC
Factory Defaults
Emissivity/Gain 0.95 0.10 to 1.50,
Hi Alarm 50°C (122°F) -30 to 900°C
± 1°C (± 2°F),
whichever is greater at 25°C ± 5°C (77°F ± 9°F )
± 2°C (± 4°F) for targets below 0°C (32°F)
< 20°C (68°F) or > 30°C (86°F)
±1°C (±2°F), whichever is greater
without batteries
(7.9 x 6.7 x 2 inches)
Default Range
in steps of 0.01
(-25 to 1600°F)
44
Page 54

TECHNISCHE DATEN
Temperaturbereich - 30 ... 900 °C
Anzeigeauflösung 0,1 °C
Genauigkeit ± 1 % vom Meßwert oder ± 1 °C,
Reproduzierbarkeit ±0,5 % vom Meßwert oder ±1 °C,
Umgebungstemperatur- < 0,05 K/K oder 0,05 %/K, jeweils
drift größerer Wert gilt bei
Antwortzeit (95%) 250 ms
Spektralbereich 8 ... 14 µm
Optische Auflösung 60 : 1
Umgebungstemperaturbereich 0 ... 50 °C
Lagertemperatur - 20 ... 50 °C
Batterien 2 x 1,5 V, Typ R6 (AA)
Abmessungen 200 x 170 x 50 mm
Stativmontage 1/4-20 UNC
WERKSVOREINSTELLUNGEN
Emissionsgrad/ 0,95 0,10 bis 1,50,
Verstärkung Schrittweite 0,01
oberer Alarmwert 50°C -30 ... 900 °C
jeweils größerer Wert gilt bei
25 °C ± 5 °C, ±2 °C für Meßobjekte
unterhalb 0 °C
der jeweils größere Wert gilt
< 20 °C oder > 30 °C
Laserbetrieb bis max. 45 °C
ohne Batterien
Voreinstellung Bereich
45
Page 55

CARACTÉRISTIQUES TECHNIQUES
Plage de températures - 30 ... 900°C
Resolution de laffichage 0.1°C
Reproductibilité / Accuracy ± 1% de la mesure ou ± 1°C,
Reproductibilité ± 0,5% de la mesure avec
Temps de réaction (95%) 250 ms
Domaine spectral 8 ... 14 µm
Résolution optique 60 : 1
Domaine nominal démploi 0 à 50°C
Température de stockage - 30 à +50°C
Alimentation 2 x 1.5 V, Typ R6 (AA)
Dimensions 200 x 170 x 50 mm
Tripod montage 1/4-20 UNC
PRÉRÉGLAGES
Réglage standard Gamme de réglages
Taux démissivité/ 0,95 0,10 à 1,50,
Gain par étapes de 0,01
LS dalarme 50°C -3 0 ... 900°C
Signal acoustique activé marche/arrêt
à 23°C
± 2°C < 0°C
un minimum de ±1°C
avec Laser max. 45°C
sans piles
46
Page 56

DATOS TECNICOS
Gama de Temperatura - 30 ... 900°C
Resolución de la visualización 0.1°C
Reproducibilidad / Accuracy ± 1% del valor de medicióno ± 1°C,
Tiempo de respuesta (95%) 250 ms
Gama espectral 8 ... 14 µm
Resolución óptica 60 : 1
Temperatura ambiente 0 a 50°C
de operación Laser max. 45°C
Temperatura de almacenaje - 30 a 50°C, sin Batterias
Alimentación 2 x 1.5 V Pila alcalina
Dimensiones 200 X 170 X 50 mm
Montaje en tripie 1/4-20 UNC
PREAJUSTES
Grado de emisión/ 0.95 d e 0,10 a 1,50
Gainen pasos de 0,01
Alarma Hi 50°C -3 0 ... 900°C
a 23°C Temperatura
ambiente de operación,
± 2°C < 0°C
tamaño AA
Ajustes estándar Campo
(-25 ... 1600°F)
47
Page 57

DADOS TÉCNICOS
gama de temperaturas - 30 ... 900°C
resolução óptica 0.1°C
reprodutibilidade / accuracy ± 1% do valor medido ou ± 1°C,
tempo de reacção (95%) 250 ms
Spectral range 8 ... 14 µm
resolução óptica 60 : 1
Temperatura de operação 0 ... 50°C
Temperatura de armazenamento - 30 ... 50°C
Alimentação 2 x 1.5 V Alcalina tipo AA
Dimensões 200 x 170 x 50 mm
Montagem em tripé 1/4-20 UNC
PARAMETROS DE FABRICA
emissividade/ 0.95 0,10 até 1,50
Gain e m passos de 0,01
alarme a
temperatura máxima 50°C - 30 ... 900°C
até 23°C temperatura de operação
± 2°C< 0°C temperatura de operação
Laser max. 45°C
sem Baterias
valores ajustades gama
na fábrica
48
Page 58

495051
Page 59

Page 60

Page 61

This instrument conforms to the following
standards:
EMC: - EN50081-1:1992
Safety: - EN 61010-1:1993 / A2:1995
This product herewith complies with the
requirements of the EMC Directive
89/336/EEC and the Low Voltage Directive
73/23/EEC.
- EN50082-1:1992
- EN 60825-1:1994
52
Page 62

This instrument conforms to the standards
of the European Community (CE).
CE
CONFORMITY
Das Gerät entspricht den Standards der
Europäischen Gemeinschaft.
Cet appareil est conforme aux standards
de lUnion Européenne.
This instrument conforms to the Standards
of the European Community.
Este instrumento obedece aos padrões
da comunidade européia.
CE
KONFORMITÄTS-
ERKLÄRUNG
CONFORMITÉ
AUX CE
CE
CONFORMITY
CE
CONFORMITY
53
Page 63
54
Page 64

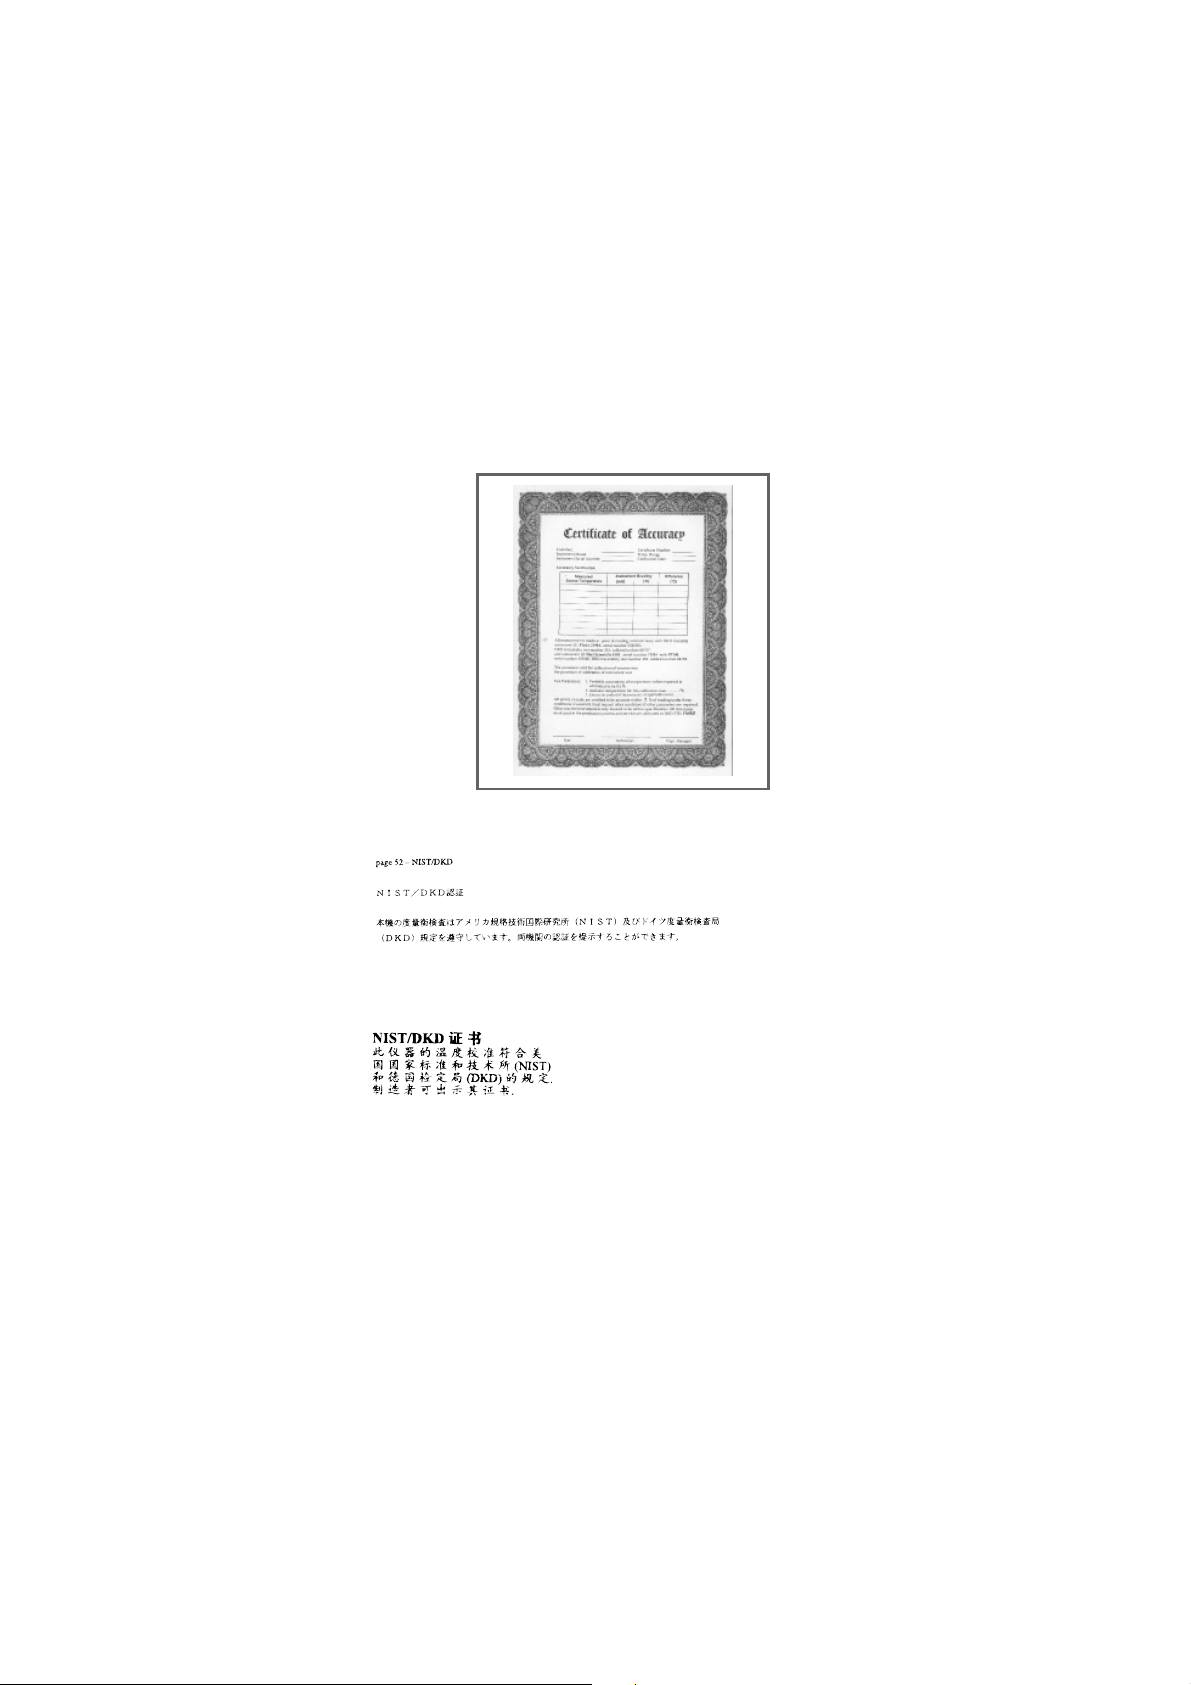
The temperature sources used to calibrate
this instrument are traceable to the U.S.
National Institute of Standards and
Technology (NIST) and the Deutscher
Kalibrierdienst (DKD). NIST and DKD
certificates are available as an option from
the manufacturer.
NIST/DKD
CERTIFICATION
Die Kalibrierung des Gerätes erfolgt entsprechend den Bestimmungen des U.S.
National Institute of Standards and
Technology (NIST) und denen des Deutschen Kalibrierdienstes (DKD). Zertifikate
beider Institute können vom Hersteller
bezogen werden.
Les sources utilisées pour la calibration de
cet appareil sont raccordées au NIST (National Institute of Standards and
Technology) et au DKD (Deutscher
Kalibrierdienst). Les certificats
détalonnage NIST et DKD sont
proposés en tant quoption du constructeur.
Las fuentes de temperatura usadas para
calibrar este instrumento son investigadadas
por el Instituto Nacional del los E.E.U.U. para
Technologia y Normas (NIST) ye el Deutscher
Kalibrierdienst (DKD). Los certificados etan
disponibles como una opcion de el fabricante.
As fontes de temperatura utilizadas para
calibrar este instrumento estão rastreadas aos
padrões do National Institute of Standards
and Technology (NIST) e ao Deutscher
Kalibrierdienst (DKD).Os certificados NIST e
DKD estão disponíveis pelo fabricante como
item opcional.
NIST/DKD
ZERTIFI-
ZIERUNG
NIST/DKD
CERTIFICATION
NIST/DKD
CERTIFICACION
CERTIFICAÇÃO
NIST/DKD
55
Page 65

WARRANTY
Raytek warrants this product to be free from defects in material and
workmanship under normal use and service for a period of one year
from date of purchase e xcept as hereinafter provided. This warranty
extends only to the ori ginal purchaser (a purchase from Raytek or Ra ytek’s
licensed distributors is an original purchase). This warranty shall not
apply to fuses or batteries. Factory calibration is warranted for a period
of one year . The warranty shall not apply to any product which has been
subject to misuse, neglect, accident, or abnormal conditions of operation
or storage. Should Raytek be unable to repair or replace the product
within a reasonable amount of time, purchaser’ s exclusive remedy shall
be a refund of the purchase price upon return of the product.
In the event of failure of a product covered by this warranty, Raytek will
repair the instrument when it is returned by the purchaser, fr eight prepaid,
to an authorized Service Facility within the applicable warranty period,
provided Raytek’ s examination discloses to its satisfaction that the product
was defective. Raytek may, at its option, replace the product in lieu of
repair. With r egar d to any covered product returned within the applica ble
warranty period, repairs or replacement will be made without cha rge
and with return freight paid by Raytek, unless the failure was caused by
misuse, neglect, accident, or abnormal conditions of operation or storage,
in which case repairs will be billed at a reasonable cost. In such a case,
an estimate will be submitted before work is started, if requested.
The foregoing warranty is in lieu of all other warranties, expressed or
implied, including but not limited to any implied warranty of
merchantability, fitness, or adequacy for any particular purpose or use.
Raytek shall not be liable for any special, incidental or consequential
damages, whether in contract, tort, or otherwise.
Page 66

GARANTIEBEDINGUNGEN
Raytek gewährt für dieses Produkt eine Garantie von einem Jahr ab dem
Kaufdatum. Der Hersteller garantiert, daß das Produkt im genannten Zeitraum bei ordnungsgemäßer Anwendung und Wartung keine Materialund Bearbeitungsfehler aufweist. Ausnahmen sind im folg enden festgelegt.
Diese Garantie gilt nur für den Ersterwerber (der Erwerb des Produktes
von Raytek oder einem autorisierten Raytek-Händler gilt als Er sterwerb).
Die Garantie erstreckt sich nicht auf Sicherungen oder Batterien. Für die
im Werk vorgenommene Kalibrierung gewährt Raytek eine Garantiefrist von einem Jahr. Die Garantie schließt keine Produkte ein, die mißbräuchlich oder fahrlässig verwendet, beschädigt oder unzulässig betrieben oder gelagert wurden.
Die vorstehenden Garantiebedingungen ersetzen alle anderen eventuell
gemachten ausdrücklichen oder stillschweigenden Zusicherungen.
Raytek übernimmt keine Haftung für einen besonderen, beiläufigen oder
mittelbaren Schaden, gleich ob dieser im Rahmen des Vetrages, durch
eine unerlaubte Handlung oder auf andere Weise entstanden ist.
Page 67

CONDITIONS DE GARANTIE
Raytek accorde sur ce produit une garantie d’un an à compter de la date
d’ achat. Le fabricant g arantit pendant cette période l’ a bsence de vice de
matériau ou de fabrication, à condition que le produit soit utilisé et
entretenu normalement et à l’ exclusion des cas définis ci-après. La
présente garantie ne s’ applique qu’ au premier acheteur (est considéré
comme premier achat l’ acquisition d’ un produit vendu directement par
Raytek ou par un distributeur agréé par lui). Les fusibles et les piles sont
exclus de la garantie. Raytek accorde une garantie d’ un an sur l’
étalonnage effectué en usine. L‘ utilisation d’ un produit dans un but non
conforme à l’ usage auquel il est destiné, la négligence, l’ utilisation de
produits abîmés, les erreurs d’ utilisation ou de stockage entraînent une
exclusion de garantie.
Dans le cas où Raytek ne serait pas en mesure de réparer ou de remplacer
le produit dans un délai conv enable, l’ acheteur pourra exiger uniquement
le remboursement du prix de l’ appareil contre restitution de ce dernier
au vendeur.
Raytek assurera la réparation des appareils tombés en panne pendant la
période de garantie. L’ acheteur expédiera l’ appareil défectueux à une
station technique agréée, à ses frais et pendant le délai de garantie . Raytek
se réserve le droit de procéder à l’ échange de l’ appareil au lieu de le
réparer. La réparation ou le remplacement seront ef fectués gr atuitement
si l’ appareil d éfectueux est retourné pendant le délai de garantie. Les
frais de retour au client seront à la charge de Raytek. Les frais de répara tion
seront facturés au client lorsque la panne sera liée à un défaut de
manipulation ou d‘ utilisation, à de la négligence, à des causes extérieures
ou à un stockage inapproprié. Un devis sera établi avant réparation à la
demande du client.
Les présentes conditions de garantie remplacent toutes les autre assurances
qui auraient pu étre données expressément ou tacitement. Raytek décline
toute respons abilité pour tout dommage particulier, causé incidemment
ou indirectement, que celui-ci soit survenu dans le cadre du présent contrat
ou ait été provoqué par un délit civil ou par toute autre cause.
Page 68

CONDICIONES DE GARANTÍA
Raytek concede en relación a este producto una garantía de un año a
partir de la fecha en que se realice la compra. El fabricante garantiza que
el producto, dentro del espacio de tiempo referido, siempre que se aplique
correctamente y se lleve a cabo el mantenimiento adecuado, no ha de
presentar fallos de material o de fabricación. Más adelante se mencionará
alguna excepción. Esta garantía es válida respecto de la adquisición
primaria (se entiende por adquisición primaria del producto aquella
llevada a cabo directamente de Raytek o bien por medio de un
establecimiento autorizado por Raytek). La garantía no cubre los fusibles
ni las pilas. En relación al calibrado llevado a cabo en fábrica,
Raytek concede un tiempo de garantía de un año. La garantía no cubre
ningún producto que haya sido usado inadecuada o negligentemente, se
haga hecho funcionar o se haya almacenado estando dañado o de manera
no autorizada.En el caso de que a Raytek no le sea posible reparar o
substituir un producto dentro de un plazo razonable, el comprador, con
carácter de reivindicación jurídica única, puede exigir la devolución de
la suma a la que haya ascendido la compra devolviendo por su parte el
producto en cuestión. En el caso de un defecto del aparato que tenga
lugar durante el tiempo de garantía, Raytek se hace cargo de la reparación.
Para ello, el comprador , corriendo con los gastos, ha de en viar el aparato
que sea objeto de reclamación a un servicio de reparaciones autorizado
dentro del plazo de validez de la garantía. En caso de que lo considere
conveniente, Raytek se reserva el derecho de substituir el aparato en
lugar de hacerse car go de la reparación. Si se envía un a parato defectuoso
durante el tiempo en que es válida la garantía, la reparación o bien la
substitución del aparato el cliente una cuenta por los costes
correspondientes a la reparación. En este caso el cliente puede solicitar
un presupuesto para la reparación antes de llevarse ésta a cabo.
Las presentes condiciones de garantía substituyen las demás eventuales
garantías realizadas de modo explícito o implícito. Raytek no acepta
niguna responsabilidad respecto a especiales daños ocasionales o
indirectos, bien hayan acontecido éstos en el marco del contrato bien se
deban a un manejo indebido o a calesquiera otras causas. defectuoso es
gratis. Los costes del en vío de vuelta al cliente corren a cargo de Raytek.
En el caso de que el defecto se deba a una manipulación incorrecta,
negligencia, daño causado por agentes exteriores, almacenamiento o
empleo no autorizados, recibirá
Page 69

Condições de garantia
Para o presente produto a Raytek concede uma garantia de um ano
contados a partir da data de compra. O fabricante gar ante que o produto
está livre de defeitos de materiais e de fabricação durante o perídodo
mencionado se o produto for devidamente utilizado e conservado. As
exceções são estipuladas a seguir. Esta garantia só serí1 concedida ao
primeiro adquirente (a compra do produto na Raytek ou num
concessioní1rio autorizado da Raytek é considerada primeira aquisição).
A garantia não cobre fusídveis e pilhas. A Raytek concede uma garantia
de um ano para a calibragem feita na fí1brica. A garantia não inclui
produtos utilizados ou danificados inde vida ou negligentemente, produtos
usados ou armazenados inadmissivelmente. Caso a Raytek não esteja
em condições de reparar ou substituir o produto durante um perídodo de
tempo apropriado, o comprador pode solicitar o reembolso do preço
contra devolução do produto como úfanico recurso.
Em caso de um defeito no aparelho durante o perídodo coberto pela
garantia, a Raytek responsabiliza-se pela reparação do mesmo. Cabe ao
comprador enviar o aparelho reclamado por conta própria e durante o
perídodo de garantia para um posto autorizado de assistíancia técnica. A
Raytek reserva-se o direito de substituir o aparelho em vez de repará-lo.
Ao enviar o aparelho defeituoso durante o perídodo de garantia, a
reparação ou a substituição do mesmo são gratuitos. Os custos da remessa
do aparelho ao cliente serão pagos pela Raytek. Se o defeito resultar de
tratamento impróprio, negligíancia, danos causados por efeitos e xteriores,
condições inadmissídveis de utilização ou armazenamento, os custos da
reparação serão correspondentemente faturados. Neste caso é possídvel
calcular uma estimativa dos custos antes da reparação por pedido do
clientes condições de garantia presentes substituem todas as outras
garantias feitas eventualmente explídcita ou implícitamente. A Raytek
não se responsabiliza por danos particulares, acidentais ou diretos, sejam
causados no quadro do presente contrato, em consequíancia de atos
ilídcitos ou de qualquer outra forma.
Page 70

Page 71

 Loading...