

Page 1
MINITEMP
™
MT2 and MT4
Noncontact Thermometer •
Berührungsloses Thermometer
• Thermomètre sans Contact • Termómetro sin Contacto
• Termômetro sem Contato
• •
Table of Contents
Unit diagram . . . . . . . . . . . . . .1
English . . . . . . . . . . . . . . . . . . .2
German . . . . . . . . . . . . . . . . . .7
French . . . . . . . . . . . . . . . . . .12
Spanish . . . . . . . . . . . . . . . . .17
Portuguese . . . . . . . . . . . . . .22
Chinese . . . . . . . . . . . . . . . . .27
Japanese . . . . . . . . . . . . . . . .32
Page 2

20
Specifications
Temperature range -18 to 260°C (0 to 500°F)
Temperature display 0.5°C or 1.0°F
Accuracy For targets at:
(assumes ambient operating -1 to 260°C (30 to 500°F) ±2% of reading
temperature of 23°C [73°F]) or ±2°C (±3.5°F), whichever is greater
-18 to -1°C (0 to 30°F) ±3°C (±5°F)
Repeatability ± 2% of reading, or ± 2°C (±3°F)
Response time 500 mSec, 95% response
Spectral response 7–18 µm
Emissivity pre-set 0.95
Ambient operating range 0 to 50°C (32 to 120°F)
Relative humidity 10–95% RH noncondensing, @ up to 30°C (86°F)
Storage temperature -20° to 65°C (-4° to 150°F) without battery
Weight / Dimensions 227 g (0.5 lb);152 x 101 x 38 mm (6 x 4 x 1.5 in)
Power 9V Alkaline or NiCd battery
Typical Battery life Non-laser models: 22 hrs • Laser Models: 12 hrs
(Alkaline)
Distance to Spot Size 6:1
Specifications subject to change without notice.
Y2k Compliant
Page 3
C
F
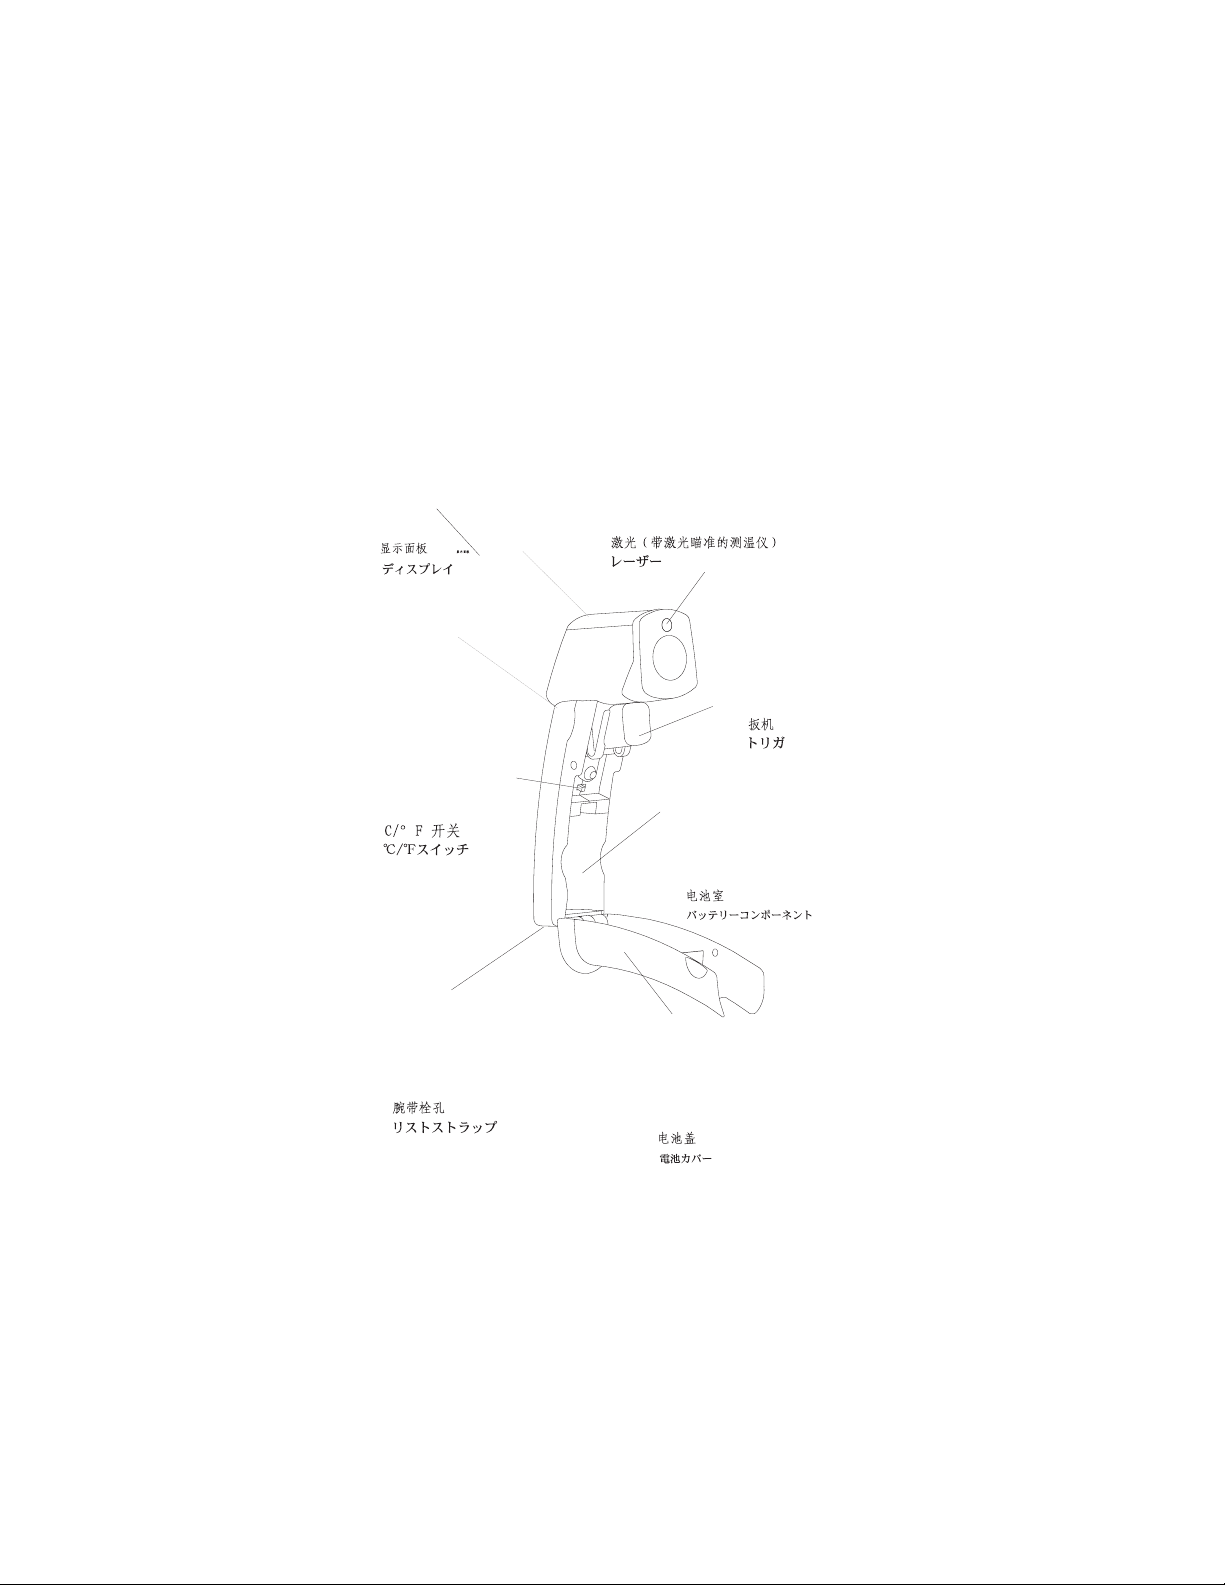
• Display
• Anzeige
• Affichage
• Pantalla
• Display
•
•
• Laser (in units with laser)
• Laser (bei Geräten mit Laser)
• Laser (pour les thermomètres avec laser)
• Láser (en unidades con láser)
• Laer ( modelos com laser )
•
•
• Trigger
• Meßtaste
• Gâchette
• Gatillo
• Gatilho
•
•
• Battery Compartment
• Batteriefach
• Logement des piles
• Compartimento de las pilas
• Compartimento de bateria
•
•
• Battery Cover
• Batterieabdeckung
• Couvercle du lcompartiment pile
• Tapa de las pilas
• Tampa da bateria
•
•
• Wrist Strap Connection
• Befestigung der Handschlaufe
• Point d’attache de la dragonne
• Correa de mano
• Conexão para alça
•
•
• °C/°F Switch
• °C/°F-Schalter
• Commutateur °C/°F
• Interruptor de °C/°F
• Chave °C/°F
•
•
Page 4
2
English
CLASS II (FDA)
AND CLASS 2 (IEC)
L
ASER WARNING LABEL
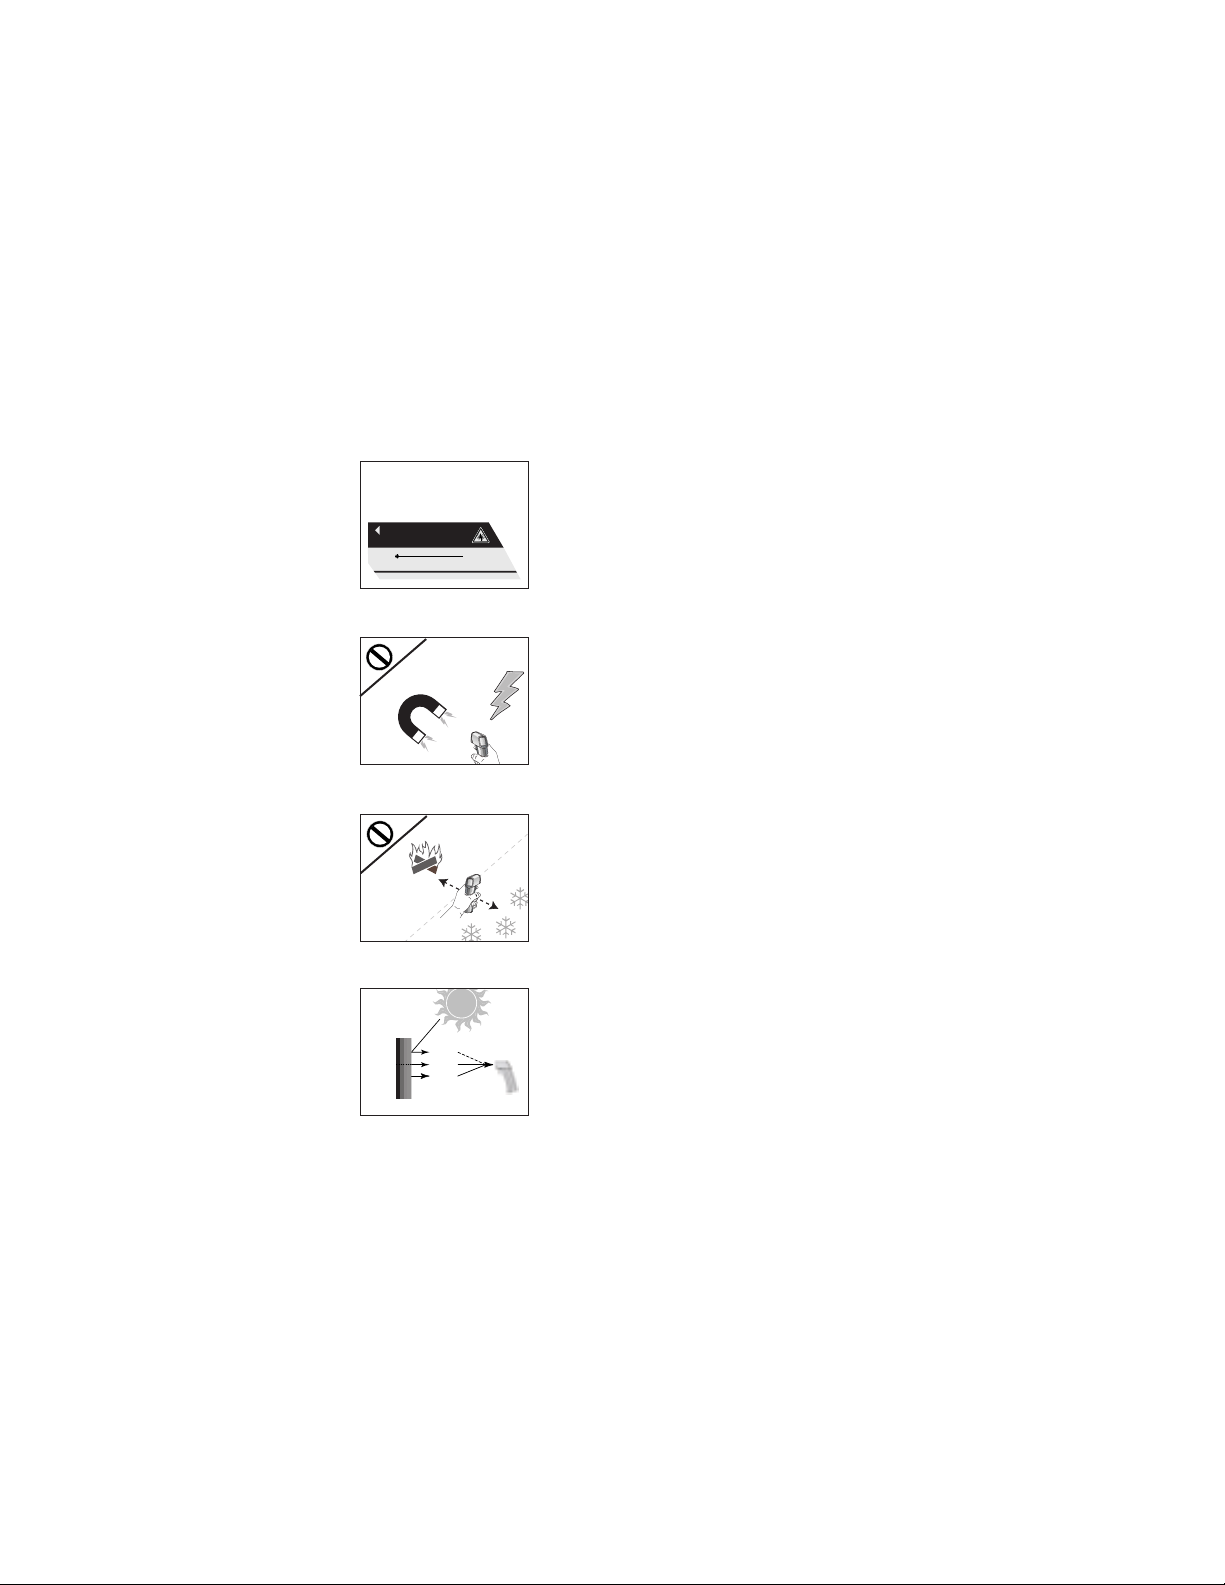
Warning
(units with laser sighting)
Do not point laser directly at eye or indirectly off
reflective surfaces.
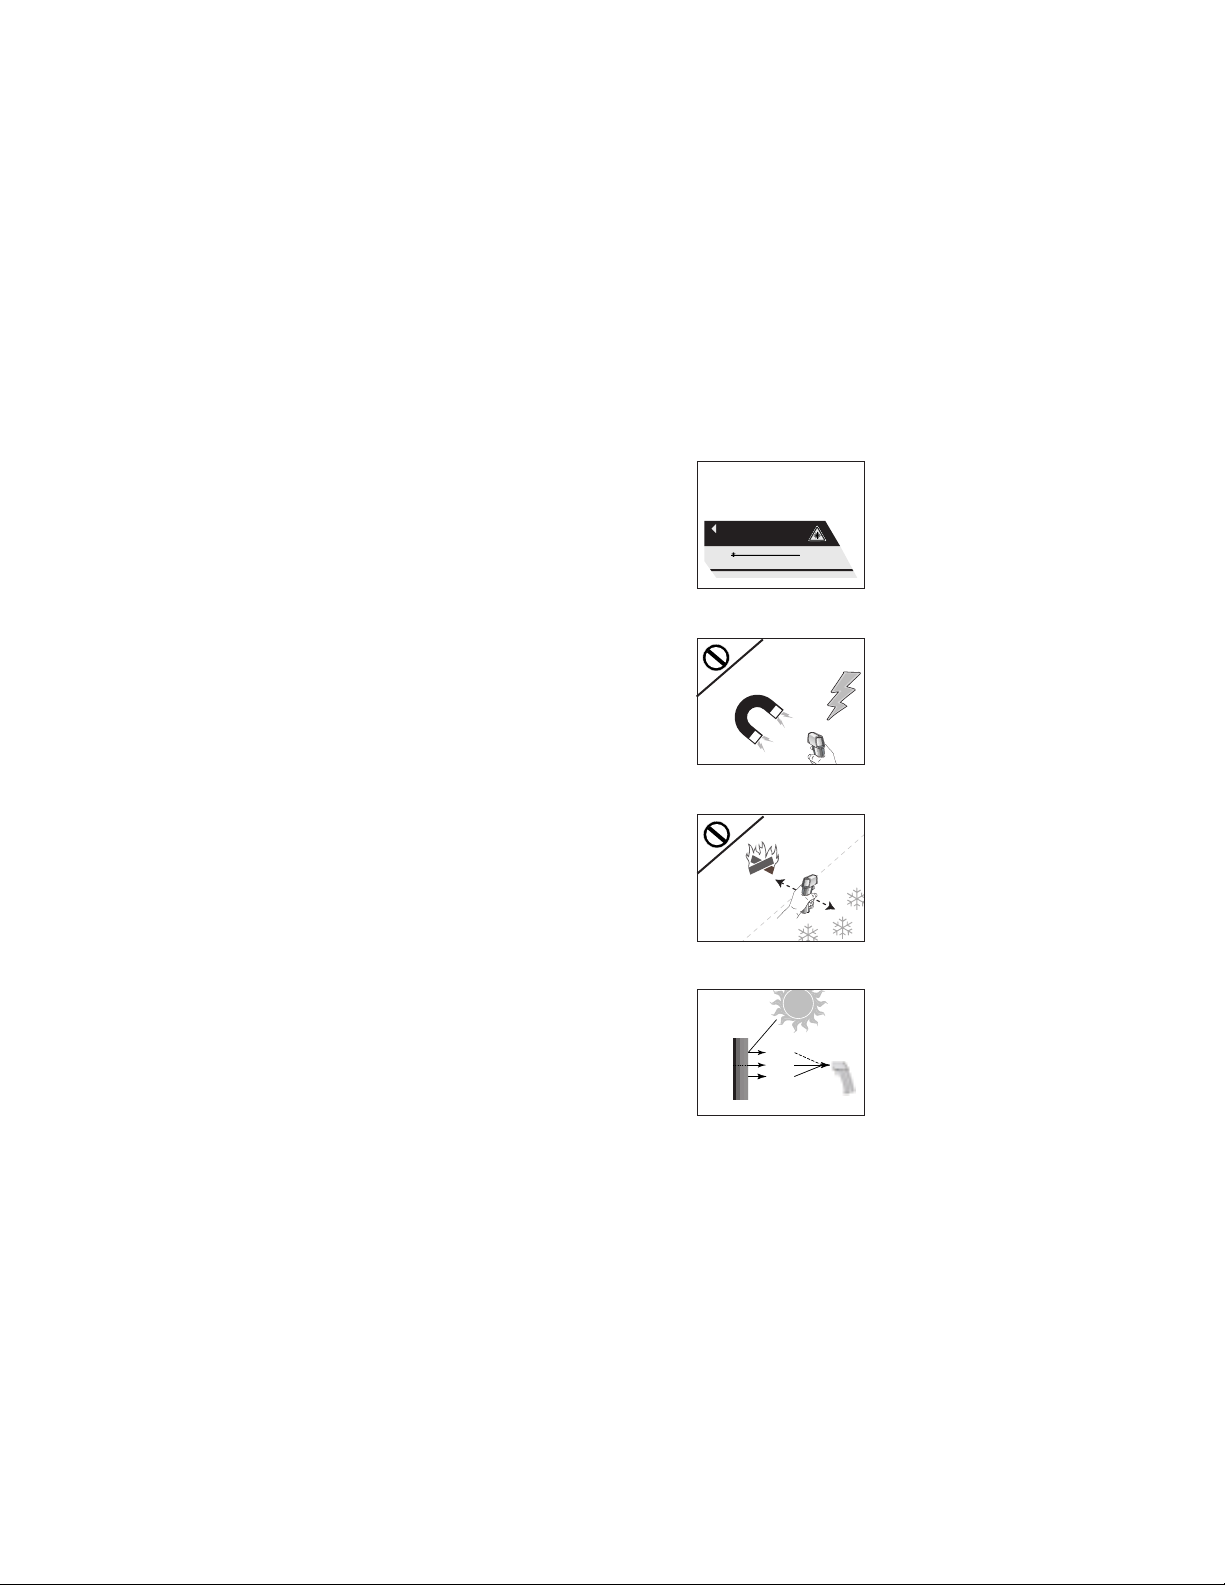
Cautions
All models should be protected from the following,
▲ EMF (electro-magnetic fields) from arc welders,
induction heaters
▲ Static electricity
▲ Thermal shock (caused by large or abrupt ambi-
ent temperature changes—allow 30 minutes for
unit to stabilize before use)
▲ Do not leave the unit on or near objects of high
temperature
Introduction
We are confident you will find many uses for your
handheld noncontact thermometer. Compact, rugged,
and easy to use—just aim, pull the trigger, and read
current surface temperatures in less than a second.
You can safely measure surface temperatures of hot,
hazardous, or hard-to-reach objects without contact.
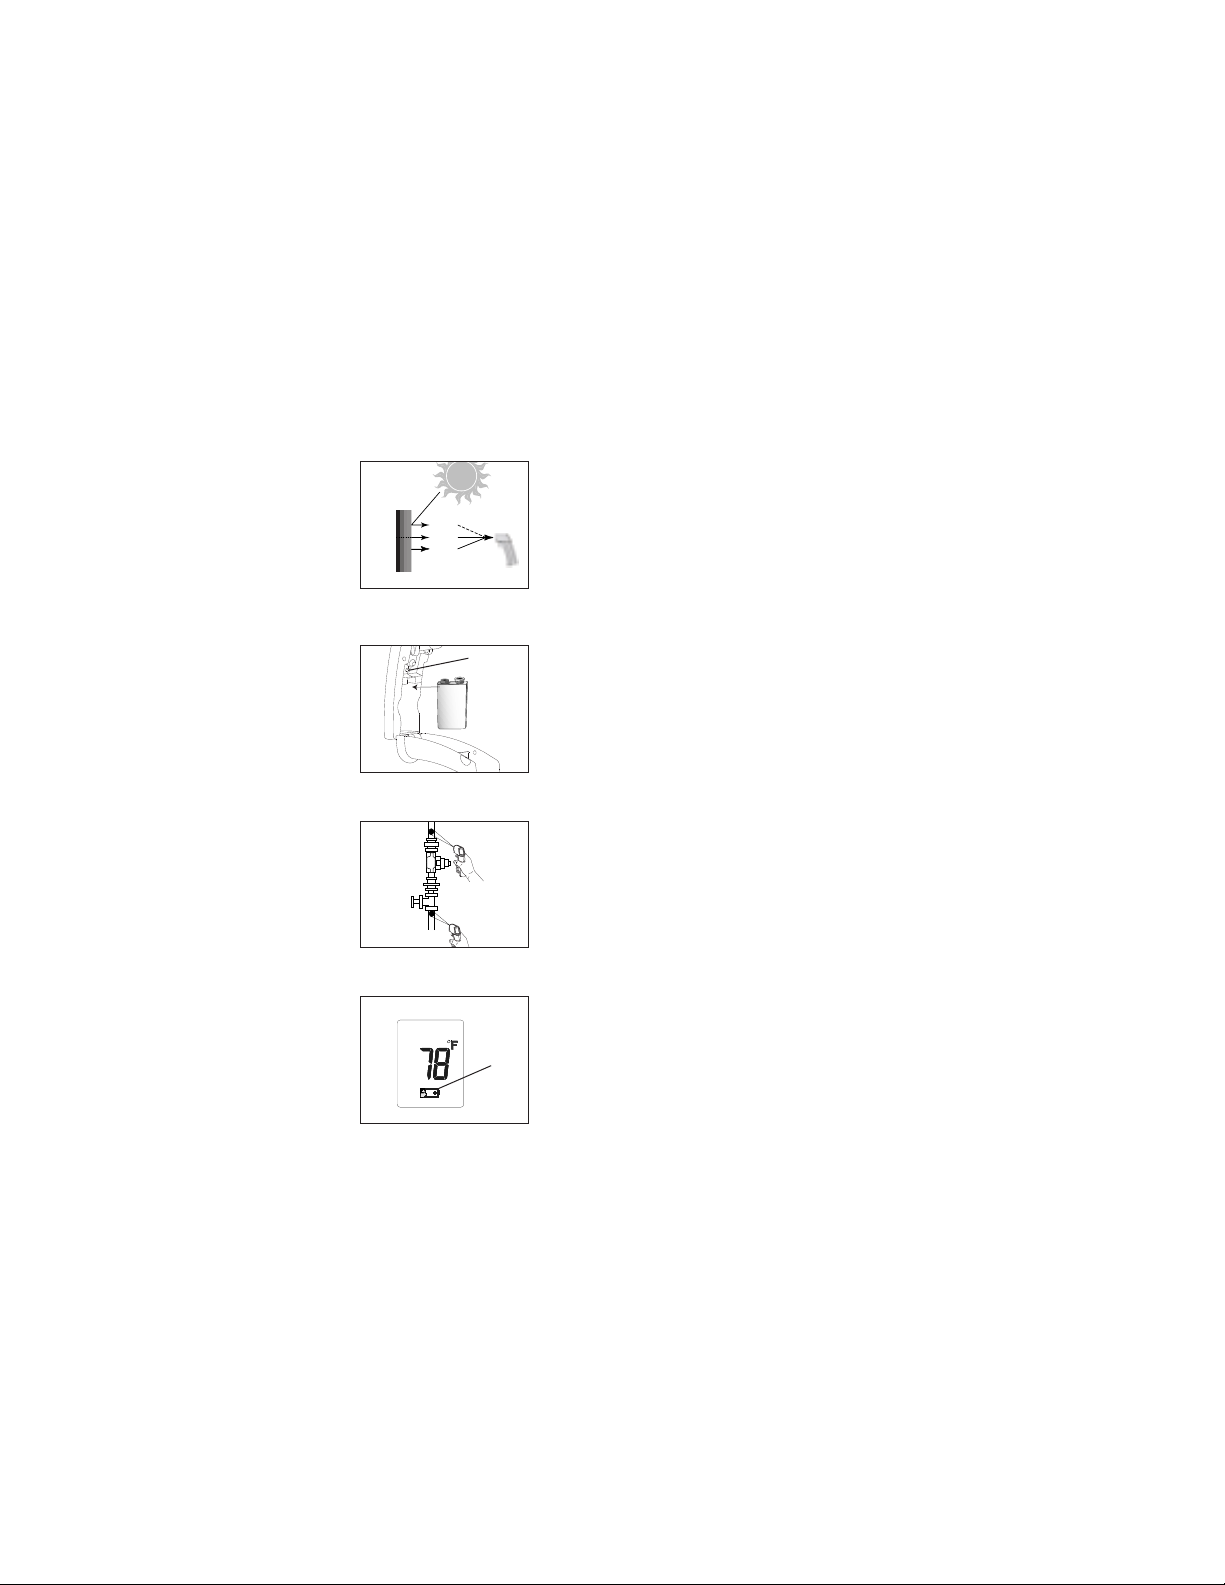
How it Works
Infrared thermometers measure the surface temperature of an object. The unit’s optics sense emitted (E),
reflected (R), and transmitted (T) energy, which is
collected and focused onto a detector. The unit’s
electronics translate the information into a temperature
reading which is displayed on the unit. In units with a
laser, the laser is used for aiming purposes only.
R
T
E
Target
AVOID EXPOSURE - LASER RADIATION
IS EMITTED FROM THIS APERTURE
CAUTION
LASER RADIATION – DO NOT STARE INTO BEAM
OUTPUT < 1mW WAVELENGTH 630 – 670 nm
CLASS II LASER PRODUCT
COMPLIES WITH CFR 1040.10
Page 5
3
English
How to Operate the Unit
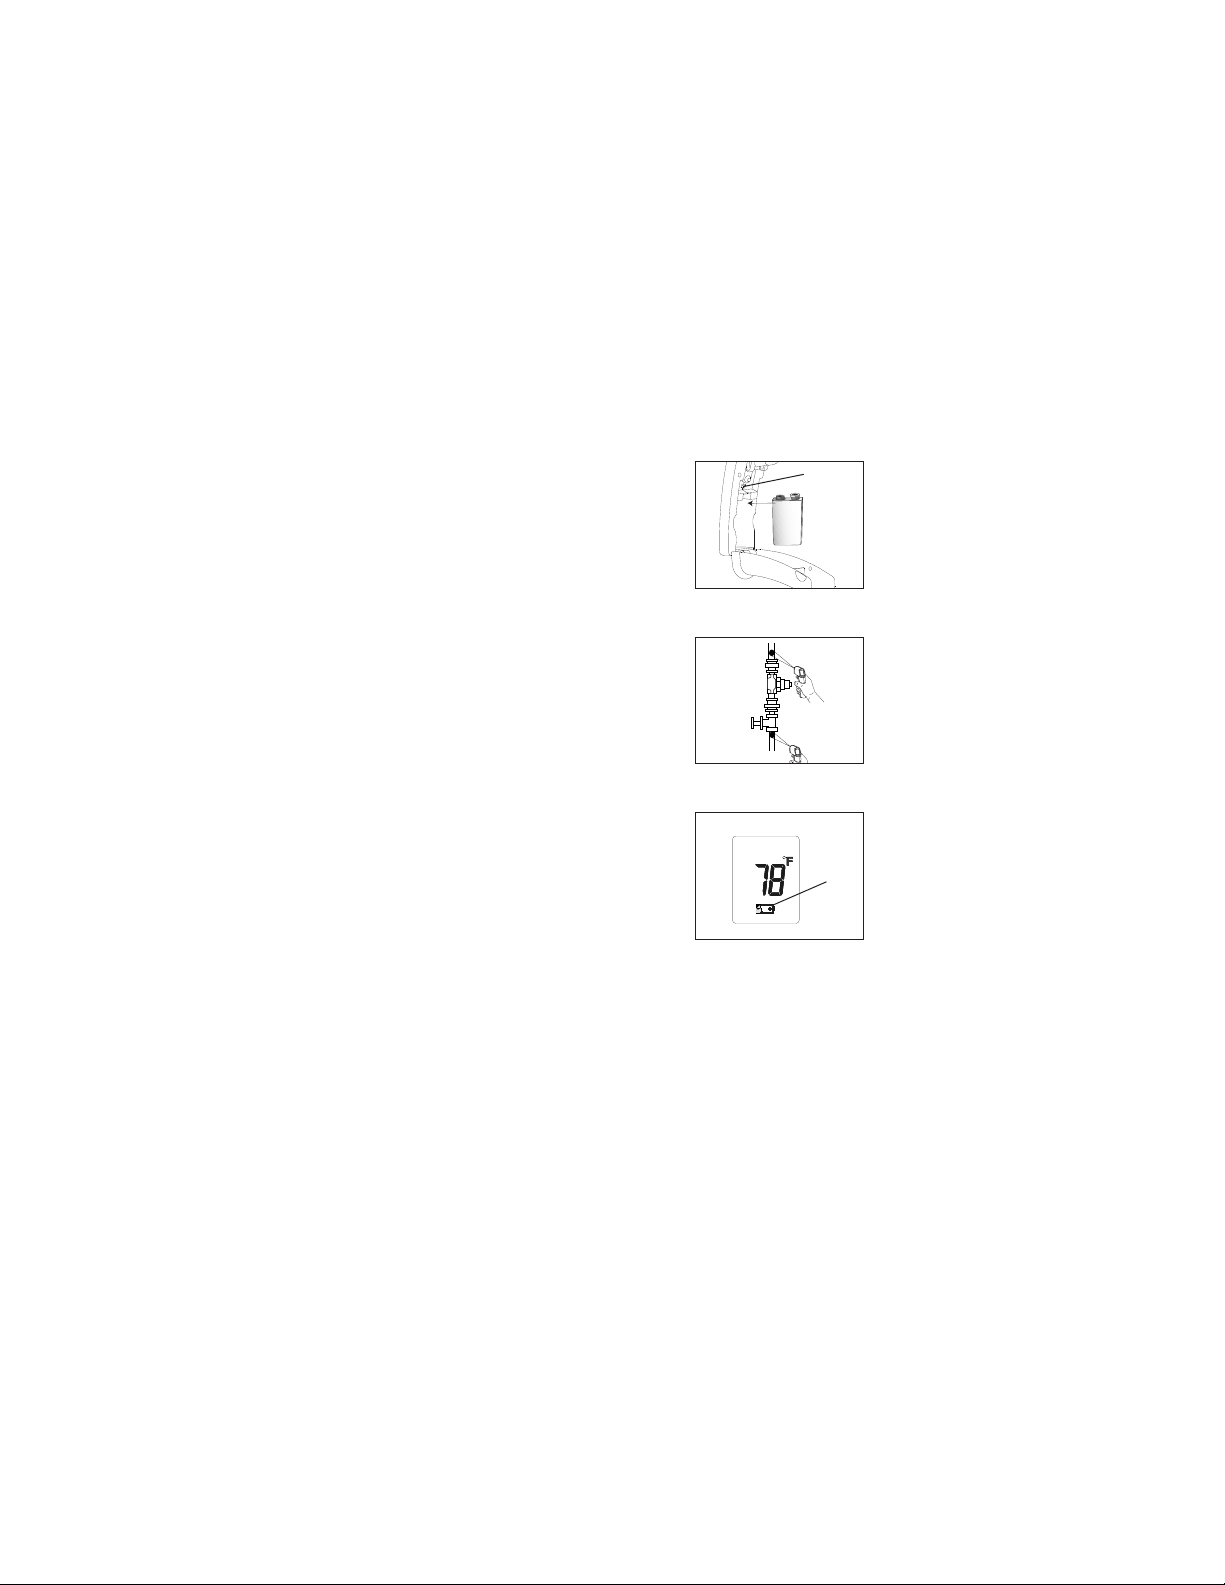
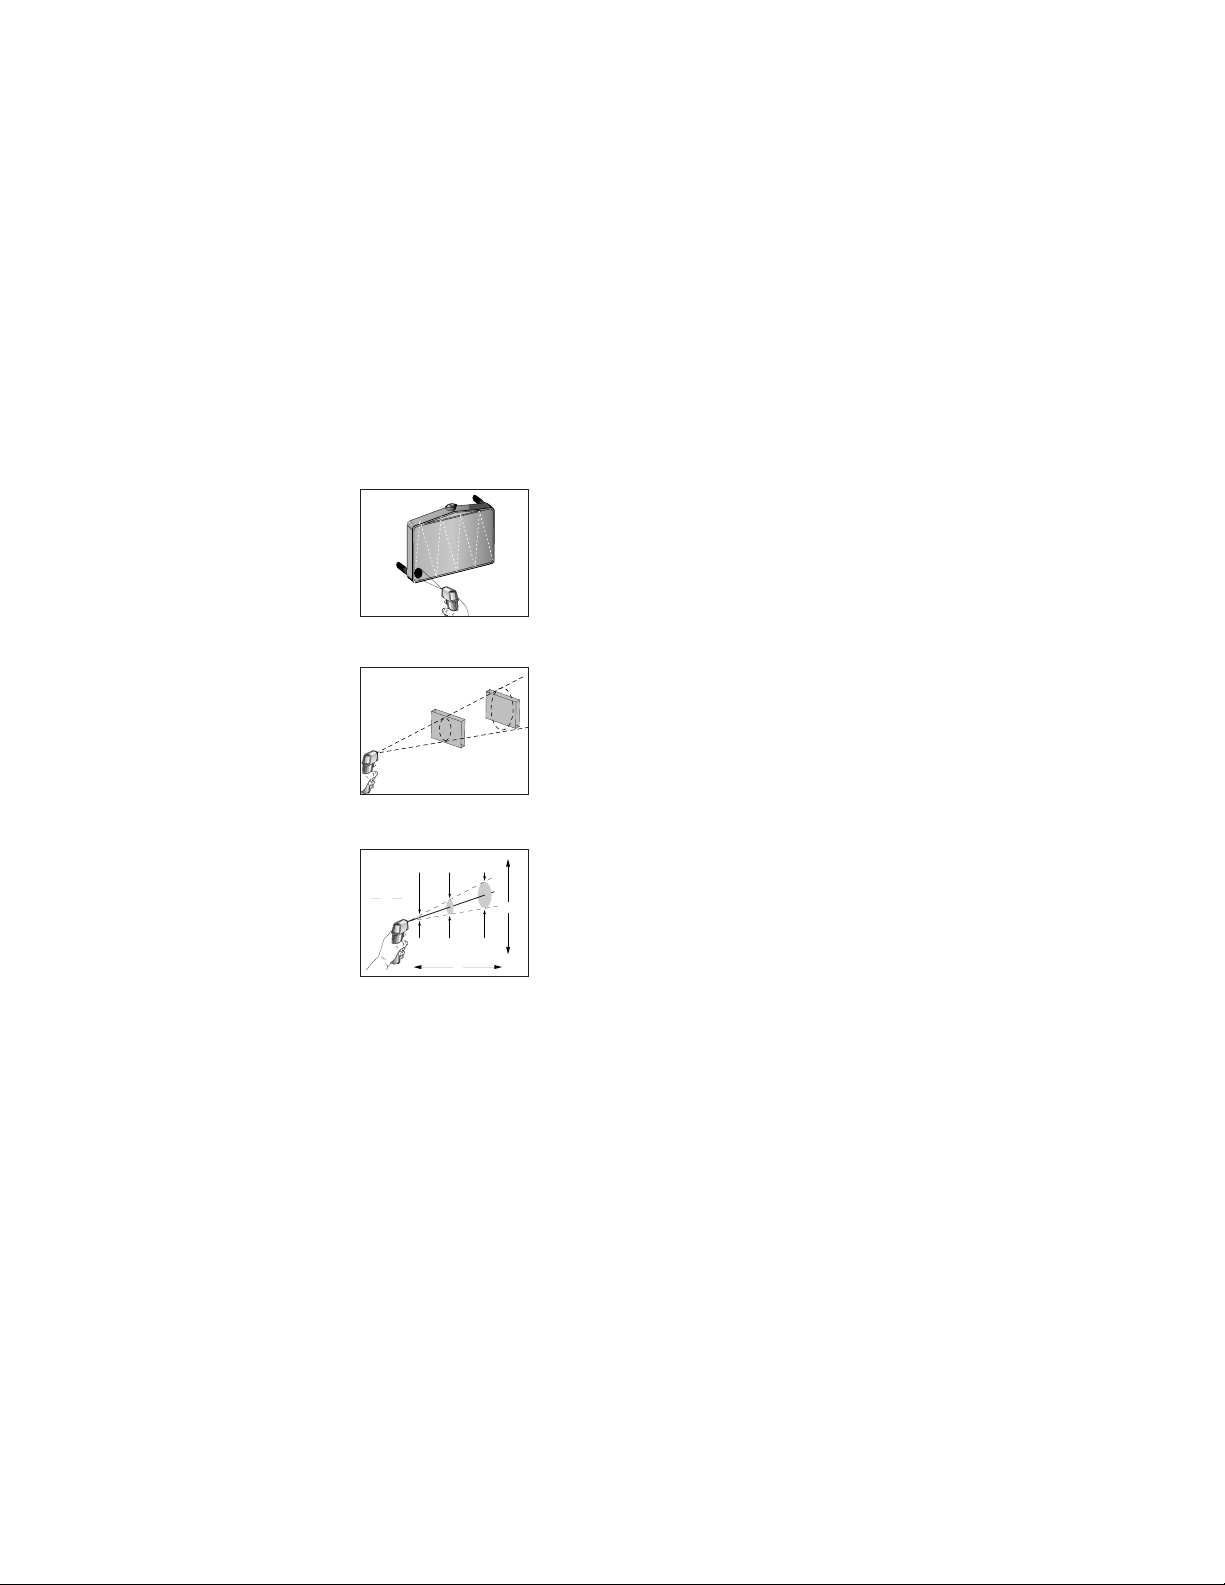
°C/°F and Battery
Pull open the unit’s handle using the finger indents
near the trigger to access the C/F switch or to
insert/remove the battery. To toggle between °C and
°F, push the switch (A). Insert the 9v battery positive
side first into the battery compartment. NOTE: The
battery door is detachable.
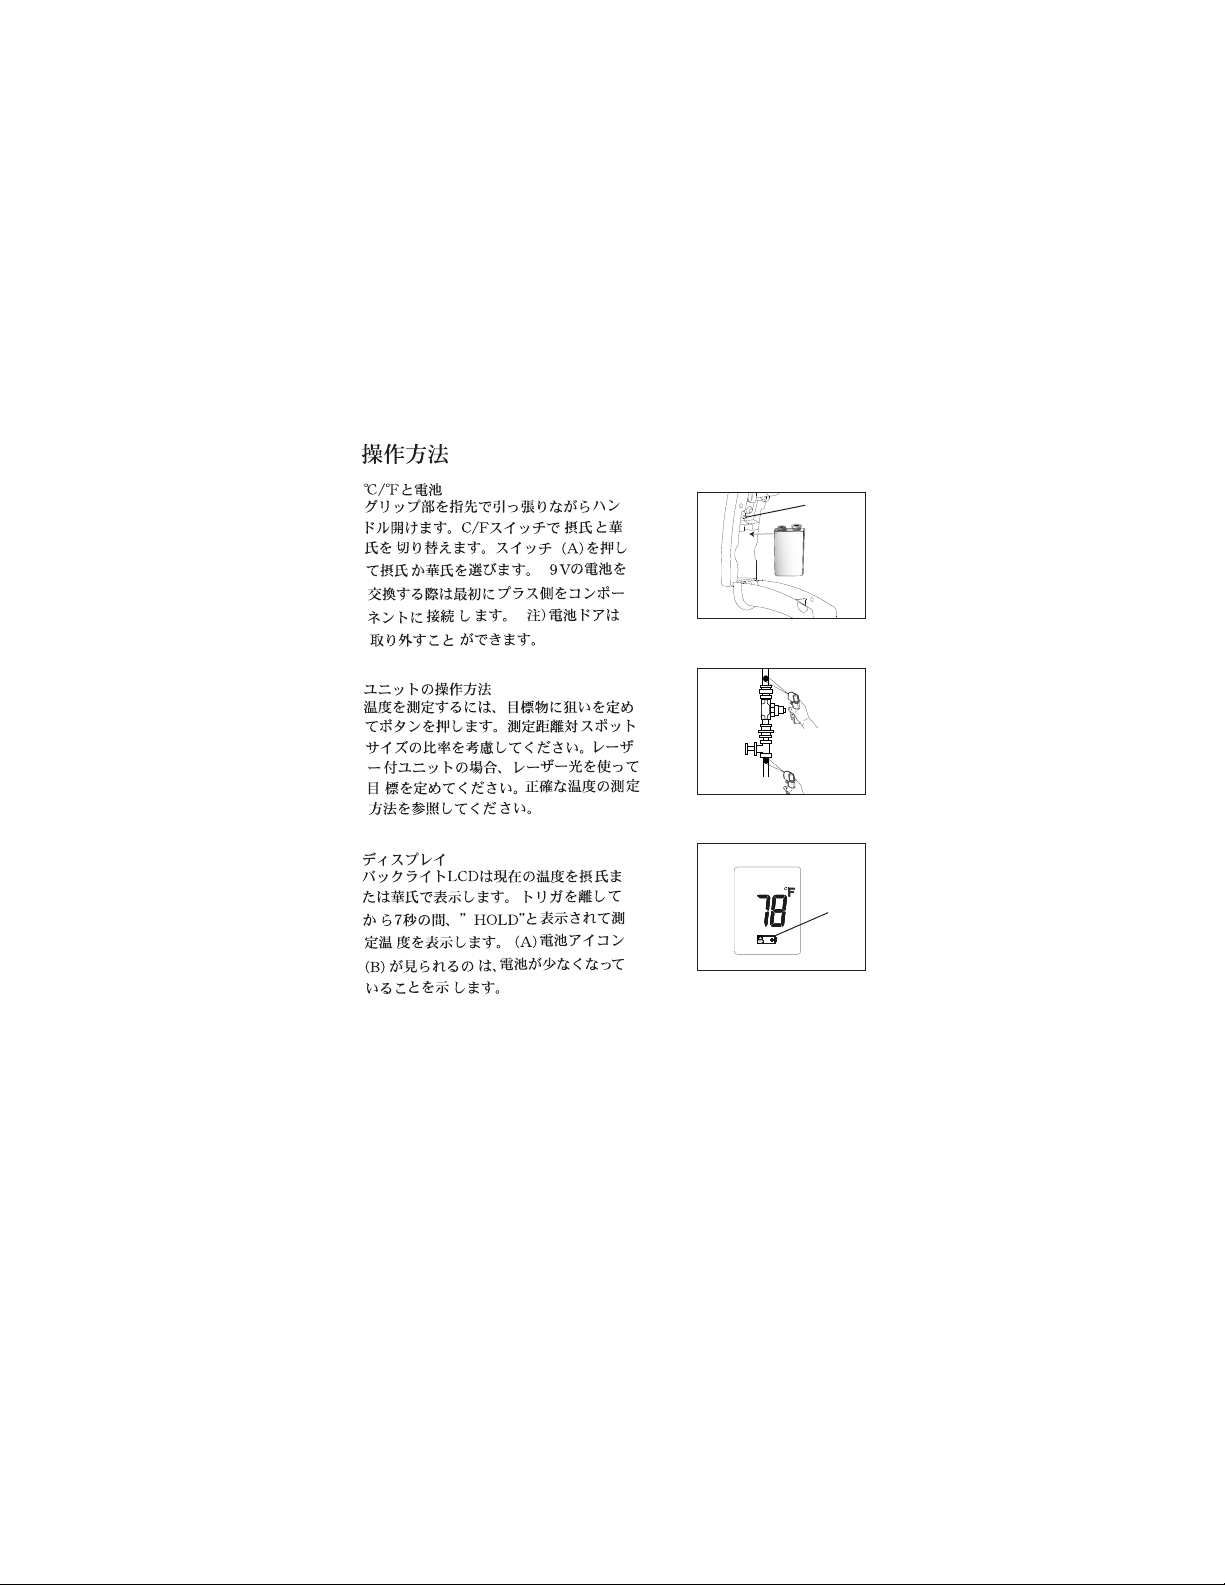
Operating the Unit
To measure a temperature, point unit at object and
pull the trigger. Be sure to consider distance-to-spot
size ratio and field of view. If the unit is equipped
with a laser, use the laser only for aiming. See How
to Accurately Measure Temperatures.
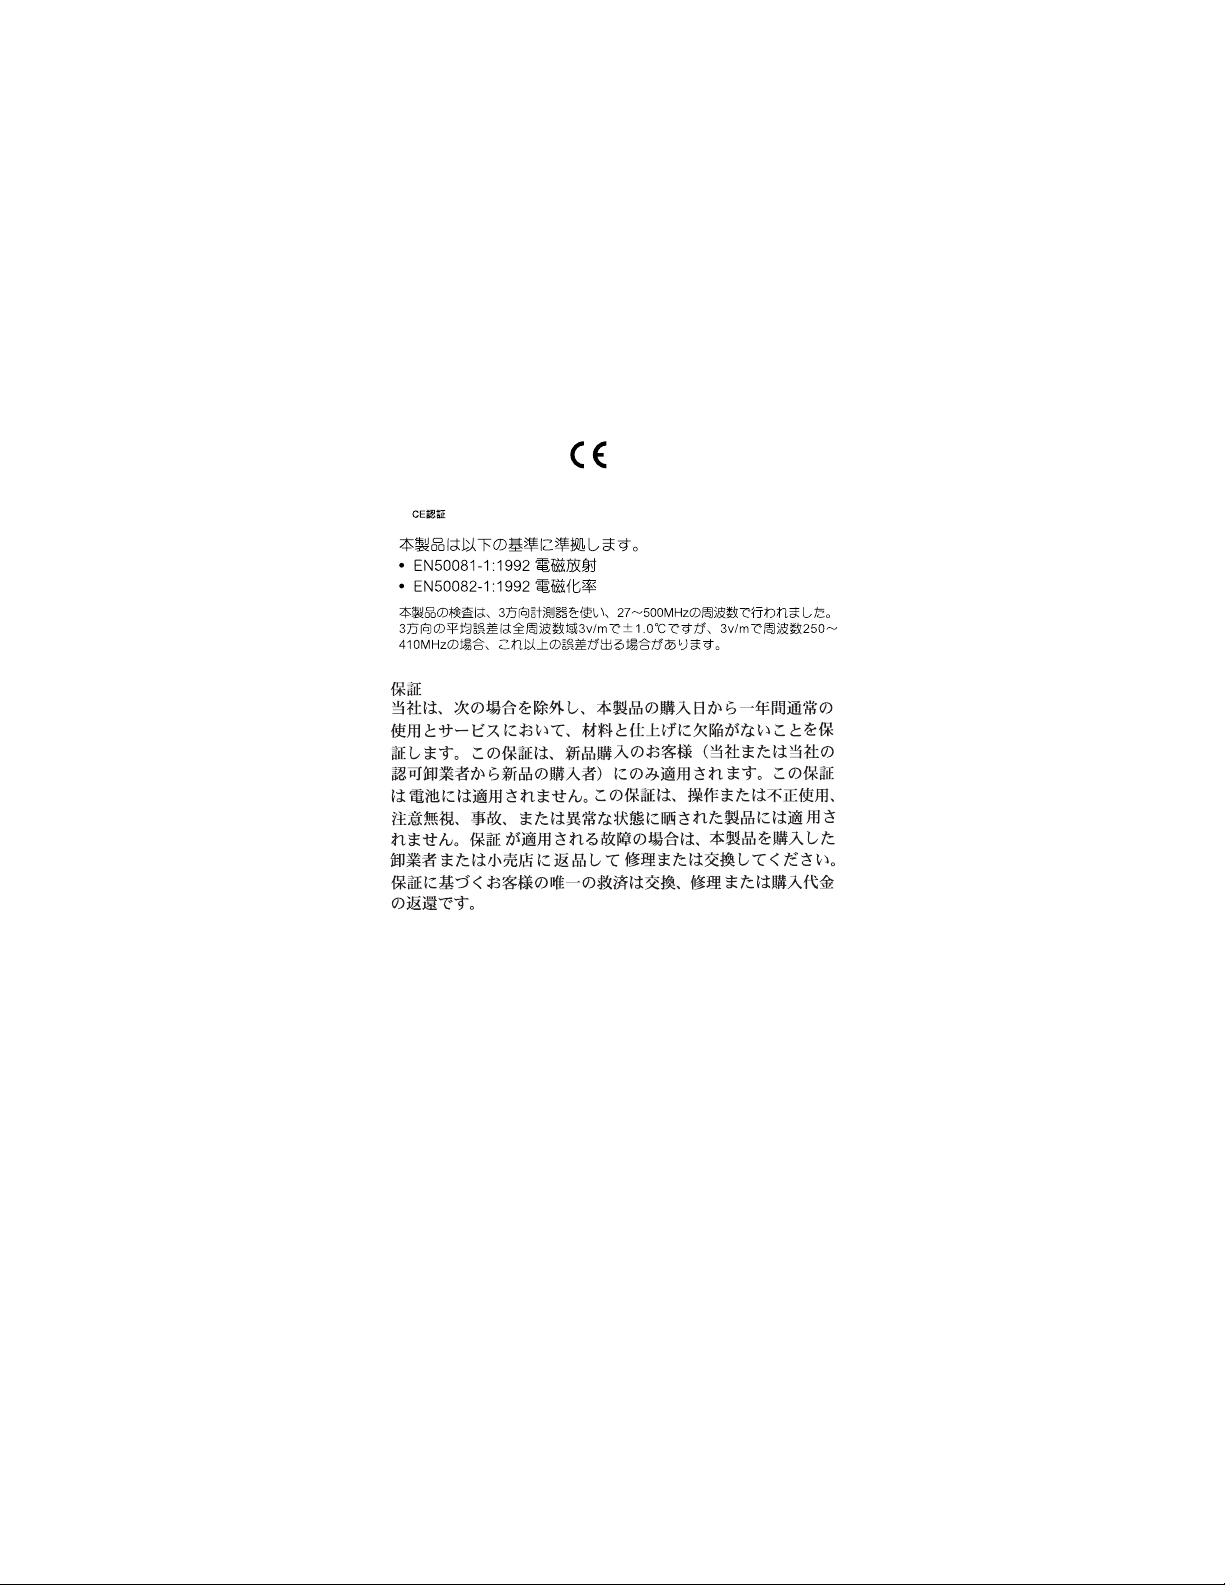
Display
The backlit LCD displays the current temperature in
Celsius or Fahrenheit. The unit will hold the reading
for 7 seconds after trigger is released; the word HOLD
appears. The presence of the battery icon indicates a
low battery (B).
B
C
9v
Battery
F
+
-
A
Page 6
4
English
How to Accurately Measure
Temperature
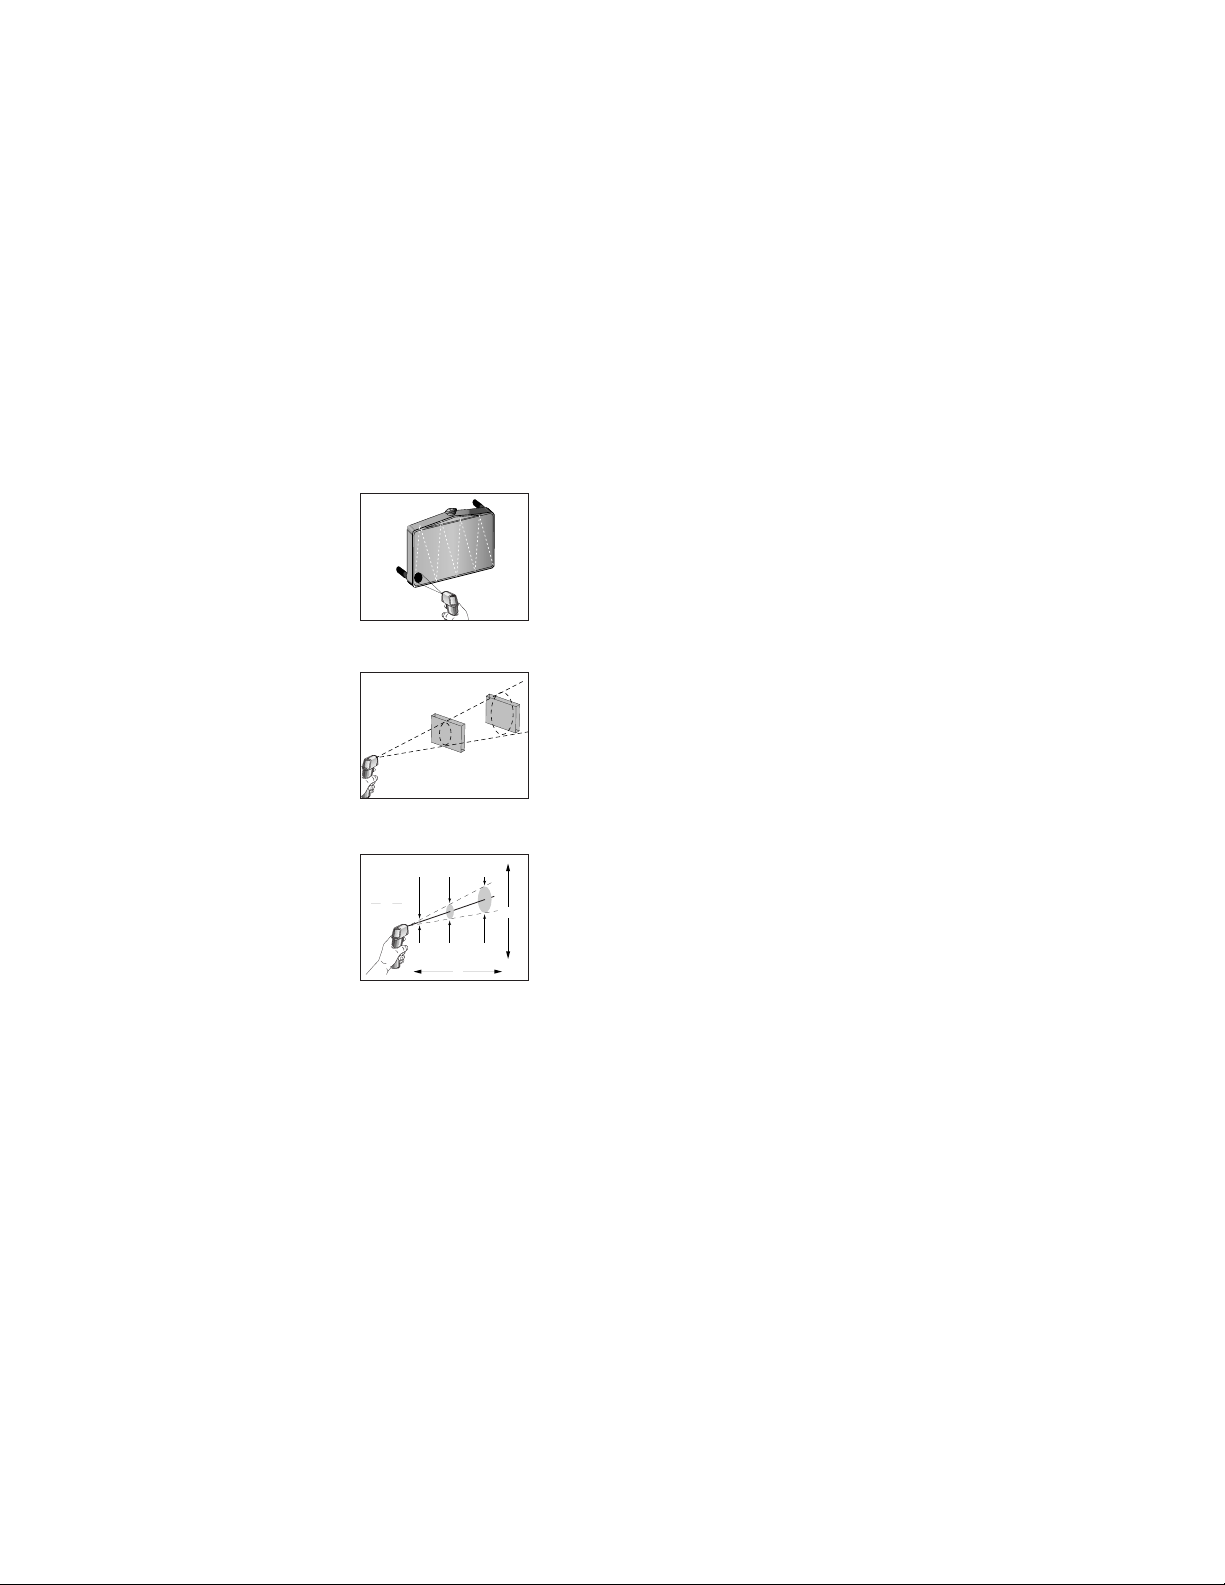
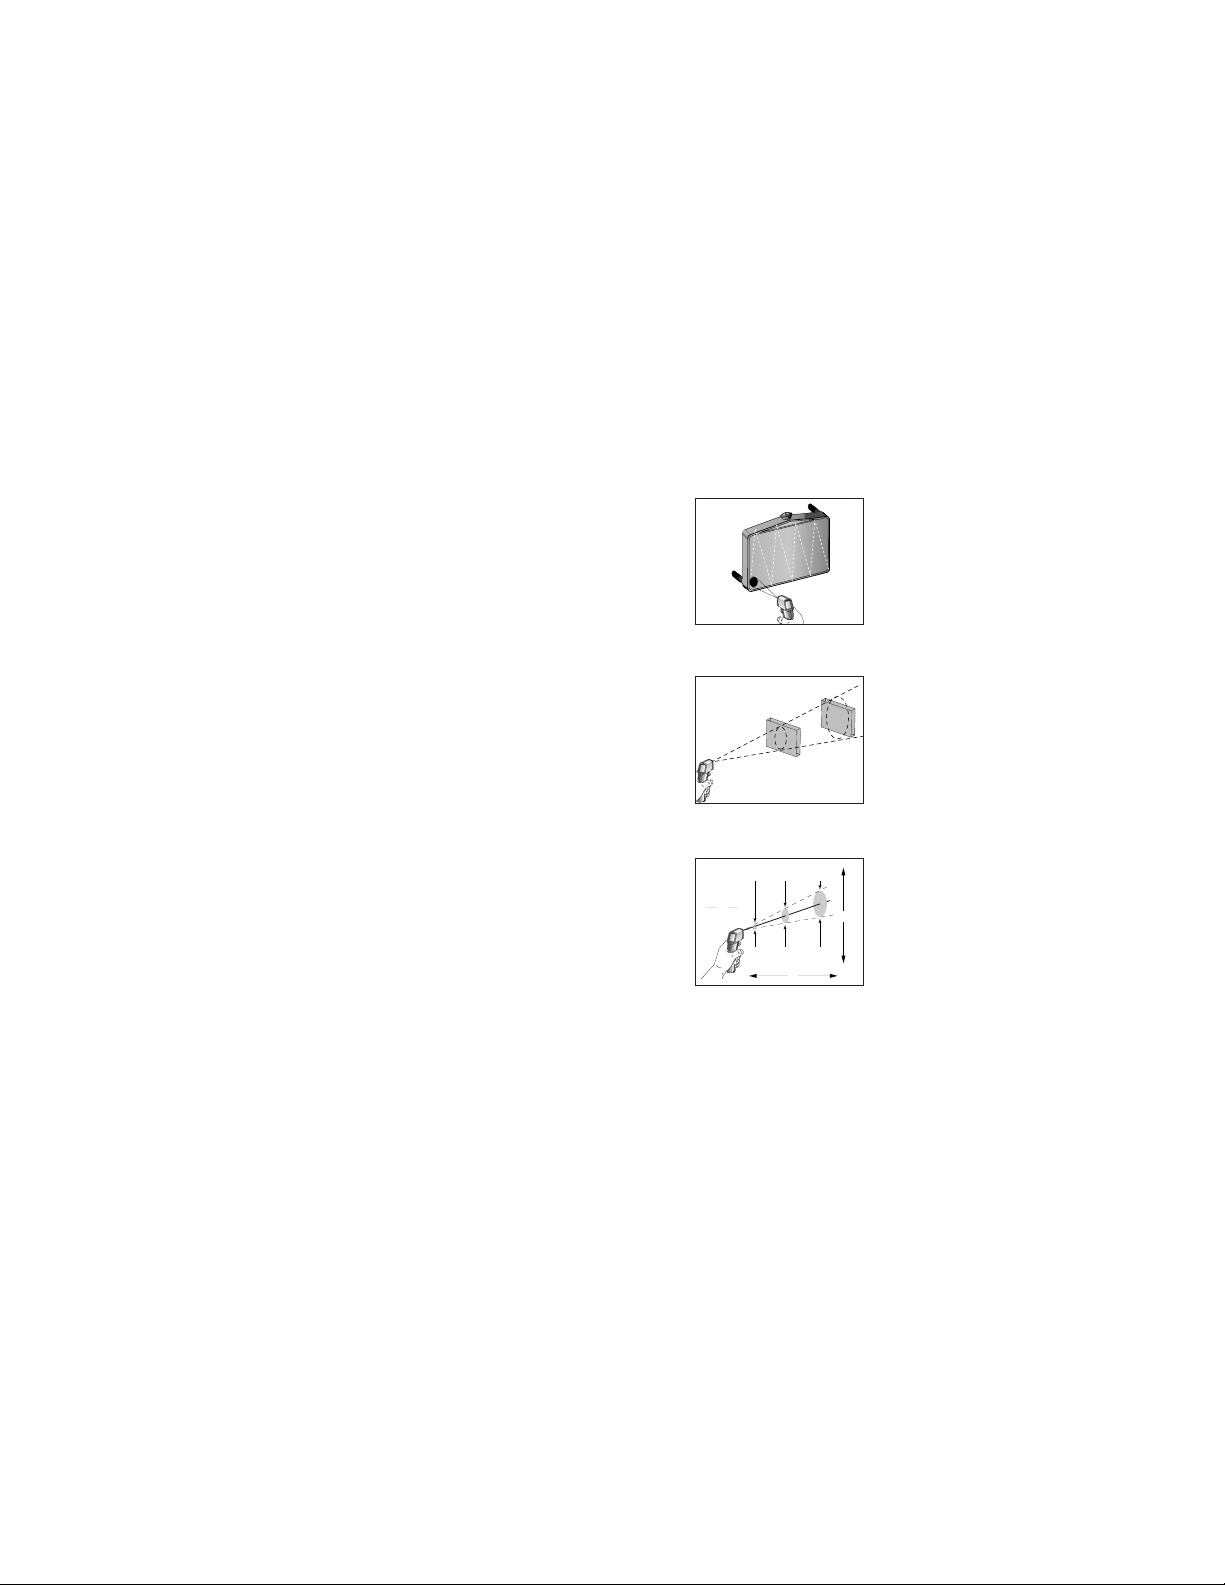
Locating a Hot Spot
To find a hot spot aim the thermometer outside the
area of interest, then scan across with an up and
down motion until you locate the hot spot.
Field of View
Make sure that the target is larger than the unit’s spot
size. The smaller the target, the closer you should be
to it. When accuracy is critical, make sure the target
is at least twice as large as the spot size.
Distance & Spot Size
As the distance (D) from the object increases, the
spot size (S) of the area measured by the unit
becomes larger.
Reminders
■ Not recommended for use in measuring shiny or
polished metal surfaces (stainless steel, aluminum, etc.). See Emissivity.
■ The unit cannot measure through transparent sur-
faces such as glass. It will measure the surface
temperature of the glass instead.
■ Steam, dust, smoke, etc., can prevent accurate
measurement by obstructing the unit’s optics.
25mm @
150mm
50mm @
300mm
100mm @
600mm
1" @6"2" @
12"
4" @
24"
D
S
D
S
6
1
=
Yes
No
Page 7

5
English
Emissivity
Most organic materials and painted or oxidized surfaces have an emissivity of 0.95
(pre-set in the unit). Inaccurate readings will result from measuring shiny or
polished metal surfaces. To compensate, cover the surface to be measured with
masking tape or flat black paint. Allow time for the tape to reach the same temperature as the the material underneath it. Measure the temperature of the tape or painted surface.
Maintenance
Lens Cleaning: Blow off loose particles using clean compressed air. Gently brush
remaining debris away with a camel's hair brush. Carefully wipe the surface with a
moist cotton swab. The swab may be moistened with water. NOTE: DO NOT use
solvents to clean the plastic lens.
Case Cleaning: Use soap and water on a damp sponge or soft cloth. NOTE: DO
NOT submerge the unit in water.
Troubleshooting
Code Problem Action
– – – (on display) Target temperature Select target within specifications
is over or under range
Battery icon appears Possible low battery Check and/or replace battery
Blank display Possible dead battery Check and/or replace battery
Laser doesn’t work Low or dead battery Replace battery
Page 8

6
English
Warranty
Raytek warrants this product to be free from defects in material and workmanship under
normal use and service for a period of one year from date of purchase, except as hereinafter provided.This warranty extends only to the original purchaser (a purchase from
Raytek or Raytek-licensed distributors is an original purchase).
This warranty shall not apply to batteries.The warranty shall not apply to any product
which has been subject to misuse, neglect, accident, or abnormal conditions of operation or storage. In the event of failure under warranty, return this product to the distributor or retailer from whom it was purchased for replacement or repair. Purchaser’s exclusive remedy under warranty shall be replacement, repair, or refund of the purchase
price.
The foregoing warranty is in lieu of all other warranties, expressed or implied, including but not limited to any implied warranty of merchantability, fitness, or adequacy for
any particular purpose or use. Raytek shall not be liable for any special, incidental, or
consequential damages, whether in contract, tort, or otherwise.
CE Certification
This instrument conforms to the following standards:
• EN50081-1:1992, Electromagnetic Emissions
• EN50082-1:1992, Electromagnetic Susceptibility
Tests were conducted using a frequency range of 27–500 MHz with the instrument in
three orientations.The average error for the three orientations is ±4.8°C (±8.6°F) at 3
v/m throughout the spectrum. However, between 190 MHz and 500 MHz at 3 V/m,
the instrument may not meet its stated accuracy.
Page 9

7
Deutsch
Warnung (bei Geräten mit Laser)
Richten Sie den Laser nicht direkt oder indirekt über
reflektierende Oberflächen auf die Augen.
Vorsichtsmaßnahmen
Alle Modelle müssen vor folgenden Zuständen
geschützt werden:
▲ EMF (elektromagnetische Felder) von
Elektroschweißgeräten, Induktionsheizgeräten
▲ statischer Elektrizität
▲ Thermischer Schock (verursacht durch große oder
plötzliche Temperaturänderungen – Gerät vor
Gebrauch 30 Minuten lang stabilisieren lassen)
▲ Gerät nicht auf oder in der Nähe von heißen
Objekten aufbewahren.
Einführung
Wir sind überzeugt, daß Sie für Ihr handgehaltenes
berührungsloses Thermometer zahlreiche
Anwendungen finden werden. Kompakt, robust und
einfach zu bedienen – einfach auf das Ziel richten,
den Knopf drücken, und in weniger als einer Sekunde
können Sie die momentane Oberflächentemperatur
ablesen. So lassen sich die Oberflächentemperaturen
von heißen, gefährlichen oder schwer erreichbaren
Objekten gefahrlos und ohne Berührung bestimmen.
LASER RADIATION – DO NOT STARE INTO BEAM
OUTPUT < 1mW WAVELENGTH 630 – 670 nm
CLASS II LASER PRODUCT
COMPLIES WITH CFR 1040.10
CAUTION
AVOID EXPOSURE - LASER RADIATION
IS EMITTED FROM THIS APERTURE
CLASS II (FDA)
AND CLASS 2 (IEC)
L
ASER WARNING LABEL
Page 10
8
Deutsch
Funktionsweise
Infrarot-Thermometer messen die Oberflächentemperatur eines Objekts (target). Die Optik des
Gerätes erfaßt die emittierte (E), reflektierte (R) und
durchgelassene (T) Wärmestrahlung, die gebündelt
und auf einen Detektor fokussiert wird. Die
Geräteelektronik wandelt diese Information in einen
Temperaturwert um, der auf dem Display angezeigt
wird. Bei Geräten mit einem Laser wird der Laser
lediglich zum Zielen verwendet.
Bedienung des Gerätes
°C/°F und Batterie
Um zwischen Celsius und Fahrenheit umzuschalten,
müssen Sie das Batteriefach öffnen und durch
Drücken des Schalters (A) C oder F wählen. Die
9-Volt-Batterie wird wie in der Abbildung dargestellt,
ausgetauscht.
Bedienung des Gerätes
Zur Temperaturbestimmung wird das Gerät auf ein
Objekt gerichtet und die Meßtaste gedrückt. Denken
Sie daran, das Verhältnis von Entfernung zu
Punktgröße sowie das Sichtfeld zu berücksichtigen.
Falls das Gerät mit einem Laser ausgerüstet ist,
benutzen Sie den Laser bitte nur zum Zielen. Siehe
Abschnitt „Korrekte Temperaturbestimmung“.
Anzeige
Die LCD-Anzeige zeigt die momentane Temperatur in
Grad Celsius oder Grad Fahrenheit an. Nach Freigabe
der Meßtaste wird der Meßwert weitere 7 Sekunden
lang angezeigt; dabei wird das Wort HOLD angezeigt.
Die Anzeige des Batteriesymbols weist auf eineverbrauchte Batterie hin (B).
B
C
9v
Battery
F
+
-
A
R
T
E
Target
Page 11
9
Deutsch
Sokönnen Sie präzise die
Temperaturmessen
Lokalisierung einer heißen Stelle
Zur Lokalisierung einer heißen Stelle wird das
Thermometer auf einen Punkt außerhalb des gewünschten Bereichs gerichtet und der Bereich dann mit
einer Auf- und Abbewegung abgetastet, bis die heiße
Stelle gefunden ist.
Sichtfeld
Achten Sie darauf, daß das Meßobjekt größer ist als
die Meßfleckgröße des Gerätes. Je kleiner das
Meßobjekt , desto näher müssen Sie an das Objekt
herangehen. Wenn die Meßgenauigkeit von ausschlaggebender Bedeutung ist, sollte das Meßobjekt
wenigstens doppelt so groß wie die Meßfleckgröße
sein.
Entfernung und Meßfleckgröße
Mit zunehmender Entfernung (D) vom Objekt nimmt
die Fläche (S) des vom Gerät gemessenen Bereichs
zu.
Hinweise
■ Zur Messung von Temperaturen glänzender oder
hochpolierter Metalloberflächen (z.B. Edelstahl,
Aluminium usw.) wird das Gerät nicht empfohlen.
Siehe Abschnitt „Emissionsgrad“.
■ Das Gerät kann nicht durch transparente
Oberflächen wie z.B. Glas messen. Statt dessen
mißt es die Oberflächentemperatur des Glases.
■ Dampf, Staub, Rauch usw. können die korrekte
Temperaturbestimmung behindern.
25mm @
150mm
50mm @
300mm
100mm @
600mm
1" @6"2" @
12"
4" @
24"
D
S
D
S
6
1
=
Yes
No
Page 12

10
Deutsch
Emissionsgrad
Die meisten organischen Materialien sowie lackierte und oxidierte Oberflächen
besitzen einen Emissionsgrad von 0,95 (im Gerät vorgegeben). Die Bestimmung der
Temperaturen glänzender oder hochpolierter Metalloberflächen ergibt ungenaue
Meßwerte. Zur Kompensierung kann die zu messende Oberfläche mit Klebeband
abgedeckt oder mit mattschwarzer Farbe angestrichen werden. Warten Sie, bis das
Klebeband dieselbe Temperatur wie das unterliegende Material aufweist. Bestimmen
Sie dann die Temperatur des Klebebands oder der angestrichenen Oberfläche.
Wartung
Reinigung der Linse: Blasen Sie lose Teilchen mit reiner Preßluft weg.
Zurückbleibende Verunreinigungen werden dann vorsichtig mit einem weichen
Pinsel entfernt. Wischen Sie die Oberfläche vorsichtig mit einem feuchten
Wattebausch ab. Der Wattebausch kann mit Wasser befeuchtet werden. HINWEIS:
KEINE Lösungsmittel zur Reinigung der Linse verwenden.
Reinigung des Gehäuses: Mit Seifenlösung und Schwamm oder einem weichen
Tuch reinigen. HINWEIS: Das Gerät darf NICHT in Wasser eingetaucht werden.
Fehlersuche und -behebung
Code Störung Vorgehenn
– – – (auf der Anzeige) Zieltemperatur oberhalb Ziel innerhalb des Bereichs
oder unterhalb des wählen
Bereichs
Batteriesymbol Batterie nahezu Batterie prüfen oder
erscheint verbraucht austauschen
Keine Anzeige Batterie entladen Batterie prüfen oder
austauschen
Laser funktioniert nicht Schwache oder entladene Batterie austauschen
Batterie
Page 13

11
Garantie
Das Unternehmen gewährleistet, daß das Produkt bei normalem Einsatz und Bedienung für den
Zeitraum von einem Jahr, gerechnet vom Datum des Erwerbs an, mit Ausnahme der nachstehend
aufgeführten Umstände, frei von Material- und Herstellungsfehlern ist. Diese Garantie erstreckt
sich nur auf den Erstkäufer (ein Kauf vom Unternehmen oder von einem lizensierten Händler gilt
als Erstkauf). Die Garantie bezieht sich nicht auf die Batterien. Die Garantie gilt nicht für
Produkte, die mißbraucht oder vernachlässigt, in einen Unfall verwickelt oder unsachgemäßen
Betriebs- oder Lagerbedingungen unterworfen wurden. Im Fall eines Ausfalls des Produkts
während der Garantiefrist ist das Produkt zwecks Reparatur oder Austausch an die Vertriebsfirma
bzw.an den Einzelhändler zurückzusenden, von dem das Gerät erworben wurde. Der alleinige
Anspruch des Käufers innerhalb der Garantiefrist besteht im Austausch oder der Reparatur des
Geräts oder der Rückerstattung des Kaufpreises.
Die vorstehende Garantie gilt anstelle aller anderen Garantien, egal ob ausdrücklicher oder
stillschweigender Natur, einschließlich, jedoch ohne Beschränkung, aller stillschweigender
Garantien der Verkäuflichkeit, der Handelstauglichkeit und der Eignung für einen bestimmten
Zweck oder eine besondere Verwendung. Das Unternehmen übernimmt keinerlei Verantwortung
für besondere, zufällige oder Folgeschäden, weder durch Vertrag, Schadenersatzanspruch noch
anderweitig.
CE=Zertifizierung
Dieses Gerät entspricht den folgenden Normen:
• EN50081-1:1992 (elektromagnetische Störstrahlung)
• EN50082-1:1992 (elektromagnetische Störstrahlung)
Das Gerät wurde Tests in einem Frequenzbereich von 27-500 MHz in drei Ausrichtungen unter-
zogen. Der durchschnittliche Fehlerwert für die drei Ausrichtungen beträgt ± 4,8°C (±8,6°F) bei
3 V/m im Testspektrum. Im Bereich zwischen 190 MHz und 500 MHz bei 3 V/m kann es jedoch
sein, daß das Gerät der angegebenen Genauigkeit nicht entspricht.
Page 14

12
Français
Avertissement
Ne pointez pas le rayon laser directement dans les
yeux ou indirectement sur des surfaces réfléchissantes.
Précautions
Tous les modèles doivent être protégés contre :
• les champs électromagnétiques des postes de
soudure, les appareils de chauffage par induction
• l’électricité statique
• les chocs thermiques (causés par d’importants
ou de brusques changements de température laissez le thermomètre se stabiliser pendant
30 minutes avant de l’utiliser)
• Ne laissez pas le thermomètre sur ou à proximité
d’objets à température élevée.
Introduction
Nous sommes certains que vous trouverez plusieurs
utilisations pour le thermomètre portable sans
contact . Compact, robuste et facile à utiliser - il
suffit de viser, d’appuyer sur la gâchette pour lire la
température courante de surface en moins d’une seconde. Vous pouvez ainsi mesurer en toute sécurité
les températures de surface d’objets les toucher brulants, dangereux ou difficiles d’accès, sans contact.
Principe de fonctionnement
Les thermomètres à infrarouge mesurent la température de surface d’un objet. L’optique de l’instrument
capte l’énergie émise, réfléchie et transmise ;celle-ci
est recueillie, puis dirigée sur un détecteur.
L’électronique du thermomètre traduit cette information et affiche la température. Le rayon laser (des
thermomètres qui en sont équipés) sert uniquement
à pointer l’objet.
LASER RADIATION – DO NOT STARE INTO BEAM
OUTPUT < 1mW WAVELENGTH 630 – 670 nm
CLASS II LASER PRODUCT
COMPLIES WITH CFR 1040.10
CAUTION
AVOID EXPOSURE - LASER RADIATION
IS EMITTED FROM THIS APERTURE
R
T
E
Target
CLASS II (FDA)
AND CLASS 2 (IEC)
L
ASER WARNING LABEL
Page 15

13
Français
Principe de fonctionnement
°C/°F et pile
Pour passer des degrés Celsius aux degrés
Fahrenheit, ouvrez le couvercle du logement des
piles et appuyez sur le bouton (A) pour sélectionner
C ou F. Lorsque cela s’avère nécessaire, remplacez la
pile 9 V comme indiqué sur le schéma.
Utilisation du thermomètre
Pour mesurer une température, pointez l’instrument
sur un objet et appuyez sur la gâchette. Veillez tenir
compte du champ de visée et du rapport distancedimension du spot. Si le thermomètre est équipé d’un
laser, n’utilisez ce dernier que pour pointer sur l’objet.
Voir « Mesure de la température avec précision ».
Affichage
L’écran à cristaux liquides, rétro-éclairé, affiche la
température courante en degrés Celsius ou
Fahrenheit. La température restera affichée pendant 7
secondes après avoir relâché le bouton et le mot
HOLD (maintenir) apparaît. Lorsque l’icône de la pile
apparaît, cela indique un faible niveau de charge de
la pile (B).
B
C
9v
Battery
F
+
-
A
Page 16

14
Français
Comment mesurer précisément la
température
Détermination d’un point chaud
Pour trouver un point chaud, pointez le thermomètre
hors de la zone d’intérêt, puis balayez d’un mouvement de haut en bas jusqu’à localisation du point
chaud.
Champ de visée
Assurez-vous que la cible est plus grande que le spot
mesuré par le thermomètre. Plus la cible est petite,
plus vous devrez vous en rapprocher. Lorsqu’il est
essentiel d’obtenir des mesures précises, veillez à ce
que la cible soit au moins deux fois plus grande que
le spot mesuré.
Distance et taille du spot mesuré
La taille du spot mesuré (S) s’accroît avec la distance
(D) séparant le thermomètre de la cible.
Rappels
• Il est déconseillé d’utiliser ce thermomètre pour
mesurer la température de surfaces métalliques
brillantes ou polies (acier inoxydable, aluminium,etc.). Voir Emissivité.
• Le thermomètre ne peut pas mesurer la température à travers des surfaces transparentes comme
le verre, car il mesure en fait la température de
surface du verre.
• La précision des résultats peut être faussée par la
présence de vapeur, de poussière, de fumée, etc.
25mm @
150mm
50mm @
300mm
100mm @
600mm
1" @6"2" @
12"
4" @
24"
D
S
D
S
6
1
=
Yes
No
Page 17

15
Français
Emissivité
La plupart des matières organiques, ainsi que les surfaces peintes ou oxydées ont
une émissivité de 0,95 (préréglée dans le thermomètre). Des résultats inexacts peuvent s’afficher en mesurant la température de surfaces métalliques brillantes ou
polies. Pour corriger cela, couvrez la surface à mesurer à l’aide de ruban adhésif
(résistant à la température mesurée) ou d’une peinture noire mate. Laissez le ruban
adhésif atteindre la mÍme température que le matériau recouvert. Mesurez la température de la surface recouverte.
Entretien
Nettoyage de l’optique : ôtez les particules libres en soufflant de l’air comprimé propre. Eliminez les débris restants en brossant délicatement à l’aide d’une brosse en
poils de chameau. Essuyez avec précaution la surface à l’aide d’un coton-tige
humide (que vous pouvez humidifier avec de l’eau). REMARQUE : N’utilisez PAS de
solvant pour nettoyer l’optique en plastique.
Nettoyage du boîtier : utilisez une éponge humide ou un linge doux imbibés d’eau
savonneuse. REMARQUE : N’immergez PAS le thermomètre dans l’eau.
Dépannage
Code Problème Action
– – – (sur l’affichage) Température cible hors Sélectionnez une cible
limites conforme aux spécifications
L’icône de la pile Pile faiblement chargée Vérifier et/ou changer la pile
apparaît
Pas d’affichage Pile déchargée Remplacez la pile
Le laser ne Pile faiblement chargée Remplacez la pile
fonctionne pas ou déchargée
Page 18

16
Français
Garantie
Raytek garantit que ce produit est exempt de défauts de fabrication et de matériaux utilisés
pour celle_ci dans des conditions normales d’utilisation et assure sa réparation pendant une
période d’un an à compter de la date d’achat du produit, sauf indications contraires mentionnées ci-après. Cette garantie n’est accordée qu’à l’acheteur d’origine (un achat auprès de
Raytek ou de l’un de ses distributeurs agréés est considéré comme un achat d’origine).Cette
garantie ne s’applique ni aux piles ni dans le cas ou le produit a été l’objet d’un mauvais
traitement, de négligence, d’un accident ou a été utilisé ou stocké dans des conditions
anormales. En cas de panne au cours de la période de garantie, retournez le produit au
distributeur ou au revendeur auprès duquel il a été acheté pour en obtenir le remplacement
ou la réparation. L’unique recours sous garantie consenti à l’Acheteur consiste à remplacer,
réparer ou rembourser le prix d’achat du produit.
La présente garantie tient lieu de toute autre garantie, expresse ou implicite, y compris mais
sans s’y limiter, toute garantie implicite de qualité marchande, de convenance ou d’adéquation à un but ou usage particulier.Raytek ne saurait en aucun cas être tenue responsable de
tout dommage particulier, indirect ou fortuit, du fait de la responsabilité contractuelle,
délictuelle ou quasi-délictuelle, ou autre.
Homologation CE
Cet instrument est conforme aux normes suivantes:
• EN50081-1:1992, Émissions électromagnétiques
• EN50082-1:1992, Susceptibilité électromagnétique
Des tests ont été effectués en utilisant une gamme de fréquences de 27–500 MHz avec l’instru-
ment dans trois orientations différentes. L’erreur moyenne pour les trois orientations est de
±1.0°C à 3 v/m pour tout le spectre de mesure. Cependant, entre 230 MHz et 500 MHz à 3 v/m,
il est possible que l’instrument ne soit pas conforme à cette précision nominale.
Page 19
17
Español
Advertencia
No apunte el láser directamente hacia los ojos o
indirectamente desde superficies reflejantes.
Precauciones
Todos los modelos deberán protegerse de lo
siguiente,
▲ Campos electromagnéticos de soldadoras de
arco, calentadores de inducción
▲ Electricidad estática
▲ Choque térmico (ocasionado por cambios
abruptos de temperatura ambiente—deje que la
unidad se estabilice por 30 minutos antes de usar)
▲ No deje la unidad sobre ni cerca de objetos de
alta temperatura
Introducción
Confiamos en que encontrará muchos usos para su
termómetro portátil sin Contacto.. Compacto,
duradero y fácil de usar —tan sólo hay que apuntar,
oprimir el gatillo y podrá leer las temperaturas reales
de superficie en menos de un segundo. Puede medir
sin peligro alguno la temperatura de la superficie de
objetos calientes, peligrosos o de difícil acceso, sin
tener que tocarlos.
Cómo funciona
Los termómetros de rayos infrarrojos miden la temperatura de la superficie de un objeto. El sistema óptico de
la unidad detecta energía emitida, reflejada y transmitida, la cual es captada y enfocada hacia un detector. El
sistema electrónico de la unidad convierte la información en una lectura de temperatura, la cual se muestra
en la unidad. En unidades que cuentan con láser, éste
se usa exclusivamente con fines de señalamiento.
LASER RADIATION – DO NOT STARE INTO BEAM
OUTPUT < 1mW WAVELENGTH 630 – 670 nm
CLASS II LASER PRODUCT
COMPLIES WITH CFR 1040.10
CAUTION
AVOID EXPOSURE - LASER RADIATION
IS EMITTED FROM THIS APERTURE
R
T
E
Target
CLASS II (FDA)
AND CLASS 2 (IEC)
L
ASER
WARNING LABEL
Page 20

18
Español
Como operar la Unidad
°C/°F y pila
Para alternar entre grados centígrados y Fahrenheit,
abra la tapa de las pilas que está en el mango y
empuje el interruptor (A) para seleccionar C o F.
Cuando sea necesario, cambie la pila de 9v como
se indica en el diagrama.con el lado positivo primero
hacia el fondo del compartimiento de la pila. La tapa
de las pilas es removible.
Funcionamiento de la unidad
Para medir una temperatura, apunte la unidad hacia
un objeto y oprima el gatillo. Asegúrese de considerar
la relación distancia-tamaño del área a medir. Si la
unidad está equipada con un láser, úselo exclusivamente para apuntar. Consulte Cómo medir temperaturas con precisión.
Pantalla
La pantalla de LCD muestra la temperatura actual en
grados centígrados o en grados Fahrenheit. La
unidad retiene la lectura durante 7 segundos después
de soltar el gatillo; aparece la palabra HOLD (retener). La presencia del icono de pila indica que está
baja la pila (B).
B
C
9v
Battery
F
+
-
A
Page 21

19
Español
Como Medir Temperatura con
Precisión
Localización de un punto caliente
Para encontrar una zona caliente, apunte el
termómetro fuera de la región de interés, luego
pase el aparato con un movimiento hacia arriba
y hacia abajo (barrido) hasta que ubique la zona
caliente.
Campo Visual
Cerciórese de que el objeto a medir sea mayor que
el diámetro del área medida. Mientras más pequeño
el objeto, más cerca se debe hacer la medición.
Cuando sea crítica la precisión, cerciórese de que
el objeto sea al menos dos veces más grande que
el diámetro del área a medir.
Distancia y Tamaño del área medida
A medida que aumenta la distancia (D) desde el
objeto, el diámetro del área medida (S) se vuelve
más grande.
Recordatorios
■ No se recomienda para uso en la medición de
superficies metálicas brillosas o pulidas (acero
inoxidable, aluminio, etc.) Véase Emisividad.
■ La unidad no puede medir a través de superficies
transparentes, tales como vidrio. En su lugar, el
aparato mide la temperatura de la superficie del
vidrio.
■ El vapor, polvo, humo, etc., pueden obstruir la
medición, impidiendo una temperatura exacta.
25mm @
150mm
50mm @
300mm
100mm @
600mm
1" @6"2" @
12"
4" @
24"
D
S
D
S
6
1
=
Yes
No
Page 22

20
Español
Emisividad
La mayoría de los materiales orgánicos y las superficies pintadas u oxidadas tienen
una emisividad de 0,95 (preestablecida en la unidad). La medición de superficies
metálicas brillosas o pulidas resultará en mediciones incorrectas. Para compensar,
cubra la superficie que va a medir con cinta aislante o con pintura mate negra.
Conceda tiempo suficiente para que la cinta alcance la misma temperatura que el
material que está cubriendo. Mida la temperatura de la cinta o de la superficie
pintada.
Mantenimiento
Limpieza de la lente: Elimine las partículas sueltas con aire comprimido limpio y
seco.. Cepille suavemente cualquier partícula sobrante con un cepillo de pelo de
camello. Limpie cuidadosamente la superficie con un cotonete húmedo. Lo puede
humedecer con agua. NOTA: NO use solventes para limpiar el lente de plástico.
Limpieza del estuche: use agua y jabón en una esponja húmeda o paño suave.
NOTA: NO sumerja la unidad en agua.
Corrección de Problemas
Código Problema Acción
– – – (en la pantalla) Fuera de rango Seleccione un objeto dentro del
(alto o bajo) rango (o dentro de las
especificaciones)
El icono de la pila Pila baja Cambie la pila
aparece
Pantalla en blanco Pila agotada Cambie la pila
El láser no funciona Pila baja o agotada Cambie la pila
Page 23

21
Español
Garantía
Raytek garantiza que este producto estará libre de defectos en materiales y mano de obra
en condiciones de uso y servicio normal durante un período de un año a partir de la fecha
de compra, con la excepción de lo que se describe a continuación.Esta garantía sólo es
válida para el comprador original (la compra en Raytek o por medio de un distribuidor
autorizado por Raytek representa una compra original). Esta garantía no cubre las pilas.
La garantía no será válida para cualquier producto que haya sido sometido a mal uso,
negligencia, accidente o condiciones anormales de operación o almacenamiento . En el
caso de una falla cubierta por la garantía, sírvase devolver el producto al distribuidor o
establecimiento en donde fué comprado para que se lo reparen, se lo reemplacen, o le
reembolsen el costo de su compra.
La garantía antedicha sustituye cualquier otra garantía, expresa o implícita, incluyendo,
pero no limitándose a cualquier garantía implícita de comerciabilidad, propiedad o suficiencia para cualquier propósito o uso particular. Raytek no se hace responsable por ningún
daño especial, incidental o consecuencial, sea por contrato, agravio o algún otro medio.
Certificación CE
Este instrumento satisface las normas siguientes:
• EN50081-1:1992, Emisiones electromagnéticas
• EN50082-1:1992, Susceptibilidad electromagnética
Se han realizado pruebas usando un rango de frecuencia de 27 a 500 MHz y con el instru-
mento en tres direcciones diferentes. El error promedio para las tres direcciones es de
±4.8°C (±8.6°F) a 3 V/m en todo el espectro.Sin embargo, es posible que el instrumento no
tenga la misma precisión entre 190 MHz y 500 MHz a 3 V/m.
Page 24

22
Portugués
Atenção ( modelos com mira laser )
Não aponte o laser para os olhos ou para superfícies
reflectivas.
Cuidados
Todos os modelos devem ser protegidos de :
▲ EMF ( campos eletro-magnéticos ) gerados por
equipamentos que operam com indução
▲ Eletricidade estática
▲ Choque térmico ( causado por mudanças
bruscas na temperatura ambiente – aguarde 30
minutos para a estabilização da unidade antes
da utilização )
▲ Não deixe a unidade próxima a objetos com alta
temperatura.
Introdução
Temos segurança em que você encontrará muitas
aplicações para o seu termômetro portátil sem contato. É compacto, robusto e fácil de usar – apenas
aponte, pressione o gatilho e leia a temperatura
superficial dos objetos em menos de um segundo.
Permite a medição segura da temperatura de objetos
quentes, perigosos ou difíceis de alcançar sem a
necessidade de tocá-los.
Como funciona
Termômetros infravermelhos medem a temperatura
superficial dos objetos. O sistema ótico do produto
coleta as energias emitida (E), refletida ( R), e transmitida ( T), as quais são concentradas sobre um
detetor. Esta energia é traduzida em uma indicação de
temperatura a qual é indicada no display. Nos modelos equipados com mira laser a mesma apenas indica o ponto central da área de medição.
LASER RADIATION – DO NOT STARE INTO BEAM
OUTPUT < 1mW WAVELENGTH 630 – 670 nm
CLASS II LASER PRODUCT
COMPLIES WITH CFR 1040.10
CAUTION
AVOID EXPOSURE - LASER RADIATION
IS EMITTED FROM THIS APERTURE
R
T
E
Target
CLASS II (FDA)
AND CLASS 2 (IEC)
L
ASER WARNING LABEL
Page 25

23
Portugués
Como operar a unidade
Bateria e °C/°F
Puxe e abra o compartimento da bateria usando a
ranhura próxima ao gatilho para acessar a chave de
seleção C/F ou para inserir / remover a bateria. Para
selecionar °C e °F pressione a chave (A). Insira
primeiro o polo positivo da bateria de 9V dentro do
compartimento. NOTA : a tampa do compartimento é
removível.
Operando a unidade
Para medir temperatura de um objeto aponte o termômetro e aperte o gatilho. Certifique-se de levar em
conta a distância e a área de medição desejada, conforme diagram ótico. Se for um modelo com mira
laser utilize o laser somente para mirar. Veja a seção
Como Medir Temperaturas Com Precisão.
Display
O display de cristal líquido retroiluminado mostra a
temperatura corrente em graus Celsius ou
Fahrenheit. O termômetro mantém a última leitura no
display por 7 segundos depois do gatilho ser liberado; o termo HOLD aparece. A presença do ícone da
bateria indica bateria fraca (B).
B
C
9v
Battery
F
+
-
A
Page 26
24
Portugués
Como Medir Temperaturas Com
Precisão
Localizando um Ponto Quente
Aponte o termometro para fora da área de interesse e
então inicie um movimento de varredura ao longo da
área de interesse, movimentado a unidade para cima
e para baixo, até localizar o ponto quente.
Campo de Visão
Certifique-se que o objeto é maior do que a Área de
Medição do termômetro. Quanto menor for o objeto,
mais próximo o termômetro deverá estar. Quando a
precisão for crítica, certifique-se de que o objeto é
pelo menos duas vezes maior do que a Área de
Medição.
Distância e Área de Medição
A medida que a distância (D) do termômetro ao objeto aumenta, a área de medição ( S) aumenta proporcionalmente.
Lembretes
■ Não recomendado para medir superfíces metáli-
cas brilhantes ou polidas ( aço inoxidável,
alumínio etc. ). Veja Emissividade.
■ O termômetro não mede através de superfíces
transparentes tais como vidro.Medirá a temperatura superficial do vidro.
■ Vapor, pó, fumaça etc. podem prejudicar a pre-
cisão das medições, obstruindo o campo de
visão do instrumento.
25mm @
150mm
50mm @
300mm
100mm @
600mm
1" @6"2" @
12"
4" @
24"
D
S
D
S
6
1
=
Yes
No
Page 27

25
Portugués
Emissividade
A grande maioria dos materiais orgânicos, ou materiais metálicos pintados ou com
superfície oxidada possuem fator de emissividade de 0.95 ( pré-ajustado no termômetro ). Leituras imprecisas podem ocorrem quando medindo superfícies polidas ou brilhantes.Para compensar, cubra a superfície a ser medida com fita ou tinta
preta. Espere a temperatura da fita / tinta atingir a temperatura da superfície abaixo
e meça a temperatura na porção coberta com a fita / tinta.
Manutenção
Limpeza das lentes : sopre as partículas aderidas à lene com ar comprimido limpo.
Escove com suavidade as partículas remanescentes com uma escova macia. Utilize
um cotonete umedecido em água para finalizar. NOTA : NÃO utilize solventes ou
álcool para limpar as lentes.
Limpeza da Caixa : utilize um pano macio umedecido em água com sabão. NOTA :
NÃO mergulhe o produto na água.
Identificação de problemas
Code Problem Action
– – – ( no display ) Temperatura fora da faixa Selecione um objeto dentro
de medição da faixa de medição
Icone de bateria Bateria fraca Verifique e/ou troque a bateria
Display apagado Bateria esgotada Verifique e/ou troque a bateria
Laser não funciona Bateria fraca Troque a bateria
Page 28

26
Garantia
Raytek garante este produto de estar isento de defeitos de material ou fabricação sob
uso normal e por um período de um ano contado a partir da data da compra, exceto nos
especificados. Esta garantia cobre apenas o comprador original compra Raytek ou de
um Distribuidor Autorizado.
Esta garantia não se aplica às baterias. Esta garantia não cobre produtos sujeitos a uso
inadequado, negligência, acidente ou condições anormais de operação ou armazenamento.Na falha eventual sob garantia, retorne este produto ao distribuidor ou revenda no
qual foi realizada a compra para reparo ou substituição. O comprador terá direito sómente
à troca, reparo ou devolução do valor pago pelo produto.
Esta garantia se sobrepõe a quaisquer outras garantias, expressas ou implícitas, incluída
mas não limitada a qualquer garantia implícita de comercialização, propriedade ou
adequação para qualquer propósito ou uso particular. Raytek não é responsável
por quaisquer danos, especial, incidental ou como consequência, sob forma de contrato
ou não.
Portugués
CERTIFICADO CE
Este instrumento está em conformidade com os seguintes padrões:
• EN50081-1:1992, Emissões eletromagnéticas
• EN50082-1:1992, Suscetibilidade eletromagnética
Foram conduzidos testes utilizando a escala de freqüência de 27–500 Mhz, com o instrumento
em três orientações. O erro médio nas três orientações é de ±4,8˚C (±8.6°F) a 3 v/m em todo
o espectro. Entretanto, o instrumento poderá não ter a mesma precisão entre 190 MHz e 500
MHz a 3 v/m.
Page 29

Page 27
Chinese
CLASS II (FDA)
AND CLASS 2 (IEC)
L
ASER WARNING LABEL
AVOID EXPOSURE - LASER RADIATION
IS EMITTED FROM THIS APERTURE
CAUTION
LASER RADIATION – DO NOT STARE INTO BEAM
OUTPUT < 1mW WAVELENGTH 630 – 670 nm
CLASS II LASER PRODUCT
COMPLIES WITH CFR 1040.10
R
T
E
Target
Page 30

28
Chinese
B
C
9v
Battery
F
+
-
A
Page 31

29
Chinese
25mm @
150mm
50mm @
300mm
100mm @
600mm
1" @6"2" @
12"
4" @
24"
D
S
D
S
6
1
=
How to Accurately Measure
Temperature
Yes
No
Page 32

30
Chinese
Page 33

31
Chinese
Page 34

32
Japanese
LASER RADIATION – DO NOT STARE INTO BEAM
OUTPUT < 1mW WAVELENGTH 630 – 670 nm
CLASS II LASER PRODUCT
COMPLIES WITH CFR 1040.10
CAUTION
AVOID EXPOSURE - LASER RADIATION
IS EMITTED FROM THIS APERTURE
R
T
E
Target
CLASS II (FDA)
AND CLASS 2 (IEC)
L
ASER WARNING LABEL
•
•
•
•
Page 35
33
Japanese
B
C
9v
Battery
F
+
-
A
Page 36

34
Japanese
25mm @
150mm
50mm @
300mm
100mm @
600mm
1" @6"2" @
12"
4" @
24"
D
S
D
S
6
1
=
Yes
No
Page 37

35
Japanese
Page 38
36
Japanese
Page 39

Noncontact Thermometer Uses
CREAM
MILK
MILK
CREAM
MILK
MILK
Electrical/Industrial •
Industrieanwendungen • Électricité-Méchanique
•Uso electromecánico Industrial • Manutenção Elétrica e Industrial
• •
Automotive & Diesel •
KFZ-Instandesetzung und Wartung
• Maintenance automobile • Automotriz y Diesel/Vehicules (essence et diesel)
• •
Food Safety •
Lebensmittelüberwachung• Hygiène alimentaire
• Seguridad en Alimentos • Segurança de Alimentos Pereciveis
• •
Page 40

Worldwide Headquarters
Raytek Corporation
1201 Shaffer Road
P.O. Box 1820
Santa Cruz, CA 95061-1820
Phone 831 458 1110
Portable Products Division
Phone 800 866 5478
Fax 831 425 4561
European Headquarters
Raytek GmbH
Berlin, Germany
Phone 49 30 4 78 00 80
Fax 49 30 4 71 02 51
South American Headquarters
Raytek do Brasil
Sorocaba, SP Brasil
Phone 55 15 233 6338
Fax 55 15 233 6826
World Wide Web
www.raytek.com
China
Raytek China Company
Beijing, China
Phone 86 10 6437 0284
Fax 86 10 6437 0285
France
Raytek France
Palaiseau, France
Phone 33 1 64 53 15 40
Fax 33 1 64 53 15 44
Japan
Raytek Japan, Inc.
Tokyo, Japan
Phone 81 3 5976 1531
Fax 81 3 5976 1530
Mexico
Raytek de Mexico
Mexico and Central America
Puebla, Mexico
Phone 52 22 30 4380
Fax 52 22 30-4438
United Kingdom
Raytek UK
Milton Keynes, UK
Phone 44 1 908 630800
Fax 44 1 908 630900
57300-1 Rev B
 Loading...