

Page 1

CS210
Kiln Shell Temperature
Monitoring System
Rev. B4 Feb 2015
58401
Page 2

Raytek Corporation
European Headquarters
France
United Kingdom
Fluke Service Center
© Raytek Corporation.
Raytek and the Raytek Logo are registered trademarks of Raytek Corporation.
All rights reserved.
Worldwide Headquarters
Santa Cruz, CA USA
Tel: +1 800 227 – 8074
+1 831 458 – 3900
Fax: +1 831 458 – 1239
solutions@raytek.com
(USA and Canada only)
CONTACTS
Berlin, Germany
Tel: +49 30 4 78 00 80
raytek@raytek.de
Beijing, China
Tel: +86 10 6438 4691
info@raytek.com.cn
Internet: http://www.raytek.com/
Thank you for purchasing this Raytek product. Register today at www.raytek.com/register to
receive the latest updates, enhancements and software upgrades!
info@raytek.fr
ukinfo@raytek.com
Specifications subject to change without notice.
Page 3

Every change of the standard system design must be acknowledged from Raytek;
WARRANTY
Raytek warrants this product to be free from defects in material and workmanship under normal use
and service for a period of two years from date of purchase except as hereinafter provided. This
warranty extends only to the original purchaser (a purchase from Raytek or Raytek’s licensed
distributors is an original purchase). This warranty shall not apply to fuses or batteries. Factory
calibration is warranted for a period of one year. The warranty shall not apply to any product which
has been subject to misuse, neglect, accident, or abnormal conditions of operation or storage. Should
Raytek be unable to repair or replace the product within a reasonable amount of time, purchaser’s
exclusive remedy shall be a refund of the purchase price upon return of the product.
In the event of failure of a product covered by this warranty, Raytek will repair the instrument when it
is returned by the purchaser, freight prepaid, to an authorize Service Facility within the applicable
warranty period, provided Raytek’s examination discloses to its satisfaction that the product was
defective. Raytek may, at its option, replace the product in lieu of repair. With regard to any covered
product returned within the applicable warranty period, repairs or replacement will be made without
charge and with return freight paid by Raytek, unless the failure was caused by misuse, neglect,
accident, or abnormal conditions of operation or storage, in which case repairs will be billed at a
reasonable cost. In such a case, an estimate will be submitted before work is started, if requested.
THE FOREGOING WARRANTY IS IN LIEU OF ALL OTHER WARRANTIES, EXPRESSED OR
IMPLIED, INCLUDING BUT NOT LIMITED TO ANY IMPLIED WARRANTY OF
MERCHANTABILITY, FITNESS, OR ADEQUACY FOR ANY PARTICULAR PURPOSE OR USE.
RAYTEK SHALL NOT BE LIABLE FOR ANY SPECIAL, INCIDENTAL OR CONSEQUENTIAL
DAMAGES, WHETHER IN CONTRACT, TORT, OR OTHERWISE.
otherwise the warranty of the complete system will be lost!
The device complies with the requirements of the European Directives.
EC – Directive 2004/108/EC (EMC)
Page 4

Content
Content .................................................................................................................................................................. 4
1. Safety Instructions ...................................................................................................................................... 8
2. Technical Data ............................................................................................................................................. 9
2.1 Specifications ............................................................................................................................................... 9
2.2 Scope of Delivery ........................................................................................................................................ 9
2.3 Weights and Dimensions ......................................................................................................................... 10
3. Description ................................................................................................................................................. 12
4. Pre-Installation .......................................................................................................................................... 13
4.1 Environment .............................................................................................................................................. 13
4.2 Scanner Distance to Kiln .......................................................................................................................... 13
4.3 Scanner Alignment ................................................................................................................................... 14
4.4 Trigger Bar ................................................................................................................................................. 14
4.5 Cable Requirements ................................................................................................................................. 14
4.6 PC Requirements ...................................................................................................................................... 17
5. Installation .................................................................................................................................................. 18
5.1 Mounting ................................................................................................................................................... 18
5.2 System Connection Box ........................................................................................................................... 20
5.2.1 Cable Entry System .............................................................................................................................. 21
5.3 Fibre Optic / RJ45 Ethernet Converter ................................................................................................... 22
5.4 Position Indicator ..................................................................................................................................... 23
5.5 Fibre Optic Converter Box ....................................................................................................................... 24
6. Configuration ............................................................................................................................................. 25
6.1 Software Installation ................................................................................................................................ 25
6.2 CS Configuration ...................................................................................................................................... 27
6.2.1 <General options>................................................................................................................................. 28
6.2.1.1 <General settings> Tab .................................................................................................................. 28
6.2.1.2 <Communications settings> Tab ................................................................................................... 29
6.2.1.3 <e-mail> Tab .................................................................................................................................. 32
6.2.2 <Colours and axes definition> .............................................................................................................. 33
6.2.2.1 <Colors> Tab ................................................................................................................................. 33
6.2.2.2 <Axes> Tab .................................................................................................................................... 33
6.2.3 <Kiln Settings> .................................................................................................................................... 34
6.2.4 <Position of Scanners / Pyrometers> .................................................................................................... 35
6.2.4.1 <Settings> for Scanner or Pyrometer ............................................................................................ 36
6.2.5 <Special Commands> ........................................................................................................................... 38
6.2.6 <Alarm zones> ...................................................................................................................................... 39
6.2.6.1 Repository of alarm zones configuration ....................................................................................... 39
6.2.6.2 Alarm Zone configuration detail ................................................................................................... 40
6.2.6.3 Alarm zone definition .................................................................................................................... 41
6.2.7 <Refractory> ......................................................................................................................................... 41
6.2.7.1 Repository of refractory configuration .......................................................................................... 41
6.2.7.2 Refractory configuration detail...................................................................................................... 42
6.2.7.3 Refractory zone definition ............................................................................................................. 43
Page 5

6.2.8 <Historical management> ..................................................................................................................... 43
6.2.8.1 <Images> Tab ................................................................................................................................. 43
6.2.8.2 <Others> Tab ................................................................................................................................. 44
6.2.9 <LRM Configuration> .......................................................................................................................... 44
6.2.10 <Digital Output Management> .......................................................................................................... 46
6.2.10.1 Repository of Digital Outputs ..................................................................................................... 46
6.2.10.2 Digital Output Management detail ............................................................................................. 46
6.2.11 <Daily Report> ................................................................................................................................... 47
6.2.12 <Management of Errors> .................................................................................................................... 48
6.2.12.1 Repository of errors ...................................................................................................................... 48
6.2.12.2 Error detail ................................................................................................................................... 48
6.2.12.3 Error list ...................................................................................................................................... 49
6.2.13 <Management of Alarms> .................................................................................................................. 50
6.2.13.1 Repository of alarms..................................................................................................................... 50
6.2.13.2 Alarms detail ................................................................................................................................ 51
6.2.13.3 Alarms list ................................................................................................................................... 51
6.2.14 <Users> ............................................................................................................................................... 52
6.2.14.1 Users Repository .......................................................................................................................... 52
6.2.14.2 User’s detail ................................................................................................................................. 53
6.2.15 <Update ReadScan> ............................................................................................................................ 56
7. Operation ..................................................................................................................................................... 57
7.1 ReadScan .................................................................................................................................................... 57
7.1.1 <Control> Tab ....................................................................................................................................... 58
7.1.2 <Scanners> Tab ..................................................................................................................................... 58
7.1.3 <Pyrometers> Tab ................................................................................................................................. 59
7.1.4 <LRM> Tab ........................................................................................................................................... 59
7.1.5 <OPC Server> Tab ................................................................................................................................ 60
7.1.6 <Log> Tab ............................................................................................................................................. 60
7.2 CS Runtime Software: Deneb .................................................................................................................. 61
7.2.1 <Main> <Real time> ............................................................................................................................. 61
7.2.2 <Main> <Historic time> <Short term> ................................................................................................. 64
7.2.3 <Main> <Historic time> <Long term> .................................................................................................. 66
7.2.4 <Main> <Reference image> ................................................................................................................... 66
7.2.5 <Secondary> <Internal temperatures> .................................................................................................. 66
7.2.6 <Secondary> <Burning zone graphic> .................................................................................................. 67
7.2.7 <Secondary> <LRM view> .................................................................................................................... 67
7.2.7.1 <Kiln view> Tab ............................................................................................................................. 67
7.2.7.2 <Vertical> Tab ................................................................................................................................ 68
7.2.7.3 <Horizontal> Tab ........................................................................................................................... 68
7.2.7.4 <Time trend> Tab ........................................................................................................................... 69
7.2.7.5 <Space trend> Tab .......................................................................................................................... 69
7.2.8 <Secondary> <Areas of Interest> .......................................................................................................... 70
7.2.9 <Secondary> <Errors> .......................................................................................................................... 70
7.2.10 <Secondary> <Alarms> ....................................................................................................................... 71
7.2.11 <Graphic> <Histogram> ..................................................................................................................... 73
7.2.12 <Graphic> <Trend> ............................................................................................................................. 74
7.2.13 <Graphic> <Difference between images> ............................................................................................ 75
7.2.14 <Reports> ............................................................................................................................................ 75
Page 6

7.2.14.1 Report Production History .......................................................................................................... 75
7.2.14.2 Daily Report ................................................................................................................................ 76
7.2.15 Command Line Options for Deneb ..................................................................................................... 77
8. Database ...................................................................................................................................................... 78
8.1 Concept ...................................................................................................................................................... 78
8.2 Historic Review......................................................................................................................................... 78
8.3 File Naming Convention ......................................................................................................................... 78
8.4 Backing Up all Data .................................................................................................................................. 79
8.5 Restoring THR Data ................................................................................................................................. 79
9. Options ........................................................................................................................................................ 80
9.1 Start-up-Service......................................................................................................................................... 80
10. Accessories .............................................................................................................................................. 81
10.1 Hardware ................................................................................................................................................. 81
10.2 Software ................................................................................................................................................... 81
10.3 Serial RS485 / RJ45 Ethernet Converter ............................................................................................... 82
10.3.1 Technical Data ................................................................................................................................... 82
10.3.2 LED Indicators ................................................................................................................................... 83
10.3.3 Driver Installation ............................................................................................................................. 83
10.4 Fan Control .............................................................................................................................................. 86
10.4.1 Technical Data ................................................................................................................................... 86
10.4.2 Installation ......................................................................................................................................... 86
10.5 LRM – Live Ring Migration .................................................................................................................. 87
10.5.1 Functionality ...................................................................................................................................... 87
10.5.2 LRM Remote Control ......................................................................................................................... 87
10.5.3 Position Indicator ............................................................................................................................... 88
10.5.4 Wiring ................................................................................................................................................ 89
10.6 Shadow Monitoring ............................................................................................................................... 90
10.7 Burning Zone Monitoring ..................................................................................................................... 92
10.8 Internal Heater ........................................................................................................................................ 94
11. Auxiliary Software ................................................................................................................................ 95
11.1 Managing the CS Database with DBCheck ......................................................................................... 95
11.1.1 Starting the DBCheck application ...................................................................................................... 95
11.1.2 Connecting to the database ................................................................................................................. 95
11.1.3 Migrating pre-existing CS100 data ................................................................................................... 96
11.1.4 Import and export CS configurations ................................................................................................. 97
11.1.5 Creating a backup file ......................................................................................................................... 98
11.1.6 Reset database ..................................................................................................................................... 99
11.2 Remote Access from a Client PC ........................................................................................................ 100
11.2.1 Enabling Remote Access to Readscan .............................................................................................. 100
11.2.2 Remote Access .................................................................................................................................. 100
11.3 Device Testing Programme: PComm ................................................................................................. 101
11.3.1 <Check operation> Window .............................................................................................................. 101
11.3.1.1 Scanner ...................................................................................................................................... 101
11.3.1.2 Pyrometer .................................................................................................................................. 102
11.3.1.3 Digital Output .......................................................................................................................... 103
11.3.1.4 LRM .......................................................................................................................................... 104
Page 7

11.4 Refractory Management ....................................................................................................................... 105
11.4.1 Configuration .................................................................................................................................... 105
11.4.1.1 Kiln State ................................................................................................................................... 105
11.4.1.2 Refractory Management ............................................................................................................ 106
11.4.1.3 Brick Manufacturers .................................................................................................................. 110
11.4.1.4 Brick Types ................................................................................................................................ 110
11.5 3D Real Time View ............................................................................................................................... 112
12. Troubleshooting ................................................................................................................................... 113
13. Drawings ............................................................................................................................................... 114
13.1 CS212 Installation without Accessories ............................................................................................. 114
13.2 CS212 Installation with Accessories ................................................................................................... 115
13.3 CS21x with Multiple Scanners............................................................................................................. 116
13.4 System Connection Box Wiring .......................................................................................................... 117
13.5 Fibre Optic Converter Box Wiring ...................................................................................................... 119
13.6 Position Indicator Wiring ..................................................................................................................... 120
13.7 Fan Control Wiring ............................................................................................................................... 121
13.8 LRM Wiring ........................................................................................................................................... 122
13.8.1 Terminal Wiring W8 ........................................................................................................................ 123
13.8.2 Terminal Wiring W9 ........................................................................................................................ 124
13.8.3 Internal Wiring for the Position Indicators 4, 5, 6 ........................................................................... 124
13.9 Shadow Monitoring Wiring ................................................................................................................. 125
13.10 Burning Zone Wiring .......................................................................................................................... 126
14. Appendix – Technical Data ................................................................................................................ 127
14.1 Protective Housing ............................................................................................................................... 127
14.2 Connection Box ..................................................................................................................................... 128
14.3 Fibre Optic / RJ45 Ethernet Converter ................................................................................................ 129
14.4 Connection Box for Accessories .......................................................................................................... 130
14.5 Position Indicator .................................................................................................................................. 131
14.6 Output Modules .................................................................................................................................... 132
14.6.1 Digital Output Module 7043 (16 channels) ..................................................................................... 132
14.6.2 Relay Output Module 7067 (7 channels) ......................................................................................... 132
15. Notes ....................................................................................................................................................... 133
Page 8

Safety Instructions
o to Fluke’s website for
The instrument is equipped with a Class 2 laser. Class 2 lasers shine only within the
mW. Looking directly into the laser beam can produce
, temporary blinding effect, but does not result in physical injury or damage to the
eyes, even when the beam is magnified by optical aids. At any rate, closing the eye lids is
reflections of the laser beam. The laser functions only to locate and mark surface
Incorrect use of 110 / 230 V electrical systems can result in electrical hazards and personal
All instrument parts supplied with electricity must be covered to prevent physical
1. Safety Instructions
This document contains important information, which should be kept at all times with the system
during its operational life. Other users of this instrument should be given these instructions with the
instrument. Updates to this information must be added to the original document. The instrument can
only be operated by trained personnel in accordance with these instructions and local safety
regulations.
Acceptable Operation
This instrument is intended only for temperature measurement and is appropriate for continuous use.
The instrument operates reliably in demanding conditions, such as in high environmental
temperatures, as long as the documented specifications are adhered to. Compliance with the operating
instructions is necessary to ensure the expected results.
Unacceptable Operation
The instrument should not be used for medical diagnosis.
Replacement Parts and Accessories
Use only original parts and accessories approved by the manufacturer. The use of other products can
compromise the operational safety and functionality of the instrument.
Instrument Disposal
Do not dispose of this product as unsorted municipal waste. G
recycling information.
Operating Instructions
The following symbols are used to highlight essential safety information in the operation instructions:
Helpful information regarding the optimal use of the instrument.
Warnings concerning operation to avoid instrument damage and personal injury.
visible spectrum at an intensity of 1
a slight
encouraged when eye contact is made with the laser beam. Pay attention to possible
measurement targets. Do not aim the laser at people or animals.
injury.
contact and other hazards at all times.
8 Rev. B4 Feb 2015 CS210
Page 9

Technical Data
2. Technical Data
2.1 Specifications
Linescanner
Type MP150HR linescanner
Temperature range: 100 to 650°C (212 to 1202°F)
1
Optical resolution (90% energy) 170 : 1 (IFOV = 5,9 mrad)
Spot detection (50% energy) 510 : 1 (IFOV = 2,0 mrad)
Spectral response: 3.5 to 4 µm
Scan angle (FOV): 90°
Accuracy: ± 0.5% of reading or ± 3°C (± 6°F)
at 0 - 50°C (32 - 122°F) ambient temperature for the scanner
Repeatability: ± 1°C (± 2°F),
Detector: HgCdTe
Sampling rate: 1024 pixel per scan line
Standard focal distance: infinity
Mechanical scanning system: MTBF: 40,000 hours
Power requirement: 100 to 240 VAC (for the system connection box in the field)
Protection rate: IP65 (NEMA4) protection for linescanner
Ambient temperature range:
(for scanner with housing)
- without cooling: -40 to 45°C (-40 to 113°F), no direct sunlight
Warm-up time: 20 minutes
System
Scan lines: 200
Min. kiln speed: 0.02 rpm (for synchronized measurement)
Max. kiln speed: 6 rpm @ 200 lines @ 20 Hz scan speed
Packaging: CS211: about 40 kg (88 lb)
CS212: about 80 kg (176 lb)
at 0 - 50°C (32 - 122°F) ambient temperature for the scanner
(for synchronized measurement)
2
whichever is greater,
2.2 Scope of Delivery
The standard CS211 package includes:
Scanner: Linescanner MP150HR
(CS212: 2 units, CS213: 3 units, CS214: 4 units)
7.5 m (24.6 ft) Ethernet cable
7.5 m (24.6 ft) power cable
1
at 20 Hz scan speed
2
at 20 Hz scan speed
CS210 Rev. B4 Feb 2015 9
Page 10

Technical Data
7.5 m (24.6 ft) alarm/trigger cable
7.5 m (24.6 ft) RS485 cable
Spare window
Protective Housing: XXXSYSPHSS, stainless steel box
(CS212: 2 units, CS213: 3 units, CS214: 4 units)
grommet kit
adjustable mounting bracket
Spare Window: for protective housing, XXXSYSPHSW
Position Indicator: High temperature inductive sensor with junction box
(XXXSYSSECPI)
System Connection Box (field) CS210CONBOX
(CS212: 2 units, CS213: 3 units, CS214: 4 units)
with:
Fibre Optic / RJ45 Ethernet Converter:
4x Ethernet, 2x fibre optic channels
and:
Power Supply 100/240 VAC to 24 VDC, 2.5 A
Fibre Optic patch cable with SC connector, 2 m (6.6 ft) - 2 pieces
Fibre Optic Converter Box XXXHSFICBOX (control room)
with:
Fibre Optic / RJ45 Ethernet Converter:
4x Ethernet, 2x fibre optic channels
and:
Power Supply 110/230 VAC to 24 VDC, 1.25 A
Ethernet patch cable, 2 m (6.6 ft)
Fibre Optic patch cable with SC connector, 2 m (6.6 ft) - 2 pieces
Tool Kit: Hex key wrench 2.5 mm
Hex key wrench 4 mm
Hex key wrench 5 mm
Wrench 7x8 and 10x13
Key for locking/unlocking enclosure doors
DVD: DataTemp CS Software (incl. manuals, presentations, tools)
Documentation: CS210 Manual,
MP150 Operating Instructions,
MP150 Protocol Manual (on DVD only)
2.3 Weights and Dimensions
Linescanner: Length: 180 mm (7.09 in)
Width: 120 mm (4.72 in)
Height: 200 mm (7.87 in)
Weight: 7 kg (15.4 lbs)
Protective Housing: Length: 300 mm (11.81 in)
Width: 300 mm (11.81 in)
Height: 300 mm (11.81 in)
Weight: 8 kg (17.6 lbs)
10 Rev. B4 Feb 2015 CS210
Page 11

Technical Data
Protective Housing: Length: 452 mm (17.79 in)
(with mounting bracket Width: 496 mm (19.53 in
and protective sighting channel) Height: 450 mm (17.72 in)
Weight: 13 kg (28.6 lbs)
Position indicator:
Sensor head: Length: 50 mm (1.97 in)
Diameter: 50 mm (M50 x 1,5) (1.97 in)
Weight: 0.3 kg (0.66 lbs)
Junction box: Length: 84 mm (3.31 in)
Length: 110 mm (4.33 in) with electronic tube
Width: 79 mm (3.11 in)
Height: 67 mm (2.64 in)
Weight: 0.7 kg (1.5 lbs)
System Connection Box: Width: 380 mm (15 in)
Height: 380 mm (15 in)
Deep: 210 mm (8.3 in)
Weight: 9.8 kg (22 lb) - netto
CS210 Rev. B4 Feb 2015 11
Page 12

Description
3. Description
The Raytek CS210 is a comprehensive temperature measurement system for the monitoring, control,
and analysis of rotating kiln shells used in cement and lime production, mineral processing,
hazardous waste incineration and other processes. This system is a unique combination of hardware
centered on the industry-leading MP150 linescanner and a powerful, industrial software package. The
system allows accurate monitoring of the kiln shell and early detection of hot spots indicating
damaged or missing refractory bricks, preventing costly kiln damage and
extending production runs.
The key component of the CS210 system is an infrared linescanner (CS212
system: two linescanners). The linescanner collects infrared energy, emitted
from the kiln surface allowing the system to measure the temperature along the
length of the kiln.
The CS210 system provides many features, which include full-color
thermograms of the kiln surface, user defined alarms, automatic fan control and extensive historical
data analysis capability. The CS210 system also adds OPC server functionality, a powerful SQL server
for database applications, and full integration of all available accessories. Most notably, additional
point sensors can be installed and configured to monitor portions of the kiln “shadowed” from the
main sensor by physical obstructions and the results displayed as one homogenous thermogram.
Similarly, a separate sensor is available to monitor the burning zone of the kiln and again the data will
be seamlessly incorporated into one common display in the control room.
Using a optical fibre cable from the scanner in the field to the PC Ethernet interface in the control room
is a reliable way for connecting. Using fibre optics, you can prevent electrical interference from
corrupting the CS210 system. The optical fibre cable supports high speeds and long distance
transmissions (up to 2 km / 1.2 mi). One fibre optic communication line only from the field to the
control room minimizes the installation efforts on-site.
For a complete system overview see section 13.2 CS212 Installation with Accessories, page 115.
12 Rev. B4 Feb 2015 CS210
Page 13

Pre-Installation
L
2
1
D ≥
D
L
Scanner
Kiln
4. Pre-Installation
The customer is responsible for preparation of the sensor stand, installation of the position indicator
with the trigger bar and the complete field wiring as indicated in the appendix.
4.1 Environment
Please take note of the following:
• The maximum ambient temperature for the scanner within the protective housing is 45°C (113°F).
If necessary, add an additional shaded roof to protect the protective housing from direct sunlight
or provide water direct to the scanner.
• For details on grounding the sensor stand, please refer to the local building codes for lightning
protection.
• The housing of the linescanner and the system connection box must have the same potential.
(Check for good electrical contact at grounding wire connection).
4.2 Scanner Distance to Kiln
The standard system, CS211, is a one-scanner system and is suited for small to medium length kilns
up to 60 m (200 ft) in length. For longer kilns the CS212, a two-scanner system, will be required.
The linescanner has a 90° scan angle. The distance between the scanner and the kiln required for
complete coverage of the kiln length can be calculated as follows:
where:
D … Distance between scanner and kiln
L … kiln length (required scan width)
Figure 1: Distance between Scanner and Kiln
CS210 Rev. B4 Feb 2015 13
Page 14
Pre-Installation
Scanner stand
(dedicated tower or
roof of a building)
Scanner
Kiln
Kiln axis
Rotation
Kiln
Trigger bar
Trigger
bar
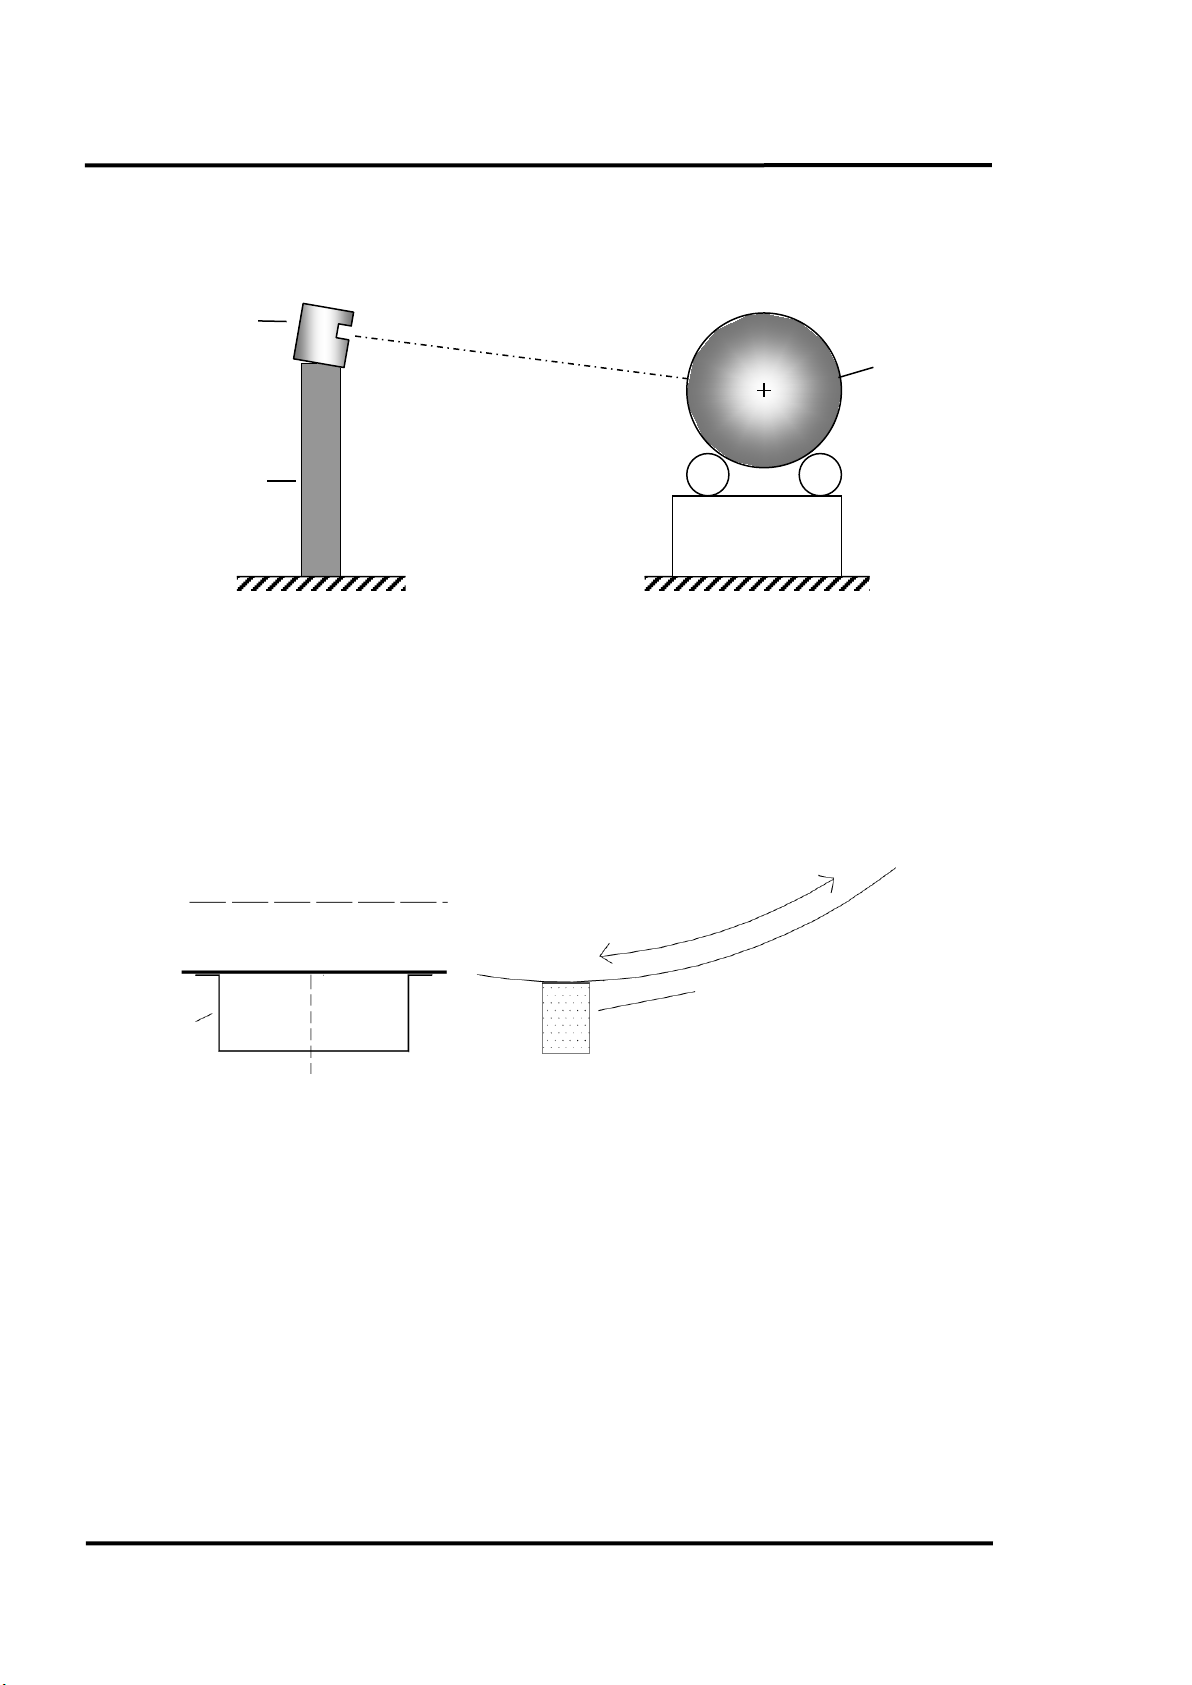
4.3 Scanner Alignment
The optimal scanner alignment is shown in the figure below.
Figure 2: Alignment of Scanner
4.4 Trigger Bar
A position indicator is mounted on the “colder” end of the kiln and generates a trigger pulse once per
revolution to supply the CS210 system with data on the rotational speed of the kiln. The installer must
mount a trigger bar onto the kiln shell as shown in the figure below.
The maximum ambient temperature for the position indicator is 230°C (446°F). For installing the
position indicator see section 5.4 Position Indicator, page 23.
4.5 Cable Requirements
The following cables are necessary for standard installations, see also system drawings given in
section 13.1 CS212 Installation without Accessories, page 114.
– W1 power supply cable for scanner (preinstalled with system connection box)
– W2 RS485 communication cable for scanner (preinstalled with system connection box)
– W3 trigger/alarm cable for linescanner (preinstalled with system connection box)
– W8 from the junction box of the position indicator to the system connection box (standard
– W9 from the LRM remote control box to the system connection box. This six-wire-cable is used for
14 Rev. B4 Feb 2015 CS210
Figure 3: Welding the Trigger Bar on the Kiln
installation) or to LRM remote control box (when used with accessory Live Ring Migration).
data communication, power supply, and trigger pulse.
Page 15

Pre-Installation
All copper cables must be shielded! The wires from W9, W10, W14, and W15 must be a
– W10 from the fan control output module to the system connection box. This four-wire-cable is
used for data communication and power supply to the output module.
– W14 from the MI connection box to the system connection box and between MI connection boxes
when more than one shadow sensor is installed. This four-wire cable is used for data
communication and power supply to the pyrometer.
– W15 from the MR connection box to the system connection box. This six-wire cable is used for
data communication and power supply to the pyrometer.
– W16 MI sensing head cable.
– W17 MR sensing head cable.
– W18 Ethernet communication cable for scanner (preinstalled with system connection box)
– W20 Fibre optic cable from system connection box to the control room and to the second scanner
(if used). Fibre optic cable to be provided by customer.
– W22 Ethernet cable from fibre optic converter (control room) to the PC.
– W23 from the position indicator head to the junction box.
– W24 Power supply cable 100 to 240 VAC.
– W25 Fibre optic cable from the first scanner to the second scanner (if used). Fibre optic cable to be
provided by customer.
twisted pair! Local building codes should be observed when selecting cables!
CS210 Rev. B4 Feb 2015 15
Page 16

Pre-Installation
Cable
Distance
Cable features
Supplied from …
Example / Remarks
W1, W2,
W3
7.5 m (25 ft.)
preinstalled
Raytek
W8
350 m (380 yd)
3 x 0.25 mm²,
24 AWG, 3 conductor, shielded
Customer
(N)YLHCY-J 3 × 0.25 mm²
Manhattan/CDT, P/N M13233
W9
350 m (380 yd)
3 x 2 x 0.25 mm²,
24 AWG, 3x twisted pair, shielded
Customer
LifYCY 3 × 2 × 0.25 mm²
W10
350 m
(380 yd)
2 x 2 x 0.25 mm²,
24 AWG, 2 x twisted pair, shielded
Customer
W14
350 m (380 yd)
2 x 2 x 0.5 mm²,
20 AWG, 2 x twisted pair, shielded
Customer
max. 5 pyrometers
350 m (380 yd)
2 x 2 x 1.5 mm²,
16 AWG, 2 x twisted pair, shielded
Customer
max. 14 pyrometers
W15
350 m (380 yd)
3 x 2 x 1.5 mm²,
16 AWG, 3x twisted pair, shielded
Customer
W16
8 m (26 ft)
preinstalled
Raytek
W17
15 m (49 ft.)
preinstalled
Raytek W18
7.5 m (25 ft.)
Raytek
W20
< 2 km (1.2 mi)
Fibre optic cable (outdoor),
connectors
Customer
Standard cable designation:
W22
2 m (6.5 ft.)
Ethernet patch cable (CAT5, RJ-45)
Raytek W23
5 m (15 ft.)
Raytek
W24
Power supply cable 100 to 240 VAC,
50 / 60 Hz, min. 3 x 1.5 mm² (16 AWG)
Customer
NYY
W25
< 2 km (1.2 mi)
Fibre optic cable (outdoor),
connectors
Customer
Standard cable designation:
The cable length causes a certain voltage drop on the power cable. In case of using
it must always be ensured, that the sensor will be supplied with the minimal voltage
Linescanner: min. 18 VDC
2 fibres, multi-mode, 62.5/125 µm or
50/125 µm, equipped with SC
2 fibres, multi-mode, 62.5/125 µm or
50/125 µm, equipped with SC
multiple sensors (MI shadow pyrometers via W14), longer cable lengths, or less gauges
power!
MR burning zone pyrometer: min. 20 VDC
MI shadow pyrometer: min. 12 VDC
A-DQ(ZN)B2Y…
A-DQ(ZN)B2Y…
16 Rev. B4 Feb 2015 CS210
Page 17

4.6 PC Requirements
software exclusively on the PC! Other
TCP/UDP Port
Server
Client
Remark
16500
CS Readscan
CS Deneb
1433
CS SQL database
CS Config, CS Readscan
25
CS Mail (SMTP)
CS Readscan
default
2727
Linescanner Communication
CS Readscan
default
5048, 5058
Serial RS485 / RJ45 Ethernet Converter
CS Readscan
as accessory only
23
Telnet
for service only
Minimum Hardware requirement for CS211 and CS212:
− Processor: Intel i5 quad core series CPU or comparable
− 8 GB RAM system memory
− 1280 x 1024 pixel graphic card and monitor
(for displaying one scanner with 1024 pixel per line)
2560 x 1600 pixel graphic card and monitor
(for displaying two scanners with 2048 pixel per line)
− OpenGL 2.1 graphics adapter (when using the 3D Real Time View)
− 50 GB hard disk
− DVD drive
− Ethernet, TCP/IP protocol, 100 Mbit/s
Minimum Software requirement:
− Windows
®
XP or Windows 7 3 with latest Service Pack
It is strongly recommended to run the CS
applications could affect function and performance.
Pre-Installation
For the CS system it is necessary to disable Windows' default power management
settings in order to avoid that the computer goes to sleep automatically.
Make sure that a possible firewall does not block the following ports:
3
Windows Vista should work but it is not guaranteed.
CS210 Rev. B4 Feb 2015 17
Page 18

Installation
Bottom view
Protective Housing
Bottom view
5. Installation
5.1 Mounting
The linescanner protective housing requires a solid vibration-free mounting stand. The protective
housing comes with a mounting bracket, adjustable 90° in all 3 axes. To mount the protective housing
onto the sensor stand, e.g. on a tower, make a mounting plate with two 8.5 mm (0.31 in.) diameter
mounting holes, as shown below. The mounting bracket is 150 mm (5.9 in) high.
Figure 4: Protective housing’s 3-axis mounting bracket
Preparing the protective housing to be mounted on the sensor stand
Open the protective housing from the back to access to the internal components. On the bottom of the
box, there is a rail/carrier system on which the linescanner will be mounted. Open the latches on both
sides of the rail, loosen the bolt on top of the carrier and take off the carrier. Mount the linescanner
onto the carrier using the 4 M6 x 12 screws provided. Connect the earth ground to the top of the
linescanner. To install the ground on the left mounting thread, use a M6 x 12 hex head screw with
washer and lock washer.
Mounting the protective channel and the window
Open the front door of the protective housing. Mount the protective field-of-view channel on the front
side by using 6 M4 x 12 bolts. The slotted side of the protection channel faces downwards. The bolts
must be inserted from inside the box (i.e. the nuts are outside).
Make sure that the drain hole for rain water in the protective channel faces downwards!
18 Rev. B4 Feb 2015 CS210
Page 19

Installation
Window holder
2 nuts – M6
Protective
housing
Protective
channel
Linescanner
Figure 5: Protective housing with protective channel
Installing the linescanner
Open the back door. Insert the linescanner (with the mounted carrier) into the rail/carrier system. Lock
in the linescanner in place with the latches and screw.
Electrical Installation
For best performance, the electrical installation of the CS210 System should correspond to one of the
recommended installation configurations illustrated in section 13.1 CS212 Installation without
Accessories, page 114.
Connecting the cables
The cables W1, W2, W3, and W18 (located between the linescanner and the system connection box) are
factory preinstalled and supplied along with the system connection box.
For running the cables through the protective housing: open one grommet plate (on the bottom of the
protective housing) by loosening the three Allen-bolts. Use an appropriate grommet by considering
the different cable outer diameters:
• Cable W1 (power supply): Ø 5 mm (0.2 in)
• Cable W18 (Ethernet): Ø 6 mm (0.24 in)
• Cable W2 (RS485) and W3 (Alarm/Trigger): Ø 7 mm (0.28 in)
Feed the cable through the grommets so that grommet is approximately 400 mm (15.7 in) away from
the linescanner connectors (round plugs). Place the grommet plate over the grommets as shown in the
figure below. Be careful to have the cable identification plates pointed toward the system connection
box (longer end of the cables). Close unused holes with the blind grommets then close the grommet
plate.
CS210 Rev. B4 Feb 2015 19
Page 20

Installation
cooling may be necessary.
Mains
Plug
Fuse
6 A
Power
Supply
Serial/Ethernet
Fibre Optic /
Heater
Grommet plate
Figure 6: Cable installation
Using the 4 M5x25 screws, mount the grommet plate on the outside of the protective housing. Plug
the cable connectors into the linescanner. Connect the socket and the plug for earth ground.
If installing the CS210 system in a warm environment, waterThe tubes used for water may be run through the second grommet plate!
5.2 System Connection Box
The system connection box connects all device field cables with the customer supplied optical fibre
cable. The system connection box includes the Fibre Optic / RJ45 Ethernet Converter, the 24 VDC
power supply and the Serial/Ethernet converter for supporting the accessories (if used).
The box is supplied with quick installation line-up terminals. For more technical data, see section
14.2 Connection Box, page 128.
RJ45 Ethernet
Converter
Converter
(Accessory)
(Accessory)
20 Rev. B4 Feb 2015 CS210
Figure 7: Opened System Connection Box
Page 21

Installation
Lay cable into appropriate grommet and provide strain relief
Use appropriate tool to punch through cover on base frame.
Pin 18
Pin 17
Installation
The system connection box can be mounted up to 7 meters (23 ft) away from the scanner. However to
simplify aiming the scanner at the kiln it is the best that the connection box is mounted as close to the
scanner as possible. The cables between the linescanner and the connection box needs to be protected
from mechanical damage.
Mount the connection box in a convenient location. The cables W1, W2, W3, and W18 are factory
preinstalled. Insert the cable W20 using the grommet plate taking care to select the correct grommet
size for the cable diameter.
Connect the cables for the accessories with the connectors of the line-up terminal as described in
section 13.4 System Connection Box Wiring, page 117.
After double-checking all connections, switch the power on. The 24V-LED indicates the ON/OFF
status (see terminal pin 8 in the system connection box). Check the trigger signal coming from the
position indicator (see terminal pin 40 in the system connection box).
Pins 17 and 18 of the terminal in the system connection box connect to the internal alarm relay of the
scanner. The contacts are potential free, the maximum load is 30 V / 1 A. To configure the alarm relay,
see section 6.2.4.1 <Settings> for Scanner or Pyrometer, page 36.
Figure 8: Connection to the internal Alarm Relay of the Scanner
5.2.1 Cable Entry System
The cable entry system is a split system that allows pre-assembled cables to be routed into the system
connection box without disassembling the connectors.
Snap-on mounting
4
where necessary using cable ties.
4
Illustrations: © Murrplastik
CS210 Rev. B4 Feb 2015 21
Page 22

Installation
Set catch hooks into the sides of the cut-out.
Insert rail completely.
Set the rail onto the catch hooks and press on.
Lock the catch hooks with the rail. Press gently on grommet one
The grommet must produce a continuous seal on the back side.
more time.
5.3 Fibre Optic / RJ45 Ethernet Converter
The Fibre Optic / RJ45 Ethernet Converter assures high reliability and
stability in harsh environments, making it a robust bridge between enterprise
fibre-optic backbones and Ethernet devices like the linescanner. Using fibre
optics, you prevent electrical interference from corrupting the CS210 system.
The Fibre Optic / RJ45 Ethernet Converter supports fast speed and high
distance transmissions. Copper based Ethernet communication is very
limited in length without using a repeater.
The Fibre Optic / RJ45 Ethernet Converter in the system connection box is
converting up to 4 Ethernet channels to support one or two scanners and the
CS210 accessories. The Fibre Optic / RJ45 Ethernet Converter in the control
room is converting the glass fibre signals back to TCP/IP Ethernet again. For further technical details
see appendix 14.3 Fibre Optic / RJ45 Ethernet Converter, page 129.
22 Rev. B4 Feb 2015 CS210
Page 23

Installation
In the case of a non-existing trigger signal, the system switches to the non-synchronized
software will blink
5.4 Position Indicator
The position indicator is a temperature resistant inductive proximity
switch used to synchronize the scanning system with the kiln rotation.
The position indicator consists of two parts, a high temperature sensor
head, and a junction box. Since the maximum ambient temperature
allowed is 230°C (446°F), the sensor may be mounted near the kiln’s
surface. For the junction box a maximum ambient temperature of 70°C (158°F) is allowed. For further
technical details see appendix 14.5 Position Indicator, page 131.
Both components, sensor and junction box, are connected via a high temperature cable (length: 5 m /
15 ft). Protecting the cable against mechanical stress is recommended. Since the position indicator is
necessary to generate a trigger pulse for the CS210 system, a trigger bar must be welded onto the
“colder“ end of the kiln and if possible close to the drive ring (see Figure 9).
The distance between the trigger bar and the position indicator is a very important parameter for
correct operation. If the distance is too small, the trigger bar can destroy the sensor head. On the other
hand, if the distance is too big, the position indicator will be unable to detect the trigger bar. Thus, it
will not be able to generate the trigger pulse for the system.
mode. In this mode, a yellow bar on the top area in the CS
continuously. Non-synchronized thermograms are not stored in the database!
In multi-scanner systems, the trigger signal may be associated with any scanner!
CS210 Rev. B4 Feb 2015 23
Page 24

Installation
Kiln axis
Rotation
Kiln
Trigger bar
steel St37
square (2.16
Trigger bar
Distance: max. 20 mm (0.79 in.)
Position indicator with
mounting pla
PTFE cable, 5 m (15 ft.)
Junction box
Cable W8 to system connection box
, sized 50 mm in
in. in square)
te
Figure 9: Mounting the Position Indicator
Adjustment of the position indicator:
1. Mount the trigger bar.
2. Mount the position indicator mounting plate .
3. Check the distance between position indicator and trigger bar.
4. Lock the position indicator in place and monitor its’ operation. With each revolution of the
kiln you should obtain a trigger pulse indicated by an LED in the junction box (field).
5.5 Fibre Optic Converter Box
The Fibre Optic Converter Box is located in the control room and connects the fibre optic cable from
the field to the Ethernet interface of the computer. For more technical data, see section 14.2 Connection
Box, page 128.
24 Rev. B4 Feb 2015 CS210
Figure 10: Fibre Optic Converter Box
Page 25

Configuration
The software installation requires the user as local administrator with full permission
It is strongly recommended to update the Windows operating system before installing
Make sure that the default SQL port 1433 is not in use; otherwise you will be not able to
c shutdown,
6. Configuration
The following sections of this manual describe the operation of the CS software. Complete
configuration requires the following steps:
1. Install the software.
2. Configure the system.
a. Provide detail of certain general options.
b. Define detail of visual appearance options.
c. Define temperature reading instruments (scanners and pyrometers).
d. List alarm zones and refractory details.
e. Need for controlling of fans
f. Provide detail of the LRM system installation.
g. Define preferences for storing historical data.
Before proceeding with the following sections please ensure that the physical installation
(communication and power wiring, air, water if necessary, etc.) is completed and working
satisfactorily.
6.1 Software Installation
whereby the administrator requires a dedicated password (network and non-password
accounts do not work).
the CS software!
install the software.
Disable all energy saving functions of the operating system like automati
energy saving modes, and hard drive spin down!
Insert the software DVD in the DVD drive and double click on the <Setup.exe> file. The install setup
application will start, showing the following steps in a screen window.
• When the install setup starts up, a welcome screen will show, letting you select the default
language for the application. Once you have selected the language, click on <Next> to
continue.
• Next, select the path where you want to install the application and the folder where you want
the database to be installed. When finished, click on <Next>.
CS210 Rev. B4 Feb 2015 25
Page 26

Configuration
Figure 11: Installation screen
• Once you have completed selecting your preferences, you can click on <Install> to proceed
with the installation.
• In one of the next screens, you have to give a valid <user name> and <password> for an
administrative user for a domain on the installation computer to allow the SQL database
server to be executed.
Figure 12: Administrative User for the Computer Domain
In case of installation problems uncheck the <Try to install SQL Server automatically>
item!
• On the last installation screen, you can activate the check box to import an old CS100
configuration and a CS100 database into CS software. After closing the install setup you will
be guided through the migration procedure.
26 Rev. B4 Feb 2015 CS210
Page 27

Configuration
In addition, you find also the check box to start automatically ReadScan when Windows
starts. It is strongly recommended to keep this check box enabled!
Figure 13: Installation finished
• If the installation is successful, all necessary shortcut icons will appear in your PC desktop
screen and in the Start-menu (Start\Programs\Raytek\DataTemp CS).
For Windows Vista and Windows 7 operating systems, the user data will be stored in
the dedicated <My Documents> folder separately from the program files!
6.2 CS Configuration
To configure the DataTemp CS software, select the start menu, activate the CS program group and
click on the icon <CS Config> (alternatively you can also find the icon on the desktop). You will be
prompted to enter a password.
Figure 14: Authentication screen
At this point, a valid user and password must be entered for the selected profile. If this is the first
login, a single profile will be seen, and that profile is normally <Raytek>.
Predetermined user for CS Config (valid also for the program components CS Deneb and ReadScan):
Username: <ADMIN>
Password: {empty}
CS210 Rev. B4 Feb 2015 27
Page 28

Configuration
When ReadScan is active, any changes made in the configuration settings won’t be
ctive until ReadScan restarts automatically later. For more information on this topic
uested physical units (distance and
The configured scanner data format <points per line> applies to all scanners and
database backups. The data format (256 pixel / 512 pixel / 1024 pixel, 1 byte / 2 byte and
200 lines) must not be mixed. The same resolution is used for every scanner
Once these 3 boxes are correctly filled, the user will proceed to a new screen and select the different
menu options.
effe
see section 7.1.1 <Control> Tab, page 58.
6.2.1 <General options>
6.2.1.1 <General settings> Tab
This tab allows the user to configure the general aspects of the system, such as description, language,
maximum and minimum temperature to be seen from Deneb, the amount of lines formed per
thermogram and metric or imperial units. In standard installations the scanner communicates via
Ethernet, there are no speed restrictions to consider.
Figure 15: General options: <General Settings> Tab
It is strongly recommended to select the req
temperature) before all others changes!
100 /
connected and all database backups loaded into the system!
28 Rev. B4 Feb 2015 CS210
Page 29

Configuration
The number of lines per thermogram is a parameter that can only be modified when the
western European languages (Turkish, Russian) it is strongly
Points per line
Bytes per point
Minimum serial speed
256 1 115 kBaud
512 1 115 kBaud
database is empty, (i.e. when the database does not contain any images)!
For running of nonrecommended to use a Windows Operating System in that desired language!
Non-western European languages can also be displayed by setting the Windows codepage
accordingly.
• Go to <Start> <Settings> <Control Panel> <Regional and Language Settings>
• Under <Regional Settings> select the desired language
• Under <Advanced> select the same desired language for programmes not supporting Unicode
fonts
For old systems only, running with RS485 communications:
The number of data points per line and the number of bytes per data point needs to be considered in case of running the
scanner via the serial RS485 communication line. The table below shows the recommended configurations.
<Points per line> defines the number of data points per line provided by one scanner.
<Bytes per point> defines the number of bytes per one data point.
Figure 16: Recommended Configurations for the Serial RS485 Communication
6.2.1.2 <Communications settings> Tab
On this tab the user can configure general communication settings for the serial devices.
The <command timeout> is the maximum time to wait after sending one command to a device. If the
device doesn’t answer in less than the time stipulated, the system will consider it as a communication
error.
The <communication timeout> is the time period between a communication error with a device and
the systems attempt to retry the communication.
<Retries for communication> defines the number of automatic trials to re-establish the communication
to a lost serial device.
By labeling the checkbox <OPC Server active>, the CS software runs as OPC server for one or more
OPC clients within a network. For interfacing to other control systems this option allows the remote
monitoring of the process.
OPC (OLE for Process Control) is an industrial standard for the data exchange between applications
based on the DCOM model from Microsoft. For further information see
http://www.opcfoundation.org/
The CS OPC server supports Data Access in version 2.0 only!
CS210 Rev. B4 Feb 2015 29
Page 30

Configuration
Figure 17: General Options: <Communication settings> Tab
<Send DTR signal with alarms> enables the output of a system alarm signal via the CS interface box
(for scanners communicating via COM) or a digital output module (for scanners communicating via
Ethernet).
30 Rev. B4 Feb 2015 CS210
Page 31

Configuration
Item
Type
Description
Synchronization
.System is synchronized
Bool
Flag for indicating that the system runs synchronized to the oven
Graphic
.Maximum temperatures
Integer array
Provides the Maximum Temperature Profile (temperature via pixel number)
.Minimum temperatures
Integer array
Provides the Minimum Temperature Profile (temperature via pixel number)
.Average temperatures
Integer array
Provides the Average Temperature Profile (temperature via pixel number)
Live Ring Migration system
.Rings
Integer
Number of rings currently used for Live Ring Migration
.Ring 1.Time
Integer
Revolution time for ring 1
.Ring 1.Offset
Integer
Offset time for ring 1 compared to kiln revolution time
.Ring 1.State
Bool
Status for ring 1
Alarm zones
.Zone 1.Maximum temperature limit
Integer
Upper alarm threshold for zone 1
.Zone 1.Hysteresis (low)
Integer
Hysteresis for zone 1 (reset threshold for an alarm)
.Zone 1.Maximum temperature
Integer
Maximum temperature for zone 1
.Zone 1.Alarm State
Bool
Alarm status for zone 1
Devices
.Kiln.Rotation velocity
Integer
Rotation velocity for the kiln given in rpm
.Kiln.Lap time
Integer
Rotation time for the kiln
.Kiln.Snapshot Counter
Integer
Snapshot counter, will be increased by 1 with each new stored image into the database, can be
used as live counter
.Kiln.Points of reading
Integer array
Provides the Length Profile of the kiln (location of each pixel)
.Scanner 1.State
Bool
Status for scanner 1
.Scanner 1.Internal temperature
Integer
Internal temperature for scanner 1
.Pyrometer 1.State
Bool
Status for pyrometer 1
.Pyrometer 1.Internal temperature
Integer
Internal temperature for pyrometer 1
.Pyrometer 1.Maximum temperature
Integer
Maximum temperature for pyrometer 1
.Pyrometer 1.Dirty lens alarm limit
Integer
Threshold for dirty lens alarm for pyrometer 1 (shadow pyrometer only)
.Pyrometer 1.Dirty lens alarm state
Bool
Dirty lens alarm status for pyrometer 1 (shadow pyrometer only)
.Pyrometer 1.Type
String
Pyrometer used for: <burningZone> or <shadowPyrometer>
.Pyrometer 2.Burning zone
Integer
Temperature of the burning zone for pyrometer 2 (burning zone pyrometer only)
The CS software provides the following data via OPC connections. All items listed below have read-only
access.
CS210 Rev. B4 Feb 2015 31
Page 32

Configuration
6.2.1.3 <e-mail> Tab
This tab lets you define the properties of the outgoing mail server to be used by the system. A typical
setting for the SMTP port is 25.
For your correct Email settings, ask your network administrator.
Figure 18: General options: <Mail setup> Tab – Configuring Outgoing Emails
To configure the email address for the recipient see section 6.2.14.2.1 <General> Tab, page 53.
To configure an email be sent in the event of an alarm see section 6.2.14.2.3 <Others> Tab, page 55,
under <Readscan>.
Figure 19: Example for an Outgoing Alarm Email
32 Rev. B4 Feb 2015 CS210
Page 33

Configuration
6.2.2 <Colours and axes definition>
6.2.2.1 <Colors> Tab
With this tabbed dialog box, the user can define their options for the thermogram colour palette. To
select colours, click on the RGB colours. <Scales> sets the number of colours to be included as the
palette colours. Blending is possible by selecting the <Color progression> option.
The <Range> value defines the temperature scale range of the temperature difference view in the CS
main software, see section 7.2.13 <Graphic> <Difference between images>, page 75.
Figure 20: Colours and axes definition: <Colours> Tab
6.2.2.2 <Axes> Tab
This tab lets you configure the appearance for the different axes shown in the graphical representation
of the thermogram, as well as the units representing the kiln diameter.
It also lets you configure the type font used for the axes in the graphical representation of the
thermogram.
CS210 Rev. B4 Feb 2015 33
Page 34

Configuration
The option <Inverse scale> only affects the labels of the screen ‘x’ axis. When this
option is selected, the actual optical parameters of the scanners and pyrometers will not
Figure 21: Colours and axes definition: <Axes> Tab
be affected!
6.2.3 <Kiln Settings>
Clicking the <Kiln settings> menu will open a screen where details about the kiln can be entered.
These specifications are the kiln size (length and diameter) and the longitudinal offset. The
longitudinal offset only affects the labels of the screen x-axis. The actual optical parameters of the
scanners and pyrometers are not affected.
Figure 22: Kiln settings
<Rotation velocity> is the parameter that defines the minimum kiln speed that the system expects
before launching a non-synchronized alarm. When not synchronized, the system will not save any
34 Rev. B4 Feb 2015 CS210
Page 35

Configuration
A kiln speed below <Rotation velocity> and a missing trigger pulse are the two main
images into the database. The <Real time> view shows scanned lines based on a simulated kiln speed
of <Rotation velocity>. The minimum kiln speed for synchronized measurements is 0.02 rpm.
reasons for a non-synchronized alarm!
6.2.4 <Position of Scanners / Pyrometers>
On this screen the user configures the characteristics of the several devices (scanners and pyrometers)
that will be used to monitor the kiln temperature. Up to four scanners can be arranged to cover the
whole kiln shell.
Figure 23: Scanners Position
The features for the different devices (scanners and pyrometers/shadow sensors) are displayed on the
screen on the basis of the type of device: the top-left area is assign to scanners, and the top-right one is
assign to pyrometers. The different devices and their positions are displayed on the centre of the
screen. However, there are few general parameters that must be modified from the screens shown
when clicking on the <Configuration> buttons.
Each pyrometer is only capable of triggering a single alarm zone. If the measurement spot of a
pyrometer is overlapping two alarm zones, only one will trigger. To avoid these kind of problems
ensure each pyrometer is aligned with a single alarm zone only.
The position of the scanners can be adapted very comfortable by using the mouse. For doing so, make
a right mouse click in the drawing area to open the context menu <Settings>. Being in that mode, the
left/right cursor keys can be used to change the Alpha angle dynamically.
CS210 Rev. B4 Feb 2015 35
Page 36

Configuration
Figure 24: Positioning the Scanner
For a multiple scanner system there is with <Overlapping points> an additional mode available to
determine the programs behaviour in the overlapping area:
<Automatic>: the program internal algorithm determines which pixels in the overlapping area
will be taken for the final merged thermal image either from one scanner or the
other scanner. The automatic mode is always useful if one scanner is being
hindered from monitoring the complete kiln by physical obstructions and also by
shadows from the tires but the other scanner is not.
<Manual>: Provides a scanner ranking to determine which scanner provides the pixel in the
overlapping area for the final merged thermal image.
6.2.4.1 <Settings> for Scanner or Pyrometer
From this screen you can configure the communication parameters and the device
emissivity/transmission setting. It is also possible to assign an output for the alarm in case the internal
temperature exceeds the maximum setting. The parameters that we are describing are applicable for
scanners and also for pyrometers.
36 Rev. B4 Feb 2015 CS210
Page 37

Figure 25: Definition of the Scanner device
Configuration
On scanners only, you can define these additional parameters:
• Communication parameters for the scanner:
Ethernet: <IP Address> for the scanner (default: 192.168.42.30 for the first scanner;
192.168.42.31 for a second scanner, and so on) and <Port> (default: 2727)
For further information to configure the Ethernet communication for scanner and PC network
adapter, see MP150 manual. Please note that all scanners in a multiple scanner system require
a different IP address!
COM: Port number and baud rate
Figure 26: Parameter for the Scanner Communication
• The execution of a template already defined in section 6.2.5 <Special Commands>, page 38.
This template contains scanner commands being executed when ReadScan is initialized.
• The triggering of the scanner <Fail Safe Hot Spot Alarm>. To increase the reliability of the
system it is necessary to guarantee fail-safe hot spot alarming even in the event of a PC or
software crash. For that reason the scanner provides an internal relay that will generate an
alarm if a hot spot that exceeds user-defined limits is detected within the 90° scanner field of
view. The relay contacts are available on the terminal line in the system connection box, see
Figure 8 Connection to the internal Alarm Relay , on page 21.
CS210 Rev. B4 Feb 2015 37
Page 38

Configuration
Figure 27: Definition for Pyrometer devices
For pyrometers you can define if it shares network with other pyrometers or not. When sharing the
network, it will be necessary to indicate the unit address.
Also, on this screen it is possible to set the dirty lens alarm and to configure one possible digital
output for it. With the dirty lens alarm, a temperature difference is being calculated for the
pyrometer’s reading and the temperature from the neighboured scanner pixel. If the difference
exceeds the maximal allowed threshold then an alarm is being triggered.
6.2.5 <Special Commands>
This library allows the user to execute commands either individually or as groups via the command
groups (templates) function.
38 Rev. B4 Feb 2015 CS210
Page 39

Configuration
Figure 28: Window of Raytek Commands
In order to create a template you must enter the name, the description, and the commands to be
executed, indicating if such commands are for Scanners or for Pyrometers.
You will also be able to delete and modify these templates.
To execute a command group you must first select the template, the port and the connection speed.
After that, click on the button to open the port. Once the connection with the device has been
established, the <Execute template> button will be active.
It is also possible to send a single command to a device. In such a case, you need only to select the type
of device, the port and the connection speed. Then you will have to open the port and introduce the
command to be executed. Afterwards, click on the button to run it.
Wrong set commands can suspend the whole CS210 system!
6.2.6 <Alarm zones>
6.2.6.1 Repository of alarm zones configuration
Within the CS software platform, several alarm zone configurations can be defined to accommodate
different parameters of kiln operation. This screen shows all of the alarm zone configurations existing
in the system. Obviously, just one of them can be active at any given time selectable by the <Set active>
button.
The buttons along the lower toolbar are used to create new configurations, and also to edit or delete
existing ones.
CS210 Rev. B4 Feb 2015 39
Page 40

Configuration
Figure 29: Managing of alarm zone configurations
6.2.6.2 Alarm Zone configuration detail
Clicking on any alarm zone configuration will open an Alarm Zone configuration detail screen. The
alarm zones will be displayed on a mimic diagram along with some basic configuration information
along the bottom of the screen. Click on any zone to see more detailed configuration information.
It is possible to adjust the size of a zone directly in that dialog box. To do this, you need to drag the
edges of the lower bar (adjacent to the Zone number) corresponding to the zone to be edited.
By a right mouse click an existing zone can be split into two ones.
Figure 30: Alarm zone configuration detail
40 Rev. B4 Feb 2015 CS210
Page 41

Configuration
6.2.6.3 Alarm zone definition
This screen defines the beginning and the end of the zone, as well as the higher and lower alarm limits
and a possible digital output in case of alarm. Also provided is additional information such as
installation date, a description field and the display colour.
Figure 31: Pyrometer device definition
6.2.7 <Refractory>
In the following sections, you will find the description for configuring the <Refractory>. The
<Refractory> comes as standard with the CS software package and provides a basic approach to
handle the refractory configuration of a kiln.
A much more advanced accessory tool is provided with the Refractory Management.
See section 11.4 Refractory Management, page 105.
6.2.7.1 Repository of refractory configuration
Several different refractory configurations can be established and displayed via this menu option.
Obviously, just one of them is the actual active configuration selectable by the <Set active> button.
The buttons along the lower toolbar are used to create new configurations, and also to edit or delete
existing ones.
CS210 Rev. B4 Feb 2015 41
Page 42

Configuration
Figure 32: Repository of refractory configuration
6.2.7.2 Refractory configuration detail
Clicking on any refractory configuration will open a refractory configuration detail screen. The
refractory zones will be displayed on a mimic diagram along with some basic configuration
information along the bottom of the screen. Click on any zone to see more detailed configuration
information.
It is possible to adjust the size of a zone directly in that dialog box. To do this, you need to drag the
edges of the lower bar (adjacent to the Zone number) corresponding to the zone to be edited.
Figure 33: Refractory configuration detail
42 Rev. B4 Feb 2015 CS210
Page 43

Configuration
6.2.7.3 Refractory zone definition
Within that dialog the user can define the beginning and end of each zone, as well as the thermal
conductivity and the thickness of the kiln refractory material. Other relevant information such as the
installation date, a description field and the display colour can also be entered.
Figure 34: Zone definition detail
6.2.8 <Historical management>
This screen records user preferences in storing historical information.
6.2.8.1 <Images> Tab
There are two different saving types available: the short term history (saving over minutes) and the
long term history (over once a day).
Figure 35: Historical management <Images> Tab
In the same example, the <Save every (minutes)> parameter is set to 10 minutes and therefore, a
thermogram will be stored every 10 minutes. If an alarm condition occurs before the 10 minutes
interval is complete, you can force the system to record additionally a thermogram of the alarm
condition by checking the <Save if there are alarms> box.
As to the long term history, in the example every day at 00:00 hours, one representative thermogram
will be stored based on the average of all thermograms in the short term history for that one day.
CS210 Rev. B4 Feb 2015 43
Page 44

Configuration
Every time the real-time database size exceeds the <Backup trigger threshold>, the THR system
triggers the generation of a backup file and stores it in the applications public backup data folder.
6.2.8.2 <Others> Tab
This option allows the user to define the interval of time during which the error and alarm
information will be stored. In the example below, the system shown will delete any error or alarm
more than 1500 days old.
Figure 36: Historical management <Others> tab
6.2.9 <LRM Configuration>
This screen lets you define the features of the LRM system (Live Ring Migration) to correspond with
the physical installation. When you first install the software the LRM system is not activated and the
only option available is a check box beside the statement <Live Ring Migration system activated>.
Once this box is checked, the dialogue screen will be completed with many more opportunities to
enter data, as you will see in the figure below.
44 Rev. B4 Feb 2015 CS210
Page 45

Configuration
Deviation values will vary from kiln to kiln and also with refractory material. We
strongly recommend that you consult the kiln specifications or contact the kiln supplier
Figure 37: Typical Setting for LRM Configuration
Standard data required includes the COM port, the maximum standard deviation accepted for any
ring. In case of violating the <Max. standard deviation>, an LRM alarm is generated.
<Rotations to start statistics> number of kiln rotations to consider before calculating the standard
deviation.
<Num. of rotations for statistics> number of kiln rotations to consider when calculating the standard
deviation.
<Use last slip value if succeeding kiln speeds differ more than> If the change for the kiln speed from
one turn to the next is bigger than the given threshold, not the current but the last valid deviation
value for the tyre will be taken.
Within the <Rings> section, the user can define each ring along the length of the kiln, the ring diameter
as well as the deviations.
for more information!
With <Min. alarm events> you can determine the number of consecutive times that a ring must exceed
the user-defined limits before an alarm is initiated. For instance, if the value is 1, at the first incident,
the system will generate an alarm to warn the user. If the value is 2, the system will not take action
CS210 Rev. B4 Feb 2015 45
Page 46

Configuration
after the first incident. If the next revolution also exceeds the limits, then an alarm will be generated
indicating that the system is outside control limits.
It is also possible to assign a digital alarm output for each ring. This one output will activate
immediately when an alarm is generated and will deactivate once the system returns to a level within
the user-defined tolerances and the alarm is cancelled.
6.2.10 <Digital Output Management>
6.2.10.1 Repository of Digital Outputs
This repository shows all digital outputs in the system. The buttons along the lower toolbar let you
make new digital output entries, as well as deleting or editing existing entries by inputting the
appropriate details.
The same screen also lets you specify the port that the system must use in order to establish
communication with the digital output. The communication baud rate will always be 9600.
Figure 38: Repository of Digital Outputs
6.2.10.2 Digital Output Management detail
Clicking on any entry will open the detail dialogue box which shows all the possible features for each
single digital output: network address, description, type, WatchDog configuration and PowerOn
value.
By setting the WatchDog value, the user can define an output value that will be acquired by a digital
output when, for whatever reason, it loses contact with ReadScan for a period of time longer than the
<Watchdog timeout> which can also be defined by the user. In the given dialog box below, output
channel 3 switches from off to on after the <WatchDog timeout>.
The PowerOn value will be the output value that a digital output acquires when starting up.
More technical data for the available output modules are described in appendix see section
14.6 Output Modules, page 132.
46 Rev. B4 Feb 2015 CS210
Page 47

Figure 39: Digital Output Configuration detail
Configuration
A digital output while assigned to an alarm cannot be deleted!
6.2.11 <Daily Report>
That menu opens a dialog to create a report for a certain time span containing the relevant system
information like zone temperatures, alarm events and error data. The output for the resulting report
can be a screen view, a printing machine, or a pdf file.
Figure 40: Daily Report
CS210 Rev. B4 Feb 2015 47
Page 48

Configuration
It is not possible to add, edit or delete any error from this repository. Errors are
sed based on the settings in the Historical
Error details
Error list
6.2.12 <Management of Errors>
6.2.12.1 Repository of errors
The following screen shows the errors registered in the system. From this screen, you can see details
from each error. Also try thru the option <Error list>, the one shown in the pop-up menu when
clicking on the printer icon.
Figure 41: Repository of errors
periodically and automatically era
Management under <Others> Tab, page 44!
6.2.12.2 Error detail
Clicking the <Look up> button in the <Repository of errors> view will launch the <Error detail> view.
In the <Error detail> view you can see all details for each single error: the period of time that the error
existed (there’s a chance that it’s still active), which device experienced the error, a brief comment
about the problem and its control status (the user, the date and the comment).
48 Rev. B4 Feb 2015 CS210
Page 49

Configuration
Figure 42: Error detail
6.2.12.3 Error list
Using this screen you can print reports of all errors registered in the system. These lists or reports are
fully configurable by using selection filters and sorting criteria.
Selection filters allow filtering information using:
• Error identifier
• Starting date
• Ending date
• State
• Control
• Device
Sorting criteria permits:
• The fields used to sort data.
• The order of each sorted field.
An error list can be filtered via an identifier or by starting and end date. By clicking on the <Export>
button you may convert a list into different formats such as pdf, xls, and rtf.
CS210 Rev. B4 Feb 2015 49
Page 50

Configuration
Alarm details
Alarm list
Export
Figure 43: Error list
6.2.13 <Management of Alarms>
6.2.13.1 Repository of alarms
This shows the alarms registered in the system. From this screen, we can display all the alarm details.
Similar detail can be displayed by clicking on <Alarms list>, which appears as a pop-up menu when
the user clicks on the printer icon.
Figure 44: Repository of alarms
50 Rev. B4 Feb 2015 CS210
Page 51

Configuration
It is not possible to add, edit or delete any alarm from this repository. Alarms are
periodically and automatically erased based on the settings in the Historical
Management under
6.2.13.2 Alarms detail
Clicking the <Look up> button in the <Repository of errors> view will launch the <Alarm detail> view.
In the <Alarm detail> you can see all details for each single alarm: the period of time that the alarm
existed (there’s a chance that it’s still active), which device experienced the alarm, the type of alarm,
registered temperature, a brief comment about the problem and its control status (the user, the date
and the comment).
<Others> Tab, page 44!
Figure 45: Alarms detail
6.2.13.3 Alarms list
Using this screen you can print reports of all alarms registered in the system. These lists or reports are
fully configurable by using selection filters and sorting criteria.
Selection filters allow filtering information using:
• Alarm identifier
• Starting date
• Ending date
• State
• Control
CS210 Rev. B4 Feb 2015 51
Page 52

Configuration
Export
• Alarm type
• Device
Sorting criteria permits:
• The fields used to sort data.
• The order of each sorted field.
An alarm list can be filtered via an identifier or by starting and end date. By clicking on the <Export>
button you may convert a list into different formats such as pdf, xls, and rtf.
Figure 46: Alarms list
6.2.14 <Users>
The repository of users is accessible via the menu <Utilities> <Users>.
The user’s management allows the entry of new users, as well as the modification and deletion of
existent ones. Each user can be assigned an appropriate security level to maintain system integrity.
6.2.14.1 Users Repository
This window shows all users currently registered in the system. There is always one default user, with
the preset user code of ‘ADMIN’ and no password.
52 Rev. B4 Feb 2015 CS210
Page 53

Figure 47: Repository of users
Configuration
The user ADMIN cannot be deleted under any circumstance!
6.2.14.2 User’s detail
Clicking on the user name will open the detail screen that will display detailed information for each
user that the system has registered. There are the main tabs <General>, <Permission>, and <Others>.
6.2.14.2.1 <General> Tab
This tab contains personal information, such as name and password, e-mail address, telephone
number, cell phone and fax.
CS210 Rev. B4 Feb 2015 53
Page 54

Configuration
Figure 48: User detail: <General> Tab
6.2.14.2.2 <Permissions> Tab
Within this detail, you can display and edit each user’s permissions, or in other terms their access to
the system. These permissions set individual access restrictions for each user for several system
components like Config, DBCheck, Deneb, and ReadScan.
Figure 49: User detail: <Permissions> Tab
54 Rev. B4 Feb 2015 CS210
Page 55

Configuration
Permissions for user ADMIN cannot be edited!
6.2.14.2.3 <Others> Tab
Under <Deneb> the users can define their personal preferences in regard to system audible alarms.
Figure 50: User detail: <Others> Tab
Under <ReadScan> the users can activate the check box to send emails in case of alarms.
CS210 Rev. B4 Feb 2015 55
Page 56

Configuration
Figure 51: User detail: <Others> Tab
Some options may be disabled since they rely upon the user’s permissions!
6.2.15 <Update ReadScan>
If Configuration values change the ReadScan program must be restarted. You can find <Update
ReadScan> under <Utilities> of the CS Config.
56 Rev. B4 Feb 2015 CS210
Page 57

Operation
CS Config Client
Scanner, Point Sensors
DB Check Client
Server
Deneb Client
OPC Client
(CS Items)
7. Operation
The system is designed in a client-server structure. That is, ReadScan works as the server while Deneb
works as the client.
Therefore, ReadScan runs the main system tasks, such as communicating with the communication
devices (scanner, pyrometers), interpreting the incoming information, and interfacing with the digital
output modules. Its other important task is serving the Deneb’s clients.
Deneb’s clients are, in essence, ‘voyeurs’ of the system. Their main duties are displaying the physical
state of the different system devices, as well as recovering historical data from the system.
Furthermore, they permit the user to control the events (alarms and errors) that can show up in the
system.
(Konfiguration)
SQL Database
(Database Config.)
ReadScan
Figure 52: Principal Software Structure
(Visualisation, Real Time
and History View
)
7.1 ReadScan
Launching:
In accordance to the pre-settings in the installation (see Figure 13, page 27), ReadScan will appear
automatically when your computer is started. Otherwise, to run ReadScan you must click on its icon,
located in the program group CS.
Closing:
There are two reasons to close ReadScan: 1) reinstalling or updating the CS software and 2) freeing an
occupied COM/Ethernet port for use by another scanning software. Be aware that ReadScan does not
close by clicking on the windows <Exit> button – The Close button removes the CS Readscan screen
from the desktop, but does NOT stop the service! To close CS Readscan, right-click on the small
Readscan icon on the tray and select the menu entry <Close>!
Figure 53: Closing of ReadScan via the task bar
CS210 Rev. B4 Feb 2015 57
Page 58

Operation
Remember that to ensure that changes are acknowledged, ReadScan has to be restarted
7.1.1 <Control> Tab
On this tab you will find the commands needed to start and stop the service without closing the
ReadScan application. This function is particularly useful when the user needs to restart ReadScan to
fully implement any changes set by CS Config.
It also shows the number of laps registered by the system from the service start up, the rotation
velocity, the time duration of the last lap, the exact time that the record was updated and the memory
occupied by the program. Except for the occupied memory, which is updated once per second, the rest
of the information refreshes after the completion of rotation of the kiln.
Figure 54: Main screen: <Control> Tab
each time configuration changes are made!
Running the software without having a valid license installed (e.g. for demonstration purposes) sets
the software to the unregistered mode with the following restrictions:
• A maximum of 10 images can be stored in the database.
• The thermal image shows 10% of the lines without temperature data.
7.1.2 <Scanners> Tab
This tab shows information on the scanners configured to work with the system.
In normal circumstances, the information shown becomes updated at the end of each kiln rotation. If
communication is interrupted the information will be updated as soon as detection takes place.
58 Rev. B4 Feb 2015 CS210
Page 59

Operation
Figure 55: Main screen: <Scanners> Tab
7.1.3 <Pyrometers> Tab
This tab shows information on the pyrometers configured to work with the system. If no pyrometer is
configured, the user will be informed about that.
In normal circumstances, the information shown becomes updated at the end of each kiln rotation. If
communication is interrupted the information will be updated as soon as detection takes place.
Figure 56: Main screen: <Pyrometers> Tab
7.1.4 <LRM> Tab
This tab shows information related to the LRM system (Live Ring Migration). If this system is not
operational, the user will be informed about that.
In normal circumstances, the information will be updated when new data is received from the system.
However, it will not be possible to report about ring slip until the kiln has finished its current lap. If
communication is interrupted the information will be updated as soon as detection takes place.
CS210 Rev. B4 Feb 2015 59
Page 60

Operation
Figure 57: Main screen: <LRM> Tab
7.1.5 <OPC Server> Tab
This tab shows information related to the OPC Server utilized by ReadScan. To make the OPC server
active, you have to check the <OPC server active> check box in CS Config, see section 6.2.1.2
<Communications settings> Tab, page 29. Under this section you can also find a list of available OPC
items.
The <Disconnect clients> button forces the disconnection of all the OPC clients connected.
Figure 58: Main screen: <OPC Server> Tab
7.1.6 <Log> Tab
By clicking on this tab the user can see a summary of the actions taken by ReadScan: the commands
sent to every device and a log showing both correct operation and any errors or alarms. It also gives
out information about every image that the system chooses to save.
Clicking the right mouse button activates a pop-up menu, which lets you copy, print, save and delete
all of the information displayed.
60 Rev. B4 Feb 2015 CS210
Page 61

Operation
Figure 59: Main screen: <Log> Tab
7.2 CS Runtime Software: Deneb
To run Deneb you must click on its icon, located on the desktop or in the program group CS.
7.2.1 <Main> <Real time>
This screen shows the temperature status of the kiln’s surface in real time. There are the following
main components to this screen: temperature chart, refractory zones, thermogram and lower status
bar.
Figure 60: Real time screen
The temperature chart is located in the upper screen area. This chart provides a plot of the kiln surface
temperature with three data sets representing maximum, minimum and average temperatures at each
data point along the length of the kiln. Overlaid on this image are the user-defined alarm zones (with
maximum limits). Highlighted in red color would be those alarm areas where there is any active alarm
caused by too hot temperatures.
CS210 Rev. B4 Feb 2015 61
Page 62

Operation
In the context menu (right mouse click) of the temperature chart view you can access the <Set as
reference> item which defines the current thermal image as a reference image. A reference image will
be used for calculating difference images, see section 7.2.13 <Graphic> <Difference between images>,
page 75.
In the same context menu you can access the <Advanced configuration> item. It allows the user to
select between different display options: background and axis colours, colours for the alarm zones,
profile lines (formats, colour and thickness) and under <Area> the configuration of an envelope as the
difference curve between two temperature graphs.
Figure 61: Advanced configuration for the Real Time view
In the middle part of the view, you will find the illustration for the refractory zones of the kiln. Each
zone is mouse-sensitive, providing a tool tip with the most essential information for that zone. The
<K> symbol indicates the kiln trigger. If the LRM life ring migration is installed, the additional
position indicators are marked as consecutive numbers starting with <1>, <2> and so on.
The thermogram takes up most of the lower screen area, and represents the temperature distribution
across the kiln surface as a false-color image. The context menu entry <Continuous View> allows you
to toggle between the approaches to update the view: either immediately with each new incoming line
from the scanner or only when kiln rotation is completed. You can also superimpose the thermogram
with symbols for the position of the linescanners <S> and the shadow pyrometers <P>.
The lower status bar makes it possible to see other useful information without the need to open other
windows. The range of information shown is:
• Time taken to complete the displayed lap
• Time elapsed since the lap was displayed
• Location and temperature at the cursor location in the current thermogram
• Internal temperatures of the temperature sensors (Scanners and pyrometers)
• Burning zone temperature
62 Rev. B4 Feb 2015 CS210
Page 63

Operation
Both in the chart and the thermogram, you can zoom into a specific area of the kiln. To
do so, click and drag from left to right, creating a square surrounding the area of
Also, in the upper part of the screen, there’re some icons that permit you to:
• Display only the profile chart
• Display only the thermogram
• Display both (default option)
• 3D standard view for the thermogram
• 3D real time view for the thermogram (available as accessory), see section 11.5 3D Real Time
View, page 112)
interest!
CS210 Rev. B4 Feb 2015 63
Page 64

Operation
7.2.2 <Main> <Historic time> <Short term>
This screen is very similar to the Real-time screen described above (described in section 7.2.1 <Main>
<Real time>, page 61), and allows the user to view historical images stored by the system in the short-
term database. Next to the image, related information such as LRM information and active alarms
during the image are displayed in separate windows.
Figure 62: Short term - Historic time screen
The upper buttons helps to navigate thru all the images stored in the system:
• Navigate one by one (a new image with every click) or play the images in sequence.
• Navigate forward (from oldest to newest) or navigate backwards (from newest to oldest) in
self-running mode
For direct accessing the Histogram charts and Tendency chart (described in sections 7.2.11 <Graphic>
<Histogram>, page 73 and 7.2.12 <Graphic> <Trend>, page 74) you have to exit the zoom mode by
clicking on the <Go to mode Marking> icon , and activating two more icons in which provide
access to the Histogram and Tendency charts.
The Marking mode allows the user to define the kiln area to be studied in the charts and the user may
select the entire kiln or just one area. To select a specific area of the kiln, click on the starting point of
the desired area and click on the point where you want the area to finish. The status bar provides
information on the area selected, and by moving the border the size can be easily edited.
64 Rev. B4 Feb 2015 CS210
Page 65

Figure 63: Short term - Historic time screen in Marking mode
Operation
Once the area is selected just click on the corresponding chart icon to display the desired information.
The data will be displayed, and the length and lines of the chart options will adjust automatically.
To exit the Marking mode and come back to zoom mode, just click on the <Go to mode Zoom> icon.
CS210 Rev. B4 Feb 2015 65
Page 66

Operation
7.2.3 <Main> <Historic time> <Long term>
This screen is very similar to the short-term screen described above with the main exception being that
the images in this case correspond to the long-term period based on days.
Figure 64: Long term - Historic time screen in zoom mode
7.2.4 <Main> <Reference image>
This item is active once the user has defined one image as a reference image. To mark an image as a
reference image, you have to launch the context menu <Set as reference> in the <Real Time> view, see
section 7.2.1 <Main> <Real time>, page 61. Alternatively, you can define a reference image also via the
historical view. One image only can be set to the reference image.
7.2.5 <Secondary> <Internal temperatures>
This screen shows the internal temperature of scanners and pyrometers. The data is recorded at the
point of completion of the lap currently being displayed. It will be refreshed after each kiln lap.
Figure 65: Internal temperatures screen
66 Rev. B4 Feb 2015 CS210
Page 67

Operation
An unrealistic temperature display of e.g. 0º C may often be a sign of a communication
error with the pyrometer or an indication of an improperly configured pyrometer. Make
An unrealistic temperature display of e.g. 0º C may be a sign of a communication error!
7.2.6 <Secondary> <Burning zone graphic>
This screen shows the temperature measured by the burning zone sensor. The data is recorded at the
point of completion of the lap currently being displayed. It will be refreshed after each kiln lap.
Apart from the numerical display, there is a chart that allows the user to visualize the temperature
trend over time.
Figure 66: Burning zone chart
sure that the pyrometer is correctly identified as a burning zone pyrometer!
7.2.7 <Secondary> <LRM view>
The LRM detail screen graphically represents the LRM information associated with the current lap.
This information comprises of the time to complete the current lap, the time for each ring to complete
that lap, and the rotational deviation or offset of each tire relative to the driven tire.
The screen has several tabs explained below.
7.2.7.1 <Kiln view> Tab
This screen shows a graphical representation of the kiln with the lap time for each ring to complete the
current lap, and the offset (slip) relative to the driven tire.
CS210 Rev. B4 Feb 2015 67
Page 68

Operation
Figure 67: <Kiln view> Tab of the LRM view
7.2.7.2 <Vertical> Tab
This tab shows, on a vertical bar chart, the time duration for each ring to complete the current lap, and
the offset relative to the driven tire. Right clicking on the chart will launch a pop-up menu allowing
the user to toggle between time and offset or to display both simultaneously.
Figure 68: <Vertical> Tab of the LRM view
7.2.7.3 <Horizontal> Tab
Almost identical to the screen described above (section 7.2.7.2 <Vertical> Tab), this chart is rotated by
90°.
68 Rev. B4 Feb 2015 CS210
Page 69

Operation
Figure 69: <Horizontal> Tab of LRM view (info about the slip)
7.2.7.4 <Time trend> Tab
This tab displays a line chart of the lap duration for each tire over a number of rotations. This allows
the user to visualize the evolution of the timing and easily compare the data for each tire.
Figure 70: <Time trend> Tab of LRM view
7.2.7.5 <Space trend> Tab
This one tab displays the offset for each tire (slip) on a line chart allowing the operator to see the
evolution of such offsets and easily compare the data for each tire.
CS210 Rev. B4 Feb 2015 69
Page 70

Operation
In normal operation the data on all tabs explained above is updated in real-time.
However, the offset data cannot be updated until the corresponding revolution of the
kiln has been completed!
Figure 71: <Space trend> Tab of LRM view
7.2.8 <Secondary> <Areas of Interest>
In the <Real time> view, one can place a dedicated window called <Areas of Interest> to monitor a
specific area of the thermal image. Click on the <Add> button to generate a new area of interest. To
place an area, move the mouse over <Real time> view and shift the cross line to the desired position.
The first crossing line marks the upper left corner of the area; the second one determines the bottom
right corner. Click on the <Confirm> button in the <Areas of Interest> dialog to set the formed area on
the <Real time> view. The area is added to the list of areas showing the current temperatures in its
minimal, averaged, and maximal value. A double click on the area in the list recalls the position
markers on the view.
The slider changes the font size for the displayed areas.
Figure 72: <Areas of Interest> Window
7.2.9 <Secondary> <Errors>
The <Errors> screen shows all errors recorded by the system with the following features:
70 Rev. B4 Feb 2015 CS210
Page 71

Operation
Errors that are no longer active will be deleted from the system as soon as ReadScan
, the user can configure the system
• The error is still active and not controlled (RED)
• The error is still active but controlled by the user (YELLOW)
• The error is not active anymore (GREY)
Figure 73: Errors’ screen
Control of an error is made via the <Controlling error> option, shown in the error’s pop-up menu or
by double clicking on the error itself.
Figure 74: Control screen and comments
confirms that a user has taken action to control the error!
In the CS Config, see section 6.2.14.2.3 <Others> Tab
to “beep” while errors are active!
7.2.10 <Secondary> <Alarms>
This screen is basically the same just explained above in the section 7.2.8 <Secondary> <Areas of
Interest>
instead of errors.
, page 70. The only difference being that the information shown in this case is about alarms
CS210 Rev. B4 Feb 2015 71
Page 72

Operation
Figure 75: Alarms’ screen
72 Rev. B4 Feb 2015 CS210
Page 73

Operation
The area to be studied can be graphically selected in the ‘real time view’, as described
7.2.11 <Graphic> <Histogram>
Within the <Graphics> drop-down menu the operator can select the histogram view.
A histogram is a bar chart where the “x” axis represents the temperatures and the “y” axis represents
the corresponding pixel count.
Figure 76: Histogram chart
On this screen the user can define:
• the time period of interest, (from X date to Y date),
• the particular zone of interest along the length of the kiln (start point at X cm, end point at Y
cm)
• the particular lines of interest over the kiln rotation
• the temperature range to be reported
• number of groups to display the temperature data
Once the values are established, the <Load data> button starts the data loading process. Depending on
the values shown, the loading process may take long time, so a progress bar indicates the
approximated percentage of the process done. Activating the <Stop> button will stop the data-loading
process.
in section 7.2.1 <Main> <Real time>, page 61!
CS210 Rev. B4 Feb 2015 73
Page 74

Operation
7.2.12 <Graphic> <Trend>
Figure 77: <Graphic trend> screen
This chart displays the same data as the histogram but in a line chart format. The lines are colour
coded showing maximum temperature (red), average temperature (green) and minimum temperature
(blue). As before the area of interest, time period of interest and temperature are all user defined.
74 Rev. B4 Feb 2015 CS210
Page 75

Operation
ribed in
7.2.13 <Graphic> <Difference between images>
This screen permits the operator to directly compare two complete images from two unique time
periods. Simply define the start points of the two periods and click on the <Load Images> button to
display the difference image. The difference image is based on the calculated temperature difference
between image 1 and image 2 for each pixel at the same position.
Figure 78: Difference between images screen
The range of temperatures to be shown can be defined in CS Config as desc
section 6.2.2 <Colours and axes definition>!
7.2.14 <Reports>
7.2.14.1 Report Production History
Under the <Report Production History> dialog, the operator can select the desired report for the
current or past days. The output generates a summary for the considered days in regard to the
refractory zones and the kiln states.
CS210 Rev. B4 Feb 2015 75
Page 76

Operation
Figure 79: Exemplary Dialog for Historical Reports
7.2.14.2 Daily Report
Be referred to the description in section 6.2.11 <Daily Report>, page 47.
76 Rev. B4 Feb 2015 CS210
Page 77

Operation
7.2.15 Command Line Options for Deneb
You can tell Deneb which windows to open when initializing. To do that, use the following parameters in
the command line:
• $LOGIN: User name
• $PASSWORD: Password (this parameter is not compulsory if no password exists)
• $PROFILE: Profile
• /REALTIME: Opens the window <Main> <Real time> automatically
• /SHORT: Opens the window <Main> <Historic time> <Short term> automatically
• /LONG: Opens the window <Main> <Historic time> <Long term> automatically
• /DIFFER: Opens the window <Graphic> <Difference between images> automatically
Example 1:
• User ADMIN with password 1234 and RAYTEK profile and real time screen
Then, the program call would be:
Deneb.exe $LOGIN ADMIN $PASSWORD 1234 $PROFILE RAYTEK /REALTIME
Example 2:
• User TEST without password and RAYTEK profile with short and long term history view
Then, the program call would be:
Deneb.exe $LOGIN TEST $PROFILE RAYTEK /SHORT /LONG
CS210 Rev. B4 Feb 2015 77
Page 78

Database
8. Database
During the CS installation procedure an SQL server will be installed automatically. The SQL server
currently comes as Microsoft SQL Server 2008 R2 Express. The maximum size for the database of
10 GB is only to be considered for a CS software installation below version 6.2.2.
8.1 Concept
From CS software version 6.2.2 on, the THR (Transparent Historic Review) system is available. The
following sections explain how backups are created and restored.
The CS Software records the current data and stores it in the real time database. The database can hold
up to 10 GB of data. The CS software though won't make use of this limit because all data is stored
outside the database.
THR manages separate backup files to have and present them to the user as a whole. To make this
work, THR backups the data from the real time database in intervals. This interval is determined by
means of a threshold in megabytes set in the CS configuration, see section 6.2.8 <Historical
management>, page 43. Every time the real-time database size exceeds that threshold, the THR system
triggers the generation of a backup file and stores it in the applications public backup data folder.
The file name for a backup file is coded with time and date. With that information, the THR system
can distinguish which backup file is relevant for the current review operation.
The backup process is automatic and after each backup the real time database is cleared. With the
described approach, the database size never gets bigger than the defined threshold size. Most of the
system’s collected data is thus stored on the system storage as backup files; only the most recent
amount of data is stored in the real time database.
8.2 Historic Review
When the user tries to look up historic data, the system knows from the selected timeframe where to
look for information. If recent data is requested, in many cases the data can be fetched from the real
time database. For all other cases, the THR system will look for the correct backup file in the system
storage, i.e. in the public backup folder. Because of the naming system, THR can easily find the
relevant backup file. The file is then restored into the historic database of the database server.
Afterwards, the historic review can access the information and display it.
8.3 File Naming Convention
The THR system provides the following naming convention for the backup files.
File name format:
year-month-day-hours-minute_year-month-day-hours-minute_year-month-day-hours-minute_yearmonth-day-hours-minute.bak
The first date element represents the earliest short term image in the backup file.
The second data element represents the latest short term image in the backup file.
The third data element represents the earliest long term image in the backup file.
The fourth data element represents the latest long term image in the backup file.
78 Rev. B4 Feb 2015 CS210
Page 79

Database
The data format is the default MS SQL server database export format. Each of these backup files can
be imported into a SQL database.
8.4 Backing Up all Data
In case the data has to be backed up from the server for safety reasons, all files in the public backup
folder have to be stored. It is important to understand that the data in the real time database is also to
be backed up to the system storage regularly. This is done by the established database backup
function of the software. This feature creates a <backup.bak> files in the public database storage and
represents the current state of the real time database at backup time.
The daily backup file and the THR backup files make up the full set up of recorded data. Thus all
these have to copied to a save location for backup.
8.5 Restoring THR Data
For a full restore, it is necessary to restore the saved <backup.bak> file into the real time database. It is
suggested to disable the THR tickup on the restore feature of DBCheck. Otherwise the THR system
will generate a THR backup file from the recently restored file and clear the real time database
afterwards. This might be desired in some cases, but for restoring a THR data file set, it is not ideal.
After restoring the <backup.bak>, simply copy the remaining THR backup files into the public backup
folder of the CS system. After a restart, Readscan will pick up the backup files and make them
available for historic review.
CS210 Rev. B4 Feb 2015 79
Page 80

Options
service option is not included in the CS210 standard package, it must be
9. Options
9.1 Start-up-Service
The start-up service includes the installation of the scanners into the protective housing boxes,
checking all wiring, communications and services from the scanners to the location of the computer.
The scanner alignment will be checked and corrected as necessary. Software will be installed, and all
users will be trained on the full operation of the system, including routine maintenance procedures.
The entire system will be operational before the final acceptance and sign-off by the customer. Raytek
does not provide construction, erection, mechanical, electrical or building services. Prior to the startup service the scanner housings should be installed in the designated locations per our
recommendations. All wiring should be in place and the associated electronics positioned in the
control room. Raytek will check the final connections and power the system. The scanner heads
should not be put into the protective housings until this start-up service begins.
The startup
ordered as a separate line item!
80 Rev. B4 Feb 2015 CS210
Page 81

Accessories
10. Accessories
Accessories include items that may be ordered at any time and added on-site.
10.1 Hardware
• Serial RS485 / RJ45 Ethernet Converter (XXXSYSCS210CON)
• Fan Control
• LRM – Live Ring Migration (XXXTCSLRM210)
• Shadow Monitoring (XXXTCS200SM)
• Burning Zone Monitoring (XXXTCS200BZ)
• Internal Heater for system connection box (XXXSYSCONNBOXHEAT)
• Laser Distance Meter (XXXSYSLDM) for distances up to 60 m (197 ft), recommended for an
exact gathering of the linescanner-to-kiln geometry
10.2 Software
• Refractory Management software package for handling kiln refractories (…RFM)
• 3D Real Time View of the rotating kiln (…3D)
CS210 Rev. B4 Feb 2015 81
Page 82

Accessories
10.3 Serial RS485 / RJ45 Ethernet Converter
The serial RS485 / RJ45 Ethernet Converter (XXXSYSCS210CON) is a dedicated device server for
connecting up to four RS485 devices to a TCP/IP network.
The serial RS485 / RJ45 Ethernet Converter must be installed in case of having either one or all
accessories such as Fan Control, Burning Zone Monitoring, Shadow Monitoring, or Live Ring
Migration. The converter must be mounted in the system connection box in the field. For both CS211
and CS212 only one converter is required.
Figure 80: Serial RS485/ RJ45 Ethernet Converter
10.3.1 Technical Data
Ethernet Communications
Speed 100 Mbit/s
Ports 2x
Port connector RJ45
Protection built-in 1.5 kV magnetic isolation
IP-address 192.168.42.10 (default)
RS485 Communications
Ports 4x
Port connector DB9 male
Protection built-in 15 kV ESD for all signals
Software
Driver support Windows 2000/XP/Vista/Win 7
Utility software Serial Device Server Configuration Utility (on the Support
for installing Virtual COM ports
Mechanics
Dimensions (W x H x D) 55 x 140 x 95 mm (2.1 x 5.5 x 3.7 in)
Mounting DIN-rail
DVD)
Power
Power input 12 to 48 VDC, redundant dual inputs
Power connector terminal block
Power consumption 4 W
82 Rev. B4 Feb 2015 CS210
Page 83

Accessories
Off
Power 1 is off, or power error condiction exits.
Off
Power 2 is off, or power error condiction exits.
Off
System is not working.
Off: 10 Mbps Ethernet connection
Off
No data is transmitted or received through the serial port.
Please reserve TCP/UDP port 5048 and 5058 in your Ethernet network, Configuration
Utility Software will use these ports to communicate with the Serial RS485 / RJ45
Environment
Operating temperature 0 to 60°C (32 to 140°F)
Storage temperature -20 to 80°C (-4 to 176°F)
Operating humidity 5 to 95% RH
10.3.2 LED Indicators
There are LEDs display the power status, network status, and serial communication status located on
the front panel of the Serial RS485 / RJ45 Ethernet Converter, each of them has its own specific
meaning as below table.
LED Color Description
P1 Green
P2 Green
Status Orange
Ethernet Orange
Green
Serial Orange
Green
Power 1 is on.
Power 2 is on.
Blinking: System is ready.
Steady on: the device has been located by utility’s location function.
Blinking: Ethernet port is transmitting or receiving data.
Steady on: Ethernet has the good link for 10 Mbps or 100 Mbps operations.
On: 100 Mbps Ethernet connection
Serial port is transmitting data.
Serial port is receiving data.
Table 1: LED Indicators
10.3.3 Driver Installation
The following procedure describes the way to install a virtual COM port on the CS computer by using
the Configuration Utility Software. The virtual COM ports work like standard Windows COM ports,
so the CS software sees no difference between both.
Ethernet Converter! Make sure that a possible firewall does not block these ports!
For an overview of all ports in use, see section
1. Power on the Serial RS485 / RJ45 Ethernet Converter!
2. Insert the Advantech driver utility
DVD
drive (e.g. E:\) on the host PC.
3. Use Windows explorer to execute the setup program, the path for the setup program on the
DVD should be:
E:\Utility& Driver\SerialDeviceServerConfigurationUtility\Serial_Device_Server_Config
uration_Utility_[Version]_Release_[date].exe
CS210 Rev. B4 Feb 2015 83
DVD for the Serial RS485 / RJ45 Ethernet Converter into the
4.6 PC Requirements, page 17.
Page 84

Accessories
4. After the installation is finished, open the Serial Device Server Configuration Utility from the
Windows Start Menu by clicking <Start> <All Programs> <Advantech eAutomation> <Serial
Device Server Configuration Utility>. The Serial Device Server <XXXSYSCS210CON> will
appear in the sub-tree of Device Server List area as shown below (may take several seconds).
Figure 81: Selecting the <Auto Mapping> Function
5. Right click the serial device <XXXSYSCS210CON> and select the “Auto Mapping” function.
6. The serial ports that can be assigned to virtual COM will be shown in the following window.
Click the <Select All> button and press <Map Selected Ports> button. All selected serial ports
will be mapped to virtual COM ports in sequential order.
Figure 82: Mapping of Virtual Ports
7. The COM ports in the <Virtual Com Ports> listing are now available for use by Windows
applications.
84 Rev. B4 Feb 2015 CS210
Page 85

Accessories
configuration for the four ports of the
Figure 83: COM Ports in the “Virtual Com Ports” Listing now available for the CS Software
8. The configuration for the four ports of the serial device <XXXSYSCS210CON> are preset in
accordance to the available CS accessories, e.g. port 1 is configured as RS-485 type for
communicating with the output modules to be wired at connector X2 in the system connection
box. In the example above port 1 is assigned to the virtual COM port 10 to be used in the CS
software configuration.
It is not recommended to change the pre-set
serial device <XXXSYSCS210CON>!
CS210 Rev. B4 Feb 2015 85
Page 86

Accessories
10.4 Fan Control
In order to ensure lining durability and avoid kiln deformation during normal operation, kilns may
require additional cooling from fans. The Fan Control system will enable the operating personnel to
automatically turn on or off fans in up to 48 user set control zones.
You may add additional Fan Control output modules to increase the number of available outputs.
Types of output modules:
• XXXSYS16DA: digital output module 7043, 16 channels, open collector
• XXXSYS7RA: digital output module 7067, 7 channels, potential free relay contacts
10.4.1 Technical Data
Common Features
power input: +10 to +30 V
power consumption: typ. 2 W
dual watchdog: power-on start value and safe value for host failure
operating temperature: -10 to + 70°C (14 to 158°F)
storage temperature: -25 to + 80°C (-13 to 176°F)
humidity: 5 to 95%, non-condensing
XXXSYS16DA
type: 7043
channels: 16 open collector outputs, non isolated
max load current: 100 mA
max load voltage 30 V
XXXSYS7RA
type: 7067
channels: 7 relay outputs, potential free contacts
contact rating: 0.5 A @ 120 VAC, 1 A @ 24 VDC
operate time: 5 ms
10.4.2 Installation
For more technical information see appendix 14.6 Output Modules, page 132.
For the detailed wiring see appendix 13.7 Fan Control Wiring, page 121. Alternatively to the field
installation of the digital output modules in the system connection box, the hardware can also be
installed in the control room. Please contact the technical support for further details.
86 Rev. B4 Feb 2015 CS210
Page 87

Accessories
Junction
Box
Position
Indicator
(LRM)
Position
Indicator
(CS210)
Position
(LRM)
Position
Indicator
(LRM)
Junction
Box
Junction
Box
Junction
Box
10.5 LRM – Live Ring Migration
In order to avoid kiln deformation that can damage refractory kiln torsion must be kept within certain
limits. Kiln shell torsion is greatly affected by the degree of clearance between the tires and the kiln
shell. The simplest and most accurate procedure is to measure the kiln shell’s rotational speed as
compared to the rotational speed of the tires. The result is termed as tire slip. The Live Ring Migration
System is an automatic measurement and registration system designed to monitor tire slip and alert
the user when the system exceeds user-defined limits.
Indicator
Figure 84: Monitoring of Rings
For an overview of a CS210 system with LRM, see section 13.2 CS212 Installation with Accessories,
page 115.
Delivery:
• Position indicator with junction box, 3 position indicators delivered for monitoring of 3 tires
(each further tire requires an additional position indicator XXXSYSECPI, up to 6 tires can be
monitored with the LRM system)
• LRM Remote Control
10.5.1 Functionality
The LRM system monitors tire slip by measuring the rotational speed of the kiln shell and of each tire.
The rotation time differences between the shell and each tire are converted to a radial slip.
The electronics in the LRM remote control box captures the trigger signals from the different rings and
send <ring number> and <time stamp> to the PC via serial communication.
10.5.2 LRM Remote Control
The LRM remote control box contains a micro PLC and an RS485 communication port, all in a
protective housing. The measured values for the kiln and for each of the tires are then sent to the
computer through the RS485 port.
For more technical data, see section 13.8 LRM Wiring, page 122.
CS210 Rev. B4 Feb 2015 87
Page 88

Accessories
Junction box
Trigger bar
Position indicator
20 mm (0.79
Position
indicator
Junction box
10.5.3 Position Indicator
Temperature resistant inductive proximity switches are used to trigger the
PLC counter rotation time. The trigger bar for the position indicator is
welded directly onto the tire.
Figure 85: Position Indicator and Trigger Bar
in)
Figure 86: Mounting the Position Indicator
88 Rev. B4 Feb 2015 CS210
Page 89

The CS210 position indicator (master) must be wired to the <kiln trigger> labeled input
! All subsequent LRM position
Flat Iron
welded
(steel ST37)
Figure 87: Trigger Bar – details –
Accessories
Angle Iron
10.5.4 Wiring
For the detailed wiring of the LRM see section 13.8 LRM Wiring, page 122.
For recommended cables see section 4.5 Cable Requirements, page 14.
on the terminal line of the LRM remote control box
indicators must be wired to the inputs <Ring 1>, <Ring 2> and so.
CS210 Rev. B4 Feb 2015 89
Page 90

Accessories
sensor covers the size of the
MI3 Sensor
Kiln
10.6 Shadow Monitoring
The linescanners can be hindered from monitoring the complete kiln by physical obstructions and also
by shadows from the tires. With the Shadow Monitoring Package (XXXTCS200SM) up to 32 additional
pyrometers can be installed and configured to monitor these “shadowed” portions. The temperature
values from these pyrometers are integrated in the scanned data from the linescanners and the results
are displayed as one homogenous thermogram.
For an overview of a system configured with Shadow Monitoring, see section 13.2 CS212 Installation
with Accessories, page 115.
Delivery:
• MI310LTH sensor and MI3 Communication Box (metal) with RS485 communications
• Air purge jacket, stainless steel
• Adjustable mounting bracket
• MI connection box
Mounting:
The recommended MI3 sensor mounting is shown in the figure below. The angular alignment of the
sensor head reduces the risk of possible contaminations on the optics.
Figure 88: Recommended Alignment of MI3 Sensor
Make sure that the resulting spot size for the MI3
shadowed area!
Example:
Optical resolution for the MI3 sensor: 10:1
Distance to the kiln 5000 mm (200 in.)
Resulting spot size: 500 mm (20 in.)
Wiring:
For an installation of two or more shadow sensors in a network, each MI3 communication box is
wired parallel to the others. You may connect up to 32 units. Make sure to deactivate the preset shunt
resistor for all units except for the last one in the chain. The switch for activating the shunt is found on
90 Rev. B4 Feb 2015 CS210
Page 91

Accessories
Termination
the circuit board in the communication box as shown in the figure below. To switch the shunt you
must first open the box lid.
Figure 89: MI3 Circuit Board with Termination for Activating the Shunt
For detailed wiring of Shadow Monitoring see section 13.9 Shadow Monitoring Wiring, page 125.
For recommended cables see section 4.5 Cable Requirements, page 14.
Technical data:
Temperature range -40 to 600°C (-40 to 1112°F)
Spectral response 8 to 14 µm
Accuracy ± (1% of reading or 1°C) whichever is greater
Optical resolution 10 : 1 (90% energy)
Head ambient temperature 0 to 180°C (32 to 356°F)
Head cable length 8 m (26 ft.)
Protection rate (head) IP65 (NEMA-4)
Digital interface RS485
For other technical data see MI3 operators manual.
CS210 Rev. B4 Feb 2015 91
Page 92

Accessories
Air
¼” NPT
10.7 Burning Zone Monitoring
With Burning Zone Monitoring (XXXTCS200BZ) a two-color point sensor (MR ratio pyrometer) can be
installed looking into the burn zone of the kiln to monitor the temperatures in this very important
area. The two-color unit will essentially “see” through the smoke and other by-products of
combustion and the temperature reading will be displayed on the main screen.
For an overview of a system configured with Burning Zone Monitoring, see section 13.2 CS212
Installation with Accessories, page 115.
Delivery:
MR ratio pyrometer, type: MR1SB
MR connection box
High temperature cable, 15 m
ThermoJacket for MR pyrometer, with adjustable mounting bracket
Blast gate assembly with quartz window
Sighting tube, 30 cm length, stainless steel
Adjustable pipe adapter assembly
Air flow regulator
Air pressure regulator
IN OUT
Water
Figure 90: Installing the Burning Zone Pyrometer
92 Rev. B4 Feb 2015 CS210
Page 93

Accessories
Wiring:
For detailed wiring of Burning Zone Monitoring see section 13.10 Burning Zone Wiring, page 126.
For recommended cables see section 4.5 Cable Requirements, page 14.
Technical data:
MR temperature range 700 to 1800°C (1292 to 3372°F)
Spectral response 1 µm nominal
Accuracy ± (0.5% T
Optical resolution 82 : 1 (95% energy)
Protection rate (sensor) IP65 (NEMA-4)
Ambient temperature
without cooling 0 to 50°C (32 to 122°F)
with ThermoJacket up to 315°C (600°F)
Cable length 15 m (49 ft.)
Digital interface RS485
For other technical data see MR operators manual and the ThermoJacket operators manual.
measured + 2°C), Tmeasured in °C
CS210 Rev. B4 Feb 2015 93
Page 94

Accessories
10.8 Internal Heater
The internal heater is for the use in the system connection box for ambient temperatures below 0°C
(32°F).
The surface temperatures on the accessible side surfaces of the housing are kept down as a result of
the heater design. The heater comes with plug-in thermostat and is designed for permanent operation.
Technical data:
Voltage 100 to 240 VAC
Heating capacity max. 50 W (170 BTU/hour)
Wiring cable diameter max. 2.5 mm² (AWG 14)
Mounting DIN rail
Fitting position vertical
Operating temperature -20 to 70°C (-4 to 158°F)
Storage temperature -45 to 70°C (-49 to 158°F)
Figure 91: Internal Heater (left: photo, right: connection)
For more detailed information see section 13.4 System Connection Box Wiring, page 117.
94 Rev. B4 Feb 2015 CS210
Page 95

Auxiliary Software
11. Auxiliary Software
The CS software package contains several auxiliary software applications designed to ease installation
and maintenance. The programmes explained in this section don’t have shortcut icons on the desktop
or in the initialization menu. Therefore they reside in the program folder.
11.1 Managing the CS Database with DBCheck
Using DBCheck to manage the CS database, the user will be able to migrate from existing CS100
databases, import and export configurations, and create backup copies.
11.1.1 Starting the DBCheck application
The <DBCheck.exe> file can be found in the CS installation program folder. Double click to execute the
file.
11.1.2 Connecting to the database
On the <DBCheck> main screen the user has to select an available profile to connect to the database.
Click on <Profiles…>
Click on <Select>
Figure 92: <DBCheck> main screen
CS210 Rev. B4 Feb 2015 95
Page 96

Auxiliary Software
Click on <Connect>
Once you insert a valid user name and password, you will get the following screen. Under the
<Messages> view make sure that connection has been established to the database.
11.1.3 Migrating pre-existing CS100 data
You can migrate pre-existing CS100 data to the newer system.
Go to <Operations> and select <Migrate old version>. The following screen appears. Under <Old
CS100 Deneb.ini> you have to browse until you find the CS100 configuration file to be migrated.
Under <Origin MDB-File> you have to select the old CS100 database. Additionally, you can select
which information to migrate: <Settings> (refractory zones and alarms, scanner’s position, …) and/or
<Temperatures> (saved images subsequent to the date shown).
Click on <Migrate> button to start the migration process. Depending on the amount of data to be
migrated, the migration process could take twenty or thirty minutes or more.
96 Rev. B4 Feb 2015 CS210
Page 97

Auxiliary Software
CS210 has many features that did not exist in CS100 and therefore parameters for these
functions will not be migrated. Further, the system physical configuration may have
e the original installation. Therefore we strongly recommend that you
changed sinc
verify all parameters using the CS Config utility!
It is strongly recommended to migrate old CS100 data from local drives only!
11.1.4 Import and export CS configurations
The CS database contains all thermal images saved over the lifetime of the system. As a consequence,
it will be very large files. In the case of service assistance, such big files are very difficult to send e.g.
via email. The <Import and export> function can be used to create a consolidated, small text file
containing the CS configuration parameters only but no thermal images.
Go to <Operations> and select <Import and export>. Fill the <File> edit box to address the file being
imported (Import) or fill the <Folder> edit box to give a path for the file being exported.
Click on either the <Import> or <Export> button respectively to complete the desired operation.
CS210 Rev. B4 Feb 2015 97
Page 98

Auxiliary Software
It is always highly recommended to revise every imported parameter using CS Config!
11.1.5 Creating a backup file
Go to <Operations> and select <Backup copies>.
In the <Folder> edit box, enter the path where you wish to save the backup copy of the database.
Click on the <Create copy> button to start the operation immediately which could take several
minutes. Finally you will get a *.bak file in your folder as a copy of the current CS database.
If you wish to restore a database backup copy, type the name of the file where the copy is stored in the
<File> edit box, and then click on the <Restore backup copy> button.
Automatic backup copy
To program a backup copy execution, follow the steps below:
• Activate the checkbox for making a backup copy every day
• Set the time for the execution of the automatic backup copy in <What time should the backup
copies be made>.
From this moment, a daily backup copy will be automatically created on the set time.
The folder entered for the backup copy must not be edited, removed or deleted since ReadScan must
recognize it in order to periodically access it.
98 Rev. B4 Feb 2015 CS210
Page 99

Auxiliary Software
It is advisable to choose a time for automatic backup where nobody is working with the
application, for instance during the night or early morning!
11.1.6 Reset database
Go to <Operations> and select <Reset database>. Clicking on the <Empty BD now> button starts the CS
software with an empty database by deleting all data in the SQL database. To avoid accidental data
loss, a backup copy will be stored automatically in the CS subfolder BACKUP.
CS210 Rev. B4 Feb 2015 99
Page 100

Auxiliary Software
11.2 Remote Access from a Client PC
11.2.1 Enabling Remote Access to Readscan
Generally the operating system Windows will ask if a program should be allowed access to the
network on the first use. Here is the manual way to setup an access firewall rule exemplary for
Windows 7.
1. Open the Firewall configurations and create a new rule for incoming connections. Select
<program> as the rule type and allow the following application:
%ProgramFiles%\Raytek\DataTempCS\Readscan.exe
2. Allow this configuration for the correct network type. Usually domain, but select all three if
unsure.
3. Finally give the rule a name and confirm your settings. This will allow external connections to
the Readscan application.
11.2.2 Remote Access
In order to access the CS software from a client PC (another networked PC) you must do the
following:
Start the <DBCheck.exe> file on the remote PC
Open the <Connection Profile>
Under <Data origin> add port 1433 (TCP/IP port of the SQL database) to the selected profile (comma
as separator).
Figure 93: Connection Profiles
100 Rev. B4 Feb 2015 CS210
 Loading...