

Page 1

Distributed by
Any reference to Raytheon or
RTN in this manual should be
interpreted as Raymarine.
The names Raytheon and RTN
are owned by the
Raytheon Company.
Page 2

FishFinder L365
Instruction Manual
Raymarine
Page 3

Contents
Echo sounding – How it works (inside front cover)
FishFinder L365 – Features and functions i
For information and service ii
1 Introduction 1
About the FishFinder L365 1
System Components 2
Standard Equipment 2
Standard Transducers 2
Optional Accessories 2
2 Installation 4
About the Transducer 4
Selecting the Correct Type of Transducer 5
Assembling the Transducer Bracket 6
Positioning the Transom-Mount Transducer 6
Mounting the Transom-Mount Transducer 9
Mounting the Optional Sidelooker Transducer 10
Installation Notes – Thru-Hull Transducer 11
Installation Notes – In-Hull Transducer 12
Installation Notes – Trolling Motor Transducer 13
Installation Notes –
Transducer for Speed and Temperature Only 14
Mounting the Display Unit – Standard Mount 14
Dismounting the Display Unit 16
Mounting the Display Unit – Flush Mount 16
Installing the Transducer Cable 17
Installing the Transducer Cable – Sidelooker Option 19
Installing the Transducer Cable –
Separate Speed and Temperature Sensors 20
Making the DC Power Connections 20
Calibrating the Sensors 22
3 Operating Instructions 24
Controls on Display Unit 24
Turning the Power On and Off 25
Setup Memory 25
Lamp/Contrast Menu 26
Operating Pages 28
iv
Page 4

FishFinder Page 29
Choosing a Frequency 34
Fish Indications 35
Bottom Indications 36
Performance Modes 37
Zoom Page 38
A-Scope (Bottom Coverage) Page 40
Digital Page 42
Sidelooker Page 43
4 Setup Instructions 47
The Setup Menu 47
Range Setting 48
Sensitivity Setting 49
Chart Speed Setting 50
Zoom Setting 52
Frequency Setting 53
Resetting the Log 54
System Setup Display 55 Fish Alarm 58
Simulator 56 Buzzer 58
Fish Symbol 56 Depth Units 59
White Line 56 Speed Units 59
Sidelooker 56 Temp Units 59
Speed Cal 57 Speed 59
Temp Cal 57 Log 59
Shallow Alarm 57 Temp 59
Deep Alarm 58
Setup Instructions for Sidelooker 60
Resetting the Unit to Factory Defaults 62
Default Settings 63
5 Maintenance and T roubleshooting 64
Cleaning Instructions 64
Troubleshooting Suggestions 64
Servicing a Thru-Hull Transducer 68
How to Contact Raymarine 68
6 Specifications 72
General Information 72
FishFinder Functions 73
Connector Diagrams 74
Glossary of Terms 75
v
Page 5

List of Figures
Figure Page
Unit in Use Inside front cover
Front Panel i
1-1 Typical Installation 1
2-1 Transducer Types 5
2-2 Assembling the Transducer Bracket 6
2-3 Transducer Mounted on Tr ansom 7
2-4 Transducer Bracket, Side View 7
2-5 Correct Mounting Position 8
2-6 Mounting the Transducer 8
2-7 Installing the Sidelooker Transducer 10
2-8 Installing the Sidelooker Transducer -
T rolling Motor 13
2-9 Installation on Bracket 14
2-10 Dimensions 15
2-11 Flush-Mount Installation 16
2-12 Disassembling from Bracket 17
2-13 Installing Cable on Transom 18
2-14 Cable for Sidelooker Transducer 19
2-15 Cable for Speed and Temperature Sensor 20
2-16 DC Power Connections 2 1
3-1 Display Panel 24
3-2 Lamp/Contrast Menu 26
3-3 Selecting DisplayPages 27
3-4 FishFinder Page 29
3-5 Fish Indications 36
3-6 Bottom Conditions 37
3-7 Zoom Page 38
3-8 A-Scope Page 40
3-9 Digital Page 42
3-10 Sidelooker Feature 43
3-11 Sidelooker Page 44
4-1 Moving Through the Setup Menu 47
4-2 Range Settings 48
4-3 Sensitivity Setting 49
4-4 Changing the Chart Speed Setting 50
4-5 Chart Speed Setting 51
4-6 Zoom Settings 52
4-7 Frequency Setting 53
4-8 Resetting the Log 54
4-9 Reaching the System Setup Display 55
4-10 System Setup Display 55
4-11 Sidelooker Range Settings 61
4-12 Sidelooker Sensitivity Settings 62
5-1 Sample Mailing Label 70
6-1 Connector Diagrams 74
vi
Page 6
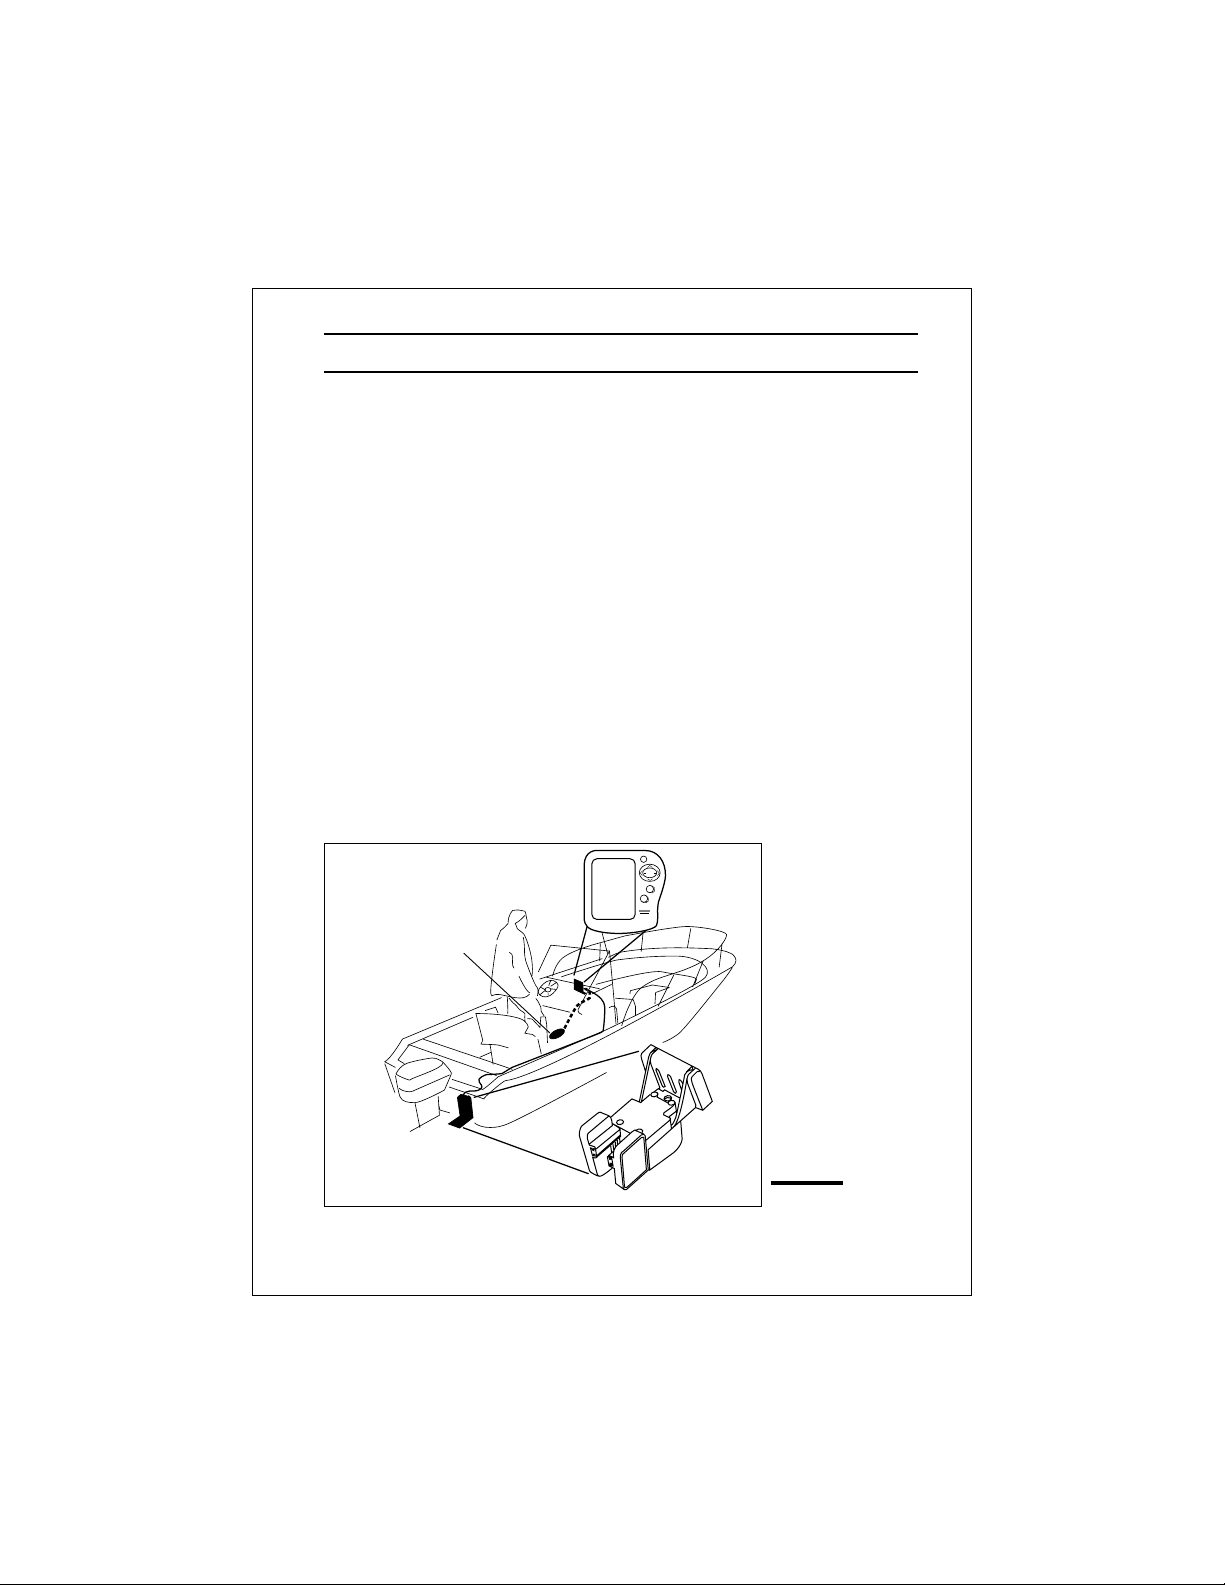
1 – Introduction
About the FishFinder L365
The FishFinder L365 is a system that uses sound waves (“sonar”) to
detect fish and show the bottom of a lake or sea. The system includes a
transducer and a display unit, connected by a cable. The transducer
sends high-frequency sound waves down into the water. These sounds
strike fish, the bottom, or other objects in the water, and return as echoes.
The FishFinder then interprets these echoes and presents a display.
The FishFinder L365 can handle many different jobs:
• detect the presence of fish below the boat
• trigger an alarm when fish are found
• measure the depth of the water
• set alarms for minimum and maximum depth
• show the shape of the bottom
• determine whether the seabed is hard or soft
• measure the speed of the boat and the distance traveled
• show the water temperature
We are sure you will find the FishFinder L365 to be one of the most useful
devices on your boat.
Raymarine
PWR
PAGE
SETUP
CLEAR
L365
Optional Thru Hull
Transducer
FishFinder 365
Display Unit
Transducer mounted
Introduction
in quick release
transom bracket
Fig. 1-1
T ypical Installation
1
Page 7

System Components
The FishFinder L365 consists of a compact display unit connected to a
transducer. The transducer is attached to the boat and extends into the
water.
Standard Equipment
When you unpack your FishFinder L365, you should find the following
standard equipment in the carton. If any items are missing, please notify
your Raymarine dealer immediately, or contact the Customer Service
Department at Raymarine at 1-800-539-5539, ext. 2333. Please provide
the serial number of the FishFinder when reporting any missing items.
Description Part No.
FishFinder L365 display unit E61010
Quick-release swivel-mount bracket
(with mounting hardware) M78945
DC power cable M99-146
Instruction manual G627296-3
Four #10 x 3/4” ss mounting screws —
Standard Transducers
Depending on which model of the L365 you have purchased, the box will
include one of the transducers listed below:
Description Part No.
Transom-mount transducer (with speed
and temperature sensors, including
mounting bracket and hardware) M78898
Bronze thru-hull transducer (with
speed and temperature sensors) M78923
Optional Accessories
Optional accessories and parts can be purchased directly from
Raymarine. For prices and ordering information, please call the Parts
Department at (800) 539-5539 ext. 2333.
2
Introduction
Page 8

Description Part No.
Sidelooker transom-mount transducer M78930
Sidelooker transducer for trolling motor mounting.
Companion with M78928 downlooker depth/temp
transducer, with 12 ft. (3.6 m) cable
and hardware M78929
Extension for transducer cable (15 ft, 5 m) M99-140
Extension for transducer cable,
for Sidelooker transducer (15 ft, 5 m) M99-139
Flush-mounting kit (with hardware and
mounting template) M99-137
Fairing block for M78923 thru-hull
transducer (Lexan®) M99-142
Low profile plastic thru-hull transducer
(Valox® plastic, sensor for depth only) M78922
Bronze thru-hull transducer
(sensor for depth only) M78921
In-hull/trolling motor transducer (for installation in
fiberglass hull only, or mounting on trolling motor,
including hardware for either installation) M78928
Angled in-hull transducer (for installation
in fiberglass hull only, where deadrise
angle is 10° to 22°) M78946
Plastic thru-hull transducer (Valox® plastic, with
speed and temperature sensors, used with depthonly transducers M78922, M78928, M78946) M78937
Transom-mount speed and temperature
sensor (used with depth-only transducers
M78922, M78928, M78946) M78936
Replacement transom transducer
mounting bracket kit M99-148
Soft storage/carrying case M99-114
Transducer switch box (select between two L365
FishFinder displays, using one transducer) M99-136
Replacement paddle wheel kit (for transom-
mount transducer) M99-143
Replacement paddle wheel kit
(for thru-hull transducer) M99-144
Introduction
3
Page 9

2 – Installation
The installation process has four parts:
• Mounting the transducer
• Mounting the display unit
• Connecting the cables for the transducer and power supply
• Calibrating the display unit
About the Transducer
Several different kinds of transducers can be used with this unit. The
transom-mount style, used most often, and in-hull types are shown in
Fig. 2-1.
Besides measuring water depth, the transducers also have two other
sensors: a paddle wheel which detects the speed of the boat, and a
sensor for the water temperature. The display unit uses the speed
information to calculate the distance the boat has traveled. An optional
transducer, the Sidelooker, detects objects by looking out to the sides of
the boat.
Since the transducer is very important to the operation of the FishFinder,
it is vital that the transducer be mounted correctly. The transducer will
give the most reliable readings if it looks into water which is smooth and
undisturbed. If you place the transducer so bubbles or turbulence flow
across the face of the unit, the system may give inaccurate readings.
There are three important rules when mounting any type of transducer:
• The transducer should be continuously covered by water when the
boat is moving. (If the transducer is mounted near the side of the
boat, it may be exposed when the boat is turning.)
• The transducer should be placed where turbulence or bubbles will not
pass directly over the face of the unit. Don’t place the transducer
behind any running strakes, intakes, or thru-hull fittings which create
turbulence.
• The transducer should be mounted where it will not be affected by the
wash from the propeller(s).
4
Installation
Page 10
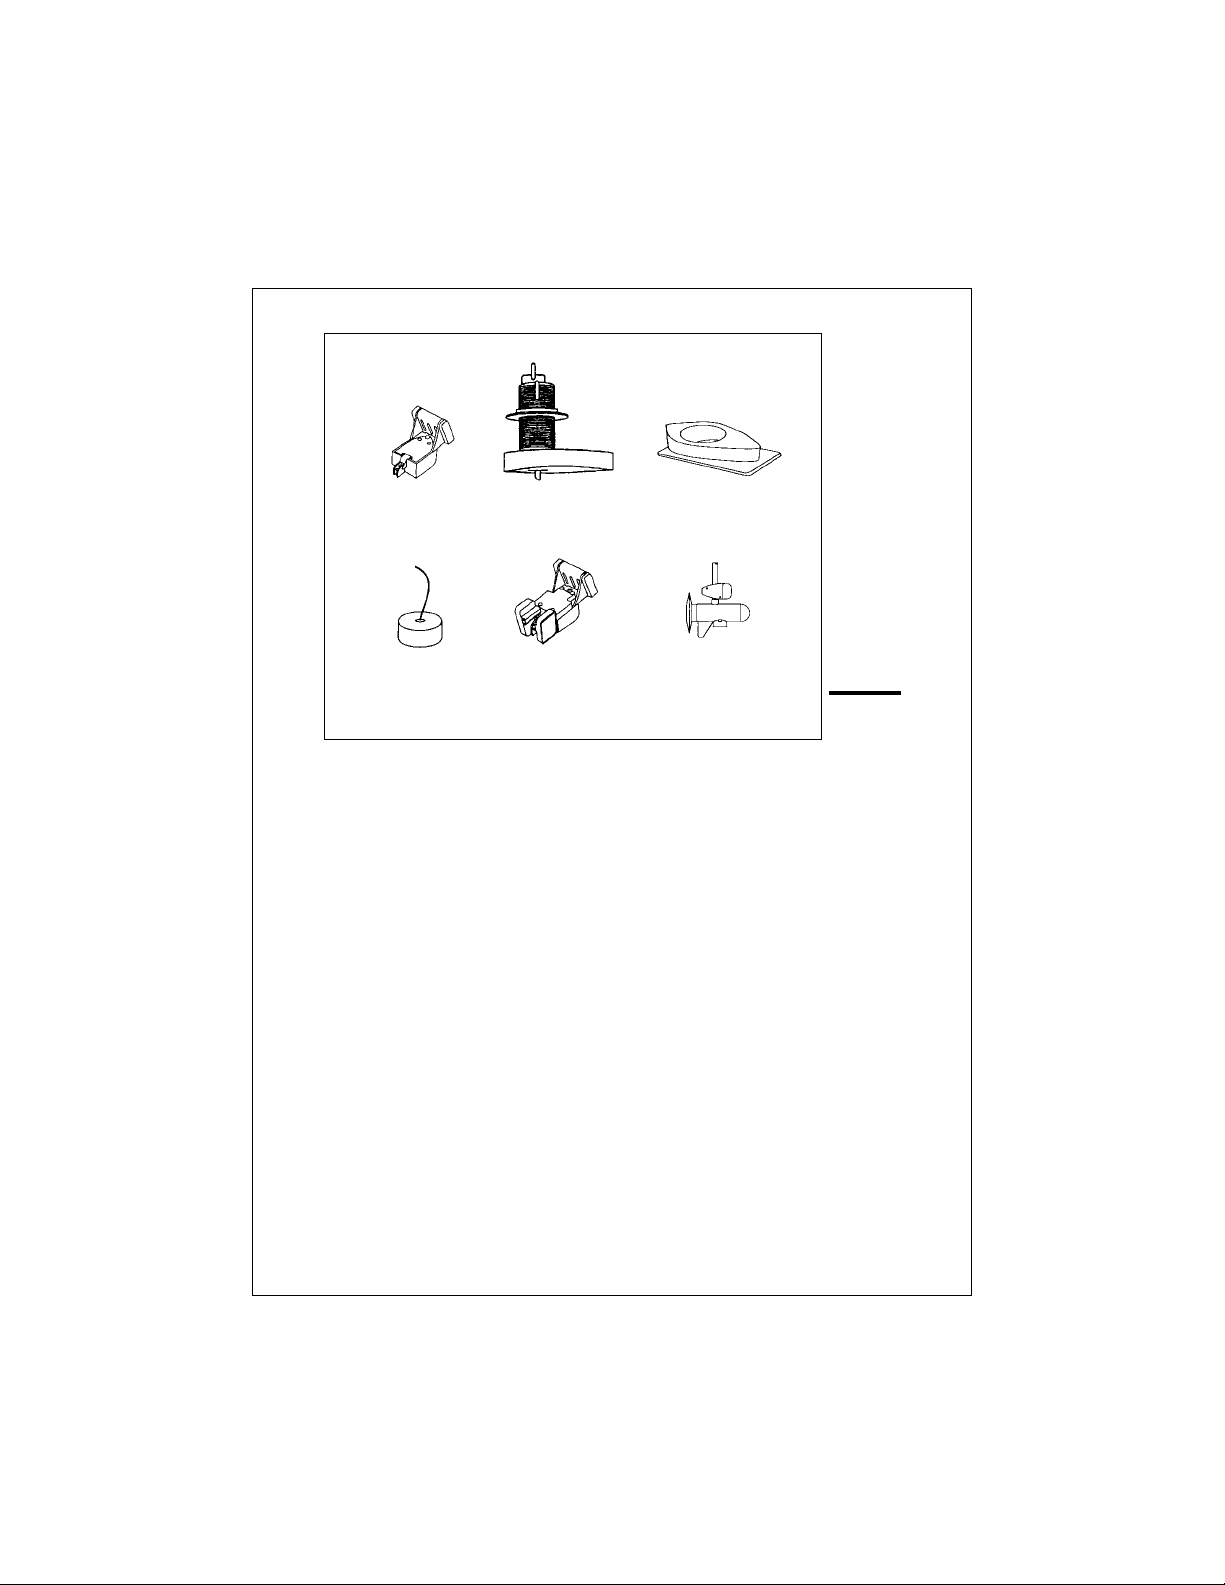
M78898
Transom-mount
transducer
M78923
Thru-hull
transducer
M99-142
Fairing for
thru-hull transducer
M78946
In-hull
transducer
M78930
Sidelooker
transducer for
transom mount
M78929
Sidelooker
transducer for
trolling motor
Fig. 2-1
Transducer
Types
Selecting the Cor rect Type of Transducer
Before you begin the installation, double-check to be sure you have the
correct type of transducer. Each kind of transducer is designed for a
particular type of use. In this manual we will include detailed mounting
instructions for the transom-mount transducer. We will also include some
general information on the other types. For detailed information on these
other transducers, see the instructions which are packaged with the unit.
Use a transom-mount transducer if –
. . . your boat has an outboard or inboard-outboard engine(s), and if you’re
planning to use the Sidelooker option. This type of transducer must be
mounted ahead of or beside the propeller(s). Do not use this type of
transducer for a boat with a straight-shaft inboard engine.
Use a thru-hull transducer if –
. . . your boat has a straight-shaft inboard engine. This type of transducer
is installed in a hole drilled through the hull.
Use an in-hull transducer if –
. . . you have a high-speed boat or if, for some reason, you cannot use a
transom-mount or thru-hull transducer. The hull may be no more than 1" thick.
Installation
5
Page 11
Use a trolling motor transducer if –
. . . you want to attach the transducer to a trolling motor. (Not recommended for deep-water operations.)
Use a Sidelooker transducer if –
. . . you need a way of searching for fish on either side of the boat. This
type of transducer is attached to the bracket of the transom-mount
transducer or to the shaft of the trolling motor.
Assembling the Transducer Bracket
Fit together the two parts of the transducer bracket as shown in Fig. 2-2.
When the installation is complete, the parts snap together as shown.
Attach the
two parts
Lower the transducer
and snap in the
release clip
Bracket is installed
upside down
Fig. 2-2
Assembling
the T ransducer
Bracket
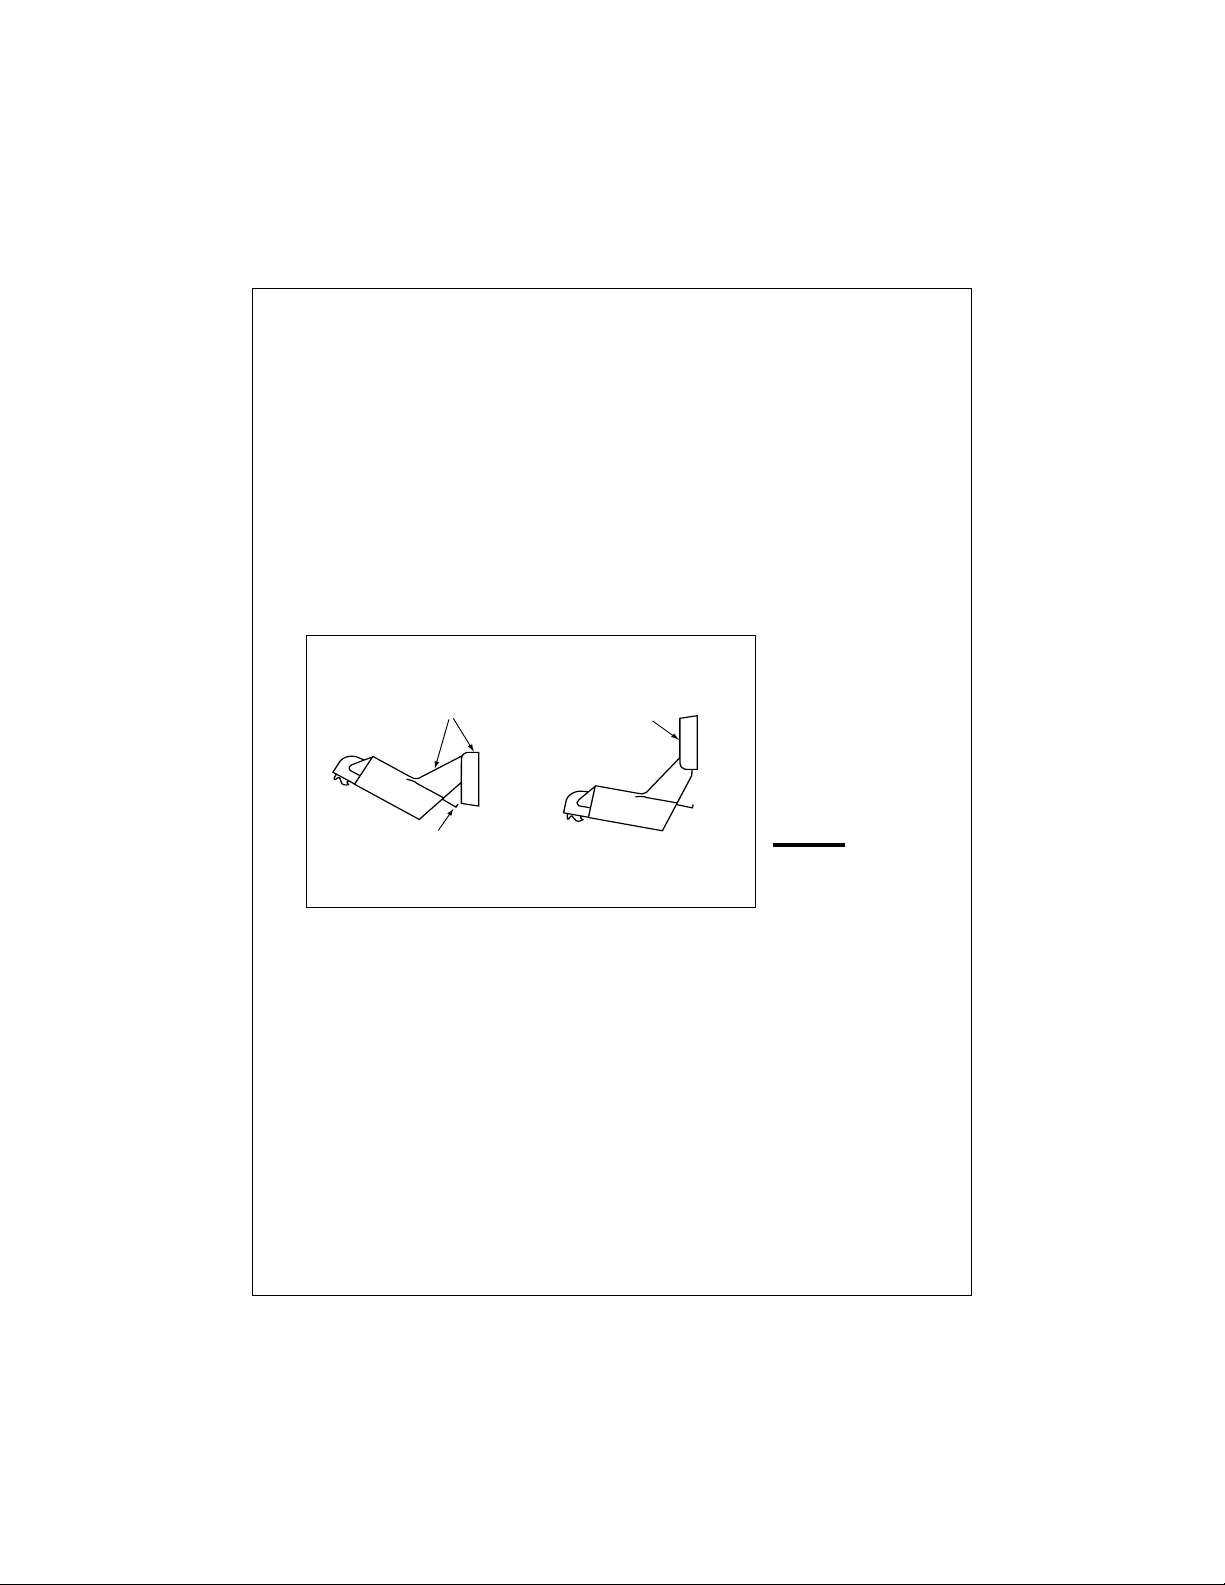
Positioning the Transom-Mount Transducer
Begin by finding the best location for the mounting bracket. Here are the
rules:
• If your boat has one propeller (outboard or inboard-outboard), mount
the transducer about 18↑ (455 mm) to the side of the centerline of the
boat. See Fig. 2-3. Choose the side that is on the downstroke of the
propeller. (This is usually the starboard side of the boat.) This will
reduce interference caused by air bubbles.
• If the propeller can be turned to steer the boat, allow at least 2" (50
mm) beyond the swing radius of the propeller. This will prevent the
NOT THIS!LIKE THIS!
6
Installation
Page 12
Fig. 2-3
Transducer
Mounted on
Transom
Allow a clearance
of at least 10
inches (254 mm)
10"
(254 mm)
Transducer in
released position
Fig. 2-4
Transducer
Bracket,
Side View
propeller from damaging the transducer when it is turned. After
installation, check the clearance by turning the wheel so the propeller
swings toward the transducer. There should always be a 2” (50 mm)
clearance.
• If your boat has twin propellers (outboard or inboard-outboard), place
the transducer near the centerline of the boat.
•
Do not
mount the transducer behind any hull fittings, intakes, or other
parts which extend from the hull. These may cause turbulence or air
bubbles.
Installation
7
Page 13
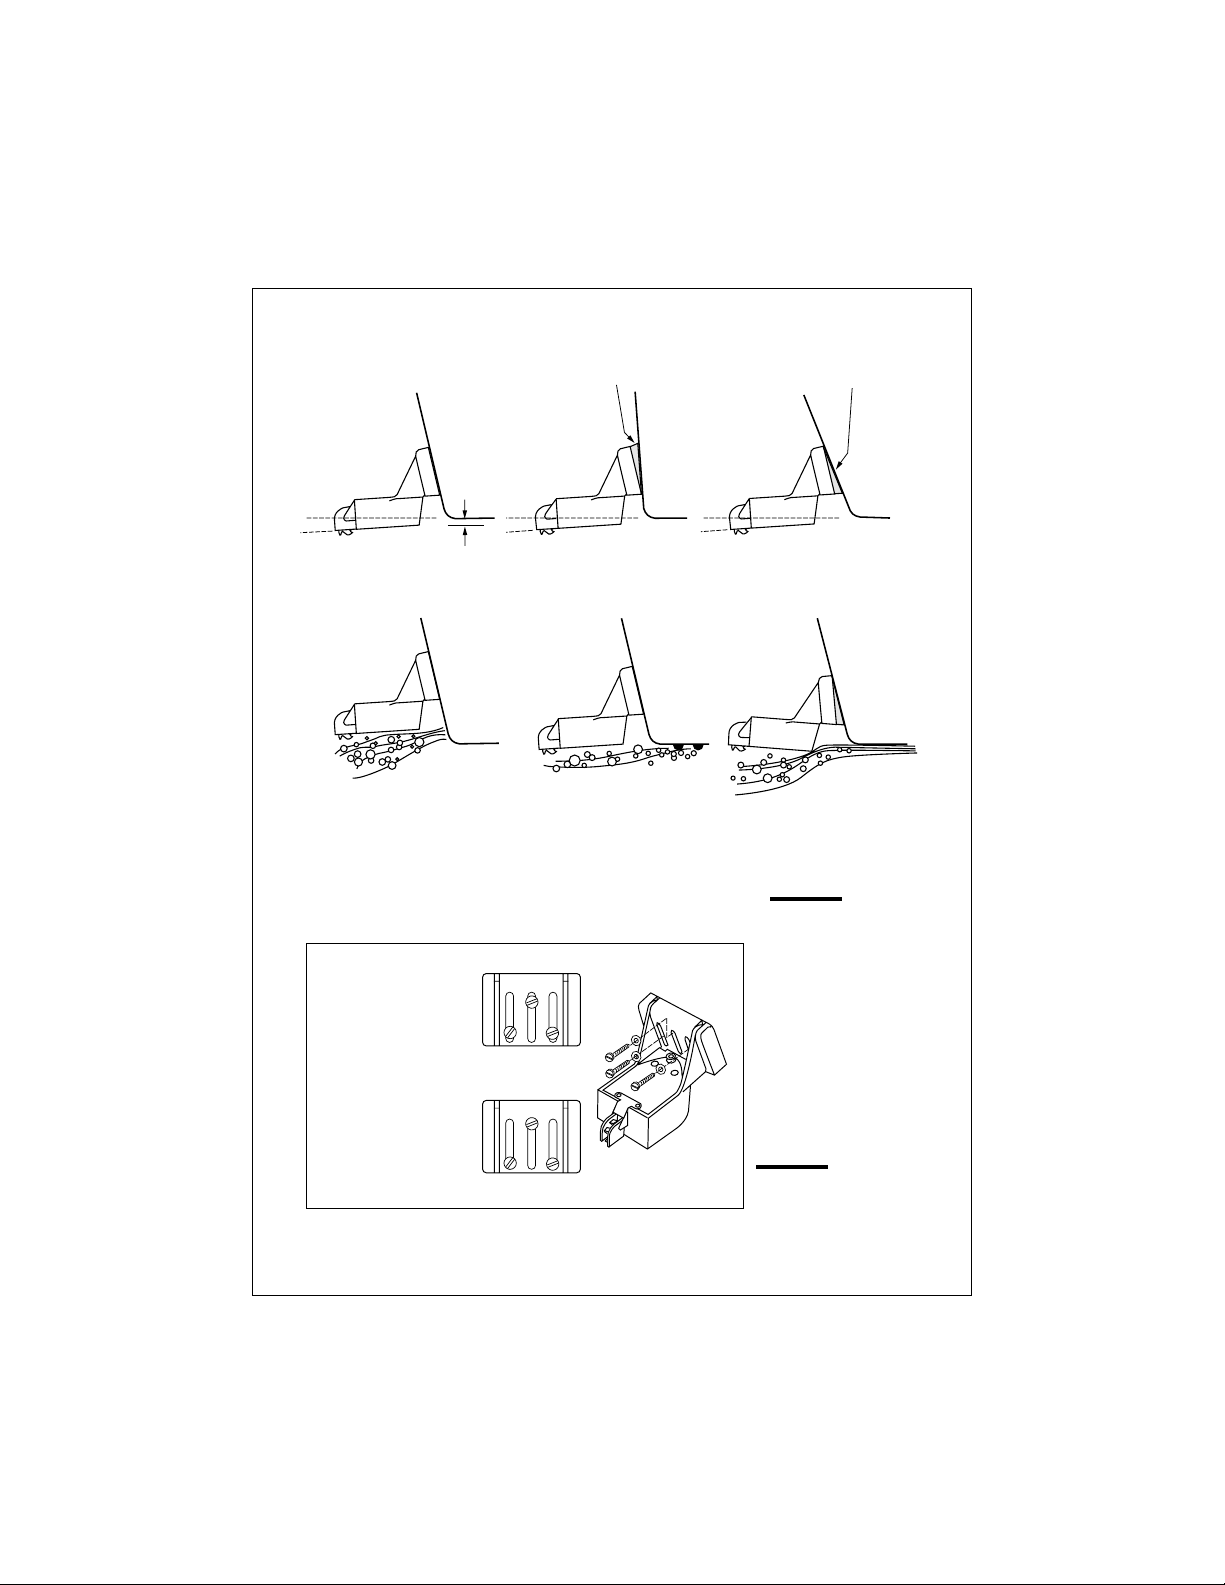
Average transom angle–
no wedge necessary
Vertical transom –
place wedge this way
Sloping transom–
place wedge this way
2 to 5
2 to 5 2 to 5
For fiberglass hull – 1/8" to 1/4" (3.2 to 6 mm)
For aluminum hull – 1/4" to 3/8" (6 to 9 mm)
No! No! No!
The bow of the transducer
is above the bottom of the
transom, creating
cavitation.
Insert screws 1 and 3
1/4" from the bottom of
slots, and screw 2
1/4" from the top of the
slot to allow room for
adjustment.
Rivets on the hull are
creating bubbles.
Lower the transducer
a bit.
123
Correct
alignment
The rear of the transducer
is too high, creating
cavitation.
Fig. 2-5
Correct Mounting
Position
If screws are inserted
this way, it won’t be
possible to make the
height adjustment.
8
Incorrect
alignment
Fig. 2-6
Mounting
the T ransducer
Installation
Page 14

• The bracket has a quick-release mechanism. This may reduce
damage by allowing the transducer to flip up if it hits any debris or the
bottom. See Fig. 2-4. Allow enough clearance above the transducer
so that it can swing upward completely. This is about 10" (254 mm)
measured from the bottom of the transom.
• If considering the Sidelooker option, look for a mounting location
where the Sidelooker array will not be blocked by the engine housing
or other mounted hardware.
• If the boat will be carried on a trailer, be sure the transducer will not
hit any rollers, bunks or fittings on the trailer.
Mounting the Transom-Mount Transducer
1. On a boat with a fiberglass hull, the leading edge of the transducer
should extend 1/8" (3.2 mm) to 1/4" (6 mm) below the bottom edge of
the hull. See Fig. 2-5. On an aluminum hull, the transducer should
extend a bit more – 1/4" (6 mm) to 3/8" (9 mm). If the boat will be
operated at high speeds, the transducer may be mounted closer to
the centerline of the hull.
2. The lower surface of the transducer should tilt down toward the rear
at a slight angle (2° to 5°). The mounting bracket includes a wedge.
Depending on the angle of the transom on your boat, you may need
this wedge to get the correct angle for the bottom of the transducer.
3. Looking at the rear of the boat, be sure the bracket is vertical (perpendicular to the water line).
4. Hold the bracket (and the wedge, if used) against the transom and
trace the positions of the screw slots.
5. Remove the bracket. See Fig. 2-6. The screws in the outer slots
should be placed about 1/4" (6 mm) up from the bottom of each slot.
The screw in the center slot should be placed 1/4” (6 mm) down from
the top. (This will allow you to adjust the bracket up or down a bit.)
Drill pilot holes 3/4" (19.1 mm) deep. Use a 9/64" (3.6 mm) drill bit.
To prevent drilling too deeply, wrap masking tape around the drill bit
about 7/8" (22 mm) from the tip. Drill in only as far as the tape
marker.
If you are attaching the bracket to a fiberglass hull, you can minimize
any surface cracking of the gel coat. Before drilling each pilot hole,
drill a shallow hole (chamfer) at each location about 1/16" (1.5 mm)
deep. Use a 1/4" (6 mm) drill bit.
Installation
9
Page 15
6. Attach the bracket to the hull using the panhead screws with flat
washers. Before you tighten the screws, apply a good-quality marine
sealant to the pilot holes. This will protect the hull from water penetration.
Do not tighten the screws completely yet.
7. Move the bracket up or down so that the leading edge of the transducer has the clearance shown in Fig. 2-5.
8. Once the bracket is in the correct position, you can tighten the
screws.
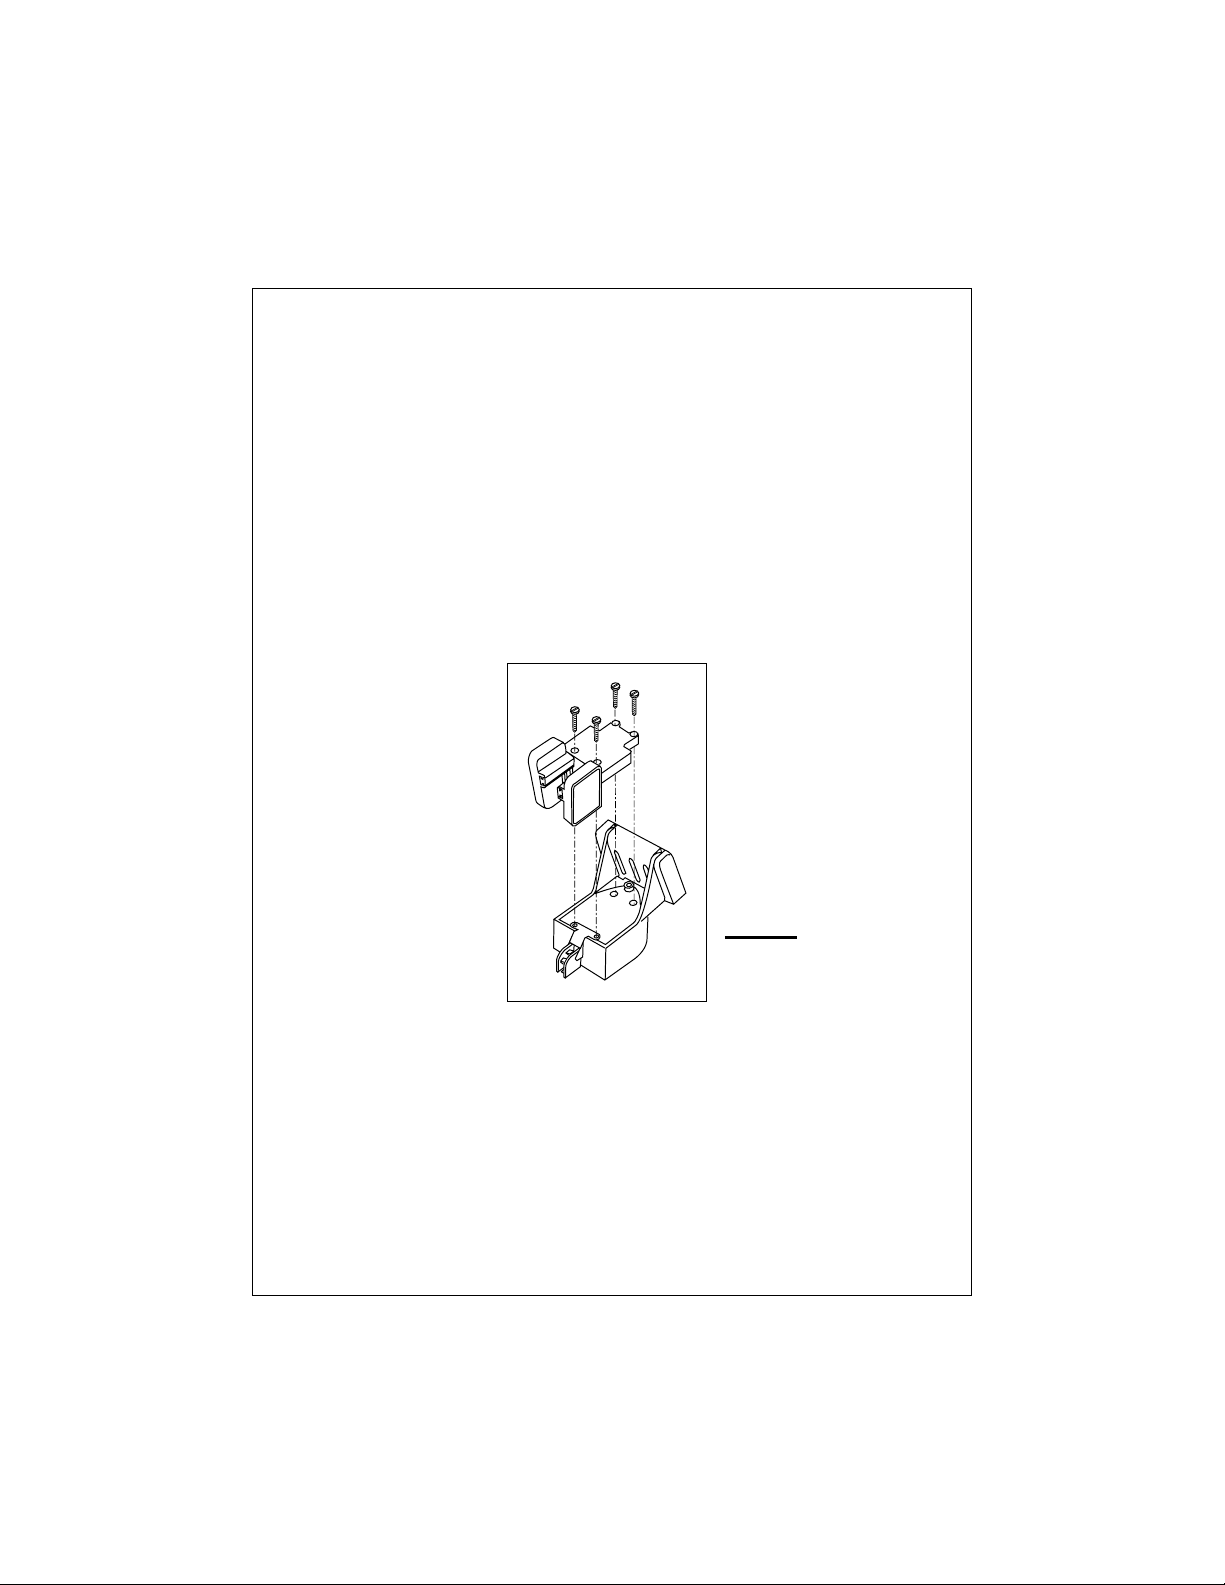
Mounting the Optional Sidelooker Transducer
1. The Sidelooker transducer allows the display unit to check the water
to either side of the boat. This is helpful when you are looking for fish
or structure near river banks, or under docks or piers.
Fig. 2-7
Installing the
Sidelooker
Transducer
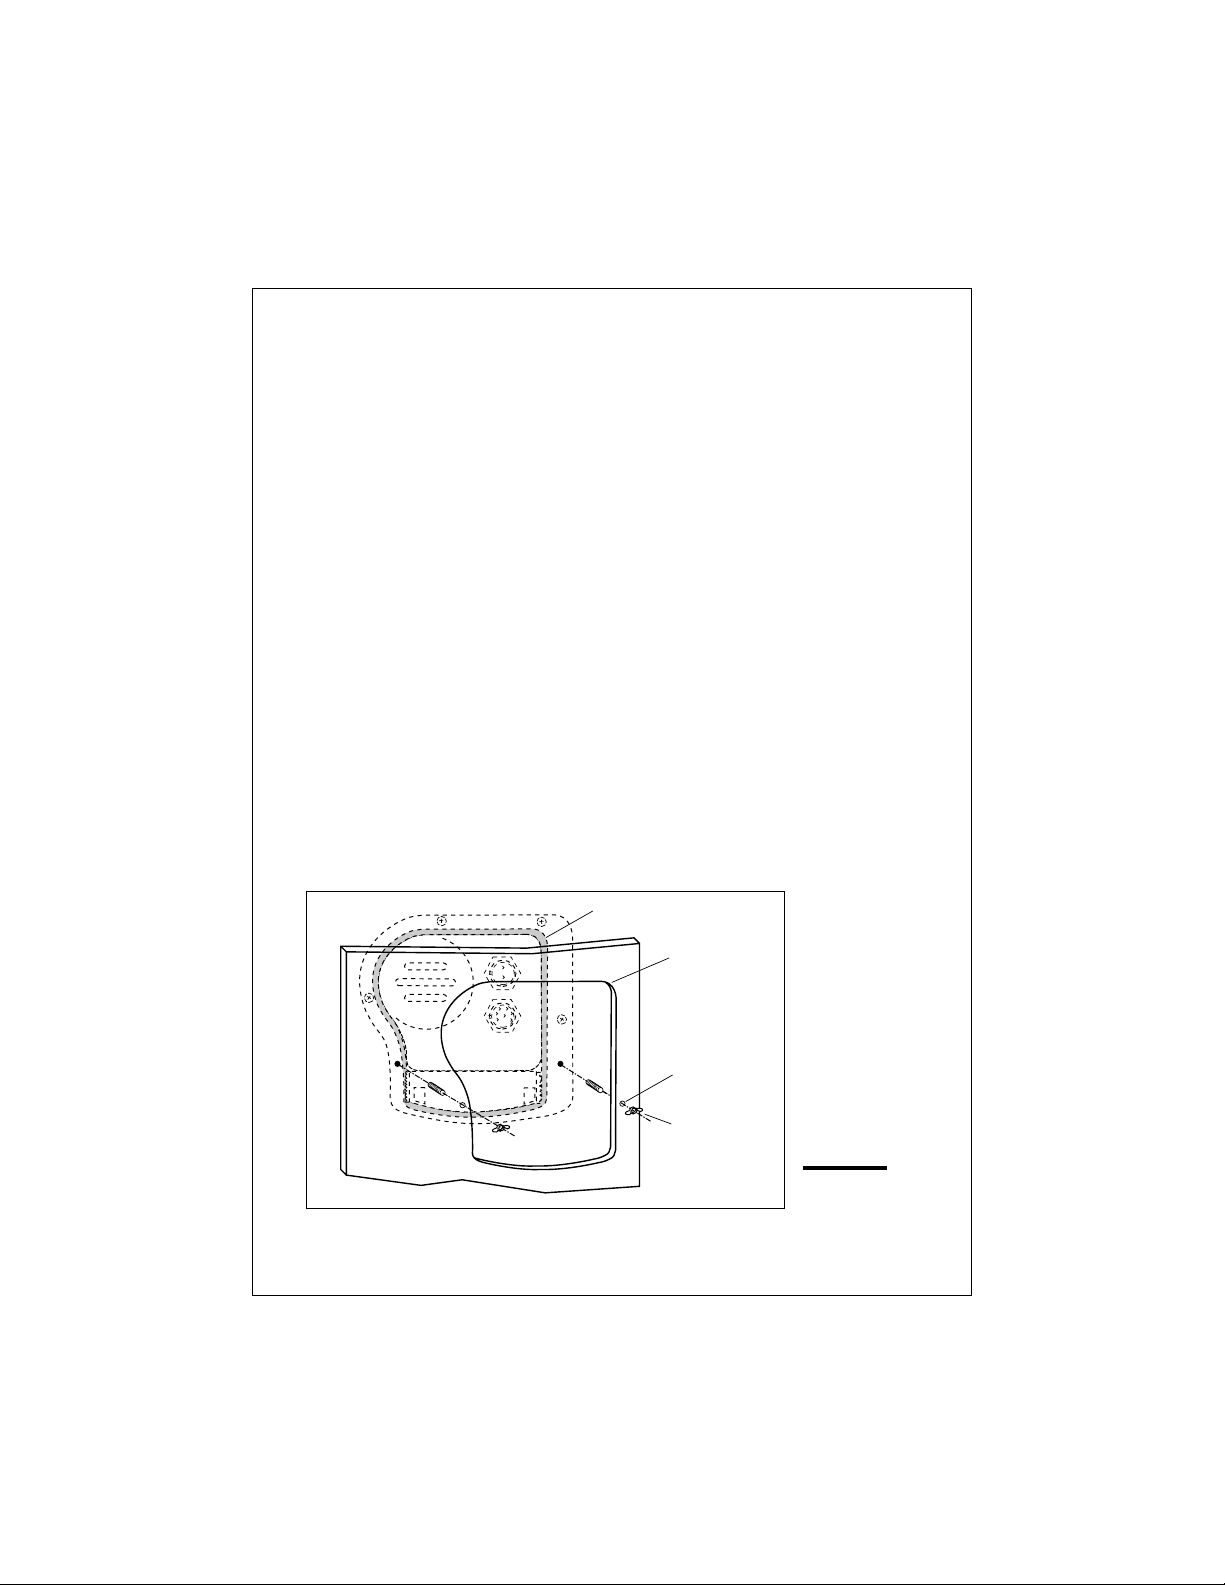
2. The M78930 Sidelooker transducer is attached to the same mounting bracket used with the transom-mount transducer. See Fig. 2-7.
Begin by installing the transom-mount bracket as described earlier.
3. Remove the two screws and brackets covering the paddlewheel.
4. Attach the Sidelooker transducer to the top of the transom mounting
bracket. Use the four panhead screws supplied. The fit should be
snug, but do not overtighten the screws.
10
Installation
Page 16

5. Run the Sidelooker cable beside the depth cable for the transommount transducer.
Installation Notes – Thru-Hull Transducer
Detailed instructions for this installation will be included with the transducer. In this section, we will note just a few important points.
1. Earlier we listed three general rules for placing transducers. All of
these rules apply when you are mounting a thru-hull transducer. Here
are some other rules for selecting the best mounting location:
For planing hulls – Install in the flat planing area near the stern.
Always install forward of the propeller(s) and shaft(s).
For small displacement hulls – Install near the centerline of the hull
and 1/3 of the way forward from the stern. Always install forward of
the propeller(s) and shaft(s).
For large displacement hulls – Install near the centerline of the hull
and 1/3 of the way aft from the bow. Always install forward of the
propeller(s) and shaft(s).
For sailboats – Install forward of the leading edge of the keel, to one
side and near the centerline of the hull.
2. Choose a location where you can easily reach the transducer from
inside the boat. This will allow you to service the unit. Allow at least
6" (152 mm) of headroom above the transducer.
3. When choosing a mounting location, drill a small pilot hole (1/8" or 3.2
mm) from the inside of the hull. Before you drill the hole, be sure you
will be able to reach the large nut on the top of the unit, and that there
will be enough clearance for the cable. If there is a strake or other
feature on the hull, drill from the outside of the hull instead. (This
small hole can be filled easily if the mounting location is not suitable.)
4. The position of the transducer is especially critical on high speed
boats (capable of more than 20 knots). Check the locations of the
transducers on similar boats before installing the transducer in your
own boat. Choose the location which will offer the best performance.
5. If the bottom of the hull at the mounting location is flat, you can mount
the transducer directly through the hull. If the hull rises at an angle
(the “deadrise angle”) of more than 10°, you must include a mounting
block or “fairing.” The transducer must be mounted in a vertical
position. Attach the fairing block to the hull as firmly as possible. This
Installation
11
Page 17

fairing block must be able to resist the drag of the water against the
hull, and must also be completely waterproof.
6. If the hull of the boat has a core-type hull, you will need to follow
some special mounting procedures. The core material must be
protected from any water which may leak from the inside of the boat.
(If the core material is allowed to remain wet, it may rot and weaken
the hull.)
7. When working with the transducer, support it by holding the body of
the unit or the rings. Do not hang the transducer from the cable.
8. It is very important to seal the opening around the transducer using a
high-quality marine sealant suitable for underwater use. After
installation, do not leave your boat in the water for any amount of time
without checking for leaks.
Installation Notes – In-Hull Transducer
Detailed instructions for this installation will be included with the transducer. In this section, we will note just a few important points.
1. Choose the best mounting location:
For outboard powerboats – Install as far aft as possible
For inboard/outboard powerboats – Install close to the engine(s)
For inboard powerboats – Install forward of the propeller(s) and
shaft(s)
For sailboats – Install near the centerline of the hull and forward of
the leading edge of the keel
2. An in-hull transducer may only be installed in a fiberglass hull which is
no more than 1" (25 mm) thick. The in-hull transducer may not be
installed in wood or aluminum hulls.
3. Use the standard in-hull transducer if it will be installed in a flat part of
the hull, or a section with no more than 10° of deadrise. Use the
angled in-hull transducer if the mounting location has up to a 22° of
deadrise.
4. Do not try to compensate for the angle of the hull by fairing the epoxy
adhesive on the face of the transducer.
5. Use the epoxy supplied with the in-hull transducer, or an equivalent
epoxy glue. Do not use any other type of adhesive, including silicone
or RTV adhesive.
12
Installation
Page 18
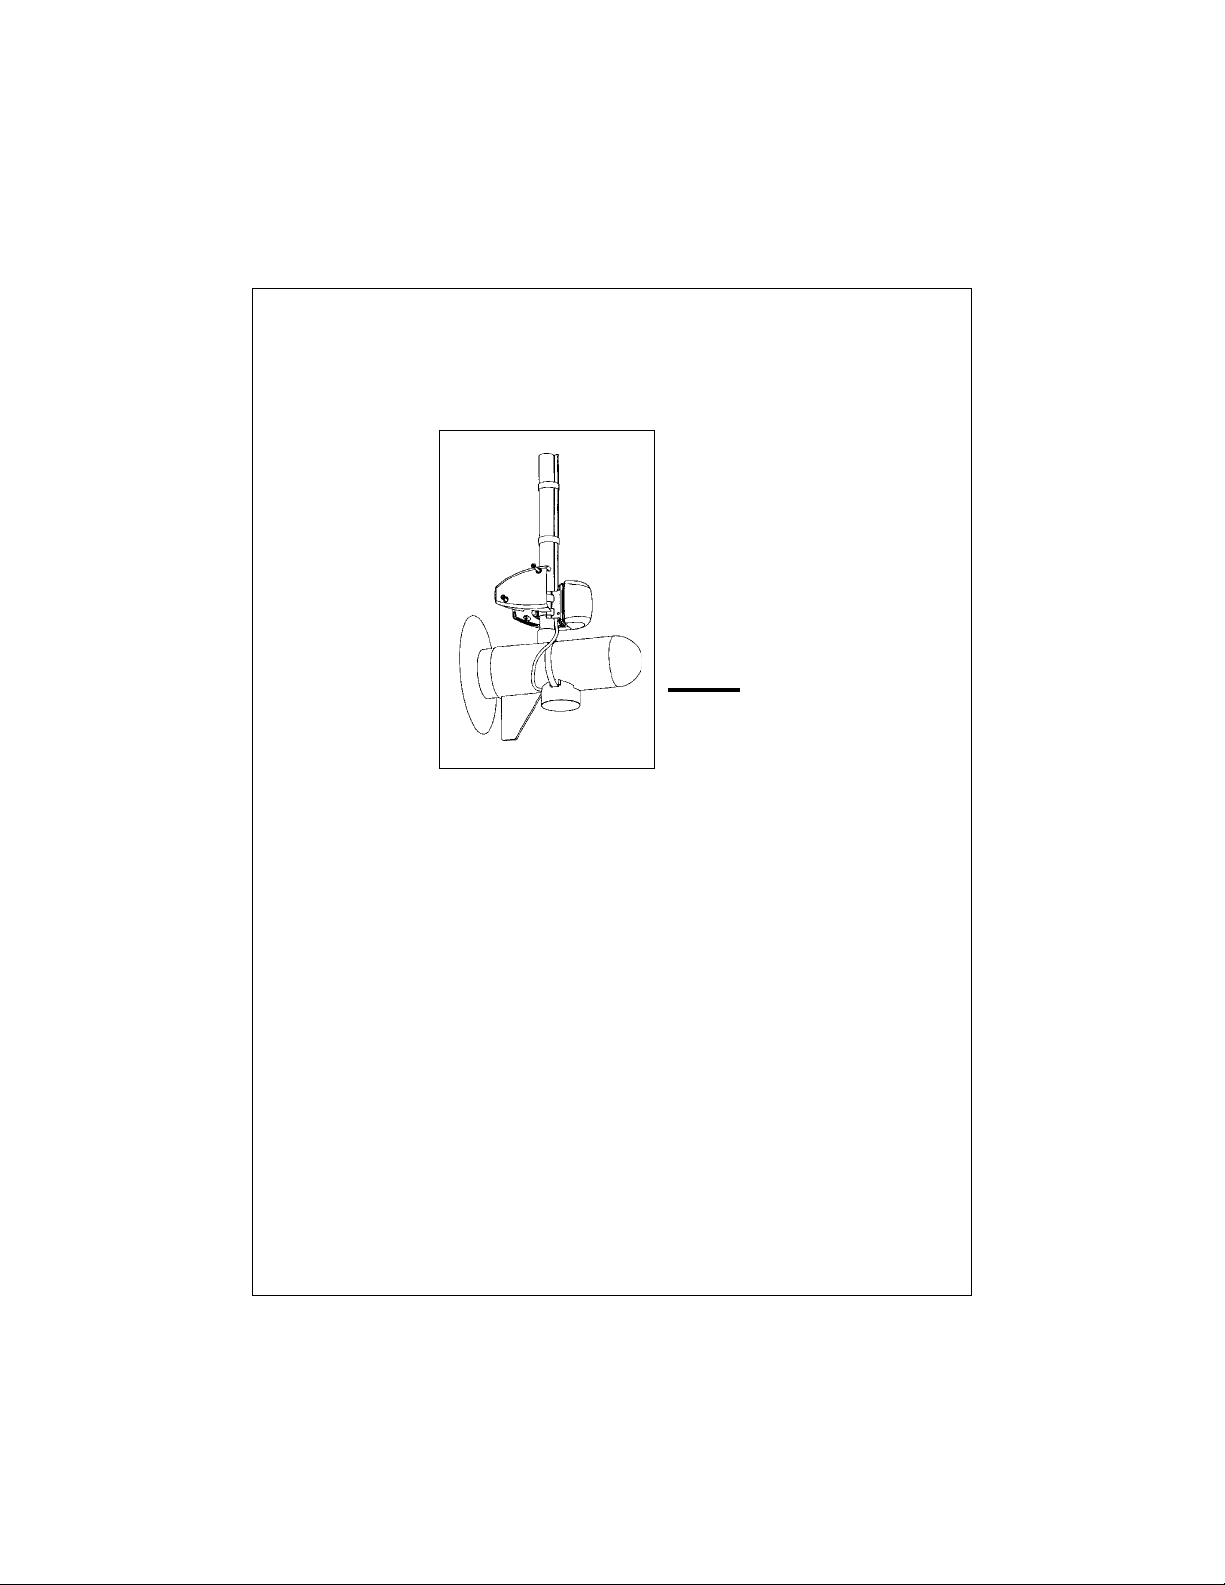
Installation Notes – Trolling Motor Transducer
Both Downlooker and Sidelooker transducers may be installed on a
trolling motor. See Fig. 2-8.
Fig. 2-8
Installing the
Sidelooker
T ransducer on a
T rolling Motor
Detailed instructions for these installations will be included with the
transducer(s). The Downlooker transducer is mounted on the horizontal
gear case of the motor. The Sidelooker transducer is attached to the
vertical support tube. These installations are simple, but it is important to
keep these points in mind:
1. Keep the Sidelooker transducer fully submerged. The transducer will
only produce an image if it is immersed in water.
2. Keep the Sidelooker transducer clear of weeds or debris.
3. When the position of the trolling motor is changed, the field of view of
the Sidelooker also changes. The Sidelooker can be aimed at
interesting echoes, but can also be positioned so that it is looking
back at the hull. Be aware of the position of the Sidelooker transducer.
Installation
13
Page 19
Installation Notes – Tr ansducer for Speed and
Temperature Only
This type of transducer may be used with a thru-hull transducer which
reads depth only. The speed/temperature transducer is attached to the
transom of the boat. Detailed instructions for this installation will be
included with the transducer. The cable for this transducer uses a “Y”
connector. See the notes on “Installing the Transducer Cable.”
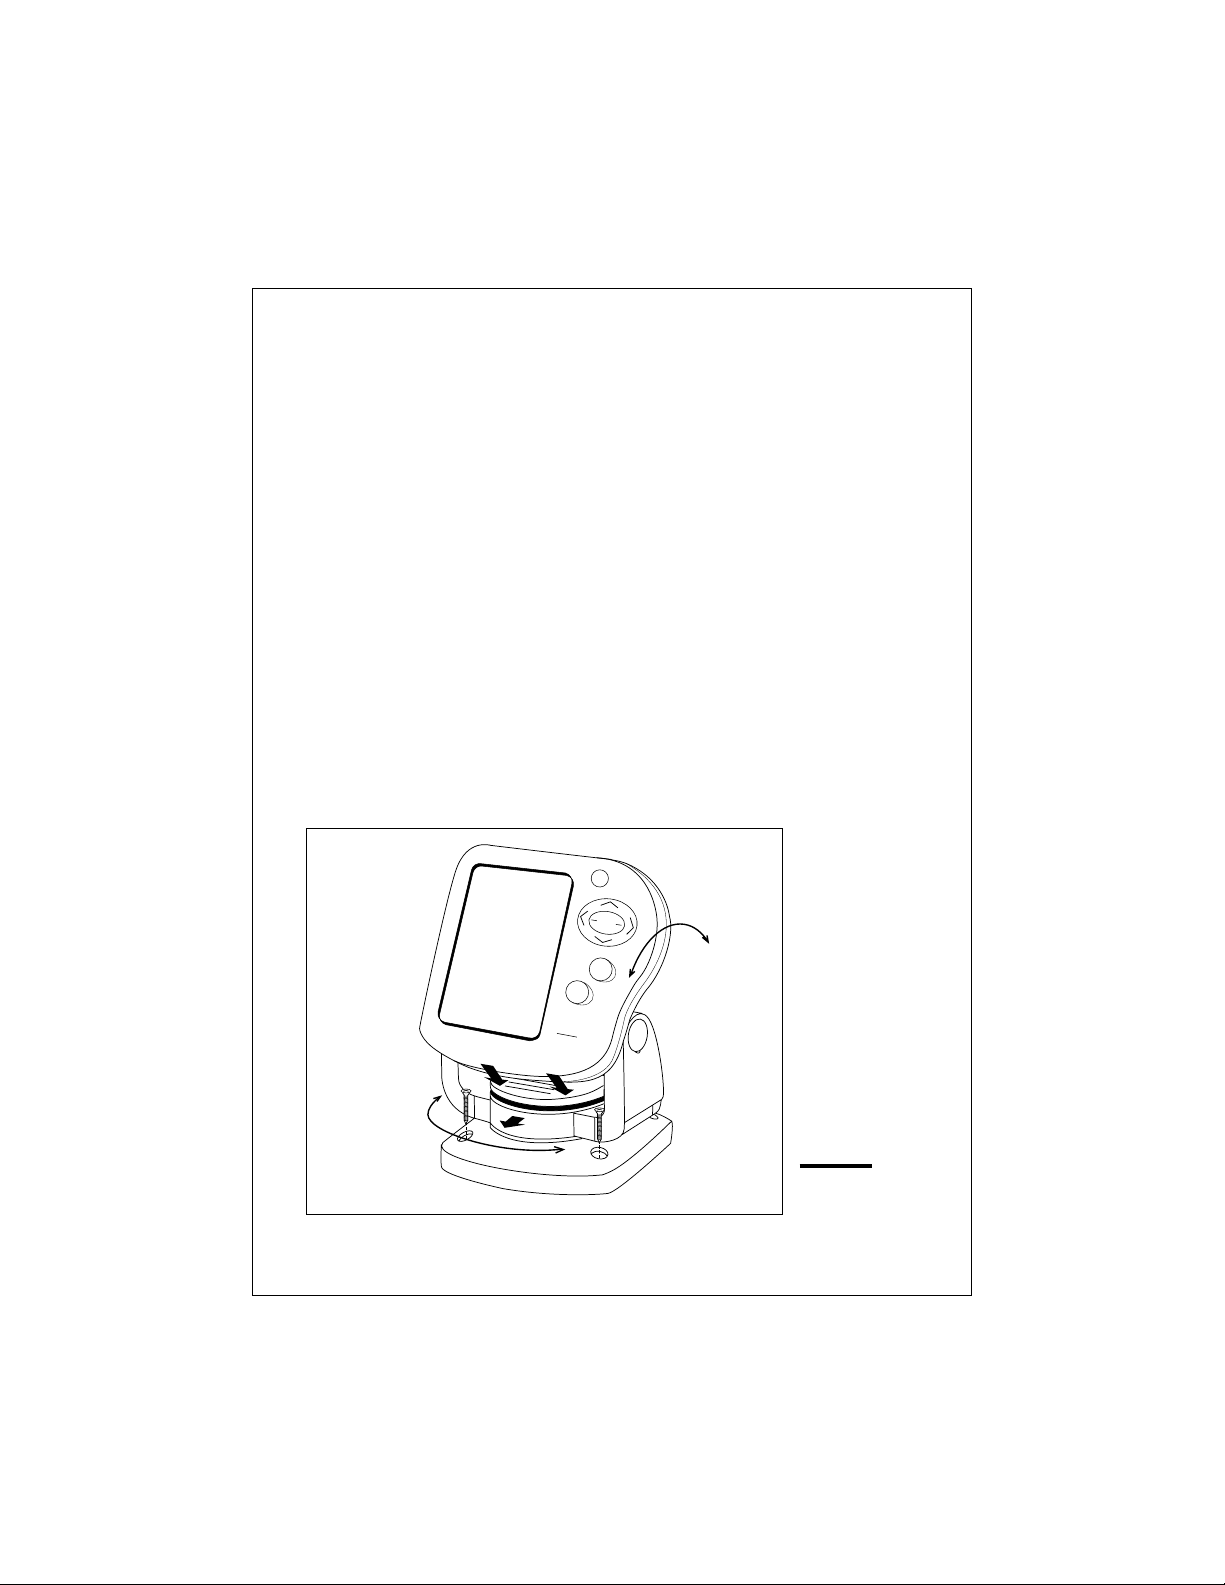
Mounting the Display Unit – Standard Mount
You may mount the display unit on any flat surface using the bracket
supplied. See Fig. 2-9. (There is also an optional kit which allows you to
flush-mount the display in a flat panel or dashboard). Follow these
instructions if you are using the standard mounting bracket:
1. The “LCD” type display used on this unit is easier to see from certain
angles. Before selecting a permanent mounting location, make
temporary power connections and turn on the unit. This will allow you
to test the visibility of the display from several different angles.
2. Remove the display unit from the bracket by pressing on the large
button in the center of the bracket. See Fig. 2-9.
3. Mount the base of the bracket using the supplied screws.
To release the
display from
the base,
press on the
right and left
sides until you
hear the clicks.
Slide the
display out
of the bracket.
The display can
be turned from
side to side.
14
Raymarine
PW
R
P
A
G
E
SE
TU
P
CLEAR
F
IS
H
F
IN
D
E
R
L365
The angle of
the display
can be changed.
Fig. 2-9
Installation
on Bracket
Installation
Page 20

1-3/4"
(44 mm)
2-23/32"
(69 mm)
4-9/32"
(109 mm)
Countersink
3/8" (10 mm)
Hole 3/16" (5 mm)
1-13/32"
(36 mm)
63/64"
(25 mm)
2-25/32"
(70 mm)
2-21/32"
(67 mm)
5-7/32" (133 mm)
6-3/4"
(172 mm)
5-9/32"
(134 mm)
Installation
3-29/32"(99 mm)
4-7/32"(107 mm)
Fig. 2-10
Dimensions
15
Page 21
4. Slide the display unit back into the bracket.
5. Adjust the display unit for the best viewing angle. You can turn the
display from side to side, and tilt it up or down.
Dismounting the Display Unit
See Fig. 2-9. To release the display from the bracket, press and hold
down the left and right sides. You will hear an audible “click,” and the
bracket will slide out.
Mounting the Display Unit – Flush Mount
In order to do this installation, you will need the optional flush mounting kit
(part no. M99-137). See Fig. 2-11.
1. Select a mounting location on the dashboard or control panel.
Choose a clear, flat area at least 6" x 6" (152 mm x 152 mm). Be sure
you will also have at least 6" (152 mm) of clearance behind the area
where the display unit will be mounted. It is a good idea to drill a
small pilot hole in the center of the mounting area. Be sure there are
no hidden electrical wires or other items behind the point where you
plan to mount the display unit.
2. A mounting template is supplied with the flush mounting kit. Tape this
over the selected location on the panel and trace around the edges.
3. Make the cutout for the display. Drill a series of 1/2" (13 mm) holes at
the points shown around the edges of the cutout area.
Gasket
16
Mounting hole
cut according to
template
Screw holes
Fasten with
threaded studs
and wing nuts
Fig. 2-11
Flush-mount
Installation
Installation
Page 22

4. Drill the two small holes for the threaded studs as shown on the
mounting template. Use a 7/32" (5.5 mm) drill bit.
5. Remove the template and draw straight lines between the 1/2" holes.
Cut along each of the lines with a small saw.
Raymarine
FISHFINDER
PWR
PAGE
SETUP
CLEAR
L365
To pry up the cap
insert a small screwdriver here
Fig. 2-12
Disassembling
from Bracket
6. Separate the display unit from the mounting bracket. (See Fig. 2-12.)
Press the large button in the center of the bracket to separate the
bracket arms. The display unit is attached to the arms by two screws.
Each screw is covered by a cap. Locate the small slot beside each
cap and pry upward using a small screwdriver. Remove the caps,
then the two screws and the two wave washers. Save these parts in
case you ever want to use the mounting bracket.
7. Screw the threaded studs into the holes on the rear of the display unit.
8. Set the display unit into place to be sure that it will fit correctly.
Thread the wing-nuts onto the threaded studs to hold the display unit
in place temporarily.
9. Once the DC wiring is complete, finish the installation. Hold the
gasket in place around the opening. Fit the display into the cutout
again. From the rear, screw the thumbscrews securely onto the
threaded studs to hold the unit in place.
Installation
17
Page 23

Installing the Transducer Cable
A 20 foot length of cable, with the connector attached, is supplied with the
transducer.
remove the connector. Do not try to shorten or splice the cable. The
transducer cable includes several wires, along with shielding and
insulation. If the cable is cut, it cannot be repaired.
will also void the warranty.) During installation, if you need to drill any
holes for the cable, they must be large enough to accept the connector.
This will allow you to make the installation without cutting the wire.
1. Route the cable up and over the top edge of the transom. See
Fig. 2-13. Secure the cable using cable clamps. (These clamps
are available from your local mar ine equipment supplier.)
If you do not want to expose the cable on the deck, you may drill a
new hole (3/4" or 19 mm) through the transom for the cable. (Remember – this hole must be large enough to accept the cable with the
connector attached. Do not cut the cable!) To seal the opening, use
a feed-thru cap where the cable passes through the transom.
2. Run the cable through the interior of the boat. If the transducer cable
runs near another electrical wire, it may pick up electrical interference
or “noise.” To reduce this, try to keep the transducer cable separated
as far as possible from all other wires. This is especially important
with wiring for the boat’s ignition, alternator, or tachometer. Also try to
During the installation, do not cut the transducer cable or
(Cutting the cable
18
Cable feed-thru
cap
Cable clamp
1" (25 mm)
Hull projections
Fiberglass: 1/4" (6mm)
Aluminum: 1/2" (13 mm)
Fig. 2-13
Installing Cable
on T ransom
Installation
Page 24
keep the transducer cable away from the antenna and power cables
for VHF or FM radios. It is also helpful to keep the transducer cable
away from the FishFinder power cable. If it is necessary to run the
transducer cable across any wires, make the crossing at a right angle.
3. Be careful not to tear the cable jacket when passing it through bulkheads and other parts of your boat. Secure the cables in place using
tywraps or lacing twine. Coil the extra cable and tie it out of the way.
4. If the 20 foot transducer cable is not long enough, a 15 foot extension
cable (4.6 m) is available from your Raymarine dealer (part no. M99-
139). When you attach the extension cable, be sure that the connections are tight and watertight. Use Dow Corning DC-4 or an equivalent sealing compound to protect the connector assemblies.
5. At the rear of the display unit, plug in the transducer cable using the
keyed connector.
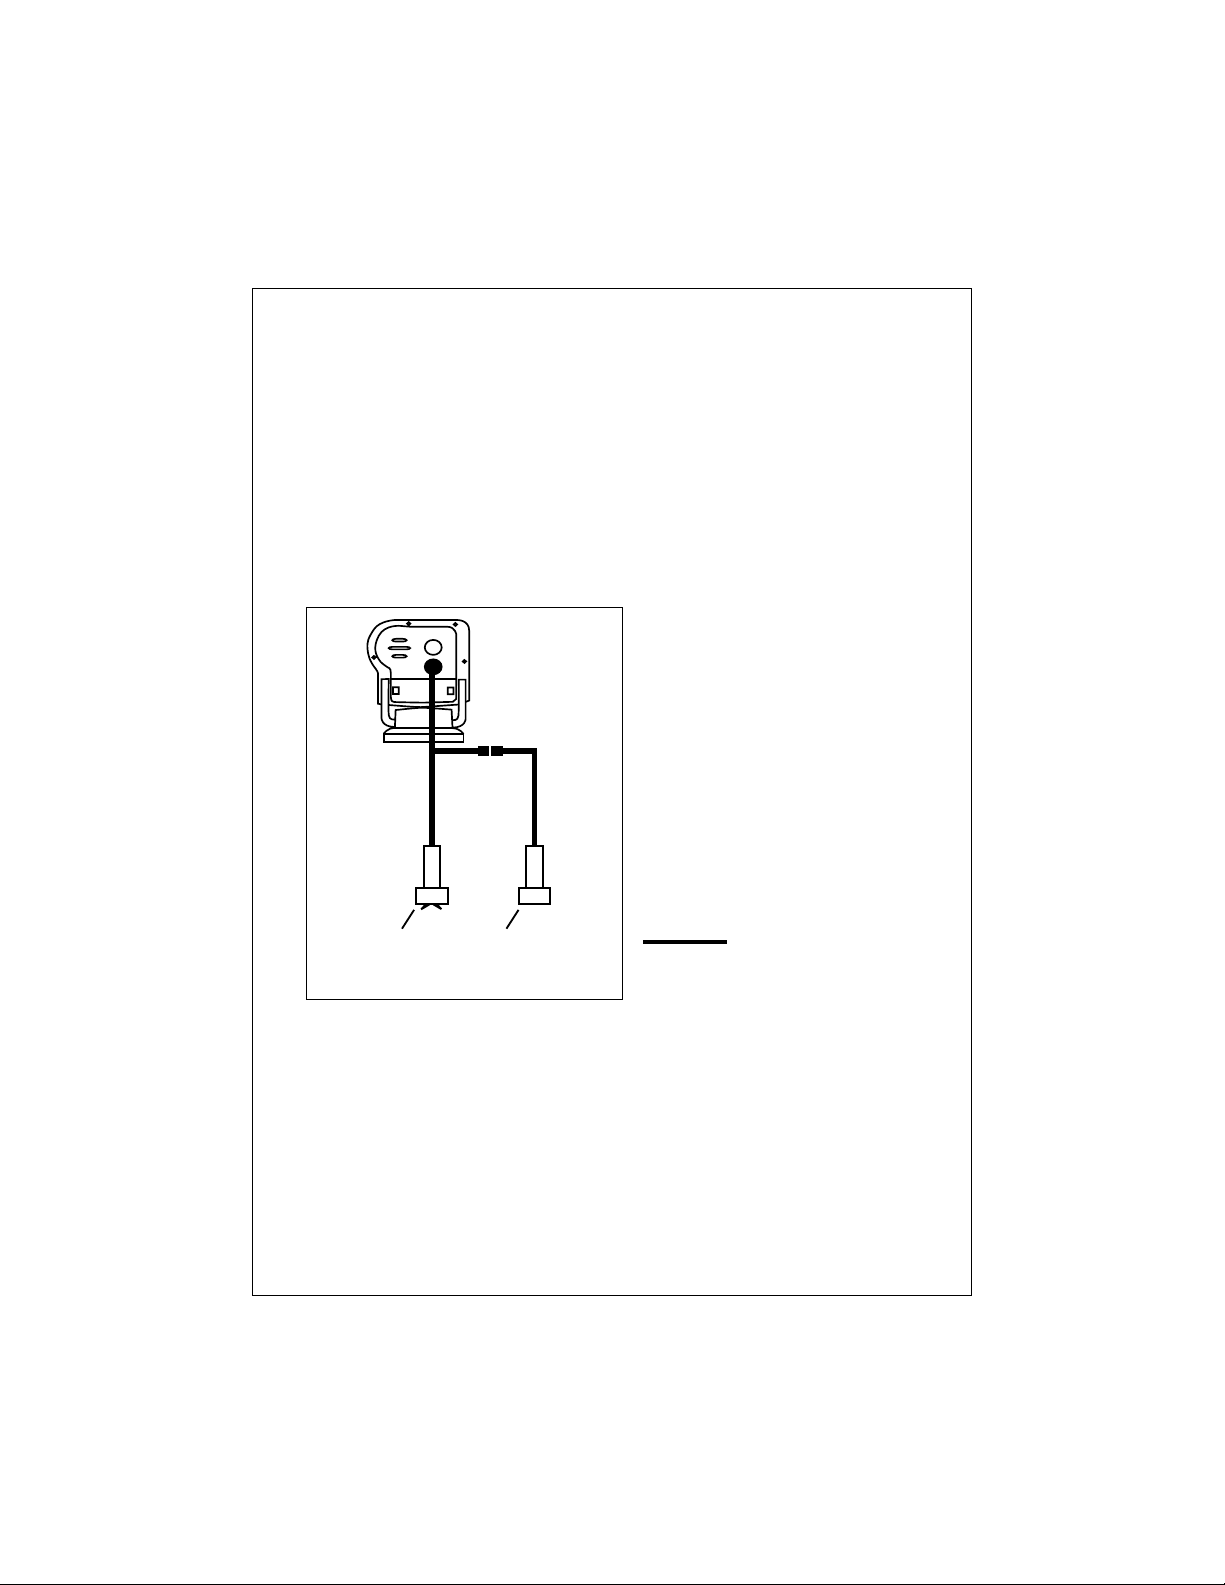
Installing the Transducer Cable – Sidelooker Option
1. If the installation includes the optional Sidelooker transducer, there
will be two transducer cables. See Fig. 2-14. The cable from the
Sidelooker includes a “Y” connector.
2. Plug the cable from the depth transducer into the open end of the “Y”
connector.
Sidelooker
transducer
Installation
Depth
transducer
Fig. 2-14
Cable for
Sidelooker
Transducer
19
Page 25
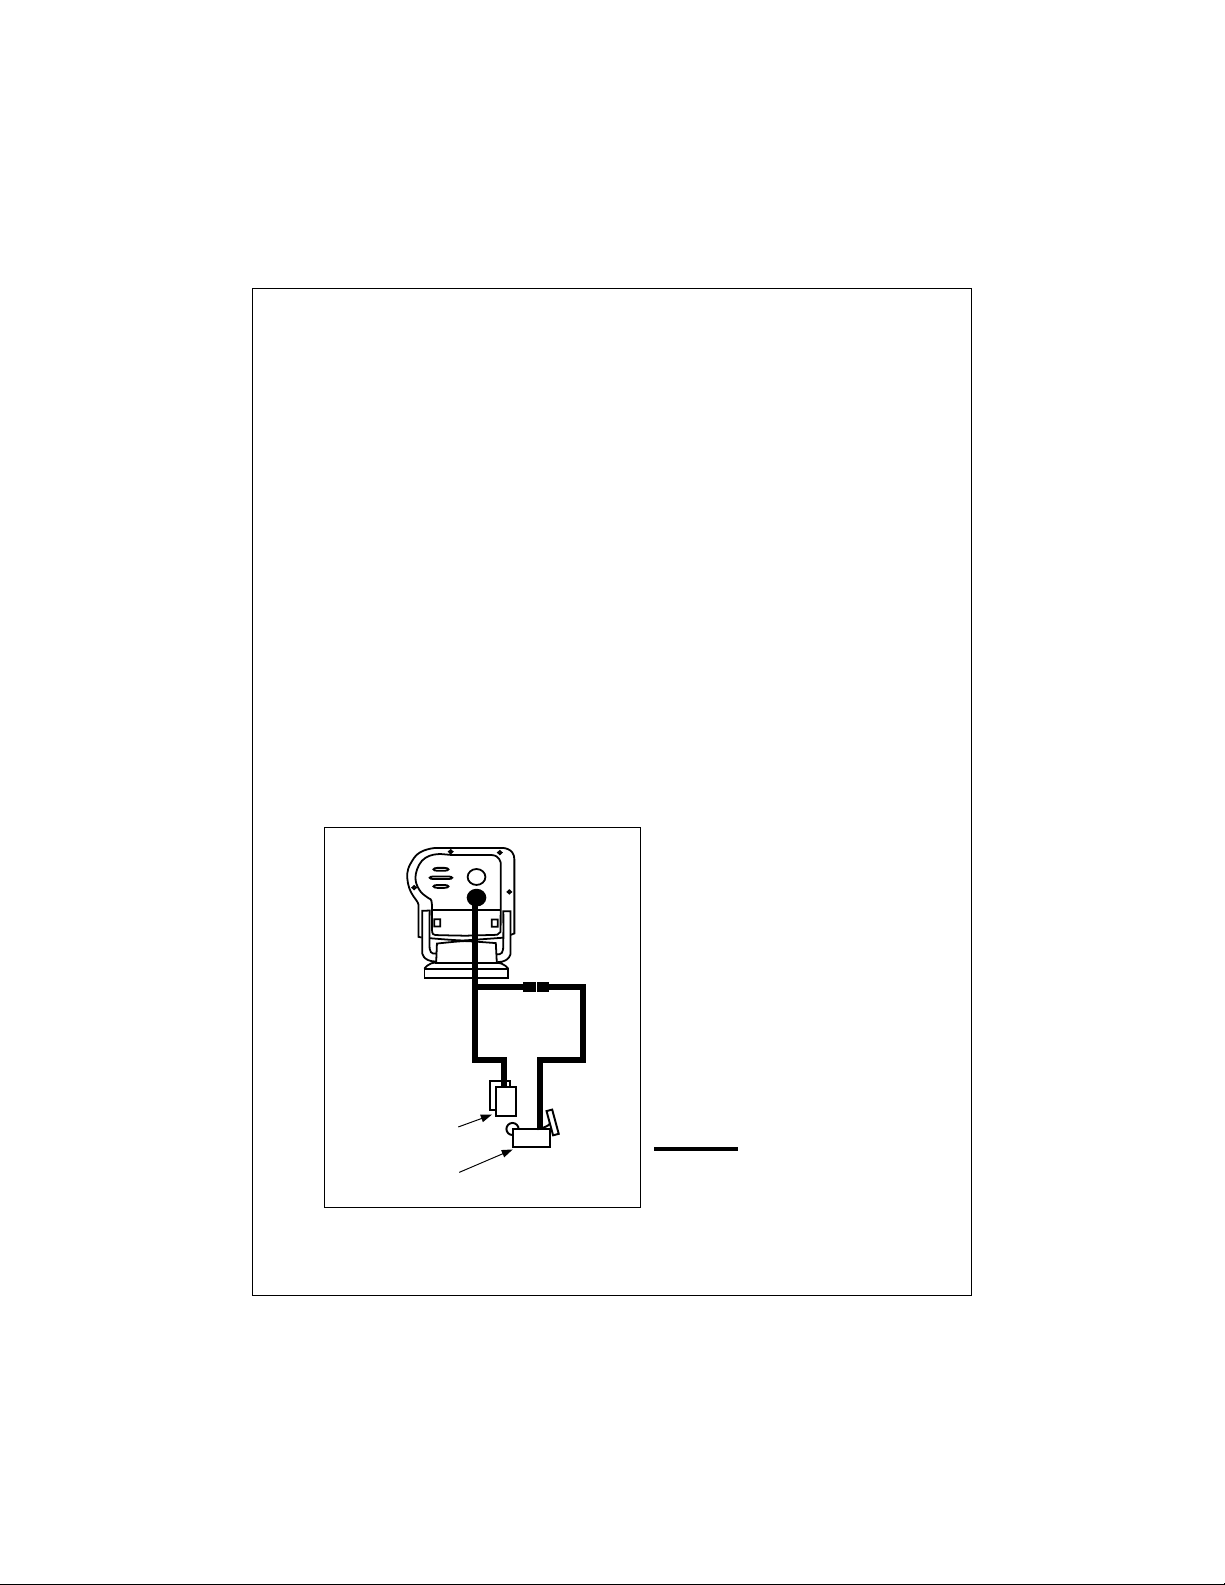
Installing the T ransducer Cable –
Installation with Separate Speed and T emperature Sensors
1. Optional depth-only and speed- and temperature-only transducers are
available for the FishFinder L365. In this optional configuration the
separate transducers are connected via a “Y” type receptacle cable
located on the optional speed- and temperature-only transducer cable.
2. Plug the cable from the depth-only transducer into the receptacle
connector on the optional speed- and temperature-only transducer.
The speed- and temperature-only transducer then connects at the
transducer receptacle of the FishFinder L365. This is shown below in
Fig. 2-15.
Sensor for
speed and
temperature
Sensor for
depth only
Fig. 2-15
Cable for Speed
and T emperature
Sensor
Making the DC Power Connections
1. The display unit is designed for use on boats with 12V DC power
systems. (The unit can operate as long as the DC voltage is between
11.0 and 16V DC.) The display unit can be wired to a negative-ground
system, or both the negative and positive supply lines may be “floating”
above ground.
positive ground.
20
This unit is not intended for use on boats with
Installation
Page 26

2. The 5-foot power cable (1.5 m) supplied with the display unit should
reach the source of DC power. On a small boat, connect the power
leads directly to the main battery isolation switch or breaker. On a
larger boat, route the power leads to the DC power distribution panel.
3. It is very important that you connect the power leads correctly. See
Fig. 2-16. At the power source, connect the
terminal (+), and the
black
wire to the
red
negative
wire to the
positive
terminal (-). The
negative terminal may also be called “ground” or “earth.” (The display
unit is internally protected if you accidentally reverse the polarity of
the power wires.)
4. Attach the red or positive wire to a 5 amp circuit breaker. If the unit is
connected directly to the boat’s battery, include a 2 amp in-line fuse.
(In-line fuses are available at most marine supply stores.)
5. To prevent any interference or electrical noise, separate the
FishFinder power wiring as much as possible from other devices.
Avoid running the FishFinder power wires near the power wiring for
any radar, radio, or Loran-C units. If possible, wire the FishFinder
power wires to a separate circuit breaker.
6. If you need to extend the power wiring by more than 10 feet, use a
larger wire size. This will allow the wires to deliver the correct voltage
DC 12V
connector
to battery
T/D
connector
to transducer
RED
DC 12V
Installation
BLACK
Fig. 2-16
DC Po wer
Connections
21
Page 27

in spite of the longer wire distance. For runs of 20 to 35 feet (6 to
10.6 m), use #14 AWG.
If you extend the power wiring, be sure all electrical connections are
solid and durable. Soldering is the best way to make these connections. Insulate all connections using heat-shrink tubing or electrical
tape. You may also use crimp connectors or a terminal str ip, but be
sure to use good-quality marine-grade parts.
7. At the rear of the display unit, plug in the power wires using the keyed
connector.
8. When you press the
the unit will not turn on and you suspect that you may have reversed the
power connections, check the DC power lines all the way back to the
battery. If the polarity is not correct, reconnect the leads properly and
try again.
PWR
button, the display unit should turn on. If
Calibrating the Sensors
The transducer most often used with this unit includes sensors for boat
speed and water temperature. These sensors are normally very accurate,
but you may want to calibrate them. The procedure appears in the section
on the System Setup Menu (page 55).
The speed indication on your FishFinder is usually very accurate. However, there are some special cases where the speed reading may be high
or low. This means that the speed of the water past the transducer may
not be the same speed that your boat moves through the water. The hull of
the boat may have a shape which channels water past the transducer at a
speed which is faster or slower than normal.
1. To calibrate the speed sensor, set up a course between two known
points. As markers you can use buoys, range markers, or landmarks.
Measure the length of time the boat takes to cover a known distance.
2. You may also use locations indicated by a G.P.S. or Loran unit. (If you
choose this method, remember that these devices measure “speed
over ground” or “speed over the bottom.” Tides, currents, or winds
can create a difference between the FishFinder’s “speed through
water” measurement and the boat’s “speed over ground.” Before
calibrating using a G.P.S. or Loran unit, wait for still water or slack tide
conditions.
22
Installation
Page 28

3. If the display unit is reading high or low, you can correct for this using
the entry for “Speed Cal.” (To reach Speed Cal, go to the System
Setup display. This is described in Section 4.) The entry for Speed
Cal is a percentage. An entry of “100” equals 100%, meaning that
there is no correction. If the display unit is producing a
use a
higher
value for Speed Cal. If the display unit is reading
use a
smaller
between 75 and 125.
4. The temperature sensor is usually very accurate, but you can adjust
the calibration using the entry for “Temp Cal.”
Final note: After you finish the installation, please remember to fill out the
Warranty Card included with this manual.
number for Speed Cal. You may enter any value
low
reading,
high
,
Installation
23
Page 29

3 – Operating Instructions
PWR
In this section of the manual, we will explain how to operate the unit.
(Setup instructions are included in the next section.) Below is a drawing
of the display unit.
Power button
Page control
pad
Set-up button
Clear button
Display area
Raymarine
PWR
CLEAR
FISHFINDER
L365
PAGE
SETUP
Fig. 3-1
Display
Panel
Controls on Display Unit
The FishFinder is designed to be easy to use while the boat is moving.
You can steady your hand by gripping the right side of the display with the
fingers of your right hand. This will allow you to use your right thumb to
press the buttons on the display.
Notice that some of the buttons can be used in two ways. They do one job
during a normal display, and a different job when you are setting up the
unit. In this section, we will use the symbols
indicate the power, setup and clear buttons.
PWR
This button turns the power on and off.
To turn on the power
– Press once to turn the power on.
To enter the Lamp/Contrast menu
any time to enter the “Lamp/Contrast” menu.
To turn off the power –
If you press and hold the button,
SETUP
,
– Press
and
CLEAR
PWR
quickly at
to
24
Operating Instructions
Page 30

the display will say “Powering Off.” If you hold the button for
more than 3 seconds, the display unit will switch off.
Page control
pad
Up and down arrows –
During setup
– Use these controls to call up a choice or
(<and V)
move to the next line on a menu.
If the Zoom display is turned on
– If the manual zoom
feature is turned on, these will move the zoom display up or
down.
Left and right arrows –
During normal display
(< and >)
– Use these buttons to go to the
next display.
During setup
– Use these arrows to make a choice within
a line on the menu.
SETUP
To enter the Setup Menu –
To go to the System Setup display –
Press
SETUP
at any time.
Press this button
twice.
CLEAR
During normal display
CLEAR
to turn off the buzzer. (The alarm will continue).
During setup
– Once you make a change, press
– When an alarm is triggered, use
CLEAR
to
save the change and go back to the normal display.
Turning the Power On and Off
Press the
Lamp/Contrast Menu will appear and the panel light will flash on and off.
The light will help you to set up the display in the dark.
To turn the power off, press and hold the
seconds.
PWR
button once to turn on the power. For a few seconds, the
PWR
button for more than 3
Setup Memor y
When you first turn on the power, the unit will be prepared to operate
using a number of preset values. These “default” values are stored in the
unit at the factory. (The default values are listed in Section 4.)
Operating Instructions
25
Page 31

This unit has a memory for some of the settings – range, sensitivity, zoom,
and frequency. (We will explain these in a moment.) When you turn off
the power, any changes you make to these settings will be saved. You can
return all of the settings to the factory default values, and reset the trip log
to zero. To reset the unit, tur n it on by pressing the
PWR
and
CLEAR
buttons
at the same time.
Lamp/Contrast Menu
Turn lamp
on or off
Adjust
contrast
Fig. 3-2
Lamp/Contrast Menu
PWR
Press
Turn on lamp The display unit includes a backlight which allows you to
The Lamp /Contrast Menu appears when you first press
PWR
the
button and turn on the power. (You will be able to
see part of the main FishFinder display behind the Lamp/
Contrast menu.)
PWR
You can press the
button a second time to exit from
the Lamp/Contrast menu and go directly to the FishFinder
mode. (If you do not make any changes to the settings
within 7 seconds, the unit automatically exits from the
Lamp/Contrast menu anyway.)
You can also enter the Lamp/Contrast menu from any of
the other displays by pressing the
PWR
button for a
moment.
read it at night. If you want to turn on the lamp, use either
the < or > arrows of the Page control pad.
26
Operating Instructions
Page 32

Fig. 3-3
Selecting
Display
Pages
Lamp/Contrast menu
FishFinder page
Zoom page
Digital page
Operating Instructions
A-Scope page
Sidelooker page
Note: This will appear
only if the Sidelooker
feature is turned on.
Return to
FishFinder
page
27
Page 33

Adjust contrast You can also adjust the “contrast” of the display. This is a
measure of how light or dark the display appears. Use
the
V control to move from the line f or “Lamp On/Off” to
the line for “Contrast.” Use the
< or > controls to adjust
the contrast. (The FishFinder unit has a feature which
adjusts the contrast automatically to compensate for
changes in air temperature.)
Save settings When the settings on this display are correct, press the
CLEAR
button to save the settings and go to the FishFinder
page.
Operating Pages
This unit has 5 “pages” or normal displays. These can be used to show
different kinds of information. Here is a list of the modes:
Mode Function See page
FishFinder page Standard operating mode, good
Zoom page Magnified view of smaller section
A-Scope page Detailed view of area under
Digital page Numerical display of depth, speed,
Sidelooker page View of either side of centerline of boat,
(using optional (used only with Sidelooker transducer) page 43
Sidelooker transducer)
general coverage of bottom. page 29
of bottom. page 38
transducer. page 40
distance traveled and water
temperature. page 42
You can step from one of these pages or displays to another using the
< and > arrows of the Page control pad. See Fig. 3-3.
There are two other kinds of displays you can see here:
• The system includes several setup displays which can be used to
change some of the controls used by the unit. See Section 4.
• When the Simulator Mode is switched on, the unit generates its own
display without receiving signals from the transducer. This mode is
used for sales and training.
28
Operating Instructions
Page 34

FishFinder Page
Auto
features on
Transducer
frequency
Speed
Log/distance
Water
temperature
Bottom
indication
Buzzer symbol
Fish alarm set
Auto sensitivity on
Auto
range on
Shallow alarm set
Deep alarm set
Auto
zoom on
Fish symbol
on
Boat symbol
Water surface
Depth markers
Fish depth
Fish symbol
Range
Bottom depth
Fig. 3-4
FishFinder
Page
A moment after you first turn on the display unit, the Lamp/Contrast menu
disappears. The unit then automatically switches to the FishFinder page.
Figure 3-4 shows a typical display. (The FishFinder page is also called the
“chart” or “bottom graph” display.) As time passes, this display scrolls from
right to left. The scrolling image becomes a record of the echoes and the
bottom seen by the FishFinder as your boat moves.
The images at the right side of the display show the most recent echoes.
Operating Instructions
29
Page 35

Some of these echoes indicate fish, and others show the bottom. As new
echoes are received, the FishFinder “draws” a graph of the bottom. The
bottom graph helps you to tell whether the bottom is rising or falling. It
also allows you to identify the shape or “structure” of the bottom. This
can indicate a reef or shipwreck.
Notice that the scrolling speed of the display does not necessarily match
the speed of the boat. The scrolling speed of the display is called the
“chart speed.” You can adjust this using the “System Setup Menu.” (See
Section 4.)
Many of the items on this display appear in the other modes. Since you are
likely to use the FishFinder page most often, we will explain all of these
items here.
Top of display
Auto features on
(AUTO) If
Auto range on (R)
Transducer frequency
Auto sensitivity on (S)
any
of the automatic features are turned on, the “Auto”
indication will appear here. (These include the automatic
range, auto sensitivity, and auto zoom features.)
The “range” is the maximum depth the unit is set to
measure. When the auto range feature is on, the
FishFinder chooses the correct range setting automatically.
The transducer can use two frequencies - 50 kHz for wide
coverage, or 200 kHz for a detailed view. You can also set
the unit to use both frequencies at the same time (“dual
frequency”). (For more on this, see “Choosing the Frequency.” )
The “sensitivity” controls the ability of the unit to tell the
difference between echoes of different strengths. A higher
sensitivity setting makes it easier to see smaller fish, but
also may pick up background noise. When auto sensitivity
is on, the FishFinder chooses the correct sensitivity setting
automatically.
30
Operating Instructions
Page 36

Auto zoom on (Z)
The “zoom” can be used to magnify the image from a small
section of the water below the boat. (This is used with the
Zoom display, which we will describe in a moment.) When
the auto zoom feature is on, the FishFinder automatically
moves the zoom window up or down to track the bottom.
Fish symbol on
When the FishFinder sees a fish, it can show this by
displaying a fish symbol. When the fish symbol feature is
turned off, the FishFinder indicates a fish as an archshaped line on the display. For more information, see the
section on “Fish Indications.”
Boat symbol This symbol is always turned on. It indicates that the new
information appears at the right edge of the display, and the
older information moves toward the left.
Center of display
Water surface This symbol (“0”) shows the depth indicated by the top of
the display. Usually, this is the level of the surface of the
water. (If the Zoom feature is turned on, this will show the
depth of the top of the zoom area.) The depth is shown
using the same units as the rest of the display. This could
be feet (FT), fathoms (FA), or meters (M), depending on the
setting you make in the System Setup display.
Depth markers
These markers show depths between the surface and the
full depth range. In this example, the unit is set for a depth
range of 100 feet. This means that each of the depth
markers shows an interval of 20 feet.
Speed This entry shows the speed of the boat through the water.
From the System Setup display, you can turn this item off or
change the units used for this display.
Log/distance This shows how far the boat has traveled since the display
was turned on, or since the log was last reset. From the
System Setup display, you can turn this item off or change
the units used for this display.
Operating Instructions
31
Page 37

Water temperature
This entry shows the current water temperature at the
surface of the water. (The reading for water temperature
can be helpful for finding fish. A particular type of fish will
often prefer water in a narrow temperature range.) From
the System Setup display, you can turn this item off or
change the units used for this display.
Fish symbol This indicates that the FishFinder sees a fish. Generally,
the larger the fish symbol appears, the larger the fish. (The
size of the fish symbol actually depends on a number of
factors. See the section on “Fish Indications.”)
If the fish is detected using the narrow 200 kHz beam, the
display will show a filled-in symbol. If the fish is detected by
the wide 50 kHz beam, the display will use a hollow symbol.
(For more on this, see “Choosing the Frequency.”)
Fish depth This indicates the depth of the fish shown by the fish
symbol. This number will be shown using the same depth
units (feet, fathoms, or meters) you have selected on the
System Setup display. The fish depth indicator is turned off
when the fish symbol function is off.
Bottom of display
Bottom indication
This shows the bottom of the lake or sea. You can compare this to the range depth shown in the lower right-hand
corner. (In this example, the checkered pattern shows the
unit is getting a strong echo return from the bottom. See
the information on the White Line feature in the Setup
Instructions.)
Range The “range” is the maximum depth the unit is set to
measure. In this example, this is 100 feet. You can set the
range manually, or the FishFinder can do it automatically.
Bottom depth This is the depth of the bottom shown on the display. You
can select FT (feet), FA (fathoms), or M (meters) using the
System Setup display. If the FishFinder can’t tell how deep
the water is, the last known depth flashes on the display.
This will continue until the unit can see the bottom again.
32
Operating Instructions
Page 38

Buzzer symbol
This symbol shows whether any of the alarms will use the
buzzer. There are three kinds of alarms: shallow, deep, and
fish. If one of these alarms is set, it will always present a
flashing symbol on the display. The Buzzer symbol shows
whether the alarms will also use the buzzer.
If the Buzzer setting in the System Setup display is on
(indicating that the buzzer is enabled for all of the alarms),
this symbol will appear filled.
If the Buzzer setting is off (indicating that the buzzer is
disabled for all of the alarms), this symbol will be open.
Shallow alarm set
You can set an alar m to go off if the boat moves into water
which is shallower than a certain depth. If you set this type
of alarm, the “S” indicator will appear on the display. If the
alarm is triggered, the “S” symbol will flash. If the buzzer
has been turned on (in the System Setup display), the
buzzer will also sound. To stop the buzzer, press the
button. The “S” symbol will continue to flash until you move
into deeper water.
Deep alarm set
You can set a different alarm to go off if the boat moves into
water which is deeper than a certain depth. When this
alarm is set, the “D” symbol will appear. If the alarm is
triggered, the “D” symbol will flash. If the buzzer has been
turned on (in the System Setup display), the buzzer will
also sound. To stop the buzzer, press the
“D” symbol will continue to flash until you move into
shallower water.
Fish alarm set
The FishFinder also has an alarm which will sound whenever it detects a fish. When this alarm is set, the fish
symbol appears at the bottom of the display. If the alarm is
triggered and the buzzer has been turned on (in the System
Setup display), the buzzer will sound for a moment.
CLEAR
button. The
CLEAR
Operating Instructions
33
Page 39

Before we explain the other pages, there are some general things you
should know about the operation of the FishFinder.
Choosing a Frequency
We said that the FishFinder uses sound waves to “see” through the water
under the boat. The “frequency” is a measure of how fast the sound
waves change or “vibrate.” The FishFinder uses sound waves with two
different frequencies – 50 kHz and 200 kHz. Raymarine uses these two
frequencies because each is better for a particular purpose:
50 kHz frequency
• Scans a wide area
• Penetrates water well, good for deep water
200 kHz frequency
• Scans a narrower area, but produces a more detailed view
• Good for seeing fish near the bottom or fish close together
• Better for use in very shallow water
“Dual” frequency (both 50 kHz and 200 kHz at once)
• Has the advantages of both frequencies
• Good depth penetration
• Good detail in display
• Using the “Dual 50 kHz” setting, the display is produced using the
signal from the 50 kHz beam, with additional information from the 200
kHz beam.
• Using the “Dual 200 kHz” setting, the display is produced using the
signal from the 200 kHz beam, with additional information from the 50
kHz beam.
If you are using one of the dual frequency settings, you can get some
useful information from the fish symbols. If the fish is spotted by the
narrow 200 kHz beam, the fish symbol will be black or filled-in. If a fish is
detected by the wide 50 kHz beam, the symbol will be hollow.
34
Operating Instructions
Page 40

Fish Indications
Even using advanced sonar technology, it is sometimes hard to detect a
fish in the water. The body of a fish is just a little more dense than the
surrounding water. There is really nothing very solid for the sound waves
to bounce off of. The FishFinder L365 is very good at telling the difference
between a fish and the surrounding water. In fact, Raymarine is the
leader in this technology.
When the FishFinder finds a fish, it can be indicated by a fish symbol on
the display. In general, a larger symbol means a larger fish. This rule is
not always true, though. Let’s say that there are two fish of the same size:
one is close to the surface, and the other is near the bottom. The fish
which is close to the surface will have a larger symbol. This is because
the fish which is closer returns more of the sound waves back to the
FishFinder.
Actually, the sound waves are usually reflected by the air sac near the
center of the fish, and not by the body of the fish. The size of this air sac
is different for different kinds of fish. This can also affect the size of the
fish symbols on the display. A fish with a large air sac will produce a large
fish symbol, while a fish with a small sac will produce a small symbol.
The symbol also indicates which of the two frequencies was used to locate
the fish. If the fish was spotted by the wide 50 kHz beam, the symbol will
appear to be hollow. If the fish was detected by the narrow 200 kHz
beam, the symbol will be solid.
If the fish symbol feature is turned off, the FishFinder indicates fish in a
different way. See Fig. 3-5. An arch-shaped mark on the display usually
indicates a fish. Again, a larger arch usually indicates a larger fish.
Several arches together show a school of fish.
The return from a fish will have a different appearance, depending on the
frequency used. If a fish is spotted by the wide 50 kHZ beam, the arch will
be broad. When using the narrower 200 kHz beam, the same fish will
produce a narrower arch.
The shape of the arch is also affected by the speed of the boat. If you are
moving slowly, the arches tend to be longer. If the boat is moving more
quickly, the arches are short and peaked. If the boat is moving very fast, a
fish may be indicated by a single vertical line.
Operating Instructions
35
Page 41

An arch-shaped image indicates a fish.
The same fish appears differently
50 kHz
200 kHz
when shown by the 50 kHz or 200 kHz
transducer beams.
This indicates a group of small fish.
This shows a fish detected in
sidelooker mode.
A shallow arch or horizontal line is
generated when the boat is moving
slowly or stopped.
When the boat is moving very fast,
a fish appears as a single vertical line.
Fig. 3-5
Fish
Indications
Bottom Indications
The bottom usually produces a strong echo, so it is easy for the
FishFinder to see a lot of detail. The FishFinder can indicate many
different kinds of bottom conditions. See Fig. 3-6. A hard bottom appears
as a thin line. A softer bottom or a bottom covered with seaweed will
produce a wide line, as the sound waves reflect from different layers of the
bottom. An uneven bottom which is covered with rocks or coral produces
a complex display like that shown in the last part of Fig. 3-6. The bottom
image is irregular, with long “tails” pointing upward. A wreck produces a
similar image.
When the White Line feature is turned on, the unit can display even more
information about the bottom. In Fig. 3-4, the FishFinder is getting a good
echo from the bottom, so the upper layer of the bottom is shown in a
checkerboard pattern.
36
Operating Instructions
Page 42

Hard
(Sand)
Soft
(Mud)
Rocks
Fig. 3-6
Bottom
Conditions
Notice that the lower layer of the bottom is shown as a solid display. This
indicates a weaker echo. Sometimes this means that the upper layer of
the bottom is soft. Some of the sound waves may reach through this
layer, and may be reflected by a more solid layer below. It is also possible
that the sound waves are making
two
complete trips - hitting the bottom,
bouncing off of the bottom of the boat, then reflecting off the bottom again.
This can happen if the water is shallow, the bottom is hard, or the sensitivity is set to a high value.
Now, let’s look at the other main operating displays. From the FishFinder
display, press the
> arrow of the Page control pad.
Performance Modes
This unit has two “performance” modes which can be used to add to
the standard FishFinder Page. These are the Zoom and the A-Scope
Modes. Each presents the raw information from the transducers in a
special way. To display one of these modes, press the Page key on
the unit. See Fig. 3-3.
Operating Instructions
37
Page 43

Zoom Page
Press
Zoom display
(magnified)
Top of zoom
area
Zoom
magnification
Normal
display
Line indicates
zoom area
Bottom of
zoom area
Fig. 3-7
Zoom Page
The Zoom page gives you a way of enlarging or magnifying a part of the
display area. See Fig. 3-7. (The “zoomed” display is actually larger only
in the vertical direction.) The right side of the display shows the same
information as the FishFinder page. The left side shows the magnified view.
In each case, the new information appears at the right edge of the display,
and moves to the left.
Many of the items on the Zoom page are the same as those on the
FishFinder page. There are a few new items.
38
Operating Instructions
Page 44

Zoom magnification
This indicates the amount of “zoom” or magnification. You
always set the amount of zoom manually, using one of the
functions on the Setup display. You can choose an x2 view
(double the normal display size), x4, x6 or x8 in the series
of setup screens. See Section 4. You must also select the
area or “window” of the water you want to zoom. See the
next item.
Zoom area When you turn on the zoom feature, it can only enlarge a
part of the FishFinder display. You must decide which part
you want to enlarge. As we said, the right side of the
display shows the normal FishFinder display. The vertical
line at the right edge of this display shows the area or
“window” of the water being enlarged.
When the FishFinder is set for auto zoom, it will choose the
zoom area automatically. The unit always chooses an area
of the water which includes the bottom. The unit then
moves this area up or down to keep the bottom in the
picture. The auto zoom feature is great for bottom fishing.
You may also set the zoom area manually. In the series of
setup screens, select manual zoom. (See Section 4.)
Once you are back to the zoom display, you can move the
zoom area up or down (using the
Page control pad) to enlarge any selected “window.”
To move to the next display, press the > arrow of the Page control pad.
<
and V arrows of the
Operating Instructions
39
Page 45

A-Scope (Bottom Coverage) Page
Press
Normal
display
A-Scope
display
A-Scope image
(real time image)
Fish
indication
Bottom
coverage
Fig. 3-8
A-Scope
Page
On the FishFinder display the bottom graph is “drawn” after the FishFinder
receives several echoes. This has the effect of showing a record of the
bottom contour. The A-scope displays raw sonar data directly from the
transducer beam. This gives you a “real time” image of fish and bottom
structure directly below the transducer. This function is very useful in
showing the strength of the echo returned from a fish. Stronger fish
echoes on the A-scope display will appear wider; weaker echoes appear
as narrow bands closer to the horizontal center of the A-scope image.
The left section of the A-Scope display shows a section of the normal
FishFinder display. All of the features are the same. The right section
shows the A-Scope image.
40
Operating Instructions
Page 46

A-Scope image
This shows the beam of sound waves extending down from
the boat, and spreading as it moves through the water. Any
fish or objects which are positioned under the boat will
appear on the display. This is a “real time” display, so you
can see the fish symbols moving as the fish swim under the
boat.
Bottom coverage
This shows the diameter of the beam of sound waves
where it meets the bottom. This dimension will be shown
using the same units as the rest of the display – feet (FT),
fathoms (FA), or meters (M). If the unit is set at 200kHz
single frequency, the bottom coverage display will reflect
the narrow (16°) beam of the 200kHz frequency setting. All
other frequency selections (200kHz dual, 50kHz dual, and
50kHz single) use the wider (65°) beam for the bottom
coverage display.
To move to the next page, press the > arrow of the Page control pad.
Operating Instructions
41
Page 47

Digital Page
Press
Depth
Speed
Distance/log
Water
temperature
Alarms
The Digital page presents some useful information in large numbers on
the display. See Fig. 3-9. This display is useful when you are traveling,
but not looking for fish or checking the appearance of the bottom. There
are four main items:
Depth The Digital display reports the depth of the bottom.
Speed This is the speed of the boat through the water.
Log This entry shows the distance traveled, determined by the speed
through the water. The L365 remembers this v alue after it is
turned off. You may reset the log using the Setup Menu.
Temperature This is the current water temperature.
Alarms Notice that the alarm indications still appear at the bottom
of the display.
To move to the next display, press the > arrow of the Page control pad.
Fig. 3-9
Digital
Page
42
Operating Instructions
Page 48

Sidelooker Page
Transducer mounted
on trolling motor
Rock
Boat
31° beam
11° beam aimed
down at 4° angle
Rock
Fig. 3-10
Sidelooker
Feature
Fish
Fish
Sidelooker
transducer
This feature will only work if an optional Sidelooker transducer has
been installed, and if the Sidelooker feature has been turned on in the
System Setup Menu. The Sidelooker feature is very helpful for certain
kinds of fishing. It allows you to check for underwater structure along
the sides of a stream or river, under the edge of a bank or pier, or into
stumps or weed beds.
The optional Sidelooker transducer transmits two acoustic beams—one to
the port side of the boat, and one to the starboard. These are displayed on
the left and right halves of the Sidelooker Page. See Fig. 3-10.
Once the Sidelooker feature has been turned on, you can reach the
Sidelooker page easily. Press the < or > buttons on the Page Control
Pad until the Sidelooker Page appears. The unit will present a display
similar to Fig. 3-11.
Operating Instructions
43
Page 49

Boat symbol
Side range
Fish echo mark
Bottom/shore
indication
Centerline
Speed
Log/distance
Water temperature
Depth below boat
Fig. 3-11
Sidelooker
Page
The Sidelooker Page, like the FishFinder Page, displays a graph or chart.
The scrolling vertical dashed line represents the centerline of the boat. As
new Sidelooker echoes are received, the new information appears at the
top of the display, and older information moves towards the bottom. There
is no relationship between the chart speed of the FishFinder and the
speed of the boat. (The speed at which the display moves is set by the
entry for “chart speed” in the Setup Menu.)
When the Fish Symbol feature is turned off, any fish detected will appear
as vertical marks. These may be slightly arched towards the center of the
display. The unit can also be set to display fish symbols, but the normal
fish marks are usually more helpful. The Sidelooker transducer transmits
at the 200 kHz frequency. If the unit spots any fish while the Fish Symbol
44
Operating Instructions
Page 50

feature is on, they will be indicated by solid fish symbols. (You can turn the
Fish Symbol feature on or off from the System Setup Menu. See Section 4.)
Underwater objects such as submerged tree stumps or rocks can also be
detected by the Sidelooker transducer. These objects usually appear as
thicker vertical targets. The Sidelooker sounding beam is transmitted very
close to the surface of the water. In rough or choppy water this turbulence
may appear on the Sidelooker display as “noise” or “clutter.” The Side-
looker will also display noise or clutter when your boat travels at high
speeds or in very shallow water. For best results, use the Sidelooker at
idle or slow trolling speeds.
Here are the special items on this display:
Boat symbol This is pointing forward on the screen to indicate that, on
the Sidelooker Page, the view is from above, as seen from
a bird’s-eye. The boat symbol appears at the top center of
the Sidelooker View.
Dashed
vertical line The scrolling vertical line is drawn under, or behind, the
boat symbol to indicate the division between the information
produced by the left and the right sidelooker transducer
elements.
Side range This is the maximum distance the unit will be able to see
using the current range setting. Remember that the sound
waves move out at a shallow angle, so this distance is
measured
are chosen using the entry for Depth Units in the System
Setup Menu. If you have selected feet (FT) or fathoms
(FA), the distance shown here will be measured in feet. If
you have selected meters (M), the distance shown here will
be in meters.
Fish echo mark
A line or arch-shaped mark shows that the unit has detected
a fish. In general, a larger mark indicates a larger fish. If the
fish symbols are turned on, the unit will indicate fish using
symbols instead. A n umber beside each symbol sho ws the
distance from the boat to the fish. Remember that this
distance is measured
sideways
. See Fig. 3-10. The units used here
sideways
. See Fig. 3-10.
Operating Instructions
45
Page 51

The units used here are chosen using the entry for Depth
Units in the System Setup Menu. If you have selected feet
(FT) or fathoms (FA), the distance shown here will be
measured in feet. If you have selected meters (M), the
distance shown here will be in meters.
Bottom/Shore
Indication This indicates the area where the transducer beam is start-
ing to see the bottom, shore, or some other object. Again,
remember that the beam is looking sideways, so this could
really represent the bank of a stream or structure under a
dock or pier.
Depth This is the depth directly below the boat. Even when the
Sidelooker feature is turned on, the downward-looking
transducer is still used to measure the depth.
The Sidelooker feature has settings for Range and Sensitivity which are
separate from the Range and Sensitivity settings used for the standard
FishFinder Page. See Section 4 for details.
46
Operating Instructions
Page 52

4 – Setup Instructions
The Setup Menu
Press the Setup button to enter the Setup Menu. To move from one
display to another, press the
return to the normal display, press
you can reach these displays quickly, make a change, then return to the
normal display quickly.
V and
<
arrows of the Page control pad. To
CLEAR
. See Fig. 4-1. This means that
Setup Instructions
Fig. 4-1
Moving
Through
the Setup
Menu
47
Page 53

Range Setting
Fig. 4-2
Range
Settings
If you press
See Fig. 4-2. The range sets the maximum depth the unit will be able to
see. Use the < and > arrows of the Page control pad to select Auto or
Manual range. (If you press
display, the unit will allow you to set the range for the Sidelooker feature.
See the end of this section.)
Auto range The FishFinder can be set to select the range by itself,
Manual range You can also set the range yourself. (However, if the
Possible Range Settings (Auto or Manual)
In feet:
In fathoms:
In meters:
If you are done with your setup changes, press the
to the normal display. To select the next menu item, press the V arrow of the
Page control pad.
SETUP
once, the first menu item allows you to set the range.
SETUP
while you are looking at the Sidelooker
automatically. The unit chooses the shallowest range which
will still include the bottom in the display. If the bottom rises
or falls, the FishFinder will adjust the range to keep the
bottom in the display.
bottom rises or falls, the FishFinder will not adjust for this.)
As soon as you select Manual, the cursor will jump down a
line so you can choose the range you want. Use the < and
> arrows of the Page control pad to make a selection. Here
are the choices:
5, 10, 20, 30, 50, 80, 100, 150, 250, 400, 600, 1000, 1500, 2000
2, 3, 5, 10, 15, 20, 25, 30, 50, 80, 100, 150, 200, 350
2, 5, 10, 15, 20, 25, 30, 50, 80, 120, 200, 300, 500, 650
CLEAR
button to go back
48
Setup Instructions
Page 54

Sensitivity Setting
Fig. 4-3
Sensitivity
Setting
The sensitivity adjusts the ability of the unit to tell the differences between
echoes of different strengths. In general, the sensitivity should be as high
as possible, to detect the fish and show the detail on the bottom. However, if the sensitivity is too high, the unit will begin to see bubbles in the
water, debris, and other “background noise.” Use a higher sensitivity
setting for deeper water, and a lower setting for shallower water.
If
you adjust the sensitivity while you are looking at the Sidelooker display,
this will affect the sensitivity for the Sidelooker feature only.
From the menu item for the range setting, press the V arrow of the Page
control pad. The next menu item will allow you to set the sensitivity. See
Fig. 4-3. Use the < and > arrows of the Page control pad to select Auto or
Manual sensitivity.
Auto sensitivity
The FishFinder can be set to select the sensitivity by itself,
automatically. The unit chooses the sensitivity setting
which will detect fish, but will also show a minimum of
background noise. If the amount of background noise
changes (due to changing depth or water conditions), the
FishFinder will change the sensitivity to adjust. (You can
adjust the sensitivity of the unit while it is using Auto
sensitivity. Once Auto sensitivity is selected, use
the V arrow of the Page control pad to go to the next line,
Setup Instructions
49
Page 55

then use the < and > arrows of the Page control pad to fine-
tune the setting. When the FishFinder is turned off, then on
again, the Auto sensitivity setting returns to the nor mal
default setting.)
Manual sensitivity
You can also set the sensitivity manually. If the amount of
background noise changes, the FishFinder will not adjust
for this. If you choose Manual sensitivity, press the
V arrow
of the Page control pad to go to the next line. Use the < and
> arrows of the Page control pad to move the dark bar on
the display. Making the bar longer increases the sensitivity.
If you are done with your setup changes, press the
to the normal display. To select the next menu item, press the
CLEAR
button to go back
V
arrow of
the Page control pad.
Chart Speed Setting
Most of the displays on the FishFinder show a record of the signals the
unit has received. The new information appears at the right (or top) edge
of the display. The older information moves toward the left (or bottom) of
the display. The chart speed adjustment sets the speed at which the
display moves. (Notice that the scrolling speed of the display is not
related to the speed of the boat over the bottom. The speed of the display
is controlled
only
by the chart speed setting.)
Section of bottom shown
at higher chart speed -
Same section shown at
slower chart speed -
50
Display shows
more detail
Display shows
longer "history"
Fig. 4-4
Changing the
Chart Speed
Setting
Setup Instructions
Page 56

Figure 4-4 shows how the chart speed setting affects the display. In both
cases, the unit is showing the same section of the bottom. Using a faster
chart speed, the display has more space on the display to show this
section, so it can include more detail. Using a slower chart speed, this
same information is displayed in a smaller horizontal space.
A faster chart speed setting shows more detail on the bottom. You will
probably want to use a faster setting when you are looking for fish.
A slower chart speed setting shows a longer record of the bottom you
pass over. Any fish detected will stay on the display longer.
From the display for the sensitivity setting, press the
V arrow of the Page
control pad. The next menu item will allow you to set the chart speed.
See Fig. 4-5.
Chart speed Thi s ad jus ts t he speed at which the information moves
across the display. Use the < and > arrows of the Page
control pad to change the chart speed. Making the bar
longer increases the chart speed. If you move the bar
all of the way to the left, the FishFinder will “freeze” and
hold the current display. (The depth indicator will
continue to update.)
Fig. 4-5
Chart Speed
Setting
If you are done with your setup changes, press the
CLEAR
button to go back
to the normal display. To select the next menu item, press the V arrow of
the Page control pad.
Setup Instructions
51
Page 57

Zoom Setting
Fig. 4-6
Zoom Settings
The “Zoom” feature allows you to enlarge or magnify a section of the
normal display. This lets you see a “window” of the echosounder view in
detail. The Zoom window may be set for four different levels of magnification. You can choose settings for x2, x4, x6 or x8 magnification.
Zoom
magnification Press the > arrow of the Page control pad to select x2, x4,
x6, or x8 Zoom magnification. At this point you may press
CLEAR
to return to the normal display or you may press
the V arrow of the Page control pad to select Auto or
Manual Zoom.
Auto zoom Once you have set the zoom magnification, you may select
either auto or manual zoom control. Select auto zoom, and
the FishFinder will automatically control the position of the
Zoom window. The auto zoom control constantly tracks the
bottom contour, and adjusts the position of the Zoom
window accordingly with changes in depth. This feature is
particularly useful when fishing for species of fish which
stay close to the bottom. Use the < and > arrows of the
Page control pad to select auto zoom. Press the V arrow
of the Page control pad to leave this display, and store the
auto zoom setting.
Manual zoom If you select manual zoom, you can choose the position of
the zoom area yourself. Use the
Page control pad to select manual zoom.
Once you make this choice, you can set the zoom area
yourself. You do this after you exit the Zoom Settings
< and > arrows of the
52
Setup Instructions
Page 58

display, and you are looking at the Zoom display itself. You
can manually move the Zoom area up or down by pressing
<
and V arrows of the Page control page. The
the
location of the zoom area is shown by the dark vertical line
at the very right-hand edge of the display.
If you are done with your setup changes, press the
to the normal display.
To select the next menu item, press the
CLEAR
button to go back
V
arrow of
the Page control pad.
Frequency Setting
Fig. 4-7
Frequency
Setting
“Frequency” is a measure of how fast the sound waves change or
“vibrate.” This unit uses sound waves with two different frequencies – 50
kHz and 200 kHz. For an explanation on the uses of these two frequencies, see the section on “Choosing a Frequency.”
From the area of the display for the zoom settings, press the V arrow of
the Page control pad. The next menu item will allow you to make the
frequency setting. See Fig. 4-7.
Frequency Use the
your choice.
You have four choices here:
• 200 kHz, single frequency – The unit will use the narrow 200 kHz
beam. The fish symbols will be solid.
• 50 kHz, single frequency – The unit will use the wider 50 kHz beam.
The fish symbols will be hollow.
• 200 kHz, dual frequency – The unit will use both frequencies, but the
image on the display will be generated using the information from the
narrow 200 kHz beam.
< and > arrows of the Page control pad to make
Setup Instructions
53
Page 59

• 50 kHz dual frequency – The unit will use both frequencies, but the
image on the display will be generated using the information from the
wider 50 kHz beam.
If you are using one of the dual frequency choices, some of the fish may
be revealed by one beam, but not the other. If a fish is detected by the
narrow 200 kHz beam, the symbol for that fish will appear solid. Any fish
which are detected by the wider 50 kHz beam will have fish symbols
which are hollow.
If you are done with your setup changes, press the
CLEAR
button to go back
to the normal display. To select the next menu item, press the V arrow of
the control pad.
Resetting the Log
Fig. 4-8
Resetting
the Log
The “log” measures how far the boat has traveled through the water. The
log records the distance traveled since it was last reset. You can reset the
log at any time using the display shown in Fig. 4-8.
Distance reading
The number inside the box shows the distance reading now
being displayed by the unit. To reset the log to zero, press
either the < or the > arrows of the Page control pad.
If you are done with your setup changes, press the
to the normal display. To go back to the menu item for Range Setting,
press the
V
arrow of the Page control pad.
CLEAR
button to go back
54
Setup Instructions
Page 60

System Setup Display
Fig. 4-9
Reaching the
System Setup
Display
You can reach the System Setup display at any time by pressing the
Setup button twice. This means that you can reach this display, make a
change, then return to the normal display quickly. See Fig. 4-9. Figure
4-10 shows the items in this display.
Setup Instructions
Fig. 4-10
System Setup
Display
55
Page 61

To change one of the items, use the< and V arrows of the Page control
pad to move up or down in the display. This will highlight an area on the
display where the unit is ready to make a change. (This is like the “cursor”
on a computer.)
Once you have moved to the correct line, press the
Page control pad to change the entry. When you leave the display, the
unit will store any changes you have made.
Simulator This unit has a built-in simulator. When the simulator is
enabled, it presents a realistic display. You can use this
display to learn about the features of the unit without
operating your boat. The information on this display is
generated by the unit itself, and does not come from a
transducer. When this mode is turned on, you will see the
word “Simulation” flashing on the display.
Fish symbol When the unit detects a fish, it can show this using a fish
symbol. A number above the symbol shows the depth of
the fish. The size of the symbol is related to the size of the
fish. In general, the larger the symbol, the larger the fish.
(For more information, see the section on “Fish Indications.”)
When the fish symbol is turned off, the unit indicates a fish
by showing an arch-shaped line. See Fig. 3-5. This kind of
display does not include the depth readings for the fish.
White line This feature controls the way the unit displays strong and
weak echoes. When the white line feature is turned off, all
of the echoes are displayed in black. When the feature is
turned on, strong echoes are displayed using a crosshatch
(or “checkerboard”) pattern. A weaker return is shown
using a solid area of black or gray.
This feature helps to show the difference between the
strong echo from the bottom and the weaker echoes from
fish or weeds near the bottom.
Sidelooker This item is used with the optional “Sidelooker” transducer.
This type of transducer sends sound waves out to the sides
of the boat. See Fig. 3-10. If you have installed this
< or > arrows of the
56
Setup Instructions
Page 62

transducer, use this line of the display to turn on the
Sidelooker mode.
Speed Cal This unit can detect and display the speed of the boat
through the water. It also uses the speed information to
calculate the distance traveled (the “log”). The item for
Speed Cal allows you to adjust the speed reading to make
it match your actual speed through the water. It presents a
reading in percentage points. A reading of 100% means
the speed readings from the factory default calibration are
accurate, and the unit does not need any correction. If the
unit says that you are moving faster than you really are, you
can adjust the Speed Cal figure to a smaller number. If the
unit says that you are moving slower than your actual
speed, use a larger number for Speed Cal. The setting can
range between 75 and 125. Use the
change the value. For more information, see the section on
“Calibrating the Sensors.”
Temp Cal This unit can display the water temperature. You may want
to fine-tune the signal from the transducer to get an
accurate display. The displayed number indicates an offset
added to the measured temperature. (This offset will be
measured in °F or °C, depending on the setting used for
Temp Units.) For example, if the temperature reading on
the FishFinder display tends to read 2°F too high, you can
correct for this by setting Temp Cal to -2.0°. The setting
can range between -9.9° and +9.9°. Use the
controls to change the value.
Shallow Alarm You can set an alarm to trigger whenever the boat moves
into water which is shallower than a limit you set. Use the
<
and V controls to move to the line for Shallow Alarm
and use the > arrow of the Page control pad to turn this
item on. Once you do this, the display will ask which depth
you want to use as a limit. Use the < and > controls to set
the limit you want. To turn this feature off, press the < control
until the display indicates zero feet, fathoms or meters.
< and > controls to
< and >
Setup Instructions
57
Page 63

When the shallow alarm is set, the letter “S” will appear in
the lower left-hand corner of the normal displays. If you
move into shallow water and trigger the alarm, the letter “S”
will begin to flash, and the buzzer will sound. Press the
CLEAR
button to silence the buzzer. The letter “S” will
continue to flash until you move into deeper water.
Deep Alarm An alarm can be set to trigger whenever the boat moves
into water which is deeper than a preset limit. Use the
and V controls to move to the line for Deep Alarm and use
the > control to turn this item on. Once you do this, the
display will ask which depth you want to use as a limit. Use
the < and > controls to set the limit you want. To turn this
feature off, press the < control until the display indicates
zero feet, fathoms or meters.
When the deep alarm is set, the letter “D” will appear in the
lower left-hand corner of the normal displays. If you move
into deep water and trigger the alarm, the letter “D” will
begin to flash, and the buzzer will sound. Press the
CLEAR
button to silence the buzzer. The letter “D” will continue to
flash until you move into shallower water.
Note: You may want to use both the Shallow Alarm and
Deep Alarm features when you are anchored. Set the limits
just a bit to either side of your anchor depth. When set this
way, the unit will trigger an alarm if the anchor drags and
the boat moves into shallower or deeper water.
Fish Alarm This unit has an alarm which will trigger when the unit
detects a fish. Use the < and > controls to turn this item on
or off. The fish alarm feature will work even if the fish
symbols are turned off.
When the fish alarm is set, the fish symbol will appear in
the lower left-hand corner of the normal displays.
Buzzer A buzzer can be set to sound when any of the alarm
conditions occurs (shallow, deep, or fish alarm). For the
shallow or deep alarms, the “S” or “D” symbol at the bottom
of the screen flashes. By pressing the
CLEAR
button, you can
<
58
Setup Instructions
Page 64

silence the buzzer for the
current alarm condition
. The
“S” or “D” symbol will continue to flash as long as the alarm
condition is still present.
If the alarm condition occurs again, the buzzer will sound
again. (For example, this would happen if, after a shallow
alarm you move into deep water, then return to shallow
water.) You can silence the buzzer again by pressing the
CLEAR
button.
The Buzzer entry in the System Setup display allows you to
permanently silence the buzzer for all of the alarms. Use
< and > controls to turn this item on or off. The buzzer
the
symbol at the bottom of the screen will appear hollow.
Once you do this, if a shallow alarm or deep alarm occurs,
the “S” or “D” symbol will flash, but the buzzer will not
sound. You can enable the buzzer again at any time by
calling up the System Setup display, going to the line for
Buzzer, and turning the item on again. The buzzer symbol
at the bottom of the screen will appear solid.
Each time you press one of the buttons on the display
panel, the buzzer will “beep.” The buzzer will continue to
do this, regardless of the setting of the Buzzer option in the
System Setup display.
Depth Units This item sets the units used by the depth display. You can
choose feet (FT), f athoms (FA), or meters (M). Use the
<
and > controls to make your choice.
Speed Units This item sets the units used by the speed display. The
same units are used for the distance (“log”) display. There
are three choices:
Code Units used for speed Units used by log
MPH Miles per hour Statute miles
KTS Knots Nautical miles
KPH Kilometers per hour Kilometers
Setup Instructions
59
Page 65

Temp Units This item sets the units used by the temperature display.
You can choose Fahrenheit degrees (°F) or Celsius
degrees (°C). Use the < and > controls to make your
choice.
Speed A speed indication appears on all of the normal displays. If
you do not want to see this item, you can turn it off using
this line of the System Setup display. Use the
< and >
controls to make your choice. (The Speed item will still
appear on the Digital display. See Fig. 3-9.)
Log On the normal displays, an entry for “log” indicates the
distance traveled. You can turn off this item using this line
of the System Setup display. Use the < and > controls to
make your choice. (The Log entry will still appear on the
Digital display.) Notice that the units used by the log are set
by changing the entry for Speed Units.
Temp An entry for temperature may appear on all of the displays.
You can turn this item off using this line of the System
Setup display. Use the < and > controls to make your
choice. (This item will still appear on the Digital display.)
If you are done with your setup changes, press the
CLEAR
button to go back
to the normal display.
Setup Instructions for Sidelooker
Some installations include the optional Sidelooker transducer. We
described the operation of this transducer in Section 3. If your boat has
this transducer, there are some extra setup steps required.
The Sidelooker feature must be turned on using the System Setup display.
Press the
the Page control pad three times to reach the line labeled “Sidelook.”
Press the > arrow of the control to turn the feature on.
The System Setup display includes a line which allows you to set the
Chart Speed. This setting for Chart Speed affects the standard displays,
and also the Sidelooker display.
Once the settings on the System Setup display are correct, press the
button to go back to the normal display.
SETUP
button twice to reach this display. Press the V arrow of
CLEAR
60
Setup Instructions
Page 66

Next, press the > arrow of the Page control pad until you see the
Sidelooker page.
The next job is to set up the range, sensitivity, and chart speed for the
Sidelooker feature. While the unit is displaying the Sidelooker page, press
SETUP
the
button once. The setup menu for the Sidelooker range will
appear.
Fig. 4-11
Sidelooker
Range Settings
Once the Sidelooker feature is turned on, the FishFinder uses
two
range
settings: one for the standard displays, and a second for just the
Sidelooker feature. The menu item shown here sets the range for
just
the
Sidelooker. (This will not change the range setting for the other display
pages.)
The range for the Sidelooker uses the Manual setting only. Select the
range you want to use. The maximum range of the Sidelooker transducer
is 150 ft (or 50 meters).
Press the V arrow of the Page control pad to move to the next menu item.
Setup Instructions
61
Page 67

Fig.4-12
Sidelooker
Sensitivity Settings
This menu item allows you to set the sensitivity for the Sidelooker feature
only. (This will not change the sensitivity setting for the other display
pages.) Choose Auto or Manual sensitivity. If you choose Manual
sensitivity, use the < and > arrows of the Page control pad to adjust the
sensitivity.
At this point, you can press the
CLEAR
button to go back to the Sidelooker
display.
If you press the V arrow of the Page control pad, the unit will move to the
remaining menu items – zoom, frequency, and log reset. The zoom and
frequency settings are for the normal displays – they will not change the
Sidelooker feature. The log reset menu will operate normally.
Resetting the Unit to Factory Defaults
It is easy to reset all of the settings on the FishFinder at the same time.
When the unit is off, press the
PWR
(Release the buttons as soon as the FishFinder begins to operate.) All of
the settings will be reset to the values listed below, and the trip log will be
reset to zero.
and
CLEAR
buttons at the same time.
62
Setup Instructions
Page 68

Default Settings
When the FishFinder is new, it uses a number of preset “default” settings.
Here is a list:
Function Default - US model Default - Europe model
Range Auto Auto
Sensitivity Auto Auto
Chart Speed 3 (fast) 3 (fast)
Zoom Auto/x4 Auto/x4
Frequency Dual 200 kHz Dual 200 kHz
Simulator Off Off
Fish symbols On O n
White line On On
Sidelooker Off Off
Depth units FT (feet) M (meters)
Temperature unit °F (Fahrenheit) °C (Celsius)
Speed units MPH (miles per hour) KPH (kilometers per
hour)
Shallow alarm Off Off
Fish alarm O ff Of f
Deep alarm Off O ff
Buzzer On On
Speed/temp/log On On
Setup Instructions
63
Page 69

5 – Maintenance and Troubleshooting
Periodically check the display unit, cable, and transducer. Be sure all
components are free of corrosion and are securely mounted. Check all
cables for signs of chafing or abrasion. Be sure all of the connections to
the boat’s DC power and ground system are clean and tight.
Cleaning Instructions
Always keep the display unit clean. Use a soft, clean cloth to wipe off the
display panel. Do not use abrasive cleansers, chemical cleaners or
solvents. Use a glass cleaner or a suitable general-purpose detergent.
If you operate your boat in salt water, you will have to protect the hull with
antifouling paint. Use caution when sanding or cleaning the outside of the
hull near the transducer. Harsh cleaning solvents such as acetone may
damage the transducer.
Sea growth can collect quickly on the bottom of the transducer. This can
reduce the performance in just a few weeks. To prevent this, coat the
bottom of the transducer with a thin layer of paint. Use only a water-based
antifouling paint, or a water-based paint specifically designed for transducers. Apply it with a brush.
If your transducer becomes fouled or stops working because of sand or
sea growth, use a stiff brush to clean it. You may sand the surface with a
fine-grit wet or dry sandpaper (#320 grade or finer), but this will affect the
performance of the unit when the boat is moving at higher speeds.
The paddle wheel mechanism may become jammed by dirt or grit. Work this
out of the mechanism, then clean the unit with soap and water or alcohol.
Troubleshooting Suggestions
If the unit is not working correctly, there may be a simple cause. Before
you call for service help, please check these points:
The FishFinder display unit will not turn on –
1. The unit may actually be operating, but the contrast may have been
set to the “full light” or “full dark” setting. Turn on the unit by pressing
64
the
PWR
and
CLEAR
buttons at the same time to change all settings to
Maintenance and Troubleshooting
Page 70

the factory defaults. See the default settings on page 63.
2. If the power wiring includes a fuse, it may be blown. Also check the
circuit breaker or main battery switch.
3. You may have reversed the power connections. Follow the DC power
lines all the way back to the battery. The red wire should connect to
the positive terminal (+) on the battery or power source, and the black
wire should connect to the negative terminal (-) (also called “ground”
or “earth”). If the polarity is not correct, reconnect the leads properly
and check again.
4. The battery or DC power source may not be producing the correct
voltage. The FishFinder needs at least 11 volts to operate. If the
voltage is lower, check for loose or corroded connections, or a
problem with the power source.
The display unit “freezes” (temporarily or permanently) –
1. Check that the display has not been stopped using the Chart Speed
setting. (If the adjustment bar is moved all of the way to the left, the
display will freeze.)
2. A source of electrical “noise” may be interfering with the unit’s
operation. Both the transducer cable and the power cable for the
FishFinder should be routed as far as possible from all other wiring on
the boat.
To locate the source of the noise, turn on the FishFinder. Next, turn
on each electrical device on the boat, but just supply power to one
device at a time. This may reveal the cause of the problem. Move
the FishFinder, the other unit, or the wiring. A movement of just a few
inches can make a big difference. If it is necessary to cross any
wires, make the crossing at a right angle.
Start the motor in neutral and increase the RPM speed. This can
reveal a problem with the wiring for the boat’s ignition, alternator, or
tachometer. It may help to use resistor-type spark plugs or spark plug
cables on the boat’s motor. You can also try a noise-suppression filter
on the alternator.
3. One of the wiring connections may be loose. All of the connections
should be clean, tight, and insulated. Soldering is the best way of
making these connections. Protect each connection with a piece of
shrink-wrap tubing.
Maintenance and Troubleshooting
65
Page 71

4. The transducer cable may be damaged. Check for any point where
the wiring may be pinched or bent. Look for signs that water has
gotten into the cable. If the transducer cable is damaged, the
transducer and cable should be replaced as a unit. Contact
Raymarine for instructions.
The display unit does not see the bottom or fish –
1. Be sure the display unit is not using the Simulation mode. (If this is
the case, the word “Simulation” will flash on the display.)
2. On a unit with the transom-mount transducer, the transducer may
have “kicked up” because it hit an obstruction. See Fig. 2-4. Move
the transducer down into the working position.
3. The unit may be set for Manual sensitivity, and be using a very low
sensitivity setting. To reset all of the values to the factory defaults, turn
on the unit by pressing the
PWR
and
CLEAR
buttons at the same time.
See the default settings on page 63.
4. The transducer may not be vertical. Be sure that the transducer is
aiming straight down, or within 10° of vertical.
5. If the transducer is an in-hull type, be sure that it is installed correctly.
The transducer should be “looking” through just one layer of fiberglass hull material, no more than 1" (25 mm) thick. The transducer
should be firmly attached to the hull using the correct type of adhesive/sealant.
6. The face of the transducer may be covered or fouled. Use a stiff
brush to clean it. You may also sand the surface with a fine-grit wet
or dry sandpaper (#320 grade or finer), but this will affect the performance of the unit when the boat is moving at higher speeds.
7. If the FishFinder is using the Auto Sensitivity setting, it may be
reacting to an increase in electrical “noise.” As the level of noise
increases, the sensitivity automatically adjusts, and the unit can lose
its ability to see the bottom or fish. Check for problems with the wiring
as described in the section on “Display unit freezes.”
8. The voltage from the power source may be low. This affects the
transmitting power of the FishFinder. Check the connections as
described in the section on “The display unit freezes.”
66
Maintenance and Troubleshooting
Page 72

The FishFinder does not display fish arches –
1. Be sure the Fish Symbol feature is turned off. See the instructions for
the System Setup display.
2. The FishFinder will not display arches unless the boat is moving. If
the boat is stopped, fish will appear on the display as straight lines.
3. The transducer may not be aimed straight down. In order to display
complete arches, the transducer must be vertical.
4. The sensitivity setting may not be high enough. Go to the Setup
Menu, choose Manual Sensitivity, and increase the sensitivity.
The display disappears or is unreliable when the boat is moving at
high speeds –
1. Increased turbulence around the transducer may be “confusing” the
unit. Move the transducer to a location where there is less turbulence
when the boat is moving.
2. If the FishFinder is using the Auto Sensitivity setting, it may be
reacting to an increase in electrical “noise.” As the level of noise
increases, the sensitivity automatically adjusts, and the unit can lose
its ability to see the bottom or fish. Check for problems with the wiring
as described in the section on “The display unit freezes.”
The display unit shows lots of background “noise” –
1. The unit may be set to use the manual sensitivity adjustment, and the
sensitivity may be set too high. See the information on “Setup
Instructions.”
2. The transducer may be mounted incorrectly, or may be fouled. Check
the mounting as described in Section 2. Clean the transducer as
described earlier in this section.
The depth setting flashes often –
Note: Normally, this indicates that the bottom has moved out of range.
1. The transducer may not be installed correctly, or the signal may not
be reaching the display unit. Recheck the instructions in “Mounting
the Transducer” in Section 2. Check the transducer cable for signs of
damage. If the cable is damaged, the transducer and cable should be
replaced as a unit.
2. The voltage reaching the unit may be low, and this may be affecting
the transmitting power. Check for problems with the wiring as
described in the section on “The display unit freezes.”
Maintenance and Troubleshooting
67
Page 73

The speed or log readings are wrong –
1. The paddle wheel on the transducer may be fouled. Clean the parts
as described in the section on “Cleaning Instructions.”
2. Check the speed calibration. Use the item for “Speed Cal” on the
System Setup display. See the instructions in Section 2.
Servicing a T hru-Hull Transducer
If your boat has a thru-hull transducer, you can service it without removing
the boat from the water. The sensor(s) are mounted in a cylindrical plug
in the center of the transducer assembly. If necessary, you can remove
this plug by working from the inside of the boat. The transducer housing
includes a check valve to minimize the water intrusion when removing the
insert. A small amount of water will enter the boat. This is normal. Immediately after removing the speed insert, place the dummy insert in the
transducer housing. Do not leave the transducer without the speed or
dummy insert in place.
How to Contact Raymarine
For marine product and services information
Visit the Raymarine World Wide Web site for the latest information on the
newest Raymarine electronic equipment and systems:
www.raymarine.com
For accessories and parts
Many Raymarine accessory items and par ts can be obtained directly
from your authorized Raymarine dealer. However, if you are in need
of an item not available from the retailer, please contact Raymarine
Customer Service at 1-800-539-5539, extension 2333 or (603) 8815200, extension 2333. Customer Service is available Monday through
Friday, 8:15 a.m. to 5:00 p.m. Eastern Standard Time or Eastern
Daylight Savings Time.
If placing an order, please have the Raymarine item or part number
ready when calling. (See the Optional Accessory List on page 2 in this
manual.) If you are not sure which item is appropriate for your unit,
you should first contact the Technical Support Department at 1-800539-5539, extension 2444 to verify your requirements.
68
Maintenance and Troubleshooting
Page 74

For technical support
Please call 1-800-539-5539, extension 2444 or (603) 881-5200, extension
2444. The Raymarine Fax number is 1-603-634-4756.
Technical Support Specialists are available to answer questions about
Our
installing,
operating, and troubleshooting all Raymarine products. Ques-
tions may be addressed directly to our Technical Suppor t Department via
the Internet at:
techsupport@raymarine.com
For product repair service
In the unlikely event your Raymarine unit should develop a problem,
please contact your authorized Raymarine dealer for assistance. The
dealer is best equipped to handle your service requirements, and can offer
timesaving help in getting the equipment back into normal operation.
In the event that repairs cannot be obtained conveniently, product service
may also be obtained by returning the unit to Raymarine’s Product Repair
Center using the prepaid shipping tag supplied with the unit. Return the
unit to:
Raymarine Product Repair Center
22 Cotton Road, Unit D
Nashua, NH 03063-4219-USA
The Product Repair Center is open Monday through Friday, 8:15 a.m. to
5:00 p.m. Eastern Standard Time or Eastern Daylight Savings Time. All
products returned to the Repair Center are registered when they arrive. A
confirmation letter will be sent to you acknowledging the repair status and
listing the product’s reference number. Should you wish to inquire about
the repair status of your unit, contact the Product Repair Center at 1-800539-5539, extension 2118. Please have the product reference number or
unit serial number ready when you call. We will do everything possible to
repair the unit and return it to you as quickly as possible.
Maintenance and Troubleshooting
69
Page 75

Raymarine in Europe
In Europe, support, service, and accessories are available from:
Raymarine Limited
Anchorage Park, Portsmouth
Hampshire PO3, 5TD, England
Tel: +44 (0) 23 9269 3611
Fax: +44 (0) 23 9269 4642
Technical suppor t is available via the Internet. Questions may be sent
directly to this address:
techsupport@raymarine.com
Prepaid Return Service
The return label included with your Raymarine unit provides
shipping
service is available only to customers within the continental United States.
To retur n your Raymarine unit for warranty repair, please follow these
steps:
1. Fill out the service information card completely.
2. Pack your FishFinder and the service information card in a suitable
3. Fill in your
4. Attach the label to the outside of the shipping carton. Be sure to
5. Give the package to your nearest shipping outlet, or directly to the
to our Product Repair Center for all warranty repairs. This
shipping container. It is best to use the original carton, if it is available.
name, address
retain the shipping receipt.
driver. Your Raymarine unit will be shipped directly to our Product
Repair Center.
and
zip code
.
free ground
70
Maintenance and Troubleshooting
Page 76

Maintenance and Troubleshooting
71
Page 77

6 – Specifications
General Information
Display panel FSTN high-contrast LCD
Panel dimensions 3.6" H (61 mm) x 2.4" W (91 mm)
No. of dots 240 x 64
LCD contrast Adjustable, with temperature compensation
Backlight LCD panel, on/off
Operating modes FishFinder mode (standard mode)
Zoom mode
A-Scope mode
Digital mode
Sidelooker mode
Keys Silicon rubber
Memory backup Non-volatile, no battery required
Power source 11.0 to 16.1 V DC
Power consumption backlight off - approx. 2.0 W
backlight on - approx. 4.5 W
Dimensions (w/o bracket) 5.3" H (134 mm) x 5.2" W (133 mm)
x 2.7" D (69 mm)
Weight 1.1 lbs (0.5 kg)
Waterproofing U.S.C.G., CFR 46
EMI resistance IEC 945
72
Specifications
Page 78

FishFinder Functions
Range Auto or manual
FT (feet) 5 10 20 30 50 80
FA (fathoms) 2 3 5 10 15 20
M (meters) 2 5 10 15 20 25
Zoom size x2, x4, x6, x8
Chart speed Freeze, slow, medium, fast
White line On/ Off
Alarms Shallow, deep, fish
Reset distance log 0 to 999 units
Fish symbols 5 sizes
Output power 300 W(rms)
Frequency 50 kHz, 200 kHz or dual operation
Transducer beam angle 200kHz: 16° @ -6db
Depth units Feet, fathoms, meters
Numerical display 3 digits (under 2.0 ft in ideal conditions)
Water temperature 32.0 to 99.9°F (0 to 37.0°C)
Boat speed units Mph, kph, knots (0 to 70)
Sensitivity Auto or manual
100 150 250 400 600 1000
1500 2000
25 30 50 80 100 150
200 350
30 50 80 120 200 300
500 650
50kHz: 65° @ -6db
Specifications
73
Page 79

Connector Diagrams
DC power connector
Pin 1 Ground (-)
12
Transducer connector
7
1
8
2
9
3
4
Pin 2 12V DC (+)
(Connectors viewed looking
toward rear of display unit.)
Pin 1 Depth TX+
Pin 2 Depth TXPin 3 L Select
6
Pin 4 Temp
5
Pin 5 R Select
Pin 6 Speed signal/voltage +
Pin 7 Shield ground
Pin 8 +12V (sidelooker)
Pin 9 L/R receive
Fig. 6-1
Connectors
74
Specifications
Page 80

Glossary of Terms
Aft: Near or toward the rear part of the boat (nautical term).
Background noise: False or meaningless echo returns produced by
bubbles, water turbulence, or debris
Bow: The front of the boat (nautical term).
Cavitation: Air bubbles in the water which affect the readings of a
transducer. These are normally caused by mounting the transducer
at an incorrect angle or location.
Chart Speed: The rate at which echoes scroll across the display.
Cursor: On a setup display, the place where the unit is ready to make a
change or enter new information. This point is highlighted. You can
move up or down the list or display using the
Deadrise angle: The slope or angle of the underside of the hull, mea-
sured in the side-to-side direction.
Default value: A value or setting which is pre-loaded into the unit at the
factory.
Fairing block: A block used when mounting a thru-hull transducer. The
fairing block shims the transducer to align it on a perfect horizontal
plane versus the rise of the hull.
Fathom: A unit of depth equal to 6 feet.
Frequency: The rate at which a sound source vibrates, or the rate at
which a sound wave changes.
Fore: Near or toward the front part of the boat (nautical term).
Keel: The center of the hull, running from the bow to the stern.
kHz: “Kilo-Hertz” – a measure of frequency (For example, 200 kHz =
200,000 oscillations per second.)
Kick-up bracket: A bracket which is installed on the transom of a boat
and holds the transducer in place. When the transducer strikes an
obstruction, it is designed to release or “kick up” out of the water to
prevent any damage.
<
and V controls.
Glossary
75
Page 81

Knot: One nautical mile per hour (1.15 statute miles per hour).
LCD: “Liquid Crystal Display” - A technology used to produce flat-panel
displays.
Nautical mile: 6076 feet
Port: Left side of the boat, when facing the bow (nautical term).
PVDF: “Poly Vinylidene Fluoride” – A unique polymer plastic that has the
ability to convert sound waves into electrical impulses. PVDF is used
in the optional Sidelooker transducer for excellent detection of fish in
the horizontal direction.
Range: The depth scale for the unit. The maximum distance the unit will
be able to see at a particular range setting.
Sensitivity: The ability of a receiver to distinguish between echoes of
different strengths. In general, use a higher sensitivity setting for
deep water, and a lower setting for shallow water.
Starboard: Right side of the boat, when facing the bow (nautical term).
Statute mile: 5280 ft.
Stern: The rear of a boat (nautical term).
Thermocline: A level in the water where two areas of differing water
temperature meet. Sometimes a thermocline can reflect sonar waves
and present a false display.
Transducer: A device which sends and receiv es high frequency sound
waves through the water.
Transom: The rear-most part of the boat’s hull, often a flat panel.
White Line: A feature used to help display fish near the bottom. This
feature helps to show the difference between weak returns (including fish near the bottom) and strong returns (including the bottom
itself).
Zoom: A way of magnifying or enlarging part of the display to give a
better view of a section of the water.
76
Glossary
Page 82

Limited Warranty Certificate
Raymarine warrants each new Light Marine/Dealer Distributor Product to be of good materials and
workmanship, and will repair or exchange any parts proven to be defective in material and
workmanship under normal use for a period of 2 years/24 months from date of sale to end user, except
as provided below.
Defects will be corrected by Raymarine or an authorized Raymarine dealer. Raymarine will, except
as provided below, accept labor cost for a period of 2 years/24 months from the date of sale to end user.
During this period, except for certain products, travel costs (auto mileage and tolls) up to 100 round
trip highway miles (160 kilometers) and travel time of 2 hours, will be assumed by Raymarine only
on products where proof of installation or commission by authorized service agents, can be shown.
Warranty Limitations
Raymarine Warranty policy does not apply to equipment which has been subjected to accident, abuse
or misuse, shipping damage, alterations, corrosion, incorrect and/or non-authorized service, or
equipment on which the serial number has been altered, mutilated or removed.
Except where Raymarine or its authorized dealer has performed the installation, it assumes no
responsibility for damage incurred during installation.
This Warranty does not cover routine system checkouts or alignment/calibration, unless required by
replacement of part(s) in the area being aligned.
A suitable proof of purchase, showing date, place, and serial number must be made available to
Raymarine or authorized service agent at the time of request for W arranty service.
Consumable items, (such as: Chart paper, lamps, fuses, batteries, styli, stylus/drive belts, radar mixer
crystals/diodes, snap-in impeller carriers, impellers, impeller bearings, and impeller shaft) are
specifically excluded from this W arranty .
Magnetrons, Cathode Ray Tubes (CRT), TFT Liquid Crystal Displays (LCD) and cold cathode
fluorescent lamps (CCFL), hailer horns, and transducers are warranted for 1 year/12 months from date
of sale. These items must be returned to a Raymarine facility.
All costs associated with transducer replacement, other than the cost of the transducer itself, are
specifically excluded from this W arranty .
Overtime premium labor portion of services outside of normal working hours is not covered by this
Warranty.
Travel cost allowance on certain products with a suggested retail price below $2500.00 is not
authorized. When/or if repairs are necessary, these products must be forwarded to a Raymarine facility
or an authorized dealer at owner’s expense will be returned via surface carrier at no cost to the owner.
Travel costs other than auto mileage, tolls and two (2) hours travel time, are specifically excluded on
all products. Travel costs which are excluded from the coverage of this Warranty include but are not
limited to: taxi, launch fees, aircraft rental, subsistence, customs, shipping and communication charges
etc. Travel costs, mileage and time, in excess to that allowed must have prior approval in writing.
TO THE EXTENT CONSISTENT WITH STATE AND FEDERAL LAW:
(1) THIS WARRANTY IS STRICTLY LIMITED TO THE TERMS INDICATED HEREIN, AND
NO OTHER WARRANTIES OR REMEDIES SHALL BE BINDING ON RAYMARINE
INCLUDING WITHOUT LIMITATION ANY WARRANTIES OF MERCHANTABLE OR
FITNESS FOR A PARTICULAR PURPOSE.
(2) Raymarine shall not be liable for any incidental, consequential or special (including punitive or
multiple) damages.
All Raymarine products sold or provided hereunder are merely aids to navigation. It is the
responsibility of the user to exercise discretion and proper navigational skill independent of any
Raymarine equipment.
Page 83

Factory Service Centers
United States of America UK, Europe, Middle East, Far East
Raymarine ,I nc. Raymarine Ltd
22 Cotton Road, Unit D Anchorage park, Portsmouth
Nashua, NH 03063-4219 USA PO3 5TD, England
Telephone: +1 603 881 5200 Telephone: +44 (0)23 9269 3611
Fax: +1 603 864 4756 Fax: +44 (0)23 9269 4642
www.raymarine.com www.raymarine.com
Sales & Order ServicesSales & Order Services
Sales & Order Services
Sales & Order ServicesSales & Order Services
Telephone: +1 800 539 5539 Ext. 2333 or Telephone: +44 (0)23 9271 4713
TT
echnical Supportechnical Support
T
echnical Support
TT
echnical Supportechnical Support
Telephone: +1 800 539 5539 Ext. 2444 or
Email: techsupport@raymarine.com
Product Repair CenterProduct Repair Center
Product Repair Center
Product Repair CenterProduct Repair Center
Telephone: +1 800 539 5539 Ext. 2118
Purchased from Purchase date
Dealer address
+1 603 881 5200 Ext 2333 Fax: +44 (0)23 9266 1228
+1 603 881 5200 Ext 2444
Customer SupportCustomer Support
Customer Support
Customer SupportCustomer Support
Email: techsupport@raymarine.com
Stick barcode label here
Installed by Installation date
Commissioned by
Commissioning date
Owner’s name
Mailing address
This portion should be completed and retained by the owner.
 Loading...