


 Loading...
Operating instructions

 Safety Instructions
Warning:
Incorrect installation, adjustment, servicing, maintenance, cleaning, or unauthorized modifications to the appliance can result in damage, injury or death. Read the Operating Manual carefully before starting to use the appliance.
For your safety:
Do not store or use any flammable gases or liquids near this appliance.
What to do in the event of danger or if you smell gas:
-Shut the gas supply immediately
-Do not touch any electric control elements
-Make sure the area is well ventilated
-Avoid naked flames or sparking
-Use an external telephone to notify the appropriate gas supplier (if the gas supplier is unobtainable call the relevant fire station).
RESET GAS
„RESET“ (gas appliances only)
If the burner function is faulty, „RESET GAS“ will light up on the display. After 15 sec. you will hear an acoustic signal. Press the „RESET GAS“ display to re-start the automatic ignition process. If the „RESET GAS“ display does not light up again after approx.. 15 sec. the flame is burning and the appliance is operational.
Please notify Customer Support if the display is still lit after repeated pressing!
- 2 -

Dear Customer
Dealer |
Installer |
installed on:
We reserve the right to make technical changes in the interest of progress!
- 3 -

Contents
General Instructions / For Your Safety |
6 |
|
Daily cleaning and care |
12 |
|
Features |
13 |
|
General Operating Instructions |
14 |
|
SelfCooking Control® Mode |
16 |
|
|
Controls |
17 |
|
Operation |
18 |
Combi-steamer mode |
26 |
|
|
Controls |
2 |
|
Moist heat |
28 |
|
Dry heat |
29 |
|
Dry heat and moist heat |
30 |
|
ClimaPlus Control® |
31 |
|
Time settings, continuous operation, preheating |
32 |
|
Working with the core temperature probe |
33 |
|
Pressure humidification, air speeds |
34 |
|
Cool Down |
35 |
Programming Mode |
|
|
|
Controls |
36 |
|
Programming Mode |
37 |
|
Programming Combi-Steamer Mode |
38 |
|
Program start, check, change |
39 |
|
Program delete, copy |
40 |
|
Level Control® |
41 |
|
Program lock |
43 |
Functions |
|
|
|
CleanJet® |
44 |
|
CleanJet® cancel |
48 |
|
CleanJet® prompt |
49 |
|
Delta T cooking, 1/2 power, power optimisation connection |
50 |
|
Automatic start time |
51 |
|
ChefLine®, CalcDiagnosis system® (CDS) |
52 |
- 4 -

Contents
Service |
|
|
|
Descaling the steam generator |
53 |
|
Descaling the humidifying nozzle |
56 |
|
Draining the steam generator, unit and software identification, Service-Info |
57 |
Data communications |
|
|
|
USB data memory (USB stick) |
58 |
|
HACCP logging, software update |
59 |
|
Importing and exporting programs |
60 |
Appliance settings |
|
|
|
Real-time, time format, time format for cooking sequences |
61 |
|
Temperature unit, enter IP address for Ethernet, language |
62 |
|
Factory default, buzzer sound and time, display contrast, CleanJet® prompt |
63 |
Manual clean |
64 |
|
Maintenance |
66 |
|
Help function |
67 |
|
Appliance options |
68 |
|
Fault warnings |
70 |
|
Before you call customer service |
72 |
|
- 5 -

 General Instructions / For Your Safety
•Please take the time to read the following safety and operating instructions carefully.
•Keep this manual carefully so that it can always be consulted by anyone using the appliance.
•This appliance must only be used to cook food in catering establishments. Any other use is not intended and is therefore considered dangerous.
•Before using the unit for cooking make sure there are no cleaner or rinse aid tablet residues in the cooking cabinet.
•Remove any cleaner and rinse aid tablet residues and rinse thoroughly with hand shower.
•Cleaning and descaling agents together with the relevant accessories should be used only for the purpose described in this manual. Other usage is not intended and could be dangerous.
•Operate using hands only. Damage caused by the use of pointed, sharp or other objects will invalidate the guarantee.
•The appliance must only be used by trained operatives.
•It is vital that operatives be given regular safety instruction.
•We recommend that the operator gives your staff regular training to avoid the risk of accident or damage to the appliance.
Caution! Daily checks before switching on
•Lock air baffle top and bottom.
•Lock grid shelf or mobile oven rack properly in position in the cooking cabinet.
General
•The temperature of door glass, outer casing and add-ons may exceed 60 °C.
•Avoid having heat sources (e.g. grill plates, deep fryers etc.) near the appliance.
•Dry the cooking cabinet - leave the unit door slightly ajar during prolonged rest periods (e.g. overnight).
•If the unit is idle for prolonged periods, shut the water supply stop valve and turn off the appliance power supply (gas and electricity).
•The cooking cabinet light can go on and off several times after switching on or while the operating system is being loaded.
•Please use always a drip pan for collecting fat while grilling and roasting (e.g. chicken).
When setting up table-top units with the appliance manufacturer’s original standard stand or base cabinet the maximum top rack working height is 1600 mm.
At the end of its service life, the unit must not be disposed of with the general waste and must not be placed in the recycling containers at local authority collection points.
We will be happy to help you with the disposal of your unit.
- 6 -

General Instructions / For Your Safety
 WARNING – If containers are filled with liquid or contents which liquefy during cooking, do not use rack levels higher
than those where the user can see into the slide-in containers. Warning sticker is enclosed with appliance.
Warning!
•Caution! Hot vapour (risk of scalding)!
•Caution! Containers and grids are hot!
•Make sure the mobile oven rack is correctly locked in position!
•If mobile units and oven racks are not to be moved, then the parking brakes on the wheels must be applied.
Display indication
In order to avoid unnecessary power consumption, the intensity of indications is automatically reduced in 2 stages during routine operation.
After 10 minutes there is an initial reduction in indication intensity. After a further 10 minutes indication intensity is again reduced As soon as you touch the display or open the cooking cabinet door indication intensity automatically returns to normal.
If your unit is switched on for more than
20 minutes and no operating mode or CleanJet® has been selected, the power-saving circuit is automatically activated and only the current time of day is shown on the display.
Gas appliances only
•If your appliance is installed under an extractor hood, this must be switched on when the appliance is in use.
•If your appliance is connected to a chimney, the flue duct must be cleaned in compliance with specific regional regulations. Contact your installer
•Do not put objects on your appliance exhaust pipes.
•The appliance must only be used in still conditions.
- 7 -
 General Instructions / For Your Safety
Loading/removal
Open appliance door slowly.
When it is opened heating and fan wheel shut down automatically.
The integral fan wheel brake is activated. The fan wheel keeps running for a brief period only. Do not touch the fan wheel.
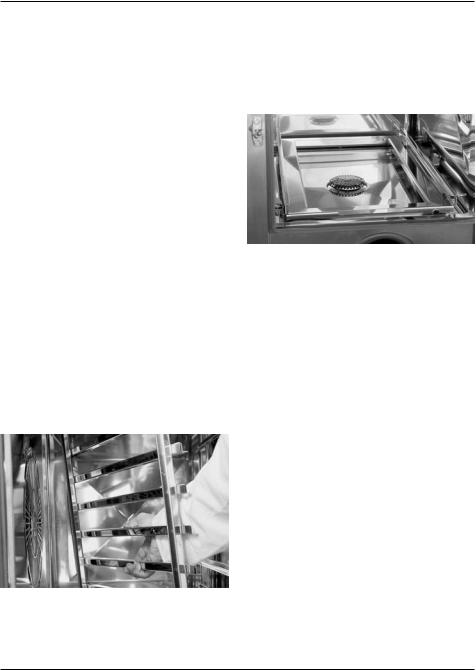
Do not insert containers or grids until the grid shelf has been properly secured and the mobile oven rack has been pushed up to the stop and locked in place.
Only use genuine heatproof accessories made by the appliance manufacturer.
Note:
The cooking cabinet door has a slam function. The floor unit door is only sealed shut when the door handle is in a vertical position.
Appliances with grid shelves (6x1/1 GN, 6x2/1 GN, 10x1/1 GN, 10x2/1 GN)
Removal
Slightly raise grid shelf and lift out of front catch. Swivel grid shelf to middle of cooking cabinet.
Press grid shelf upwards, lift from fixings. Slot into place in reverse order.
Mobile oven rack
Working with mobile oven racks, mobile plate racks and transport trolleys for table-top units (option)
-Remove grid shelf
-Lay run-in rail on appliance floor and engage.
-Make sure the unit is adjusted and levelled to the exact height of the transport trolley.
-Push mobile oven rack or plate rack in
-Push mobile oven rack or plate rack up to the stop and lock into place.
-Transport trolley must be properly fixed to appliance using the holder.
-Disengage mobile oven rack or plate rack and pull out.
-When transporting the mobile oven rack or plate rack on the trolley, make sure trolley is engaged in the transport safety catch.
-Cover and secure containers with liquids to avoid risk of scalding from liquid slopping over.
- 8 -

General Instructions / For Your Safety
Working with mobile plate racks
Please always insert core temperature probe into ceramic tube.
Warning!
Before the mobile plate rack is removed the core temperature probe must be removed and placed in the holding position on the run-in rail.
Warning!
•Shut the GN container locks on the mobile oven rack!
•Mobile oven racks, mobile plate racks, transport trolleys and appliances on casters can tip over when being moved over an inclined plane or threshold.
Appliance size |
Max. load sizes |
6x1/1 GN |
30 kg (max. 15 kg per rack) |
10x1/1 GN |
45 kg (max. 15 kg per rack) |
20x2/1 GN |
90 kg (max. 15 kg per rack) |
6x2/1 GN |
60 kg (max. 30 kg per rack) |
10x2/1 GN |
90 kg (max. 30 kg per rack) |
20x2/1 GN |
180 kg (max. 30 kg per rack) |
Low water
This may appear on the display when you switch on. It means that the steam generator is not yet filled with water. When it is full the display goes out automatically.
If the display does not go out, check that the water valve is open and the strainer at the water supply (solenoid valve) is unblocked.
Ambient temperatures
If ambient temperatures drop below +5 °C make sure the cooking cabinet is heated to room temperature (> + 5 °C) before starting to use it.
Core temperature probe
•The core temperature probe and core temperature probe positioning aid may be hot – use oven gloves.
•Cool core temperature probe with hand shower before use.
•Do not let core temperature probe hang out of cooking cabinet.
•Remove core temperature probe from food before removing a load.
•Always insert the core temperature probe fully into the holder provided – damage risk.
- 9 -

 General Instructions / For Your Safety
Cool Down
Use the „Cool Down“ function to cool the cooking cabinet .
 Warning!
•During „Cool Down“ the fan wheel runs when the door is open!
•Do not switch on „Cool Down“ function unless air baffle is correctly locked.
•Do not touch the fan wheel.
•Appliance must not be cooled with cold water.
Hand shower
-To use pull hand shower out at least 20 cm.
-Hand shower has no lock-in position. The hose may be damaged if the hand shower is tugged beyond the available max. hose length.
-Press hand shower control button to select 2 jet strengths.
-Hand shower retracts automatically.
-Make sure hand shower hose is fully rewound after use.
-Do not pull hand shower out beyond the end mark.
Warning!
•Hand shower and hand shower water may be hot!
- 10 -
General Instructions / For Your Safety
Maintenance
•Inspection, maintenance and repair work must only be carried out by trained technicians.
•The unit must be switched off at the mains when cleaning (except CleanJet® cleaning), carrying out inspection, maintenance or repair work.
•If the appliance is installed on casters, freedom of movement must be restricted so that energy, water and drainage pipes cannot be damaged when the unit is moved. If the unit is moved, make sure that energy, water and drainage pipes are correctly disconnected. If the unit is returned to its original position, make sure that the retention device, energy, water and drainage pipes are correctly fitted.
Descaling
•Note that the steam generator must be descaled as required (see Descaling chapter).
Warning!
•The process described involves working with an aggressive chemical fluid – danger of corrosive burns!
•To prevent damage to health it is vital that you use:
protective clothing, safety goggles, protective gloves, face mask.
Servicing
•Your appliance should be serviced by an authorised service partner at least once a year to ensure that it remains in perfect working order.
Danger!
•High Voltage!
•Switch the appliance off at the mains before opening service doors or working on live components.
- 11 -

 Daily cleaning and care
Warning!
•Your unit must be cleaned every day to maintain the high quality of the stainless steel, for hygiene reasons and to prevent faults occurring. To do this, follow the instructions in the „CleanJet® functions“ or „Manual cleaning“ sections.
•To avoid corrosion in the cooking cabinet, your unit must be cleaned every day, even if it is only operated in “Moist Heat” (steaming) mode.
•Dry the cooking cabinet - leave the unit’s door slightly ajar if it is going to be idle for any length of time (e.g. overnight).
•Apply vegetable oil or grease to the inside of the cooking cabinet at regular intervals (every
2 weeks or so) to prevent corrosion.
•Before you start the CleanJet® programme, make sure that the grid shelves or mobile oven rack are inserted into the cooking cabinet correctly.
•Do not use a high pressure cleaner to clean the unit.
•Do not treat the unit with acids or expose to acid fumes – this will damage the passivated coating of the nickel-chromium steel and the units might discolour.
•Follow the instructions on the cleaner pack.
•Never put Cleaner and Rinse Aid tablets in the hot cooking cabinet (>60 °C). The rinse aid film will not detach, which will lead to faults.
•For the cleaning procedure, see the „CleanJet®“ or „Manual Cleaning „ section.
•Only use cleaning agents made by the unit’s manufacturer. Cleaning agents from other manufacturers may cause damage and invalidate the warranty.
•Do not use scouring products or scratchy cleaning agents.
•Daily cleaning of the cooking cabinet seal with a non-abrasive cleaning agent will extend the service life.
•Remove and clean the incoming air filter once per month (see Maintenance).
Warning!
•If the unit is not cleaned or is not cleaned well enough, deposits of grease or food residues in the cooking cabinet may catch fire.
•Wear the correct protective clothing, gloves, goggles and mask.
•Do not store cleaner and rinse aid tablets in the unit.
- 12 -

Features
Appliance serial number
(visible only when door open)
Draft diverter
(gas appliances only, optional)
Interior lighting
Appliance door with double glass panel
Door handle
Table-top units:
one-handed operation with slam function Floor units:
(One-handed operation)
Unlocking device to open double glass door panel (inside)
Integral and self-draining door drip pan
(inside)
Drip collector connected directly to appliance drain
Appliance feet
(height adjustable)
Unit data plate
(with all important data such as power input, gas type, voltage, phase number and frequency, as well as appliance model and appliance
serial number, see also Functions/Settings/ Mod. e, Option number)
Control panel
Protective cover for electrical installation area
Central dial
Hand shower
(with automatic rewind)
Run-in guide
(floor models)
Air filter
(installation area ventilation)
|
|
|
|
|
|
|
|
|
|
|
|
|
|
|
|
|
|
|
|
|
|
Table top unit 6 x 1/1 GN, identical for 6 x 2/1 GN, 10 x 1/1 GN and 10 x 2/1 GN.
|
|
|
|
|
|
|
|
|
|
|
|
|
|
|
|
|
|
|
|
Floor unit 20 x 1/1 GN, identical for 20 x 2/1 GN.
- 13 -
General User Instructions
SelfCooking Control®- Combi-Steamer-Mode Programming-Mode
Mode
|
Clean |
|
new |
Level |
|
Control |
||
|
||
copy |
change |
|
delete |
|
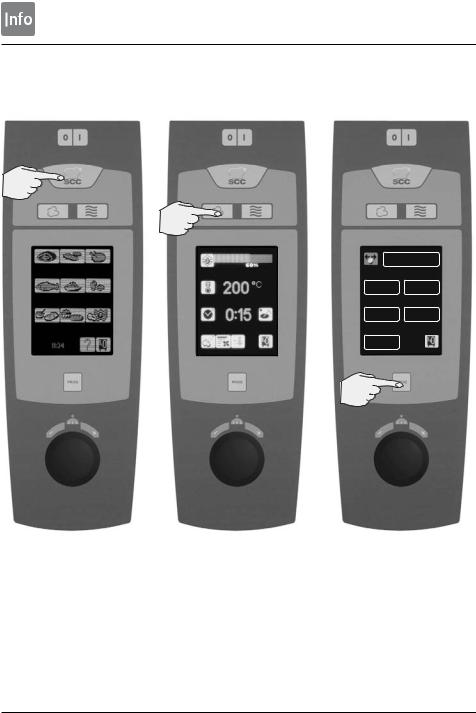
After switching on or operating the SelfCooking Control® button you enter SelfCooking
Control® Mode.
See chapter on SelfCooking Control® Mode for description.
By operating the Moist Heat, Dry Heat or Combination Moist Heat and Dry Heat button you enter
Combi-Steamer-Mode.
See chapter on Combi-Steamer Mode for description.
By operating the „Prog” button you enter Programming-
Mode.
See Programming Mode chapter for description.
- 14 -

General User Instructions
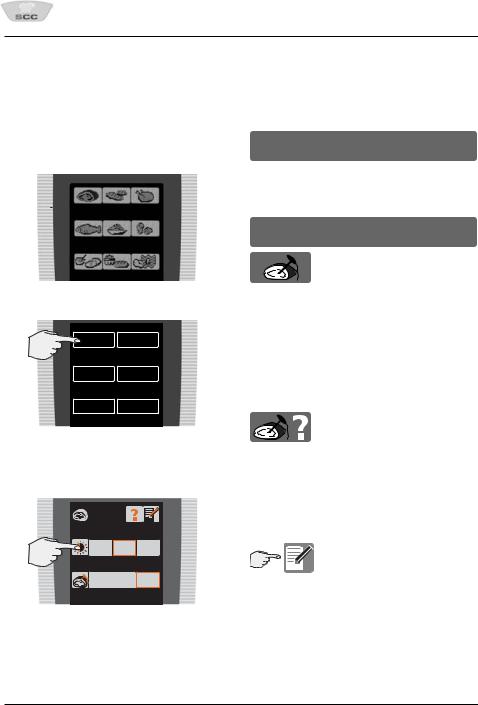
Your unit has a “touch screen“. You can enter data on your unit just by touching it lightly with your finger.
Selecting a function
Examples:
 Press button
Short bleep and flashing red light confirms button has been pressed.
Active button is surrounded by flashing red frame.
The central dial can be used to enter data while the button is flashing.
Confirmation of data input
takes place automatically after 4 seconds.
or
press (Push Function) on central dial
or
press any button.
Central dial
You can enter your desired values by rotating the central dial.

 Push Function
Entries can be confirmed by pressing the central dial.
End of cooking process
The end of a cooking process is indicated by the flashing SelfCooking Control® button.
Cooking processes can be interrupted by pressing the SelfCooking Control® button (4 seconds)
Unit too hot
If the cooking cabinet is hotter than the temperature set, the button for the mode selected will flash (e.g. Dry Heat).
(See „Cool Down“ chapter for cooking cabinet cooling).
Preheat display
preheat
The status of the preheating temperature is displayed in red and blue.
Help Function
This will give you handy tips on everyday use (see also Help Function chapter)
- 15 -
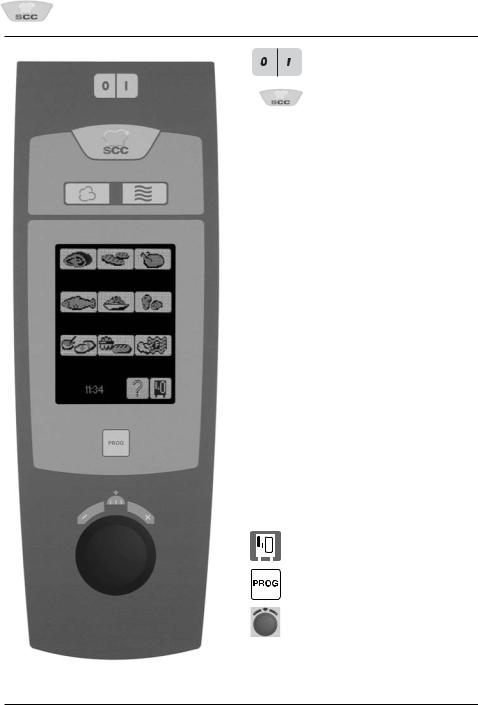
SelfCooking Control® Mode
On/Off switch
SelfCooking Control®
9 Modes:
 Large roasts
 Pan fries
 Poultry
 Fish
Fish
 Side dishes
 Potato products
 Egg dishes/desserts
 Bakery products
 Finishing®
Function button
Programming Mode button
Central dial
with Push Function
- 16 -
SelfCooking Control® Mode – Controls
The 9 SelfCooking Control® modes (Roasts, pan fries, poultry, fish, side dishes, potato products, egg dishes/desserts, baked products, Finishing®) automatically detect product-specific requirements,
the size of the food to be cooked and the load size. Cooking time, temperature and the ideal cooking cabinet climate are continuously adjusted to achieve the result you want. The remaining cooking time is displayed.
 Select size
Food thickness
Gratinee
Crisping
Examples and useful hints on how to cook your products like child‘s play can be found in the user manual.
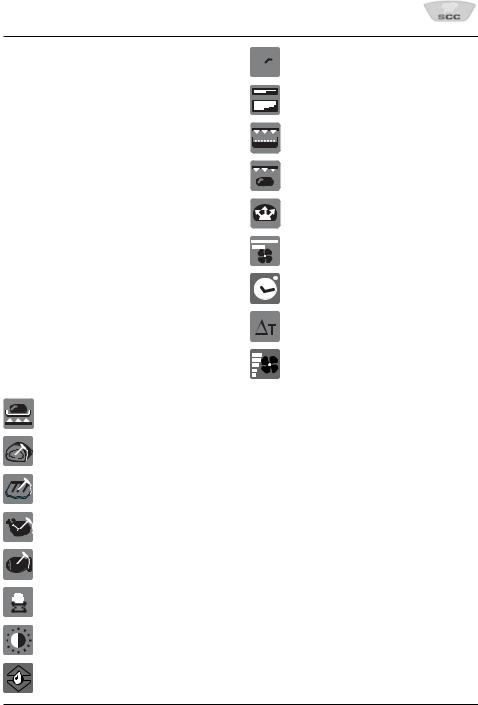
Key to the pictograms
Searing temperature
Core temperature/cooking level
Core temperature/cooking level
Core temperature/cooking level
Core temperature/cooking level
Cooking level
Browning
ClimaPlus Control®
Proofing volume
Smooth baking
Time settings
Delta-T cooking
Change air speed
- 17 -
SelfCooking Control® Mode – Operation
We would like to explain the operation by giving you 5 examples. Many more useful tips how to prepare your food really easily can be found in your Unit Cookbook, or simply follow the user prompts on the display.
After preheating you can change the default settings as desired within the first 60 seconds.
The unit preheats automatically – the display shows:
Example 1: Veal roast
1 
Select Large Joint
2 |
roast |
braise |
|
roast with |
soft |
|
crackling |
roosting |
|
overnight |
moist |
|
roasting |
cooking |
Select preparation e.g. roast – that’s it!
The unit right away works with preset, factorytested settings.
.
roast
3 |
light |
dark |
|
medium |
71° |
Or you have the option of making individual changes to the level of browning and cooking.
preheat
As soon as the preheat temperature is reached the display shows
Load
Please note that the core temperature probe must be inserted when requested!
If the core temperature probe is not inserted or incorrectly inserted (see chapter on Working with Core Temperature Probe) the buzzer sounds and you see an appropriate message on the display:
The cooking process continues once the probe position has been corrected.
Note:
You can store your entries under an individual name (see Programming chapter)
- 18 -

SelfCooking Control® Mode – Operation
Note:
The required total cooking time is displayed when the cooking time has elapsed and the cooking cabinet door is opened.
You can cook different-sized roasts at the same time. To do this, first insert the core temperature probe into the smallest joint. The buzzer will sound when the smallest joint is ready. Please remove the finished joint and insert the CT probe into the next largest joint. Then close the cooking cabinet door.
The display changes to:
Press the arrow button – the cooking process resumes automatically. This procedure can be repeated any number of times.
Discontinuing an operation in SelfCooking
Control® Mode
An operation in SelfCooking Control® Mode may be discontinued while the display shows the „back“ symbol. As soon as the „back“ symbol goes out the only way of halting the process is by switching the appliance off.
or
After the door has been open for some time
appears again so that the cooking process can be deselected.
- 19 -

SelfCooking Control® Mode – Operation
Example 2: Muffins
1
Select „Bakery Products“ mode
2 |
baking |
baking with |
|
moisture |
|||
|
|
Select „baking“ – that’s it!
The unit right away works with preset, factorytested settings.
baking
1 |
light |
dark |
Unit preheats automatically – display shows:
preheat
As soon as the preheat temperature is reached display shows
Load
Please use the positioning aid.
Alternatively, you have the option of making individual changes to the degree of browning.
After preheating you can change the default settings as desired within the first 60 seconds.
Please note that the core temperature probe must be inserted when requested!
If the core temperature probe is not inserted or incorrectly inserted (see chapter on Working with Core Temperature Probe) the buzzer sounds and you see an appropriate message on the display:
The cooking process continues once the probe position has been corrected.
Note:
You can store your entries under an individual name (see Programming chapter)
- 20 -
SelfCooking Control® Mode – Operation
Note:
The requisite cooking time is displayed once the cooking time is up and the cooking cabinet doors have been opened.
Discontinuing an operation in SelfCooking
Control® Mode
An operation in SelfCooking Control® Mode may be discontinued while the display shows the „back“ symbol. As soon as the „back“ symbol goes out the only way of halting the process is by switching the appliance off,
or
After the door has been open for some time
appears again so that the cooking process can be deselected.
- 21 -
SelfCooking Control® Mode – Operation
Example 3: „Finishing® – à la carte”
1
Select „Finishing®“ mode
2 |
plates |
|
|
la carte |
|
container |
coloration |
|
bakery |
pizza |
|
produkts |
||
|
Select „plates à la carte“ – that’s it!
The unit right away works with preset, factorytested settings.
plates |
|
à la carte |
|
dry |
humide |
3 |
|
short |
long |
Unit preheats automatically – display shows:
preheat
As soon as the preheat temperature is reached display shows
Load
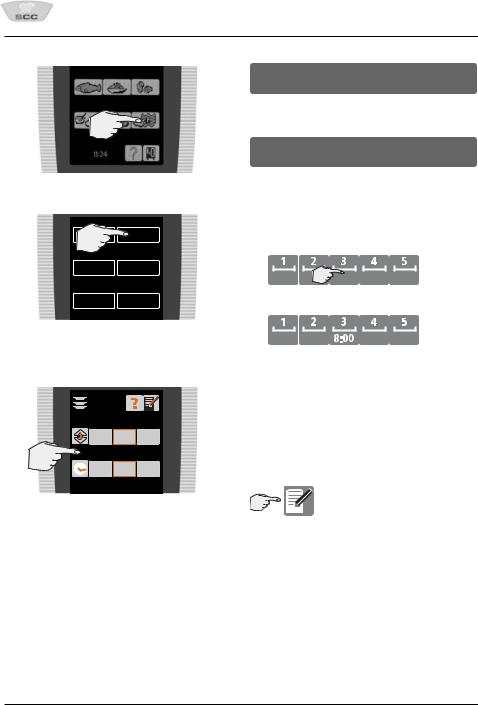
LevelControl®
LevelControl® is automatically activated for Finishing® plated à la carte”, “Finishing® container” and “Steam vegetables”.
4
Select level loaded (e.g. level 3)
You can repeat this procedure as often as you like for any rack.
The time runs when the cooking cabinet door is closed. As soon as you open the cooking cabinet door the time is stopped.
Note:
Or you can change the desired cabinet climate, e.g. „dry“ or „moist“.
You can store your entries under an individual name (see Programming chapter)
- 22 -

SelfCooking Control® Mode – Operation „LevelControl®“
With Level Control® you can enter an individual time for each of your appliance racks and have it displayed. That way you can always see exactly
when each rack is ready. A buzzer sounds and the indicated level flashes as soon as the preset time for the relevant rack is up. Once the cabinet doors have been opened and shut the level is free again and can be reloaded.
Select the loaded level for which you want to change the cooking time (e.g. level 3)
1 


 2
2 


- 23 -
Loading...