

Page 1
Operating instructions
Page 2

Safety Instructions
Warning:
Incorrect installation, adjustment, servicing, maintenance, cleaning, or
unauthorized modifi cations to the appliance can result in damage, injury
or death. Read the Operating Manual carefully before starting to use the
appliance.
For your safety:
Do not store or use any fl ammable gases or liquids near this appliance.
What to do in the event of danger or if you smell gas:
- Shut the gas supply immediately
- Do not touch any electric control elements
- Make sure the area is well ventilated
- Avoid naked fl ames or sparking
- Use an external telephone to notify the appropriate gas supplier
(if the gas supplier is unobtainable call the relevant fi re station).
RESET GAS
„RESET“ (gas appliances only)
If the burner function is faulty, „RESET GAS“ will light up on the display.
After 15 sec. you will hear an acoustic signal. Press the „RESET GAS“
display to re-start the automatic ignition process. If the „RESET GAS“
display does not light up again after approx.. 15 sec. the fl ame is
burning and the appliance is operational.
Please notify Customer Support if the display is still lit after repeated
pressing!
- 2 -
Page 3
Dear Customer
Dealer Installer
installed on:
We reserve the right to make technical changes in the interest of progress!
- 3 -
Page 4
Contents
General Instructions / For Your Safety 6
Daily cleaning and care 12
Features 13
General Operating Instructions 14
SelfCooking Control
Controls 17
Operation 18
Combi-steamer mode 26
Controls 2
Moist heat 28
Dry heat 29
Dry heat and moist heat 30
ClimaPlus Control
Time settings, continuous operation, preheating 32
Working with the core temperature probe 33
Pressure humidifi cation, air speeds 34
Cool Down 35
Programming Mode
Controls 36
Programming Mode 37
Programming Combi-Steamer Mode 38
Program start, check, change 39
Program delete, copy 40
Level Control
Program lock 43
Functions
®
CleanJet
®
CleanJet
®
CleanJet
Delta T cooking, 1/2 power, power optimisation connection 50
Automatic start time 51
®
ChefLine
®
Mode 16
®
31
®
41
44
cancel 48
prompt 49
, CalcDiagnosis system® (CDS) 52
- 4 -
Page 5
Contents
Service
Descaling the steam generator 53
Descaling the humidifying nozzle 56
Draining the steam generator, unit and software identifi cation, Service-Info 57
Data communications
USB data memory (USB stick) 58
HACCP logging, software update 59
Importing and exporting programs 60
Appliance settings
Real-time, time format, time format for cooking sequences 61
Temperature unit, enter IP address for Ethernet, language 62
®
Factory default, buzzer sound and time, display contrast, CleanJet
Manual clean 64
Maintenance 66
Help function 67
Appliance options 68
Fault warnings 70
Before you call customer service 72
prompt 63
- 5 -
Page 6

General Instructions / For Your Safety
• Please take the time to read the following safety
and operating instructions carefully.
• Keep this manual carefully so that it can always
be consulted by anyone using the appliance.
• This appliance must only be used to cook food
in catering establishments. Any other use is not
intended and is therefore considered dangerous.
• Before using the unit for cooking make sure there
are no cleaner or rinse aid tablet residues in the
cooking cabinet.
• Remove any cleaner and rinse aid tablet residues
and rinse thoroughly with hand shower.
• Cleaning and descaling agents together with the
relevant accessories should be used only for the
purpose described in this manual. Other usage is
not intended and could be dangerous.
• Operate using hands only. Damage caused by
the use of pointed, sharp or other objects will
invalidate the guarantee.
• The appliance must only be used by trained
operatives.
• It is vital that operatives be given regular safety
instruction.
• We recommend that the operator gives your staff
regular training to avoid the risk of accident or
damage to the appliance.
Caution! Daily checks before
switching on
• Lock air baffl e top and bottom.
• Lock grid shelf or mobile oven rack
properly in position in the cooking cabinet.
General
• The temperature of door glass, outer casing and
add-ons may exceed 60 °C.
• Avoid having heat sources (e.g. grill plates, deep
fryers etc.) near the appliance.
• Dry the cooking cabinet - leave the unit door
slightly ajar during prolonged rest periods
(e.g. overnight).
• If the unit is idle for prolonged periods, shut the
water supply stop valve and turn off the
appliance power supply (gas and electricity).
• The cooking cabinet light can go on and off
several times after switching on or while the
operating system is being loaded.
• Please use always a drip pan for collecting fat
while grilling and roasting (e.g. chicken).
When setting up table-top units with the appliance
manufacturer’s original standard stand or base
cabinet the maximum top rack working height is
1600 mm.
At the end of its service life, the unit must not be
disposed of with the general waste and must not be
placed in the recycling containers at local authority
collection points.
We will be happy to help you with the disposal of
your unit.
- 6 -
Page 7
General Instructions / For Your Safety
Display indication
WARNING – If containers are fi lled
with liquid or contents which liquefy during
cooking, do not use rack levels higher
than those where the user can see into the
slide-in containers. Warning sticker is
enclosed with appliance.
In order to avoid unnecessary power consumption,
the intensity of indications is automatically reduced
in 2 stages during routine operation.
After 10 minutes there is an initial reduction in
indication intensity. After a further 10 minutes
indication intensity is again reduced As soon as you
touch the display or open the cooking cabinet door
indication intensity automatically returns to normal.
Warning!
• Caution! Hot vapour (risk of scalding)!
• Caution! Containers and grids are hot!
• Make sure the mobile oven rack is
correctly locked in position!
• If mobile units and oven racks are not to
be moved, then the parking brakes on the
wheels must be applied.
If your unit is switched on for more than
20 minutes and no operating mode or CleanJet
has been selected, the power-saving circuit is
automatically activated and only the current time of
day is shown on the display.
®
Gas appliances only
• If your appliance is installed under an extractor
hood, this must be switched on when the
appliance is in use.
• If your appliance is connected to a chimney, the
fl ue duct must be cleaned in compliance with
specifi c regional regulations. Contact your
installer
• Do not put objects on your appliance exhaust
pipes.
• The appliance must only be used in still
conditions.
- 7 -
Page 8
General Instructions / For Your Safety
Loading/removal
Open appliance door slowly.
When it is opened heating and fan wheel shut
down automatically.
The integral fan wheel brake is activated. The fan
wheel keeps running for a brief period only. Do not
touch the fan wheel.
Do not insert containers or grids until the grid shelf
has been properly secured and the mobile oven
rack has been pushed up to the stop and locked in
place.
Only use genuine heatproof accessories made by
the appliance manufacturer.
Note:
The cooking cabinet door has a slam function. The
fl oor unit door is only sealed shut when the door
handle is in a vertical position.
Appliances with grid shelves (6x1/1 GN,
6x2/1 GN, 10x1/1 GN, 10x2/1 GN)
Removal
Slightly raise grid shelf and lift out of front catch.
Swivel grid shelf to middle of cooking cabinet.
Press grid shelf upwards, lift from fi xings. Slot into
place in reverse order.
Mobile oven rack
Working with mobile oven racks, mobile
plate racks and transport trolleys for
table-top units (option)
- Remove grid shelf
- Lay run-in rail on appliance fl oor and engage.
- Make sure the unit is adjusted and levelled to the
exact height of the transport trolley.
- Push mobile oven rack or plate rack in
- Push mobile oven rack or plate rack up to the stop
and lock into place.
- Transport trolley must be properly fi xed to
appliance using the holder.
- Disengage mobile oven rack or plate rack and
pull out.
- When transporting the mobile oven rack or plate
rack on the trolley, make sure trolley is engaged in
the transport safety catch.
- Cover and secure containers with liquids to avoid
risk of scalding from liquid slopping over.
- 8 -
Page 9
General Instructions / For Your Safety
Working with mobile plate racks
Please always insert core temperature probe into
ceramic tube.
Warning!
Before the mobile plate rack is removed the
core temperature probe must be removed
and placed in the holding position on the
run-in rail.
Warning!
• Shut the GN container locks on the mobile
oven rack!
• Mobile oven racks, mobile plate racks,
transport trolleys and appliances on
casters can tip over when being moved
over an inclined plane or threshold.
Appliance size Max. load sizes
6x1/1 GN 30 kg (max. 15 kg per rack)
10x1/1 GN 45 kg (max. 15 kg per rack)
20x2/1 GN 90 kg (max. 15 kg per rack)
6x2/1 GN 60 kg (max. 30 kg per rack)
10x2/1 GN 90 kg (max. 30 kg per rack)
20x2/1 GN 180 kg (max. 30 kg per rack)
Low water
This may appear on the display when you switch
on. It means that the steam generator is not yet
fi lled with water. When it is full the display goes out
automatically.
If the display does not go out, check that the water
valve is open and the strainer at the water supply
(solenoid valve) is unblocked.
Ambient temperatures
If ambient temperatures drop below +5 °C make
sure the cooking cabinet is heated to room
temperature (> + 5 °C) before starting to use it.
Core temperature probe
• The core temperature probe and core
temperature probe positioning aid may be hot –
use oven gloves.
• Cool core temperature probe with hand shower
before use.
• Do not let core temperature probe hang out of
cooking cabinet.
• Remove core temperature probe from food before
removing a load.
• Always insert the core temperature probe fully
into the holder provided – damage risk.
- 9 -
Page 10
General Instructions / For Your Safety
Cool Down
Use the „Cool Down“ function to cool the cooking
cabinet .
Warning!
• During „Cool Down“ the fan wheel runs
when the door is open!
• Do not switch on „Cool Down“ function
unless air baffl e is correctly locked.
• Do not touch the fan wheel.
• Appliance must not be cooled with cold
water.
Hand shower
- To use pull hand shower out at least 20 cm.
- Hand shower has no lock-in position. The hose
may be damaged if the hand shower is tugged
beyond the available max. hose length.
- Press hand shower control button to select 2 jet
strengths.
- Hand shower retracts automatically.
- Make sure hand shower hose is fully rewound
after use.
- Do not pull hand shower out beyond the end
mark.
Warning!
• Hand shower and hand shower water may
be hot!
- 10 -
Page 11
General Instructions / For Your Safety
Maintenance
• Inspection, maintenance and repair work must
only be carried out by trained technicians.
• The unit must be switched off at the mains when
cleaning (except CleanJet
inspection, maintenance or repair work.
• If the appliance is installed on casters, freedom
of movement must be restricted so that energy,
water and drainage pipes cannot be damaged
when the unit is moved. If the unit is moved,
make sure that energy, water and drainage pipes
are correctly disconnected. If the unit is returned
to its original position, make sure that the
retention device, energy, water and drainage
pipes are correctly fi tted.
®
cleaning), carrying out
Servicing
• Your appliance should be serviced by an
authorised service partner at least once a year to
ensure that it remains in perfect working order.
Danger!
• High Voltage!
• Switch the appliance off at the mains
before opening service doors or working
on live components.
Descaling
• Note that the steam generator must be descaled
as required (see Descaling chapter).
Warning!
• The process described involves working
with an aggressive chemical fl uid –
danger of corrosive burns!
• To prevent damage to health it is vital that
you use:
protective clothing,
safety goggles,
protective gloves,
face mask.
- 11 -
Page 12

Daily cleaning and care
Warning!
• Your unit must be cleaned every day to
maintain the high quality of the stainless
steel, for hygiene reasons and to prevent
faults occurring. To do this, follow the
instructions in the „CleanJet
„Manual cleaning“ sections.
• To avoid corrosion in the cooking cabinet,
your unit must be cleaned every day,
even if it is only operated in “Moist Heat”
(steaming) mode.
• Dry the cooking cabinet - leave the unit’s door
slightly ajar if it is going to be idle for any length
of time (e.g. overnight).
• Apply vegetable oil or grease to the inside of the
cooking cabinet at regular intervals (every
2 weeks or so) to prevent corrosion.
• Before you start the CleanJet
sure that the grid shelves or mobile oven rack are
inserted into the cooking cabinet correctly.
• Do not use a high pressure cleaner to clean the
unit.
• Do not treat the unit with acids or expose to acid
fumes – this will damage the passivated coating
of the nickel-chromium steel and the units might
discolour.
• Follow the instructions on the cleaner pack.
• Never put Cleaner and Rinse Aid tablets in the hot
cooking cabinet (>60 °C). The rinse aid fi lm will
not detach, which will lead to faults.
• For the cleaning procedure, see the „CleanJet
or „Manual Cleaning „ section.
• Only use cleaning agents made by the unit’s
manufacturer. Cleaning agents from other
manufacturers may cause damage and invalidate
the warranty.
• Do not use scouring products or scratchy cleaning
agents.
®
functions“ or
®
programme, make
®
“
• Daily cleaning of the cooking cabinet seal with
a non-abrasive cleaning agent will extend the
service life.
• Remove and clean the incoming air fi lter once per
month (see Maintenance).
Warning!
• If the unit is not cleaned or is not cleaned
well enough, deposits of grease or food
residues in the cooking cabinet may catch
fi re.
• Wear the correct protective clothing,
gloves, goggles and mask.
• Do not store cleaner and rinse aid tablets
in the unit.
- 12 -
Page 13
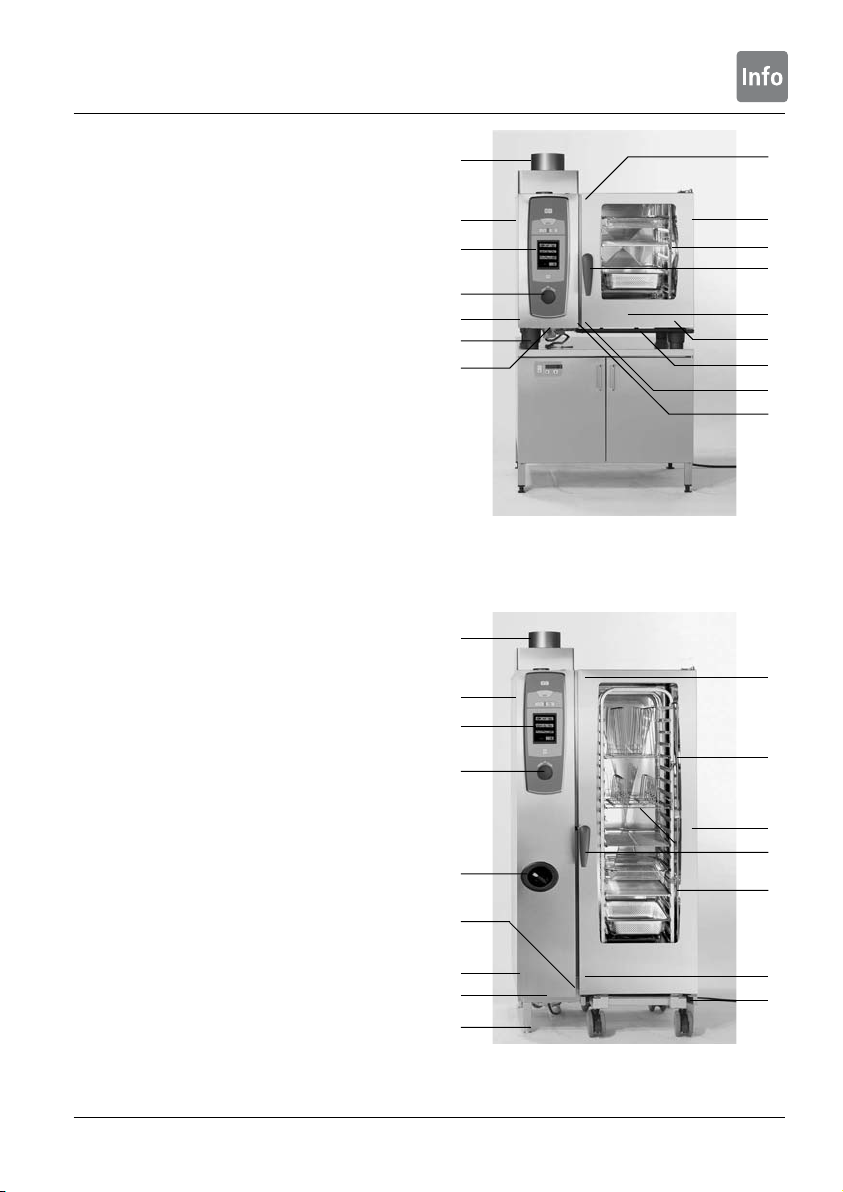
Features
햲 Appliance serial number
(visible only when door open)
햳 Draft diverter
(gas appliances only, optional)
햴 Interior lighting
햵 Appliance door with double glass panel
햶 Door handle
Table-top units:
one-handed operation with slam function
Floor units:
(One-handed operation)
햷 Unlocking device to open double glass
door panel (inside)
햸 Integral and self-draining door drip pan
(inside)
햹 Drip collector connected directly to
appliance drain
햺 Appliance feet
(height adjustable)
햻 Unit data plate
(with all important data such as power input,
gas type, voltage, phase number and frequency,
as well as appliance model and appliance
serial number, see also Functions/Settings/ Mod.
e, Option number)
햽 Control panel
햾 Protective cover for electrical
installation area
햿 Central dial
헀 Hand shower
(with automatic rewind)
헁 Run-in guide
(fl oor models)
헂 Air fi lter
(installation area ventilation)
햳
햾
햽
햿
햻
햺
헂
Table top unit 6 x 1/1 GN, identical for 6 x 2/1 GN, 10 x 1/1 GN
and 10 x 2/1 GN.
햳
햾
햽
햿
헀
햲
햻
헂
햺
Floor unit 20 x 1/1 GN, identical for 20 x 2/1 GN.
햷
햵
햴
햶
헀
햸
햹
햷
햲
햷
햴
햵
햶
햴
햷
헁
- 13 -
Page 14
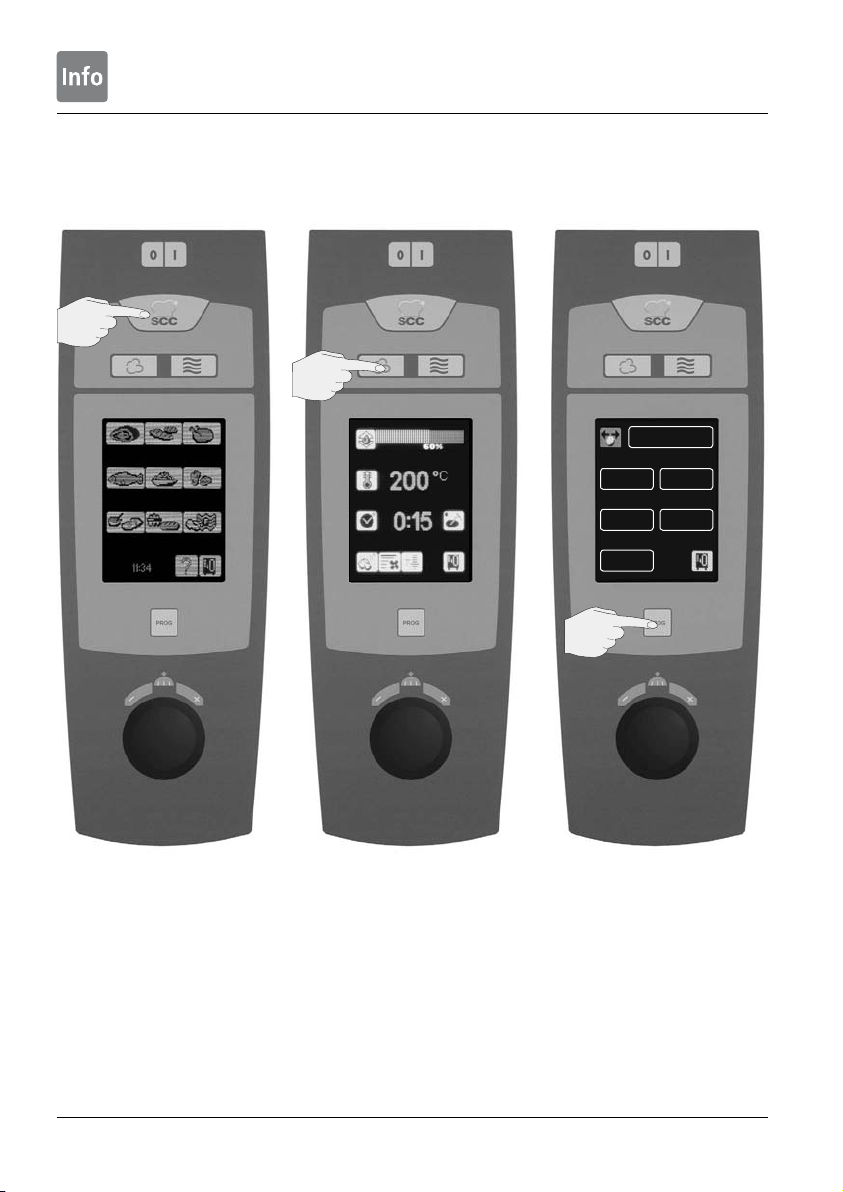
General User Instructions
SelfCooking Control®-
Mode
Combi-Steamer-Mode
Programming-Mode
Clean
Level
new
Control
copy change
delete
After switching on or operating
the SelfCooking Control
®
button
you enter SelfCooking
®
Control
Mode.
See chapter on SelfCooking
®
Mode for description.
Control
By operating the Moist Heat, Dry
Heat or Combination Moist Heat
and Dry Heat button you enter
Combi-Steamer-Mode.
See chapter on Combi-Steamer
Mode for description.
- 14 -
By operating the „Prog” button
you enter Programming-
Mode.
See Programming Mode chapter
for description.
Page 15
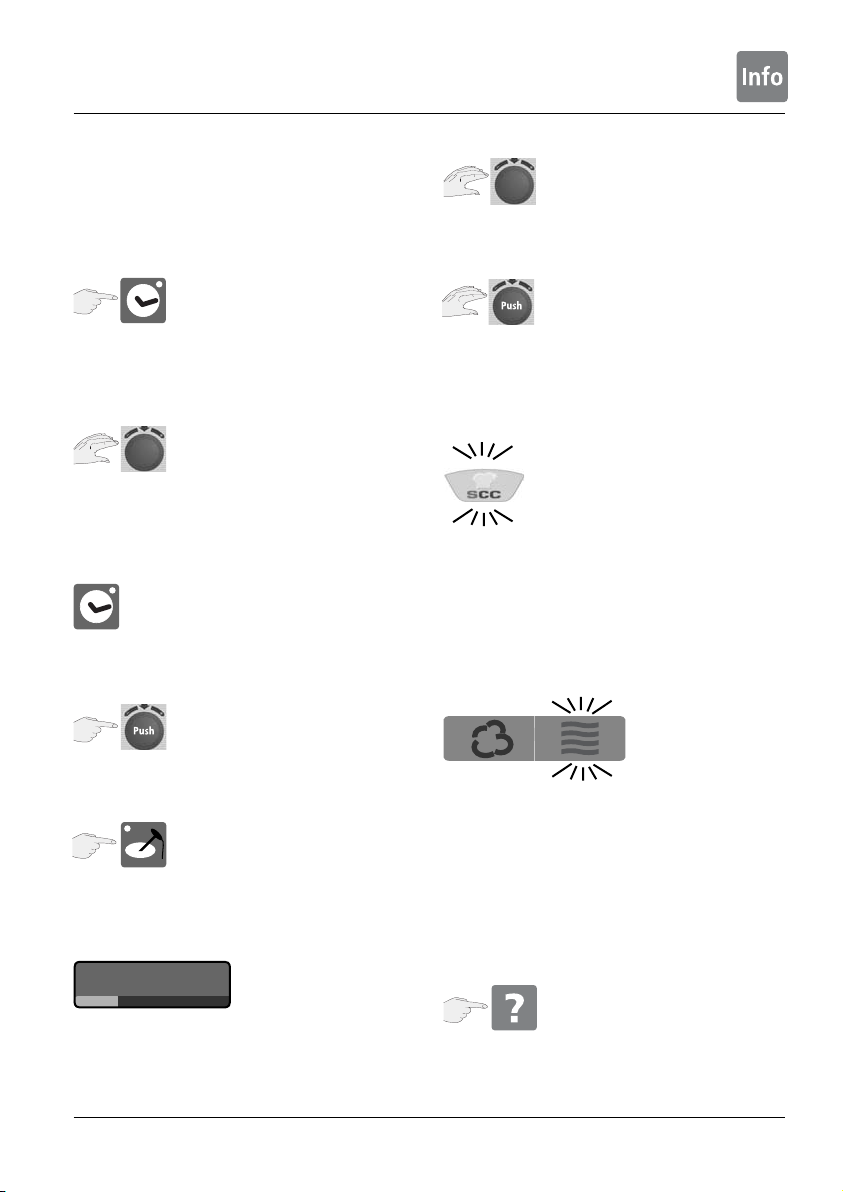
General User Instructions
Your unit has a “touch screen“. You can enter
data on your unit just by touching it lightly with
your fi nger.
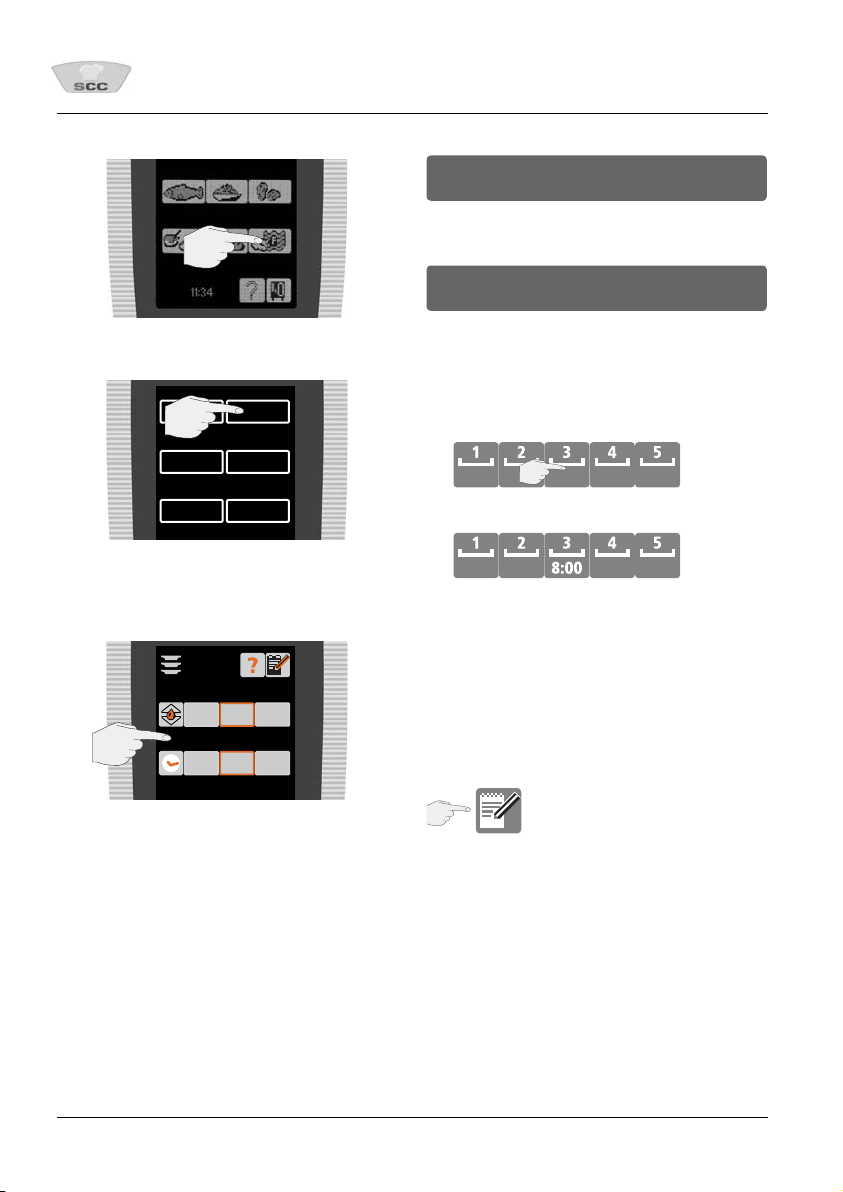
Selecting a function
Examples:
Press button
Short bleep and fl ashing red light confi rms button
has been pressed.
Active button is surrounded by fl ashing red frame.
The central dial can be used to enter data while the
button is fl ashing.
Confi rmation of data input
takes place automatically after 4 seconds.
or
Central dial
You can enter your desired values by rotating the
central dial.
Push Function
Entries can be confi rmed by pressing the central
dial.
End of cooking process
The end of a cooking process is indicated by the
fl ashing SelfCooking Control
Cooking processes can be interrupted by pressing
the SelfCooking Control
®
button.
®
button (4 seconds)
Unit too hot
press (Push Function) on central dial
or
press any button.
Preheat display
preheat
The status of the preheating temperature is
displayed in red and blue.
If the cooking cabinet is hotter than the
temperature set, the button for the mode selected
will fl ash (e.g. Dry Heat).
(See „Cool Down“ chapter for cooking cabinet
cooling).
Help Function
This will give you handy tips on everyday
use (see also Help Function chapter)
- 15 -
Page 16
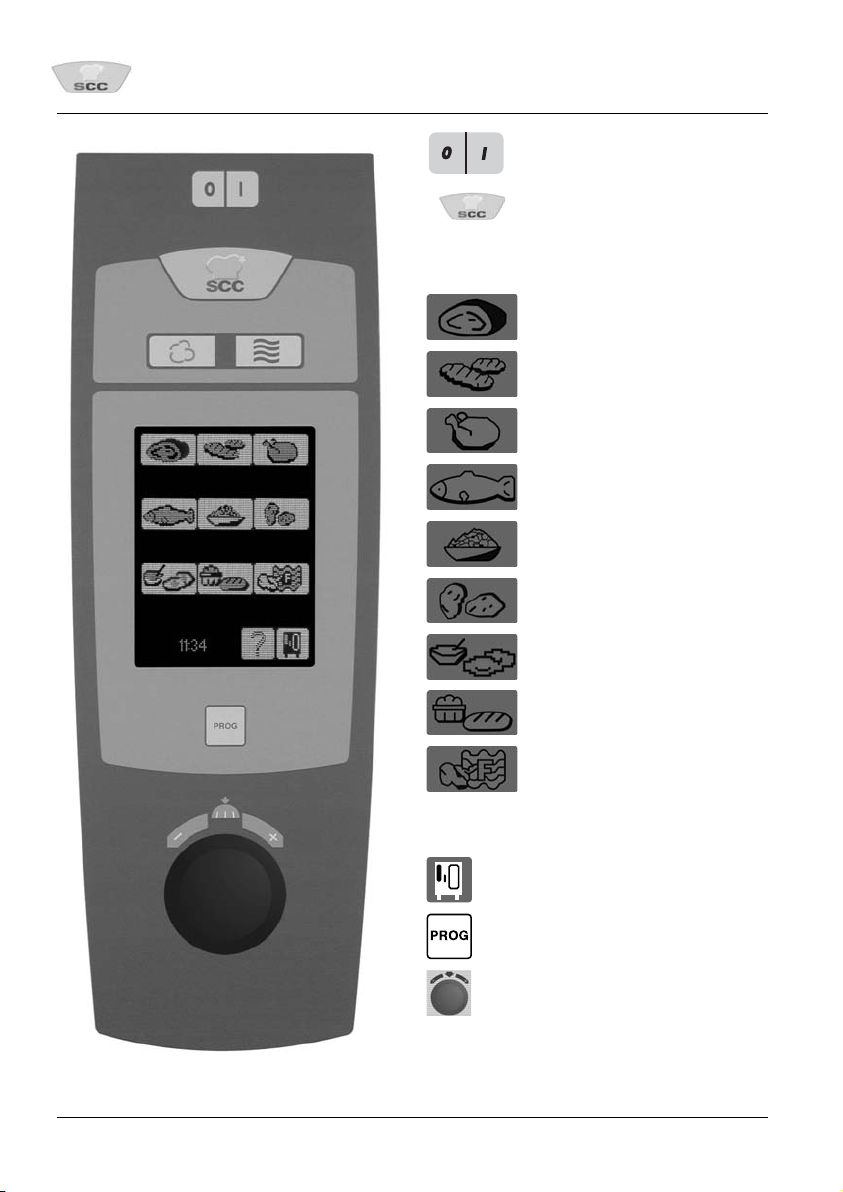
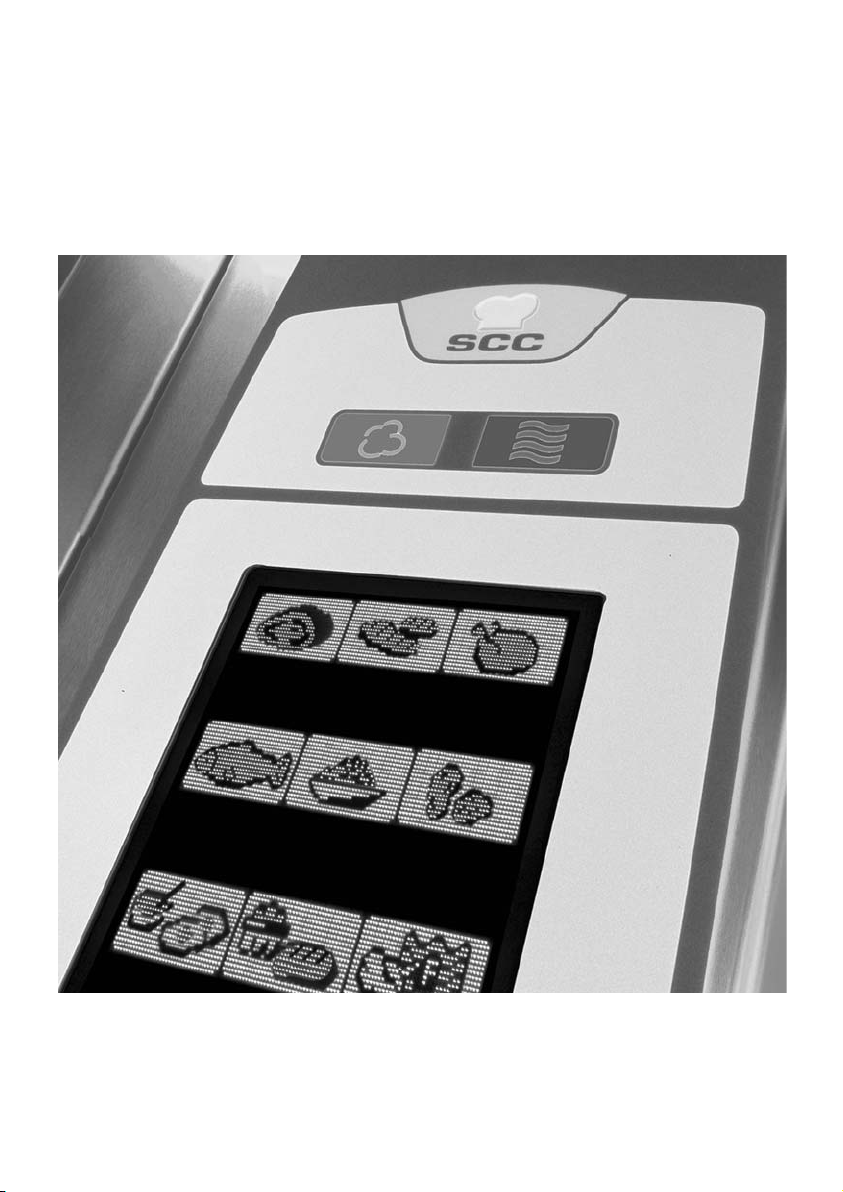
SelfCooking Control® Mode
On/Off switch
9 Modes:
SelfCooking Control
Large roasts
Pan fries
Poultry
Fish
Side dishes
Potato products
Egg dishes/desserts
Bakery products
Finishing
®
®
- 16 -
Function button
Programming Mode button
Central dial
with Push Function
Page 17
SelfCooking Control® Mode – Controls
The 9 SelfCooking Control® modes (Roasts, pan
fries, poultry, fi sh, side dishes, potato products,
egg dishes/desserts, baked products, Finishing
®
)
automatically detect product-specifi c requirements,
the size of the food to be cooked and the load size.
Cooking time, temperature and the ideal cooking
cabinet climate are continuously adjusted to achieve
the result you want. The remaining cooking time is
displayed.
Examples and useful hints on how to cook your
products like child‘s play can be found in the user
manual.
Select size
Food thickness
Gratinee
Crisping
Proofi ng volume
Smooth baking
Time settings
Delta-T cooking
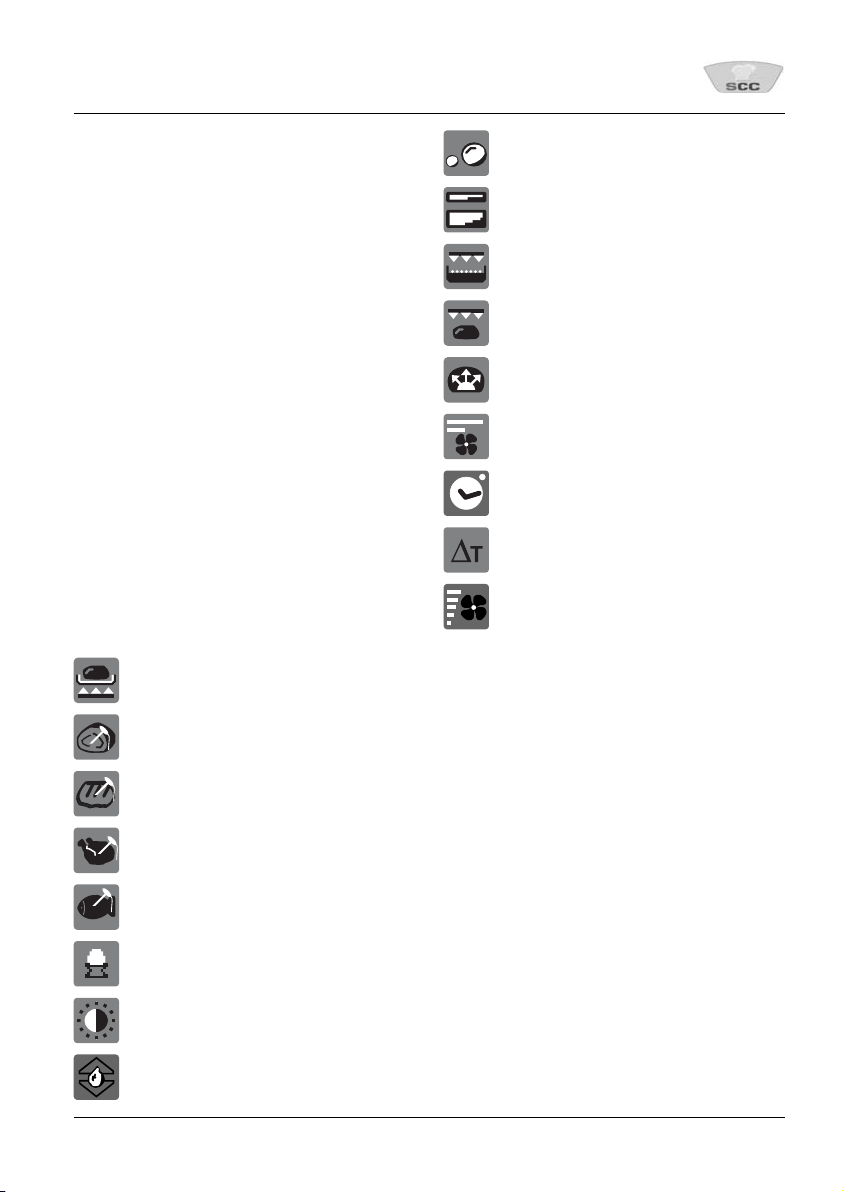
Key to the pictograms
Searing temperature
Core temperature/cooking level
Core temperature/cooking level
Core temperature/cooking level
Core temperature/cooking level
Cooking level
Browning
ClimaPlus Control
®
Change air speed
- 17 -
Page 18
SelfCooking Control® Mode – Operation
We would like to explain the operation by giving
you 5 examples. Many more useful tips how to
prepare your food really easily can be found in your
Unit Cookbook, or simply follow the user prompts
on the display.
Example 1: Veal roast
1
Select Large Joint
2
Select preparation e.g. roast – that’s it!
The unit right away works with preset, factorytested settings.
.
roast braise
roast with
crackling
overnight
roasting
soft
roosting
moist
cooking
After preheating you can change the default
settings as desired within the fi rst 60 seconds.
The unit preheats automatically – the display
shows:
preheat
As soon as the preheat temperature is reached the
display shows
Load
Please note that the core temperature probe must
be inserted when requested!
If the core temperature probe is not inserted or
incorrectly inserted (see chapter on Working with
Core Temperature Probe) the buzzer sounds and
you see an appropriate message on the display:
The cooking process continues once the probe
position has been corrected.
roast
3
light dark
medium 71°
Or you have the option of making individual
changes to the level of browning and cooking.
Note:
You can store your entries under an individual
name (see Programming chapter)
- 18 -
Page 19

SelfCooking Control® Mode – Operation
Note:
The required total cooking time is displayed when
the cooking time has elapsed and the cooking
cabinet door is opened.
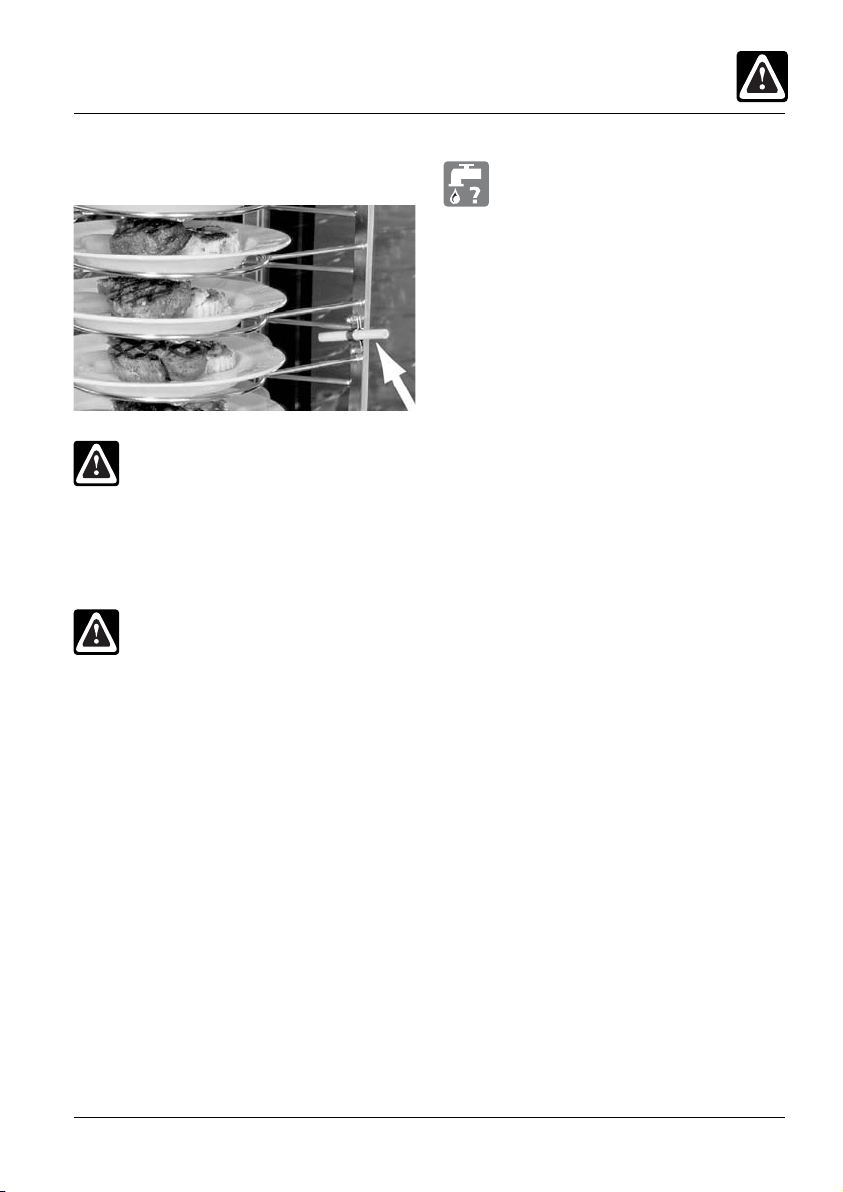
You can cook different-sized roasts at the same
time. To do this, fi rst insert the core temperature
probe into the smallest joint. The buzzer will sound
when the smallest joint is ready. Please remove the
fi nished joint and insert the CT probe into the next
largest joint. Then close the cooking cabinet door.
The display changes to:
Press the arrow button – the cooking process
resumes automatically. This procedure can be
repeated any number of times.
Discontinuing an operation in SelfCooking
®
Control
Mode
®
An operation in SelfCooking Control
discontinued while the display shows the „back“
symbol. As soon as the „back“ symbol goes out the
only way of halting the process is by switching the
appliance off.
Mode may be
or
After the door has been open for some time
appears again so that the cooking process can be
deselected.
- 19 -
Page 20
SelfCooking Control® Mode – Operation
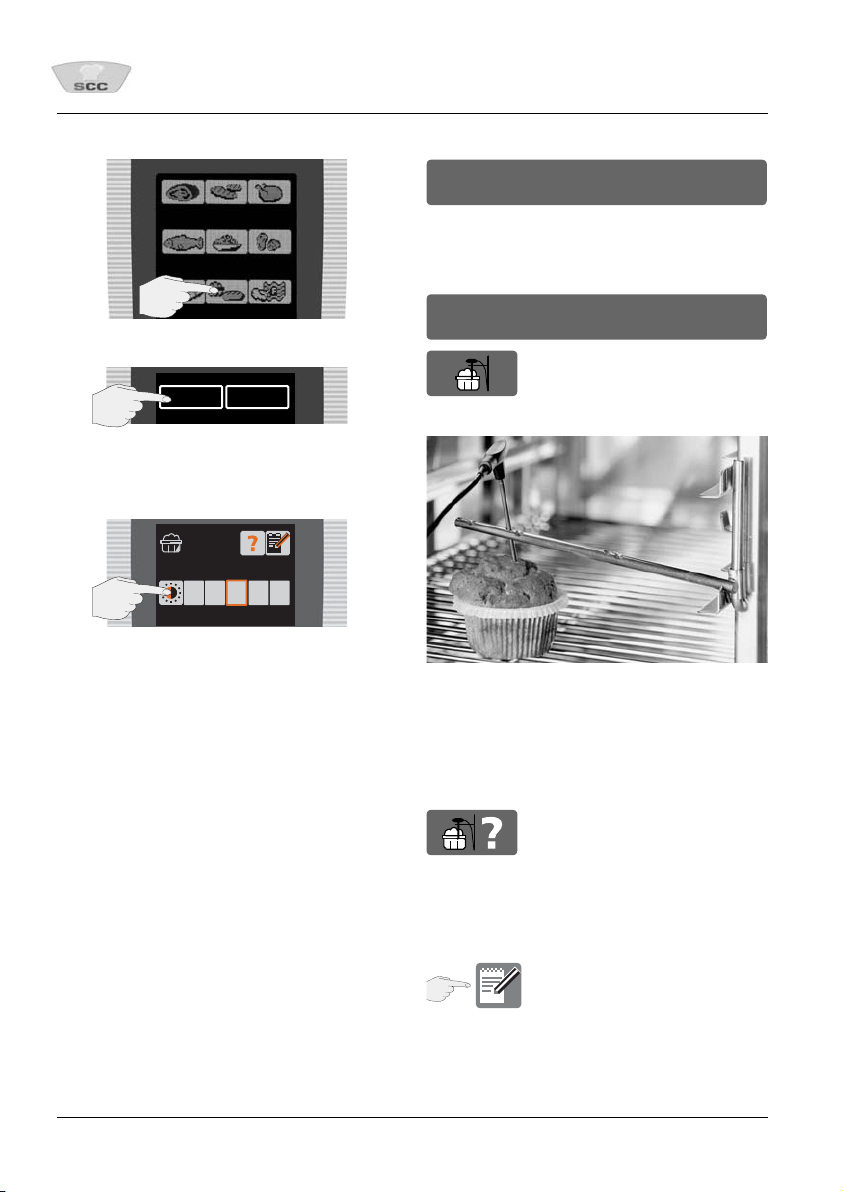
Example 2: Muffi ns
1
Select „Bakery Products“ mode
baking with
2
baking
Select „baking“ – that’s it!
The unit right away works with preset, factory-
tested settings.
1
Alternatively, you have the option of making
individual changes to the degree of browning.
After preheating you can change the default
settings as desired within the fi rst 60 seconds.
moisture
baking
light dark
Unit preheats automatically – display shows:
preheat
As soon as the preheat temperature is reached
display shows
Load
Please use the positioning aid.
Please note that the core temperature probe must
be inserted when requested!
If the core temperature probe is not inserted or
incorrectly inserted (see chapter on Working with
Core Temperature Probe) the buzzer sounds and you
see an appropriate message on the display:
The cooking process continues once the probe
position has been corrected.
Note:
You can store your entries under an individual name
(see Programming chapter)
- 20 -
Page 21

SelfCooking Control® Mode – Operation
Note:
The requisite cooking time is displayed once the
cooking time is up and the cooking cabinet doors
have been opened.
Discontinuing an operation in SelfCooking
®
Control
An operation in SelfCooking Control
discontinued while the display shows the „back“
symbol. As soon as the „back“ symbol goes out the
only way of halting the process is by switching the
appliance off,
or
After the door has been open for some time
appears again so that the cooking process can be
deselected.
Mode
®
Mode may be
- 21 -
Page 22
SelfCooking Control® Mode – Operation
Example 3: „Finishing® – à la carte”
1
®
Select „Finishing
2
Select „plates à la carte“ – that’s it!
The unit right away works with preset, factorytested settings.
3
“ mode
plates
bankett
container coloration
bakery
produkts
dry humide
short long
plates
à la carte
plates
à la carte
pizza
Unit preheats automatically – display shows:
preheat
As soon as the preheat temperature is reached
display shows
Load
LevelControl®
LevelControl® is automatically activated for
®
Finishing
plated à la carte”, “Finishing® container”
and “Steam vegetables”.
4
Select level loaded (e.g. level 3)
You can repeat this procedure as often as you like
for any rack.
The time runs when the cooking cabinet door is
closed. As soon as you open the cooking cabinet
door the time is stopped.
Note:
Or you can change the desired cabinet climate, e.g.
„dry“ or „moist“.
You can store your entries under an individual name
(see Programming chapter)
- 22 -
Page 23
SelfCooking Control® Mode – Operation
„LevelControl
With Level Control® you can enter an individual
time for each of your appliance racks and have
it displayed. That way you can always see exactly
when each rack is ready. A buzzer sounds and the
indicated level fl ashes as soon as the preset time for
the relevant rack is up. Once the cabinet doors have
been opened and shut the level is free again and
can be reloaded.
Select the loaded level for which you want to
change the cooking time (e.g. level 3)
®
“
1
2
- 23 -
Page 24

SelfCooking Control® Mode – Operation
Example 4: „Finishing® – Banquet”
1
®
Select „Finishing
2
Select „plated banquet „ – that’s it!
The unit right away works with preset, factorytested settings.
3
Or you can change the desired Finishing climate e.g.
„dry“ or „moist“.
The preset time may be changed if required.
“ mode
plates
banquet
container coloration
bakery
produkts
dry humide
short long
plated
banquet
plates
à la carte
pizza
As soon as the preheat temperature is reached
display shows:
Load
Please note that the core temperature probe must
be inserted in the ceramic tube on the mobile plate
rack when requested!
An arrow button appears on the display at the end
of the Finishing
®
time. You can press the button to
start another load.
The cooking cabinet is cooled for the next
Finishing
®
process and the display changes
to:
cooling
The status is displayed in red and blue.
Unit preheats automatically – display shows:
preheat
Note:
You can store your entries under an individual name
(see Programming chapter)
- 24 -
Page 25

SelfCooking Control® Mode – Operation
Example 5: Rice
1
Select Side Dishes
steamed
vegetables
steamed
2
rice
noodles with
sauce
Select „steamed rice“ – that’s it!
The unit right away works with preset, factory-
tested settings.
3
grilled
vegetables
fried
rice
convenience
roasted
steamed
rice
short lang
If the core temperature probe is not inserted or
incorrectly inserted (see chapter on working with
Core Temperature Probe) the buzzer sounds and you
see an appropriate message on the display:
The cooking process continues once the probe
position has been corrected.
Note:
You can store your entries under an individual name
(see Programming chapter)
Note:
The requisite cooking time is displayed once the
cooking time is up and the cooking cabinet doors
have been opened.
Discontinuing an operation in SelfCooking
®
Control
Mode
Or you have the option of making individual
changes to the time.
If desired the default settings can be changed
within the fi rst 60 seconds.
load
Please note that the core temperature probe
must be inserted into the container of rice when
requested!
®
An operation in SelfCooking Control
Mode may be
discontinued while the display shows the „back“
symbol. As soon as the „back“ symbol goes out the
only way of halting the process is by switching the
appliance off,
or
After the door has been open for some time
appears again so that the cooking process can be
deselected.
- 25 -
Page 26

Combi-Steamer-Mode
All Combi-Steamer functions are available in
Combi-Steamer Mode.
You enter Combi-Steamer Mode by operating the
Moist Heat, Dry Heat or Combination Moist Heat
and Dry Heat button.
- 26 -
Page 27

Combi-Steamer Mode – Controls
Request current cooking data
On/Off switch
3 operating modes:
„Moist Heat“ button
„Dry Heat“ button
Combination of
Dry and Moist Heat
Clima window
Cooking cabinet temperature
Time
Core temperature
Humidifi cation
Air speed
Hold down temperature button (2 sec.)
The following values are displayed:
• current cooking cabinet humidity
• current cooking cabinet temperature
• time elapsed (cooking time)
• current core temperature
Cool Down
Function button
Programming Mode button
Central dial
with Push In function
- 27 -
Page 28

Combi-Steamer Mode – Moist Heat
The fresh steam generator generates hygienic fresh
steam.
Cooking cabinet temperature can be set to
between 30 °C and 130 °C.
Cooking methods:
Steaming, stewing, blanching, simmering, soaking,
vacuum cooking, thawing, preserving
Example setting range between 30 °C and
130 °C
1
2
100°C
3
4
0:33
5
Optional functions, e.g. air speed (excepting
®
CleanJet
incorporated.
, Descale and Cool Down), may be
or work with
core temperature probe
4
Desired Actual
76°C 19°C
5
(see chapter on Working with Core Temperature
Probe).
- 28 -
Page 29

Combi-Steamer Mode – Dry Heat
Powerful heating elements heat the dry air. Cooking
cabinet temperature can be set to between 30 °C
and 300 °C
Cooking cabinet humidity can be defi ned (see
chapter on ClimaPlus Control
Cooking methods:
Baking, roasting, grilling, deep-frying, gratinating,
glazing
®
).
1
2
3
4
160°C
5
6
0:33
Optional functions, e.g. air speed (excepting
®
CleanJet
incorporated.
Note:
During continuous operation the cooking cabinet
temperature is automatically reduced from 300 °C
to 270 °C after 60 minutes.
, Descale and Cool Down), may be
7
or work with
core temperature probe
6
Desired Actual
76°C 19°C
7
(see chapter on Working with Core Temperature
Probe).
- 29 -
Page 30

Combi-Steamer Mode – Combination
of Moist Heat + Dry Heat
„Moist Heat“ and „Dry Heat“ cooking modes are
combined. This combination creates a hot humid
cabinet climate for especially intensive cooking.
Cooking cabinet humidity can be defi ned (see
chapter on ClimaPlus Control
Cabinet temperature can be set to between 30 °C
and 300 °C .
Garungsarten:
Braten, Backen, Finishing
®
).
®
.
1
Press both buttons simultaneously.
2
3
4
160°C
5
or work with
core temperature probe
6
Desired Actual
76°C 19°C
7
(see chapter on Working with Core Temperature
Probe).
All optional functions, e.g. air speed
(excepting CleanJet
be incorporated.
Note:
During continuous operation the cooking cabinet
temperature is automatically reduced from 300 °C
to 270 °C after 60 minutes.
®
, Descale and Cool Down), may
6
0:33
7
- 30 -
Page 31

Combi-Steamer-Mode – ClimaPlus Control
®
ClimaPlus Control® measures and regulates the
humidity in the cooking cabinet to within one
percent. You can set the exact product-specifi c
climate for each food in the clima window.
Moist Heat
ClimaPlus Control® is factory-set to
100 % humidity.
Dry Heat
ClimaPlus Control® allows cooking cabinet
humidity to be defi ned.
Red bars and associated percentages show the
max. permissible moisture level in the cooking
cabinet. The more red visible on the display, the
drier the cabinet atmosphere and the lower the
humidity level.
While cooking is taking place you can see what
ClimaPlus Control
Illuminated up arrow – moisture entering cooking
cabinet.
Illuminated down arrow – moisture leaving cooking
cabinet.
®
is doing:
1
2
The exact humidity level is shown as a percentage
(e.g. 70%).
Dry Heat + Moist Heat
The more blue visible in the clima window, the
moister the cabinet atmosphere and the higher the
humidity level.
The more red visible in the clima window, the
drier the cabinet atmosphere and the lower the
humidity level.
- 31 -
Page 32

Combi-Steamer-Mode –
Time settings, Continuous operation, Preheat
Timer
1
0:33
2
Continuous operation
1
until „Continuous“ appears on the display.
CONT.
Press clock symbol and hold button down
or
1
2
Rotate central dial to the left until „Continuous“
appears.
CONT.
Manual Preheat
1
2
#
3
Rotate central dial to the left. First
„Continuous“ appears, then „Preheat“.
Real-time setting
(see chapter on Appliance Settings).
Start-time setting
(see chapter on Appliance Settings).
Change to min/sec or h/min
(see chapter on Appliance Settings)
CONT.
preheat
- 32 -
Page 33

Combi-Steamer-Mode –
Working with the Core Temperature Probe
The cooking process is regulated by a 6-point core
temperature measurement in the food.
Clean core temperature probe prior to use and cool
with hand shower.
Insert the core temperature probe into the thickest
part at an angle of 30-45 degrees, so that the
tip of the probe is in the centre of the food to be
cooked.
1
2
160°C
3
Using the core temperature probe
on frozen food
With the drill bit provided drill a hole in the thickest
part of the food to be cooked. To do this, place
the food on a fi rm support. Protect your arms and
hands!
Working with the core
temperature probe positioning
aid
Use the core temperature probe positioning aid if
the core temperature probe could fall out of the
food, for instance if the food to be cooked is of a
soft consistency or not very thick.
4
Desired Actual
76°C 19°C
5
Timer disabled.
When the preselected core temperature is
reached a buzzer sounds and the cooking process
is complete.
Warning!
• The core temperature probe and
positioning aid may be hot – wear oven
gloves.
• Do not let core temperature probe hang
out of cooking cabinet.
• Remove core temperature probe from the
food before removing a load.
- 33 -
Page 34

Combi-Steamer Mode – Humidifi cation,
air speed
Humidifi cation
A powerful jet atomises bursts of water and
distributes it throughout the cooking cabinet.
Air speed
5 air speeds are available. The appliance operates at
a standard air speed factory setting.
Humidifi cation creates ideal rising conditions and
gives bakery products an attractive glossy fi nish.
Can be selected with Dry Heat or
Combination Moist Heat and Dry Heat.
1
Humidifi cation period:
Humidifi cation is limited to 2 seconds. Press the
button again to humidify for a further 2 seconds.
Temperature range
30 °C to 260 °C cooking cabinet temperature.
Humidifying in a program
The additional „Humidifi cation“ function can be
programmed in all program steps with Dry Heat or
Combination Moist and Dry Heat.
1
Can be selected for any cooking medium.
1
2
Turbo air speed
Standard air speed
1/2 air speed
1/4 air speed
Fan wheel cycles at 1/4 air speed
2
3
- 34 -
Page 35

Combi-Steamer Mode – Cool Down
You have been operating your appliance at high
cooking cabinet temperature and now want to
continue working at low cabinet temperature.
„Cool Down“ Function lets you cool the cabinet
quickly and gently.
1
deselect mode
close door
2
Warning!
• During „Cool Down“ the fan wheel does
not switch off when the door is opened.
• Do not switch on „Cool Down“ function
unless air baffl e is correctly locked.
• Do not touch the fan wheel.
• The applicance must not be cooled with
cold water.
3
open door
open door
4
COOL DOWN
133°C
Display shows current cooking cabinet
temperature.
5
You can select various air speeds.
Maximum „Cool Down“ time is limited to
6 minutes.
Note:
Before selecting optional „Cool Down“ function –
close doors.
The „Cool Down“ function is not programmable.
- 35 -
Page 36

Programming Mode – Controls
It takes no time at all to create your own cooking
programs in Programming Mode using the
easy-to-understand control concept.
Select program
Clean
Program name
new
New program
Level
Control
Clean
new
copy change
delete
Level
Control
New LevelControl
copy
Copy program
change
Change program
delete
Delete program
Function button
®
program
Cooking programs display:
SelfCooking cooking process
Test
LevelControl
Test
Manual cooking program
- 36 -
®
cooking program
Page 37

Programming Mode
“Programming SelfCooking Mode“
Programming SelfCooking Mode
You can copy or adapt the 9 operating modes
(Roasts, Grills, Poultry, Fish, Side Dishes, Potato
Products, Egg Dishes/Desserts, Baked Products,
®
Finishing
and store them under a new name.
) to meet your individual requirements
1
2
3
Examples:
You could rename “Roasts” and save it under the
new name of “Veal roast” with your individual
settings, e.g. “Light browning” and “Well done”.
Enter desired program names, dial letter with
central dial and press central dial to select.
4
5
6
new
ABCDEF G HIJKLM
store
7
roast
light dark
8
9
Program stored.
Note:
Or you can put steps 5-9 in front of steps 2-4
Manual Programming Mode
- 37 -
Page 38

Programming Mode –
“Programming - Combi-Steamer Mode“
Programming Manual-Mode
10
1
2
3
Enter desired program name.
4
new
ABCDEF G HIJKLM
Dial letter with central dial and press central dial
to select.
store
5
6
160°C
7
8
9
or Preheat
or Work with
core temperature probe
0:33
8
9
76°C 19°C
11
You can store your program, add extra
program steps, or end programming.
or
11
For extra program steps see Section 6-9.
12
13
Note:
An acoustic signal can be keyed in after each
cooking step.
1
2
settings
3
4
For example, the display shows:
100°C
All optional functions, e.g. fan wheel (excepting
®
CleanJet
incorporated.
, Descale and Cool Down), may be
- 38 -
Page 39

Programming-Mode
“Start, check, change program“
Start program
e.g. „Test“ Program
1
2
Test
Test
TEST
1
®
3
4
During program execution the program name
and program step appear on the display.
Note:
You can adjust the settings (ClimaPlus Control
temperature, time, etc.) as required while a
program is running.
Test program steps
e.g. „Test“ program
TEST
6
Program step 2
Change program
e.g. „Test“ program
2
1
2
3
4
Name can be changed as required.
5
change
store
Test
1
2
3
4
5
Program step 1
Test
TEST
1
Test
6
e.g. cooking cabinet temperature
160°C
7
Your changes are stored.
- 39 -
Page 40

Programming-Mode –
“Delete, copy programm“
Delete individual programs
e.g. „Test“ program
1
2
3
4
5
Delete all programs
Test
delete
delete
1
2
3
Briefl y press key 1x, a red frame fl ashes.
Copy program
e.g. „Test“ program
1
2
3
4
5
Name can be changed as required.
If the program name is not changed the
appliance allocates a consecutive index number.
6
Test
copy
ABCDEF G HIJKLM
store
4
Hold key down until the background changes
from red to blue.
The deletion process is represented by a moving
arrow.
Note:
After deletion the unit starts automatically.
- 40 -
Page 41

Programming-Mode – „LevelControl®“
With Level Control® you can enter an individual
time for each of your appliance racks and have
it displayed. That way you can always see exactly
when each rack is ready. The buzzer sounds and the
indicated level fl ashes as soon as the preset time for
the relevant rack is up. Once the cabinet doors have
been opened and shut the level is free again and
can be reloaded.
Note:
Please note that the products must always be
cooked with the same cooking parameters
(climate, cooking cabinet temperature, air speed,
etc.).
e.g. „Test“ program
1
2
3
Enter desired program name.
e.g. „Test“ program
LevelControl
ABCDEF G HIJKLM
Dial desired letter with central dial and press
central dial to select.
6
160°C
7
8
0:33
9
10
Program stored.
All optional functions, e.g. air speed
(excepting CleanJet
incorporated.
Note:
In Level Control
be entered (plus „Preheat“, if necessary).
The „Level Control
SelfCooking modes.
Note:
A sticker for labelling the levels is included in the
unit scope of supply. Stickers should only be affi xed
outside the cooking cabinet.
®
, Descale, Cool Down), may be
®
a maximum of 1 cooking step can
®
“ function cannot be used for
Test
4
store
5
- 41 -
Page 42

Programming-Mode – “LevelControl®“
„Start“ Level Control® Program
e.g. „Test“ program
1
2
3
4
The unit preheats automatically – the display shows:
preheat
Note:
LevelControl
“Finishing
container” and “Steam vegetables”.
Test - - - - - - - -
5
Select level loaded (e.g. level 3)
Test
Test
®
is automatically activated for
®
plated à la carte”, “Finishing®
3 LevelControl® programs
You can activate up to 3 LevelControl® programs
with different cooking times (e.g. broccoli 15 min.,
spinach 8 min., tomatoes 2 min.)
This is subject to the operating mode,
climate, cooking cabinet temperature and air
speed being identical.
broccoli spinach tomatoes
5
Changing the cooking time
Select the loaded level for which you want to
change the cooking time (e.g. level 3)
1
2
You can repeat this procedure as often as you like
for any rack.
The time runs when the cooking cabinet door is
closed. The time is stopped as soon as you open the
cooking cabinet door. As soon as the preset time
for the relevant rack has elapsed, the buzzer sounds
and the indicated level fl ashes. After the cabinet
door has been opened and closed, the level is free
again and can be reloaded.
Note:
The display is factory-set to minutes:seconds.
Reset the time / program
Hold down the selected button for 5 seconds
to reset the time or program. It can then be
reassigned.
Resetting the LevelControl
®
time
1
Resetting the LevelControl
broccoli spinach tomatoes
®
program
1
- 42 -
Page 43

Programming-Mode – “Program Lock“
Setting Program Lock:
1
2
3
4
New programs cannot be created when
„Program Lock“ is set. You can use existing
programs, but not change, copy or delete them.
or
4
Only cooking programs can be used. Manual
operation is not possible.
_xxxx
Prog
Level 1
Level 2
enter password
Change password
1
2
3
4
_xxxx
Prog
change password
enter old password
ABCDEF G HIJKLM
5
Enter password:
Use central dial to dial desired letter or number
and press central dial to select.
6
enter new password
ABCDEF G HIJKLM
5
Enter password
Use central dial to dial desired letter or number
and press central dial to select.
Default password „12345”
Program lock active
Program lock inactive
7
Enter password:
Use central dial to dial desired letter or number
and press central dial to select.
8
9
Enter password:
Use central dial to dial desired letter or number
and press central dial to select.
- 43 -
ABCDEF G HIJKLM
repeat new password
ABCDEF G HIJKLM
Page 44

CleanJet
®
CleanJet® is the automatic cleaning system for
cleaning the cooking cabinet.
Attention:
For hygiene reasons and to prevent
malfunctions it is essential to clean the unit
every day. Please note that your unit must be
cleaned every day at the close of work, even
if it is only operated in Moist Heat mode.
With 6 cleaning steps, it can be adjusted to suit the
individual degree of soiling.
Note:
The cleaning steps are described on the following
pages.
Caution!
• Always wear gloves when handling Cleaner
and Rinse Aid tablets – danger of corrosive
burns!
• Never open the cooking cabinet door
while the cleaning process is under way
– chemical cleaner and hot vapour may
escape – danger of scalding!
• If the unit is not cleaned or is not cleaned
well enough, deposits of grease or food
residues in the cooking cabinet may catch
fi re.
• Use only the appliance manufacturer’s
Cleaner and Rinse Aid tablets. The use of
other chemical cleaners may damage the
appliance. Manufakturer willnot be held
liable for damcres caused as a result!
• Putting in too much cleaner can cause
foaming.
• Never put tablets in the hot cooking
cabinet (>60 °C). The rinse aid fi lm will not
detach, which will lead to faults.
1
Deselect cooking programmes or control mode.
Note:
For safety reasons CleanJet
when cooking process is deselected.
Follow the user prompt:
®
can only be selected
1
2
Note:
If the cabinet temperature exceeds 75 °C at
the start of a CleanJet
message is displayed:
unit to hot
open door
CleanJet
®
program, the following
4
Please cool cabinet with „Cool Down“.
When your unit has cooled, „Cool Down“ switches
off automatically and you can continue cleaning:
rinse
5
without tabs
interim
cleaning
medium
Select the desired cleaning step,
depending on how soiled the cabinet is.
rinse
light
strong
- 44 -
Page 45

CleanJet
®
open door
remove containers
You are asked to open the door and remove the
container.
Stainless steel grids, CombiFry
poultry grids can stay in the cabinet during
cleaning.
®
and Super-Spike
1x 2x
Rinse aid (blue) Cleaner (red)
Note:
When using softened water the recommended
amount of cleaner tablets can be reduced by up
to 50%.
If foaming does occur, even though the amount
is correct, then the number of detergent tablets
should be reduced.
When requested please place the indicated
6
number of appliance manufacturer’s tablets into
the recess in the air baffl e – at the left of the
cabinet. To do this swing the hinging rack to the
side and remove the mobile oven rack. Follow
the chemical cleaner handling instructions on
the next page.
7
Rinse Aid tablet (blue): Remove outer
protective foil only. Do not damage the
transparent protective fi lm!
8
Place Rinse Aid tablet (blue) with transparent
protective fi lm into the recess in the air baffl e
– at the left of the cabinet.
9
Note:
The number of Cleaner and Rinse Aid tablets
will vary, depending on the degree of soiling and
size of the unit.
Cleaner tablet (white): remove protective foil.
- 45 -
Page 46

0:00
10
CleanJet
®
12
Start
CleanJet medium
0:43
Place Cleaner tablet (white) on top of Rinse
Aid tablet (blue).
Caution!
• Do not place Cleaner and Rinse Aid tablets
in the cooking cabinet!
®
• Before the start of CleanJet
hinging racks or mobile plate rack must
be inserted in the cooking cabinet as
instructed.
Close unit door.
11
cleaning the
The cleaning time is displayed.
do not open door
The buzzer sounds for 20 seconds once the
selected cleaning program has fi nished.
Your unit is ready for cooking again.
Warning:
• After the end of CleanJet
the cooking cabinet for cleaner and rinse
aid residues. Remove any cleaner and rinse
aid tablet residues and rinse thoroughly
with hand shower - Risk of corrosive burns.
• Do not store cleaner and rinse aid tablets
in the unit.
Note:
• Leave the unit door slightly open if it is going to
be idle for a prolonged period (e.g. overnight).
• Cleaning the cooking cabinet seal will extend the
service life. Use a soft cloth and cleaning agent
to clean the cooking cabinet seal. Do not use
scouring products.
• Clean the glass windows on the inside and out
and the outer panels of the unit, ideally using a
soft, damp cloth. Do not use a scouring product.
®
cleaning check
- 46 -
Page 47

CleanJet
®
Examples of cleaning step selections:
Cleaning step Description/application Cleaner/Rinse Aid
Rinse without tablets Rinse cabinet with warm water. No
Rinse For non-greasy limescale deposits Rinse Aid
e.g. after baking, working in Moist Heat.
Interim cleaning For all deposits – without drying and rinsing. Cleaner
Short cleaning time with increased user of Cleaner.
Light For light soiling, e.g. after mixed loads, Cleaner/Rinse Aid
applications to 200 °C.
Medium For roasting and grilling deposits, e.g. after cooking Cleaner/Rinse Aid
chicken, steaks, grilled fi sh.
Strong For heavy roasting and grilling deposits, Cleaner/Rinse Aid
e.g. multiple loads of chicken, steaks, etc.
- 47 -
Page 48

CleanJet®/Interrupt CleanJet
®
Interrupting the CleanJet®Program:
If there is a power cut of more than 10 minutes or
after the unit is switched off the display shows.
Interrupt CleanJet
®
If Interrupt CleanJet
seconds by pressing the display or the central dial,
the program continues uninterrupted to the end.
If Interrupt CleanJet
1
is not confi rmed within 20
®
is selected:
Interrupt CleanJet
remove
The display asks you to remove the Cleaner and
2
Rinse Aid tablets (if still there).
Warning!
• Always wear gloves when handling Cleaner
and Rinse Aid tablets – danger of corrosive
burns!
Note:
If the unit is again switched off and on during the
Abort Program the following appears:
manual rinse
The cooking cabinet should then be thoroughly
1
rinsed with the hand shower.
2
End the process by pressing the arrow key.
Warning!
Thoroughly fl ush away Cleaner and Rinse Aid
residues with hand shower.
Your unit is ready for cooking again.
3
Close the cooking cabinet door.
Unit being rinsed, the display shows:
Interrupt CleanJet
Once rinsing has fi nished the display shows
cleaning incomplete
Your unit is ready for cooking again.
- 48 -
Page 49

CleanJet® – Request
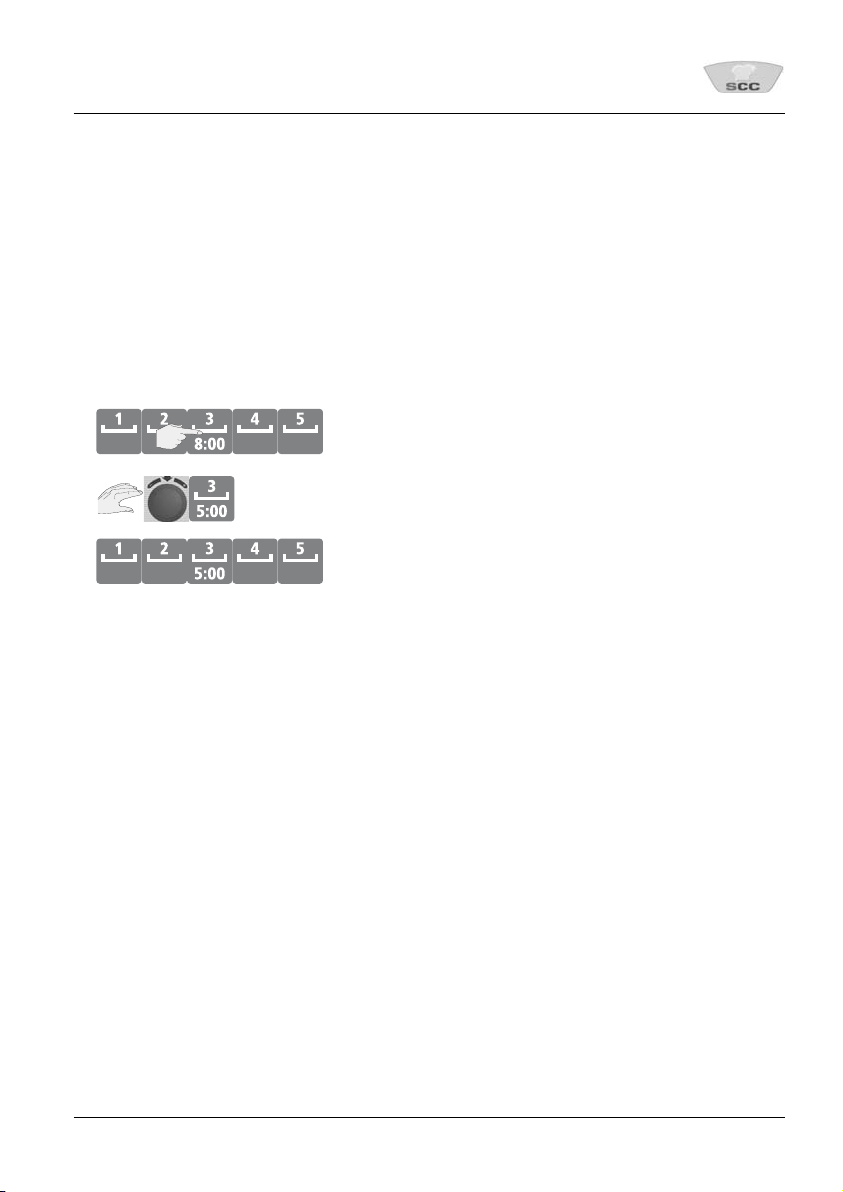
CleanJet® Request
This function allows a fi xed operating hours time to
be set for CleanJet
®
cleaning.
1
2
settings
3
4
8:00
5
You can set the desired operating hours for the
cleaning request using the central dial.
Note:
„red” CleanJet
®
request active.
CleanJet request
The display shows this message when the set
operating time is reached, the activated cooking
process is complete or after the unit is switched on.
CleanJet
®
CleanJet
is activated (see CleanJet®).
or
Later
CleanJet® Request is suppressed and appears on
completion of the next cooking process, or when
the unit is switched on. This procedure can be
repeated any number of times.
„blue” CleanJet
®
request inactive.
- 49 -
Page 50

Delta T cooking, 1/2 power, power optimisation connection
By gradually raising the temperature in the cabinet
until the cooking process ends and maintaining
a constant differential to the current core
temperature, the meat is cooked more slowly.
Delta = difference between core temperature and
cooking cabinet temperature.
The difference between the core temperature and the
cooking cabinet temperature gives the Delta temperature.
1
2
3
ΔT
Δ25
4
1/2 Power
(Cannot be selected in SelfCooking Control® mode!)
The power consumption of the heating elements in
electric appliances is cut by 50% (e.g. Model
10 x 1/1 GN from 18 kW to 9 kW).
Can be selected for any cooking medium.
1
2
3
Function E1/2 active, E/2 red light comes on
Note:
Cooking times are longer when cooking with half
power. Food quality may be reduced.
Connection of Energy
Optimisation System
(electric appliances only!)
If the power supply is interrupted by an energy
optimisation system this will be indicated on the
display (Combi-Steamer mode only).
E/2
150°C E/2
5
6
or
5
6
72
E
0:30
- 50 -
Page 51

Automatic start time
If your kitchen setup so requires, you can set your
unit to start automatically.
Enter automatic start time:
1
2
Most recently set start time is automatically
3
start time
17:00
displayed.
17:00
7
Select cooking mode in SelfCooking Control® mode,
manual mode or program and make the desired
set-tings (time, cabinet temperature, core temperature etc.).
The start time is activated.
Real time and start time are displayed alternately.
The cabinet lighting is switched off.
06:00
04:00
4
Set the desired start time using the central dial
and press the central dial to confi rm.
5
6
Set the desired date using the central dial and
press the central dial to confi rm.
06:00
17.02.05
18.02.05
7
or
7
or
Deactivating start time
1
2
Caution!
• We would remind you that it is very bad
food hygiene to keep food in an uncooled
or unheated cooking cabinet for a
pro-longed period!
start time
start time
- 51 -
Page 52

ChefLine®, CalcDiagnosis system® (CDS)
ChefLine
You are given the opportunity of having the
ChefLine
®
®
telephone number displayed.
1
2
3
The display shows:
Tel:
Chef✆Line
CalcDiagnosis system® (CDS)
The CalcDiagnosis System® rinses and drains the
steam generator as required by the amount of
use. The CalcDiagnosis System
limescale level in the steam generator. The display
shows the limescale level in the steam generator
as a red bar.
®
also monitors the
1
2
Limescale level displayed:
Note:
Indication 8 red bars – display shows:
CalcCheck
The message goes out when the display is pressed.
Please descale the steam generator within
the next 3-4 weeks.
Indication 9 red bars – display shows:
CalcCheck
Message goes out automatically after 30 seconds.
The steam generator must be descaled
within the next 2 weeks at the latest!
If you have any questions on descaling please ask
an authorised service partner.
- 52 -
Page 53

Steam generator descaling
Descaling
Warning!
• The process described involves working
with an aggressive chemical fl uid – danger
of corrosive burns!
• To prevent damage to materials and
health it is vital that you use:
protective clothing
safety goggles
protective gloves
face mask
the manufacturer’s descaler hand pump
• Thoroughly rinse descaling fl uid spills with
water immediately.
• After descaling rinse descaler pump and
hoses thoroughly with water.
• Use only the descaler made by the
appliance manufacturer.
• Follow descaler pump instructions and
safety instructions.
You will need:
Electric descaler pump – Article no.: 60.70.409
Descaler, 10 litre canister – Article no.: 6006. 0110
Note:
If the cabinet temperature exceeds 40 °C,
the display will show the message
unit to hot
open door
Please cool the cabinet with „Cool Down“.
Once your unit has cooled down you can continue
descaling
descale
close door
wait cool
steam generator
Wait until the steam generator has cooled down.
5
1
Deselect operating mode
2
3
4
Follow user prompt
descale
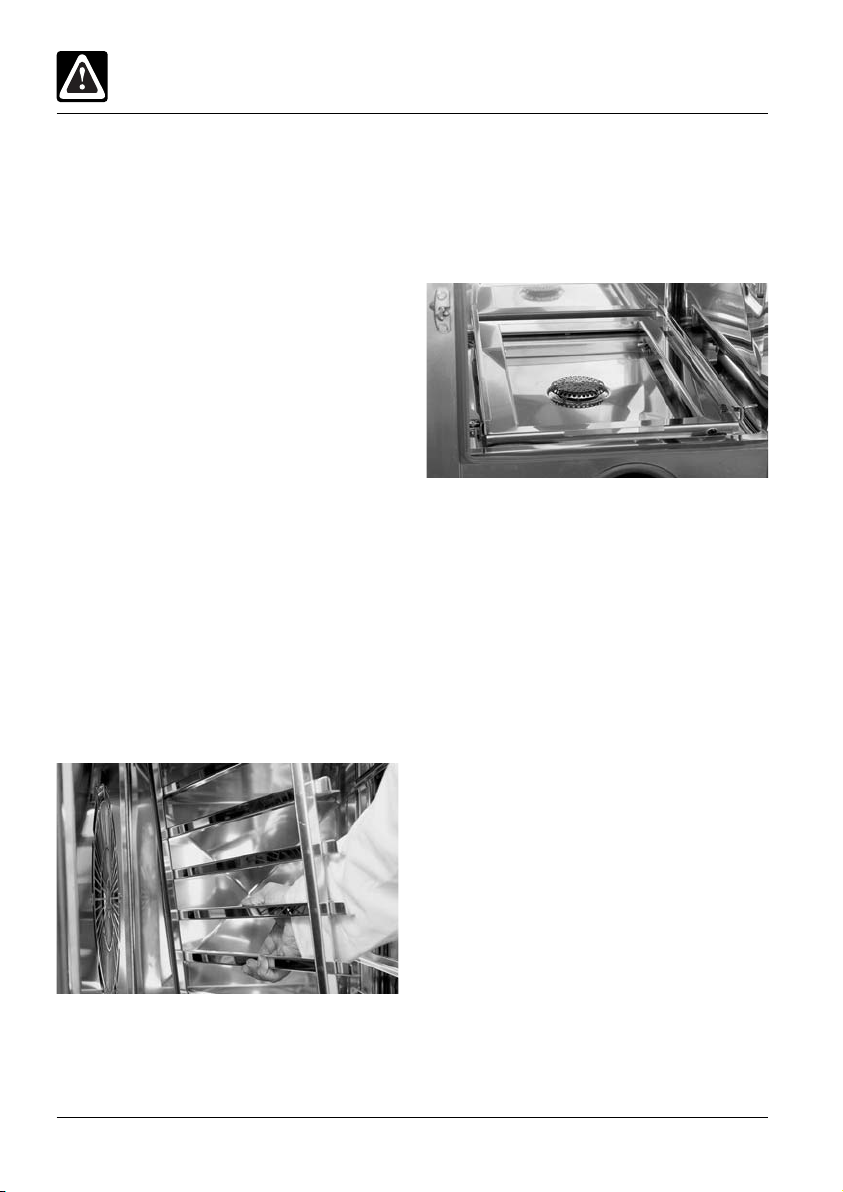
Remove left grid shelf and air baffl e.
- 53 -
Page 54

Steam generator descaling
6
Guide the hose into the steam inlet up to the
mark shown on the hose. Fasten the hose to the
left grid shelf with the wire hook.
Note:
The allocation of marking to unit size is
described in the descaler pump instructions.
7
Replace left grid shelf to secure the descaler
8
hose.
Introduce the hose into the canister with the
9
descaling fl uid.
fill 5 liter descaler
10
Use the appliance manufacturer’s hand
pump to very slowly fi ll with the amount of
descaling fl uid shown on the display.
Caution!
• Descaling fl uid reacts with lime and can
foam over.
11
As soon as the indicated amount of descaler
12
Remove the descaling accessories (hand
Caution!
• Residual quantities of descaling fl uid
13
Rinse cabinet and descaling accessories
Insert air baffl e and left grid shelf correctly
14
stop filling?
has been fi lled, please confi rm input.
pump and canister) from the cabinet.
may be present in the hoses.
thoroughly with hand shower.
into the cabinet and lock properly.
Place the canister in the cabinet.
close door
Close the cooking cabinet door – Descaling
15
process starts automatically.
- 54 -
Page 55

Steam generator descaling
1:30
cooking cabinet
being rinsed
Descaling processes and descaling time are shown
on the display.
When the descaling process has fi nished the
descaling status of the steam generator is indicated.
If more than 3 bars are displayed after the
descaling process, the descaling process can be
repeated.
repeat descale?
Aborting the descaling process
If necessary you can discontinue the descaling
process.
Not yet fi lled with descaling fl uid:
or
Already fi lled with descaling fl uid:
1
Switch unit off and on.
2
Remove descaling accessories from cooking
cabinet.
Fit air baffl e and grid shelf and lock properly.
3
4
Immediately rinse cabinet and descaling
accessories thoroughly with water.
5
Abort program
1:06
Note:
The minimum running time of the Abort
Program is 1 hour 6 minutes.
steam generator
descale complete
6
The steam generator is automatically drained
and thoroughly rinsed.
Your unit can be used for cooking again.
- 55 -
Page 56

Humidifying nozzle descaling
Descaling the humidifying nozzle
Please check the humidifying nozzle for limescale
deposits once a month.
Warning!
• The process described involves working
with an aggressive chemical fl uid – danger
of corrosive burns!
• To prevent damage to health it is vital that
you use:
protective clothing
safety goggles
protective gloves
face mask
Release the union nut of the humidifying nozzle
4
(turn anticlockwise – spanner size 18).
1
Switch unit off.
To descale the humidifying nozzle please remove
2
the left grid shelf.
Open the air baffl e.
3
Place the humidifying nozzle in the descaling
5
fl uid overnight. Before assembling make sure
that the hole in the humidifying nozzle is free of
limescale..
Assemble in reverse order. Take care to fi t the
6
humidifying nozzle in the correct position.
Note:
Make sure that the air baffl e and the grid shelf are
properly fi tted and locked.
You will need the appliance manufacturer’s
descaler:
10 litre canister – Article no.: 6006. 0110.
- 56 -
Page 57

Draining the steam generator, unit and software
identifi cation, Service-Info
Draining the steam generator
You can drain the steam generator before moving it
or to stop it freezing.
Deselect cooking process.
1
Open cabinet door.
2
3
4
5
The steam generator is drained automatically.
Unit and software identifi cation
The unit and software identifi cation can be read
out using the „Model“ Function.
1
2
3
Mod.
Service-Info
The following service notices can be displayed in the
Service-Info area.
1
2
3
The display shows:
e.g.
Service 26
call Customer Serv.
Tel.:
Note:
If there is no service notice, the relevant
Customer Service telephone number is shown under
Service-Info.
Service✆Info
No.:
4
SW:
Model:
ENGLISH
Service notices are displayed automatically at
10 second intervals.
See also Fault Indications chapter.
- 57 -
Page 58

USB data memory (USB stick)
USB data storage (USB stick)
You can read out cooking programs and HACCP
data from the unit with the USB stick.
You will need the appliance manufacturer’s
USB memory stick: Article No.: 42.00.042
USB stick connected. HACCP data present.
The status of the USB data memory is shown on the
display:
Insert USB memory stick into the USB interface
below the control panel.
USB data storage (USB stick)
display readout
USB stick connected, HACCP data present, stick is
write-protected.
USB stick connected, HACCP data successfully
written
USB stick connected, program fi le present.
USB stick connected, program fi le present, stick is
write-protected.
USB stick connected, program fi le successfully
written.
USB stick connected, writing error.
USB stick connected, no data present.
USB stick connected, no data present, stick is
write-protected.
USB stick connected, writing in progress, do not
remove!
- 58 -
Page 59

HACCP logging, software update
There is a continuous output of HACCP process data
via the unit interface. HACCP process data is also
stored for a period of 10 days and can be
outputted via the unit interface as required.
You will need a PC/Laptop and CombiLink
software. You will fi nd more detailed explanations in
the CombiLink
Output of stored process data:
®
Manual.
®
1
2
HACCP
3
Continuous process data output is interrupted.
4
24.08.04 09:15
5
Start time (date/time of day)
6
01.10.04 12:00
7
Finish time (date/time of day)
The following data is logged:
Data output every 60 sec (in ASCCII format)
– Batch no.
– Time of day
– Cooking program name
– Cooking cabinet temperature
– Core temperature
– Door open /door closed
– Change of cooking mode
– CleanJet
– 1/2 power
– Connection of energy optimisation system.
®
‚ cleaning
Software update
You can update the unit software using the USB
stick.
1
Insert the USB memory stick with the new
software into the USB port under the control
panel.
8
Download
2
3
Update
3
Notes:
“Software update” is only displayed if the USB stick
with the new software is inserted.
- 59 -
Page 60

Importing and exporting programs
Importing and exporting programs
You can copy your cooking programs to an original
USB memory stick made by the appliance manufacturer. The cooking programs can subsequently be
copied to a computer or another unit.
Program export:
1
Plug USB memory stick into USB interface below
control panel.
2
3
4
Cooking programs are stored on the USB
memory stick (storage process is complete as
soon as the colour of the USB stick symbol
changes from red to blue and a tick is
displayed.
Program import:
1
Plug USB memory stick into USB interface below
control panel
2
3
4
Cooking programs are downloaded to the unit’s
program memory (storage process is complete
as soon as the colour of the USB stick symbol
changes from red to blue and a tick is
displayed.
Unit is restarted automatically.
5
Note:
Existing programs are kept if the program names
are different. If the program name is the same, the
program is replaced.
- 60 -
Page 61

Real-time, time format, time format for cooking sequences
Basic appliance settings can be displayed and
changed.
Real-time
1
2
3
settings
10:50
4
5
10:50
6
Time format
1
2
3
Press the display to change between the
Set time format glows red
settings
am/pm
24h
24 hour and 12 hour indication.
(date format changes automatically).
Time format for cooking
sequences
1
2
h:m
3
Press the display to change between h:m and
m:s settings.
Set time format glows red.
Possible time settings:
h:m setting: hours : minutes
m:s setting: minutes : seconds
Note:
m:s setting only possible up to
99 minutes and 59 seconds.
The time format for each individual program step
can be changed during programming
Example:
Program step 1 (h:m),
Program step 2 (m:s),
Program step 3 (h:m)
m:s
- 61 -
Page 62

Temperature unit, enter IP address for Ethernet, language
Modifying the basic settings
1 2
Temperature unit setting
Your appliance gives you the choice of two
temperature units.
3
Press the display to change between the
The set temperature unit glows red.
Date setting
3
°C / °F
temperature units °C and °F.
17.02.05
4
5
17.02.05
settings
Enter IP address for Ethernet
3
4
IP
Edit
127.0.0.1
5
Delete the set IP address.
6
Enter new IP address. Select a number with the
7
delete
01234 5 6789°
central dial and press central dial to confi rm.
store
6
7
17.02.05
8
Date format is linked to time format.
Selection:
24h appears as 17.02.05 (day/month/year)
am/pm appears as 02/17/05 (month/day/year)
Language setting
3
english
4
Use the central dial to select the language you
want.
- 62 -
Page 63

Factory default, buzzer sound and time,
display contrast, CleanJet
Modifying the basic settings
®
prompt
1 2
Factory Defaults
3
Briefl y press key 1x, a red frame fl ashes.
Hold key down until the background changes
from red to blue.
Press the button to reset the basic settings
(language, temperature unit, buzzer tone, time
unit, display settings, forced clean) to their
factory defaults.
Buzzer – Tone setting
3
4
Rotate the central dial to select the desired
signal tone.
Buzzer – Time setting
settings
Display Contrast setting
3
4
Rotate the central dial to change the contrast
on the display. The factory default is reset
automatically to ensure maximum indicator life.
CleanJet® Request time setting
The operating hours time for the automatic cleaning
request is set using the CleanJet
®
Request function.
3
4
24:00
5
®
For description see CleanJet
chapter.
3
30 sec
4
Turn the central dial to set the duration of the
signal tone from 30 seconds to 240 seconds or
to continuous tone..
- 63 -
Page 64

Manual cleaning
Or, instead of cleaning with CleanJet®, you can
clean your unit manually.
For hygiene reasons and to prevent
malfunctions it is essential to clean the unit
every day.
4
5
Clean
Warning!
• The process described involves working
with an aggressive chemical fl uid – danger
of corrosive burns!
• It is vital to wear the correct protective
clothing, gloves, face mask and safety
goggles.
• Follow the safety instructions on the spray
bottle and cleaner canister.
• Use only the appliance manufacturer’s
Original Cleaner and Original Hand Spray
Pistol.
• Never leave the hand spray pistol unused
under pressure.
• Do not spray persons, animals or other
objects.
• If the unit is not cleaned or is not cleaned
well enough, deposits of grease or food
residues in the cooking cabinet may catch
fi re.
• Please make sure that the air baffl e and
grid shelf are properly inserted and locked
before starting to clean.
Note:
Ensure the cabinet temperature is under 60 °C
before you start manual cleaning.
If the temperature in the cooking cabinet
exceeds 60 °C the display shows:
cooking cabinet
too hot
Cool cabinet to below 60 °C.
6
Spray the cabinet, the inside of the door, the
door gasket, the area behind the swivel air
-baffl e and both sides of the air baffl e with the
appliance manufacturer’s cleaner.
1
Switch unit on.
2
3
Insert air baffl e and grid shelf and lock properly.
7
Insert cable for the core temperature probe into
the holding tabs on the air baffl e.
- 64 -
Page 65

Manual cleaning
0:50
8
Close unit door, cleaning starts automatically.
Follow the appliance menu prompt.
The cleaning time is shown on the display.
rinse
When „rinse“ request appears, please
9
thoroughly rinse grid rack, mobile oven rack,
cooking cabinet and the area behind the air
baffl e with the hand shower.
Insert air baffl e and grid shelf and lock
10
properly. Insert cable for the core temperature
probe into the holding tabs on the air baffl e.
11
Wipe down cooking cabinet door and door
seal with a damp cloth.
12
Close cooking cabinet door.
0:10
To dry the cooking cabinet „Hot air“
operating mode is automatically switched
on for 10 minutes after the cabinet door is
closed.
End
By selecting an operating mode you leave the
13
cleaning program.
Attention:
• To stop the high-quality nickel-chromium
steel corroding, your unit must be cleaned
regularly, even if it is only operated in
“Moist Heat” mode.
• Leave the appliance door slightly open if it is
going to be idle for a prolonged period (e.g.
overnight).
• Cleaning the cooking cabinet seal will extend the
service life. Use a soft cloth and cleaning agent
to clean the cooking cabinet seal. Do not use
scouring products.
• Clean the glass windows on the inside and out
and the outer panels of the unit, ideally using a
soft, damp cloth. Do not use a scouring product.
• To stop the high-quality chrome nickel steel
corroding, your appliance must be cleaned
regularly, even if it is only operated at „Moist
Heat“.
• If there is heavy soiling let the residues soften for
10 minutes in „Moist Heat“ mode before
cleaning.
• Do not treat unit with acids or expose to acid
fumes – this will damage the protective layer
of stainless steel and may cause the fi nish to
discolour.
• Do not use high pressure cleaners.
• Rinse the spray pistol nozzle and nozzle
extension with clear water after every use.
• Rinse the cleaning bottle with warm water after
use.
• A couple of drops of salad oil will clear any
stiffness in the pump plunger.
You need:
Spray pistol – Article no.: 6004.0100
- 65 -
Page 66

Maintenance
Inspections which shoud only be
carried out by experienced staff
technicians.
Danger!
• High Voltage!
• Switch off the unit at the mains before
opening the service doors and working on
live components.
• Use only genuine spare parts made by the
appliance manufacturer.
Cleaning the air fi lter below the
installation area
• Push the lever to the right in order to release
the lug. Then push the fi lter to the right and pull
down to remove.
• Clean the air fi lter in the dishwasher at least
once a month and replace after drying.
• Air fi lters should be replaced at least twice a
year.
Changing the interior lighting
Replace the halogen bulb when the interior lighting
fails.
First switch off the unit at the mains!
Cover the outlet inside the cabinet with a cloth and
remove the 4 screws holding the glass retaining
frame.
Remove the frame together with glass and gaskets.
Replace the halogen bulb with a genuine spare part
(Article no.: 3024.0201).
Also replace both gaskets.
External gasket frame: Article no.: 40.00.093
Internal gasket frame: Article no.: 40.00.094.
Please be careful not to touch the bulb with
your fi ngers.
Screw down the retaining frame with glass and
gaskets and switch the unit on.
- 66 -
Page 67

Maintenance Help Function
Replacing the door gasket
The door gasket comprises a vulcanised frame
which slots into a guide on the cooking cabinet.
If a gasket needs changing, pull the old gasket out
of the guide.
Clean any dirt from the guide rails.
When fi tting the gasket make sure the rectangular
part of the gasket is inserted properly into the
frame.
When assembling it is advisable to fi rst dampen the
retaining lips with soapy water.
Cooking cabinet gaskets
Model 6 x 1/1 GN Article no.: 20.00.394
Model 6 x 2/1 GN Article no.: 20.00.395
Model 10 x 1/1 GN Article no.: 20.00.396
Model 10 x 2/1 GN Article no.: 20.00.397
Model 20 x 1/1 GN Article no.: 20.00.398
Model 20 x 2/1 GN Article no.: 20.00.399
Help Function
Help texts are fi led in your appliance so that you
can use its extensive potential as fully and as simply
as possible. The Help Function is available if the
display shows „?“.
1
2
To leaf through the Help Function:
1
2
Note:
The desired cooking process can be selected
directly from the Help Function.
Note:
The control PC board battery must be disposed
of separately when disposing of the electronic PC
board or the appliance.
- 67 -
Page 68

Appliance options
Draft diverter (gas appliances only)
Exhaust gas pipe diameter: 180 mm
UltraVent® condensation hood
The patented condensation technology used in
the UltraVent
steam in enclosed areas and discharges it through
the integral exhaust system. Vapour is automatically
fan-extracted, even when the cabinet door is open.
Signifi cantly reduces unpleasant cooking smells.
No ventilation system needed. Easy to install and
retrofi t.
Only for units with right hand hinging.
®
condensation hood totally absorbs
Access ramp for 20 x 1/1 and
20 x 2/1 GN
SLevels out unevenness in the kitchen fl oor to a
maximum of 20 mm in the direction of insertion.
Levels out unevenness in the kitchen fl oor
(crosswise) to a maximum of 12 mm in the direction
of insertion.
Heat shield for left side panel
Condensation extractor hood for
table-top units
Vapour is automatically fan-extracted when
the cabinet door is opened (no condensation
engineering). Easy to install and retrofi t.
Only for units with right hand hinging.
If the required minimum distance (350 mm) from
heat sources (e.g. grill plate) cannot be observed for
installation reasons, the distance may be
reduced to 50 mm by using a heat shield.
- 68 -
Page 69

Appliance options
Combi Duo
Model 6 x 1/1 on 6x1/1
or 10 x 1/1 GN (electric)
Model 6 x 2/1 on 6 x 2/1
or 10 x 2/1 GN (electric)
Model 6 x 1/1 on 6x1/1 GN (gas)
Model 6 x 2/1 on 6x2/1 GN (gas)
Pedestal fastenings table-top
units
Floor fastening for fl oor units and
base cabinets.
Standard
Top rack 1.60 m
Mobile
Top rack 1.72 m
With 150 mm height-adjustable feet
Top rack 1.68 m
Article numbers on request.
- 69 -
Page 70

Fault indications
Any faults developed by your unit will be shown on
the display:
Faults on your unit which allow you to continue
using the unit can be suppressed by pressing the
arrow button.
Service 26
Tel.:
Fault When and how What to do
indication
Service 10 For 30 seconds after switching on Can be suppressed with „arrow button”. Unit
can be used for cooking.
Please notify Customer Service!
Service 11 For 30 seconds after switching on Can be suppressed with „arrow button”. Unit
can be used for cooking.
Please notify Customer Service!
Service 12 For 30 seconds after switching on Can be suppressed with „arrow button”. Unit
can be used for cooking.
Please notify Customer Service!
Service 14 For 30 seconds when switching on Can be suppressed with „arrow button”. Unit
can only be used in Dry Heat mode.
Please notify Customer Service!
®
Service 20 Displayed for 30 seconds when the Working with SelfCooking Control
cooking mode is changed, on switch- modes and programmes not possible. Working
ing on and when the SelfCooking in Combi-Steamer mode is possible to a limited
Control
®
modes are selected. extent. Please notify Customer Service!
Service 21 For 30 seconds when switching on Working with SelfCooking Control
modes and programmes not possible. Working
in Combi-Steamer mode is possible to a limited
extent. Please notify Customer Service!
Service 23 Displayed continuously. Switch the unit off and notify Customer Service.
Service 24 Displayed continuously. Switch the unit off and notify Customer Service.
cooking
®
cookin und
- 70 -
Page 71

Fault indications
Service 25 Indicated for 30 seconds during CleanJet® not functioning!
CleanJet
®
cleaning • Turn water tap on full
• Check supply fi lter
• Remove containers from cooking cabinet
• If you cannot identify the fault please notify
Customer Service.
• If Service 25 appears when CleanJet
®
cleaning is running, please remove tablets
from cooking cabinet and rinse cabinet
thoroughly with hand shower (including
behind the air baffl e).
• Unit can be used to cook for short periods.
Please notify Customer Service!
®
Service 26 Continuous indication If fault indication appears when CleanJet
cleaning is running, please initiate „CleanJet
®
Abort“.
If the fault indication still shows after „CleanJet
Abort“, please remove tablets from the cooking
cabinet and rinse cabinet thoroughly with hand
shower (including behind the air baffl e).
Please notify Customer Service!
®
Service 27 For 30 seconds after switching on CleanJet
system fault!
Isolate unit from power supply for 5 seconds
at point of power connection.
Service 28 For 30 seconds after switching on Please notify Customer Service!
Service 29 Continuous indication Please check air fi lter under the control panel
and clean or replace if necessary.
Check whether an external heat source is
affecting the unit.
Please notify Customer Service if the service
notice persists!
Service 30 For 30 seconds when switching on Moisture regulation not functioning! Unit can
be used for cooking to a limited extent. Please
notify Customer Service!
Service 31 For 30 seconds after switching on Core temperature probe defective! Unit can be
used for cooking without core temperature
probe. Please notify Customer Service!
Service 32 Continuous indication. Shut off gas gap!
Gas units only Please notify Customer Service!
Service 33 Continuous indication after 4 Resets Shut gas tap!
Gas units only Please notify Customer Service!
Service 34 Displayed continuously. Please notify Customer Service!
®
- 71 -
Page 72

Before you call customer service
Error Possible cause To eliminate
Water dripping out of the
unit’s door
Noise is heard in the
cooking cabinet while the
unit is in use.
Door is not closed correctly.
Door seal is worn or
damaged.
Air baffl es, grid shelves, etc,
are not fi xed correctly.
If the door is closed correctly, the door handle
will point down on fl oor units.
Replace the door seal (see the „Maintenance”
section of the manual).
Care instructions for a maximum service life:
- At the end of production, clean the door seal
thoroughly with a damp cloth.
- If lots of grilled products are cooked
(considerable build-up of grease), then the
door seal must also be cleaned with a damp
cloth between cycles.
- If the unit is to be operated for a long time
without products, we recommend that the
cooking cabinet temperature should not
exceed 180 °C.
Fix the air baffl es and grid shelves correctly in
the cooking cabinet.
Cooking cabinet light not
working.
Low water level: “Flashing
water valve symbol”.
Water running out of the
bottom of the unit.
Halogen lamp is defective. Replace the lamp (see the „Maintenance”
section of the manual).
Water valve closed.
Water intake fi lter on the unit
is clogged.
The unit is not level.
Drain is blocked.
- 72 -
Open the water valve.
Check and clean the fi lter. To do this: Close
the water valve, unscrew the water intake on
the unit, then remove and clean the fi lter in
the water intake. Insert the fi lter, connect the
water intake and check for leaks.
Level the unit using a spirit level (see
Installation Manual).
Remove and clean the outlet (HT pipe) on
the back of the unit. Blockages can occur if
products with a high proportion of fat are
cooked frequently or if the drop on the outlet
pipe is too shallow.
To remedy:
Run the outlet pipe as described in the
installation instructions.
Clean the unit regularly with CleanJet
®
Page 73

Before you call customer service
Error Possible cause To eliminate
The unit does not indicate a
function after it is switched
on.
Foam forms on the unit at
the top of the outlet pipe
during CleanJet
®
cleaning.
The run time is suddenly
incremented during a
®
CleanJet
process.
The gas unit indicates
„Change polarity”.
Gas unit constantly displays
Reset.
Cooking mode button
fl ashing
External main switch is
switched off.
Fuse on the premises’
distribution board has
tripped.
The ambient temperature
after switching the unit off
remained below 5 °C (41 °F)
for a long time.
The amount of cleaner and
rinse aid tablets was set too
high.
The outlet is not installed
correctly.
®
The CleanJet
process is
interrupted.
The power supply is not
connected with the correct
polarity.
The gas supply to the unit is
interrupted.
The gas pressure is too low.
The cooking cabinet is too
hot
Switch on at the main switch.
Check the fuses on the premises’ distribution
board.
Heat the cooking cabinet to above 20 °C
(68 °F).
The appliance must only be used in frost-free
conditions (see installation instructions).
Select the number of tablets as specifi ed for
the CleanJet
of tablets if a water softener is connected
or if the water is naturally soft (see the
„CleanJet
®
Install the outlet as described in the
installation manual.
Make sure that the air baffl e and the grid
shelves are fi xed correctly in the cooking
cabinet. There must be no containers or sheets
in the cooking cabinet during the CleanJet
process.
If the gas unit is connected to a socket,
remove the connector and turn through 180°.
An electrician can permanently connect the
unit (without a connector) with the correct
polarity.
Open the gas valve.
Switch on the ventilation cover.
Have the gas supply to the unit checked.
Use Cool Down to cool the cooking cabinet
(see the “Cool Down” section of the “General
User Instructions” manual).
®
process. Reduce the number
“ section of the manual).
®
- 73 -
Page 74

Notes
- 78 -
Page 75

Page 76

englisch UK
80.01.098 · V-09 · MediaDesign and Services · Ad · 09/06
 Loading...