

Page 1
PROGRAM SELECT
LEVEL
82
100
4 6
L1
L3L2
P
PAGE 2 ASSIGN
PAGE 1 ASSIGN
BOTHOFF
BOTH
Z1
OFF
Z2
Z1
Z2
DATA SHEET / MANUAL ZR 1 & PR 2
COMMERCIAL PROCESSOR REMOTES
CP 64 & CP 52 CONNECTIONS
Turn the power to the CP unit OFF until all connections are
made.
EUROBLOCK CONNECTIONS
When wiring to Euroblocks, a minimum wire gauge of 22
is preferred for reliability. If the ground or shield wire is left
shorter, it acts as a strain relief for the other wires. Cable with
a flexible jacket is easier to use and less likely to damage the
connections. Avoid stripping excess insulation. Inspect wires for
nicks that may lead to wire breakage. Fully insert each wire in
the appropriate socket and tighten the screw.
REMOTE INSTALLATION
e CP 64 supports wired remotes for Page Assign (PR 2)
and Zone Level and Zone Source (ZR 1) selection. e CP 52
only supports Zone Level and Zone Source (ZR 1) selection.
Wire lengths of up to 1000 feet are possible. A brief list of suitable wire types is provided below in the section on Wire Types.
e PR 2 remote provides Page Zone Assign for Page 1 and
Page 2 signals and is usually located at the Page source. If your
application requires one of the two PAGE ASSIGN switches to
control both Page 1 and Page 2 Assign, simply wire Page 1 and
Page 2 control bits in parallel. You may wish to leave the knob
off the unused control and cover it with one of the hole plugs
provided in the kit. If your installation requires Page 1 and Page
2 remote control at two different locations, only three wires are
required for each PR 2 remote (Z1, Z2 & GND). As above, you
may wish to leave the knob off the unused control and cover it
with a hole plug.
e ZR 1 remote provides Zone Level and Source Selection,
allowing local control from inside the zone. Two ZR 1 remotes
may be used (use only one for each Zone). If only one of the two
controls is used, you may cover the unused control with one
of the hole plugs provided in the kit. If you require one ZR 1
remote to control both Zones, simply wire the ports in parallel.
is may be done with selector only, volume only or both. If only
one of the two controls is wired in parallel, the other is still available for a second remote.
When paralleling one remote across multiple CP 64s, all
three control pins must be wired, including the shields.
Power to the CP 64 or CP 52 should be off until all connections are made. It is important to ensure that the Remote Ports
are not subjected to sustained voltages outside the range of 0 to
5 volts DC or high levels of static. Inputs are protected, however, caution is the better part of... you know. It is a good idea to
install the wiring, connect it to the remote assemblies and then
make the final connections at the CP unit. Do not short Vr1 or
Vr2 pins to ground. ese pins are current limited, however, excess heat is generated in the 5 volt supply if a short occurs. Never
subject the Vr1 or Vr2 pins to voltages above 5 volts.
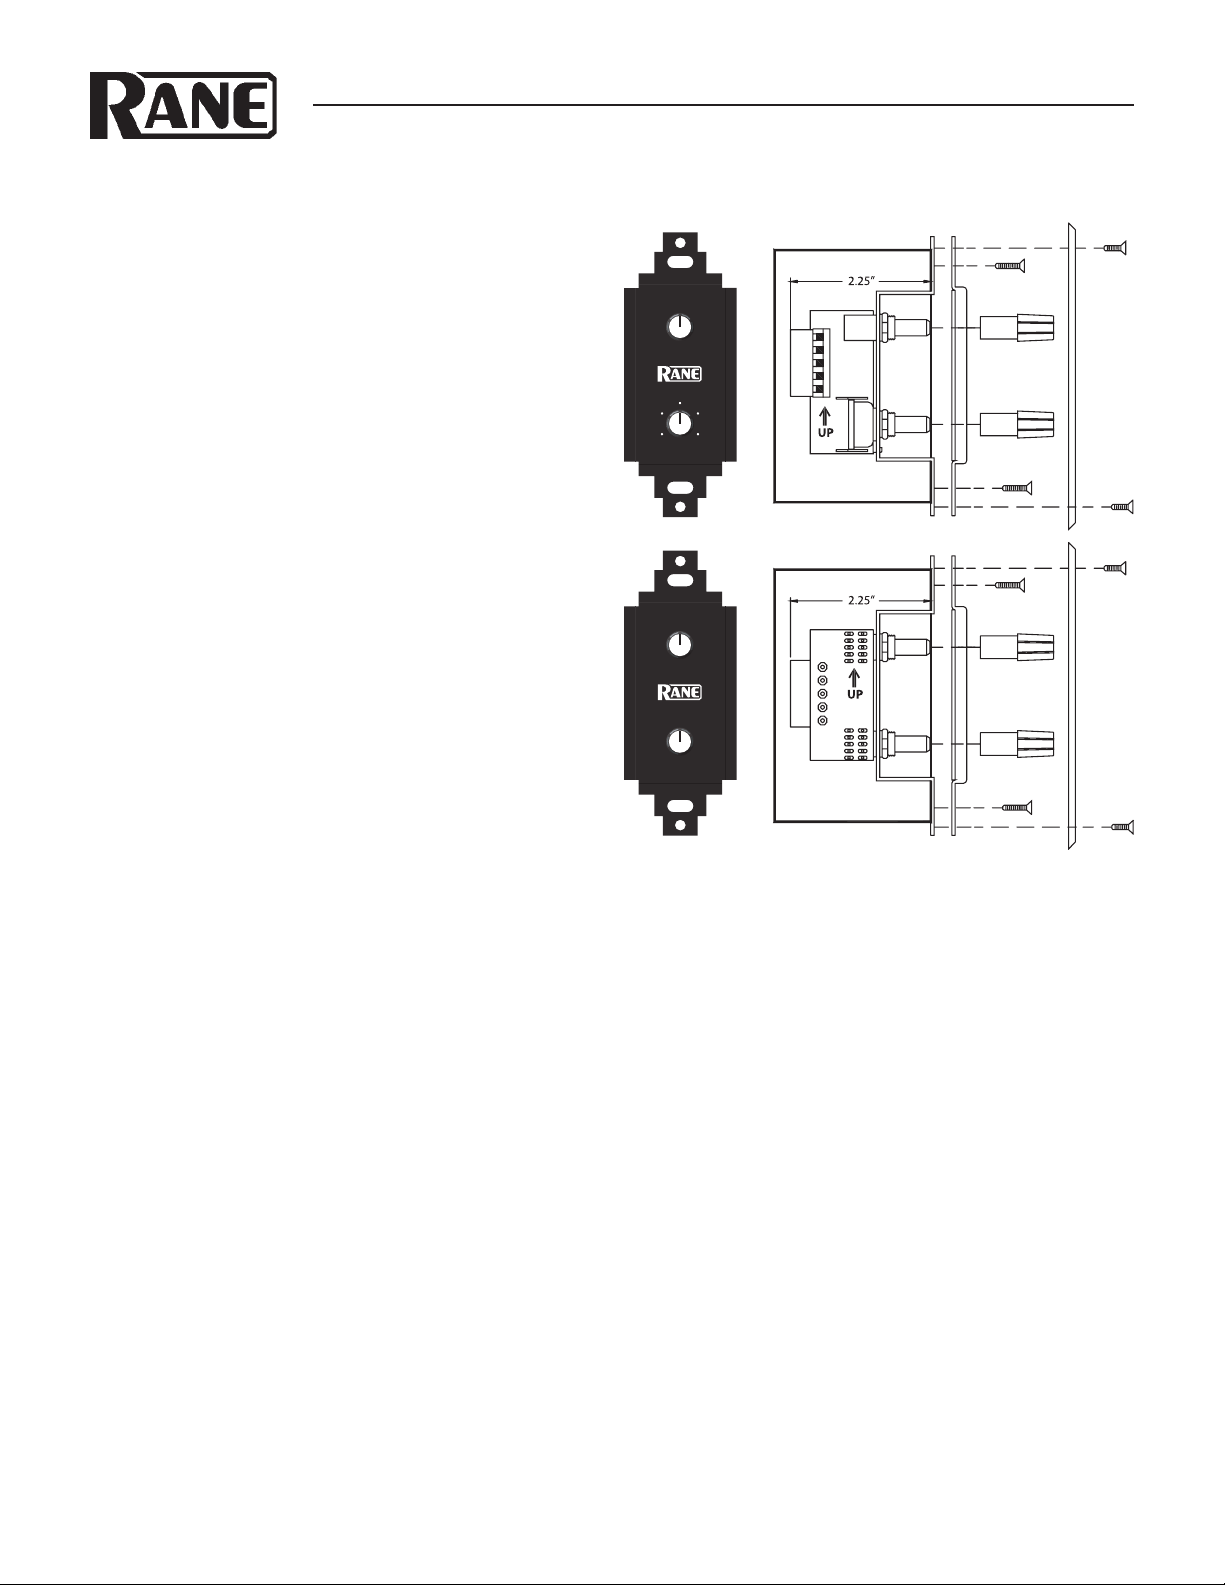
REMOTE MOUNTING
e ZR 1 and PR 2 remote assemblies mount in a standard
U.S. electrical box with a minimum depth of 2.25" (5.5 cm).
Be sure to note the wire color of each input in order to facilitate
correct wiring to the CP unit. Connect each wire to the 5-pin
connector by fully inserting it in the correct socket and tightening the screw. Make sure wires are free of nicks and that the
cable jacket is stripped back sufficiently to allow it to lie in the
electrical box with the remote assembly inserted. Use the flat
head #6 screws supplied with the kit to mount the remote assembly and silk-screened front panel to the electrical box (see above
diagram). Note the “UP” arrow screened on the printed circuit
board of each remote (mount it pointing up).
Install each knob so that the line on the knob is properly
aligned with the silk-screening on the front panel of the remote
assembly. Install any Decora plate of your choice. For a secured
installation, you may wish to leave the knobs off and use a blank
Decora plate to cover the remote after adjustment.
Page 2
1
2
3
4
5
S2A
6
7
8
9
10
S2B
2
3
4
1
5
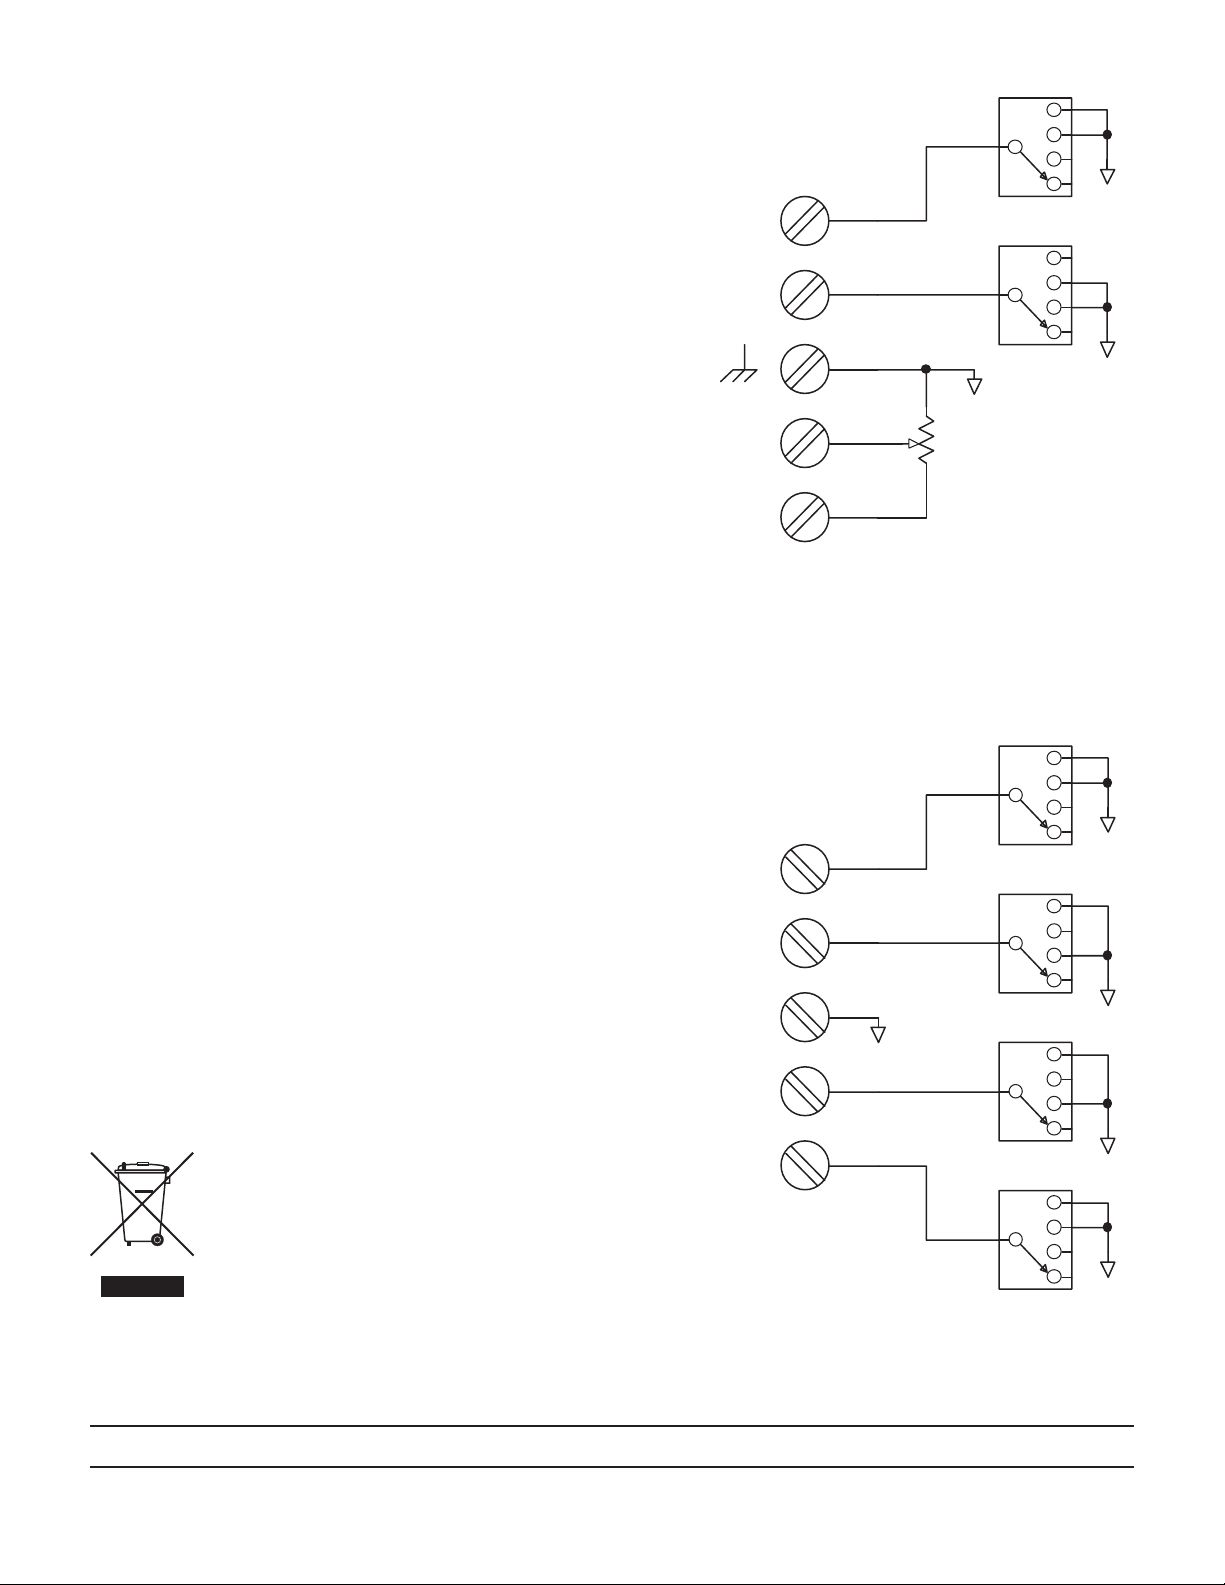
J1A
5 POS TERM
GND
GND
6
7
8
9
10
S1B
1
2
3
4
5
S1A
GND
GND
GND
Z2
Z1
GND
Z1
Z2
PAGE 1
PAGE 2
PAGE REMOTE (PR 2)
1
2
3
4
5
S1A
6
7
8
9
10
S1B
2
3
4
1
5
J1A
5 POS TERM
GND
GND
GND
D1
D0
Vc
Vr
ZONE REMOTE (ZR 1)
CW
2
1 3
R1
2KRD
WIRE TYPES
Variations in wire type do not greatly affect the performance
of the remote controls. However, 22-gauge stranded wire with
a flexible jacket is recommended. You may use 5-conductor
unshielded remote control signal cable for shorter runs (less than
200 ft.) or 4-conductor (2 pair) shielded remote control signal
cable (use the shield as the GND return) for longer runs (200 to
1000 ft.). e type of wire required is influenced by your installation and local electrical codes.
Rane Corporation does not provide or source cable. Please
contact your local retail or wholesale outlet, not the factory. e
following is a short list of suitable cable types:
CONSOLIDATED ELECTRONIC WIRE AND CABLE
Plenum cable:
Unshielded remote control signal cable CAT. # 9896
Shielded remote control signal cable CAT. #9877, CAT. #9852
WEICO WIRE & CABLE INC.
Communication and control cable:
Multiconductor, unshielded CAT. #7606
ALPHA
Communication and control cable:
Multiconductor, unshielded CAT. #1175C
BELDEN
Unshielded remote control signal cable CAT. # 88741
Shielded remote control signal cable CAT. # 88723
All features & specifications subject to change without notice. 10013
©Rane Corporation 108 02 47th Ave. W., Muk ilteo WA 98275-5 098 TE L 4 25-35 5-600 0 FAX 42 5-347 -7757 WEB www.rane.com
 Loading...