

Page 1

User Guide
(English)
Page 2

Table of Contents
Introduction................................................................................................................................. 3
Box Contents ......................................................................................................................... 3
Support .................................................................................................................................. 3
Setup............................................................................................................................................ 4
Features ...................................................................................................................................... 5
Front Panel ............................................................................................................................ 5
Rear Panel ............................................................................................................................. 6
Operation .................................................................................................................................... 7
Editing Input Settings ........................................................................................................... 7
Stream .................................................................................................................................... 9
Bluetooth ........................................................................................................................... 9
AirPlay.............................................................................................................................. 10
UPnP and DLNA .............................................................................................................. 10
Editing Output (Zone) Settings .......................................................................................... 11
Paging .................................................................................................................................. 14
Info ........................................................................................................................................ 16
Controlling Zonetech Remotely ......................................................................................... 18
Computer ......................................................................................................................... 18
Master Remote ................................................................................................................ 24
Zones ............................................................................................................................... 24
Troubleshooting ....................................................................................................................... 25
Appendix ...................................................................................................................................
Te
chnical Specifications .................................................................................................... 26
Trademarks & Licenses ...................................................................................................... 27
2
26
Page 3
Introduction
Thank you for purchasing the Zonetech. At Rane, performance and reliability mean as much to
us as they do to you. That’s why we design our equipment with only one thing in mind—to
make your performance the best it can be.
Box Contents
Zonetech
(1) 6-pin 3.8 mm Euroblock inputs
(3) 6-pin 3.8 mm Euroblock outputs
(1) 3-pin 3.8 mm Euroblock outputs
(1) 3-pin 3.8 mm Euroblock inputs
Bluetooth
Power Cable
Quickstart Guide
Safety & Warranty Manual
®
Antenna
Support
For the latest information about this product (documentation, technical specifications, system
requirements, compatibility information, etc.) and product registration, visit rane.com.
For additional product support, visit rane.com/support.
(green, for audio inputs)
(orange, for zone outputs)
(orange, for zone outputs)
(black, for logic input)
3
Page 4
Setup
Items not listed under Introduction > Box Contents are sold separately.
1. Use the included Euroblock connectors or stereo RCA cables to connect the inputs on
the rear panel to your audio sources.
2. Use the included Euroblock connectors to connect the outputs on the rear panel to your
zone amplifiers or powered loudspeakers.
3. Use shielded Cat5e or Cat6 RJ45 cables to connect optional remotes or paging devices
(e.g., Rane DR6, Rane DRZH, Rane RAD devices) to the Master Remote Port, Zone
Remotes Ports, and Pager Port on the rear panel.
4. Attach the Bluetooth antenna (included) to the Bluetooth antenna connector on the rear
panel. For best results, place Zonetech and the Bluetooth antenna so that it is not
obstructed by walls, furniture, etc.
5. Use standard Ethernet cables to connect the Computer Ethernet port on the rear panel
to a DHCP-enabled router or similar access point, and then connect your computer to
another port on the same router or access point.
6. Power on all of your audio sources (media players, stereos, microphones, amplifiers,
etc.).
7. Use a standard IEC cable (included) to connect the power input to a power outlet.
8. Power on all of your audio outputs.
Example
Power
Bluetooth
Device
Paging
Remote
(e.g., Rane
RAD16z)
Mono Audio Inputs
(Microphones)
INFO
SOURCE STATUS DIMMER
PHONES BACK
MASTER VOLUME
QUICK SELECT
OPTION
1 CBL/SAT 3 GAME4 NETWORK
2 Blu-ray
ENTER
VIDEO
SETUP MICL - AUDIO - R
SETUP
AUX 1
Inputs
(Receiver, DVD
SOURCE SELECT
ZONE 2
ZONE 3 ZONE 3
ZONE 2
SOURCE
ON/OFF
ON/OFF
AUX 1
HDMI 7 5V/1A
Stereo Audio
Player, etc.)
4
Computer
Router
Master
Remote
(e.g., Rane
DR6)
Zone
Remote
(e.g., Rane
DRZH)
Zone Amplifier
and Speakers
Powered
Stereo
Speakers
Page 5
Features
Front Panel
9
7
1
4
56
3
10
1. Display: This display shows information about Zonetech’s current status and options.
2. Power Light: This light is on when Zonetech is powered on.
3. Computer Link Light: This light is on when the Computer Ethernet port on the rear
panel is connected to a computer (powered on). You can then use the computer to
control Zonetech remotely using a web-based interface.
4. Stream Light: When the Stream Source is set to Bluetooth, this light will flash to
indicate Zonetech is in Pairing Mode and be lit solidly when Zonetech is paired with an
active Bluetooth device. When the Stream Source is set to AirPlay or UPnP/DLNA, this
light will be lit solidly to indicate a successful connection. You can then send the device's
audio signal to Zonetech wirelessly.
5. Info: Press this knob to cycle through the Info pages shown in the display. Turn this
knob to adjust the value of each setting in the display.
6. Left/Right (/): Press each of these buttons to select the previous or next option
(respectively) shown in the display.
Note: To reset Zonetech to factory default settings, press and hold both Left/Right
(/) buttons while powering on. Keep holding the buttons until the factory reset
message appears on the display, then release the buttons to continue.
7. Stream: Press this button to show the Stream settings in the display.
8. Page: Press this button to show the Pager settings in the display.
9. Input 1–6: Press each of these buttons to select the corresponding input. Its information
will appear in the display. You can then use the Info knob and Left/Right (/) buttons
to edit its settings.
10. Zone 1–6: Press each of these buttons to select the corresponding zone. Its information
will appear in the display. You can then use the Info knob and Left/Right (/) buttons
to edit its settings.
8
2
5
Page 6
Rear Panel
2
4
3333
1
10
9
8
1. Power Input (IEC): Use a standard IEC cable to connect this input to a power outlet.
2. Bluetooth Antenna Connector (SMA): Connect the included Bluetooth antenna here.
Important: For compliance, you must use the included antenna only. No substitutions or
modifications to the antenna are permitted.
3. Inputs (stereo RCA): Connect audio sources to these stereo input pairs.
4. Inputs (Euroblock): Connect balanced or unbalanced audio sources to these mono inputs.
5. Outputs (Euroblock): Connect line-level (-10 dBV to +4 dBu) devices to these balanced
outputs. The outputs for Zones 1–5 are mono; the Zone 6 output is stereo. Alternatively,
you can configure the Zone 6 output for mono use with a subwoofer (connected to the
R(LO) output) and main loudspeaker (connected to the L(HI) output).
6. Logic Input (Euroblock): Connect normally open external control contacts (relay or
equivalent) to these terminals. When the terminals are connected to each other (i.e., when
the switch is closed), all outputs will be muted. This would typically be used with a fire
alarm system to silence audio output during an emergency.
Note: When this mute function is active, all front-panel controls will be locked. Mute will
appear in the display with a red background.
7. Zone Remotes Ports (RJ45, shielded Cat5e or Cat6 cables): Connect optional Rane
DRZH devices to these ports, which will allow you to select sources and adjust levels for
the zones remotely.
8. Master Remote Port (RJ45, shielded Cat5e or Cat6 cables): Connect an optional Rane
DR6 remote control to this port, which will allow you to select sources and adjust levels
for all zones remotely.
9. Pager Port (RJ45, shielded Cat5e or Cat6 cables): Connect an optional Rane RAD device
(e.g., RAD16z, RAD26, etc.) to provide analog audio and logic inputs. Available functions
will depend on the RAD model. Please see rane.com/zonetech for additional
information.
Note: When using the pager function, make sure to activate the 1 logic input on your
connected RAD to allow the audio to pass.
Note: If you do not need the pager function, you can connect an optional Rane DR6 to
this port instead. This will provide the same functions as a DR6 connected to the Master
Remote port (see #8 above).
10. Computer Ethernet Port (Ethernet): Connect this port to a router or similar access point
during setup. After Zonetech is properly configured, you can connect a computer to
another port on the same router or access point, allowing you to use a web browser to
access an interface to control Zonetech. See Operation > Controlling Zonetech
Remotely for more information.
6
67
555
5
Page 7
Operation
Editing Input Settings
You can use Zonetech’s display, Info knob, and Left/Right (/) buttons to edit the settings
of each input.
To select an input to edit, press the corresponding Input button (1–6) or the Stream
button. The display will indicate which input is selected: Input 1–6 or Stream.
To show the previous or next setting for the selected input, use the Left/Right (/)
buttons (respectively). Turn the Info knob to adjust the value of each setting.
Note: To control the input settings remotely, you can also use a web-based interface
on your computer (connected to the Computer Ethernet port), or up to two Rane DR6
master remote controls (connected to the Master Remote and Pager port).
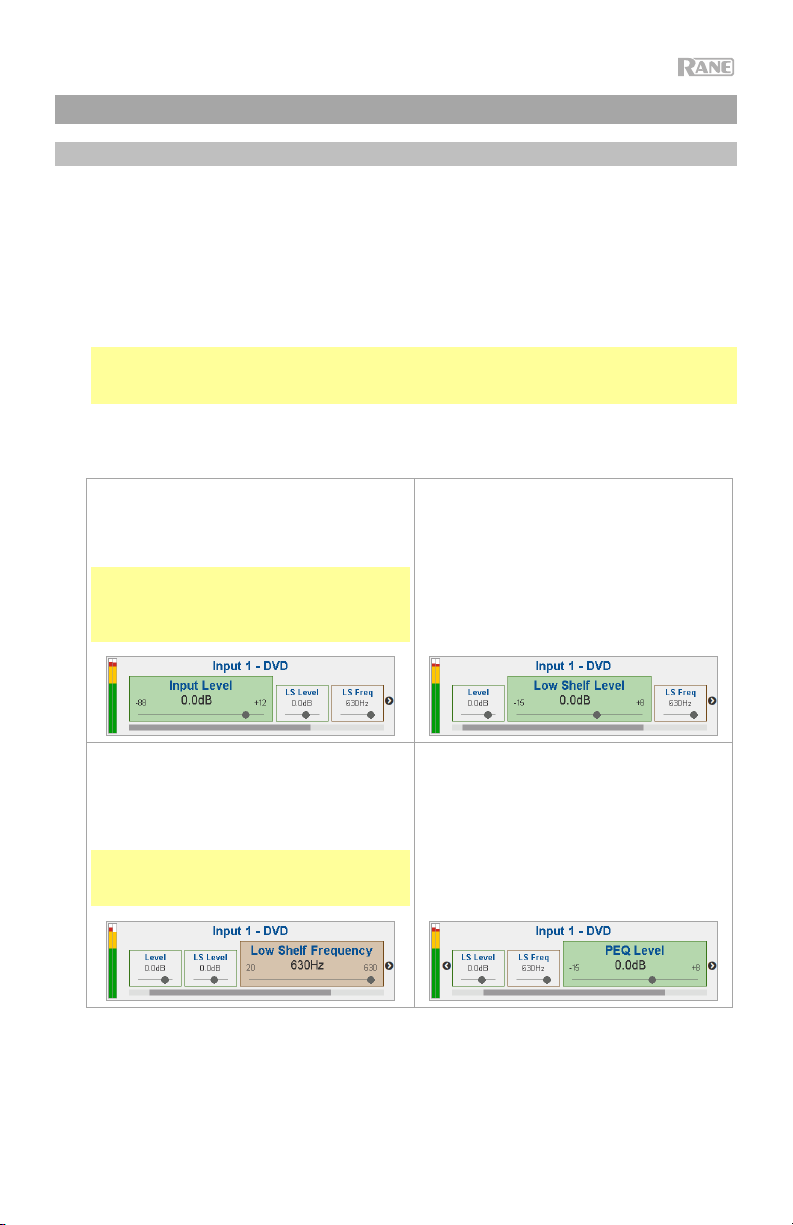
These are the editable input settings. The abbreviated name (shown when the setting is not
selected) is in parentheses.
Input Level (Level)
This is the volume level at the input stage:
-88.0 to +12.0 dB.
Tip: If you are unsure of what this level
should be, it is better to use a lower setting
to allow for headroom and to prevent
clipping/distortion.
Low Shelf Frequency (LS Freq)
This is the center frequency of the lowfrequency shelving filter: 40–630 Hz
(default: 630 Hz).
Tip: Higher values allow you to boost bass
frequencies more but also require more
amplifier power.
Low Shelf Level (LS Level)
This is the amount of “boost” (increase) or
“cut” (decrease) of the low-frequency
shelving filter: -15.0 to +8.0 dB.
PEQ Level
This is the amount of “boost” (increase) or
“cut” (decrease) of the mid-range
parametric equalization band: -15.0 to +8.0
dB.
7
Page 8
PEQ Frequency (PEQ Freq)
This is the center frequency of the midrange parametric equalization band: 40 Hz
– 16 kHz (default: 630 Hz).
High Shelf Level (HS Level)
This is the amount of “boost” (increase) or
“cut” (decrease) of the high-frequency
shelving filter: -15.0 to +8.0 dB.
Input Type (Type) (Inputs 5 and 6 only)
This is the type of device connected to Input
5 and Input 6: Dynamic (microphone),
Condenser (microphone), Unbalanced
Line+, Balanced Line (default: Balanced
Line).
Note: Phantom power is enabled only
when Condenser is selected.
Tip: Unbalanced Line+ sums two
unbalanced signals (such as left and right
RCA lines) when one is connected to the
positive (+) input and one is connected to
the negative (-) input.
Tip: Balanced Line is a typical fully
balanced line-level input (e.g., TRS or XLR)
as used with commercial audio equipment.
PEQ Bandwidth (PEQ Band)
This is the width of the mid-range
parametric equalization band: 0.300–
4.000 oct (octaves) (default: 0.500 oct).
High Shelf Frequency (HS Freq)
This is the center frequency of the highfrequency shelving filter: 630 Hz – 16 kHz
(default: 630 Hz).
Tip: Lower values allow you to boost
treble frequencies more but increases the
risk of overdriving the tweeters.
Stream Source (Source)
This is the source from which Zonetech
will play streamed audio: None (off),
Bluetooth, AirPlay, UPnP/DLNA.
8
Page 9
Stream
In addition to the six audio inputs on the rear panel, you can send an audio signal wirelessly
through Zonetech to any zone using Bluetooth
its own input channel.
Bluetooth
To pair/connect your Bluetooth device to Zonetech:
1. On Zonetech, press the Stream button to access the Stream settings.
2. Use the Left/Right (/) buttons to select the Stream Source (Source) setting. Then,
turn the Info knob to select the Bluetooth option.
3. Use the Left/Right (/) buttons to select the Bluetooth Pairing (Pairing) setting. Then,
turn the Info knob to select Enabled. Zonetech's Stream Light will begin flashing.
4. On your Bluetooth device, enter its Bluetooth settings, find Zonetech and connect to it.
The Stream Light will be solid blue when it is connected.
Notes:
• IMPORTANT: Bluetooth and WiFi may not both be in use at the same time. When
Bluetooth is enabled, WiFi will be disabled.
• If your device requires a passcode or PIN, enter 0000.
• If your Bluetooth device is not able to connect to Zonetech, set the Stream Source
(Source) to None to disconnect previous Bluetooth connections, and try the above steps
again.
• If you experience trouble connecting or playing music, make sure your Bluetooth device’s
operating system is up to date.
To unpair/disconnect your Bluetooth device from Zonetech, set the Stream Source
(Source) setting to None. Zonetech will disconnect from your Bluetooth device. Alternatively,
disconnect using the Bluetooth settings on your device.
To stream the Bluetooth audio signal to an output on Zonetech:
1. On Zonetech, press the Stream button to
access the Stream settings.
2. Follow the directions above to pair your
Bluetooth device to Zonetech.
3. Press and release the Zone button (1–6) for the
zone where you want to send the Bluetooth
audio signal.
4. Use the Left/Right (/) buttons to select the
Input Source (In Source) setting.
5. Turn the Info knob to select the Stream
option. That zone is now receiving the audio
signal from your Bluetooth device.
®
, AirPlay®, UPnP and DLNA®. This signal uses
9
Page 10

AirPlay
Select this option to connect a device to Zonetech using Apple AirPlay.
1. Make sure your AirPlay-enabled Apple device and Zonetech are powered on and
connected to the same network.
2. On Zonetech, press the Stream button to access the Stream settings.
3. Use the Left/Right (/) buttons to select the Stream Source (Source) setting. Then,
turn the Info knob to select the AirPlay option.
4. On your Apple device, select the AirPlay icon, then select Zonetech. When the
connection is established, the Stream light will be lit solidly.
5. Begin playback on your device.
UPnP and DLNA
Select this option to use Zonetech as a DLNA (Digital Living Network Alliance) Digital Media
Renderer (DMR). This allows you to stream media directly to Zonetech from a PC (or other
device) on the same network. Directions for setting up a DLNA media server may differ
depending on your computer's operating system and the program you would like to use.
Consult your media server’s documentation to find out how to set up media streaming.
1. Make sure the PC and Zonetech are powered on and connected to the same network.
2. On your PC, open a DLNA compatible media server. Windows Media Player is
recommended for most users, but other software can be used.
3. On Zonetech, press the Stream button to access the Stream settings.
4. Use the Left/Right (/) buttons to select the Stream Source (Source) setting. Then,
turn the Info knob to select the UPnP/DLNA option.
5. In Windows Media Player, right-click the track you would like to play. Navigate to Play To
and select Zonetech. When the connection is established, the Stream light will be lit
solidly.
Note: If Zonetech does not appear in your list of devices, make sure your PC has been
set to allow media streaming access for Zonetech.
6. A Play To menu will appear where you can add and remove tracks and control the
playback on Zonetech.
10
Page 11

Editing Output (Zone) Settings
You can use Zonetech’s display, Info knob, and Left/Right (/) buttons to edit the settings
of each output (zone):
To select a zone to edit, press the corresponding Zone button (1–6). The display will
indicate which zone is selected: Zone 1–6.
To show the previous or next setting for the selected zone, use the Left/Right (/)
buttons (respectively). Turn the Info knob to adjust the value of each setting.
Note: To control the zone settings remotely, you can also use a web-based interface
on your computer (connected to the Computer Ethernet port), one Rane DRZH remote
control per zone (connected to the Zone Remotes ports), or up to two Rane DR6 master
remote controls (connected to the Master Remote and Pager port). See Controlling
Zonetech Remotely for more information.
These are the editable zone settings. The abbreviated name (shown when the setting is not
selected) is in parentheses.
Output Level (Level)
This is the output volume level: -30.0 to
+12.0 dB (default: 0.0 dB). This is the
master volume of the zone.
Priority Source (Pr Source)
This is the audio source that will play
automatically when an incoming signal is
detected: Input 1–6 or Stream.
Tip: Enabling this feature is ideal for
automatic switching between audio
sources, such as ducking background
music when a television is turned on.
Input Source (In Source)
This is the audio source of the zone: Input
1–6 or Stream.
Priority Hold Time (H Time)
This determines how long it will take (in
seconds) for the output to switch back to
the original audio source after the priority
source signal falls below the threshold:
1–60 Sec (default: 3 Sec).
Tip: Avoid setting this value too low,
which can cause unintended switching
between signals.
Low Shelf Level (LS Level)
This is the amount of “boost” (increase) or
“cut” (decrease) of the low-frequency
shelving filter: -15.0 to +8.0 dB.
Low Shelf Frequency (LS Freq)
This is the center frequency of the lowfrequency shelving filter: 40–630 Hz
(default: 630 Hz).
Tip: Higher values allow you to boost
bass frequencies more but also require
more amplifier power.
11
Page 12

PEQ Level
This is the amount of “boost” (increase) or
“cut” (decrease) of the mid-range parametric
equalization band: -15.0 to +8.0 dB.
PEQ Bandwidth (PEQ Band)
This is the width of the mid-range
parametric equalization band: 0.300–4.000
oct (octaves) (default: 0.500 oct).
High Shelf Frequency (HS Freq)
This is the center frequency of the highfrequency shelving filter: 630 Hz – 16 kHz
(default: 630 Hz).
Tip: Lower values allow you to boost treble
frequencies more but increases the risk of
overdriving the tweeters.
PEQ Frequency (PEQ Freq)
This is the center frequency of the midrange parametric equalization band: 40 Hz
– 16 kHz (default: 630 Hz).
High Shelf Level (HS Level)
This is the amount of “boost” (increase) or
“cut” (decrease) of the high-frequency
shelving filter: -15.0 to +8.0 dB.
Page Enable (PG Enable)
This feature determines whether or not the
zone will receive an audio signal from the
pager: Enabled (on), Disabled (off).
Note: If this feature is on, remember to set
the Output Paging Level, which is
independent of the normal Zone Output
Level.
Page Level (PG Level)
This is the output volume level of the pager:
-30.0 to +12.0 dB (default: 0.0 dB).
12
Page Ducker Depth (PG Duck)
This determines how much the pager,
when activated, will attenuate the normal
output signal: 0.0 to -85.0 dB (default:
-12.0 dB).
Tip: Setting this to -85.0 dB will completely
mute the normal output signal when the
pager is on.
Page 13

Limiter Threshold (Threshold)
The limiter ensures the output audio signal
does not exceed this volume level: -60.0 to
0.0 dB (default: 0.0 dB).
Note: If a device (e.g., a power amplifier)
later in the signal path than Zonetech is
using a limiter, the limiter with a lower
threshold will determine the maximum level.
X-Over Frequency (X Freq) (Zone 6 only)
This determines the frequency at which the
low frequencies and high frequencies are
split between the subwoofer and main
loudspeaker: 80–300 Hz (default: 125 Hz).
Output Mode (Mode)
(Zone 6 only)
This determines whether Zone 6’s output
signal is stereo (left and right) (Stereo) or
mono with two-way crossover (X-Over).
Tip: If you are using a subwoofer and
main loudspeaker with this zone, use the
mono setting, and use the X-Over Freq,
Low Level, and High Level settings to
manage the signal.
X-Over Low Level (XL Level)
(Zone 6 only)
This is the output volume level of the audio
frequencies below the crossover frequency:
-10.0 to +6.0 dB.
Tip: This is essentially the master volume
of the Zone 6 subwoofer.
X-Over High Level (XH Level) (Zone 6 only)
This is the output volume level of the audio
frequencies above the crossover
frequency: -10.0 to +6.0 dB.
Tip: This is essentially the master volume of
the Zone 6 main loudspeaker.
13
Page 14

Paging
You can use Zonetech’s display, Info knob, and Left/Right (/) buttons to edit the paging
settings.
To view Paging settings, press the Page button.
To edit the Paging settings, use the Left/Right (/) buttons to show the previous or
next setting (respectively). Turn the Info knob to adjust the value of each setting.
Note: To control the page settings remotely, you can also use a web-based interface
on your computer (connected to the Computer Ethernet port), or an optional Rane RAD
device (e.g., RAD16z, RAD26, etc.) connected to the Pager port.
These are the editable pager settings. The abbreviated name (shown when the setting is not
selected) is in parentheses.
Input Level (Level)
This is the pager volume level: -88.0 to
+12.0 dB. This is independent of the
pager’s chime volume level (see below)
and independent of the Zone level.
Low Shelf Frequency (LS Freq)
This is the frequency of the low-frequency
shelving filter: 40–630 Hz (default: 630 Hz).
PEQ Frequency (PEQ Freq)
This is the frequency of the mid-range
parametric equalization band: 40 Hz – 16
kHz (default: 630 Hz).
Low Shelf Level (LS Level)
This is the amount of “boost” (increase) or
“cut” (decrease) of the low-frequency
shelving filter: -15.0 to +8.0 dB.
PEQ Level
This is the amount of “boost” (increase) or
“cut” (decrease) of the mid-range
parametric equalization band: -15.0 to +8.0
dB.
PEQ Bandwidth (PEQ Band)
This is the bandwidth of the mid-range
parametric equalization band: 0.300–
4.000 oct (octaves) (default: 0.500 oct).
14
Page 15

High Shelf Level (HS Level)
This is the amount of “boost” (increase) or
“cut” (decrease) of the high-frequency
shelving filter: -15.0 to +8.0 dB.
Chime
This determines whether the pager’s chime
sound is on (Enabled) or off (Disabled).
The chime will be mixed with the paging
output signal.
Tip: If this setting is on when you use the
pager, we recommend waiting a brief
moment for the chime to end before
making an announcement.
High Shelf Frequency (HS Freq)
This is the frequency of the highfrequency shelving filter: 630 Hz – 16 kHz
(default: 630 Hz).
Chime Level (CH Level)
This is the volume level of the pager’s
chime sound: -30.0 to +12.0 dB (default: 0
dB). This is independent of the pager’s
overall volume level.
15
Page 16

Info
You can use Zonetech’s display to view additional Zonetech system settings. Press the Info
knob to cycle through the following information pages.
These are the viewable Info settings.
Meters
This view shows multicolor level meters for
all inputs and zones.
Device/Port Status
This view shows information about the
devices currently connected to Zonetech
and their current operations. Use this view
to evaluate system faults, hardware errors,
and other issues.
Important: When diagnosing or
troubleshooting your system, always begin
by reviewing this information.
16
Page 17

Wired Network Settings
This view shows the wired network
address, subnet, and status.
Important: When diagnosing or
troubleshooting your system, always begin
by reviewing this information and the
Wireless Network Settings.
Zonetech Device Information
This view shows information about
Zonetech: the name of the location (Venue
name), the current firmware version
(Firmware Version), and serial number of
the unit (Serial Number).
Wireless Network Settings
This view shows the wireless network
address, subnet, and status.
Important: When diagnosing or
troubleshooting your system, always
begin by reviewing this information and
the Wired Network Settings.
17
Page 18

Controlling Zonetech Remotely
There are a few different ways to control various Zonetech functions remotely:
• You can use a computer to access a web-based interface to control all Zonetech
functions. See Computer below.
Note: Some controls are only available through the web interface.
• You can use a Rane DR6 remote device to control all input levels, output (zone)
levels, and zone source selections. See Master Remote below.
• You can use a Rane DRZH to control the output (zone) functions. See Zones below.
Computer
You can use a web-based interface on your computer to control Zonetech remotely.
To set up Zonetech for use with its web interface:
1. Use standard Ethernet cables to connect Zonetech’s Computer Ethernet port to a
DHCP (Dynamic Host Configuration Protocol)-enabled router or similar access point, and
then connect your computer to that same router or access point.
2. Once connected to a network, Zonetech will automatically acquire a dynamic IP address
that you can use. This may take a few seconds.
3. Press the Info button on Zonetech until the Wired Network Settings appear on the
display, and then make note of the DHCP IP address (e.g., 10.10.10.182).
To open the Zonetech web interface:
1. Open a web browser on your computer.
2. In the browser, enter the DHCP IP address shown in Zonetech's Wired Network
Settings (e.g., http://10.10.10.182) to load the web interface.
3. Press the Login button, and then enter the password for Full access mode. The default
password is admin.
To use the web interface, log-in to either the Full or Limited access options using your
password. If no password has been set, users will be logged in automatically at that access
level. By default, Zonetech is shipped in Full access mode.
If you need to switch between Full and Limited access modes, use the Logout button in the
top left corner of the page.
To edit settings in either mode, click the arrows or move the slider to adjust a value, or click
a radio button to select an option.
18
Page 19

These are the editable settings for Limited access mode:
Master Outputs
This page provides controls for output volume level and input audio source.
In Full access mode, click the tabs at the top
of your web browser to navigate between
pages.
These are the editable settings for each tab in Full Access mode:
Input 1–6, Stream, and Page
General
Level: This is the volume level at the input
stage.
Input Type (Input 5 and 6 Tabs): This is the
type of device connected to Input 5 and
Input 6.
Stream Source (Stream Tab): This is the
source from which Zonetech will play
streamed audio. Select None, Bluetooth,
AirPlay, or UPnP/DLNA.
Pairing and Status (Stream Tab): When
the Stream Source is set to Bluetooth,
click the Pairing checkbox to enter
Pairing mode and connect your Bluetooth
device. The Status shows the current
state of Bluetooth.
19
Page 20

Input 1–6, Stream, and Page (continued)
Low Shelf
Level: This is the amount of “boost”
(increase) or “cut” (decrease) of the lowfrequency shelving filter.
Frequency: This is the center frequency of
the low-frequency shelving filter.
High-Shelf
Level: This is the amount of “boost”
(increase) or “cut” (decrease) of the highfrequency shelving filter.
Frequency: This is the center frequency of
the high-frequency shelving filter.
Parametric EQ (PEQ)
Level: This is the amount of “boost”
(increase) or “cut” (decrease) of the midrange parametric equalization band.
Frequency: This is the center frequency
of the mid-range parametric equalization
band.
Bandwidth: This is the width of the midrange parametric equalization band.
Chime (Page Tab)
Enable: This determines whether the
pager’s chime sound is on (Enabled) or
off (Disabled). The chime will be mixed
with the paging output signal.
Level: This is the volume level of the
pager’s chime sound. This is independent
of the pager’s overall volume level.
20
Page 21

Zones (Outputs)
General
Level: This is the output volume level.
Input Source: This is the audio source of
the zone.
Priority Source: This is the audio source
that will play automatically when an
incoming signal is detected.
Priority Hold Time: This determines how long it will take (in seconds) for the output to
switch back to the original audio source after the priority source signal falls below the
threshold.
Low Shelf
Level: This is the amount of “boost”
(increase) or “cut” (decrease) of the lowfrequency shelving filter.
Frequency: This is the center frequency of
the low-frequency shelving filter.
Parametric EQ (PEQ)
Level: This is the amount of “boost”
(increase) or “cut” (decrease) of the midrange parametric equalization band.
Frequency: This is the center frequency
of the mid-range parametric equalization
band.
Bandwidth: This is the width of the midrange parametric equalization band.
High-Shelf
Level: This is the amount of “boost”
(increase) or “cut” (decrease) of the highfrequency shelving filter.
Frequency: This is the center frequency of
the high-frequency shelving filter.
Paging
Enable: This feature determines whether
or not the zone will receive an audio signal
from the pager.
Level: This is the output volume level of
the pager.
Ducker Depth: This determines how
much the pager, when activated, will
attenuate the normal output signal.
21
Page 22

Zones (continued)
Stereo/X-Over (Zone 6 only)
Output Mode This determines whether Zone 6’s
output signal is stereo (left and right) (Stereo) or
mono with two-way crossover (X-Over).
X-Over Frequency: This determines the frequency
Limiter
Threshold: The limiter ensures
the output audio signal does not
exceed this volume level.
at which the low frequencies and high frequencies
are split between the subwoofer and main
loudspeaker.
X-Over Low Level: This is the output volume level of
the audio frequencies below the crossover frequency.
X-Over High Level: This is the output volume level
of the audio frequencies above the crossover
frequency.
Master
This tab provides an overview of controls for output volume level and input audio source.
Naming
Use this tab to rename the Venue, Inputs, and Zones.
22
Page 23

Important: When diagnosing or troubleshooting your system, always begin by reviewing
the Wired Network Settings and Wireless Network Settings below.
Settings
Device Information
Firmware Version: This is current firmware
version running on your Zonetech.
Serial Number: This is the serial number of
your Zonetech unit.
Wired Network Settings
DHCP IP and Subnet Mask: This is the
dynamic IP address and subnet mask
assigned through DHCP (Dynamic Host
Configuration Protocol), if supported by
your network.
Static IP and Subnet Mask: Enter a
manually assigned IP address and subnet
mask for the connected wired network.
MAC Address: This displays the unique
MAC (Media Access Control) address of
your Zonetech device.
Wireless Network Settings
Enable: This enables or disables wireless
network connection.
SSID: This is the name of the connected
wireless network.
Password: This is the password of the
connected wireless network.
Connection Status: This is the status of
the current wireless network connection.
Available SSIDs: These are the available
wireless networks within range of your
Zonetech.
DHCP IP and Subnet Mask: This is the
dynamic IP address and subnet mask
assigned through DHCP, if supported by
your network.
Static IP and Subnet Mask: Enter a
manually assigned IP address and subnet
mask for the connected wireless network.
MAC Address: This displays the unique
MAC address of your Zonetech device.
Security Levels
Full Access Password: This is the
password used for entering Full access
mode in the web interface.
Limited Access Password: This is the
password used for entering Limited
access mode in the web interface.
Note: When a password is empty, users
will be logged in automatically at that
level.
Front Panel Security: This sets the
access level for the front panel controls:
Full, View Only, or Limited.
Note: In View Only mode, no changes to
any settings are permitted.
23
Page 24

Settings (continued)
Configuration
Save Settings: This allows you to save
your system settings to a .zonetech file.
Send Settings: This allows you to send
Firmware Update
Update Firmware: This allows you to
check for firmware updates and update
your Zonetech.
saved settings to a Zonetech device.
Master Remote
You can use up to two Rane DR6 as master remote controls, allowing you to control all input
levels, output (zone) levels, and zone source selections. Please visit rane.com/HAL and refer
to the documentation for DR6 and the Halogen system to for additional information.
To set up Zonetech for use with a DR6, use a shielded Cat5e or Cat6 Ethernet cable to
connect the DR6 to the Master Remote port on Zonetech. You can also connect a
second DR6 to the Pager port if it is not in use. (Remember to connect your DR6 to a
power outlet through a Rane RPI.)
Zones
You can use one to six Rane DRZH units to control the functions of one or more zones. Please
visit rane.com/HAL and refer to the documentation for DRZH and the Halogen system for
additional information.
To set up Zonetech for use with one or more DRZH units, use shielded Cat5e or Cat6
Ethernet cables to connect each DRZH to a Zone Remotes port on Zonetech.
24
Page 25

Troubleshooting
If you encounter a problem, try doing these things first:
• Make sure all cables and other connected devices are properly and securely connected.
• Make sure you are using Zonetech as described in this user guide.
• Make sure your other devices or media are working properly.
• If you believe Zonetech is not working properly, check the following table for your
problem and solution.
Problem: Solution: Please see:
Power does not turn on.
Zonetech does not
produce any sound, or
the sound is distorted.
Audio from my Bluetooth
device does not play
through Zonetech.
Pairing my Bluetooth
device to Zonetech
requires a PIN.
Make sure Zonetech’s power input is
properly connected to a power outlet
using the included power cable.
Make sure all cable and device
connections are secure and correct.
Make sure none of the cables are
damaged.
Make sure all devices connected to
Zonetech are properly powered,
connected, and supported. Check the
hardware connections as well as the
Info page.
Make sure the settings on your
Bluetooth device, loudspeaker, mixer,
etc. are correct.
Make sure WiFi is turned off. Bluetooth
will be disabled when WiFi is active.
Make sure you have properly paired
your Bluetooth device.
Improve the Bluetooth signal reception
by moving your Bluetooth device
closer to Zonetech. Also, remove
obstacles (walls, furniture, etc.) so
there is a clear line of sight between
your Bluetooth device and Zonetech.
Enter 0000 as the PIN. (Some older
Bluetooth devices may require you to
enter a PIN.)
Setup
Setup,
Operation > Info
Setup,
Operation > Stream >
Bluetooth
Operation > Stream >
Bluetooth
25
Page 26

Appendix
Technical Specifications
Audio Inputs Connectors
Maximum Input Level
Audio Outputs Connectors
Frequency Response
Dynamic Range
THD+N
Bluetooth
Specifications
Impedance
Maximum Output Level
40 Hz – 16 kHz
(A-weighted)
111 dB
0.005%
(+4 dBu output, 1 kHz)
Version
Profile
Range
Maximum Transmission
Power
Frequency
Display Type
Dimensions
Resolution
(+0/-3 dB)
(4) RCA stereo input pairs
(1) 6-pin 3.8 mm Euroblock input
(balanced mic/line level, green)
+20 dBu
(3) 6-pin 3.8 mm Euroblock outputs
(Zones 1–4 & 6, balanced line level, orange)
(1) 3-pin 3.8 mm Euroblock output
(Zone 5, balanced line level, orange)
200 Ω, each leg to ground
+20 dBu
4.1
A2DP
Up to 100 feet / 30.5 meters *
Class 1 (10 dBm max)
2402–2480 MHz
RGB TFT
3.9” x 1.2” / 99 x 30 mm (width x depth)
4.1” / 104 mm
(diagonal)
480 x 128
26
Page 27

Other Connectors
(6) RJ45 ports
(1) RJ45 port
(1) RJ45 port
(1) Ethernet port
(1) 2-pin 3.8 mm Euroblock input
(1) SMA antenna input
(Zone 1–6 remote control via DRZH)
(master remote control)
(pager)
(computer)
(TTL [digital logic], black)
(Bluetooth)
(1) IEC power cable input
Operating Temperature
32–95°F / 0–35°C
Power Connection
Dimensions
(width x depth x height)
Weight
Voltage
Consumption
19” x 8.7” x 1.7”
482 x 220 x 44 mm
6.06 lb.
(non-condensing)
IEC
100–240 VAC, 50/60 Hz
50 W
2.75 kg
Specifications are subject to change without notice. Bluetooth range is affected by walls, obstructions, and
movement. For optimal performance, place the product in the center of the room so it is unobstructed by
walls, furniture, etc.
Trademarks & Licenses
Rane is a trademark of inMusic Brands, Inc., registered in the U.S. and other countries.
The Bluetooth word mark and logos are registered trademarks owned by Bluetooth SIG, Inc. and any use of
such marks by Rane is under license.
Apple and AirPlay are registered trademarks of Apple Inc., registered in the U.S. and other countries.
DLNA is a trademark of the Digital Living Network Alliance.
All other product names, company names, trademarks, or trade names are those of their respective owners.
27
Page 28

rane.com
Manual Version 1.1
 Loading...