

Page 1

A
User Guide
Guía del usuario
Guide d'utilisation
Guida per l'uso
Benutzerhandbuch
English (2–17)
Español (18–33)
Français (34–49)
Italiano (50–65)
Deutsch (66–81)
ppendix
English (82–83)
Page 2
User Guide (English)
Introduction
Thank you for purchasing the Seventy-Two. At Rane DJ, we know how serious music is to
you. That’s why we design our equipment with only one thing in mind—to make your
performance the best it can be.
Box Contents
Seventy-Two
Power Cable
(2) Serato NoiseMap™ Control Vinyl Records
(2) Serato NoiseMap™ Control CDs
Serato Pitch 'n Time Download Card with Serial Number
(2) USB Cables
Rane Stickers
User Guide
Safety & Warranty Manual
Support
For the latest information about this product (documentation, technical specifications, system
requirements, compatibility information, etc.) and product registration, visit dj.rane.com.
For additional product support, visit dj.rane.com/support.
2
Page 3
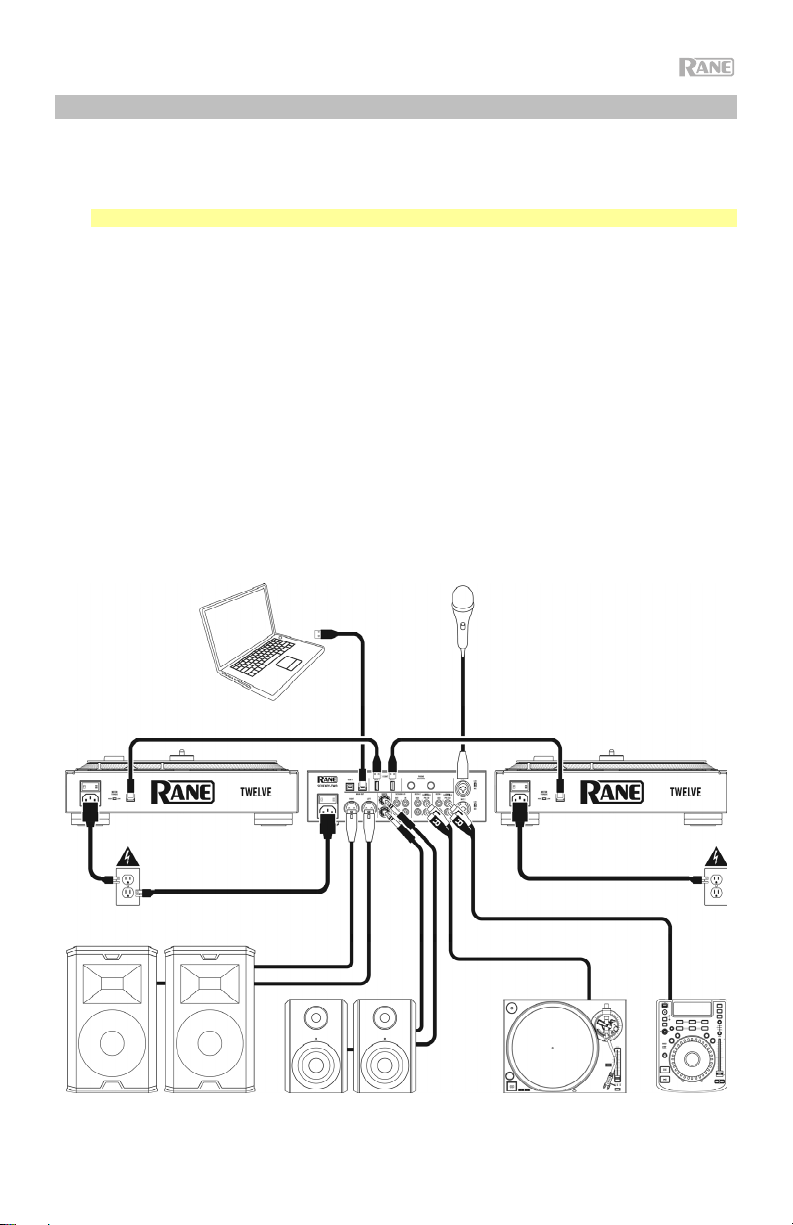
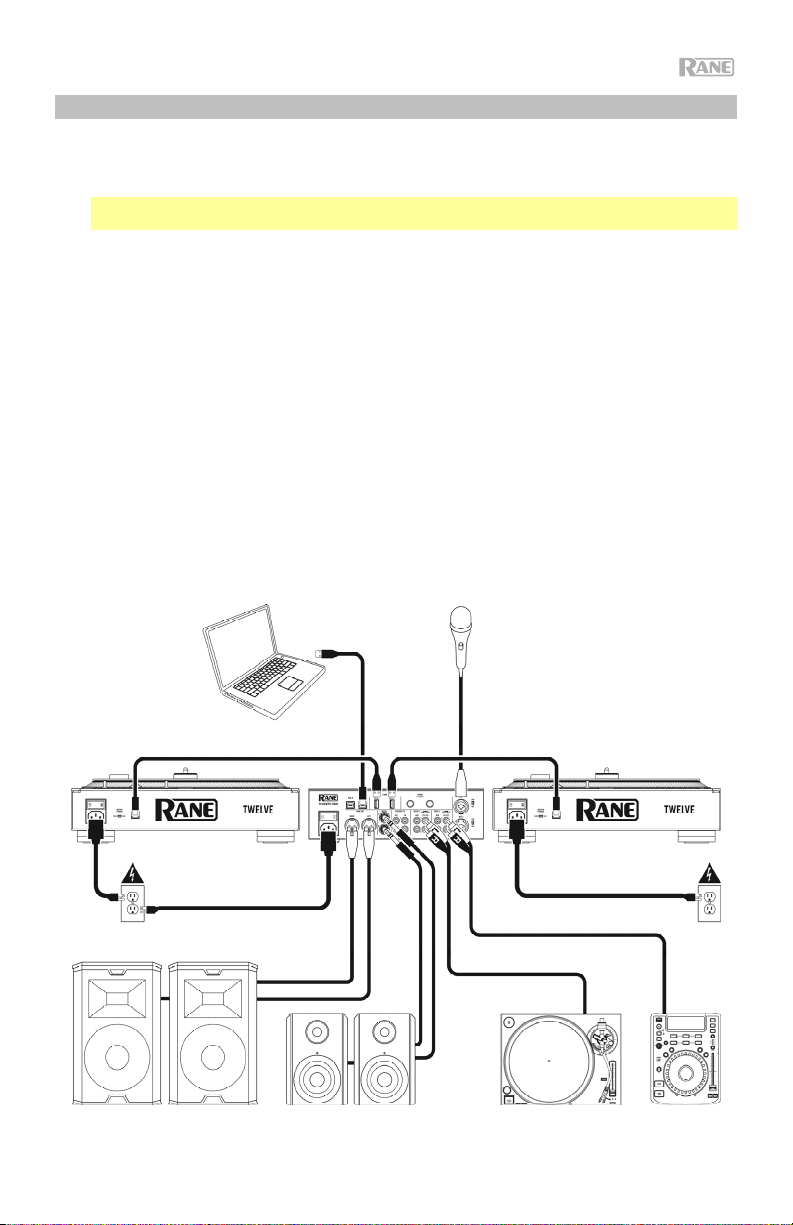
Setup
Items not listed under Introduction > Box Contents are sold separately.
1. Visit dj.rane.com and log into your account. (Create an account if this is your first Rane product.)
In your account, register your Seventy-Two and download the Rane Control Panel.
Windows users only: The Rane Control Panel contains drivers required for Windows.
2. IMPORTANT: Occasionally, we may update Seventy-Two’s firmware to improve its
performance. Visit dj.rane.com to check for available firmware updates, especially after you
update your software (firmware updates may address new software features).
3. Download and install the latest version of Serato DJ Pro from serato.com.
4. Using USB cables, connect the USB ports on the Rane Twelve (if using) or other USB MIDI
controllers to the Twelve/Controller USB ports on Seventy-Two.
5. Connect audio input sources (microphones, turntables, etc.) to Seventy-Two.
6. Connect audio output devices (headphones, power amplifiers, loudspeakers, etc.) to SeventyTwo.
7. Connect all devices to power outlets, and power on the devices in proper order:
• When starting a session, turn on (1) input sources, (2) Seventy-Two, (3) output devices.
• When ending a session, turn off (1) output devices, (2) Seventy-Two, (3) input sources.
8. Using a USB cable, connect the USB port on Seventy-Two to your computer. Open Serato DJ Pro
and go! For more information on how to use Serato DJ Pro with Seventy-Two, visit
support.serato.com and select Rane Seventy-Two.
Computer
Microphone
Rane Twelve
(or other USB MIDI controller)
Powered Loudspeakers Booth Monitors Turntable CD Player
(or other USB MIDI controller)
Rane Twelve
3
Page 4

Features
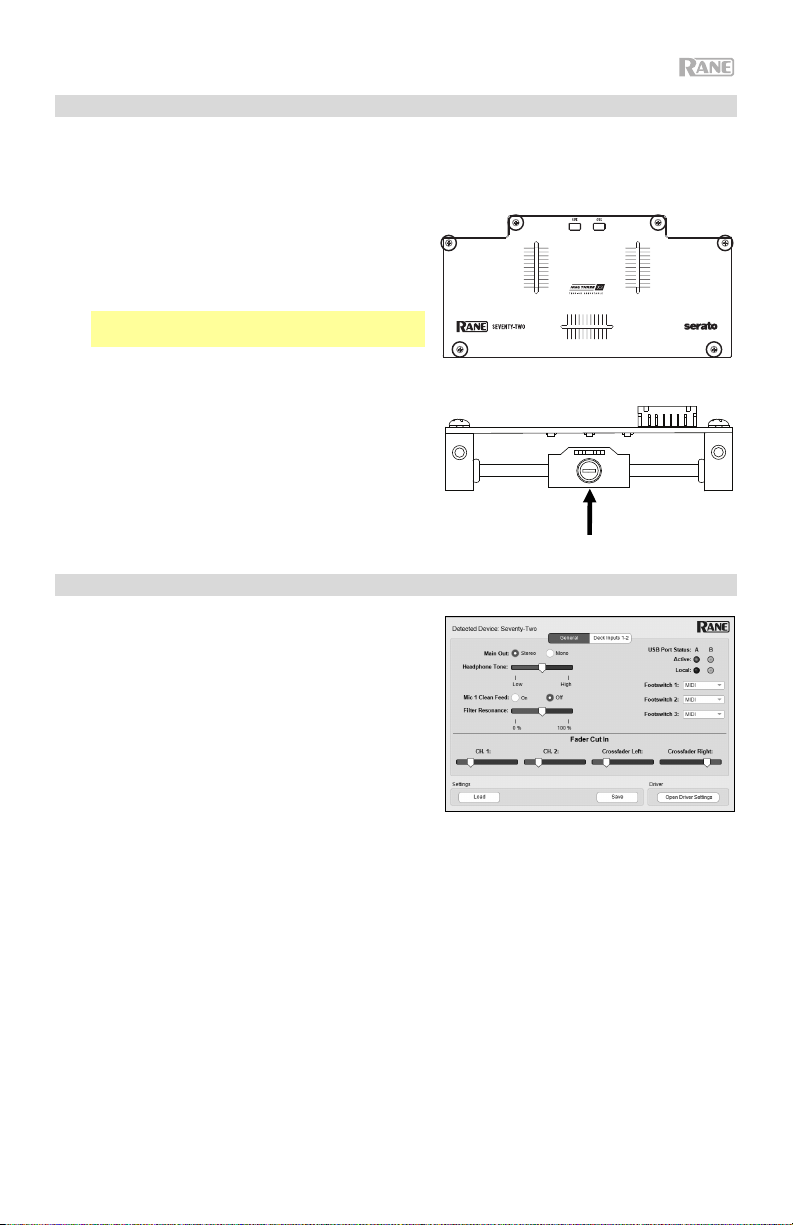
Top Panel
4
Page 5
1. Touchscreen: This full-color multi-touch display shows information relevant to Seventy-Two’s
current operation. Touch the display and use the hardware controls to control the interface. See
Operation > Touchscreen for more information.
2. Shift: Press and hold this button to access secondary functions of other controls on SeventyTwo.
3. View/Menu: Press this button to toggle to Library View and Waveform views on the touchscreen.
See Operation > Touchscreen for more information.
Hold Shift and press this button, or press and hold this button for 4 seconds, to show
Seventy-Two’s Main Menu.
4. Effects/Tap: Press this button to show the Effects View immediately.
Hold Shift and press this button multiple times at the desired tempo to manually set the BPM rate
for beat-tempo effects, per channel.
5. Back: Press this button to view the previous screen. In Library View, press this button to move
back through levels of library organization.
Hold Shift and press this button to open the Prepare Area in Serato DJ Pro.
6. Load/Scroll: Turn this knob to browse through lists and press it to select an item or load the currently
selected track to the deck. When in Waveform View, touch this knob to switch to Library View in the
touchscreen.
Hold Shift and press this knob to load the currently selected track to the Prepare Area.
Tip: Press this knob twice quickly to load the same track to both decks (“instant doubles”).
7. Deck Source: Set this knob to the desired audio source from this channel: USB A or B (a track
playing on that layer in the software), PH/CD (a device connected to the Deck PH/CD In on the
rear panel), or Aux (a device connected to the Deck Aux In on the rear panel).
Note: If you select PH/CD, set the PH/CD selector switches on the rear panel properly.
Note: A deck’s controls will send MIDI information only when its deck source selector is set to
USB A or B.
8. Deck Level: Turn this knob to set the pre-fader, pre-EQ audio level of the corresponding
channel. The meter next to this knob indicates the signal’s volume level (reduce it if it begins
"clipping," reaching the red part of the meter).
9. Deck EQ High: Turn this knob to adjust the high (treble) frequencies.
10. Deck EQ Mid: Turn this knob to adjust the mid-range frequencies.
11. Deck EQ Low: Turn this knob to adjust the low (bass) frequencies.
Note: All EQ and
Filter controls are fullkill.
12. Deck LP/HP: Turn this knob to adjust the filter applied to the deck. Turn the knob
counterclockwise to apply a low-pass filter. Turn the knob clockwise to apply a high-pass filter.
Set it to the center (“12:00”) position to deactivate the filters.
13. Pad Mode Buttons: Press one of these buttons to enter the corresponding pad mode. Press
once to enter the primary (printed above) mode, and press a second time to enter the
secondary (printed below) mode. Press Shift and one of these buttons to access custom pad
modes. See Operation > Pad Modes to learn how to use the pads in each mode.
14. Performance Pads: These pads have different functions on each deck depending on the
current pad mode. Use the Pad Mode Buttons to select the pad mode. These pads are
velocity-sensitive (in certain modes only), durable, and easy to play. See Operation > Pad
Modes to learn how to use the pads in each mode.
15. Parameter /: Use these buttons for various functions in each pad mode. Press and hold
Shift and use these buttons to access secondary parameters.
5
Page 6

16. Touch FX: Press this button to activate or deactivate the X-Y touch-pad feature on the
touchscreen. You can use this feature to control various effect parameters. See Operation >
Effects for more information.
17. Effects Toggle: Move this toggle switch away from you to activate the software effects and
Seventy-Two's Flex effects—the toggle will latch to that position. Pull the toggle back to the
center position to deactivate the effects.
Pull and hold this toggle toward you to activate the software effects and Seventy-Two effects
momentarily, and release the toggle to deactivate the effects—the toggle will return to the
center position.
Note: The Effect Toggle switches can be removed and rotated 180° depending on your
preference.
18. Parameter Knob: Turn these knobs to adjust various effect parameters. Parameter knob focus
is indicated on the touchscreen with a white caret for each bank.
19. FX 1–3: Press each of these buttons to activate or deactivate their corresponding software
effect in a bank of three effects.
20. Flex FX: Press this button to activate or deactivate Seventy-Two’s internal effects.
21. Depth: Turn this knob to adjust the “wet-dry” mix of the internal Flex FX on that deck.
22. Sampler Level: Turn this knob to adjust the volume level of the software sampler.
23. Sampler LP/HP: Turn this knob to adjust the filter applied to the software sampler. Turn the
knob counterclockwise to apply a low-pass filter. Turn the knob clockwise to apply a high-pass
filter. Set it to the center (“12:00”) position for a “flat” response (no filter).
24. Sampler Effects: Press this button to activate or deactivate effects for the software sampler.
Note: Sampler must be selected in the Effects routing menu. See Effects for more details.
25. Cue Level: Turn this knob to adjust the volume level of the cue channel.
26. Cue Mix: Turn to mix between the cue channel and program mix in the headphone outputs.
When all the way to the left, only the cue channel will be heard. When all the way to the right,
only the program mix will be heard.
27. Split Cue: When this button is lit in the On position, the headphone audio will be “split” such
that the cue channel are summed to mono and sent to the left headphone channel while the
program mix is summed to mono and sent to the right channel. When the button is dim in the
Off position, the cue channel and program mix will be “blended” together. In both cases, use
the Cue Mix knob to control the blend of the two signals.
28. Deck Cue: Press this button to send this deck’s pre-fader signal to the cue channel for
monitoring. When engaged, the button will be lit. To cue multiple channels simultaneously,
press the Deck Cue buttons for both decks.
29. Channel Fader: Move this fader to adjust the volume level of the corresponding deck.
30. Crossfader: Move this fader to mix between the decks.
31. Main: Turn this knob to adjust the output volume of the main outs. The meters next to this knob
indicate the signal’s volume level (reduce it if it begins "clipping," reaching the red part of the
meter).
32. Booth: Turn this knob to adjust the output volume of the Booth Outs.
33. Session Out: Turn this knob to adjust the output volume of the Session Outs.
34. Session In: Tur
n this knob to adjust the input volume of the Session Ins.
35. Session In Cue: Press this button to send the signal from the Session Ins to the cue channel
for monitoring. When engaged, the button will be lit.
36. Mic 1 Level: Turn this knob to adjust the gain of the Mic 1 Input. The meter next to this knob
indicates the signal’s volume level (reduce it if it begins "clipping," reaching the red part of the
meter).
6
Page 7
37. Mic 1 Tone: Turn this knob to adjust the balance of low (bass) and high (treble) frequencies of
the audio signal coming from the Mic 1 Input.
38. Mic 1 On/Duck: Press this to activate or deactivate the Mic 1 Input on the rear panel.
Press and hold this button for 2 seconds to activate the “ducking” feature, which reduces the
volume level of all other inputs by 10 dB. The button will flash when this feature is active. Press
this button once more to deactivate this feature and the Mic 1 Input.
39. Mic 1 Echo: Press this button to activate or deactivate the echo effect on the Mic 1 Input signal.
Turn the Mic 1 Echo knob on the front panel to adjust the amount of the effect.
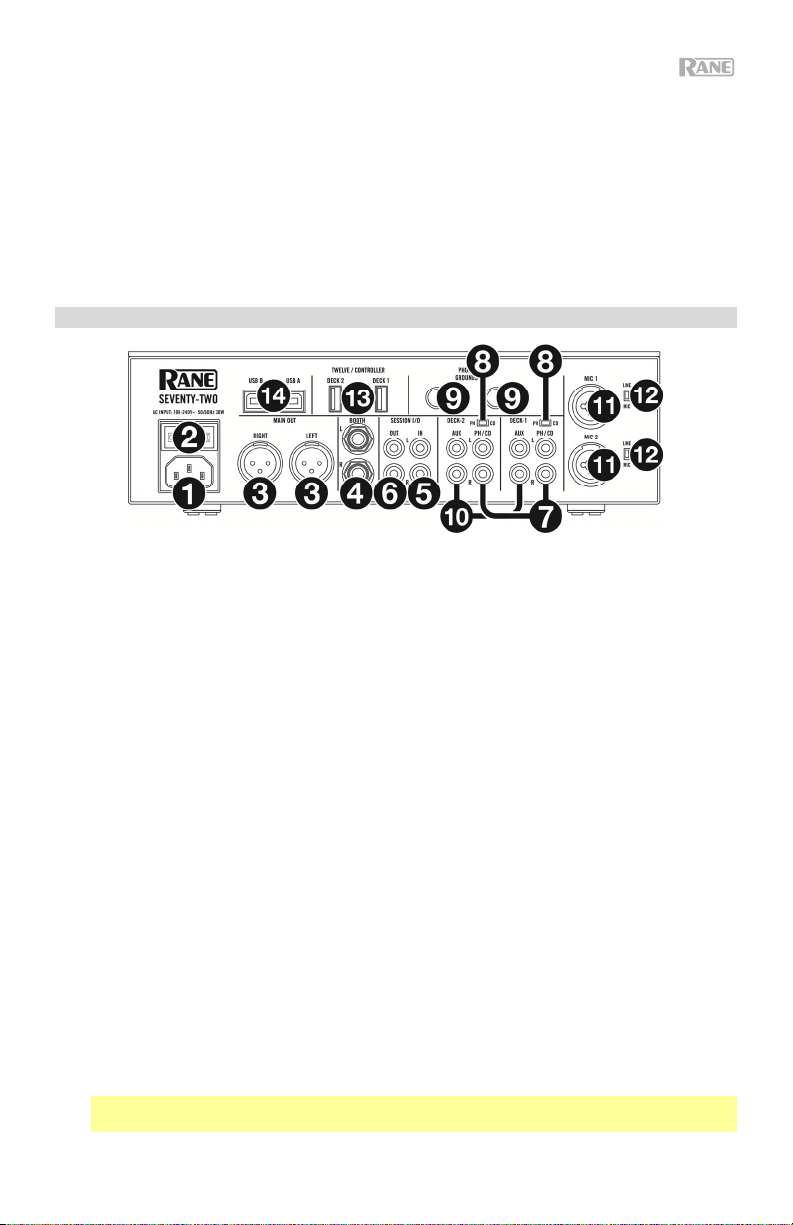
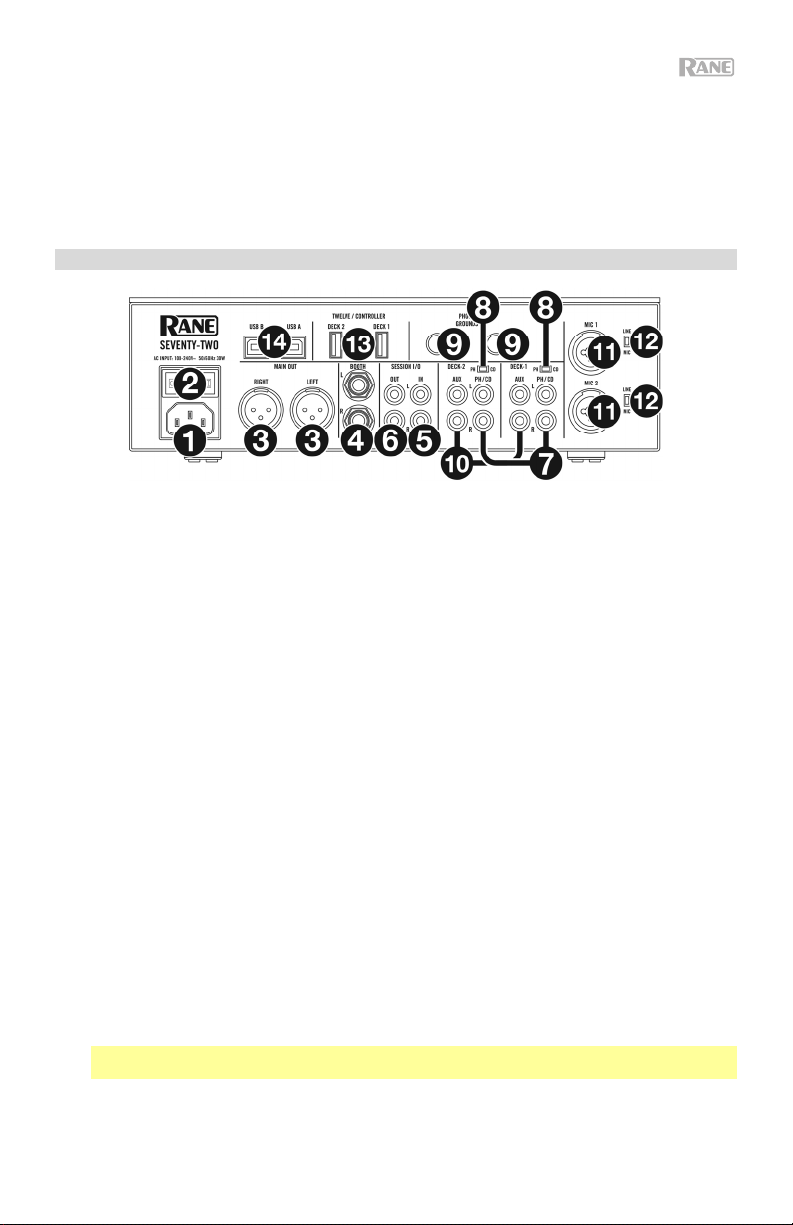
Rear Panel
1. Power Input: While Seventy-Two is powered off, connect the included power cable to this
input and then to a power outlet.
2. Power Switch: Use this switch to power Seventy-Two on or off. Power on Seventy-Two only
after you have connected all of your input devices and before you power on your amplifiers and
loudspeakers. Power off your amplifiers and loudspeakers before powering off Seventy-Two.
3. Main Out (XLR): Connect these outputs to loudspeakers or an amplifier system. Use the
Master knob on the top panel to control the volume level.
4. Booth Out (1/4”/6.35 mm, TRS): Connect these outputs to booth monitors or a booth amplifier
system. Use the Booth knob on the top panel to control the volume level.
5. Session In (RCA): Connect these inputs from a line-level device like another mixer, a CD
player, drum machine, etc. The signal will be sent directly to the program mix. Turn the Session
In knob on the top panel to control the input volume level.
6. Session Out (RCA): Connect these outputs to another mixer, recording device, etc. The
program mix will be sent to these outputs. Turn the Session Out knob on the top panel to
control the volume level.
7. Deck PH/CD In (RCA): Connect these inputs to an external audio source or to a turntable, CD
player, or other line-level device. Remember to set the corresponding PH/CD selector to the
appropriate position and to set the deck source knob for that deck to PH/CD to play its audio
signal on that deck.
8. PH/CD Selector: Set this switch to the appropriate position, depending on the device connected
to the PH/CD Ins of the corresponding deck. If you are using phono-level turntables, set this
switch to PH to provide the additional amplification needed for phono-level signals. If you are
using a line-level device, such as a line-level turntable, CD player or sampler, set this switch to
CD.
9. Phono Grounds: If you are using phono-level turntables with a grounding wire, connect the
grounding wire to these terminals. If you experience a low “hum” or “buzz”, this could mean
that your turntables are not grounded.
Note: Some turntables have a grounding wire built into the RCA connection and, therefore,
nothing needs to be connected to the grounding terminal.
7
Page 8

10. Deck Aux In (RCA): Connect these inputs to an external line-level audio source. Remember to
set the Deck Source knob for that deck to Aux to play its audio signal on that deck.
11. Mic Inputs 1–2 (XLR / 1/4”/6.35 mm, TS): Connect microphones or line-level devices to these
mono inputs. Their mono audio signals are split and routed directly to the stereo program mix
and cue channel. If you prefer a stereo line input, the Session In may be used.
12. Line/Mic Selector: Set this switch to the appropriate position, depending on the device
connected to Mic Inputs 1–2. If you are using a microphone, set this switch to Mic. If you are
using a line-level device, such as a keyboard or sampler, set this switch to Line.
13. Twelve/Controller USB Ports (USB Type-A): Use USB cables to connect these USB ports to
your controllers such as Twelve or a standard USB MIDI controller.
Important: Do not connect USB drives to these ports. Switching the Deck Source knob will
force eject the drive from the connected computer, which could damage the contents and
should be avoided.
14. USB Ports (USB Type-B): Use USB cables to connect these USB ports to available USB ports
on your computer. These connections send and receive audio and MIDI control information to
and from the computer.
Note: Make sure you have downloaded and installed the Rane Control Panel from
dj.rane.com.
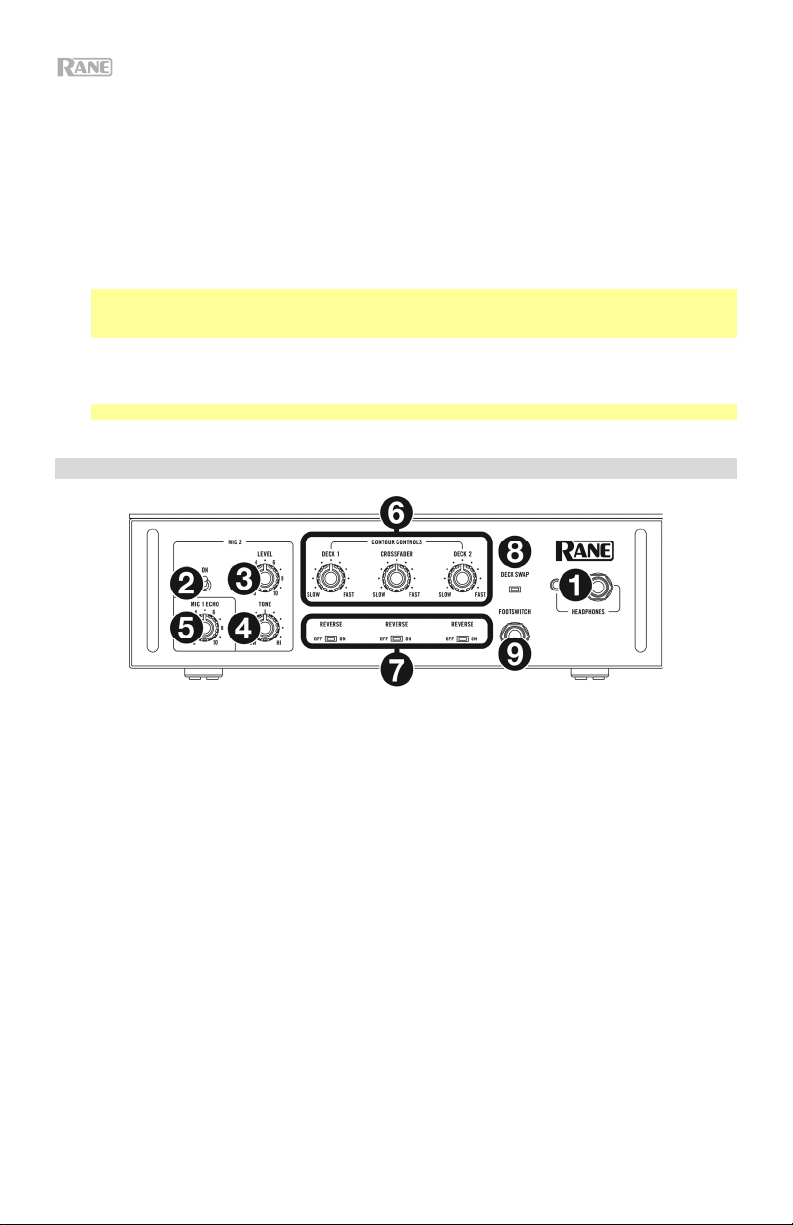
Front Panel
1. Headphone Outputs (1/4”, 1/8” / 6.35 mm, 3.5 mm, TRS): Connect your 1/4” or 1/8” (6.35 mm
or 3.5 mm) headphones to this output for cueing and mix monitoring.
2. Mic 2 On: When set to On, the Mic 2 Input on the rear panel is active, and its audio signal is
routed directly to the program mix and cue mix. When set to Off, the Mic 2 Input is disabled.
3. Mic 2 Level: Turn this knob to adjust the gain of the Mic 2 Input.
4. Mic 2 Tone: Turn this knob to adjust the balance of low (bass) and high (treble) frequencies of
the audio signal coming from the Mic 2 Input.
5. Mic 1 Echo: Turn this knob to adjust the amount of the echo effect on the Mic 1 Input signal.
Press the Mic 1 Echo button on the top panel to activate or deactivate this effect.
6. Contour Controls: Adjusts the slope of the crossfader curve. Turn the knob to the left for a
smooth fade (mixing) or to the right for a sharp cut (scratching). The center position is a typical
setting for club performances.
7. Fader Reverse: Set this switch to On to reverse the direction (“polarity”) of the corresponding
fader. Set it to Off to use the conventional fader polarity.
8. Deck Swap: Set this switch to On position to swap the left and right Channel Faders as
controlled by Seventy-Two. Set it to Off to use the conventional deck configuration.
9. Footswitch Input (1/4”/6.35 mm, TRS): Connect a footswitch here, which you can use to
activate or deactivate effects. You can assign this to other functions, as well. This input
supports a three-switch footswitch
8
with passive-contact closure.
Page 9
Operation
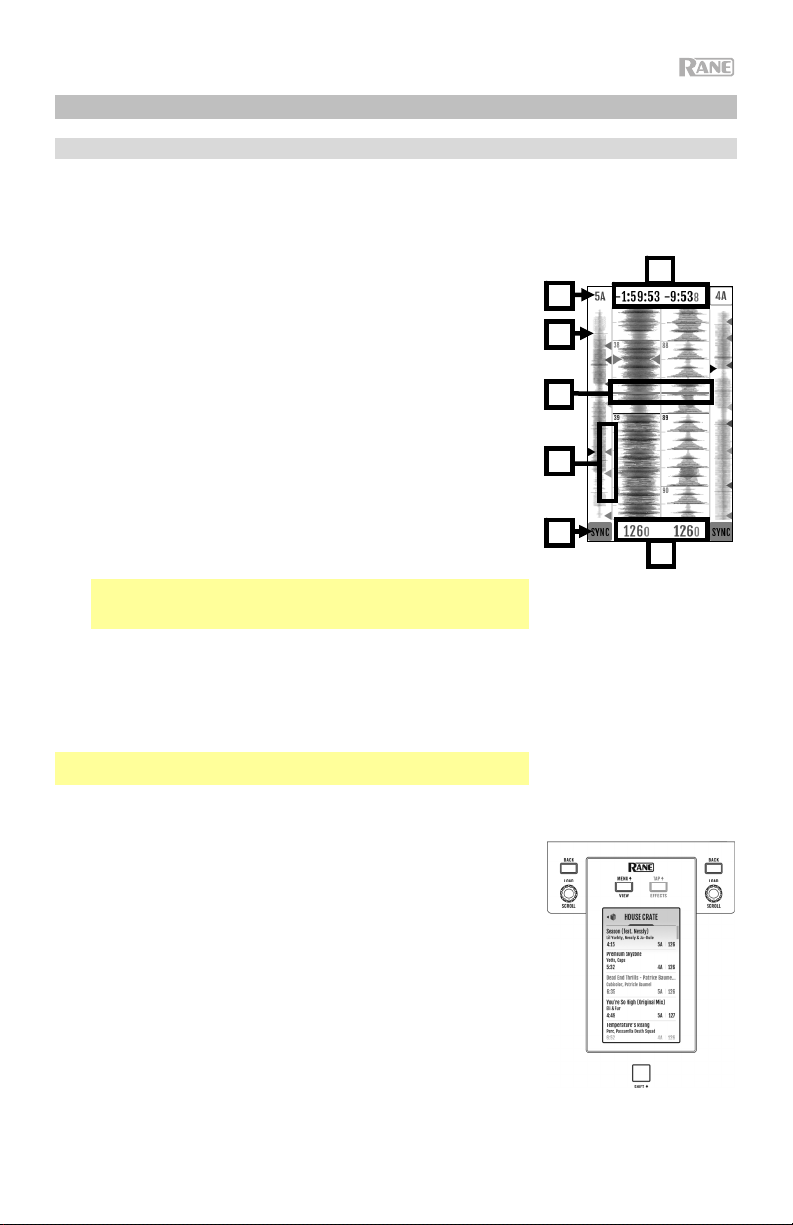
Touchscreen
To toggle between Waveform and Library views, press the View/Menu button.
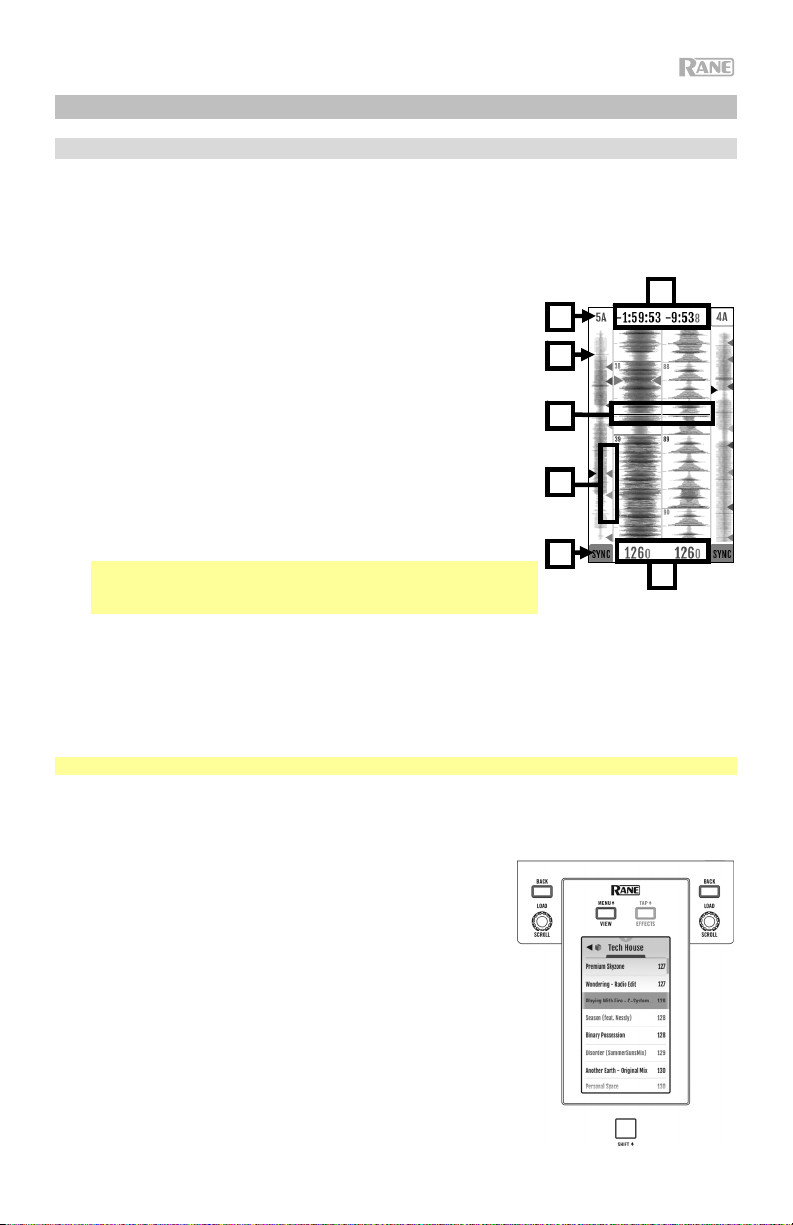
Waveform View
In Waveform view, track waveforms are displayed vertically, with
Channel 1 on the left side and Channel 2 on the right side. The large
waveform represents a section of the current track. The smaller
waveform represents the entire current track.
1. Time: Displays the time remaining of the current track.
2. Key/Key Lock: Hold Shift and tap this icon to toggle between
the Key and Key Lock views. When Key is selected, the key of the
current track will be displayed, and you can tap to enable or
disable Key Sync. When Key Lock is selected, a Key Lock icon
(or Serato Pitch 'n Time icon, if installed) will be displayed, and
you can tap to enable or disable Key Lock. When any option is
enabled, the field will be highlighted.
3. Overview: The smaller waveform represents an overview of the
entire current track. You can use your finger to "scrub" through
the track while it is playing.
Note: If the Disable Needle Search option in Serato DJ Pro has
been enabled, you will need to hold Shift to scrub through the
track.
4. Song Position: Playhead position of the current track.
5. Hot Cues: Displays hot cues by color.
6. Sync: When Sync is enabled, the field will be highlighted and the
BPM indicators will color blue. To enable or disable Sync, tap the
icon for either channel.
7. BPM: Beats Per Minute of the current track.
Note: While in Waveform View, touch the Load/Scroll knob to quickly bring up Library View.
2
3
4
5
6
Library View
In Library View, the display shows the Serato library of the
connected computer. If Seventy-Two is connected to two
computers, the one to which both decks were last assigned will
be shown.
To change view modes, swipe down on the pull-down menu
icon at the top of a tracklist view, then tap the icon for the desired
mode—Simple View or Expanded View.
To browse tracks, turn the Load/Scroll knob.
To quickly scroll, press Shift and turn the Load/Scroll knob.
To open a crate or load a track to a deck, press the
Load/Scroll knob.
To move back a level, press Back, or press the back arrow
located in the top-left region of the touchscreen.
Touchscreen with
Library Simple View
1
7
9
Page 10
Main Menu
To access the main menu, press Shift and View/Menu, or press and hold View/Menu for 4
seconds. The Main Menu contains the following options.
Mixer Settings: Select this option to edit the following settings.
• Audio Out: Select this option to edit the Main Out, Mic 1 Clean Feed, and Deck Balance
settings.
Note: When Clean Feed is On, the Mic 1 will not pass audio when recording in Serato DJ Pro.
• Deck Inputs: Select this option to edit the Phono 1/2 Sensitivity and Tone XOver 1/2 settings.
Note: Set Phono Sensitivity to the settings recommended by your cartridge's manufacturer.
• Filter Setup: Select this option to edit the Deck 1/2 Resonance and Sampler Resonance
settings.
• Pad Setup: Select this option to edit the Pad Sensitivity settings.
• Headphone Setup: Select this option to edit the headphone Tone setting.
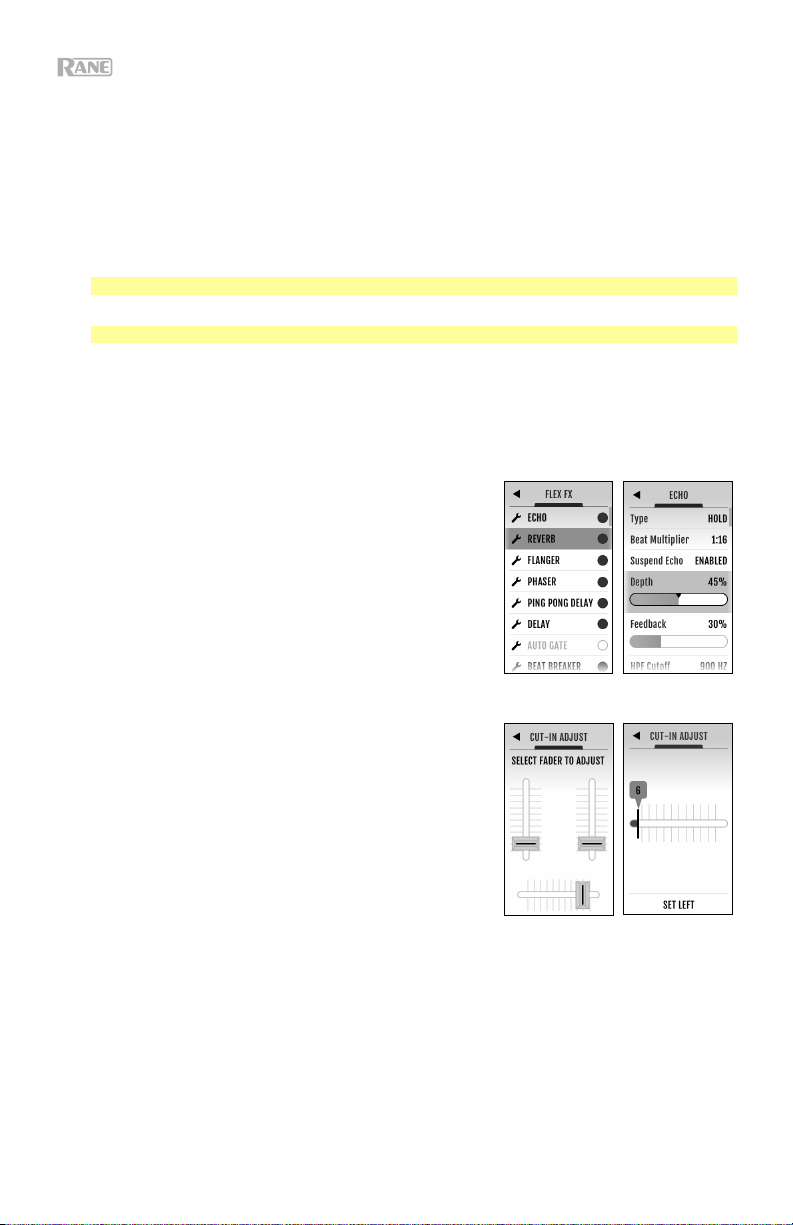
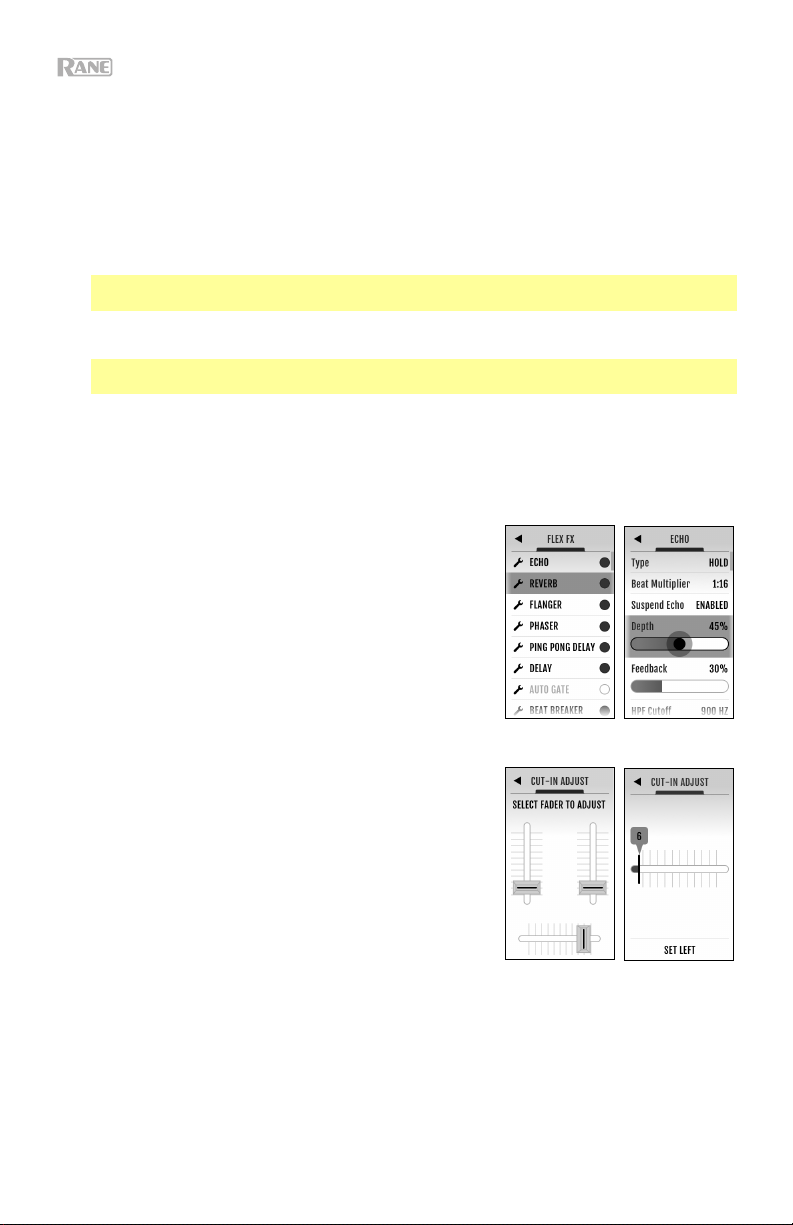
Flex FX: Select this option to view and edit the internal Flex FX
settings.
• To add or remove an effect from the list of favorites,
tap the circle on the right side of the display. When the
circle is green, the effect will be included in the list of Flex
FX in Effects View. When the circle is empty and effect
name is grayed out, the effect will no longer appear in the
list.
• To adjust the default settings of the internal Flex FX,
tap the wrench icon. Any changes made will be saved to the
mixer.
Cut-In Adjust: Select this option to enter the Cut-In Adjust
setup menu. This controls the amount of dead space between
a fader's closed and open positions. Select the fader you
would like to adjust, then move the selected fader to the
desired position and press Set to store the setting.
Footswitch: Select this option to set the assignments for
Footswitch 1/2/3.
Display: Select this option to adjust the Brightness of the display.
10
Page 11
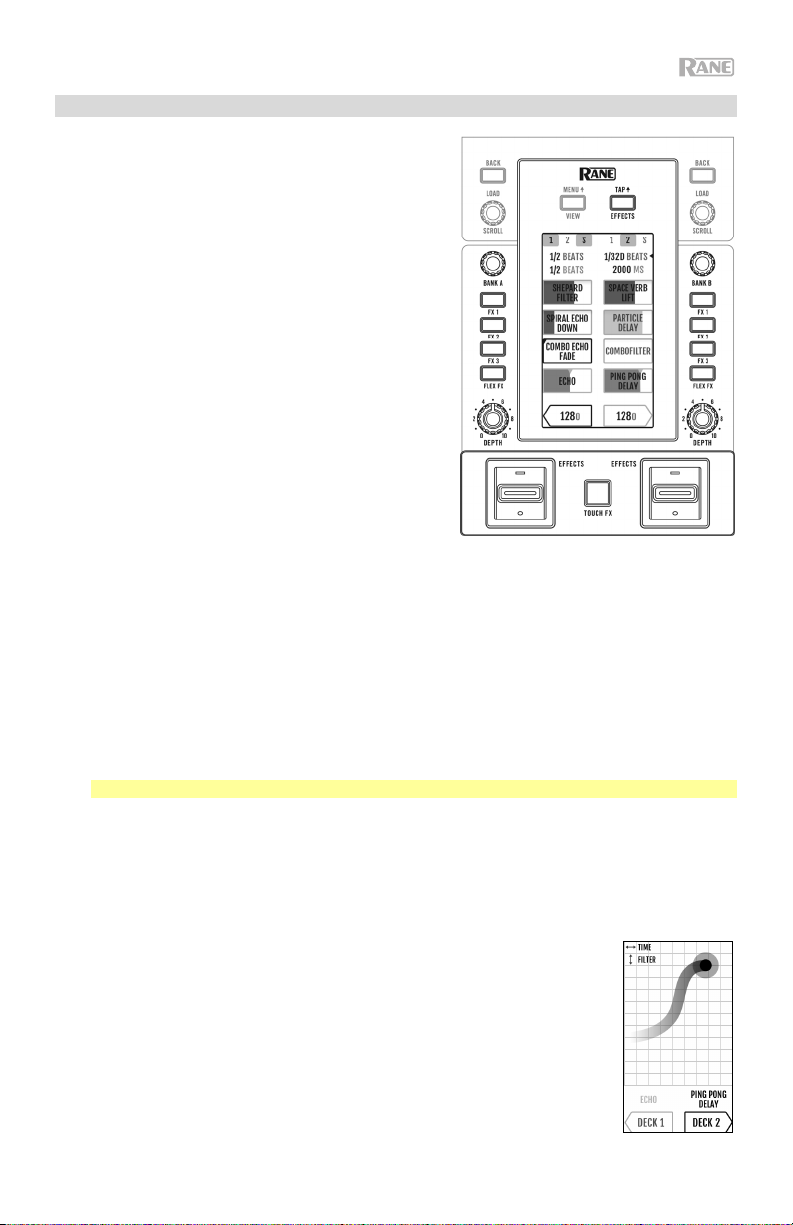
Effects
Each bank of Effects contains up to 3 software effects,
plus the internal Flex FX, for a total of up to 8 effects that
can be added and routed to Deck 1, Deck 2, and the
Sampler. By default, effects are routed to Deck 1 and
Deck 2.
To change the effect routing:
1. Tap the blue 1/2/S icons at the top of the display to
enter the Routing menu.
2. Select where you would like to route the effects,
then press OK to return to the previous page. Both
banks of effects can be routed to the same deck(s).
To add and use effects:
1. Press the Effects button to enter Effects View.
2. Tap the Touchscreen to select the desired effect, and
press the Parameter Knob to switch to FX select
mode.
3. Turn the Parameter Knob to cycle through the list
of effects, and press it to load the effect to that slot.
4. Push the FX 1–3 or Flex FX buttons to activate the effect in the chain. Effects are applied in
sequence in the chain (FX1 > FX2 > FX3 > Flex FX).
5. Use the Effects Toggles to apply the effects to Deck 1 and 2. Push the Toggle away from you
to latch an effect, or pull and hold the Toggle toward you to momentarily trigger an effect.
Press the Sampler Effects button to apply the effects to the sampler.
To edit a software effect:
1. Tap the effect on the display.
2. Turn the Parameter Knob to begin editing the selected parameter. Pressing the Parameter
Knob will switch to software FX select mode for the effect in focus.
3. To edit effect timing, tap on the Timing and turn the Parameter Knob.
Note: Time adjustments are per bank.
To edit internal Flex FX:
1. Tap to bring Parameter Knob focus to the desired effect, then use the Parameter Knob to
adjust. Double-tap the desired effect to adjust the default Flex FX settings. Any changes made
will be saved to the mixer.
Touch FX
Press the Touch FX button to open the X/Y display.
To select which deck the Touch FX is applied to, tap the respective Deck
arrow. Active effects routed to that deck from either Bank will be highlighted.
To apply Touch FX, slide your finger across the display. Sliding on the Y-axis
applies a high pass (up) or low pass (down) Filter. Sliding left to right on the Xaxis increases the Time parameter for the active internal Flex FX.
11
Page 12
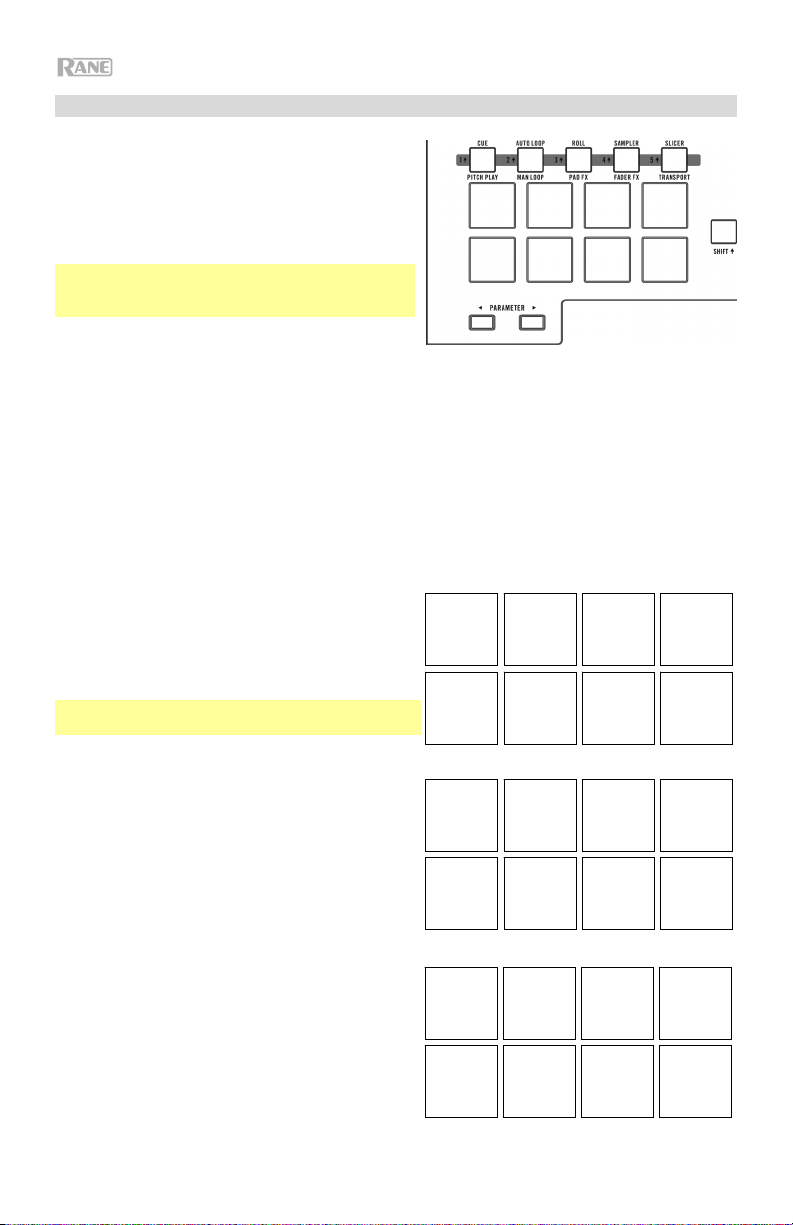
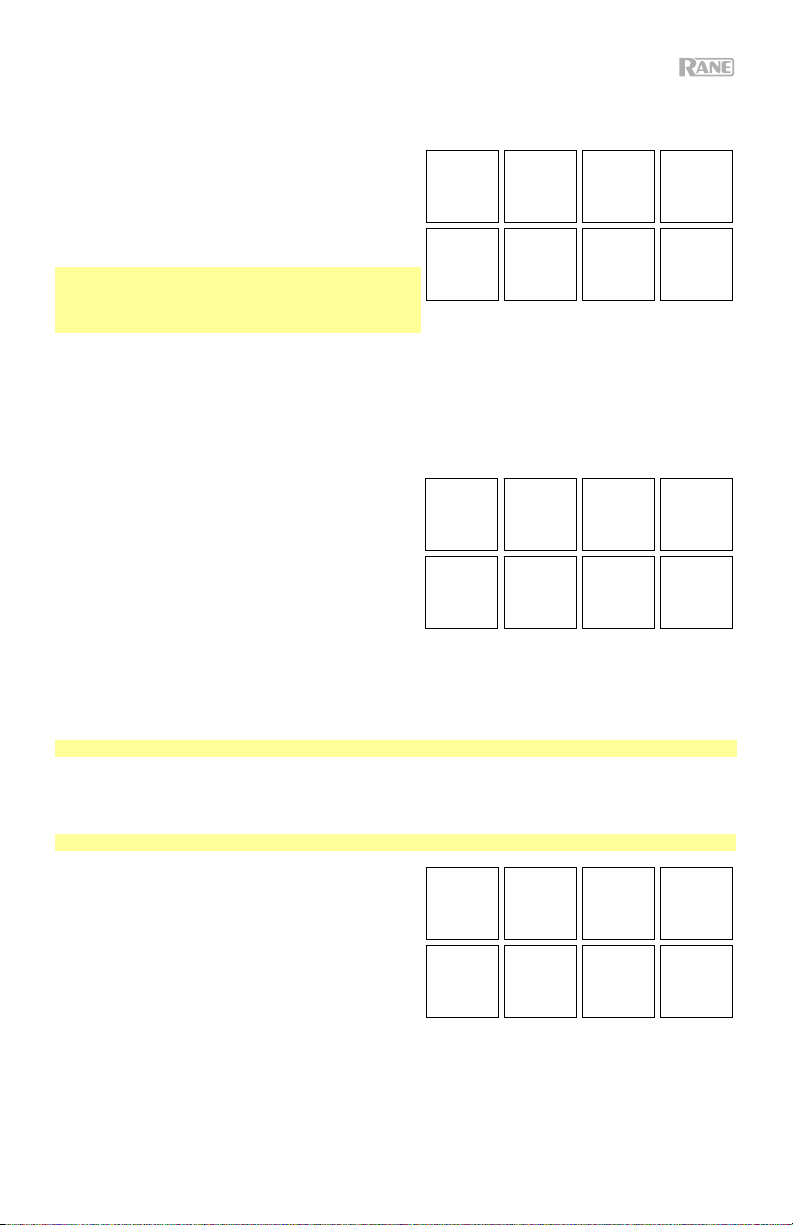
Pad Modes
This chapter describes the different pad modes.
Each deck has eight pads, which are always in one
of these modes, and each deck’s pads can be in a
different mode. Press one of the Pad Mode buttons
to enter the corresponding pad mode on that deck.
1 2
3 4
Each pad mode button will alternate between two
modes with each press.
Tip: In each pad mode, press Shift and one of the
5 6
7 8
Pad Mode buttons to access additional modes or
use custom modes.
Cue
In Cue Mode, each pad assigns a hot cue point or returns the track to that hot cue point.
To enter Cue Mode, press Cue / Pitch Play so that it lights white.
To assign a hot cue point, press an unlit Pad at the desired point in your track. The pad will light
up when it is assigned (with the corresponding color, if available).
To jump to a hot cue point, press a lit Pad.
To delete an assigned hot cue point, press Shift and the corresponding pad.
Pitch Play
In Pitch Play Mode, each pad plays the track from a
hot cue point at a different transposition (adjustable
by semitones). The Serato Pitch ‘n Time DJ
Expansion Pack must be installed to use this mode.
See Cue Mode to learn how to assign hot cue points.
Note: A Serato Pitch 'n Time download card with
serial number is included with your Seventy-Two.
To enter Pitch Play Mode, press Cue / Pitch Play
so that it lights green.
To select which hot cue point to use, press Shift
and a dimly lit Pad.
To select the range of transpositions the pads will
use, use the Parameter / buttons (see the
diagrams here).
To adjust the key of the current track down or up,
press Shift and the Parameter / buttons,
respectively.
To play the track from the hot cue point, press a lit
Pad. Each pad corresponds to a specific transposition
(by semitones), depending on the current range of
transposition (see the diagrams here). The pad with no
transposition (the original pitch) will be lit white.
12
+4
semitones
0
(original
pitch)
0
(original
pitch)
-4
semitones
-3
semitones
-7
semitones
+5
semitones
+1
semitone
Middle
+1
semitone
-3
semitones
Down
-2
semitones
-6
semitones
Up
semitones
semitones
semitones
semitones
semitone
semitones
+6
+2
+2
-2
-1
-5
semitones
semitones
semitones
semitone
(original
semitones
+7
+3
+3
-1
0
pitch)
-4
Page 13
Auto Loop
In Auto Loop Mode, each pad triggers or releases an auto-loop of a different length. The software’s
loop grid determines the size of the loop.
To enter Auto Loop Mode, press Auto Loop / Man Loop so that it lights dark blue.
To change which eight lengths for auto loops are shown (in the software), press either of the
Parameter / buttons. The pad layout will shift to match it.
To shift the Auto Loop backward or forward, press Shift and the Parameter / buttons,
respectively.
Manual Loop
In Manual Loop Mode, each pad will return the track
to a loop you created and saved earlier. The pad
layouts for the two banks are identical.
To enter Manual Loop Mode, press Auto Loop /
Man Loop so that it lights yellow.
To create a loop, press Pad 5 to set the Loop In
point and then press Pad 6 to set the Loop Out point
and activate the loop.
To save a loop, while a loop is active, press an unlit pad in the top row (Pads 1–4). You can do this
regardless of how the loop was created (Auto Loop Mode, Manual Loop Mode, etc.).
To activate or deactivate a saved loop, press a lit pad in the top row (Pads 1–4).
To delete a saved loop, press Shift and a lit pad in the top row (Pads 1–4).
To activate or deactivate the last-activated loop, press Pad 7.
To immediately reactivate the last-activated loop (“reloop”), press Pad 8.
To halve or double the length of a loop, press the Parameter / buttons, respectively.
To shift a loop backward or forward, press Shift and the Parameter / buttons, respectively.
1
Loop 1 Loop 2 Loop 3 Loop 4
56
Loop In
234
Set
Loop Out
Set
7
Loop
On/Off
8
Reloop
Saved Loops
Hold Shift and press Auto Loop / Man Loop (2) to access Saved Loops. In this mode, all 8 pads are
used to activate or deactivate a saved loop.
Roll
In Roll Mode, each pad triggers a momentary loop roll. Releasing the pad stops the loop roll and
resumes normal playback where the playhead would be if you had not triggered the loop roll (i.e., as
if the track had been playing forward the whole time).
Note: Make sure Show Beat Jump Controls is disabled in the Serato DJ Pro Setup menu. You can
also view and edit the set loop sizes in the software.
To enter Roll Mode, press Roll / Pad FX so that it lights aqua.
To trigger a loop roll, press and hold a Pad.
To change which eight lengths for loop rolls are shown (in the software), press either of the
Parameter / buttons. The pad layout will shift to match it.
To shift the loop roll backward or forward, press Shift and the Parameter / buttons,
respectively.
13
Page 14
Pad FX
In Pad FX Mode, the pads select and activate effects.
The top row of pads selects the type of effect, and the
bottom row triggers and controls the lenth of the effect.
To enter Pad FX mode, press Roll / Pad FX so that it
lights yellow.
To select the Vinyl Brake effect, press Pad 1. When the
Vinyl Brake effect is triggered by the bottom row pads,
the audio slows as if a phono platter has stopped, fading
out to silence after the time selected.
To select the Backspin effect, press Pad 2. When the Backspin effect is triggered by one of the bottom
row pads, the audio plays backwards and speeds up as if a phono platter is spun backwards, fading out to
silence after the time selected.
To select the Gate effect, press Pad 3. When the Gate effect is triggered by one of the bottom row pads, a
time-based gate is applied to the audio based on the selected size.
To select the Echo effect, press Pad 4. When the Echo effect is triggered by the bottom row pads, the
audio will echo to silence based on the size selected.
Note: The Echo effect can be combined with other effects. All other effects are exclusive.
To trigger the selected effect, press one of Pads 5–8. Each pad activates the effect immediately with a set
size, increasing from Pad 5 (shortest time) to Pad 8 (longest time). When an effect is triggered, the selected
pad will blink.
Note: Selecting a new pad mode will disable all currently active Pad FX on that deck.
1
Vinyl
Brake
5678
Size 1 Size 2 Size 3 Size 4
2
3
Backspin Gate Echo
4
Sampler
In Sampler Mode, the pads will control the sampler in the software. The pads each trigger a sample at a
specified volume (you can assign the sample and its volume in the software).
To enter Sampler Mode, press Sampler / Fader FX so that it lights purple.
To assign a sample and its volume, use the software. See the Serato DJ Pro manual to learn more about
using samples.
To play a sample, press a lit pad. The pad will flash as the sample plays.
To stop playback of a sample, press Shift and a Pad while it plays.
To cycle through the sample banks, press the Parameter / buttons.
To cycle through the Sampler outputs, press Shift and the Parameter / buttons.
14
Page 15
Fader FX
In Fader FX Mode, the pads will mute and unmute the
deck’s audio signal in a way that emulates crossfader
movements toward that deck. A “click” is a movement of
the crossfader toward a deck (“open”) and then away
from that deck (“closed”). DJs use clicks in different
rhythmic patterns (often in conjunction with scratching) to
create various effects.
Note: Fader FX are based on the current track's BPM.
Since some scratch sound files may not accurately
display the BPM, set the BPM manually for the desired
sound.
To enter Fader FX Mode, press Sampler / Fader FX so that it lights green.
To trigger a fader effect, press one of Pads 1–8.
To reverse an effect, hold Shift and press one of Pads 1–8.
1
1-Click
Flare
5 6 7 8
Trans-
formers
2 3 4
2-Click
Flare
3-Click
Flare
4-Click
Flare
2-to-1
Alternator
Tri-forms Uzi
Baby
Flip
If you have purchased the Serato Flip Expansion Pack,
you can access the Flip control by holding Shift and
pressing Sampler / Fader FX (4). If you have not
purchased the Flip Expansion Pack, this will be available
as a Custom Pad mode.
In this mode, unlit pads have no Flip assigned to them;
solidly lit pads have a Flip assigned but are not playing;
flashing pads have a Flip assigned and are currently
playing.
To assign a Flip to a pad, press and hold Pad 8 and press Pad 1, 2, 3, 5, 6 or 7.
To play an assigned Flip, press Pad 1, 2, 3, 5, 6 or 7 (if it has a Flip assigned to it).
To immediately stop playback of a Flip, hold Shift and then press the corresponding pad.
To automatically "snap" the length of a Flip so it aligns with the Beatgrid (Loop Snap), press and hold
Pad 4 and then press a pad with a Flip assigned to it.
Important: Your track must have a set Beatgrid for the Loop Snap function to work.
Flip 1 Flip 2 Flip 3
Flip 4 Flip 5 Flip 6
Loop
Snap
Assign
Flip
Slicer
Important: Your track must have a set beatgrid for this mode to work.
In Slicer Mode, the eight pads represent eight sequential
beats—“slices”—in the beatgrid. The currently playing
slice is represented by the currently lit pad; the light will
“move through the pads” as it progresses through each
eight-slice phrase. You can press a pad to play that slice.
When you release the pad, the track will resume normal
playback from where it would have been if you had never
pressed it (i.e., as if the track had been playing forward
the whole time).
To enter Slicer Mode, press Slicer / Transport so that it
lights red. The deck will exit Slicer Mode if you load
another track to the deck or enable Grid Edit Mode.
To play a slice, press the corresponding Pad.
To decrease or increase the size of the slices, press the Parameter / buttons.
To move the playhead backward or forward, press Shift and the Parameter / buttons.
Slice 1 Slice 2 Slice 3 Slice 4
Slice 5 Slice 6 Slice 7 Slice 8
15
Page 16
Transport
In Transport Control Mode, the pads correspond to
different transport controls. The software will
automatically enter Internal Mode when you do this (if
you are using a Twelve controller with Seventy-Two,
the software will always be in Internal Mode).
To enter Transport Mode, press Slicer / Transport
so that it lights green.
To bend the pitch downward temporarily, press
Pad 1.
To bend the pitch upward temporarily, press Pad 2.
To move the pitch fader down, press Pad 3.
To move the pitch fader up, press Pad 4.
To enable or disable Keylock, press Pad 5.
To switch between Internal Mode (INT) and Relative Mode (REL), press Shift and Pad 5.
(Switching to Relative Mode will allow you to resume control of playback with control vinyl or control
CDs.)
To activate or deactivate Sync, press Pad 6.
To skip to the cue point, press Pad 7.
To play or pause the track, press Pad 8.
1
Pitch
Bend
5
Keylock
INT/REL
2
Pitch
-
Bend
6
Sync Cue
3
Pitch
+
Fader -
7
4
Pitch
Fader
8
+
Slicer Loop
Hold Shift and press Slicer / Transport (5) to enter Slicer Loop mode. The pads behave
identically to the pads in Slicer Mode, except the eight-Slice phrase will loop rather than moving
forward continuously through the track.
Custom Pad Sets
In addition to the standard pad modes, you can create up to 3 customized Pad Sets using Serato DJ
Pro's MIDI mapping feature.
To create a custom pad set:
1. Hold Shift and press Cue / Pitch Play (1), Roll / Pad FX (3), or Sampler / Fader FX (4).
Note: If you have purchased the Serato Flip expansion pack, holding Shift and pressing
Sampler / Fader FX (4) will access the Flip Controls, not a custom pad set.
2. In Serato DJ Pro, open the Setup menu and select MIDI.
3. Select Seventy-Two and make sure that Allow Serato DJ Hardware Remapping is enabled.
Close the Setup window.
4. In the main Serato DJ Pro window, click the MIDI button at the top of the screen to begin
mapping.
5. Click a feature in Serato DJ Pro, then touch or move a control on your hardware to map the
feature to that control.
See the Serato DJ Pro manual for more information on MIDI mapping.
16
Page 17
V
Faders
Seventy-Two's Channel Faders and Crossfader are contactless MAG THREE faders with
adjustable tension.
To adjust the tension on Seventy-Two's faders:
1. Make sure the unit is powered off and
disconnected from a power source.
2. Using a screwdriver, remove the screws from
faceplate at bottom of the top panel where the
faders are located (see image).
Note: The fader caps must be removed to
remove the faceplate.
3. Using a screwdriver, adjust the tension screw for
each fader to your preference.
Top Panel Fader Plate
MAG THREE Fader
Top
iew
Tension Screw
Control Panel
The Rane Control Panel allows you to adjust settings
on your Seventy-Two mixer and save and load these
settings to a file (.r72) on your computer. Using
settings files lets you maintain several different control
configurations to use in different situations.
To manage settings files, navigate to the Settings
section of the Rane Control Panel, under the General
tab.
• Load: Select this to locate and load a Seventy-
Two settings file (.r72) on your computer to the
Control Panel.
• Save: Select this to save the mixer's settings to
your computer as a Seventy-Two settings file
(.r72).
17
Page 18
Guía del usuario (Español)
Introducción
Gracias por comprar el Seventy-Two. En Rane DJ, sabemos que usted se toma la música en
serio. Por eso es que diseñamos nuestros equipos con una sola cosa en mente—hacer que
pueda tocar su mejor interpretación.
Contenido de la caja
Seventy-Two
Cable del suministro eléctrico
(2) Discos de vinilo de control Serato NoiseMap™
(2) CD de control Serato NoiseMap™
Tarjeta de descarga Serato Pitch 'n Time con número de serie
(2) Cables USB
Pegatinas de Rane
Tarjeta de descarga de software
Guía del usuario
Manual sobre la seguridad y garantía
Soporte
Para obtener la información más reciente acerca de este producto (documentación,
especificaciones técnicas, requisitos de sistema, información de compatibilidad, etc.) y
registrarlo, visite dj.rane.com.
Para obtener soporte adicional del producto, visite dj.rane.com/support.
18
Page 19
Instalación
Los elementos que no se enumeran en Introducción > Contenido de la caja se venden por separado.
1. Visite dj.rane.com e inicie sesión con su cuenta. (Cree una cuenta si este es su primer producto
Rane). En su cuenta, registre su Seventy-Two y descargue el Rane Control Panel.
Usuarios de Windows únicamente: El panel de control de Rane contiene los controladores
requeridos para Windows.
2. IMPORTANTE: Ocasionalmente, puede que actualicemos el firmware del Seventy-Two para mejorar
su funcionamiento. Visite dj.rane.com para encontrar las actualizaciones de firmware disponibles,
especialmente luego de actualizar su software (las actualizaciones de firmware pueden contemplar las
nuevas características del software).
3. Descargue e instale la versión más reciente de Serato DJ Pro desde serato.com.
4. Con unos cables USB, conecte los puertos USB del Rane Twelve (si lo está utilizando) u otros
controladores MIDI USB a los puertos USB del Twelve/Controller del Seventy-Two.
5. Conecte las fuentes de entrada de audio (micrófonos, giradiscos, etc.) al Seventy-Two.
6. Conecte los dispositivos de salida de audio (auriculares, amplificadores de potencia, altavoces, etc.)
al Seventy-Two.
7. Enchufe todos los dispositivos en sus tomas de corriente y enciéndalos en el orden correcto:
• Para iniciar la sesión, encienda (1) las fuentes de entrada, (2) el Seventy-Two y (3) los
dispositivos de salida.
• Al terminar la sesión, apague (1) los dispositivos de salida, (2) el Seventy-Two y (3) las fuentes
de entrada.
8. Utilice un cable USB para conectar el puerto USB del Seventy-Two a su ordenador. ¡Abra Serato DJ
Pro y a tocar! Para obtener más información sobre cómo utilizar Serato DJ Pro con el Seventy-Two,
visite support.serato.com y seleccione Rane Seventy-Two.
Computadora
Micrófono
Rane Twelve
(u otro controlador MIDI USB)
Altavoces activos Monitores de cabina Giradiscos
(u otro controlador MIDI USB)
Rane Twelve
Reproductor
de CD
19
Page 20

Características
Panel superior
20
Page 21
1. Pantalla táctil: Esta pantalla multitáctil a todo color muestra información relevante para la operación
actual del Seventy-Two. Toque la pantalla y utilice los controles de hardware para controlar la interfaz.
Para más información, consulte Funcionamiento > Pantalla táctil.
2. Shift: Mantenga pulsado este botón para acceder a las funciones secundarias de otros controles del
Seventy-Two.
3. View/Menu: Pulse este botón para alternar entre las vistas de biblioteca y las vistas de formas de
onda de la pantalla táctil. Para más información, consulte Funcionamiento > Pantalla táctil.
Mantenga pulsado Shift y pulse este botón o mantenga pulsado este botón durante 4 segundos,
para mostrar el menú principal del Seventy-Two.
4. Effects/Tap: Pulse este botón para mostrar la vista de efectos de forma inmediata.
Mantenga pulsado Shift y pulse este botón varias veces con el tempo deseado para ajustar
manualmente la frecuencia BPM de los efectos pulso-tempo, para cada canal.
5. Back: Pulse este botón para ver la pantalla anterior. En la vista de biblioteca, pulse este botón para
moverse hacia atrás a través de los niveles de la organización de biblioteca.
Mantenga pulsado Shift y pulse este botón para abrir el área de preparación de Serato DJ Pro.
6. Load/Scroll: Gire esta perilla para navegar por las listas y púlsela para seleccionar un elemento o
cargar en la bandeja la pista actualmente seleccionada. En la vista de formas de onda, toque este
botón para cambiar a la vista de biblioteca de la pantalla táctil.
Mantenga pulsado Shift y pulse esta perilla para cargar la pista actualmente seleccionada en el área
de preparación.
Consejo: Pulse esta perilla dos veces rápidamente para cargar la misma pista en ambas bandejas
("dobles instantáneos").
7. Fuente de la bandeja: Ajuste esta perilla a la fuente de audio deseada desde este canal: USB A o B
(una pista que se reproduce en esa capa del software), PH/CD (un dispositivo conectado a la entrada
PH/CD del panel trasero de la bandeja), o Aux (un dispositivo conectado a la entrada Aux del panel
de entrada de la bandeja).
Nota: Si selecciona PH/CD, ajuste los interruptores de selección PH/CD del panel trasero
correctamente.
Nota: Los controles de una bandeja solo envían la información MIDI cuando el selector de fuente de
la bandeja está ajustado a USB A o B.
8. Level de la bandeja: Gire esta perilla para ajustar el nivel de audio del pre-fader y pre-ecualizador del
canal correspondiente. El medidor junto a esta perilla indica el nivel de volumen de la señal (redúzcalo
si comienza a "recortarse" y llega a la parte roja del medidor).
9. Ecualizador High de la bandeja: Gire esta perilla para ajustar las
frecuencias altas (agudos).
10. Ecualizador Mid de la bandeja: Gire esta perilla para ajustar las
frecuencias medias.
11. Ecualizador Low de la bandeja: Gire esta perilla para ajustar las frecuencias bajas (graves).
12. LP/HP de la bandeja: Gire esta perilla para ajustar el filtro aplicado a la bandeja. Gire la perilla en
sentido antihorario para aplicar un filtro pasabajos. Gire esta perilla en sentido horario para aplicar un
filtro pasaaltos. Ajuste la perilla a la posición central (“12:00”) para desactivar los filtros.
13. Botones de modo de pad: Pulse uno de estos botones para entrar al modo de pad correspondiente.
Pulse una vez para entrar al modo primario (impreso más arriba) y pulse nuevamente para entrar al
modo secundario (impreso a continuación). Pulse Shift y uno de estos botones para acceder a los
modos de pads personalizados. Consulte Funcionamiento > Modos de pads para aprender a usar
los pads en cada modo.
14. Pads para actuaciones en vivo: Estos pads tienen distintas funciones en cada bandeja en función
del modo de pad activo. Utilice los botones de modo de pad para seleccionar el modo de pad. Estos
pads son sensibles a la velocidad (en ciertos modos solamente), duraderos y fáciles de tocar.
Consulte Funcionamiento > Modos de pads para aprender a usar los pads en cada modo.
15. Parameter /: Utilice estos botones para las diversas funciones en cada modo de pad. Mantenga
pulsado Shift y utilice estos botones para acceder a los parámetros secundarios.
Nota: Todos los controles
del ecualizador y el filtro
son de tipo full-kill.
21
Page 22

16. Touch FX: Pulse este botón para activar o desactivar la característica X-Y del panel táctil en la
pantalla táctil. Puede utilizar esta característica para controlar distintos parámetros de efectos. Para
más información, consulte Funcionamiento > Efectos.
17. Conmutador Effects: Mueva este interruptor de conmutación alejándolo de usted para activar los
efectos de software y los efectos Flex del Seventy-Two—el conmutador se bloqueará en esa
posición. Tire del conmutador hacia la posición central para desactivar los efectos.
Tire y sostenga el conmutador en dirección a usted para activar los efectos de software y los efectos
del Seventy-Two momentáneamente, y suelte el interruptor de conmutación para desactivar los
efectos—el interruptor regresará a la posición central.
Nota: Los interruptores de conmutación de efectos pueden quitarse y girarse 180° según sus
preferencias.
18. Perilla Parameter: Gire estas perillas para ajustar distintos parámetros de efectos. El enfoque de la
perilla de parámetros se indica en la pantalla táctil con una caret blanca para cada banco.
19. FX 1–3: Pulse cada uno de estos botones para activar o desactivar el efecto de software
correspondiente en un banco de tres efectos.
20. Flex FX: Pulse este botón para activar o desactivar efectos internos del Seventy-Two.
21. Depth: Gire esta perilla para ajustar la mezcla “wet-dry” (señal húmeda/señal seca) de los Flex FX
internos en esa bandeja.
22. Sampler Level: Gire esta perilla para ajustar el nivel de volumen del muestreador del software.
23. Perilla LP/HP del muestreador: Gire esta perilla para ajustar el filtro aplicado al muestreador del
software. Gire la perilla en sentido antihorario para aplicar un filtro pasabajos. Gire esta perilla en
sentido horario para aplicar un filtro pasaaltos. Ajuste la perilla a la posición central (“12:00”) para
obtener una respuesta “plana” (sin filtros).
24. Botón Effects del muestreador: Pulse este botón para activar o desactivar los efectos para el
muestreador del software.
Nota: Debe seleccionarse el muestreador en el menú de encaminamiento de efectos. Consulte
Efectos para ver más detalles.
25. Cue Level: Gire esta perilla para ajustar el nivel de volumen del canal de cue.
26. Cue Mix: Gírela para mezclar el canal de cue y la mezcla del programa en las salidas de auriculares.
Cuando se gira totalmente a la izquierda, sólo se oye el canal de cue. Cuando se gira totalmente a la
derecha, se oye sólo la mezcla del programa.
27. Split Cue: Cuando este botón está iluminado en la posición On (Activado), se “divide” el audio de los
auriculares de modo que el canal de cue se suma a mono y se envía al canal del auricular izquierdo
mientras que la mezcla del programa se suma a mono y se envía al canal derecho. Cuando el botón
no está iluminado en la posición Off (Desactivado), el canal de cue y la mezcla del programa se
“combinan”. En ambos casos, use la perilla Cue Mix para controlar la mezcla de las dos señales.
28. Cue de la bandeja: Pulse este botón para enviar la señal pre-fader de esta bandeja al canal de cue
para monitoreo. Cuando está pulsado, el botón se enciende. Para colocar en el punto de cue varios
canales simultáneamente, pulse los botones Cue de ambas bandejas.
29. Fader del canal: Mueva este fader para ajustar el nivel de volumen de la bandeja correspondiente.
30. Crossfader: Mueva este fader para mezclar las bandejas.
31. Main: Gire esta perilla para ajustar el volumen de salida de las salidas principales. El medidor junto a
esta perilla indica el nivel de volumen de la señal (redúzcalo si comienza a "recortarse" y llega a la
parte roja del medidor).
32. Booth: Gire esta perilla para ajustar el volumen de salida de las salidas de la cabina.
33. Session Out: Gire esta perilla para ajustar el volumen de salida de las salidas Session.
34. Session In: Gire esta perilla para ajustar el volumen de salida de las entradas Session.
35. Cue Session In: Pulse este botón para enviar la señal desde las entradas Session al canal de cue
para monitoreo. Cuando está pulsado, el botón se enciende.
36. Level del Mic 1:
Gire esta perilla para ajustar la ganancia de la entrada Mic 1. El medidor junto a esta
perilla indica el nivel de volumen de la señal (redúzcalo si comienza a "recortarse" y llega a la parte
roja del medidor).
37. Tone del Mic 1: Gire esta perilla para ajustar el balance de frecuencias bajas (graves) y altas (agudas)
de la señal de audio procedente de la entrada Mic 1.
22
Page 23
38. On/Duck del Mic 1: Pulse este control para activar o desactivar la entrada Mic 1 del panel trasero.
Mantenga pulsado este botón durante 2 segundos para activar la característica “ducking” (atenuación
automática), la cual reduce el nivel de volumen de todas las demás entradas en 10 dB. El botón
parpadeará cuando esta característica está activa. Pulse este botón una vez más para desactivar esta
característica y la entrada Mic 1.
39. Echo del Mic 1: Pulse este botón para activar o desactivar el efecto de eco en la señal de la entrada
Mic 1. Gire la perilla Mic 1 Echo del panel frontal para ajustar la cantidad de efecto.
Panel trasero
1. Entrada de alimentación: Con el Seventy-Two apagado, conecte el cable de alimentación incluido a
esta entrada y, a continuación, en una toma de corriente.
2. Interruptor de encendido: Utilice este interruptor para encender y apagar el Seventy-Two. Encienda
el Seventy-Two después de haber conectado todos sus dispositivos de entrada y antes de encender
sus amplificadores y altavoces. Apague sus amplificadores y altavoces antes de apagar el SeventyTwo.
3. Salida Main (XLR): Conecte estas salidas a un sistema de altavoces o amplificador. Utilice la perilla
Master (Maestro) ubicada en el panel superior para controlar el nivel de volumen.
4. Salida Booth (1/4 pulg./6,35 mm, TRS): Conecte estas salidas a un sistema de monitores de cabina o
amplificador de cabina. Utilice la perilla Booth (Cabina) ubicada en el panel superior para controlar el
nivel de volumen.
5. Entrada Session (RCA): Conecte estas entradas desde un dispositivo de nivel de línea como otro
mezclador, un reproductor de CD, una caja de ritmos, etc. La señal se enviará directamente a la
mezcla de programa. Gire la perilla Session In ubicada en el panel superior para ajustar el nivel de
volumen.
6. Salida Session (RCA): Conecte estas salidas a otro mezclador, dispositivo de grabación, etc. La
mezcla de programa se enviará a estas salidas. Gire la perilla Session Out ubicada en el panel
superior para ajustar el nivel de volumen.
7. Entrada PH/CD de la bandeja (RCA): Conecte estas entradas a una fuente de audio externa o a un
giradiscos, reproductor de CD u otro dispositivo de nivel de línea. Recuerde ajustar el selector PH/CD
correspondiente a la posición adecuada y ajustar la perilla de la fuente de esa bandeja a PH/CD
para reproducir su señal de audio en dicha bandeja.
8. Selector PH/CD: Ajuste este interruptor a la posición adecuada, en función del dispositivo conectado
a las entradas PH/CD de la bandeja correspondiente. Si utiliza giradiscos de nivel fonográfico, ajuste
este interruptor a PH para proporcionar la amplificación adicional necesaria para las señales de este
nivel. Si está utilizando un dispositivo de nivel de línea, como un giradiscos de nivel de línea,
reproductor de CD o muestreador, ajuste este interruptor a CD.
9. Phono Grounds: Si está utilizando giradiscos de nivel fonográfico con cable de conexión a tierra,
conecte dicho cable a estos terminales. Si se experimenta un zumbido grave, puede significar que sus
giradiscos no están conectados a tierra.
Nota: Algunos giradiscos tienen el cable de conexión a tierra incorporado a la conexión RCA y, por lo
tanto, no es necesario conectar nada al terminal de tierra.
10. Entrada Aux de la bandeja (RCA): Conecte estas entradas a una fuente de audio de nivel de línea
externa. Recuerde ajustar la perilla de la fuente de esa bandeja a Aux para reproducir su señal de
audio en dicha bandeja.
23
Page 24
11. Entradas Mic 1–2 (XLR / 1/4 pulg. / 6,35 mm, TS): Conecte micrófonos o dispositivos de nivel de
línea a estas entradas mono. Sus señales de audio mono se dividen y encaminan directamente a la
mezcla de programa estéreo y al canal de cue. Si prefiere una entrada de línea estéreo, puede
utilizarse la entrada Session.
12. Selector Line/Mic: Ajuste este interruptor a la posición adecuada, en función del dispositivo
conectado a las entradas Mic 1–2. Si está utilizando un micrófono, ajuste este interruptor a Mic. Si
está utilizando un dispositivo de nivel de línea, como un teclado o muestreador, ajuste este interruptor
a Line.
13. Puertos USB del Twelve/Controller (USB tipo A): Utilice unos cables USB para conectar estos
puertos USB a sus controladores como Twelve o un controlador MIDI USB estándar
Importante: No conecte unidades USB a estos puertos. Conmutar la perilla de la fuente de la
bandeja forzará la expulsión de la unidad del ordenador conectado, lo que podría dañar el contenido,
por lo que debe evitarse.
14. Puertos USB (USB tipo B): Utilice unos cables USB para conectar estos puertos USB a puertos USB
disponibles en su ordenador. Estas conexiones envían y reciben audio e información de controles
MIDI desde y hacia el ordenador.
Nota: Asegúrese de haber descargado e instalado el panel de control de Rane desde dj.rane.com.
Panel frontal
1. Salidas para auriculares (1/4 pulg., 1/8 pulg. / 6,35 mm, 3,5 mm, TRS): Conecte sus auriculares de
1/4 o 1/8 pulg. (6,35 o 3,5 mm) a esta salida para búsqueda del punto inicial (cueing) y monitoreo de
la mezcla.
2. Mic 2 On: Cuando se coloca en On (Si), la entrada Mic 2 del panel trasero está activa y su señal de
audio se encamina directamente a la mezcla de programa y la mezcla de cue. Cuando se coloca en
Off (No), la entrada Mic 2 se desactiva.
3. Level del Mic 2: Gire esta perilla para ajustar la ganancia de la entrada Mic 2.
4. Tone del Mic 2: Gire esta perilla para ajustar el balance de frecuencias bajas (graves) y altas (agudas)
de la señal de audio procedente de la entrada Mic 2.
5. Mic 1 Echo: Gire esta perilla para ajustar la cantidad de efecto de eco en la señal de entrada Mic 1.
Pulse el botón Echo del Mic 1 en el panel superior para activar o desactivar este efecto.
6. Contour Controls: Permite ajustar la pendiente de la curva del crossfader. Gire la perilla a la izquierda
para una fusión suave (mezcla) o a la derecha para un corte abrupto (rayado). La posición central es
un ajuste típico para actuaciones en clubes.
7. Reverse del Fader: Ajuste este interruptor a On para invertir la dirección (polaridad) del fader
correspondiente. Ajuste el interruptor a Off para usar la polaridad del fader convencional.
8. Deck Swap: Ajuste este interruptor a la posición On (encendido) para intercambiar los faders de los
canales izquierdo y derecho según lo controlado por el Seventy-Two. Ajuste el interruptor a Off
(apagado) para usar la configuración de la bandeja convencional.
9. Entrada Footswitch (1/4 pulg. / 6,35 mm, TRS): Conecte un interruptor de pedal aquí, el cual puede
utilizarse para activar o desactivar efectos. También puede asignar esta entrada a otras funciones.
Esta entrada admite un interruptor de pedal con tres interruptores con cierre de contacto pasivo.
24
Page 25
Funcionamiento
Pantalla táctil
Para alternar entre las vistas de forma de onda y biblioteca, pulse el botón View/Menu.
Vista de forma de onda
En la vista de forma de onda, las formas de onda de las pistas se
muestran verticalmente, con el canal 1 del lado izquierdo y el canal 2 en el
lado derecho. La forma de onda más grande representa una sección de la
pista actual. La forma de onda más pequeña representa la totalidad de la
pista actual.
1. Tiempo: Muestra el tiempo restante de la pista actual.
2. Tono/Bloqueo de tono: Mantenga pulsado Shift y toque este
icono para alternar entre las vistas de tono y bloqueo de tono.
Cuando se selecciona un tono, se mostrará el tono de la pista actual
y podrá tocar para activar o desactivar la sincronización de tono.
Cuando el bloqueo de tono esté seleccionado, se mostrará un icono
de bloqueo de tono (o icono de Serato Pitch 'n Time, si está
instalado) y podrá tocar para activar o desactivar el bloqueo de tono.
Cuando cualquiera de las opciones este activada, el campo se
iluminará.
3. Descripción general: La forma de onda más pequeña representa
una descripción general de la totalidad de la pista actual. Puede usar
su dedo para "barrer" la pista mientras se está reproduciendo.
Nota: Si la opción Disable Needle Search (desactivar búsqueda de
púa) de Serato DJ Pro esta activada, deberá pulsar Shift para
barrer la pista.
4. Posición de la canción: Posición de la cabeza de reproducción de la pista actual.
5. Cues rápidos: Muestra los cues rápidos por color.
6. Sync: Cuando Sync está activado, el campo se iluminará y los indicadores de BPM se iluminarán en
color azul. Para activar o desactivar la sincronización, toque el icono de cualquiera de los canales.
7. BPM: Pulsos por minuto de la pista actual.
Nota: Mientras está en la vista de forma de onda, toque la perilla
Load/Scroll para traer rápidamente la vista de biblioteca.
Vista de la biblioteca
En la vista de biblioteca, la pantalla muestra la biblioteca del ordenador
conectado. Si el Seventy-Two está conectado a dos ordenadores, se
mostrará aquel al que se le asignaron por última vez ambas bandejas.
Para cambiar los modos de vista, deslice su dedo hacia abajo sobre el
icono del menú desplegable que se encuentra en la parte superior de la
vista de la lista de pistas y, a continuación, toque el icono para cambiar al
modo deseado—Vista simple o Vista ampliada.
Para recorrer las pistas, gire la perilla Load/Scroll.
Para recorrer las pistas rápidamente, pulse Shift y gire la perilla
Load/Scroll.
Para abrir una caja de discos o cargar una pista en una bandeja, pulse
la perilla Load/Scroll.
Para retroceder un nivel, pulse Back.
2
3
4
5
6
Pantalla táctil con
vista de biblioteca ampliada
1
7
25
Page 26
Menú principal
Para acceder al menú principal, pulse Shift y View/Menu o mantenga pulsado View/Menu
durante 4 segundos. El menú principal contiene las siguientes opciones.
Ajustes del mezclador: Seleccione esta opción para editar los siguientes ajustes:
• Audio Out (Salida de audio): Seleccione esta opción para editar los ajustes de la salida
principal, la señal limpia del micrófono 1, y el balance de la bandeja.
Nota: Cuando la salida limpia está activada, el micrófono 1 no enviará audio mientras se
grabe en Serato DJ Pro.
• Deck Inputs: Seleccione esta opción para editar los ajustes de sensibilidad 1/2 y XOver de
tonos 1/2 del interruptor fonográfico.
Nota: Ajuste la Phono Sensitivity sensibilidad fonográfica según los ajustes recomendados
por el fabricante de su cápsula.
• Filter Setup: Seleccione esta opción para editar los ajustes de resonancia 1/2 de la bandeja
y resonancia del muestreador.
• Pad Setup: Seleccione esta opción para editar los ajustes de sensibilidad del pad:
• Headphone Setup: Seleccione esta opción para editar el ajuste de tono de los auriculares.
Flex FX: Seleccione esta opción para ver y editar los ajustes de
los Flex FX internos.
• Para añadir o quitar un efecto de la lista de favoritos,
toque el círculo del lado derecho de la pantalla. Cuando el
círculo está en verde, el efecto se incluirá en la lista de
Flex FX en la vista de efectos. Cuando el círculo está
vacío y el nombre del efecto está en gris, el efecto ya no
aparecerá en la lista.
• Para configurar los ajustes predeterminados de los
Flex FX internos, toque el icono de la llave. toque el icono
de la llave.
Cut-In Adjust: Seleccione esta opción para abrir el menú de
configuración Cut-In Adjust. Esto controla la cantidad de
espacio muerto entre las posiciones cerrada y abierta de un
fader. Seleccione el fader que desea ajustar, mueva el fader
seleccionado a la posición deseada y pulse Set (Ajustar) para
guardar el ajuste.
Footswitch: Seleccione esta opción para ajustar las
asignaciones del interruptor de pedal 1/2/3.
Display: Seleccione esta opción para ajustar el brillo de la pantalla.
26
Page 27

Efectos
Cada banco de efectos contiene hasta 3 efectos de software,
además de los Flex FX internos, para un total de hasta 8
efectos que se pueden añadir y encaminar hacia la bandeja 1,
la bandeja 2 o el muestreador. De forma predeterminada, los
efectos se encaminan a la bandeja 1 y la bandeja 2.
Para cambiar el enrutamiento de los efectos:
1. Toque los iconos azules 1/2/S ubicados en la parte
superior de la pantalla del menú de enrutamiento.
2. Seleccione hacia dónde desea encaminar los efectos y, a
continuación, pulse OK para volver a la página anterior.
Ambos bancos de efectos se pueden encaminar hacia
la(s) misma(s) bandeja(s).
Para añadir y utilizar los efectos:
1. Pulse el botón Effects para abrir la vista de efectos.
2. Toque la pantalla táctil para seleccionar el efecto
deseado, y pulse la perilla de parámetros para cambiar
al modo de selección de efectos especiales.
3. Gire la perilla de parámetros para recorrer la lista de
efectos, y pulse la perilla para cargar el efecto en esa
ranura.
4. Pulse los botones FX 1–3 o Flex FX para activar el efecto en la cadena. Los efectos se aplican
secuencialmente en la cadena (FX1 > FX2 > FX3 > Flex FX).
5. Use los conmutadores de efectos para aplicar los efectos a las bandejas 1 y 2. Pulse el
conmutador alejándolo de usted para bloquear un efecto o tire de él acercándolo hacia usted para
disparar momentáneamente un efecto.
Mantenga pulsado el botón Sampler Effects (efectos del muestreador) para aplicar los efectos al
muestreador.
Para editar un efecto de software:
1. Toque el efecto en la pantalla.
2. Gire la perilla de parámetros para comenzar a editar el parámetro seleccionado. Pulse la perilla de
parámetros para cambiar al modo de selección de efectos especiales de software para el efecto
enfocado.
3. Para editar el tiempo del efecto, toque en Timing y gire la perilla de parámetros.
Nota: Los ajustes de tiempo son por banco.
Para editar los Flex FX internos:
1. Toque la perilla de parámetros para enfocar el efecto deseado y, a continuación, utilice la perilla de
parámetros para ajustar. Haga un doble toque sobre el efecto deseado para modificar los ajustes
predeterminados del Flex FX. Todos los cambios serán guardados en el mezclador.
Touch FX
Pulse el botón Touch FX para abrir la pantalla X/Y.
Para seleccionar la bandeja a la que se aplicará el Touch FX, toque la flecha de la
bandeja respectiva. Los efectos activos encaminados hacia esa bandeja desde
cualquiera de los bancos se iluminarán.
Para aplicar Touch FX, deslice su dedo a largo de la pantalla. Deslizar el dedo en el
eje Y aplica un filtro pasaaltos (arriba) o pasabajos (abajo). Deslizar el dedo de
izquierda a derecha sobre el eje X aumenta el parámetro Time del Flex FX interno
activo.
27
Page 28

Modos de pad
Este capítulo describe los distintos modos de pads. Cada
bandeja tiene ocho pads, los cuales siempre están en uno
de estos modos, y los pads de cada bandeja pueden estar
en un modo diferente. Pulse uno de los botones de modo
de pads para entrar al modo de pad correspondiente en
esa bandeja. Cada uno de los botones de modo de pads
alterna entre dos modos con cada pulsación.
Consejo: En cada modo de pad, pulse Shift y uno de los
botones de modo de pads para acceder a modos
adicionales o utilizar modos personalizados.
12
5 6
34
7 8
Cue
En el modo de cue, cada pad asigna un punto de cue rápido o hace que la pista vuelva a ese punto de cue
rápido.
Para entrar al modo de cue, pulse Cue / Pitch Play de modo que se ilumine en blanco.
Para asignar un punto de cue rápido, pulse un pad apagado en el punto deseado de su pista. El pad se
iluminará cuando se lo asigne (con el color correspondiente, si está disponible).
Para saltar a un punto de cue rápido, pulse un pad iluminado.
Para borrar un punto de cue rápido asignado, pulse Shift y el pad correspondiente.
Reproducción de tonos
+5
semitonos
+1
semitono
+1
semitono
-3
semitonos
-2
semitonos
-6
semitonos
Arriba
Medio
Abajo
semitonos
+6
semitonos
+2
semitonos
+2
semitonos
-2
semitonos
-1
semitono
-5
semitonos
semitonos
semitonos
semitono
(tono
original)
semitonos
+7
+3
+3
-1
0
-4
En el modo de reproducción de tonos, cada pad
reproduce la pista desde un punto de cue rápido en una
transposición diferente (ajustable por semitonos). El
paquete de expansión para DJ Serato Pitch ‘n Time debe
estar instalado para poder utilizar este modo. Consulte
Cue Mode para aprender cómo asignar puntos de cue
rápidos.
Nota: Se incluye una tarjeta de descarga con número de
serie Serato Pitch 'n Time con su Seventy-Two.
Para entrar al modo de reproducción de tonos, pulse
Cue / Pitch Play de modo que se ilumine en verde.
Para seleccionar el punto de cue rápido que desea
utilizar, pulse Shift y un pad tenuemente iluminado.
Para seleccionar el rango de transposiciones que
utilizará el pad, use los botones Parameter /
(consulte los diagramas aquí detallados).
Para ajustar el tono de la pista actual hacia arriba o
hacia abajo, pulse Shift y los botones Parameter /
respectivamente.
Para reproducir la pista desde el punto de cue rápido,
pulse un pad iluminado. Cada pad corresponde a una
transposición específica (por semitonos), en función del
rango de transposición actual (consulte los diagramas
aquí detallados). El pad sin transposición (el tono original)
estará iluminado en blanco.
+4
semitonos
0
(tono
original)
0
(tono
original)
-4
semitonos
-3
semitonos
-7
semitonos
28
Page 29

Bucle automático
En el modo de bucle automático, cada pad dispara o libera un bucle automático de diferente
longitud. La grilla de bucles del software determina el tamaño del bucle.
Para entrar al modo de bucle automático, pulse Auto Loop / Man Loop de modo que se ilumine
en azul oscuro.
Para cambiar las ocho longitudes de bucles automáticos que se muestran (en el software),
pulse cualquiera de los botones Parameter /. La disposición de los pads cambiará para que
coincida.
Para desplazar el bucle automático hacia atrás o hacia adelante, pulse Shift y los botones
Parameter /, respectivamente.
Bucle manual
En el modo de bucle manual, cada pad hará volver la
pista a un bucle anteriormente creado y guardado.
Las disposiciones de pads de los dos bancos son
1
Loop 1 Loop 2 Loop 3 Loop 4
2
34
idénticas.
Para entrar al modo de bucle manual, pulse Auto
Loop / Man Loop de modo que se ilumine en
amarillo.
5678
Entrada
del loop
Salida
del loop
Activar /
desactivar
loop
Repetición
de loop
Para crear un bucle, pulse el pad 5 para establecer
el punto de entrada del bucle y, a continuación, pulse
el pad 6 para establecer el punto de salida del bucle
y activar el mismo.
Para guardar un bucle, mientras está activo un bucle, pulse un pad apagado de la fila superior
(pads 1–4). Puede hacer esto independientemente de la forma en la que se creó el bucle (modo de
bucle automático, modo de bucle manual, etc.).
Para activar o desactivar un bucle guardado, pulse un pad iluminado de la fila superior (pads 1–
4).
Para borrar un bucle guardado, pulse Shift y un pad iluminado de la fila superior (pads 1–4).
Para activar o desactivar el bucle que se activó por última vez, pulse pad 7.
Para reactivar inmediatamente el bucle que se activó por última vez (“reloop”), pulse el pad 8.
Para duplicar o dividir a la mitad la longitud de un bucle, pulse los botones Parameter /,
respectivamente.
Para cambiar un bucle hacia atrás o hacia adelante, pulse Shift y los botones Parameter /,
respectivamente.
Bucles guardados
Mantenga pulsado Shift y pulse Auto Loop / Man Loop (2) para acceder a los bucles
guardados. En este modo, los 8 pads se utilizan para activar o desactivar un bucle guardado.
29
Page 30

Redoble
En el modo de redoble, cada pad dispara un redoble de bucle momentáneo. Al soltar el pad, se
detiene el redoble del bucle y se retoma la reproducción normal donde se encontraría el cabezal de
reproducción si no se hubiese disparado el redoble del bucle (es decir, como si la pista se hubiese
estado reproduciendo en avance todo el tiempo).
Nota: Asegúrese de que Show Beat Jump Controls está desactivado en el menú de configuración
de Serato DJ Pro. También puede ver y editar los tamaños de bucle establecidos en el software.
Para entrar al modo de redoble, pulse Roll / Pad FX de modo que se ilumine en color agua.
Para disparar un redoble de bucle, mantenga pulsado un pad.
Para cambiar cuáles son las ocho longitudes de bucles con retorno que se muestran (en el
software), pulse cualquiera de los botones Parameter /. La disposición de los pads cambiará
para que coincida.
Para desplazar el bucle con retorno hacia atrás o hacia adelante, pulse Shift y los botones
Parameter /, respectivamente.
Efectos especiales de los pads
En el modo de efectos especiales de los pads, estos
seleccionan y activan efectos. La fila superior de
pads selecciona el tipo de efecto, y la fila inferior
dispara y controla la longitud del mismo.
Para entrar al modo de efectos especiales de los
pads, pulse Roll / Pad FX de modo que se ilumine
en color amarillo.
Para seleccionar el efecto de freno de vinilo, pulse
el pad 1. Cuando se dispara el efecto de freno de
vinilo mediante los pads de la fila inferior, el audio se
ralentiza como si se hubiese detenido un plato
fonográfico, silenciándose progresivamente después
del tiempo seleccionado.
Para seleccionar el efecto de retroceso, pulse el pad 2. Cuando se dispara el efecto de retroceso
mediante los pads de la fila inferior, el audio se reproduce hacia atrás y se acelera como si se girara
un plato fonográfico hacia atrás, silenciándose progresivamente después del tiempo seleccionado.
Para seleccionar el efecto de compuerta, pulse el pad 3. Cuando se dispara el efecto de
compuerta mediante uno de los pads de la fila inferior, se aplica una compuerta basada en el tiempo
al audio en función del tamaño seleccionado.
Para seleccionar el efecto de eco, pulse el pad 4. Cuando el efecto de eco se dispara mediante
los pads de la fila inferior, el audio emitirá un eco hasta silenciarse en función del tamaño
seleccionado.
Nota: El efecto de eco puede combinarse con otros efectos. Todos los demás efectos son
excluyentes.
Para disparar el efecto seleccionado, pulse uno entre los pads 5–8. Cada pad activa el efecto
inmediatamente con un tamaño establecido, aumentando del pad 5 (tiempo más corto) al pad 8
(tiempo más largo). Cuando se dispara un efecto, el pad seleccionado parpadeará.
Nota: Al seleccionar un nuevo modo de pad, se desactivan todos los efectos especiales de los pads
activos en ese momento.
1234
Vinyl
Brake
56
Tamaño 1 Tamaño 2 Tamaño 3 Tamaño 4
Backspin Gate Echo
78
30
Page 31

Muestreador
En el modo de muestreador, los pads controlan el muestreador del software. Cada uno de los pads dispara
un muestreador a un volumen especificado (puede asignar la muestra y su volumen en el software).
Para entrar al modo de muestreador, pulse Sampler / Fader FX de modo que se ilumine en púrpura.
Para asignar una muestra y su volumen, utilice el software. Consulte el manual de Serato DJ Pro para
obtener más información sobre el uso de muestras.
Para reproducir una muestra, pulse un pad iluminado. El pad parpadeará mientras se reproduce la
muestra.
Para detener la reproducción de una muestra, pulse Shift y un pad mientras se reproduce.
Para recorrer los bancos de muestras, pulsa los botones Parameter /.
Para recorrer las salidas del muestreador, pulse Shift y los botones Parameter /.
Efectos especiales del fader
En el modo de efectos especiales del fader, los pads
silenciarán y desilenciarán la señal de audio de la
bandeja emulando los movimientos del crossfader hacia
dicha bandeja. Un “clic” es un movimiento del crossfader
hacia una bandeja (“abierto”) y luego alejándose de esa
bandeja (“cerrado”). Los DJ utilizan clics en distintos
patrones rítmicos (a menudo junto con el rayado) para
crear distintos efectos.
Para entrar al modo de efectos especiales del fader,
pulse Sampler / Fader FX de modo que se ilumine en
verde.
Para disparar un efecto del fader, pulse uno entre los pads 1–8.
Para invertir un efecto, mantenga pulsado Shift y pulse uno entre los pads 1–8.
1
1-Click
Flare
5 6 7 8
Trans-
formers
2 3 4
2-Click
Flare
3-Click
Flare
4-Click
Flare
2-to-1
Alternator
Tri-forms Uzi
Baby
Voltear
Si ha comprado el Serato Flip Expansion Pack, puede
acceder al control Flip manteniendo pulsado Shift y
pulsando Sampler / Fader FX (4). Si no ha comprado
el Flip Expansion Pack, esta característica estará
disponible como un modo de pad personalizado.
En este modo, los pads apagados no tienen ningún Flip
asignado; los pads con luz fija tienen un Flip asignado
pero no se están reproduciendo y los pads
parpadeantes tienen un Flip asignando y se están
reproduciendo actualmente.
Para asignar un Flip a un pad, mantenga pulsado el pad 8 y pulse el pad 1, 2, 3, 5, 6 o 7.
Para reproducir un Flip asignado, pulse el pad 1, 2, 3, 5, 6 o 7 (si tiene un Flip asignado).
Para detener inmediatamente la reproducción de un Flip, mantenga pulsado Shift y pulse el pad
correspondiente.
Para "encajar" automáticamente la longitud de un Flip para que coincida con la grilla de beats (loop
snap), mantenga pulsado el pad 4 y pulse un pad con un Flip asignado.
Importante: Su pista debe tener configurada una grilla de beats para que funcione la función de encaje de
loop.
12
34
Flip 1 Flip 2 Flip 3
56
78
Flip 4 Flip 5 Flip 6
Loop
encajar
Asignar
Flip
31
Page 32

Cortador
Importante: Su pista debe tener una grilla de beats establecida para que este modo funcione.
En el modo de cortador, los 8 pads representan 8
pulsos secuenciales—“cortes”—de la grilla de beats.
El pad iluminado representa el corte que se está
reproduciendo en ese momento. La luz "recorre los
pads" a medida que progresa a lo largo de cada una
de las frases de ocho cortes. Puede pulsar un pad
para reproducir ese corte. Cuando suelte el pad, se
reanuda la reproducción normal de la pista desde
donde habría estado si nunca lo hubiera presionado
(es decir, como si la pista hubiera estado
reproduciéndose en avance todo el tiempo).
Para entrar al modo de cortador, pulse Slicer / Transport de modo que se ilumine en rojo. La
bandeja saldrá del modo de cortador si carga otra pista en la bandeja o activa el modo de edición de
la grilla.
Para reproducir un corte, pulse el pad correspondiente.
Para aumentar o reducir el tamaño de los cortes, pulse los botones Parameter /.
Para mover el cabezal de reproducción hacia atrás o hacia adelante, pulse Shift y los botones
Parameter /.
1 2
Corte 1 Corte 2 Corte 3 Corte 4
5
Corte 5 Corte 6 Corte 7 Corte 8
6
34
78
Transporte
En el modo de control de transporte, los pads se
corresponden con los distintos controles de
transporte. El software entrará automáticamente en
el modo interno cuando haga esto (si está utilizando
un controlador Twelve con Seventy-Two, el software
siempre estará en el modo interno).
Para entrar al modo de transporte, pulse Slicer /
Transport de modo que se ilumine en verde.
Para doblar el tono hacia abajo momentáneamente, pulse el pad 1.
Para doblar el tono hacia arriba momentáneamente, pulse el pad 2.
Para mover el fader del tono hacia abajo, pulse el pad 3.
Para mover el fader del tono hacia arriba, pulse el pad 4.
Para activar o desactivar Keylock, pulse el pad 5.
Para cambiar entre el modo interno (INT) y el modo relativo (REL), pulse Shift y el pad 5.
(Cambiar al modo relativo le permite reanudar el control de la reproducción con vinilos de control o
CD de control).
Para activar o desactivar Sync, pulse el pad 6.
Para saltar el punto de cue, pulse el pad 7.
Para reproducir o poner en pausa la pista, pulse el pad 8.
Inflexión
de pitch
-
Keylock
INT/REL
Inflexión
de pitch
Sync Cue
Fader de
pitch -
+
Fader de
pitch
+
Bucle del cortador
Mantenga pulsado Shift y pulse Slicer / Transport (5) para entrar al modo de bucle del cortador.
Los pads se comportan de manera idéntica al modo cortador, excepto que la frase de ocho cortes
realiza un loop en vez de avanzar continuamente por la pista.
32
Page 33

Conjuntos de pads personalizados
Además de los modos de pads estándar, puede crear hasta 3 conjuntos de pads personalizados utilizando
la característica de mapeo MIDI de Serato DJ Pro.
Para crear un conjunto de pads personalizados:
1. Mantenga pulsado Shift y pulse Cue / Pitch Play (1), Roll / Pad FX (3), o Sampler / Fader FX
(4).
Nota: Si ha comprado el Serato Flip Expansion Pack, al mantener pulsado Shift y pulsar Sampler /
Fader FX (4) accederá a los controles de Flip y no a un conjunto de pads personalizados.
2. En Serato DJ Pro, abra el menú Setup y seleccione MIDI.
3. Seleccione Seventy-Two y asegúrese de que Allow Serato DJ Hardware Remapping esté activado.
Cierre la ventana Setup.
4. En la ventana principal de Serato DJ Pro, haga clic en el botón MIDI de la parte superior de la pantalla
para iniciar el mapeo.
5. Haga clic en una característica de Serato DJ Pro y, a continuación, toque o mueva un control de su
hardware para mapear la característica en ese control.
Consulte el manual de Serato DJ Pro para obtener más información sobre el mapeo MIDI.
Faders
Los faders y el crossfader de los canales son faders sin contacto MAG THREE con tensión ajustable.
Para ajustar la tensión de los faders del Seventy-Two:
1. Asegúrese de que la unidad esté apagada y desconectada del
suministro eléctrico.
2. Utilice un destornillador para retirar los tornillos de la placa
frontal inferior del panel superior donde se encuentran los faders
(consulte la imagen).
Nota: Las tapas de los faders deben quitarse para retirar la
placa frontal.
3. Utilice un destornillador para ajustar el tornillo de tensión de
cada fader según lo desee.
Panel superior placa de fader
MAG THREE fader
vista superior
Tornillo de tensión
Panel de control
El panel de control de Rane le permite modificar los ajustes de su
mezclador Seventy-Two y guardar y cargar dichos ajustes en un
archivo de configuración (.r72) en su ordenador. El uso de archivos de
configuración le permite mantener diversas configuraciones de
control diferentes para usar en diferentes situaciones.
Para administrar los archivos de configuración, navegue hasta la
sección Settings (Ajustes) del panel de control de Rane, debajo de la
pestaña General.
• Load (Cargar): Seleccione esta opción para localizar y cargar un archivo de configuración de Seventy-
Two (.r72) en su ordenador al panel de control.
• Save (Guardar): Seleccione esta opción para guardar los ajustes del mezclador en su ordenador
como un archivo de configuración de Seventy-Two (.r72).
33
Page 34

Guide d'utilisation (Français)
Présentation
Merci d’avoir fait l’acquisition du Seventy-Two. Chez Rane DJ, nous savons à quel point la
musique est importante pour vous. C’est pourquoi nous concevons nos produits avec une
seule chose en tête — faire de votre performance la meilleure qui soit.
Contenu de la boîte
Seventy-Two
Câble d'alimentation
2 vinyles de contrôle Serato NoiseMap™
2 CD de contrôle Serato NoiseMap™
Carte de téléchargement avec numéro de série pour le logiciel Serato Pitch 'n Time
2 câbles USB
Autocollants Rane
Guide d'utilisation
Consignes de sécurité et informations concernant la garantie
Assistance
Pour les toutes dernières informations concernant la documentation, les spécifications techniques,
la configuration requise, la compatibilité et l’enregistrement du produit, veuillez visiter dj.rane.com.
Pour de l’assistance supplémentaire, veuillez visiter dj.rane.com/support.
34
Page 35

Démarrage
Les éléments qui ne figurent pas dans Présentation > Contenu de la boîte sont vendus séparément.
1. Visitez le site dj.rane.com et ouvrez une session. (Si c'est votre premier produit Rane, vous devez
d’abord créer un compte.) À partir de votre compte, enregistrez la Seventy-Two et téléchargez le logiciel
Rane Control Panel.
Pour les utilisateurs Windows : Le logiciel Rane Control Panel contient des pilotes requis pour
Windows.
2. IMPORTANT : De temps à autre, il est possible que nous mettions à jour le progiciel de la Seventy-Two
afin d’améliorer sa performance. Veuillez visiter le site dj.rane.com afin de vérifier s’il y a des mises à
jour disponibles pour le progiciel, en particulier après une mise à jour de logiciel, car les mises à jour de
progiciel peuvent être destinées à supporter les nouvelles fonctionnalités du logiciel).
3. Visitez le site serato.com et téléchargez la toute dernière version du logiciel Serato DJ Pro.
4. En utilisant des câbles USB, reliez les ports USB de la Rane Twelve (si utilisée) ou d'autres contrôleurs
MIDI USB aux ports USB Twelve/Controller de la Seventy-Two.
5. Reliez les sources d'entrée audio (microphones, platines vinyle, etc.) à la Seventy-Two.
6. Reliez les sources de sortie audio (casques, amplificateurs de puissance, enceintes, etc.) à la SeventyTwo.
7. Branchez tous les appareils à des prises secteurs, puis les mettre sous tension dans l’ordre approprié :
• Lors de la mise en marche, commencez par allumer (1) les sources d’entrée, (2) la Seventy-Two,
puis (3) les appareils de sortie.
• Pour mettre hors tension, commencez par fermer (1) les appareils de sortie, (2) la Seventy-Two,
puis (3) les sources d’entrée.
8. En utilisant un câble USB, reliez le port USB de la Seventy-Two au port de votre ordinateur. Lancez le logiciel
Serato DJ Pro, puis laissez libre cours à votre imagination ! Pour plus d'informations sur l'utilisation de
Serato DJ Pro avec la Seventy-Two, visitez le site support.serato.com et sélectionnez Rane Seventy-Two.
Ordinateur
Microphone
Rane Twelve
(ou un autre contrôleur MIDI USB)
Haut-parleurs actives Enceintes cabine Platine disque Lecteur de CD
(ou un autre contrôleur MIDI USB)
Rane Twelve
35
Page 36

Caractéristiques
Panneau supérieur
36
Page 37

1. Écran tactile : Cet écran tactile multipoint couleur affiche les informations pertinentes aux opérations
en cours de la Seventy-Two. Touchez l'écran et utilisez les commandes matérielles pour contrôler
l’interface. Veuillez consulter la section Fonctionnement > Écran tactile afin d’en savoir plus.
2. Shift : Maintenir cette touche enfoncée permet d’accéder aux fonctions secondaires des autres
commandes de la Seventy-Two.
3. View/Menu : Cette touche permet de basculer entre les modes Library View et Waveform. Veuillez
consulter la section Fonctionnement > Écran tactile afin d’en savoir plus.
Maintenir la touche Shift enfoncée tout en appuyant sur cette touche, ou maintenir cette touche
pendant 4 secondes, permet d’afficher le menu principal de la Seventy-Two.
4. Effects/Tap : Cette touche permet de lancer immédiatement l’affichage des effets.
Maintenir la touche Shift enfoncée tout en appuyant sur cette touche à plusieur reprises au rythme
désiré permet de régler la vitesse des effets du canal.
5. Back : Cette touche permet de revenir à la fenêtre précédente. En mode Library View, cette touche
permet d’accéder aux niveaux précédents de la bibliothèque.
Maintenir la touche Shift enfoncée tout en appuyant sur cette touche permet d’afficher la fenêtre de
préparation dans Serato DJ Pro.
6. Load/Scroll : Tourner ce bouton permet de parcourir les listes et l’enfoncer permet de sélectionner un des
items ou de charger la piste sélectionnée sur le module. En mode Waveform View, toucher ce bouton
permet de basculer en mode Library View.
Maintenir la touche Shift enfoncée tout en appuyant sur cette touche permet de charger la piste
sélectionnée dans la fenêtre de préparation.
Astuce : Appuyer deux fois rapidement permet de charger la même piste sur les deux modules
(« double instantané »).
7. Sélecteur de source : Ce bouton permet de sélectionner la source audio pour le canal : USB A ou B
(une piste qui joue sur ce niveau dans le logiciel), PH/CD (un appareil relié à l'entrée PH/CD du module
sur le panneau arrière) ou Aux (un appareil relié à l'entrée Aux du module sur le panneau arrière).
Remarque : Si vous sélectionnez PH/CD, réglez les sélecteurs PH/CD sur le panneau arrière
correctement.
Remarque : Les commandes d’un module transmettent des données MIDI seulement lorsque son
sélecteur de source est réglé sur USB A ou B.
8. Level : Ce bouton permet de définir le niveau de pré-égalisation pré-atténuation du canal
correspondant. Le vumètre à côté du bouton indique le niveau du signal. Diminuez le réglage s’il
atteint la partie rouge (écrêtage).
9. High : Ce bouton permet d’ajuster le réglage des hautes fréquences du module.
10. Mid : Ce bouton permet d’ajuster le réglage des moyennes fréquences du module.
11. Low : Ce bouton permet d’ajuster le réglage des basses fréquences du module.
12. LP/HP : Ce bouton permet de régler le filtre appliqué au canal. Tourner le bouton vers la gauche
permet d’appliquer un filtre passe-bas et tourner le bouton vers la droite permet d’appliquer un filtre
passe-haut. Régler ce bouton sur la position centrale (12 h) permet de désactiver les filtres.
Remarque : Toutes les commandes d’égalisation et de filtre peuvent être coupées.
13. Touches des modes de fonctionnement des pads : Ces touches permettent d’accéder au mode de
fonctionnement des pads correspondant. Appuyer une fois permet d’accéder au mode de
fonctionnement principal (indiqué au-dessus de la touche), et appuyer une seconde fois permet
d’accéder au mode de fonctionnement secondaire (imprimé en dessous). Maintenir la touche Shift
enfoncée tout en appuyant sur une de ces touches permet d’accéder aux modes de fonctionnement
personnalisés. Veuillez consulter la section Fonctionnement > Modes de fonctionnement des pads
afin d’en apprendre plus sur le fonctionnement des pads pour chaque mode.
14. Pads : Ces pads ont différentes fonctions selon le mode de fonctionnement sélectionné et le module
sélectionné. Utilisez les touches des modes de fonctionnement des pads pour sélectionner un
mode. Ces pads sont sensibles à la dynamique (en certains modes seulement), robustes et faciles à
jouer. Veuillez consulter la section Fonctionnement > Modes de fonctionnement des pads afin d’en
apprendre plus sur le fonctionnement des pads pour chaque mode.
37
Page 38

15. Parameter / : Ces touches permettent d’utiliser les différentes fonctions de chaque mode de
fonctionnement des pads. Maintenir la touche Shift enfoncée tout en appuyant sur ces touches
permet d’accéder aux paramètres secondaires.
16. Touch FX : Cette touche permet d'activer ou de désactiver la fonction de pavé tactile X/Y sur l’écran
tactile. Cette fonctionnalité peut être utilisée pour contrôler divers paramètres d’effet. Veuillez
consulter la section Fonctionnement > Effets afin d’en savoir plus.
17. Interrupteur Effects : Pousser cet interrupteur vers le haut permet d’activer les effets logiciel et les
effets internes (Flex FX) de la Seventy-Two ; l’interrupteur demeure verrouillé dans cette position.
Pousser l’interrupteur vers la position centrale permet de désactiver les effets.
Pousser et maintenir cet interrupteur vers le bas permet d'activer les effets logiciel et les effets
internes (Flex FX) de la Seventy-Two momentanément ; l’interrupteur retourne à la position centrale.
Remarque : Les interrupteurs Effect peuvent être enlevés et tournés de 180° selon votre préférence.
18. Bouton Parameter : Ce bouton permet d'ajuster les différents paramètres d’effet. La fonction du
bouton Parameter est indiquée à l'écran tactile par une caret blanche pour chaque banque.
19. FX 1–3 : Ces touches permettent d’activer et de désactiver l’effet logiciel correspondant dans une
banque de trois effets.
20. Flex FX : Cette touche permet d’activer et de désactiver les effets internes (Flex FX) de la Seventy-
Two.
21. Depth : Ce bouton permet de régler l'équilibre traité/non traité des effets internes (Flex FX) sur ce
module.
22. Sampler Level : Ce bouton permet d’ajuster le volume de l’échantillonneur logiciel.
23. Sampler LP/HP : Ce bouton permet de régler le filtre appliqué à l’échantillonneur logiciel. Tourner le
bouton vers la gauche permet d’appliquer un filtre passe-bas et tourner le bouton vers la droite
permet d’appliquer un filtre passe-haut. Régler ce bouton sur la position centrale (12 h) permet
d’obtenir une réponse en fréquence plane (aucun filtre).
24. Sampler Effects : Cette touche permet d’activer ou de désactiver les effets de l’échantillonneur.
Remarque : L'échantillonneur doit être sélectionné dans le menu de routage des effets. Veuillez
consulter la section Effets afin d’en savoir plus.
25. Cue Level : Ce bouton permet d’ajuster le volume du canal de pré-écoute.
26. Cue Mix : Ce bouton permet d’ajuster le mix entre le canal de pré-écoute et le mix du programme des
sorties casque. Lorsqu'il est réglé complètement à gauche, seul le canal de pré-écoute est entendu.
Lorsqu'il est réglé complètement à droite, seul le mix du programme est entendu.
27. Split Cue : Lorsque cette touche est enfoncée, l'audio du casque est partagé afin que tous les
canaux envoyés au canal de pré-écoute soient combinés en mono et transmis au canal gauche et que
le mix du programme soit combiné en mono et transmis au canal droit. Lorsque cette touche est
relâchée, l’audio du canal de pré-écoute et du mix du programme sont combinés. Dans les deux cas,
le bouton Cue Mix permet de contrôler le mélange des deux signaux.
28. Cue : Cette touche permet d’acheminer le signal pré-atténuation du module au canal de pré-écoute.
La touche s’allume lorsque cette fonction est activée. Pour pré-écouter simultanément plusieurs
canaux, appuyez sur les touches Cue des deux modules.
29. Curseur du canal : Ce bouton permet d'ajuster le volume du module correspondant.
30. Crossfader : Déplacez ce curseur afin de mélanger les signaux des modules.
31. Main : Ce bouton permet d’ajuster le volume de sortie des sorties principales. Les vumètres à côté du
bouton indiquent le niveau du signal. Diminuez le réglage s’il atteint la partie rouge (écrêtage).
32. Booth : Ce bouton permet d’ajuster le volume de sortie des sorties cabine.
33. Session Out : Ce bouton permet d’ajuster le volume de sortie des sorties Session.
34. Session In : Ce bouton permet d’ajuster le volume de sortie des entrées Session.
35. Cue : Cette touche permet d’acheminer le signal des entrées Session au canal de pré-écoute. La
touche s’allume lorsque cette fonction est activée.
36. Mic 1 Level : Ce bouton permet d’ajuster le gain de l’entrée Mic
1. Le vumètre à côté du bouton
indique le niveau du signal. Diminuez le réglage s’il atteint la partie rouge (écrêtage).
37. Mic 1 Tone : Ce bouton permet d’ajuster le réglage des basses et hautes fréquences du signal
provenant de l'entrée Mic 1.
38
Page 39

38. Mic 1 On/Duck : Cette touche permet d’activer et de désactiver l'entrée Mic 1 sur le panneau arrière.
Maintenir cette touche enfoncée pendant 2 secondes permet d’activer la fonction « ducking », ce qui
réduit le volume de toutes les autres entrées de 10 dB. La touche clignote lorsque cette fonction est
activée. Appuyer une deuxième fois sur la touche permet de désactiver cette fonction et l’entrée Mic
1.
39. Mic 1 Echo : Cette touche permet d’activer ou de désactiver l’effet d’écho du signal de l’entrée Mic 1.
Le bouton Mic 1 Echo sur le panneau avant permet d’ajuster la quantité d’effet.
Panneau arrière
1. Entrée d'alimentation : Alors que la Seventy-Two est hors tension, utilisez le câble d’alimentation
fourni pour brancher l’entrée d’alimentation à une prise secteur.
2. Interrupteur d'alimentation : Cet interrupteur permet de mettre la Seventy-Two sous et hors tension.
Veillez à mettre la Seventy-Two sous tension uniquement après avoir raccordé tous les appareils
d'entrée et avant de mettre les amplificateurs et enceintes sous tension. Veillez à mettre les amplificateurs
et les enceintes hors tension avant de mettre la Seventy-Two hors tension.
3. Sorties Main (XLR) : Ces sorties permettent de brancher des enceintes ou un système d’amplification.
Le niveau du signal de ces sorties est commandé par le bouton Master du panneau supérieur.
4. Sorties Booth (6,35 mm, TRS) : Ces sorties permettent de brancher des enceintes cabine ou un
système d’amplification. Le niveau du signal de ces sorties est commandé par le bouton Booth du
panneau supérieur.
5. Entrées Session (RCA) : Ces entrées permettent de brancher la sortie à niveau ligne d'un appareil à
niveau ligne comme une autre console de mixage, un lecteur CD, un module de percussion, etc. Le
signal sera transmis directement au mix du programme. Le niveau du signal de ces sorties est
commandé par le bouton Session In du panneau supérieur.
6. Sorties Session (RCA) : Ces sorties permettent de brancher une autre console de mixage, un appareil
d’enregistrement, etc. Le mix du programme sera transmis à ces sorties. Le niveau du signal de ces
sorties est commandé par le bouton Session Out du panneau supérieur.
7. Entrée PH/CD (RCA) : Ces entrées permettent de brancher des sources audio externes comme une
platine vinyle, un lecteur CD ou un autre appareil à niveau ligne. Le sélecteur PH/CD du module doit
être réglé en fonction de l’appareil branché et le sélecteur de source doit être réglé sur PH/CD afin
que le signal du module puisse être joué.
8. Sélecteur PH/CD : Ce sélecteur permet de sélectionner le niveau du signal approprié selon l’appareil
branché aux entrées PH/CD du module correspondant. Si vous utilisez
réglez le sélecteur sur PH afin d’ajouter plus d’amplification aux signaux phono. Pour brancher un
appareil à niveau de ligne, comme une platine vinyle à niveau ligne, un lecteur CD ou un
échantillonneur, réglez-le sur CD.
9. Phono Grounds : Si vous utilisez des platines vinyle phono avec fil de mise à la terre, veillez à relier le
fil à ces bornes. S’il y a un ronflement ou du bruit, il se pourrait que vos platines vinyle ne soient pas
mises à la terre.
Remarque : Certaines platines vinyle sont dotées d'un fil de mise à la terre intégré à la connexion
RCA, et donc, n'ont pas besoin d’être reliées à la borne de mise à la terre.
des platines vinyle phono,
39
Page 40

10. Entrées Aux (RCA) : Ces entrées permettent de brancher des sources audio externe à niveau ligne. Le
sélecteur de source du module doit être réglé sur Aux afin que le signal du module puisse être joué.
11. Entrées Mic 1–2 (XLR/6,35 mm, TS) : Ces entrées permettent de brancher un microphone ou un
appareil à niveau ligne. Les signaux audio mono de ces entrées sont séparés puis acheminés
directement au mix du programme stéréo et au canal de pré-écoute. Pour une entrée ligne stéréo,
l'entrée Session doit être utilisée.
12. Sélecteur Line/Mic : Ce sélecteur doit être réglé selon l’appareil branché aux entrées Mic 1–2. Si
vous utilisez un microphone, réglez le sélecteur sur Mic. Pour brancher un appareil à niveau de ligne,
comme un clavier ou un échantillonneur, réglez le sélecteur sur Line.
13. Ports USB Twelve/Controller (USB de type A) : Ces ports permettent de relier des contrôleurs
Twelve ou autres contrôleurs MIDI USB standard en utilisant des câbles USB.
Important : Ne pas brancher de clés USB à ces ports. Changer le réglage du sélecteur de source
entraîne l’éjection de la clé USB de l’ordinateur et peut endommager le contenu.
14. Ports USB (USB de type-B) : Ces ports permettent de relier des ordinateurs en utilisant des câbles
USB. Ces connexions permettent de transmettre et de recevoir de l’audio et des données de
commande depuis et vers un ordinateur.
Remarque : Veuillez vous assurer d’avoir téléchargé et installé le logiciel Rane Control Panel à partir
du site dj.rane.com.
Panneau avant
1. Sorties casque (6,35 mm, 3,5 mm, TRS) : Cette sortie permet de brancher un casque d’écoute
6,35 mm ou 3,5 mm pour la pré-écoute et le calage.
2. Mic 2 On : Lorsque cette commande est enfoncé, l’entrée Mic 2 sur le panneau arrière est activée et
le signal audio est acheminé directement au mix du programme et au mix de pré-écoute. Lorsque
cette commande est relâchée, l’entrée Mic 2 est désactivée.
3. Mic 2 Level : Ce bouton permet d’ajuster le gain de l’entrée Mic 2.
4. Mic 2 Tone : Ce bouton permet d’ajuster le réglage des basses et hautes fréquences du signal
provenant de l'entrée Mic 2.
5. Mic 1 Echo : Ce bouton permet d’ajuster la quantité d’effet d’écho ajoutée sur le signal de
l’entrée Mic 1. Appuyer sur la touche Mic 1 Echo sur le panneau supérieur permet d’activer et de
désactiver cet effet.
6. Contour Controls : Ce bouton permet de régler l'intensité du fondu du crossfader. Tourner dans le
sens antihoraire permet d’obtenir un fondu progressif (mixage) et tourner dans le sens horaire permet
d’obtenir une coupure nette (scratch). La position centrale est typiquement utilisée dans les clubs.
7. Reverse : Lorsque ce sélecteur est réglé sur On, la direction (« polarité ») du curseur correspondant
est inversée. Pour utiliser la polarité classique, réglez-le sur Off.
8. Deck Swap : Lorsque ce sélecteur est réglé sur On, les curseurs des canaux gauche et droit sont
inversés. Pour utiliser la configuration classique, réglez-le sur Off.
9. Entrée Footswitch (6,35 mm, TRS) : Cette entrée permet de relier un commutateur au pied afin
d’activer et de désactiver les effets. Vous pouvez également y assigner d’autres fonctions. Cette
entrée prend en charge un commutateur au pied à trois positions avec contact de commutation
passif.
40
Page 41

Fonctionnement
Écran tactile
Pour basculer entre les modes d’affichages Waveform et Library, appuyez sur la touche View/Menu.
Mode Waveform View
En mode Waveform View, la forme d’onde des pistes est affichée à la
verticale, avec le canal 1 à gauche et le canal 2 à droite. La grande forme
d'onde représente une section de la piste sélectionnée. La forme d'onde
plus petite représente toute la piste.
1. Durée : Affiche la durée restante de la piste en cours.
2. Tonalité/Verrouillage tonale : Maintenir la touche Shift enfoncée
tout en tapant sur cette icône permet de basculer entre l’affichage
de la tonalité et du verrouillage tonal. Lorsque tonalité est
sélectionnée, la tonalité de la piste en cours est affichée, et vous
pouvez taper afin d’activer ou désactiver la fonction de
synchronisation tonale. Lors le verrouillage tonal est sélectionné,
l’icône serrure (ou l’icône Serato Pitch 'n Time si installé) est
affichée, et vous pouvez taper afin d’activer ou désactiver la fonction
de verrouillage tonal. Lorsqu’une option est activée, le champ est en
surbrillance.
3. Vue d’ensemble : La forme d'onde plus petite représente une vue
d’ensemble de toute la piste. Vous pouvez utiliser votre doigt pour
balayer la piste durant la lecture.
Remarque : Si l'option Disable Needle Search est désactivée dans
Serato DJ Pro, vous devrez maintenir la touche Shift pour balayer
la piste.
4. Position dans la piste : La position actuelle du curseur de lecture.
5. Points de repère rapides : Affiche les points de repère rapides par couleur.
6. Sync : Lorsque Sync est activé, le champ est en surbrillance et les indicateurs de BPM sont bleus.
Pour activer et désactiver la fonction de synchronisation, tapez sur l'icône d’un des canaux.
7. BPM : Ceci indique le nombre de battements par minute de la piste sélectionnée.
Remarque : En mode Waveform View, touchez le bouton Load/Scroll pour afficher rapidement le mode
Library View bibliothèque.
Mode Library View
En mode Library View, l’écran affiche la bibliothèque de l’ordinateur
connecté. Lorsque la Seventy-Two est reliée à deux ordinateurs, la
bibliothèque de l’ordinateur auxquels les deux modules ont été
assignés lors de la dernière session sera affichée.
Pour changer le format de l’affichage, balayez vers le bas l'icône du
menu déroulant au-dessus de la liste des pistes, puis taper l'icône
pour afficher le format désiré, format simple ou agrandi.
Pour parcourir les pistes, tournez le bouton Load/Scroll.
Pour parcourir rapidement la liste, maintenez la touche Shift
enfoncée puis tourner le bouton Load/Scroll.
Pour ouvrir un crate ou pour charger une piste sur un module,
appuyez sur le bouton Load/Scroll.
Pour accéder au menu précédent, appuyez sur la touche Back.
2
3
4
5
6
Écran tactile avec format
d’affichage agrandi de la
bibliothèque
1
7
41
Page 42

Menu principal
Pour accéder au menu principal, appuyez sur les touches Shift et View/Menu, ou maintenez la
touche View/Menu enfoncée pendant 4 secondes. Le menu principal contient les options suivantes :
Mixer Settings : Cette option permet de modifier les paramètres suivants.
• Audio Out : Cette option permet de modifier les paramètres Main Out, Mic 1 Clean Feed et
Deck Balance.
Remarque : Lorsque l’option Clean Feed est activée, Mic 1 ne transmet pas de signal audio
lorsque l'enregistrement est fait à partir de Serato DJ Pro.
• Deck Inputs : Cette option permet de modifier les paramètres de sensibilité des entrées
phono 1/2 et de tonalité des crossovers 1/2.
Remarque : Réglez l’option Phono Sensitivity selon les recommandations du fabricant de
votre cartouche.
• Filter Setup : Cette option permet de modifier les paramètres de résonance du filtre des
modules 1/2 et de résonance du filtre de l’échantillonneur.
• Pad Setup : Cette option permet de modifier les paramètres de sensibilité des pads.
• Headphone Setup : Cette option permet de modifier les paramètres de tonalité du casque.
Flex FX : Cette option permet d'afficher et de modifier les
paramètres des effets internes (Flex FX) de la Seventy-Two.
• Pour ajouter ou supprimer un des effets de la liste des
favoris, tapez le cercle sur le côté droite de l’écran.
Lorsque le cercle est vert, l'effet sera inclus dans la liste
des effets internes (Flex FX) en mode d’affichage des
effets. Lorsque le cercle est vide et que le nom de l'effet
apparaît en gris, l’effet ne sera plus affiché dans la liste
des effets.
• Pour modifier les paramètres par défaut des effets
internes (Flex FX), tapez sur l’icône de la clé à molette.
Toute modification sera sauvegardée par la console de mixage.
Cut-In Adjust : Cette option permet d’accéder au menu de
configuration Cut-In Adjust. Cette option permet de modifier la
course entre la position du début et de fin d’un curseur.
Sélectionnez le curseur que vous désirez modifier, puis
déplacez le curseur à la position désirée et appuyez sur Set
pour sauvegarder le réglage.
Footswitch : Cette option permet d’assigner des fonctions aux
commutateurs au pied 1/2/3.
Display : Cette option permet régler la luminosité de l’écran.
42
Page 43

Effets
Chaque banque d’effets contient jusqu'à 3 effets logiciels, en
plus des effets internes Flex FX, pour un total de 8 effets qui
peuvent être ajoutés et routés au module 1, module 2 et à
l’échantillonneur. Par défaut, les effets sont routés aux
modules 1 et 2.
Pour modifier le routage des effets :
1. Tapez sur les icônes 1/2/S bleues dans le haut de
l’écran pour accéder au menu de routage des effets.
2. Sélectionnez où vous désirez router les effets, puis
appuyez sur la touche OK pour retourner au menu
précédent. Les deux banques d’effets peuvent être
routées aux mêmes modules.
Pour ajouter et utiliser des effets :
1. Appuyez sur la touche Effects pour accéder au mode
d’affichage des effets.
2. Tapez l’écran pour sélectionner l’effet souhaité, puis
appuyez sur le bouton Parameter pour afficher le mode
de sélection des effets.
3. Tournez le bouton Parameter pour faire défiler la liste
des effets, puis enfoncez-le pour charger l'effet sur cet
emplacement.
4. Appuyez sur les touches FX 1–3 ou Flex FX pour activer l’effet dans la chaîne de traitement du signal.
Les effets sont appliqués dans l'ordre dans la chaîne (FX1 > FX2 > FX3 > Flex FX).
5. Uilisez les interrupteurs Effects pour ajouter les effets aux modules 1 et 2. Poussez l’interrupteur
vers le haut pour verrouiller un effet, ou tirez et maintenez l’interrupteur vers le bas pour déclencher
momentanément un effet.
Appuyez sur la touche Sampler Effects pour ajouter les effets à l’échantillonneur.
Pour modifier un effet logiciel :
1. Tapez l’effet sur l’écran.
2. Tournez le bouton Parameter afin de pouvoir modifier le paramètre sélectionné. Appuyer sur le
bouton Parameter permet de basculer en mode sélection des effets logiciel.
3. Pour modifier la durée de l’effet, tapez sur l’option et tournez le bouton Parameter.
Remarque : Les modifications de la durée des effets sont appliquées à la banque.
Pour modifier les effets internes (Flex FX) :
1. Tapez sur l’effet pour le sélectionner, puis utilisez le bouton Parameter pour le modifier. Doubletapez l'effet désiré pour modifier les paramètres Flex FX par défaut. Toute modification sera
sauvegardée par console de mixage.
Touch FX
Appuyez sur le bouton Touch FX pour afficher le pavé X/Y.
Pour sélectionner le module auquel sera appliqué l’effet Touch FX, tapez la flèche
du module correspondant. Les effets activés provenant de l’une ou de l’autre banque
routés à ce module seront en surbrillance.
Pour appliquer l’effet Touch FX, faites glisser votre doigt horizontalement à travers
l'écran. Glisser sur l'axe Y ajoute un filtre passe-haut (haut) ou passe-bas (bas). Glisser
de gauche à droite sur l'axe X augmente le paramètre Durée pour les effets internes
Flex FX activés.
43
Page 44

g
)
Modes de fonctionnement des pads
Cette section explique les différents modes de
fonctionnement des pads. Chaque module dispose de huit
pads qui peuvent être en mode différent. Appuyez sur une
des touches des modes de fonctionnement des pads
afin de faire basculer les pads du module au mode
correspondant. Chaque touche des modes de
fonctionnement des pads bascule entre deux modes
chaque fois qu’elle est enfoncée.
Astuce : Pour chaque mode de fonctionnement, maintenir
la touche Shift enfoncée tout en appuyant sur une des
touches des modes de fonctionnement des pads
permet d’accéder à des modes de fonctionnement
supplémentaires ou personnalisés.
Mode de programmation de points de repère rapide
En mode de programmation de points de repère rapide, chaque pad peut assigner un point de repère
rapide ou retourner la piste à ce point de repère.
Pour accéder au mode de programmation de points de repère rapide, appuyez sur la touche Cue/Pitch
Play afin qu’elle devienne blanc.
Pour assigner un point de repère rapide, appuyez sur un pad éteint lorsque le curseur atteint l’endroit
désiré sur la piste. Le pad s'allume lorsqu’il est assigné à point de repère rapide (avec la couleur
correspondante, lorsque disponible).
Pour sauter à un point de repère rapide, appuyez sur un pad allumé.
Pour supprimer un point de repère rapide, maintenez la touche Shift enfoncée tout en appuyant sur le
pad correspondant.
Mode Pitch Play
En mode Pitch Play, chaque pad joue la piste à partir
d'un point de repère rapide avec une transposition
différente (réglable en demi-tons). Le logiciel Serato Pitch
‘n Time DJ Expansion Pack doit être installé afin d’utiliser
ce mode. Veuillez consulter la section Mode de
programmation de points de repère rapides afin d’en
savoir plus.
Remarque : Une carte de téléchargement avec numéro
de série pour le logiciel Serato Pitch 'n Time est fournie
avec la Seventy-Two.
Pour accéder au mode Pitch Play, appuyez sur la
touche Cue/Pitch Play afin qu’elle devienne verte.
Pour sélectionner un point de repère rapide, appuyez
sur la touche Shift et un sur pad allumé à faible
intensité.
Pour sélectionner la plage des transpositions utilisée
par les pads, utilisez les touches Parameter /
(consultez les diagrammes ci-contre).
Pour augmenter ou baisser la tonalité de la piste
sélectionnée, maintenez la touche Shift enfoncée et
appuyez sur une des touches Parameter /.
Pour faire la lecture de la piste à partir d’un point de
repère rapide, appuyez sur un pad allumé. Chaque pad
correspond à une transposition spécifique (en demi-tons),
selon la plage de transposition sélectionnée (consultez les
diagrammes ci-contre). Le pad sans transposition
(hauteur tonale originale) sera allumé et blanc.
44
+4 Demi-
tons
0
(Hauteur
tonale
inale
ori
0
(Hauteur
tonale
originale)
-4 Demitons
-3 Demitons
-7 Demitons
2
1
3
567
Plage vers le haut
+5 Demi-
tons
+1 Demi-
Plage moyenne
+1 Demi-
-3 Demitons
Plage vers le bas
-2 Demitons
-6 Demitons
ton
ton
+6 Demi-
tons
+2 Demi-
tons
+2 Demi-
tons
-2 Demitons
-1 Demi-
ton
-5 Demitons
4
8
+7 Demi-
tons
+3 Demi-
tons
+3 Demi-
tons
-1
semitone
(Hauteur
tonale
originale)
-4 Demitons
0
Page 45

Bouclage automatique
En mode bouclage automatique, chaque pad active ou désactive une boucle automatique d'une
durée différente. La grille de bouclage du logiciel détermine la durée de la boucle.
Pour accéder au mode bouclage automatique, appuyez sur la touche Auto Loop/Man Loop afin
qu’elle devienne bleu foncé.
Pour modifier quelles huit durées de boucles automatiques sont affichées (dans le logiciel),
appuyez sur une des touches Parameter /. La disposition des pads changera en conséquence.
Pour faire avancer ou reculer le bouclage automatique, maintenez la touche Shift enfoncée et
appuyez sur une des touches Parameter /.
Bouclage manuel
En mode bouclage manuel, chaque pad retourne la
piste à une boucle que vous avez créée et
sauvegardée au préalable. Les configurations des
1
Boucle 1 Boucle 2 Boucle 3 Boucle 4
2 3
pads pour les deux banques sont identiques.
Pour accéder au mode bouclage manuel, appuyez
sur la touche Auto Loop/Man Loop afin qu’elle
devienne jaune.
5
Départ de
la boucle
6
Sortie de
la boucle
7 8
Activer /
désactiver
boucle
Pour créer une boucle, appuyez sur le pad 5 pour
définir le point de départ de boucle, puis appuyez sur
le pad 6 pour définir le point de sortie de boucle et
pour activer la boucle.
Pour sauvegarder une boucle, appuyez sur un pad éteint dans la rangée du haut (Pads 1–4) alors
que la boucle est activée. Vous pouvez le faire indépendamment de la façon dont la boucle a été
créée (mode bouclage automatique, bouclage manuel, etc.).
Pour activer ou désactiver une boucle sauvegardée, appuyez sur un pad allumé dans la rangée
du haut (Pads 1–4).
Pour supprimer une boucle sauvegardée, appuyez sur la touche Shift et sur un pad allumé dans
la rangée du haut (Pads 1–4).
Pour activer ou désactiver la dernière boucle activée, appuyez sur le pad 7.
Pour réactiver immédiatement la dernière boucle activée (rebouclage), appuyez sur le pad 8.
Pour réduire de moitié ou doubler la durée d'une boucle, appuyez sur l’une des touches
Parameter /.
Pour faire avancer ou reculer une boucle, maintenez la touche Shift enfoncée et appuyez sur une des
touches Parameter /.
4
Rebouclage
Boucles sauvegardées
Maintenez la touche Shift enfoncée et appuyez sur Auto Loop/Man Loop (2) afin d'accéder aux
boucles sauvegardées. En ce mode, les 8 pads permettent d’activer et de désactiver une boucle
sauvegardée.
45
Page 46

Roulement de boucle
En mode roulement de boucle, chaque pad déclenche un roulement de boucle momentanée.
Lorsque le pad est relâché, le roulement de boucle est désactivé et la lecture normale de la piste
reprend à partir de l’emplacement où elle serait si vous n’aviez pas activé le roulement de boucle (c.à-d., comme si la lecture n’avait jamais été interrompue).
Remarque : Assurez-vous que « Show Beat Jump Controls » est désactivé dans le menu de
configuration de Serato DJ Pro. Vous pouvez également afficher et modifier la durée des roulements
de boucle dans le logiciel.
Pour accéder au mode de roulement de boucle, appuyez sur la touche Roll/Pad FX afin qu’elle
devienne turquoise.
Pour déclencher un roulement de boucle, maintenez un des pads enfoncé.
Pour modifier quelles huit durées de boucles automatiques sont affichées (dans le logiciel),
appuyez sur une des touches Parameter /. La disposition des pads changera en conséquence.
Pour décaler le roulement de boucle vers l’arrière ou l’avant, maintenez la touche Shift
enfoncée et appuyez sur une des touches Parameter /.
Pad FX
En mode Pad FX, les pads sélectionnent et activent
les effets. Les pads de la rangée du haut
sélectionnent le type d'effet, les pads de la rangée du
bas déclenchent et contrôlent la durée de l'effet.
Pour accéder au mode Pad FX, appuyez sur la
touche Roll/Pad FX afin qu’elle devienne jaune.
1
Vinyl
Brake
5
2 3
Backspin Gate Echo
6
7 8
Size 1 Size 2 Size 3 Size 4
Pour sélectionner l'effet Vinyle Brake, appuyez sur
le pad 1. Lorsque l'effet Vinyle Brake est déclenché
par un des pads de la rangée du bas, l'audio ralentit
et se fond dans un silence, selon la durée
sélectionnée de l’effet, comme si le plateau phono
s'était arrêté.
Pour sélectionner l'effet Backspin, appuyez sur le pad 2. Lorsque l'effet Backspin est déclenché
par un des pads de la rangée du bas, l'audio joue à l’envers et la vitesse augmente comme si la
rotation d’un plateau phono était inversée, puis se fond dans un silence, selon la durée sélectionnée.
Pour sélectionner l'effet Gate, appuyez sur le pad 3. Lorsque l'effet Gate est déclenché par un des
pads de la rangée du bas, un effet de gate basé sur la durée est ajouté à l'audio selon la durée
sélectionnée.
Pour sélectionner l'effet Echo, appuyez sur le pad 4. Lorsque l'effet Echo est déclenché par un
des pads de la rangée du bas, un effet d’écho est ajouté à l’audio, puis se fond dans un silence,
selon la durée sélectionnée.
Remarque : L'effet d'écho peut être combiné avec d'autres effets. Tous les autres effets ne peuvent
être utilisés qu’un à la fois.
Pour déclencher l'effet sélectionné, appuyez sur un des pads 5-8. Chaque pad permet d’activer
l’effet immédiatement avec une durée définie, en commençant avec le pad 5 dont la durée est plus
courte, en augmentant jusqu’au pad 8 dont la durée est la plus longue. Lorsqu’un effet est
déclenché, le pad sélectionné clignote.
Remarque : Sélectionner un nouveau mode de fonctionnement des pads désactive tous les effets
activés pour ce module.
46
4
Page 47

Échantillonneur
En mode échantillonneur, les pads commandent l'échantillonneur du logiciel. Les pads déclenchent chacun
un échantillon avec un volume défini (vous pouvez assigner l’échantillon et définir son volume dans le
logiciel).
Pour accéder au mode échantillonneur, appuyez sur la touche Sampler/Fader FX afin qu’elle devienne
violette.
Pour assigner un échantillon et définir son volume, utilisez le logiciel. Veuillez consulter le guide
d’utilisation de Serato DJ Pro pour plus d'information sur l’utilisation d’échantillons.
Pour jouer un échantillon, appuyez sur un pad allumé. Le pad clignotera durant la lecture de l’échantillon.
Pour interrompre un échantillon, maintenez la touche Shift enfoncée puis appuyez sur le pad lorsque
l’échantillon joue.
Pour faire défiler les banques d’échantillons, appuyez sur les touches Parameter /.
Pour faire défiler les sorties de l’échantillonneur, appuyez sur la touche Shift et sur les touches
Parameter /.
Fader FX
En mode Fader FX, les pads peuvent désactiver et
réactiver le signal audio du module de la même manière
qu’un crossfader. Un « clic » est un mouvement du
crossfader qui se déplace vers un module (« ouvert ») et
puis ensuite que se déplace du module (« fermé »). Les
DJ utilisent les clics dans différents modèles rythmiques
(souvent en conjonction avec le scratch) afin de créer
divers effets.
Pour accéder au mode Fader FX, appuyez sur la
touche Sampler/Fader FX afin qu’elle devienne verte.
Pour déclencher un effet de curseur, appuyez sur un des pads 1-8.
Pour inverser un effet, appuyez sur la touche Shift et sur un des pads 1-8.
1
1-Click
Flare
5 6 7 8
Trans-
formers
2 3 4
2-Click
Flare
3-Click
Flare
4-Click
Flare
2-to-1
Alternator
Tri-forms Uzi
Baby
Flip
Si vous avez acheté le Serato Flip Expansion Pack, vous
pouvez accéder à la fonction Flip en maintenant la
touche Shift enfoncée et en appuyant sur la touche
Sampler/Fader FX (4). Si vous n'avez pas acheté le
Serato Flip Expansion Pack, cette fonction est disponible
comme mode de fonctionnement des pads personnalisé.
En ce mode, les pads éteints n'ont pas de Flip qui leur
est assigné ; les pads allumés ont un Flip qui leur est
assigné, mais qui n’est pas en cours de lecture ; les pads
clignotants ont un Flip qui leur est assigné et sont en
cours de lecture.
Pour assigner un Flip à un pad, maintenez le pad 8 enfoncé puis appuyez sur le pad 1, 2, 3, 5, 6 ou 7.
Pour lancer la lecture d’un Flip assigné, appuyez sur le pad 1, 2, 3, 5, 6 ou 7 (s’il a un Flip qui lui est
assigné).
Pour interrompre immédiatement la lecture d’un Flip, maintenez la touche Shift enfoncée puis appuyez
sur le pad correspondant.
Pour « aligner » automatiquement la durée d'un Flip au Beatgrid (Loop Snap), maintenez le pad 4
enfoncé et appuyez sur un pad assigné à un Flip.
Important : Un Beatgrid pour la piste doit avoir été configuré afin que la fonction Loop Snap fonctionne.
1 2 3
Flip 1 Flip 2 Flip 3
5
Flip 4 Flip 5 Flip 6
6
7 8
4
Loop
Snap
Assign
Flip
47
Page 48

Slicer
Important : Un Beatgrid pour la piste doit avoir été configuré afin que ce mode fonctionne.
En mode Slicer, les huit pads représentent huit
battements séquentiels ou « tranches » dans le Beatgrid.
La tranche en cours de lecture est représentée par le pad
qui est allumé ; la lumière parcourra les pads au fur et à
mesure que les huit tranches de la phase sont jouées.
Vous pouvez appuyer sur un pad pour faire jouer la
tranche correspondante. Lorsque le pad est relâché, la
lecture normale de la piste est relancée à partir de
l’emplacement où elle serait si vous ne l’aviez pas
enfoncé (c.-à-d., comme si la lecture n’avait jamais été
interrompue).
Pour accéder au mode Slicer, appuyez sur la touche Slicer/Transport afin qu’elle devienne rouge. Le
module quitte le mode Slicer si vous chargez une autre piste au module ou activez le mode Grid Edit.
Pour activer une tranche, appuyez sur le pad correspondant.
Pour augmenter ou de diminuer la durée des tranches, appuyez sur les touches Parameter /.
Pour faire avancer ou reculer le curseur de lecture, appuyez sur la touche Shift et sur les touches
Parameter /.
1
Tranche 1 Tranche 2 Tranche
5
Tranche 5 Tranche 6 Tranche
2 3
6
7 8
4
Tranche
3
7
Tranche
4
8
Commandes de lecture
En mode commandes de lecture, les pads correspondent
aux différentes commandes de lecture. Le logiciel bascule
automatiquement en mode interne lorsque ce mode est
activé (si vous utilisez un contrôleur Twelve avec la
Seventy-Two, le logiciel demeura toujours en mode
interne).
Pour accéder au mode commandes de lecture,
appuyez sur la touche Slicer/Transport afin qu’elle
devienne verte.
Pour baisser la tonalité temporairement, appuyez sur le Pad 1.
Pour augmenter la tonalité temporairement, appuyez sur le Pad 2.
Pour déplacer le curseur de la hauteur tonale vers le bas, appuyez sur le Pad 3.
Pour déplacer le curseur de la hauteur tonale vers le haut, appuyez sur le Pad 4.
Pour activer ou désactiver le verrouillage tonal, appuyez sur le pad 5.
Pour basculer entre le mode interne (INT) et le mode relatif (REL), appuyez sur la touche Shift et sur le
pad 5. (Basculer en mode relatif vous permet de reprendre la commande de la lecture avec un vinyle ou CD
de contrôle.)
Pour activer ou désactiver la synchronisation, appuyez sur le pad 6.
Pour sauter à un point de repère, appuyez sur le pad 7.
Pour lancer ou interrompre la lecture d’une piste, appuyez sur le pad 8.
Hauteur
tonale
Keylock
INT/REL
Hauteur
tonale
-
Sync Cue
+
Curseur de
la hauteur
-
tonale
Curseur de
la hauteur
tonale
+
Slicer Loop
Maintenez la touche Shift enfoncée et appuyez sur la touche Slicer/Transport (5) afin d'accéder au
mode Slicer Loop. Les pads se comportent de manière identique au mode Slicer, sauf que la phrase de huit
tranches sera bouclée au lieu de poursuivre la lecture de la piste.
48
Page 49

V
Ensembles de pads personnalisés
En plus des modes de fonctionnement des pads standard, vous pouvez créer jusqu'à 3 ensembles de pads
personnalisés en utilisant la fonction de mappage MIDI de Serato DJ Pro.
Pour créer un ensemble de pads personnalisé :
1. Maintenez la touche Shift et appuyez sur la touche Cue / Pitch Play (1), Roll / Pad FX (3) ou
Sampler / Fader FX (4).
Remarque : Si vous avez acheté le Serato Flip Expansion Pack, maintenir la touche Shift et appuyer
sur la touche Sampler / Fader FX (4) vous permet d’accéder aux commandes Flip, non pas à un
ensemble de pads personnalisé.
2. Dans le logiciel Serato DJ Pro, ouvrez le menu Setup et sélectionnez MIDI.
3. Sélectionnez Seventy-Two et assurez-vous que l’option Allow Serato DJ Hardware Remapping est
activée. Fermez la fenêtre Setup.
4. Dans la fenêtre principale de Serato DJ Pro, cliquez sur le bouton MIDI dans le haut de l'écran pour
commencer le mappage.
5. Cliquez sur une des fonctionnalités de Serato DJ Pro, puis toucher ou déplacer une commande sur
votre matériel afin de mapper la fonctionnalité à cette commande.
Pour de plus amples informations sur le mappage MIDI, veuillez consulter le guide d’utilisation de Serato DJ
Pro.
Curseurs
Les curseurs des canaux et le crosfader de la Seventy-Two sont des curseurs MAG THREE sans contact
avec tension réglable.
Pour régler la tension des curseurs de la Seventy-Two :
1. Assurez-vous que l’appareil est hors tension et que le câble
d’alimentation n’est plus branché à une prise secteur.
2. En utilisant un tournevis, retirez les vis du bas du panneau
supérieur où se trouvent les curseurs (consultez l'image).
Remarque : Les boutons des curseurs doivent être retirés avant
de pouvoir enlever la façade.
3. À l’aide du tournevis, ajustez la vis de tension de chaque curseur
selon votre préférence.
is de tension
Plaque de curseurs de
panneau supérieur
Vue de dessus de curseur
MAG THREE
Logiciel Control Panel
Le logiciel Rane Control Panel vous permet de modifier les
paramètres de la console de mixage Seventy-Two et de sauvegarder
ces paramètres dans un fichier (.r72) sur votre ordinateur. L'utilisation
de fichiers de paramètres vous permet d’utiliser différentes
configurations pour différentes situations.
Pour gérer les fichiers de paramètres, ouvrez la section Settings
du logiciel Rane Control Panel, sous l’onglet General.
• Load : Cette option permet de trouver les fichiers de paramètres
(.r72) de la Seventy-Two sur votre ordinateur et de les et de
charger dans le Control Panel.
• Save : Cette option permet de sauvegarder les paramètres de la console de mixage comme un fichier
de paramètres Seventy-Two (.r72).
49
Page 50

Guida per l'uso (Italiano)
Introduzione
Grazie per aver acquistato il Seventy-Two. Noi di Rane DJ sappiamo che per te la musica è
una cosa seria. Ecco perché progettiamo i nostri dispositivi con un unico obiettivo in mente:
rendere le tue prestazioni le migliori possibili.
Contenuti della confezione
Seventy-Two
Cavo di alimentazione
(2) Serato NoiseMap™ Controllo dischi in vinile
(2) Serato NoiseMap™ Controllo CD
Serato Pitch 'n Time Scarica la scheda con numero di serie
(2) Cavi USB
Adesivi Rane
Guida per l'uso
Istruzioni di sicurezza e garanzia
Assistenza
Per le ultime informazioni in merito a questo prodotto (documentazione, specifiche tecniche,
requisiti di sistema, informazioni sulla compatibilità, ecc.) e per effettuarne la registrazione,
recarsi alla pagina dj.rane.com.
Per ulteriore assistenza sul prodotto, recarsi alla pagina dj.rane.com/support.
50
Page 51

Configurazione
Elementi non elencati sotto Introduzione > Contenuti della confezione sono venduti separatamente.
1. Recarsi alla pagina dj.rane.com ed effettuare il login al proprio account. (Creare un account se si tratta
del proprio primo prodotto Rane.) Nell’account, registrare il Seventy-Two e scaricare il Rane Control
Panel.
Solo utenti Windows: il pannello di controllo Rane contiene i driver richiesti per Windows.
2. IMPORTANTE: di tanto in tanto, potremo aggiornare il firmware del Seventy-Two per migliorarne le
prestazioni. Recarsi alla pagina dj.rane.com per verificare l'eventuale presenza di aggiornamenti del
firmware disponibili, soprattutto dopo l'eventuale aggiornamento del software (gli aggiornamenti del
firmware possono riguardare nuove funzioni del software).
3. Scaricare e installare l’ultima versione di Serato DJ Pro da serato.com.
4. Servendosi di cavi USB, collegare le porte USB del RaneTwelve (se in uso) o di altri controller MIDI USB
alle porte USB Twelve/Controller sul Seventy-Two.
5. Collegare fonti di ingresso audio (microfoni, giradischi, ecc.) al Seventy-Two.
6. Collegare dispositivi di uscita audio (cuffie, amplificatori, altoparlanti, ecc.) al Seventy-Two.
7. Collegare tutti i dispositivi a prese elettriche e accenderli nell’ordine corretto:
• Al momento di avviare una sessione accendere, nell’ordine, (1) sorgenti d’ingresso, (2) Seventy-
Two, (3) dispositivi di uscita.
• Al momento di concludere una sessione, invertire questa operazione spegnendo (1) dispositivi di
uscita, (2) Seventy-Two, (3) sorgenti d’ingresso.
8. Servendosi di un cavo USB, collegare la porta USB del Seventy-Two al computer. Aprire Serato DJ Pro
e via! Per maggiori informazioni su come utilizzare il Serato DJ Pro con il Seventy-Two, recarsi alla
pagina support.serato.com e selezionare Rane Seventy-Two.
Computer Microfono
Rane Twelve
(o altri controller MIDI USB)
Altoparlanti Monitor booth Giradischi Lettore CD
(o altri controller MIDI USB)
Rane Twelve
51
Page 52

Caratteristiche
Pannello superiore
52
Page 53

1. Schermo tattile: questo display multi-touch a colori mostra informazioni specifiche per l'operazione
corrente del Seventy-Two. Toccare il display e servirsi dei comandi hardware per controllare
l'interfaccia. Per maggiori informazioni, si veda Operazione > Touchscreen.
2. Shift: tenere premuto questo pulsante per accedere alle funzioni secondarie di altri comandi del
Seventy-Two.
3. View/Menu: Premere questo tasto per passare alla vista Library e Waveform sullo schermo tattile. Si
veda Operazione > Touchscreen per maggiori informazioni.
Tenere premuto Shift e premere questo tasto, oppure tenere premuto questo tasto per 4 secondi,
per far comparire il menu principale del Seventy-Two.
4. Effects/Tap: premere questo tasto per visualizzare la schermata Effetti.
Tenere premuto Shift e premere questo tasto più volte al tempo desiderato per impostare
manualmente il BPM per gli effetti beat-tempo, per ciascun canale.
5. Back: premere questo tasto per visualizzare la schermata precedente. In vista libreria, premere questo
tasto per tornare indietro lungo i livelli dell’organizzazione della libreria.
Tenere premuto Shift e premere questo tasto per aprire l’area “Prepare” in Serato DJ Pro.
6. Load/Scroll: girare questa manopola per scorrere lungo gli elenchi e premerla per selezionare una
voce o per caricare la traccia selezionata sul deck. Quando ci si trova in vista Waveform (onda),
toccare questa manopola per passare alla vista Libreria sullo schermo tattile.
Tenere premuto Shift e premere questa manopola per caricare la traccia attualmente selezionata
sull’area “Prepare”.
Suggerimento: premere la manopola rapidamente due volte per caricare la stessa traccia su entrambi
i deck (“raddoppio istantaneo”).
7. Deck Source (fonte deck): impostare questa manopola sulla fonte audio desiderata per questo
canale: USB A o B (una traccia che viene riprodotta su quello strato del software), PH/CD (un
dispositivo collegato al Deck PH/CD In sul pannello posteriore), o Aux (un dispositivo collegato al
Deck Aux In sul pannello posteriore).
Nota bene: se si seleziona PH/CD, impostare adeguatamente gli interruttori di selezione PH/CD sul
pannello posteriore.
Nota bene: i comandi di un deck invieranno informazioni MIDI unicamente quando il selettore di
fonte del deck è impostato su USB A o B.
8. Deck Level (livello deck): girare questa manopola per impostare il livello audio pre-fader, pre-EQ del
canale corrispondente. Il misuratore accanto a questa manopola indica il livello di volume del segnale
(ridurlo se inizia a “saltare” raggiungendo la parte rossa del misuratore).
9. Deck EQ High: girare questa manopola per regolare le frequenze alte
(treble).
10. Deck EQ Mid: girare questa manopola per regolare le frequenze medie.
11. Deck EQ Low: girare questa manopola per regolare le frequenze basse
(bass).
12. Deck LP/HP: girare questa manopola per regolare il filtro applicato al deck. Girare la manopola in
senso antiorario per applicare un filtro passa basso. Girare la manopola in senso orario per applicare
un filtro passa alto. Impostarla in posizione centrale (“12:00”) per disattivare i filtri.
13. Tasti modalità pad: premere uno di questi tasti per entrare nella modalità pad corrispondente.
Premerlo una volta per entrare nella modalità principale (stampata sopra) e una seconda volta per
entrare nella modalità secondaria (stampata sotto). Premere Shift e uno di questi tasti per accedere
alle modalità pad personalizzate. Si veda Operazione > Modalità pad per scoprire come utilizzare i
pad in ciascuna modalità.
14. Pad performance: questi pad hanno funzioni diverse su ciascun deck a seconda della modalità pad
corrente. Servirsi dei tasti modalità pad per selezionare la modalità pad. I pad sono sensibili alla
velocità (solo in determinate modalità), resistenti e facili da suonare. Si veda Operazione > Modalità
pad per scoprire come utilizzare i pad in ciascuna modalità.
15. Parameter /: servirsi di questi tasti per varie funzioni in ciascuna modalità pad. Tenere premuto
Shift utilizzare questi tasti per accedere a parametri secondari.
Nota bene: tutti i
comandi EQ e Filtro
sono full-kill.
53
Page 54

16. Touch FX: premere questo tasto per attivare o disattivare la funzione X-Y del touch-pad sullo
schermo tattile. Si può utilizzare questa funzione per controllare vari parametri effetti. Per maggiori
informazioni, si veda Operazione > Effetti.
17. Commutatore Effects: allontanare questo commutatore per attivare gli effetti software e gli effetti
Flex del Seventy-Two—il commutatore si blocca in quella posizione. Posizionare il commutatore in
posizione centrale per disattivare gli effetti.
Tirare il commutatore verso di sé e mantenerlo in posizione per attivare momentaneamente gli effetti
software e gli effetti del Seventy-Two e rilasciarlo per disattivarli: il commutatore tornerà alla posizione
centrale.
Nota bene: gli interruttori di commutazione effetti possono essere rimossi e ruotati di 180°, come
desiderato.
18. Manopola Parameter: girare queste manopole per regolare vari parametri effetti. Il punto focale della
manopola parametri è indicato sullo schermo tattile con una caret (segno di omissione) bianca per
ciascun banco.
19. FX 1–3: premere ciascuno di questi tasti per attivare o disattivare il corrispondente effetto software in
un banco di tre effetti.
20. Flex FX: premere questo tasto per attivare o disattivare gli effetti interni del Seventy-Two.
21. Depth: girare questa manopola per regolare il mix “wet-dry” del Flex FX interne su quel deck.
22. Sampler Level: girare questa manopola per regolare il livello del volume del campionatore del
software.
23. Campionatore LP/HP: girare questa manopola per regolare il filtro applicato al campionatore
software. Girare la manopola in senso antiorario per applicare un filtro passa basso. Girare la
manopola in senso orario per applicare un filtro passa alto. Impostarla in posizione centrale (“12:00”)
per ottenere una risposta “flat” (senza filtri).
24. Campionatore Effects: premere questo tasto per attivare o disattivare gli effetti per il campionatore
software.
Nota bene: il campionatore deve essere selezionato nel menu di convogliamento Effetti. Per maggiori
dettagli, si veda Effetti.
25. Cue Level: girare questa manopola per regolare il livello del volume del canale cue.
26. Cue Mix: girare questo comando per mixare tra il canale cue e il mix di programma nelle uscite
cuffie. Quando impostato all’estrema sinistra, si sentirà unicamente il canale cue. Quando impostato
all’estrema destra, si udrà solo il mix programma.
27. Split Cue: quando questo tasto è acceso (On), l’audio delle cuffie sarà “suddiviso” in modo che il
canale cue venga sommato a mono e inviato al canale cuffie di sinistra, e che il mix di programma
venga sommato a mono e inviato al canale destro. Quando il tasto è fioco (Off), il canale Cue e il mix
di programma verranno “miscelati” insieme. In entrambi i casi, servirsi della manopola Cue Mix per
regolare la miscela dei due segnali.
28. Deck Cue: premere questo tasto per inviare il segnale pre-fader di questo deck al canale cue per il
monitoraggio. Una volta attivato, il tasto sarà acceso. Per effettuare il cueing di più canali
contemporaneamente, premere i tasti deck cue di entrambi i deck.
29. Fader canale: muovere questo fader per regolare il livello del volume del deck corrispondente.
30. Crossfader: servirsi di questo fader per mixare tra i deck.
31. Main: girare questa manopola per regolare il volume di uscita delle uscite main. I misuratori accanto
a questa manopola indicano il livello di volume del segnale (ridurlo se inizia a “saltare” raggiungendo la
parte rossa del misuratore).
32. Booth: girare questa manopola per regolare il volume di uscita delle uscite booth.
33. Session Out: girare questa manopola per regolare il volume delle uscite Session.
34. Session In: girare questa manopola per regolare il volume di uscita degli ingressi Session.
35. Session In Cue: premere questo tasto per inviare il segnale dagli ingressi Session al canale cue per il
monitoraggio. Una volta attivato, il tasto sarà acceso.
36. Mic 1 Level: girare questa manopola per regolare il guadagno dell'ingresso Mic 1. Il mis
uratore
accanto a questa manopola indica il livello di volume del segnale (ridurlo se inizia a “saltare”
raggiungendo la parte rossa del misuratore).
37. Mic 1 Tone: girare questa manopola per regolare l’equilibrio tra frequenze basse e alte (treble) del
segnale audio proveniente dall’ingresso Mic 1.
54
Page 55

38. Mic 1 On/Duck: premere questo comando per attivare o disattivare l’ingresso Mic 1 sul pannello
posteriore.
Tenere premuto questo tasto per 2 secondi per attivare la funzione di “abbassamento” che riduce il
livello del volume di tutti gli ingressi di 10 dB. Quando questa funzione è attiva il tasto lampeggia.
Premere nuovamente il tasto per disattivare questa funzione e l’ingresso Mic 1.
39. Mic 1 Echo: premere questo tasto per attivare o disattivare l'effetto eco sul segnale di ingresso Mic
1. Girare la manopola Mic 1 Echo sul pannello anteriore per regolare la quantità dell’effetto.
Pannello posteriore
1. Ingresso di alimentazione: quando il Seventy-Two è spento, collegare il cavo di alimentazione in
dotazione a questo ingresso e quindi a una presa di alimentazione.
2. Interruttore di alimentazione: servirsi di questo interruttore per accendere e spegnere il Seventy-
Two. Accendere il Seventy-Two solo dopo aver collegato tutti i dispositivi di ingresso e prima di
accendere amplificatori e casse. Spegnere amplificatori e casse prima di spegnere il Seventy-Two.
3. Uscite Main: collegare queste uscite ad altoparlanti o a un impianto di amplificazione. Servirsi della
manopola Master sul pannello superiore per controllare il livello del volume.
4. Uscite Booth (1/4”/6,35 mm, TRS): collegare queste uscite a monitor booth o a un impianto di
amplificazione booth. Servirsi della manopola Booth sul pannello superiore per controllare il livello del
volume.
5. Ingressi Session (RCA): collegare questi ingressi da un dispositivo a livello di linea quale un altro
mixer, un lettore CD, una drum machine, ecc. Il segnale sarà inviato direttamente al mix di
programma. Girare la manopola Session In sul pannello superiore per regolare il livello del volume di
ingresso.
6. Uscite Session (RCA): collegare queste uscite a un altro mixer, dispositivo di registrazione, ecc. Il mix
di programma sarà inviato a queste uscite. Girare la manopola Session Out sul pannello superiore per
regolare il livello del volume.
7. Ingressi Deck PH/CD (RCA): collegare questi ingressi a una fonte audio esterna o a un giradischi, a
un lettore CD o a un altro dispositivo a livello di linea. Ricordarsi di impostare il selettore PH/CD
corrispondente nella posizione adeguata e impostare la manopola deck source per quel deck su
PH/CD per riprodurre il relativo segnale audio su quel deck.
8. Selettore PH/CD: impostare questo interruttore sulla posizione adeguata, a seconda del dispositivo
collegato agli ingressi PH/CD del deck corrispondente. Se si utilizzano giradischi a livello phono,
impostare l’interruttore su PH per
phono. Se si utilizza un dispositivo a livello di linea quale un giradischi a livello di linea, un lettore CD o
un campionatore, impostare l’interruttore su CD.
9. Phono Grounds: se si utilizzano giradischi a livello phono dotati di cavo di messa a terra, collegare
quest’ultimo a questi terminali. Se si verifica un “ronzio” o un “brusio” basso, ciò può significare che i
giradischi non sono messi a terra.
Nota bene: alcuni giradischi hanno il cavo di messa a terra incorporato nel collegamento RCA e, di
conseguenza, non è necessario collegare nulla al terminale di messa a terra.
10. Ingresso Aux deck (RCA): collegare questi ingressi a una fonte audio esterna a livello di linea.
Ricordarsi di impostare la manopola deck source per quel deck su Aux per riprodurre il segnale audio
su quel deck.
garantire l’amplificazione aggiuntiva necessaria per i segnali a livello
55
Page 56

11. Ingressi Mic 1–2 (XLR / 1/4”/6,35 mm, TS): collegare microfoni o dispositivi a livello di linea a questi
ingressi mono. I relativi segnali audio mono sono divisi e convogliati direttamente al mix programma
stereo e al canale cue. Se si preferisce un ingresso di linea stereo, è possibile utilizzare l’Ingresso
Session.
12. Selettore Line/Mic: impostare questo interruttore nella posizione adeguata, a seconda del dispositivo
collegato agli Ingressi Mic 1–2. Se si utilizza un microfono, impostare l'interruttore su Mic. Se si
utilizza un dispositivo a livello di linea quale una tastiera o un campionatore, impostare l’interruttore su
Line (linea).
13. Porte USB Twelve/Controller (USB Tipo A): servirsi di cavi USB per collegare queste porte USB ai
controller quali il Twelve o un controller USB MIDI standard.
Importante: non collegare drive USB a queste porte. L’attivazione della manopola deck source
forzerà l’espulsione del drive dal computer collegato, cosa che potrebbe danneggiarne i contenuti e
deve essere evitata.
14. Porte USB (USB Tipo B): servirsi di cavi USB per collegare queste porte USB ad una porta USB libera
del computer. Questi collegamenti inviano e ricevono audio e informazioni di controllo MIDI da e verso
il computer.
Nota bene: assicurarsi di aver scaricato e installato il pannello di controllo Rane da dj.rane.com.
Pannello anteriore
1. Uscite cuffie (1/4”, 1/8” / 6,35 mm, 3,5 mm, TRS): collegare cuffie da 1/4” o 1/8” (6,5 mm o 3,5 mm) a
questa uscita per il monitoraggio del mix e il cueing.
2. Mic 2 On: quando è impostato su On, l'ingresso Mic 2 sul pannello posteriore è attivo, e il suo
segnale audio viene convogliato direttamente a Mix Programma e Cue Mix. Quando è impostato su
Off, l'ingresso Mic 2 è disattivo.
3. Mic 2 Level: girare questa manopola per regolare il guadagno dell'ingresso Mic 2.
4. Mic 2 Tone: girare questa manopola per regolare l’equilibrio tra frequenze basse e alte (treble) del
segnale audio proveniente dall’ingresso Mic 2.
5. Mic 1 Echo: girare questa manopola per regolare la quantità di effetto eco del segnale di ingresso
Mic 1. Premere il tasto Mic 1 Echo sul pannello superiore per attivare o disattivare questo effetto.
6. Contour Controls: regola la variazione della curva del crossfader. Girare la manopola verso sinistra
per una dissolvenza uniforme (mix) oppure verso destra per un taglio netto (scratch). La posizione
centrale è un'impostazione tipica per esibizioni in discoteca.
7. Reverse del fader: impostare questo interruttore su On per invertire la direzione (“polarità”) del fader
corrispondente. Impostarlo su Off per utilizzare la polarità convenzionale del fader.
8. Deck Swap: impostare questo interruttore su On per invertire i fader canale destro e sinistro così
come controllati dal Seventy-Two. Impostarlo su Off per utilizzare la configurazione convenzionale del
deck.
9. Ingresso Footswitch (1/4”/6,35 mm, TRS): collegare a questo livello un interruttore a pedale che può
essere utilizzato per attivare o disattivare gli effetti. Questo può anche essere assegnato ad altre
funzioni. Questo ingresso supporta un interruttore a pedale a tre interruttori con chiusura a contatto
passivo.
56
Page 57

Operazione
Schermo tattile
Per commutare tra le viste Waveform e Library, premere il tasto View/Menu.
Vista Waveform (onde)
In vista Waveform (onde), le onde relative alle tracce sono visualizzate
verticalmente a display, con il Canale 1 sul lato sinistro e il Canale 2
sul lato destro. L’onda grande rappresenta una sezione della traccia
corrente. L’onda più piccola rappresenta l’intera traccia corrente.
1. Time (tempo): mostra a display il tempo rimanente della traccia
corrente.
2. Key/Key Lock: tenere premuto Shift e toccare quest’icona
per commutare tra le visuali Key e Key Lock. Quando è
selezionato Key, la tonalità della traccia corrente sarà mostrata
a display ed è possibile toccarla per disattivare la funzione di
Key Sync. Quando è selezionato Key Lock, l’icona Key Lock (o
l’icona Serato Pitch 'n Time, se installato) comparirà a display
ed è possibile toccarla per abilitare o disattivare la funzione Key
Lock. Quando una qualsiasi funzione è attivata, il campo sarà
evidenziato.
3. Overview: l’onda più piccola rappresenta una panoramica
dell’intera traccia corrente. Si può utilizzare il dito per "scorrere"
lungo la traccia mentre viene riprodotta.
Nota bene: se l’opzione Disable Needle Search in Serato DJ Pro è stata abilitata, sarà
necessario tenere premuto Shift per scorrere lungo la traccia.
4. Song Position: posizione della testina di riproduzione nella traccia corrente.
5. Hot Cue: mostra a display i punti hot cue distinti per colore.
6. Sync: quando Sync è abilitato, il campo sarà evidenziato e gli indicatori del BPM diventeranno
blu. Per abilitare o disabilitare la funzione Sync, toccare l’icona di uno dei canali.
7. BPM: battiti al minuto della traccia corrente.
Nota bene: quando ci si trova in vista Waveform, toccare la manopola Load/Scroll per richiamare
rapidamente la vista Libreria.
Vista Libreria
Nella vista Libreria, il display mostra la libreria del computer
collegato. Se il Seventy-Two è collegato a due computer, verrà
mostrato quello cui entrambi i deck sono stati assegnati l’ultima
volta.
Per ambiare vista, far scorrere verso il basso lungo l’icona del
menu a discesa in cina all’elenco delle tracce, quindi toccare
l’icona della modalità desiderata — Vista semplice o Vista
espansa.
Per navigare tra le tracce, girare la manopola Load/Scroll.
Per scorrere rapidamente, premere Shift e girare la manopola
Load/Scroll.
Per aprire un crate o caricare una traccia su un deck, premere
la manopola Load/Scroll.
Per tornare indietro di un livello, premere Back.
2
3
4
5
6
Schermo tattile con vista
Libreria espansa
1
7
57
Page 58

Menu principale
Per accedere al menu principale, premere Shift e View/Menu, oppure tenere premuto
View/Menu per 4 secondi. Il menu principale contiene le seguenti opzioni.
Impostazioni mixer: selezionare questa opzione per modificare le seguenti impostazioni.
• Audio Out: selezionare questa opzione per modificare le impostazioni di Main Out, Mic 1
Clean Feed e Deck Balance.
Nota bene: quando Clean Feed è attivo (On), il Mic 1 non farà passare l’audio quando si
registra in Serato DJ Pro.
• Deck Inputs: selezionare questa opzione per modificare le impostazioni di Phono 1/2
Sensitivity e Tone XOver 1/2.
Nota bene: impostare la Phono Sensitivity sulle impostazioni raccomandate dal produttore
della cartuccia.
• Filter Setup: selezionare questa opzione per modificare le impostazioni di Deck 1/2
Resonance e Sampler Resonance.
• Pad Setup: selezionare questa opzione per modificare le impostazioni relative alla sensibilità
del pad.
• Headphone Setup: selezionare questa opzione per modificare le impostazioni relative al tono
delle cuffie
Flex FX: selezionare questa opzione per visualizzare e
modificare le impostazioni Flex FX interne.
• Per aggiungere o rimuovere un effetto dall’elenco dei
preferiti, toccare il cerchio sul lato destra del display.
Quando il cerchio è verde, l’effetto sarà incluso nell’elenco
dei Flex FX nella vista effetti. Quando il cerchio è vuoto e il
nome effetti è ombreggiato, l’effetto non compare più
nell’elenco.
• Per regolare le impostazioni predefinite del Flex FX
interno, toccare l’icona con la chiave inglese. Qualsiasi
modifica apportata sarà salvata sul mixer.
Cut-In Adjust: selezionare questa opzione per entrare nel menu
di regolazione Cut-In Adjust. Quest’ultimo controlla la quantità
di spazio morto tra le posizioni aperta e chiusa di un fader.
Selezionare il fader che si desidera regolare, quindi spostare il
fader selezionato sulla posizione desiderata e premere Set per
memorizzare l’impostazione.
Footswitch: selezionare questa opzione per impostare le
assegnazioni agli interruttori a pedale 1/2/3.
Display: selezionare questa opzione per regolare la luminosità del display.
58
Page 59

Effetti
Ciascun banco effetti contiene fino a un massimo di 3 effetti
software, oltre al Flex FX per un totale di fino a 8 effetti che
possono essere aggiunti e convogliati al Deck 1, al Deck 2 o al
campionatore. In via predefinita, gli effetti sono convogliati al
Deck 1 e al Deck 2.
Per modificare il convogliamento degli effetti:
1. Toccare le icone blu 1/2/S in cima al display per entrare
nell’apposito menu Routing.
2. Selezionare dove si desidera convogliare gli effetti, quindi
premere OK per tornare alla pagina precedente. Entrambi
i banchi effetti possono essere convogliati allo stesso (o
agli stessi) deck.
Per aggiungere e utilizzare gli effetti:
1. Premere il tasto Effects per entrare nella vista Effetti.
2. Toccare lo schermo tattile per selezionare l’effetto
desiderato e premere la manopola Parameter per
passare alla modalità di scelta FX.
3. Girare la manopola Parameter Knob per scorrere lungo
la lista degli effetti e premerla per caricare l’effetto su
quella slot.
4. Premere i tasti FX 1–3 o Flex FX per attivare l’effetto nella catena. Gli effetti sono applicai in sequenza
nella catena (FX1 > FX2 > FX3 > Flex FX).
5. Servirsi dei commutatori effetti per applicare gli effetti al Deck 1 e 2. Allontanare il commutatore per
bloccare un effetto, oppure avvicinarlo a sé e mantenerlo in posizione per attivare un effetto
momentaneamente.
Premere il tasto Sampler Effects per applicare gli effetti al campionatore.
Per modificare un effetto software:
1. Toccare l’effetto sul display.
2. Girare la manopola Parameter per iniziare a modificare il parametro selezionato. Premendo la
manopola Parameter si passa alla modalità di scelta software FX per l’effetto evidenziato.
3. Per modificare la tempistica dell’effetto, toccare il tempo e girare la manopola Parameter.
Nota bene: le regolazioni di tempo sono per banco.
Per modificare il Flex FX interno:
1. Toccare per portare la manopola Parameter Knob sull’effetto desiderato, quindi servirsi della
manopola Parameter stessa per regolare. Toccare due volte l’effetto desiderato per regolare le
impostazioni predefinite del Flex FX. Qualsiasi modifica apportata sarà salvata sul mixer.
Touch FX
Premere il tasto Touch FX per aprire il display X/Y.
Per selezionare il deck al quale è applicato il Touch FX, toccare la freccia del
rispettivo Deck. Gli effetti attivi convogliati a quel deck da uno dei banchi sarànno
evidenziati.
Per applicare il Touch FX, far scorrere il dito attraverso il display. Facendolo scorrere
lungo l’asse Y si applica un filtro passa alto (su) o passa basso (giù). Scorrendo da
sinistra a destra sull’asse X, si aumenta il parametro di tempo Time per il Flex FX
interno attivo.
59
Page 60

Modalità Pad
Questo capitolo descrive le diverse modalità pad.
Ciascun deck presenta otto pad, che si trovano sempre
in una di queste modalità e i pad di ciascun deck si
possono trovare in una modalità diversa. Premere uno
1234
dei tasti modalità pad per entrare nella modalità pad
corrispondente su quel deck. Ciascun tasto modalità
pad alternerà tra due modalità a ciascuna pressione.
56
8
7
Suggerimento: in ciascuna modalità pad, premere
Shift e uno dei tasti modalità pad per accedere a
modalità aggiuntive o utilizzare modalità personalizzate.
Cue
In modalità Cue, ciascun pad assegna un punto hot cue o fa tornare la traccia a quel punto hot cue.
Per entrare in modalità Cue, premere Cue / Pitch Play in modo che si illumini di bianco.
Per assegnare un punto hot cue, premere un pad spento nel punto desiderato della traccia.
Quando è assegnato, il pad si illumina (del colore corrispondente, se disponibile).
Per saltare a un punto hot cue, premere un pad illuminato.
Per cancellare un punto hot cue assegnato, premere Shift e il pad corrispondente.
Pitch Play
In modalità Pitch Play, ciascun pad riproduce la
traccia da un punto hot cue ad una trasposizione
diversa (regolabile in semitoni). Per poter utilizzare
questa modalità, il pack di espansione DJ Serato
Pitch ‘n Time deve essere installato. Si veda
Modalità cue per sapere come si assegnano i punti
hot cue.
Nota bene: una scheda di download di Serato Pitch
'n Time con un numero di serie è inclusa con il
Seventy-Two.
Per entrare in modalità Pitch Play, premere Cue /
Pitch Play in modo che si illumini di verde.
Per selezionare quale punto hot cue utilizzare,
premere Shift e un pad dalla luce smorzata.
Per selezionare l’intervallo di trasposizione che
utilizzeranno i pad, servirsi dei tasti Parameter
/ (vedi schemi qui di seguito).
Per regolare la tonalità della traccia corrente in
alto o in basso, premere Shift e i tasti Parameter
/, rispettivamente.
Per riprodurre la traccia dal punto hot cue,
premere un pad acceso. Ciascun pad corrisponde
a una trasposizione specifica (in semitoni), che
dipende dall’intervallo di trasposizione corrente (si
vedano gli schemi qui di seguito). Il pad privo di
trasposizione (il pitch originale) sarà illuminato di
bianco.
60
+4
semitoni
0
(pitch
originale)
0
(pitch
originale)
-4
semitoni
-3
semitoni
-7
semitoni
Up (su)
+5
semitoni
+1
semitono
Middle (centro)
+1
semitono
-3
semitoni
Down (giù)
-2
semitoni
-6
semitoni
+6
semitoni
+2
semitoni
+2
semitoni
-2
semitoni
-1
semitono
-5
semitoni
+7
semitoni
+3
semitoni
+3
semitoni
-1
semitoni
0
(pitch
originale)
-4
semitoni
Page 61

Auto Loop
In modalità Loop automatico, ciascun pad attiva o rilascia un auto-Loop di una lunghezza diversa. La
griglia dei loop del software determina le dimensioni del loop.
Per entrare in modalità Auto Loop, premere Auto Loop / Man Loop in modo che si illumini di blu
scuro.
Per modificare le otto lunghezze dell'auto loop illustrate (nel software), premere uno dei tasti
Parameter /. Il layout dei pad cambierà di conseguenza.
Per spostare il loop Audio in avanti o indietro, premere Shift e i tasti Parameter/,
rispettivamente.
Manual Loop
In modalità loop manuale, ciascun pad farà tornare la
traccia a un loop creato e salvato in precedenza. I
layout dei pad dei due banchi sono identici.
1 2 3
Loop 1 Loop 2 Loop 3 Loop 4
4
Per entrare in modalità Manual Loop, premere
Auto Loop / Man Loop in modo che si illumini di
giallo.
Per creare un loop, premere il Pad 5 per impostare il
5
Loop In
Set
6
Set
Loop Out
7 8
Attivare /
disattivare
Reloop
loop
punto di Loop In e quindi premere il Pad 6 per
impostare il punto di Loop Out e attivare il loop.
Per salvare un loop, mentre un loop è attivo, premere un pad spento nella fila superiore (Pad 1–4).
Questo può essere fatto indipendentemente dal modo in cui il loop è stato creato (modalità Auto
Loop, Manual Loop, ecc.).
Per attivare o disattivare un loop salvato, premere un pad acceso nella fila superiore (Pad 1–4).
Per cancellare un loop salvato, premere Shift e un pad acceso nella fila superiore (Pad 1–4).
Per attivare o disattivare l’ultimo loop attivato, premere il Pad 7.
Per riattivare immediatamente l’ultimo loop attivato (“reloop”), premere il Pad 8.
Per dimezzare o raddoppiare la lunghezza di un loop, premere i tasti Parameter /,
rispettivamente.
Per spostare un loop in avanti o indietro, premere Shift e i tasti Parameter /,
rispettivamente.
Loop salvati
Tenere premuto Shift e premere Auto Loop / Man Loop (2) per avere accesso ai loop salvati. In
questa modalità, tutti e 8 i pad sono utilizzati per attivare o disattivare un loop salvato.
61
Page 62

Roll
In modalità Roll, ciascun pad attiva un Loop Roll momentaneo. Rilasciando il pad si ferma il loop roll
e si riprende la riproduzione normale nel punto in cui la testina di riproduzione si troverebbe se non
fosse stato attivato il loop roll (ossia, se la traccia avesse continuato la sua riproduzione per tutto il
tempo).
Nota bene: assicurarsi che "Show Beat Jump Controls" sia disattivato nel menu di configurazione
del Serato DJ Pro. Si possono anche visualizzare e modificare le dimensioni del loop impostate nel
software.
Per entrare in modalità Roll, premere Roll / Pad FX in modo che si illumini di color acqua.
Per attivare un loop roll, tenere premuto un pad.
Per modificare le otto lunghezze dei loop illustrate (nel software) premere uno dei tasti
Parameter /. Il layout dei pad cambierà di conseguenza.
Per spostare il loop in avanti o indietro, premere Shift e i tasti Parameter /, rispettivamente.
Pad FX
In modalità Pad FX, i pad selezionano e attivano gli
effetti. La fila superiore di pad seleziona il tipo di
effetti e quella inferiore attiva e controlla la lunghezza
dell’effetto.
Per entrare in modalità Pad FX, premere Roll / Pad
FX in modo che si illumini di giallo.
Per selezionare l’effetto Vinyl Brake, premere il
Pad 1. Quando ll’effetto Vinyl Brake è attivato dalla
fila inferiore di pad, l’audio rallenta come se un piatto
fono si fosse fermato sfumando fino al silenzio dopo
il tempo selezionato.
Per selezionare l’effetto Backspin, premere il Pad 2. Quando l’effetto Backspin è attivato da uno
dei pad della fila inferiore, l’audio suona all’indietro e accelera come se un piatto fono venisse
riavvolto, sfumando fino al silenzio dopo il tempo selezionato.
Per selezionare l’effetto Gate, premere il Pad 3. Quando l’effetto Gate è attivato da uno dei pad
della fila inferiore, un effetto cancello temporizzato viene applicato all’audio basandosi sulle
dimensioni selezionate.
Per selezionare l’effetto Eco, premere il Pad 4. Quando l’effetto eco è attivato dai pad della fila
inferiore, l’audio echeggerà fino al silenzio basandosi sulle dimensioni selezionate.
Nota bene: l’effetto eco può essere abbinato ad altri effetti. Tutti gli altri effetti sono esclusivi.
Per attivare l’effetto selezionato, premere uno dei Pad 5–8. Ciascun pad attiva l’effetto
immediatamente con una determinata dimensione, aumentando dal Pad 5 (tempo minore) al Pad 8
(tempo maggiore). Quando viene attivato un effetto, il pad selezionato lampeggia.
Nota bene: selezionando una nuova modalità pad si disattivano tutti i Pad FX attualmente attivi su
quel deck.
1 2 3 4
Vinyl
Brake
5
Backspin Gate Echo
6
7 8
Size 1 Size 2 Size 3 Size 4
62
Page 63

Campionatore
In modalità campionatore, i pad controlleranno il campionatore nel software. Ciascun pad attiva un
campione ad un volume specifico (è possibile assegnare il campione e il relativo volume nel software).
Per entrare in modalità Campionatore, premere Sampler / Fader in modo che si illumini di viola.
Per assegnare un campione e il relativo volume, utilizzare il software. Si veda il manuale del Serato DJ
Pro per maggiori informazioni sull’utilizzo dei campioni.
Per riprodurre un campione, premere un pad illuminato. Durante la riproduzione del campione, il pad
lampeggia.
Per interrompere la riproduzione di un campione, premere Shift e un Pad mentre viene riprodotto.
Per commutare tra i banchi di campioni, premere i tasti Parameter /.
Per commutare tra le uscite del campionatore, premere Shift e i tasti Parameter /.
Fader FX
In modalità Fader FX, i pad silenzieranno e attiveranno il
segnale audio del deck in un modo che simula i
movimenti del crossfader verso quel deck. Un “clic” è un
movimento del crossfader verso un deck (“aperto”) e poi
via da quel deck (“chiuso”). I DJ usano i clic in diversi
schemi ritmici (spesso unitamente allo scratch) per creare
vari effetti.
Per entrare in modalità Fader FX, premere Sampler /
Fader FX in modo che si illumini di verde.
Per attivare un effetto fader, premere uno dei Pad 1–8.
Per invertire un effetto, tenere premuto Shift e premere uno dei Pad 1–8.
1
1-Click
Flare
5 6 7 8
Trans-
formers
2 3 4
2-Click
Flare
2-to-1
Alternator
Baby
3-Click
Flare
Tri-forms Uzi
4-Click
Flare
Flip
Se è stato acquistato il Serato Flip Expansion Pack, è
possibile accedere al comando Flip tenendo premuto
Shift e premendo Sampler / Fader FX (4). Se non è
stato acquistato il Flip Expansion Pack, sarà disponibile
come modalità di personalizzazione pad (Custom Pad).
In questa modalità, ai pad spenti non è assegnato alcun
Flip; ai pad illuminati in maniera fissa è stato assegnato
un Flip, ma non sono in corso di riproduzione; ai pad
lampeggianti è stato assegnato un Flip e vengono
attualmente riprodotti.
Per assegnare un Flip a un pad, tenere premuto il Pad 8 e quindi premere il Pad 1, 2, 3, 5, 6 o 7.
Per riprodurre un Flip assegnato, premere Pad 1, 2, 3, 5, 6 o 7 (se gli è stato assegnato un Flip).
Per interrompere immediatamente la riproduzione di un Flip, tenere premuto Shift, quindi premere il
pad corrispondente.
Per far "scattare" automaticamente la lunghezza di un Flip in modo che si allinei con la griglia del
beat (Loop Snap) tenere premuto il Pad 4 e premere un pad cui sia stato assegnato un Flip.
Importante: la traccia deve avere una griglia del beat affinché la funzione Loop Snap funzioni.
1 2 3
Flip 1 Flip 2 Flip 3
5 6 7 8
Flip 4 Flip 5 Flip 6
4
Loop
Snap
Assegnare
Flip
63
Page 64

Slicer
Importante: la traccia deve avere una griglia del beat affinché questa modalità funzioni.
In modalità Slicer, gli otto pad rappresentano otto
beat sequenziali, "slice", nella griglia del beat. Lo
slice che viene riprodotto è rappresentato dal pad
1
Slice 1 Slice 2 Slice 3 Slice 4
234
acceso; la luce si "sposta tra i pad" man mano che
avanza attraverso ciascuna frase di otto slice. Si può
premere un pad per riprodurre quello slice. Quando si
rilascia il pad verrà ripresa la normale riproduzione
della traccia dal punto in cui si sarebbe trovata se
56 7
Slice 5 Slice 6 Slice 7 Slice 8
8
non fosse mai stata premuta (ossia, come se la
traccia avesse continuato a suonare).
Per entrare in modalità Slicer, premere Slicer / Transport in modo che si illumini di rosso. Se si
carica un’altra traccia sul deck o si abilita la modalità Grid Edit, il deck uscirà dalla modalità Slicer.
Per riprodurre uno slice, premere il pad corrispondente.
Per ridurre o aumentare le dimensioni degli slice, premere i tasti Parameter /.
Per spostare la testina di riproduzione in avanti o indietro, premere Shift e i tasti Parameter
/.
Trasporto
In modalità Comandi di Trasporto, i pad
corrispondono ai diversi comandi di trasporto. Il
software entrerà automaticamente in Internal Mode
quando si fa questo (se si utilizza un controller
Bend del
pitch
-
Bend del
pitch
Fader del
pitch -
+
Fader del
pitch
+
Twelve con il Seventy-Two, il software sarà sempre in
modalità interna).
Per entrare in modalità di Trasporto, premere
Keylock
INT/REL
Sync Cue
Slicer / Transport in modo che si illumini di verde.
Per effettuare il bend temporaneo del pitch verso il basso, premere il Pad 1.
Per effettuare il bend temporaneo del pitch verso l’alto, premere il Pad 2.
Per spostare il fader del pitch verso il basso, premere il Pad 3.
Per spostare il fader del pitch verso l’alto, premere il Pad 4.
Per attivare o disattivare la funzione Blocco tasti, premere il Pad 5.
Per commutare tra la modalità Interna (INT) e la modalità Relativa (REL), premere Shift e il Pad
5. (Il passaggio alla modalità Relativa consente di riprendere il controllo della riproduzione con
controllo di vinili o controllo di CD.)
Per attivare o disattivare la funzione Sync, premere il Pad 6.
Per passare al punto the cue, premere il Pad 7.
Per avviare o interrompere momentaneamente la riproduzione della traccia, premere il Pad 8.
Slicer Loop
Tenere premuto Shift e premere Slicer / Transport (5) per entrare in modalità Slicer Loop. i pad
si comportano come i pad nella modalità Slicer, tranne per il fatto che la frase da otto Slice effettuerà
un loop anziché avanzare in maniera continua lungo la traccia
64
.
Page 65

V
Set pad personalizzati
Oltre alle modalità pad standard, è possibile creare fino a un massimo di 3 set pad personalizzati
utilizzando la funzione di mappatura MiDI del Serato DJ Pro.
Per creare un set pad personalizzato:
1. Tenere premuto Shift e premere Cue / Pitch Play (1), Roll / Pad FX (3), o Sampler /
Fader FX (4).
Nota bene: se è stato acquistato il Serato Flip Expansion Pack, tenendo premuto Shift e
premendo Sampler / Fader FX (4) si accede ai comandi Flip, non a un set pad
personalizzato.
2. In Serato DJ Pro, aprire il menu Setup e selezionare MIDI.
3. Selezionare il Seventy-Two e assicurarsi che Allow Serato DJ Hardware Remapping sia
abilitato. Chiudere la finestra Setup.
4. Nella finestra principale di Serato DJ Pro, fare clic sul tasto MIDI in cima alla schermata per
iniziare la mappatura.
5. Fare clic su una funzione in Serato DJ Pro, quindi toccare o muovere un comando sul proprio
hardware per mappare la funzione stessa su tale comando.
Si veda il manuale del Serato DJ Pro per maggiori informazioni sulla mappatura MIDI.
Fader
I fader canale e i crossfader del Seventy-Two sono fader contactless MAG THREE dalla tensione
regolabile.
Per regolare la tensione dei fader del Seventy-Two:
1. Assicurarsi che l’apparecchio sia spento e scollegato
dall’alimentazione.
2. Servendosi di un cacciavite, rimuovere le viti dalla piastra
frontale in fondo al pannello superiore dove si trovano i fader
(vedi immagine).
Nota bene: per rimuovere la piastra frontale, occorre
rimuovere le coperture dei fader.
3. Servendosi di un cacciavite, regolare la vite di tensione di
ciascun fader come desiderato.
ite di tensione
Vista dall'alto di MAG
THREE Fader
Piastra fader
pannello superiore
Pannello di controllo
Il pannello di controllo Rane consente di regolare le impostazioni
sul mixer Seventy-Two e di caricare e salvare tali impostazioni su
un file (.r72) sul computer. L’utilizzo dei file di configurazione
consente di mantenere numerose configurazioni diverse dei
comandi, da utilizzare in diverse situazioni.
Per gestire i file delle impostazioni, navigare fino alla sezione
Settings del pannello di controllo Rane, sotto la scheda General.
• Load: selezionare questo comando per individuare e caricare un file impostazioni (.r72)
Seventy-Two sul computer sul pannello di controllo.
• Save (salva): selezionare questo comando per salvare le impostazioni del mixer sul computer
sotto forma di file impostazioni del Seventy-Two (.r72).
65
Page 66

Benutzerhandbuch (Deutsch)
Einführung
Vielen Dank für den Kauf des Seventy-Two. Wir von Rane DJ wissen, wie wichtig Ihnen die
Musik ist. Darum entwerfen wir unsere Geräte stets nur mit einem einzigen Ziel vor Augen: Ihre
Performance so gut wie möglich zu unterstützen.
Lieferumfang
Seventy-Two
Stromkabel
(2) Serato NoiseMap™ Control Vinyl Records
(2) Serato NoiseMap™ Control-CDs
Serato Pitch 'n Time Download-Karte mit Seriennummer
(2) USB-Kabel
Rane-Stickers
Benutzerhandbuch
Sicherheitshinweise und Garantieinformationen
Kundendienst
Für die neuesten Informationen zu diesem Produkt (Dokumentation, technische Daten,
Systemanforderungen, Informationen zur Kompatibilität etc.) und zur Produktregistrierung
besuchen Sie bitte: dj.rane.com.
Für zusätzlichen Produkt-Support besuchen Sie dj.rane.com/support.
66
Page 67

)
Setup
Teile, die nicht unter Einführung > Lieferumfang angegeben sind, sind separat erhältlich.
1. Besuchen Sie dj.rane.com und melden Sie sich bei Ihrem Konto an. (Erstellen Sie ein Konto, wenn dies
Ihr erstes Rane-Produkt ist.) Registrieren Sie in Ihrem Konto Ihren Seventy-Two und laden Sie das Rane
Control Panel herunter.
Nur für Windows-Benutzer: Die Rane-Systemsteuerung enthält die für Windows erforderlichen Treiber.
2. WICHTIG: Gelegentlich aktualisieren wir die Firmware des Seventy-Two, um die Leistung zu
verbessern. Besuchen Sie dj.rane.com, um nach verfügbaren Firmware-Updates zu suchen, vor allem
nachdem Sie Ihre Software aktualisiert haben (Firmware-Updates können neue Software-Features
betreffen).
3. Besuchen Sie serato.com und laden die neueste Version von Serato DJ Pro herunter und installieren
es.
4. Verwenden Sie USB-Kabel, um die USB-Buchsen des Rane Twelve (falls verwendet) oder anderer USBMIDI-Controller mit den Twelve/Controller USB-Buchesn des Seventy-Two zu verbinden.
5. Schließen Sie Audio-Eingangsquellen (Mikrofone, Plattenspieler usw.) an Seventy-Two an.
6. Schließen Sie Audio-Ausgabegeräte (Kopfhörer, Leistungsverstärker, Lautsprecher usw.) an SeventyTwo an.
7. Verbinden Sie alle Geräte mit Netzsteckdosen und schalten Sie sie in der richtigen Reihenfolge ein:
• Schalten Sie beim Beginn einer Sitzung (1) die Eingangsquellen, (2) Seventy-Two, (3) die
Ausgabegeräte ein.
• Wenn Sie eine Sitzung beenden, schalten Sie (1) die Ausgabegeräte, (2) Seventy-Two und (3) die
Eingangsquellen aus.
8. Verbinden Sie den USB-Anschluss des Seventy-Two über ein USB-Kabel mit Ihrem Computer. Öffnen Sie
Serato DJ Pro und los geht's! Weitere Informationen zur Verwendung von Serato DJ Pro mit Seventy-Two
finden Sie unter support.serato.com und wählen Rane Seventy-Two aus.
Computer
Mikrofon
Rane Twelve
(oder andere USB-MIDI-Controller)
Lautsprecher
Booth-Monitoren
(oder andere USB-MIDI-Controller
Plattenspieler CD-Spieler
Rane Twelve
67
Page 68

Funktionen
Oberseite
68
Page 69

1. Touchscreen: Das Vollfarb-Multitouch-Display zeigt Informationen, die den aktuellen Betrieb des
Seventy-Two betreffen. Tippen Sie auf das Display und verwenden Sie die Hardware-Steuerelemente,
um die Schnittstelle zu bedienen. Bitte lesen Sie den Abschnitt Betrieb > Touchscreen für weitere
Informationen.
2. Shift: Halten Sie diese Taste gedrückt, um auf sekundäre Funktionen anderer Bedienelemente des
Seventy-Two zuzugreifen.
3. View/Menu: Drücken Sie diese Taste, um am Touchscreen zur Bibliothekansicht und zur Wellenformansicht
zu wechseln. Bitte lesen Sie den Abschnitt Betrieb > Touchscreen für weitere Informationen.
Halten Sie Shift gedrückt und drücken Sie diese Taste oder halten Sie diese Taste 4 Sekunden lang
gedrückt, um das Hauptmenü des Seventy-Two anzuzeigen.
4. Effects/Tap: Drücken Sie diese Taste, um sofort die Effektansicht anzuzeigen.
Halten Sie Shift gedrückt und drücken Sie diese Taste mehrmals im gewünschten Tempo, um die BPM-
Rate für Beat-Tempo-Effekte pro Kanal manuell einzustellen.
5. Back: Drücken Sie diese Taste, um den vorherigen Bildschirm anzuzeigen. Drücken Sie in der
Bibliotheksansicht diese Taste, um in den Ebenen der Bibliotheksstruktur zurück zu springen.
Halten Sie die Shift gedrückt und drücken Sie diese Taste, um den Vorbereitungsbereich im Serato DJ Pro
zu öffnen.
6. Load/Scroll: Drehen Sie diesen Regler, um durch die Listen zu blättern und drücken Sie ihn, um ein Element
auszuwählen. Berühren Sie diesen Regler in der Wellenformansicht, um am Touchscreen zur
Bibliotheksansicht zu wechseln.
Halten Sie Shift gedrückt und drücken Sie diesen Regler, um den aktuell ausgewählten Track im
Vorbereitungsbereich zu laden.
Tipp: Drücken Sie diesen Regler zweimal schnell hintereinander, um den gleichen Track auf beide Decks
zu laden („Instant Doubles“).
7. Deck-Quelle: Stellen Sie diesen Regler auf die gewünschte Audioquelle von diesem Kanal: USB A oder B
(ein Track, der in der Software auf dieser Ebene spielt), PH/CD (ein Gerät, das an den Deck PH/CD -
Eingang an der Rückseite angeschlossen ist) oder Aux (ein Gerät, das mit dem Deck Aux In auf der
Rückseite verbunden ist).
Hinweis: Wenn Sie PH/CD wählen, stellen Sie die PH/CD-Wahlschalter auf der Rückseite richtig ein.
Hinweis: Die Bedienelemente eines Decks senden MIDI-Informationen nur, wenn der Deck-
Quellenwahlschalter auf USB A oder B gestellt ist.
8. Deck Level: Drehen Sie diesen Regler, um den Pre-Fader, Pre-EQ-Audiopegel des entsprechenden
Kanals einzustellen. Die Anzeige neben diesem Regler zeigt den Signalpegel an (reduzieren Sie ihn,
wenn das Signal zu „clippen“ beginnt und den roten Teil der Anzeige erreicht).
9. Deck EQ High: Drehen Sie diesen Regler, um die hohen Frequenzen anzupassen.
10. Deck EQ Mid: Drehen Sie diesen Regler, um die Mittenfrequenzen einzustellen.
11. Deck EQ Low: Drehen Sie diesen Regler, um die tiefen (Bass)-Frequenzen einzustellen.
12. Deck LP/HP: Drehen Sie diesen Regler, um den Filter für das Deck einzustellen. Drehen Sie den Regler
gegen den Uhrzeigersinn, um einen Tiefpassfilter anzulegen. Drehen Sie den Regler im Uhrzeigersinn,
um einen Hochpassfilter anzuwenden. Stellen Sie ihn auf die mittlere Position („12:00“) ein, um die Filter
zu deaktivieren.
Hinweis: Alle EQ- und Filter-Steuerelemente sind „full-kill“.
13. Pad-Modus-Tasten: Drücken Sie eine dieser Tasten, um den entsprechenden Pad-Modus aufzurufen.
Drücken Sie einmal, um in den primären Modus (Aufdruck oben) zu wechseln und ein zweites Mal, um
in den sekundären Modus (Aufdruck unten) zu wechseln. Drücken Sie Shift und eine dieser Tasten,
um auf die benutzerdefinierten Pad-Modi zuzugreifen. Unter Betrieb > Pad-Modi erfahren Sie, wie Sie
die Pads in jedem Modus verwenden.
14. Performance-Pads: Je nach aktuellem Pad-Modus besitzen diese Pads unterschiedliche Funktionen
auf jedem Deck. Verwenden Sie die Pad-Modus-Tasten, um den Pad-Modus auszuwählen. Diese
Pads sind anschlagsdynamisch (allerdings nur in bestimmten Modi), robust und einfach zu spielen.
Unter Betrieb > Pad-Modi erfahren Sie, wie Sie die Pads in jedem Modus verwenden.
15. Parameter /: Diese Tasten haben in jedem Pad-Modus unterschiedliche Funktionen. Halten Sie
Shift gedrückt und verwenden Sie diese Tasten, um auf Sekundärparameter zuzugreifen.
69
Page 70

16. Touch FX: Drücken Sie diese Taste, um die X-Y-Touchpad-Funktion auf dem Touchscreen zu
aktivieren oder zu deaktivieren. Sie können diese Funktion verwenden, um verschiedene
Effektparameter zu steuern. Bitte lesen Sie den Abschnitt Betrieb > Effekte für weitere Informationen.
17. Effects umschalten: Kippen Sie diesen Schalter vom Körper weg, um die Effekte der Software und des
Seventy-Two's Flex vorübergehend zu aktivieren. Kippen Sie den Schalter in die andere Richtung, um
die Effekte zu deaktivieren.
Ziehen und halten Sie diesen Schalter zum Körper hin, um die Effekte der Software und des SeventyTwo vorübergehend anzuzeigen, und lassen Sie den Schalter los, um die Effekte zu deaktivieren. Der
Schalter kehrt in die mittlere Position zurück.
Hinweis: Die Effektschalter können je nach Wunsch entfernt und um 180° gedreht werden.
18. Parameter-Regler: Drehen Sie diese Regler, um verschiedene Effektparameter einzustellen. Der
Parameterregler-Fokus wird auf dem Touchscreen mit einem weißen Caret (Einschaltungszeichen) für
jede Bank angezeigt.
19. FX 1–3: Drücken Sie jede dieser Tasten, um ihren jeweiligen Softwareeffekt in einer Bank mit drei
Effekten zu aktivieren oder zu deaktivieren.
20. Flex FX: Drücken Sie diese Taste, um die internen Effekte des Seventy-Two zu aktivieren oder zu
deaktivieren.
21. Depth: Drehen Sie diesen Regler, um den „Wet-Dry“-Mix der internen Flex FX-Einstellungen auf diesem
Deck einzustellen.
22. Sampler Level: Drehen Sie diesen Regler, um die Lautstärke des Software-Samplers einzustellen.
23. Sampler LP/HP: Drehen Sie diesen Regler, um die Lautstärke des Software-Samplers einzustellen.
Drehen Sie den Regler gegen den Uhrzeigersinn, um einen Tiefpassfilter anzulegen. Drehen Sie den
Regler im Uhrzeigersinn, um einen Hochpassfilter anzuwenden. Stellen Sie ihn auf die mittlere Position
(„12:00“) für einen „flachen“ Frequenzgang (kein Filter).
24. Sampler Effects: Drücken Sie diese Taste, um Effekte für den Software-Sampler zu aktivieren oder zu
deaktivieren.
Hinweis: Der Sampler muss im Menü "Effects Routing" ausgewählt sein. Weitere Informationen finden
Sie unter Effekte.
25. Cue Level: Drehen Sie diesen Regler, um die Lautstärke des Cue-Kanals einzustellen.
26. Cue Mix: Drehen Sie den Regler, um im Kopfhörerkanal zwischen Cue und Programm zu wechseln.
Wenn der Regler ganz nach links gedreht ist, kann nur der Cue-Kanal gehört werden. Wenn der Regler
ganz nach rechts gedreht ist, ist nur der Programm-Mix zu hören.
27. Split Cue: Wenn dieser Taste in der Position On leuchtet, wird das Kopfhörersignal „aufgeteilt“, so dass
der Cue-Kanal auf Mono summiert und an den linken Kopfhörerkanal gesendet wird und der
Programm-Mix auf Mono summiert und an den rechten Kanal gesendet wird. Wenn dieser Taste in der
Position Off dunkel ist, wird der Cue-Kanal und Programm-Mix „zusammengemischt“. Verwenden Sie
in beiden Fällen den Cue Mix-Regler, um den Mix der beiden Signale zu steuern.
28. Deck Cue: Drücken Sie diese Taste, um das Pre-Fader-Signal dieses Decks an den Cue-Kanal zum
Monitoring zu senden. Wenn die Taste aktiviert ist, leuchtet sie auf. Um mehrere Kanäle gleichzeitig
aufzurufen, drücken Sie die Deck Cue-Tasten für beide Decks.
29. Kanal-Fader: Bewegen Sie diesen Fader, um die Lautstärke des entsprechenden Decks einzustellen.
30. Crossfader: Bewegen Sie diesen Fader, um zwischen den Decks zu mischen.
31. Main: Mit diesem Regler stellen Sie die Ausgabelautstärke der Hauptausgänge ein. Die Anzeige neben
diesem Regler zeigt den Signalpegel an (reduzieren Sie ihn, wenn das Signal zu „clippen“ beginnt und
den roten Teil der Anzeige erreicht).
32. Booth: Mit diesem Regler stellen Sie die Ausgabelautstärke der Booth-Ausgänge ein.
33. Session Out: Mit diesem Regler stellen Sie die Ausgabelautstärke der Session-Ausgänge ein.
34. Session In: Mit diesem Regler stellen Sie die Ausgabelautstärke der Session-Eingänge ein.
35. Session In Cue: Drücken Sie diese Taste, um das Signal der Session-Eingänge an den Cue-Kanal zur
Überwachung zu senden. Wenn die Taste aktiviert ist, leuchtet sie auf.
36. Mic 1 Level: Drehen Sie diesen Regler, um die Lautstärke des Mic 1 Eingangs einzustellen. Die
Anzeige neben diesem Regler zeigt den Signalpegel an (reduzieren Sie ihn, wenn das Signal zu
„clippen“ beginnt und den roten T
eil der Anzeige erreicht).
37. Mic 1 Tone: Drehen Sie diesen Regler, um die Balance zwischen tiefen Frequenzen (Bass) und hohen
Frequenzen (Treble) des Audiosignals einzustellen, das vom Mic 1-Eingang kommt.
70
Page 71

38. Mic 1 On/Duck: Drücken Sie diese Taste, um den Mic 1-Eingang auf der Rückseite zu aktivieren oder
zu deaktivieren.
Halten Sie diese Taste 2 Sekunden lang gedrückt, um die „Ducking“ -Funktion zu aktivieren, die die
Lautstärke aller anderen Eingänge um 10 dB reduziert. Die Taste blinkt, wenn diese Funktion aktiviert
ist. Drücken Sie diese Taste noch einmal, um diese Funktion und den Mic 1-Eingang zu deaktivieren.
39. Mic 1 Echo: Drücken Sie diese Taste, um den Echoeffekt am Mic 1 Eingangssignal zu aktivieren oder
zu deaktivieren. Drehen Sie den Mic 1 Echo -Regler an der Vorderseite, um die Stärke des Effekts
einzustellen.
Rückseite
1. Netzeingang: Während Seventy-Two ausgeschaltet ist, schließen Sie das mitgelieferte Netzkabel an
diesen Eingang und dann an eine Steckdose an.
2. Netzschalter: Verwenden Sie diesen Schalter, um Seventy-Two ein- oder auszuschalten. Schalten Sie
Seventy-Two erst ein, nachdem Sie all Ihre Eingabegeräte verbunden haben und bevor Sie Ihren
Verstärker und Lautsprecher einschalten. Schalten Sie Ihre Verstärker und Lautsprecher aus, bevor Sie
Ihren Seventy-Two ausschalten.
3. Main Out (XLR): Verbinden Sie diese Ausgänge mit Ihren Lautsprechern oder einem Verstärkersystem.
Verwenden Sie den Master-Regler an der Oberseite, um die Lautstärke einzustellen.
4. Booth-Ausgang (1/4”/6,35 mm, TRS): Verbinden Sie diese Ausgänge mit Booth-Monitoren oder einem
Booth-Verstärkersystem. Verwenden Sie den Booth-Regler an der Oberseite, um die Lautstärke
einzustellen.
5. Session Eingang (RCA): Verbinden Sie diese Eingänge mit einem Line-Level-Gerät wie einem anderen
Mixer, einem CD-Player, einem Drumcomputer usw. Das Signal wird direkt zum Programmmix
gesendet. Drehen Sie den Session In-Regler auf der Oberseite, um den Eingangspegel zu steuern.
6. Session Ausgang (RCA): Verbinden Sie diese Ausgänge mit einem anderen Mixer, Aufnahmegerät usw.
Der Programmmix wird an diese Ausgänge gesendet. Drehen Sie den Session Out-Regler auf der
Oberseite, um den Pegel zu steuern.
7. Deck PH/CD In (Cinch): Schließen Sie diese Eingänge an eine externe Audioquelle oder an einen
Plattenspieler, CD-Player oder ein anderes Line-Level-Gerät an. Denken Sie daran, den entsprechenden
PH/CD-Wahlschalter auf die richtige Position zu stellen und den Deck-Quellenwahlschalter für dieses
Deck auf PH/CD zu stellen, um sein Audiosignal auf diesem Deck abzuspielen.
8. PH/CD-Wahlschalter: Stellen Sie diesen Schalter auf die richtige Position, je nachdem, welches Gerät
an die PH/CD-Eingänge des entsprechenden Decks angeschlossen ist. Wenn Sie Phono-Level-
Plattenspieler verwenden, stellen Sie diesen Schalter auf PH, um eine zusätzliche Verstärkung zu
ermöglichen, die bei Phono-Level-Signalen notwendig ist. Wenn Sie ein Line-Level-Gerät, wie etwa einen
Line-Level-Plattenspieler, einen CD-Player oder einen Sampler, verwenden, stellen Sie diesen Schalter
auf CD.
9. Phono Grounds: Wenn Sie Phono-Level-Plattenspieler mit einem Erdungsdraht verwenden, verbinden
Sie den Draht mit diesen Klemmen. Wenn Sie ein tiefes Brummgeräusch oder Summen hören, könnte
dies bedeuten, dass Ihre Plattenspieler nicht geerdet sind.
Hinweis: Einige Plattenspieler haben einen im Cinch-Anschluss integrierten Erdungsdraht. In diesem
Fall muss nichts an die Erdungsklemmen angeschlossen werden.
10. Deck Aux In (Cinch): Verbinden Sie diese Eingänge mit einer externen Line-Level-Audioquelle. Denken
Sie daran, den Deck-Quellenwahlschalter für dieses Deck auf Aux zu stellen, um sein Audiosignal auf
diesem Deck zu spielen.
71
Page 72

11. Mic Eingänge 1–2 (XLR / 1/4”/6,35 mm, TS): Verbinden Sie Mikrofone oder Line-Level-Geräte mit
diesen Mono-Eingängen. Ihre Mono-Audiosignale werden aufgeteilt und direkt an den StereoProgramm-Mix und den Cue-Kanal geleitet. Wenn Sie eine Stereo-Line-Eingabe bevorzugen, kann
Session In verwendet werden.
12. Line/Mic-Wahlschalter: Stellen Sie diesen Schalter auf die richtige Position, je nachdem, welches
Gerät an die Mic Eingänge 1–2 angeschlossen ist. Wenn Sie ein Mikrofon anschließen, stellen Sie
diesen Schalter auf Mic. Wenn Sie ein Line-Level-Gerät wie eine Tastatur oder einen Sampler
verwenden, stellen Sie diesen Schalter auf Line.
13. Twelve/Controller USB-Anschlüsse (USB Typ-A): Verwenden Sie USB-Kabel, um diese USBAnschlüsse mit Ihren Controllern wie Twelve oder einem Standard-USB-MIDI-Controller zu verbinden.
Wichtig: Schließen Sie keine USB-Laufwerke an diese Anschlüsse an. Wenn Sie die Einstellung des
Quellenwahlschalters ändern, wird das Laufwerk vom angeschlossenen Computer ausgeworfen, was
den Inhalt beschädigen könnte und somit vermieden werden soll.
14. USB-Anschlüsse (USB Typ-B): Verwenden Sie USB-Kabel, um diese Anschlüsse mit einem freien
USB-Anschluss Ihres Computers zu verbinden. Diese Verbindungen senden und empfangen MIDISteuerinformationen an - oder von - einem Computer.
Hinweis: Stellen Sie sicher, dass Sie das Rane Control-Panel von dj.rane.com heruntergeladen und
installiert haben.
Vorderseite
1. Kopfhörerausgänge (1/4”, 1/8” / 6,35 mm, 3.5 mm, TRS): Schließen Sie Ihren 1/4" oder 1/8"-Kopfhörer
(6,35 mm oder 3,5 mm) zum Cueing und Mix-Monitoring an diesen Ausgang an.
2. Mic 2 Ein: Ist On eingestellt, dann ist der Mic 2 Eingang auf der Rückseite aktiv und sein Audiosignal
wird direkt zum Programm-Mix und Cue Mix geroutet. Ist Auseingestellt, wird der Mic 2 Eingang
deaktiviert.
3. Mic 2 Level: Drehen Sie diesen Regler, um die Lautstärke des Mic 2 Eingangs einzustellen.
4. Mic 2 Tone: Drehen Sie diesen Regler, um die Balance zwischen tiefen Frequenzen (Bass) und hohen
Frequenzen (Treble) des Audiosignals einzustellen, das vom Mic 2-Eingang kommt.
5. Mic 1 Echo: Drehen Sie diesen Regler, um die Stärke des Echoeffekts am Mic 1 Eingangssignal
einzustellen. Drücken Sie die Taste Mic 1 Echo auf dem oberen Paneel, um diesen Effekt zu aktivieren
oder zu deaktivieren.
6. Contour Controls: Passt die Steigung der Crossfader-Kurve an. Drehen Sie den Regler nach links für
sanfte Übergänge (Mixing) oder nach rechts für abrupte Übergänge (Scratching). Die Mittelposition ist
eine typische Einstellung für Club-Performances.
7. Fader Reverse: Stellen Sie diesen Schalter auf Ein, um die Richtung („Polarity“) des entsprechenden
Faders umzukehren. Stellen Sie es auf Aus, um die konventionelle Fader-Polarität zu verwenden.
8. Deck Swap: Stellen Sie diesen Schalter auf On, um den linken und rechten Kanal-Fader, der vom
Seventy-Two gesteuert wird, zu vertauschen. Stellen Sie es auf Aus, um die konventionelle
Deckkonfiguration zu verwenden.
9. Footswitch-Eingang (1/4”/6,35 mm, TRS): Schließen Sie hier einen Fußschalter an, mit dem Sie Effekte
aktivieren oder deaktivieren können. Sie können dies auch anderen Funktionen zuweisen. Dieser
Eingang unterstützt einen Fußschalter mit drei Schaltern und passivem Kontakt.
72
Page 73

Betrieb
Touchscreen
Um zwischen den Ansichten Waveform und Library umzuschalten, drücken Sie die Taste View/Menu.
Wellenformansicht
In der Wellenformansicht werden die Spursignale vertikal angezeigt, Kanal 1
auf der linken Seite und Kanal 2 auf der rechten Seite. Die große Wellenform
repräsentiert einen Abschnitt des aktuellen Tracks. Die kleinere Wellenform
repräsentiert die gesamte aktuelle Spur.
1. Zeit: Zeigt die Zeit an, die dem aktuellen Track verbleibt.
2. Key/Key Lock: Halten Sie Shift gedrückt und tippen Sie auf dieses
Symbol, um zwischen Key- und der Key Lock zu wechseln. Wenn Key
ausgewählt ist, wird die Tonart des aktuellen Tracks angezeigt und Sie
können tippen, um Key Sync zu aktivieren oder zu deaktivieren. Wenn
die Key Lock ausgewählt ist, wird ein Key Lock-Symbol (bzw. falls
installiert, das Serato Pitch 'n Time-Symbol) angezeigt und Sie können
tippen, um Key Lock zu aktivieren oder zu deaktivieren. Wenn eine
Option aktiviert ist, wird das Feld hervorgehoben.
3. Übersicht: Die kleinere Wellenform repräsentiert eine Übersicht über
die gesamte aktuelle Spur. Sie können mit Ihrem Finger während der
Wiedergabe durch den Track "scrubben".
Hinweis: Wenn in Serato DJ Pro die Option Nadelsuche
Deaktivieren aktiviert wurde, müssen Sie Shift gedrückt halten, um
durch den Track zu scrubben.
4. Song-Position: Position des Abspielkopfes im aktuellen Track.
5. Hot Cues: Zeigt Hot Cues nach Farbe an.
6. Sync: Wenn Sync aktiviert ist, wird das Feld hervorgehoben und die BPM-Indikatoren werden blau
dargestellt. Um die Synchronisierung zu aktivieren/deaktivieren, tippen Sie auf das Symbol für einen
der beiden Kanäle.
7. BPM: Schläge pro Minute des aktuellen Tracks.
Hinweis: Berühren Sie in der Wellenformansicht den Load/Scroll-Regler, um schnell die Bibliotheksansicht
aufzurufen.
2
3
4
5
6
Bibliotheksansicht
In der Bibliotheksansicht zeigt das Display die Bibliothek des
angeschlossenen Computers an. Wenn Seventy-Two mit zwei
Computern verbunden ist, wird jener Computer angezeigt, dem die
beiden Decks zuletzt zugewiesen wurden.
Um den Ansichtsmodus zu ändern, wischen Sie auf dem PulldownMenüsymbol oben in der Tracklistenansicht nach unten und tippen Sie
dann auf das Symbol für den gewünschten Modus - Einfache Ansicht
oder Erweiterte Ansicht.
Um die Tracks zu durchsuchen, drehen Sie den Load/Scroll-Regler.
Um schnell zu scrollen, drücken Sie die Shift-Taste und drehen Sie
den Load/Scroll-Regler.
Um einen Crate zu öffnen oder einen Track auf ein Deck zu laden,
drücken Sie den Load/Scroll-Regler.
Um eine Ebene zurück zu springen, drücken Sie Back.
Touchscreen mit erweiterter
Bibliotheksansicht
1
7
73
Page 74

Hauptmenü
Um in das Hauptmenü zu gelangen, drücken Sie Shift und View/Menu, oder halten Sie View/
Menu 4 Sekunden lang gedrückt.
Mixer-Einstellungen: Wählen Sie diese Option, um die folgenden Einstellungen zu bearbeiten.
• Audio Out: Wählen Sie diese Option, um die Einstellungen Hauptausgang und Mic 1 Clean
Feed und Deck Balance zu bearbeiten.
Hinweis: Wenn Clean Feed eingeschaltet ist, gibt das Mic 1 bei der Aufnahme in Serato DJ
Pro keinen Ton aus.
• Deck Inputs: Wählen Sie diese Option, um die Einstellungen Phono 1/2 Empfindlichkeit und
Tone XOver 1/2 zu bearbeiten.
Hinweis: Stellen Sie Phono Sensitivity auf die Einstellungen ein, die vom Hersteller Ihres
Tonabnehmers empfohlen werden.
• Filter Setup: Wählen Sie diese Option, um die Einstellungen für Deck 1/2 Resonanz und
Sampler-Resonanz zu bearbeiten.
• Pad Setup: Wählen Sie diese Option, um die Pad-Empfindlichkeitseinstellungen zu
bearbeiten.
• Headphone Setup: Wählen Sie diese Option, um die Tone-Kopfhörereinstellung zu bearbeiten.
Flex FX: Wählen Sie diese Option, um die internen Flex FX-
Einstellungen anzuzeigen und zu bearbeiten.
• Um einen Effekt aus der Favoritenliste hinzuzufügen
oder zu entfernen, tippen Sie auf den Kreis auf der
rechten Seite des Bildschirms. Wenn der Kreis grün ist,
wird der Effekt in der Liste der Flex FX in der Effektansicht
angezeigt. Wenn der Kreis leer ist und der Effektname
ausgegraut ist, wird der Effekt nicht mehr in der Liste
angezeigt.
• Um die Standardeinstellungen des internen Flex FX
anzupassen, tippen Sie auf das Schraubenschlüssel-
symbol. Alle vorgenommenen Änderungen werden im Mixer
gespeichert.
Cut-In Adjust: Wählen Sie diese Option, um das
Einstellungsmenü für Cut-In Adjust aufzurufen. Dies steuert die
Größe des Totraums zwischen den geschlossenen und offenen
Positionen eines Faders. Wählen Sie den Fader, den Sie
einstellen möchten, bewegen Sie dann den ausgewählten Fader
an die gewünschte Position und drücken Sie Festlegen, um die
Einstellung zu speichern.
Footswitch: Wählen Sie diese Option, um die Zuweisungen für
den Fußschalter 1/2/3 festzulegen.
Display: Wählen Sie diese Option, um die Helligkeit des Displays einzustellen.
74
Page 75

Effekte
Jede Effekt-Bank enthält bis zu 3 Software-Effekte sowie die internen
Flex FX für insgesamt bis zu 8 Effekte, die hinzugefügt und an Deck 1,
Deck 2 und den Sampler weitergeleitet werden können.
Standardmäßig werden Effekte an Deck 1 und Deck 2 geroutet.
So ändern Sie das Effekt-Routing:
1. Tippen Sie auf die blauen 1/2/S-Symbole oben im Display, um
das Routing-Menü aufzurufen.
2. Wählen Sie, wohin Sie die Effekte routen möchten und drücken
OK, um zur vorherigen Seite zurückzukehren. Beide Effektbänke
können auf ein oder mehrere Decks geroutet werden.
So fügen Sie Effekte hinzu und verwenden sie:
1. Drücken Sie die Effects-Taste, um in die Effektansicht zu gelangen.
2. Tippen Sie auf den Touchscreen, um den gewünschten Effekt
auszuwählen und drücken den Parameterregler, um in den FXAuswahlmodus zu wechseln.
3. Drehen Sie den Parameterregler, um durch die Liste der Effekte
zu blättern und drücken ihn anschließend, um den Effekt auf
diesen Slot zu laden.
4. Drücken Sie die FX 1–3 oder die Flex FX-Tasten, um den Effekt in der Kette zu aktivieren. Effekte
werden nacheinander in der Kette angewendet (FX1 > FX2 > FX3 > Flex FX).
5. Verwenden Sie die Effekt- Wahlschalter, um die Effekte auf Deck 1 und 2 anzuwenden. Drücken Sie
den Kippschalter von Ihnen weg, um einen Effekt zu speichern oder kippen bzw. halten Sie den
Kippschalter zu Ihnen, um einen Effekt auszulösen.
Drücken Sie die Taste Sampler-Effekte, um die Effekte auf den Sampler anzuwenden.
So bearbeiten Sie einen Software-Effekt:
1. Tippen Sie auf den Effekt im Display.
2. Drehen Sie den Parameterregler, um mit der Bearbeitung des ausgewählten Parameters zu
beginnen. Durch Drücken des Parameterreglers wird in den Software-FX-Auswahlmodus für den
Effekt im Fokus umgeschaltet.
3. Um das Effekt-Timing zu bearbeiten, tippen Sie auf das Timing und drehen Sie den Parameterregler.
Hinweis: Die Zeitanpassung erfolgt pro Bank.
So bearbeiten Sie interne Flex FX:
1. Tippen Sie, um den Parameterregler auf den gewünschten Effekt zu fokussieren und verwenden Sie
dann den Parameterregler zum Einstellen. Tippen Sie zweimal auf den gewünschten Effekt, um die
standardmäßigen Flex FX-Einstellungen anzupassen. Alle vorgenommenen Änderungen werden im
Mixer gespeichert.
Touch FX
Drücken Sie die Touch FX-Taste, um das X/Y-Display zu öffnen.
Um auszuwählen, auf welches Deck der Touch FX angewendet wird, tippen Sie auf
den entsprechenden Deck-Kanalpfeil. Aktive Effekte, die von jeder Bank an dieses
Deck geroutet werden, werden hervorgehoben.
Bewegen Sie Ihren Finger über das Display, um Touch FX anzuwenden. Wenn Sie
mit dem Finger die Y-Achse entlanggleiten, wird ein Hochpassfilter (nach oben) oder
Tiefpassfilter (nach unten) angewendet. Wenn Sie mit dem Finger auf der X-Achse von
links nach rechts entlanggleiten, erhöht sich der Time-Parameter für den aktiven
internen Flex FX.
75
Page 76

Pad-Modi
In diesem Kapitel werden die verschiedenen Pad-Modi
beschrieben. Jedes Deck hat acht Pads, die sich stets in
einem dieser Modi befinden. Die Pads eines Decks können
sich in einem anderen Modus befinden. Drücken Sie eine der
Pad Mode-Tasten, um in den entsprechenden Pad-Modus
auf diesem Deck zu wechseln. Jede Pad-Modustaste
wechselt bei jedem Drücken zwischen zwei Modi.
Tipp: Drücken Sie in jedem Pad-Modus Shift und eine der
Pad-Modus-Tasten, um auf zusätzliche Modi zuzugreifen
oder benutzerdefinierte Modi zu verwenden.
2
1
6
5
4
3
78
Cue
Im Cue-Modus weist jedes Pad einen Hot Cue-Punkt zu oder lässt den Track zu diesem Hot Cue-Punkt
zurückspringen.
Um in den Cue-Modus zu gelangen, drücken Sie Cue / Pitch Play, so dass es weiß leuchtet.
Um einen Hot-Cue-Punkt zuzuweisen, drücken Sie ein unbeleuchtetes Pad an der gewünschten Stelle in
Ihrem Track. Das Pad leuchtet auf, wenn es zugewiesen ist (mit der entsprechenden Farbe, falls verfügbar).
Um zu einem Hot-Cue-Punkt zu springen, drücken Sie ein beleuchtetes Pad.
Um einen zugewiesenen Hot Cue-Punkt zu löschen, drücken Sie die Shift und das entsprechende Pad.
Pitch Play
Im Pitch Play-Modus spielt jedes Pad den Track eines
Hot-Cue-Punkts in einer anderen Transposition (in
Halbtönen einstellbar). Das Serato Pitch'n Time DJ
Expansion Pack muss installiert sein, um diesen Modus
zu verwenden. Im Cue-Modus erfahren Sie, wie Sie HotCue-Punkte zuweisen.
Hinweis: Im Lieferumfang Ihres Seventy-Two ist eine
Serato Pitch 'n Time -Download-Karte mit Seriennummer
enthalten.
Um in den Pitch-Play-Modus zu gelangen, drücken Sie
Cue / Pitch Play, so dass es grün leuchtet.
Um auszuwählen, welcher Hot-Cue-Punkt verwendet
werden soll, drücken Sie Shift und ein schwach
beleuchtetes Pad.
Um den Transpositionsbereich auszuwählen, den die
Pads verwenden, verwenden Sie die Parameter /-
Tasten (siehe Diagramme).
Um die Tonart des aktuellen Tracks nach unten oder
oben zu verschieben, drücken Sie die Taste Shift bzw.
die Tasten Parameter /.
Um den Track vom Hot-Cue-Punkt abzuspielen,
drücken Sie ein beleuchtetes Pad. Jedes Pad entspricht
einer spezifischen Transposition (in Halbtonschritten) je
nach dem aktuellen Bereich der Tranposition (siehe
Diagramme). Das Pad ohne Transposition (ursprüngliche
Tonhöhe) leuchtet weiß.
+4
Halbtöne
0
(Original
Tonhöhe)
0
(Original
Tonhöhe)
-4
Halbtöne
-3
Halbtöne
-7
Halbtöne
Aufwärts
+5
semitones
+1
Halbton
+1
Halbton
-3
Halbtöne
Abwärts
-2
Halbtöne
-6
Halbtöne
Mitte
+6
Halbtöne
+2
Halbtöne
+2
Halbtöne
-2
Halbtöne
-1
Halbton
-5
Halbtöne
+7
Halbtöne
+3
Halbtöne
+3
Halbtöne
-1
semitone
0
(Original
Tonhöhe)
-4
Halbtöne
76
Page 77

Auto-Loop
Im Autoloop-Modus triggert oder gibt jedes Pad einen Autoloop mit unterschiedlicher Länge frei. Das
Loop-Gitter in der Software bestimmt die Größe des Loops.
Um den Autoloop-Modus zu aktivieren, drücken Sie Auto Loop / Man Loop, so dass die Anzeige
dunkelblau leuchtet.
Um zu ändern, welche acht Längen (in der Software) für die Autoloops angezeigt werden,
drücken Sie einen der Parameter /-Tasten. Das Pad-Layout wird verschoben, um es
anzupassen.
Um einen Auto-Loop rückwärts oder vorwärts zu verschieben, drücken Sie Shift und die
jeweiligen Parameter /-Tasten.
Manueller Loop
Im manuellen Loop-Modus lässt jedes Pad den Track
zurück zu einem Loop springen, die Sie zuvor erstellt
und gespeichert haben. Die Pad-Layouts für die zwei
Bänke sind identisch.
Um den manuellen Loop-Modus zu aktivieren,
drücken Sie Auto Loop / Man Loop, so dass die
Anzeige gelb leuchtet.
Um eine Loop zu erstellen, drücken Sie Pad 5, um
den Loop In-Punkt einzustellen und anschließend
Pad 6, um den Loop Out-Punkt einzustellen und den
Loop zu aktivieren.
Um einen Loop zu speichern, während er aktiv ist, drücken Sie ein unbeleuchtetes Pad in der
oberen Reihe (Pads 1–4). Sie können dies unabhängig davon tun, auf welche Weise der Loop erstellt
wurde (Autoloop-Modus, manueller Loop-Modus etc.).
Um einen gespeicherten Loop zu aktivieren oder zu deaktivieren, drücken Sie ein beleuchtetes
Pad in der oberen Reihe (Pads 1–4).
Um einen gespeicherten Loop zu löschen, drücken Sie Shift und ein leuchtendes Pad in der
oberen Reihe (Pads 1–4).
Um den zuletzt aktivierten Loop zu aktivieren bzw. zu deaktivieren, drücken Sie Pad 7.
Um den zuletzt aktivierten Loop sofort wieder zu reaktivieren („reloop“), drücken Sie Pad 8.
Um die Länge eines Loops zu halbieren oder zu verdoppeln, drücken Sie die Parameter /
Tasten.
Um einen Loop rückwärts oder vorwärts zu verschieben, drücken Sie Shift und die jeweiligen
Parameter / -Tasten.
1 2 3
Loop 1 Loop 2 Loop 3 Loop 4
Set
6
Set
Loop Out
7 8
Loop
On/Off
5
Loop In
4
Reloop
Gespeicherte Loops
Halten Sie Shift gedrückt und drücken Sie Auto Loop / Man Loop (2), um gespeicherte Loops
aufzurufen. In diesem Modus werden alle 8 Pads zum Aktivieren oder Deaktivieren eines gespeicherten
Loops verwendet.
77
Page 78

Roll
Im Roll-Modus löst jedes Pad einen temporären Loop-Roll aus. Das Loslassen des Pads stoppt die
Loop-Roll und wechselt zur normalen Wiedergabe an den Punkt, an dem die Wiedergabe sich
befinden würde, wenn keine Loop-Roll getriggert worden wäre (so als ob der Track normal
wiedergegeben worden wäre).
Hinweis: Stellen Sie sicher, dass Show Beat Jump Controls im Serato DJ Pro Setup-Menü
deaktiviert ist. Sie können auch die eingestellten Loop-Größen in der Software anzeigen und
bearbeiten.
Um in den Roll-Modus zu gelangen, drücken Sie Roll / Pad FX, so dass es türkis leuchtet.
Um einen Loop-Roll auszulösen, halten Sie ein Pad gedrückt.
Um zu ändern, welche acht Längen (in der Software) für die Loop-Rolls angezeigt werden,
drücken Sie einen der Parameter /-Tasten. Das Pad-Layout wird verschoben, um es
anzupassen.
Um einen Loop-Roll rückwärts oder vorwärts zu verschieben, drücken Sie Shiftund die
jeweiligen Parameter /-Tasten.
Pad FX
Im Pad FX-Modus wählen und aktivieren die Pads
Effekte. Die obere Reihe der Pads wählt den Effekttyp
und die untere Reihe triggert und steuert die Länge
des Effekts.
Um in den Pad FX-Modus zu gelangen, drücken
Sie Roll / Pad FX, so dass es gelb leuchtet.
1 2 3
Vinyl
Brake
5 6 7 8
Backspin Gate Echo
Size 1 Size 2 Size 3 Size 4
Um die Vinyl-Bremseffekt zu wählen, drücken Pad
1. Wenn der Vinyl-Bremseffekt durch die untere Pad-
Reihe ausgelöst wird, verlangsamt sich das
Audiosignal, als ob der Plattenteller gestoppt wurde
und blendet nach der ausgewählten Zeit aus.
Um den Backspin-Effekt zu wählen, drücken Sie Pad 2. Wenn der Backspin-Effekt durch die
untere Pad-Reihe ausgelöst wird, wird das Audio-signal rückwärts und beschleunigt wiedergegeben,
als ob ein Plattenteller rückwärts gedreht wurde und blendet nach der ausgewählten Zeit aus.
Um den Gate-Effekt zu wählen, drücken Pad 3. Wenn der Gate-Effekt durch die untere Pad-Reihe
ausgelöst wird, wird ein zeitbasierter Gate-Effekt in der gewählten Größe auf das Audiosignal
angewendet.
Um die Echo-Effekt zu wählen, drücken Pad 4. Wenn der Echo-Effekt durch die untere Pad-Reihe
ausgelöst wird, wird das Echo bis zum Ausfaden in der gewählten Größe auf das Audiosignal
angewendet.
Hinweis: Der Echo-Effekt kann mit anderen Effekten kombiniert werden. Alle anderen Effekte sind
exklusiv.
Um den ausgewählten Effekt auszulösen, drücken Sie einen der Pads 5–8. Jedes Pad aktiviert
den Effekt sofort in einer eingestellten Länge, die von Pad 5 (kürzeste Zeitspanne) bis Pad 8 (längste
Zeitspanne) zunimmt. Wenn ein Effekt ausgelöst wird, blinkt das ausgewählte Pad.
Hinweis: Wenn Sie einen neuen Pad-Modus auswählen, werden alle derzeit aktiven Pad FX auf
diesem Deck deaktiviert.
4
78
Page 79

Sampler
Im Sampler-Modus steuern die Pads den Sampler in der Software. Die Pads lösen jeweils ein Sample mit
einer bestimmten Lautstärke aus (sie können das Sample und seine Lautstärke in der Software zuweisen).
Um in den Sampler-Modus zu gelangen, drücken Sie Sampler / Fader FX, so dass es lila aufleuchtet.
Um ein Sample und seinen Pegel zuzuweisen, verwenden Sie die Software. Werfen Sie einen Blick in das
Serato DJ Pro Handbuch, um mehr über die Verwendung von Samples zu erfahren.
Um ein Sample abzuspielen, drücken Sie ein beleuchtetes Pad. Das Pad blinkt, während das Sample
abgespielt wird.
Um die Wiedergabe eines Samples anzuhalten, drücken Sie Shift und ein Pad während der
Wiedergabe.
Um durch die Sample-Bänke zu schalten, drücken Sie die Tasten Parameter /.
Um durch die Sampler-Ausgänge zu schalten, drücken Sie die Taste Shift und die Tasten Parameter
/.
Fader FX
Im Fader-FX-Modus aktivieren/deaktivieren die Pads die
Stummschaltung des Deck-Audiosignals und emulieren
auf diese Weise Crossfader-Bewegungen zum Deck. Ein
„Klick“ ist eine Bewegung des Crossfaders zu einem
Deck hin („offen“) und dann von diesem Deck weg
(„geschlossen“). DJs verwenden Klicks in verschiedenen
rhythmischen Mustern (oft in Verbindung mit Scratchen),
um verschiedene Effekte zu erzeugen.
Um in den Fader FX-Modus zu gelangen, drücken Sie
Sampler / Fader FX, so dass es grün leuchtet
Um einen Fader-Effekt auszulösen, drücken Sie eines der Pads 1–8.
Um einen Effekt umzukehren, halten Sie die Shift gedrückt und drücken Sie eines der Pads 1–8.
1
1-Click
Flare
5 6 7 8
Trans-
formers
2 3 4
2-Click
Flare
2-to-1
Alternator
Baby
3-Click
Flare
Tri-forms Uzi
4-Click
Flare
Flip
Wenn Sie das Serato Flip Expansion Pack erworben
haben, können Sie auf den Flip-Controller zugreifen,
indem Sie Shift gedrückt halten und Sampler / Fader
FX (4) drücken. Wenn Sie das Flip Expansion Pack
nicht gekauft haben, wird dies als benutzerdefinierter
Pad-Modus verfügbar sein.
In diesem Modus gilt: unbeleuchteten Pads wurde kein
Flip zugewiesen; konstant leuchtenden Pads wurde ein
Flip zugeordnet, welcher jedoch nicht abgespielt wird;
Blinkenden Pads wurde ein Flip zugeordnet, der derzeit
abgespielt wird.
Um einem Pad einen Flip zuzuordnen, halten Sie Pad 8 gedrückt und drücken dann Pad 1, 2, 3, 5, 6 oder
7.
Um einen zugewiesene Flip wiederzugeben, drücken Sie Pad Pad 1, 2, 3, 5, 6 oder 7 (wenn dem
betreffenden Pad ein Flip zugewiesen wurde).
Um die Wiedergabe eines Flips sofort zu stoppen, halten Sie Shift gedrückt und drücken Sie dann das
entsprechende Pad.
Um die Länge des Flips automatisch anzupassen, damit es sich in das Beatgrid (Loop Snap) einfügt,
halten Sie Pad 4 gedrückt und drücken Sie dann auf ein Pad, dem ein Flip zugeordnet ist.
Wichtig: Ihr Track muss ein fixes Beatgrid haben, damit die Loop Snap-Funktion verwendet werden kann.
Flip 1 Flip 2 Flip 3
Flip 4 Flip 5 Flip 6
Loop
Snap
Assign
Flip
79
Page 80

Slicer
Wichtig: Ihr Track muss über ein Beatgrid verfügen, damit dieser Modus funktioniert.
Im Slicer-Modus repräsentieren die acht Pads acht
aufeinanderfolgende Schläge - sogenannte „Slices“ innerhalb des Beat-Grid. Die aktuell wiedergegebene
Slice wird durch das aktuell beleuchtete Pad
dargestellt; das Licht „bewegt sich durch die Pads“,
so wie es sich durch jedes der acht Slices bewegt.
Sie können ein Pad drücken, um diese Slice
abzuspielen. Wenn Sie das Pad loslassen, wird der
Track zur normalen Wiedergabe zu jenem Punkt
zurückkehren, an dem sich der Track befinden
würde, wenn Sie das Pad nie gedrückt hätten (so als
ob der Track einfach normal weitergelaufen wäre).
Um in den Slicer-Modus zu gelangen, drücken Sie Slicer / Transport, so dass es rot leuchtet. Das
Deck wird den Slicer-Modus verlassen, wenn Sie einen anderen Track in das Deck laden oder den
Grid-Bearbeitungsmodus aktivieren.
Um eine Scheibe abzuspielen, drücken Sie das entsprechende Pad.
Um die Größe der Slices zu verringern oder zu erhöhen, drücken Sie die Parameter /-Tasten.
Um den Abspielkopf vorwärts oder rückwärts zu bewegen, drücken Sie die Taste Shift und die
Tasten Parameter /.
1 2 3
Slice 1 Slice 2 Slice 3 Slice 4
5
Slice 5 Slice 6 Slice 7 Slice 8
6
7 8
4
Transport
Im Transport-Steuermodus entsprechen die Pads
unterschiedlichen Transportsteuerelementen. Die
Software wird automatisch in den internen Modus
wechseln (wenn Sie einen Twelve-Controller mit
Seventy-Two verwenden, befindet sich die Software
immer im internen Modus).
Um in den Transportmodus zu gelangen, drücken
Sie Slicer / Transport, so dass es grün leuchtet.
Um die Tonhöhe vorübergehend zu senken, drücken Sie Pad 1.
Um die Tonhöhe vorübergehend nach oben zu bringen, drücken Sie Pad 2.
Um den Pitch Fader nach unten zu bewegen, drücken Sie Pad 3.
Um den Pitch Fader nach oben zu bewegen, drücken Sie Pad 4.
Um Keylock zu aktivieren oder zu deaktivieren, drücken Sie Pad 5.
Um zwischen dem internen Modus (INT) und dem relativen Modus (REL) zu wechseln, drücken
Sie Shift und die Pad 5. (Das Umschalten in den relativen Modus erlaubt es Ihnen, die Wiedergabe
mit Control Vinyl oder Control CDs zu steuern).
Um die Synchronisierung zu aktivieren oder zu deaktivieren, drücken Sie die Pad 6.
Um zum Cue-Punkt zu springen, drücken Sie Pad 7.
Um den Track abzuspielen oder anzuhalten, drücken Sie Pad 8.
Pitch-
Bend
-
Keylock
INT/REL
Pitch-
Bend
+
Sync Cue
PitchFader -
Pitch-
Fader
+
Slicer-Loop
Halten Sie Shift gedrückt und drücken Sie Slicer / Transport (5), um den Slicer Loop-Modus
aufzurufen. Die Pads verhalten sich genauso wie im Slicer-Modus, mit dem Unterschied, dass die
Phrase mit den acht Slices als kontinuierlicher Loop im Track wiedergegeben wird.
80
Page 81

Benutzerdefinierte Pad-Sets
Zusätzlich zu den Standard-Pad-Modi können Sie mit der MIDI-Mapping-Funktion von Serato DJ
Pro bis zu 3 benutzerdefinierte Pad-Sets erstellen.
So erstellen Sie ein benutzerdefiniertes Pad:
1. Halten Sie Shift gedrückt und drücken Sie Cue / Pitch Play (1), Roll / Pad FX (3) oder
Sampler / Fader FX (4).
Hinweis: Wenn Sie das Serato Flip Expansion Pack erworben haben, greifen Sie durch
Drücken von Shift und Sampler / Fader FX (4) auf die Flip-Steuerelemente und nicht auf
ein benutzerdefiniertes Pad-Set zu.
2. Öffnen Sie das Setup-Menü in Serato DJ Pro und wählen MIDI.
3. Wählen Sie Seventy-Two und stellen Sie sicher, dass Allow Serato DJ Hardware Remapping
aktiviert ist. Schließen Sie das Setup-Fenster.
4. Klicken Sie im Hauptfenster von Serato DJ Pro auf die Taste MIDI am oberen Bildschirmrand,
um mit der Zuordnung zu beginnen.
5. Klicken Sie auf eine Funktion in Serato DJ Pro und berühren oder bewegen Sie dann ein
Steuerelement Ihrer Hardware, um die Funktion dieser Steuerung zuzuordnen.
Weitere Informationen zum MIDI-Mapping finden Sie im Serato DJ Pro Handbuch.
Faders
Seventy-Two's Kanalfader und Crossfader sind kontaktlose MAG THREE Fader mit einstellbarer
Spannung.
Um die Spannung der Seventy-Two Fader einzustellen:
1. Stellen Sie sicher, dass das Gerät ausgeschaltet und von
einer Stromquelle getrennt ist.
2. Entfernen Sie die Schrauben von der Frontplatte an der
Unterseite der oberen Abdeckung, wo sich die Fader
befinden mit einem Schraubendreher (siehe Abbildung).
Hinweis: Die Faderkappen müssen entfernt werden, um die
Frontplatte zu entfernen.
3. Stellen Sie die Spannschraube für jeden Fader mit einem
Schraubenzieher nach Ihren Wünschen ein.
Spannschraube
Unterseite Faderplatte
MAG THREE Fader
Übersicht
Bedienfeld
Im Rane-Bedienfeld können Sie die Einstellungen Ihres Seventy-Two-Mixers anpassen und diese
Einstellungen in einer Datei (.r72) auf Ihrem Computer speichern und laden. Mithilfe von
Einstellungsdateien können Sie verschiedene Steuerungskonfigurationen verwalten, die in
verschiedenen Situationen verwendet werden können.
Um Einstellungsdateien zu verwalten, navigieren Sie zum
Abschnitt Einstellungen des Rane-Bedienfelds in der
Registerkarte Allgemein.
• Laden: Wählen Sie diese Option, um eine Seventy-Two-
Einstellungsdatei (.r72) auf Ihrem Computer in der
Systemsteuerung zu suchen und zu laden.
• Speichern: Wählen Sie diese Option, um die Einstellungen
des Mixers als Seventy-Two-Einstellungsdatei (.r72) auf
Ihrem Computer zu speichern.
81
Page 82

Appendix (English)
Technical Specifications
Digital Audio
Converters
Digital Signal Processing
Dynamic Range
(A-weighted, unity gain)
Inputs
Microphone 1/2
(Combo XLR/1/4" [6.35 mm] TRS,
Mic/Line switchable)
Aux Inputs 1/2
(RCA stereo pairs)
CD/Phono Inputs 1/2
(RCA stereo pairs, switchable)
Session Input
(RCA stereo pair)
Outputs
Main Outputs
(XLR)
Booth Outputs
(1/4"/6.35 mm TRS)
Session Outputs
(RCA stereo pair)
Headphone Outputs
(1/4"/6.35 mm and 1/8"/3.5 mm
TRS)
AKM High Definition Audio; 24-bit PCM, 48 kHz
32-bit, floating point, double precision
ADC
DAC
CD Input to Analog Output
CD Input to USB Output
USB Input to Analog Output
Analog Gain
Maximum Input
Gain Trim
Maximum Input
Dynamic Range (A-weighted)
CD
Maximum Input
Dynamic Range (A-weighted)
Phono
RIAA Curve
Gain (@ 1 kHz)
Maximum Input (@ 1 kHz)
Maximum Input
Dynamic Range (A-weighted)
Frequency Response
Maximum Output
THD+N (@ 1 kHz, 4 Vrms)
Frequency Response
Maximum Output
THD+N (@ 1 kHz, 4 Vrms)
Frequency Response
Maximum Output
THD+N (@ 1 kHz, 2 Vrms)
Maximum Output Voltage
THD+N
(@ 1 kHz, 2 Vrms)
Output Power
Controls
114 dB
114 dB
111 dB
114 dB
114 dB
30 dB (Mic), 4.75 dB (Line)
0.126 Vrms (Mic), 2.3 Vrms (Line)
Off to +20 dB (unity at center)
4 Vrms
114 dB
Line
4 Vrms
114 dB
RIAA
+0.1/-0.2 dB
30 dB
126 mV
4 Vrms
114 dB
20 Hz to 20 kHz (± 0.2 dB)
8 Vrms
0.002%
20 Hz to 20 kHz (± 0.2 dB)
8 Vrms
0.002%
20 Hz to 20 kHz (± 0.2 dB)
4 Vrms
0.002%
4 V (no load)
0.003%
96 mW (50 ohms)
On/Off muting
82
Page 83

General
Display
Pads
Faders
Connectors
Power Connection: IEC
Dimensions
(width x depth x height)
Weight
Full-color display with capacitive multi-touch
2.1” x 3.7” / 54 x 95 mm (width x depth)
4.3” / 109 mm (diagonal)
(16) velocity-sensitive multi-color back-lit pads (8 per deck, 10
modes each)
(3) MAG THREE tension-adjustable faders (2 channel/line faders, 1
crossfader)
(2) XLR outputs (Main)
(2) 1/4” (6.35 mm) TRS outputs (Booth)
(4) RCA stereo input pairs (Deck 1–2)
(2) XLR / 1/4” (6.35 mm) TRS inputs (Mic 1–2)
(1) RCA stereo input pair (Session)
(1) RCA stereo output pair (Session)
(1) 1/4” (6.35 mm) TRS output (Headphones)
(1) 1/8” (3.5 mm) TRS output (Headphones)
(1) 1/4” (6.35 mm) TRS input (Footswitch)
(2) USB Type-A ports (Deck 1–2 USB Controllers)
(2) USB Type-B ports
(1) IEC power cable input
Voltage: 100–240 V, 50/60 Hz
Consumption: 30 W
11.2” x 17.5” x 4.13”
285 x 445 x 105 mm
12.3 lbs.
5.6 kg
Specifications are subject to change without notice.
Trademarks & Licenses
Rane is a trademark of inMusic Brands, Inc., registered in the U.S. and other countries.
Serato, Serato DJ Pro, NoiseMap and the Serato logo are registered trademarks of Serato Audio Research.
Windows is a registered trademark of Microsoft Corporation in the United States and other countries.
All other product names, company names, trademarks, or trade names are those of their respective owners.
83
Page 84

dj.rane.com
Manual Version 1.1
 Loading...