

Page 1

CLASSE 7
User Manual
Bedienungsanleitung
Mode d’emploi
Manuale d’uso
Manual de instrucciones
Manual do utilitazor
Page 2

Structure
Gliederung
Structure
Struttura
Estructura
Estrutura
Original instructions – Use and maintenance
Original Bedienungsanleitung – Gebrauch und Instandhaltung
Instructions originales – Emploi et entretien ..............................................................................................3
Istruzioni originali – Uso e manutenzione
Instrucciones originales – Uso y manutención
Manual de instruções originais - Utilização e manutenção .....................................................................39
Diagrams, legal information
Schemata, Gesetzliche Hinweise
Diagrammes, mentions légales
Schemi, informazioni legali
Diagramas, información legal
Diagramas, informação jurídica.................................................................................................................75
2
Page 3

Dear customer
Verehrte Kundin, verehrter Kunde
Chère cliente, cher client
First of all, we thank you for choosing RANCILIO.
We are confident that the product you have purchased will meet all your expectations. The coee machine you are
about to use is the outcome of extensive research and development.
It is the most ecient, user-friendly and well designed machine of its kind.
This manual outlines the correct use and maintenance and will help you to get the best results from your machine.
We hope you will find our explanations clear and we may continue to earn your business in the future.
The machines in the CLASSE 7 series have been designed to prepare espresso and other hot beverages for
professional use.
Wir danken Ihnen, dass Sie sich für RANCILIO entschieden haben.
Wir sind überzeugt, dass das Produkt, das Sie erworben haben, alle Ihre Erwartungen erfüllen wird. Diese Kaeemaschine ist das Ergebnis sorgfältiger Forschung und Entwicklung. Wir legen besonderen Wert auf Leistungsfähigkeit, Benutzerfreundlichkeit und Design.
Die Bedienungsanleitung wird Ihnen helfen Ihre Kaeemaschine ordnungsgemäss zu bedienen, zu verstehen und
das beste Ergebnis zu erzielen.
Wir hoen, unsere Erklärungen sind klar und verständlich und wir dürfen Sie auch in Zukunft zu unseren
geschätzten Kunden zählen.
Die Maschinen der Serie CLASSE 7 sind speziell zur Zubereitung von Kaee und warmen Getränken im
professionellen Gebrauch entwickelt.
Tout d’abord merci d’avoir choisi RANCILIO.
Nous avons l’assurance que le produit que vous venez d’acheter vous donnera entière satisfaction, tout comme tous
nos autres produits sont conçus pour le faire. Le produit que vous allez utiliser est l’aboutissement de minutieux
travaux de recherche et d’essais.
RANCILIO garantit que l’équipement fourni ore une fonctionnalité, une sécurité et une satisfaction maximales par
rapport aux produits actuellement sur le marché, à la fois en termes de design et de performances.
Ce livret d’instructions qui explique comment utiliser et entretenir correctement votre produit vous aidera à obtenir
les meilleurs résultats d’utilisation possibles. Nous espérons que nos explications sont faciles à comprendre et que
vous resterez l’un de nos fidèles clients à l’avenir.
Les machines de la série CLASSE 7 ont été conçues pour préparer des cafés espresso et d’autres boissons chaudes à
usage professionnel.
Barista Bediener Operateur
3
Page 4

Content
Inhalt
Sommaire
Barista
Bediener
Operateur
Dear customer
Verehrte Kundin, verehrter Kunde
Chère cliente, cher client .................................................................................................3
Overview
Übersicht
Vue d’ensemble ............................................................................................................. 6
Switch ON / O
Ein- / Ausschalten
Mise en marche / arrêt ....................................................................................................7
Use
Gebrauch
Utilisation ...................................................................................................................... 8
What if…
Was tun wenn…
Que faire si .................................................................................................................... 15
Daily cleaning
Tägliche Reinigung
Nettoyage quotidien ....................................................................................................16
Cleaning the filter
Filter reinigen
Nettoyer le filtre ............................................................................................................ 17
Cleaning of the group heads
Reinigung der Brühgruppen
Nettoyage des groupes d’infusion ...............................................................................18
Adjusting the dose (Model E)
Dosierung einstellen (Modell E)
Régler le dosage (Modèle E) ........................................................................................ 20
Stop using the machine
Maschine ausser Betrieb setzen
Cesser d’utiliser la machine ......................................................................................... 22
4
Page 5

General
Allgemeines
Généralités
Set up the machine
Aufstellen der Maschine
Installer la machine ..................................................................................................... 23
First start up
Erste Inbetriebnahme
Première mise en service ............................................................................................. 24
Specific assembling
Spezielle Montagen
Montage spécifique ..................................................................................................... 25
Empty the boiler
Boiler leeren
Vider la chaudière ........................................................................................................ 26
Boiler pressure regulation (Model E)
Boilerdruckregelung (Modell E)
Réglage de la pression de la chaudière (Modèle E) .....................................................27
Auto-test components (Model E)
Autotest der Bauteile (Modell E)
Test automatique des éléments (Modèle E)............................................................... 28
Diagnostics (Model E)
Fehlerdiagnose (Modell E)
Diagnostic (Modèle E) ................................................................................................. 30
Technical data
Technische Daten
Caractéristiques techniques ........................................................................................ 32
Safety instructions
Sicherheitshinweise
Consignes de sécurité .................................................................................................. 34
Specific safety instructions / Water renewal / Water hardness
Spezifische Sicherheitshinweise / Wasseraustausch / Wasserhärte
Consignes de sécurité spécifique / Remplacer l’eau / Dureté de l’eau ......................... 36
Barista Bediener Operateur
5
Page 6

Overview
Übersicht
Vue d’ensemble
Hot water spout
Heisswasserauslauf
Sortie d’eau chaude
Hot water button
Taste Heisswasser
Bouton d’eau chaude
You-Steam *
Steam wand
Dampflanze
Lance vapeur
Boiler gauge
Manometer Boiler
Manomètre de la chaudière
Pump gauge
Manometer Pumpe
Manomètre de la pompe
Group head / Filter holder
Brühgruppe / Siebträger
Groupe d’infusion / porte-filtres
Illumination
Beleuchtung
Eclairage
Interface Model E
Bedienpanel Modell E
Interface du Modèle E
A B C D E
Cup tray
Tassenablage
Plateau tasses
Steam tap /
Dampfhahn /
Robinet de vapeur / C-Lever *
Switches
Schalter
Interrupteurs
Cup warmer
Tassenwärmer
Chaue tasse
Boiler heating element
Boilerheizung
Elément chauant de la chaudière
Main switch
Hauptschalter
Interrupteur principal
Interface Model S
Bedienpanel Modell S
Interface du Modèle S
Lever for coee dispensing (Model L)
Hebel für Kaeebezug (Modell L)
Levier pour dosage du café (Modèle L)
optional*
optional
optionnel
6
1 small coee
1 Espresso
1 petit café
2 small coees
2 Espressos
2 petits cafés
1 coee
1 Kaee
1 café
2 coees
2 Kaees
2 cafés
Start / Stop dispensing
Start / Stopp Brühung
Commencer / arrêter le dosage
Page 7

Switch ON / OFF
Ein- / Ausschalten
Mise en marche / arrêt
Switch ON
Einschalten
Mise en marche
1
2
Open water tap
Wasserhahn önen
Ouvrir le robinet d’eau
Switch on main switch
Hauptschalter einschalten
Brancher l’interrupteur principal
Wait until boiler is filled up
Warten bis der Boiler gefüllt ist
Attendre que la chaudière soit remplie
Switch OFF
Ausschalten
Arrêt
1
2
Remove filter holder, knock it out and
lock it again
Siebträger entfernen, ausklopfen und
wieder einsetzen
Retirer le porte-filtres, le secouer et le
bloquer de nouveau
Do not damage the filter
Filter nicht beschädigen
Ne pas endommager le filtre
Switch o cup warmer, boiler heating
element and main switch
Tassenwärmer, Boilerheizung und
Hauptschalter ausschalten
Débrancher le chaue-tasses,
l’élément chauant de la chaudière et
l’interrupteur principal
Bediener Operateur
3
Switch on boiler heating element
Boilerheizung einschalten
Brancher l’élément chauant de la chaudière
Cup warmer as required
Tassenwärmer nach Bedarf
Chaue-tasses, si besoin
3
Close water tap
Wasserhahn schliessen
Fermer le robinet d’eau
Clean the machine
Maschine reinigen
Nettoyer la machine
Barista
7
Page 8

Use
Gebrauch
Utilisation
Preparing coee
Zubereitung von Kaee
Préparation de boissons au café
Water renewal: see note on page 37
Wasseraustausch: Hinweis auf Seite 37 beachten
Renouvellment d‘eau: voir page 37
Remove filter holder and knock it out
1
2 5
Siebträger entfernen und ausklopfen
Retirer le porte-filtres et le secouer
Do not damage the filter
Filtersieb nicht beschädigen
Ne pas endommager le filtre
Use a filter for 1 or 2 coees as required
Nach Bedarf Filtersieb für 1 oder 2 Kaees
verwenden
Selon les besoins, utiliser un filtre pour
1 ou 2 cafés
4
Warning: Hot surface
Achtung: Heisse Oberflächen
Attention: surfaces brûlantes
Lock the filter holder into the group
head
Siebträger in Brühgruppe einsetzen
Bloquer le porte-filtres dans le groupe
d’infusion
Put cup(s) under coee outlet
Tasse(n) unter Kaeeauslauf stellen
Placer une tasse sous l’écoulement
du café
Fill with coee powder and tamp
3
8
Kaeepulver einfüllen und pressen
Remplir de café moulu et tasser
Remove leftovers from rim of the
filter
Pulverreste vom Filterrand entfernen
Retirer les résidus présents sur le bord
du filtre
6
Start preparation
Zubereitung starten
Commencer la préparation
Model S: Stop preparation manually
Modell S: Zubereitung manuell stoppen
Modèle S: arrêter la préparation
manuellement
Page 9

Preparing hot water (tea)
Zubereitung von Heisswasser (Tee)
Préparation d’eau chaude (thé)
Warning: Hot surface
Achtung: Heisse Oberflächen
Attention: surfaces brûlantes
Preparing a large volume of hot water (Model E)
Grosse Mengen Heisswasser zubereiten (Modell E)
Préparation d’une grande quantité d’eau chaude (Modèle E)
1
2
3
Put cup under hot water spout
Tasse unter Heisswasserauslauf stellen
Placer une tasse sous l’écoulement
d’eau chaude
Press the hot water button
Taste Heisswasser drücken
Appuyer sur la touche d’eau chaude
Wait for end of preparation
Ende der Zubereitung abwarten
Attendre la fin de la préparation
Model S: Stop preparation manually
Modell S: Zubereitung manuell stoppen
Modèle S: arrêter la préparation
manuellement
1
2
Hold hot water button 2 sec.
Taste Heisswasser 2 Sek. drücken
Appuyer sur la touche d’eau chaude
pendant 2 sec.
Continuous preparations starts…
Kontinuierliche Zubereitung startet…
Une préparation continue commence...
Press button again when desired
amount is poured
Taste nach Erreichen der gewünschten
Menge nochmals drücken
Appuyer de nouveau sur la touche quand
la quantité souhaitée est atteinte
Bediener Operateur
Barista
9
Page 10

Use (Model L)
Gebrauch (Modell L)
Utilisation (Modèle L)
Preparing coee
Zubereitung von Kaee
Préparation de boissons au café
Water renewal: see note on page 37
Wasseraustausch: Hinweis auf Seite 37 beachten
Renouvellment d‘eau: voir page 37
Remove filter holder and knock it out
1
2 5
Siebträger entfernen und ausklopfen
Retirer le porte-filtres et le secouer
Do not damage the filter
Filtersieb nicht beschädigen
Ne pas endommager le filtre
Use a filter for 1 or 2 coees as required
Nach Bedarf Filtersieb für 1 oder 2 Kaees
verwenden
Selon les besoins, utiliser un filtre pour
1 ou 2 cafés
4
Warning: Hot surface
Achtung: Heisse Oberflächen
Attention: surfaces brûlantes
Lock the filter holder into the group
head
Siebträger in Brühgruppe einsetzen
Bloquer le porte-filtres dans le groupe
d’infusion
Put cup(s) under coee outlet
Tasse(n) unter Kaeeauslauf stellen
Placer une tasse sous l’écoulement
du café
10
3
Fill with coee powder and tamp
Kaeepulver einfüllen und pressen
Remplir de café moulu et tasser
Remove leftovers from rim of the
filter
Pulverreste vom Filterrand entfernen
Retirer les résidus présents sur le bord
du filtre
6
Pull down the lever
Hebel nach unten ziehen
Baisser le levier
Page 11

Preparing hot water (tea)
Zubereitung von Heisswasser (Tee)
Préparation d’eau chaude (thé)
Warning: Do not pull the lever without coee in the filterholder
Achtung: Hebel nicht ohne Kaee im Siebträger betätigen
Attention: Ne pas baisser le levier sans café dans le porte-filtre
Wait for coee to begin to drip
7
8
Warten, bis Kaee tropft
Attendre que le café commence à tomber
goutte à goutte
Release the lever and let it lift up by
itself
Hebel loslassen - Hebel geht selbständig
nach oben
Lâcher le levier et le laisser se relever
tout seul
Warning: Hot surface
Achtung: Heisse Oberflächen
Attention: surfaces brûlantes
1
2
Put cup under hot water spout
Tasse unter Heisswasserauslauf stellen
Placer une tasse sous l’écoulement
d’eau chaude
Open hot water tap
Heisswasserhahn önen
Ouvrir le robinet d’eau chaude
Bediener Operateur
Repeat steps 6 – 8 for a double coee
Für einen doppelten Kaee Schritt 6 – 8 wiederholen
Répéter les étapes 6 à 8 pour un café double
3
Close hot water tap
Heisswasserhahn schliessen
Fermer le robinet d’eau chaude
Barista
11
Page 12

Use
Gebrauch
Utilisation
Steam wand
Dampflanze
Lance vapeur
For best results: store milk at ≤ 5 °C (≤ 41 °F)
Für optimale Resultate: Milch bei ≤5 °C (≤ 41 °F) aufbewahren
Pour de meilleurs résultats: conserver le lait à ≤5 °C (≤ 41 °F)
2 sec.
Flush out residual steam condensate
1
2
Kondenswasser ausspülen
Retirer l’eau de condensation résiduelle
Submerge steam wand in milk
Dampflanze in Milch eintauchen
Plonger la lance vapeur dans le lait
Warning: Hot surface
Achtung: Heisse Oberflächen
Attention: surfaces brûlantes
4
5
Close steam tap when the desired
temperature is reached
Dampfhahn schliessen
Fermer le robinet de vapeur quand la
température souhaitée est atteinte
Remove product when finished
Fertiges Produkt entnehmen
Retirer la tasse de produit préparé
12
3
Open steam tap progressively
Dampfhahn stufenweise önen
Ouvrir progressivement le robinet
de vapeur
6
Purge and clean steam wand
Dampflanze spülen und feucht abwischen
Rinçer et nettoyer la lance vapeur
Page 13

Steam C-lever (optional)
Dampf C-lever (optional)
C-lever de vapeur (optionnel)
Warning: Hot surface
Achtung: Heisse Oberflächen
Attention: surfaces brûlantes
1
2
3
2 sec.
Flush out residual steam condensate
Kondenswasser ausspülen
Retirer l’eau de condensation résiduelle
Submerge steam wand in milk
Dampflanze in Milch eintauchen
Plonger la lance vapeur dans le lait
Push down C-lever to pulse steam
Für Dampfstoss nach unten drücken
Baisser le C-lever pour obtenir de la
vapeur
4
5
or | oder | ou
Push up C-lever for continuous steam
Für kontinuierlichen Dampfbezug
C-lever nach oben drücken
Relever le C-lever pour obtenir de la
vapeur continue
Push back to stop steam
Zum Beenden zurückstellen
Relever pour arrêter la vapeur
Remove product when finished
Fertiges Produkt entnehmen
Retirer la tasse de produit préparé
Purge and clean steam wand
Dampflanze spülen und feucht abwischen
Rinçer et nettoyer la lance vapeur
Bediener Operateur
13
Barista
Page 14

Use
Gebrauch
Utilisation
You-Steam (optional)
You-Steam (optional)
You-Steam (optionnel)
For best results: store milk at ≤ 5 °C (≤ 41 °F)
Für optimale Resultate: Milch bei ≤5 °C (≤ 41 °F) aufbewahren
Pour de meilleurs résultats: conserver le lait à ≤5 °C (≤ 41 °F)
2 sec.
Flush out residual steam condensate
1
2
Kondenswasser ausspülen
Retirer l’eau de condensation résiduelle
Submerge steam wand in milk
Dampflanze in Milch eintauchen
Plonger la lance vapeur dans le lait
Warning: Hot surface
Achtung: Heisse Oberflächen
Attention: surfaces brûlantes
or | oder | ou
4
Push up You-Steam to position 2 for
foamed milk
Für geschäumte Milch You-Steam nach
oben auf Position 2 drücken
Positionner le You-Steam sur position 2
pour la mousse de lait
Push back to stop steam
Zum Beenden zurückstellen
Relever pour arrêter la vapeur
Remove product when finished
Fertiges Produkt entnehmen
Retirer la tasse de produit préparé
14
3
Push up You-Steam to position 1 for
hot milk
Für heisse Milch You-Steam nach oben
auf Position 1 drücken
Positionner le You-Steam sur position 1
pour le lait chaud
5
Purge and clean steam wand
Dampflanze spülen und feucht abwischen
Rinçer et nettoyer la lance vapeur
Page 15

What if…
Was tun wenn…
Que faire si...
The machine does not start
Maschine nicht läuft
La machine ne se met pas en marche
Is the power supply working?
Funktioniert die Stromversorgung?
L’alimentation électrique principale fonctionne-t-elle?
Is the fuse for the power supply fine?
Ist die Haussicherung in Ordnung?
Le fusible de réseau est-il endommagé?
Is the main switch switched on?
Ist der Hauptschalter eingeschaltet?
L’interrupteur de mise en marche est-il activé?
Are the plug and the cable ok?
Sind der Stecker und das Kabel in Ordnung?
La prise et le câble sont-ils en bon état?
There is water under the machine
Wasser unter der Maschine
Il y a de l’eau sous la machine
Is the drain tray obstructed?
Ist der Ablauf der Wasserauangwanne verstopft?
Le plateau d’écoulement est-il obstrué?
Slow dispensing
Langsame Zubereitung
Dosage lent
Are the filter and the group heads ok?
Sind Filtersieb und Filterduschen in Ordnung?
Les filtres et les groupes d’infusion sont-ils en bon état?
Is the coee ground too finely?
Ist der Kaee zu fein gemahlen?
Le café moulu est-il trop fin?
Irregular steam delivery
Unregelmässige Dampfausgabe
Sortie irrégulière de vapeur
Are the tips of the steam wand obstructed?
Sind die Düsen der Dampflanze verstopft?
Les pointes de la lance vapeur sont-elles obstruées?
Barista Bediener Operateur
15
Page 16

Daily cleaning
Tägliche Reinigung
Nettoyage quotidien
Do not use abrasive sponges and detergents or solvents! If cleaner is required, follow the instructions on the package!
Keine Lösungs- und Scheuermittel verwenden! Wenn Reiniger benötigt wird, Angaben auf der Verpackung beachten!
Ne pas utiliser de solvants ou abrasifs! Si un produit de nettoyage est nécessaire, il faut suivre les instructions sur l’emballage!
Do not immerse the machine into water!
Maschine nicht in Wasser eintauchen!
Ne pas plonger la machine dans l’eau!
1
2
3
Clean housing with damp cloth
Gehäuse feucht abwischen
Nettoyer carrosserie avec chion humide
Follow the grain of the satin finish
on stainless steel parts
Bei Edelstahlteilen in Satinierrichtung
wischen
Nettoyer les pièces en acier inox dans
le sens de la finition satinée
Clean steam wand / hot water spout
Dampflanze / Heisswasserauslauf reinigen
Nettoyer la lance vapeur / la sortie d’eau
chaude
Clean encrusted nozzles
Ablagerungen an Düsen entfernen
Eliminer les dépôts inscrustés dans
les buses
Remove filter holders, unlock the filters,
clean all parts
Siebträger entfernen, Filtersieb herausnehmen, alle Teile reinigen
Retirer le porte-filtres, débloquer les filtres,
nettoyer les pièces détachées
4
5
6
Brush the seals under the group head
Dichtungen sauber bürsten
Brosser les joints sous le boîtier
Rinse with hot water to dissolve any
coee bean oil residue
Zum Lösen von Kaeefettablagerungen
mit heissem Wasser spülen
Rincer à l’eau chaude pour dissoudre les
résidus d’huile des grains de café
Submerge steam wand in milk detergent
Dampflanze in Milchreiniger eintauchen
Plonger la lance vapeur dans le nettoyant
à lait
16
Page 17

Cleaning the filter
Filter reinigen
Nettoyer le filtre
The machine has to be switched o and cooled down!
Maschine muss ausgeschaltet und abgekühlt sein!
Débrancher la machine et la laisser refroidir!
Use container of glass or stainless steel!
Gefässe aus Glas oder Edelstahl benutzen!
Utiliser des récipients en verre ou en acier inox!
Prepare solution in glass or stainless
1
2 5
3
steel container
Lösung in Edelstahl- oder Glasgefäss
zubereiten
Préparer la solution dans un récipient en
verre ou en acier inox
Immerse filter holder / unlocked filter in
solution for at least 20 min.
Siebträger / Filtersieb min. 20 Minuten
in Lösung einlegen
Plonger le porte-filtres / les filtres dans la
solution pendant au moins 20 min.
Rinse filter holder / filter thoroughly
under running water
Siebträger / Filtersieb gründlich unter
fliessendem Wasser spülen
Rincer soigneusement à l’eau courante
le porte-filtres / les filtres
4
6
Reattach filter holder, lock the filter
holder into the group head
Siebträger zusammenbauen und in
Brühgruppe einsetzen
Remettre le porte-filtre et le bloquer
dans le groupe d’infusion
Remove cup-holder grid, clean drain
outlet
Tassenrost entfernen, Ablauf reinigen
Retirer la grille du porte-tasses, nettoyer
l’orifice de sortie de l’écoulement
Reattach cup-holder grid
Tassenrost wieder einsetzen
Replacer la grille du porte-tasses
Bediener Operateur
Barista
17
Page 18

Automatic cleaning of the group heads (Model E)
Automatische Reinigung der Brühgruppen (Modell E)
Nettoyage automatique des groupes d’infusion (Modèle E)
The machine has to be under pressure *
Maschine muss unter Druck stehen
La machine doit être sous pression
Perform cleaning at least once a day
Reinigung mindestens einmal täglich durchführen
Procéder à un nettoyage au moins une fois par jour
Hold button C at least 5 sec.
1
2
Taste C für min. 5 Sek. drücken
Appuyer sur le bouton C pendant au
moins 5 sec.
Insert blind filter disk, add cleaning
detergent for coee machines
Blindfilterscheibe einsetzen, Reinigungsmittel für Kaeemaschinen zugeben
Insérer le disque filtre aveugle, ajouter
le produit de nettoyage pour machines
à café
4
5
The groups are cleaned alternatively. Push button C for about 2 sec.
to skip phase
Die Gruppen werden abwechselnd gereinigt. Taste C fur ca. 2 Sek.
drücken um Reinigungsphase abzubrechen
Les groupes sont lavés en alternance. Appuyer 2 sec. env. sur le
bouton C pour interrompre la phase
Activate the cleaning phase with button C
Reinigungsprozess mit Taste C starten
Activer la phase de nettoyage avec le
bouton C
Stops automatically
Stoppt automatisch
S’arrête automatiquement
Remove blind filter disk, lock filter
holder again
Blindfilterscheibe entfernen, Siebträger
wieder einsetzen
Retirer le disque filtre aveugle et bloquer
de nouveau le porte-filtre
*
18
3
Lock the filter holder into the group head
Siebträger in Brühgruppe einsetzen
Bloquer le porte-filtres dans le groupe
d’infusion
6
Activate the rinsing phase with boutton C
Spülprozess mit Taste C starten
Activer la phase de rinçage aves le
bouton C
Stops automatically
Stoppt automatisch
S’arrête automatiquement
Page 19

Automatic cleaning of the group heads (Model S)
Automatische Reinigung der Brühgruppen (Modell S)
Nettoyage automatique des groupes d’infusion (Modèle S)
Press Start / Stop dispensing button 2x to skip phase
The machine has to be under pressure
Maschine muss unter Druck stehen
La machine doit être sous pression
Perform cleaning at least once a day. Cleaning is possible per group
Reinigung mindestens einmal täglich durchführen. Reinigung ist pro Gruppe möglich
Procéder à un nettoyage au moins une fois par jour. Nettoyage est possible par groupe
*
Taste Start / Stop 2x drücken um Reinigungsphase abzubrechen
Appuyer 2 fois sur la touche de début / d’arrêt d’infusion pour
annuler la phase
1
2
3
Hold Start / Stop dispensing button at
least 5 sec.
Taste Start / Stopp min. 5 Sek. drücken
Appuyer sur la touche de début / d’arrêt
d’infusion pendant au moins 5 sec.
Insert blind filter disk, add cleaning
detergent for coee machines
Blindfilterscheibe einsetzen, Reinigungsmittel für Kaeemaschinen zugeben
Insérer le disque filtre aveugle, ajouter
le produit de nettoyage pour machines
à café
Lock the filter holder into the group head
Siebträger in Brühgruppe einsetzen
Bloquer le porte-filtres dans le groupe
d’infusion
4
5
6
Activate the cleaning phase
Reinigungsprozess starten
Activer la phase de nettoyage
Stops automatically
Stoppt automatisch
S’arrête automatiquement
Remove blind filter disk, lock filter
holder again
Blindfilterscheibe entfernen, Siebträger
wieder einsetzen
Retirer le disque filtre aveugle et bloquer
de nouveau le porte-filtre
Activate the rinsing phase
Spülprozess starten
Activer la phase de rinçage
Stops automatically
Stoppt automatisch
S’arrête automatiquement
*
19
Bediener Operateur
Barista
Page 20

Adjusting the dose (Model E)
Dosierung einstellen (Modell E)
The machine has to be under pressure
Maschine muss unter Druck stehen
La machine doit être sous pression
Régler le dosage (Modèle E)
Adjusting the doses of coee for each group head (Repeat steps 1 – 6 for each group head)
Kaeemengen für jede Brühgruppe einstellen
Régler les doses de café pour chaque groupe d’infusion (Répéter les étapes 1 à 6 pour chaque groupe d’infusion)
The settings of the left group are copied to all other groups automatically – always start with the group on the left
Einstellungen der linken Brühgruppe werden automatisch auf alle Brühgruppen übertragen – immer mit der Brühgruppe links beginnen
Les réglages du groupe à gauche sont automatiquement transmis aux autres groupes – toujours commencer par le groupe situé à gauche
(Schritt 1 – 6 für jede Brühgruppe wiederholen)
Push button E of the according group
1
2 5
3
20
head for 10 sec.
Taste E der entsprechenden Brühgruppe
10 Sek. gedrückt halten
Appuyer sur la touche E du groupe
d’infusion correspondant pendant 10 sec.
Fill coee into filter holder
Siebträger entfernen, Kaeepulver
einfüllen
Remplir le porte-filtres de café
Lock the filter holder, put cup under the
group head
Siebträger einsetzen, Tasse unterstellen
Bloquer le porte-filtres, mettre une
tasse sous le groupe d’infusion
4
6
Press the button to be programmed
(e.g. button A)
Zu programmierende Taste drücken
(z.B. Taste A)
Appuyer sur la touche à programmer
(p. ex. touche A)
Preparations starts…
Zubereitung startet…
La préparation commence...
Press button again when desired
amount is poured
Taste nach Erreichen der gewünschten
Menge nochmals drücken
Appuyer de nouveau sur la touche quand
la quantité souhaitée est atteinte
Repeat steps 2 – 5 for each button
Schritt 2 – 5 für jede Taste wiederholen
Répéter les étapes 2 à 5 pour chaque
touche
Push button E again to store new
settings
Einstellungen mit Taste E speichern
Appuyer de nouveau sur la touche E
pour mémoriser les nouveaux réglages
Prepare coees to check the doses
Kaees zubereiten, um Menge zu prüfen
Préparer des cafés pour vérifier
les doses
Page 21

Adjusting the quantity of hot water
Dosierung Heisswasser einstellen
Régler la quantité d’eau chaude
Push button E of the left group head
1
2 5
3
for 10 sec.
Taste E der linken Brühgruppe 10 Sek.
gedrückt halten
Appuyer sur la touche E du groupe
d’infusion de gauche pendant 10 sec.
Put cup under hot water spout
Tasse unter Heisswasserauslauf stellen
Placer une tasse sous la sortie d’eau
chaude
Press the hot water button
Taste Heisswasser drücken
Appuyer sur la touche d’eau chaude
Preparations starts…
Zubereitung startet…
La préparation commence...
4
Press button again when desired
amount is poured
Taste nach Erreichen der gewünschten
Menge nochmals drücken
Appuyer de nouveau sur la touche quand
la quantité souhaitée est atteinte
Push button E again to store new
settings
Einstellungen mit Taste E der linken
Brühgruppe speichern
Appuyer de nouveau sur la touche E
pour mémoriser les nouveaux réglages
Prepare hot water to check the dose
Heisswasser beziehen um Menge zu
prüfen
Préparer de l’eau chaude pour vérifier
la dose
Barista Bediener Operateur
21
Page 22

Stop using the machine
Maschine ausser Betrieb setzen
Cesser d’utiliser la machine
Only a qualified person is allowed to disconnect the machine from the main power supply!
Maschine nur von einem Fachmann von den Versorgungsnetzen trennen lassen!
Seule une personne qualifiée est autorisée à déconnecter la machine de l’alimentation électrique principale!
Final Stop: Cut o the power supply cable. Consign the machine to authorized companies for its disposal
Endgültig: Kabel durchschneiden. Maschine gemäss geltenden Bestimmungen entsorgen
Arrêt final: couper le câble. Confier l’élimination de la machine à une entreprise autorisée
Clean the machine
1
Maschine reinigen
Nettoyer la machine
See page «Daily cleaning»
Siehe Seite «Tägliche Reinigung»
Voir page «Nettoyage quotidien»
22
2
3
Switch o the circuit braker
Sicherungsautomat ausschalten
Arrêter l’interrupteur diérentielle
Cover the machine and place it in a dry
room, not exposed to environmental
elements
Maschine zudecken, an einem trockenen,
vor Witterungseinflüssen geschützten Ort
lagern
Couvrir la machine et l’entreposer dans un
endroit sec, non exposé aux intempéries
Page 23

Set up the machine
Aufstellen der Maschine
Installer la machine
Erroneous installation can cause damage to people, animals and things
Nicht fachgerechte Installation kann zu Personen- und Sachschäden führen
Une installation incorrecte peut conduire des dommages aux personnes, animaux et matériaux
Observe the notes on specific saftey instructions!
Beachten Sie die spezifischen Sicherheitshinweise!
Tenir compte des remarques concernant les consignes de sécurité spécifiques!
Put machine on a level and stable surface
1
2 5
3
0.1 - 0.6 MPa
15 - 87 PSI
ø G
Maschine auf stabile, ebene Fläche stellen
Placer la machine sûr une surface plane
et stable
Leave enough free space around
Auf allen Seiten genügend Abstand
lassen
Laisser susamment d’espace libre
autour
Balance unevenness with screw-in foot
Mit Schraubfüssen Unebenheiten
ausgleichen
Égaliser des inégalités avec les pieds
réglables
Connect fresh water tube
Wasserzuleitung anschliessen
Connecter le tuyau d’eau fraîche
Never crimp tube
3
/
Schlauch nicht knicken
8
Les tuyaux ne doivent être ni pliés,
ni écrasés
4
6
Attach drain tube to machine
Ablaufschlauch an Maschine anschliessen
Attacher le tuyau d’eau résiduelle à la
machine
Tighten the connections
Fest aufstecken
Bien appuyer le tuyau sûr le raccord
Connect drain tube to sink
Ablaufschlauch an Abfluss anschliessen
Poser le tuyau d’eau résiduelle dans
l’écoulement
Ensure drain has proper incline
Gefälle zum Abfluss sicherstellen
Assurer inclination vers l’égout
Check tightness
Alle Anschlüsse auf Dichtheit prüfen
Bien vérifier l’étanchéité de tous les connections
General Allgemeines Généralités
23
Page 24

First start up
Erste Inbetriebnahme
Première mise en service
Erroneous installation can cause damage to people, animals and things
Nicht fachgerechte Installation kann zu Personen- und Sachschäden führen
Une installation incorrecte peut conduire des dommages aux personnes, animaux et matériaux
Observe the notes on specific saftey instructions!
Beachten Sie die spezifischen Sicherheitshinweise!
Tenir compte des remarques concernant les consignes de sécurité spécifiques!
24
1
2
Connect equipotential earthing wire to
the dedicated terminal
Potentialausgleichsleiter mit Anschlussklemme verbinden
Raccorder le câble équipotentiel de mise
à la terre à la borne terminale
yellow / green cable
gelb / grüne Leitung
Fil jaune / vert
Connect to main power
Netzzuleitung herstellen
Connecter à l’alimentation principale
Wiring diagrams see page «Diagrams»
Anschlusspläne siehe Seite «Schemata»
Schéma de câblage, voir page
«Diagrammes»
Open water tap
Wasserhahn önen
Ouvrir le robinet d’eau
4
5
63
Switch on main switch
Hauptschalter einschalten
Actionner l’interrupteur de mise en
marche
Wait until boiler is filled up
Warten bis der Boiler gefüllt ist
Attendre que la chaudière soit remplie
Switch on boiler heating element
Boilerheizung einschalten
Brancher l’élément chauant de la
chaudière
Rinse each group for 1 min.
Jede Brühgruppe 1 Min. spülen
Rincer chaque groupe pendant 1 min.
Repeat 2 times
2x wiederholen
Répéter 2 fois
Page 25

Specific assembling
Spezielle Montagen
Montage spécifique
Assembling the lever (Model L)
Montage des Hebels (Modell L)
Monter le levier (Modèle L)
Deliver steam from the steam wands
7
8
Switch o boiler heating element and main switch
9
Boilerheizung und Hauptschalter ausschalten
Débrancher l’élément chauant de la chaudière et l’interrupteur principal
Empty the water from the boiler (see page «Empty the boiler»)
10
Boiler entleeren (siehe Seite «Boiler entleeren»)
Vider l’eau de la chaudière (voir page «Vider la chaudière»)
for 1 min.
An jeder Dampflanze 1 Min. Dampf
entnehmen
Retirer de la vapeur des lances vapeur
pendant 1 min.
Take hot water for 1 Min.
1 Min. Heisswasser beziehen
Retirer de l’eau chaude pendant 1 min.
Repeat 2 times
2x wiederholen
Répéter 2 fois
1
2
3
Assemble the upper case
Gehäuse aufsetzen
Monter le boîtier supérieur
Fix with screws
Gehäuse festschrauben
Fixer avec des vis
Assemble lever(s)
Hebel einschrauben
Monter le(s) levier(s)
General Allgemeines Généralités
25
Page 26

Empty the boiler
Boiler entleeren
Vider la chaudière
Only a qualified person is allowed to empty the boiler!
Nur Fachpersonal darf den Boiler entleeren!
Seule une personne qualifiée est autorisée à vider la chaudière!
The machine has to be switched o and must not be under pressure (check manometer)!
Maschine muss ausgeschaltet sein und darf nicht unter Druck stehen (Manometer prüfen)!
La machine doit être débranchée et ne plus être sous pression (vérifier le manomètre)!
Remove cup-holder grid and drain basin
1
2 5
3
26
Tassenrost und Ablaufwanne entfernen
Retirer la grille du porte-tasses et la
cuvette d’écoulement
Insert the tube into the tube-end fitting
Schlauch auf Schlauchtülle stecken
Insérer le tuyau dans le raccord
Loosen the tube-end fitting
Schlauchtülle lösen
Desserrer le raccord du tuyau
Immobilize fitting with a wrench
Verschraubung mit Schlüssel festhalten
Fixer le raccord avec une clé
Allow the water to flow out completely
4
Reattach drain basin and cup-holder grid
6
Ablaufwanne und Tassenrost wieder einsetzen
Replacer la cuvette d’écoulement et la grille du porte-tasses
Refill the boiler if requested (see page «First start up», step 4 / 5)
7
Bei Bedarf Boiler füllen (siehe Seite «Erste Inbetriebnahme», Schritt 4 / 5)
Si besoin, remplir la chaudière (voir page «Première mise en service»,
étapes 4 / 5)
Wasser komplett abfliessen lassen
Laisser l’eau s’écouler complètement
Close the fitting
Schlauchtülle schliessen
Fermer le raccord
Page 27

Boiler pressure regulation (Model E)
Boilerdruckregelung (Modell E)
Réglage de la pression de la chaudière (Modèle E)
Function of the buttons A C
Funktion der Tasten
Fonction des touches
1
2
+ button, pressure increase 0.1 bar (max. 1.4 bar) Factory setting at 1 bar
+ Taste, Druckerhöhung 0.1 bar (max. 1.4 bar) Werkseinstellung von 1 bar
Touche +, augmentation de la pression 0,1 bar (max. 1,4 bar) Réglage par défaut à 1 bar
B D
– button, pressure decrease 0.1 bar (min. 0.6 bar) Save pressure, leave menu
– Taste, Druckreduzierung 0.1 bar (min. 0.6 bar) Druck speichern, Menü verlassen
Touche –, diminution de la pression 0,1 bar (min. 0,6 bar) Mémoriser la valeur, quitter le menu
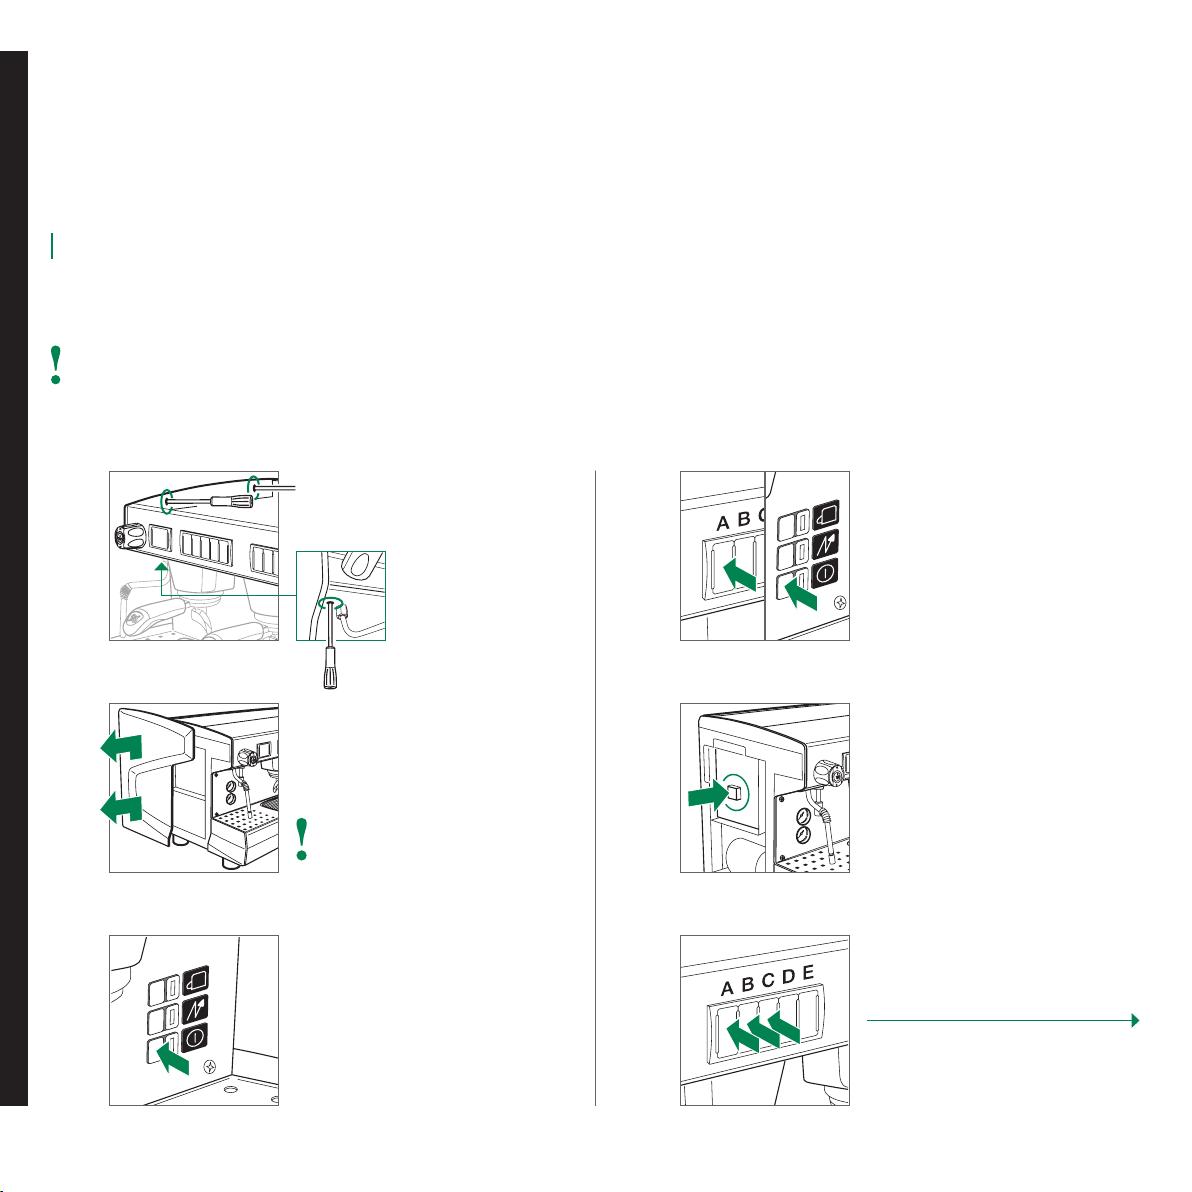
Switch o boiler heating element and
main switch
Hauptschalter und Boilerheizung
ausschalten
Débrancher l’élément chauant de la
chaudière et l’interrupteur principal
Hold button E of the first group,
then switch on the machine
Taste E der ersten Brühgruppe gedrückt
halten, Maschine einschalten
Appuyer sur la touche E du premier groupe,
puis mettre la machine en marche
4
Button A
Taste
Touche
On
Ein
On
Press button D to save pressure
Druck mit Taste D sichern
Appuyer sur la touche D pour mémoriser
la pression
Button B
Taste
Touche
Flashing 4x
Blinken
Clignotante
3x
2x
1x
Pressure [bar]
Druck [bar]
Pression [bar]
0.6
0.7
0.8
0.9
3
Change pressure with button A / B
Druck mit Taste A / B verändern
Modifier la pression avec la touche A / B
Check manometer for changings
Druck am Manometer beobachten
Vérifier les modifications sur le
manomètre
Flashing 1x
Blinken
Clignotante
2x
3x
4x
On
Ein
On
1.0
1.1
1.2
1.3
1.4
General Allgemeines Généralités
27
Page 28
Auto-test components (Model E)
Autotest der Bauteile (Modell E)
Test automatique des éléments (Modèle E)
Function of the buttons
Funktion der Tasten
Fonction des touches
Repeat step 5 for each component
Schritt 5 für jedes Bauteil wiederholen
Répéter l’opération 5 pour chaque composante
1
2
A
+ button (increase)
+ Taste (aufsteigend)
Touche + (augmentation)
Unscrew the left side panel
Linke Seitenwand lösen
Devisser le panneau latéral gauche
Dismantle the left side panel
Linke Seitenwand entfernen
Démonter le panneau latéral gauche
Caution: risk of electric shock
Vorsicht: Maschine steht unter Strom
Attention: risque de choc électrique
B
– button (decrease)
– Taste (absteigend)
Touche – (diminution)
4
C
Enter (Start)
Eingabe (Anwahl)
Entrée (start)
Hold button A of the first group, then
switch on the machine
Taste A der ersten Brühgruppe gedrückt
halten, Maschine einschalten
Appuyer sur la touche A du premier
groupe, puis mettre la machine en
marche
«0» appears on the electronic board
«0» erscheint auf der Elektronik
«0» apparaît sur la carte électronique
D
ESC (Stop)
Finalización (parada)
Terminer (Stop)
28
3
Switch o main switch
Hauptschalter ausschalten
Débrancher l’interrupteur principal
5
Select component with button A / B
Bauteil mit Tasten A / B auswählen
Sélectionner l’élément avec la touche
Start test with button C*
Test mit Taste C starten*
Commencer le test avec la touche C*
A / B
Page 29

Only for predisposed machines
* For machines with star resistance connection
Test verlassen: Taste D drücken
Appuyer sur la touche D pour
interrompre le test
**Press button D to abort test
Nur bei entsprechenden Maschinen
Seulement pour machines prédisposées
***
Für Maschinen mit Sternschaltung
Pour les machines avec résistance en étoile
Code
Code
Code
0
1
2
3
4
5
6
7
8
Component
Bauteil
Elément
Auto-test ON
Autotest aktiviert
Test automatique ON
Solenoid valve group 1 (ON for 3 sec.)
Ventil Brühgruppe 1 (ON 3 Sek.)
Soupape solenoïdale du groupe 1 (ON pendant 3 sec.)
Solenoid valve group 2 (ON for 3 sec.)
Ventil Brühgruppe 2 (ON 3 Sek.)
Soupape solenoïdale du groupe 2 (ON pendant 3 sec.)
Solenoid valve group 3 (ON for 3 sec.)**
Ventil Brühgruppe 3 (ON 3 Sek.)**
Soupape solenoïdale du groupe 3 (ON pendant 3 sec.)**
Solenoid valve hot water supply (ON for 3 sec.)
Ventil Heisswasserentnahme (ON 3 Sek.)
Soupape solenoïdale de l’alimentation en eau chaude
(ON pendant 3 sec.)
Solenoid valve boiler filling (ON for 3 sec.)
Ventil Boilerbefüllung (ON 3 Sek.)
Soupape solenoïdale de remplissage de la chaudière (ON
pendant 3 sec.)
Pump motor (ON 3 sec.)
Pumpenmotor (ON 3 Sek.)
Moteur de la pompe (ON 3 sec.)
1st boiler heating element (ON 5 sec.)
1. Boilerheizelement (ON 5 Sek.)
1er élément chauant de la chaudière (ON 5 sec.)
2nd boiler heating element (ON 5 sec.)***
2. Boilerheizelement (ON 5 Sek.)***
2e élément chauant de la chaudière (ON 5 sec.)***
Code
Code
Code
9
A
B
C
d
E
F
H
Component
Bauteil
Elément
3rd boiler heating element (ON 5 sec.)***
3. Boilerheizelement (ON 5 Sek.)***
3e élément chauant (ON 5 sec.)***
Key pad (corresponding LED flashes)
Tastatur (bei Betätigung blinkt jeweilige Taste)
Clavier (la LED correspondante clignote)
Flow meter group 1 (100 pulse supply)
Flowmeter Brühgruppe 1 (100 Impulse)
Débitmètre du groupe 1 (100 impulsions)
Flow meter group 2 (100 pulse supply)
Flowmeter Brühgruppe 2 (100 Impulse)
Débitmètre du groupe 2 (100 impulsions)
Flow meter group 3 (100 pulse supply)**
Flowmeter Brühgruppe 3 (100 Impulse)**
Débitmètre du groupe 3 (100 impulsions)**
Boiler level (fills until sucient water level)
Boilerniveau (füllt bis Wasserstand OK)
Niveau de la chaudière (se remplit jusqu’au niveau
d’eau susant)
Pressure sensor (ON until pressure set-point reached)
Drucksensor (ON bis Boilerdruck OK)
Capteur de pression (ON jusqu’à ce que la pression ait
atteint le point défini)
Relay for boiler over pressure (Switch OFF the relay)
Relais für Boilerüberdruck (Relais ausschalten)
Relais protégeant la chaudière d‘une surpression
(Eteindre le relais)
General Allgemeines Généralités
29
Page 30

Diagnostics (Model E)
Fehlerdiagnose (Modell E)
Diagnostic (Modèle E)
Only by a qualified person!
Darf nur von Fachpersonal ausgeführt werden!
Uniquement par une personne qualifiée!
Caution: machine is under pressure. Do not touch any live parts!
Vorsicht: Maschine ist unter Spannung und unter Druck!
Attention: la machine est sous pression. Ne pas toucher les éléments sous tension!
1
2
Unscrew the left side panel
Linke Seitenwand lösen
Devisser le panneau latéral gauche
Dismantle the left side panel
Linke Seitenwand entfernen
Démonter le panneau latéral gauche
Caution: risk of electric shock
Vorsicht: Maschine steht unter Strom
Attention: risque de choc électrique
3
4
5
Identify the failures
Fehlercode identifizieren
Identifier les erreurs
Restart machine after resolving the
failure
Maschine nach Fehlerbehebung neu
starten
Remettre la machine en marche après
avoir supprimé l’erreur
Reattach the left side panel
Linke Gehäuseplatte anbringen
Remettre le panneau gauche
30
Page 31

Only for predisposed machines
*
Nur bei entsprechenden Maschinen
Seulement pour machines prédisposées
Code
Code
Code
1
2
3
4
5
6
Fault description
Fehlerbeschreibung
Description de l’erreur
Time limit for boiler filling has been exceeded
Zeitüberschreitung Boilerbefüllung
La durée limite de remplissage de la chaudière est dépassée
Time limit to reach boiler pressure has been exceeded
Zeitüberschreitung Boilerdruck
La durée limite pour atteindre la pression dans la chaudière
est dépassée.
Short circuit + 12 V in the electronic board
Kurzschluss + 12 V an der Elektronik
Court-circuit + 12 V dans le carte électronique
Short circuit + 12 V LED*
Kurzschluss + 12 V LED*
Court-circuit + 12 V DEL*
Short circuit + 12 V in the pressure sensor
Kurzschluss + 12 V Drucksensor
Court-circuit + 12 V dans le capteur de pression
Short circuit + 12 V in the flow meters
Kurzschluss + 12 V Flowmeter
Court-circuit + 12 V dans les débitmètres
Code
Code
Code
8
9
A
B
C
d
Fault description
Fehlerbeschreibung
Description de l’erreur
Short circuit in the output signal from the pressure sensor
Kurzschluss Drucksensor
Court-circuit dans le signal de sortie du capteur de pression
Output signal from pressure sensor is interrupted
Drucksensor unterbrochen
Signal de sortie du capteur de pression interrompu
st
Flow meter of the 1
Flowmeter Brühgruppe 1 unterbrochen
Débitmètre du 1er groupe interrompu
Flow meter of the 2nd group interrupted
Flowmeter Brühgruppe 2 unterbrochen
Débitmètre du 2e groupe interrompu
Flow meter of the 3rd group interrupted*
Flowmeter Brühgruppe 3 unterbrochen*
Débitmètre du 3e groupe interrompu*
Output signal from boiler over pressure sensor interrupted
Ausgangssignal Boilerüberdrucksensor unterbrochen
Sortie du capteur de pression de la chaudière interrompu
group interrupted
7
Short circuit + 5 V in the key pad
Kurzschluss + 5 V Tastatur
Court-circuit + 5 V dans le clavier
General Allgemeines Généralités
31
Page 32

Technical data
Technische Daten
Caractéristiques techniques
We reserve the right to make technical changes
Technische Änderungen vorbehalten
Sous réserve de modifications techniques
520 mm
A
20.5 inch
495 mm*
19.5 inch*
Model L: 880 mm
*
Modell L: 880 mm
Modèle L: 880 mm
General
Allgemein
Généralités
Power supply
Stromversorgung
Alimentation électrique
Width
Breite
Largeur
Weight
Gewicht
Poids
Noise level during use
Geräuschpegel im Betrieb
Niveau de bruit en service
Water inlet
Wasseranschluss
Admission de l’eau
ø mm drainage
Wasserablauf
Ecoulement de ø mm
Ambient temperature during use
Umgebungstemp. im Betrieb
Température ambiante en service
Models E,S
Modelle
Modèles
Model L
Modell
Modèle
A
110V~, 60Hz
220 – 240V~ / 380-415V3N~,
50 – 60Hz
220 – 240V~ / 380-415V3N~,
50 – 60Hz
1 GR
590 mm
23.2 inch
55 kg
121.3 lb
+5 – +35 °C +5 – +35 °C +5 – +35 °C +5 – +35 °C
–
–
3.30 kW 4.65 kW– 6.45 kW 6.50 kW
2 GR
Compact
590 mm
23.2 inch
55 kg
121.3 lb
< 70 dB< 70 dB < 70 dB < 70 dB < 70 dB
3 / 8“3 / 8“ 3 / 8“ 3 / 8“ 3 / 8“
14 mm14 mm 14 mm 14 mm 14 mm
0.55 inch0.55 inch 0.55 inch 0.55 inch 0.55 inch
+5 – +35 °C
+41 – +95 °F+41 – +95 °F +41 – +95 °F +41 – +95 °F +41 – +95 °F
3.20 kW
3.60 kW
2 GR
750 mm
29.5 inch
60 kg
132.3 lb
3.20 kW
4.95 kW
3 GR
990 mm
39.0 inch
75 kg
165.4 lb
–
6.75 kW
4 GR
1230 mm
48.5 inch
93 kg
205.1 lb
–
–
32
Page 33

Manufacturer
Hersteller
Fabricant
Model / version
Modell / Version
Modèle / version
Serial number
Seriennummer
Numéro de série
Pin
Pin
Pin
Max. boiler / static pressure
Max. Boilerdruck
Pression statique max. de la chaudière
Conformity marks
Konformitätszeichen
Marques de conformité
Total absorbtion
Anschlussleistung
Absorption totale
Heating element power
Heizkörperleistung
Puissance de l’élément
chauant
Voltage
Spannung
Tension
EC conformity mark
CE-Konformitätszeichen
Marque de conformité CE
Motor power
Motorleistung
Régime moteur
Frequency
Frequenz
Fréquence
Date of manufacture (mmyy)
Produktionsdatum (MMJJ)
Date de fabrication (mmaa)
Boiler
Boiler
Chaudière
Exchanger
Wärmetauscher
Echangeur
Pressure
Druck
Pression
Temperature
Temperatur
Température
Content
Inhalt
Contenu
Capacity
Volumen
Capacité
Pressure
Druck
Pression
Temperature
Temperatur
Température
Content
Inhalt
Contenu
Capacity
Volumen
Capacité
1 GR 2 GR 3 GR
0.22 MPa
2.2 bar
134 °C
Water / Steam
Wasser / Dampf
Eau
/
Vapeur
1.2 MPa
12 bar
134 °C 134 °C 134 °C 134 °C
Water
Wasser
Eau
2 GR
Compact
0.22 MPa
2.2 bar
134 °C
Water / Steam
Wasser / Dampf
Eau
/
Vapeur
5 l5 l 11 l 16 l 22 l
1.2 MPa
12 bar
134 °C
Water
Wasser
Eau
0.35 l0.35 l 0.35 l 0.35 l 0.35 l
0.22 MPa
2.2 bar
134 °C 134 °C 134 °C
Water / Steam
Wasser / Dampf
Eau
/
Vapeur
1.2 MPa
12 bar
Water
Wasser
Eau
0.22 MPa
2.2 bar
Water / Steam
Wasser / Dampf
Eau
/
Vapeur
1.2 MPa
12 bar
Water
Wasser
Eau
4 GR
0.22 MPa
2.2 bar
Water / Steam
Wasser / Dampf
Eau
1.2 MPa
12 bar
Water
Wasser
Eau
/
Vapeur
General Allgemeines Généralités
33
Page 34

Safety instructions
Sicherheitshinweise
Consignes de sécurité
The appliance is not to be used by children or persons with reduced
physical, sensory or mental capabilities, or lack of experience and
knowledge, unless they have been given supervision or instruction.
Das Gerät darf nicht von Kindern oder Personen mit eingeschränkten
physischen, sensorischen oder geistigen Fähigkeiten oder Mangel an
Erfahrung und Wissen benutzt werden, es sei denn, sie werden bei der
Nutzung angeleitet oder beaufsichtigt.
Cet appareil n’est pas prévu pour être utilisé par des enfants ou des
personnes dont les capacités physiques, sensorielles ou mentales sont
réduites, ou des personnes dénuées d’expérience ou de connaissance,
sauf si elles ont pu bénéficier d’une surveillance ou d’instructions.
Children should not play with the machine, whether they are supervised or unsupervised.
Kinder müssen überwacht werden, damit sie nicht mit der Maschine
spielen.
Il convient de surveiller les enfants pour s’assurer qu’ils ne jouent pas
avec l’appareil.
Don’t leave the packing elements (plastic bags, expanded polystyrene,
nails, cardboard, etc.) within the reach of children, as these elements
are potential sources of danger.
Verpackungselemente (Plastiksäcke, Schaumstoe, Nägel, Kartons,
usw.) dürfen Kindern nicht zugänglich gemacht werden, da sie eine
potentielle Gefahrenquelle darstellen.
Tenir le matériel d’emballage (sacs en plastique, polystyrène expansé,
clous, cartons, etc.) hors de portée des enfants car il constitue une
source potentielle de danger.
Do not place heavy items on the packaging. Do not stack more than
three items of the same kind.
Es dürfen nicht mehr als drei verpackte Maschinen desselben Typs
aufeinander gestapelt und keine schweren Gegenstände auf den Kisten
gelagert werden.
Ne pas poser d’objets lourds sur l’emballage. Ne pas empiler plus de
trois articles de même nature.
Do not obstruct the suction and dispersion grilles, the drainage of cup
tray and grill. Do not cover with cloths, etc.
Ablaufgitter, Ablauf des Tassenwärmers und Tassenroste nicht verstopfen. Nicht mit Tüchern abdecken.
Ne pas obstruer les grilles d’aspiration et de dispersion, de l’écoulement
du plateau et de la grille des tasses. Ne pas recouvrir avec des chions,
etc.
34
If liquids inside the machine freeze, leave the coee machine in a
place with a minimum temperature of 20 °C for at least 20 minutes
before switching it on.
Sollte Flüssigkeit im Inneren der Maschine gefrieren, lassen Sie die
Kaeemaschine an einem Ort mit einer Temperatur von nicht unter
20 °C mindestens 20 Minuten vor dem Einschalten stehen.
Si du liquide gèle à l’intérieur de la machine, laisser la machine à café
dans un lieu avec une température égale ou supérieure à 20 °C pendant
au moins 20 minutes avant de l’utiliser.
Keep the packed machine in a dry place, not exposed to environmental elements and in conditions in which the temperature does not go
below 5 °C.
Die verpackte Maschine muss an einem trockenen, vor Witterungseinflüssen geschützten Ort gelagert werden. Die Umgebungstemperatur
darf nicht unter 5 °C fallen.
Stocker la machine emballée dans un endroit sec, non exposé aux
intempéries et où la température ne descend pas au-dessous de 5 °C.
Never put any vessels filled with liquid on top of the machine.
Nie mit Flüssigkeiten gefüllte Gefässe auf das Gerät stellen.
Ne jamais placer de récipients remplis de liquide sur la machine.
Improper installation can cause damage to people, animals and
things for which the manufacturer cannot be considered responsible.
Nicht fachgerechte Installation kann zu Personen- und Sachschäden
führen, für die der Hersteller nicht verantwortlich gemacht werden kann.
Toute installation non réalisée dans les règles peut blesser des personnes et animaux et endommager des biens. Dans ce cas, le fabricant
décline toute responsabilité.
Install the machine on a water repellent surface (laminate, steel,
ceramic, etc.) away from heat sources (oven, cooking stove, fireplace,
etc.) and in conditions in which the temperature may not go below
5 °C. KEEP WARM. Place on even surface.
Maschine auf einer wasserabweisenden Oberfläche (Laminat, Stahl,
Keramik, usw.) installieren. Nicht in der Nähe von Wärmequellen (Ofen,
Herd, Kamin, usw.) aufstellen. Die Umgebungstemperatur darf nicht
unter 5 °C fallen. MASCHINE VOR FROST SCHÜTZEN! Die Oberfläche
muss eben sein.
Installer la machine sur une surface hydrophobe (laminé, acier,
céramique, etc.) à l’écart des sources de chaleur (four, plan de cuisson,
cheminée, etc.) et où la température ne descend pas au-dessous de
5 °C. LA MACHINE CRAINT LE GEL. La surface doit être plane.
Page 35

Do not leave the machine exposed to environmental elements or place
them in damp rooms such as bathrooms.
Maschine keinen Witterungseinflüssen ausset zen und nicht in feuchten
Räumen wie Badezimmern installieren.
Ne pas exposer la machine aux intempéries ou la placer dans une pièce
humide comme la salle de bains.
Before connecting the equipment, check if the data on the machine
corresponds to your electrical power supply.
Vor dem Anschluss der Maschine überprüfen, ob die auf dem Schild
angegebenen Daten mit denen des Installationsort übereinstimmt.
Avant de brancher l’appareil, vérifier que les caractéristiques de la
machine correspondent à celles du réseau électrique.
Switch o the appliance and disconnect from power supply before
changing accessories or approaching parts that move in use.
Schalten Sie das Gerät aus und trennen es von der Stromversorgung,
bevor Sie Zubehör austauschen oder sich Teilen nähern, die sich im
Betrieb bewegen.
Éteindre l’appareil et le débrancher avant de remplacer des accessoires
ou d’approcher de pièces qui sont mobiles lorsqu’elles sont utilisées.
Only use original spare parts in order to avoid compromising the
safety and proper functioning of the machine.
Nur original Ersatzteile vom Hersteller verwenden, um den störungsfreien Betrieb zu gewährleisten.
Utiliser exclusivement des pièces de rechange d’origine afin de ne pas
compromettre la sécurité et le bon fonctionnement de la machine.
In an emergency, such as fire, unusual noise, overheating, etc., take
immediate action, disconnect the power and close gas and water taps.
Im Notfall, z.B. Feuer, merkwürdige Geräusche oder Überhitzung, sofort
den Netzstecker ziehen sowie Gas und Wasserzufuhr schliessen.
En cas d’urgence, comme un incendie, bruit inhabituel, surchaue,
etc., réagir immédiatement en coupant le courant et en fermant les
robinets à gaz et à eau.
When in doubt, request a detailed diagram of the supplied power
from a qualified electrician.
Im Zweifelsfall die elektrische Anlage von einem Fachmann überprüfen
lassen.
En cas de doute, se procurer un schéma électrique détaillé auprès d’un
électricien qualifié.
Adaptors, multiple sockets and / or extensions must not be used.
Die Verwendung von Adaptern, Mehrfachsteckdosen und / oder Verlängerungskabeln ist nicht erlaubt.
L’utilisation d’adaptateurs, multiprises et / ou rallonges est interdite.
The power supply must be provided with the following safety devices:
ecient grounding connection; section of conductors suitable for
absorption capacity; ecient grounding leakage protection circuit
breaker.
Die elektrische Netzversorgung muss den Sicherheitsvorschriften entsprechen und folgende Schutzeinrichtungen enthalten: Schutzerdung;
ein dem Leistungsbedarf angemessenen Kabeldurchmesser; Leitungsschutzschalter.
L’alimentation électrique doit comporter les dispositifs de sécurité
suivants: mise à la terre ecace, section des conducteurs adaptée aux
puissances, coupe-circuit de protection ecace en cas de fuite de terre.
If the power supply cable to the machine is damaged it must be replaced by the manufacturer or his service personnel or an authorized
electrician in order to prevent any risks.
Sollte das Netzkabel beschädigt sein, muss es vom Hersteller, durch
seinen technischen Service oder von einer Fachperson ersetzt werden,
um jegliche Risiken zu vermeiden.
Si le câble d’alimentation est endommagé, il doit être remplacé par
le fabricant, le service technique ou par une personne présentant une
qualification équivalente pour prévenir tout risque.
The coee machine has to be connected to the fixed installation using
a UL listed grounding type plug of proper rating. Plug shall be selected
and installed only by qualified personnel. (for US and Canada only).
Die Kaeemaschine darf nur unter Verwendung eines geerdeten ULStecker in der richtigen Dimension an die Festinstallation angeschlossen
werden. Der Stecker darf nur von qualifiziertem Personal ausgewählt
und installiert werden. (nur für USA und Kanada).
La machine à café doit être raccordée à l’installation fixe à l’aide d’une
fiche UL mise à la terre uniquement et présentant les bonnes caractéris
tiques. La fiche doit être sélectionnée et installée exclusivement par des
personnes qualifiées (uniquement pour les États-Unis et le Canada).
-
General Allgemeines Généralités
35
Page 36

Specific safety instructions
Spezifische Sicherheitshinweise
Consignes de sécurité spécifique
Installation and first start up must only be carried out by a RANCILIO
service technician or trained RANCILIO representative with due regard
to all local installation regulations.
Installation und Inbetriebnahme dürfen ausschliesslich von einem
RANCILIO Servicetechniker oder einem ausgebildeten RANCILIO-Spezialisten unter Berücksichtigung aller lokalen Installationsvorschriften
durchgeführt werden.
L’installation et la mise en service initiale de la machine doivent être
exécutée par un technicien spécialisé RANCILO, en accord avec toute
législation en matière valable au lieu d’installation.
Leave enough free space around the machine to facilitate its use and
the performance of any maintenance operations.
Zur einfacheren Bedienung und für Wartungsarbeiten genügend Freiraum um die Maschine lassen.
Laisser susamment d’espace libre autour de la machine pour faciliter
son utilisation et l’exécution de toute opération de maintenance.
The support surface shall be plane, dry, stable and as high that the
cupwarming surface is more than 150 cm from the floor.
Die Auflagefläche muss eben, trocken, stabil und so hoch sein, dass der
Tassenwärmer mindestens 150 cm über dem Boden ist.
La surface de support doit être plane, sèche, stable et susamment
haute pour que le chaue-tasses soit au moins à 150 cm du sol.
The machine must not be set up in areas where water tubes or highpressure cleaners are in use!
Die Maschine darf nicht in Räumen aufgestellt werden, in denen mit
Wasserschlauch oder Hochdruckreinigern gearbeitet wird!
La machine ne doit pas être installée dans des locaux où l’on travaille
au jet d’eau ou à la vapeur sous pression!
The main tubes must be rinsed out before being connected so that no
dirt particles get into the machine. Used gaskets and tubes for connection to the water supply are not allowed.
Vor dem Anschliessen die Wasserleitung und Schläuche durchspülen,
damit keine Schmutzteilchen in die Maschine gelangen. Gebrauchte
Dichtungen und Schläuche dürfen nicht an die Wasserversorgung
angeschlossen werden.
Rincer la conduite d’eau et les tuyaux avant d’eectuer le branchement
pour éviter que des impuretés ne parviennent à l’intérieur de la machine.
Il n’est pas consenti l’utilisation des tuyaux et joints de raccord au
réseaux hydrique déjà utilisés.
A water supply faucet and a non-return valve must be fitted, readily
accessible, at the front end (building side) of the water supply tube.
Vor dem Wasserzulauf-Schlauch muss ein Wasserhahn und ein Rückflussverhinderer (bauseits) gut zugänglich eingebaut sein.
Un robinet d’eau avec non-retour facilement accessible doit être installé
en amont du tuyau d’amenée.
A qualified electrician must make all electrical connections.
Der Elektroanschluss muss von einem zugelassenen Elektro-Installateur vorgenommen werden.
Le branchement de la machine au réseau électrique doit être eectué
par un électricien qualifié et agréé.
For the power supply, the data listed on the type plate must be carefully consulted!
Für den elektrischen Anschluss unbedingt die Daten auf dem Typenschild beachten!
Respecter impérativement les données de la plaque signalétique pour
le branchement électrique!
A power switch (mains switch) and / or an electrical socket must be
connected, and readily accessible, near the machine.
Ein elektrischer Schalter (Netzschalter) und / oder ein Netzstecker muss
leicht zugänglich installationsseitig vorgeschaltet werden.
Il incombe au propriétaire de la machine de faire installer un interrupteur électrique (interrupteur réseau) et / ou une prise fixe facilement
accessible.
The power switch must isolate the machine completely from the
power supply. The gap between the contacts must be at least 3 mm.
Der elektrische Hauptschalter muss die Maschine wirksam und allpolig
vom Elektronetz trennen. Die Kontaktönung muss dabei mindestens
3 mm betragen.
L’interrupteur doit séparer avec ecacité la machine du réseau sur tous
les pôles. L’ouverture du contact doit être d’au moins 3 mm.
36
Page 37

Water renewal
Wasseraustausch
Remplacer l’eau
At the start of each day and anytime after a stop of more than 8 hours, it is necessary to renew 100 % of the water inside the hydraulic circuit. Let flow out water from each group for at least 30 seconds and dispense from the hot water spout at least 2 liters
of water for 1-group or 2-groups compact , 5 liters for 2-groups , 8 liters for 3-groups and 11 liters from the 4-groups machine.
Jeden Tag beim Aufstarten der Maschine und bei Nichtgebrauch von mehr als 8 Stunden muss das Wasser im Kreislauf komplett
ausgetauscht werden. Dazu aus jeder Brühgruppe für mindestens 30 Sekunden Wasser ausströmen lassen. Aus dem Heisswasserauslauf mindestens 2 Liter Wasser bei einer 1- oder 2-gruppigen Compact, 5 Liter bei 2-gruppigen, 8 Liter bei 3-gruppigen und 11 Liter bei
4-gruppigen Maschinen auslaufen lassen.
En début de journée ou, systématiquement, après un arrêt de plus de 8 heures, il est nécessaire de remplacer complètement l’eau dans
le circuit hydraulique. Faire couler l’eau pendant au moins 30 secondes de chaque groupe et remplir via la sortie d’eau chaude au moins
2 litres d’eau dans la machine compacte à 1 ou 2 groupes, 5 litres dans la machine à 2 groupes, 8 litres dans la machine à 3 groupes et
11 litres dans la machine à 4 groupes.
Water hardness
Wasserhärte
Dureté de l’eau
A water softening or salt partial removal system must be fitted if the hardness of the water supply is above 5 °dKH or 9 °fKH,
(German or French degrees of carbonate hardness). The water supply after treatment should be about 5 °dKH or 9 °fKH.
Bei einer Wasserhärte von mehr als 5 °dKH, bzw. 9 °fKH (deutsche bzw. französische Grad Karbonathärte) muss eine Wasserenthärtung
oder Teilentsalzung eingesetzt werden. Die Resthärte des Wassers nach dem Enthärter soll ca. 5 °dKH bzw. 9 °fKH betragen.
Si la dureté de l’eau est supérieure à 5 °dKH ou 9 °fKH (dureté au carbonate française ou allemande), une installation d’adoucissement
de l’eau ou de déminéralisation partielle est nécessaire. La dureté résiduelle de l’eau en aval de l’adoucisseur doit être d’environ 5 °dKH
ou 9 °fKH.
Water softening systems, which are regenerated with cooking salt, are not suitable for coee machines fitted with steam
boilers! Also to be avoided is the connecting of a coee machine to a central water softening system.
Wasserenthärter, welche mit Kochsalz regeneriert werden, sind für Kaeemaschinen mit Dampfboiler nicht geeignet! Insbesondere ist
ein Anschluss von Kaeemaschinen an eine Hausenthärtungsanlage zu vermeiden.
Les systèmes d’adoucissement à régénération au sel ne sont pas indiqués pour les machines à café équipées d’une chaudière à vapeur!
Le branchement de telles machines à café à une installation centrale d’adoucissement de l’eau est à éviter absolument.
General Allgemeines Généralités
37
Page 38

38
Page 39

Gentile cliente
Estimado cliente
Caro cliente
Grazie per averci accordato la Sua fiducia.
Siamo sicuri che il prodotto che Lei ha acquistato risponderà in pieno alle Sue aspettative. Il prodotto che Lei si
accinge ad usare è il risultato di approfonditi studi e meticolose sperimentazioni ed è quanto di più funzionale,
sicuro ed apprezzabile, anche sotto il profilo del design, si possa trovare sul mercato.
Questo manuale per il corretto uso e manutenzione La aiuterà a sfruttare al meglio la sua macchina. Sperando
che trovi chiare le nostre spiegazioni, ci auguriamo di poterLa sempre annoverare tra i nostri clienti.
Le macchine della serie CLASSE 7 sono realizzate per la preparazione di caé espresso e bevande calde in ambito
professionale.
Ante todo, queremos agradecerle por haber elegido RANCILIO.
Estamos seguros de que el producto que ha adquirido cumplirá con todas sus expectativas. La máquina de café que
está a punto de utilizar es el resultado de extensas actividades de investigación y desarrollo. Es la que ofrece el mejor
rendimiento, es la más fácil de usar y la mejor diseñada de su clase.
Este manual de instrucciones, en el que se explica la manera correcta de utilizar y mantener su máquina de café,
le ayudará a obtener los mejores resultados. Esperamos que nuestras explicaciones le parezcan claras y fáciles de
comprender y que siga siendo en el futuro uno de nuestros fieles clientes.
Las máquinas de la serie CLASSE 7 han sido diseñadas para preparar café espresso y otras bebidas calientes de uso
profesional.
Em primeiro lugar, obrigado por seleccionar a RANCILIO.
Estamos confiantes de que o produto que adquiriu irá dar resposta a todas as suas expectativas. A máquina de café
que está prestes a utilizar é o resultado de uma investigação e desenvolvimento extensivos. Trata-se da máquina
mais eficiente, fácil de utilizar e bem concebida do seu género.
Este manual descreve a utilização e manutenção correctas e irá ajudá-lo a obter os melhores resultados da sua máquina. Esperamos que considere as nossas explicações claras e que possamos continuar a contar com a sua empresa
no futuro.
As máquinas da série CLASSE 7 foram concebidas para preparar café expresso e outras bebidas quentes para
utilização profissional.
Barista Operador Operador
39
Page 40

Indice
Índice
Índice
Barista
Operador
Operador
Gentile cliente
Estimado cliente
Caro cliente .................................................................................................................. 39
Vista generale
Visión de conjunto
Perspectiva geral.......................................................................................................... 42
Accensione / Spegnimento
ENCENDIDO / APAGADO
Interruptor ON / OFF .................................................................................................... 43
Uso
Utilización
Utilização ..................................................................................................................... 44
Cosa fare se…
Qué hacer si…
E se ................................................................................................................................ 51
Pulizia giornaliera
Limpieza diaria
Limpeza diária ............................................................................................................. 52
Pulizia dei filtri
Limpiar el filtro
Limpar o filtro .............................................................................................................. 53
40
Pulizia dei gruppi erogatori
Limpieza de los grupos de erogación
Limpeza dos grupos de cabeças ................................................................................. 54
Regolazione dosatura
Ajustar la cantidad
Regular a dosagem ..................................................................................................... 56
Messa fuori servizio
Dejar de utilizar la máquina
Parar de utilizar a máquina ........................................................................................ 58
Page 41

Generale
Generalidades
Generalidades
Installazione della macchina
Instalar la máquina
Montagem da máquina .............................................................................................. 59
Primo avvio
Primera puesta en marcha
Primeira colocação em funcionamento ...................................................................... 60
Specifiche di montaggio
Montaje específico
Montagens especiais .................................................................................................... 61
Svuotare la caldaia
Vaciar la caldera
Esvaziar a caldeira ....................................................................................................... 62
Regolazione della pressione in caldaia
Regulación de la presión de caldera
Regulação da pressão da caldeira .............................................................................. 63
Auto-test dei componenti
Prueba automática de los componentes
Teste automático dos componentes .......................................................................... 64
Diagnostica
Diagnosis
Diagnóstico .................................................................................................................. 66
Dati tecnici
Datos técnicos
Dados técnicos .............................................................................................................68
Istruzioni di sicurezza
Instrucciones de seguridad
Instruções de segurança .............................................................................................. 70
Istruzioni di sicurezza specifiche / Rinnovo acqua / durezza dell’acqua
Instrucciones de seguridad específicas / Recambio de agua / dureza del agua
Instruções de segurança específicas / Renovação da água / Dureza da água ............. 72
Barista Operador Operador
41
Page 42

Vista generale
Visión de conjunto
Perspectiva geral
Lancia acqua calda
Salida del agua caliente
Bico de água quente
Tasto acqua calda
Tecla de agua caliente
Tecla de água quente
You-Steam *
Lancia vapore
Lanza de vapor
Tubo de vapor
Manometro caldaia
Manómetro caldera
Manómetro da caldeira
Manometro pompa
Manómetro bomba
Manómetro da bomba
Gruppo erogatore / portafiltro
Grupo de erogación / portafiltro
Grupo de cabeças / Suporte do filtro
Illuminazione
Iluminación
Iluminação
Leva per erogazione caè (Modello L)
Palanca para erogación de café
(Modelo L)
Alavanca para a dosagem de café
(Modelo L)
opzionale*
opcional
opcional
Interfaccia Modello E
Interfaz de Modelo E
Interface do Modelo E
1 caè espresso
1 café pequeño
1 café expresso
2 caè espresso
2 cafés pequeños
2 cafés expresso
A B C D E
2 caè
2 cafés
2 cafés
1 caè
1 café
1 café
Piano scaldatazze
Bandeja de tazas
Tabuleiro de chávenas
Manopola vapore /
Grifo de vapor /
Torneira de vapor / C-Lever *
Interruttori
Interruptores
Interruptores
Scaldatazze
Calentador de tazas
Aquecedor de chávenas
Resistenza caldaia
Elemento calefactor de caldera
Elemento de aquecimento da caldeira
Interruttore generale
Interruptor general
Interruptor principal
Interfaccia Modello S
Interfaz de Modelo S
Interface do Modelo S
Start / Stop erogazione
Iniciar / parar la erogación
Erogazione Start / Stop
42
Page 43

Accensione / Spegnimento
Encendido / Apagado
Interruptor ON / OFF
Accensione
Encendido
Interruptor ON
1
2
Aprire il rubinetto dell’acqua
Abrir el grifo de agua
Abrir a torneira da água
Accendere l’interruttore generale
Encender el Interruptor general
Ligar o interruptor principal
Aspettare che la caldaia si sia riempita
Esperar hasta que la caldera esté llena
Aguardar até a caldeira ter terminado
o enchimento
Spegnimento
Apagado
Interruptor OFF
1
2
Rimuovere il portafiltro, sbatterlo e
riagganciarlo
Retirar el soporte del filtro, sacudirlo y
volverlo a enganchar
Retirar o suporte de filtro, bater com ele
sobre uma superfície e voltar a bloqueá-lo
Non danneggiare il filtro
No dañar el filtro
Não danificar o filtro
Spegnere lo scaldatazze, la resistenza
caldaia e l’interruttore generale
Apagar el calentador de tazas, el
elemento calefactor de la caldera y el
Interruptor general
Desligar o aquecedor de chávenas, o
elemento de aquecimento da caldeira e
o interruptor principal
Operador Operador
3
Accendere la resistenza caldaia
Encender el elemento calefactor de la caldera
Ligar o elemento de aquecimento da caldeira
Scaldatazze se richiesto (se presente)
Calentador de tazas, si es necesario
Aquecedor de chávenas se necessário
3
Chiudere il rubinetto dell’acqua
Cerrar el grifo de agua
Fechar a torneira de água
Pulire la macchina
Limpiar la máquina
Limpar a máquina
Barista
43
Page 44
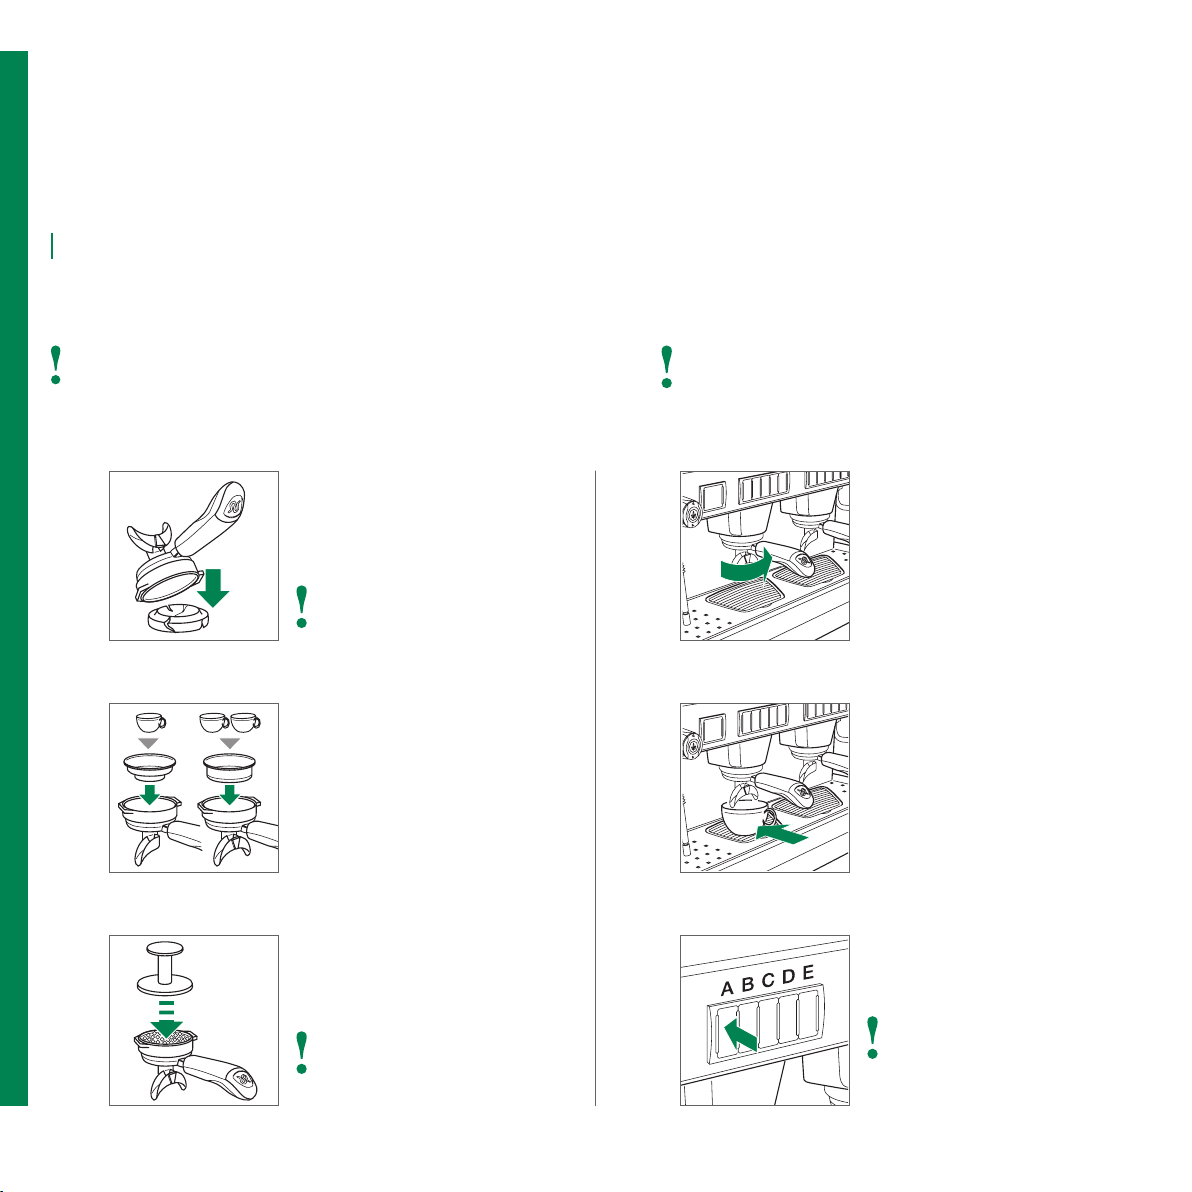
Uso
Utilización
Utilização
Erogare caè
Preparación de café
Preparação de café
Per il rinnovo acqua: vedere la nota a pag. 73
Vea la nota sobre recambio de agua en la página 73
Sobre a renovação da água: veja a nota na página 73
Rimuovere il portafiltro e sbatterlo
1
2 5
Retirar el soporte del filtro y sacudirlo
Retirar o suporte de filtro e bater com
ele sobre uma superfície
Non danneggiare il filtro
No dañar el filtro
Não danificar o filtro
Usare un filtro per 1 o 2 caè
Utilizar un filtro para 1 o 2 cafés, si es
necesario
Usar um filtro para 1 ou 2 cafés conforme
necessário
4
Attenzione: superficie calda
Advertencia: Superficie caliente
Advertência: Superfície quente
Agganciare il portafiltro al gruppo
erogatore
Enganchar el soporte del filtro en el
grupo de erogación
Bloquear o suporte de filtro no grupo de
cabeças
Posizionare una tazzina sotto il becco
caè
Colocar la(s) taza(s) debajo de la boquilla
del café
Colocar a(s) chávena(s) por baixo da
saída de café
44
3
Riempire di caè macinato e pressare
Rellenar con café molido y compactar
Encher com pó de café e pressionar
Rimuovere i residui di caè sul bordo
del filtro
Retirar los restos del borde del filtro
Retirar os resíduos do rebordo do filtro
6
Avviare l’erogazione
Iniciar la preparación
Iniciar a preparação
Modello S: interruzione manuale
dell’erogazione
Modelo S: terminar la preparación
manualmente
Modelo S: Para manualmente a
preparação
Page 45

Prelevare acqua calda (tè)
Preparación de agua caliente (té)
Preparação de água quente (chá)
Attenzione: superficie calda
Advertencia: Superficie caliente
Advertência: Superfície quente
Prelevare una grande quantità di acqua calda (Modello E)
Preparación de un gran volumen de agua caliente (Modelo E)
Preparação de um grande volume de água quente (Modelo E)
1
2
3
Posizionare la tazza sotto la lancia
acqua calda
Colocar la taza debajo de la salida del
agua caliente
Colocar a chávena por baixo do bico de
água quente
Premere il tasto acqua calda
Pulsar la tecla para agua caliente
Pressionar a tecla de água quente
Aspettare la fine dell’erogazione
Esperar hasta que finalice la preparación
Aguardar até ao final da preparação
Modello S: interruzione manuale
dell’erogazione
Modelo S: terminar la preparación
manualmente
Modelo S: Para manualmente a
preparação
1
2
Tenere premuto 2 sec. il tasto acqua calda
Pulsar la tecla de agua caliente durante
2 seg.
Manter a tecla de água quente
pressionada durante 2 seg.
Si avvia l’erogazione continua…
Se inician las preparaciones continuas...
A preparação contínua inicia-se…
Ripremere il tasto quando è stata
erogata la quantità desiderata
Volver a pulsar la tecla cuando la
cantidad deseada haya sido vertida
Pressionar novamente a tecla depois de
atingida a quantidade desejada
45
Operador Operador
Barista
Page 46

Uso (Modello L)
Utilización (Modelo L)
Utilização (Modelo L)
Erogare caè
Preparación de café
Preparação de café
Per il rinnovo acqua: vedere la nota a pag. 73
Vea la nota sobre recambio de agua en la página 73
Sobre a renovação da água: veja a nota na página 73
Rimuovere il portafiltro e sbatterlo
1
2 5
Retirar el soporte del filtro y sacudirlo
Retirar o suporte de filtro e bater com
ele sobre uma superfície
Non danneggiare il filtro
No dañar el filtro
Não danificar o filtro
Usare un filtro per 1 o 2 caè
Utilizar un filtro para 1 o 2 cafés, si es
necesario
Usar um filtro para 1 ou 2 cafés conforme
necessário
4
Attenzione: superficie calda
Advertencia: Superficie caliente
Advertência: Superfície quente
Agganciare il portafiltro al gruppo
erogatore
Enganchar el soporte del filtro en el
grupo de erogación
Bloquear o suporte de filtro no grupo de
cabeças
Posizionare una tazzina sotto il becco
caè
Colocar la(s) taza(s) debajo de la boquilla
del café
Colocar a(s) chávena(s) por baixo da
saída de café
46
3
Riempire di caè macinato e pressare
Rellenar con café molido y compactar
Encher com pó de café e pressionar
Rimuovere i residui di caè sul bordo
del filtro
Retirar los restos del borde del filtro
Retirar os resíduos do rebordo do filtro
6
Abbassare la leva
Bajar la palanca
Baixar a alavanca
Page 47

Prelevare acqua calda (tè)
Preparación de agua caliente (té)
Preparação de água quente (chá)
Attenzione: Non abbassare la leva senza caé nel portafiltro
Advertencia: No tirar de la palanca sin café en el potra-filtro
Advertência: Não puxe a alavanca sem café no porta-filtro
Aspettare che il caè cominci a scendere
7
8
Esperar a que el café empiece a gotear
Aguardar até que o café comece a sair
Rilasciare la leva e lasciarla risalire da sola
Soltar la palanca y dejar que se eleve sola
Soltar a alavanca e deixá-la subir por
si própria
Attenzione: superficie calda
Advertencia: Superficie caliente
Advertência: Superfície quente
1
2
Posizionare la tazza sotto la lancia
acqua calda
Colocar la taza debajo de la salida del
agua caliente
Colocar a chávena por baixo do bico de
água quente
Aprire il rubinetto dell’acqua calda
Abrir el grifo de agua caliente
Abrir a torneira de água quente
Operador Operador
Ripetere i passi 6 – 8 per un caè doppio
Repetir los pasos 6 a 8 para un segundo café
Repetir os passos 6 – 8 para um segundo café
3
Chiudere il rubinetto dell’acqua calda
Cerrar el grifo de agua caliente
Fechar a torneira de água quente
Barista
47
Page 48

Uso
Utilización
Utilização
Lancia vapore
Lanza de vapor
Tubo de vapor
Per risultati ottimali: conservare il latte a ≤ 5 °C (≤ 41 °F)
Para obtener los mejores resultados: conservar la leche a ≤ 5 °C (≤ 41 °F)
Para obter resultados melhores: conservar o leite a ≤ 5 °C (≤ 41 °F)
2 sec.
Rimuovere residui di condensa
1
2
Hacer salir el agua de condensación residual
Remover o condensado de vapor residual
Immergere la lancia vapore nel latte
Sumergir la lanza de vapor en leche
Mergulhar o tubo de vapor em leite
Attenzione: superficie calda
Advertencia: Superficie caliente
Advertência: Superfície quente
4
5
Raggiunta la temperatura desiderata,
chiudere il rubinetto vapore
Cerrar el grifo de vapor cuando se
alcance la temperatura deseada
Fechar a torneira de vapor quando se
alcançar a temperatura desejada
Rimuovere il prodotto quando finito
Retirar el producto cuando esté listo
Retirar o produto quando terminar
48
3
Aprire il rubinetto vapore progressivamente
Abrir el grifo de vapor poco a poco
Abrir progressivamente a torneira de vapor
6
Risciacquare e pulire la lancia vapore
Purgar y liampiar la lanza de vapor
Enxaguar e limpar o tubo de vapor
Page 49

C-lever (opzionale)
Palanca en C para el vapor (opcional)
Alavanca de vapor C (opcional)
Attenzione: superficie calda
Advertencia: Superficie caliente
Advertência: Superfície quente
1
2
3
2 sec.
Rimuovere residui di condensa
Hacer salir el agua de condensación residual
Remover o condensado de vapor residual
Immergere la lancia vapore nel latte
Sumergir la lanza de vapor en leche
Mergulhar o tubo de vapor em leite
Spingere verso il basso la C-lever per un
impulso di vapore
Presionar hacia abajo la palanca en C
para obtener vapor
Baixar a alavanca C para impulsionar
o vapor
4
5
o | o | ou
Spingere verso l’alto la C-lever per
erogare vapore in modo continuo
Presionar hacia arriba la palanca en C
para obtener vapor continuo
Levantar a alavanca C para obter vapor
contínuo
Abbassare la leva per fermare
l’erogazione
Presionar hacia arriba para interrumpir
la salida
Subir novamente para parar o vapor
Rimuovere il prodotto quando finito
Retirar el producto cuando esté listo
Retirar o produto quando terminar
Risciacquare e pulire la lancia vapore
Purgar y liampiar la lanza de vapor
Enxaguar e limpar o tubo de vapor
Operador Operador
Barista
49
Page 50

Uso
Utilización
Utilização
You-Steam (opzionale)
You-Steam (opcional)
You-Steam (opcional)
Per risultati ottimali: conservare il latte a ≤ 5 °C (≤ 41 °F)
Para obtener los mejores resultados: conservar la leche a ≤ 5 °C (≤ 41 °F)
Para obter resultados melhores: conservar o leite a ≤ 5 °C (≤ 41 °F)
2 sec.
Rimuovere residui di condensa
1
2
Hacer salir el agua de condensación residual
Remover o condensado de vapor residual
Immergere la lancia vapore nel latte
Sumergir la lanza de vapor en leche
Mergulhar o tubo de vapor em leite
Attenzione: superficie calda
Advertencia: Superficie caliente
Advertência: Superfície quente
o | o | ou
4
Spingere verso l’alto lo You-Steam in
posizione 2 per latte montato
Presionehacia arriba a la segunda
posición para leche espumada
Levante o You-Steam para a posição 2
para leite com espuma
Abbassare la leva per fermare
l’erogazione
Presionar hacia arriba para interrumpir
la salida
Subir novamente para parar o vapor
Rimuovere il prodotto quando finito
Retirar el producto cuando esté listo
Retirar o produto quando terminar
50
3
Spingere verso l’alto lo You-Steam in
posizione 1 per latte caldo
Presione hacia arriba el You-steam a la
primera posición para calentar leche
Levante o You-Steam para a posição 1
para leite quente
5
Risciacquare e pulire la lancia vapore
Purgar y liampiar la lanza de vapor
Enxaguar e limpar o tubo de vapor
Page 51

Cosa fare se…
Que hacer si…
E se…
La macchina non si avvia
La máquina no empieza a funcionar
A máquina não arranca
L’alimentazione elettrica funziona?
¿Está funcionando el suministro de energía eléctrica?
A alimentação de energia está a funcionar?
Il fusibile sull’alimentazione è integro?
¿El fusible de alimentación esta bien?
O fusível da alimentação eléctrica é adequado?
L’interruttore generale è inserito?
¿El Interruptor general está activado?
O interruptor principal está ligado?
Cavo e spina di alimentazione sono integri?
¿El enchufe y el cable están en buen estado?
A ficha e o cabo estão ok?
C’è acqua sotto la macchina
Hay agua debajo de la máquina
Existe água por baixo da máquina
Lo scarico della bacinella è ostruito?
¿La bandeja de drenaje está obstruida?
O tabuleiro de escoamento está obstruído?
Erogazione lenta
Erogación lenta
Dosagem lenta
Filtri e doccette sono puliti?
¿El filtro y los grupos de erogación están limpios?
O filtro e os grupos de cabeças estão ok?
La polvere di caè è troppo fine?
¿El café molido es demasiado fino?
O café está moído demasiado fino?
Erogazione vapore irregolare
Salida irregular de vapor
Fornecimento irregular de vapor
I fori dello spruzzatore della lancia vapore sono ostruiti?
¿Las puntas de la lanza de vapor están obstruidas?
As pontas do tubo de vapor estão obstruídas?
Barista Operador Operador
51
Page 52
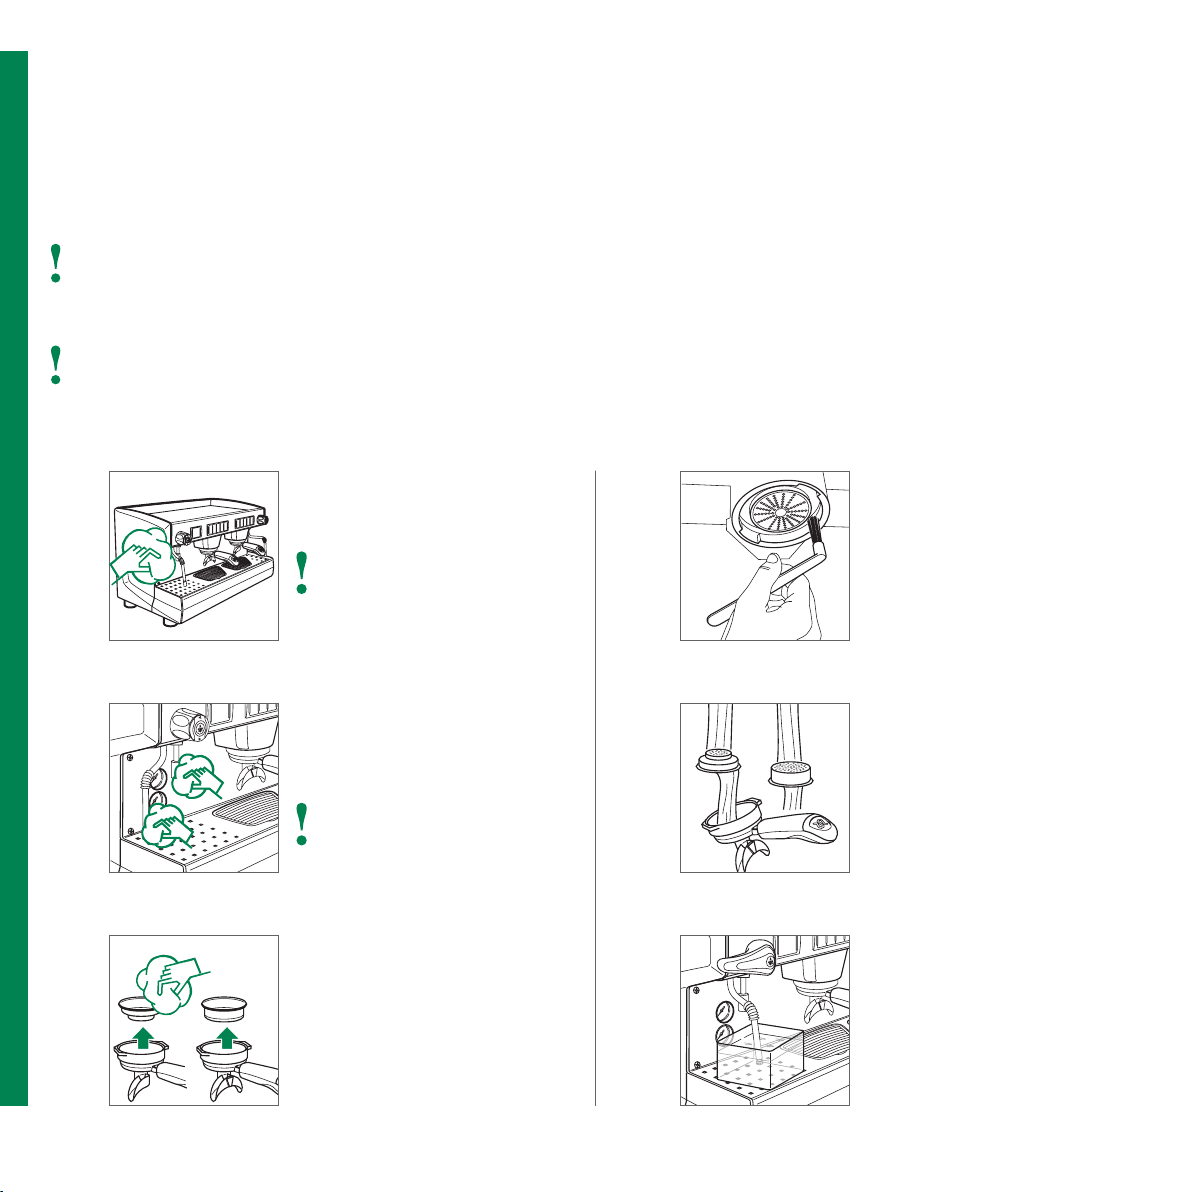
Pulizia giornaliera
Limpieza diaria
Limpeza diária
Non utilizzare strumenti abrasivi e detergenti o solventi generici! Per la pulizia, seguire le istruzioni sulla confezione!
¡No utilice ni esponjas abrasivas ni disolventes! Si se necesitara un producto de limpieza, ¡siga las instrucciones que aparecen en el embalaje!
Não usar esponjas abrasivas e detergentes ou solventes! Se for necessário um material de limpeza, seguir as instruções constantes na
embalagem!
Non immergere la macchina in acqua!
¡No sumerja la máquina en agua!
Não mergulhar a máquina em água!
Pulire la carrozzeria con un panno umido
1
2
3 6
Limpiar el exterior con un trapo húmedo
Limpar a estrutura com um pano húmido
Seguire il senso della satinatura
sulle parti in acciaio inox
Seguir el sentido del satinado en las
piezas de acero inoxidable
No caso de peças de aço inoxidável limpar
no sentido do acabamento acetinado
Pulire la lancia vapore / lancia acqua
Limpiar la lanza de vapor / la salida del
agua caliente
Limpar o tubo de vapor / bico de água quente
Pulire gli ugelli incrostati
Limpiar las boquillas de incrustaciones
Limpar as agulhetas com sujidade
incrustada
Rimuovere i portafiltri, sganciare i filtri,
pulire filtri e portafiltri
Retirar los soportes de filtro, desenganchar
los filtros, impiar los soportes de filtro y los
filtros
Retirar os suportes dos filtros e desbloquear
os filtros, limpar os suportes dos filtros e
os filtros
4
5
Pulire le guarnizioni sottocoppa dei
gruppi erogatori
Cepillar la junta debajo de la cubierta
Escovar as vedações por baixo da
estrutura
Risciacquare con acqua calda per
eliminare ogni residuo oleoso dovuto ai
grani di caè
Enjuagar con agua caliente para disolver
cualquier residuo de aceite de los granos
de café
Enxaguar com água quente para dissolver
qualquer resíduo de óleo do grão do café
Immergere la lancia vapore nel soluzione
cappuccinatore
Sumergir la lanza de vapor en limpiador
de leche
Mergulhar o tubo de vapor em detergente
de leite
52
Page 53

Pulizia dei filtri
Limpiar el filtro
Limpar o filtro
La macchina deve essere spenta e fatta rareddare!
¡Se debe apagar la máquina y dejar que se enfríe!
A máquina tem de ser desligada e arrefecer!
Utilizzare un contenitore di vetro o acciaio INOX!
¡Utilizar recipientes de vidrio o de acero inoxidable!
Usar um recipiente de vidro ou de aço inoxidável!
Preparare la soluzione in un contenitore
1
2 5
3
di vetro o acciaio INOX
Preparar la solución en un recipiente
de vidrio o de acero inoxidable
Preparar a solução num recipiente de
vidro ou de aço inoxidável
Immergere per almeno 20 minuti nella
soluzione preparata filtro e porta filtro
separati
Sumergir el portafiltro / el filtro desenganchado en la solución durante 20 min.,
como mínimo
Mergulhar o suporte do filtro / filtro solto
na solução durante pelo menos 20 min.
Risciacquare portafiltro / filtro
accuratamente sotto acqua corrente
Enjuagar bien el soporte del filtro / el
filtro bajo agua corriente
Enxaguar o suporte do filtro / filtro cuidadosamente sob água corrente
4
6
Riagganciare il portafiltro al gruppo
erogatore
Volver a colocar el soporte del filtro,
engancharlo en el grupo de erogación
Colocar novamente o suporte de filtro,
bloquear o suporte de filtro no grupo de
cabeças
Rimuovere la griglia portatazze, pulire
lo scarico
Retirar la rejilla del soporte de tazas,
limpiar el orificio de salida del desagüe
Retirar a grelha de suporte de chávenas
e limpar a saída de escoamento
Riposizionare la griglia portatazze
Volver a colocar la rejilla del soporte de
tazas
Colocar novamente a grelha de suporte
de chávenas
Operador Operador
Barista
53
Page 54

Lavaggio automatico dei gruppi erogatori (Modello E)
Limpieza automática de los grupos de erogación (Modelo E)
Limpeza automática dos grupos de cabeças (Modelo E)
La macchina deve essere in pressione *
La máquina deberá estar bajo presión
A máquina tem de estar sob pressão
Eettuare il lavaggio almeno una volta al giorno
Realizar la limpieza por lo menos una vez al día
Efectuar pelo menos uma limpeza diária
Tenere premuto il tasto C per almeno
1
2
5 sec.
Pulsar la tecla C durante 5 seg., como
mínimo
Manter a tecla C durante pelo menos
5 seg.
Inserire la membrana filtro ciego e aggiungere il detergente per macchine per caè
Insertar la membrana filtro ciego, añadir el
detergente para máquinas de café
Introduzir o la membrana de filtro cego e
adicionar produto de limpeza próprio para
máquinas de café
4
5
I gruppi sono lavati alternativamente. Tenere premuto per circa
2 sec. il tasto C per saltare la fase
Los grupos se lavan alternativamente. Pulsar la tecla C durante
unos 2 seg. para saltarse esta fase
Os grupos são lavados alternadamente. Pressionar o botão C
durante cerca de 2 seg. para saltar esta fase
Premere il tasto C per avviare la fase
di pulizia
Pulsar la tecla C para activar la fase de
limpieza
Activar a fase de limpeza com botão C
Si ferma automaticamente
Parar automaticamente
Se para automáticamente
Rimuovere la membrana filtro ciego,
riagganciare il portafiltro
Retirar la membrana filtro ciego, volver
a enganchar el soporte del filtro
Retirar o la membrana de filtro cego e
bloquear novamente o suporte de filtro
*
54
3
Agganciare il portafiltro al gruppo
erogatore
Enganchar el soporte del filtro en el grupo
de erogación
Bloquear o suporte de filtro no grupo de
cabeças
6
Premere il tasto C per avviare la fase
di risciacquo
Pulsar la tecla C para activar la fase de enjuague
Activar a fase de enxaguamento com botão C
Si ferma automaticamente
Parar automaticamente
Se para automáticamente
Page 55

Lavaggio automatico dei gruppi erogatori (Modello S)
Limpieza automática de los grupos de erogación (Modelo S)
Limpeza automática dos grupos de cabeças (Modelo S)
La macchina deve essere in pressione *
La máquina deberá estar bajo presión
A máquina tem de estar sob pressão
Eettuare il lavaggio almeno una volta al giorno. Pulizia è possibile per gruppo
Realizar la limpieza por lo menos una vez al día. Limpieza es posible por grupo
Efectuar pelo menos uma limpeza diária. Limpeza é possível por grupo
Tenere premuto il tasto Start / Stop per
1
2
almeno 5 sec.
Pulsar la tecla de inicio / parada de erogación durante 5 seg., como mínimo
Manter a tecla Start / tecla de paragem
da dosagem pressionada durante pelo
menos 5 seg.
Inserire la membrana filtro ciego e aggiungere il detergente per macchine per caè
Insertar la membrana filtro ciego, añadir el
detergente para máquinas de café
Introduzir o la membrana de filtro cego e
adicionar produto de limpeza próprio para
máquinas de café
Premere il tasto Start / Stop 2 volte per saltare la fase
Pulsar la tecla de inicio / parade de erogación 2x por saltarse la fase
Pressione o botão de dosagem Start / Stop 2x para anular esta fase
4
5
Avviare la fase di pulizia
Activar la fase de limpieza
Activar a fase de limpeza
Si ferma automaticamente
Parar automaticamente
Se para automáticamente
Rimuovere la membrana filtro ciego,
riagganciare il portafiltro
Retirar la membrana filtro ciego, volver
a enganchar el soporte del filtro
Retirar o la membrana de filtro cego e
bloquear novamente o suporte de filtro
*
Operador Operador
3
Agganciare il portafiltro al gruppo
erogatore
Enganchar el soporte del filtro en el grupo
de erogación
Bloquear o suporte de filtro no grupo de
cabeças
6
Avviare la fase di risciacquo
Activar la fase de enjuague
Activar a fase de enxaguamento
Si ferma automaticamente
Parar automaticamente
Se para automáticamente
Barista
55
Page 56

Regolazione dosatura (Modello E)
Ajustar la cantidad (Modelo E)
La macchina deve essere in pressione
La máquina deberá estar bajo presión
A máquina tem de estar sob pressão
Regular a dosagem (Modelo E)
Regolazione delle dosi caè per ciascun gruppo erogatore (Ripetere i passi 1 – 6 per ogni gruppo erogatore)
Ajustar las cantidades de café para cada uno de los grupos de erogación
Regular as dosagens de café para cada grupo de cabeças (repita os passos 1 – 6 para cada grupo de cabeças)
Le impostazioni del gruppo di sinistra sono automaticamente copiate sugli altri gruppi – iniziare sempre dal gruppo di sinistra
La configuración del grupo de la izquierda se copia a todos los demas grupos automaticamente – empezar siempre con el grupo de la izquierda
As configurações do grupo da esquerda são automaticamente copiadas para todos os outros grupos – inicia-se sempre o grupo da esquerda
(Repetir los pasos 1 – 6 para cada grupo erogador)
Premere il tasto E del corrispondente
1
2 5
3
56
gruppo erogatore per 10 sec.
Pulsar la tecla E del grupo de erogación
correspondiente durante 10 seg.
Pressionar a tecla E do correspondente
grupo de cabeças durante 10 seg.
Riempire il portafiltro con caè macinato
Rellenar el soporte del filtro con café
Encher o suporte de café com café
Agganciare il portafiltro, posizionare la
tazzina sotto il gruppo erogatore
Colocar el soporte del filtro, poner la taza
debajo del grupo de erogación
Bloquear o suporte de filtro e colocar a
chávena sob o grupo de cabeças
4
6
Premere il tasto da programmare
(ad es. tasto A)
Pulsar la tecla para que esté programado (por ej., la tecla A)
Pressionar a tecla a programar
(p. ex. tecla A)
Comincia l’erogazione…
La preparación se inicia...
A preparação inicia-se…
Ripremere il tasto quando è stata
erogata la quantità desiderata
Volver a pulsar la tecla cuando la cantidad deseada haya sido vertida
Pressionar novamente a tecla depois de
atingida a quantidade desejada
Ripetere i passi 2 – 5 per ogni tasto
Repetir los pasos 2 a 5 para cada tecla
Repetir os passos 2 – 5 para cada tecla
Premere il tasto E per memorizzare
le nuove impostazioni
Volver a pulsar la tecla E para guardar
nuevas configuraciones
Pressionar a tecla E novamente para
memorizar as novas configurações
Controllare le dosi erogando caè
Preparar cafés para comprobar las
cantidades
Preparar cafés para verificar as dosagens
Page 57

Regolazione quantità di acqua calda
Ajustar la cantidad de agua caliente
Regular a quantidade de água quente
Premere il tasto E del gruppo erogatore
1
2 5
3
di sinistra per circa 10 sec.
Pulsar la tecla E del grupo de erogación
izquierdo durante 10 seg.
Pressionar a tecla E do grupo de cabeças
esquerdo durante 10 seg.
Posizionare la tazza sotto la lancia
acqua calda
Colocar la taza debajo de la salida del
agua caliente
Colocar a chávena por baixo do bico de
água quente
Premere il tasto acqua calda
Pulsar la tecla para agua caliente
Pressionar a tecla de água quente
Si avvia l’erogazione continua…
Se inician las preparaciones continuas...
A preparação contínua inicia-se…
4
Ripremere il tasto quando è stata
erogata la quantità desiderata
Volver a pulsar la tecla cuando la cantidad deseada haya sido vertida
Pressionar novamente a tecla depois
de atingida a quantidade desejada
Premere il tasto E per memorizzare
le nuove impostazioni
Volver a pulsar la tecla E para guardar
nuevas configuraciones
Pressionar a tecla E novamente para
memorizar as novas configurações
Controllare la dose prelevando acqua
calda
Preparar agua caliente para comprobar la cantidad
Preparar água quente para verificar
a dosagem
Barista Operador Operador
57
Page 58
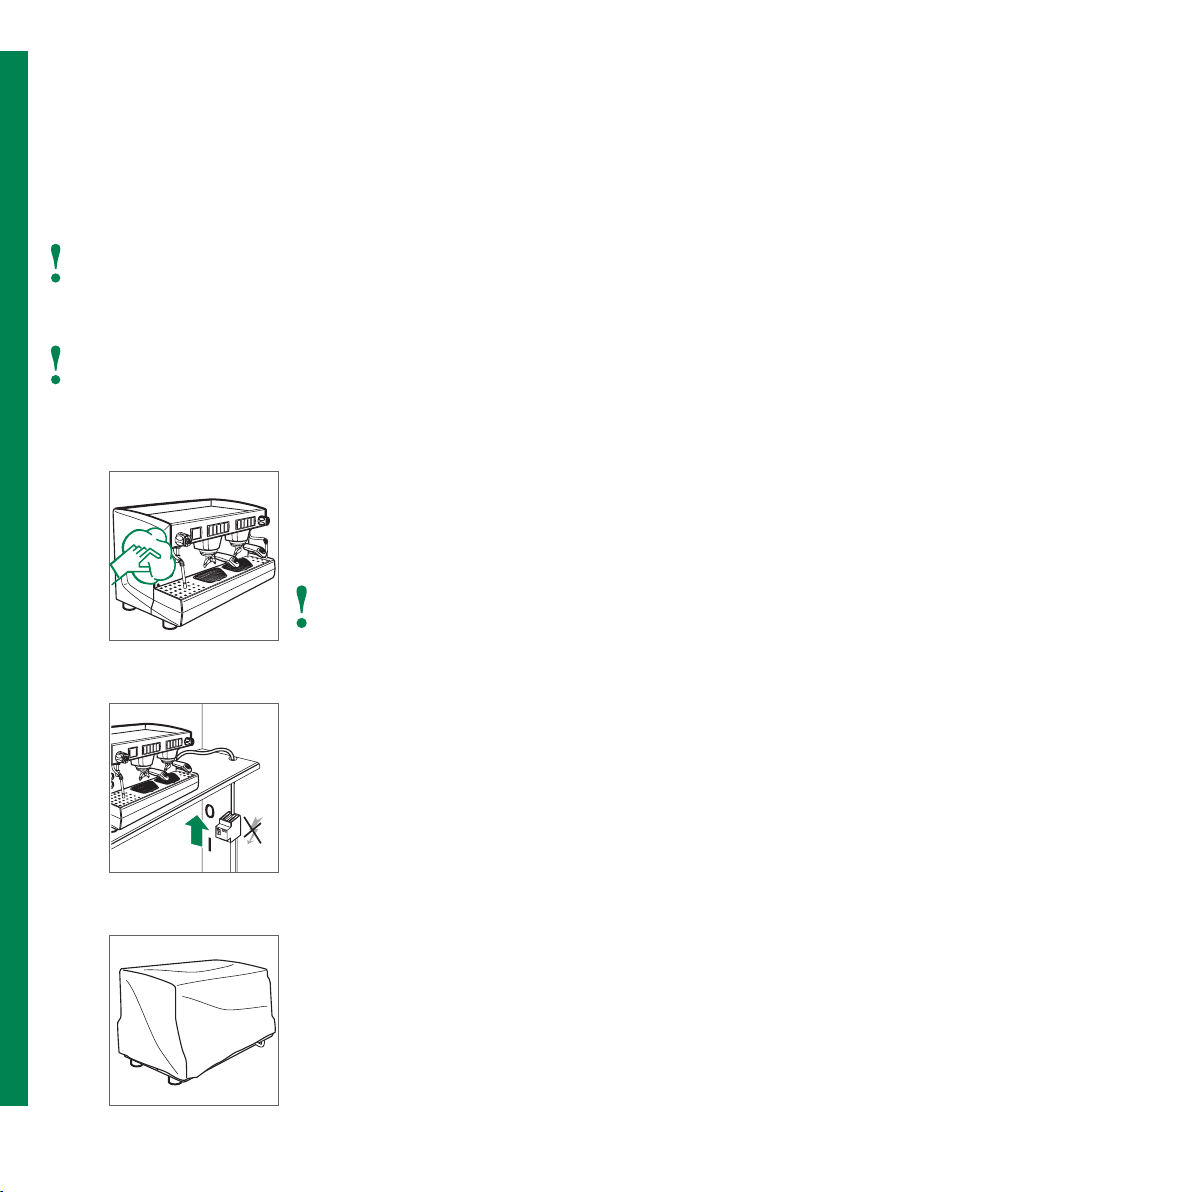
Messa fuori servizio
Dejar de utilizar la máquina
Parar de utilizar a máquina
La macchina può essere scollegata dalla rete elettrica solo da una persona qualificata!
¡Solo una persona cualificada estará autorizada a desconectar la máquina del suministro principal de energía eléctrica!
A máquina só pode ser desligada da corrente por uma pessoa qualificada!
Messa fuori servizio: tagliare il cavo di alimentazione. Consegnare la macchina al personale preposto per il suo smaltimento
Parada definitiva: Cortar el cable. Encomiende la máquina a una empresa autorizada para su eliminación
Fase final: Cortar o cabo. Entregar a máquina nas empresas autorizadas para eliminação
Pulire la macchina
1
Limpiar la máquina
Limpar a máquina
Vedere pagina «Pulizia giornaliera»
Véase la página «Limpieza diaria»
Consultar a página «Limpeza diária»
58
2
3
Staccare l’interruttore dierenziale
Desconectar el interruptor diferencial
Desligue o disjuntor principal
Coprire la macchina e riporla in un ambiente asciutto, al riparo da intemperie
Cubra la máquina y colóquela en un
recinto seco, no expuesta a elementos
medioambientales
Cobrir a máquina e colocá-la num local seco,
não exposto aos elementos ambientais
Page 59

Installazione della macchina
Instalar la máquina
Montagem da máquina
Un’errata installazione può causare danni a persone, animali e cose
Una instalación errónea puede causar daños a personas, animales y objetos
Uma instalação incorrecta pode provocar danos em pessoas, animais ou objectos
Osservare le istruzioni di sicurezza specifiche!
¡Observar las notas sobre instrucciones de seguridad específicas!
Observar as notas sobre as instruções específicas de segurança!
Posizionare la macchina in piano su una
1
2 5
3
0.1 - 0.6 MPa
15 - 87 PSI
ø G
superficie stabile
Colocar la máquina sobre una superficie
plana y estable
Colocar a máquina sobre uma superfície
nivelada e estável
Lasciare dello spazio libero attorno
Dejar suficiente espacio libre alrededor
Deixar espaço suficiente em volta
Regolare i piedini
Nivelar las irregularidades con los pies
regulables
Compensar os desequilíbrios usando os
pés de rosca
Collegare il tubo di carico dell’acqua
Conectar el tubo para el agua dulce
Ligar o tubo de água fresca
3
/
Non attorcigliare il tubo
8
No doblar jamás el tubo
Nunca dobrar o tubo
4
6
Collegare il tubo di scarico alla macchina
Fijar el tubo de desagüe a la máquina
Ligar o tubo de drenagem à máquina
Serrare le connessioni
Fijar las conexiones firmemente
Apertar as ligações
Collegare il tubo di scarico al lavello
Conectar el tubo de desagüe al sumidero
Ligar o tubo de drenagem ao escoamento
Assicurare un’inclinazione
appropriata per lo scarico
Asegurarse de que el desagüe tenga
una inclinación apropiada
Assegurar que a drenagem tem uma
inclinação adequada
Verificare la tenuta
Comprobar la estanqueidad de todas las conexiones
Verificar a estanquicidade
Generale Generalidades Generalidades
59
Page 60

Primo avvio
Primera puesta en marcha
Primeira colocação em funcionamento
Un’errata installazione può causare danni a persone, animali e cose
Una instalación errónea puede causar daños a personas, animales y objetos
Uma instalação incorrecta pode provocar danos em pessoas, animais ou objectos
Osservare le istruzioni di sicurezza specifiche!
¡Observar las notas sobre instrucciones de seguridad específicas!
Observar as notas sobre as instruções específicas de segurança!
60
1
2
Collegare il cavo di terra equipotenziale
all’apposito morsetto
Conectar el cable equipotencial de puesta
a tierra al borne de conexión
Ligar o fio de terra equipotencial ao borne
do terminal
Cavo giallo / verde
cable amarillo / verde
Cabo amarelo / verde
Collegare il cavo di alimentazione
Conectar a la alimentación principal
Ligar à alimentação de energia
Schemi di collegamento, vedere
pag. «Schemi»
Para los diagramas eléctricos, véase la
página «Diagramas»
Esquema de ligações, consultar a
página «Diagramas»
Aprire il rubinetto dell’acqua
Abrir el grifo de agua
Abrir a torneira da água
4
5
63
Accendere l’interruttore generale
Encender el Interruptor general
Ligar o interruptor principal
Aspettare che la caldaia si sia riempita
Esperar hasta que la caldera esté llena
Aguardar até a caldeira ter terminado
o enchimento
Accendere la resistenza caldaia
Encender el elemento calefactor
de la caldera
Ligar o elemento de aquecimento
da caldeira
Risciacquare ciascun gruppo per 1 min.
Enjuagar cada grupo durante 1 min.
Enxaguar cada grupo durante 1 min.
Ripetere 2 volte
Repetir 2 veces
Repetir 2 vezes
Page 61

Specifiche di montaggio
Montaje específico
Montagens especiais
Montaggio della leva (Modello L)
Montar la palanca (Modelo L)
Montagem da alavanca (Modelo L)
Erogare vapore dalla lancia vapore per
7
8
Spegnere l’interruttore della resistenza caldaia e quello generale
9
Apagar el elemento calefactor de la caldera y el Interruptor general
Desligar o elemento de aquecimento da caldeira e o interruptor principal
Svuotare l’acqua dalla caldaia (vedere pagina «Svuotare la caldaia»)
10
Vaciar el agua de la caldera (véase la página «Vaciar la caldera»)
Esvaziar a água da caldeira (consultar a página «Esvaziar a caldeira»)
1 min.
Extraer vapor de cada una de las lanzas
de vapor durante 1 min.
Retirar vapor do tubo de vapor durante
1 min.
Prelevare acqua calda per 1 min.
Extraer agua caliente durante 1 min.
Tirar água quente durante 1 min.
Ripetere 2 volte
Repetir 2 veces
Repetir 2 vezes
1
2
3
Montare il carter superiore
Montar la cubierta de protección superior
Montar a estrutura superior
Fissare con le viti
Fijar con tornillos
Fixar com os parafusos
Montare la(e) leva(e)
Montar la(s) palanca(s)
Aparafusar a(s) alavanca(s)
Generale Generalidades Generalidades
61
Page 62
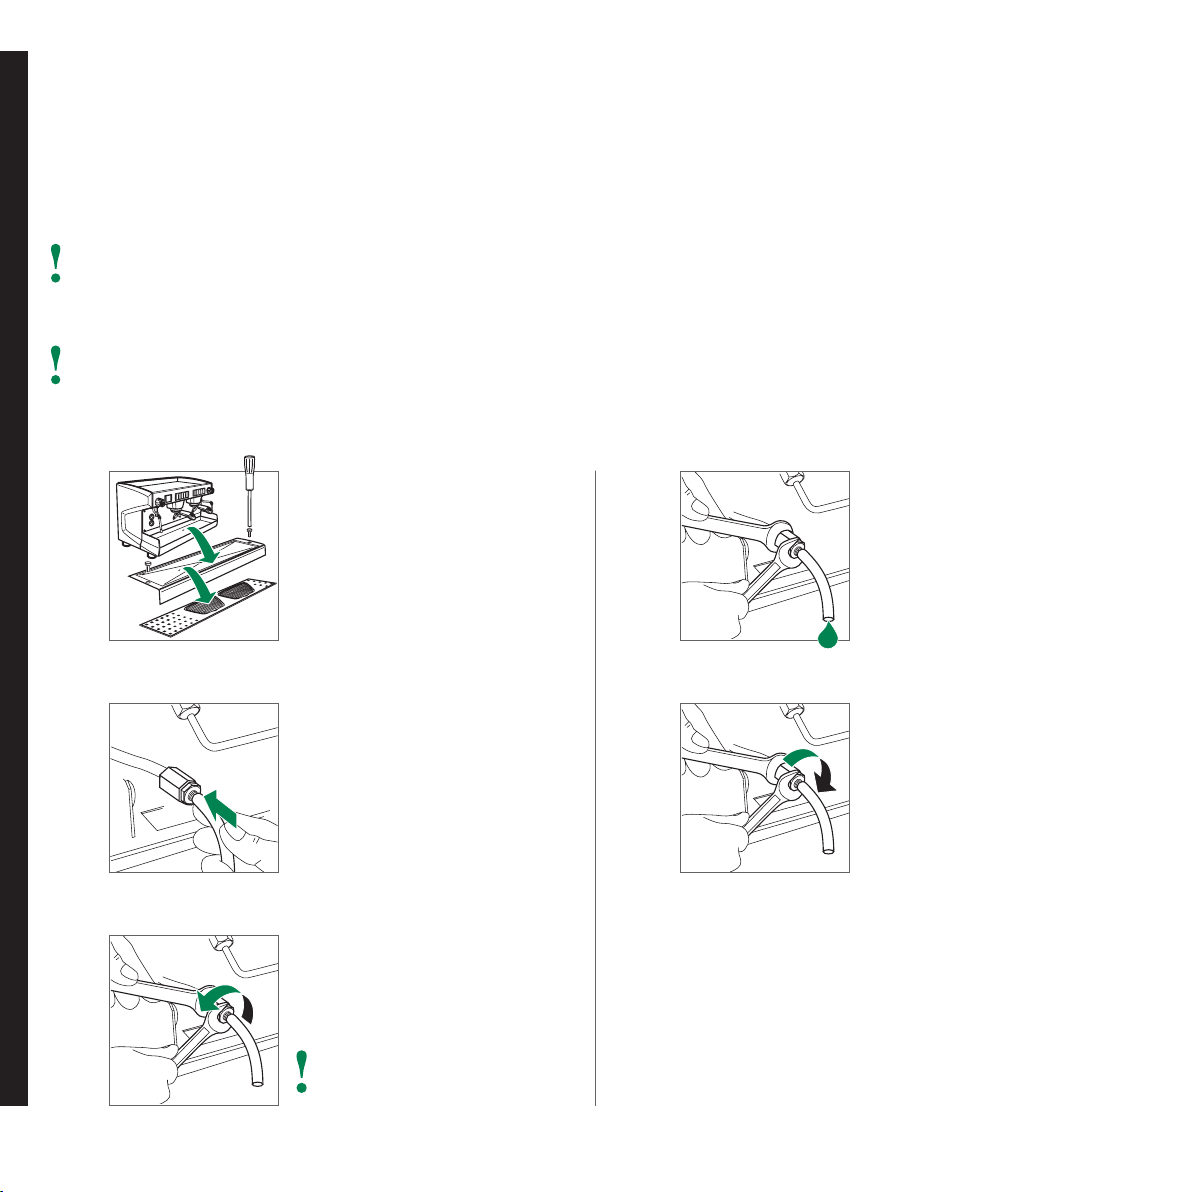
Svuotare la caldaia
Vaciar la caldera
Esvaziar a caldeira
La caldaia può essere svuotata solo da una persona qualificata!
¡Solo una persona cualificada estará autorizada a vaciar la caldera!
A caldeira só pode ser esvaziada por uma pessoa qualificada!
La macchina deve essere spenta e non deve essere in pressione (controllare il manometro)!
¡Se deberá apagar la máquina y no deberá estar bajo presión (comprobar el manómetro)!
A máquina tem de ser desligada e não pode estar sob pressão (verificar o manómetro)!
Rimuovere la griglia portatazze e la
1
2 5
3
62
bacinella di scarico
Retirar la rejilla del soporte de tazas y el
cuenco de drenaje
Retirar a grelha de suporte de chávenas
e o recipiente de escoamento
Inserire il tubo nel raccordo
Insertar el tubo dentro del accesorio del
extremo del tubo
Introduzir o tubo no adaptador da
extremidade do tubo
Allentare il raccordo
Aflojar el accesorio del extremo del tubo
Soltar o adaptador da extremidade do tubo
Tenere fermo il raccordo con una chiave
Sujetar el accesorio con una llave inglesa
Imobilizar o suporte com uma chave
Lasciare defluire completamente l’acqua
4
Riposizionare la bacinella e la griglia portatazze
6
Volver a colocar el cuenco de drenaje y la rejilla del soporte de tazas
Colocar novamente o recipiente de escoamento e a grelha de suporte de
chávenas
Riempire la caldaia, se necessario (vedere «Primo avvio», figure 4 / 5)
7
Rellene la caldera, si se requiere (ver página «Primera puesta en marcha»,
pasos 4 / 5)
Encher a caldeira, se necessário (ver a página «Primeira colocação em
funcionamento», passo 4 / 5)
Dejar que el agua fluya hacia afuera por
completo
Deixar a água sair completamente
Chiudere il raccordo
Cerrar el accesorio
Fechar a ligação
Page 63
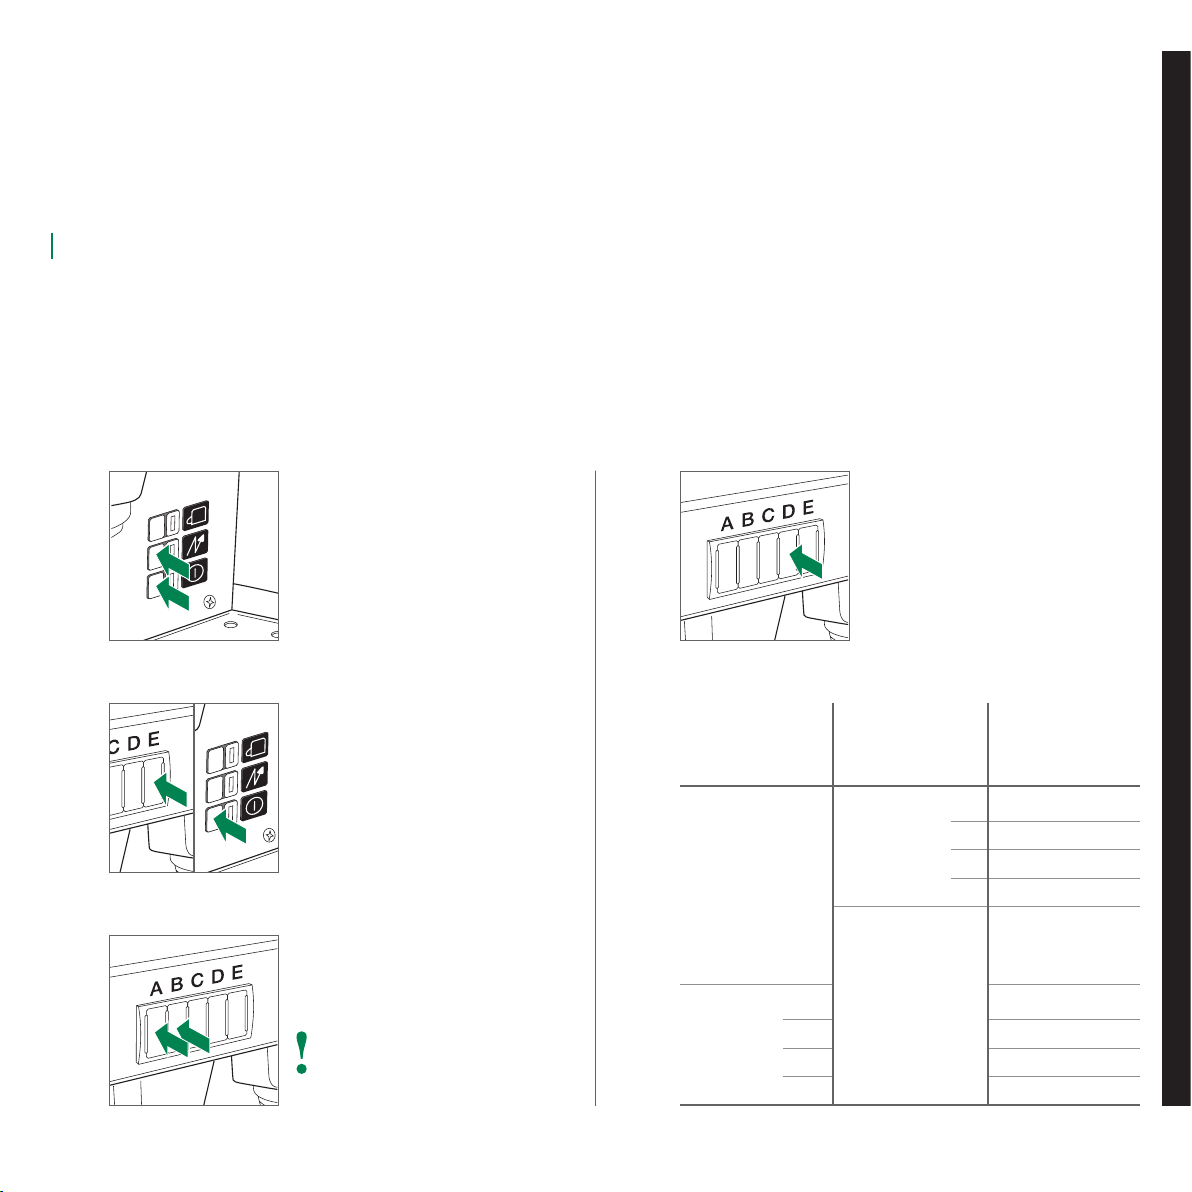
Regolazione della pressione in caldaia (Modello E)
Regulación de la presión de caldera (Modelo E)
Regulação da pressão da caldeira (Modelo E)
Funzionamento dei tasti A C
Función de las teclas
Função das teclas
1
2
Tasto +, la pressione aumenta di 0.1 bar (max. 1.4 bar) Preimpostato a 1 bar
+ tecla, aumento de la presión 0.1 bar (máx. 1.4 bar) Ajuste de fábrica a 1 bar
Tecla +, aumento da pressão 0,1 bar (mín. 1,4 bar) Configuração de fábrica em 1 bar
B D
Tasto -, la pressione diminuisce di 0.1 bar (min. 0.6 bar) Salvare la pressione, uscire dal menù
– tecla, disminución de la presión 0.1 bar (mín. 0.6 bar) Guardar la presión, abandonar el menú
Tecla –, diminuição da pressão 0,1 bar (mín. 0,6 bar) Memorizar a pressão, sair do menu
Spegnere l’interruttore della resistenza
caldaia e quello generale
Apagar el elemento calefactor de la
caldera y el Interruptor general
Desligar o elemento de aquecimento da
caldeira e o interruptor principal
Accendere la macchina tenendo premuto
il tasto E del primo gruppo
Pulsar la tecla E del primer grupo, a continuación poner en marcha la máquina
Manter a tecla E do primeiro grupo
pressionada, depois ligar a máquina
4
Tasto A
Tecla A
Tecla A
ON
Encendido
Ligado
Premere il tasto D per salvare la
pressione
Pulsar la tecla D para guardar la presión
Pressione a tecla D para memorizar a
pressão
Tasto B
Tecla B
Tecla B
Lampeggio
Parpadeo
A piscar
4x
3x
2x
1x
Pressione [bar]
Presión [bar]
Pressão [bar]
0.6
0.7
0.8
0.9
3
Cambiare la pressione tramite i tasti A / B
Modifique la presión con la tecla A / B
Alterar a pressão usando a tecla A / B
Controllare sul manometro i cambiamenti
Comprobar el manómetro para las modificaciones
Verificar o manómetro quanto a alterações
Lampeggio
Parpadeo
A piscar
1x
2x
3x
4x
ON
Encendido
Ligado
1.0
1.1
1.2
1.3
1.4
Generale Generalidades Generalidades
63
Page 64

Auto-test dei componenti (Modello E)
Prueba automática de los componentes (Modelo E)
Teste automático dos componentes (Modelo E)
Funzionamento dei tasti
Función de las teclas
Função das teclas
Ripetere il passo 5 per ogni componente
Repetir el paso 5 para cada component
Repita o passo 5 para cada componente
1
2
A
Tasto + (aumenta)
+ tecla (aumento)
Tecla + (aumento)
Svitare il pannello laterale sinistro
Desatornillar el panel lateral izquierdo
Desaparafusar o painel lateral esquerdo
Smontare il pannello laterale sinistro
Desmontar el panel lateral izquierdo
Desmontar o painel lateral esquerdo
Avvertenza: rischio di scossa elettrica
Advertencia: riesgo de descarga eléctrica
Atenção: Risco de choque eléctrico
B
Tasto - (diminuisce)
– tecla (disminución)
Tecla – (diminuição)
4
C
Enter (Start)
Entrada (selección)
Introdução (Start)
D
ESC (Stop)
ESC (Stop)
ESC (paragem)
Accendere la macchina tenendo premuto
il tasto A del primo gruppo
Pulsar la tecla A del primer grupo,
a continuación poner en marcha la
máquina
Manter a tecla A do primeiro grupo
pressionada, depois ligar a máquina
Appare «0» sulla scheda elettronica
«0» aparece en la placa electrónica
«0» é visualizado na placa electrónica
64
3
Spegnere l’interruttore generale
Apagar el Interruptor general
Desligar o interruptor principal
5
Selezionare il componente con i tasti A / B
Seleccionar el componente con la tecla A / B
Seleccionar o componente usando a tecla A / B
Avviare il test con il tasto C*
Iniciar la prueba con la tecla C*
Iniciar o teste através da tecla C*
Page 65

Solo per macchine predisposte
* Per macchine con connessione a Stella
Pulsar la tecla D para interrumpir la prueba
Pressionar a tecla D para cancelar o teste
**Premere il tasto D per interrompere il test
Sólo máquinas predispuestas
Somente no caso das correspondentes
máquinas
***
Para máquinas con conexión de resistencia en estrella
No caso de máquinas com ligação de resistência em estrela
Codice
Código
Código
0
1
2
3
4
5
6
7
8
Componente
Componente
Componente
Auto-test ON
Prueba automática ENCENDIDA
Teste automático ON
Elettrovalvola gruppo 1 (ON per 3 sec.)
Válvula de electroimán grupo 1 (ENCENDIDO durante 3 seg.)
Válvula solenóide do grupo 1 (ON durante 3 seg.)
Elettrovalvola gruppo 2 (ON per 3 sec.)
Válvula de electroimán grupo 2 (ENCENDIDO durante 3 seg.)
Válvula solenóide do grupo 2 (ON durante 3 seg.)
Elettrovalvola gruppo 3 (ON per 3 sec.)**
Válvula de electroimán grupo 3 (ENCENDIDO durante 3 seg.)**
Válvula solenóide do grupo 3 (ON durante 3 seg.)**
Elettrovalvola acqua calda (ON per 3 sec.)
Válvula de electroimán de suministro de agua caliente
(ENCENDIDO durante 3 seg.)
Válvula solenóide do abastecimento de água quente (ON
durante 3 seg.)
Elettrovalvola riempimento caldaia (ON per 3 sec.)
Válvula de electroimán de llenado de la caldera (ENCENDIDO durante 3 seg.)
Enchimento da válvula solenóide da caldeira (ON durante 3 seg.)
Motore pompa (ON 3 sec.)
Motor de la bomba (ENCENDIDO 3 seg.)
Motor da bomba (ON 3 seg.)
1° elemento resistenza caldaia (ON 5 sec.)
1er elemento calefactor de la caldera (ENCENDIDO 5 seg.)
1º elemento de aquecimento da caldeira (ON 5 seg.)
2° elemento resistenza caldaia (ON 5 sec.)***
2° elemento calefactor (ENCENDIDO 5 seg.)***
2º elemento de aquecimento (ON 5 seg.)***
Codice
Código
Código
9
A
B
C
d
E
F
H
Component
Componente
Componente
3° elemento resistenza caldaia (ON 5 sec.)***
3er elemento calefactor (ENCENDIDO 5 seg.)***
3º elemento de aquecimento (ON 5 seg.)***
Tastiera (il LED corrispondente lampeggia)
Teclado (el LED correspondiente parpadea)
Teclas de LED (piscam quando as respectivas teclas são
pressionadas)
Contatore volumetrico gruppo 1 (erogazione di 100 impulsi)
Grupo contador volumétrico 1 (100 impulsos)
Fluxómetro do grupo 1 (100 impulsos)
Contatore volumetrico gruppo 2 (erogazione di 100 impulsi)
Grupo contador volumétrico 2 (100 impulsos)
Fluxómetro do grupo 2 (100 impulsos)
Contatore volumetrico gruppo 3 (erogazione di 100 impulsi)**
Grupo contador volumétrico 3 (100 impulsos)**
Fluxómetro do grupo 3 (100 impulsos)**
Livello in caldaia
Nivel de la caldera (llena hasta un nivel de agua suficiente)
Nível da caldeira (enche-se até atingir um nível de água suficiente)
Pressostato (ON fino al raggiungimento della pressione impostata)
Sensor de presión (ENCENDIDO hasta alcanzar el punto de
ajuste de la presión)
Sensor da pressão (ON até atingir o ponto definido)
Relè per la sovrappressione della caldaia (spegne il relè)
Relé para sobrepresión de caldera (pone el relé en OFF)
Relé para sobrepressão da caldeira (DESLIGAR o relé)
Generale Generalidades Generalidades
65
Page 66

Diagnostica (Modello E)
Diagnosis (Modelo E)
Diagnóstico (Modelo E)
Solo da una persona qualificata!
¡Solo por una persona cualificada!
Somente por uma pessoa qualificada!
Avvertenza: macchina in pressione. Non toccare parti in tensione!
Advertencia: la máquina está bajo presión. ¡No tocar las piezas bajo tensión!
Atenção: máquina sob pressão. Não tocar nas peças sob tensão!
1
2
Svitare il pannello laterale sinistro
Desatornillar el panel lateral izquierdo
Desaparafusar o painel lateral esquerdo
Smontare il pannello laterale sinistro
Desmontar el panel lateral izquierdo
Desmontar o painel lateral esquerdo
Avvertenza: rischio di scossa elettrica
Advertencia: riesgo de descarga eléctrica
Atenção: Risco de choque eléctrico
3
4
5
Identificare il guasto
Identificación de fallos
Identificar as falhas
Riavviare la macchina dopo aver risolto
il guasto
Volver a poner en marcha la máquina
después de subsanar el fallo
Reiniciar a máquina depois de solucionar
a falha
Riagganciare il pannello laterale sinistro
Volver a colocar el panel izquierdo
Colocar novamente o painel esquerdo
66
Page 67

Solo per macchine predisposte
*
Sólo máquinas predispuestas
Somente no caso das correspondentes máquinas
Codice
Código
Código
1
2
3
4
5
6
7
Descrizione guasti
Descripción del error
Descrição da falha
Superato il tempo limite di caricamento caldaia
Se ha excedido el tiempo límite para el llenado de la caldera
O tempo-limite para o enchimento da caldeira foi ultrapassado
Superato il tempo limite di raggiungimento della pressione in caldaia
Se ha excedido el tiempo límite para alcanzar la presión de la caldera
O tempo-limite para a caldeira atingir a pressão necessária
foi ultrapassado
Cortocircuito + 12 V della scheda elettronica
Cortocircuito + 12 V en el placa electrónico
Curto-circuito + 12 V na placa electrónica
Cortocircuito + 12 V LED*
Cortocircuito + 12 V LED*
Curto-circuito + 12 V LED*
Cortocircuito + 12 V del pressostato
Cortocircuito + 12 V en el sensor de presión
Curto-circuito + 12 V no sensor de pressão
Cortocircuito + 12 V del contatore volumetrico
Cortocircuito + 12 V de los contadores volumétricos
Curto-circuito + 12 V dos fluxómetros
Cortocircuito + 5 V della tastiera
Cortocircuito + 5 V en el teclado
Curto-circuito + 5 V nas teclas
Codice
Código
Código
8
9
A
B
C
d
Descrizione guasti
Descripción del error
Descrição da falha
Cortocircuito dell’uscita del pressostato
Cortocircuito en la señal de salida del sensor de presión
Curto-circuito no sinal de saída do sensor de pressão
Segnale d’uscita del pressostato interrotto
Señal de salida del sensor de presión está interrumpida
Sinal de saída do sensor da pressão interrompido
Contatore volumetrico gruppo 1 interrotto
Contador volumétrico del 1er grupo interrumpido
Fluxómetro do 1º grupo interrompido
Contatore volumetrico gruppo 2 interrotto
Contador volumétrico del 2° grupo interrumpido
Fluxómetro do 2º grupo interrompido
Contatore volumetrico gruppo 3 interrotto*
Contador volumétrico del 3er grupo interrumpido*
Fluxómetro do 3º grupo interrompido*
Segnale d‘uscita dal sensore di sovrappressione caldaia
interrotto
Señal de salida del sensor de sobrepresión de caldera está interrumpida
Sinal de saída do sensor de sobrepressão da caldeira
interrompido
Generale Generalidades Generalidades
67
Page 68

Dati tecnici
Datos técnicos
Dados técnicos
Ci si riserva il diritto di apportare modifiche tecniche
Nos reservamos el derecho de realizar modificaciones técnicas
Reservamo-nos o direito a proceder a alterações técnicas
520 mm
A
20.5 inch
495 mm*
19.5 inch*
Modello L: 880 mm
*
Modelo L: 880 mm
Modelo L: 880 mm
Generale
Generalidades
Generalidades
Alimentazione
Suministro de energía eléctrica
Alimentação de energia
Larghezza
Ancho
Largura
Peso
Peso
Peso
Livello di rumore durante l’uso
Nivel de ruido durante el funcionamiento
Nível de ruído durante a utilização
Ingresso acqua
Orificio de entrada del agua
Entrada de água
ø scarico (mm)
ø drenaje (mm)
Escoamento de ø mm
Temperatura ambiente durante l’uso
Temp. ambiente durante su utilización
Temperatura ambiente durante a utilização
Modelli E,S
Modelo
Modelo
Modello L
Modelo
Modelo
A
110V~, 60Hz
220 – 240V~ / 380-415V3N~,
50 – 60Hz
220 – 240V~ / 380-415V3N~,
50 – 60Hz
1 GR 2 GR 3 GR 4 GR
590 mm
23.2 inch
55 kg
121.3 lb
+5 – +35 °C +5 – +35 °C +5 – +35 °C +5 – +35 °C
–
–
3.30 kW 4.65 kW– 6.45 kW 6.50 kW
2 GR
Compact
590 mm
23.2 inch
55 kg
121.3 lb
< 70 dB< 70 dB < 70 dB < 70 dB < 70 dB
3 / 8“3 / 8“ 3 / 8“ 3 / 8“ 3 / 8“
14 mm14 mm 14 mm 14 mm 14 mm
0.55 inch0.55 inch 0.55 inch 0.55 inch 0.55 inch
+5 – +35 °C
+41 – +95 °F+41 – +95 °F +41 – +95 °F +41 – +95 °F +41 – +95 °F
3.20 kW
3.60 kW
750 mm
29.5 inch
60 kg
132.3 lb
3.20 kW
4.95 kW
990 mm
39.0 inch
75 kg
165.4 lb
–
6.75 kW
1230 mm
48.5 inch
93 kg
205.1 lb
–
–
68
Page 69

Produttore
Fabricante
Fabricante
Modello / versione
Modelo / versión
Modelo / versão
Numero di serie
Número de serie
Número de série
Pin
Clavija
Pino
Massima pressione caldaia / rete
Presión máx. de caldera / estática
Pressão da caldeira / estática máx.
Marchi di conformità
Marcas de conformidad
Marcações de conformidade
Assorbimento totale
Absorción total
Absorção total
Potenza resistiva
Potencia del elemento calefactor
Potência do elemento de
aquecimento
Tensione
Tensión
Voltagem
Marchio CE di conformità
Marca de conformidad CE
Marcação de conformidade CE
Potenza motore
Potencia del motor
Potência do motor
Frequenza
Frecuencia
Frequência
Data di produzione
Fecha de fabricación (mmaa)
Data de fabrico (mmaa)
Caldaia
Caldera
Caldeira
Scambiatori
Intercambiador
Permutador
Pressione
Presión
Presión
Temperatura
Temperatura
Temperatura
Contenuto
Contenido
Conteúdo
Capacità
Capacidad
Capacidade
Pressione
Presión
Presión
Temperatura
Temperatura
Temperatura
Contenuto
Contenido
Conteúdo
Capacità
Capacidad
Capacidade
1 GR 2 GR 3 GR
0.22 MPa
2.2 bar
134 °C
Acqua / Vapore
Agua / vapor
Água / Vapor
1.2 MPa
12 bar
134 °C 134 °C 134 °C 134 °C
Acqua
Agua
Água
2 GR
Compact
0.22 MPa
2.2 bar
134 °C
Acqua / Vapore
Agua / vapor
Água / Vapor
5 l5 l 11 l 16 l 22 l
1.2 MPa
12 bar
134 °C
Acqua
Agua
Água
0.35 l0.35 l 0.35 l 0.35 l 0.35 l
0.22 MPa
2.2 bar
134 °C 134 °C 134 °C
Acqua / Vapore
Agua / vapor
Água / Vapor
1.2 MPa
12 bar
Acqua
Agua
Água
0.22 MPa
2.2 bar
Acqua / Vapore
Agua / vapor
Água / Vapor
1.2 MPa
12 bar
Acqua
Agua
Água
4 GR
0.22 MPa
2.2 bar
Acqua / Vapore
Agua / vapor
Água / Vapor
1.2 MPa
12 bar
Acqua
Agua
Água
Generale Generalidades Generalidades
69
Page 70

Istruzioni di sicurezza
Instrucciones de seguridad
Instruções de segurança
L’apparecchio non deve essere usato da bambini o da persone con
capacità fisiche, sensoriali o mentali ridotte o privi di esperienza e
conoscenza dell’apparecchio, salvo che non siano sorvegliati o che non
siano stati opportunamente istruiti.
El aparato no deberá ser utilizado por niños ni por personas con capacidades físicas, sensoriales o mentales reducidas, o sin experiencia o
conocimiento, salvo que a éstas se les supervise o instruya.
O equipamento não deve ser utilizado por crianças, pessoas com
capacidades físicas, sensoriais ou mentais reduzidas ou com falta de
experiência e conhecimentos, excepto se tiverem supervisão ou recebido
formação.
Controllare che i bambini non giochino con l’apparecchio.
Los niños no deberán jugar jamás con la máquina, ni vigilados ni sin
vigilar.
As crianças não devem brincar com a máquina, quer sob ou sem
supervisão.
Gli elementi d’imballaggio (sacchetti di plastica, polistirolo espanso,
chiodi, cartoni, ecc...) non devono essere lasciati alla portata di bambini
in quanto potenziali fonti di pericolo.
No deje ninguno de los elementos del embalaje (bolsas de plástico,
poliestireno expandido, clavos, cartón, etc.) al alcance de los niños, ya
que son potenciales fuentes de peligro.
Não deixar os elementos da embalagem (sacos de plástico, esferovite,
pregos, cartões, etc.) ao alcance de crianças, uma vez que estes elementos constituem uma potencial fonte de perigo.
Evitare di sovrapporre all’imballo colli pesanti di altro genere. Non
impilare più di tre pezzi dello stesso tipo.
No coloque objetos pesados sobre el embalaje. No apile más de tres
objetos del mismo tipo.
Não colocar objectos pesados sobre a embalagem. Não empilhar mais
de três artigos do mesmo tipo.
Non ostruire le griglie di aspirazione o di dissipazione, lo scarico del
piano scaldatazze e della griglia. Non coprire con panni o altro.
No obstruya las rejillas de aspiración y de dispersión, el drenaje de la
bandeja y la rejilla de tazas con trapos. No cubra con trapos, etc.
Não obstruir as grelhas de sucção e de dispersão, o escoamento do
tabuleiro de chávenas e a grelha com panos. Não cobrir com panos, etc.
In caso di congelamento dei liquidi all’interno della macchina, lasciare
la macchina in un luogo con temperatura minima di 20 °C per almeno
20 minuti prima di accenderla.
En caso de congelación de los líquidos que están dentro de la máquina
de café, deje la máquina en un lugar con una temperatura mínima de
20 °C, por lo menos 20 minutos, antes de conectarla.
Se o líquido congelar dentro da máquina, deixar a máquina de café
num local a uma temperatura mínima de 20 °C durante pelo menos
20minutos antes de a ligar.
La macchina imballata va immagazzinata in un luogo riparato dalle
intemperie, asciutto e privo di umidità. La temperatura non deve
essere inferiore a +5 °C.
Mantener la máquina empaquetada en un lugar seco, no expuesto a
elementos medioambientales y en condiciones en las cuales la temperatura no descienda a menos de 5 °C.
Manter a máquina embalada num local seco, não exposto a elementos
ambientais e em condições de temperatura não inferior a 5 °C.
Non appoggiare contenitori di liquidi sulla macchina.
No colocar ningún recipiente con líquido encima de la máquina.
Nunca colocar recipientes com líquidos sobre a máquina.
Un’errata installazione può causare danni a persone, animali e cose
per i quali il costruttore non può considerarsi responsabile.
No se considerará responsable al fabricante por una instalación inapropiada que pueda causar daños a personas, animales u objetos.
Uma instalação incorrecta pode provocar danos a pessoas, animais e
objectos, pelos quais o fabricante não poderá ser responsabilizado.
Posizionare la macchina su un piano idrorepellente (laminato, acciaio,
ceramica, ecc...) lontano da sorgenti di calore (forni, fornelli, camini,
ecc...) e in ambienti dove la temperatura non scenda sotto i 5 °C.
TEME IL GELO. Posizionare la macchina in piano.
Instalar la máquina sobre una superficie impermeable (de laminado,
acero, cerámica, etc.) lejos de fuentes de calor (horno, cocina eléctrica,
chimenea, etc.) y en condiciones en las que la temperatura no pueda
descender a menos de 5 °C. MANTENERLA CALIENTE. Colocarla sobre
una superficie plana.
Instalar a máquina sobre uma superfície repelente de água (laminado,
aço, cerâmica, etc.), afastada de fontes de calor (forno, fogão, lareira,
etc.) e em condições de temperatura não inferior a 5 °C. MANTER
QUENTE. Colocar sobre uma superfície plana.
70
Page 71

Non esporre la macchina ad intemperie né installarla in ambienti ad
elevata umidità come locali da bagno.
No deje la máquina expuesta a elementos medioambientales ni la
coloque en habitaciones húmedas, como cuartos de baño.
Não deixar a máquina exposta aos elementos ambientais, nem colocá-la
em locais húmidos, tais como casas de banho.
Prima di collegare la macchina accertarsi che i dati di targa siano
rispondenti a quelli della rete di distribuzione elettrica.
Antes de conectar la unidad, compruebe si los datos de la máquina
corresponden con los de su suministro de energía eléctrica.
Antes de ligar o equipamento, verificar se os dados na máquina correspondem ao seu fornecimento de energia eléctrica.
Spegnere la macchina e scollegarla dalla rete prima di cambiare accessori o avvicinarsi a parti in movimento durante l’uso normale.
Apagar el aparato y desconectar de la red antes de sustituir accesorios
o de acercarse a piezas que se mueven durante el funcionamiento.
Desligar o equipamento e a alimentação de corrente antes de alterar
os acessórios ou aproximar-se de partes que se movam durante a
utilização.
Utilizzare solo accessori e ricambi autorizzati dal produttore per
evitare di compromettere la sicurezza ed il corretto funzionamento
della macchina.
Utilizar solo repuestos originales para evitar poner en peligro la seguridad
y el adecuado funcionamiento de la máquina.
Utilizar somente peças sobressalentes originais para evitar comprometer
a segurança e o funcionamento correcto da máquina.
In caso di emergenza, come principio d’incendio, rumorosità anomala,
surriscaldamento, ecc…, intervenire immediatamente staccando l’alimentazione elettrica, chiudere i rubinetti del gas e dell’acqua.
En caso de emergencia como un incendio, ruidos extraños, recalentamiento, etc., tome medidas de inmediato, desconecte de la red y cierre
los grifos de gas y de agua.
Numa emergência, tal como um incêndio, ruído estranho, sobreaquecimento, etc., actuar imediatamente, desligar a corrente e fechar as
torneiras de gás e de água.
In caso di dubbio o di incertezza far controllare da personale qualificato l’impianto di alimentazione elettrica.
En caso de duda, solicite a un electricista cualificado un diagrama
detallado de la energía eléctrica suministrada.
Quando tiver alguma dúvida, solicitar um esquema detalhado junto de
um electricista qualificado.
È vietato l’uso di adattatori, prese multiple e / o prolunghe.
Está prohibido utilizar adaptadores, enchufes múltiples y / o cables de
prolongación.
Não é possível utilizar adaptadores, tomadas múltiplas e / ou extensões.
L’impianto di alimentazione elettrica deve essere provvisto dei seguenti dispositivi di sicurezza: ecace messa a terra; sezione dei conduttori adatta alla potenza assorbita; dispositivo salvavita eciente.
El suministro de energía eléctrica deberá estar provisto de los siguientes dispositivos de seguridad: una conexión a tierra eficaz; un diámetro
de los cables adecuado a la potencia; un interruptor de protección
eficaz en caso de fuga a tierra.
O fornecimento de energia tem de ser assegurado com os seguintes
dispositivos de segurança: ligação à terra eficiente; secção de condutores adequados à capacidade de absorção; disjuntor de protecção de
fuga de terra eficiente.
Se il cavo di alimentazione è danneggiato deve essere sostituito dal
costruttore o dal suo servizio assistenza tecnica o da una persona
qualificata, in modo da prevenire ogni rischio.
Si los cables de alimentación eléctrica a la máquina están estropeados,
el fabricante o su personal de servicio técnico o un electricista autorizado tendrá que sustituirlos para evitar cualquier riesgo.
Se os cabos de alimentação eléctrica da máquina estiverem danificados terão de ser substituídos pelo fabricante, pelo seu pessoal da
assistência ou por um electricista autorizado, de modo a prevenir
eventuais riscos.
La macchina per caè deve essere connessa alla rete usando una
spina con contatto di terra approvata UL di portata adeguata. La spina
deve essere scelta e installata solo da personale qualificato. (solo per
USA e Canada)
La máquina de café tiene que estar conectada a una instalación fija utilizando un enchufe UL con toma a tierra que presente las características
adecuadas. El enchufe será seleccionado e instalado solo por personal
cualificado. (Solo para EE.UU. y Canadá).
A máquina de café tem de estar ligada a uma instalação fixa usando
uma ficha UL com ligação à terra adequada e dimensões correctas.
A ficha só deve ser seleccionada e instalada por pessoal qualificado.
(somente para os EUA e Canadá).
Generale Generalidades Generalidades
71
Page 72

Istruzioni di sicurezza specifiche
Instrucciones de seguridad específicas
Instruções específicas de segurança
Installazione e primo avvio devono essere eettuati da personale
RANCILIO o da un tecnico addestrato da RANCILIO in completa osservanza delle regole di installazione locali.
La instalación y puesta en marcha solo deberán ser realizadas por un
técnico de servicio de RANCILIO o un representante de RANCILIO,
formado especialmente, observando debidamente las normas de
instalación locales.
A instalação e a colocação em funcionamento só podem ser realizadas
por um técnico ou um representante com formação da RANCILIO tendo
em conta todas os respectivos regulamentos de instalação locais.
Lasciare degli spazi liberi attorno alla macchina al fine di agevolare
l’uso e le operazioni di manutenzione.
Dejar suficiente espacio libre alrededor de la máquina para facilitar su
uso y la ejecución de cualquier operación de mantenimiento.
Deixar espaço suficiente em volta da máquina para facilitar a sua utilização e a realização de eventuais trabalhos de manutenção.
Il piano di appoggio deve essere ben livellato, asciutto, stabile ed
essere ad un’altezza tale per cui il piano scaldatazze si trovi oltre
150 cm da terra.
La superficie de apoyo tendrá que ser plana, seca, estable y encontrarse
a una altura tal que la superficie calentadora de tazas esté a más de
150 cm del suelo.
A superfície de apoio tem de ser plana, seca, estável e elevada de forma
a que a superfície de aquecimento das chávenas fique a uma altura
superior a 150 cm do pavimento.
Non istallare la macchina in luoghi dove vengono usati getti d’acqua o
macchine pulitrici ad alta pressione
¡No se debe instalar la máquina en recintos donde se utilicen mangueras de agua o aparatos de limpieza de alta presión!
A máquina não deve ser montada em áreas onde sejam utilizadas
mangueiras de água ou limpadores de alta pressão!
Predisporre in posizione facilmente accessibile un rubinetto di alimentazione dell’acqua e una valvola di non ritorno dove collegare il tubo di
carico dell’acqua.
Se deberán instalar un grifo de abastecimiento de agua y una válvula
de retención (en la instalación hídrica del local), fácilmente accesibles,
en el extremo delantero del tubo del abastecimiento de agua.
Antes do tubo de abastecimento de água tem de ser instalada, numa
posição acessível, uma torneira de água e uma válvula anti-retorno (de
série).
Prima di eettuare le connessioni, eseguire un accurato lavaggio dei
tubi idrici di rete, così da evitare l’ingresso di sporcizia nella macchina.
Non è consentito l’utilizzo di tubi e guarnizioni di raccordo alla rete
idrica già utilizzati.
Los tubos se deberán enjuagar antes de conectarlos, de modo que no
entren partículas de suciedad en la máquina. No está permitido utilizar
ni empaquetaduras ni tubos usados para la conexión con el suministro
de agua.
Os tubos têm de ser enxaguados antes de serem ligados, de modo a
que não entrem partículas de sujidade na máquina. A utilização de
vedações e tubos para a ligação ao abastecimento de água não está
autorizada.
Le operazioni di allacciamento devono essere eseguite da personale
qualificato.
Un electricista cualificado deberá realizar todas las conexiones eléctricas
Todas as ligações eléctricas têm de ser realizadas por um electricista
qualificado.
Prima di collegare la macchina, accertarsi che i dati di targa siano
rispondenti a quelli della rete di distribuzione elettrica
Para el suministro de electricidad, se deberán consultar atentamente
los datos especificados en la placa de identificación.
Para a ligação eléctrica, respeitar obrigatoriamente os dados constantes na placa de características!
L’ interruttore automatico dierenziale o, nel caso di macchine dotate
di cavo con spina, la presa di corrente deve essere situato in prossimità della macchina, in posizione facilmente accessibile.
Un interruptor eléctrico (interruptor de red) y / o un enchufe deberá
estar conectado, y ser de acceso fácil, cerca de la máquina.
Um interruptor eléctrico (Interruptor general) e / ou uma tomada eléctrica têm de estar ligadas e disponíveis na proximidade da máquina.
Predisporre a monte del cavo di alimentazione un interruttore automatico dierenziale. I contatti devono avere una apertura di almeno
3 mm.
El interruptor eléctrico deberá aislar la máquina de la alimentación de
la red completamente. La distancia entre los contactos tiene que ser de
3 mm, como mínimo.
O interruptor de energia tem de isolar completamente a máquina do
fornecimento de energia. O intervalo entre os contactos tem de ser, no
mínimo, de 3 mm.
72
Page 73

Rinnovo acqua
Recambio de agua
Renovação da água
All’inizio dell’attività giornaliera o comunque dopo uno stop superiore alle 8 ore è necessario rinnovare il 100 % dell’acqua
contenuta nel circuito idraulico. Erogare acqua da ciascun gruppo per almeno 30 secondi e prelevare almeno 2 litri d’acqua dalla
lancia acqua calda per macchine con 1 o 2 gruppi compatte, 5 litri per le 2 gruppi, 8 litri per le 3 gruppi e 11 litri per le 4 gruppi.
Al comienzo de todos los días y cada vez que no se utilice por un periodo mayor a 8 horas, es necesario cambiar el 100 % del agua dentro
del circuito hidráulico. Deje salir el agua de cada grupo por al menos 30 segundos y dispense de la salida de agua caliente al menos 2 litros de agua para el compacto de 1 grupo o 2 grupos, 5 litros para 2 grupos, 8 litros para 3 grupos y 11 litros para la máquina de 4 grupos.
No início de cada dia e sempre após uma paragem superior a 8 horas, é necessário renovar 100 % da água no interior do circuito hidráulico. Deixe sair a água de cada grupo durante pelo menos 30 segundos e deixe correr, no mínimo, 2 litros de água pela saída para
máquinas de conjuntos de 1 ou 2 grupos, 5 litros para 2 grupos, 8 litros para 3 grupo e 11 litros para 4 grupos.
Durezza dell’acqua
Dureza del agua
Dureza da água
Nel caso in cui la durezza dell’acqua in ingresso superi i 5 °dKH o 9 °fKH, (gradi tedeschi o francesi, rispettivamente, di durezza
di carbonato) installare un addolcitore. Dopo il trattamento, l’acqua in ingresso deve essere circa 5 °dKH o 9 °fKH.
Se deberá instalar un sistema de ablandamiento de agua o de eliminación parcial de sales si la dureza del agua es superior a 5 °dKH o
9 °fKH, respectivamente (grados alemanes o franceses de la dureza de carbonatos, respectivamente). Después del tratamiento, el agua
de abastecimiento debería presentar alrededor de 5 °dKH o 9 °fKH, respectivamente.
No caso de uma dureza da água superior a 5 °dKH ou 9 °fKH, respectivamente (graus alemães ou franceses de dureza de carbonato,
respectivamente) deverá instalar-se um sistema de amaciamento da água ou de remoção parcial de sal. O abastecimento de água depois do tratamento deve ser de cerca de 5 °dKH ou 9 °fKH, respectivamente.
Non utilizzare sistemi di addolcimento dell’acqua che utilizzano sale da cucina, non adatti a macchine per caè dotate di caldaie
vapore! Evitare anche di connettere la macchina per caè ad un sistema di addolcimento dell’acqua centralizzato.
¡Los sistemas de ablandamiento de agua, que son regenerados con sal de cocina, no son adecuados para máquinas de café con calderas
de vapor! Se debe evitar, asimismo, conectar la máquina de café a un sistema central de ablandamiento de agua.
Os sistemas de amaciamento de água que são regenerados com sal de cozinha não são adequados a máquinas de café equipadas com
caldeiras de vapor! Um sistema de amaciamento de água central também deve ser evitado em conjunto com uma máquina de café.
73
Generale Generalidades Generalidades
Page 74

Legal information
Gesetzliche Hinweise
Mentions légales
Informazioni legali
Información legal
Informação jurídica
In accordance with all European Directives and Norms concerning this type of
appliance.
In Übereinstimmung mit allen Europäischen Richtlinien für diese Art von Geräten.
En conformité avec toutes les directives et normes européennes concernant ce type d’appareil.
In accordo a tutte le Direttive Europee e le Norme che riguardano questo tipo di apparecchi.
De conformidad con todas las directivas y normativas europeas relacionadas con este tipo de aparato.
Nos termos de todas as directivas e normas europeias relativas a este tipo de equipamento.
The machine is equipped with the following protective devices: complete panelling
protection of all the parts subject to heat and of the steam and hot water supplier;
cup warmer supplied with a tray to collect spilt liquids; work surface provided with
grill and tray to collect split liquids; expansion valve in the water system and valve
on the boiler to avoid overpressure; nonreturn valve on the water system to avoid
backflow to the main water supply; 12 V low tension push buttons and the control
key panel; thermal protection on the pump motor; gas failure thermocouple and
thermostat automatically closing gas tap; safe resistance thermal, electronic safety
devices.
Die Maschinen sind mit folgenden Schutzvorrichtungen ausgestattet: Heiss werdende
Teile sowie der Dampf- und Heisswassererzeuger sind von einer Schutzverkleidung
umgeben; die Tassenablage ist mit einer Auangwanne für vergossene Flüssigkeiten
ausgestattet; die Arbeitsfläche hat ein Gitter mit darunterliegenden Auangbehälter
für Flüssigkeiten; Überlaufventil in der Hydraulik und Überdruckventil auf dem Boiler;
Rückschlagventil in der Hydraulik, um einen Rückfluss in das Wasserversorgungsnetz
zu vermeiden; die Tasten der Tastatur arbeiten mit Niederspannung 12 V; Überhitzungsschutz für die Pumpe; Thermoelement zur Kontrolle bei Gasmangel; Thermostat, der die Gaszufuhr automatisch stoppt; Schutzschalter für die Boilerheizung;
elektronische Sicherheitsvorrichtungen.
La machine est équipée des dispositifs de protection suivants: un revêtement complet
par panneaux de protection de toutes les pièces exposées à la chaleur et de celles qui
produisent de la vapeur et de l‘eau chaude ; porte-tasses fourni avec grille à égouttoir
et égouttoir pour collecter les liquides qui s‘écoulent ; surface de travail fournie avec
grille à égouttoir et égouttoir pour collecter les liquides qui s‘écoulent ; soupape
d‘expansion dans le système d‘eau et soupape dans la chaudière pour éviter toute
surpression ; soupape de non-retour dans le système d‘eau pour éviter un contre-courant dans le système d‘alimentation en eau principal ; boutons basse tension de 12 V et
clavier de contrôle ; protection thermique dans le moteur de la pompe ; thermocouple
de fuite de gaz et thermostat de thermocouple qui ferme automatiquement le robinet
de gaz ; disjoncteur de résistance thermique, dispositifs de sécurité électroniques.
74
La macchina è dotata dei seguenti dispositivi di protezione: pannellatura completa
di protezione dalle parti soggette a calore e dal generatore di vapore e acqua calda;
piano scaldatazze con vasca di contenimento dei liquidi che possono essere accidentalmente travasati; piano di lavoro con griglia e sottostante bacinella di raccolta
liquidi; valvola di espansione sull’impianto idraulico e valvola sulla caldaia contro le
sovrapressioni; valvola di non ritorno sull’impianto idraulico per evitare riflussi nella
rete di alimentazione; comandi tastiera in bassa tensione (12V); protezione termica
sul motore pompa; termocoppia di controllo mancanza gas e termostato per chiusura
automatica del rubinetto del gas; termica salvaresistenze; sicurezze elettroniche.
La máquina está equipada con los siguientes dispositivos de protección: una cubierta
completa, compuesta por paneles, alrededor de todas las piezas expuestas al calor y
de aquellas productoras de vapor y agua caliente; el calentador de tazas cuenta con
una bandeja colectora de los líquidos derramados; la superficie de trabajo está provista
de una rejilla y de una bandeja para recoger los líquidos derramados; una válvula de
expansión en el sistema de abastecimiento de agua y una válvula en la caldera para
evitar una sobrepresión; una válvula de retención en el sistema de abastecimiento
de agua para evitar una contracorriente hacia el sistema de abastecimiento de agua
principal; pulsadores de baja tensión de 12 V y tablero de control con pulsadores; protección térmica en el motor de la bomba; termopar de pérdida de gas y termopar con
termostato que cierra automáticamente el grifo de gas; interruptor de protección para
las resistencias; dispositivos de seguridad electrónicos.
A máquina está equipada com os seguintes dispositivos de protecção: revestimento
completo de protecção de todas as peças sujeitas à geração de calor, vapor e água
quente; aquecedor de chávenas fornecido com um tabuleiro para recolha de líquidos
que escorram; superfície de trabalho fornecida com grelha e tabuleiro para recolha de
líquidos que escorram; válvula de expansão no sistema de água e válvula na caldeira
para evitar uma pressão excessiva; válvula anti-retorno no sistema hidráulico para
evitar o retorno ao abastecimento principal de água; botões de baixa tensão de 12 V
e painel de teclas de controlo; protecção térmica no motor da bomba; termopar de
falha de gás e termóstato de termopar que fecha automaticamente a torneira de gás;
disjuntor de resistência térmica, dispositivos de segurança electrónica.
Page 75

Diagrams
Schemata
Diagrammes
Schemi
Diagramas
Diagramas
Schemi Diagramas DiagramasDiagrammesSchemataDiagrams
75
Page 76
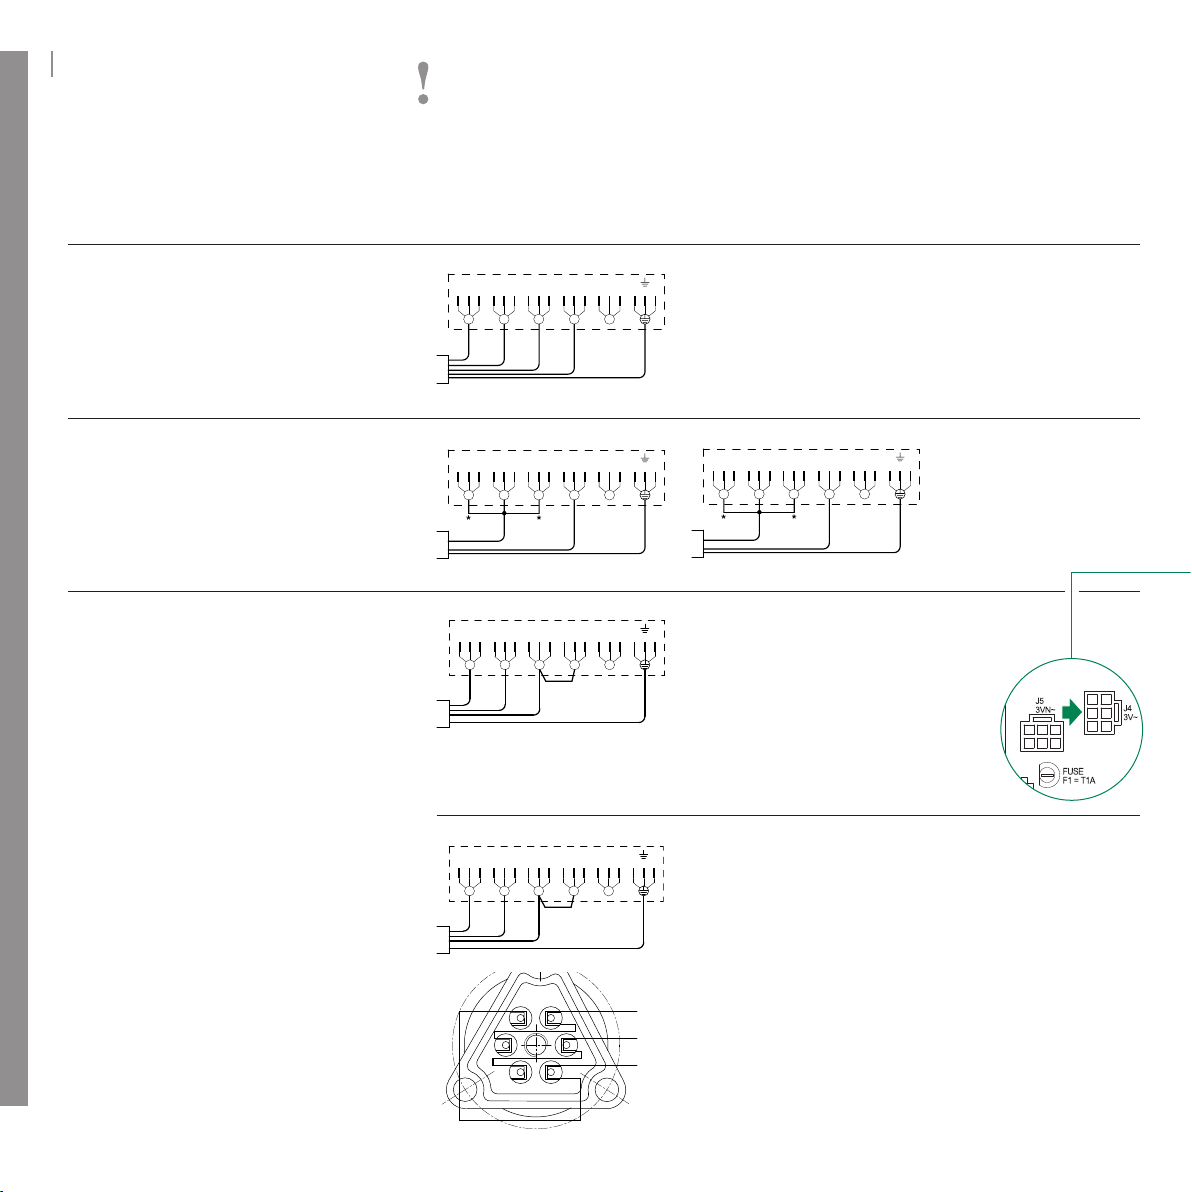
Mains connections
L3 L2 L1 N
R S T N
NM GR
GV
L3 L2 L1 N
L N
M
GVB
B
L3 L2 L1 N
R S T N
NM GR
GV
L3 L2 L1 N
R S T N
NM GR
GV
L3 L2 L1 N
R S T N
NM
GR
GV
R
B
L3 L2 L1 N
R S T N
NM GR
GV
L3 L2 L1 N
R S T N
NM GR
GV
L3 L2 L1 N
R S T N
NM
GR
GV
L3 L2 L1 N
R S T N
NM GR
GV
L3 L2 L1 N
R S T N
NM
GR
GV
L3 L2 L1 N
R S T N
NM GR
GV
Netzanschlüsse
Branchements sur le secteur
Connessioni di alimentazione
Conexiones a la red
Ligação à corrente
Ground conductor must be 9 cm longer than other conductors
Erdleiter muss 9 cm länger sein als die übrigen Leiter
Le conducteur de terre doit être 9 cm plus long que les autres conducteurs
Il conduttore di terra deve essere 9 cm più lungo degli altri conduttori
El conductor de tierra tendrá que ser 9 cm más largo que los otros conductores
O condutor à terra tem de ser 9 cm mais comprido do que os outros condutores
Three-phase star connection with neutral
Dreiphasige Sternschaltung mit Neutralleiter
Branchement en étoile triphasé avec neutre
Connessione trifase a stella con neutro
Conexión trifásica en estrella con conductor neutro
Ligação trifásica em estrela com neutro
Single-phase connection with neutral
Einphasiger Anschluss mit Neutralleiter
Branchement monophasé avec neutre
Connessione monofase con neutro
Conexión monofásica con conductor neutro
Ligação monofásica com neutro
Delta connection
Dreieckschaltung
Connexion en triangle
Connessione a Delta
Conexión delta
Ligação Delta
XY
See pages 84, 85
Siehe Seiten 84, 85
Voir pages 84 et 85
Vedere pagine 84, 85
Véase las páginas 84 y 85
Consultar a página 84, 85
76
346 - 415 V / 3N~
R S T N
L3 L2 L1 N
NM GR GV
200 - 240 V ~
L N
L3 L2 L1 N
M GVB
220-240V 3~, Model E
R S T N
L3 L2 L1 N
NM GR GV
220-240 V 3~, Model S - L
R S T N
L3 L2 L1 N
NM
Basic configuration
Auslieferzustand
Configuration de base
Configurazione di base
B
Configuración básica
Configuração de base
120 V ~ / 220 V ~ (U.S.)
*
L N
L3 L2 L1 N
N V or GVBI
1.
Connect cable as shown in the picture
Netzkabel wie abgebildet anschliessen
Brancher le câble comme indiqué dans la figure
Collegare il cavo come mostrato in figura
Conectar el cable como se ve en la imagen
Ligar o cabo conforme apresentado na figura
2.
Move connector from J5 (3VN~) to J4 (3V~)
Stecker von J5 (3VN~) auf J4 (3V~) wechseln
Déplacer le connecteur de J5 (3VN~) à J4 (3V~)
Spostare il connettore da J5 (3VN~) a J4 (3V~)
Mover el conector de J5 (3VN~) a J4 (3V~)
Deslocar o conector de J5 (3VN~) para J4 (3V~)
1.
GR
GV
R
S
T
Connect cable as shown in the picture
Netzkabel wie abgebildet anschliessen
Brancher le câble comme indiqué dans la figure
Collegare il cavo come mostrato in figura
Conectar el cable como se ve en la imagen
Ligar o cabo conforme apresentado na figura
2.
Disconnect the blue cables (neutral) from the boiler, insulate them
Blaues Kabel (Nullleiter) vom Boiler trennen und isolieren
Déconnecter les câbles bleus (neutres) de la chaudière et les isoler
Scollegare i cavi blu (neutro) dalla resistenza caldaia ed isolarli.
Desconectar los cables azules (neutros) de la caldera y aislarlos
Desligar os cabos azuis (neutro) da caldeira e isolá-los
3.
Connect boiler heating elements as shown in the diagram
Boilerheizelemente wie abgebildet anschliessen
Brancher les éléments chauants de la chaudière comme indiqué dans le diagramme
Collegare gli elementi della resistenza caldaia come mostrato in figura
Conectar los elementos calefactores de la caldera según el diagrama
Ligar os elementos de aquecimento da caldeira conforme apresentado no diagrama
Jumpers are supplied
Jumpers mitgeliefert
Les cavaliers sont fournis
Ponticelli forniti con la macchina
Los jumpers vienen
suministrados
Os comutadores de derivação
são fornecidos
Page 77

Electronic board
Elektronik
Carte électronique
Scheda elettronica
Placa electrónico
Placa electrónica
Schemi Diagramas DiagramasDiagrammesSchemataDiagrams
Jumpers
Jumper
Cavaliers
Jumper
Jumpers
Comutadores
de derivação
DO
Dose programming
Mengenprogrammierung
Programmer le dosage
Programmazione dosi
Programar las cantidades
Programação da dosagem
Enabled
Freigegeben
Activé
Abilitato
Activar
Activado
Disabled
Gesperrt
Désactivé
Disabilitato
Desactivado
Desactivado
PW
Power resistance
Heizleistung
Résistivité
Potenza resistenza
Resistencia de potencia
Resistência à potência
2/3 power
2/3 der Leistung
2/3 de la puissance
2/3 di potenza
2/3 de la potencia
2/3 da potência
Full power
Volle Leistung
Pleine puissance
Piena potenza
Plena potencia
Potência total
DIP switches
DIP Schalter
Interrupteurs DIP
DIP switches
Interruptores DIP
Interruptor DIP
n.1
Do not touch
Nicht berühren
n.2
Ne pas toucher
n.3
n.4
Non modificare
No tocar
Não tocar
77
Page 78

Electric diagram
Elektroschema
Schéma électrique
Schemi elettrici
Diagrama eléctrico
Esquema eléctrico
Classe 7 S 2 – 2C – 3gr. 400V3N~
XY
See pages 84, 85
Siehe Seiten 84, 85
Voir pages 84 et 85
Vedere pagine 84, 85
Véase las páginas 84 y 85
Consultar a página 84, 85
78
Ref: SE_1361/--
Page 79

Electric diagram
Elektroschema
Schéma électrique
Schemi elettrici
Diagrama eléctrico
Esquema eléctrico
Classe 7 E 2 – 2C – 3gr. 346 - 415 V / 3N~
Schemi Diagramas DiagramasDiagrammesSchemataDiagrams
XY
See pages 84, 85
Siehe Seiten 84, 85
Voir pages 84 et 85
Vedere pagine 84, 85
Véase las páginas 84 y 85
Consultar a página 84, 85
Ref: SE_1390/--
79
Page 80

Electric diagram
Elektroschema
Schéma électrique
Schemi elettrici
Diagrama eléctrico
Esquema eléctrico
Classe 7 L 1-4gr. 346 - 415 V / 3N~
XY
See pages 84, 85
Siehe Seiten 84, 85
Voir pages 84 et 85
Vedere pagine 84, 85
Véase las páginas 84 y 85
Consultar a página 84, 85
80
Ref: SE_1359/--
Page 81

Hydraulic diagram
Hydraulikschema
Schéma hydraulique
Schemi idraulici
Diagrama hidráulico
Esquema hidráulico
Classe 7 S
RA
RV
YOU-STEAM (optional)
EV
RV
VS
SL
CL
CSCS
VA
P
MA2
Schemi Diagramas DiagramasDiagrammesSchemataDiagrams
EAR
BV
RGRG
ES
VR
PV
MA1
VR
EC
PA
Ref: SI_69/--
XY
See pages 84, 85
Siehe Seiten 84, 85
Voir pages 84 et 85
Vedere pagine 84, 85
Véase las páginas 84 y 85
Consultar a página 84, 85
81
Page 82

Hydraulic diagram
EA
Hydraulikschema
Schéma hydraulique
Schemi idraulici
Diagrama hidráulico
Esquema hidráulico
Classe 7 E
SP
RA
RV
YOU-STEAM (optional)
BV
EV
RV
EAR
PV
VS
SL
CS
CL
MA1
CS
RGRG
VA
MA2
CVCV
VR
EC
ES
PA
VR
Ref: SI_70/--
XY
See pages 84, 85
Siehe Seiten 84, 85
Voir pages 84 et 85
Vedere pagine 84, 85
Véase las páginas 84 y 85
Consultar a página 84, 85
82
Page 83

Hydraulic diagram
VS
Hydraulikschema
Schéma hydraulique
Schemi idraulici
Diagrama hidráulico
Esquema hidráulico
Classe 7 L
RA
RV
VA
SL
CL
IL
P
MA2
Schemi Diagramas DiagramasDiagrammesSchemataDiagrams
RGRG
ES
VR
VR
EC
PA
XY
See pages 84, 85
Siehe Seiten 84, 85
Voir pages 84 et 85
Vedere pagine 84, 85
Véase las páginas 84 y 85
Consultar a página 84, 85
Ref: SI_68/--
General Allgemeines Généralités
83
Page 84

Abbreviations
Abkürzungen
Abréviations
Abbreviazioni
Abreviaturas
Abreviaturas
Diagrams
Schematas
Diagrammes
Schemi
Diagramas
Diagramas
Electronic board
Elektronik
Carte électronique
Scheda elettronica
Placa electrónico
Placa electrónica
A24
Power supply 24V
Netzgerät 24V
Alimentation 24V
Alimentazione
Suministro de energía eléctrica
Alimentação de energia
F
Fuse
Sicherung
Fusible
Fusibile
Fusible
Fusível
MA2
Manometer boiler
Manometer Boiler
Manomètre de la chaudière
Manometro caldaia
Manómetro caldera
Manómetro da caldeira
SL
Level sensor
Niveausensor
Capteurs de niveau
Sensore di livello
Sensores de nivel de agua
Sensores de nível
DO
Dose programming
Mengenprogrammierung
Programmer le dosage
Programmazione dosi
Programar las cantidades
Programação da dosagem
CA
Water level control
Wasserniveauregler
Contrôle du niveau d’eau
Controllo livello acqua
Control de nivel de agua
Controlo do nível de água
GR
Group
Brühgruppe
Groupe
Gruppo
Grupo
Grupo
MC
Micro relay pump
Microrelais Pumpe
Micro Relé pompe
Micro Relé pompa
Micro Relé bomba
Micro Relé bomba
SP
Pressure sensor
Drucksensor
Capteur de pression
Pressostato
Sensor de presión
Sensor de pressão
GR1
Group
Brühgruppe
GR2
Groupe
GR3
Gruppo
Grupo
Grupo
CL
Boiler
Boiler
Chaudière
Caldaia
Caldera
Caldeira
IG
Main switch
Hauptschalter
Interrupteur principal
Interruttore generale
Interruptor principal
Interruptor principal
MP
Motor pump
Pumpenmotor
Pompe moteur
Pompa
Bomba del motor
Bomba do motor
TA
Button Water
Wassertaste
Touche eau
Tasto acqua
Tecla agua
Tecla água
GV
Ground connection
Erdklemme
Borne de terre
Connessione di terra
Conexión a tierra
Ligação terra
CPU
CPU board
CPU-Board
CPU
Scheda CPU
Tarjeta CPU
CPU
IL
Level indicator
Niveauanzeige
Indicateur de niveau
Indicatore di livello
Indicador de nivel de agua
Indicador de nível
P
Mechanic pressure switch
Mech. Druckschalter
Interrupteur de pression
mécanique
Pressostato
Interruptor de presión
mecánico
Interruptor da pressão
mecânica
TG1
Group keyboard
Tastatur Brühgruppe
TG2
Clavier du groupe
TG3
Tastiera gruppo
Teclado del grupo
Teclado do grupo
LV
Level sensors
Niveausensoren
Capteurs de niveau
Sensore di livello
Sensores de nivel de agua
Sensores de nível
CV
Flow meter
Flowmeter
Débitmètre
Contatore volumetrico
Contador volumétrico
Fluxómetro
IR
Switch Boiler heating
Schalter Boilerheizung
Interrupteur de chauage
chaudière
Interruttore resistenza
caldaia
Interruptor resistencia caldera
Interruptor da resist. caldeira
PV
Volumetric pump
Volumetrische Pumpe
Pompe volumétrique
Pompa volumetrica
Bomba volumétrica
Bomba volumétrica
TM
Transformer
Transformator
Transformateur
Trasformatore
Transformador
Transformador
RS1
LED Boiler heating elements
LED Heizelemente Boiler
RS2
DEL éléments chauants
RS3
de la chaudièr
LED elementi della
resistenza caldaia
LED elementos de resistencia caldera
LED elementos de
aquecimento da caldeira
Colors of the cables
Kabelfarben
Couleurs de câbles
Colori dei cavi
Colores de los cables
Cabo cores
84
M
Brown
Braun
Marron
Marrone
Marrón
Castanho
N
Black
Schwarz
Blanc-noir
Nero
Negro
Preto
B
Blue
Blau
Blanc-bleu
Blu
Azul
Azul
BI
White
Weiss
Blanc
Bianco
Blanco
Branco
GR
Grey
Grau
Gris
Grigio
Gris
Cinza
Page 85

EA
Water solenoid valve
Wasserventil
Soupape à eau solenoïdale
Elettrovalvola acqua
Válvula de electroimán para el agua
Válvula solenóide de água
EB
Electronic board
Steuerung
Carte électronique
Scheda elettronica
Placa electrónico
Placa electrónica
EC
Feeding solenoid valve
Füllventil
Soupape solenoïdale
d’alimentation
Elettrovalvola di carico
Válvula de electroimán de
alimentación
Válvula solenóide de alimentação
EG
Group solenoid valve
Brühgruppenventil
Soupape solenoïdale du groupe
Elettrovalvola gruppo
Válvula de electroimán del grupo
Válvula solenóide do grupo
ES
Expansion valve
Expansionsventil
Soupape d’expansion
Valvola di espansione
Válvula de expansión
Válvula de expansão
IS
Cup warmer switch
Schalter Tassenwärmer
Interrupteur de chauage des tasses
Interruttore scaldatazze
Interruptor de la calefacción de tazas
Interruptor de aquecimento de chávenas
RA
Water tap
Wasserhahn
Robinet d’eau
Rubinetto acqua
Grifo de agua
Torneira de água
TR
Remote switch
Fernschalter
Télérupteur
Teleruttore
Telerruptor
Contador
SL
LED Level sensor
LED Niveausensor
DEL Capteurs de niveau
LED Sensori di livello
LED Sensores de nivel de agua
LED Sensores de nível
LC
Lamp Level indicator
Lampe Niveauanzeige
Lampe niveau
Lampada livello
Lámpara de nivel
Lâmpada nível
RC
Boiler heating resist.
Boilerheizung
Resist. chauage de la
chaudière
Resistenza caldaia
Resist. de calentamiento
de caldera
Resist. de aquecimento
da caldeira
TS
Safety thermostat
Sicherheitsthermostat
Thermostat de sécurité
Termostato di sicurezza
Termostato de seguridad
Termóstato de segurança
PT
Boiler sensors
Boilersensor
Capteurs de la chaudière
Sensori della caldaia
Sensores de caldera
Sensores da caldeira
LGR1
LED Group
LGR2
LED Brühgruppe
LGR3
DEL Groupe
LED Gruppo
LED Grupo
LED Grupo
RS
Heater cup warmer
Heizung Tassenwärmer
Resistance chaue tasse
Resistenza scaldatazze
Resist. Calienta tazas
Resistência aquec. xícaras
VA
Vacuum valve
Vakuumventil
Vanne antidépression
Valvola antidepressione
Válvula antidepresión
Válvula anti depressão
PV
LED Pump
LED Pumpe
DEL Pompe
LED pompa
LED de bomba
LED da bomba
M1
Main Terminal
Anschlussklemmen
Borne de raccordement
Morsettiera
Boque de terminales (regleta)
Bornes ligação
RV
Steam tap
Dampfhahn
Robinet de vapeur
Manopola vapore
Grifo de vapor
Torneira de vapor
VR
Check valve
Rückschlagventil
Vérifier la soupape
Valvola di ritegno
Valvula de retención
Verificar a válvula
PW
Power resistance
Heizleistung
Résistivité
Potenza resistenza
Resistencia de potencia
Resistência à potência
MA1
Manometer pump
Manometer Pumpe
Manomètre de la pompe
Manometro pompa
Manómetro bomba
Manómetro da bomba
SC
Heat exchanger
Wärmetauscher
Echangeur thermique
Scambiatore
Intercambiador de calor
Permutador de calor
VS
Safety valve
Sicherheitsventil
Soupape de sécurité
Valvola di sicurezza
Válvula de seguridad
Válvula de segurança
Schemi Diagramas DiagramasDiagrammesSchemataDiagrams
GV
Yellow-Green
Gelb-Grün
Jaune-Vert
Giallo-Verde
Amarillo-Verde
Amarelo-Verde
85
Page 86

EU only
Nur für EU
Uniquement pour l’UE
Solo Europa
Solo para la UE
Somente UE
86
Page 87

Declaration
Erklärung
Déclaration
Dichiarazione
Declaración
Declaração
Schemi Diagramas DiagramasDiagrammesSchemataDiagrams
87
Page 88

Contacts
Ansprechpartner
Contacts
Headquarters, Production Plant and R&D Centers
Rancilio Group S.p.A.
Viale della Repubblica 40
20015 Villastanza di Parabiago (MI) – Italy
Ph. +39 0331 408200
Fax +39 0331 551437
info@ranciliogroup.com
Worldwide Branch Locations
Egro Suisse AG
Bahnhofstrasse 66
5605 Dottikon – Switzerland
Ph. +41 (0)56 616 95 95
Fax +41 (0)56 616 95 97
info-ch@ranciliogroup.com
Contatti
Contactos
Contactos
Spain
Rancilio Group Espana, S.A.
Gran Vía de Carlos III, 84 3ª – Edificio Trade
08028 Barcelona – Spain
Ph. +34 902 884 275
Ph. +34 934 923 414
Fax +34 93 496 57 01
info-es@ranciliogroup.com
Portugal
Rancilio Group Portugal Lda
Estrada da Falagueira nº 68 E
2700-365 Amadora-Lisboa – Portugal
Ph. + 351 21 019 10 91
Fax + 351 21 019 10 91
Rua Nova do Seixo 1282
4465-706 Leça do Balio-Porto – Portugal
Ph. + 351 22 010 14 19
Fax + 351 22 010 14 19
info-pt@ranciliogroup.com
Germany
Rancilio Group Deutschland GmbH
Talstrasse 27
97990 Weikersheim – Germany
Ph. +49 7934 99 29 30
Fax +49 7934 99 29 330
info-de@ranciliogroup.com
Switzerland
Egro Suisse AG
Bahnhofstrasse 66
5605 Dottikon – Switzerland
Ph. +41 (0)56 616 95 95
Fax +41 (0)56 616 95 97
info-ch@ranciliogroup.com
USA / Canada
Rancilio Group North America Inc.
1340 Internationale Parkway / Suite 200
Woodridge, IL 60517 – U.S.A.
Ph. +1 630 914 7900
Fax +1 630 914 7901
Toll Free: +1 877 726 2454
info@ranciliogroupna.com
www.ranciliogroup.com
facebook.com/RancilioGroup
88
Rancilio Group Channel
No. 46900185 REV: -- 06/2014
 Loading...