

Page 1
Welcome and thank you for purchasing the Rain Bird Simple To Set Timer! In the following
pages, you will find step by step instructions on how to use every function included in your Simple To Set Timer. If at any
time you have trouble understanding how to setup your timer, please call Rain Bird Technical Support at 1.800.Rain Bird
and let us guide you through the setup process. Thanks again and we hope you enjoy your new timer.
Simple To Set Timer Operation Manual
Page 2
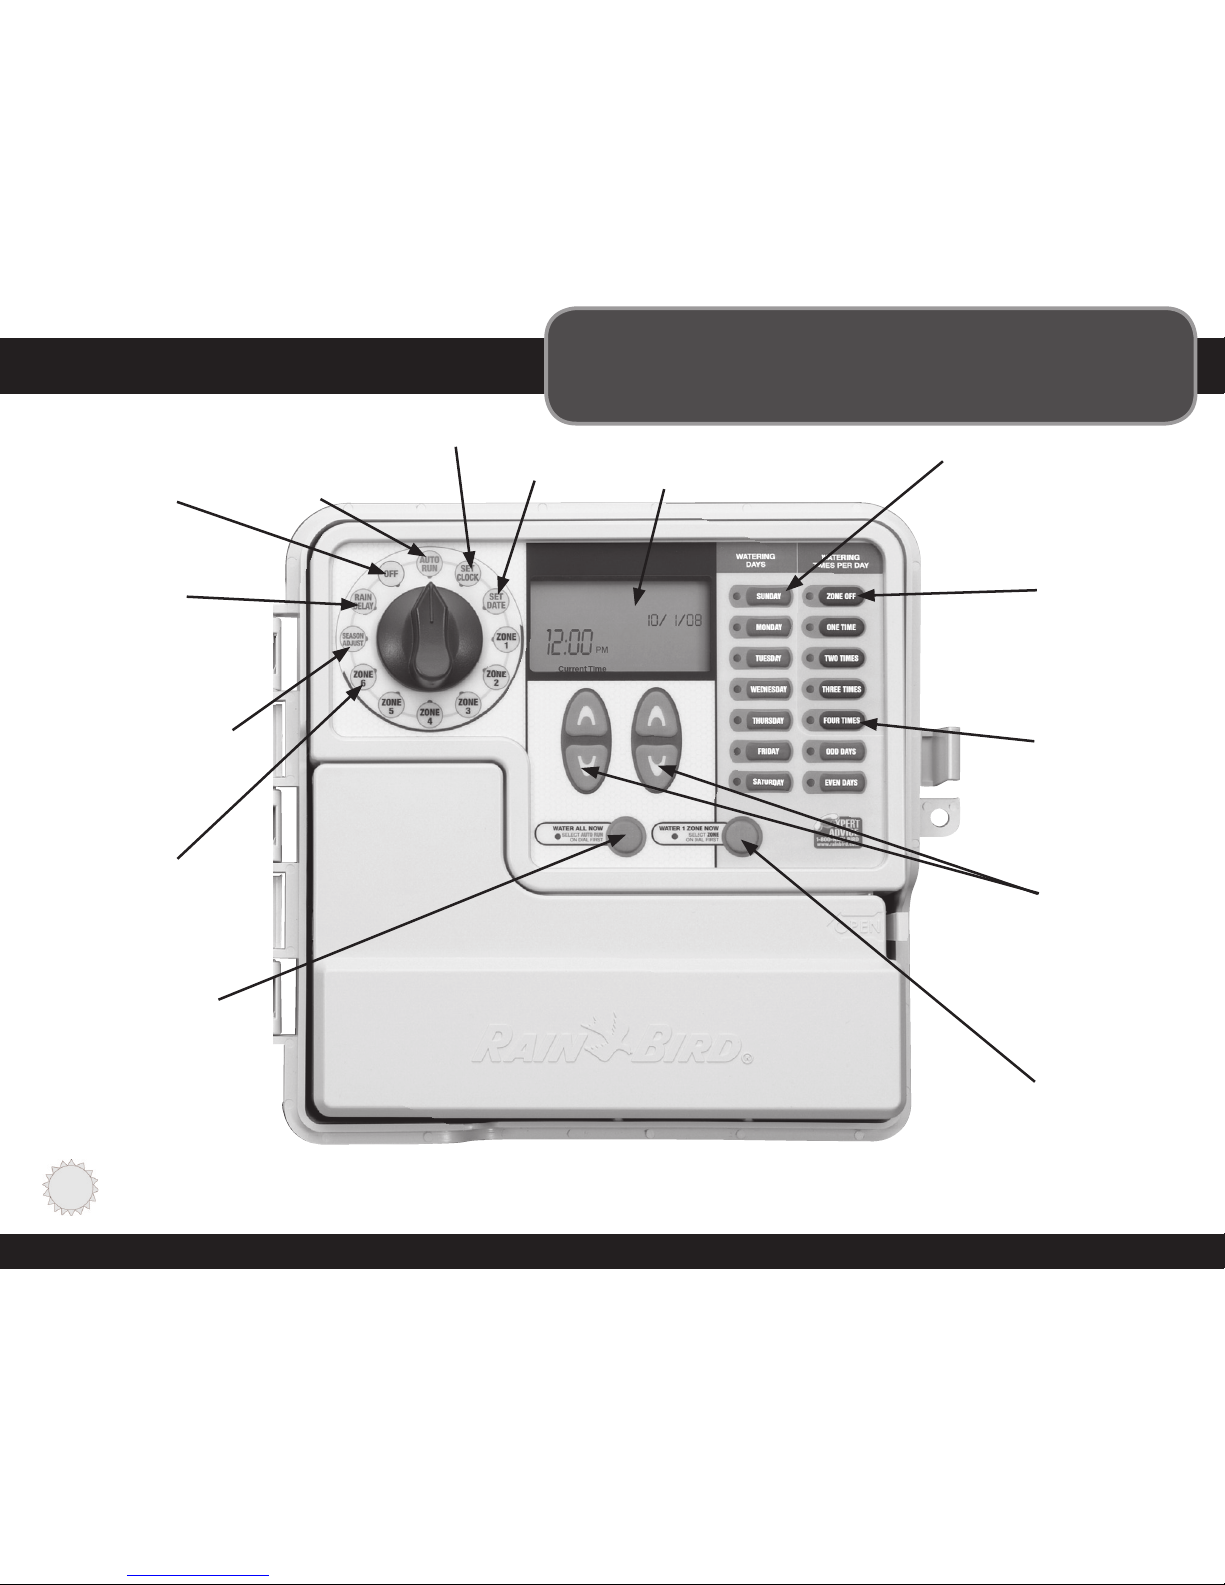
Getting Started
1 OFF (Main)
Turns off
all watering
1 AUTO RUN Set
dial here to run
your programmed
settings
1 SET CLOCK
1 SET DATE
Display Screen
1 RAIN DELAY
Delays watering
up to 72 hours
1 SEASON ADJUST
Adjusts watering %
as seasons change
1 ZONES 1-6
Program watering
for each area
(6 zone model Shown)
1 WATER All NOW
Waters all zones
in sequence for
scheduled duration
1 `WATERING DAYS
Select which day(s)
a Zone is watered
1 ZONE OFF
Turns off watering
of selected zone
1
WATERING TIMES
Select how many
times per day a
Zone is watered
1 UP/DOWN
ARROWS Use
Up/Down arrows
on left or right
keys to set clock,
date, zone, etc.
USER TIP:
Always begin by turning the dial to the area you want make a change to and make your changes using the options and
information displayed to the right and below the dial. For instance, if you want to set a schedule for Zone 1 in your yard, first turn
the dial to “Zone 1” and then make your changes using the buttons to the right of the dial.
Rain Bird Timer
Below is a diagram that shows all of the controls
and displays for your timer. Use this diagram
to become familiar with the timer functions
1 WATER 1 Zone
NOW Manually
waters any zone
Page 3
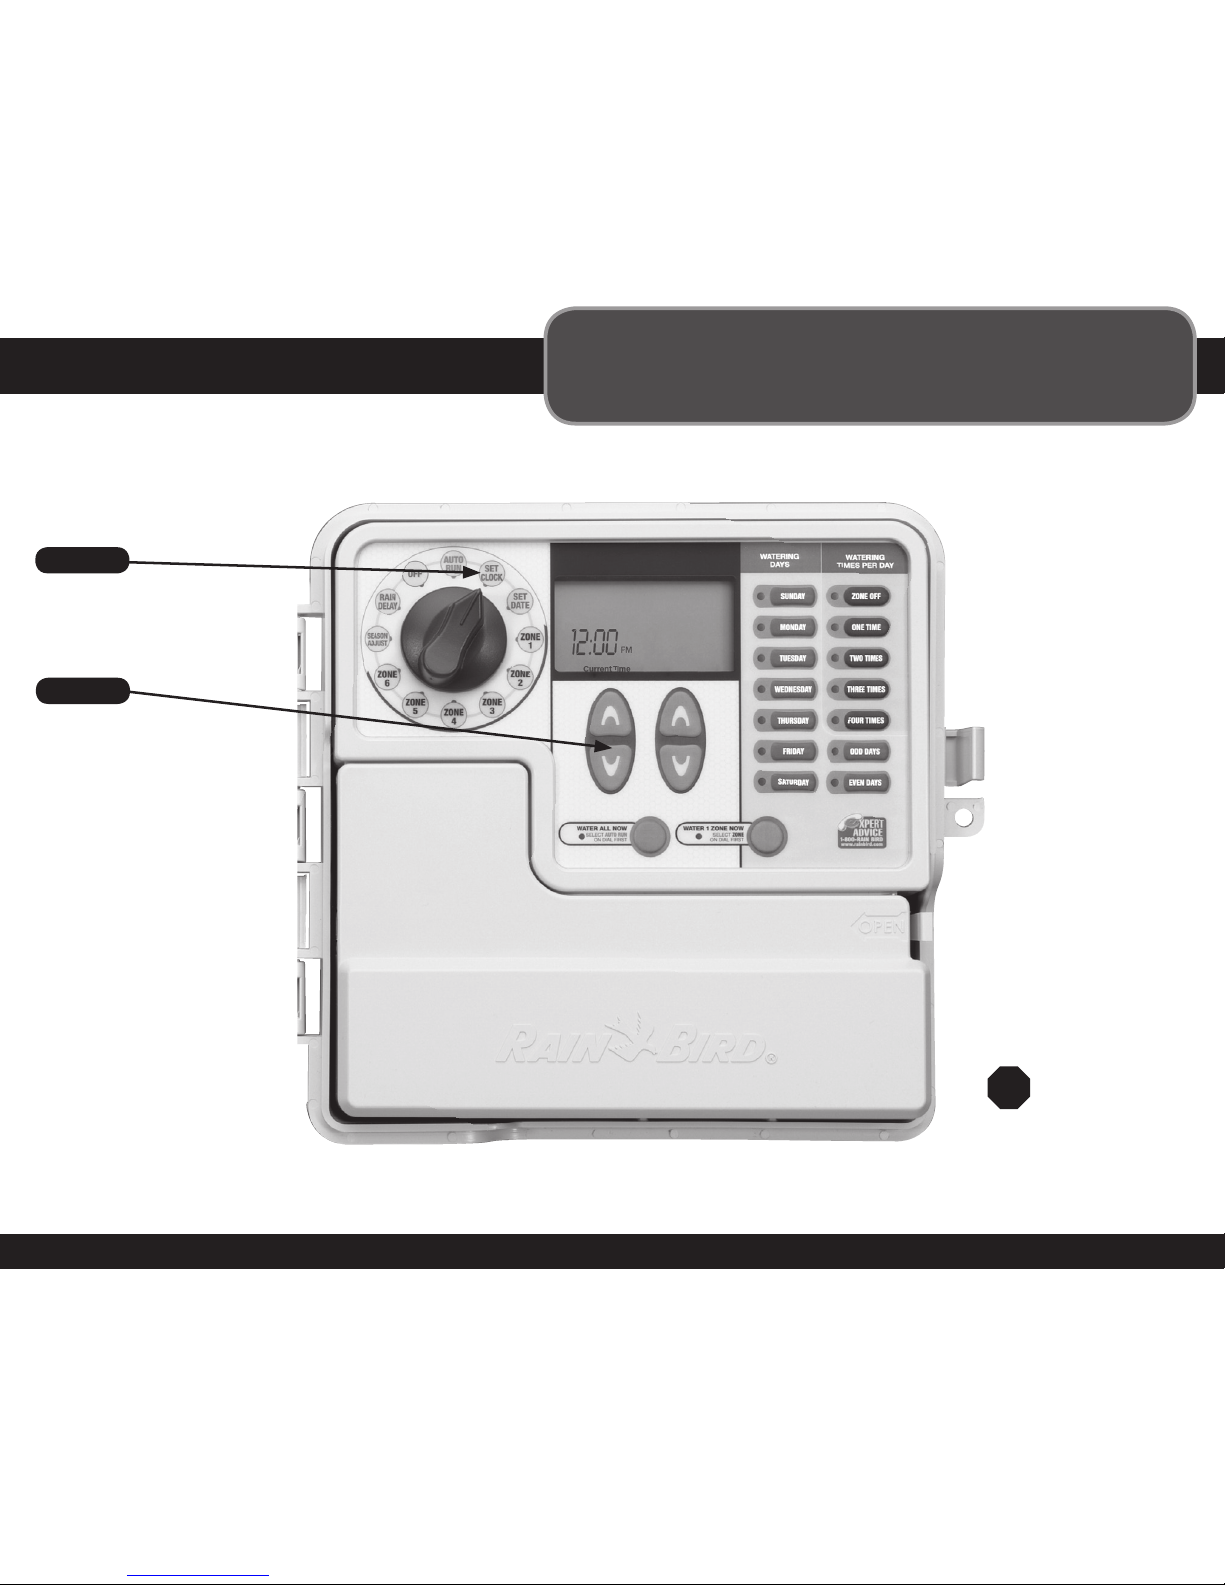
Setting Clock
To Set Clock:
Step 2
Use left Up/
Down arrow
keys to choose
current time
IMPORTANT:
Reset dial to
Auto Run after
making any
adjustments to
the programming
STOP
Step 1
Turn dial to
Set Clock
Rain Bird Timer
The first thing you will want to do before setting
up your watering schedule is to put the correct
time into the timer. Follow the steps below.
Page 4
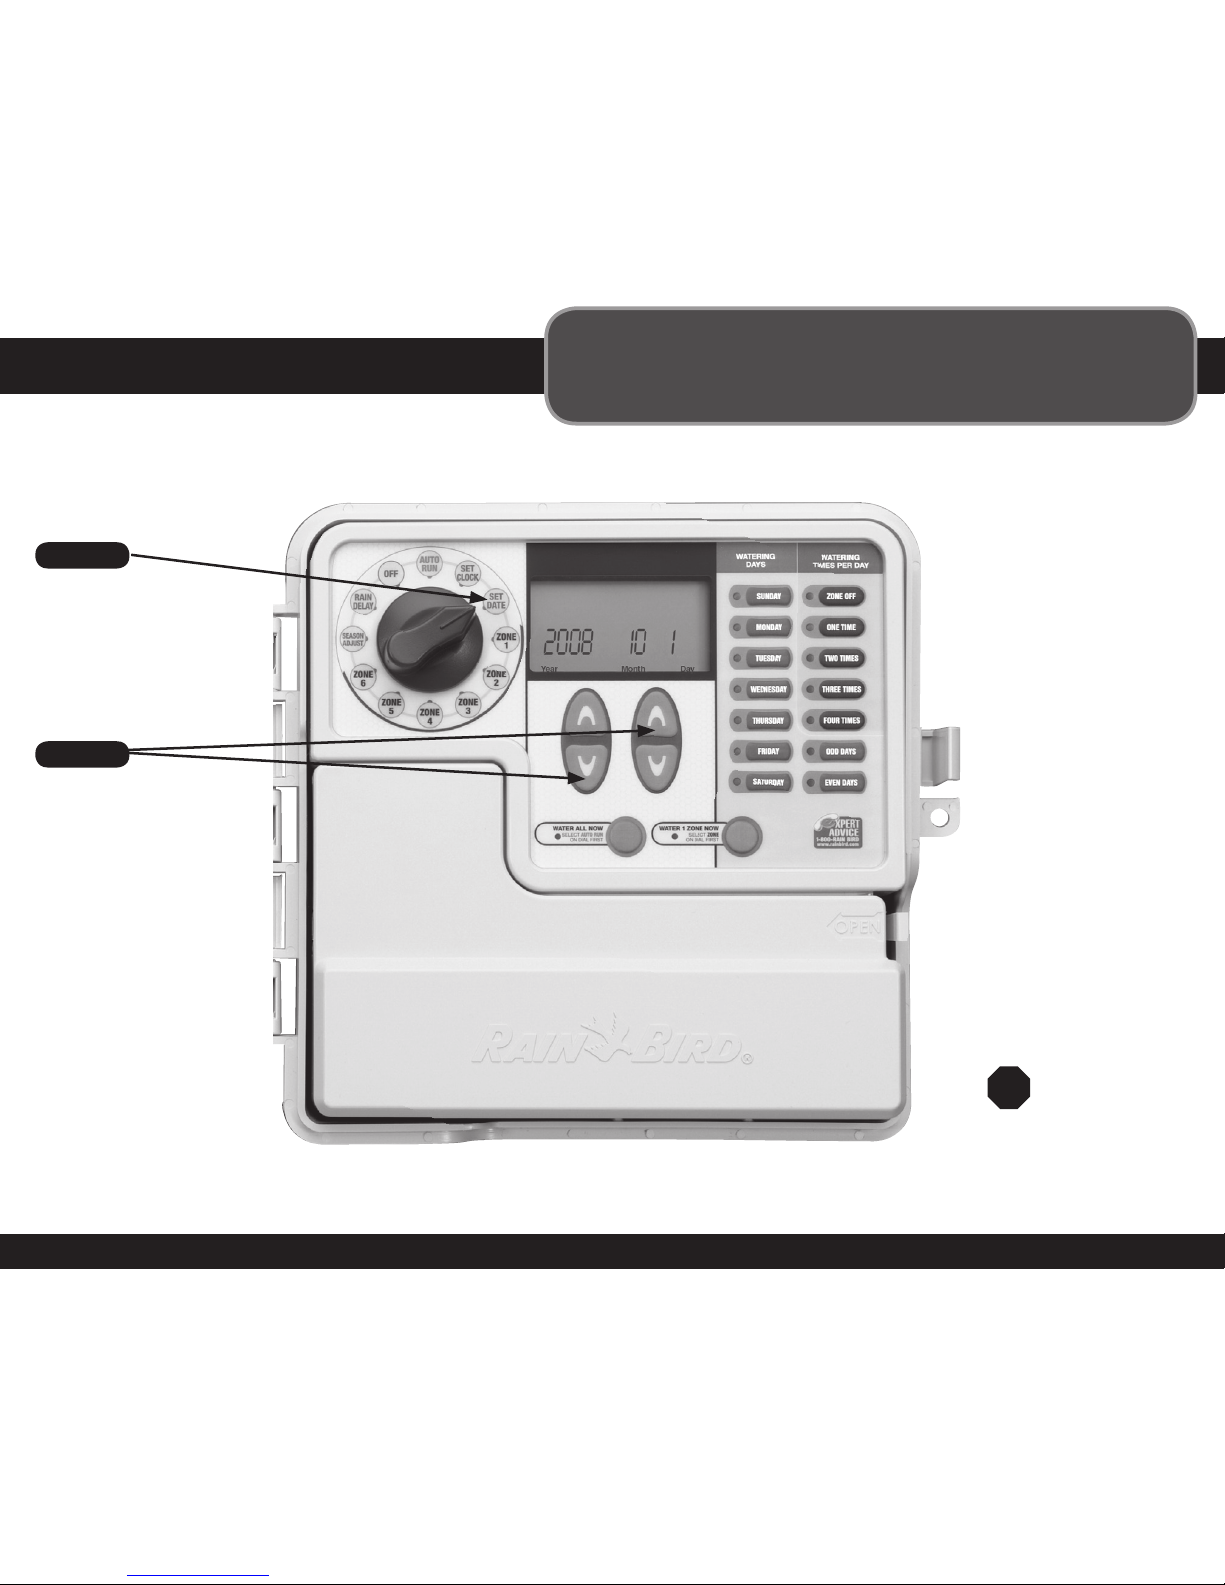
Setting Date
The next thing you will want to do before setting
up your watering schedule is to put the correct
date into the timer. Follow the steps below.
To Set Date:
IMPORTANT:
Reset dial to
Auto Run after
making any
adjustments to
the programming
STOP
Step 1
Turn dial to
Set Date
Step 2
Use left and
right Up/
Down arrow
keys to choose
current date
Rain Bird Timer
Page 5

Scheduled Watering
Step 1
Turn dial to
the Zone
you wish to
schedule
Step 3
Select number of times
per day to water**;
default is once per day
**If you have trouble with
water puddling or running off,
you might consider watering
more than once per day—but
for less time each time you
water. This will give the water
a better chance of soaking
into the soil and not running
off into the street.
Step 4
Use Up/Down
arrow keys to select
how many minutes
to water
Step 5
Use Up/Down arrow
keys to select start time
to water*
*If you selected more than
one watering time per day
in Step 3, then you will be
asked to input the FIRST
watering start time. All
subsequent start times are at
fixed intervals that cannot be
changed and are noted in text
above the Start Time. The
fixed intervals are:
Step 2
Select the day(s) of the week or
odd/even days you wish to water
Step 6
Turn dial to
next Zone
and repeat
Steps 2–5
IMPORTANT:
Reset dial to
Auto Run after
making any
adjustments to
the programming
STOP
Watering Times per Day Options Hours from First Start Time For Additional Watering Times
2 times per day 6 hours
3 times per day 4 and 8 hours
4 times per day 3, 6, and 9 hours
USER TIP:
You will set up each Zone on its
own schedule simply by repeating the steps
below for each Zone you want to schedule.
Zone to water
Rain Bird Timer
This section shows you how to set up a
watering schedule for each Zone in your yard.
Page 6

Water 1 Zone Now
Water 1
Zone Now
Step 1
Turn the dial to the
Zone you wish to
water and press
“Water 1 Zone Now”
Step 2
The Zone will start
watering for a default
of 10 minutes
IMPORTANT:
Reset dial to
Auto Run after
making any
adjustments to
the programming
STOP
USER TIP:
Any watering you do with this
function will not affect your normal schedule.
Current watering zone
Rain Bird Timer
This option allows you to water any single
Zone on demand instead of waiting
for the programmed schedule
Step 3
Use the Up/Down
arrows to adjust the
number of minutes
Step 4
To stop watering before
the time is up, return dial
to “Auto Run”
Page 7

Rain Bird Timer
Water All Now
Water All Now
Step 1
Turn the dial to
Auto Run and press
“Water All Now”
Step 2
The timer will water each
zone in sequence for its
scheduled duration
Step 3
To stop watering before
the time is up, turn the dial
to “Off” for a few seconds
IMPORTANT:
Reset dial to
Auto Run after
making any
adjustments to
the programming
STOP
USER TIP:
Any watering you do with this
function will not affect your normal schedule.
This option allows you to water all Zones
in sequence instead of waiting for the
programmed schedule
Current watering zone
Page 8
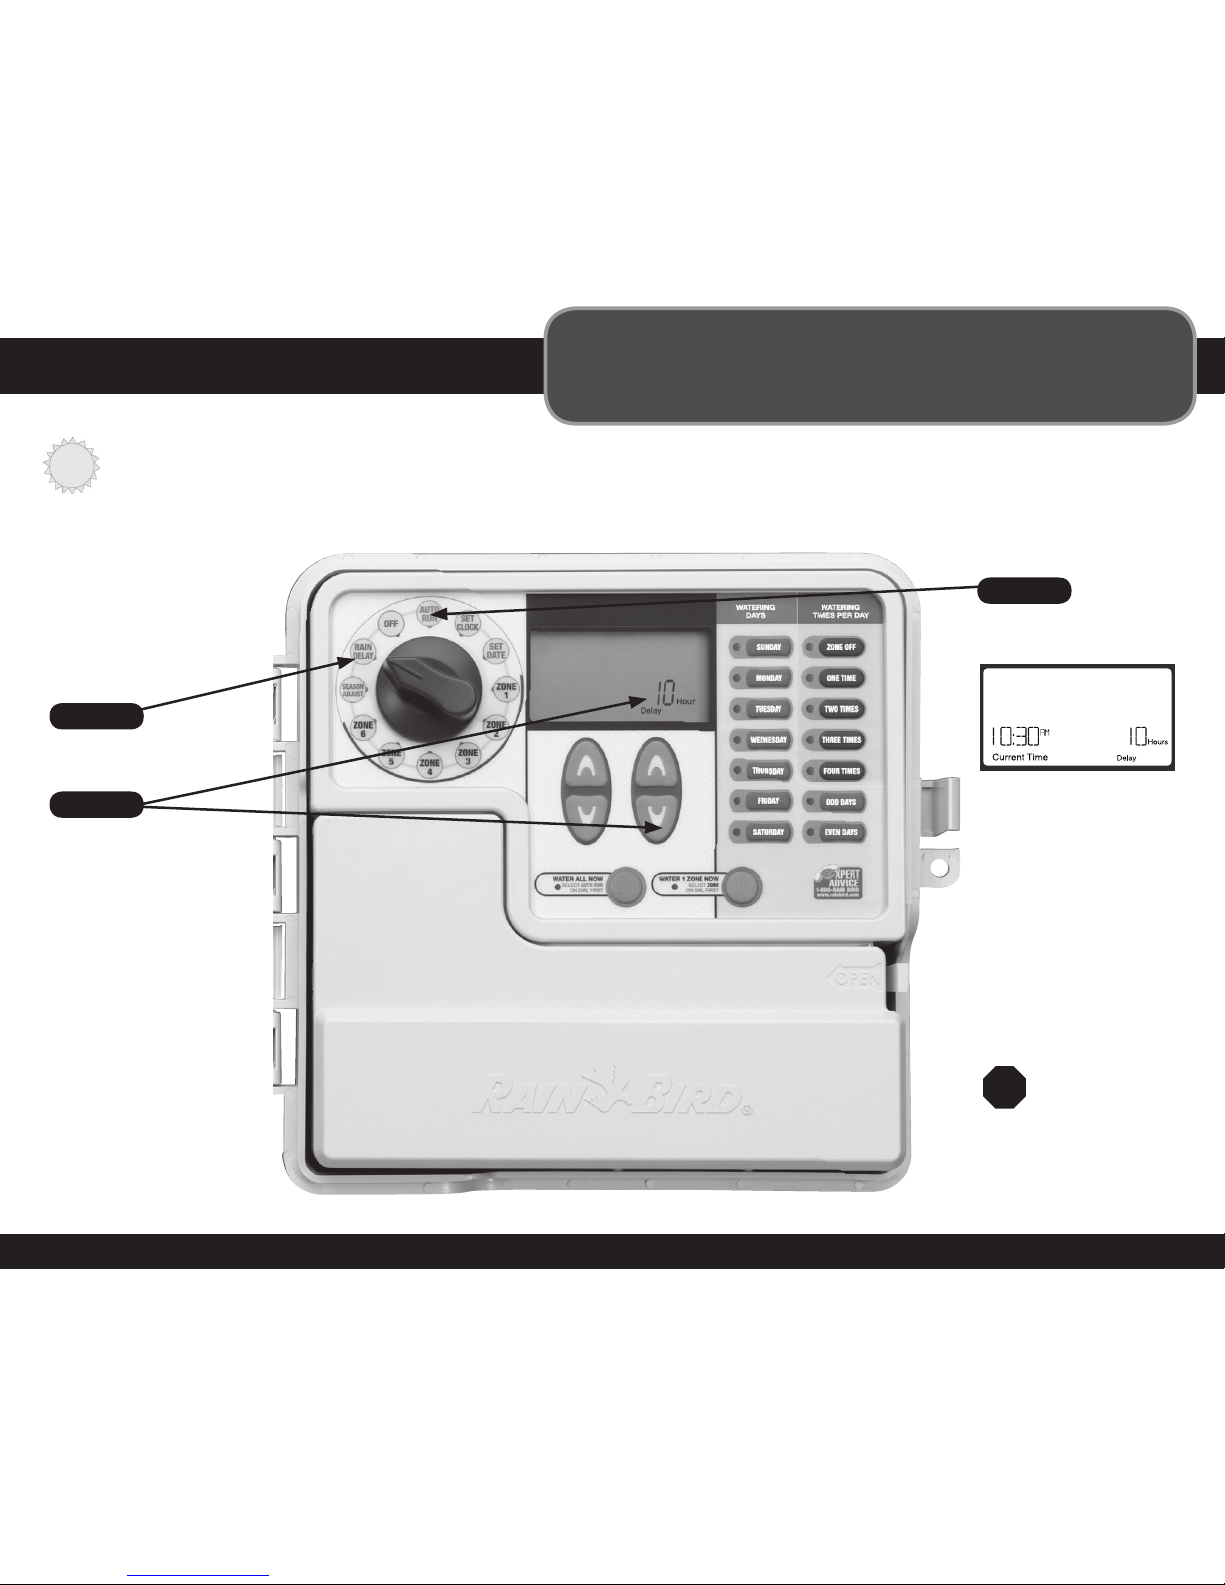
Rain Bird Timer
Rain Delay
IMPORTANT:
Reset dial to
Auto Run after
making any
adjustments to
the programming
STOP
USER TIP:
Once the timer has waited the amount of time you select
for Rain Delay, it will resume normal scheduled watering. Any scheduled
watering that falls into the delay period will not occur.
Rain Delay
Step 1
Turn the dial to
Rain Delay
Step 2
Use the right
Up/Down
arrows to adjust
the amount of
delay time
Screen displays
current time and the
number of Rain Delay
hours that are left until
regularly scheduled
watering resumes.
Step 3
Return dial to
Auto Run
Use this function to suspend watering for up
to 3 days due to weather or other reasons.
Page 9
Rain Bird Timer
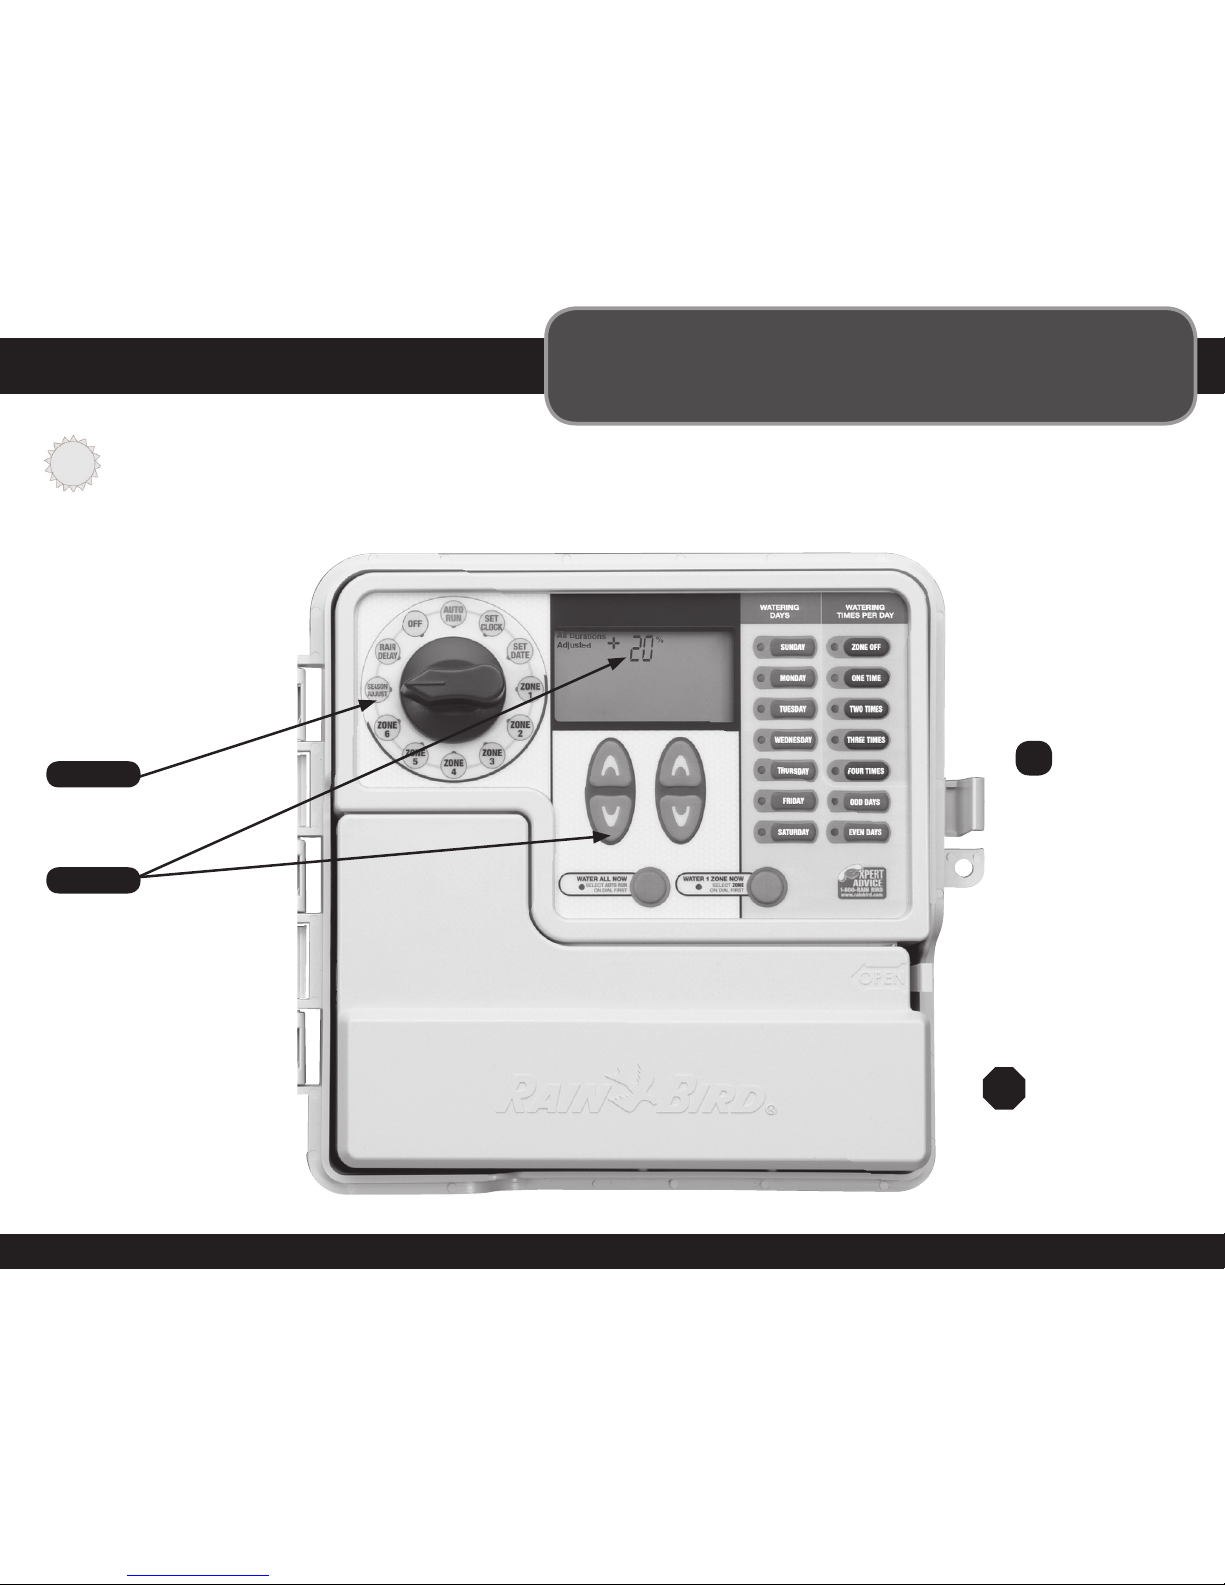
Season Adjust
IMPORTANT:
Reset dial to
Auto Run after
making any
adjustments to
the programming
STOP
EXAMPLE:
If you have Zone 1
scheduled to water
for 10 minutes and
you set Season
Adjust to +50%,
Zone 1 will then
be watered for 15
minutes.
Season Adjust
Step 1
Turn the dial to
Season Adjust
Step 2
Use the left
Up/Down
arrows to adjust
the percentage
USER TIP:
Depending on where you live, your landscapes watering needs can change throughout the year. In the summer, you may
need to water more than at other times of the year, etc. Instead of changing your settings for each zone in your yard, you can adjust
up or down the amount of time you water for your ENTIRE schedule with one simple adjustment using Season Adjust. Your scheduled
times will not change, but the actual amount of time that is watered will be adjusted per your Season Adjust setting. Automatically
adjust watering of any Zone(s) by percentages by using left Up/Down arrows to adjust from -90° to+100°.
e
Use this option to make changes to
account for seasonal changes without
changing your schedule setting.
Page 10

Rain Bird Timer
Normal Operation
With Rain Delay
Valve Short
Watering All Now
Screen displays current time, which zone is currently
being watered, and the number of minutes remaining in
the cycle for that zone.
Normal Operation
Screen displays current time, the zone that is scheduled to
be watered next, and the date and time it will be watered.
Screen displays current time and the number of Rain
Delay hours that are left until regularly scheduled
watering resumes.
Below are different screens your timer
might display while in Auto Run mode.
Page 11

Rain Bird Timer
Troubleshooting
Problem Possible Cause Possible Solution
Automatic and Manual cycles do not
begin watering.
Water source not supplying water. Make sure the main water line and all supply lines are open and
operating properly.
Wires not properly connected. Make sure all field wires and master valve/pump start relay wiring is
connected properly.
Wires loose or cut; corroded connections. Check field wiring for broken, cut, or “skinned” wires and replace if
necessary. Check all wire connections and replace with watertight
splice connectors as needed.
Dial not set to AUTO RUN. Make sure the dial is on AUTO RUN—not any other dial position.
If you have a Rain Sensor, it may be activated. You can either wait until the Rain Sensor dries out, or disconnect
the Rain Sensor from the yellow terminals on the timer and replace it
with a wire connecting the two yellow terminals.
If you do not have a Rain Sensor, the wire
connecting the two yellow Rain Sensor terminals
may be damaged or missing.
Connect the two yellow Rain Sensor terminals in the timer’s terminal
bay with a short length of 14 to 18 gauge wire.
An electrical surge may have damaged the
timer’s electronics.
Press the reset button under the wiring cover. If there is no
permanent damage, the timer should resume normal operation.
You will need to input the correct time and date, but your watering
schedule should remain intact.
Watering Issues
Electrical Issues
Problem Possible Cause Possible Solution
LCD Display is blank. Power cord not plugged in. Make sure the two-prong connector is connected and the power
cord is securely plugged in.
Wall socket not supplying power. Make sure the main AC power supply is working properly.
LCD Display is “frozen” and the
timer will not accept programming.
An electrical surge may have damaged the
timer’s electronics.
Unplug the timer for 3 minutes. Plug the timer back in. If there is no
permanent damage, the timer will accept programming and resume
normal operation.
Page 12

P/N: 637607-01 01/09
In the interest of product improvement, Rain Bird reserves the right to change
product design or specifications without notification.
®Trademark of Rain Bird Corporation.
© 2009 Rain Bird Corporation.
Rain Bird Corporation Consumer Products Division
Customer Service Center
6991 E. Southpoint Rd. Building #1
Tucson, AZ 85706
1-800-RAIN BIRD
Notes
Zone Notes
 Loading...