

Page 1

PRS-D Pressure Regulator
Installation and Operation Guide
Guía de Uso del PRS-D
Guia de Operação do PRS-D
Istruzioni PRS-D
PRS-D Bedienungsanleitung
Manuel d’utilisation du PRS-D
PRS-D Sproeier bedieningshandleiding
Recycled Paper.
Rain Bird. Conserving more than water.
® Registered trademark of Rain Bird Sprinkler Mfg. Corp.
® 2000 Rain Bird Sprinkler Corp. 3/00
P/N 231947
Rain Bird Sales, Inc.
970 West Sierra Madre Avenue
Azusa, CA 91702
Phone: (626) 963-9311
Fax: (626) 812-3411
Rain Bird Technical Services
(800) 247-3782 (U.S. only)
Rain Bird Sales, Inc.
6640 South Bonney Ave.
Tucson, AZ 85706
Phone: (520) 434-6200
Fax: (520) 434-6246
Specification Hotline
(800) 458-3005 (U.S. only)
Rain Bird International, Inc.
145 North Grand Avenue
Glendora, CA 91741
Phone: (626) 963-9311
Fax: (626) 963-4287
www.rainbird.com
gpm
m3⁄h
l/s
100-PGA 5-40 1,14-9,08 0,32-2,52
150-PGA 30-100 6,81-22,70 1,89-6,30
200-PGA 40-150 9,08-34,05 2,52-9,45
100-PEB/PESB 5-50 1,14-11,35 0,32-3,15
150-PEB/PESB 20-150 11,36-34,05 3,15-9,45
200-PEB/PESB 50-200 17,03-45,40 4,73-12,60
100-GB 5-50 1,14-11,35 0,32-3,15
125-GB 20-80 4,54-18,16 1,26-5,04
150-GB 20-140 4,54-31,78 1,26-8,82
200-GB 20-200 4,54-45,40 1,26-12,60
100-EFB-CP 5-50 1,14-11,35 0,32-3,15
125-EFB-CP 20-80 4,54-18,16 1,26-5,04
150-EFB-CP 20-140 4,54-31,78 1,26-8,82
200-EFB-CP 20-200 4,54-45,40 1,26-12,60
300-BPE 60-300 13,62-68,10 3,78-18,90
300-BPES 60-300 13,62-68,10 3,78-18,90
300-BPE-MV 60-300 13,62-68,10 3,78-18,90
300-BPES-MV 60-300 13,62-68,10 3,78-18,90
T1
Page 2
+
–
1
3
4
6
7
5
2
Thank you for purchasing a Rain Bird
PRS-D pressure regulator to optimize the
performance of your irrigation system.
This product automatically maintains constant outlet pressure regardless of inlet
pressure fluctuations. Proper operation
requires inlet pressure to be a minimum of
15 psi (1 bar) higher than desired outlet
pressure. This product is designed for use
with Rain Bird PGA, PEB, PESB, GB, EFBCP, BPE and BPES commercial valves.
Much of the installation is done by hand;
elsewhere, an adjustable wrench and pressure hose gauge (PHG) are required.
As with all pressure regulators, this product senses back pressure before regulating outlet pressure. When opening the
valve, it is normal for outlet pressure to
momentarily exceed the desired set pressure and then begin regulating outlet pressure. This situation can be greatly
reduced by following the installation and
adjustment procedures below.
NOTES:
1. For areas with very high pressure or
uneven terrain, install sprinklers with
PRS pressure regulating stems or SAM
check valves.
2. When inlet pressures exceed 100 psi
(6,9 bars), a pressure regulating master
valve or inline pressure regulator is
suggested.
3. Rain Bird does not recommend using
the PRS-D module for applications outside the receommended flow ranges
(listed in T1).
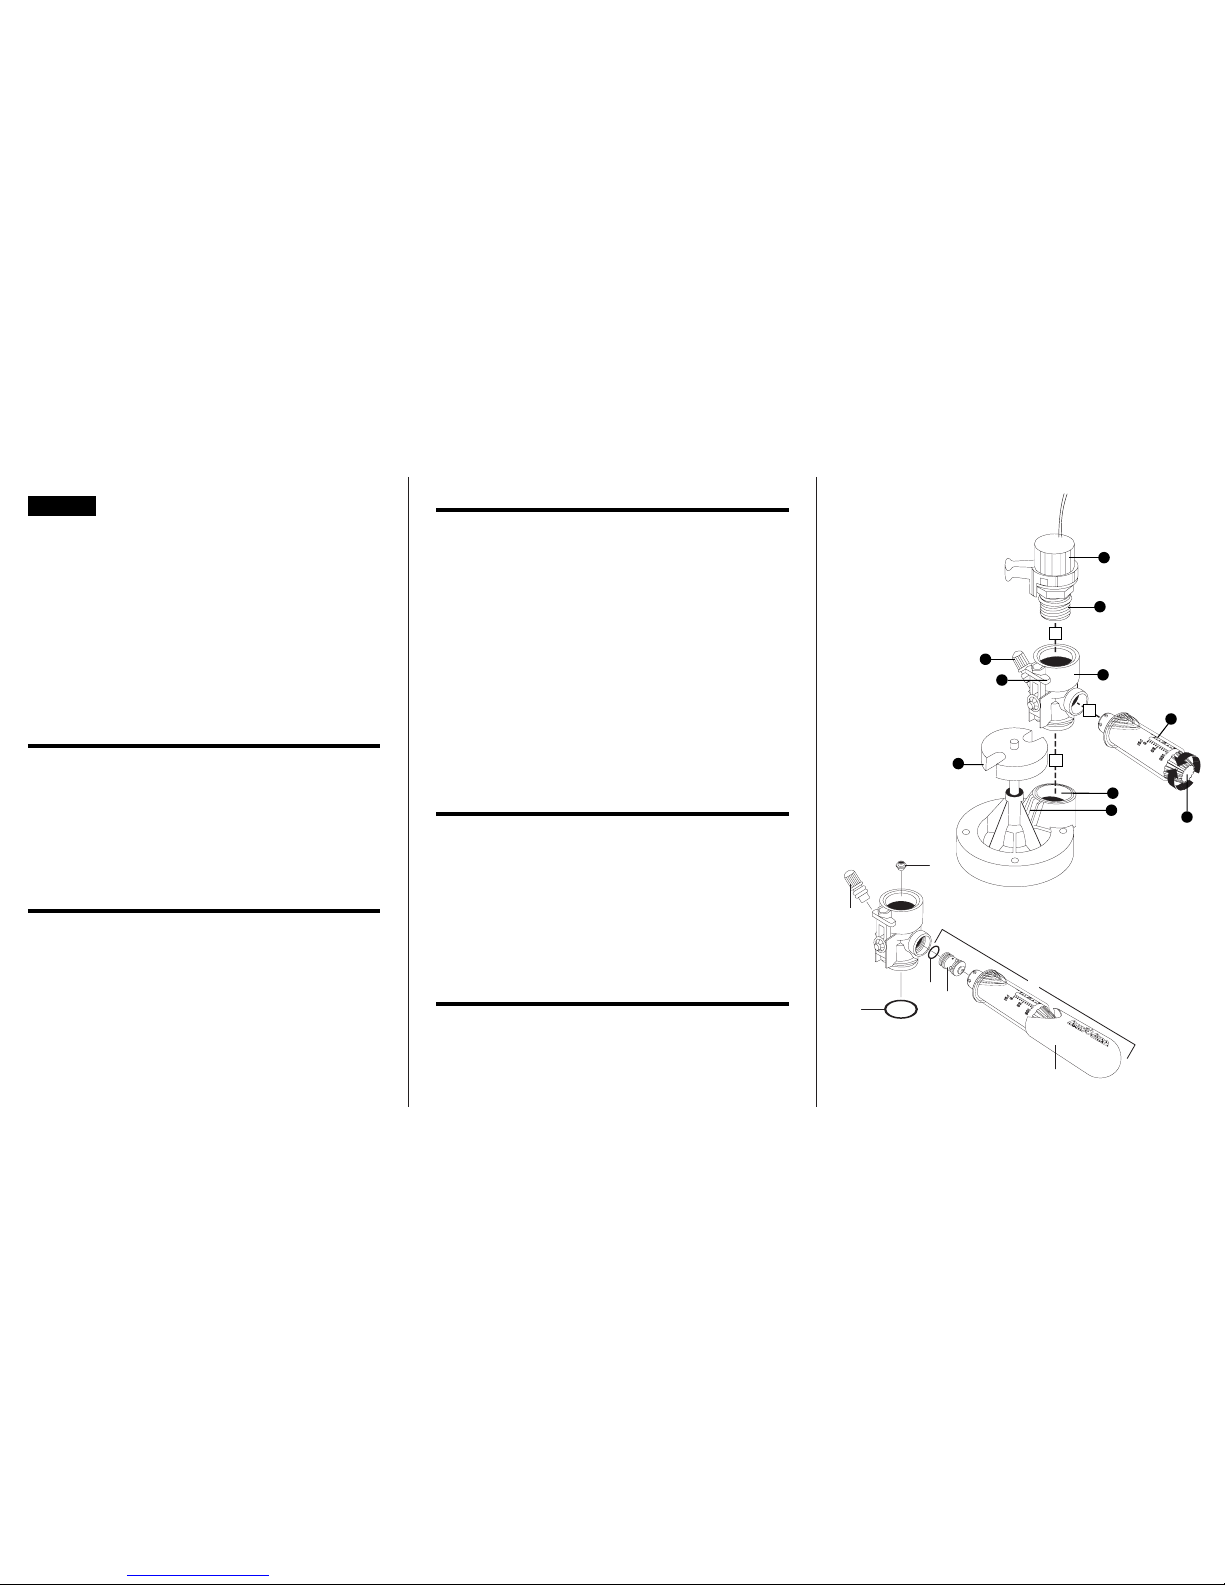
Installation
Refer to F1.
1. Turn off water supply to the valve and
turn flow control handle
•
A
clockwise
until closed.
2. Remove solenoid
•
B
and adapter
•
C
from bonnet
•
F
with an adjustable
wrench.
3. Remove the Schrader valve cap
•
D
.
4. Thread PRS-D housing
•
E
into valve
bonnet
•
F
until hand tight.
5. Loosen slightly to align latch
•
G
between
ribs on plastic valves
•
H
or hole on brass
valves, then push down latch to snap in
place.
6. Thread PRS-D cartridge
•
I
into housing
until hand tight, then thread adapter and
solenoid into top of housing.
7. Keep the flow control handle closed,
then turn on water supply to the valve
and proceed with adjustment.
Adjustment
Refer to F1.
1. Remove the PRS-D cap by pulling away
from the housing. Verify setting is 100
psi (6,9 bars).
2. Attach pressure hose gauge to Schrader
valve
•
D
.
3. Turn solenoid counter-clockwise
1
/4turn
to manually open the valve or activate
the solenoid from the controller. Do not
use external bleed.
4. Turn flow control handle counter-clockwise until pressure gauge indicates
15 psi (1 bar) above desired downstream pressure.
5. Turn PRS-D adjustment knob
•
J
until
pressure gauge indicates the desired
outlet pressure, then replace PRS-D and
Schrader valve caps.
7. Turn solenoid clockwise to close the
valve or deactivate the solenoid from the
controller.
Troubleshooting
External Leaks. Main cause is improp-
er o-ring seal between bonnet, cartridge,
adapter or solenoid.
1. Turn off water supply to the valve, then
unthread parts at the leak.
2. Wipe or blow parts clean, reassemble,
then turn on water supply and verify
proper function.
Internal leaks. Main cause is loose
solenoid. If tightening solenoid does not fix
the leak, proceed as follows.
1. Turn off water supply to the valve, then
remove solenoid and clean debris.
2. Unthread the PRS-D and check the rubber boot under the housing for tears or
debris.
3. Check inside the solenoid bowl for
damage to the white seat; a slight
impression on top is normal.
4. Clean all parts and reassemble, then
turn on water supply and verify proper
function.
Excess Vibration. Main cause is
excess air in the line or operation outside
recommended flow ranges (see T1). To
purge the air, proceed as follows.
1. Keep water supply on.
2. PGA valves only, remove solenoid and
let water flow for two minutes.
3. All other valves, remove external bleed
screw and let water flow for two minutes.
4. Open and close flow control handle a
few times to remove air trapped inside
the bonnet.
5. Reinstall parts, follow adjustment
procedures and verify proper function.
English
1. Dial assembly..........................B33136
2. Cap ..........................................231678
3. Seat assembly .........................231742
4. O-ring, seat..............................203026
5. O-ring, housing........................209502
6. Schrader valve.........................203030
7. Solenoid seal ...........................208629
A
B
C
F
J
H
E
I
D
G
F1
F2
PRS-D Pressure Regulator
1
2
3
Notes
Replacement Parts
Refer to F2.
 Loading...