

Page 1

User Manual
Page 2

Page 3

END-USER LICENSE AGREEMENT FOR RAIN BIRD SOFTWARE
IMPORTANT-READ CAREFULLY: This Rain Bird End-User License Agreement (“EULA”) is a legal agreement
between you (either an individual or a single entity) and the Rain Bird Sprinkler Mfg. Corp. for the Rain Bird software
product(s) identified above, which includes computer software and associated media and printed materials, and
may include “on-line” or electronic documentation (“SOFTWARE PRODUCT” or “SOFTWARE”). By installing,
copying or otherwise using the SOFTWARE PRODUCT, you agree to be bound by the terms of this EULA. If you do
not agree to the terms of this EULA, you may not use or copy the SOFTWARE PRODUCT, and you should promptly
return the unused product(s) to an Authorized Maxicom Distributor (“AMD”) for a full refund.
Software PRODUCT LICENSE
The SOFTWARE PRODUCT is protected by copyright laws and international copyright treaties, as well as other
intellectual property laws and treaties. The SOFTWARE PRODUCT is licensed, not sold.
1
GRANT OF LICENSE. This EULA grants you the following rights:
Software. You may install and use one copy of the SOFTWARE PRODUCT, or in its place, any prior version for the
same operating system, on a single computer. Only the primary user of the computer on which the SOFTWARE
PRODUCT is installed may make a second copy for his or her exclusive use on either a home or portable
computer. If the SOFTWARE PRODUCT was purchased preinstalled in a computer, only the primary user may
make a second copy for his or her exclusive use on either a home or portable computer.
Storage/Network Use. You may also store or install a copy of the SOFTWARE PRODUCT on a storage device, such
as a network server, used only to install or run the SOFTWARE PRODUCT on your other computers over an
internal network; however, you must acquire and dedicate a license for the SOFTWARE PRODUCT for each
computer on which the SOFTWARE PRODUCT is installed or run from the storage device. A license for the
SOFTWARE PRODUCT may not be shared or used concurrently on different computers.
Back-up Copy. Exclusive of the aforementioned second copy for home or portable computer use, you may make
a single back-up copy of the SOFTWARE PRODUCT. You may use the back-up copy solely for archival purposes.
License Pak. If you acquired this EULA in a Rain Bird License Pak, you may make the number of additional
copies of the computer software portion of the SOFTWARE PRODUCT authorized on the printed copy of this
EULA, and you may use each copy in the manner specified above. You are also entitled to make a corresponding
number of secondary copies for home or portable computer use and archive copy as described above.
2
DESCRIPTION OF OTHER RIGHTS AND LIMITATIONS.
Limitations on Reverse Engineering, Decompilation and Disassembly. You may not reverse engineer,
decompile, or disassemble the SOFTWARE PRODUCT, except and only to the extent that such activity is
expressly permitted by applicable law notwithstanding this limitation.
Separation of Components. The SOFTWARE PRODUCT is licensed as a single product. Its component parts may
not be separated for use on more than one computer.
Single Computer. If the SOFTWARE PRODUCT was shipped preinstalled in a computer, the SOFTWARE
PRODUCT is licensed with the COMPUTER as a single integrated product. The SOFTWARE PRODUCT may only
be used with the COMPUTER.
Rental. You may not rent or lease the SOFTWARE PRODUCT,
End-User License Agreement
Page 4

Software Transfer. You may permanently transfer all of your rights under this EULA, provided you retain no
copies, you transfer all of the SOFTWARE PRODUCT (including all component parts, the media and printed
materials, any upgrades and this EULA) and the recipient agrees to the terms of this EULA. If the SOFTWARE
PRODUCT is an upgrade, any transfer must include all prior versions of the SOFTWARE PRODUCT. If the
SOFTWARE PRODUCT was preinstalled on a computer, you may permanently transfer all of your rights under
this EULA only as part of a sale or transfer of the COMPUTER, provided you retain no copies, you transfer all of
the SOFTWARE PRODUCT (including all component parts, the media and printed materials, any upgrades, this
EULA and, if applicable, the Certificate(s) of Authenticity), and the recipient agrees to the terms of this EULA. If
the SOFTWARE PRODUCT is an upgrade, any transfer must include all prior versions of the SOFTWARE
PRODUCT.
Termination. Without prejudice to any other rights, Rain Bird may terminate this EULA if you fail to comply with
the terms and conditions of this EULA. In such event, you must destroy all copies of the SOFTWARE PRODUCT
and all of its component parts.
3
UPGRADES. If the SOFTWARE PRODUCT is an upgrade from another product, whether from Rain Bird or
another supplier, you may use or transfer the SOFTWARE PRODUCT only in conjunction with that upgraded
product, unless you destroy the upgraded product. If the SOFTWARE PRODUCT is an upgrade of a Rain Bird
product, you now may use that upgraded product only in accordance with this EULA. If the SOFTWARE
PRODUCT is an upgrade of a component of a package of software programs which you licensed as a single
product, the SOFTWARE PRODUCT may be used and transferred only as part of that single product package and
may not be separated for use on more than one computer.
4
COPYRIGHT. All title and copyrights in and to the SOFTWARE PRODUCT (including but not limited to any
images, photographs, animations, video, audio, music, text and “applets,” incorporated into the SOFTWARE
PRODUCT), the accompanying printed materials, and any copies of the SOFTWARE PRODUCT, are owned by
Rain Bird or its suppliers. The SOFTWARE PRODUCT is protected by copyright laws and international treaty
provisions. Therefore, you must treat the SOFTWARE PRODUCT like any other copyrighted material except that
you may either (a) make one copy of the SOFTWARE PRODUCT solely for backup or archival purposes or (b)
install the SOFTWARE PRODUCT on a single computer provided you keep the original solely for backup or
archival purposes. You may not copy the printed materials accompanying the SOFTWARE PRODUCT. All rights
not specifically granted under this EULA are reserved by Rain Bird.
5
DUAL-MEDIA SOFTWARE. You may receive the SOFTWARE PRODUCT in more than one medium. Regardless
of the type or size of medium you receive, you may use only one medium that is appropriate for the
COMPUTER. You may not use or install the other medium on another computer. You may not loan, rent, lease,
or otherwise transfer the other medium to another user, except as part of the permanent transfer (as provided
above) of the SOFTWARE PRODUCT.
6
PRODUCT SUPPORT. Product support for the SOFTWARE PRODUCT is provided by your AMD and Rain Bird.
If the SOFTWARE PRODUCT was preinstalled on a computer and you desire computer product support, please
refer to PC Manufacturer’s support number provided in the documentation for the COMPUTER. Should you
have any questions concerning this EULA, or if you desire to contact PC Manufacturer for any other reason,
please refer to the address provided in the documentation for the COMPUTER.
End-User License Agreement
Page 5

Introduction . . . . . . . . . . . . . . . . . . . . . . . . . . . . . . . . . . . . . . . . . . . . . . . . . . . . . . . . . .xi
Welcome to Maxicom2 . . . . . . . . . . . . . . . . . . . . . . . . . . . . . . . . . . . . . . . . . . . . . . . . . . . . . . . . . . . . . . . .xi
Overview of the Maxicom2System . . . . . . . . . . . . . . . . . . . . . . . . . . . . . . . . . . . . . . . . . . . . . . . . . . . . .xii
About this Manual . . . . . . . . . . . . . . . . . . . . . . . . . . . . . . . . . . . . . . . . . . . . . . . . . . . . . . . . . . . . . . . . . .xiv
Terminology Used in this Manual . . . . . . . . . . . . . . . . . . . . . . . . . . . . . . . . . . . . . . . . . . . . . . . . . . . . . .xv
Icons Used in This Manual . . . . . . . . . . . . . . . . . . . . . . . . . . . . . . . . . . . . . . . . . . . . . . . . . . . . . . . . . . .xvi
Getting Started Right Away . . . . . . . . . . . . . . . . . . . . . . . . . . . . . . . . . . . . . . . . . . . . . . . . . . . . . . . . . . .xvi
1 Installing Maxicom2 . . . . . . . . . . . . . . . . . . . . . . . . . . . . . . . . . . . . . . . . . . . . . . . . .1.1
System Requirements . . . . . . . . . . . . . . . . . . . . . . . . . . . . . . . . . . . . . . . . . . . . . . . . . . . . . . . . . . . . . . .1.1
Minimum Hardware and Software Requirements . . . . . . . . . . . . . . . . . . . . . . . . . . . . . . . . . . .1.1
Recommended Hardware and Software Requirements . . . . . . . . . . . . . . . . . . . . . . . . . . . . . .1.2
Remote Access Requirements . . . . . . . . . . . . . . . . . . . . . . . . . . . . . . . . . . . . . . . . . . . . . . . . . . . .1.2
Installing the Software . . . . . . . . . . . . . . . . . . . . . . . . . . . . . . . . . . . . . . . . . . . . . . . . . . . . . . . . . . . . . . .1.3
Installing the Maxicom2Tour . . . . . . . . . . . . . . . . . . . . . . . . . . . . . . . . . . . . . . . . . . . . . . . . . . . . .1.4
Installing Adobe®Acrobat Software . . . . . . . . . . . . . . . . . . . . . . . . . . . . . . . . . . . . . . . . . . . . . . .1.5
Running the Upgrade Utility . . . . . . . . . . . . . . . . . . . . . . . . . . . . . . . . . . . . . . . . . . . . . . . . . . . . .1.5
2 Getting to Know Maxicom2 . . . . . . . . . . . . . . . . . . . . . . . . . . . . . . . . . . . . . . . . . . . .2.1
Starting Maxicom2 . . . . . . . . . . . . . . . . . . . . . . . . . . . . . . . . . . . . . . . . . . . . . . . . . . . . . . . . . . . . . . . . . .2.1
Using the Windows . . . . . . . . . . . . . . . . . . . . . . . . . . . . . . . . . . . . . . . . . . . . . . . . . . . . . . . . . . . . . . . . . .2.4
Standard Window and Dialog Box Features . . . . . . . . . . . . . . . . . . . . . . . . . . . . . . . . . . . . . . . .2.4
Maxicom2’s System Window and Central Window . . . . . . . . . . . . . . . . . . . . . . . . . . . . . . . . . . .2.7
System Window and Toolbar . . . . . . . . . . . . . . . . . . . . . . . . . . . . . . . . . . . . . . . . . . . . . . . . . . . . . . . . . .2.7
Maxicom
2
Central Window . . . . . . . . . . . . . . . . . . . . . . . . . . . . . . . . . . . . . . . . . . . . . . . . . . . . . . . . . .2.10
Finding and Arranging Open Windows . . . . . . . . . . . . . . . . . . . . . . . . . . . . . . . . . . . . . . . . . . .2.11
Finding a Specific Window . . . . . . . . . . . . . . . . . . . . . . . . . . . . . . . . . . . . . . . . . . . . . . . . . . . . . . . . . .2.11
Arranging Open Windows . . . . . . . . . . . . . . . . . . . . . . . . . . . . . . . . . . . . . . . . . . . . . . . . . . . . . . . . . . .2.11
Changing Your View of the Windows . . . . . . . . . . . . . . . . . . . . . . . . . . . . . . . . . . . . . . . . . . . . .2.11
Restoring a Window . . . . . . . . . . . . . . . . . . . . . . . . . . . . . . . . . . . . . . . . . . . . . . . . . . . . . . . . . . . . . . . .2.12
Moving a Window . . . . . . . . . . . . . . . . . . . . . . . . . . . . . . . . . . . . . . . . . . . . . . . . . . . . . . . . . . . . . . . . . .2.12
Resizing a Window . . . . . . . . . . . . . . . . . . . . . . . . . . . . . . . . . . . . . . . . . . . . . . . . . . . . . . . . . . . . . . . . .2.12
Closing a Window or Windows . . . . . . . . . . . . . . . . . . . . . . . . . . . . . . . . . . . . . . . . . . . . . . . . . . . . . . .2.12
Contents
i
Contents
Page 6

Using the Main Menu Bar . . . . . . . . . . . . . . . . . . . . . . . . . . . . . . . . . . . . . . . . . . . . . . . . . . . . . . . . . . .2.13
Selecting a Menu Bar Option . . . . . . . . . . . . . . . . . . . . . . . . . . . . . . . . . . . . . . . . . . . . . . . . . . . .2.13
Traditional Method . . . . . . . . . . . . . . . . . . . . . . . . . . . . . . . . . . . . . . . . . . . . . . . . . . . . . . . . . . . . . . . . .2.13
Accelerator Key Method . . . . . . . . . . . . . . . . . . . . . . . . . . . . . . . . . . . . . . . . . . . . . . . . . . . . . . . . . . . . .2.13
Menu Bar Options . . . . . . . . . . . . . . . . . . . . . . . . . . . . . . . . . . . . . . . . . . . . . . . . . . . . . . . . . . . . .2.14
System Menu (accelerator = Alt-Y) . . . . . . . . . . . . . . . . . . . . . . . . . . . . . . . . . . . . . . . . . . . . . . . . . . .2.14
Site Menu (accelerator = Alt-S) . . . . . . . . . . . . . . . . . . . . . . . . . . . . . . . . . . . . . . . . . . . . . . . . . . . . . . .2.16
Weather Menu (accelerator = Alt-W) . . . . . . . . . . . . . . . . . . . . . . . . . . . . . . . . . . . . . . . . . . . . . . . . . .2.18
Report Menu (accelerator = Alt-R) . . . . . . . . . . . . . . . . . . . . . . . . . . . . . . . . . . . . . . . . . . . . . . . . . . . .2.19
Window Menu (accelerator = Alt-N) . . . . . . . . . . . . . . . . . . . . . . . . . . . . . . . . . . . . . . . . . . . . . . . . . .2.19
Help Menu (accelerator = Alt-H) . . . . . . . . . . . . . . . . . . . . . . . . . . . . . . . . . . . . . . . . . . . . . . . . . . . . .2.21
Entering and Editing Text . . . . . . . . . . . . . . . . . . . . . . . . . . . . . . . . . . . . . . . . . . . . . . . . . . . . . . . . . . .2.22
Positioning Your Cursor in a Text Field . . . . . . . . . . . . . . . . . . . . . . . . . . . . . . . . . . . . . . . . . . .2.22
Adding Text . . . . . . . . . . . . . . . . . . . . . . . . . . . . . . . . . . . . . . . . . . . . . . . . . . . . . . . . . . . . . . . . . . .2.22
Selecting Text . . . . . . . . . . . . . . . . . . . . . . . . . . . . . . . . . . . . . . . . . . . . . . . . . . . . . . . . . . . . . . . . . .2.22
Deleting Text . . . . . . . . . . . . . . . . . . . . . . . . . . . . . . . . . . . . . . . . . . . . . . . . . . . . . . . . . . . . . . . . . .2.23
Deleting All Text . . . . . . . . . . . . . . . . . . . . . . . . . . . . . . . . . . . . . . . . . . . . . . . . . . . . . . . . . . . . . . .2.23
Replacing Text . . . . . . . . . . . . . . . . . . . . . . . . . . . . . . . . . . . . . . . . . . . . . . . . . . . . . . . . . . . . . . . . .2.23
Cutting Text . . . . . . . . . . . . . . . . . . . . . . . . . . . . . . . . . . . . . . . . . . . . . . . . . . . . . . . . . . . . . . . . . . .2.23
Copying Text . . . . . . . . . . . . . . . . . . . . . . . . . . . . . . . . . . . . . . . . . . . . . . . . . . . . . . . . . . . . . . . . . .2.24
Pasting Text . . . . . . . . . . . . . . . . . . . . . . . . . . . . . . . . . . . . . . . . . . . . . . . . . . . . . . . . . . . . . . . . . . .2.24
Using Maxicom2On-line Help . . . . . . . . . . . . . . . . . . . . . . . . . . . . . . . . . . . . . . . . . . . . . . . . . . . . . . .2.25
Viewing the Help Contents . . . . . . . . . . . . . . . . . . . . . . . . . . . . . . . . . . . . . . . . . . . . . . . . . . . . . .2.25
Viewing the Help Index . . . . . . . . . . . . . . . . . . . . . . . . . . . . . . . . . . . . . . . . . . . . . . . . . . . . . . . . .2.27
Finding a Particular Word in Help . . . . . . . . . . . . . . . . . . . . . . . . . . . . . . . . . . . . . . . . . . . . . . . .2.29
Setting Find Options . . . . . . . . . . . . . . . . . . . . . . . . . . . . . . . . . . . . . . . . . . . . . . . . . . . . . . . . . . . . . . . .2.32
Rebuilding the Find Word List . . . . . . . . . . . . . . . . . . . . . . . . . . . . . . . . . . . . . . . . . . . . . . . . . . . . . . . .2.33
Using the Help Information Windows . . . . . . . . . . . . . . . . . . . . . . . . . . . . . . . . . . . . . . . . . . . .2.34
Viewing Information about Your Version of Maxicom2 . . . . . . . . . . . . . . . . . . . . . . . . . . . . . . . . . .2.35
Saving Your Work . . . . . . . . . . . . . . . . . . . . . . . . . . . . . . . . . . . . . . . . . . . . . . . . . . . . . . . . . . . . . . . . . . .2.35
Canceling Your Work . . . . . . . . . . . . . . . . . . . . . . . . . . . . . . . . . . . . . . . . . . . . . . . . . . . . . . . . . . . . . . .2.36
Exiting the Maxicom2Interface . . . . . . . . . . . . . . . . . . . . . . . . . . . . . . . . . . . . . . . . . . . . . . . . . . . . . .2.36
Turning Maxicom2Control Off and On . . . . . . . . . . . . . . . . . . . . . . . . . . . . . . . . . . . . . . . . . . . . . . .2.36
Turning the Maxicom2Control Engine On and Off . . . . . . . . . . . . . . . . . . . . . . . . . . . . . . . . . . . . .2.37
Contents
ii
Page 7

3 Setting System Properties . . . . . . . . . . . . . . . . . . . . . . . . . . . . . . . . . . . . . . . . . . . .3.1
Using the System Wizard for Interactive Setup . . . . . . . . . . . . . . . . . . . . . . . . . . . . . . . . . . . . . . . . . .3.1
Using the System Properties Setup Dialog Box for Setup . . . . . . . . . . . . . . . . . . . . . . . . . . . . . . . . .3.3
Setting Communications Properties . . . . . . . . . . . . . . . . . . . . . . . . . . . . . . . . . . . . . . . . . . . . . .3.4
Setting Registration Properties . . . . . . . . . . . . . . . . . . . . . . . . . . . . . . . . . . . . . . . . . . . . . . . . . . .3.6
Setting Passwords . . . . . . . . . . . . . . . . . . . . . . . . . . . . . . . . . . . . . . . . . . . . . . . . . . . . . . . . . . . . . . .3.7
Changing the Master Password . . . . . . . . . . . . . . . . . . . . . . . . . . . . . . . . . . . . . . . . . . . . . . . . . . . . . . .3.8
Changing Site Passwords . . . . . . . . . . . . . . . . . . . . . . . . . . . . . . . . . . . . . . . . . . . . . . . . . . . . . . . . . . . . .3.8
Changing Weather Source Passwords . . . . . . . . . . . . . . . . . . . . . . . . . . . . . . . . . . . . . . . . . . . . . . . . . .3.9
Setting a FREEDOM Time Window . . . . . . . . . . . . . . . . . . . . . . . . . . . . . . . . . . . . . . . . . . . . . . . .3.9
Setting Preferences . . . . . . . . . . . . . . . . . . . . . . . . . . . . . . . . . . . . . . . . . . . . . . . . . . . . . . . . . . . . .3.11
Setting Station Property Macros . . . . . . . . . . . . . . . . . . . . . . . . . . . . . . . . . . . . . . . . . . . . . . . . .3.12
Setting the Database Service . . . . . . . . . . . . . . . . . . . . . . . . . . . . . . . . . . . . . . . . . . . . . . . . . . . .3.14
4 Setting Site Properties . . . . . . . . . . . . . . . . . . . . . . . . . . . . . . . . . . . . . . . . . . . . . . .4.1
Using the Site Wizard for Interactive Setup . . . . . . . . . . . . . . . . . . . . . . . . . . . . . . . . . . . . . . . . . . . . .4.2
Using the Site Properties Setup Dialog Box for Setup . . . . . . . . . . . . . . . . . . . . . . . . . . . . . . . . . . . .4.3
Setting General Site Properties . . . . . . . . . . . . . . . . . . . . . . . . . . . . . . . . . . . . . . . . . . . . . . . . . . .4.4
Setting the Site Password . . . . . . . . . . . . . . . . . . . . . . . . . . . . . . . . . . . . . . . . . . . . . . . . . . . . . . . . . . . . .4.5
Setting the Site’s Time Zone . . . . . . . . . . . . . . . . . . . . . . . . . . . . . . . . . . . . . . . . . . . . . . . . . . . . . . . . . . .4.5
Setting Weather Sources for the Site . . . . . . . . . . . . . . . . . . . . . . . . . . . . . . . . . . . . . . . . . . . . . . . . . . .4.5
Setting the Site Map File Location . . . . . . . . . . . . . . . . . . . . . . . . . . . . . . . . . . . . . . . . . . . . . . . . . . . . .4.6
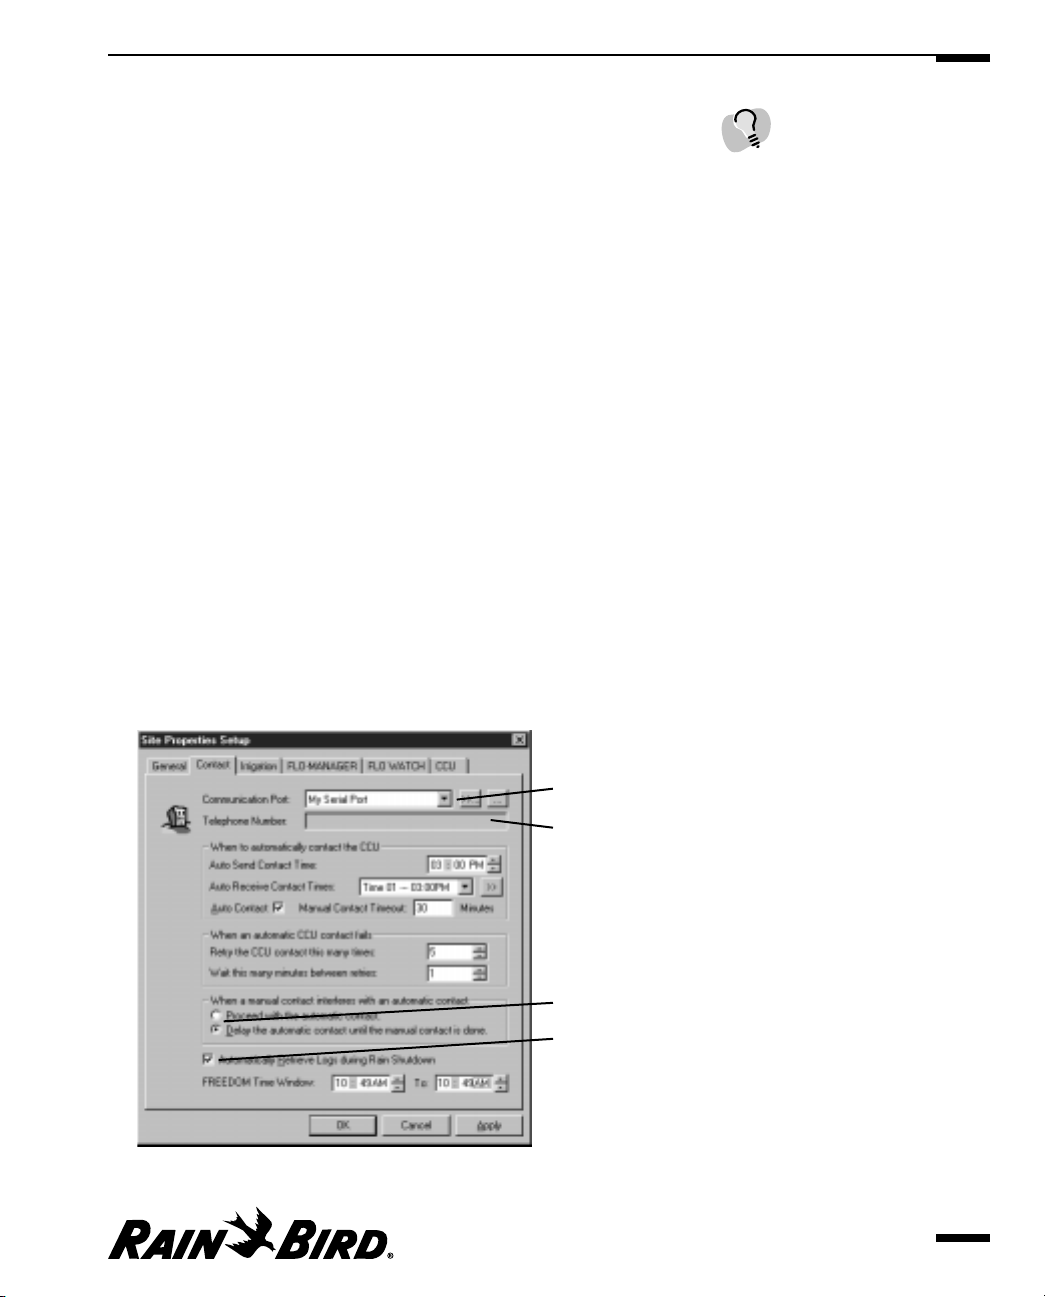
Setting Site Contact Properties . . . . . . . . . . . . . . . . . . . . . . . . . . . . . . . . . . . . . . . . . . . . . . . . . . .4.6
Setting the Communication Port and Telephone Number . . . . . . . . . . . . . . . . . . . . . . . . . . . . . . . .4.7
Setting Times to Contact the Site’s CCU . . . . . . . . . . . . . . . . . . . . . . . . . . . . . . . . . . . . . . . . . . . . . . . .4.7
Setting the Number of Failed Contacts and the Time Between Retries . . . . . . . . . . . . . . . . . . . . .4.8
Setting Automatic or Manual Contact Priorities . . . . . . . . . . . . . . . . . . . . . . . . . . . . . . . . . . . . . . . . .4.8
Setting Retrieval of Logs During Rain Shut Down . . . . . . . . . . . . . . . . . . . . . . . . . . . . . . . . . . . . . . . .4.8
Setting the FREEDOM Time Window . . . . . . . . . . . . . . . . . . . . . . . . . . . . . . . . . . . . . . . . . . . . . . . . . .4.8
Setting Site Irrigation Properties . . . . . . . . . . . . . . . . . . . . . . . . . . . . . . . . . . . . . . . . . . . . . . . . . .4.9
Setting the Site’s Water Budget . . . . . . . . . . . . . . . . . . . . . . . . . . . . . . . . . . . . . . . . . . . . . . . . . . . . . . . .4.9
Setting the Default Daily ET Value . . . . . . . . . . . . . . . . . . . . . . . . . . . . . . . . . . . . . . . . . . . . . . . . . . . .4.10
Setting the Minimum Daily ET Value . . . . . . . . . . . . . . . . . . . . . . . . . . . . . . . . . . . . . . . . . . . . . . . . .4.10
Setting the Maximum Daily ET Value . . . . . . . . . . . . . . . . . . . . . . . . . . . . . . . . . . . . . . . . . . . . . . . . .4.10
Setting the Crop Coefficient . . . . . . . . . . . . . . . . . . . . . . . . . . . . . . . . . . . . . . . . . . . . . . . . . . . . . . . . .4.10
Setting the Soil Moisture Holding Capacity . . . . . . . . . . . . . . . . . . . . . . . . . . . . . . . . . . . . . . . . . . . .4.11
Setting the Soil Moisture Refill Percentage . . . . . . . . . . . . . . . . . . . . . . . . . . . . . . . . . . . . . . . . . . . . .4.11
Setting the Soil Infiltration Rate . . . . . . . . . . . . . . . . . . . . . . . . . . . . . . . . . . . . . . . . . . . . . . . . . . . . . .4.11
Setting the Currency . . . . . . . . . . . . . . . . . . . . . . . . . . . . . . . . . . . . . . . . . . . . . . . . . . . . . . . . . . . . . . . .4.11
Setting the Prefix . . . . . . . . . . . . . . . . . . . . . . . . . . . . . . . . . . . . . . . . . . . . . . . . . . . . . . . . . . . . . . . . . . .4.12
Setting the Water Price . . . . . . . . . . . . . . . . . . . . . . . . . . . . . . . . . . . . . . . . . . . . . . . . . . . . . . . . . . . . . .4.12
Contents
iii
Page 8

Setting Site FLO-MANAGER Properties . . . . . . . . . . . . . . . . . . . . . . . . . . . . . . . . . . . . . . . . . . .4.13
Setting the Point of Connection Name and Capacity . . . . . . . . . . . . . . . . . . . . . . . . . . . . . . . . . . . .4.14
Setting FLO-MANAGER Flow Zones . . . . . . . . . . . . . . . . . . . . . . . . . . . . . . . . . . . . . . . . . . . . . . . . . .4.14
Setting Site FLO WATCH Properties . . . . . . . . . . . . . . . . . . . . . . . . . . . . . . . . . . . . . . . . . . . . . .4.15
Setting Site CCU Properties . . . . . . . . . . . . . . . . . . . . . . . . . . . . . . . . . . . . . . . . . . . . . . . . . . . . .4.16
Setting the CCU Type . . . . . . . . . . . . . . . . . . . . . . . . . . . . . . . . . . . . . . . . . . . . . . . . . . . . . . . . . . . . . . .4.17
Setting the CCU Call Handle . . . . . . . . . . . . . . . . . . . . . . . . . . . . . . . . . . . . . . . . . . . . . . . . . . . . . . . . .4.17
Editing CCU Properties . . . . . . . . . . . . . . . . . . . . . . . . . . . . . . . . . . . . . . . . . . . . . . . . . . . . . . . . . . . . .4.18
Setting Device Types . . . . . . . . . . . . . . . . . . . . . . . . . . . . . . . . . . . . . . . . . . . . . . . . . . . . . . . . . . .4.20
Setting Station Properties . . . . . . . . . . . . . . . . . . . . . . . . . . . . . . . . . . . . . . . . . . . . . . . . . . . . . . .4.21
Copying, Pasting, and Cutting Station Properties . . . . . . . . . . . . . . . . . . . . . . . . . . . . . . . . . .4.22
5 Setting Weather Source Properties . . . . . . . . . . . . . . . . . . . . . . . . . . . . . . . . . . . . . .5.1
Using the Weather Source Wizard for Interactive Setup . . . . . . . . . . . . . . . . . . . . . . . . . . . . . . . . . .5.2
Using the Weather Properties Setup Dialog Box for Setup . . . . . . . . . . . . . . . . . . . . . . . . . . . . . . . .5.3
Setting Weather Source Type Properties . . . . . . . . . . . . . . . . . . . . . . . . . . . . . . . . . . . . . . . . . . .5.4
Setting the Weather Source Password . . . . . . . . . . . . . . . . . . . . . . . . . . . . . . . . . . . . . . . . . . . . . . . . . .5.5
Selecting the Type of Weather Source . . . . . . . . . . . . . . . . . . . . . . . . . . . . . . . . . . . . . . . . . . . . . . . . . .5.5
Setting Rain Bird Weather Station Properties . . . . . . . . . . . . . . . . . . . . . . . . . . . . . . . . . . . . . . .5.6
Selecting the Time Zone . . . . . . . . . . . . . . . . . . . . . . . . . . . . . . . . . . . . . . . . . . . . . . . . . . . . . . . . . . . . . .5.6
Setting Times to Receive Data . . . . . . . . . . . . . . . . . . . . . . . . . . . . . . . . . . . . . . . . . . . . . . . . . . . . . . . . .5.7
Setting the Elevation and Latitude . . . . . . . . . . . . . . . . . . . . . . . . . . . . . . . . . . . . . . . . . . . . . . . . . . . . .5.7
Setting the Weather Station’s Default ET . . . . . . . . . . . . . . . . . . . . . . . . . . . . . . . . . . . . . . . . . . . . . . . .5.7
Setting the Weather Station Password . . . . . . . . . . . . . . . . . . . . . . . . . . . . . . . . . . . . . . . . . . . . . . . . . .5.7
Selecting the Contact Port and Telephone Number . . . . . . . . . . . . . . . . . . . . . . . . . . . . . . . . . . . . . .5.8
Enabling or Disabling Automatic Contact . . . . . . . . . . . . . . . . . . . . . . . . . . . . . . . . . . . . . . . . . . . . . .5.8
Setting a Manual Contact Time Out . . . . . . . . . . . . . . . . . . . . . . . . . . . . . . . . . . . . . . . . . . . . . . . . . . . .5.8
Setting CIMIS Bulletin Board System Properties . . . . . . . . . . . . . . . . . . . . . . . . . . . . . . . . . . . .5.9
Selecting the Time Zone . . . . . . . . . . . . . . . . . . . . . . . . . . . . . . . . . . . . . . . . . . . . . . . . . . . . . . . . . . . . .5.10
Setting Times to Receive Data . . . . . . . . . . . . . . . . . . . . . . . . . . . . . . . . . . . . . . . . . . . . . . . . . . . . . . . .5.10
Setting the Elevation and Latitude . . . . . . . . . . . . . . . . . . . . . . . . . . . . . . . . . . . . . . . . . . . . . . . . . . . .5.10
Setting the CIMIS Login Name . . . . . . . . . . . . . . . . . . . . . . . . . . . . . . . . . . . . . . . . . . . . . . . . . . . . . . .5.10
Setting the CIMIS Password . . . . . . . . . . . . . . . . . . . . . . . . . . . . . . . . . . . . . . . . . . . . . . . . . . . . . . . . .5.11
Setting the CIMIS Weather Station Number . . . . . . . . . . . . . . . . . . . . . . . . . . . . . . . . . . . . . . . . . . .5.11
Selecting the Contact Port and Telephone Number . . . . . . . . . . . . . . . . . . . . . . . . . . . . . . . . . . . . .5.11
Setting CCU-Based ET Gauge Properties . . . . . . . . . . . . . . . . . . . . . . . . . . . . . . . . . . . . . . . . .5.12
Selecting a Site and a Channel . . . . . . . . . . . . . . . . . . . . . . . . . . . . . . . . . . . . . . . . . . . . . . . . . . . . . . .5.13
Setting Times to Receive Data . . . . . . . . . . . . . . . . . . . . . . . . . . . . . . . . . . . . . . . . . . . . . . . . . . . . . . . .5.13
Enabling or Disabling Automatic Contact . . . . . . . . . . . . . . . . . . . . . . . . . . . . . . . . . . . . . . . . . . . . .5.13
Setting the Weather Station’s Default ET . . . . . . . . . . . . . . . . . . . . . . . . . . . . . . . . . . . . . . . . . . . . . . .5.13
Contents
iv
Page 9

Setting CCU-Based Site Rain Counter Properties . . . . . . . . . . . . . . . . . . . . . . . . . . . . . . . . . .5.14
Selecting a Site and Channel . . . . . . . . . . . . . . . . . . . . . . . . . . . . . . . . . . . . . . . . . . . . . . . . . . . . . . . . .5.14
Setting Times to Receive Data . . . . . . . . . . . . . . . . . . . . . . . . . . . . . . . . . . . . . . . . . . . . . . . . . . . . . . . .5.15
Enabling or Disabling Automatic Contact . . . . . . . . . . . . . . . . . . . . . . . . . . . . . . . . . . . . . . . . . . . . .5.15
Setting the Weather Station’s Default ET . . . . . . . . . . . . . . . . . . . . . . . . . . . . . . . . . . . . . . . . . . . . . . .5.15
Setting Historical ET Database Properties . . . . . . . . . . . . . . . . . . . . . . . . . . . . . . . . . . . . . . . . .5.15
Setting User-Entered Weather Data Properties . . . . . . . . . . . . . . . . . . . . . . . . . . . . . . . . . . . .5.17
6 Creating and Editing a Site Schedule . . . . . . . . . . . . . . . . . . . . . . . . . . . . . . . . . . . .6.1
Using the Schedule Wizard for Interactive Setup . . . . . . . . . . . . . . . . . . . . . . . . . . . . . . . . . . . . . . . .6.1
Creating a Schedule by Yourself . . . . . . . . . . . . . . . . . . . . . . . . . . . . . . . . . . . . . . . . . . . . . . . . . . . . . . .6.3
Creating a Schedule Using a Template . . . . . . . . . . . . . . . . . . . . . . . . . . . . . . . . . . . . . . . . . . . . . . . . .6.7
Copying an Existing Schedule . . . . . . . . . . . . . . . . . . . . . . . . . . . . . . . . . . . . . . . . . . . . . . . . . . . . . . . .6.10
Using the Schedule Editor Window and Toolbar . . . . . . . . . . . . . . . . . . . . . . . . . . . . . . . . . . . . . . .6.14
Editing a Schedule . . . . . . . . . . . . . . . . . . . . . . . . . . . . . . . . . . . . . . . . . . . . . . . . . . . . . . . . . . . . .6.16
Auditing a Schedule . . . . . . . . . . . . . . . . . . . . . . . . . . . . . . . . . . . . . . . . . . . . . . . . . . . . . . . . . . . .6.16
Setting Schedule Properties . . . . . . . . . . . . . . . . . . . . . . . . . . . . . . . . . . . . . . . . . . . . . . . . . . . . .6.17
Setting Execution Window Programmed Repeats . . . . . . . . . . . . . . . . . . . . . . . . . . . . . . . . . . . . . .6.17
Setting Schedule Attributes . . . . . . . . . . . . . . . . . . . . . . . . . . . . . . . . . . . . . . . . . . . . . . . . . . . . . . . . . .6.18
Selecting the Schedule Runtime Adjustment . . . . . . . . . . . . . . . . . . . . . . . . . . . . . . . . . . . . . . . . . .6.18
Setting the Nominal ET . . . . . . . . . . . . . . . . . . . . . . . . . . . . . . . . . . . . . . . . . . . . . . . . . . . . . . . . . . . . .6.19
Performing a Flow-Cost Analysis . . . . . . . . . . . . . . . . . . . . . . . . . . . . . . . . . . . . . . . . . . . . . . . . . . . . .6.19
7 Viewing and Editing Site Data . . . . . . . . . . . . . . . . . . . . . . . . . . . . . . . . . . . . . . . . . .7.1
Using the Site Window and Toolbar . . . . . . . . . . . . . . . . . . . . . . . . . . . . . . . . . . . . . . . . . . . . . . . . . . .7.1
Renaming a Site . . . . . . . . . . . . . . . . . . . . . . . . . . . . . . . . . . . . . . . . . . . . . . . . . . . . . . . . . . . . . . . .7.3
Deleting a Site . . . . . . . . . . . . . . . . . . . . . . . . . . . . . . . . . . . . . . . . . . . . . . . . . . . . . . . . . . . . . . . . . .7.4
Viewing and Editing General Site Data . . . . . . . . . . . . . . . . . . . . . . . . . . . . . . . . . . . . . . . . . . . .7.4
Viewing and Acknowledging an Unacknowledged Alarm . . . . . . . . . . . . . . . . . . . . . . . . . . . . . . . . .7.5
Viewing Current Site Data . . . . . . . . . . . . . . . . . . . . . . . . . . . . . . . . . . . . . . . . . . . . . . . . . . . . . . . . . . . .7.5
Viewing Projected Site Data . . . . . . . . . . . . . . . . . . . . . . . . . . . . . . . . . . . . . . . . . . . . . . . . . . . . . . . . . . .7.6
Viewing a Site’s Log Data . . . . . . . . . . . . . . . . . . . . . . . . . . . . . . . . . . . . . . . . . . . . . . . . . . . . . . . . .7.7
Selecting the Time Period to View . . . . . . . . . . . . . . . . . . . . . . . . . . . . . . . . . . . . . . . . . . . . . . . . . . . . .7.8
Viewing the Data as a Flow Graph, Flow List or Runtime Roster . . . . . . . . . . . . . . . . . . . . . . . . . . .7.8
Viewing the Runtime Roster . . . . . . . . . . . . . . . . . . . . . . . . . . . . . . . . . . . . . . . . . . . . . . . . . . . . . .7.9
Viewing the Entire Site or One FLO WATCH Zone . . . . . . . . . . . . . . . . . . . . . . . . . . . . . . . . . . . . . . .7.9
Viewing Actual Log Data or Projected Data . . . . . . . . . . . . . . . . . . . . . . . . . . . . . . . . . . . . . . . . . . . . .7.9
Contents
v
Page 10

Viewing and Editing a Site’s Schedule Data . . . . . . . . . . . . . . . . . . . . . . . . . . . . . . . . . . . . . . .7.10
Viewing General Schedule Data . . . . . . . . . . . . . . . . . . . . . . . . . . . . . . . . . . . . . . . . . . . . . . . . . . . . . .7.10
Adding a New Schedule . . . . . . . . . . . . . . . . . . . . . . . . . . . . . . . . . . . . . . . . . . . . . . . . . . . . . . . . . . . . .7.11
Editing a Schedule . . . . . . . . . . . . . . . . . . . . . . . . . . . . . . . . . . . . . . . . . . . . . . . . . . . . . . . . . . . . . . . . . .7.11
Removing a Schedule . . . . . . . . . . . . . . . . . . . . . . . . . . . . . . . . . . . . . . . . . . . . . . . . . . . . . . . . . . . . . . .7.12
Viewing and Editing a Schedule’s Properties . . . . . . . . . . . . . . . . . . . . . . . . . . . . . . . . . . . . . . . . . . .7.12
Previewing a Schedule . . . . . . . . . . . . . . . . . . . . . . . . . . . . . . . . . . . . . . . . . . . . . . . . . . . . . . . . . . . . . .7.13
Viewing and Editing a Site’s ET Data . . . . . . . . . . . . . . . . . . . . . . . . . . . . . . . . . . . . . . . . . . . . .7.13
Selecting the Time Period to View . . . . . . . . . . . . . . . . . . . . . . . . . . . . . . . . . . . . . . . . . . . . . . . . . . . .7.14
Selecting to View Data as a Check Book, Log, Graph or Calendar . . . . . . . . . . . . . . . . . . . . . . . . .7.14
Selecting the Type of Data to View . . . . . . . . . . . . . . . . . . . . . . . . . . . . . . . . . . . . . . . . . . . . . . . . . . . .7.14
Modifying the ET or Rainfall . . . . . . . . . . . . . . . . . . . . . . . . . . . . . . . . . . . . . . . . . . . . . . . . . . . . . . . . .7.15
Viewing and Editing a Site’s Event Data . . . . . . . . . . . . . . . . . . . . . . . . . . . . . . . . . . . . . . . . . . .7.15
Setting No Watering Days . . . . . . . . . . . . . . . . . . . . . . . . . . . . . . . . . . . . . . . . . . . . . . . . . . . . . . . . . . .7.16
Setting Auto Pop-Up Memos . . . . . . . . . . . . . . . . . . . . . . . . . . . . . . . . . . . . . . . . . . . . . . . . . . . . . . . . .7.16
Setting Up and Viewing the Site Map . . . . . . . . . . . . . . . . . . . . . . . . . . . . . . . . . . . . . . . . . . . . .7.17
Joining the Site’s Map File with Other Site Data . . . . . . . . . . . . . . . . . . . . . . . . . . . . . . . . . . . . . . . .7.17
Changing the Size of the Map . . . . . . . . . . . . . . . . . . . . . . . . . . . . . . . . . . . . . . . . . . . . . . . . . . . . . . . .7.18
Manually Contacting a Site’s CCU . . . . . . . . . . . . . . . . . . . . . . . . . . . . . . . . . . . . . . . . . . . . . . . .7.18
Adjusting the Amount of Time for Contact . . . . . . . . . . . . . . . . . . . . . . . . . . . . . . . . . . . . . . . . . . . .7.19
Viewing Wireless Diagnostic Data . . . . . . . . . . . . . . . . . . . . . . . . . . . . . . . . . . . . . . . . . . . . . . . .7.21
Setting Rain Shut Down for a Site . . . . . . . . . . . . . . . . . . . . . . . . . . . . . . . . . . . . . . . . . . . . . . . .7.22
Manually Operating Site Schedules . . . . . . . . . . . . . . . . . . . . . . . . . . . . . . . . . . . . . . . . . . . . . .7.23
Sending Schedules to the CCU . . . . . . . . . . . . . . . . . . . . . . . . . . . . . . . . . . . . . . . . . . . . . . . . . . . . . . .7.25
Sending Configuration Data to the CCU . . . . . . . . . . . . . . . . . . . . . . . . . . . . . . . . . . . . . . . . . . . . . .7.25
Monitoring and Operating Site Channels . . . . . . . . . . . . . . . . . . . . . . . . . . . . . . . . . . . . . . . . .7.26
Contents
vi
Page 11

8 Viewing and Editing Weather Source Data . . . . . . . . . . . . . . . . . . . . . . . . . . . . . . . .8.1
Using the Weather Source Window and Toolbar . . . . . . . . . . . . . . . . . . . . . . . . . . . . . . . . . . . . . . . .8.1
Renaming a Weather Source . . . . . . . . . . . . . . . . . . . . . . . . . . . . . . . . . . . . . . . . . . . . . . . . . . . . .8.3
Deleting a Weather Source . . . . . . . . . . . . . . . . . . . . . . . . . . . . . . . . . . . . . . . . . . . . . . . . . . . . . . .8.3
Viewing Recent Weather Source Data . . . . . . . . . . . . . . . . . . . . . . . . . . . . . . . . . . . . . . . . . . . . .8.4
Viewing the Most Recent Statistics . . . . . . . . . . . . . . . . . . . . . . . . . . . . . . . . . . . . . . . . . . . . . . . . . . . . .8.5
Viewing and Editing the Sites Assigned to the Weather Source . . . . . . . . . . . . . . . . . . . . . . . . . . . .8.5
Viewing and Acknowledging Unacknowledged Alarms . . . . . . . . . . . . . . . . . . . . . . . . . . . . . . . . . . .8.6
Viewing Historical Weather Source Data . . . . . . . . . . . . . . . . . . . . . . . . . . . . . . . . . . . . . . . . . . .8.6
Selecting a Time Period to View . . . . . . . . . . . . . . . . . . . . . . . . . . . . . . . . . . . . . . . . . . . . . . . . . . . . . . .8.7
Selecting to View Data as a Calendar, Graph or List . . . . . . . . . . . . . . . . . . . . . . . . . . . . . . . . . . . . . .8.7
Selecting the Type of Data to View . . . . . . . . . . . . . . . . . . . . . . . . . . . . . . . . . . . . . . . . . . . . . . . . . . . . .8.7
Manually Contacting a Weather Source . . . . . . . . . . . . . . . . . . . . . . . . . . . . . . . . . . . . . . . . . . . .8.8
Increasing the Amount of Time for Contact . . . . . . . . . . . . . . . . . . . . . . . . . . . . . . . . . . . . . . . . . . . . .8.9
Displaying Current Weather Source Data . . . . . . . . . . . . . . . . . . . . . . . . . . . . . . . . . . . . . . . . . .8.9
Getting Logged Weather Source Data . . . . . . . . . . . . . . . . . . . . . . . . . . . . . . . . . . . . . . . . . . . . .8.10
Editing Weather Source Properties . . . . . . . . . . . . . . . . . . . . . . . . . . . . . . . . . . . . . . . . . . . . . . .8.10
Manually Updating Weather Data . . . . . . . . . . . . . . . . . . . . . . . . . . . . . . . . . . . . . . . . . . . . . . . .8.11
Disconnecting from a Weather Source . . . . . . . . . . . . . . . . . . . . . . . . . . . . . . . . . . . . . . . . . . . .8.12
9 Viewing the Event Log and Generating Reports . . . . . . . . . . . . . . . . . . . . . . . . . . . .9.1
Using the Event Log Window and Toolbar . . . . . . . . . . . . . . . . . . . . . . . . . . . . . . . . . . . . . . . . . . . . . .9.1
Filtering Data in the Event Log . . . . . . . . . . . . . . . . . . . . . . . . . . . . . . . . . . . . . . . . . . . . . . . . . . .9.2
Acknowledging Events in the Event Log . . . . . . . . . . . . . . . . . . . . . . . . . . . . . . . . . . . . . . . . . . .9.3
Clearing Events from the Event Log . . . . . . . . . . . . . . . . . . . . . . . . . . . . . . . . . . . . . . . . . . . . . . .9.4
Viewing Event Log Statistics . . . . . . . . . . . . . . . . . . . . . . . . . . . . . . . . . . . . . . . . . . . . . . . . . . . . . .9.4
Refreshing Event Log Data . . . . . . . . . . . . . . . . . . . . . . . . . . . . . . . . . . . . . . . . . . . . . . . . . . . . . . .9.5
Creating a Report from the Event Log . . . . . . . . . . . . . . . . . . . . . . . . . . . . . . . . . . . . . . . . . . . . .9.5
Using the Report Wizard for Generating Reports . . . . . . . . . . . . . . . . . . . . . . . . . . . . . . . . . . . . . . . .9.6
Creating a Field Device Report . . . . . . . . . . . . . . . . . . . . . . . . . . . . . . . . . . . . . . . . . . . . . . . . . . . . . . . .9.7
Creating a Flow/Time/Cost Report . . . . . . . . . . . . . . . . . . . . . . . . . . . . . . . . . . . . . . . . . . . . . . . . . . . .9.8
Creating a Schedule Report . . . . . . . . . . . . . . . . . . . . . . . . . . . . . . . . . . . . . . . . . . . . . . . . . . . . . . . . .9.10
Previewing and Printing Reports . . . . . . . . . . . . . . . . . . . . . . . . . . . . . . . . . . . . . . . . . . . . . . . . . . . . .9.11
Contents
vii
Page 12

10 Viewing Maxicom2’s Communication Status . . . . . . . . . . . . . . . . . . . . . . . . . . . . . .10.1
Using the Communication Status Window . . . . . . . . . . . . . . . . . . . . . . . . . . . . . . . . . . . . . . . . . . . .10.1
Viewing the Status of All Ports Simultaneously . . . . . . . . . . . . . . . . . . . . . . . . . . . . . . . . . . . .10.2
Viewing One Port in Detail . . . . . . . . . . . . . . . . . . . . . . . . . . . . . . . . . . . . . . . . . . . . . . . . . . . . . .10.2
Disconnecting from a Port . . . . . . . . . . . . . . . . . . . . . . . . . . . . . . . . . . . . . . . . . . . . . . . . . . . . . .10.3
Viewing a FREEDOM Port in the Communication Status Window . . . . . . . . . . . . . . . . . . . . . . .10.4
11 Backing Up Data . . . . . . . . . . . . . . . . . . . . . . . . . . . . . . . . . . . . . . . . . . . . . . . . . .11.1
12 Glossary . . . . . . . . . . . . . . . . . . . . . . . . . . . . . . . . . . . . . . . . . . . . . . . . . . . . . . . .12.1
Index . . . . . . . . . . . . . . . . . . . . . . . . . . . . . . . . . . . . . . . . . . . . . . . . . . . . . . . . . . . . . . .I.1
Service Information . . . . . . . . . . . . . . . . . . . . . . . . . . . . . . . . . . . . . . . . . .inside back cover
Contents
viii
Page 13

Welcome to Maxicom
2
Congratulations! By selecting the Maxicom2Central Control System from Rain
Bird, you have chosen the finest Central Irrigation Control System available. Some
of Maxicom
2
’s unique features include the ability to:
• customize the system to suit your needs
• operate multiple sites and controllers from one location
• respond automatically to weather conditions
• locate excessive flow problems
• manage water flow to prevent the system from exceeding hydraulic capacity
• adjust the water budget
• water only during predetermined time periods
• eliminate wasteful run-off and puddling
• record actual usage, allowing you to maintain usage records easily and
efficiently
• create reports that display the information you need
• control all operations from one computer with an easy-to-use Windows
®
interface that does not require previous computer experience
The benefits you realize by using the Maxicom
2
system include: water savings,
power savings, labor savings and increased irrigation system efficiency. All of these
benefits add up to saving money!
This manual gives you step-by-step instructions for using the Maxicom
2
software
so that you can make the most of these exciting features and benefits.
Introduction
ix
Introduction
For the most efficient use of
the Maxicom system,
Maxicom2software and field
equipment must be installed
to Rain Bird’s specifications.
For a complete account of
Rain Bird’s Maxicom
installation specifications,
contact your local Maxicom
distributor or any of the
Maxicom support services
listed on the inside back
cover of this manual.
Page 14

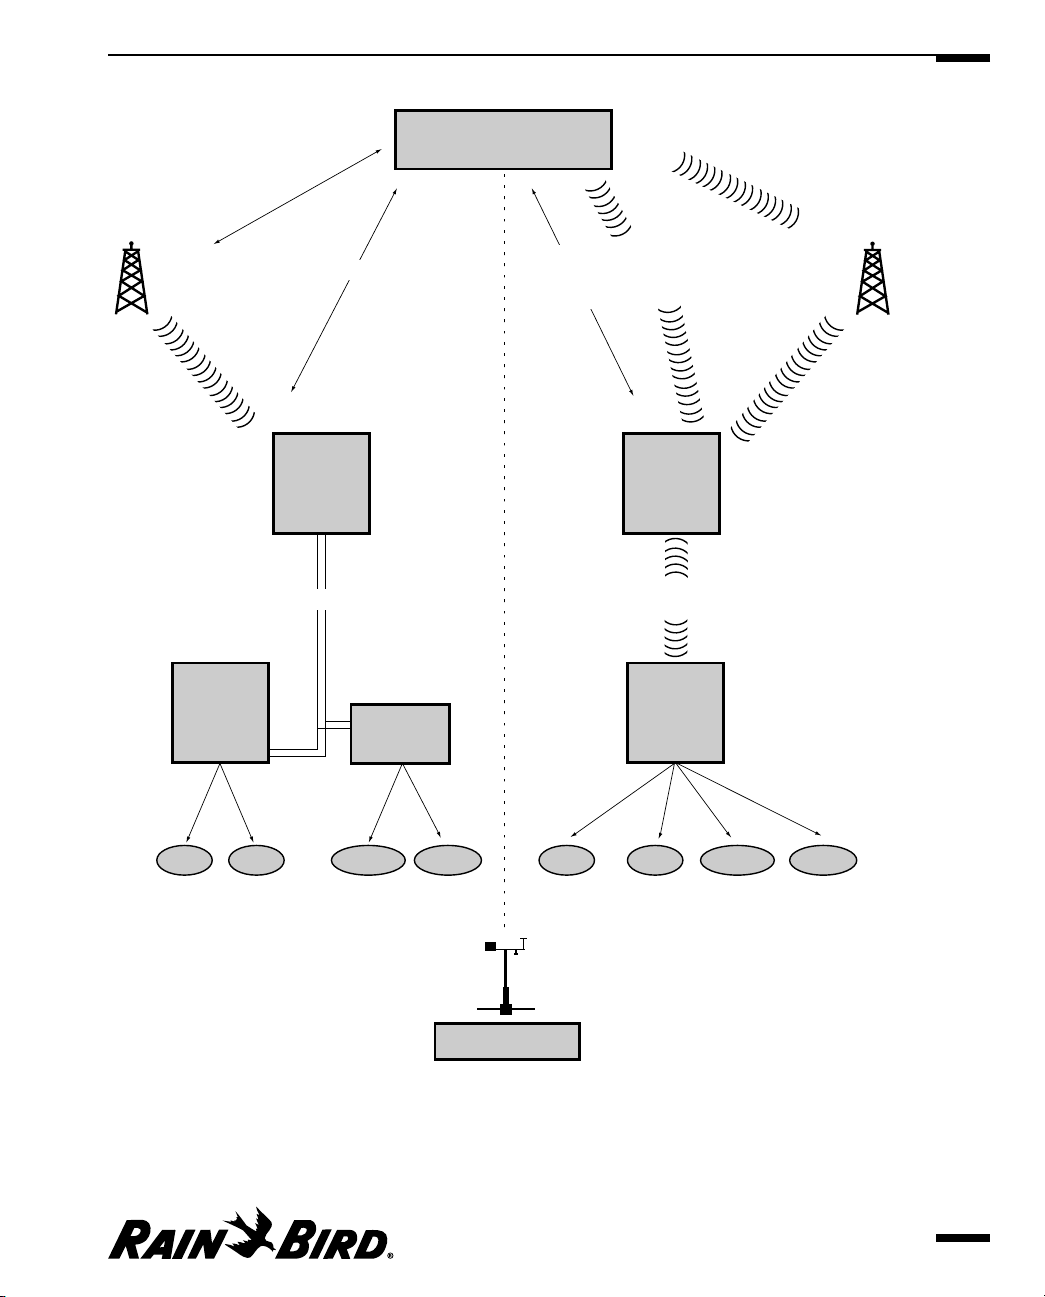
Overview of the Maxicom2System
The Maxicom2Central Irrigation System uses a central computer to send
irrigation schedules and other data via telephone lines, cellular telephone,
hardwire, point-to-point radio, trunk radio, or fiber optics to Central Control
Units (CCUs) in the field.
A CCU communicates with up to 28 satellite controllers through a two-wire path
or wireless radio link. The CCU monitors field conditions and reacts to problems
such as excessive flow. When necessary, the CCU selectively turns off all or
portions of a site’s irrigation system. The CCU also reads and reacts to moisture
sensors, wind sensors, and rain gauges. In this way, multiple remote sites can be
controlled and monitored from a single central location at your personal
computer.
The Maxicom Central Control System chiefly consists of seven parts. (See the
illustration on the opposite page.)
1
Central Computer — uses the Maxicom2software program to control the
entire irrigation system.
2
Computer to CCU or computer to weather source data path — transfers
information from the central computer to the CCU or weather source by
phone communication or by radio/direct communication.
3
Central Control Unit — operates field devices by executing commands
received from the central computer.
4
Satellite data path — transfers information from the CCU to the field devices
by a two-wire path or wireless radio link.
5
CCU-based field devices — include satellite controllers, decoders, or sensors:
satellite controllers send a 24 VAC power signal to each station;
decoders control and monitor system functions;
sensors monitor conditions in the field.
6
Stations — consist of irrigation valves, sensors, or switch-operated devices.
7
Weather source/ET — interprets weather conditions and/or
evapotranspiration (ET) information and sends that information to the central
computer.
Introduction
x
Page 15
Introduction
xi
Central Computer
Cellular
Telephone
Satellite
Controller
Phone
CCU
at site
Two-wire Path (TW) MAXILink Radio (LINK/R)
Decoder
Hardwire/
Short-haul
Modem
Point-to-point
Radio
Link
CCU
at site
Satellite
Controller
Trunk
Radio
Valve
Valve
Sensor
Switch Switch
Weather Station
Valve
Valve
Sensor
Page 16

About this Manual
This manual is divided into the following chapters:
• Chapter One: Installing Maxicom
2
Tells you what hardware and software requirements you need to run
Maxicom
2
on your personal computer and gives step-by-step installation
instructions.
• Chapter Two: Getting to Know Maxicom
2
Introduces the menus and windows with which you will be working. It also
gives beginning users instructions on entering and editing text and canceling
and saving work. In addition, this chapter tells you how to use Maxicom
2
’s on-
line Help system.
• Chapter Three: Setting System Properties
Tells you how to configure the Maxicom
2
system for your specifications so
that you can set such properties as computer communications ports,
registration information, passwords and units of measure.
• Chapter Four: Setting Site Properties
Tells you how to set up a new Maxicom
2
site in your system. This chapter
contains instructions on how to set the site’s time zone, weather source, and
password, as well as the site’s CCU and irrigation requirements.
• Chapter Five: Setting Weather Source Properties
Tells you how to set up a new Maxicom
2
weather source in your system. This
chapter contains instructions on how to set the type of weather source, and
such particulars as the weather source’s location, password, and
communication requirements.
• Chapter Six: Creating and Editing a Site Schedule
Gives you instructions for creating a new schedule for a site or making
changes to an existing schedule. Instructions in this chapter take you through
the setup of each of the schedule functions as well as schedule properties,
such as whether the schedule will be automatically sent to the CCU and
whether it will be “FLO-MANAGED.”
• Chapter Seven: Viewing and Editing Site Data
Tells you how to obtain and, in some instances, change various types of site
data, such as flow data and weather data and how to contact a site’s CCU
manually.
• Chapter Eight: Viewing and Editing Weather Source Data
Tells you how to obtain various types of recent or historical weather source
data and how to contact a weather source manually.
• Chapter Nine: Viewing the Event Log and Generating Reports
Guides you in using the Event Log to view the information you want and tells
you how to generate various types of reports from Maxicom
2
data.
Introduction
xii
Page 17

• Chapter Ten:Viewing Maxicom2’s Communication Status
Tells you how to view the status of all Maxicom
2
ports simultaneously, how to
view a single port in detail, and how to disconnect a port from a field device.
• Chapter Eleven: Backing Up Data
Explains how Maxicom
2
backs up your data.
• Chapter Twelve: Glossary
Provides you with a handy glossary of terms.
Terminology Used in this Manual
The following computer-usage terminology is used in this manual:
• Click means to place the cursor on an on-screen item and press the left
mouse button.
• Double-click means to place the cursor on an on-screen item and quickly
press the left mouse button twice.
• Right-click means to place the cursor on an on-screen item and press the
right mouse button.
• Select means to place the cursor in a text field or on a menu option,
checkbox, or radio button and press the left mouse button.
• Check means to click a checkbox so that a check mark appears in the
checkbox.
• Enter means to type text. (If you are required to press the Enter key on the
keyboard, the instructions will say, “Press the Enter key.”)
• Highlight means to place the cursor on an item and press the left mouse
button so that the item’s background is displayed in a different color than the
background of unselected items.
• Drag means to click on an item and hold the mouse button down while you
drag the mouse (and the item) to the desired position on the screen.
• Keyboard accelerators such as “Alt-S” mean to hold down the Alt key and
type an “S.”
Introduction
xiii
For a list of other terms used
in this manual, see the
Glossary on page 12.1.
Saving your work in
Maxicom2is an automatic
process that is different from
other Windows applications.
For more information, see
“Saving Your Work” on page
2.35.
Page 18

Icons Used in This Manual
To help you understand and find the information you need, this manual uses
three icons in the margins of its pages.
This icon is used to designate information that is not critical but
that may be helpful to you.
This icon is used to designate a cross reference within the manual
and lists page numbers where you can find information on the same
or related topics.
This icon is used to designate very important warning information.
Getting Started Right Away
To get your system up and running, you must:
1
Install the Maxicom2 software (described in Chapter One),
2
Set system properties (described in Chapter Three),
3
Set up your sites (described in Chapter Four),
4
Set up your weather sources (described in Chapter Five), and
5
Create schedules (described in Chapter Six).
If you are already familiar with computers and MAXICOM and would like to get
started using Maxicom
2
right away, the chapters listed above can be used as a
“quick start.” Follow the instructions in the sequence suggested above.
Introduction
xiv
If you need more
information about using
windows and menus, see
“Getting to Know
Maxicom2,” which begins on
page 2.1.
If you were using a previous
version of MAXICOM
software and you want to
maintain your existing data,
you must run the Upgrade
Utility after installing the new
software.
Page 19

This chapter describes:
• minimum hardware and software requirements for running Maxicom
2
• recommended hardware and software requirements for running Maxicom
2
• remote access requirements
• how to install the software from a CD-ROM
• how to run the upgrade utility so that you can use data from an earlier version
of the MAXICOM software
System Requirements
In order to run the Maxicom2software, your computer system must meet certain
requirements. Below is a list of minimum hardware and software requirements.
The recommended hardware and software requirements, also listed here, will
maximize the speed of your Maxicom
2
software.
Minimum Hardware and Software Requirements
The personal computer you use to run the Maxicom2software must meet or
exceed the following minimum requirements:
• Intel
®
Pentium®166 MHz or faster processor
• 32 megabytes RAM
• standard SVGA monitor (800 x 600, 256 colors)
• mouse
• 101-key standard keyboard
• 2 GB hard disk drive
• 3.5 inch floppy disk drive
• CD-ROM drive
• one free serial port for communication with Rain Bird Cluster Control Units
(CCUs)
• Windows95/98 or NT software
• printer
Installing Maxicom
2
1.1
Installing Maxicom
2
1
Page 20

Installing Maxicom
2
1.2
Maxicom2does not require more than 100 megabytes of hard disk space above
the operating system for a full installation. Actual disk space requirements may be
greater with use, depending upon the amount of logged historical data and the
number of sites. Maxicom
2
is not designed to operate on a computer with a non-
Intel Pentium-based microprocessor for the primary central processing unit.
Recommended Hardware and Software Requirements
The following are the recommended requirements for running Maxicom2:
• Pentium® III 450 MHz or faster processor
• 64 megabytes RAM
• VGA monitor
• 101-key standard AT keyboard
• 4 GB hard disk drive
• 3.5 inch floppy disk drive
• CD-ROM drive
• mouse
• 56 K telephone modem
• four free serial ports
• Windows95/98 or NT software
• sound card and speakers
• printer
Remote Access Requirements
If you want to access Maxicom2from a remote computer, you will need:
• PC Anywhere32
• a dedicated modem
All Maxicom
2
functionality available on the central computer is available on the
remote computer via PC Anywhere32. PC Anywhere32 is the only remote access
method supported by Maxicom
2
. PC Anywhere32 is provided when you purchase
Maxicom
2
.
Page 21

Installing Maxicom
2
1.3
Installing the Software
The installation procedure is nearly the same for new Maxicom2users as for users
who are upgrading from an older version of the software. However, users who are
upgrading from another version of MAXICOM should back up the old MAXICOM
software and data before installing the new Maxicom
2
software. The installation
procedure will transfer your data to the new Maxicom
2
software, but in the event
that something should go wrong, you should have a backup of your most current
data.
Users who are upgrading and want to use existing data must run the Upgrade
Utility after installing the new Maxicom
2
software. In addition, users who are
upgrading from an older version should check that database items and schedules
were converted properly. Because Maxicom
2
now allows you to identify sites,
devices, and other field items with a name of your choice, you may want to
change these.
Upgrading users should also make sure that field hardware is updated to work
with Maxicom
2
. The CCUs’ EPROM must be version 5.2R or higher for the system
to operate properly.
To install Maxicom
2
on your computer:
1
Turn on your computer and start Windows95/98.
2
Make sure that no other applications are running. (Active applications appear
in the Windows95/98 taskbar.)
3
Insert the CD-ROM into your computer’s CD-ROM drive.
The Installation wizard’s main menu is displayed. Click on Install Maxicom
2
and then follow the instructions in the wizard.
Some virus-protection
programs can interfere with
installation. Before you
install Maxicom2, turn off any
virus protection programs
that may be running on your
computer.
For more information about
using the Upgrade Utility,
see “Running the Upgrade
Utility” on page 1.5.
Page 22

Installing Maxicom
2
1.4
Maxicom2Installation Wizard
4 After finishing each section of the wizard, click the Next button.
The next section of the wizard is displayed.
5 When you have finished the last section of the wizard, click the Finish button.
When you restart your computer, Maxicom
2
will be available from the
Windows95/98 Start menu. The control engine installs automatically in your
Startup Folder so that when you restart your computer, it begins to run
automatically.
Installing the Maxicom2Tour
If you would like an on-line overview of the Maxicom2software, install the
Maxicom
2
Tour.
To install the Maxicom
2
tour:
1 From the main menu of the Maxicom
2
installation CD, click the Maxicom
2
Tour button.
The installation wizard will install the Maxicom
2
Tour on your hard drive.
2 Select Maxicom
2
Software Tour from the Windows95/98 start menu.
Follow the on-screen instructions for viewing the tour.
The second screen of the
wizard makes assumptions
about where the old
MAXICOM data files are
located. If the directories
listed are not the actual
location of the files you want
to convert, you must enter
the path to the correct
directories. You may want to
use the Browse buttons to
the right of the text fields to
help you.
Page 23

Installing Maxicom
2
1.5
Installing Adobe®Acrobat Software
Rain Bird offers many resources to their customers at the website
www.rainbird.com, such as technical updates and on-line user manuals. This
information has been stored in .pdf (portable document format), which can be
read by almost any computer that has Adobe Acrobat Reader software installed.
While this software is not required to operate the Maxicom
2
software, Rain Bird
recommends that you install Acrobat Reader on your computer.
To install Acrobat Reader:
From the main menu of the Maxicom
2
installation CD, click the Install
Acrobat Reader button.
The installation wizard will install the software on your hard drive. Please see
the Acrobat Reader “readme” file for operating instructions
Running the Upgrade Utility
If you are upgrading from an earlier version of the MAXICOM software and want
to maintain your existing data, you must run the Upgrade Utility after you install
the new Maxicom
2
software.
To run the Upgrade Utility:
1 Use the Windows95/98 Start menu (as described in the Windows95/98 Users
manual) to start the Upgrade Utility. The Upgrade Utility was automatically
installed when you installed Maxicom
2
.
The Maxicom
2
Upgrade Utility wizard will be displayed.
2
Follow the instructions in the wizard to upgrade the software.
3
After finishing each section of the wizard, click the Next button.
The next section of the wizard will be displayed.
4
When you have finished the last section of the wizard, click the Finish button.
A message will be displayed, “Upgrade Installed Successfully.” You may also
get a message that some issues were encountered with the conversion.
5 If necessary, click the View Issues button to view issues that must be resolved.
If you have trouble fixing any issues that may be listed, contact your Rain Bird
Distributor for help.
The Upgrade Utility wizard
offers you the option of
upgrading all of the sites or
just some of the sites.
Page 24

Page 25

This chapter will help you to become familiar with the Maxicom2interface. This
chapter describes:
• how to start the Maxicom
2
application
• standard features of the windows and dialog boxes
• features of the System window and Central window
• how to use the Main menu
• how to enter and edit text
• how to use Maxicom
2
Help
• how to save or cancel your work
• how to exit Maxicom
2
Starting Maxicom
2
Once you have installed Maxicom2, there are three ways you can start the
Maxicom
2
interface.
To start Maxicom
2
:
Double-click the Rain Bird icon in the tray in the right bottom corner of your
screen.
Or
Right-click the Rain Bird icon in the tray in the right bottom corner of your
screen and select the Launch Maxicom
2
option.
Or
Use the Windows95/98 Start menu as described in the Windows95/98 Users
Manual.
The Maxicom
2
splash screen is displayed while the program launches.
Getting to Know Maxicom
2
2.1
Getting to Know
Maxicom
2
2
The Rain Bird icon appears
in the tray whenever the
Maxicom2controls are
running.
Page 26
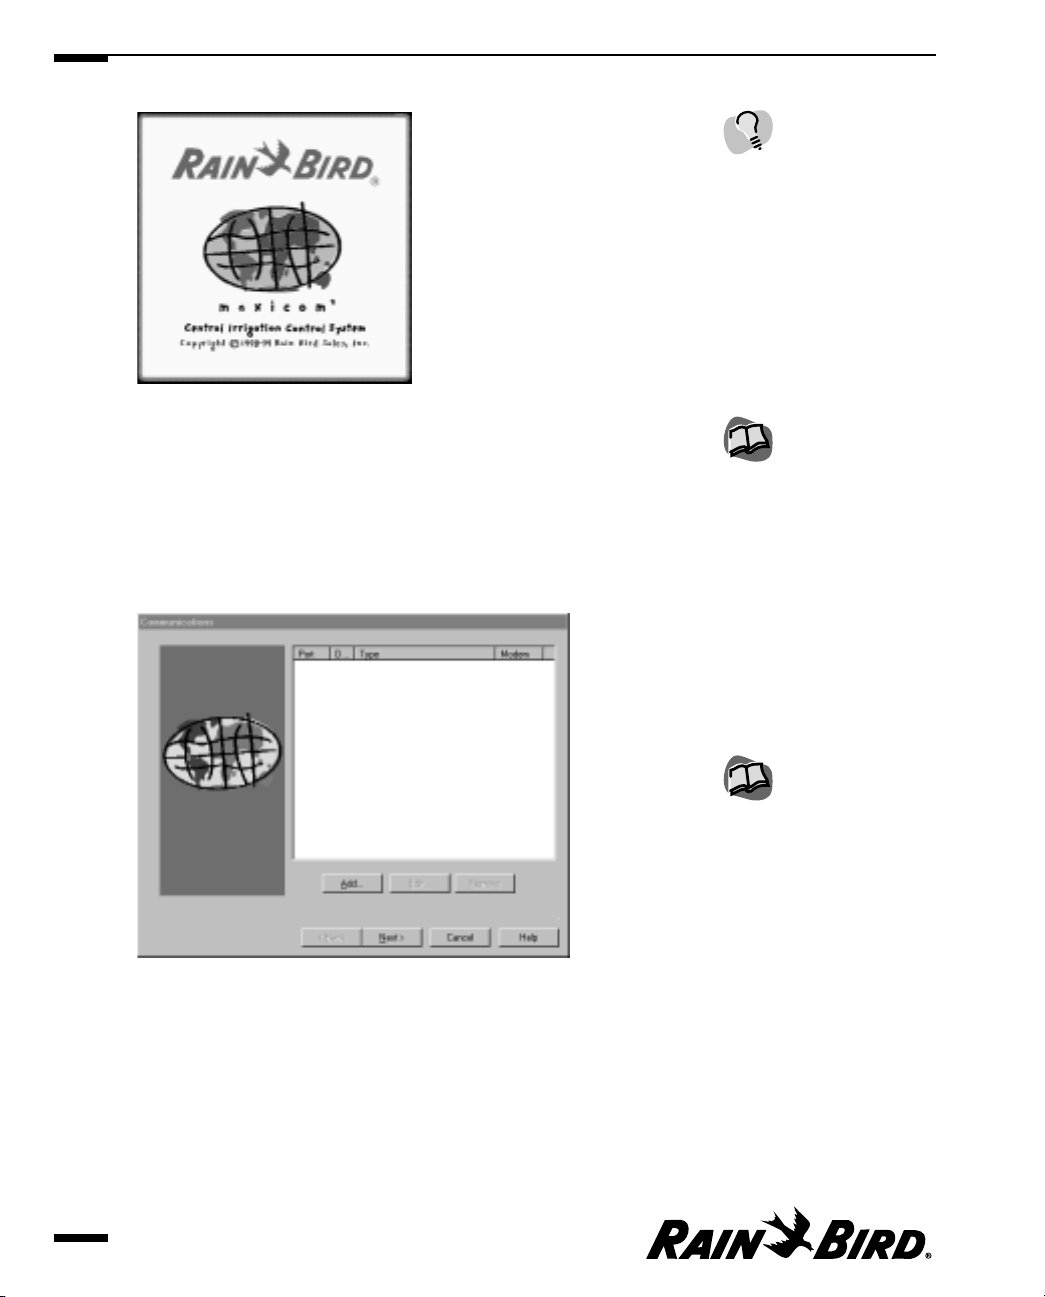
Splash Screen
When the application is finished launching, the Splash screen closes and the
System window is displayed.
If this is the first time you have used Maxicom
2
(you did not upgrade a
previous version when you installed the software), the System wizard, which
guides you through a series of steps to set up your system, runs automatically
and displays the Communications dialog box.
System Wizard with Communications Dialog Box
If you have used a previous version of Maxicom2and ran the Upgrade Utility
after installing the Maxicom
2
software, the System window is displayed.
If you launched the program from the Rain Bird icon in the tray and there is
an unacknowledged alarm (the icon has an exclamation mark on it), the Event
Log is displayed within the System window; if you launched the program from
Getting to Know Maxicom
2
2.2
For more information, see
“System Window and
Toolbar” on page 2.7.
For more information, see
“Using the System Wizard
for Interactive Setup” on
page 3.1.
You can close the Splash
screen by clicking anywhere
on the screen.
Page 27
the Windows95/98 Start menu, the Maxicom2Central menu is displayed
within the System window.
System Window with Maxicom2Central Menu Displayed
It is not necessary to run the Maxicom2interface for the Maxicom2controls to
run; only the application needs to be active. This means that you do not have to
dedicate a computer to Maxicom
2
. You can do word processing or other tasks
while Maxicom
2
runs in the background. When the Rain Bird icon appears in the
tray at the right bottom corner of your screen, you know Maxicom
2
is active. If the
application is not active, the icon turns blue on a red back-ground. If an
unacknowledged alarm is present, an exclamation point is next to the Rain Bird
icon.
Rain Bird Icon in the Tray — Maxicom2Active
Rain Bird Icon Turns Blue — Maxicom
2
Not Active
Rain Bird Icon with Exclamation — Alarm Present
While you may want to go ahead and start setting up your system, Rain Bird
recommends that you read the remainder of this chapter to learn more about
how to use the software.
• To continue learning about the Maxicom
2
software before setting up your
system, click the Cancel button on the System Wizard.
• To proceed with setting up your system, turn to “Setting System Properties,”
page 3.1.
Getting to Know Maxicom
2
2.3
For more information, see
“Turning Maxicom2Controls
Off and On” on page 2.36
and “Acknowledging Events
in the Event Log” on page
9.3.
Page 28
Using the Windows
You will perform all the tasks described in this manual in windows and dialog
boxes. It may help you to take a few minutes to familiarize yourself with the
standard features of windows and dialog boxes and the specific features of the
System window and Central window which are described in this section.
Standard Window and Dialog Box Features
Maxicom2windows and dialog boxes, like the one shown here, contain certain
standard elements. These elements are described on the following pages.
System Window with Maxicom2Central Window
• Title bar
Contains the title of the window or dialog box. When the window is active, the
title bar changes color. Click in a window to make the window active.
• Close button
Allows you to close the window or dialog box and automatically save changes
you have made. (The Maxicom
2
Central window, Communications Status
window, and Event Log window do not have Close buttons separate from the
System window because they are always part of the System window.)
Getting to Know Maxicom
2
2.4
Windows allow you to work
continuously; dialog boxes
require you to click OK or
Cancel before going on to
the next task.
Title bar
Close button
Minimize button
Maximize/Restore button
Hot spot
Button
Tool
Page 29
• Minimize button
Converts the window to an icon at the bottom of your screen. Once a window
has been minimized, the Minimize button is replaced by a Restore button.
Dialog boxes do not have minimize buttons.
• Maximize button
Maximizes the size of the window on your screen. Once a window has been
maximized, the Maximize button is replaced by a Restore button. Dialog
boxes do not have Maximize buttons.
• Restore button
Restores the window to its previous size after you have maximized or
minimized it. Dialog boxes do not have Restore buttons.
• Horizontal and vertical scroll bars
Allows you to display data that cannot fit in the window or dialog box. Click
the up or down arrows in the horizontal scroll bars or the left and right arrows
in the vertical scroll bars to move a line at a time, or drag the bar within the
scroll bars to move in larger increments.
• Buttons
Allow you to perform an action or display a dialog box. Click a button to
activate it. (Or type the accelerator key that corresponds to the button; the
accelerator key letter is underlined on the on-screen button. Not all buttons
have accelerator keys.)
• Hot spots
Allow you to display a window or dialog box. Click a hot spot to activate it.
Drop down list
Text field
Radio button
checkbox
Typical Dialog Box
Getting to Know Maxicom
2
2.5
Saving your work in
Maxicom2is an automatic
process that is different from
other Windows programs.
For more information, see
“Saving Your Work” on page
2.35.
Page 30

• Checkboxes
Allow you to select items. A selected checkbox has a check inside it; a
deselected checkbox is empty. More than one checkbox may be selected in a
given area of a window or dialog box. Click a checkbox to select it; click it
again to deselect it.
• Radio buttons
Allow you to select one item from a group of items. A deselected radio button
is the same color as the window or dialog box’s background; a selected radio
button appears to be pressed and is displayed in a different color. Click a
radio button to select it; click a different radio button to deselect the first.
• Text fields
Allow you to enter and select values. Click in a field and then type the value.
In fields with scroll buttons, you may enter the value or click the up or down
arrows to select a value without typing.
• Drop down lists
Allow you to select an item or value from a list. Click an item on a drop down
list to select it; a selected item appears highlighted.
• Display areas
Allow you to view data. Display areas cannot be edited.
• Tooltips
Display the name or function of an icon in the status bar when the icon has
no text label. Place the mouse cursor over an icon to display the Tooltip for
that icon.
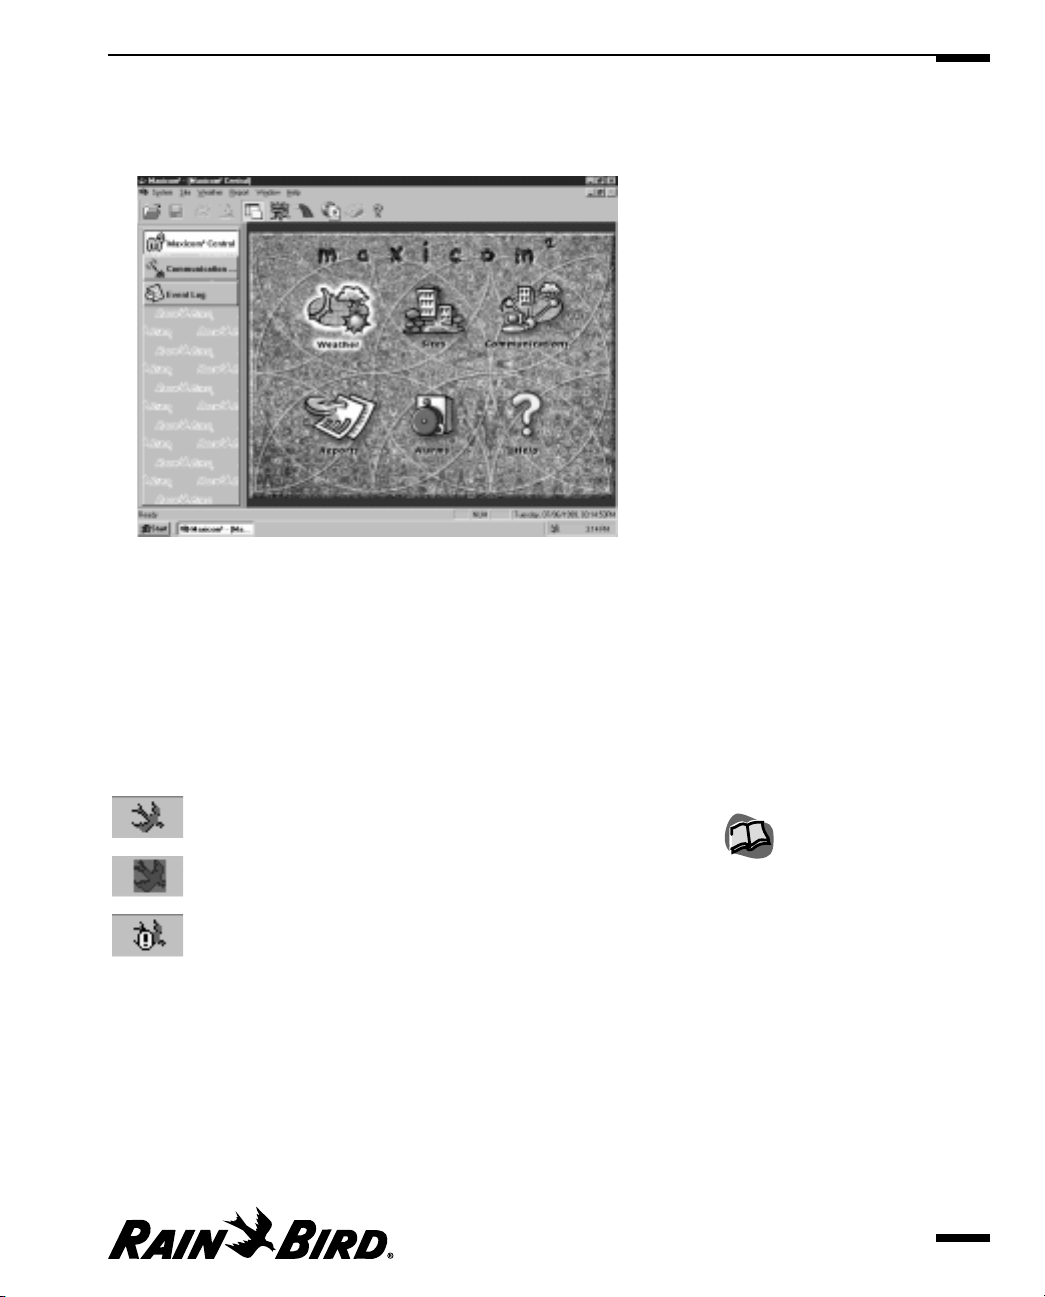
Maxicom2’s System Window and Central Window
The System window is the parent window of the entire Maxicom2interface. The
Maxicom
2
Central window, Communication Status window, and Event Log
window are always present in some form within the System window. All four of
these windows are open whenever the Maxicom
2
interface is running.
The System window and Maxicom
2
Central window are described in detail in this
section because all other windows and dialog boxes come from these two
important windows. Other windows used in Maxicom
2
, including the
Communication Status window and the Event Log window, are described in the
sections of this manual where they are used.
Getting to Know Maxicom
2
2.6
For more information, see
“Entering and Editing Text”
on page 2.22.
Page 31

System Window and Toolbar
Whenever the Maxicom2user interface is open, the System window is displayed.
The System window is the base window from which all other interface activity
takes place.
System Window
Getting to Know Maxicom
2
2.7
Application icon and menu
Application title bar
Window buttons
Main menu bar
Toolbar
Selection pane
Document pane
Maxicom
2
status bar
Page 32

The System window contains the following features:
• Application title bar
The application title bar contains the application icon at the far left, the
application name, the name of the current active window if there is one, and
the window buttons. Right-clicking the title bar anywhere except for on the
window buttons displays the drop-down Application menu. For more
information about the Application menu, application icon, and the window
buttons, see the items below.
• Application icon and Application menu
Click the application icon or right-click the application title bar to display the
Application menu. The Application menu contains options that allow you to
terminate the application or change the way you view the windows.
Restore returns the window to its previous size after it has been maximized or
minimized.
Move allows you to use the arrow keys to move the window and the Enter key
to end the operation.
Size allows you to use the arrow keys to resize the window and the Enter key
to end the operation.
Minimize minimizes the size of the window to an icon.
Maximize maximizes the size of the window on your screen.
Close closes the application.
• Window buttons
Allow you to change the size of the windows or close them. Click the left
window button to minimize the window; click the middle window button to
toggle between maximized and normal; click the right window button to exit
the application.
• Main menu bar
The Main menu bar contains the drop-down menus described on pages 2.13
through 2.21 of this manual: System, Site, Weather, Report, Window, and Help.
• Toolbar
The System window displays its own toolbar and, underneath that, the
toolbar for the active window, if there is one. The System toolbar contains the
following icon buttons, most of which perform the same tasks as options
available from the Main menu:
Main Toolbar
Getting to Know Maxicom
2
2.8
Double-clicking the
application icon in the title
bar exits Maxicom2.
For more information about
using the window buttons,
see “Changing Your View of
the Windows” on page 2.11.
Page 33

Create or Open allows you to create new or open existing sites and weather
sources.
Save allows you to save the current active window.
Print allows you to print the data from the current active window without
going through the Print dialog box.
Print Preview allows you to see what the currently selected document will
look like when it is printed.
Toggle Selection Pane allows you to toggle between an open Selection Pane
or a closed Selection Pane.
Rain Shut Down allows you to start or cancel a site’s Rain Shut Down for all
the active sites.
Flow/Runtime Logs shows flow and station runtime data for all sites.
Rain Bird Web Page offers you a short cut for connecting to the Rain Bird
World Wide Web page if you have an Internet browser set up on your
computer.
Fax Rain Bird allows you to quickly dial and fax directly to Rain Bird if you
have a fax modem connected to your computer.
Help allows you to view Maxicom
2
Help files.
• Selection pane
The selection pane contains buttons that allow you to select any open
window. The Maxicom
2
Central window button, the Communication Status
window button, and the Event Log window button are permanently
displayed on the selection pane along with buttons for any other open
windows (such as sites and weather sources). You can resize the selection
pane by clicking the side of the pane and dragging the side in or out.
• Document pane
The document pane provides a view of the currently active window. Windows
automatically default to the size of the document pane; you cannot enlarge a
window beyond the boundaries of the document pane. When no Site, Weather
Source or Schedule window is open, the document pane contains the
Maxicom
2
Central window, the Communication Status window or the Event
Log window. The default window displayed is the Central window.
• Maxicom
2
status bar
The status bar is a horizontal bar across the bottom of the System window. It
displays helpful text messages that correlate with the active on-screen item or
mouse cursor position.
Getting to Know Maxicom
2
2.9
Page 34

Maxicom2Central Window
The Maxicom2Central window appears in the System window when no other
windows are open. It also appears as a button in the selection pane of the System
window. In addition, the Maxicom
2
Central window can be displayed by selecting
the Maxicom
2
Central option from the Window menu on the Main menu bar.
When selecting items from the Maxicom
2
Central window, you are not limited to
a single function — if you click the Maxicom
2
Central window button and restore
the Maxicom
2
Central window, you can open new windows without closing the
first.
In addition to having the standard window features, the Maxicom
2
Central
window contains six hot spots. Click a picture/hot spot to activate it.
Central Window
• Weather
Allows you to view weather source information. Click the Weather hot spot to
display the Create or Open a Weather Source dialog box from which you can
create a new or open an existing weather source. For more information, see
“Using the Weather Source Window and Toolbar” on page 8.1.
• Sites
Allows you to view site information. Click the Sites hot spot to display the
Create or Open a Site dialog box from which you can create a new or open
and existing site. For more information, see “Using the Site Window and
Toolbar” on page 7.1.
• Communication
Allows you to view your communication status. Click the Communication hot
spot to display the Communication Status window. For more information, see
“Viewing Maxicom
2
’s Communication Status” on page 10.1.
Getting to Know Maxicom
2
2.10
Page 35

• Reports
Allows you to create a report. Click the Reports hot spot to display the
Generate a Report dialog box from which you can select the type of report you
want. For more information, see “Viewing the Event Log and Generating
Reports” on page 9.1.
• Alarms
Allows you to view the Event Log. Click the Alarms hot spot to display the
Event Log window filtered for alarms. For more information, see “Using the
Event Log Window and Toolbar” on page 9.1.
• Help
Allows you to view Maxicom
2
Help files. Click the Help hot spot to display the
Help Topics window. For more information, see “Using Maxicom
2
On-line
Help” on page 2.25.
Finding and Arranging Open Windows
In Maxicom2, it is possible to have many windows open at the same time.
Because having many windows open can become confusing, Maxicom
2
offers
you ways to find and arrange these open windows.
Finding a Specific Window
To find the open window you want:
Select the icon for the window you want to see from the selection pane of the
System window.
Or
Select the name of the window you want to see from the Window menu.
The window you have selected comes to the front of the stack.
Arranging Open Windows
To tile all the open windows on your screen:
Select the Arrange All option from the Window menu.
The open windows are tiled on your screen.
Changing Your View of the Windows
Maxicom2allows you to change the way the windows appear on screen. You can
move the windows, change their size and even close them by using the
Application menu or the window buttons.
Getting to Know Maxicom
2
2.11
If unacknowledged alarms
are present, the Alarms hot
spot will be highlighted to let
you know.
The Maxicom2Central
window, Communication
Status window and Event
Log window are always
available directly from the
selection pane of the
System window or from the
Window menu.
Page 36

Restoring a Window
The Restore option and Restore button allow you to return the window to its
previous size after the window has been maximized or minimized.
To restore the window:
Click the Restore window button or select the Restore option from the
Application menu.
The window returns to its previous size.
Moving a Window
You can use the Move option or the mouse to change the position of a window on
your screen.
To move the window:
1
Select the Move option from the Application menu, then with the arrow
positioned over the title bar, drag the window or use the arrow keys to move
the window to the desired position on your screen.
2
Press the Enter key to end the operation.
Resizing a Window
The Restore, Maximize, and Minimize options and the Maximize and Restore
window buttons allow you to change the size of the windows on your screen.
To change the size of the window:
Select the Restore, Maximize, or Minimize option from the Application menu
or click the Maximize or Restore window buttons.
The size of the window changes according to your choice.
Closing a Window or Windows
To close the window:
Click the Close button on the window or select the Close option from the
appropriate menu. (Site and Weather menus have close options).
The active window closes.
To close all open windows:
Select the Close All option from the Window menu.
All windows close except the System window, Central window,
Communications window and Event Log window.
Getting to Know Maxicom
2
2.12
Using the Application menu
or the window buttons on
the System window affects
the entire application.
If the window is maximized
(it fills the entire screen), the
Move option is not available
on the Application menu.
If the System, Maxicom
2
Central, Communications
Status and Event Log
windows are the only
windows open, the Close All
option is not available on the
Window menu.
Page 37

Using the Main Menu Bar
The Maxicom2Main menu bar appears on the System window. (For more
information about other features of the System window, see page 2.7.) The Main
menu bar contains seven drop-down menus that let you perform various tasks
within Maxicom
2
.
Main Menu Bar
Selecting a Menu Bar Option
There are two methods for selecting a menu bar option: the traditional method
uses the mouse and the accelerator key method uses the keyboard.
Traditional Method
To select an option from the Main menu bar:
1
Select an item in the Main menu bar.
A submenu is displayed.
2
Highlight and click on an option on the submenu.
The option is executed and a window or dialog box is displayed.
Accelerator Key Method
Accelerator keys allow you to select an option from the Main menu bar quickly
and without using the mouse.
To select an option from the Main menu bar by using the accelerator keys:
1
Press and hold down the Alt key, then, while holding down the Alt key, type the
letter that corresponds to the option you want. (The letter that corresponds to
the option is underlined on the on-screen menu.)
The option is highlighted and the submenu is displayed. Each submenu
option has one letter underlined; this letter is the accelerator key for the
option.
2
While the submenu is displayed, type the letter that corresponds to the
submenu option you want.
The submenu option is executed and a window or dialog box is displayed.
Getting to Know Maxicom
2
2.13
Accelerator keys for each
menu and submenu option
are listed on pages 2.13
through 2.21.
Not all submenu options
have accelerator keys.
Accelerator keys can also be
used to replace some
buttons in some windows
and dialog boxes. The
accelerator key letter is
underlined on the on-screen
button.
Page 38

Menu Bar Options
The following is a description of each of the menu items and their submenu
options. Accelerator keys for each option are noted next to the option.
System Menu (accelerator = Alt-Y)
System Menu
• Configure (accelerator = C)
Allows you to set (with the System Configuration wizard) communication
preferences and registration properties. For more information, see “Setting
System Properties” on page 3.1.
• Properties (accelerator = I)
Allows you to set (without the System Configuration wizard) the following
properties: communications, preferences, registration, station property
macros, database service, passwords and FREEDOM. For more information,
see “Setting System Properties” on page 3.1.
• Passwords (accelerator = A)
Allows you to change the master, site, or weather source passwords. For more
information, see “Setting Passwords” on page 3.7.
• Flow/Runtime Logs (accelerator = F)
Allows you to view flow data and station runtime logs (both actual and
projected) for sites and FLO-WATCH zones. For more information, see
“Viewing a Site’s Log Data,” on page 7.7.
• Maxicom
2
Central (accelerator = M)
Displays the Maxicom
2
Central window; allows you to select information
about weather, sites, communications, reports, alarms and help. For more
information, see “Maxicom
2
Central Window” on page 2.10.
Getting to Know Maxicom
2
2.14
Page 39

• Communication Status (accelerator = S)
Allows you to view the status of communication on any port configured for
Maxicom
2
. For more information, see “Viewing Maxicom2’s Communication
Status” on page 10.1.
• Event Log (accelerator = E)
Allows you to view event log data that you can sort, filter and use to create a
report. For more information, see “Viewing the Event Log and Generating
Reports” on page 9.1.
• Print Setup (accelerator = U)
Allows you to change printer parameters such as paper size, orientation, and
properties for the selected printer. For more information about printing, see
your Windows95/98 user manual.
• Print Preview (accelerator = V)
Allows you to see what the currently selected document will look like when
printed. For more information about printing, see your Windows95/98 user
manual.
• Print (accelerator = P)
Allows you to select the number of copies, the printer, and other printing
options. For more information about printing, see your Windows95/98 user
manual.
• Backup (accelerator = B)
Allows you to backup the current data to the hard drive. For more
information, see “Backing Up Data” on page 11.1.
• Recently opened sites, weather sources and reports
Allows you to quickly open up to nine existing sites, weather sources or
reports. When you initially open a site, weather source or report, it is
automatically appended to the System menu and is automatically assigned an
accelerator key (1, 2, 3, etc.). The most recently opened site, weather source or
report is assigned the “1” accelerator key and the other recently opened items
on the menu move down one position.
• Exit (accelerator = X)
Exits the Maxicom
2
interface and terminates any manual connections. For
more information, see “Exiting the Maxicom
2
Interface” on page 2.36.
Getting to Know Maxicom
2
2.15
Page 40

Site Menu (accelerator = Alt-S)
Site Menu
•New(accelerator = N)
Allows you to create a new site in Maxicom
2
using the Site wizard, which
guides you through a series of steps necessary to set up the site. For more
information, see “Setting Site Properties” on page 4.1.
• Open (accelerator = O)
Allows you to open an existing Maxicom
2
site.
• Close (accelerator = C)
Allows you to close the currently active Site window, saving any changes that
have been made.
• Configure (accelerator = F)
Allows you to configure the active site by using the Site wizard, which
automatically fills in any information that may already exist for the open site
and guides you through a series of steps necessary to configure the site. For
more information, see “Setting Site Properties” on page 4.1.
•Save(accelerator = S)
Allows you to save the changes you made to the active site.
• Rename (accelerator = R)
Allows you to rename the active site. For more information, see “Renaming a
Site” on page 7.3.
• Delete (accelerator = D)
Allows you to delete the active site. For more information, see “Deleting a Site”
on page 7.4.
Getting to Know Maxicom
2
2.16
Page 41

• Properties (accelerator = P)
Allows you to set general, contact, irrigation, FLO-MANAGER, FLO WATCH
and CCU properties. For more information, see “Setting Site Properties” on
page 4.1.
• CCU Properties (accelerator = U)
Allows you to set the site properties for the active site by attaching specific
field devices to specific CCU channels. Once the field devices are attached
to the channels, you are able to view various types of station data, such as
landscape coefficients, cycle times, soak times, flow rates, and precipitation
rates. For more information, see “Setting Site CCU Properties” on page 4.16.
• Manual Contact (accelerator = M)
Allows you to contact a site manually. For more information, see “Manually
Contacting a Site’s CCU” on page 7.18.
• Wireless Diagnostics (accelerator = W)
Allows you to monitor the communication status of the CCU and field devices
by displaying the results of the diagnostics messages sent by Maxicom to the
devices via MaxiLINK. For more information, see “Viewing Wireless
Diagnostics Data” on page. 7.21.
• Rain Shut Down (accelerator = H)
Allows you to turn Rain Shut Down on or off for any site or sites. For more
information, see “Setting Rain Shut Down for a Site” on page 7.22.
• Send Today’s Schedules to CCU (accelerator = T)
Allows you to send schedules to a site’s CCU manually. For more information,
see “Sending Schedules to the CCU” on page 7.25.
• Send Configuration Data to CCU (accelerator = I)
Allows you send the configuration data that you have set up to the currently
active site. For more information, see “Sending Configuration Data to the
CCU” on page 7.25.
• Get Logs from CCU (accelerator = G)
Allows you to collect logs from the CCU (site) that is active. For more
information, see “Sending Schedules to the CCU” on page 7.25.
• Abandon Changes (accelerator = A)
Allows you to close the active Site window without saving changes you have
made.
Getting to Know Maxicom
2
2.17
Page 42

Weather Menu (accelerator = Alt-W)
Weather Menu
•New(accelerator = N)
Allows you to set up a new weather source in Maxicom
2
using the Weather
Source wizard, which guides you through a series of steps necessary to set up
the weather source. For more information, see “Setting Weather Source
Properties” on page 5.1.
• Open (accelerator = O)
Allows you to open an existing Maxicom
2
weather source. For more
information, see “Using the Weather Source Window and Toolbar” on page
8.1.
• Close (accelerator = C)
Allows you to close the currently active Weather Source window, saving any
changes that have been made.
• Configure (accelerator = F)
Allows you to configure the active weather source by using the Weather
Source wizard, which automatically fills in any information that already exists
for the open weather source and guides you through a series of steps to
configure the weather source. For more information, see “Setting Weather
Source Properties” on page 5.1.
• Rename (accelerator = R)
Allows you to rename the currently active weather source. For more
information, see “Renaming a Weather Source” on page 8.3.
• Delete (accelerator = D)
Allows you to delete the currently active weather source. For more
information, see “Deleting a Weather Source” on page 8.3.
• Properties (accelerator = P)
Allows you to set the type of weather source and such particulars as location,
password and communications requirements. For more information, see
“Setting Weather Source Properties” on page 5.1.
Getting to Know Maxicom
2
2.18
Page 43

• Update (accelerator = U)
Allows you to enter weather data that changes daily. This option is available
only for user-entered weather sources. For more information, see “Manually
Updating Weather Data” on page 8.11.
• Manual Contact (accelerator = M)
Allows you to contact a weather source manually. For more information, see
“Manually Contacting a Weather Source” on page 8.8.
• Abandon Changes (accelerator = A)
Allows you to close the currently active Weather Source window without
saving changes you have made.
Report Menu (accelerator = Alt-R)
Report Menu
• Field Device (accelerator = D)
Allows you to create a report that tells how the CCU and its attached field
devices are configured. For more information, see “Creating a Field Device
Report” on page 9.7.
• Flow/Time/Cost (accelerator = F)
Allows you to create a report that displays flow, time, and cost data. For more
information, see “Creating a Flow/Time/Cost Report” on page 9.8.
• Schedule (accelerator = S)
Allows you to create a report on the schedules you select. For more
information, see “Creating a Schedule Report” on page 9.10.
Window Menu (accelerator = Alt-N)
Window Menu
• Refresh All (accelerator = R or F5)
Allows you to refresh the data on the active screen or window. When you
Getting to Know Maxicom
2
2.19
Page 44

select this option, Maxicom2accesses its databases and then displays the
most current data.
• Arrange All (accelerator = A)
Allows you to tile the open windows. For more information, see “Arranging
Open Windows” on page 2.11.
• Close All (accelerator = C)
Allows you to close all open windows except the System, Maxicom
2
Central,
Communication Status and Event Log windows.
• Main Toolbar (accelerator = T)
Allows you to toggle between displaying and hiding the System window Main
toolbar. A check in front of this option means that the toolbar is currently
displayed; no check means the toolbar is hidden.
• Selection Pane (accelerator = P)
Allows you to toggle between displaying and hiding the selection pane of the
System window. A check in front of this option means that the selection pane
is currently displayed; no check means the selection pane is hidden.
• Maxicom
2
Central (accelerator = 1)
Allows you to bring the Maxicom
2
Central window to the front of your screen.
The Central window is always listed on the Window menu and its accelerator
is always 1. For more information, see “Maxicom
2
Central Window” on page
2.10.
• Communication Status (accelerator = 2)
Allows you to bring the Communication Status window to the front of your
screen. The Communication Status window is always listed on the Window
menu and its accelerator is always 2. For more information, see “Viewing
Maxicom
2
’s Communication Status” on page 10.1.
• Event Log (accelerator = 3)
Allows you to bring the Event Log window to the front of your screen. The
Event Log window is always listed on the Window menu and its accelerator
key is always 3. For more information, see “Viewing the Event Log and
Generating Reports” on page 9.1.
• Open sites, weather sources and reports
If sites, weather sources or reports are open, they will also appear on the
Window menu and will automatically be assigned accelerator keys (4, 5, 6, etc.)
in the order in which you opened them.
Getting to Know Maxicom
2
2.20
Page 45

Help Menu (accelerator = Alt-H)
Help Menu
• Rain Bird Web Page (accelerator = W)
Allows you to connect directly to the Rain Bird World Wide Web page if you
have a modem connected to your computer.
• Fax to Rain Bird (accelerator = X)
Allows you to quickly dial and fax directly to Rain Bird if you have a fax
modem connected to your computer.
• Maxicom
2
Help Topics (accelerator = H)
Allows you to view the Help Topics window, which contains a Contents sheet,
an Index sheet, and a Search sheet. For more information, see “Viewing the
Help Contents” on page 2.25 or “Viewing the Help Index” on page 2.27.
• About Maxicom
2
(accelerator = A)
Allows you to view information about your version of Maxicom
2
. For more
information, see “Viewing Information about Your Version of Maxicom
2
” on
page 2.35.
Getting to Know Maxicom
2
2.21
Page 46

Entering and Editing Text
To set up and use the Maxicom2system, you will need to enter text in window text
fields and dialog boxes. This section describes how to edit text fields in windows
and dialog boxes.
Positioning Your Cursor in a Text Field
To position your cursor in a field:
Move the cursor to the desired position and click the left mouse button.
The cursor blinks at its position in the text field.
Adding Text
To add text:
1
Position your cursor at the point at which you want to add text.
2
Enter the text by typing.
Selecting Text
Once you have selected text, you can delete, replace, cut, or copy it.
To select a word:
1
Position the cursor anywhere in the word.
2
Double-click the left mouse button.
The word is highlighted.
To select any piece of text or all text in a field:
1
Position the cursor in front of the first character you want to select.
2
Press the left mouse button and hold it down.
3
While you continue to hold down the left mouse button, move the cursor to
the last character that you want to select.
As you move the cursor, selected characters are highlighted.
4
When all the characters you want to select are highlighted, release the mouse
button.
The characters remain highlighted.
Getting to Know Maxicom
2
2.22
Page 47

Deleting Text
To delete text:
1
Select the text you want to delete.
The text is highlighted.
2
Press the Backspace key. Or, if you are working in a window, select the Clear
option from the Edit menu; if you are working in a dialog box, press the right
mouse button and select Delete from the pop-up menu.
The text is deleted.
Deleting All Text
To delete the text in all fields of a dialog box or window:
1
Click the window or dialog box to make it active.
The title bar changes color.
2
Press the right mouse button and select Select All from the pop-up menu,
then bring up the pop-up menu again and select Delete.
All of the text fields are cleared and set to their default values.
Replacing Text
To delete text and replace it with new text:
1
Select the text you want to delete.
The text is highlighted.
2
Enter the new text.
The new text replaces the old text.
Cutting Text
Cutting text is different from deleting it because when you cut text, it is
automatically copied to the system’s clipboard so that you can paste it.
To cut text:
1
Select the text you want to cut.
The text is highlighted.
2
Press the right mouse button and select Cut from the pop-up menu.
The text is cut from the document and pasted to the system clipboard. The cut
text stays on the clipboard until it is replaced by other text or you exit the
application.
Getting to Know Maxicom
2
2.23
Page 48

Copying Text
To copy text:
1
Select the text you want to copy.
The text is highlighted.
2
Press the right mouse button and select Copy from the pop-up menu.
A copy of the selected text is sent to the system clipboard. The copied text
stays on the clipboard until it is replaced by other text or you exit the
application.
Pasting Text
To paste text that you have cut or copied:
1
Position the cursor where you would like to paste the cut or copied text.
2
Press the right mouse button and select Paste from the pop-up menu.
The text is pasted into the document. A copy of the text remains on the
clipboard so that you may paste it again.
Getting to Know Maxicom
2
2.24
Page 49

Using Maxicom2On-line Help
Maxicom2on-line Help is available to you in three ways: from the Help menu on
the Main menu bar, from Tooltips, and from Help buttons that are available on
some dialog boxes. The Help menu is the most commonly used way to get help.
This section describes how to use the Help menu. For information about using
Tooltips, see page 7.1.
Viewing the Help Contents
The Help Contents is a listing of general topics and subtopics available from
Maxicom
2
on-line Help. (The subtopics in the Table of Contents are the same as
the topics on the Index list.)
To see the Help Contents and then read the associated Help files:
1
Select the Maxicom2Help Topics option from the Help menu or click the Help
hot spot on the Maxicom
2
Central window or click on the question mark
button on the Main toolbar.
The Help Topics window is displayed on the left and the Help Information
window is displayed on the right. The Help Topics window includes a
Contents, an Index and a Search tabbed sheet.
Help Topics Window and Help Information Window
2
If the Contents tab is not already selected, click on the Contents tab to bring
the sheet to the front.
The Contents sheet is displayed.
Getting to Know Maxicom
2
2.25
If, after checking Maxicom
2
on-line Help, you still need
assistance, see “Service
Information” on the inside
back cover of this manual.
Page 50

3
Select the topic you want by clicking on it.
A list of subtopics is displayed.
Help Topics Contents Sheet with Subtopics Displayed
4
Select the subtopic you want by clicking on it. (Some topics have two levels of
subtopics which you must open before you can read the associated Help file.)
The information you have selected is displayed in the Information window.
List of Subtopics Help Information
5
When you are finished reading the Help Information window, select a new
Help topic to read or select Exit from the File menu to exit Help.
Getting to Know Maxicom
2
2.26
The Information window
sometimes contains
highlighted words that are
links to other topics. Click a
highlighted word to find out
more about it.
Page 51

Viewing the Help Index
To see the an alphabetical listing of Help topics and then read the associated Help
files:
1
Select the Maxicom2Help Topics option from the Help menu or click the Help
hot spot on the Maxicom
2
Central window or click on the question mark
button on the Main toolbar.
The Help Topics window is displayed on the left and the Help Information
window is displayed on the right. The Help Topics window includes a
Contents, an Index and a Search tabbed sheet.
2
Select the Index tab.
The Index sheet is displayed.
Help Window with Index Sheet Displayed
Getting to Know Maxicom
2
2.27
Page 52

3
Scroll through the alphabetical list and click on the topic you want.
The information you selected is displayed in the Help Information window.
Help Topics Index Sheet with Help Information Displayed
4
When you are finished reading the Information window, select a new Help
Index entry or select Exit from the File window to exit Help.
Getting to Know Maxicom
2
2.28
Page 53

Finding a Particular Word in Help
The Find feature in Maxicom2Help gets a list of every topic where the word you
are searching for appears.
To search for a particular word in a Help file:
1
Select the Maxicom2Help Topics option from the Help menu or click the Help
hot spot on the Maxicom
2
Central window or click on the question mark
button on the Main toolbar.
The Help Topics window is displayed on the left and the Help Information
window is displayed on the right. The Help Topics window includes a
Contents, an Index and a Search tabbed sheet.
2
Select the Search tab.
• If this is the first time you selected the Search tab, the Find Setup wizard
appears.
Find Setup Wizard
Follow the instructions on the Find Setup wizard to configure the Search
help. When the wizard has finished building the Find Word list, the Search
sheet is displayed.
Getting to Know Maxicom
2
2.29
Page 54

• If you have previously selected the Search tab and completed the Find
Setup wizard, the Search sheet is displayed.
Help Window with Search Sheet Displayed
3
Enter the word you want in the text field or scroll the matching word list to
narrow the search and highlight the word you want.
As you enter the word, the application searches for matching words in the
word list and highlights the topic closest to the word you have typed or
chosen.
Getting to Know Maxicom
2
2.30
If the word string you enter
is too specific, the list will
appear blank.
If the word you enter does
not appear anywhere in the
Help files, the list will appear
blank.
Page 55

Help Window with Search Sheet Text Matches
4
When the topic you want is displayed, double-click the topic.
The information you have selected is displayed in the Help Information
window.
Help Information Window
5
When you are finished reading the Help Information window, perform a new
Search or select Exit from the File menu to exit Help.
Getting to Know Maxicom
2
2.31
The Information window
sometimes contains
highlighted words that are
links to other topics. Click a
highlighted word to find out
more about it.
Page 56

Setting Find Options
You can set how the system will search for the word you want to find.
To set Find options:
1
With the Search sheet displayed, select Option from the Search menu.
The Find Options dialog box is displayed.
Find Options Dialog Box
2
Select one of the following radio buttons in the “Search for topics containing”
area:
• All the words you typed in any order — specifies that you want to find all
Help topics containing all of the words you typed.
• At least one of the words you typed — specifies that you want to find all
Help topics containing at least one of the words you typed.
• The words you typed in exact order — specifies that you want to find all
Help topics containing exactly the phrase you typed. If this option is not
available, it means that your word list was not set up to support phrase
searching. In this case, you can recreate the word list (using the Rebuild
option) and specify that you want to include phrase searching. For more
information, see “Rebuilding the Find Word List” on page 2.33.
3
Check the “Display matching phrases” checkbox to narrow the search by
displaying the words that follow the words you entered; uncheck the “Display
matching phrases” checkbox to not show the words that follow the words you
entered. If your word list has not been set up to support phrase searching, this
option is not available.
Getting to Know Maxicom
2
2.32
If you did not select the
maximum database size for
Maxicom2Help, all of the
options may not be
available. For more
information, see “Rebuilding
the Find Word List” on page
2.33.
Checking the “Display
matching phrases”
checkbox can slow down
the search.
Page 57

4
Select one of the following items from the “Show words that” drop-down list:
• begin with the characters you type
• contain the characters you type
• end with the characters you type
• match the characters you type
• have the same root
5
Check the “Wait for pause before searching” checkbox if you want to begin
searching after a pause in your typing; uncheck the “Wait for a pause before
searching ”checkbox if you want to search as you type.
6
When you are finished setting Find options, click OK to save your changes and
close the Find Options dialog box or click Cancel to cancel your changes.
Rebuilding the Find Word List
You can minimize, maximize, or customize the Find word list. The default setting
is minimum, which is also the recommended setting because maximizing or
customizing the list can slow the search process. The rebuilding feature uses a
wizard to guide you through the process of creating the Find word list. The wizard
runs automatically the first time you select the Search tab.
To rebuild the Find word list:
1
With the Search sheet of the Help Topics window open, select Rebuild from
the Search menu.
The Find Setup wizard is displayed giving information about how the wizard
works.
2
Select one of the following radio buttons:
• Minimize database size (recommended)
• Maximize search capabilities
• Customize search capabilities
3
Follow the instructions in the wizard. After finishing each section of the
wizard, click the Next button to proceed to the next section of the wizard.
4
When you have finished the last section of the wizard, click the Finish button.
The rebuild is completed and your work is saved.
Getting to Know Maxicom
2
2.33
Page 58

Using the Help Information Windows
The Help Information windows are windows in which the Help files appear.
Help Information Window
The buttons available to you on a Help window depend upon what type of Help
window is open. The following is a list of buttons that may be available:
• Contents — opens the Help Topics dialog box and displays the Contents,
Index and Find tabbed sheets.
• Find — opens the Help Topics dialog box and displays the Contents, Index
and Find tabbed sheets.
• Back — allows you to return to the Help Information window you were in
previously.
• Print Topic — prints the entire topic.
• Options
Annotate — allows you to type additional information you want associated
with the active Help Information window. When a topic is annotated, a paper
clip icon appears at the top of the topic. Click the paper clip icon to display
your annotation.
Copy — copies the entire topic to the system clipboard.
Print Topic — prints the entire topic.
Font — allows you to select small, normal, or large size font for the active Help
Information window.
Keep Help on Top — allows you to select Default, On Top, which keeps the
Help Information window on top of other windows, or Not on Top, which
allows the Help Information window to go to the background.
Use System Colors — allows you to change the interface colors.
• See Also — displays a list of Help topics related to the content of the current
Help Information window.
Getting to Know Maxicom
2
2.34
The Help Information
window sometimes contains
highlighted words that are
links to other topics. Click a
highlighted word to find out
more about it.
Page 59

Viewing Information about Your Version of Maxicom
2
You can quickly see the following information about your version of Maxicom2:
• version number
• copyright notice
• registered user information
This section will remain blank until you enter your registration information.
See “Setting Registration Properties,” page 3.6.
• system resource information
To see this information:
1 Select the About Maxicom
2
option from the Help menu.
The About Maxicom
2
dialog box is displayed.
About Maxicom2Dialog Box
2 When you are finished reading the information, click the OK button.
The About Maxicom
2
dialog box closes.
Saving Your Work
In most Windows software programs, it is assumed that you do not want to save
your work, so saving work is an extra step. Maxicom
2
is different. To ensure that
your work is saved and to save you the extra step of saving your work, Maxicom
2
assumes that you want to save the work you have done, unless you select to
cancel it.
Getting to Know Maxicom
2
2.35
Page 60

To save the work you have done:
Click the OK button on the window or dialog box in which you are working to
save your work and close the window or dialog box. Or, click the Apply button
on the window or dialog box in which you are working to save your work
without closing the window or dialog box.
Canceling Your Work
All of the dialog boxes and wizards in which you can enter text in Maxicom2have
Cancel buttons that allow you to cancel the work you have done since you
opened the dialog box or wizard. Site windows and Weather Source windows
allow you to select the Abandon Changes option to cancel changes.
To cancel the work you have done in a dialog box or wizard:
Click the Cancel button or, if you are working in a Site or Weather Source
window, select the Abandon Changes option from the Site menu or Weather
menu.
The window or dialog box reverts to the state in which it was last saved.
Exiting the Maxicom2Interface
It is not necessary to run the Maxicom2interface for the Maxicom2controls to
run; only the application needs to be active. This means that you do not have to
dedicate a computer to Maxicom
2
. You can do word processing or other tasks
while Maxicom
2
runs in the background.
To exit the interface:
Select the Exit option from the System menu, double-click the Maxicom
2
icon
on the application title bar, or click the Close button on the application title
bar.
The interface closes and your work is saved.
Turning Maxicom2Control Off and On
To turn off Maxicom2control:
1
Right-click the Rain Bird icon in the tray at the right bottom corner of your
screen.
The Rain Bird icon menu is displayed.
Getting to Know Maxicom
2
2.36
To back up Maxicom2data,
see “Backing Up Data” on
page 11.1.
If you close the entire
interface, Maxicom
2
automatically saves your
changes.
Page 61

2
Select the Disable Auto Contacting option.
The Rain Bird icon turns blue on a red background, the interface closes and
Maxicom
2
controls are turned off.
Maxicom2Control Off
To turn the controls back on again:
1
Right-click the Rain Bird icon in the tray at the right bottom corner of your
screen.
The icon menu is displayed.
2
Select the Enable Communications option.
The Rain Bird icon turns green again and Maxicom
2
controls are turned back
on.
Maxicom2Control On
Turning the Maxicom2Control
Engine On and Off
To turn off the Maxicom2control engine:
1
Exit the Maxicom2interface. See “Exiting the Maxicom2Interface,” above.
2
Right click the Rain Bird icon in the tray at the lower right corner of the screen.
The Rain Bird icon menu is displayed.
3
Select the Exit Maxicom2Control Engine option.
The Rain Bird icon disappears from the tray and the Maxicom
2
Control Engine
shuts down.
To turn on the Maxicom
2
control engine:
Select Maxicom
2
Control Engine from the Windows95/98 Start menu.
The Rain Bird icon menu reappears in the tray and the Maxicom
2
control
engine starts.
Getting to Know Maxicom
2
2.37
Page 62

Page 63

To use your Maxicom2system, you must first describe to Maxicom2how you would
like your system to work, or “set system properties.” This chapter describes how to
set the system properties that are required to operate your system.
There are two ways to set system properties:
• You can set system properties by using the System Configuration wizard, which
guides you through a series of steps in which required properties are set. The
wizard presents each property to you, gives an explanation of the property, and
a default value. You can move forward or backward within the wizard, or even
cancel the wizard at any time. The System wizard runs automatically the first
time you open Maxicom
2
.
• Or, you can set system properties by using the System Properties Setup dialog
box without the wizard. The System Property Setup dialog box contains more
properties than the System wizard outlines for you.
Each way to set system properties is described in this chapter.
Using the System Wizard for Interactive Setup
The System wizard is an easy, interactive guide that helps you to set up your system
properties. The System wizard runs automatically the first time you open
Maxicom
2
.
To use the System wizard at any other time:
1
Select the Configure option from the System menu.
The System wizard begins to run automatically. The Communication dialog box
is displayed first, which allows you to setup Communication ports.
Setting System Properties
3.1
Setting System
Properties
3
Page 64

System Wizard
2
Follow the instructions in the wizard. If you need more help, read “Using the
System Properties Setup Dialog Box for Setup” on the next page.
3
After finishing each section of the wizard, click the Next button.
The next section of the wizard will be displayed.
4
When you have finished the last section of the wizard, click the Finish button.
System setup is completed and your work is saved.
Setting System Properties
3.2
If you want to change
direction or cancel the
wizard at any time, click the
Back button to return to the
previous section, or click the
Cancel button to cancel the
wizard entirely.
Page 65

Using the System Properties Setup Dialog Box
for Setup
To use the System Properties Setup dialog box to set up your system:
1
Select the Properties option from the System menu.
The System Properties Setup dialog box is displayed.
System Properties Setup Dialog Box
2
Select any of the tabbed sheets to bring that sheet to the front of the stack.
Available sheets are: Communications, Registration, Passwords, FREEDOM,
Preferences, Station Property Macros and Database Service.
3
Follow the instructions in this chapter for the sheet you have selected.
4
When you are finished working with the System Property Setup dialog box,
click OK to save your changes and close the dialog box, Apply to save your
changes without closing the dialog box, or Cancel to cancel your changes and
close the dialog box.
Setting System Properties
3.3
You must click OK or Cancel
in the System Properties
Setup dialog box before you
will be able to work in
another Maxicom2window
or dialog box.
Page 66

Setting Communications Properties
The Communications sheet lists all communications configured for use with
Maxicom
2
. Each has a Port Name assigned by the system. The Device Name is the
name you give the port to make it easy for you to remember. The Type is the kind
of port, for instance, direct hardwire or radio. If the port is a telephone port, it also
has a Modem designation.
To set system communications properties:
1
With the System Properties Setup dialog box open, select the
Communications tab.
The Communications sheet comes to the front of the stack.
Communications Sheet
2
If the port you want to set properties for is already listed, double-click the port
name. Or, if it is not listed, click the Add button.
The Edit Communications Port Properties dialog box is displayed.
Setting System Properties
3.4
Page 67

Edit Communications Port Properties Dialog Box
3
Enter a device name you want to give the port in the Device Name field.
4
Click the drop-down list arrow on the Type field and select one of the
following types:
• Direct Cable Connection
• FREEDOM — You may assign a maximum of one port as a FREEDOM
Remote device type.
• Spread Spectrum Radio
• Point-to-Point Radio
• Telephone Modem (Dedicated)
• Telephone Modem (Pooled)
• Trunk Radio
5
If necessary, enter the port name in the Port Name field.
6
If the Type is:
• Point-to-Point or Spread Spectrum Radios, enter the radio delay(in
milliseconds) in the Radio Delay field
• Telephone Modem (Dedicated or Pooled)
— click the arrow next to the Modem field to view and select the modem
type from the drop-down list
— enter the initialization string for your modem in the Initialization String
field
— adjust the modem volume with the Modem Volume grab bar
Setting System Properties
3.5
If the selected port is
configured with a modem in
the Windows95/98
operating system, you will
be permitted to choose only
Telephone Modem for the
port’s device type. Similarly,
if the selected port is
configured without a
modem, you will not be
permitted to select
Telephone Modem as your
device type.
Pooled modem is the best
choice for most systems. It
is recommended for single
modem systems.
Page 68

• Trunk Radio
— click the radio button to choose the signal selection manner DSR (Data
Set Ready) or CTS (Clear to Send)
— enter the radio delay (in milliseconds, 500 is the default) in the Radio
Delay field
7
Click the OK button.
8
Repeat steps 1 through 7 for each of the ports that you would like to define.
9
When you are finished setting communications properties, select another
tabbed sheet or click OK to save your changes and close the dialog box, Apply
to save your changes without closing the dialog box, or Cancel to cancel your
changes and close the dialog box.
Setting Registration Properties
The data entered on the Registration sheet is used by the system to record your
Maxicom
2
software ownership.
To set registration properties:
1
With the System Properties Setup dialog box open, select the Registration tab.
The Registration sheet comes to the front of the stack.
Registration Sheet
Setting System Properties
3.6
Page 69

2
Enter the name, company, title, address, telephone, fax, and address
information.
3
When you are finished setting registration properties, select another tabbed
sheet or click OK to save your changes and close the dialog box, Apply to save
your changes without closing the dialog box, or Cancel to cancel your changes
and close the dialog box.
Setting Passwords
Setting passwords and changing them periodically protects your system from
unauthorized use.
To set passwords:
1
With the System Properties Setup dialog box open, select the Passwords tab.
Or
Select the Passwords option from the System menu.
The Passwords sheet comes to the front of the stack.
Passwords Sheet
2
If necessary, enter the master password.
The Password sheet becomes accessible.
3
Set each of the passwords as described in this section.
Setting System Properties
3.7
If you have already entered a
master password in the
system, the Password sheet
is initially unavailable except
for the field in which you
must enter the master
password.
Page 70

4
When you are finished setting passwords, you can select another tabbed sheet
or click OK to save your changes and close the dialog box, Apply to save your
changes without closing the dialog box, or Cancel to cancel your changes and
close the dialog box.
Changing the Master Password
To change the master password:
1
Enter the old password in the Master Password field, then click the Change
Master Password button.
For security purposes, the password characters appear on your screen as
asterisks (*). The Change Password dialog box is displayed.
Change Password Dialog Box
2
Enter the old password in the Old Password field.
3
Enter the new password in the New Password field. The new password must
be alphanumeric (composed of letters and/or numbers) and may be up to ten
characters long.
4
Re-enter the new password in the Confirm New Password field.
5
Click the OK button.
Your new password is saved.
Changing Site Passwords
Each time you select a site to work with from the Site menu, if there is a site
password you will be prompted for the password for the site. You can use the
master password as the site password, or you can set different passwords for the
sites. From the Passwords sheet, you can change all of the site passwords, but you
must change them one at a time.
Setting System Properties
3.8
If you have not entered the
passwords correctly, a
message will be displayed
asking you to repeat the
process.
The master password is also
a valid password for any Site
or Weather Source window
or for editing the password
assigned to each site or
weather source.
You can also set site
passwords for each site
from that site’s Site Property
Setup dialog box. For more
information, see “Using the
Site Properties Setup Dialog
Box for Setup” on page 4.3.
Page 71

To change the site password from the Password sheet:
1
On the Site Passwords list, select the name of the site you want to change and
click the Change Password button, or double-click the name of the site.
The Password dialog box is displayed.
2
Enter the old password in the Old Password field.
3
Enter the new password in the New Password field.
The new password must be alphanumeric (composed of letters and/or
numbers) and may be up to ten characters long.
For security purposes, the password characters appear on your screen as
asterisks (*).
4
Click the OK button.
The new site password is saved.
Changing Weather Source Passwords
Each time you select a weather source to work with from the Weather menu, if
there is a weather source password you will be prompted for the password for the
weather source. You can use the master password as the weather source
password, or you can set different passwords for the weather sources. From the
Passwords sheet, you can change all of the weather source passwords, but you
must change them one at a time.
To change the weather source password from the Password sheet:
1
On the Weather Source Passwords list, select the name of the weather source
you want to change and click the Change Password button, or double-click
the name of the weather source.
The Password dialog box is displayed.
2
Enter the old password in the Old Password field.
3
Enter the new password in the New Password field.
The new password must be alphanumeric (composed of letters and/or
numbers) and may be up to ten characters long.
For security purposes, the password characters appear on your screen as
asterisks (*).
4
Click the OK button.
The new weather source password is saved.
Setting System Properties
3.9
Page 72

Setting a FREEDOM Time Window
The FREEDOM Remote System allows you to send commands to Maxicom2via a
touch-tone telephone or radio and a special modem assigned to a specific serial
port on your computer. To avoid the possibility of the FREEDOM Remote System
inadvertently interfering with the schedules you set up in Maxicom
2
, you will
probably want to limit the time frame (window) during which the FREEDOM
System can send commands to Maxicom
2
.
To set a FREEDOM Time Window,
1
With the System Properties Setup dialog box open, select the FREEDOM tab.
The FREEDOM sheet comes to the front of the stack.
FREEDOM Sheet
2
To change the FREEDOM password, enter the password in the Password field.
If there is already a password in the field, replace it by typing over it. The
password must be alphanumeric (composed of letters and/or numbers) and
may be up to ten characters long.
Setting System Properties
3.10
Page 73

3
Set the FREEDOM Time Window:
• Enter the start time in the From field or use the scroll buttons on the right
side of the field to enter the time without typing.
• Enter the end time in the To field or use the scroll buttons on the right side
of the field to enter the time without typing.
4
When you are finished setting FREEDOM properties, select another tabbed
sheet or click OK to save your changes and close the dialog box, Apply to save
your changes without closing the dialog box, or Cancel to cancel your changes
and close the dialog box.
Setting Preferences
The Preferences sheet allows you to select a variety of preferences, including units
of measure, currency types, default water price and time display format.
To set preference properties:
1
With the System Properties Setup dialog box open, select the Preference tab.
The Preferences sheet comes to the front of the stack.
Preferences Sheet
2
For the items listed (water flow rate, water volume, rainfall,
evapotranspiration, precipitation rate, wind run, and temperature), select the
radio button for the type of units you want to display: English, Metric Liters, or
Metric Cubic Meters.
Setting System Properties
3.11
Page 74

3
Enter the type of currency in the System Default Currency field.
4
Enter the prefix for the currency (e.g., $) in the Prefix field.
5
Enter the water price (between 0.00 and 9999.99) in the System Default Water
Price field.
6
Click on the preferred time format: 24 or 12 hours.
7
Select any other preferences you would like to choose: Enable Maxicom
2
Sound, Run Virtual CCU at Auto Send Time and Enable Maxicom2Warning
System.
8
When you are finished making your Preference selections, you can select
another tabbed sheet or click OK to save your changes and close the dialog
box, Apply to save your changes without closing the dialog box, or Cancel to
cancel your changes and close the dialog box.
Setting Station Property Macros
Macros allow you to create shortcuts for certain items and their values that you
use often in Maxicom
2
. Once you enter a macro, Maxicom2will automatically
remember it the next time you need to enter it.
To set a station macro:
1
With the System Properties Setup dialog box open, select the Station Property
Macros tab.
The Station Property Macros sheet comes to the front of the stack.
Setting System Properties
3.12
Setting the estimated cost
per unit of water allows
Maxicom2to calculate water
costs for you.
Page 75

Station Property Macros Sheet
2
Select the macro you want by clicking the radio button associated with it. (You
can choose from Water Budget, Precipitation Rate, Flow Rate, Cycle, Soak or
Landscape Coefficient.)
The list displays all existing macros for the selection you have made.
3
If you want to edit an existing macro, select the macro on the list and click the
Edit button. Or, if you want to add a new macro, click the Add button.
The Edit Water Budget Macro dialog box is displayed.
Edit Water Budget Macro Dialog Box
4
Enter the name and value you want to give the macro in the Name and Value
fields.
5
Click the OK button.
The new macro is edited or added to the list.
6
When you are finished setting station property macros, you can select another
tabbed sheet or click OK to save your changes and close the dialog box, Apply
Setting System Properties
3.13
If you want to remove a
macro from the list, select
the macro from the list and
click the Remove button.
Page 76

to save your changes without closing the dialog box, or Cancel to cancel your
changes and close the dialog box.
Setting the Database Service
The system database retains the historical data until it is purged. You can set the
Database Service to purge and back up data automatically or manually. You can
also choose to back up the purged data into a historical database.
To open the Database Service sheet:
With the System Properties Setup dialog box open, select the Database Service
tab.
The Database Service sheet comes to the front of the stack.
Database Service Sheet
To purge and back up data automatically:
1
Select the database purge time length by either entering the number of
months (1-24) or use the scroll buttons on the right side of the field to enter a
number without typing.
The purge date automatically changes below.
2
Click the checkbox next to the “Automatically purge the data...” if you want the
system to automatically purge data.
Setting System Properties
3.14
Page 77

3
Click on the checkbox next to “Backup purged data into historical database” if
you want the system to automatically back up the purged data into an
historical database.
To purge and back up data manually:
1
Select the database purge time length by either entering the number of
months (1-24) or use the scroll buttons on the right side of the field to enter a
number without typing.
The purge date automatically changes below.
2
Press the “Manually purge the data...” button.
The system purges the data older than the date you selected in step 1.
3
Press the “Back up current database to historical database now” button.
The system backs up the current database to a historical database.
Setting System Properties
3.15
Page 78

Page 79

To set up a site in your Maxicom2system, you must describe the site to Maxicom2,
or “set the site’s properties.” This chapter describes how to set the properties that
are required to operate the site.
Many of Maxicom
2
’s features and benefits are dependent upon the detail and
accuracy of the site information you enter. Therefore, it is important that you enter
accurate information about site characteristics.
There are two ways to set site properties:
• You can set site properties by using the Site wizard, which guides you through a
series of steps in which all required properties are set. The wizard presents each
property to you, gives an explanation of the property, and a default value. You
can move forward or backward within the wizard, or even cancel the wizard at
any time. The Site wizard runs automatically when you select the New option
from the Site menu. If you already have a site open, you can run the wizard for
the currently active Site window by selecting the Configure option from the Site
menu.
• You can set site properties by using the Site Properties Setup dialog box. The
Site Properties Setup dialog box contains more properties than the Site wizard
outlines for you. Even if you use the Site wizard to set site properties, you will
need to set some properties from the Site Properties Setup dialog box.
Each way to set site properties is described in this chapter.
Setting Site Properties
4.1
Setting Site Properties
4
Page 80

Using the Site Wizard for Interactive Setup
The Site wizard is an easy, interactive guide that helps you to set up your site
properties.
To use the site wizard:
1
Select the New option from the Site menu.
Or
If you have a site already open, select the Configure option from the Site
menu.
The Site wizard begins to run automatically. The Wizard dialog box is
displayed, giving information about how the wizard works.
Site Wizard
2
Follow the instructions in the wizard. If you need more help, read “Using the
Site Properties Setup Dialog Box for Setup” on page 4.3.
3
After finishing each section of the wizard, click the Next button.
The next section of the wizard will be displayed.
4
When you have finished the last section of the wizard, click the Finish button.
Site setup is completed and your work is saved.
Setting Site Properties
4.2
If you want to change
direction or cancel the
wizard at any time, click the
Back button to return to the
previous section, or click the
Cancel button to cancel the
wizard entirely.
Page 81

Using the Site Properties Setup Dialog Box for
Setup
To use the Site Properties Setup dialog box to set up your site:
1
Select the Properties option from the Site menu. (If the active window is not a
Site window, the Properties option is not available.)
The Site Properties Setup dialog box is displayed.
Site Properties Setup Dialog Box
2
Select any of the tabbed sheets to bring that sheet to the front of the stack.
Available sheets are: General, Contact, Irrigation, FLO-MANAGER, FLO
WATCH and CCU.
3
Follow the instructions in this chapter for the sheet you have selected.
4
When you are finished working with the Site Properties Setup dialog box, click
OK to save your changes and close the dialog box, Apply to save your changes
without closing the dialog box, or Cancel to cancel your changes and close the
dialog box.
Setting Site Properties
4.3
You must click OK or Cancel
in the Site Properties Setup
dialog box before you will be
able to work in another
Maxicom2window or dialog
box.
Page 82

Setting General Site Properties
To set general site properties:
1
With the Site Properties Setup dialog box open, select the General tab.
The General sheet comes to the front of the stack with the site name already
displayed in the Site Name field.
General Sheet
2
Set the general site properties as described in this section.
3
When you are finished setting general site properties, you can select another
tabbed sheet or click OK to save your changes and close the dialog box, Apply
to save your changes without closing the dialog box, or Cancel to cancel your
changes and close the dialog box.
Setting Site Properties
4.4
Page 83

Setting the Site Password
Setting site passwords and changing them periodically protects your system from
unauthorized use. Each time you select a site to work with from the Site menu,
you will be prompted for a password for the site. You can use the master password
as the site password, or you can set different passwords for the sites.
To change the site password:
1
Click the Change button next to the Password field.
The Change Password dialog box is displayed.
2
Enter the old password in the Old Password field. If you have not yet set a
password for that site, leave the field blank.
For security purposes, the password characters appear on your screen as
asterisks (*).
3
Enter the new password in the New Password field. The new password must
be alphanumeric (composed of letters and/or numbers) and may be up to ten
characters long.
4
Re-enter the new password in the Confirm New Password field.
5
Click the OK button.
The new site password is saved.
Setting the Site’s Time Zone
The time zone is used to calculate evapotranspiration (ET) and rainfall data
regardless of the relative location of the central computer to the site’s CCU.
To set the site’s time zone:
Select the time zone name from the drop-down list provided.
Setting Weather Sources for the Site
You must select the site’s evapotranspiration (ET) and rainfall sources from a list
of weather sources configured for Maxicom
2
.
If you have not set up weather sources yet, you can still continue to set site
properties. Simply use the default historical weather source until you set up the
real weather source for the site. After you have set up the real weather source,
return to the Site Properties Setup dialog box and enter the real weather source
for the site.
Setting Site Properties
4.5
You can also change site
passwords from the
Passwords sheet of the
System Properties Setup
dialog box. For more
information, see “Setting
Passwords” on page 3.7.
If you have not entered the
passwords correctly, a
message will be displayed
asking you to repeat the
process.
Page 84

To select the site’s ET (evapotranspiration) and rainfall sources:
1
Select the ET source from the drop-down list of sources configured in
Maxicom
2
as ET sources.
2
Select the rainfall source from the drop-down list of sources configured in
Maxicom
2
as rainfall sources.
Setting the Site Map File Location
If you have site map image files, you can link the image files to Maxicom2and
view the site maps with the other site data. The image files must be in .bmp
format for Maxicom
2
to recognize them and display them.
To locate the site’s default map image file for Maxicom
2
:
Enter the name of the file in the Site Map Image File field.
Setting Site Contact Properties
Contact properties dictate how the central computer will contact the site’s CCU.
To set contact properties for the site:
1
With the Site Properties Setup dialog box open, select the Contact tab.
The Contact sheet comes to the front of the stack.
Contact Sheet
Setting Site Properties
4.6
You can select the same
source for rainfall that you
selected for ET, provided
that the source has been
properly configured. For
more information about
configuring weather sources,
see “Setting Weather Source
Properties” on page 5.1.
If you do not know the
location of the map image
file, click the Select button
to display a listing of image
files in your system. Then
either double-click the file
name or select the file name
and click the Open button.
The file name will be
automatically entered in the
field.
You can also set the map file
location from the Site
window. For more
information, see “Joining the
Site’s Map File with Other
Site Data” on page 7.17.
Page 85

2
Set the site contact properties as described in this section.
3
When you are finished setting site contact properties, you can select another
tabbed sheet or click OK to save your changes and close the dialog box, Apply
to save your changes without closing the dialog box, or Cancel to cancel your
changes and close the dialog box.
Selecting the Communication Port and Telephone Number
To select the communication port you will use for communication with the site:
1
Select a port name from the drop-down list of communication ports that have
been configured for use with Maxicom
2
. Choose First Available Modem if you
want to use the first modem that becomes available when contact takes place.
2
If you have selected a communications port that is a telephone modem, enter
the area code and telephone number in the Telephone Number field.
Setting Times to Contact the Site’s CCU
You set the time of day when you want to send schedules to the site’s CCU
automatically and when you want to receive logs of activity at the CCU
automatically. You can also set the maximum amount of time for these contacts.
To set automatic send and receive times:
1
Enter the time to send schedules in the Auto Send Contact Time field. Or, use
the scroll buttons on the right side of the field to enter the time without
typing. You can enter only one send time.
2
Enter the time to receive logs in the Auto Receive Contact Times field. Or, use
the scroll buttons on the right side of the field to enter the time without
typing. You can enter up to 24 times to receive logs.
3
Check the Auto Contact checkbox to enable automatic contact with the CCU
or uncheck the checkbox to disable automatic contact.
4
Enter the maximum number of minutes for these contacts in the Manual
Contact Timeout field.
Setting Site Properties
4.7
For more information about
configuring ports, see
“Setting Communications
Properties” on page 3.4.
If communications on this
port fail consistently, click
the button to check the
settings for the port. You
should not normally need to
change these settings.
For recommended times to
contact the CCU, see
Maxicom2on-line Help.
Click on the fields to display
the times available from the
drop-down menu. to add
additional times to the drop-
down menus, click the
button and enter additional
times.
When setting automatic
send and receive times, be
sure to select the times
based on the site’s time
zone, not the computer’s
time zone.
Page 86

Setting the Number of Failed Contacts and the Time
Between Retries
You can set the maximum number of contact attempts the system will allow
before it gives up and issues an alarm. You can also set the amount of time
between failed contact attempts.
To set the maximum number of attempts and minutes between:
1
Enter the maximum number of failed attempts (from 0 to 100) in the Retry the
CCU Contact field or use the scroll button on the right side of the field to
select a number without typing.
2
Enter the number of minutes between failed attempts (from 0 to 1000) in the
Wait This Many Minutes field or use the scroll button on the right side of the
field to select a number without typing.
Setting Automatic or Manual Contact Priorities
You can choose whether automatic or manual contact will take priority on your
system.
To set the contact priority:
If you want automatic contact to take priority, select the Proceed with the
Automatic Contact radio button; if you want manual contact to take priority,
select the Delay Automatic Contact radio button.
Setting Retrieval of Logs During Rain Shut Down
You can set your system to retrieve logs as scheduled during a Rain Shut Down, or
to suspend retrieval of logs until the Rain Shut Down is over.
To set retrieval of logs in the event of Rain Shut Down:
Check the Automatically Retrieve Logs During Rain Shut Down checkbox to
continue to retrieve logs during Rain Shut Down; uncheck the checkbox to
suspend retrieval during Rain Shut Down.
Setting the FREEDOM Time Window
You can set your system to allow contact from a FREEDOM System during a
specific time frame (window).
To set the FREEDOM time window:
1
Enter the time to start the time window in the FREEDOM Time Window field.
Or, use the scroll buttons on the right side of the field to enter the time
without typing.
2
Enter the time to end the time window in the To field. Or, use the scroll
buttons on the right side of the field to enter the time without typing.
Setting Site Properties
4.8
For more information about
Rain Shut Down, see
“Setting Rain Shut Down for
a Site” on page 7.22.
Page 87

Setting Site Irrigation Properties
To set site irrigation properties:
1
With the Site Properties Setup dialog box open, select the Irrigation tab.
The Irrigation sheet comes to the front of the stack.
Irrigation Sheet
2
Set the irrigation properties as described in this section.
3
When you are finished setting irrigation properties, you can select another
tabbed sheet or click OK to save your changes and close the dialog box, Apply
to save your changes without closing the dialog box, or Cancel to cancel your
changes and close the dialog box.
Setting the Site’s Water Budget
Adjusting the water budget allows you to increase or decrease watering time in
increments of 1% without having to reset schedules. The default percentage is
100%.
To set the water budget percentage:
Enter the percentage (from 0 to 999) in the Site Water Budget field or use the
scroll buttons on the right side of the field to select a percentage without
typing.
Setting Site Properties
4.9
Page 88

Setting the Default Daily ET Value
The daily evapotranspiration (ET) value can be calculated by the computer with
information from a weather source or entered in the system manually. In the
event that no other ET value is given for the site, the default value is used. The
default ET value is 0.10 inches per day.
To set the default ET value:
Enter the value (from 0 to 5.00) in the Default ET Value field or use the scroll
buttons on the right of the field to select a value without typing.
Setting the Minimum Daily ET Value
The evapotranspiration (ET) value can be calculated by the computer with
information from a weather source or entered in the system manually. If the ET
for a given day is below the Minimum Daily ET Value, then Irrigation ET will be
set to 0 and the ET value will be postponed until the next day.
To set the minimum ET value:
Enter the value (from 0 to 5.00) in the Minimum ET Value field or use the
scroll buttons on the right of the field to select a value without typing.
Setting the Maximum Daily ET Value
The evapotranspiration (ET) value can be calculated by the computer with
information from a weather source or entered in the system manually. The
Maximum Daily ET Value is the maximum ET that can be applied in one day.
To set the maximum daily ET value:
Enter the value (from 0 to 5.00) in the Maximum ET Value field or use the
scroll buttons to the right of the field to select a value without typing.
Setting the Crop Coefficient
The crop coefficient is the evapotranspiration (ET) adjustment factor for the type
of plant at the site. This adjustment factor is necessary because certain types of
plants require more water than others. The default crop coefficient is 1.0.
To set the crop coefficient:
Enter the value (from 0.00 to 9.99) in the Crop Coefficient field or use the scroll
buttons on the right side of the field to select a value without typing.
Setting Site Properties
4.10
Page 89

Setting the Soil Moisture Holding Capacity
The moisture holding capacity is the total amount of water the soil can hold. This
value can be calculated by the computer with information from a weather source
or entered in the system manually. The default value is 2.0 inches.
To set the soil moisture holding capacity:
Enter the value (from 0 to 9.98) in the Soil Moisture Holding Capacity field or
use the scroll buttons on the right side of the field to select a value without
typing.
Setting the Soil Moisture Refill Percentage
The moisture refill percentage is a percentage of the soil moisture holding
capacity. The default value is 80%, allowing an additional 20% available for
excessive rainfall. If you typically experience large amounts of rainfall, you can
either lower this percentage or raise the soil moisture capacity setting. The ET
Checkbook will always set the Irrigation ET to refill the soil to the percentage you
select.
To set the soil moisture refill percentage:
Enter the value (from 0 to 100) in the Soil Moisture Refill Percentage field or
use the scroll buttons on the right side of the field to select a value without
typing.
Setting the Soil Infiltration Rate
The soil infiltration rate is how fast the soil can absorb water. This value can be
calculated by the computer with information from a weather source or entered in
the system manually. The default value is .50 inches per hour.
To set the soil infiltration rate:
Enter the value (from 0 to 9.98) in the Soil Infiltration Rate field or use the
scroll buttons on the right side of the field to select a value without typing.
Setting the Currency
The currency is the monetary value you want to assign to this site. The computer
will use this information to evaluate costs and generate reports. The system
default value is dollars, but you must specify the currency for individual sites.
To set the currency:
Enter the value (e.g., dollars) in the Currency field.
Setting Site Properties
4.11
Page 90

Setting the Prefix
The prefix is the symbol for the currency you assigned to a particular site. This
value must be entered into the system manually. The system default prefix is $,
but you must specify the prefix for individual sites.
To set the prefix:
Depending on the selection you made in the currency field, enter a
corresponding symbol (e.g., $) in the Prefix field.
Setting the Water Price
The water price is the cost per unit of water. Setting the estimated cost per unit
allows Maxicom
2
to calculate your water costs. The default price is 0.00. You must
specify the price for individual sites.
To set the water price:
Enter the value (0.00 to 9999999.99) in the Water Price field.
Setting Site Properties
4.12
Page 91

Setting Site FLO-MANAGER Properties
Maxicom2’s FLO-MANAGER allows your system to run at peak efficiency by
determining the best sequence for operation, based upon the hydraulic capacity
of the system. You set up the FLO-MANAGER by specifying a point of connection
capacity then creating one or more flow zones that use the point of connection(s).
Maxicom
2
then calculates the best sequence for the schedule operations you
program. You can create up to 20 FLO-MANAGER flow zones.
To set FLO-MANAGER properties for the site:
1
With the Site Properties Setup dialog box open, select the FLO-MANAGER tab.
The FLO-MANAGER sheet comes to the front of the stack.
FLO-MANAGER Sheet
2
Set the FLO-MANAGER properties as described in this section.
3
When you are finished setting FLO-MANAGER properties, you can select
another tabbed sheet or click OK to save changes and close the dialog box,
Apply to save changes without closing the dialog box, or Cancel to cancel
changes and close the dialog box.
Setting Site Properties
4.13
To delete a flow zone, click
on the zone to select it and
then click on the Delete
button.
Page 92

Setting the Point of Connection Name and Capacity
To set the point of connection name and capacity:
1
Double-click a column of cells in the Point of Connection table.
The Edit FLO-MANAGER Point of Connection (POC) dialog box is displayed.
Edit FLO-MANAGER POC Dialog Box
2
Enter the name of the point of connection in the Name field.
3
Enter the capacity, expressed in water units, in the Capacity field.
4
Click the OK button.
The information you entered is displayed in the FLO-MANAGER sheet.
Setting FLO-MANAGER Flow Zones
You can enter the flow zone name, capacity and point of connection for each
zone.
To set up the flow zones associated with the FLO-MANAGER point of connection:
1
Double-click the row of cells that corresponds to the zone number you want
to set.
The Edit FLO-MANAGER Flow Zone dialog box is displayed.
Edit FLO-MANAGER Flow Zone Dialog Box
2
Enter the name of the zone in the Name field.
3
Enter the zone’s capacity, expressed in water units, in the Capacity field.
4
Use the drop-down list in the Point of Connection field to select one of the
POCs that you already defined.
5
Click the OK button.
The information you entered is displayed in the FLO-MANAGER sheet.
Setting Site Properties
4.14
Page 93

Setting Site FLO WATCH Properties
Maxicom2’s FLO WATCH watches your system for signs of leaks or other hydraulic
problems. To do so, FLO WATCH uses flow zones you define. (These flow zones do
not have to be the same as those defined in the FLO-MANAGER sheet.) FLO
WATCH uses these flow zones to measure flow by arriving at an average for the
stations in the flow zone. You can create up to 20 FLO WATCH zones.
To set up FLO WATCH zones:
1
With the Site Properties Setup dialog box open, select the FLO WATCH sheet.
The FLO WATCH sheet comes to the front of the stack.
FLO WATCH Sheet
2
Double-click the rows of cells that correspond with the zone number you
want to set.
The Edit FLO WATCH Flow Zone dialog box is displayed.
Edit FLO WATCH Flow Zone Dialog Box
Setting Site Properties
4.15
Each flow meter for a site
must have a FLO WATCH
name.
Page 94

3
Enter the name of the FLO WATCH flow zone.
4
Check the When Calculating Flow Data box if you would like this zone to be
included when calculating the flow data for the whole site.
5
Click the OK button.
The FLO WATCH flow zone name is displayed on the FLO WATCH sheet.
6
When you are finished setting FLO WATCH properties, you can select another
tabbed sheet or click OK to save changes and close the dialog box, Apply to
save changes without closing the dialog box, or Cancel to cancel changes and
close the dialog box.
Setting Site CCU Properties
The CCU sheet allows you to select and set up the CCU for the site.
To set site CCU properties:
1
With the Site Properties Setup dialog box open, select the CCU tab.
The CCU sheet comes to the front of the stack.
CCU Sheet
2
Set the CCU properties as described in this section.
3
When you are finished setting CCU properties, you can select another tabbed
sheet or click OK to save your changes and close the dialog box, Apply to save
your changes without closing the dialog box, or Cancel to cancel your changes
and close the dialog box.
Setting Site Properties
4.16
Page 95

Setting the CCU Type
For the site, you can select from a list of CCU types configured in your system.
To set the CCU type:
Use the drop-down list on the CCU Type field to select a type of CCU for the
site.
The text line beneath the field shows the number of channels supported by
the CCU you have selected.
Setting the CCU Call Handle
Non-telephone CCUs require a call handle, which is used by Maxicom2to identify
the CCU on a shared communication line.
To set the CCU’s call handle:
1
Enter the call handle in the CCU Call Handle field.
2
Click the:
• Send button to send the new call handle to the CCU and save it into the
site database.
OR
• Save button to save the new call handle into the site database without
sending it.
Setting Site Properties
4.17
If you update a call handle
and do not save it before
exiting the Site Properties
Setup dialog box, Maxicom
2
will not update the site
database and you will lose
the new call handle.
If you have a ESP-Site
Satellite CCU, you must
reinitialize the CCU before
sending a new call handle
by pressing the RESET
button on the Site-SAT
Interface board set.
Page 96

Editing CCU Properties
Setting CCU properties is accomplished in the CCU setup spreadsheet, which lists
the devices controlled by the CCU and the stations for each of those devices.
Before you begin to fill in the CCU setup spreadsheet, it is helpful to obtain the
following information:
• types of controllers used with the CCU and the channel number for each
• types of decoders used with the CCU and the channel numbers for each
• landscape coefficient for each station on each satellite
• maximum cycle and minimum soak time for each station on each satellite
• precipitation rate for each station on each satellite
• flow rate for each station on each satellite
• which stations are in each FLO WATCH zone
• which stations are in which FLO-MANAGER zone
When setting up a site’s CCU, it is also helpful to number channels in a systematic
way. Some examples of systematic organization for channel numbers are:
• by flow zone
• by controller identification numbers on irrigation drawings
• by device type
To display the CCU Setup spreadsheet:
1
Select CCU Properties from the Site menu.
The CCU Setup spreadsheet is displayed.
Setting Site Properties
4.18
Page 97

CCU Setup Spreadsheet
2
Set up the device types and station properties as described in this section.
3
When you are finished setting up device types and station properties, click OK
to save your changes to the CCU Setup spreadsheet and close the spreadsheet
or click Cancel to cancel your changes and close the spreadsheet.
The CCU Setup spreadsheet is designed so that you can set up the CCU station by
station, one device (channel) at a time. The radio buttons at the top of the CCU
Setup spreadsheet allow you to select what property is displayed on the
spreadsheet. You can choose to display any one of the following properties:
• flow rate
• cycle time
• soak time
• landscape coefficient
• precipitation rate
• FLO WATCH zone
• FLO-MANAGER zone
• Decoder/Sensor setting
We recommend that you fill in the spreadsheet one device at a time. You can elect
to fill in all the properties for a particular station before moving on to the next
station or you can fill in all the stations for a particular property before moving on
to the next property, whatever works best for you.
Setting Site Properties
4.19
Device columns contain the
number of editable cells
corresponding to the
number of stations available
on that type of device. For
example, if the device is a
Site Rain Counter, no cells in
that column are editable; if
the device type is a 24station satellite controller, 24
cells in the column are
editable.
Page 98

Setting Device Types
To set the type of device for a given column:
1
Double-click the Device cell. (The Device cells are the first cells under the
channel numbers.)
The Set Channel Properties dialog box is displayed.
Set Channel Properties Dialog Box
2
Select the device category you want: Two-Wire satellite, Radio Link Satellite,
ESP-Site Satellite, Decoder or Sensor or none.
If you have already entered CCU device data in the Site Properties CCU sheet,
then some Device Category options will not be available. For example, if you
had selected a two-wire CCU (as opposed to a radio link CCU), then the radio
link satellite and ESP-Site Satellite options will not be available on the Set
Channel Properties dialog box.
3
Select the Device Type from the drop-down list.
4
Enter the name of the device in the Device Name field.
5
If you do not want this channel sent to the CCU, check the Do Not Send This
Channel checkbox.
6
Click the OK button.
The device type you have selected is displayed in the cell in the CCU setup
spreadsheet.
Setting Site Properties
4.20
Page 99

Setting Station Properties
To view and set the properties for each station:
1
Select the type of property you want to enter or display from the list of radio
buttons at the top of the CCU setup spreadsheet.
The spreadsheet displays only the property you have selected.
Or
Double-click the cell to display the Set Station Properties dialog box which
contains all properties for that cell. (Or right-click the cell and select the
Properties option from the pop-up menu to display the Set Station Properties
dialog box.)
Set Station Properties Dialog Box
2
Enter the appropriate value for each of the properties displayed.
3 Click the OK button.
Setting Site Properties
4.21
Page 100

Copying, Pasting, and Cutting Station Properties
Maxicom2allows you to cut, copy, or paste any amount of property information
in one cell to another cell or group of cells; you can also copy entire channels —
and you can do so between different sites (by copying information to the system’s
clipboard and then pasting to another site).
To copy, clear, or cut property information in the CCU setup spreadsheet:
1
Select the cell or cells from which you want to copy, clear, or cut information.
2
Click the right mouse button to display a pop-up menu or use the Clipboard
Operations buttons at the top right of the spreadsheet. The following options
are available:
• Cut — cuts property information from the selected cell and pastes it on
the system clipboard.
• Clear — clears the selected cell of property information. The cell then
reverts to default values.
• Copy — copies the property information in the selected cell to the system
clipboard.
• Paste Special — allows you to select which property items in the cell to
copy to the system clipboard.
• Paste All — pastes all property information from the system clipboard to
the selected cell.
3
Select the option you want to perform.
To paste the information from the clipboard into a new cell:
1
Select the cell or cells into which you want to paste.
2
Right click to display the pop-up menu or use the Clipboard Operations
buttons at the top right of the spreadsheet and select the Paste option.
The information from the clipboard is entered into the selected cell.
Setting Site Properties
4.22
You can set macros for
properties and their values.
For more information, see
“Setting Station Property
Macros” on page 3.12.
You can only copy and
paste property values
between devices that are in
the same device category
(e.g., CCU to CCU, sensor
to sensor, etc.).
You will receive an error
message if the number of
cells you copy is different
than the number of cells you
attempt to paste.
 Loading...