

Page 1
THE MUSIC SYSTEM
COMMODORE
64/128K
ADVANCED
D64 ATTACHED
TO THIS PDF
Page 2

Philip Black (SYSTEM) SOUND/VMW/
ADVANCED EDITOR
TMS KEYBOARD/
EDITOR/SYSTEM DESIGN
Adrian Boot (ISLAND LOGIC) CONCEPT/SYSTEM
DESIGN/USER MANUAL
David Ellis (SYSTEM) CONCEPT/SYSTEM
DESIGN/USER MANUAL
Nicky Johns (ISLAND LOGIC) FILING/
INTEGRATION/DESIGN/
UTILITIES
Geoffrey Ellis (SYSTEM) DESIGN/
SYNTHESISER
Ewan Hayward (SYSTEM) ADVANCED LINKER
JOEY (ISLAND LOGIC) ADVANCED MIDI
Ching Man Wong (ISLAND LOGIC) COMMAND LINE/
KEYBOARD/GRAPHICS
Steve McGarry (ISLAND LOGIC) ADVANCED PRINTER
Shaun McGarry (ISLAND LOGIC) DEVELOPMENT
SUPPORT/PRINTER
Additional design/help/support/encouragement from:
Brian Jones (ISLAND LOGIC) Keith Shaw (SYSTEM)
Sue Shaw (SYSTEM) Steve Swallow (SYSTEM)
ii
Page 3

AMS DEVELOPMENT TEAM ii
INTRODUCTION 2
EDITOR 10
KEYBOARD 37
SYNTHESISER 44
MIDI 63
THE PRINTER MODULE 73
LINKER 81
INDEX 86
APPENDIX 93
CONTENTS
Page 4

THE MUSIC SYSTEM
ADVANCED
COMMODORE
64/128K
Page 5
2
The Music System TMS is a comprehensive microcomputer-based music
program for creating, editing, playing and printing music. The system allows
easy input and storage of music which can then be played back through the
Commodore 64 internal sound system, or through an external MIDI
keyboard/synthesiser. Music can be printed out in proper musical notation
together with lyrics.
The music is entered in various ways: through an extremely versatile
EDITOR in written music format (note at a time). Via an on-screen piano
KEYBOARD emulator, or via an externally connected MIDI keyboard. Each
of these three input modes can create music files compatible with all other
modules. The LINKER can connect these music files together to form much
larger compositions. An understanding of the power as well as the limitations of TMS can be gained through experience with the EDITOR module.
This module provides a central reference for the rest of the system, its
highly flexible step by step music input producing very accurate results.
The types of sound that can be generated are almost unlimited due to the
flexibility of the SYNTHESISER module. This allows you to create the
shapes of the sounds simply and quickly. The sound shapes (ENVELOPES) are incorporated into the music using the EDITOR, KEYBOARD or
MIDI modules, to give you amazing versatility over your compositions.
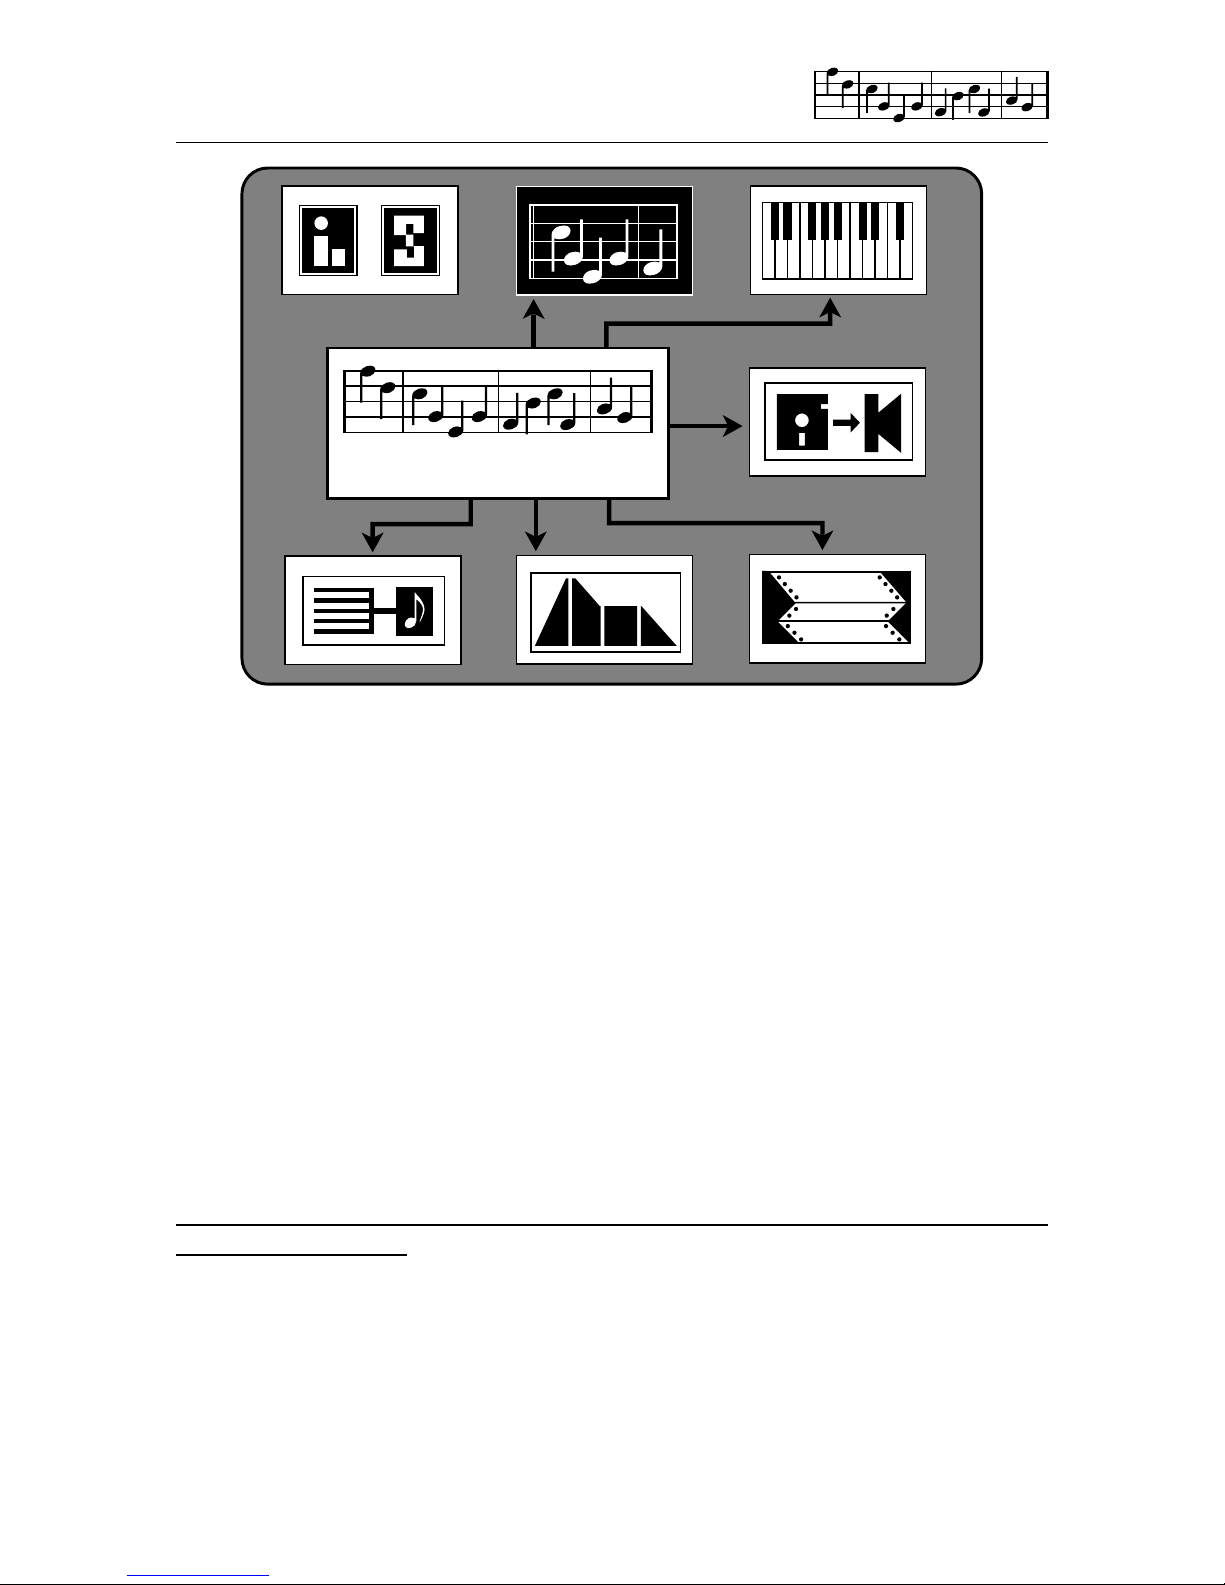
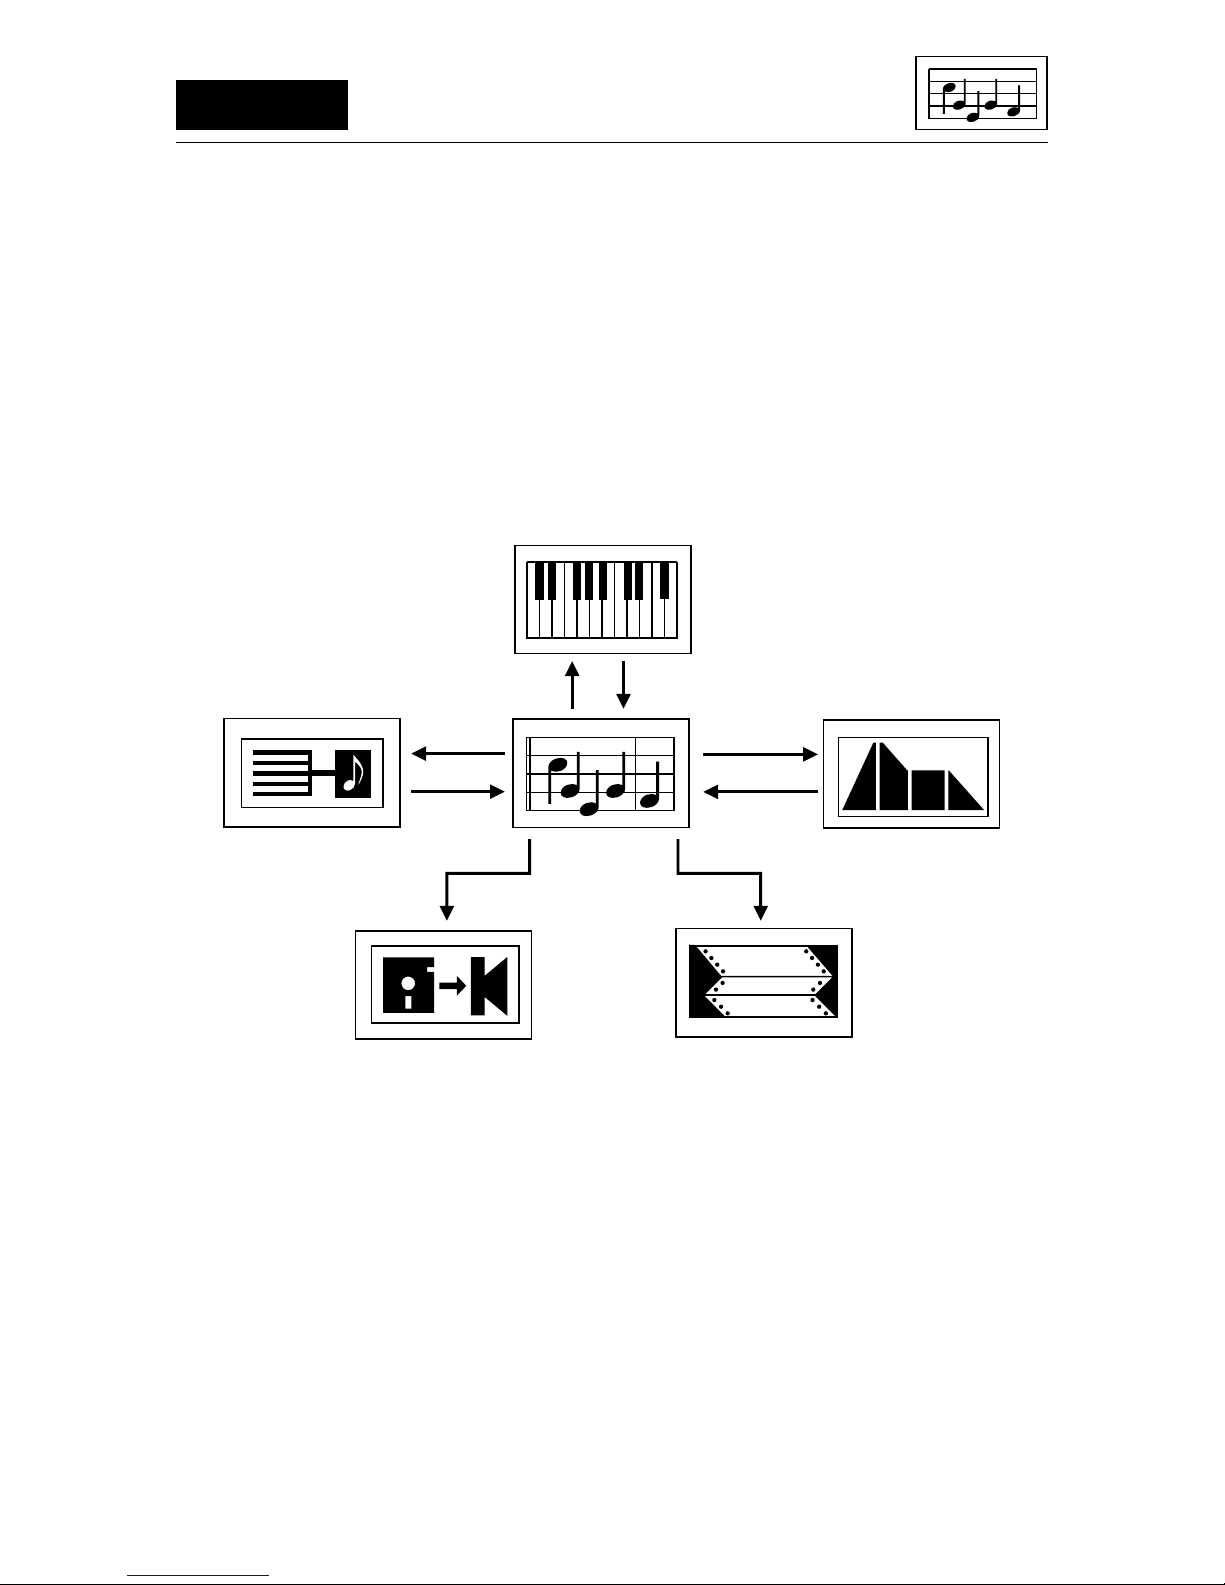
INTRODUCTION
The six modules are directly accessible from the CONTROL SCREEN.
Each module is identifiable by its own symbol or icon. When applicable data
files are preserved when moving from module to module.
Editor Keyboard Synthesiser
Linker Printer Midi
Page 6
3
TMS is loaded from disk via the Commodore 1541 disk drive after typing
LOAD“TMS”,8,1 and pressing RETURN. The Commodore 64 also allows
you to enter LOAD“*”,8,1 (RETURN). After the Island Logic/System Copyright screen has appeared the main TMS program will load automatically.
The loading will stop at the CONTROL SCREEN waiting for you to select a
module. When moving from one module to the next, you must always pass
through this screen. The highlighted icon is the one which may be run.
Press SPACE or SHIFT SPACE to select the next icon. Keep pressing to
get back to the original. Once selected the required module can be run by
pressing RETURN. Make sure that the TMS system disk is in your disk
drive before trying to load a module, otherwise an error message pop-up
will appear.
In general SPACE is used throughout the system to move a highlight or
select an operation.
When in the module return to the CONTROL screen by pressing function
key F5 to activate the command line pop-up. Use SPACE to move the
highlight bar over the EXIT command (eg. EXIT KEYBOARD) and press
RETURN. A short cut back to the CONTROL SCREEN can be achieved via
the COM CLR/HOME key pair. The COM key or Commodore key is at the
bottom left of the keyboard. Make sure the TMS system disk is in the disk
drive before leaving a module.
Moving around the MUSIC SYSTEM
TMS CONTROL SCREEN - EDITOR ICON SELECTED.
THE MUSIC SYSTEM
Page 7
4
In each of the modules the command line provides easy access to the
available functions of TMS. Any command line pop-up menu can be activated by pressing one of the four commodore function keys, and de-activated
by pressing the same function key. Try selecting each of the command line
pop-ups.
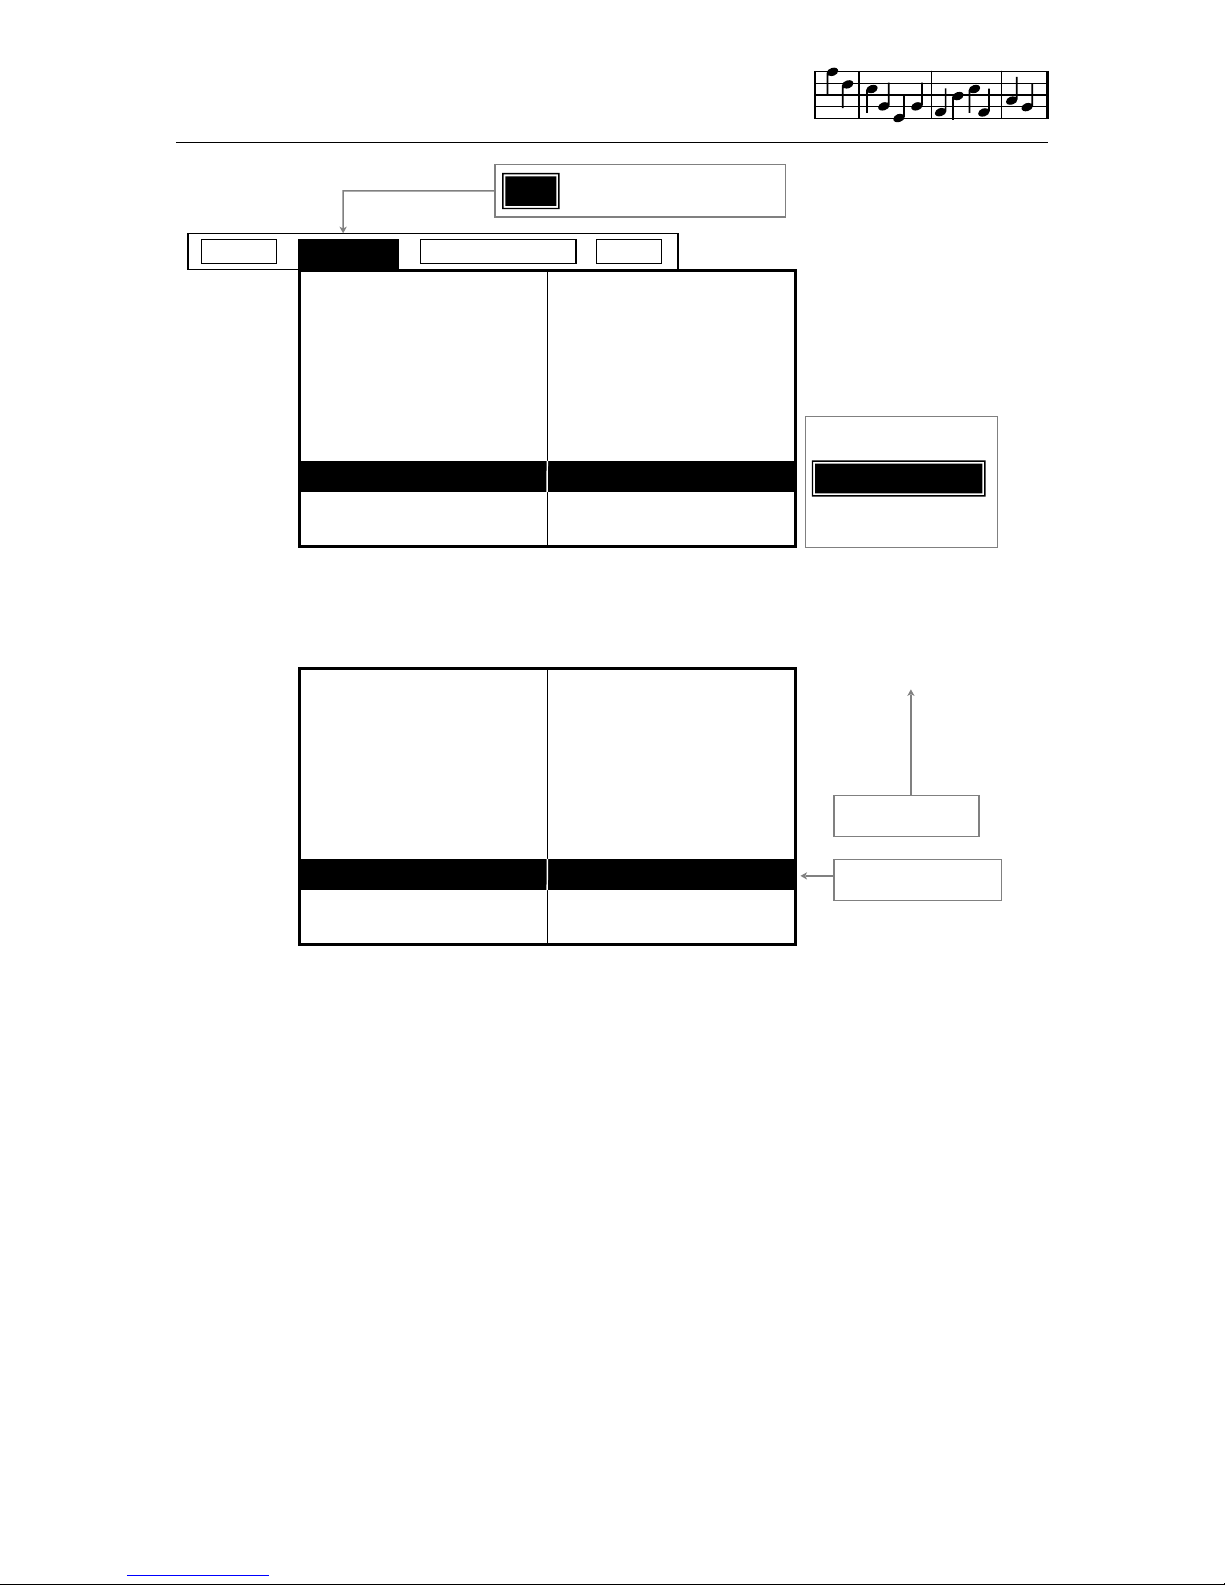
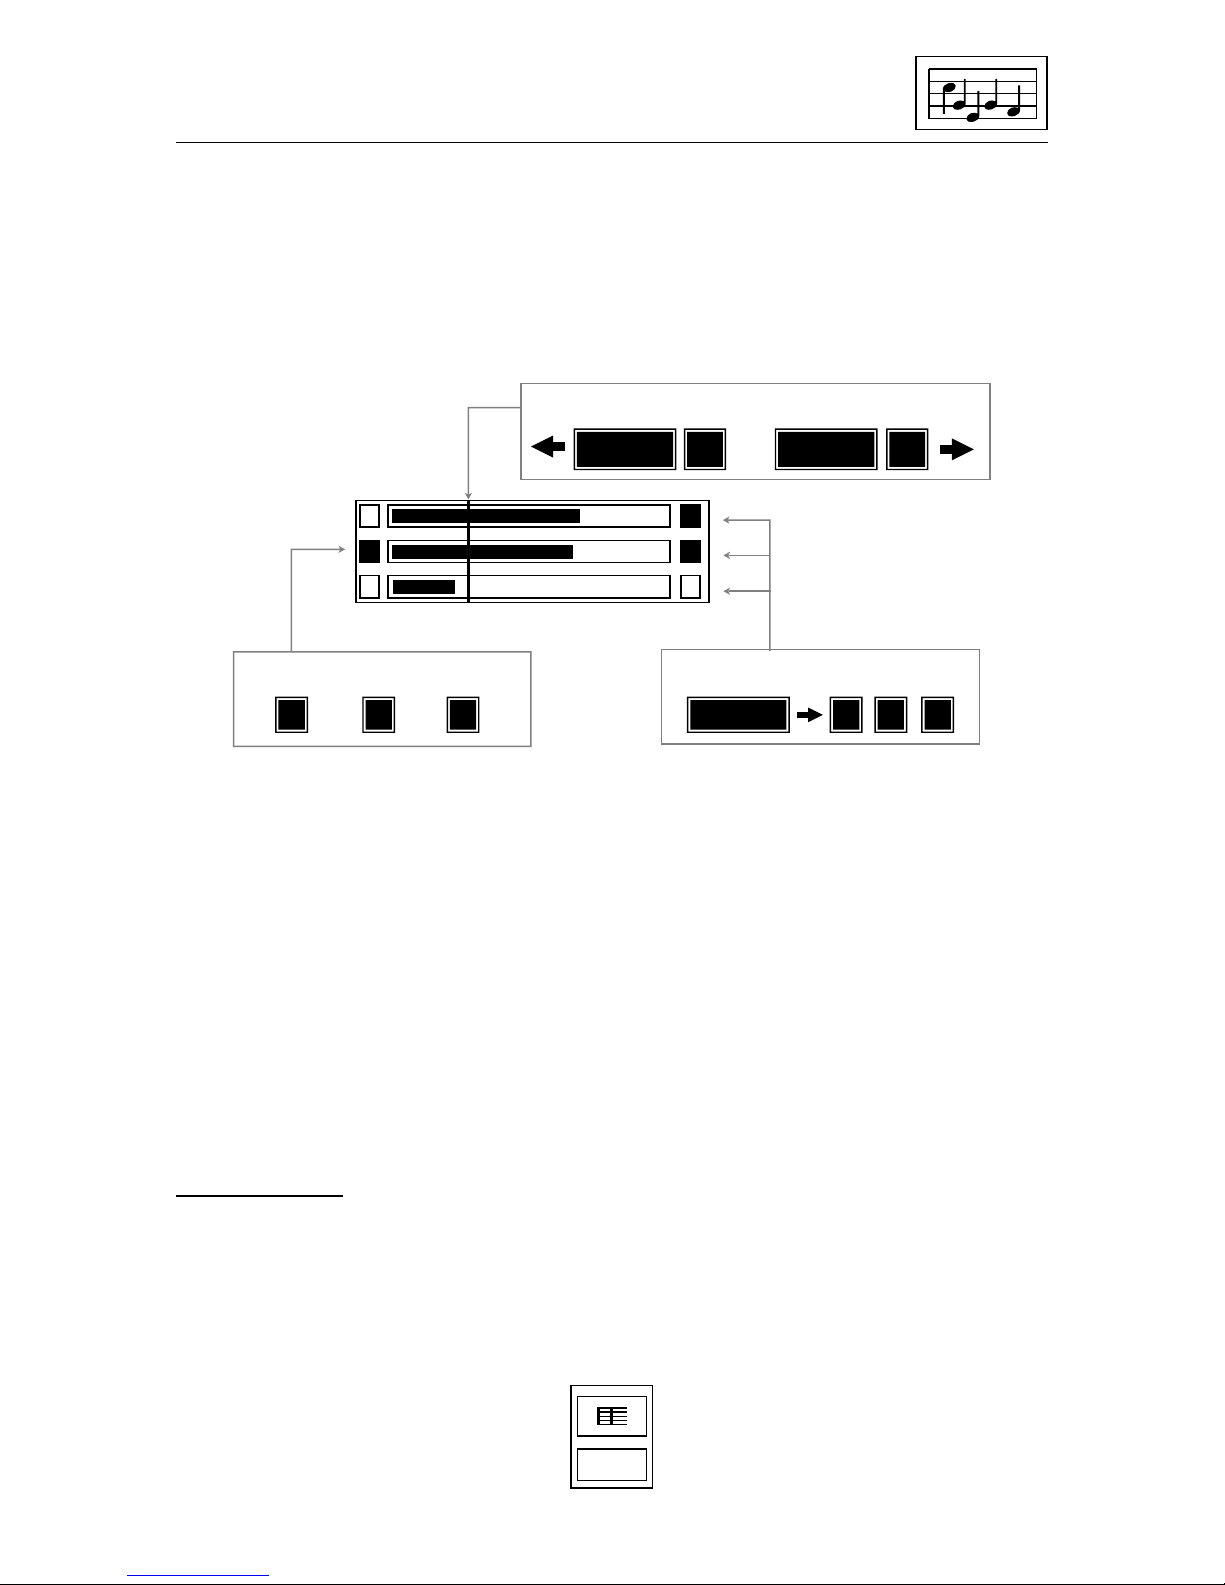
The command line
You will notice that each of the pop-ups except INFO F7 has a horizontal
HIGHLIGHT bar or cursor which can be moved by pressing the SPACE bar.
This highlight cursor can also be moved in the opposite direction by holding
down SHIFT while pressing the SPACE bar. The highlight cursor is used to
select the function you intend to use.
Menu auto-scroll
In some cases, when the highlight reaches the bottom of a pop-up menu,
the menu itself will automatically scroll up, displaying new functions. It is
important to remember this feature. If you are looking for a particular
function and can’t see it within the selected pop-up, scroll the highlight
cursor up or down to auto-scroll the menu itself. You may reset the menu
after an autoscroll by pressing the function key to pop-down the menu
window and pressing the same key again to pop it back up.
Info Files Values Commands
f1
f3
f5
f7
Info Files Values Commands
f1
RETURN
SPACE
SPACE SHIFT
Catalogue
Load
Save
Rename
Pop-up/pop-down Activate selection
↓ Down
↑ Up
Page 8
5
The menu scrolls in a loop, a broken line showing the top of menu.
The SHIFT SPACE key combination causes the reverse to occur. When the
highlight reaches the top of the pop-up window the menu auto scrolls down.
Each item within the VALUES pop-up represents a value that can be
changed. For example when TEMPO or KEY SIGNATURE are selected,
the value can be changed using either the Q or W keys. These keys are
used throughout the system to change values.
The INFO pop-up only provides information and you can not directly
change it. Quantities such as available space, the size of individual voices,
and the values of important controls are displayed. This is the information
that you will often need to check during the operation of TMS.
Info Files Values Commands
Key signature
Save
Time signature
Tempo
Resolution
Volume
Filter
Voice
F # 6 sharps
Save
4/4
Presto
Expert
15
3
3
f3
Pop-up/pop-down
SPACE
↓ Down
Highlight bar
Tempo
Save
Resolution
Volume
Filter
Voice
- - - - - - - - - - - - - - - - - - - - - - - - - - - - - -
Key signature
Presto
Save
Expert
15
3
3
F # 6 sharps
Auto scroll
Top of menu
Page 9
6
The FILES pop-up and the COMMANDS pop-up both expect you to activate
a selected function by pressing RETURN. Often the action of pressing
RETURN will produce one or more secondary pop-ups either as a second
interactive window, or as simple messages or warnings. Remember, pressing the same function key will close down the window.
FILES
The most important function of the COMMAND LINE is to control the
loading and saving of files. Depending upon which module you are in, TMS
uses up to six different types of file.
Music files - Prefix m. Music as created by the EDITOR, KEYBOARD, or
converted from MIDI. Music files can be loaded into the LINKER, MIDI,
SYNTHESISER or PRINTER.
Sound files - Prefix s. Created and/or edited by the SYNTHESISER and are
used by the EDITOR, LINKER and KEYBOARD modules. Each sound file
can store 15 different instrument sounds.
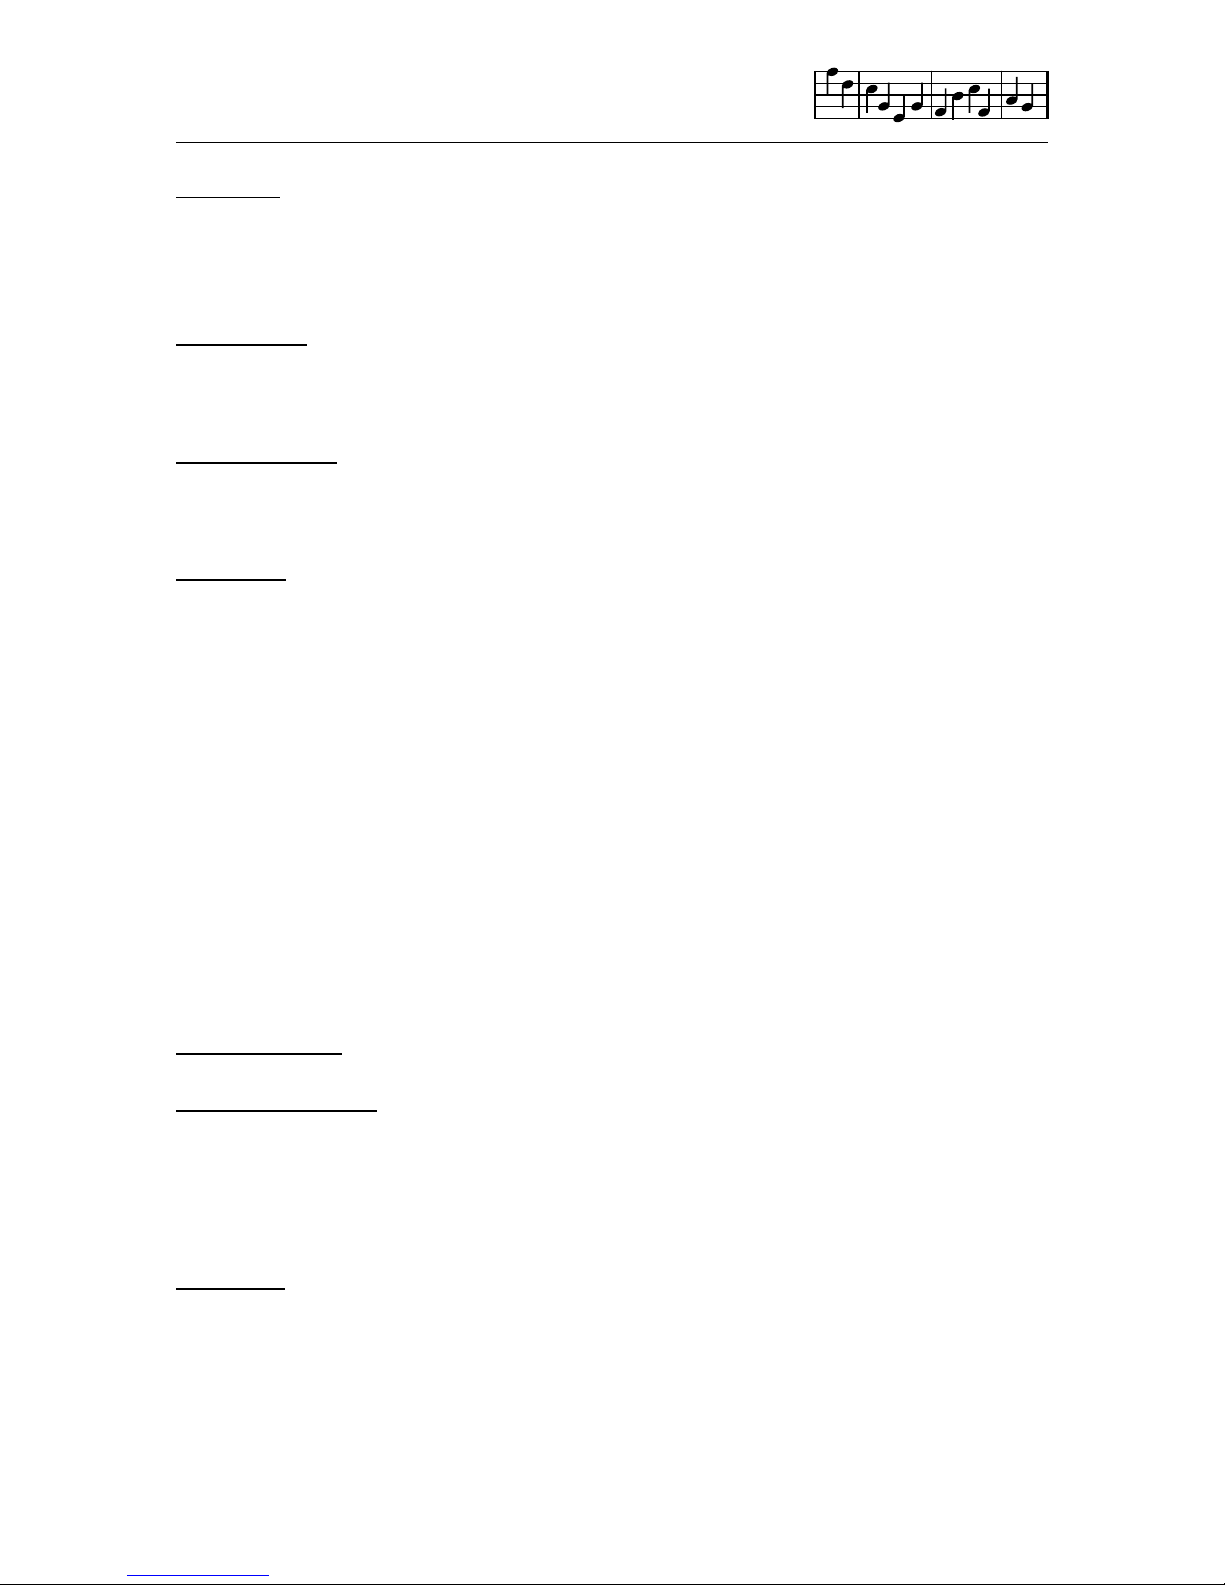
Info Files Values Commands
Track Events
Free 9999
9999
9999
9999
9999
9999
9999
1
2
3
4
5
6
Info Files Values Commands
f5
RETURN
Save
Pop-up/pop-down
Activate selection
SPACE
Select command
Clear all tracks
Metronome
Voice monitor window
Exit midi
Delete track
Page 10
7
Midi files - Prefix x. Created via the MIDI module, and require an external
midi keyboard and interface. Midi files are easily converted to TMS music
files for use by the EDITOR and back to MIDI files for playback through a
MIDI.
Linker files - Prefix l. These files can only be created and used by the
LINKER. They use music ( m. ) files to produce much longer and more
complex compositions than the EDITOR or KEYBOARD alone can provide.
Notepad files - Prefix n. These are special files that are used by the
EDITOR to allow you to ‘cut and paste’ sections of music between voices
or even between music files
Text files - Prefix t. These files are created and used by the PRINTER
module: they are files of Lyrics that are normally associated with specific
music files.
It is very important that you ensure, when loading and saving files, that the
file is of the correct type. It is possible that two or more files can have the
same file name but different file types. ie. s.jazz is a sound file whereas
m.jazz is a music file.
Examples x.rock midi file
m.sonata music file
s.piano sound file
l.bigtune linker file
t.words text file
n.goodbit notepad file
FILES options
To CATALOGUE the files available to the module you are in, first select the
FILES pop-up by pressing f1. Then move the highlight, using the SPACE
key, to select CATALOGUE. Press RETURN and wait a few moments. If
the disk contains any available files, then these will be displayed within a
CATALOGUE pop-up. Press RETURN to close the pop-up.
To LOAD a file, select the FILES pop-up f1, move the highlight bar to LOAD
press RETURN. After a few moments a pop-up will appear with a catalogue
of files available to the module. Move the highlight over the file you wish to
Page 11
8
load and press RETURN. After a short delay the file will be loaded into the
module. If the filing system can’t find a file or encounters some other
problem, a pop-up message will occur.
To SAVE a file select the FILES pop-up f1 move the highlight to SAVE and
press RETURN. A small save pop-up will occur and wait for you to type in
afilename.The←keycanbeusedtochangethefiletype.Makesurethat
you use the correct file type. If you try to save a musical composition as a
sound (s.) file, then the current sound set will be saved, and not the music.
When you have entered a file name next to its correct file type prefix, press
RETURN and the file will be saved to the current disk. You cannot save files
to the TMS system disk. It is write protected. You will need a new disk to
save new or edited files.
To RENAME a file select the FILES pop-up and move the highlight to
RENAME (as above) and press RETURN. A catalogue will be displayed.
Move the highlight to the file you want to rename, press RETURN and type
in the new name. Press RETURN and the file will be renamed. You may
use the CATALOGUE option to check the renamed file.
You may DELETE a file in the similar way. A catalogue will allow you to
select the file you wish to delete.
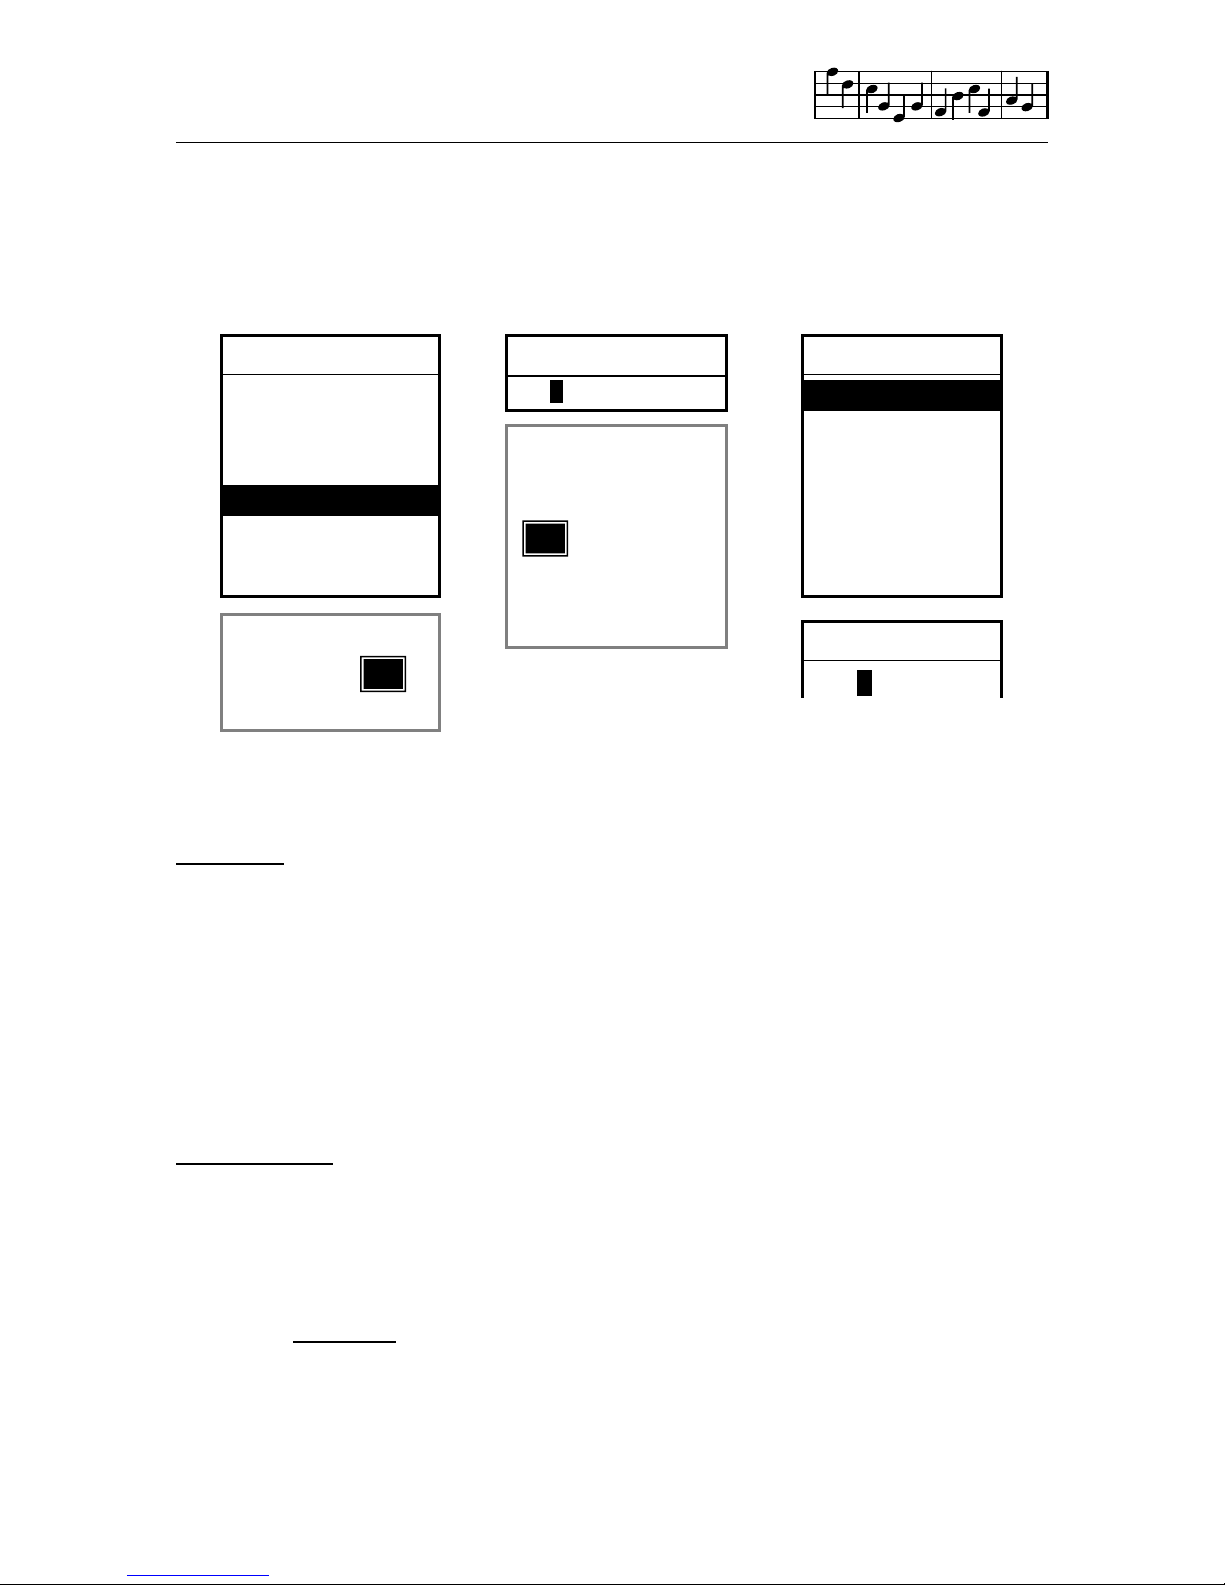
Load sound 2
m.sonata
m.rockroll
m.jazz
s.woodwind
music
s.effects
Rename
m.rockroll
m.jazz
s.woodwind
m.reggae
s.effects
m.sonata
Rename
m.sonata
Save music
m.
SOUND 1
SOUND 2
↕
←
←
CHANGE FILE TYPE
midi
sound
linker
notepad
Page 12
9
TMS may not function correctly if additional, or worse still exotic hardware
add-ons, are connected to your Commodore 64. The disk filing system may
not operate correctly when used in areas with a poor or fluctuation mains
power supply. Large magnetic fields generated by some TV’s and loudspeaker systems could also create problems. Keep your disk drive in good
condition and operate it away from the above mentioned demons.
Filing Errors
If the disc drive reports any problems during filing operations, these will be
shown as “Disk Error XX” pop-ups. Look in your 1541 Disc Drive manual to
find out the nature of the error. (Refer to “DOS ERROR MESSAGES”)
The most likely errors are:
1) Disc Error 21 - No disc in the disc drive! It can also mean that your disk
is unformatted; or, more seriously, your disc drive is faulty.
2) Disc Error 26 - This happens if the disc is “write-protected”, and probably
means you are trying to save files to the System disk.
* Do not attempt to VALIDATE a disk which contains TMS files, as this may
result in the files being erased.
* All TMS filing operations only work on TMS files, so, for example, nonTMS files will not be displayed in the catalogue, and cannot be renamed,
deleted etc.
* New discs must be “formatted” on the CBM64 before they can be used to
store files. If you have a new (unformatted) disc, then before loading TMS,
put the new disc in the disc drive and type:
OPEN 15,8,15,”NEW0:name,ID” <return>
CLOSE 15 <return>
N.B. Refer to the “NEW” command in your Disc Drive User’s Manual.
Audio Link. With care you can easily connect your Commodore and TMS to
your HI FI, with spectacular results. Connect your HI Fl lead to pins 2 and
3 of your video DIN. (C64’s programmers reference guide.) Shield to pin 2
and core to pin 3.
WARNING
Page 13
10
The EDITOR module provides all the facilities of a wordprocessor; writing,
displaying and editing music rather than words. The EDITOR can of course
play the tunes as well! Tunes may be entered directly on the staves, played
and edited using the very comprehensive facilities available within the
EDITOR. The EDITOR also provides the unique function of displaying and
editing tunes entered via the KEYBOARD and MIDI modules. There is even
a command for ‘tidying up’ the results of your accomplishments with a
keyboard! The EDITOR also provides the finished files for the PRINTER
module and can also create tunes and backing tracks for both the SYNTHESISER and MIDI modules.
EDITOR
The EDITOR displays notes within the selected four octave range on treble
and bass staves together with the appropriate key and time signatures. One
of the three voices may be displayed, scrolled through (with or without
playing) or edited at any time. You may flip instantaneously between voices
at exactly the same point in a tune and play selected voices together from
any note. The barmeter device shows you exactly where you are in a tune.
Music can be transposed instantly into any available key with the insertion
of the appropriate accidentals. Music can be entered in practically any time
signature with the facility for automatically entering barlines and ties where
necessary. Most common musical notation is catered for including triplets,
ties and repeats. The versatile loop sections may be used and edited in this
module.
Editor
Page 14
11
The EDITOR features many powerful facilities for editing musical compositions. There are block move, copy and delete facilities just like most
wordprocessors and even a notepad for storing sections of music for later
use. The EDITOR also includes many MACRO editing facilities for the more
advanced user.
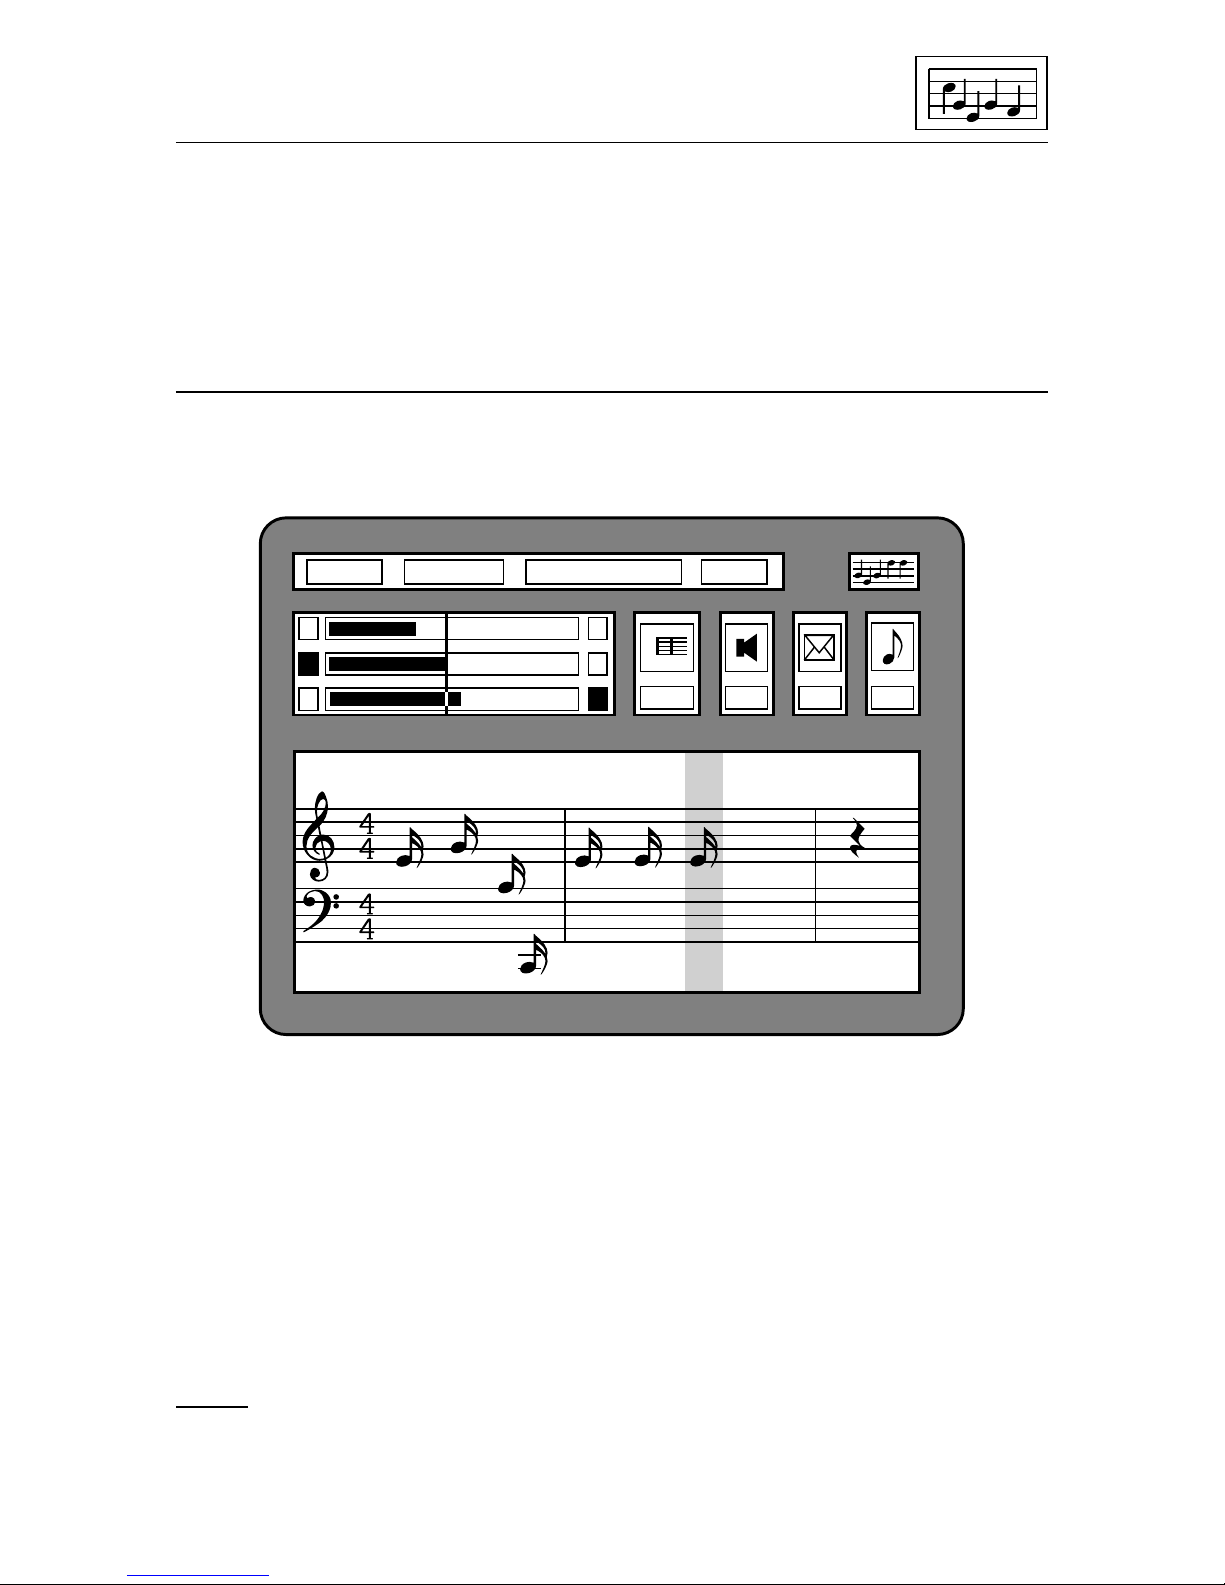
The EDITOR screen
The EDITOR module can be selected from the CONTROL screen by
highlighting the EDITOR icon and pressing RETURN.
The screen consists of a large Voice Monitor Window (VMW) at the bottom
displaying the notes in any one of the voices; a barmeter followed by the
barnumber, volume, envelope and notename devices. A Free Space device
also appears in the top left of the VMW. You can return to the CONTROL
screen by accessing Commands: Exit Editor or pressing COMM-HOME.
The following sections briefly describe each of the EDITOR devices. Move
on to ‘Entering and playing notes - a quick guide’ if you really want to start
composing straight away! (p.14)
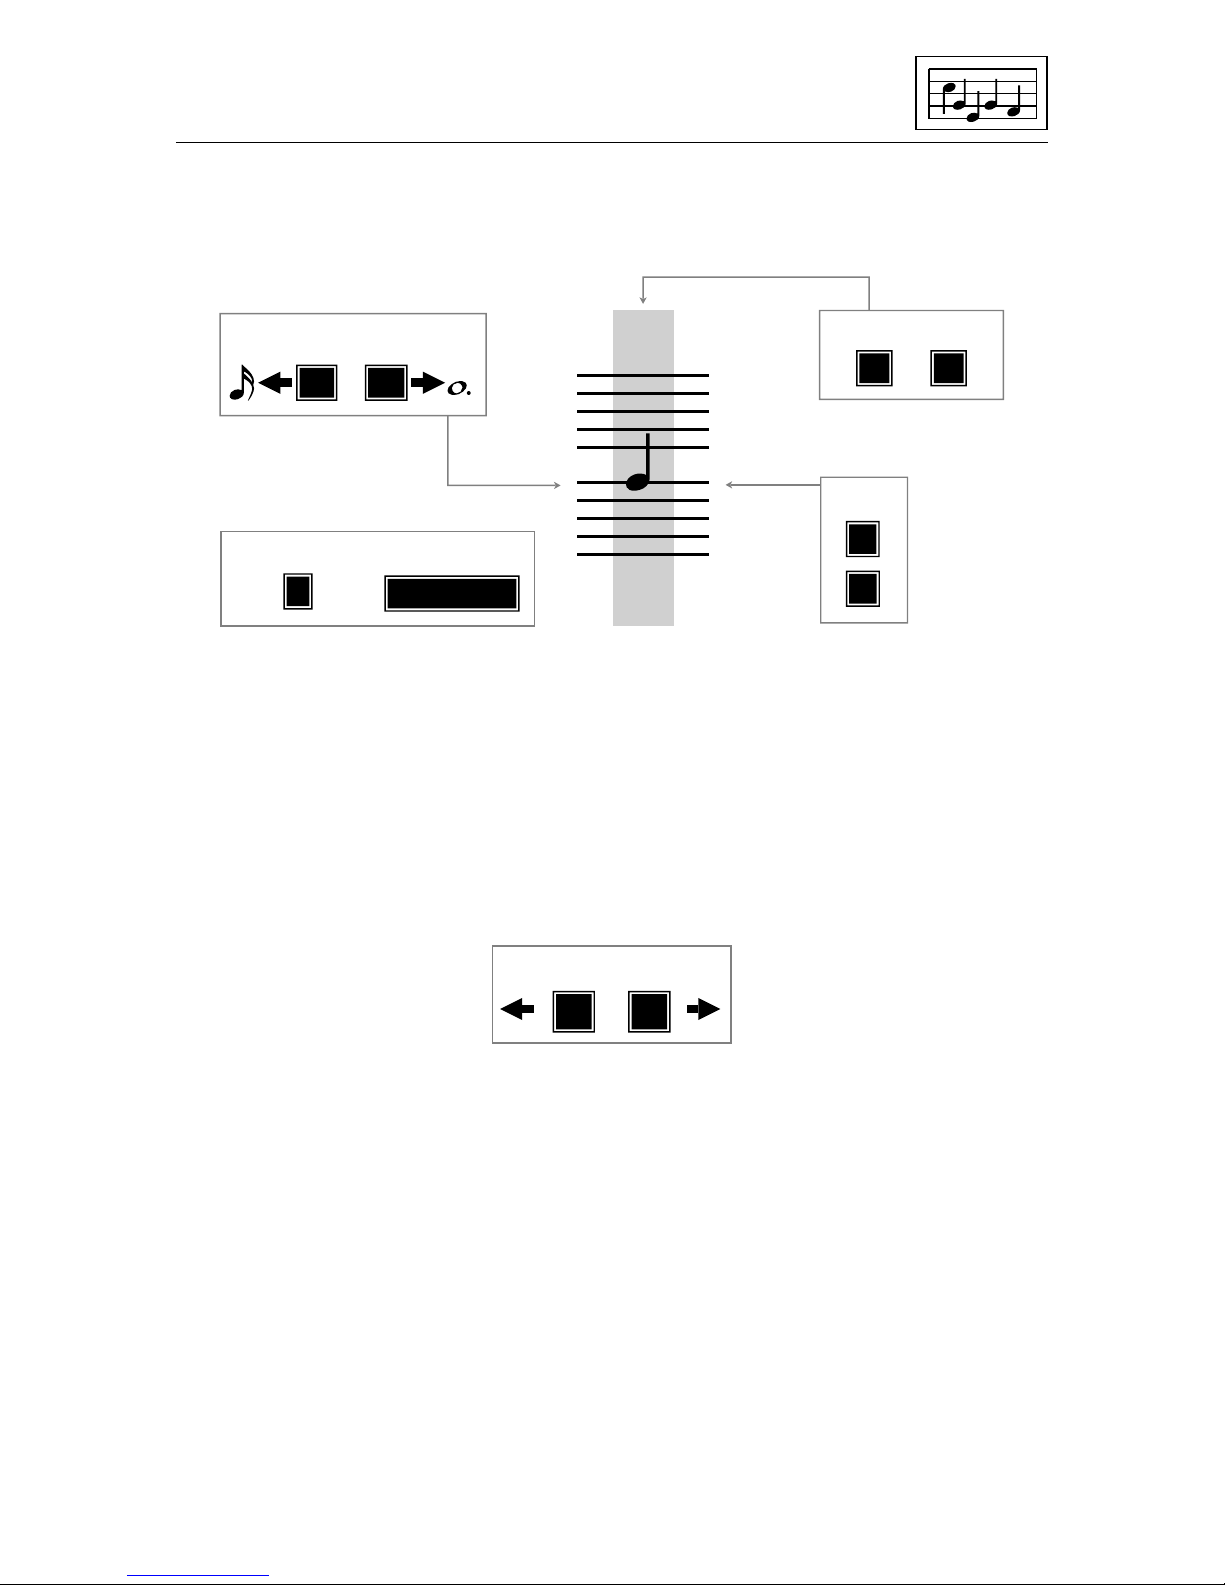
VMW
The Voice Monitor Window displays a part of the tune stored in memory. A
tune can have up to three voices and the VMW can show a small part of
Info Files Values Commands
1
2
3
125 15 15 40
Page 15
12
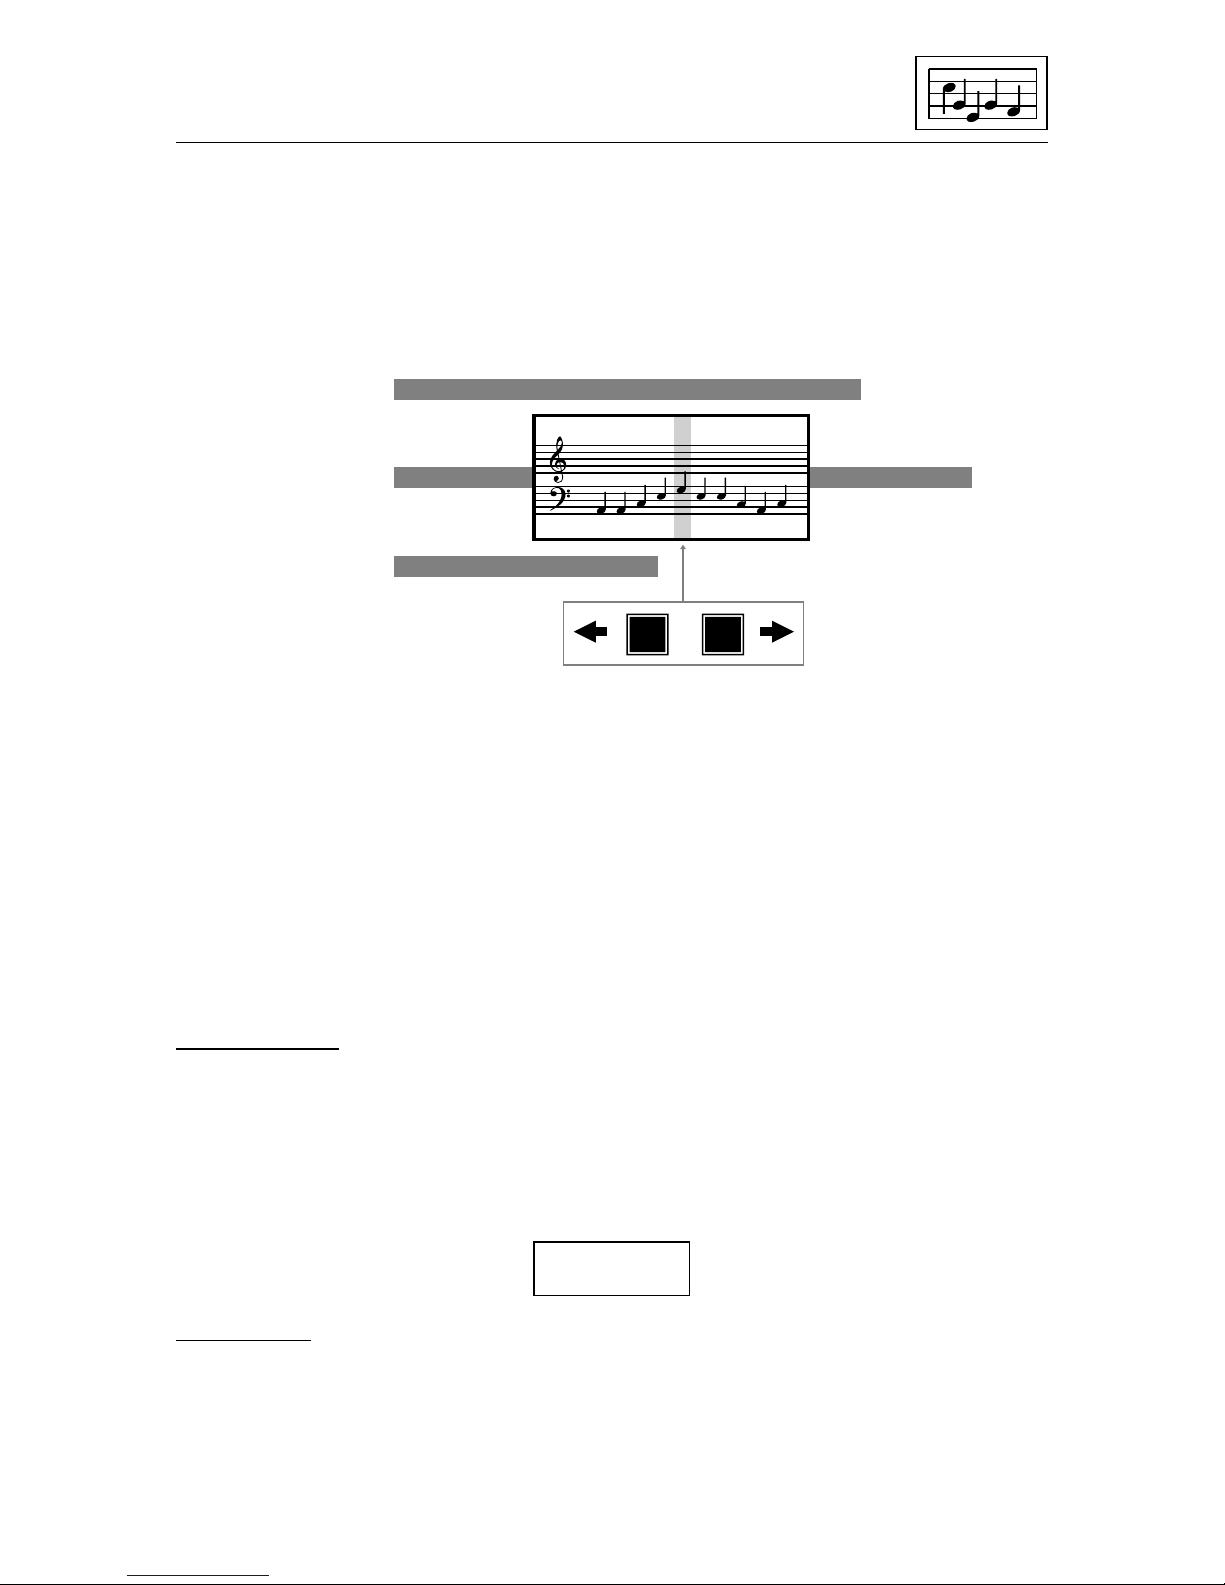
one of those voices. The window can be flipped between voices by pressing
1, 2, or 3. The notes in that voice can be scrolled through the window using
[ and ]. You can also hear them as they scroll by using SHIFT-RUN/STOP.
The diagram below shows the VMW looking into part of Voice 2.
Inside the VMW there is a white vertical band called the note cursor. This
marks the ‘current note’ - the one that can be edited or sounded. When
notes scroll past they sound when they reach the cursor column. When
flipping between voices the current note in the new voice is the one that
would have been playing at the same time as the current note in the
previous voice. If there wasn’t a note playing then it will go to the last note
in that voice. You can therefore flip easily between voices knowing that the
notes ‘line up’. The VMW also displays the appropriate key and time
signatures selected from Values.
Free Space
The EDITOR free space device is within the VMW and shows you how
many notes you can add to your tune before running out of space. It also
takes into account the space you have used up for your notepad. Look at
Info to see what the notepad size is.
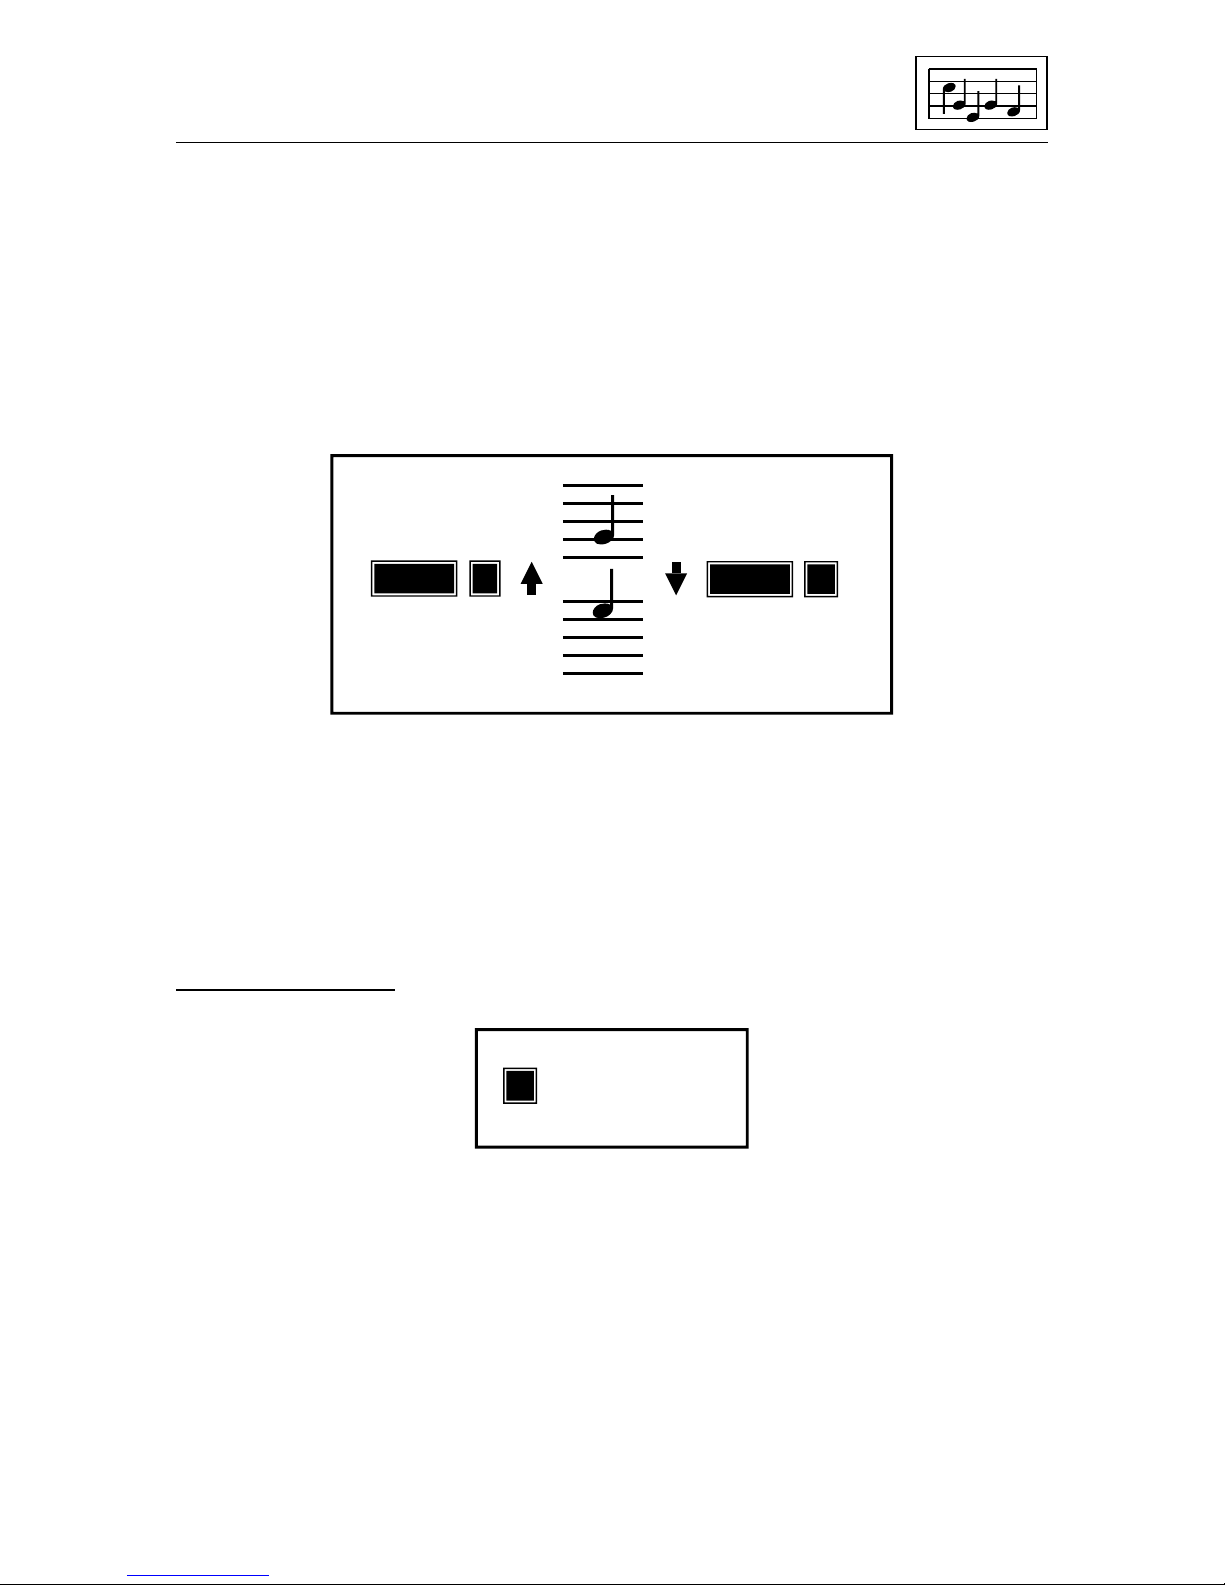
Barmeter
The EDITOR barmeter indicates the overall length of each voice relative to
the others. Each voice is expanded to include all repeats. The barmeter
cursor shows you where you are within a tune and moves left and right as
you scroll backwards and forwards through a voice. The highlighted voice
Voice 1
Voice 2
Voice 3
[ ]
Free 792
Page 16
13
number on the left indicates the current voice being displayed on the VMW.
If you flip between voices then the barmeter cursor will not move unless the
new voice is shorter. You can move the barmeter cursor quickly through a
tune using SHIFT-[ and SHIFT-]. When you release the keys the note
cursor will point to the new section of music in that voice.
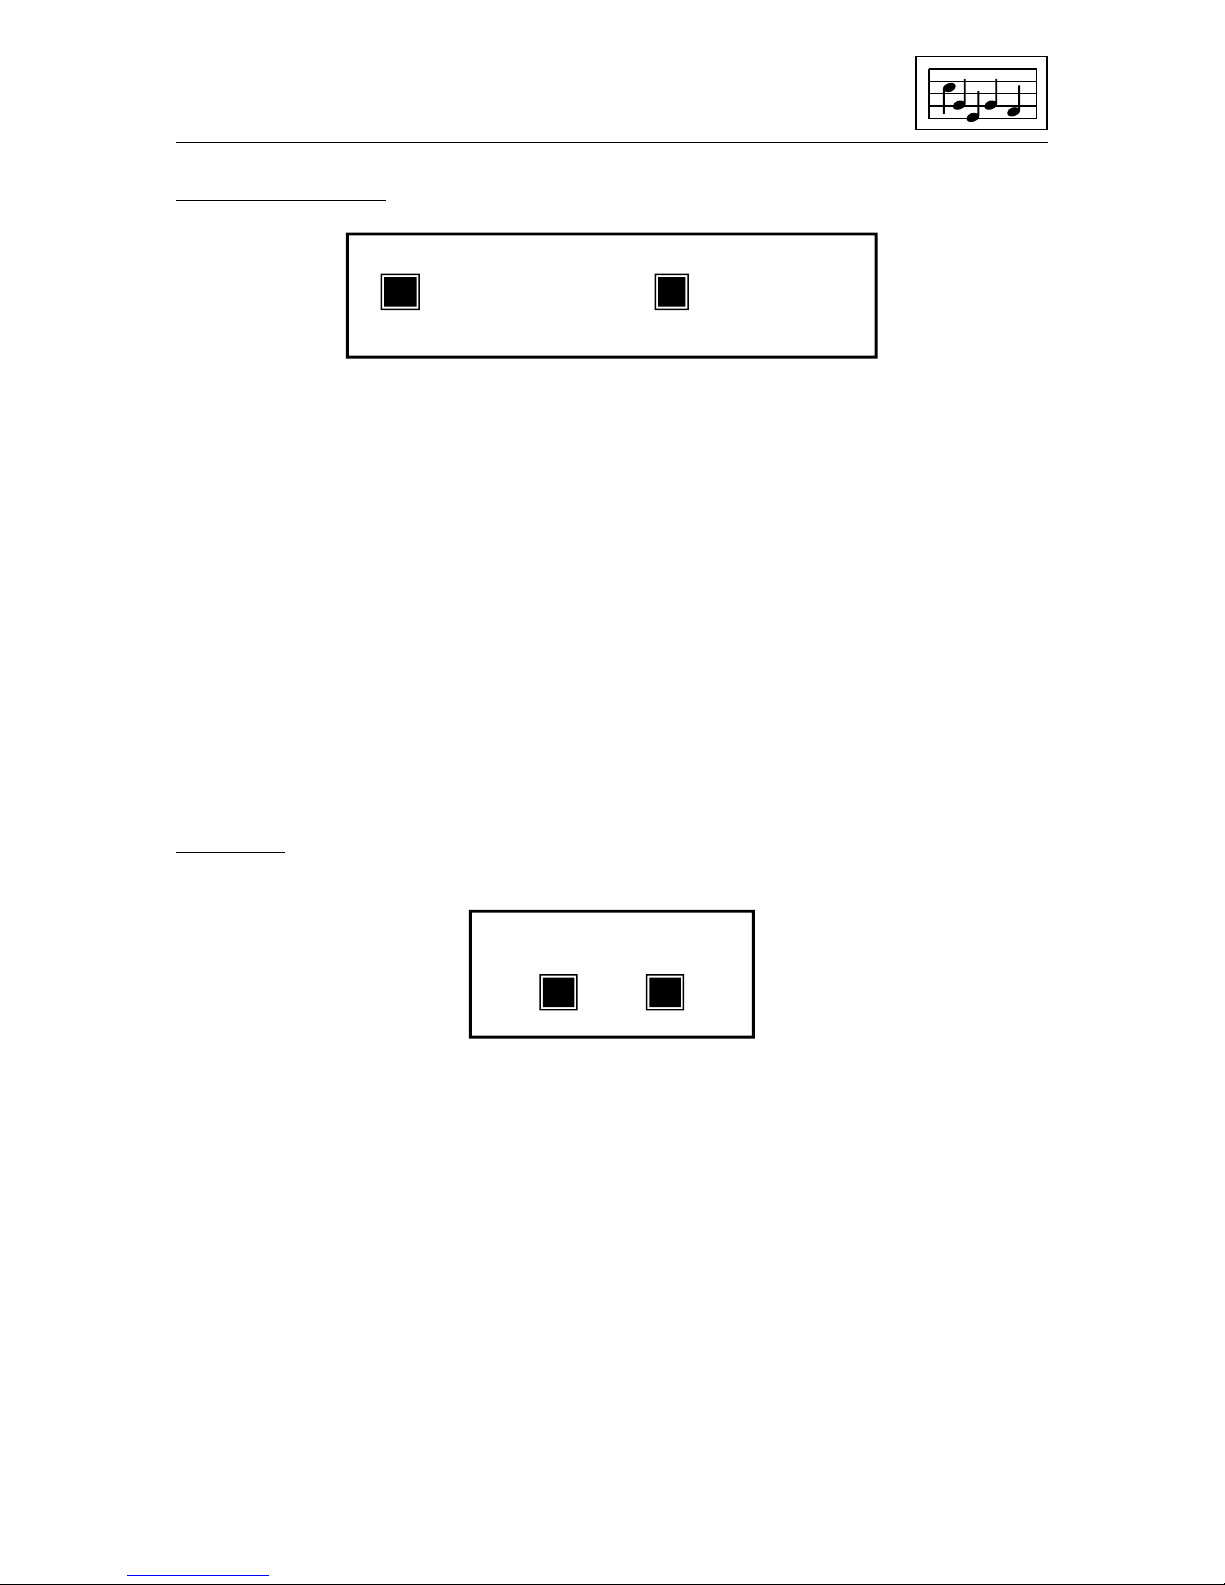
The small playback indicators on the righthand end of the barmeter are
highlighted when voices are selected for playback. They remain highlighted
until switched off. SHIFT-1 is used to switch voice 1 on or off, SHIFT-2 to
switch voice 2 etc. Any combination of voices may be played back (including none!) irrespective of the current voice displayed on the VMW.
The playback indictors also show whether a voice is being played as a
whole voice or as a loop section. An S indicates a loop section. Loop
sections are intended to be used for repeated rhythm tracks, bass lines and
accompaniments and are set from Values.
Bar number
The bar number device indicates the number of the current bar displayed
by the VMW. Unlike the barmeter, repeats are ignored. When flipping
between voices the bar number might not necessarily remain the same
since it only counts the barlines and not the duration of the notes.
1
2
3
1
S
2 3
Barmeter cursor
Current voice on VMW
1 2 3
Active playback voices
SHIFT
[ ]
SHIFT SHIFT
16
Page 17
14
Volume and envelope
These devices display the volume and envelope associated with the current
note on the VMW. The volume setting is an additional volume and can only
be used in voice 1. The overall (or global) volume is set from Values. The
envelope number for the current note is changed using Z and X.
Notename
For those of you who can not remember F-A-C-E or Every-Good-BoyDeserves-Favours the notename device displays the octave, notename
and accidental for the current note on the VMW. The key signature and any
previous accidentals in the bar are taken into account. The notename for a
rest is blank.
Entering and playing notes - a quick guide
The Editor is a very powerful composing tool with many facilities. This
section is intended as an introduction - as you become more familiar with
the basic commands you can launch yourself into the advanced editing
facilities, set up the user parameters from Values, attack macros and get to
grips with the notepad… adjust barlines… clock tidy… etc.
Notes are always entered directly on the treble and bass staves at the note
cursor. If there are no notes in the voice the current note is shown in blue.
If there are notes already there, you may delete all notes by accessing
Commands: Clear music. A blue note has not yet been stored in memory.
A
Voice 1 volume
2
10
3C
f
S
Z
X
<>
<>
Envelope
↑
=
Pitch
Page 18
15
It always appears at the end of a voice ready to be entered. The pitch,
duration and envelope of this note can all be changed before it is entered.
Enter the note by pressing RETURN. If autosound is on the note will be
heard. The newly entered note moves to the left and a similar note appears
under the note cursor. Again this note may be edited and entered into
memory by pressing RETURN. If you want to hear the note before it is
entered press *. This is very useful when changing envelopes.
Once a note has been entered you can easily edit it by moving the note to
the cursor position and changing the pitch, duration, etc.
This time the note will appear black because it is a real note stored as part
of the voice. You can press * to preview the note and press RETURN to
move on to the next one. You could just as well press [ or ] to move onto
another note.
To remove a note (it must be a real one!) move it to the cursor column and
press DEL. To add another note to the end of a voice, scroll to the last note
and press RETURN. A blue note will appear again for you to edit and enter
as before.
As more notes are added to a voice barlines will begin to appear automatically according to the time signature. You may even find that some of the
notes are automatically tied across a barline for you! In other cases you
might be told that the bar is too long and the notes can not be fitted in. Press
↑
=
Pitch
Z X
<>
Envelope
Q
Duration
W
<>
[ ]
*
Sound note
RETURN
Enter note
Scroll music
Page 19
16
SPACE and change the duration of the note so that the bar will be the
correct length. The autobar and autotie parameters may be switched off in
Values if necessary.
Having entered some notes move to the beginning of the voice and play the
notes in that voice by pressing SHIFT-RUN/STOP. The notes will play and
scroll right to the end. You can stop them playing by pressing RUN/STOP
again. You can start and stop playing at any point in the voice. Notice how
the barmeter keeps track of the notes you have entered in the voice and
how the barmeter cursor shows where you are as you scroll through. You
can move through a voice more quickly using SHIFT-[ and SHIFT-] to fast
rewind and fast forward. This time the notemeter cursor moves left or right
without the music scrolling. Let go of the keys and the VMW will update
itself to the new part of the music. Look at the barnumber device to see
which bar you have reached. You can jump straight to the beginning of the
tune by pressing COMM-[ or to the end of the voice by pressing COMM-].
Remember that you have to press RETURN to get a blue note at the end
again.
So far you have only used one voice and we’ll assume that you have been
entering notes in voice 1. Press 2 and you will be at the start of voice 2 - at
a blue note again because no notes have yet been entered. Check that the
barmeter shows number 2 highlighted on the left. Enter notes in exactly the
same way as before until both voices are the same length. You can flip to
voice 1 by pressing 1 and back again with 2. Move to the start of voice 2
and press RUN/STOP. Both voices will play together without scrolling the
music. Press RUN/STOP again to stop playback before the end of the tune.
If both voices do not play then check that the playback indicators are all
highlighted (on). On pressing RUN/STOP only those voices set for playback
are heard. If none are on then you will not bear anything although the tune
will actually be playing! Press SHIFT-1 to switch voice 1 on/off; SHIFT-2 for
voice 2, etc.
[ ]
Scroll left
Fast rewind
Move to start
Play voice
SHIFT [
SHIFT
SHIFT
RUN
STOP
]
]
[
C
=
C
=
RUN
STOP
Scroll right
Fast forward
Move to end
Stop playback
Page 20
17
Try adding a third voice in the same way as above but this time experiment
with the envelope settings. Each note can have a different sound envelope
attached to it. There are 15 envelopes available in sound set 1. Use Z and
X to change the envelope number. Remember that you can preview the
sound with * before entering it. You can always return to any note and
change its envelope setting again. A whole sound set containing another
15 envelopes can be loaded into the EDITOR and this could change the
sound of all the notes already entered.
Your new tune can be saved in the normal way through Filing. Press f1,
select the Save option and press RETURN. Type your filename and press
RETURN again. Remember that you need your own data disc in the disc
drive and not the A.M.S. disc when you save a file. Your tune will remain in
memory after saving it. A new tune could also be loaded but remember that
this will delete your current tune and replace the sound set.
More on editing
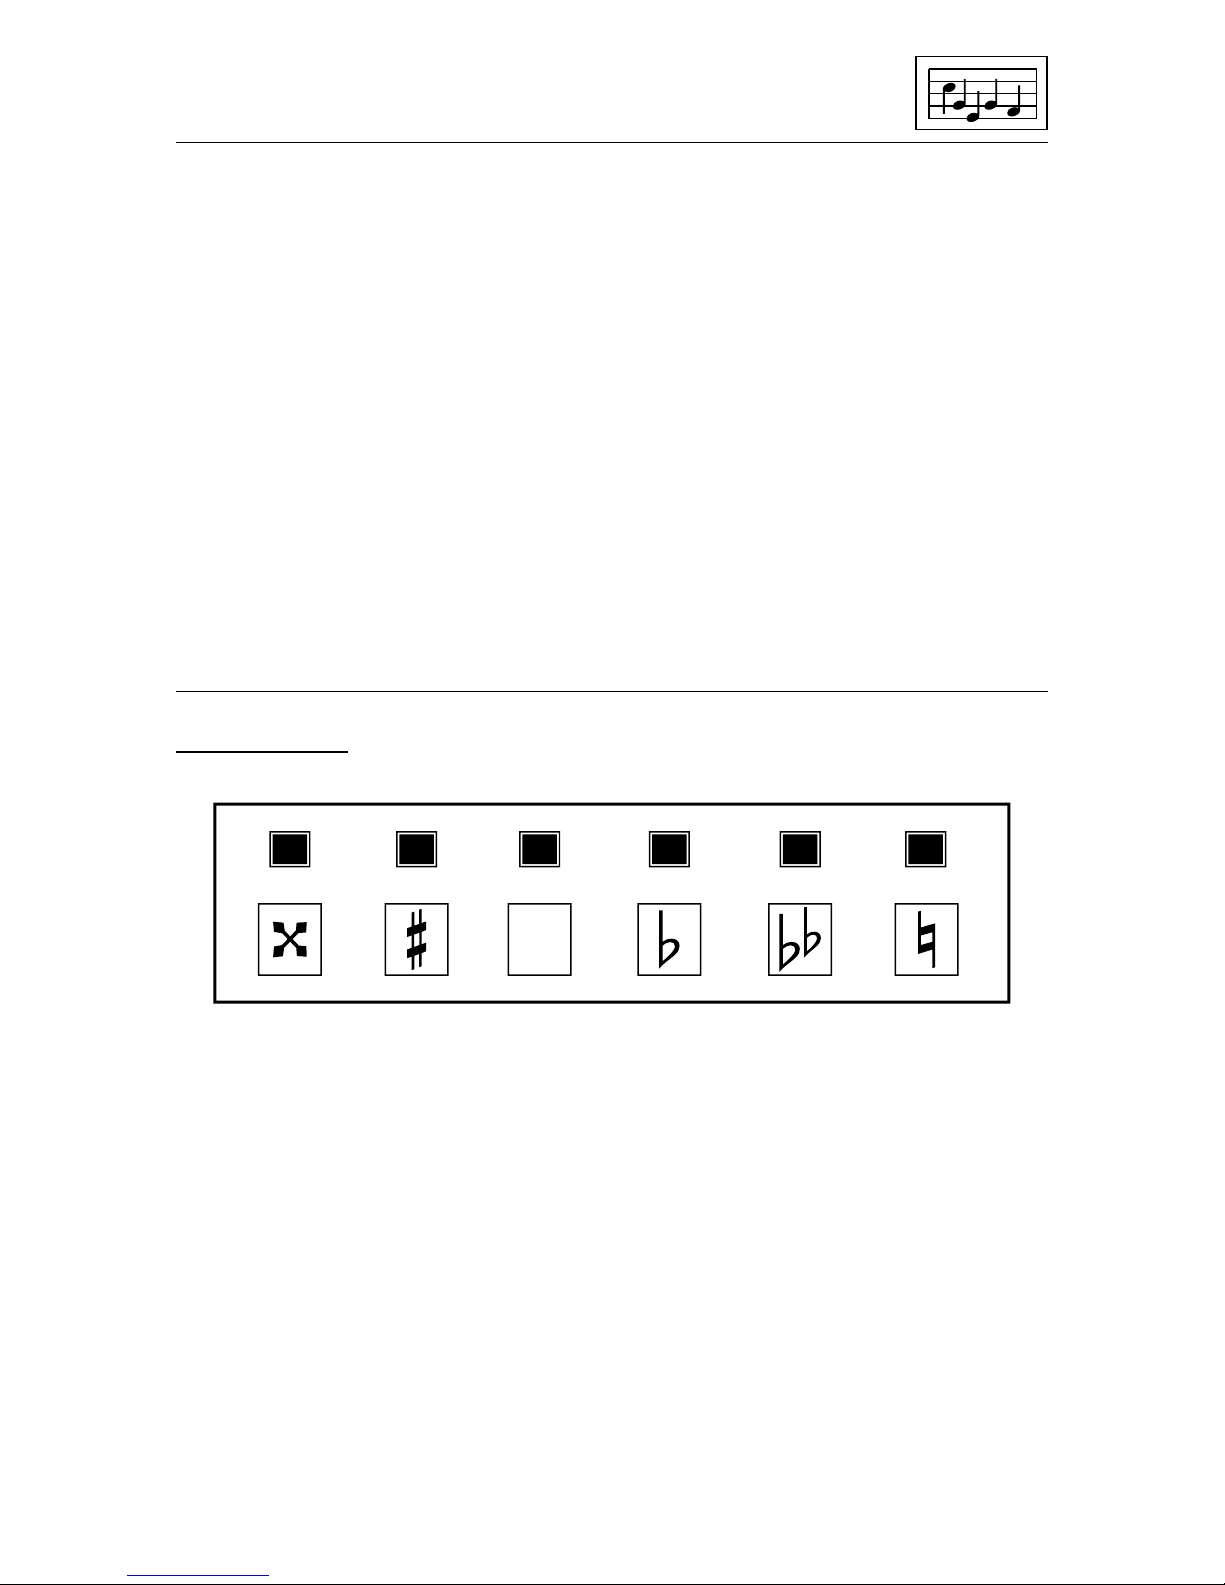
Accidentals
Accidentals can be added to any note by pressing the relevant key. Notes
are automatically put in the correct key according to the selected key
signature so there is no need to put in sharps and flats where they are
already shown in the key signature. If you require a note to be a natural,
press U. Press J to cancel any accidental and therefore leave the note in
the selected key.
In the EDITOR music is entered in proper musical notation. The usual
convention of only showing accidentals once in a bar is adhered to. If a
particular note, say C is made sharp (C#) any further C’s at that pitch will
be assumed sharp for the rest of that bar unless cancelled by a natural or
any other accidental.
The EDITOR also uses double sharps and double flats. They do not appear
in the most commonly used key signatures and are only usually used when
L K J H G U
Page 21
18
transposing tunes from one key to another (see the section on key signature for more details on transposition).
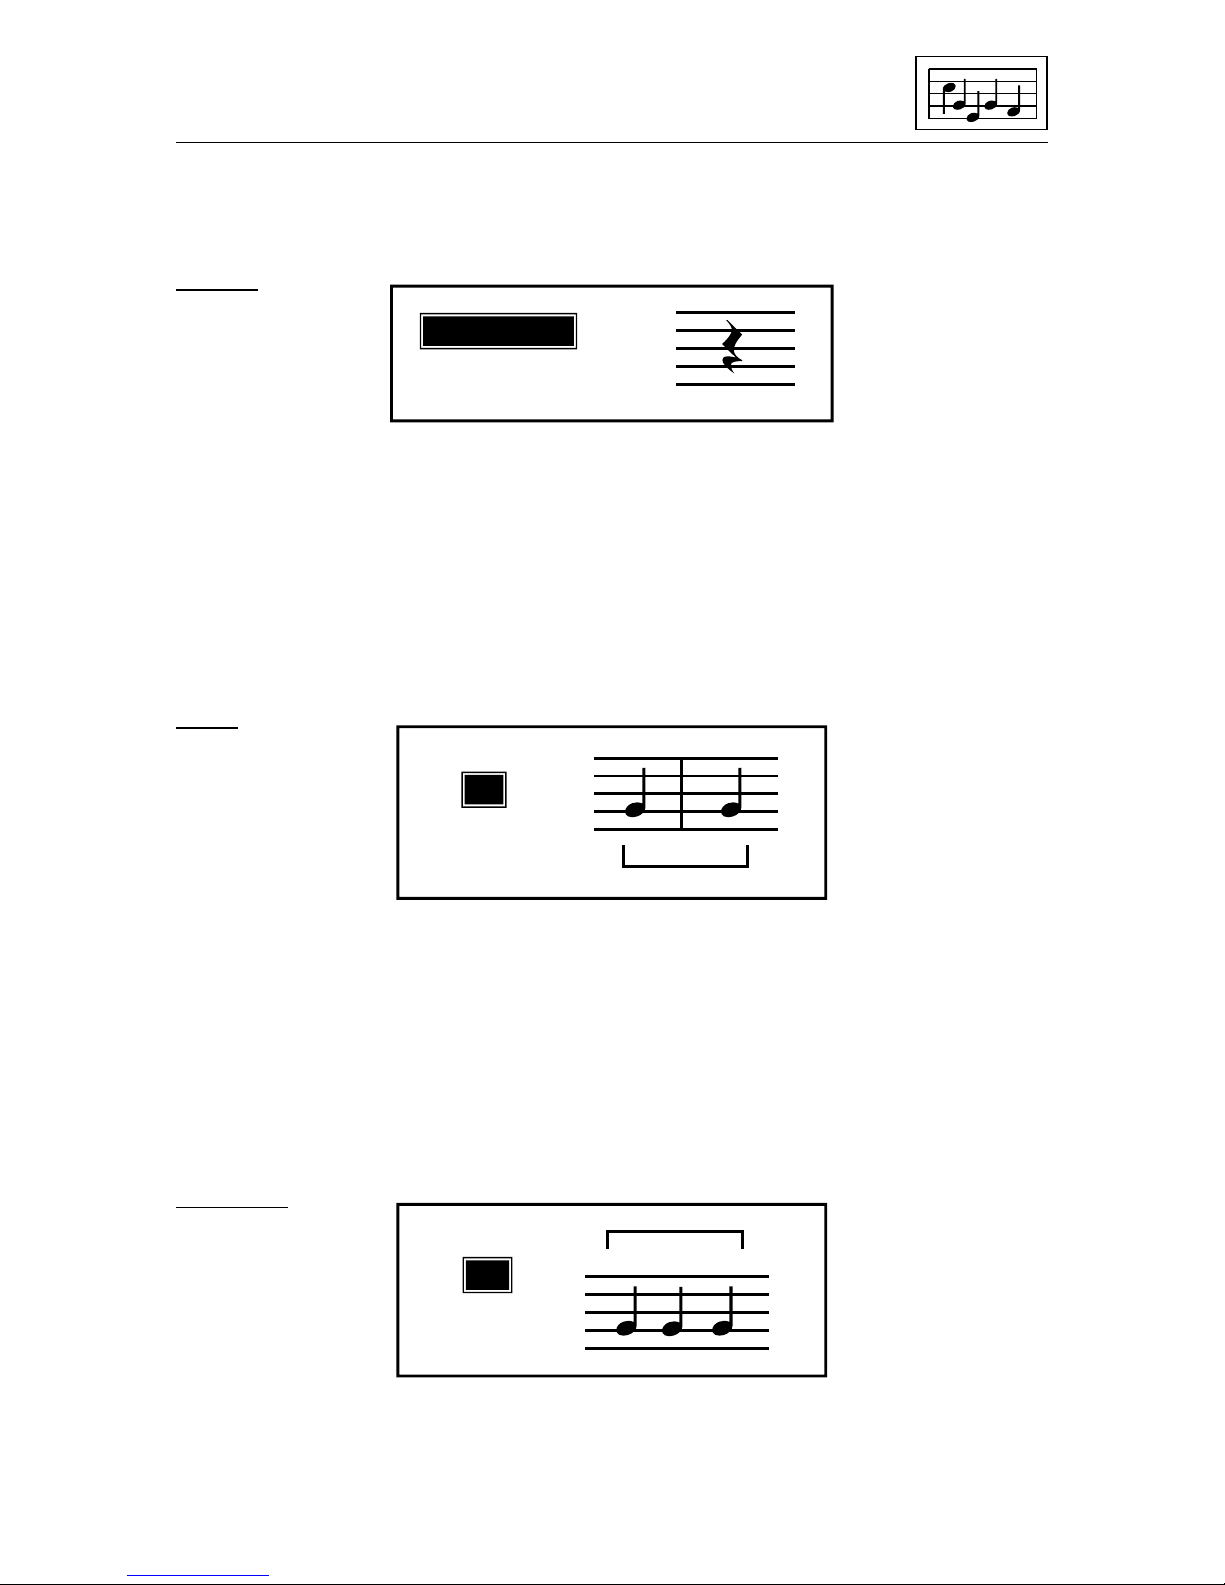
Rests
The current note can be switched to a rest by pressing SPACE. A rest can
be switched back to a note by pressing SPACE again. Whilst switched to a
rest the duration can still be set using Q and W. Any note below middle C
will be switched to a rest on the bass stave, otherwise it will appear on the
treble stave. Rests can be moved up or down between the staves. Rests
can be tied together although, since there is no sound, it is not really
necessary!
Ties
A real (black) note at the cursor may be tied to the previous note if it is of
the same pitch. Blue notes can not be tied directly - they must be entered
first. The envelope number (and volume) of the second note in the tie is
taken from the first note. The tied pair will sound and move as one note with
a duration equal to their total duration. A tie is removed by pressing T again.
Notes may be tied across barlines but not across repeat markers (or loop
sections).
Triplets
Semiquavers, quavers, crotchets, minims and semibreves can be changed
into a set of three notes with the same overall duration called a triplet. If you
want three crotchet triplets, set the current note to a minim and press R.
Switch
T
Switch
SPACE
R
Switch
3
Page 22
19
Press R to turn the three notes back to a minim again. Once entered, the
pitch, envelope (and volume) of any of the notes may be changed. You
cannot change the duration! You can not delete any single note in a triplet…
the entire triplet will disappear! Barlines cannot be inserted within a triplet.
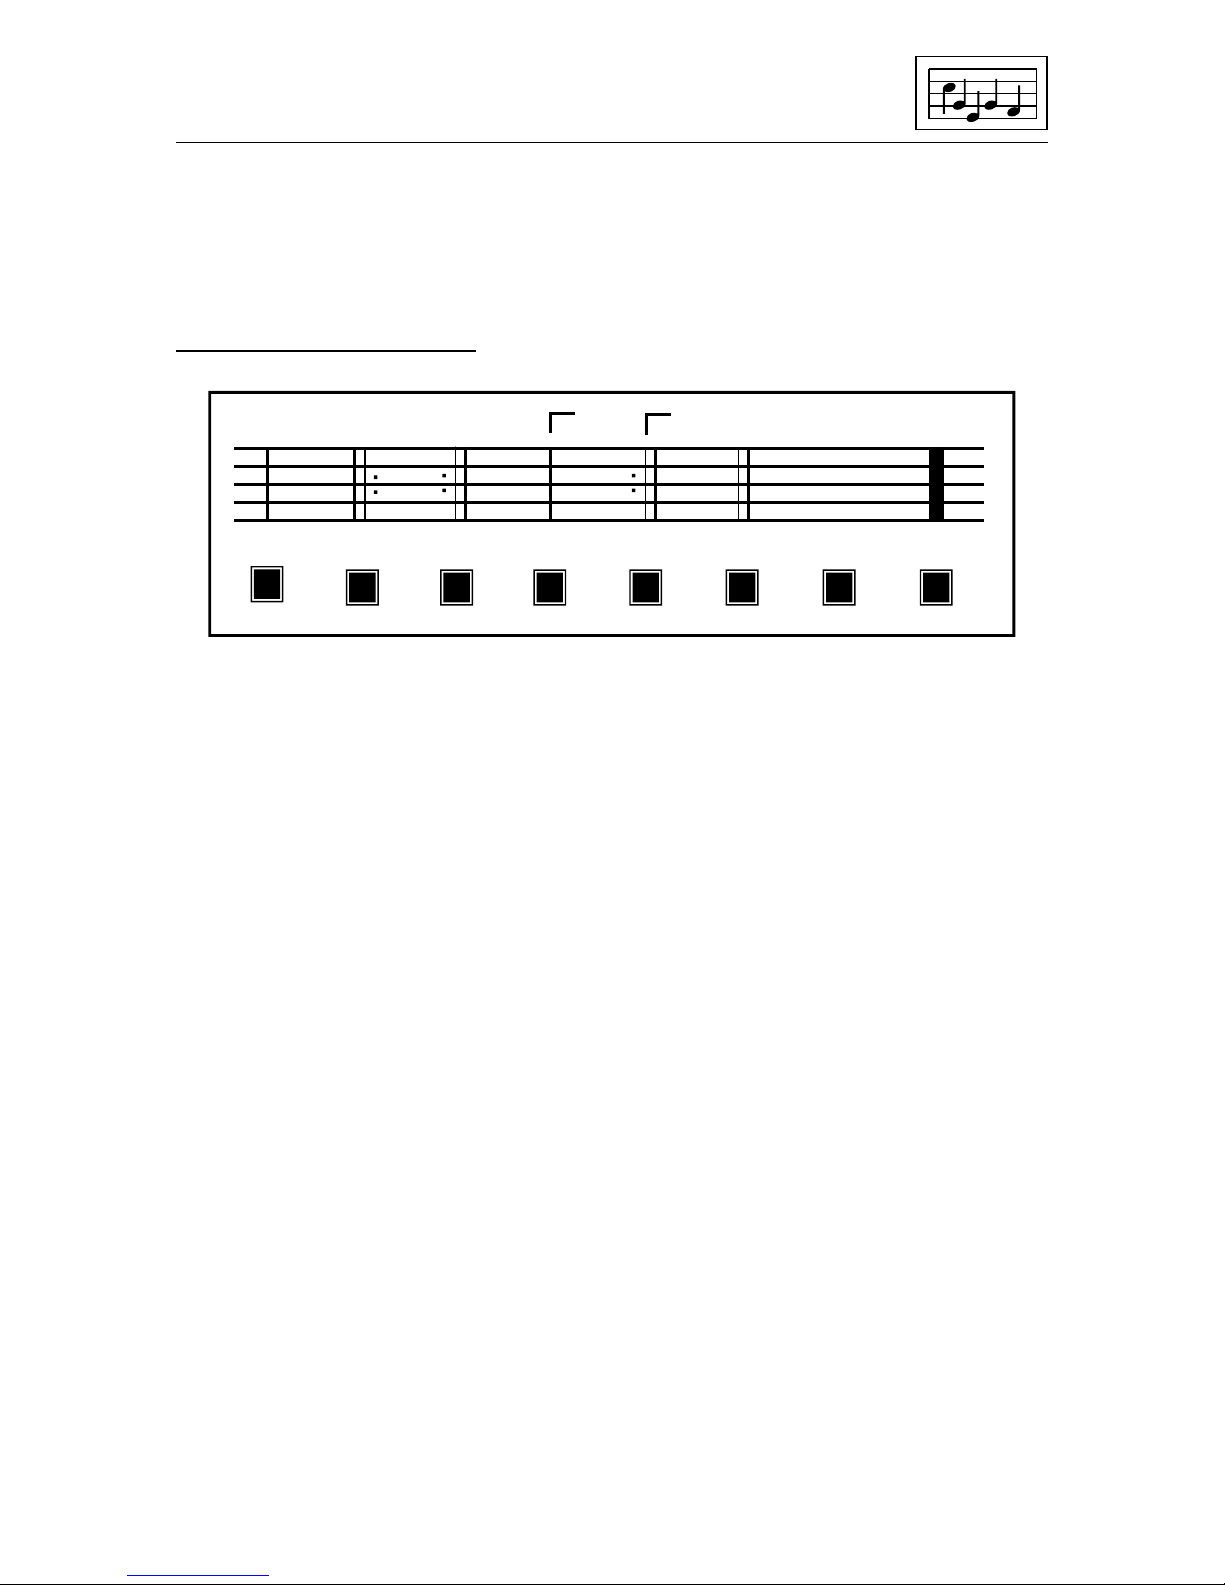
Barlines and repeats
Pressing 4 will enter a barline to the right of the current note/rest. Barlines
may be entered at any point in a voice except between triplets and in front
of the very first note. In fact, there are no restrictions on the use of barlines
in the EDITOR. Other barline symbols are entered in the same way and
although there are no restrictions on their use, unusual positioning of repeat
symbols will produce unusual results! Barlines can be removed by pressing
0.
Barlines are entered automatically at the end of a voice if the autobar facility
is on. This is set in Values. If the autotie facility is also on, then the EDITOR
will usually be able to make each bar the correct length according to the
time signature. This is often accomplished by splitting the entered note into
two parts and tying across the barline. With autobar on, the EDITOR will not
automatically enter a bar of incorrect length at the end of a voice: Another
method of checking and automatically entering barlines is via Commands:
Adjust barlines.
After complete bars have been entered, changing the duration of a note
within a bar will make the bar length incorrect according to the time
signature. The EDITOR does not check for this directly since you may
actually want to insert a 3 beat bar in a nominally 4/4 time signature.
However, you can easily check each voice for correct barlengths using
Commands: Check barlines. When notes are deleted the attached barline
or repeat symbol is also deleted. The start of repeat symbol (key 5) is
implied at the beginning of each voice and by inserting an end of repeat
symbol (key 6) further on in the voice the tune will repeat from the beginning
again.
1
2
loop section
4
5 6 7 8 9 0 £
Page 23
20
Repeats cannot be nested. However, the tune will not stop playing whatever you enter in the way of repeats, first and second time bars. Here are
some examples of what will happen:
The first time bar symbol (key 7) marks the start of a first time bar. In fact,
there can be any number of bars before the end of repeat symbol. If you
forget to put in the repeat symbol after the first time bar symbol it will just be
ignored. The second time bar symbol (key 8) is normally used to mark the
end of a first time bar. The double bar symbol (key 9) and behaves just like
a normal barline. The final symbol (key £) marks the start of a loop section.
These are described fully in ‘Loop Sections’. However, if a voice is played
as a whole voice (with Section off) then these markers behave as normal
barlines.
When playing and scrolling through a single voice with SHIFT-RUN/ STOP
the repeat markers and 1st and 2nd time bars are ignored. The notes on
the stave play purely in the sequence they appear. When playing voices
with RUN/STOP all repeat symbols are obeyed. The EDITOR keeps a note
on whether you are first or second time through a particular repeat section.
You can often see this from the position of the barmeter cursor which
counts the voice in expanded mode. When playing all voices from within a
repeat section that section will not be repeated again if you are second time
through. If you have scrolled into the repeat section in that voice it is
plays A-B, B-C, B-C, C-D, C-D
Note that the symbol at B acts as a ÕÓ where necessary
plays A-B, B-C, B-C
A
B
C D
A B C
A
B C D
plays A-B, A-B, B-C, B-C, C-D
Page 24
21
assumed that you are first time through. However, if you have entered from
another voice perhaps without a repeat section then you could quite likely
be second time through. This feature allows for flipping between voices and
ending back at the same point irrespective of repeats in any or all of the
voices. When scrolling past an end of repeat symbol (1st time through) the
barmeter cursor will jump forwards indicating that the second time through
that section has been missed out.
Pressing SHIFT together with ↑ will increase the pitch of a note by 1 octave
assuming that the new note is still within range and there are no accidentals
in effect in that bar. Press SHIFT-= to go the other way. This command is
particularly useful when used as a macro command for transposing sections of a voice by an octave (see Commands: Set macro).
Inserting notes
Notes can always be added to the end of each voice if there is sufficient free
space. Look at Info to see what is available and how much has been used
in each voice. Notes can be inserted into a voice by pressing +. An extra
note is generated at the cursor position and the notes are pushed one
space to the right. The extra note will be identical to the original one. You
can change the pitch, duration, etc. in the normal way. Note that the bar you
are in might not now contain the correct number of beats. + is inactive at the
2nd and 3rd parts of a triplet. At the 1st triplet note, + inserts a single note
of the same duration as the whole triplet. Whole sections may be inserted
in a voice using the notepad facilities (see Files - notepad).
↑
=
SHIFT
SHIFT
Insert note
+
Page 25
22
Deleting notes
Notes may be deleted forwards or backwards from the cursor position. DEL
deletes the current note and the notes to the left are pulled in by one space.
If DEL is kept depressed the effect is to ‘suck in’ the notes from the left
eventually arriving at the start of the voice. – deletes in the other direction
and if kept depressed will delete all notes to the end of the voice. The delete
operation removes any barline symbol which is to the right of the current
note.
You cannot delete ONE part of a triplet… all three notes will be erased. A
blue note at the end of a voice cannot, of course, be deleted since it is not
yet stored. To delete large sections of a voice access Commands: Block
delete. Use Commands: Clear music to delete all voices.
Volume
Due to the nature of the CBM64 hardware it is only possible to sound all
notes at one particular volume at any time. This means that you cannot set
different voices at different volumes directly. However, TMS does allow you
to change the volume of a tune in a number of different ways.
Firstly there is an overall volume control in Values. This is called the global
volume since it affects all notes alike. Secondly you can give each note in
VOICE 1 an additional volume called the voice 1 increment. When voices
are played back together the actual volume is equal to the global volume
(from Values) PLUS the voice 1 increment (for the note playing in voice 1
at that time). If there is not a note playing in voice 1 then there will be no
increment. However, it doesn’t matter if voice 1 is turned on or off - the
increment is still added. When voices 2 and 3 are played and scrolled, TMS
Delete left
DEL
Delete right
–
A
Voice 1 volume
S
< >
Page 26
23
can not take account of what’s happening to the volume in voice 1 because
of repeats, etc. In this case the actual volume is equal to the global volume
plus the volume increment for THE FIRST NOTE in voice 1.
It does mean that you are able to add dynamics to voice 1 and the rest of
the tune will follow suit. The volume device is only active in voice 1 where
the volume increment of each note can be set to between 0 and 15 using A
and S. If the note volume plus the global volume is greater than 15 the
volume device is shown in blue. This is because the hardware will not
accept a volume greater than 15. If you set the global volume to 0 you have
the whole range of dynamics available to you in voice 1 and hence in the
rest of the tune. However, perhaps the best way to start is to set the global
volume to say 7 and use volume increments of between 0 and 8 for
dynamics.
Despite having to play the notes in all voices at the same volume at any
particular time there are two ways of changing the effective volume between voices. You can choose or define a filter (in the SYNTHESISER)
which reduces the actual volume of a note. Since the filter can be on or off
in any voice this gives a fair measure of control. Finally changing the shape
of a note - the ADSR part of the envelope can considerably soften the note.
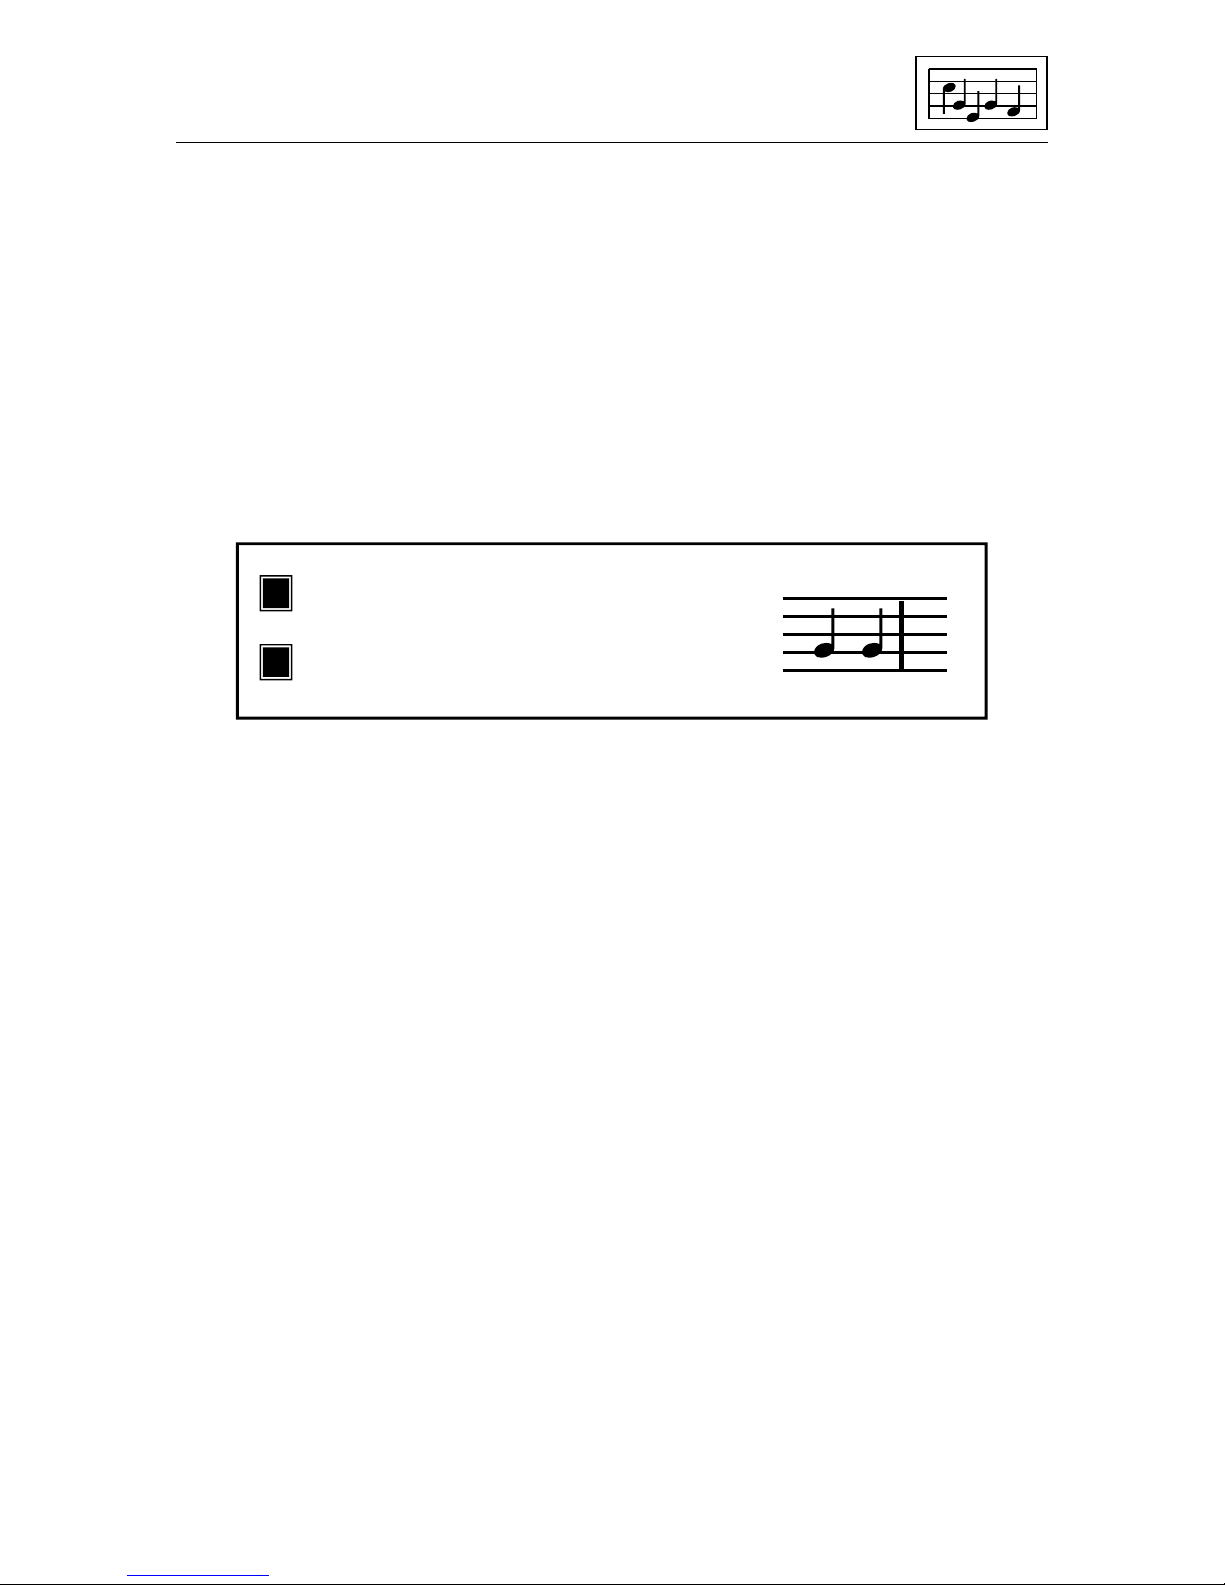
Markers
One or two markers may be used in each voice to assist in the editing of a
tune. Markers are inserted under the current note by pressing M and
deleted by pressing M again. Pairs of markers are required to define a
section of a voice by many Commands including Macros. They are also
particularly useful for labelling the start of a particular section of a voice. If
you need to play and scroll a single voice from a set point several times,
position a marker there and use the < key to locate it again. A marker to the
right of the cursor can be found by pressing >.
Switch marker on/off Marker
M
~
Page 27

24
If markers are set they are displayed under the bass clef as either | or }
depending on whether the marker is to the left or right of the cursor. You
can therefore always see at a glance where the markers are.
There are other commands for moving markers. Accessing Commands:
Markers to ends moves the markers to the start and end of the voice, and
Commands: Delete markers removes both markers from the current voice.
You can move either marker to the cursor using the following:
Moving the cursor
The note cursor is initially in the centre of the screen. For convenience it
can be moved left or right.
Loop sections
Loop sections are an important feature of TMS. They can be created in the
EDITOR or KEYBOARD as part of a normal music file. They are intended
Find marker left
<
Find marker right
>
One marker
to left of
cursor
~
|} }| }
|
Cursor between
two markers
Both marker
to right of
cursor
Cursor at
right hand
marker
Move marker left of cursor to cursor position
<
Move marker right of cursor to cursor position
>
SHIFT
SHIFT
Move cursor to left
CTRL
[
]
Move cursor to right
CTRL
Page 28
25
to be used for repeated rhythm tracks, bass lines, etc. and are especially
useful in the SYNTHESISER sequencer, KEYBOARD and MIDI for real
time backing tracks. A loop section is a section of a voice or whole voice
which when played as part of a tune keeps on repeating until the whole tune
has finished. If all voices with notes in are loop sections then once started
they will all repeat indefinitely until playback is halted.
There may be up to 20 different consecutive loop sections within each
voice. This means that a whole voice of say 20 rhythm patterns can be
loaded in or constructed enabling you to literally dial up a different rhythm
accompaniment whenever you need to.
Every voice can be considered as a single loop section and can be set as
such in Values. A start of loop section marker (|) is implied at the start of
every voice. A | is not required to end a loop section. To set up more than
one loop section enter a loop section marker by pressing £. Look at Info to
see how many sections there are in a voice. A | placed after the last note
will give an extra loop section containing no notes. If Section is not set in
Values (Info will say Section is off) the | markers are treated as normal
barlines. If Section is set to all then the whole voice is treated as one loop
section and repeats indefinitely. The playback indicators on the barmeter
will also display an S if section is set.
If the current voice has Section set then the note cursor will always be within
that loop section. The section, bounded by |, start or end of voice, is treated
EXACTLY as if it was a whole voice and all editing commands are available
within it. The VMW will show any notes in neighbouring loop sections (if
any) but these will not be accessible.
The next start of loop section marker, if any, may be switched to a normal
barline by pressing 4 and the loop section will be extended to the next | or
end of voice whichever is reached first. The Section number remains the
same and the number of Sections decremented. A | may also be inserted
within a loop section. In this case the Section number and number of
Sections are incremented by one.
£
Delete loop section marker
0
Enter start of loop section marker
Page 29

26
The beginning of loop section marker which is implied in section 1 (start of
voice) cannot be accessed since it belongs to the last note of the previous
loop section. If Section is changed in Values the note cursor will move to
the start of the specified loop section. If you want to browse through
available loop sections set Section off.
If Section is set the barmeter displays the length of that voice as the length
of the particular section irrespective of the length of the entire voice.
Because loop sections can be repeated several times (it might even consist
of just one note!) the barmeter cursor can go past the end of a loop section
bar. It is assumed that the loop section continues until the end of the longest
voice (or loop section). Do not worry because the EDITOR knows exactly
how many times the loop section has been repeated and will always enter
the loop section at the correct point when flipping between voices .
You can scroll backwards and forwards through a loop section or use
SHIFT-[ and SHIFT-] to fast rewind and fast forward. However, you will
never get beyond the bounds of the loop section and might not even be able
to reach the end of a loop section if the barmeter cursor reaches the end of
the longest voice. Press COMM-] to go to the end of the loop section the
FIRST TIME THROUGH. The barmeter cursor will actually jump backwards! COMM-[ is equivalent to moving to the start of the voice.
Markers are available within loop sections. As there are only two per voice,
any markers set in a previous loop section will be deleted and hence
available in the current loop section. Accessing Commands: Markers to
ends places the markers at the ends of the loop section.
Normal repeats are active within a loop section. The start of loop marker (|)
acts as a ||: if necessary just like at the beginning of a voice. Part or whole
of a loop section may be copied or moved to the notepad (see Commands).
Any | markers are converted to double bars (||) to avoid problems caused
by moving too many loop sections. These will need to be switched back to
| if the number of sections is less than 20.
A final point. If all voices are loop sections then play continues until aborted
by RUN/STOP. In this case the barmeter cursor moves to the position of
the last note played in the LONGEST SECTION. The corresponding notes
in other voices will not necessarily be the last notes played unless all the
loop sections are of the same length.
Page 30

27
Apart from the normal filing problem and status information, the Command
line is used to set user parameters and access the many Commands
available within the EDITOR. These are described below.
Files f1
Apart from the loading and saving of music files and sound sets, the
EDITOR has access to notepad files. The notepad can be used to store all
or part of a voice. Often it is used temporarily to move sections from one
voice to another or to swap parts around within a voice (see Commands).
However, the notepad can also be used to store and retrieve whole voices
such as rhythm tracks and even to merge two music files together (see
Hints and Tips).
A notepad file is loaded in the normal way. They can be recognised by their
n. prefix. Notepads can range in size from ‘1 to 999 notes and will only be
loaded if there is sufficient free space available. If the notepad is already in
use then a warning is given before replacing it. None of the music parameters such as key signature or time signature are changed when a notepad
is loaded. You will therefore have to be careful about key signatures since
the music in the notepad could have been originally written in a different
key.
The current notepad may be saved on disc at any time. It might be a good
idea to make a note of the key signature it was composed in. You can
always of course, load it in separately, move it to a voice, transpose it and
save it as a notepad file once more.
The current notepad is erased when any music file is loaded. It is therefore
important to save the notepad file before replacing the music file.
THE EDITOR Command line
Page 31

28
Values f3
The key signature may be changed at any time in the EDITOR even when
notes have already been entered. This is called Transposition (see page
34). Because of the differences in pitch interval a particular piece of music
could quite possibly be transposed into some keys but not others. The
EDITOR will not allow you to access any key signature that the tune can not
be transposed to. It is possible therefore that particular keys will be missed
out and there may be some tunes which cannot be transposed into any
otherkey.Usethe←keytotogglebetweenmajorandminorkeys.
If the Time signature is altered after notes have been entered, the barlines
will probably not appear in the correct positions. You will need to access
Commands: Adjust barlines to reset the barlines according to the new time
signature.
If Tempo is set high and you have written a piece of music using lots of
semiquaver triplets (the shortest notes) then the poor computer might run
out of steam when playing and scrolling a voice. It will be playing notes a
LOT faster than you could manage on a piano! If it does tell you things are
getting out of hand, just wind down the tempo a little and give the computer
a rest!
Use the ← key to toggle between b.p.m. and Italian notation.
The Volume is the overall baseline volume for the tune. For notes on using
this and the voice 1 volume increment see ‘More on editing - Volume’.
Info Files Values Commands
Key signature
Save
Time signature
Tempo
Volume
Voice
Filter number
Autosound
F # 6 sharps
Save
4/4
Presto
15
3
3
on
Save
Autobar
on
Autotie
on
Play to
end
Play and
stay
Page 32

29
Filter number gives the overall or global filter for the tune from the set of 4
filters defined in the sound set. The filter may be set off or on for each voice.
Voice gives the current voice number displayed by the VMW. Press RE-
TURN to display the secondary pop up and change the Octave, Filter and
Section Values for that voice. Press RETURN to pop this window down
again. You can change Voice and pop up the secondary window again. All
Values for each voice are displayed together in Info.
With Octave set to 3 the pitch of the notes on the VMW is then correct as
written. Selecting another octave will transpose the voice up or down. Filter
can be either off or on for each voice. If set on the voice is passed through
the filter number selected. Section selects a particular loop section within a
voice (if more than one) or turns the whole voice into a loop section (see
Loop Sections).
If Autosound is on, blue notes entered at the end of a voice are sounded
when you press RETURN. Autosound can be turned off to make entering
music a quieter and quicker task.
If Autobar is on, barlines are entered automatically at the end of a voice
according to the current time signature. The EDITOR will not put in a barline
unless the bar is the correct duration. If Autotie is also on then it might resort
to tieing two notes across the barline. Otherwise it will ask you whether you
want to tie over the barline or not. Press Y to tie, N to stay where you are
and alter the duration of the current note so that it will fit. You will be warned
if the barline cannot be inserted correctly. You must then either change the
duration of the note(s) in that bar so that they will fit or enter a barline
yourself (key 4).
Info Files Values Commands
Octave
Save
Filter
Section
Volume
Voice
Filter number
Autosound
F # 6 sharps
Save
4/4
Presto
15
3
1
on
Autobar on
2
off
off
Page 33

30
Normally voices or tunes are played to the end or playback is stopped by
pressing RUN/STOP when you have heard enough. However, if Play to is
set to marker then the voice or tune stops whenever a marker is reached in
the current voice. The marked note is not played. Note that it does not
matter if the current voice is actually being played at the time. This is very
useful for repeatedly playing a particular defined section of music. A marker
at the first note is ignored so that you can easily play between markers. You
are also given the option of playing a tune (without scrolling) from the
current note and staying there or moving to where the tune stopped. Set to
Play and move for the note cursor to be updated to the last note played in
the current voice. If the current voice has finished playing before the tune
has finished then the cursor moves to the last note in the voice.
Commands f5
Set macro puts all notes between markers in the current voice into macro
mode. There must be two markers set and the cursor must be on or
between the markers. If not, this command will have no effect. In macro
mode the cursor column colour changes to blue and a bar appears over the
marker indicators. To exit macro mode press [ or ], access the Command
line or press ←.
Info Files Values Commands
Save
Set macro
Markers to ends
Delete markers
Accent music
Copy to notepad
Move to notepad
Copy from notepad
Move from notepad
Clear notepad
Block delete
Swap sound sets
Set note stem
Check barlines
Adjust barlines
Block tidy
Clear music
Exit Editor
Page 34

31
The EDITOR macro facilities are provided to make editing of tunes quicker
and easier. They are called macros because they can operate over many
notes instead of one, as with the normal editing facilities. Whilst in macro
mode altering the pitch (↑ or =), volume (A/S in voice 1 only) or envelope
(Z/X) will not only alter the current note but ALL notes on and between the
markers. There are two types of macro commands:
Relative adjusts the value of all notes up or down by the
SAME AMOUNT as the current note.
e.g. transposes the section of voice up one
octave.
Absolute sets values of all notes EQUAL to the value of
the current note.
e.g. used to set all envelopes between markers
to the same value.
The following table summarises the available macro commands.
Macro mode set
↑
=
A
S
Z
X
SHIFT
C
=
Volume of all
notes set to volume of
current note
SHIFT
↑
=
Pitch +1
Pitch –1
+1 octave
–1 octave
Volume –1
Volume +1
Envelope –1
Envelope +1
No command
C
=
A
Z
Envelopes of all
notes set to envelope of
current note
AbsoluteRelative
Page 35

32
Markers to ends sets the markers to the beginning and end of the current
voice (or loop section) whereas Delete markers removes both of them from
the voice.
Accent music only operates when voice 1 is displayed on the VMW. It
increases the volume increment for the FIRST note in each bar (between
markers) by 1. This provides an easy method of accenting tunes. Access
the command again to increase the effect. Note that if the overall volume
setting (in Values) is too high you might not hear the effect of the accented
notes.
Notepad
This notepad is a section of the note storage area. The notepad size (given
in Info) is only limited by the total number of notes already stored in voices
1…3. The notepad may be saved on disc at any time or a new notepad file
loaded to replace it (see Files). The notepad cannot be directly added to;
only replaced or deleted. Copy to notepad copies all notes between markers in the current voice to the notepad replacing any previous contents of
the notepad. The voice is left as it was. This command will only be successful if there is enough free space in the note storage area. On the other hand
Move to notepad will always succeed since the section between the markers is deleted.
Copy from notepad copies the contents of the notepad to the current voice
at the cursor position leaving the notepad as it was. Of course, this again is
limited by the available free space. Move from notepad also deletes the
notepad after moving it. Clear notepad deletes the notepad. You will then
have the maximum free space available for your composition. Note that
loading any music file also deletes the notepad.
You will need to exercise some care when using the notepad facility if you
also change the key signature because, unlike the rest of the tune, the
contents of the notepad are NOT transposed to the new key. Look at Hints
and Tips to see how the notepad can be used to merge two music files.
Block delete deletes all notes on and between the markers in the current
voice (or loop section). Both markers are also deleted.
voice 1 voice 2 voice 3 FREE notepad
Page 36

33
Swap sound sets swaps the position of sound sets 1 and 2. The sound set
names will also be swapped. These are displayed in Info. All envelope
numbers in the tune now refer to the other available envelope set. The filter
will also change. This might change the sound of your tune somewhat! The
new set will be saved with your music file. You can, of course, swap the
sound sets again and return to using the original sound set 1.
The flipover point for the note stem may be changed at any time by
accessing Set note stem. A different flipover point may be set in each voice
- these are stored with the music file. This enables the user to write bass
parts correctly on the bass stave with the note tails pointing in the conventional direction. To set the flipover point set a note (blue or black) to the
required pitch and access Set note stem. Any new notes entered will flip at
the new point. All other notes remain unaffected. You can override the flip
point by manually flipping the tails using /.
Notes near the top and bottom of the staves may only have their stems
pointing down or up respectively. You can not alter these.
Check barlines will check that barlines are in the correct positions according
to the time signature. This command only operates on notes between
markers although it will actually start checking from the first barline it finds
on searching backwards from the marker. If a bar is not the correct duration
an error pop up ‘Bar too long’ or ‘Bar too short’ will be displayed where the
error occurred. The markers are not moved.
Adjust barlines will attempt to insert or correct barlines according to the
current time signature. Again this command operates between markers; the
first marker being set at the start of the voice (or loop section) or the 1st note
of a bar. A barline will be inserted to the left of the 1st marker if one does
not exist already. Repeat symbols, first and second time bar symbols and
loop section markers are never moved.
In attempting to fit barlines, notes may be split and tied across barlines,
non-essential ties are removed and the durations of tied note pairs adjusted
where necessary. If you do not want ties to be automatically entered, use
/
Flip note stem
Page 37

34
Check barlines and adjust any mistakes by hand. If a barline cannot be
fitted correctly (even using ties) the note cursor will stop at the offending
note and an error pop up displayed. The markers are not moved so you can
try the command again after sorting out that particular problem manually.
Block tidy will attempt to remove unwanted rests from tunes entered via the
KEYBOARD or MIDI modules. It will attempt to convert ALL single rests
between markers to notes and tie them to the previous note. The overall
timing is not affected by this command. Use Adjust barlines to remove
unecessary ties and make the tune look even smarter!
Clear music deletes ALL notes in ALL voices and the notepad. You only
need to use this before entering a new tune from scratch.
Exit Editor will exit back to the CONTROL screen as will COMM-HOME.
Info f7
The normal music file information is displayed.
Hints and tips
Transposition
When a piece of music is transposed, the music sounds and is written at a
different pitch from the original. The simplest form of transposition is by one
octave. Individual voices may be easily transposed by changing the octave
number from Values. Increase the octave number to transpose up by one
octave. Part of a voice may be transposed by one or more octaves using
the macro facilities (see page 31). If music is transposed by exactly one
octave then the key signature is not changed.
If a piece of music is transposed by less than an octave then the key
signature changes. Each transposition from one key to another will give a
different pitch interval between the original and transposed notes. For
instance, if transposing from the key of G to the key of C the pitch of each
note will decrease by five notes. From C to B the pitch of each note will
increase by seven notes.
Page 38

35
When the EDITOR transposes a tune it will first try and transpose the notes
in the correct direction (either increasing or decreasing the pitch). If this is
not possible because there are notes which would go outside the pitch
range on the VMW then it tries transposing in the other direction. This is
equivalent to transposing and increasing or decreasing the pitch by one
octave. If this is not possible for the same reason that particular key is not
available to be transposed to and it will not be shown in Values.
Transposition is very simple if the music contains no accidentals (sharps
and flats) because the notes are simply moved up or down the staves to the
new positions corresponding to the new key signature. In transposing from
G to B flat for instance, every note on a G line will appear on the B line as
a B flat. Because of the key signature the B note will not require a flat
symbol. However, where a tune contains accidentals, for each accidental in
the original there must be a corresponding one in the transposed version.
Each of these new accidentals will have the same effect as the corresponding one in the original but it will not necessary be the same accidental since
we have to allow for the new key signature. For example, in the key of B flat
a B natural has been raised by one semitone from the given key. If the
music is transposed to the key of G (which includes an F sharp) then the
note will now be a G but its pitch will have to be raised by one semitone. It
therefore becomes a G sharp. The situation can be rather more complicated in transpositions between certain pairs of keys and can give rise to
double-sharp and/or double-flat symbols in addition to the normal sharps,
flats and naturals. This is in accordance with normal music nomenclature.
Merging music files
The notepad facility allows you to save part or the whole of one voice as a
separate notepad file. These files can then be reloaded and either added to
an existing composition or used to form the basis of a new piece of music.
If you need to add one whole music file on to the end of another try the
following method. Note that the LINKER will already play up to 26 music
files in any sequence.
a) Load 2nd music file (note key signature).
b) Move voice 1 to notepad and save as FILE2A, for instance.
c) Repeat for voices 2 and 3, saving as FILE2B and FILE2C.
d) Load 1st music file and check that key signature is the same
as 2nd file, if not, transpose.
e) Load FILE2A, go to end of voice 1 and access Commands:
Move from notepad.
g) Similarly for FILE2C.
Page 39

36
If you have not run out of room by now you will have one music file which
may be played and saved as normal.
Using the sequencer
One of the uses of the sequencer in the SYNTHESISER Module is to create
the right sounds for a piece of music after the notes have been entered. You
will have already chosen or designed a sound set for use with a tune but
you might want to experiment further once the tune is in. If you only want
one particular sound per voice, then use the same envelope number for all
notes in each voice, e.g. voice 1 can use envelope 3 and voice 2, envelope
9. Use the macro facilities if necessary.
If your musical composition is more complex you can divide each voice into
loop sections by inserting loop markers (|) and assign a particular envelope
number for each loop section. You can still play the whole voice by leaving
Section off. Keep a note of the envelope numbers so that you know which
envelopes to change in the SYNTHESISER when the sequencer is running.
Each loop section can be dialled up (and played) individually for each voice
in the sequencer until the sounds are right. Turn Section off, leave the voice
envelope blank and the tune will play back just as it would in the EDITOR.
You can save the music file (together with the sound set) from the SYNTHESISER.
Page 40

37
The KEYBOARD module provides an alternative method of entering music
into The Advanced Music System (A.M.S.). The upper two rows of Q-W-ER-T-Y keys on your Commodore 64 are used to emulate the black and
white keys of a piano keyboard. Keyboard overlays such as the Sight and
Sound™ model can be used effectively. As a key is pressed a note sounds
and the proper note name according to the key signature is displayed on
the keyboard on the screen. The music being played or recorded can be
displayed in real time on a pop-up VMW (Voice Monitor Window). Each
note animates on the VMW showing changes in both pitch and duration.
Music recorded via this module can be loaded into the EDITOR, and used
as the basis of more complex compositions. The module may be looked on
as a musical sketch pad: ideas can be quickly tried out in real time. The
Keyboard also provides a useful means of experimenting with the sounds
and effects created via the Synthesiser module.
KEYBOARD
The Keyboard module is selected from the CONTROL SCREEN by highlighting the Keyboard icon and pressing RETURN.
Info Files Values Commands
1
2
3
15 15
2
R
100
Trumpet
R
Page 41

38
In common with the other AMS modules the Command Line at the top of
the screen can be accessed via the four Commodore function keys. Command Line options specific to this module will be described at the end of this
section.
The device in the centre of the screen, below the command line is the multi
track DIGITAL RECORDER device. This indicates not only the Record,
Pause and Playback status of the Keyboard but also provides a display of
the current octave range of the keyboard. These will be described in more
detail below.
The Keyboard Screen
The barmeter device on the left of the screen provides a visual guide to the
contents of each of the three music voices, as in the Editor module. When
music is recorded, horizontal bars extend across the device indicating the
relative overall length of each voice. Use the keys COMM 1, 2, and 3 to
select the voice to be recorded (active record voice, or current voice), and
SHIFT 1, 2, and 3 to select voices for playback. Voices selected for
playback are displayed as highlights on the right side of the barmeter device.
R
1
2
3
1 2 3
Barmeter cursor
Current voice on VMW
1 2 3
Active playback voices
SHIFT
[ ]
C
=
C
=
RUN
STOP
SPACE
RUN
STOP
[
]
C
Playback or stop
V
<>
Rewind
Octave shift
Forward
Pause
Record
Page 42

39
The Metronome at the bottom left of the screen displays the current tempo
in beats per minute (this maybe changed in the VALUES pop-up), and ticks
from side to side accordingly. You may add a ticking sound to the metronome by setting “Metronome” in VALUES to “Tick”. (This is only operative
in Record or Practise Modes - see below).
The two icons to the left of the DIGITAL RECORDER device indicate the
current Volume and Sound Envelope. These may be changed using the
keys A, S, Z and X. The sound envelope name is displayed in the small
window just below the Envelope icon.
Keyboard: Modes of operation
The Keyboard can be set into various “modes”.
It starts off in TINKLE MODE.
Press some of the keys on the top two rows of the keyboard, and the notes
will sound as you press them. The keys correspond to piano keys as follows:
Try pressing C or V and notice how this makes the notes sound an octave
lower or higher.
Press Z or X to change envelopes to get different sound effects.
Press A or S to change the Volume.
Pop-up the Voice Monitor Window (VMW) either via the Command Line f5
option (Display V.M.W.), or use the COMM-V keys as a short cut for pop-up
and pop-down. The music you play will be displayed note for note on the
VMW. Note that the metronome will not sound in this mode.
15
A
Volume
S
<>
Z
X
<>
Envelope
15
F G A B C D E F G A B C D E
1 2 3 5 6 8 9 0 – £
CTRL Q W E R T Y U I O P @ * ↑
FsGsB
f
CsE
f
FsGsB
f
CsE
f
Page 43

40
If the V.M.W. is up the current voice is displayed in an icon next to the
Metronome at the bottom left of the screen.
You may enter PRACTISE MODE by pressing RUN/STOP.
If there is no music in the current voice (or if you are at the end of the voice),
you can “practise” playing music (the notes will not be saved to memory). If
there is music in the other voices, they will play back too, and the metronome will sound if you have selected the metronome “tick” in VALUES.
Pop up the VMW and enter Practise Mode - the notes you play will appear
on the VMW as the Tinkle Mode, but this time barlines will be added
according to the selected time signature, and rests will appear while you’re
not actually pressing any keys.
Press the RUN STOP key to go back to Tinkle Mode.
RECORD MODE may be entered by holding down the Commodore key
and pressing the RUN STOP key.
This is similar to Practise Mode except that any notes you play will be
entered into the computer’s memory!
Select the voice you wish to record by pressing COMM 1, 2, or 3 (described
above), and enter Record Mode. Once again, any other voices with music
in which are selected for playback will play, and any notes you play will
sound and be entered into the current voice. Rests are automatically put in
when you’re not pressing keys.
Notice that the barmeter grows as notes and rests are recorded.
If you have the VMW up whilst recording, your notes will appear on the
staves with barlines and rests.
Whilst you are recording, you may wish to change the octave range, the
volume or the sound envelope, or simply stop for a breather! To do this,
press the SPACE BAR to PAUSE: you may now press C or V, A or S, or Z
or X, and then continue recording by pressing SPACE again.
To go from Record Mode back to Tinkle Mode, press RUN STOP.
To play back what you have just recorded, rewind to the beginning of the
voice using the [ key. (You can observe this rewind as the cursor line on the
barmeter moving to the left.) Now press RUN STOP to play the music back.
If you want to continue recording, move to the end of the voice using the ]
key (the barmeter cursor should now be at the right hand end of the voice),
and simply press COMM-RUN STOP again.
NOTE: if music already exists in the current voice, and if the cursor is not at the end of the voice,
then it will be erased or over recorded when the Keyboard is set into Record Mode (after a
Confirm pop-up).
Page 44

41
Notice that the DIGITAL RECORDER device gives a visual indication of the
current Keyboard mode by highlighting the appropriate icon. When the
VMW is up, the relevant icon is displayed next to the metronome, together
with the number of the current voice.
THE COMMAND LINE (KEYBOARD)
The general operation of the COMMAND LINE is discussed fully earlier in
this manual.
Files f1
Both music (m.) and sound envelope (s.) files can be loaded into the
Keyboard module. Only music files can be saved from this module. The
sound envelopes used within a composition are saved with the music (m.)
file. DELETE, RENAME and CATALOGUE function in the usual way.
Values f3
Values may be selected as usual with the SPACE bar and changed with
either the Q or W keys. Many of the VALUES available from the Keyboard
are described in more detail in the Editor module section. There are,
however, some differences.
Key signature - This value cannot be altered once music is either loaded or
recorded into the Keyboard’s memory. Transposition etc. is available in the
Editor module. Switch to minor keys with the ← arrow key.
Info Files Values Commands
Key signature
F # 6 sharps
Time signature
4/4
Tempo
Presto
Resolution
Expert
Volume
15
Filter number
2
Voice
1
Metronome
Tick
f3
Pop-up/pop-down
Page 45

42
Resolution - This sets the minimum note duration that can be detected by
the keyboard. The Keyboard does not allow you to play notes shorter than
a certain duration so that your music will consist of proper notes and look
reasonably tidy. With expert resolution the minimum note duration is a
semi-quaver. With average resolution, it is a quaver, and beginner resolution will ignore all notes less than a crotchet’s duration. Select a Resolution
value in conjunction with Tempo to provide a comfortable keyboard response. At faster tempos you will be able to play quicker. The Tempo value
is displayed at all times in beats/minute within the Metronome device.
Metronome - the audible tick maybe set to on or off (tick or quiet). There
are, however, some limitations to the use of the metronome, since its sound
actually comes from one of the Commodore’s music voices. Therefore if
you are playing all three voices you will not be able to hear the metronome
tick.
Commands f5
Display V.M.W. will pop up the Voice Monitor Window.
Delete Voice will delete the current voice, after asking for confirmation that
you really wish to delete it!
Swap Sound Sets will swap Sound Set 1 with Sound Set 2, thus giving you
access to the 15 envelopes in the second sound set.
Exit Keyboard allows you to exit from the module back to the Control Screen.
Info Files Values Commands
f5
Pop-up/pop-down
Display V.M.W.
Delete voice 1
Swap sound sets
Exit keyboard
Page 46

43
Info f7
For display only - provides current status information, including the number
of notes and bars in each voice. You may see here how many notes you
have entered, how much free space (i.e. how many notes) you have left,
and the names of the current music files.
More on the Keyboard
You may record music via the Keyboard one voice at a time while listening
to one or both of the other voices. These other voices can be either
previously recorded in the Keyboard or created in the Editor or Midi modules and loaded into the Keyboard module. Voices with loop sections can
also be created within the Editor and utilized as a backing tracks or rhythm
sections within the Keyboard.
If you are starting a new piece of music, remember to set the Key Signature
and the Time Signature before you start recording, because they can’t be
changed in the Keyboard once any notes are entered. You can, however,
go into the Editor module to alter these values if you wish.
During Record Mode the Keyboard attempts to convert the music you are
playing from real-time durations to musical notation. Barlines, rests etc. will
be inserted according to the selected tempo and time signature. However,
you may find that anything other than simple tunes can produce rather
untidy compositions, in that unwanted rests tend to creep in. Facilities exist
within the Editor specifically to tidy up music entered in the Keyboard - see
the Command Block Tidy in the Editor module.
When you exit from the module back to the Control Screen, any music you
have in memory will be preserved. You may move onto the Editor, Synthesiser or Printer modules (and back again) without losing your file. However,
if you go into the Linker or Midi, any music in memory will be lost, so be sure
to save your files to disc before leaving the Keyboard if you intend to use
Midi or Linker afterwards.
Page 47

44
The SYNTHESISER module provides the means of creating and editing the
sounds used in the EDITOR and KEYBOARD Modules. It also features a
real time sequencer which allows tunes to be played back while changing
or editing the sounds.
Each sound is controlled by a set of parameters collectively called an
envelope. The basic parameters consist of waveform (including pulse width
where appropriate) and amplitude shape. The initial pitch and duration of
the sound can also be edited so that the sound produced in the SYNTHESISER exactly mirrors the sound of notes on the staves in the EDITOR or
KEYBOARD. There are 15 resident envelopes in the current sound set
which may be used together with an optional filter. The filter parameters
consist primarily of filter type, resonance and filter frequency.
Apart from the basic envelope and filter parameters the sounds may be
controlled by the optional use of Dynamic Response Envelopes (DREs).
The two DREs can transform the sound by independently modulating the
frequency and/or pulse width and the filter frequency. The DRE is one of
the more complex features of the SYNTHESISER and as such is left until
the section ‘More on creating sounds’.
Any of the envelope and filter parameters may be changed and the resulting sound heard instantly. The SYNTHESISER also allows you to give a
name to each of the 15 envelope sounds eg piano, violin or bass. These
names may be used within the KEYBOARD and EDITOR to provide a
useful description of the sound.
The sequencer can play up to 3 voices or tracks from the resident music
file. Particular envelopes can be selected for each voice together with an
optional filter. Apart from playing whole tunes, the sequencer is designed to
utilise loop sections. At any time these short sequences, bass riffs, drum
patterns etc may be selected for each voice and set playing. They will
continue to play until stopped. This allows creative experimentation with
rhythm and sounds using tunes or loop sections entered from the EDITOR,
KEYBOARD or MIDI modules.
SYNTHESISER
Page 48

45
The SYNTHESISER module is selected from the control screen by highlighting the SYNTHESISER icon and pressing RETURN. The screen consists of a number of basic devices; envelope number, waveform, filter
number and envelope name together with the amplitude, sequence and
mini VMW device windows. The filter parameters and DREs are additional
pop up windows and do not appear on the basic screen. You can return to
the control screen by accessing Commands: Exit Synthesiser or pressing
COMM-HOME.
The following sections briefly describe each of the devices on the basic
screen. The more advanced features are described later in ‘More on
creating sounds’.
The SYNTHESISER screen
The devices are arranged in a circular manner. Only one device can be
edited at anytime; this is shown highlighted by a white background. Pressing SPACE moves onto the next device in a CLOCKWISE direction.
Pressing SHIFT-SPACE moves in the opposite direction (COUNTERCLOCKWISE).
Info Files Values Commands
15
Trumpet
1
P
15
S
1
2
3
0
15
15
1
15 15 1515
Page 49

46
Envelope number
This device displays the number of the selected envelope from the current
sound set (1). The envelope parameters and filter associated with this
envelope are displayed and may be edited. You can change the current
envelope number at any time using Z and X. It is also included on the
‘circuit’ and may be changed with Q and W; the normal editing keys (see
‘Creating sounds-a quick guide’).
When changing the envelope number all the parameters are updated
including the filter. The new sound will be heard when * is pressed. Changing the envelope number itself has no effect on the sequencer. However,
the filter stored with that envelope will become the new global filter and may
therefore affect voices which have filter selected (see ‘The Sequencer’).
Waveform
The next device on the circuit displays the selected waveform icon and
letter for the current envelope.
The waveform governs the timbre or frequency spectrum of the sound.
Triangular waveforms tend to give rather mellow sounds, sawtooth waves
provide brass and string sounds, and noise waveform, the percussive
sounds like a cymbal. The pulse waveform is perhaps the most interesting
since you can vary the proportion of the different harmonics by changing
the pulse width. If pulse width is selected the pulse width device is displayed
alongside. This is then included in the circuit.
10
Z X
<>
Envelope
P
S
T
N
Triangle Saw Pulse Noise
Page 50

47
When highlighted the pulse width may be changed using Q and W. Some
example pulse waveforms are given below.
Filter number
The filter number device displays the filter associated with the current
envelope. The filter facility allows you to change the tone of the sound set
and these can be edited in the same way as envelopes. For any envelope
the filter can be off ( ) or set between 1 and 4.
The sound can only be passed through one filter at a time. Although you
can select any of the four filters with each envelope and sound the note (*),
when playing a tune there is only one filter available for all the envelopes.
The filter may be on or off for each voice. This should be kept in mind when
designing sounds for use in a musical composition. However, using the
LINKER module, music files with different filters set can be strung together
to give a varied musical composition.
When using the sequencer to playback a tune, the filter number device
displays the one available filter. This could, of course, be set to off.
minimum pulse width
(DC wave)
perfect square wave
intermediate pulse width
Q W
<>
Filter number
1
Page 51

48
ADSR
The block graph in the bottom right of the basic screen represents the
amplitude shape of the sound. The devices below the graph show the four
parameters that control the shape of the ADSR graph. Highlight the appropriate parameter using [ and ]. Change its value using Q and W.
Mini VMW
The mini Voice Monitor Window behaves in exactly the same way as in the
EDITOR module. The pitch and duration of the note can be changed.
This note sounds when you press *. When the sequencer is playing the mini
VMW is replaced by the Dynamic Envelope Device. The octave setting of
this note is determined by the Voice1-octave number given in Values. The
6 7
5
8
Select device
[ ]
Attack Decay Sustain Release
↑
=
Pitch
Q
Duration
W
<>
Page 52

49
duration of the note governs the time before the release phase starts. With
a large decay rate and zero sustain level the sound level will possibly reach
zero before the note has finished. In the other extreme a short note with a
low release rate can continue to sound for much longer than the actual
duration while the sound fades away.
Sequencer
The sequencer panel controls the playback of music files within the SYNTHESISER. The active playback voices are shown as highlighted numbers
on the left. SHIFT-1 is used to switch voice 1 on etc. The sequencer panel
is part of the circuit and when selected one of the values is highlighted. This
value is changed using Q and W. Move the highlight around the panel using
↑, =, [ and ]. The envelope, filter and loop section may be set for each voice.
Note duration Note duration
Attack rate
Sound finishes before end
of note
Sound continues past end
of note
Decay rate Sustain level Release phase
Page 53

50
If an envelope value box is blank (ie. off) that voice will play back using the
original envelope values in the music file. These are displayed in real time
by the Dynamic Envelope Device. Any value between 1 and 15 plays ALL
the notes in that voice using that envelope. The filter can be on or off for
each voice. Section is used in exactly the same way as in EDITOR or
KEYBOARD Values. A blank box (ie. off) means that any loop section
markers are ignored; a number selects the loop section to be played for that
voice and the double arrows means that the whole voice is repeated as if it
were a loop section.
Envelope name
Each of the 15 envelopes can be given a name to correspond with the
particular sound. You are allowed to type in up to 8 characters when this
device is highlighted. Note that you can not enter spaces since SPACE will
move you onto the envelope number device in the circuit! To change the
envelope number while on the envelope name use SHIFT-Z and SHIFT-X.
Note that you cannot be in the middle of editing a name so press RETURN
first.
S
3
Select box
[ ]
=
Envelope
1 2 3
Active playback voices
SHIFT
TROMBONE
2
1
1
1
2
2
Filter
Loop selection
off
number
off
on
off
number
all
1
↑
Page 54

51
Sounds can be designed on their own or in conjunction with the sequencer.
This section deals with the basic method of creating simple sounds…
dynamic effects such as tremelo, wahwah and phasing are converted later
on.
Press * to sound the current envelope. You can change the volume in
Values.
Change envelope with Z and X and listen to some of the other effects that
can be achieved. Notice how the numbers and graph change as you move
to another envelope number. If a sound continues too long (some enve-
lopeslastindefinitely!)thenkillthesoundwith←.
Creating sounds - a quick guide
Some of the sounds are probably using Dynamic Response Envelopes and
perhaps a filter. These are covered later. To make things easier access
Commands: zero envelope. The current envelope is reset to the basic
sound shape with the filter off. Move around the devices by pressing
SPACE. Now press SHIFT-SPACE and go round the other way. This is
exactly the same as selecting a module in the CONTROL screen.
When a device is highlighted you can edit the value(s) with Q and W. If
there is more than one value box within a device window move the highlight
around using the usual TMS up-down-sideways keys.
Move onto the waveform device and move through the four options. Notice
that the letters might help you identify the different waveforms… Triangle…
Saw… Pulse… you will probably instantly recognise the Noise waveform.
Whenever pulse is selected the pulse width device appears. This is now
part of the circuit so SPACE along and use Q and W to change the pulse
width. See how the sound goes from ‘hollow’ like a clarinet when the blocks
*
Sound note
←
Kill sound
[ ]
=
↑
Page 55

52
are equal (called a square wave) to ‘thin’ like an oboe when the blocks are
almost entirely on one side (called a DC wave).
Leaving the pulse width move onto the ADSR window. The graph shows
the amplitude shape of the sound. As you increase or decrease the values
of the Attack, Decay, Sustain or Release parameters, the graph and the
sound change shape. Experiment with different shapes… it’s fun. Remember to press * to hear the new shape. If you set the release parameter (the
oneofthefarright)tozerothesoundmightcontinueforever!Press←to
relieve you of the agony!
Leaving the graph looking similar to how you found it, move onto the mini
VMW. Change the duration of the note with Q and W and move the note up
and down the staves with ↑ and = as in the EDITOR. A note in the EDITOR
with this envelope would sound exactly the same.
Finally move onto the envelope name and type in the name of your new
sound. The whole of sound set 1 comprising of the 15 envelope definitions
and 4 filters can be saved in the normal way through Filing.
The Sequencer
The sequencer allows you to edit envelopes and filters whilst playing a tune
giving an instant response to parameter changes. The sequencer plays
music files just like the EDITOR and KEYBOARD modules. If there is
already a music file in memory (look at Info to find out) press RUN/STOP
and it will play from the beginning. If not, load a music file and try again. As
the tune is playing try turning voices on and off. Press SHIFT-1 to switch
voice 1 on/off etc. The tune will continue to play until you press RUN/STOP
again even with all the voices turned off!
RUN
STOP
Play
1 SHIFT
1
1
RUN
STOP
Stop play
Switch voice 1 on/off
Voice 1 ON
Voice 1 OFF
Page 56

53
The tune will automatically restart when all voices have finished. This gives
you plenty of time to change envelopes and filters. You can access the
Command line while the tune is playing but if meanwhile the tune ends it
will not restart until you pop down again. Try popping up Values and
changing Tempo or Voice 1-octave for instance. You can also access
Commands whilst playing. However, it is not safe to access files since the
results are not very predictable!
When a tune is playing you have probably noticed that the mini VMW has
been replaced by another pop up device. This is the Dynamic Envelope
Device (DED). It monitors the envelopes that are playing with each note in
every voice. If your tune has many envelope changes they provide a
fascinating real time display who wants flashing disco lights?
Highlight the sequencer panel and move to one of the envelope boxes. If
the box is blank the notes in that voice will be playing with the envelopes
set in the EDITOR (or KEYBOARD). Press W to set all notes in that voice
to envelope 1. Notice how the DED displays envelope 1 for that voice. Now
set the other voices to envelope 1. Use Z and X to dial up the envelope 1
parameters. You can always change the envelope number whatever device
is highlighted. The sequence panel and DED should now look like this:-
As the tune is playing move round the devices and change the waveform
(pulsewidth) and ADSR graph… you can also change the Tempo and
Octave settings for each voice. Great fun isn’t it? When you are changing
parameters make sure that the envelope number device shows one of the
S
3
2
1
1
1
1
1
1
1
1
10
1
Page 57

54
numbers you have set in the sequencer panel, otherwise you will not hear
any changes.
You can experiment with different envelopes for each voice and try turning
voices on and off to hear the changes better (SHIFT-1 etc). If there is a filter
on (a number appears in the filter number device) try turning the filter on
and off in each voice. The next section deals with actually editing filter
parameters.
The final set of value boxes enable you to dial up different loop sections as
a tune is playing. Refer to ‘Loop sections’ in the EDITOR part of the manual
for details on setting up and using loop sections. If you have a tune loaded
which contains more than one loop section in a voice then you can dial up
any of the sections for that voice. When a new section is selected the tune
restarts at the beginning again. If a voice contains rhythm tracks dial
through these. Then you could dial up a suitable bass line for instance in
another voice and add a melody line perhaps… the possibilities are endless.
You can, of course, use the EDITOR, KEYBOARD or MIDI modules to enter
and edit loop sections. Look at ‘Hints & Tips’ in the EDITOR for more help
in using the sequencer.
More on creating sounds
A more complex but very powerful feature of the TMS sound system is the
ability to sweep the pulse width, pitch and filter frequency of any note in any
voice. Unlike the ring modulation and synchronisation effects normally
associated with the CBM64, TMS does not require another voice to modulate these parameters. Instead, two Dynamic Response Envelopes (DREs)
control the sweeping of the pitch and/or pulse width and filter frequency.
Tremelo, phasing, wahwah and flanging effects are all within the scope of
TMS and can be used in all 3 voices at the same time.
A pitch/pulse width DRE is part of each envelope definition whereas a filter
frequency DRE is associated with each set of filter parameters. A DRE is
popped up over the ADSR graph by pressing D. Pop it down by pressing D
again. Alternatively access Commands: DRE up/down. If the filter devices
are being displayed (see below) the filter frequency DRE will be popped up.
Otherwise the pitch/pulse width DRE will appear.
D
Pop DRE up/down
Page 58

55
Pitch/pulse width DRE
This DRE can sweep the pitch and/or the pulse width of the note. Pulse
width can only be modulated if the pulse waveform is selected. There are
separate devices for selecting whether the pitch and/or pulse width are to
be swept.
There are three independent sections each of which are specified by a step
height (or rate) and a number of steps (section length). There is an overall
step time which governs the actual rate of change of the pitch/pulse width
with time. The smaller the step time the greater the rate of change.
A DRE section is ignored if the step number is zero. Each section follows
on from the next.
Select box
[ ]
=
↑
Sweep pitch
off
on
4
2
10
1
-27
4
1
Sweep
pulsewidth
off
on
Repeat pattern
off
on
Steptime
Rate
Steps
2
10
-4
5
10
0
Pitch change with DRE active
initial
pitch of
note
10 steps
5 steps
no further change
1 2
Page 59

56
If the pitch reaches the upper pitch limited then it automatically folds down
to the lowest pitch limit and vice versa. The pitch then continues to increase
or decrease at the same rate. This effect is called foldover or wrapround.
Changing the pitch up and down rapidly produces a vibrato effect. This can
be slowed down by increasing the step time. A slow change in pitch gives
a glissando effect. If you want the note to stay in tune make sure that the
upward change in say DRE section 1 is the same as the downward change
in DRE section 2. You could of course have more complicated pitch
patterns involving a third DRE section. Pitch changes are especially effective in percussive effects using the noise waveform.
A phasing effect used to great effect by synthesiser players is achieved by
sweeping the pulse width. The step time can be used to slow down or
speed up the effect. Both the pitch and the pulse width can be swept
together using the same DRE sections.
The repeat device can be either on or off. When off each DRE section will
only be active once. When on the whole sequence of DRE sections will be
repeated continuously until the end of note duration. DREs are not active
during the release phase. Only DRE sections which have non-zero step
lengths will be included in the sequence. Patterns consisting of 1, 2 or 3
frequency sections can be repeated. The initial pitch or pulse width value is
reset at the beginning of each cycle. If the volume reaches zero before the
sequence is completed then the repeat device will have no effect.
10
30
0
0
0
0
Pitch change with DRE active
upper
limit
section 1
no further change
lower
limit
Repeat ON
Page 60

57
Filters
Filters can alter the tone of a note by allowing only a certain range of
frequencies to pass through. TMS allows you to define 4 filters to be used
with the set of 15 envelopes. However, the CBM64 sound hardware only
lets you use one filter for all three voices. You may set the filter number off,
or select one of the four filters available. The filter number device displays
the current filter that can be used by the sequencer.
A filter is defined in a similar way to an envelope. There are three main
parameters: filter type, resonance and filter frequency. A DRE may be used
to sweep the frequency. The filter devices are popped up by pressing F or
accessing Commands: Filter up. They are then included in the normal
circuit. These devices are popped down in the same way.
The filter frequency DRE can only be popped up when the filter devices are
displayed. Otherwise the pitch/pulse width DRE is displayed. The filter type
device allows you to select one of the four available filter types. They are
identified by an icon and a letter.
-6
16
12
5
0
10
DRE section repeats until end of note duration
F
Pop filter up/down
low pass band pass high pass notch
L B H N
Page 61

58
The low pass filter allows everything below a certain frequency to pass
through, cutting out most of the higher frequency sound. This means that
high pitched notes might sound very quiet if heard at all! The high pass filter
works in the opposite way. The band pass filter restricts the frequency
range to near the filter frequency. The volume and sound of a note passing
through a band pass filter depends a great deal on how far the pitch of the
note is away from the filter frequency. The notch filter is opposite to the
band pass.
The filter resonance determines how effective the filter will be. With a low
resonance the filter effects might not be very marked, however with a high
resonance the effect will be more noticeable.
The filter frequency graph gives an indication of the effect of the particular
filter. The black area of the graph shows which frequencies will pass
through unaffected. Move the graph using Q and W in the normal way.
The filter frequency can be modulated with the filter DRE. Press D to pop it
up. Note that it will appear automatically when you press F if the pitch/pulse
width DRE is already displayed. Sweeping the filter frequency can produce
amazing sounds such as the ‘wahwah’ effect loved by many electric guitarists. This is achieved by sweeping the frequency of the band pass filter up
and down. You can alter the rate using the step time device. ‘Flanging’ is
achieved by slowly changing the filter frequency of a high or low pass filter.
All these effects are based upon triangle, saw or pulse waveforms. Howev-
10
Resonance
Filter
frequency
these frequencies pass
through
Page 62

59
er the noise waveform (white noise) can be filtered to give what is known
as pink noise. Sweeping the filter frequency can produce dramatic sounds.
The Command Line
Apart from the normal filing operations and status information, the Command line is used to access the many commands available from within the
SYNTHESISER. These are described below.
Files f1
TMS stores two sound sets in memory. Only the envelopes and filters in
sound set 1 are immediately available for use within the modules. The
SYNTHESISER always displays this set. The second set can be swapped
in at any time by accessing Commands: Swap sound sets. Individual
envelopes or files may also be swapped or copied between the sets. Sound
sets can be loaded into either set 1 or set 2. When loading remember to
press to switch between set 1 and 2 (see ‘Filing’). Similarly for saving sets.
Values f3
The Key signature and Time signature can not be changed in the SYNTHE-
SISER. They are displayed for reference purposes only.
Tempo and Volume can be changed while you are playing a tune in the
sequencer. To change the octave settings for each voice, highlight Voice
and press RETURN. The Octave for that voice can then be changed. Press
RETURN to pop the secondary window down again.
Info Files Values Commands
Key signature
F # 6 sharps
Time signature
4/4
Tempo
Presto
Volume
15
Voice
3
Page 63

60
Commands f5
DRE up (down) displays or hides the Dynamic Response Envelope. This is
equivalent to pressing D. If the filter devices are displayed the filter frequency DRE will pop up. Filter up (down) pops the filter devices up or down. This
is equivalent to pressing F.
Copy envelope allows you to copy the current envelope parameters (which
are always in sound set 1) to any other envelope in either sound set 1 or
sound set 2. You may also use this command to copy the parameters from
any other envelope to the current envelope. A pop up appears under the
Command line. Move between the devices with [ and ], changing the values
with Q and W. Press RETURN to copy. You may escape from this command by pressing ←.
Info Files Values Commands
DRE up
(down)
Filter up
(down)
Copy envelope
Swap envelope
Copy filter
Swap filter
Zero envelope
Zero filter
Zero all envs
Zero all filters
Reset all envs
Reset all filters
Swap sound sets
Exit Synthesiser
RETURN
←
Select device
[ ]
Envelope
number
10 2
Copy
Abort command
Sound set
Copy from
Copy to
Copy from
Page 64

61
Use Copy filter in exactly the same way to copy filter parameters. The copy
operations are very useful for making up a new sound set from envelopes
and filters in other sets. The easiest method is to Zero all envs and Swap
sound sets to get a ‘blank’ set in sound set 2. Then load your sound sets
into set 1 and copy the required envelopes from each one to the new set in
2. Remember that you have to be on the required envelope number (use Z
and X to change) before accessing Copy envelope. Use a similar procedure
for making up a filter set.
Swap envelope and Swap filter are very similar to the copy commands
except that there are only two devices in the pop up for specifying the
envelope or filter to be swapped with. Again you may abort the command
by pressing ←.
Zero envelope and Zero filter can be used to reset the current
envelope/filter to a standard set of parameters. These may be used as a
base for creating a new envelope or filter. Zero all envs and Zero all filters
reset all the envelopes/filters in sound set 1 to the same standard values.
All envelope/filters will then be identical. This is particularly useful when
starting to create new sounds from scratch.
Reset envelopes resets all the envelopes in sound set 1 to the default
values that were initially loaded into set 1 when entering TMS. Reset filters
replaces the current set of filters with the original default set. After the reset
commands the envelopes/filters will all be different unlike the zero commands above.
Swap sound sets swaps set 1 completely with set 2. If you want to hear and
edit the alternative sound set (2) you have to first swap it into set 1. After
editing you can always swap back in the original sound set 1. If you want to
try a new set of envelopes and filters with a particular tune using the
sequencer swap sound sets before loading the music file (the sound set
associated with the music file always loads into set 1). Then swap your new
sound set back into set 1 to use with the tune. This avoids having to reload
the sound set again.
Exit synthesiser will exit back to the Control screen as will COMM-HOME.
Page 65

62
Info f7
The normal music file information is displayed. Use info to see which sound
set you are currently using.
Page 66

63
The Midi module provides a software interface between the Music System
and an external midi keyboard/synthesizer. This module requires that a
MIDI keyboard is connected to your Commodore 64 microcomputer via a
hardware MIDI interface. AMS is configured to function correctly with most
MIDI keyboard/synthesizers in conjunction with either the S.I.E.L. MIDI
computer interface (UK, or the PASSPORT DESIGNS C64 MIDI INTERFACE (USA). Other MIDI hardware combinations (ie J.M.S.) may also work,
but Island Logic cannot guarantee this. You may also find it desirable to
provide some form of amplification for your keyboard.
MIDI
Midi hardware combinations can send and receive MIDI format data files
from the Commodore 64. The AMS MIDI module can record and playback
MIDI standard files with a limit of six voices or channels. The module will
allow a single keyboard to be directly interfaced with AMS. For more
complex operations consult your MIDI hardware manual.
WARNING During any sort of disk drive operation it is advisable to remove
the lead from the ‘MIDI IN’ socket of the interface. This is because some
keyboards could interrupt such operations and possibly crash the system.
The ‘MIDI IN’ lead should only be connected during MIDI RECORD and
PRACTICE operations.
C64 Audio output
Midi Interface
Midi out
Amplifier
Midi in
Audio output
Page 67

64
The MIDI module does not have explicit channel assignment. The playing
back of a track is through the same channel as it was recorded. When
recording a track you must set the MIDI output channel on the keyboard to
the one you want it to be played back on. AMS will do its best to be
compatible with as many keyboards as possible. Unfortunately hardly a day
goes by without news of some new MIDI facility or device. The only way to
uncover the power of MIDI is to experiment. AMS offers you lots of flexibility
- you can tidy up MIDI music files in the EDITOR module - or re-assign the
sound envelopes to be played via your MIDI keyboard.
All recording and playback is from the start of a track. To add to the end of
a track you must use a separate track and use the EDITOR to ‘cut and
paste’ the two tracks together via a ‘notepad’ file. The EDITOR contains
many facilities to help you tidy up or correct your compositions.
To EDIT or PRINT any music composed via MIDI, the MIDI data file (x. file)
must be converted into one or more internal TMS music files (m. files). To
do this AMS provides a TRACK/VOICE ASSIGNMENT device that will
allow you to decide which MIDI channels to assign to each of the three AMS
voices (or visa versa). Both the MIDI (x.) file and the AMS (m.) file/s can be
saved to disk in the normal way via the FILES COMMAND LINE option.
The METRONOME tick is output through the Commodore 64’s internal
sound hardware.
An audio output from the C64 can be obtained from pin 3 of the Audio
connector (N.B. Consult your Commodore 64 user manual before attempting any hardware modifications).
IMPORTANT
Page 68

65
PLAYING MIDI
The MIDI module can be selected from the CONTROL SCREEN by highlighting the MIDI ICON (SPACE bar) and pressing RETURN. The initial
MIDI screen shows the MIDI TRACK device in the center of the screen just
below the COMMAND LINE. Other devices occupying the same screen are
the METRONOME (bottom right), the ENVELOPE device, (bottom middle),
and the RECORD/PLAYBACK/EVENT device (bottom left). You can EXIT
back to the CONTROL SCREEN by selecting EXIT MIDI via the COMMANDS pop-up or by pressing the COM CLR/HOME key pair.
The VOICE MONITOR WINDOW (VMW) can be displayed by pressing the
COM V key pair or selecting it from the COMMANDS pop-up (F5). The
VMW is closed on pressing the same COM V key pair. The VMW will
display and animate music contained within the current voice in a similar
way to the KEYBOARD module. The current track (available for recording)
is indicated in the EVENT/RECORD/PLAYBACK device, in the VALUES
pop-up and on the MIDI TRACK METER device.
The VMW will display music in real time as it is entered from a MIDI
keyboard. The VMW will also display music being played back through a
MIDI keyboard.
PRACTICE MODE. Pressing the COM P key pair will put MIDI into PRACTICE mode. The VMW will pop-up and display any music played through a
Info Files Values Commands
1
2
3
2
100
R
4
5
6
EVENTS
999
15127
Page 69

66
MIDI keyboard. Music is not saved. RUN/STOP exits practice mode.
The COMMAND LINE (MIDI)
Most MIDI operations can be controlled via the COMMAND LINE. Unlike
the other modules AMS music (m.) files cannot be loaded directly into the
MIDI module. Instead AMS voices are converted and assigned to MIDI
tracks as the AMS music (m.) file is loaded. You can load and assign more
than one AMS music (m.) file into a single six track MIDI (x.) file. This
feature allows you to pick and mix AMS voices from different music files for
use by MIDI.
The reverse is also true. You must assign MIDI tracks to specific AMS
music file voices if you wish to save music composed via MIDI in AMS (m.)
format.
You can of course save and load MIDI (x.) format music files directly in and
out of the MIDI module. However MIDI (x.) files cannot be used directly by
the rest of the system. A MIDI (x.) file created by an external keyboard will
retain any special effects ie. modulation etc. If the music data is saved as a
AMS music (m.) file, then these effects will be lost.
To edit or print MIDI music you must convert it to AMS format by opting to
save the music as a AMS (m.) file. This can be done easily from the
COMMAND line. Select the SAVE option from the FILES pop-up and press
RETURN. A small SAVE MUSIC pop-up will then appear. You can use the
← key to change between SAVE MUSIC and SAVE MIDI. If you decide to
save the music in AMS format, select SAVE MUSIC and type the name you
wish to give the tune (file name). Note that filenames m.music and x.midi
are displayed as default names. Press RETURN to activate the SAVE
operation. A confirm pop-up will then await a Y or N response. Answer Y to
confirm the SAVE operation, or N to abort the SAVE operation.
Use the arrow key to flip between file types.
Save music
m.music
Save midi
m.midi
←
Page 70

67
TRACK/VOICE ASSIGNMENT
At this point a special TRACK/VOICE assignment pop-up appears to the
right of the MIDI TRACK METER. You can use this device to tell the filing
system which MIDI tracks to assign to which AMS voices. Use the Q and W
keys to change the AMS voice and the SPACE bar to assign the MIDI track.
(see diagram below). Note that the AMS voices 1 - 3 have MIDI tracks 1 3 assigned as default values.
If your MIDI composition uses more than three tracks you can SAVE say
three of these into one AMS (m.) file and then repeat the SAVE operation
to save the other tracks into a second or even third AMS (m.) file. Press
RETURN after you have assigned the tracks to create and save the AMS
(m.) file. If you create more than one AMS file from a MIDI file try and
choose file names that relate to one another. This will make life easier when
reassigning these AMS files to a MIDI file.
eg. m.PART 1 m.PART 2 m.PART3 etc.
Loading files into the MIDI module works in a similar way. You may load
multiple AMS (m.) files one at a time into MIDI tracks again using the
TRACK/VOICE assignment device. Since MIDI uses 2 to 3 times more
space to store music data than internal AMS (m.) files care must be taken
during multiple file loading to ensure that you have the space available. The
FILES command line pop-up can also be used to produce a CATALOGUE
of your data disk. It can be used to DELETE or RENAME a file. Refer to the
COMMAND LINE section of this manual for more information.
1
2
3
4
5
6
1
2
3
4
5
6
f1
SPACE
Q W
<>
SELECT TMS VOICE (1-3)
SELECT MIDI TRACK (1-6)
1
Info Files Values Commands
Catalogue
Load
Save
Delete
Rename
Page 71

68
MAKING MUSIC
The easy way to check that your MIDI set-up is working is to load a MIDI
(x.) file directly into the module and experiment with the various ways of
playing the tune back through a connected external MIDI keyboard.
1. Load the MIDI module from the CONTROL SCREEN.
2. Press F1 to display the FILES pop-up.
3. Use the SPACE bar to select the LOAD option.
4. Press RETURN.
5. Use SPACE to select x.example from the catalogue.
6. Press RETURN.
7. Press Y to confirm the LOAD operation.
You will see that when the file has loaded the horizontal bars on the MIDI
TRACK METER will partially fill indicating that those TRACKS contain
music data. To play the music through an external keyboard press the RUN
STOP key.
If your MIDI keyboard is correctly set up then you should hear the music
play. Stop the music playing by pressing the RUN STOP key again. The
SPACE bar can be used to pause the playback at any time. Press SPACE
to release the pause mode and continue playing.
It is important to note that unlike the EDITOR and KEYBOARD modules,
the MIDI module does not have its own internal sound driver, so cannot
produce sound without an external MIDI keyboard.
The EVENT indicator in the RECORD/PLAYBACK/EVENT device shows
the number of MIDI EVENTS used. During recording you must take care
that this number doesn’t exceed 3000. If this happens then you could be
running on empty.
C
=
RUN
STOP
SPACE
RUN
STOP
PLAYBACK
2
R
EVENTS
999
PAUSE
RECORD
ACTIVE VOICE
TOTAL MIDI EVENTS
Page 72

69
The MIDI TRACK device
The MIDI module’s flexibility relies on the ability to display individual voices
during RECORD and PLAYBACK operations as animated music within the
VMW (Voice Monitor Window). The VMW is always associated with the midi
track selected for recording. i.e. The ACTIVE RECORD TRACK.
The ACTIVE RECORD TRACK is the midi track which is selected for
recording on to. This can be changed by holding down the Commodore key
and pressing a number key between 1 and 6.
For playback operations you may elect to play back one or more of the
tracks. The tracks active for playback can be toggled ON or OFF by holding
down the SHIFT key and pressing a number key between 1 and 6.
The ‘Tape Head’ indicator provides a visual guide across tracks during
record operations. Note that the TRACK METER highlight bars re-scale
themselves when they reach the left side of the device providing an accurate visual indication of the size of each track.
RECORDING is started by pressing the COM RUN-STOP key pair and
stopped with the same keys. You can pause recording with the SPACE bar.
1
2
3
4
5
6
‘TAPE HEAD’ INDICATOR
1
2 3
SHIFT
C
=
TRACK METER DEVICE
4
5 6
ACTIVE RECORD TRACK
1
2 3
4
5 6
ACTIVE PLAYBACK TRACKS
Page 73

70
ENVELOPES
In order to fully understand the MIDI module it is recommended that you
experiment with other AMS modules. The EDITOR, KEYBOARD and
SYNTHESISER all use ENVELOPES to describe different instrument
sounds. These instrument sounds can be changed within each of the
modules to provide an unlimited range of sounds. The above modules can
store 30 of these sounds (or ENVELOPES) for use within EDITOR or
KEYBOARD compositions. New sets of envelopes can be loaded into the
modules via the FILES (LOAD) command line pop-up in the form of two
sound files (refer to the COMMAND LINE section of the manual). Each
sound (s.) file contains 15 envelopes or sounds.
These sounds are created edited and saved from the SYNTHESISER
module. They use the internal Commodore sound hardware.
When a MIDI file is created the external MIDI envelope numbers as used
by your MIDI keyboard are automatically assigned to internal AMS ENVELOPE numbers 1-15 as they occur. Since some MIDI keyboards are able
to use up to 255 different envelopes, you must ensure that the AMS
envelope numbers to which the MIDI envelopes are assigned simulate the
sound of the MIDI envelope. This may require that you use the SYNTHESISER to edit the ENVELOPE file so that when the MIDI (x.) music file is
converted and saved to a AMS music (m.) file are played back through the
EDITOR, the sound is roughly equivalent to the original MIDI input.
When a AMS (m.) file is loaded/converted back into MIDI the original MIDI
envelopes are re-installed so that on playback through the MIDI keyboard,
the correct sounds are played.
During a MIDI recording session you may change the MIDI envelope from
the MIDI keyboard as often as you like. However if you use more than 15
different envelopes the automatic envelope assignment will overflow into
AMS envelope number 15.
You can manually change this assignment of MIDI envelopes to AMS
envelope numbers via the ENVELOPE ASSIGNMENT device. Use the Z
and X keys to view how these envelopes are assigned. Use SHIFT Z and
SHIFT X to change the MIDI envelope assignment.
15127
Z X
<>
TMS ENVELOPE
SHIFT Z X
<>
MIDI ENVELOPE
Page 74

71
VALUES (F3)
The Q and W keys can be used to increment or decrement any selected
value within the VALUES pop-up.
The TIME SIGNATURE and TEMPO can also be toggled to display their
alternative notations using the ← key. Note that TIME SIGNATURE can
only be changed while there is no music in the system. This sets the time
signature for any new music data entry.
INTERFACE allows you to select the MIDI hardware interface being used
to connect the Commodore 64 and an external midi keyboard.
Info Files Values Commands
Key signature
F # 6 sharps
Time signature
4/4
Tempo
Presto
Metronome
Off
Interface
S.E.I.L.
Page 75

72
COMMANDS (F5)
The currently highlighted COMMAND can be activated by pressing the
RETURN key.
DELETE TRACK will delete the current active MIDI track as set within the
VALUES pop-up. You may use the COM 2 to 6 key pairs to change the
ACTIVE RECORD TRACK.
CLEAR ALL TRACKS will delete all tracks.
METRONOME will toggle the metronome tick on or off. The N key will also
toggle the metronome tick. The sound of the metronome tick is generated
internally and played through the Commodore 64’s internal sound system.
If you have provided an external sound output for your Commodore then
this metronome tick can be amplified separately to your MIDI keyboard
output.
The VOICE MONITOR WINDOW command will toggle on and off screen
the VMW. The COM V key pair also toggles the VMW on and off. The VMW
can only display the ACTIVE VOICE. Use SHIFT RUN-STOP to play the
ACTIVE VOICE through the VMW.
EXIT MIDI will exit back to the CONTROL SCREEN as will the COMMO-
DORE CLR-HOME key pair.
INFO (F7)
This pop-up window displays the number of EVENTS in each of the six MIDI
tracks, as well as the amount of free space left to the user.
Info Files Values Commands
Voice monitor window
Delete track
Clear all tracks
Exit midi
Page 76

73
The PRINTER module allows the printing of AMS music (m.) files in various
prints qualities on standard form feed paper. Both the Commodore and
Epson range of printers are supported. Many Epson compatible printers will
also work. Music is printed out in horizontal format, 1 - 3 voices. Lyrics can
be entered or loaded from disk to be included with the print-out.
The PRINTER Module
The PRINTER screen operates in a similar way to the rest of the system.
Important functions are provided via the COMMAND LINE. The PRINTER
screen also displays a fixed VMW (Voice Monitor Window) together with a
TEXT window. The Printer VMW will only display Voice 1. Text or lyrics can
be entered and saved as a TEXT (t.) file. Music can be printed with or
without lyrics.
On entry to the module, if no music is present, then only the COMMAND
LINE is active. Music files may be loaded by using the Files f1 pop-up. If a
music file (m.) is loaded, any text (t.) file with the same name will be loaded
at the same time. The text is displayed within the text window along with the
music. If a text file with the same name is not available then the text window
will remain blank ready for text input. Barlines are shown on the text window
corresponding to the positions of the barlines in the music.
Info Files Values Commands
111
dance to the music
Page 77

74
The VMW (Voice Monitor Window) displays voice 1 of the music file, in
exactly the same format as it will appear when printed out (i.e. including any
spaces necessary to align with the bars in voices 2 and 3). The white
marker in the text window indicates the position of the text cursor. Barlines
in both the VMW and the TEXT window are aligned and scroll synchronously.
Text can be entered via the TEXT window and edited easily via simple line
editing commands. Editing always occurs within the current bar as indicated
by the bar icon to the left of the TEXT window. During editing the bar width
may be expanded to fit the text. This effect only occurs within the PRINTER
module. Even though the printed music may have expanded bars, the
original music (m.) file is left undisturbed. If the text is deleted then the
music can be printed out in the normal way.
Page 78

75
Editing Lyrics
You can type lyrics in both upper and lower case, directly into the text
window. The white text cursor can be moved back and forth via the [ and ]
keys. Use SHIFT [ and ] to move one bar at a time and RETURN to move
to the start of the next bar.
Text often requires more space than the bar width of the music allows. The
bar width can be extended or reduced using the SHIFT and up arrow keys
as described in the following diagram.
dance to the music
dance to the music
[ ]
[ ]
<>
<>
SHIFT
RETURN
Move left/right one character
Move left/right one bar
Move to start of next bar
↑
↑
SHIFT
Extend bar by 3 character spaces
Reduce bar by 3 character spaces
Page 79

76
Characters may be deleted using the INST DEL key. Extra spaces may be
inserted using SHIFT INST DEL.
Note that the total bar width is not increased when you insert spaces in this
way: the text in the current bar is simply moved over to the right, and if there
is not room in the bar it will be truncated! Use the up arrow key (described
above) if you need to actually extend the bar width.
INST
DEL
SHIFT
INST
DEL
Delete character to left
Insert space to left of current character
Page 80

77
The operation of the command line is much the same as the other AMS
modules. Refer to the section earlier in this manual for a full description of
the command line.
FILES f1
LOAD Both music (m.) and text (t.) files may be loaded into the PRINTER
module. When a music file is loaded, its corresponding text file will also be
loaded, automatically, if it exists on the disk. A text file cannot be loaded if
no music file is present. Use the ← key to switch between (m.) and (t.) file
types.
If the text file has a different name from the music file, it must be loaded
separately after loading the music file. If a text file is loaded which does not
correspond to the current music file, an effort will be made to match the text
to the bars. If the text is too long to fit a bar then the text will be truncated
within the bar.
The PRINTER module does not allow music files which contain more than
255 bars in voice 1. An error message will pop-up if this situation occurs.
You can avoid this situation by using the EDITOR to create smaller files.
The LINKER can be used to create larger files for playback.
SAVE. Only text (t.) files (lyrics) can be saved from this module. No music
editing facilities are provided within this module. Try and make sure you
give the text (t.) file the same name as the music (m.) file for subsequent
auto-loading. You may create more than one Lyric TEXT file for the same
piece of music. To do this, use a similar (but unique) name for the text (t.)
file.
CATALOGUE, RENAME and DELETE are also available from the FILES
Command Line as usual.
THE COMMAND LINE (PRINTER)
Page 81

78
VALUES f3
Printer type. The first item in the values window allows printer selection.
Five different printers are catered for: use the Q<>W keys to select.
Printer HI/LO Res Auto Line Feed Page Skip
Epson FX-80 Yes Yes Yes
Epson RX-80 Yes Yes Yes
*Epson MX-80 F/T No Yes Yes
Star Delta 10 Yes Yes Yes
CBM MPS 801 No No Yes
CBM MPS 802 No No Yes
*For the Epson MX-80 F/T select Epson RX-80.
Although other dot matrix printers may work, Island Logic can only guarantee that AMS will operate correctly if used with the above printers.
f3
Pop-up/pop-down
Info Files Values Commands
Printer type Epson FX–80
3
Q W
<>
Change value
Print mode Hi–res
Format Aligned
Voice 1 Print
Voice 2 Print
Voice 3 Empty
Lyrics Print
Sections on
Form length 66 lines
Auto line feed on
Page skip off
Output User port
Page 82

79
Print mode. This allows you to select either High or Low print resolution.
N.B. Some printers do not support different resolutions.
Format. The music may be printed either with the bars in each voice
aligned, or non-aligned N.B. Text (lyrics) can only be printed if the bars are
aligned.
Voices. These entries allow the selection of voices for printing. If a voice is
empty it cannot be printed. Text can only be printed when all non-empty
voices are selected for printing.
Lyrics. These may be printed or not, subject to the conditions specified in
Voices and Format.
The following values can be found by scrolling the VALUES menu up. ie.
Move the highlight bar to bottom of window to begin scrolling.
Sections. If set to Off then all section markers will be ignored. If set to On
and if a voice has a section marked, then the section will be printed once
and the printing of that voice terminated.
Form length. Can be set for either 66 or 72 lines per page.
Auto line feed. Some printers may generate their own line feeds: if so, this
entry should be set to Off. Set this entry to on if line feeds are required.
Page skip. When set to On the music will be printed on separate pages,
otherwise it will print continuously.
Output. Two methods of connecting a printer to your Commodore 64 are
supported: either via the User port or via the Serial port using a serial to
parallel converter (interface).
Page 83

80
COMMANDS f5
Print music. This command starts the printing of music. All values should
already have been set up. Use the RUN/STOP key to abort printing.
Delete text. This will clear all the lyrics from the text memory, and clear the
text window.
Start of text. Reset text cursor to start of text.
Exit printer. Exit the module back to the Control Screen. Note that all text
will be lost from memory, so remember to save it to disc before leaving the
Printer module if you wish to keep it. Any music file present will remain in
memory, however.
INFO f7
Display only. Indicates current status, as in other modules, except that the
Free Space here indicates how many text characters are still available. This
number will change only if you expand or reduce bar widths.
Info Files Values Commands
Print music
Delete text
Start of text
Exit printer
Page 84

81
The LINKER module enables large compositions consisting of up to 26
separate music files to be played back as one piece of music. In this way
tempo, key and time signature changes can be easily incorported into a
composition. The music files can be created in the EDITOR, KEYBOARD
or MIDI modules. Each of the separate files are played back exactly as they
were composed; at the specified key and tempo with the envelopes and
filters in use at the time. The sequence in which the files are played back
can easily be entered and edited. The separate music file can be saved as
one large or LINKER file together with the sequence. This can be reloaded
for playing or editing.
There is space for over four maximum-sized music files in the LINKER.
However, since compositions are often made up of shorter sections in
perhaps different key and time signatures there is room available for 26
different music files at one time.
Unlike the EDITOR or KEYBOARD modules for instance, the Linker will not
play any music until you have loaded a music or Linker file. Any music and
sound sets in memory are wiped out when you enter the LINKER module.
Make sure that your latest masterpiece has been saved on disc before
selecting the LINKER!
The LINKER screen
LINKER
Info Files Values Commands
FREE 1135
Sequence
a intro
b m. verse
c m. chorus
d m. finale
e m.
f m.
g m.
h m.
i m.
b verse
c chorus
b verse
c chorus
d finale
a m. intro
Page 85

82
The LINKER module can be selected from the CONTROL screen by
highlighting the LINKER icon and pressing RETURN. The screen consists
of two windows; the file list on the left and the sequence on the right.
The file list displays any music files that have been loaded either as
individual music files or together as part of a LINKER file. The music files
are labelled from a…z. These letters are used to identify the music files in
the sequence. When files are loaded they are automatically entered in the
first available space in the list. They are then available for use in the
sequence. There are Commands for replacing and deleting music files in
the list.
The sequence window displays the order in which to play the individual
music files. Only music files that appear in the file list can be included in the
sequence. Files may be repeated as many times as you want in the
sequence. However there is a maximum of 99 items in any sequence! The
sequence can be played from any point.
Entering and playing a sequence
Load a music file using Filing in the usual way. You can also load a linker
file… but we’ll get to that later on. The music file should have appeared in
the file list as file a. Load another music file. This will appear as file b.
underneath. You can scroll the file list in the window with SPACE and
SHIFT-SPACE. This is only necessary when you have too many files to fit
in the window.
FREE 2865 Sequence
a
m.TUNE1
b
m.TUNE2
c
d
e
f
g
h
i
a TUNE1
b TUNE2
a TUNE1
Q W
<>
Sequence letter
Highlight
=
↑
SHIFT
RETURN
SPACE
SPACE
Enter file in sequence
Scroll window
Page 86

83
As you load music files keep an eye on the Free space displayed above the
file window. You will be warned if a music file is too big to load. Having
loaded a couple of music files you can enter these in the sequence window.
Use Q and W to move through the file letters (in this case only a and b will
appear) and press RETURN to enter the file in the sequence. The highlight
will move on to the next null entry shown in blue ready for selecting and
entering if necessary. Choose the other file and press RETURN. You
should now have two files entered in the sequence and a null entry at the
end. Press ↑ (twice) to move to the top of the sequence and press
RUN/STOP to play. If you have a long sequence use SHIFT↑ to move to
the top. You can stop the sequence by pressing RUN/STOP again.
The music will play from the highlighted file in the sequence and will
continue to the final item. Remember that you can kill the sound when the
music has ended by pressing ←. You can not play from the null entry at the
bottom of the sequence.
Files may be deleted from the null entry at the bottom of the sequence with
– and inserted in the middle of the sequence with +. You can delete the
entire sequence by pressing SHIFT-DEL.
↑
←
RUN
STOP
SHIFT
Q W
SHIFT
INST
DEL
Move to top of sequence
Play sequence / Stop play
Kill sound
–
+
Edit sequence file
Delete sequence file
Insert sequence file
Delete sequence
Page 87

84
Linker files
Having loaded a set of music files and entered the sequence you may like
to save the entire composition as one file ready to be loaded again for the
next performance! The Save option in Filing allows the music to be saved
as a linker file. Make sure that you have plenty of room on your library disc
as linker files can be quite large.
You can use the Load option to reload your linker file. All the original music
files and the sequence will be loaded overwriting any files that have already
been loaded. Make sure that you do not load a linker file instead of a music
file by mistake!
The Command Line
Apart from the Filing operations mentioned above, the Command line is
used to access the status information of each music file and a number of
Commands. There are no accessible parameters within Values.
Commands f5
Remove file is used to delete a music file from the file list. After accessing
the command (press RETURN) one of the music files is shown highlighted.
Move the highlight to the required file using SPACE and SHIFT-SPACE
and press RETURN to remove the file from the list. You are not allowed to
delete a file that is in the current sequence. If you decide that you didn’t
really want to delete any of the files, find a blank entry and press RETURN.
Replace file is used in exactly the same way except that you enter the Filing
option after selecting the file to replace and pressing RETURN. Now load
the replacement file. Note that music files can be loaded in any order.
Info Files Values Commands
Print music
Replace file
Remove all files
Exit printer
Delete sequence
Page 88

85
Remove all files deletes all music files in the file list and Delete sequence
has the same action as SHIFT-DEL.
Exit Linker will exit back to the control screen as will COMM-HOME.
Info f7
The status information can be displayed for any music file in the list. Move
the highlight bar up or down to show the information for other files. Press
RETURN or f7 to pop Info down again.
FREE 2865
a
m.TUNE1
b
m.TUNE2
c
d
e
f
g
h
i
SHIFT
SPACE
SPACE
Move highlight
Info Files Values Commands
Notes
45
27 0
Bars
13
5 1
Sects
4
5 1
Octave
3
2 2
Filter
off
on off
Sect
1
2 off
1 2 3
Page 89

86
ADSR 23, 48, 49, 52
Absolute Macros 31
Accent Music 32
Accidentals 17
Active Track 69
Active Voice 13, 38, 40, 50, 68
Adjust Barlines 19, 28, 33
Amplification 63
Amplitude 44, 48
Assignment 64, 66, 67
Attack 48, 49, 52
Audio Output 9, 64
Auto Linefeed 78, 79
Auto-scroll 4, 5
Autobar 16, 19, 29
Autosound 29
Autotie 16, 19, 29
Average 42
Backing Tracks 25
Band Pass 57, 58
Bar Number 13
Bar Width 75, 76
Barlines 15, 19, 20, 29, 33
Barmeter 11, 12, 13, 16, 26, 38
Beginner 42
Block Delete 22, 32
Block Tidy 34, 43
Blue Note 14, 22
B.P.M. 28, 39, 42
Catalogue 7, 8
Channels 64
Check Barlines 19, 33
Clear Music 14, 22, 34
Clear Notepad 32
Clear Tracks 6, 72
Command Line 4…9, 27, 41, 53, 59, 66, 77, 78, 84
Commands Pop-up 6, 30, 42, 60, 72, 80, 84
Commodore Key 3
Control Screen 2, 3, 11, 37, 45, 65, 82
Converting Midi Files 70
Copy Envelope 60, 61
Copy Filter 61
Copy to Notepad 32
INDEX
Page 90

87
Creating Sounds 51, 54
Current Note 12, 14
Cursor 4, 12, 13, 24, 75, 80
Cut and Paste 7, 64
D.C. Wave 47, 52
DED 48, 50, 53
DRE 44, 51, 54, 55, 56, 58, 60
Decay 48, 49, 52
Delete File 8, 83
Delete Note 15, 22
Delete Text 80
Delete Track 6, 72
Delete Voice 42
Digital Recorder 38, 41
Disc Drive 9
Disc Errors 9
Disco Lights 53
Duration 15, 18, 48, 49
Dynamic Envelope Device 48,50, 53
Dynamic Response Envelope 44, 51, 54, 55, 56, 58, 60
Dynamics 23
Editor Screen 11
Editor 10…36
Effects 51
Entering Notes 14, 15
Envelope Assignment 70
Envelope Name 39, 44, 50, 52
Envelope 13, 15, 17, 31, 39, 40, 44, 46, 50, 70
Error Messages 9
Events 6, 65, 68, 72
Exit 11, 34, 42, 43, 45, 61, 65, 72, 81, 85
Expert 42
External Keyboard Files 7
Fast Forward 16, 26, 38
File Examples 7
File Prefix 6, 7, 27, 66
Files 6…9, 4, 8, 17, 27, 41, 59, 66, 67, 77
Filing Errors 9
Filter Frequency 54, 58
Filter Up/Down 57, 60
Filters 23, 29, 44, 46, 47, 50, 57, 58
First Time Bar 20
Flanging 54, 58
Page 91

88
Flats 17
Flip Note Stem 33
Foldover 56
Form Length 79
Format Disc 9
Free Space 12, 72, 80, 83
Frequency 44, 46
Frequency Sections 54, 55, 56
Fun 52, 53
Function Keys 4
Glissando 56
Global Volume 14, 22
Hardware 9, 63
Hi-Fi 9
High Pass 57, 58
Highlight Cursor 4, 83
Highlight Bar 4, 5
Icons 2, 3, 11, 37, 57, 65, 82
Info Pop-up 5, 6, 34, 43, 62, 72, 80, 85
Inserting Characters 76
Inserting Files 83
Inserting Notes 21
Instrument Sounds 6, 46, 52
Introduction 2
J.M.S. 63
Key Signature 5, 17, 28, 35, 41, 43, 59
Keyboard Devices 38
Keyboard Overlay 37
Keyboard Screen 37
Keyboard 37…43
Kill 51, 83
Linker Files 7, 81, 84
Linker Screen 81
Linker Sequence 83
Linker 81…85
Load 7, 8, 67, 68, 82, 84
Loading TMS 3
Loop Sections 13, 19, 20, 24, 25, 26, 36, 43, 44, 50
Low Pass 57, 58
Lyric Files 7, 73, 77
Lyrics 73, 75, 79
Macro 21, 23, 30, 31
Magnetic Fields 9
Page 92

89
Major Key 28
Markers 20, 23, 24, 26, 30, 31, 32
Menu 4, 5
Merge Music 35
Metronome 6, 39, 42, 64, 65, 72
Midi Channels 64
Midi Files 7, 64
Midi In 63
Midi Interfaces 63, 71
Midi Keyboard 63
Midi Screen 65
Midi Synthesisers 63
Midi 63…72
Mini VMW 45, 48, 52
Minor Keys 28, 41
Modes 39
Modulation 44, 58
Move 30, 32
Multi-track 67
Music Files 6, 77
Naturals 17
Nesting 20
Noise 46
Notch 57, 58
Note Cursor 12, 24
Note Name 14
Note Scroll 12
Note Stem 33
Notepad Files 7, 12, 27
Notepad 27, 32, 35, 64
Octave 21, 29, 38, 48, 53, 59
Output 79
Page Skip 78, 79
Parameters 44, 52, 57, 60
Passport 63
Pause Mode 40
Pause 38, 40, 68
Percussion 46, 56
Phasing 51, 54, 56
Piano Keys 37, 39
Pink Noise 59
Pitch 15, 21, 31, 48, 55, 56
Play To 30
Page 93

90
Playback 13, 16, 30, 38, 40, 49, 50,
52, 65, 68, 69, 83
Playing Midi 65
Playing Notes 14
Pop-down 4…9
Pop-up 4…9
Practice Mode 40, 65
Prefix 6, 7, 27, 66
Print Format 79
Print Music 80
Print Resolution 78, 79
Printer Screen 73
Printer 73…80
Printers 73, 78
Pulse Wave 46
Pulse Width 46, 47, 51, 55
QWERTY 37
Rate 55
Real Note 15, 18
Record Mode 40
Record 38, 43, 69
Recursive (see Recursive)
Relative Macros 31
Release 48, 49, 52
Remove File 84
Rename 8
Repeat Device 55, 56
Repeats 12, 19, 20, 26
Replace File 84
Reset Envelopes 61
Reset Filters 61
Resolution 42
Resonance 57, 58
Rests 18
Rewind 16, 26, 38, 40
Rhythm Sections 25, 27
S.I.E.L. 63
Save 8, 17, 66, 67, 77, 84
Saw Wave 46
Scroll Left/Right 16
Scroll Music 12, 15, 26
Second Time Bar 20
Section Markers 25
Page 94

91
Sections 13, 24, 25, 26, 29, 36, 43,
44, 50, 54, 79
Sequence 81, 82, 83
Sequencer 36, 44, 49, 50, 52, 53
Serial Port 79
Set Macro 21, 30
Sharps 17
Sound Files 6, 17, 33, 59, 70
Sound Note 15, 51
Square Wave 47, 52
Staves 10
Step Time 55
Sustain 48, 49
Swap Envelope 61
Swap Filter 61
Swap Sounds 33, 42, 59, 61
Sweep 54, 55, 56, 58
Synthesiser Screen 45
Synthesiser Devices 45
Synthesiser 44…62
Tape Head 69
Tempo 5, 28, 42, 53, 59, 71
Text Cursor 75
Text Editor 76
Text Files 7, 73, 77
Text Window 73, 74
Text 74, 75
Tick 39, 40, 42, 64, 72
Ties 15, 18, 33
Time Signature 19, 28, 43, 59, 71
Tinkle Mode 39
Track Meter 65, 68, 69
Tracks 65, 68, 69
Transposition 18, 28, 34, 35
Tremelo 51, 54
Triangle Wave 46
Triplets 18, 21
User Port 79
VMW 11, 13, 16, 37, 38, 39, 40,
48, 65, 69, 72, 73,74, 75
Values Pop-up 5, 28, 29, 41, 59, 71, 78
Vibrato 56
Page 95

92
Voice Monitor Window 11, 13, 16, 37, 38, 39, 40,
48, 65, 69, 72, 73, 74, 75
Voice 5, 10, 11, 12, 13, 16, 22,
29, 52, 59, 67, 79
Volume 5, 14, 22, 28, 31, 39, 40, 59
Wahwah 51, 54, 58
Warning 63
Waveforms 44, 46, 51, 52
White Noise 59
Wrapround 56
Write Protect 9
Zero Envelope 51, 61
Zero Filter 61
Page 96

93
On the reverse side of your disc is a utility to convert TMS files saved on
cassette to disc AMS files.
To load this utility, type
LOAD “FILES”,8,1 <RETURN>
The program will then load and run automatically.
Press the f1 key on the Commodore to load a file from tape - the familiar
TMS “Files” window will pop-up, and you may select either the Catalogue
or the Load option to load a file, as in the tape version of TMS. (In this case
the Save option will do nothing.)
When a file is loaded, simply press Y to confirm that you wish to save it to
disc. When the file has been saved to disc, you may then load another file
from tape and repeat the process.
N.B. This utility does not contain any disc filing facilities: if you wish to
Catalogue your disc, Rename files etc., this can be done from within any
Advanced AMS module.
On your AMS disc are some sample music and sound files. These are
provided as examples of what AMS can do.
The Music
1 Breaker A hip hop special from Mark Harrison.
2 Minuette Beethoven rolls over - courtesy of Tony Selinger
3 Fugue Bach arranged by Nicky Johns.
4 Rag A Scott Joplin tune.
APPENDIX
Page 97

94
The Soundsets
Electro pop (included with Breaker)
1 Hihat
2 Accent
3 Snare
4 Bassdrum
5 Scratch
6 Syndrum
7 Electro bass
8 Lead 2
9 Worp
10 Lead 1
11 Attack
12 Burble
13 Lead 3
14 Lead 4
15 Tremelo
Orchestral (included with Minuette)
1 Violin 1
2 Violin 2
3 Cello
4 Doublebass
5 Clarinet
6 Oboe
7 Bassoon
8 Flute
9 Saxophone
10 Trumpet
11 Trombone
12 Piano
13 Harpsichord
14 Harp
15 Percussion
Also included with the soundsets are some sample filter settings. These will
enhance the sound of the envelopes provided.
Page 98

RAINBIRD SOFTWARE . WELLINGTON HOUSE
UPPER ST MARTIN’S LANE . LONDON WC2H 9DL
 Loading...