

Page 1
Rain Bird. Conserving more than water.
® Registered trademark of Rain Bird Corporation
® 2002 Rain Bird Corporation 2/02
P/N 232153
Rain Bird Corporation
Contractor Division
970 West Sierra Madre Avenue
Azusa, CA 91702
Phone: (626) 963-9311
Fax: (626) 812-3411
Rain Bird Technical Services
(800) 247-3782 (U.S. only)
Rain Bird Corporation
Commercial Division
6991 East Southpoint Road
Tucson, AZ 85706
Phone: (520) 741-6100
Fax: (520) 741-6522
Specification Hotline
(800) 458-3005 (U.S. only)
Rain Bird International, Inc.
145 North Grand Avenue
Glendora, CA 91741 USA
Phone: (626) 963-9311
Fax: (626) 963-4287
www.rainbird.com
200PRV Valve
Installation and Operation Instructions
Troubleshooting Guide
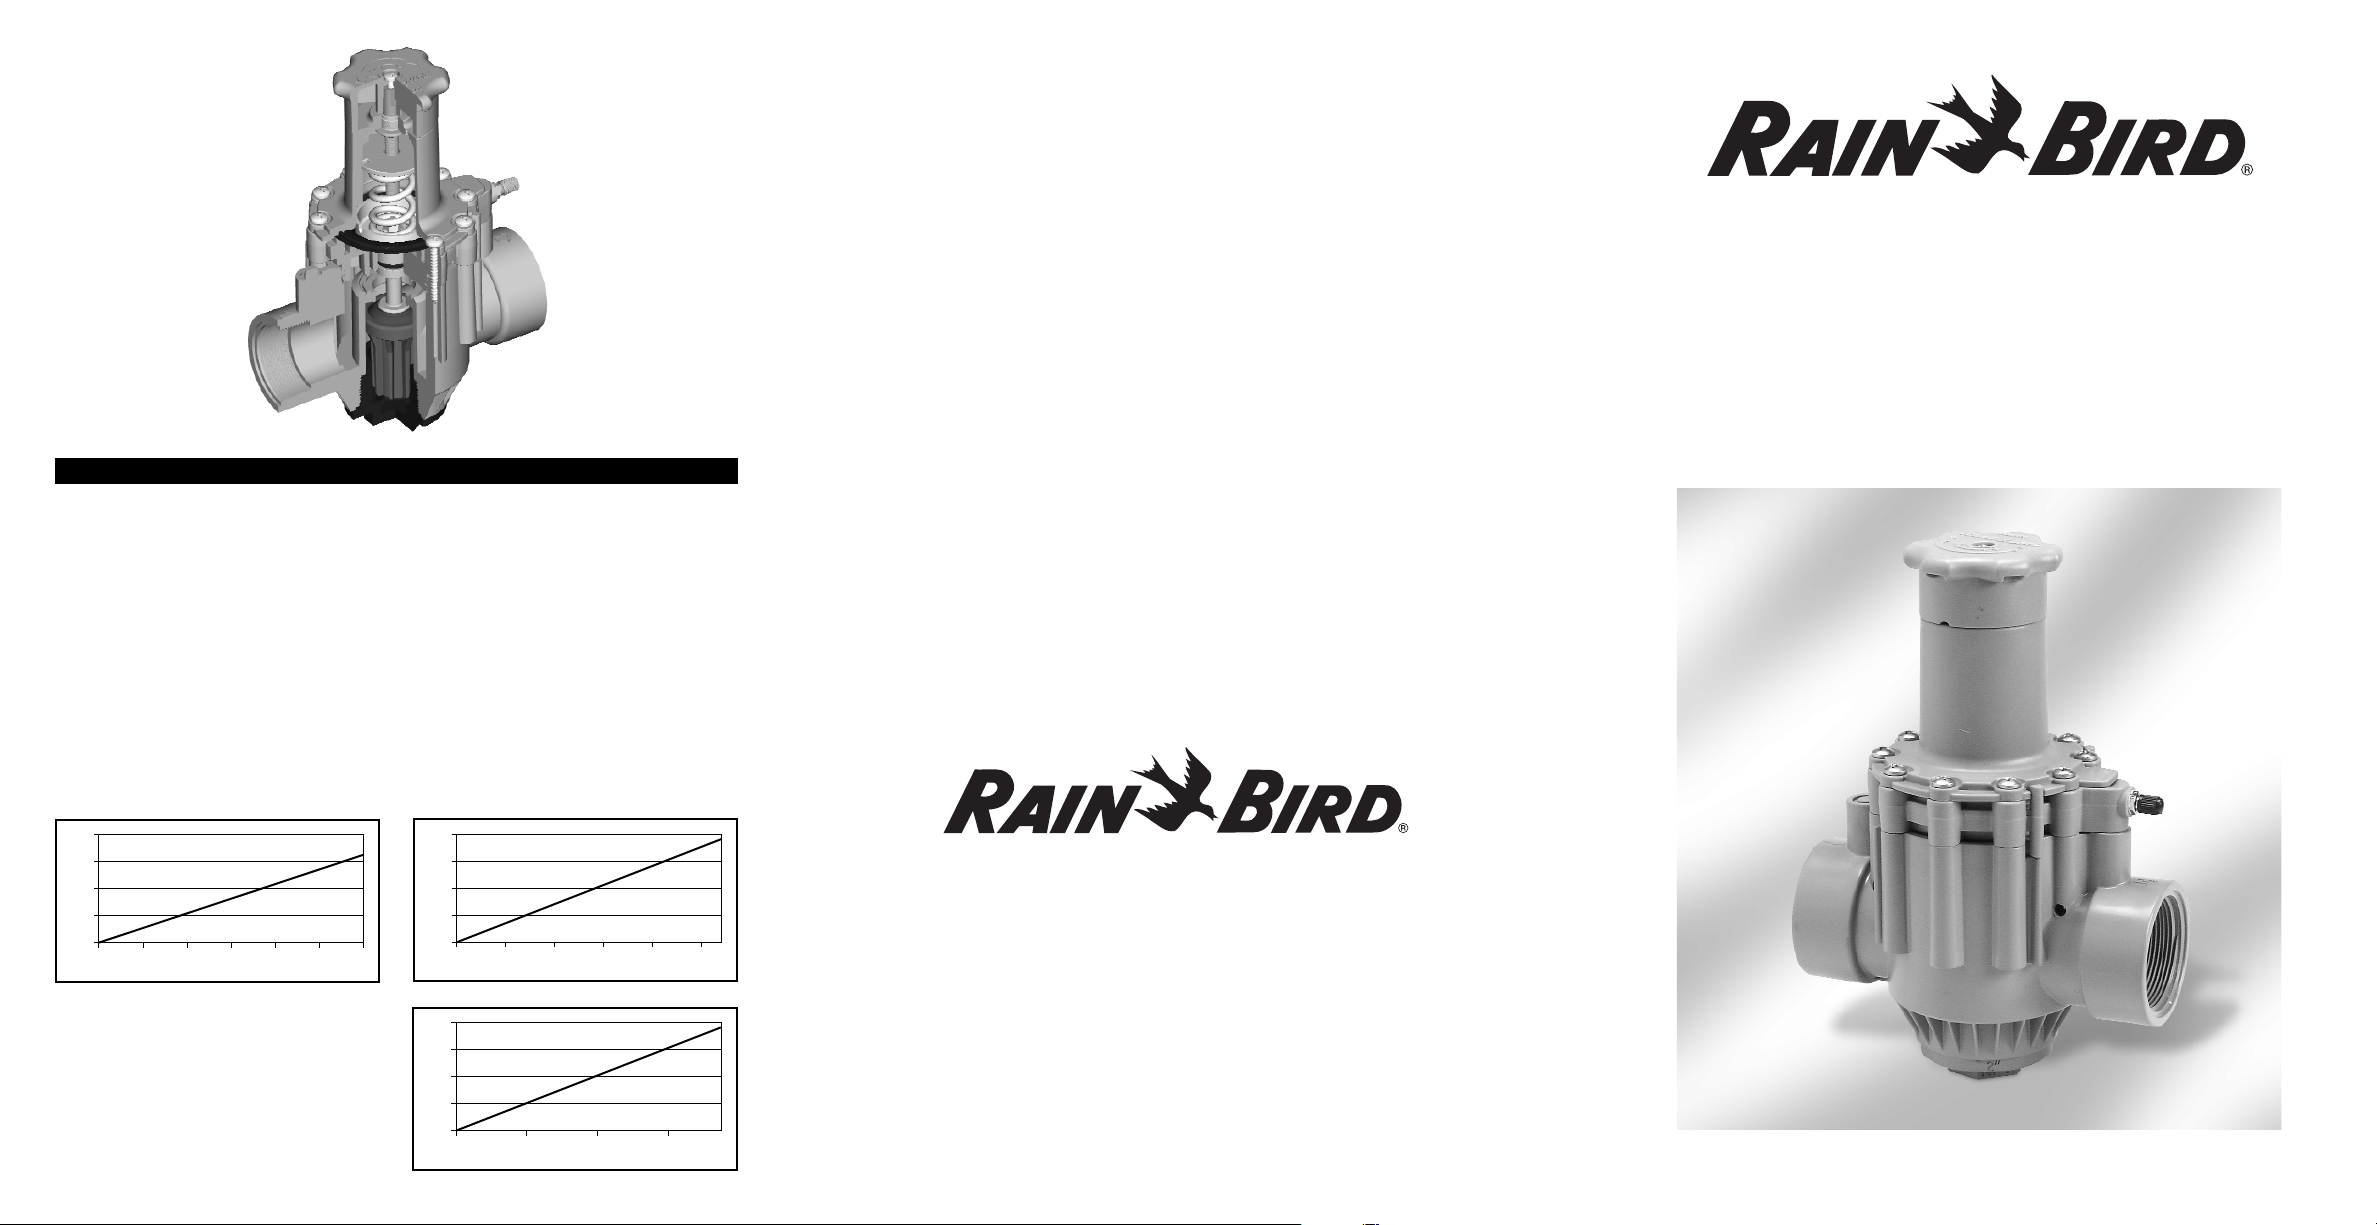
200PRV Fall-Off Characteristics
Fall-Off (PSI)
Flow (GPM)
0
0
5
10
15
20
20 40 60 80 100 120
Fall-Off (Bar)
Flow (m3/hr)
0
0
0.3
0.6
0.9
1.2
510152025
Fall-Off (Bar)
Flow (l/s)
0
0
0.3
0.6
0.9
1.2
246
Reduced pressure fall-off is inherent to direct acting regulators and a key factor relating
valve characteristics to system requirements. Fall-off is the difference between the static and
dynamic pressures downstream of the regulator. It varies with flow and represents the pressure change that occurs when the valve opens.
The following chart depicts the fall-off characteristics of the 200PRV. The zero point represents the valve when there is no flow (valve in lock-up condition) and can be any setting
within the outlet pressure adjustment range. As water flows through the open valve, fall-off is
the dynamic pressure reduction associated with a given flow.
Example: The regulator is set at 60 psi (4,2 bar) static outlet pressure. If a downstream control valve opens and water flows at 80 gpm (18,2 m
3
/h; 5,1 l/s), the fall-off will be approxi-
mately 10 psi (0,7 bar) making the dynamic outlet pressure approximately 50 psi (3,5 bar).
Page 2
Thank you for purchasing a Rain Bird
200PRV valve. When a pressure reducing valve is desired for commercial irrigation purposes, Rain Bird’s PRV pressure regulator provides quality, performance and economy. This normally
open valve designed for point-of-connection applications is rugged and reliable. By reducing high inlet pressures
to lower outlet pressures, the PRV
improves irrigation system performance
and conserves water.
NOTES
• The PRV is shipped in a globe configuration and is designed for globe
installation/operation only.
• The PRV is a normally open valve. It is
not a control valve. Rain Bird recommends at least one on/off control
valve before and/or after the PRV.
Install a shut-off valve upstream of the
PRV so water can be conveniently
turned off if the regulator needs servicing.
• This valve should only be used on irrigation systems and should be
installed downstream of the backflow
prevention device (according to local
code).
• Proper operation requires inlet pressure to be a minimum of 15 psi (1 bar)
higher than desired outlet pressure.
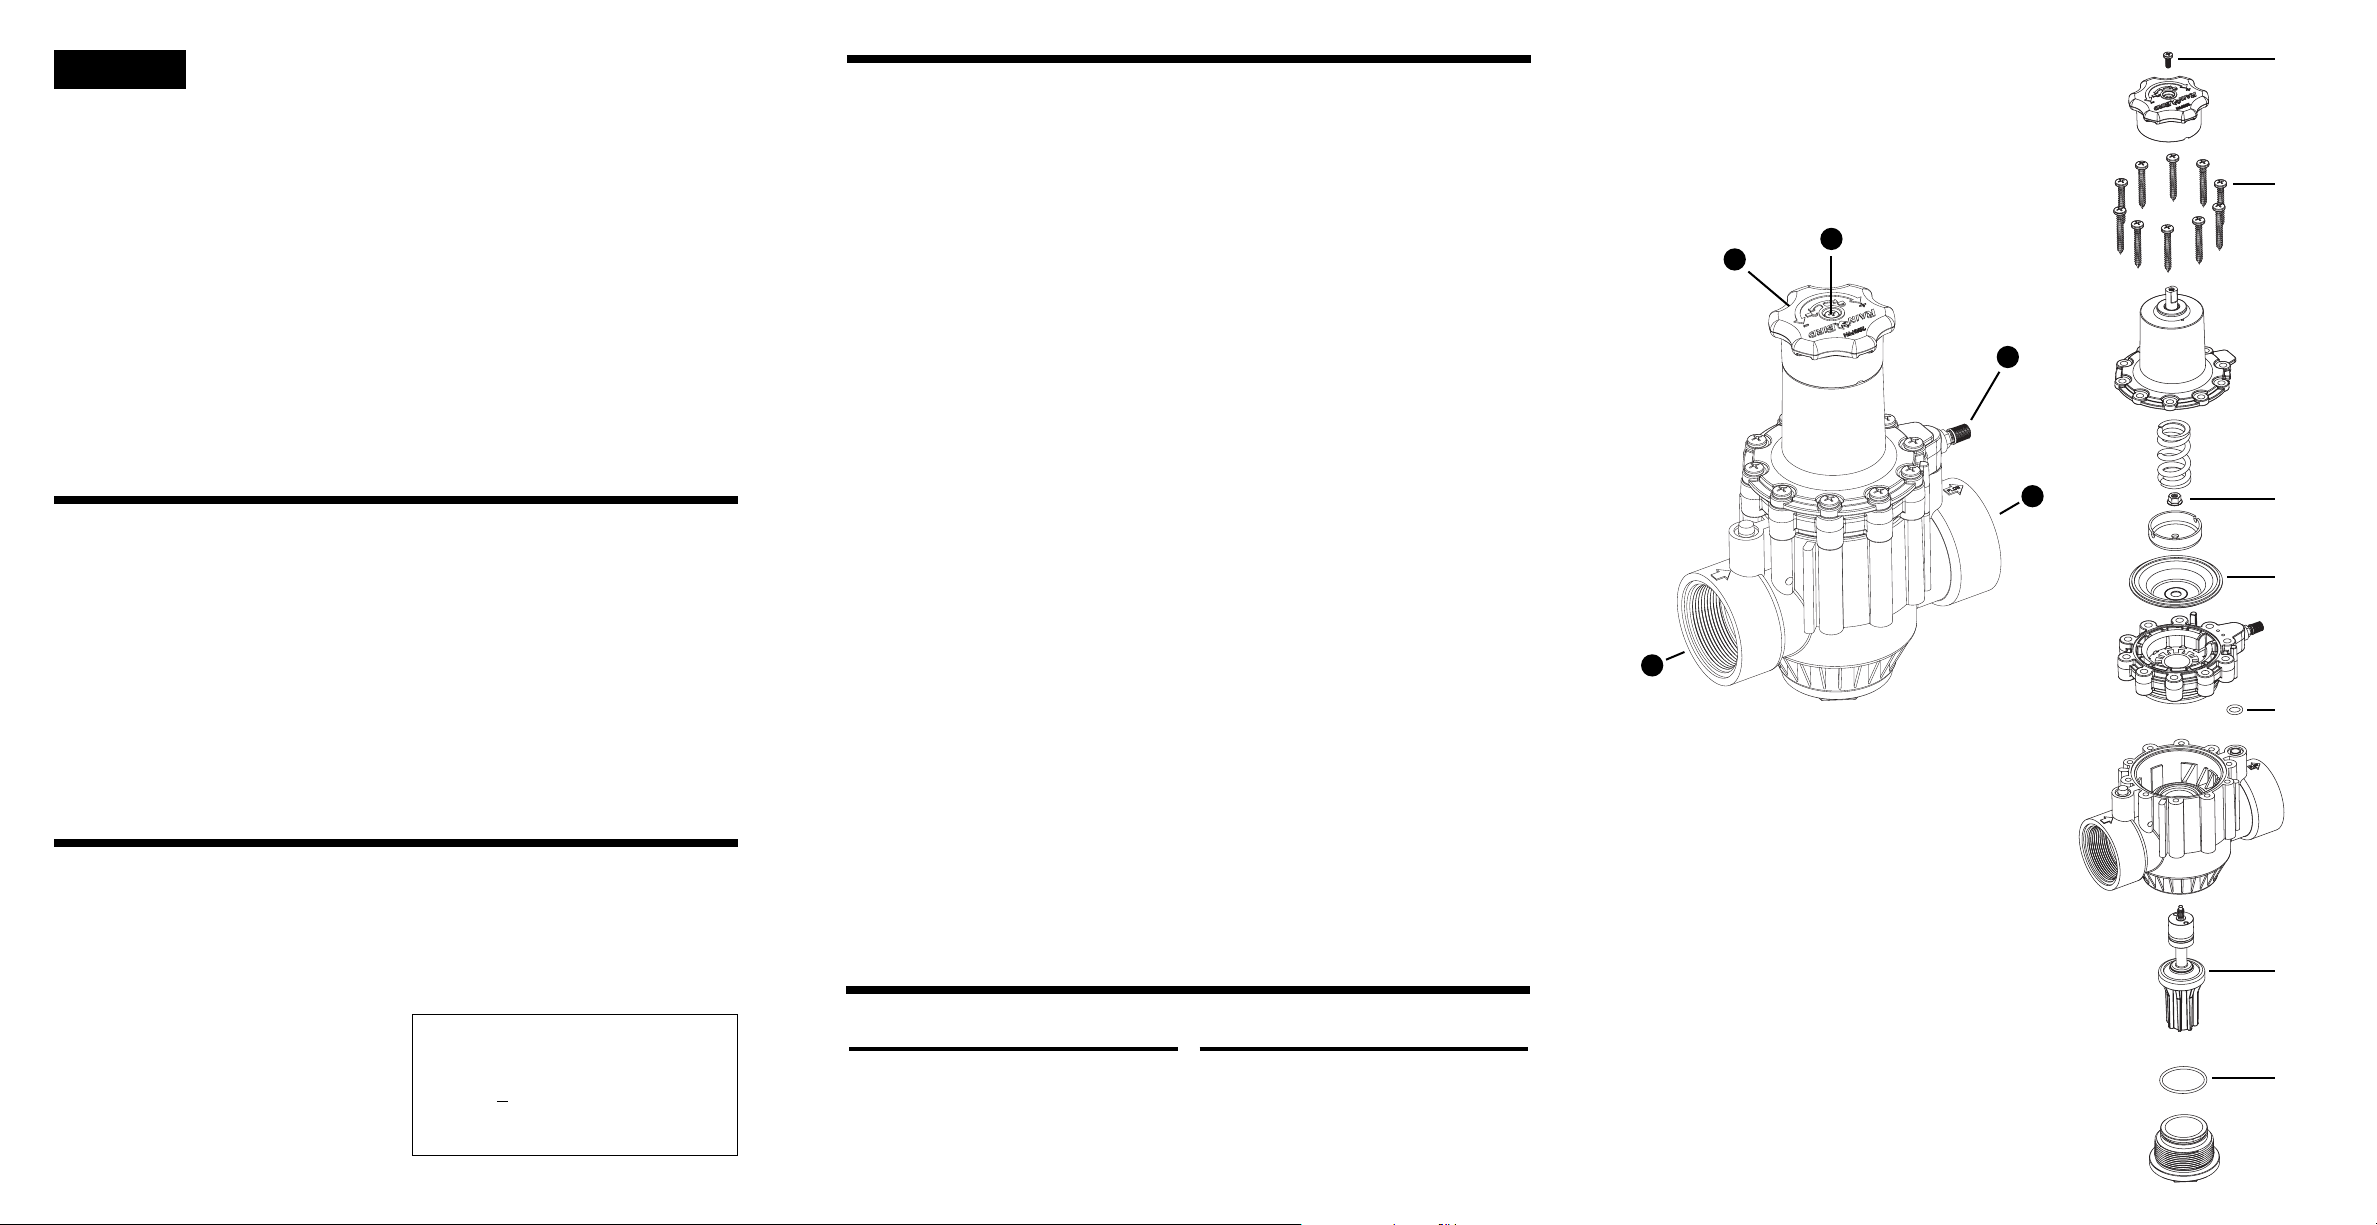
Installation Refer to F1.
1. Flush main line thoroughly before
installing the valve.
2. Use two wraps of Teflon tape along
the full length of the inlet and outlet
pipe threads. Do not apply pipe
thread or pipe dope compound.
3. Thread inlet pipe into the inlet port of
the valve
●
A and hand tighten.
Thread outlet pipe into the outlet port
of the valve
●
B and hand tighten.
Tighten with wrench but do not
exceed two turns beyond hand tight.
4. Ensure inlet side is connected to
main line. Note arrows on valve body
indicating direction of water flow.
Schrader valve
●
C should be on the
downstream side of the valve.
5. After installing the valve, slowly open
the water supply at point-of-connection. Remember this is a normally
open valve and water will continue to
flow unless an on/off control valve is
in place downstream.
6. For dirty water systems be sure to
install a 100 mesh (or finer) WYE filter
or screen filter before the PRV valve.
200PRV
1 Poppet/Seat/Plunger Assembly 232295
2 Diaphragm 232296
3 Bonnet Screws 232297
4 Handle Screw 232298
200PRV
5 O-Ring, Body 232299
6 O-Ring, Plug 232300
7 Locknut 204968
Replacement Parts Refer to F2.
English
D
E
C
A
B
F1
200PRV Valve
Operating Instructions
The valve comes from the factory preset at 60 psi (4,1 bar) static outlet pressure. To change the outlet pressure setting, loosen the screw on the top of the
valve handle
●
D by turning one turn
counter-clockwise. Connect a pressure
hose gauge to the Schrader valve stem
●
C located just above the outlet port of
the valve
●
B . Turn the handle●E
counter-clockwise to decrease the outlet pressure setting, or clockwise to
increase the outlet pressure setting.
When the outlet pressure is at the
desired setting, remove the pressure
gauge from the valve stem and tighten
the screw on the valve handle to lock-in
the setting.
Troubleshooting Guide
Difficulty adjusting valve to
desired outlet pressure.
• Verify that the inlet pressure is at least
15 psi (1 bar) above the desired outlet pressure.
• Attempting to adjust the outlet pressure when the inlet pressure is too low
can cause the valve spring to
become fully compressed. This may
deform and permanently damage the
bonnet, thereby causing external
leaks.
With no downstream flow, the
outlet pressure increases to
equal the inlet pressure.
• Lock-up pressure is not in effect. The
valve seat cannot fully close against
the valve body throat.
• Check to see if there is debris lodged
between the seat and the body throat.
• Check to see if the seat is damaged.
Water leaks from the top of the
bonnet, near the handle.
• Loose diaphragm lock nut. Remove
the bonnet and tighten the nut to 25
inch-pounds of torque.
• Torn or damaged diaphragm. Replace
the diaphragm.
Water leaks from between the
body and the bonnet.
• Bonnet retaining screws are loose.
Re-tighten the screws.
• Valve spring is compressed to solid
height by attempting to set the outlet
pressure too high. Turn the adjustment handle counter-clockwise to
lower the outlet pressure setting, and
verify that the inlet pressure is at least
15 psi (1 bar) above the desired outlet pressure.
Water leaks from inlet or outlet
threads.
• Valve is not properly tightened on
mating pipe threads. Re-tighten valve
connections or re-connect valve to
line according to installation
instructions.
• Threads are damaged by crossthreading or contaminated by debris.
Inspect threads and repair or clean as
needed.
Low or inadequate flow
condition.
• System gate or master valve is not
fully open. Locate the gate or master
valve and open.
• Obstruction in the main pipeline.
Isolate obstruction and remove.
• Water pressure is being used elsewhere on the site. Too many downstream control valves and sprinklers
operating at one time. Do not exceed
maximum flow capabilities.
Technical Questions:
• Inside the U.S., please call Rain Bird
Technical Services at (800) 247-3782
or the Rain Bird Spec Hotline at (800)
458-3005.
• Outside the U.S., please refer to the
back page for contact information.
• Visit www.rainbird.com
Operating Range:
Pressure: up to 200 psi (13,8 bar)
Regulation: 25 to 85 psi (1,7 bar to 5,9 bar)
Accuracy: + 5 psi (0,3 bar)
Flow: up to 120 GPM (27,3 m3/h; 7,6 l/s)
Water temperature: up to 110° F (43° C)
4
3
7
2
5
1
6
F2
 Loading...