

RAID Xanadu User Manual
Xanadu
User’s Guide
NOTE:
Read this manual carefully before using the unit. Keep this
manual nearby as a handy reference and refer to the
"CAUTION" and "WARNING" statements whenever necessary.
RAID CONFIDENTIAL AND P ROPRIETARY
All rights reserved by RAID Inc.. This document must be used
solely for the purpose for which it was furnished by RAID Inc..
No part of this document may be reproduced or disclosed to
others, in any form, without the prior written permission of RAID
Inc..
7/1/2008

Introduction
At this time, we would like to thank you for purchasing RAID Inc. products.
This manual is written at the level of an individual who is capable of server system construction and
network setup. It is for systems that meet the following conditions.
Connected servers and OS:
Windows or Linux supported by RAID Storage program products
For details, refer to the “RAID Storage Manager Installation Guide”, as well as
the “RAID Storage PathManager Installation Guide” and “RAID Storage
ControlCommand Installation Guide”, depending on your purchase.
* Xanadu-beta version supports only Windows and Linux servers (excluding the
Itanium
Configuration: Storage Area Network and Direct Attached Storage configurations containing
Other: Fibre Channel switches and modems are not covered.
Chapters 7 through 14 of this manual describe facilities that are restricted to Windows and Linux
environments.
To use them in another operating system environment, ask your maintenance service agent, since
maintenance personnel of the maintenance service agent will configure the RAID Storage unit.
This guide explains the general methods used in setting up RAID Storage itself, installing RAID Storage
Manager, and installing RAID Storage ControlCommand.
Prepare in advance for program products for which a license sheet is included.
D1 series / D3 seri es
This guide also documents procedures for setting up products for the first time that are based on the
sample recommended configuration in the figure. If your configuration is different, read the
appropriate changes into the procedures.
Processor Familiy).
the sample recommended configuration in the figure below
* These require separate setup by maintenance personnel.
LAN
SAN
Fibre Channel
Business
server
PathManager
ControlCommand
*1 Included as a product in Ba seP roduct
Figure i. Sample Recommended Configuration
- i -
Management
server
Storage Manager
server
Client
Storage M anager
client
LAN
*1
*1
For installation on management servers and business servers, setup methods in Windows and Linux
vary depending on the OS that is used.
For details about each software product, refer to the manual that comes with each software product.
The tasks documented in this manual can also be entrusted to your maintenance service agent.
Remarks
1. This guide explains functions implemented by the following program products:
RAID Storage Manager and RAID Storage BaseProduct
2. This
3. The following terms in this guide refer to the corresponding RAID Storage software products unless
otherwise stated.
RAID Storage AccessControl
guide is applicable to the program products of the following versions:
RAID Storage Manager Ver5.1 or later
RAID Storage BaseProduct Ver5.1 or later
Term RAID Storage Software Product
Storage Manager RAID Storage Manager
BaseProduct RAID Storage BaseProduct
ControlCommand RAID Storage ControlCommand (Note)
AccessControl RAID Storage AccessControl
PathManager RAID Storage PathManager
Note: RAID Storage ControlCommand is a program product that has integrated the following
five functions.
ReplicationControl
SnapControl
ReplicationControl/DisasterRecovery
ProtectControl
PowerControl
- ii -

The following terms in this guide refer to the corresponding RAID Storage software manuals unless
otherwise stated.
PathManager User’s Manual (Linux)
PathManager User’s Manual (Windows)
User’s Manual (UNIX)
User’s Manual
Configuration Setting Tool User’s Manual
(GUI)
Data Replication User’s Manual (Function
Guide)
Snapshot User’s Manual (Function Guide)
Term RAID Storage Software Manual
RAID Storage Software
RAID Storage PathManager User’s Manual (Linux)
RAID Storage Software
RAID Storage PathManager User’s Manual (Windows)
RAID Storage Software
RAID Storage Manager User’s Manual (UNIX)
RAID Storage Software
RAID Storage Manager User’s Manual
RAID Storage Software
Configuration Setting Tool User’s Manual (GUI)
RAID Storage Software
Data Replication User’s Manual (Function Guide)
RAID Storage Software
Snapshot User’s Manual (Function Guide)
5. In this document, the capacity is calculated based on units of 1024 (for example 1 KB = 1024 bytes)
unless otherwise specified.
Trademarks and registered trademarks
UNIX is a registered trademark of The Open Group in the United States and other countries.
Microsoft®, Windows®, and Windows Vista™ are trademarks or registered trademarks of
Microsoft Corporation in the United States and other countries.
Linux is a trademark or registered trademark of Mr. Linus Torvalds in the United States and other
countries.
Java and JRE (Java™ 2 Runtime Environment) are registered trademarks of Sum Microsystems,
Inc.
Other product names and company names, etc. are trademarks or registered trademarks of the
associated companies.
- iii -
The following symbols are used throughout this guide.
Type Description
Items that are mandatory or require attention when using the unit
Display Types
Information such as restrictions on operations
Text Conventions
The table below explains notation used in this guide.
Disk array unit Denotes unit NF51x1-xR4xx-* shown on the front cover.
Disk enclosure Denotes an NF5021-xE60x extended SAS/SATA disk enclosure.
Disk drive Denotes a hard disk drive with an exclusive tray.
Dummy tray Denotes an exclusive tray (used for an uninstalled hard disk drive).
Host bus adapter (HBA) Denotes a Fibre Channel controller.
DAC (disk array controller) Denotes a disk array unit.
CONT (controller) Denotes a controller in the DAC portion.
Extended BBU Denotes an extended battery backup unit.
DE (disk enclosure) Denotes a disk enclosure.
PS (power supply) Denotes a power supply (unit)
Supplemental explanations of text
NF5021-xM6xxx (SAS drive)
NF5021-xM8xxx (SATA drive)
* SATA is referred to as “ATA” in the software.
- iv -
Safety Precauti o ns
Carefully read and understand these Safety Precautions before using this unit in order to use it
safely.
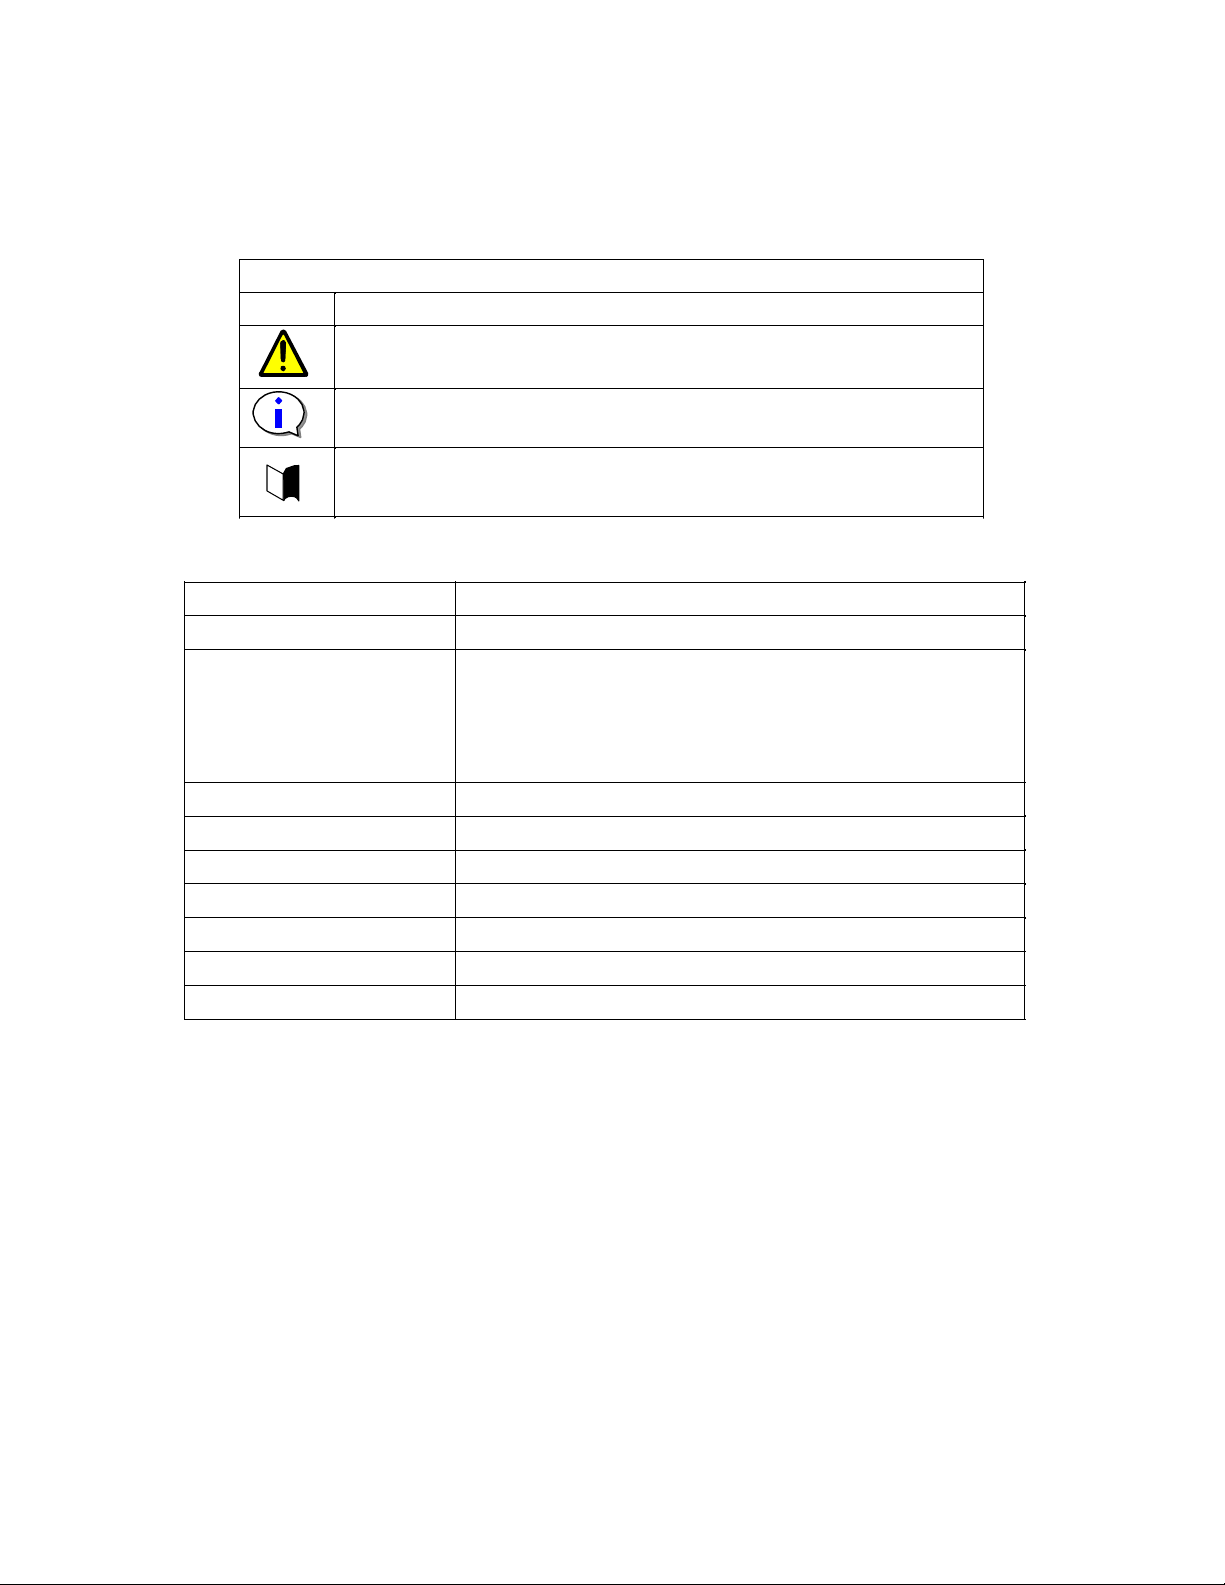
The following symbols are used in this guide to make it easy to understand how to operate the unit
safely and correctly.
WARNING
CAUTION
Risks and necessary actions to reduce risks are indicated individually by the following symbols.
Indicates that smoking and/or ignition may occur.
Indicates that you may be electrically shocked.
Indicates proper procedure for safety.
Indicates that the plugs of power cords should be removed for safety.
Indicates general prohibitions.
Indicates that fire should not be brought near devices for safety.
Indicates that devices are prohibited from being disassembled for safety.
Indicates that there is a risk of death, serious injury, or burns.
Indicates that there is a risk of injury and/or loss of assets.
- v -
Notes on Safety
Before using the disk array unit, carefully read and understand these "Notes on Safety" for safe use
of the unit.
WAR NING
Never use the disk array unit in a location where there is flammable gas or
combustible material. Doing so could cause a fire or explosion.
Do not use the disk array unit in a location that is unusually damp or a location where
water is handled. Doing so could cause failure, electric shock, or fire.
Do not install the disk array unit in a dusty location.
Remove dust adhering to the unit, outlets, and power cord plugs.
Using these with dust on them could cause a fire.
Do not perform any disassembly or rebuilding other than that described in this
manual.
Doing so could cause failure, electric shock, or fire.
Do not install the disk array unit in a location where there is direct sunlight or near a
heater or other object that generates heat.
Doing so could cause failure, fire, or electric shock.
Do not handle the disk array unit with wet hands.
Doing so could cause electric shock.
Do not set up the disk array unit in an unstable location.
If it fell, it could cause failure or injury.
Install the disk array unit so that vent holes are not blocked.
Blocking the vent holes could cause the temperature inside the unit to rise, leading to
failure or fire.
If abnormalities such as smoking or odors occur, turn off the power to the disk array
unit and remove the power plug from the outlet.
Immediately request inspection and repair from your sales or maintenance service
agent.
When moving the disk array unit, do so after removing power cords and cables.
Moving it while these are connected could cause failure, electric shock, or fire.
Do not put your hands into the disk array unit.
If you must put your hands into the unit, do so after turning off the power and
removing power plugs from outlets.
Be careful not to catch or bump your fingers.
- vi -

Warnings concerning power
Do not overload an outlet with the power cords of the disk array unit and extended
BBU.
Doing so could cause a fire.
Do not put heavy objects on the power cords of the disk array unit or extended BBU.
If the covering of a power cord is torn, it could cause a fire or electric shock.
Although the disk array unit and extended BBU are compatible with AC 100 V-AC 240
V, the accompanying power cords are as follows according to model number.
Model numbers NF5111-S*/NF5131-S*: For AC 100 V
Model numbers NF5111-N*/NF5131-N*: For AC 200 V
When using the accompanying power cord, use it with AC 100 V (50/60 Hz) or AC
200 V (50/60 Hz), depending on the product model number.
Using it with a different voltage could cause electric shock, smoke, or fire.
Insert the plug of the power cord of the disk array unit or extended BBU in an outlet
securely.
Provide sufficient slack in the power cord so that excessive force is not placed on the
power cord plug or the power cord.
If the power cord is disconnected during operation, it could cause data loss or failure.
To prevent electric shock, connect the power cords of the disk array unit and
extended BBU to outlets that have ground terminals.
Grounding to an object such as a gas pipe is hazardous and must never be done.
Warnings concerning batteries
The batteries of the disk array unit could explode if brought near flames or soaked in
water.
When lithium batteries (button batteries) and nickel metal hydride batteries no longer
operate correctly due to their life spans, do not disassemble, exchange, or charge
them yourself, but contact your sales or maintenance service agent.
WAR NING
- vii -

WAR NING
It is recommended that setup and maintenance of the disk array unit be entrusted to
service engineers with specialized knowledge from your maintenance service agent.
For details, contact your sales agent.
Although installation and maintenance of the disk array unit can be done by
customers themselves, they must understand that RAID and its sales agents shall not
assume responsibility for any damage to the disk array unit, its components, or
connected devices or for any outcome occurring during, before, or after operation
when customers do these things themselves.
When installing the disk array unit, follow the documentation in the “Disk Array Unit
Installation Guide.”
The “Disk Array Unit Installation Guide” is included in the accompanying CD.
Because the disk array unit is precision equipment, do not expose it to strong
vibrations or shock, regardless of whether the power is on or off.
Do not disconnect a disk drive, cable, or other part while the power is on.
If customers themselves change connections of the disk array unit system once it has
been configured, there is a risk of operation ceasing or data disappearing. To change
connections, it is recommended that you ask your maintenance service agent.
To expand the system, turn off the power of the disk array unit and remove power
cords from outlets.
Not doing so could cause failure or elec tric shock.
- viii -
Be sure to perform backup of the data of the disk array unit regularly.
It is recommended that particularly important files be backed up on media such as
magnetic tape.
Reason: The disk array unit, which is available on strictly hard failures, cannot cope
with unexpected vibrations or shocks, power cuts due to electrical outages, or soft
faults. Damage from soft faults can be kept to a minimum by performing backups.
A hard failure is a phenomenon such as a disk drive being damaged or a disk drive
being unable to rotate.
A soft fault is a phenomenon such as a human error or a host malfunctioning.
It is recommended that the latest software and firmware for the disk array unit be
used.
The disk array unit could be destroyed if you power it off or it becomes powered off
while updating its firmware. Be sure that it does not become powered off during a
firmware update.
Do not power off the disk array unit or the host unit or reset the host unit if the
ACTIVE/FAULT LED (gr een or orange) of a disk drive of the disk array unit is
blinking, if the host unit shows that a disk is being accessed, or if it shows that
initialization i s in pr ogress.
If a fault occurs in the disk array unit, the SERVICE LED of the disk array unit and the
FAULT LED corresponding to the faulted component illuminate.
When faults occur, contact your sales or maintenance service agent.
Cautions concerning power
If a component of the disk array unit normally is not fully inse rted or is loose, or if a
cable normally is not fully inserted or is loose, it could cause failure.
Always connect all power supplies of the disk array unit and pass current through
them. If no current is passed, data is not duplicated and data may be lost. A power
supply that is not connected is judged to be abnormal.
WAR NING
- ix -

Cautions concerning disk drives
A disk drive is an electronic device.
When handling one, take measures against static electricity, such as using a wrist
strap.
If you do not have a wrist strap, firmly place one hand on the unpainted metal surface of
the disk drive before handling it.
Mount three disk drives in the disk array unit at locations 00, 01, and 02 of the unit. If
these are not mounted, data may be lost.
Do not remove more than one of the drives at locations 00, 01, and 02 of the disk array
unit while the power to the unit is off. Moreover, do not turn off the power if more than
one of the drives at locations 00, 01, a nd 02 are removed. If you remove drives, data
may be lost.
When adding disk drives or changing the locations at which disk drives are mounted, be
sure to work on one at a time in powering them on. Install the next disk drive after
confirming that the installed disk drive is ready.
When installing a disk drive, lock the ejector after it has been inserted fully. Not
inserting it fully may cause failure.
Do not change the locations at which disk drives are installed if logical disks have been
configured. Data may be lost.
CAUTION
- x -
Cautions concerning batteries
The batteries of the disk array unit have a life span.
If batteries are used past their life span, the backup time cannot be guaranteed and
user data may be destroyed on a power outage.
When replacing batteries due to their life span, a request for battery purchase and
maintenance must be made.
Ask your sales or maintenance service agent for details.
Make use of backup using the battery of the disk array unit no more than 4 times per
year.
If this is done more than four times in a year, the battery life cannot be guaranteed.
Backups: Power-offs without a power-off sequence. Power outages, for example.
Performance may deteriorate while charging the battery of the disk array unit.
CAUTION
Reason
: Fast writing in which a cache is used is not done unless the battery is fully
charged, since backup time on a power outage cannot be guaranteed.
Do not use the disk array unit at temperatures higher than what is documented in the
“Disk Array Unit Setup Guide.”
The battery life cannot be guaranteed if you use it beyond that temperature.
When disposing of batteries of the disk array unit, do so in accordance with local
government regulations.
For details, contact y our local government. The unit is equipped with batteries as
follows.
Each controller: Lithium battery (button battery)
Each controller: Nickel metal hydride battery
Each extended BBU: Nickel metal hydride battery
- xi -
Cautions concerning cables
For the FC cables and SAS cables used in connections in the disk array unit, use
cables and cable lengths specified by RA ID. If cables other than those specified are
used, data can be lost.
Check cable specifications and connectors so that there will be no wiring errors.
If the unit were operated with wiring errors, data could be lost. When correcting wiring, it
may be necessary to erase all disk drive data.
When installing, confirm that there is no bending or other damage, dust adhesion, or
dirt on connectors or contacts.
Do not forcibly insert cable connectors.
A connector cannot be connected unless it is inserted with the correct orientation and at
the correct angle.
When inserted correctly, they go in smoothly without applying excessive force. If you
cannot insert one successfully, do not forcibly insert it, but check the orientation and
shape of the connector.
Handle cable connectors carefully so that they are not dropped on a floor and
damaged.
Do not place excessive strain on the connector portion or the cable portion of an
installed cable.
Do not deform a cable by stepping on it or putting heavy objects on it.
Treat optical fiber cables with care and respect. Rough treatment of optical fiber cables
could cause deterioration of characteristics or mechanical damage (line disconnection).
(How to treat optical fiber cables)
1. Ensure a minimum bending radius of 30 mm.
2. Do not drop a cable on the floor or otherwise shock it.
3. If not connecting a cable, place caps on it.
When connecting a cable, do not discard the caps but save them (as well as those for
connectors on the unit).
Optical power may be attenuated by dust or dirt present when inserting an optical fiber
cable in a controller of the disk array unit and result in data errors. When inserting a
cable, always be sure to clean the optical connector using the following procedure.
(Cleaning method)
1. Spray air or another parts cleaning gas on the optical connector for several seconds.
2. Wipe the optical connector lightly several times with a non-fibrous cloth wetted with
isopropyl alcohol.
3. Spray parts cleaning gas on the optical connector for several seconds again.
Treat SAS cables with care and respect. Rough treatment of the cables may cause
deterioration of characteristics or mechanical damage (line disconnection).
(How to treat SAS cables)
1. Make allowance for cable forming.
2. Do not forcibly stretch a cable or otherwise stress it.
3. Ensure a minimum bending radius of 50 mm.
CAUTION
- xii -
Cautions concerning LAN
In connecting to the Storage Manager, be sure to connect to a LAN port and not to a
MNT port.
Assign different addresses for the IP address of the CONT#0 LAN and the IP address
of the CONT#1 LAN. This disk array unit does not support several features, including
teaming.
Set Auto Detect for servers, hubs, and other devices connected to the LAN.
Reason
: Connecting to a device in full duplex mode could cause abnormal operation.
If settings do not match, it may be impossible to connect intermittentl y e ven if
a connection is established temporarily.
To set Speed and Detect settings other than Auto Detect, ask your sales or
maintenance service agent.
Use a shielded straight c able to connect a LAN cable via a hub or a shielded
cross cable to connect it directly.
Do not place excessive strain on the cable portion or connector portion of an installed
LAN cable. Do not deform the cable by stepping on it or putting heavy objects on it.
Cautions concerning UPS
Constructing a system configuration in which a UPS is used allows the system to
operate stably even if an accidental power interruption or momentary AC power
outage occurs.
Consult your sales or maintenance service agent concerning configuring a system in
which a UPS is used.
A disk array unit and a directly connected UPS can be linked only if the host is an NX
server.
Consult your sales or maintenance service agent concerning configuring a system in
which a UPS is used.
UPSs and power controls that use ESMPRO can be used.
Consult your sales or maintenance service agent regarding UPSs and power control s
that use ESMPRO.
Do not use a UPS other than the ones specified.
Operation is not guaranteed if you use one other than one that is specified.
Do not connect a UPS to the UPS interface without the AC power turned on.
This state is equivalent to a power interruption and mistakenly causes processing for
power interruptions to operate.
Cautions concerning modems
Remote monitoring service through a modem requires a maintenance contract with a
maintenance service agent. Contact your sales agent.
WAR NING
- xiii -

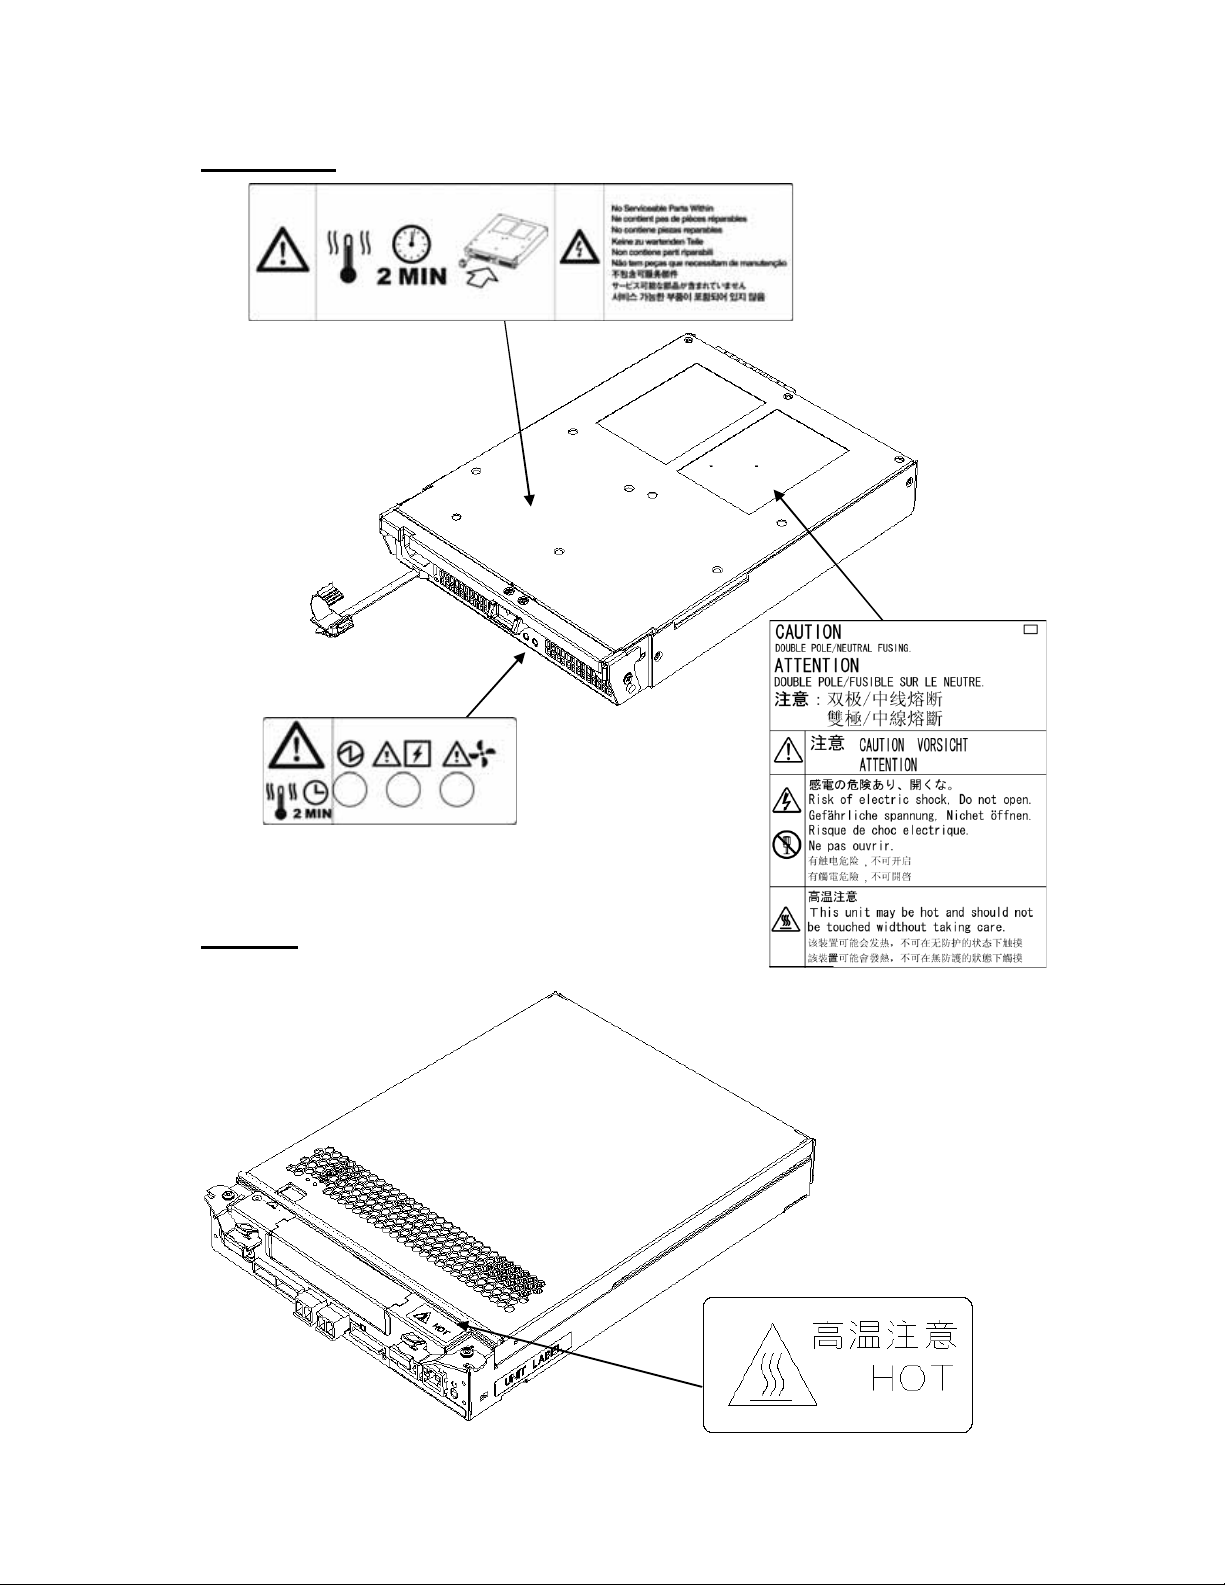
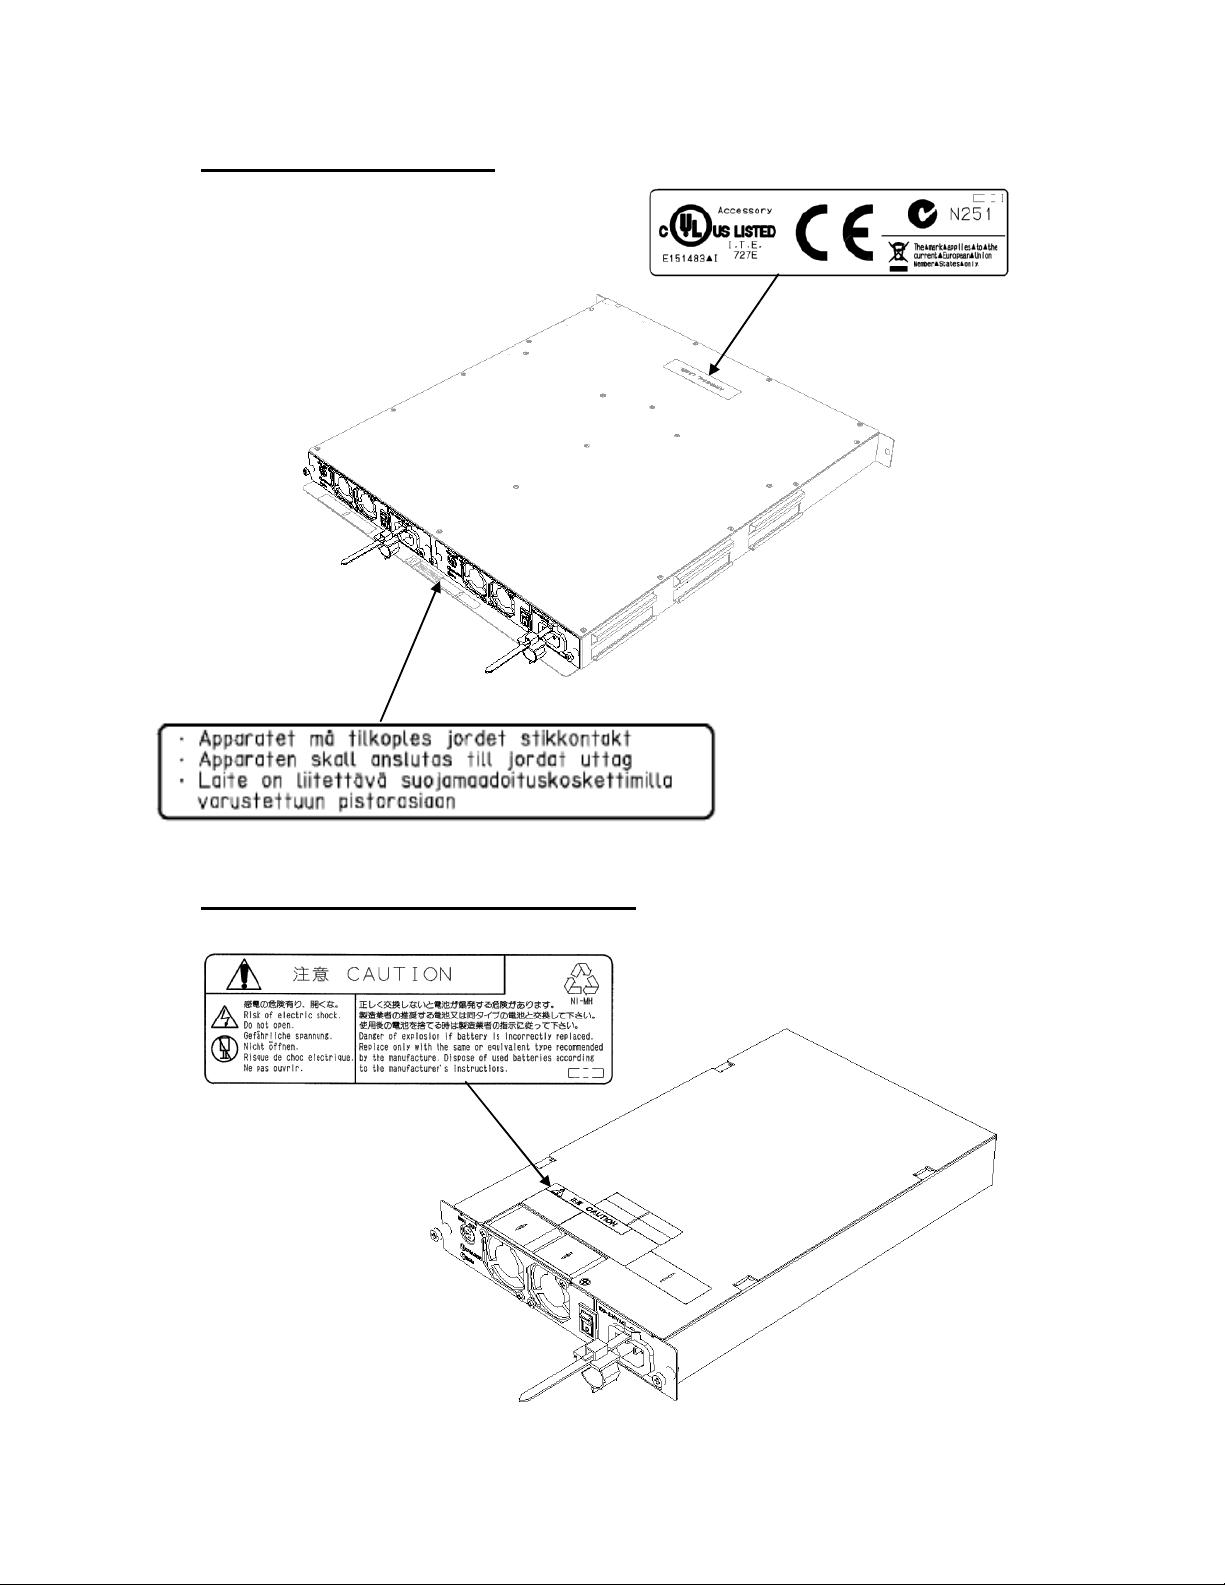
Indication on Safety
The warning label is attached to components with possible danger or their vicinity in your disk
array unit to inform the user that a hazardous situation may arise when operating the disk array
unit. (Do not intentionally remove or damage any of the labels.)
If you find any labels totally/partially removed or illegible due to damage, contact your sales
representative.
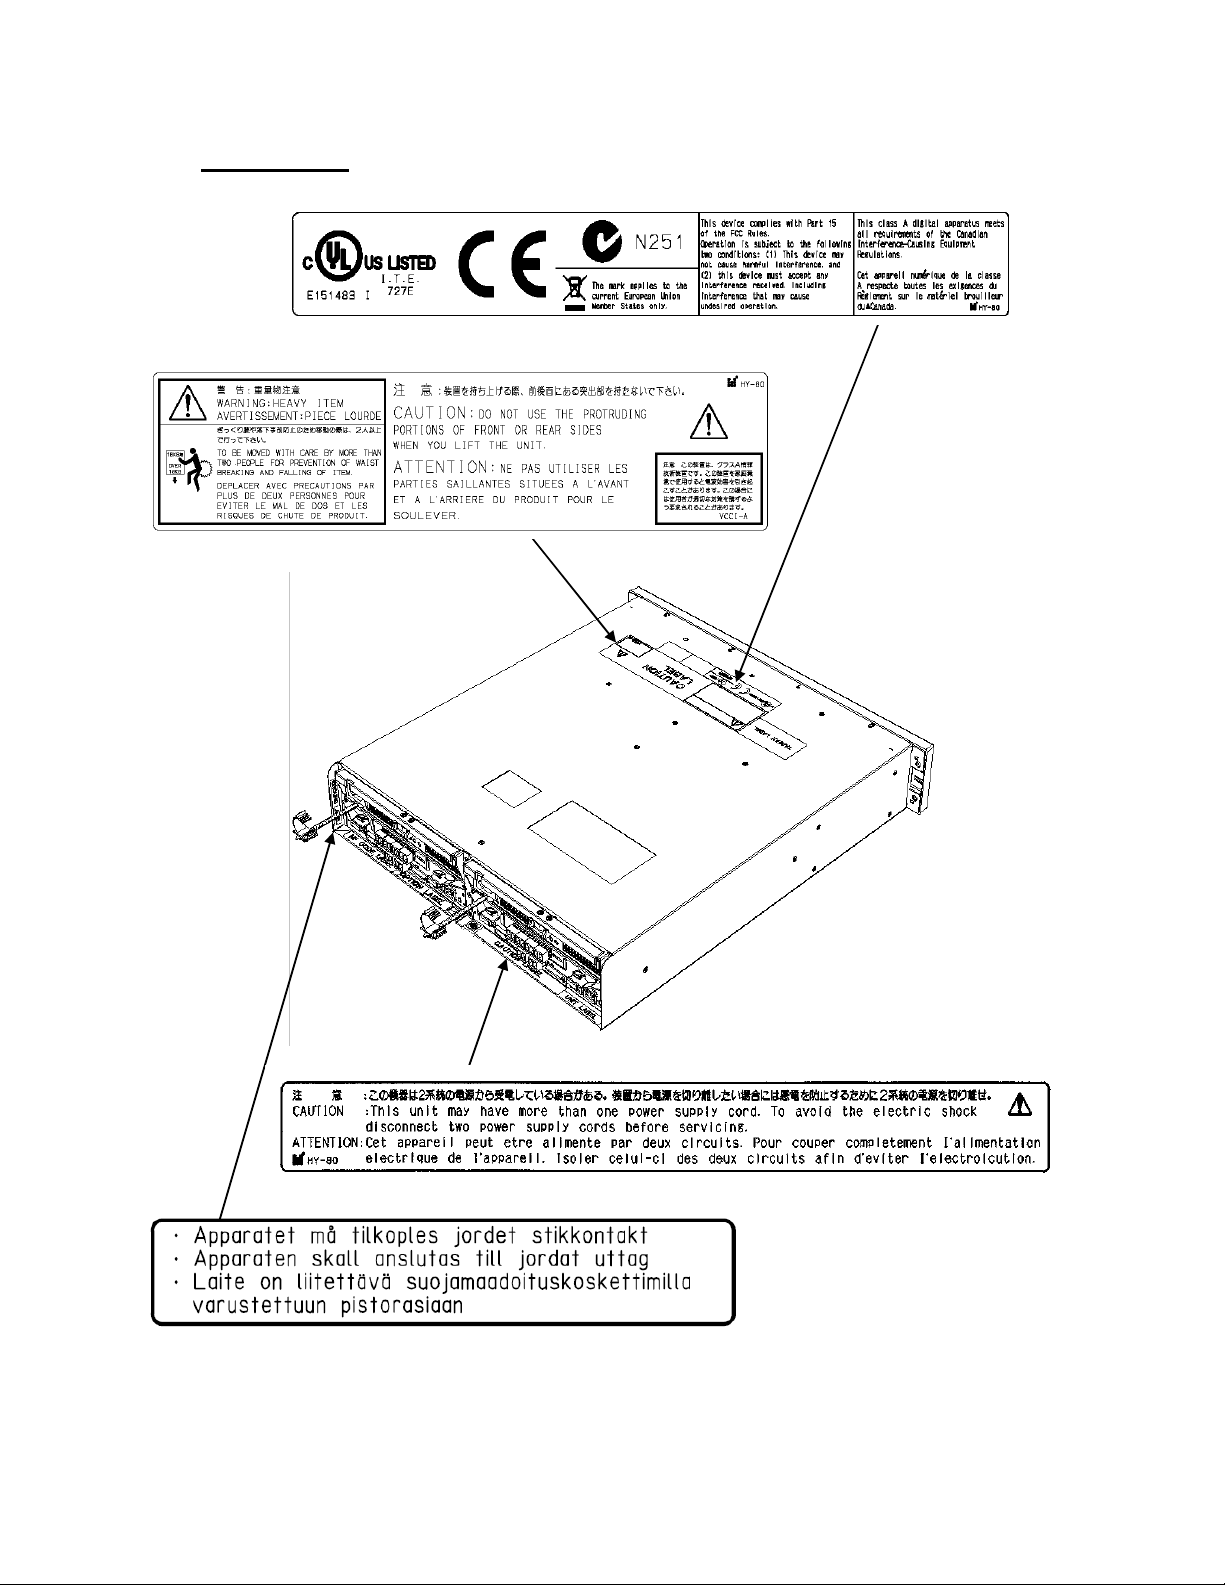
Disk Arr ay Unit
- xiv -
Power Supply
Controller
- xv -
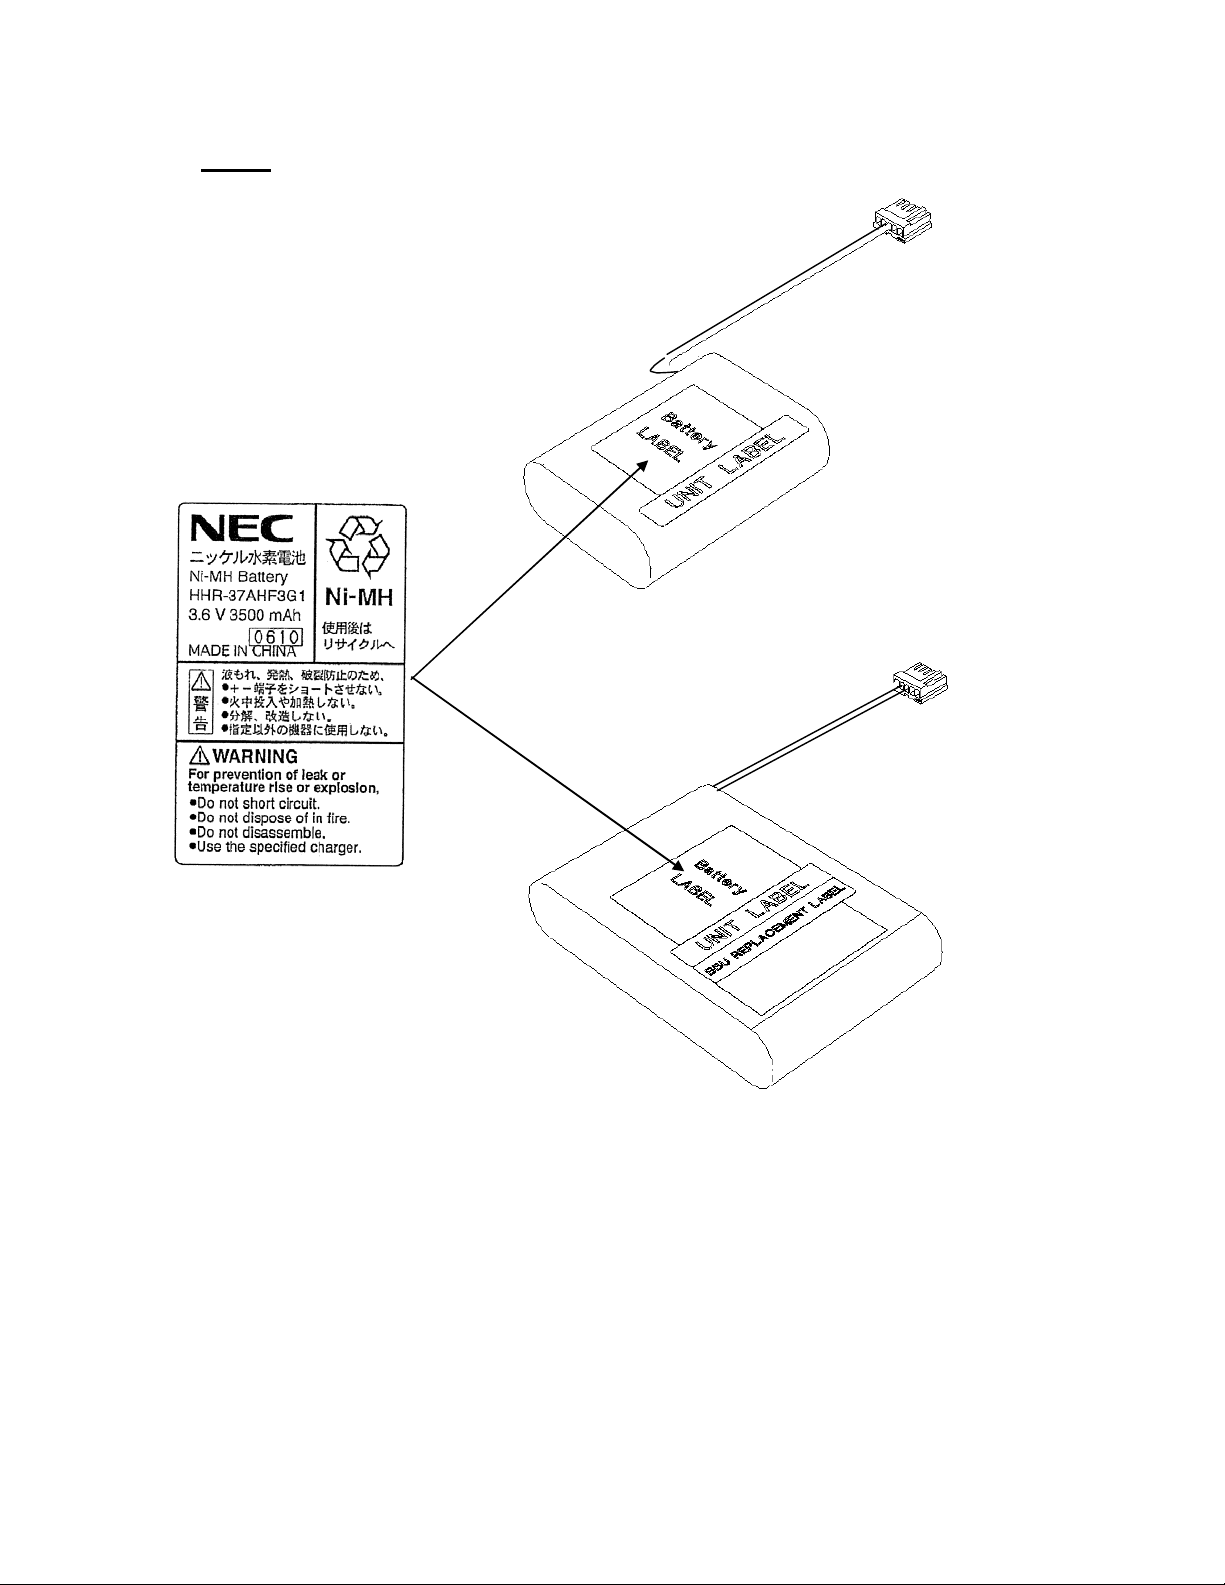
Battery
- xvi -
Disk Enclosure
- xvii -
Extended Battery Backup Unit
Extended Battery Backup Unit Power Supply
- xviii -

Cautions
(1) No part of this manual may be reproduced in any form without prior written consent from RAID.
(2) The information in this manual is subject to change without notice.
(3) This manual was created with the greatest care, but in the event that any technical or editorial errors or
omissions are found, contact your dealer.
(4) RAID shall not be liable for any claims of loss or lost profits caused by the use of this disk array unit,
regardless of item (3) above.
(5) This unit is not intended to be installed in installations or equipment associated with human life, such as
medical equipment, atomic installations or equipment, aviation and space equipment, transportation
installations or equipment or to be installed in and used to control installations or equipment requiring
high reliability. If this unit is used in such installations, equipment, or control systems, RAID shall not
be liable for any accident leading to personal injury or death or any property damage that may occur.
(6) If you transfer (or sell) the disk array unit to a third party, deliver this manual along with it.
- xix -
© RAID Inc. 2007

Documentati on Besides this Manual
Besides this manual, the user-oriented information below is also available.
Since this is necessary information that is important for installation and stable operation, be sure to
check it.
Title Content
Setup Guide
Contains the setup procedures of this guide.
Packaged with the unit.
- xx -

Contents
1. OVERVIEW ................................................................................................................... 1
1.1 Features ............................................................................................................................1
1.2 Specifications ...................................................................................................................2
1.3 Optional Components .......................................................................................................3
2. Initiating Setup ............................................................................................................ 4
2.1 Tasks and Procedure for New Setup .................................................................................4
2.2 Preparation .......................................................................................................................5
2.3 Unpacking ........................................................................................................................7
2.4 Checking Sent Items .........................................................................................................7
3. Checking Appearance and Features ................................................... .......... .......... . 9
3.1 Disk Array Unit ................................................................................................................9
3.1.1 Front View....................................................................................................................9
3.1.2 Front View (viewed when front panel is removed).......................................................9
3.1.3 Rear View................................................................................................................... 11
3.1.4 Power Supply ...........................................................................................................12
3.1.5 Controller ...................................................................................................................13
3.2 Disk Enclosure ...............................................................................................................16
3.2.1 Front View..................................................................................................................16
3.2.2 Front View (viewed when front panel is removed).....................................................16
3.2.3 Rear View ...................................................................................................................18
3.2.4 Power Supply .............................................................................................................19
3.2.5 Adapter .......................................................................................................................20
3.3 Extended BBU................................................................................................................22
3.3.1 Front View..................................................................................................................22
3.3.2 Rear View...................................................................................................................22
4. Installation ................................................................................................................. 24
4.1 Mounting Disk Array Unit and Disk Enclosures on Rack ..............................................24
4.2 Installation of Disk Drives..............................................................................................28
4.3 Setting AC Operating Mode ...........................................................................................32
4.4 Installing and Removing Front Panel .............................................................................33
4.5 Mounting an Extended BBU on a Rack ..........................................................................35
5. Cable Connections ................................................................................................... 39
5.1 Notes on Cable Connections...........................................................................................39
5.2 Connection of SAS Cables .............................................................................................39
5.3 SAS Cable Connections and DE and PD Numbers.........................................................40
5.4 Connection of Disk Array Unit to Business Server ........................................................42
5.5 Connecting LAN Cables.................................................................................................44
5.6 Connection of Extended BBU and Controllers ...............................................................46
5.7 Connecting Power Cables...............................................................................................47
6. Turning On/Off Unit Power....................................................................................... 50
6.1 Power-on Procedure .......................................................................................................50
- xxi -

6.2 Power-off Procedure.......................................................................................................51
6.3 Powering On When AC Power Has Not Been Turned Off .............................................52
6.4 Notes on Turning Off the AC Power ..............................................................................53
6.5 Power Control Means Besides Power Button .................................................................56
6.6 Notes on UPS Coordination and Automatic Running .....................................................57
7. Installation of Storage Manager in a Windows E nvironment ............................ . . 58
7.1 Installation and Initial Setup of Storage Manager Server ...............................................58
7.2 Installation and Volume List Command..........................................................................59
7.2.1 Prior to Setup ..............................................................................................................59
7.2.2 Installation ..................................................................................................................59
7.3 Installation of ControlCommand ....................................................................................60
7.3.1 Prior to Setup ..............................................................................................................60
7.3.2 Installation ..................................................................................................................60
8. Installation of Storage Man ager in a Linux Environme n t..................................... 62
8.1 Installation of Storage Manager Server ..........................................................................62
8.1.1 Installation of Storage Manager Server.......................................................................62
8.1.2 Storage Manager Server Environment Setup ..............................................................63
8.2 Installation of Volume List Command ............................................................................65
8.2.1 Prior to Setup ..............................................................................................................65
8.2.2 Installation ..................................................................................................................65
8.3 Installation of ControlCommand ....................................................................................67
8.3.1 Prior to Setup ..............................................................................................................67
8.3.2 Installation ..................................................................................................................67
9. Collection of Host Information on Business Server ............................................. 69
9.1 Host Information Collection Using File Output on Business Server in Windows
Environment ...............................................................................................................................71
9.2 Collecting Host Information Using File Output on Business Server in Linux
Environment ...............................................................................................................................72
10. Installation of the Storage Manager Client ......................................................... 73
10.1 Configurations Offered by the Storage Manager Client..................................................73
10.2 Installing the Storage Manager Client ............................................................................74
10.3 Starting the Storage Manager Client ...............................................................................79
11. Initialization of RAID Storage ................................................................................ 81
11.1 Initialization Using Initialization Wizard........................................................................81
11.1.1 How to Start............................................................................................................81
11.1.2 Initialization............................................................................................................82
11.2 Setup Modification ....................................................................................................... 112
12. Easy Configuration of RAID Storage.................................................................. 114
12.1 Starting Easy Configuration ......................................................................................... 114
12.2 Easy Configuration Menu Screen ................................................................................. 115
12.3 Batch Unlocking of Licenses ........................................................................................ 116
12.4 Easy Configuration of Logical Disks............................................................................ 117
- xxii -

13. Connection Confirmation from Business Server ............................................ 120
13.1 Connection Confirmation in a Windows Environment .................................................120
13.2 Connection Confirmation in a Linux Environment.......................................................123
14. Storing Host Information Output to File on Business Server ........................ 128
15. Expansion Methods............................................................................................. 129
15.1 Notes on Expansion ......................................................................................................129
15.2 Removing and Installing Controllers ............................................................................130
15.3 Installing and Removing Disk Drives ...........................................................................131
15.4 Installing and Removing Disk Enclosures ....................................................................131
15.5 Installing and Removing Extended BBU......................................................................131
15.6 Installing and Removing Expansion Ports ....................................................................132
15.7 Changing DIP Switches................................................................................................136
16. Troubleshooting .................................................................................................. 138
16.1 Troubleshooting According to Device Conditions........................................................138
16.2 LED Checks .................................................................................................................143
16.3 Troubleshooting in Initialization Wizard/Easy Configuration ......................................149
16.3.1 Changing Network Settings for Monitoring Disk Arrays from Storage Manager .152
16.4 Unit Life Span and Maintenance Period .......................................................................156
16.5 Disposing of Equipment ...............................................................................................157
16.6 Before You Call ............................................................................................................157
16.7 Contacts for Questions and Consultation ......................................................................157
Appendix A. Notes on Using MSCS (Microsoft Cluster Service) in a Windows
Server 2003 Environment and on Connecting FC Switches in a Fault Tolerant
Server Environment ....................................................................................................... 158
Appendix B. Initialize Wizard File.............................................................................. 163
- xxiii -

1. OVERVIEW
1.1 Features
The features of this disk array unit are shown below.
High performance, large capacity
High reliability, high availability
Operation management
Fibre channel (FC-AL/Fabric, 400 MB/s) is employed in the host interface.
Disk drives employed are 73 GB (15,000 rpm), 147 GB (15,000 rpm), or 300 GB (15,000
rpm) SAS disk drives, and 500 GB (7200 rpm) or 750 GB (7200 rpm) SATA disk drives,
of which a maximum of 72 (Xanadu-beta version) drives or a maximum of 144 (Xanadu)
drives can be implemented.
SAS disk drives and SATA disk drives can be mixed in a disk enclosure.
Connection as a Windows, Linux, HP-UX, Solaris, or AIX server storage system is
possible.
Note: Xanadu-beta version supports only Windows and Linux servers (excluding the
Itanium Processor
Family).
Controllers, caches, power supplies, fans, and other major components are made
redundant.
Note: In the Xanadu-beta version Single Controller model, the controller and cache
are not made redundant.
Caches are double-written between controllers so that even if one controller fails, data is
preserved in the cache of another controller.
Notes: In the Xanadu-beta version Single Controller model, caches are not doublewritten.
In the Xanadu-beta version Single Controller model, the initial value of
the write cache function is OFF.
Data in a cache is held a standard 24 hours by the battery.
By adding an optional extended battery backup unit, the backup time can be extended to a
maximum of 120 hours (Xanadu-beta version) or a maximum of 72 hours (Xanadu).
RAID-1, 5, 10, 50, and 6 are supported.
Even if one disk drive fails, continuous operation is possible and data is not lost.
Note: RAID-6 is supported for SATA disk drives.
Multiple hot spare disks can be established.
Configuration, status display, and status monitoring can be performed easily using Storage
Manager.
Note: In order to use this disk array unit, you must purchase the program product
BaseProduct separately.
Storage Manager is included in BaseProduct.
- 1 -

This page is intentionally left blank

2. Initiating Setup
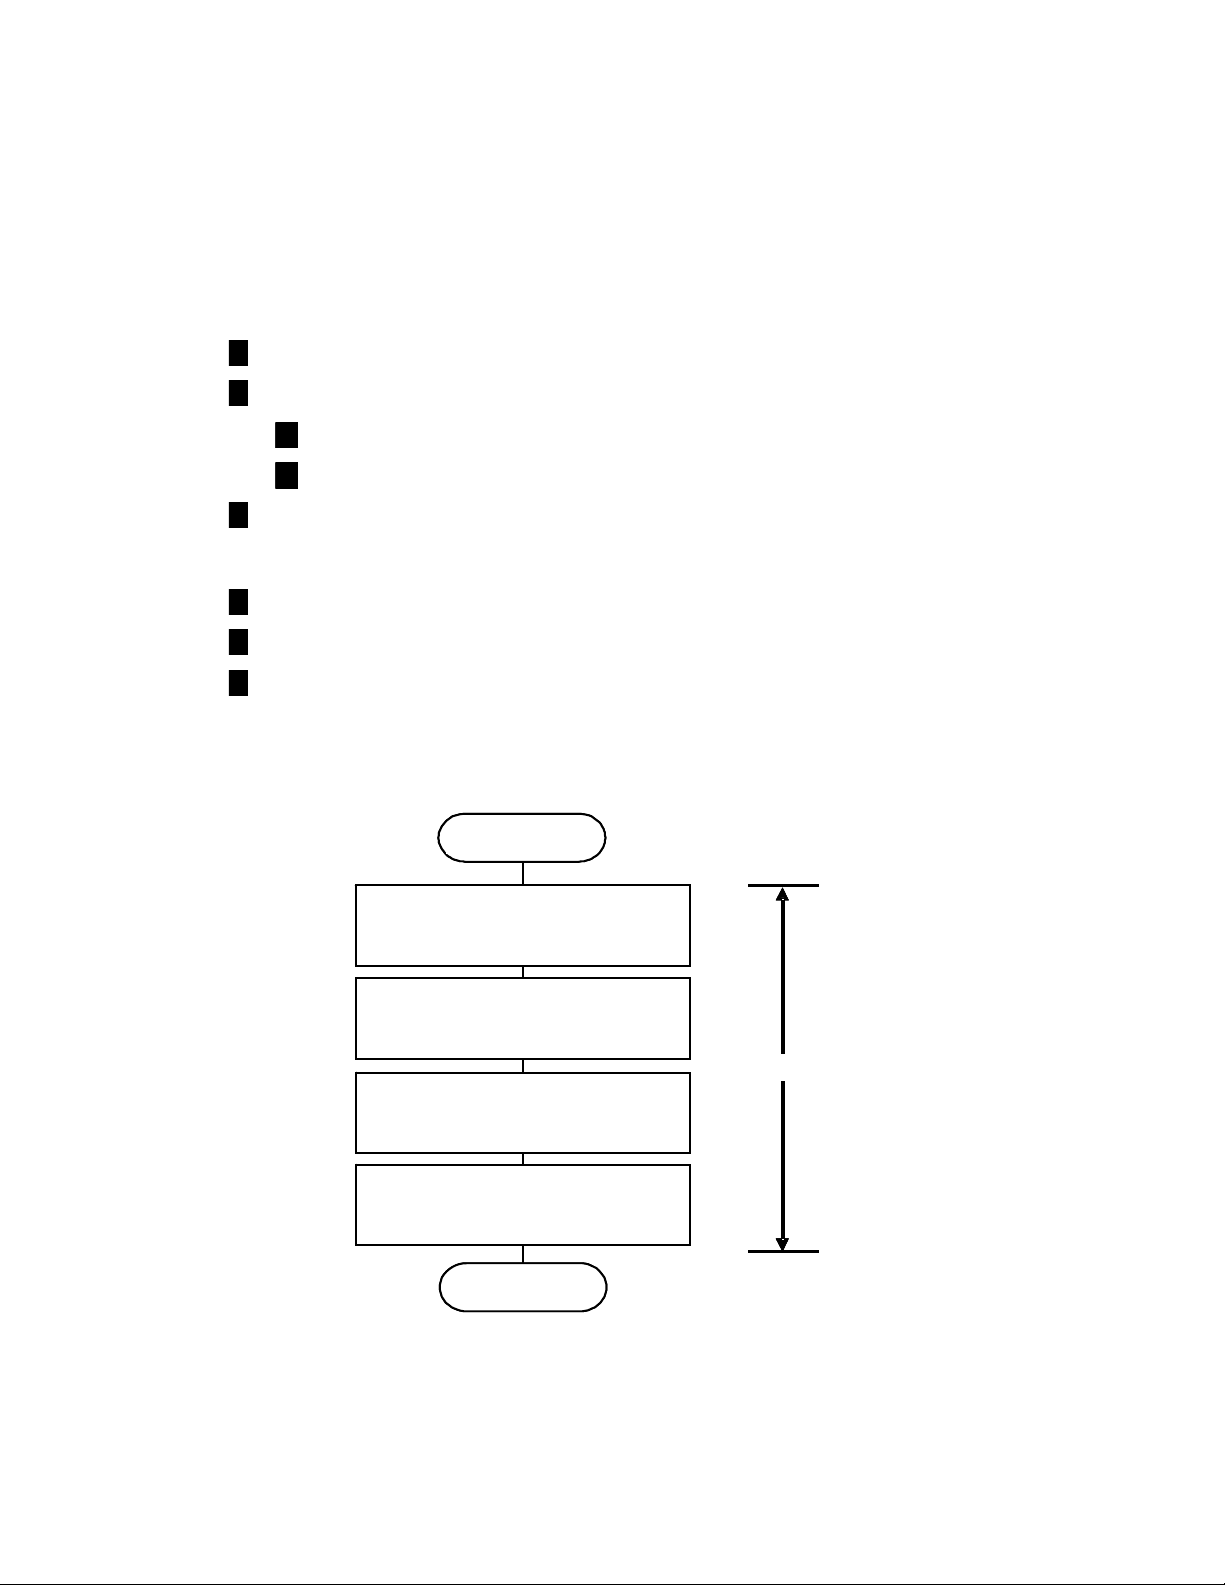
2.1 Tasks and Procedure f or New Setup
Execute setup tasks according to the following procedure.
An asterisk (*) before processing indicates that it is executed depending on conditions. Always
execute processing that is not so marked.
Chapter 2 Initiating Setup
Preparation, unpacking, and checking sent items
Chapter 4 Installation
Mounting the disk array unit and disk enclosures on a rack
Installation of disk drives
* Setting AC operating mode
Installing and removing the front panel
* Mounting an extended BBU on a rack
Chapter 5 Cable Connections
* SAS cable connections
Connection to the business server
Connection of LAN cables
* Connection of controller to extended BBU
Connection of power cables
Chapter 6 Turning On/Off Unit Power
Turning on the unit power
Chapter 7/8 Installation of Storage Manager
Installation of Storage Manager
Installation of the volume list command
* Installation of ControlCommand
Chapter 9 Collection of Host Information on Business Server
* Collecting the host information using a file output on a business server
Chapter 10 Installation of the Storage Manager Client
Chapter 11 Initialization of RAID Storage
Initialization using the initialization wizard
Chapter 12 Easy Configuration of RAID Storage
* Batch unlocking of licenses
* LD bind easy configuration
Chapter 13 Connection Confirmation from Business Server
* Chapter 14 Storing Host Information Output to File on Business Server
- 4 -
2.2 Preparation
For this setup task, the following supplies and tools are required. Since preparation is required at
the business server connecting RAID Storage, also perform that in advance.
(1) Prepare the following.
Management server, business server, client, installation CD
LAN cable (shielded)
(2) Execute the setup tasks below at the business server connecting RAID Storage.
Use a cross cable to connect the disk array unit to the management server directly.
Use a straight cable to connect the disk array unit to the management server via a hub.
Prepare as many IP addresses to assign to the disk array unit as there are connection ports.
Also prepare the subnet mask and gateway address after confirming them with the network
administrator.
Phillips screwdriver (No. 1)
At least three people (required to move the disk array unit)
At least three disk drives are required at the time of setup. Please purchase additional
disk drives.
Begin preparation
Get host bus adapter WWPN
Install host bus adapter
Business ser ve r
Install host bus adapter dri ver
Install RAID Storage PathManager
(If installing RAID Storage PathManager)
End preparation
Figure 2.2.1 Flow of Preparation
- 5 -

(a) Getting the WWPN (World Wide Port Name) of the host bus adapter (Fibre Channel
controller)
This setup is only for WWN mode (using the WWPN of the host bus adapter to allocate
LUN to the business server) as the AccessControl setup mode. During the setup task, the
WWPN of the host bus adapter installed on the business server is obtained using software.
However, it is recommended that you make note of it and provide for a substitute task
(confirmation of the server expansion slot location at which the host bus adapter is installed
and the WWPN) in case of a host bus adapter fault.
The WWPN that is assigned to the host bus adapter may have to be input manually if the
WWPN of the host bus adapter cannot be obtained by the software.
(b) Installing the host bus adapter
If a host bus adapter has already been installed in the business server, this task is not
necessary.
Install the host bus adapter in the business server according to the host bus adapter and
business server user’s manuals.
(c) Installing the host bus adapter driver
If a driver for the host bus adapter that is installed in the business server has already been
installed and set up, this task is not necessary.
Perform the tasks of host bus adapter driver installation and setup according to the manual
that came with the host bus adapter product installed in the server or information provided
on the Web.
(d) Installing PathManager (Windows/Linux)
If PathManager has already been installed and set up for the business server, or if
PathManager is not being installed, this task is not necessary.
To perform this task, installation and setup of the host bus adapter driver must be done
first.
Perform the tasks of PathManager installation and setup according to the “PathManager
User’s Manual” that comes with the PathManager product, or the “PathManager Installation
Guide”.
- 6 -
2.3 Unpacking
This is the task of unpacking a delivered disk array unit and removing the materials used to protect
the unit for transportation.
In order to prevent condensation, unpack after sufficiently acclimating the unit to the ambient
temperature following delivery (approximately nine hours).
In unpacking, take the disk array unit itself and the accessories out of the carton in such a way
that they are not exposed to excessive shocks.
The disk array unit is extremely heavy. If only one or two persons lift it when taking it out of
the carton, they may hurt their backs.
At least three people should take the disk array unit out of the carton by supporting the bottom
of the unit and not holding on to projections such as power supplies and controllers.
The carton is designed to transport precision equipment. Do not discard the carton because it
will be needed when returning the unit to the factory for repair.
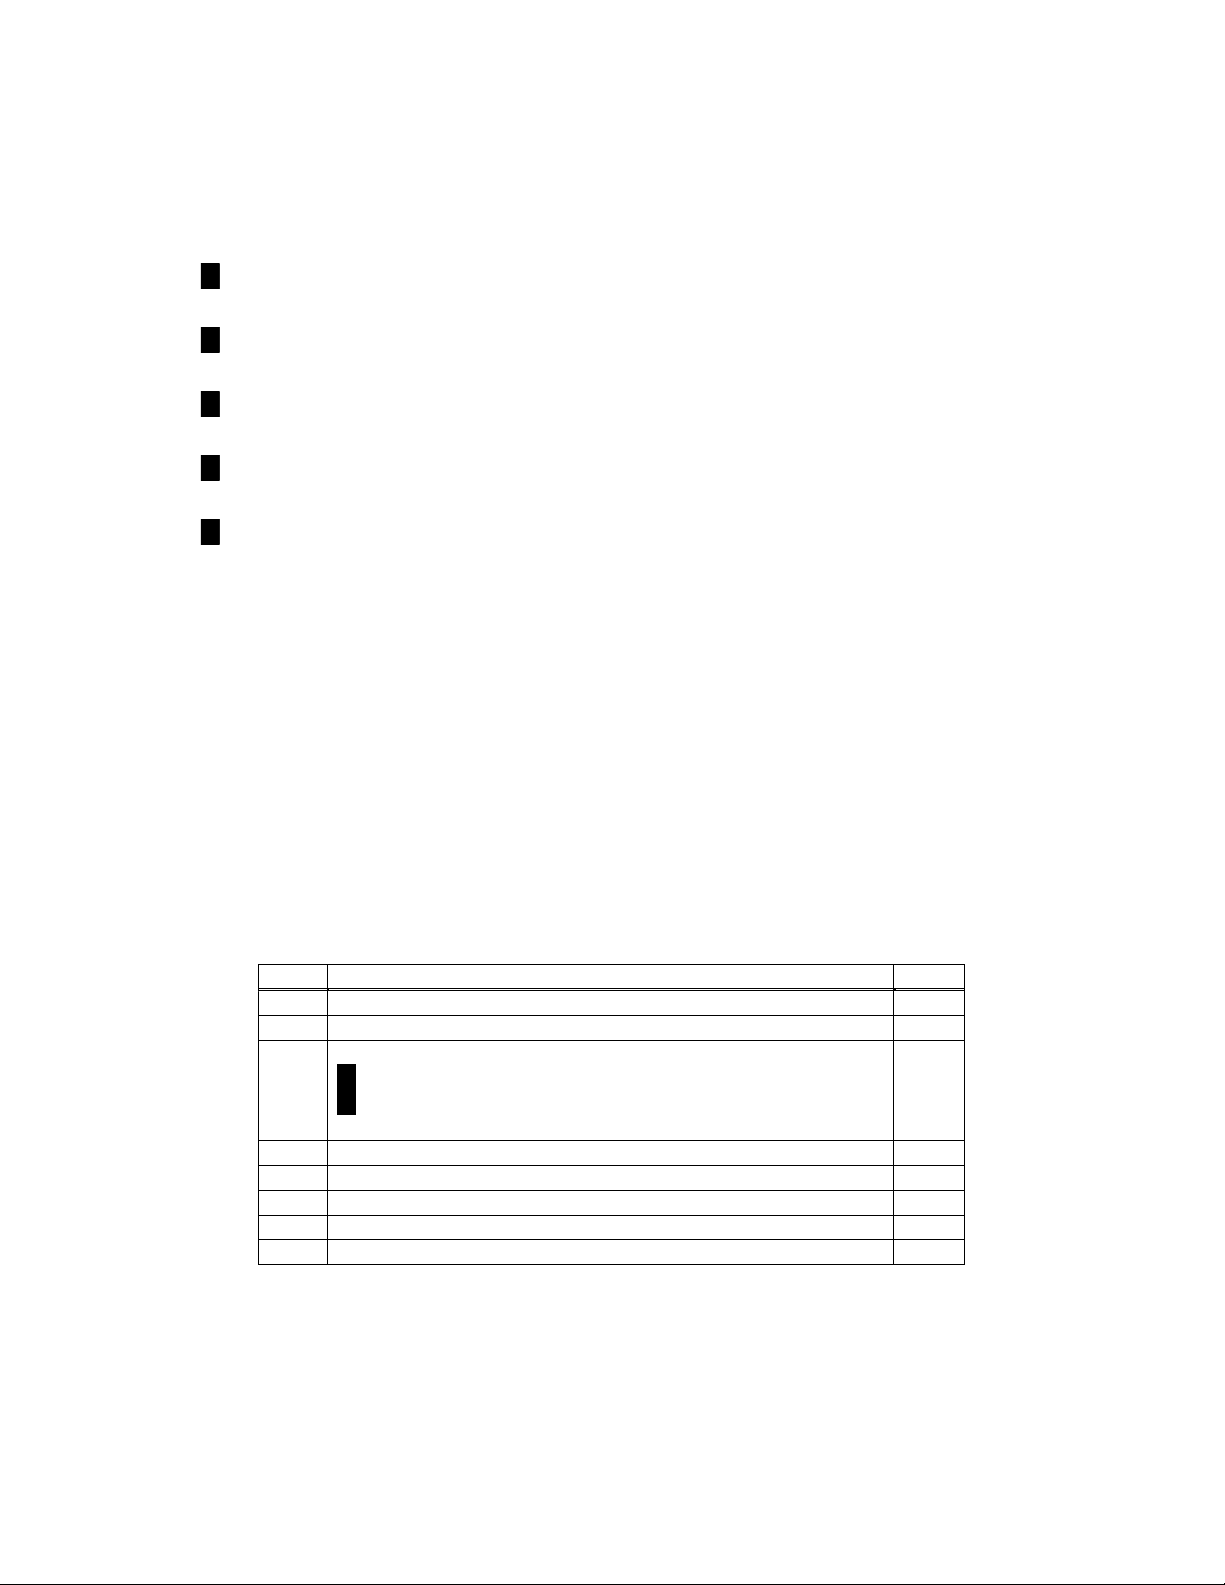
2.4 Checking Sent Items
When finished unpacking, confirm that all of the items shown in the table below have been sent. If
anything is missing, contact your sales representative.
Next, inspect the unit and the accessories.
If there is any damage, contact your sales representative.
* In order to perform the setup tasks for this disk array unit, at least three disk drives are needed.
If you have not bought disk drives, purchase them before performing the setup tasks.
Table 2.4.1 List of Included Items for Disk Array
No. Item Name Qty.
1 Rack mount kit 1
2 Front mask 1
AC cable
3
4 Xanadu microprogram 1
5 Setup Guide 1
6 User’s Guide 1
7 User’s Guide (CD-R edition) 1
8 Warranty 1
9 List of Included Items 1
- 7 -
 Loading...