

Page 1

19-1206.fm Page 1 Tuesday, August 3, 1999 10:50 AM
Cat. No. 19-1206
OWNER’S MANUAL
Please read before using this equipment.
BTX-127
CTCSS • VHF/FM
Business Band Transceiver
Page 2

19-1206.fm Page 2 Tuesday, August 3, 1999 10:50 AM
Features
Your RadioShack BTX-127 CTCSS •
VHF/FM Business Band Transceiver is a
portable, tw o-way business radio service
transceiver that you can carry almost
anywhere. The transceiver is compact
and light, making it an ideal choice for
your business needs.
Your transceiver has these features:
Programmable Frequencies — an au-
thorized service facility can program the
transceiver to any VHF business band
frequency you have a license to use —
no crystals to buy !
Note: Your local RadioShack store must
send the transceiver to an authorized
service facility to program the transceiver with a frequency. You must show your
license to store personnel.
38-Tone CTCSS (Continuous Tone Control Squelch System) — helps reduce interference from other transceivers which
are operating on the same frequency, in
the same area.
Rechargeable Long-Life Battery Pack
and Battery Charger — the supplied battery charger lets you conveniently recharge your transceiver’s long-life
battery pack while it is on the transceiver.
High/Low Power Switch — lets you increase the transmitted signal strength
to increase the transceiver’s range, or
decrease it to sav e batt ery power.
Earphone/Speaker Jack and External
Microphone Jack — let you connect
an external earphone or speaker and
an external mic rophone to help ensure
understandable communications in
noisy areas.
Built-In Modulation Limiter Circuit —
automatical ly adjusts for a wide variety
of voice levels to ensure an understandable transmission.
Battery Low Indicator — shows the
battery pack’s condition.
PLL-Controlled Circuitry — provides accurate and stabl e channel selection.
© 1998 Tandy Corporation.
All Rights Reserved.
2
Page 3

19-1206.fm Page 3 Tuesday, August 3, 1999 10:50 AM
Flexible Antenna — provides excellent
reception.
Belt Clip — lets you attach the transceiver to your belt or waist band.
WARNING: To reduce the risk of fire
or shock hazard, do not expose this
product to rain or moist ure.
The transceiver’s preset frequencies
are:
• 151.625 MHz (red dot)
• 151.700 MHz
• 151.760 MHz
• 151.820 MHz
• 151.880 MHz
• 151.940 MHz
• 151.955 MHz (purple dot)
• 154.570 MHz (blue dot)
• 154.600 MHz (green dot)
Note: Some manufacturers identify
some business band frequencies by color. These “dot” frequencies are shown
above.
We recommend you record your transceiver’s serial number here. The number
is on the back of the transceiver.
Serial Number _________________
CAUTION
RISK OF ELEC-
!
TRIC SHOCK.
DO NOT OPEN.
CAUTION: TO REDUCE THE
RISK OF ELECTRIC SHOCK, DO
NOT REMOVE COVER OR
BACK. NO USER-SERVICEABLE
PARTS INSIDE. REFER SERVICING TO QUALIFIED PERSONNEL.
This symbol is intended to
alert you to the presence of
uninsulated dangerous voltage within the product’s enclosure that might be of
sufficient magnitude to constitute a risk of electric
shock. Do not open the
product’s case.
This symbol is intended to
inform you that important
!
operating and maintenance
instructions are included in
the literature accompanying
this product.
3
Page 4

19-1206.fm Page 4 Tuesday, August 3, 1999 10:50 AM
CONTENTS
FCC Regulations ......... .. ............. .. .. ............. .. .. ............. .. .. ............. .. .. ............. .. .. ..... 5
FCC License Required ..................................................................................... 5
FCC Part 90 Rules ........................................................................................... 5
Additional FCC Regulat ions .............. ............................................... ................ 7
Preparation .............................................................................................................. 8
Installing the Battery Pack ................................................................................ 8
Charging the Battery Pack ............................................................................... 9
Connecting the Ant enna .......... ............ ...................... ..................................... 10
Connecting an Optional Antenna ............................................................ 11
Using the Belt Clip .......................................................................................... 11
Connecting an Earphone/External Speaker ................................................... 11
Listening Safely ....................................................................................... 12
Traffic Safety ........................................................................................... 12
Using an External Spea ker/Microphone ............. .. ................................ .......... 12
Setting Frequen cy O pti ons .............. .. ........................................... ...................... ... 13
About CTCSS ................................................................................................. 13
Using a CTCSS Frequency ............................................................................ 14
Operation ............................................................................................................... 16
Operational Hints ............................................................................................ 17
Care and Maintenance .......................................................................................... 18
Specifications ......................................................................................................... 19
4
Page 5

19-1206.fm Page 5 Tuesday, August 3, 1999 10:50 AM
FCC Regulations
FCC License Required
This transceiver is intended for use in
the operation of commercial activities,
educational, philanthropic, or ecclesi astical institutions, and hospitals, clinics, or
medical associations.
The Federal Communications Commission (FCC) requires you to have a license before you operate this
transceiver. Unless you are already licensed to operate on one of the preset
frequencies, you must apply for a frequency through the PCIA (Personal
Communication Industry Association), a
non-profit organization that assigns frequencies nationwide to help prevent
conflicts between different businesses
using transceivers in the same area. For
more information about get ti ng a license,
contact the PCIA at 800-759-0300, extension 3068 (in Virginia 703-739-0300,
extension 3068).
For other questions concerning the license application, contact the FCC at
717-337-1212, or write:
FCC
P.O. Box 1040
Gettysburg, PA 17325
To receive: You enter:
All forms and instructions 000600
Form 600 instruct ions only 006001
Main Form 600 only 006002
Form 600 schedules only 006003
If yo u do not hav e a fax m ac hine, yo u
can call t he Gover nm ent F orm s Dis tribution Center at 1-800-418-FORM and
request that the form and instructions
be mailed to you.
FCC Part 90 Rules
You must be familiar with Part 90 of
FCC Rules before you operate your
transceiver. The operation instructions
in this manual conform to Part 90, but
do not cover all items in Part 90.
Overall, Part 90 states that:
• You must have a valid license
before you use the transceiver.
For the latest FCC application form and
instructions, call the FCC’s fax-on-demand service at 1-202-418-0177 from a
fax machine and request one or more of
the following documents:
5
Page 6

19-1206.fm Page 6 Tuesday, August 3, 1999 10:50 AM
• As licensee, you are responsible for
proper operation of all transceivers
operating under your license authority.
• You can let unlicensed persons
operate this transmitter, as long as
you take precautions to prevent
unauthorized transmissions.
• You must use this transceiver only
for the commercial use of your business, and only when other commercial channels (such as the
telephone) are either not available
or not practical.
• You must always yield the operating
frequency to communications that
involve the safety of life or property.
• You must take reasonable precautions to prev ent harmful interfer ence
to other services operating on the
same frequency.
• You must not transmit program
material of any kind used in connection with commercial broadcasting.
• You must not provide a service
that is normally handled by telephone or telegraph unless such
broadcasts involve the safety of
life or property or in emergencies
such as an earthquake, hurr icane,
flood or a similar disaster where
normal communication channels
are disrupte d.
• During each transmission or
exchange of transmissions, you
must identify your station with the
call sign issued to you by the
FCC, or once each 15 minutes
during periods of continuous
operation.
• You must keep a written record of
any maintenance or modification
made to the transceiver, and you
must make this record available
for inspection upon demand by
the FCC.
Violating any of the provisions of Part
90 can result in fines and/or confiscation of equipment.
6
Page 7

19-1206.fm Page 7 Tuesday, August 3, 1999 10:50 AM
Your trans ceiver might cause TV or radio
interference even when it is operating
properly. To determine whether your
transceiver is causing the interference,
turn off your transceiver. If the interference goes away, your transceiver is
causing it. Try to eliminate the interference by:
• mov ing your transc eiver aw ay fro m
the receiver
• contacting your local RadioShack
store for help
If you cannot eliminate the interference,
the FCC requires that you stop using
your transceiver.
Additional FCC Regula tions
The Business Radio Service is under the
jurisdiction of the Federal Communications Commission (FCC). Any adjustments or al terations that would alter the
performance of the transceiver so it no
longer meets the original FCC type acceptance or would change the frequency-determining method are strictly
prohibited.
Before you operate the transceiver,
you must obtain your license. It is illegal to transmit without the appropriate
license, which you can get by submitting a completed FCC Form 600 to the
FCC (or through the PCIA). Furthermore, you are required to understand
Part 90 of the FCC Rules and Regulations prior to operating your transceiver. It is the user’s responsibility to see
that this unit is operating at all times in
accordance with the FCC Rules and
Regulations.
Replacement or substitution of crystals,
transistors, ICS, regulator diodes, or any
other component that is of a unique nature with components other than those
recommended can violate the technical
regulations of the FCC rules or violate
type acceptance requirement of the
rules.
7
Page 8

19-1206.fm Page 8 Tuesday, August 3, 1999 10:50 AM
Preparation
Installing the Battery Pack
The supplied battery pack, when fully
charged, provides power to your transceiv er fo r up to 8 hours. You m u st in stall
the battery pack in your transce iver, then
charge it.
Caution: Do not remove the plastic wrap
from the battery pack. Doing so can permanently damage the battery.
Follow these steps to install the battery
pack.
1. Unlock the battery compartment
cover by sliding both of the cover’s
latche s toward the front o f the tra n sceiver as shown. Then slide the
cover in the direction of the arrow
and lift it off.
illus - show bat comp cover
latches being released and
cover being slid down
the battery pack into the compartment while applying slight pressure to the bottom of the battery
pack.
illus - show battery pack
being installed into
compartment
3. Slide the battery cover back into
place, then slide both of the
latches toward the back of the
transceiver to lock it.
To remove the battery pack, unl ock the
compartment, then turn the transceiver face down and gently tap it into your
palm so the battery pack slides out.
2. With the battery printing facing up,
align the contacts on the battery
pack with the contacts inside the
battery compartment. Then, press
8
Page 9

19-1206.fm Page 9 Tuesday, August 3, 1999 10:50 AM
Charging the Battery Pack
Before you use the battery pack for the
first time, you must use the supplied battery charger to charge it for about 12 to
14 hours to bring it to a full charge.
You cannot use the transceiver while you
charge the batt ery pack.
Caution: The supplied battery charger
was designed specifically for your transceiver. Use only the supplied battery
charger.
Follow these steps to charge the battery
pack.
1. Turn VOLUME fully counterclockwise to OFF to make sure power is
turned off .
illus -
show
VOLUME
other end of the charger into a
standard AC outlet.
illus - show barrel plug/
charger. Show plug being
plugged into CHRG and
AC plug about to be
plugged into
an AC outlet
If the RX/TX indicator lights yellow
when the transceiver’s power is on and
you press PUSH TO TALK, recharge
the battery pack .
illus - show
PTT and
RX/TX lit on
front of
transceiver
2. Pull out the rubber cover over the
CHRG jack on the side of the transceiver, and i nsert the charger’s barrel plug into the jack. Then plug the
9
Page 10

19-120 6.fm Page 10 Tuesday, August 3, 1999 10:50 AM
Notes:
• A nickel-cadmium battery pack lasts
longer and delivers more power if
you occasionally let it fully discharge. To do this, use the transceiver until the RX/TX indicator
lights yellow when you press PUSH
TO TALK.
• To prevent damaging a nickel-cadmium battery pack, never charge it
in an area where the temperature is
above 113°F (45°C) or below 32°F
(0°C) .
Important: At the end of a rechargeable
battery pack’s useful life, it must be recycled or disposed of properly. Contact
your local, county, or state hazardous
waste management authorities for information on recycling or disposal programs in your area. Some options that
might be available are: municipal curbside collection, drop-off boxes at retailers such as your local RadioShac k store,
recycling collection centers, and mailback programs.
Connecting THE Antenna
Follow these steps to attach the sup-
plied flexible antenna to your transceiver.
illus - show
antenna being
connected to
transmitter
1. Align the slots around the
antenna’s connector with the tabs
on the antenna jack on top of the
trans c eiv er.
2. While squeezing the base of the
antenna, press the antenna down
over the jack and turn the
antenna’s base clockwise until it
locks into pl ace.
10
Page 11

19-120 6.fm Page 11 Tuesday, August 3, 1999 10:50 AM
Connecting an Opti onal Antenna
Although the supplied flexible antenna
provides excellent local reception, you
can connect an optional external mobile
antenna or outdoor base station antenna
to your trans ceiver for better rec eption of
weak signals. The antenna jack on the
top of the transceiver makes it easy to
use the transceiver with a variety of antennas. Your local RadioShack store
sells a variety of antennas.
Caution: Never connect an antenna that
is not specifically tuned for th e transceiver’s frequency range.
Using the Belt Clip
The supplied belt clip lets you easily clip
the transcei ver to your belt.
illus - show belt clip
being attached to
transceiver with screws
Connecting an Earphone/External
Speaker
To listen privately or to hear better in a
large area such as a warehouse, you
can plug a monaural earphone or an
external speaker with a 1/8-inch (3.5
mm) plug (not supplied) into the EAR
jack on thetop of the transceiver. This
automatically disconnects the built-in
speaker.
Use a Phillips screwdriver to secure the
clip to the transceiver’s back with the
supplied scr ews.
illus - show earphone/speaker
being connected to EAR
11
Page 12

19-120 6.fm Page 12 Tuesday, August 3, 1999 10:50 AM
Listening Saf ely
To protect your hearing, follow these
guidelines when you use an earphone.
• Set the volume to the lowest setting
before you begin listening. After you
begin listening, adjust the volume to
a comfortable le vel.
• Do not listen at extremely high volume levels. Extended high-volume
listening can lead to permanent
hearing loss.
• Once you set the volume, do not
increase it. Over time, your ears
adapt to the volume level, so a volume level that does not cause discomfort might still damage your
hearing.
Traffic Safety
Do not use an earphone with your trans-
ceiver when operat ing a motor vehicle or
riding a bicycle in or near traffic. Doing
so can create a traffic hazard and could
be illegal in some areas.
Using an External Speaker/
Microphone
An external speaker/microphone can
make it easier to use the transceiver
when you clip it to your belt, so you do
not have to lift the transceiver to your
mouth each time you transmit. Plug
the speaker/microphone’s plug into
the EAR jack and the MIC jack on top
of the transceiver. This automatically
disconnects the transceiver’s built-in
speaker and microphone.
illus - show ext. speaker/
mike being connected to
top of transceiv er
If you use an earphone with your transceiver while riding a bicycle, be very
careful. Do not listen to a continuous
broadcast. Even though some earphones let you hear some outside
sounds when listening at normal volume
levels, they sti ll can present a traf fic hazard.
12
Page 13

À
19-120 6.fm Page 13 Tuesday, August 3, 1999 10:50 AM
Setting Frequency Options
Before you can use your transceiver, an
authoriz ed service fac ility must set you r
transceiver to a VHF business band frequency you have a license to use. Then,
you can select a preset CTCSS (Continuous Tone Control Squelch System) frequency and set your transceiver to use
it.
Here is what you need to do to set your
transceiver to use a business band frequency and CTCSS.
Send your transcei ver to an authorized
þ
service facility to have it set to a business band frequency.
Set the DIP switches for a CTCSS frequency (see “Using a CTCSS Frequency” on Page14).
Set your transceiver to that CTCSS
Ã
frequency.
Set a DIP switch to activate or deacti-
Õ
vate CTCSS.
You can select one CTCSS frequency at
a time. If you do not want to use a CTCSS frequency, skip Steps 2_4 above.
About CTCSS
CTCSS helps eliminate interference
between different users of the same
frequency, letting you talk and listen to
people who are using other transceivers set to the same frequency and
CTCSS code. This is like having a s ubchannel within a channel, giving you
greater communication flexibility. When
you set a CTCSS code — there are 38
to choose from — and turn on your
transceiver’s CTCSS, the transceiver
transmits a tone with your transmission, letting you communicate with
anyone who has a transceiver set to
the same frequency and code. This
tone is too low for you to hear, but other transceivers can detect it.
If CTCSS is turned on and set to the
same tone on the receiving transceiver, it only receives those transmissions
that include the tone. If two different
groups oper-ate transceivers in the
same area on the same frequency,
they do not hear each other’s broadcasts if they both use CTCSS and
each select a different CTCSS tone.
Your transceiver’s default CTCSS tone
is 100 Hz.
13
Page 14

19-120 6.fm Page 14 Tuesday, August 3, 1999 10:50 AM
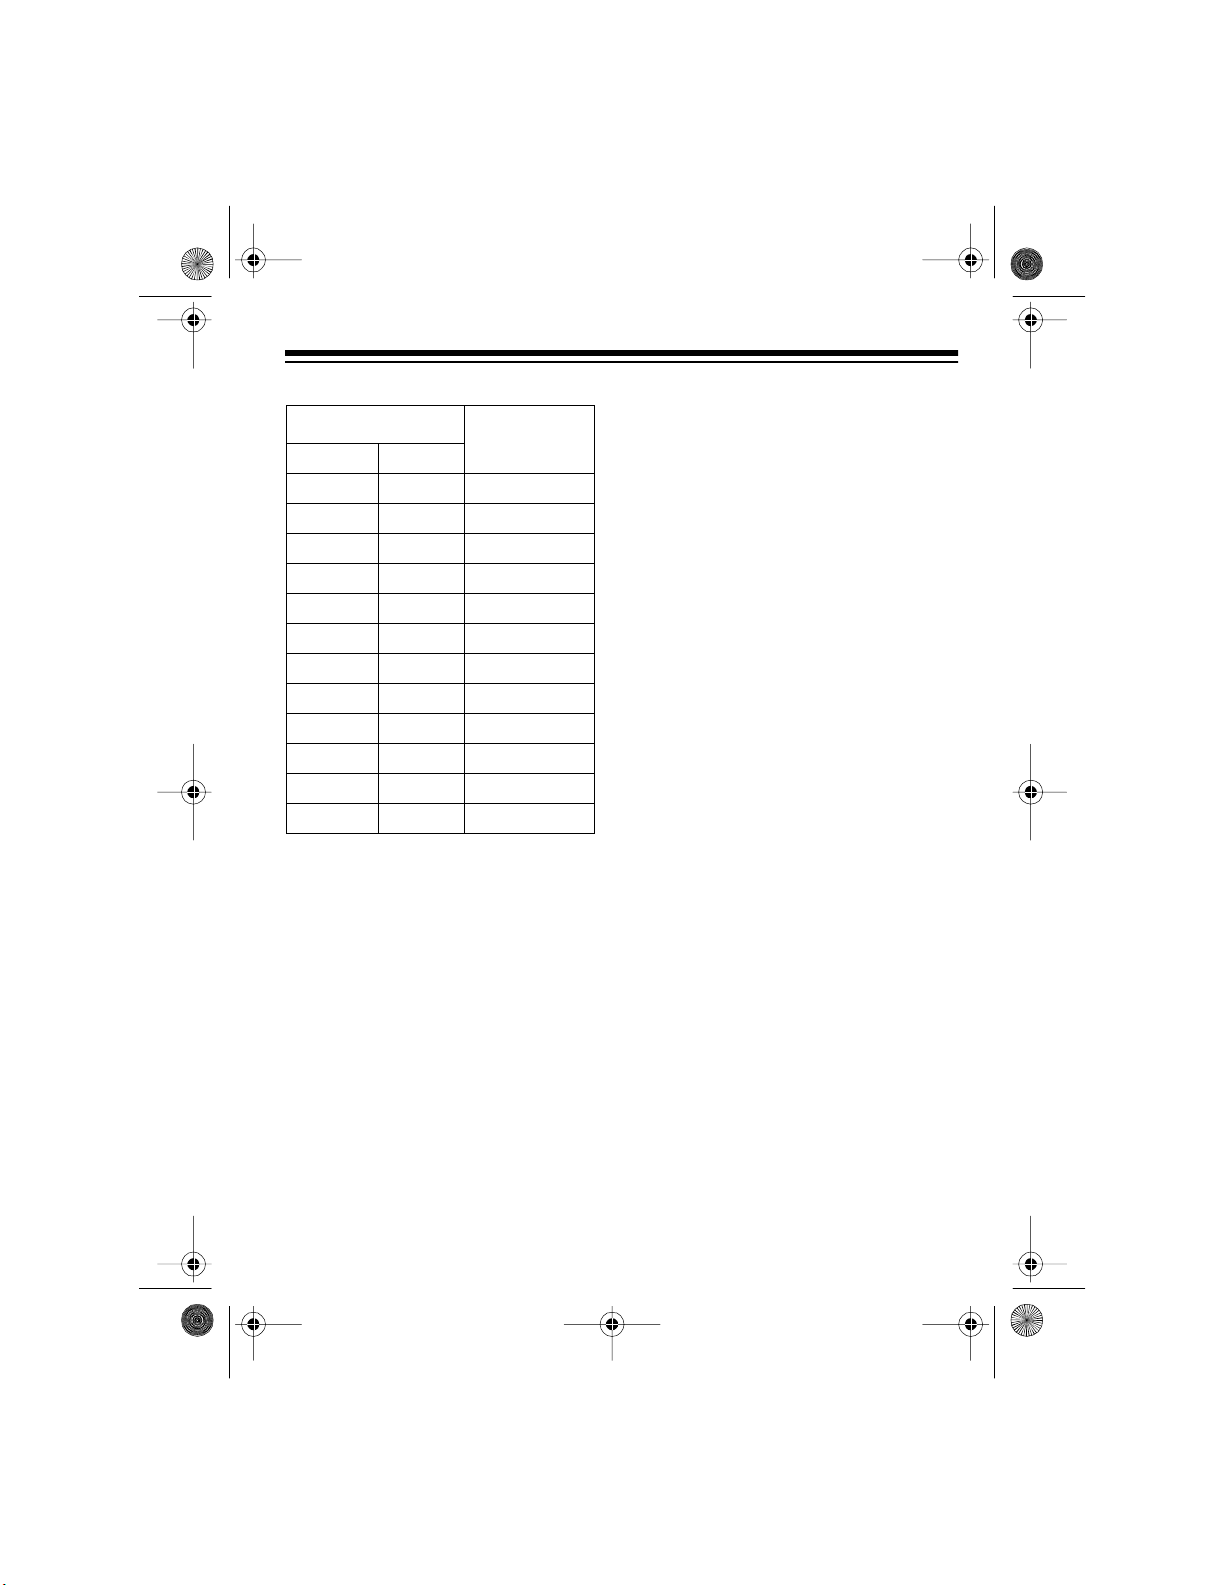
Using a CTCSS Frequency
Follow these steps to set your transceiv-
er to a CTCSS frequency and then activate or deactivate CTCSS.
1. Turn VOLUME fully counterclockwise to make sure power is turned
off.
2. Remove the battery compartment
cover (see “Installing the Battery
Pack” on Page 8). You do not have
to remove the battery pack.
3. Choose a CTCSS code from the
table on the right. Then use a
pointed object such as a straightened paper cli p to set the posit ion of
each DIP switch inside the battery
compartment to 1 (up) or 0 (down)
corresponding to the setting for that
CTCSS code.
illus - show D IP switch
inside battery compartment
set to any setting
Dip Switch Setting Key:
0 = down
1 = up
CTCSS
Code
Freq
(Hz)
DIP Switch
Setting
14
CTCSS
none
167.0
000000
000001
2 71.9 000010
3 74.4 000011
4 77.0 000100
5 79.7 000101
6 82.5 000110
7 85.4 000111
8 88.5 001000
9 91.5 001001
10 94.8 001010
11 97.4 001011
12 100.0 001100
13 103.5 001101
14 107.2 001110
15 110.9 001111
16 114.8 010000
17 118.8 010001
18 123.0 010010
19 127.3 010011
20 131.8 010100
21 136.5 010101
22 141.3 010110
23 146.2 010111
24 151.4 011000
Code
Freq
(Hz)
DIP Switch
Setting
25 156.7 01 1001
Page 15
19-120 6.fm Page 15 Tuesday, August 3, 1999 10:50 AM
CTCSS
26 162.2 011010
27 167.9 011011
28 173.8 011100
29 179.9 011101
30 1 8 6. 2 01111 0
31 1 9 2. 8 011111
32 203.5 100000
33 210.7 100001
34 218.1 100010
35 225.7 100011
36 233.6 100100
37 241.8 100101
38 250.3 100110
4. Hold down PUSH TO TALK, then
turn VOLUME clockwise until it
clicks. The transceiver sets the
CTCSS code. Release PUSH TO
TA L K .
If the transceiver beeps once and
RX/TX lights green for about 2
seconds, that means the CTCSS
setting was successful.
If the transceiver beeps 3 times
and RX/TX lights red for about 2
seconds, the CTCSS setting did
not work. Start over at Step 1.
5. To activate the CTCSS code you
set, set the first DIP switch to 1
(up). To deactivate the code, set the
switch to 0 (down).
6. Replace the battery compartment
cover.
15
Page 16

19-120 6.fm Page 16 Tuesday, August 3, 1999 10:50 AM
Operation
Note: You can only communicate with
another transceiver that is using the
same channel and/or the same CTCSS
code as your trans c eiver.
1. Turn VOLUME clockwise to turn on
the tran s c ei v er, turn SQ U E L C H fu lly
counterclockwise until you hear a
hissing sound, then adjust the volume to a comfortable l ist ening level.
illus - show VOLUME being
adjusted
2. If you did not set the transceiver to
use a CTCSS code, wait until there
is no signal on the channel. Then
turn SQUELCH clockwise until the
background noise between signals
stops.
3. To conserve battery power, slide
HI/LO to LO. If the person you
transmit to has trouble receiving
your signal, slide HI/LO to HI.
illus - show HI/LO switch
4. To transmit, hold down PUSH TO
TALK. Then hold the transceiver
about 3 inches from your mouth
and speak slowly in a normal
voice. The RX/TX indicator lights
red.
illus - show P U S H TO
T ALK and RX/TX
indicator
16
illus - show SQUELCH
being adjusted
5. Release PUSH TO TALK when
you finish your transmission.
6. To turn off the transceiver, turn
VOLUME counterclockwise until it
clicks.
Page 17

19-120 6.fm Page 17 Tuesday, August 3, 1999 10:50 AM
Operational Hints
Your transceiver’s range varies depend-
ing on factors such as position, terrain,
and battery condition. Buildings absorb
transmitted signals and, if they contain
metal, might completely block the signals. Trees and heavy cloud formations
have a similar effect, though not as severe. If you are near a lake or the ocean,
you might get excel lent range.
To ensure maximum range, operate the
transceiver with the battery pack fully
charged. As the voltage decreases, the
range decreases.
17
Page 18

19-120 6.fm Page 18 Tuesday, August 3, 1999 10:50 AM
Care AND Maintenance
Y our RadioSh ack BTX-127 CTCSS • VHF/FM Busine ss Band T ransceiver i s an example of superior design and craftsmanshi p. The following sugg estions will hel p you care
for your transc eiver so you can enjoy it for years.
• Keep the transceiver dry. If it gets wet, wipe it dry immediately. Liquids might
contain minerals that can corrode the electr onic circuits.
• Use and store the transceiver only in normal temperature environments. Temperature extremes can shorten the life of electronic devices, damage batteries,
and distort or mel t plastic parts.
• Keep the transceiver away from dust and dirt, which can cause premature wear
of parts.
• Handle the transceiver gently and carefully. Dropping it can damage circuit
boards and cases and can cause the transceiver to work improperly.
• Use only a battery pack of the required size and type. Battery packs can leak
chemicals that damage your transceiver’s electronic parts.
• Wipe the transceiver with a damp cloth occasionally to keep it looking new. Do
not use harsh chemicals, cleaning solvents, or strong detergents to clean the
transceiver.
Modifying or tampering with the transceiver’s internal components can cause a malfunction and might invalidate your transceiver’s warranty and void your FCC authorization to operate it. If your transceiver is not performing as it should, take it to your
local RadioShack store for assistance.
18
Page 19

19-120 6.fm Page 19 Tuesday, August 3, 1999 10:50 AM
Specifications
Frequency Range ................................................................... 150.775–157.740 MHz
Channe ls ............ .............. ............. .............. ............... ............ ............... .............. ...... 1
Modulation Type ...................................... ...................... ...................... .................. FM
Antenna Impedance .......... ...................... ................................ ....................... 50 Ohm
Microphone ...................................................................................... Condenser Type
Power Supply ............. ............ .............................. 7.2V 950 mAh Ni-Cd Battery Pack
Note: The supplied battery charger does not operate at temperatures below
32°F (0°C) or above 113°F (45°C).
Sensitivity at 12dB SINAD .... ............................................... ............................. 0.5 µV
Bandwidth .......... .. ............... .. ... ....... .. ............... ... .............. ... .. ....... ... ............ 12.5 KHz
Adjacent Channel Rejection .............................................................................. 45 dB
Audio Output Power ............................................. 200mW @ 8 ohm (10% distortion)
Audio Distortion .................................................................................................... 7 %
Transmit Power ............................................................................................... Hi: 2W
Lo: 600 mW
Harmon ic Emissi o n ...... .. .. ........ .. ............... .. ............... .. ... ....... .. ............... .. ........ 55 dB
Dimens io ns (HWD ) . .. ............... .. ... ....... .. ............... .. ......... 51/2 × 23/8 × 19/16 Inches
(140 × 60 × 35 mm)
Weight (with battery pack) .................................................................................. 14 oz
(0.4 kg)
Specifications are typical; individual units might vary. Specifications are subject to
change and improvem ent without notice.
19
Page 20

19-120 6.fm Page 20 Tuesday, August 3, 1999 10:50 AM
Limited One-Year Warranty
This product is warranted by RadioShack against manufacturing defects in
material and workmanship under normal use for one (1) year from the date of
purchase from RadioShack company-owned stores and authorized RadioShack franchisees and dealers. EXCEPT AS PROVIDED HEREIN, RadioShack MAKES NO EXPRESS WARRANTIES AND ANY IMPLIED
WARRANTIES, INCLUDING THOSE OF MERCHANTABILITY AND FITNESS FOR A PARTICULAR PURPOSE, ARE LIMITED IN DURATION TO
THE DURATION OF THE WRITTEN LIMITED WARRANTIES CONTAINED
HEREIN. EXCEPT AS PROVIDED HEREIN, RadioShack SHALL HAVE NO
LIABILITY OR RESPONSIBILITY TO CUSTOMER OR ANY OTHER PERSON OR ENTITY WITH RESPECT TO ANY LIABILITY, LOSS OR DAMAGE
CAUSED DIRECTLY OR INDIRECTLY BY USE OR PERFORMANCE OF
THE PRODUCT OR ARISING OUT OF ANY BREACH OF THIS WARRANTY, INCLUDING, BUT NOT LIMITED TO, ANY DAMAGES RESULTING
FROM INCONVENIENCE, LOSS OF TIME, DATA, PROPERTY, REVENUE,
OR PROFIT OR ANY INDIRECT, SPECIAL, INCIDENTAL, OR CONSEQUENTIAL DAMAGES, EVEN IF RadioShack HAS BEEN ADVISED OF THE
POSSIBILITY OF SUCH DAMAGES.
Some states do not allow th e limitations on how long an implied warranty lasts
or the exclusion of incidental or consequential damages, so the above limitations or exclus ions may not apply to you.
In the event of a product defect during the warranty period, take the product
and the RadioShack sales receipt as proof of purchase date to any RadioShack store. RadioShack will, at its option, unless otherwise provided by
law: (a) c orrect the defe ct by product repair without charge for parts and labor;
(b) replace the product with one of the same or similar design; or (c) refund
RadioShack
A Division of Tandy Corporation
Fort Worth, Texas 76102
10A8 Printed in Hong Kong
 Loading...