

Page 1
15-1994.fm Page 1 Tuesday, February 29, 2000 2:04 PM
6-in-One Smart Audio/
Video Remote Control
Owner’s Manual
Please read before using this equipment.
Page 2
15-1994.fm Page 2 Tuesday, February 29, 2000 2:04 PM
INTRODUCTION
Your RadioShack 6-in-One Smart Audio/Video (A/V)
Remote Control is both preprogrammed with the
most commonly used commands and equipped with
“smart technology ” that lets you custom ize your remote to suit your home entertainment needs.
Your 6-in-One can re place up to six infrar ed remote
controls. Use it to con trol your TV, VCR, c able converter, satellite receiver, CD or DVD player, tuner,
phonograph, video accessory, digital audio tape,
cassette, or laser disc player from up to about 26 feet
(8 meters) away. It also has these features:
Four Smart Keys
— can learn up to 24 features from
your original re motes (one for each key in u p to six
device modes), so you can use the 6-in-One to perform functions that were not part of its original p rogramming.
Lighted Keypad
— lets you easily see the remote’s
buttons in a dark room. With this feature on, pressing
any button lights the entire keypad.
Favorite Channel Scan
— lets you program your remote to automatically scan through 10 of your favorite channels on a TV, VCR, or cable converter.
Sleep Timer
— lets you set a devi ce with or with out
a built-in sleep tim er to operate for 15 -minute intervals (up to 60 minutes), then automatically turn off.
This manual incl udes a list of many manufacturers’
4-digit codes for your devices. (If your br and is not
listed, see “Searching for a Code” on Page 48.) After
you enter the codes for y our ori gin al re mote s, the 6 in-One Smart A/V Remote is ready to operate the
original remotes’ most used functions.
©
2000 Tandy Corporation.
Plug ’n Power and RadioShack are registered trademarks
RadioShack.com is a trademark used by Tandy Corporation
Need help? Call 1-888-284-8735
2
All Rights Reserved.
used by Tandy Corporation.
.
Page 3

15-1994.fm Page 3 Tuesday, February 29, 2000 2:04 PM
CONTENTS
A Look At Your Remote ............................................... 4
Preparation ................................................................... 6
Installing Batteries ................................................... 6
Device Types ........................................................... 7
Setting Up Your Remote Control ............................. 7
To Operate Your TV/VCR Combination ........... 8
Operation .................................................................... 10
Using the Light ....................................................... 10
Converting Device Keys ........................................ 10
Using Punch-Through ............................................ 11
Turning Punch-Th rough Off ........................... 11
Using the Smart Keys ............................................ 12
Clearing Smart Keys ..................................... 13
Using Favorite Channel Scan ................................ 14
Clearing Favorite Channel Scan ................... 15
Using the Sleep Function ...................................... 15
Manufacturer Codes ............. ...... ..... ...... ..... ............... 17
Amplifiers ............................................................... 17
Cable Converters ................................................... 18
CD Players ............................................................ 21
DVD Players .......................................................... 24
Home Automation .................................................. 25
Laser Disc Players ................................................. 25
Miscellaneous Audio .............................................. 26
Satellite Receivers ................................................. 26
Televisions ............................................................. 27
Tuners/Receivers .................................................. 34
TV/VCR Combinations .......................................... 37
VCRs ..................................................................... 39
Video Accessories ................................................. 46
Troubleshooting ......................................................... 47
Searching for a Code ............................................. 48
Determining the 4-Digit Code ........................ 49
Care and Maintenance ............................................... 50
Specifications ............................................................ 51
Need help? Call 1-888-284-8735
3
Page 4
15-1994.fm Page 4 Tuesday, February 29, 2000 2:04 PM
A LOOK AT YOUR REMOTE
Your RadioShack 6-in-O ne Sm art A/V Remo te Con trol was designed with the functions used most often
to operate your TV, VCR, cable converter, CD or
DVD player, satellite receiver, and audio equipment.
Key Function
P
POWER
MENU, GUIDE
SELECT
MUTE, LAST
VOL +, VOL–
DISPLAY, CH
+, CH –
keys,
VIDEO, ENTER
AUX 1, AUX 2
VCR, TV, CD
CBL/SA T
,
,
, digit
TV/
All Lights On
POWER
(
PLUG ’N
POWER
All Off
Brt
Dim
On
Off
SLEEP
VOL+
(
VOL–
(
CH+
(
CH–
(
),
,
MUTE
(
),
)
),
Used in setting up your devices.
Used to activate light mo de.
Operate the same as the correspond-
,
ing keys on your original remote control.
,
,
,
Used when you set up the remote
,
control to replace your original remote
controls. Also used during normal
operation to let you select the device
you want to control.
Allows you to con trol la mp s and appliances with your 6-in-One A/V Rem ote
Control. To get the full benefit from
this feature, you must purchase addi-
),
tional equipment, available at your
local RadioShack store.
),
Controls the Sleep Timer in TV,
CABLE, SAT, and AUX 1 or AUX 2
modes for devices that have this feature. If your device does not have a
sleep timer,
remote’s built-in sleep timer.
SLEEP
activates the
Need help? Call 1-888-284-8735
4
Page 5
15-1994.fm Page 5 Tuesday, February 29, 2000 2:04 PM
Key Function
REW, PLAY
FFWD, REC
STOP, PAUSE
1s, 2s, 3s, 4s
FAV/SCAN
PIP, SWAP
MOVE
SURR
CENTER
, and
,
,
,
,
, ,
Control VCR functions and are used
to select options and na vigate in your
TV or cable converter.
Smart keys used for learning from
your original remote co ntrol.
Can be programmed to scan through
your 10 favorite channels or left unprogrammed to scan all channels.
Picture-in-Picture keys operate the
same as corresponding keys on your
original remote control.
Control your Surround Sound system
and other similar devices.
Notes:
• Whenever you use
REC
on the remote control,
you must press it twice. This safety feature
helps you avoid accidentally recording over
tapes.
• If you use the 6-in-One to replace extremely
complex remote controls, the 6-in-One might not
be able to duplica te some of the ori ginal remote
control’s functions, but you can program one of
the Smart Keys to operate those f unctions. See
“Using the Smart Keys” on Page 12.
Need help? Call 1-888-284-8735
5
Page 6

15-1994.fm Page 6 Tuesday, February 29, 2000 2:04 PM
PREPARATION
INSTALLING BATTERIES
Your RadioShack 6-in-O ne Sm art A/V Remo te Con trol requires four AA A batt er ies ( no t s upp li ed), available at your local RadioShack store.
Cautions:
• Use only fresh batteries of the required size and
recommended type.
• Do not mix old and new batteries, different types
of batteries (standard, alkaline, or rechargeable), or rechargeable batteries of different
capacities.
1. Press the battery com partment cover’s tab and
lift off the cover.
2. Place the batteries in the comp artment as indicated by the p olarity symbo ls (+ and –) marked
inside.
3. Replace the cover.
If you installed the bat ter ie s cor rec tly and the re d in dicator does not light when you press
place the batteries.
Note:
You do not need to reprogram your remote
control after removing the batteries, because no
stored information is lost during battery replacement.
Cautions:
• Dispose of old batter ies promptly and properly.
Do not burn or bury them.
• Always remove old or weak batteries . Batteries
can leak chemicals tha t can destroy electronic
parts.
Need help? Call 1-888-284-8735
6
POWER
, re-
Page 7

15-1994.fm Page 7 Tuesday, February 29, 2000 2:04 PM
DEVICE TYPES
You can use the remote control's device keys to control these types of devices:
TV
•
— TVs
VCR
— VCRs and TV/VCR combinations, digital
•
video disc play ers, laser disc players, ca ssette
decks, digital audio tape players
CBL/SAT
•
video accessories
CD
•
— cable conver ters, satellite syst ems,
— CD players
AUX 1
•
or
AUX 2
— miscellaneous a udio dev ices
(such as graphic equalizers and digital audio
service terminals)
PLUG ’N POWER
•
Note:
To enjoy the full benefit of the Plug ’ n Power
— home automation
feature, you must purchase additional equipment,
available at your local RadioShack store.
SETTING UP YOUR REMOTE
CONTROL
1. Refer to “Manufacturer Code s” on Page 17 and
write down the codes for yo ur devices on th e 6in-One’s label.
Note:
Some manufacturer s have severa l codes
listed. Try each until you fin d the right one. See
“Searching for a Code” on Page 48 if you cannot
find the correct code.
2. Turn on your TV.
3. Press the devic e key for the type of remo te you
are replacing (
TV, VCR, CBL/SAT, CD, AUX 1
or
Need help? Call 1-888-284-8735
7
Page 8

15-1994.fm Page 8 Tuesday, February 29, 2000 2:04 PM
AUX 2
PLUG ’N POWER
, or
), then hold down
until the red light blinks twice.
4. Enter the 4-digit code.
For example, to replace a Panasonic TV’s
remote control (set-up code 0051), press
hold down
enter
P
until the red light bl inks twice, then
0 0 5 1
.
TV
When the red light bli nks twic e, the r emote control has accepted the code.
Note:
If you enter an invalid code, the red light
makes one long blink.
5. Point the 6-in-One at your device and press
POWER
. Your TV should turn off.
If the remote does not operate your device, try the
other codes you wrote down in Step 1.
To Operate Your TV/VCR Combination
1. Refer to “TV/VCR Combinations” on Page 37
and write down the codes for your TV/VCR combination on the supplied label.
P
,
Notes:
• Some manufacturers have several codes
listed. Try each until you find the right one.
See “Searching for a Code” on Page 48 if you
cannot find the correct code.
• Some TV/VCR combinations require a sec-
ond code to control volume. If you cannot
control volume, use one of the codes listed
for your brand in “TV/VCR Combinations.”
2. Turn on your TV/VCR combination and insert a
tape.
Need help? Call 1-888-284-8735
8
Page 9

15-1994.fm Page 9 Tuesday, February 29, 2000 2:04 PM
3. Press
VCR
then hold down P until the red light
blinks twice.
4. Enter the 4-digit code.
For example, to replace a Panasonic TV/VCR
combination’s remote control (set-up code
1162), press
blinks twice, then press
VCR
, hold down P until the red light
1 1 6 2
.
When the red light blink s twi ce, the re mote co ntrol has accepted the code.
Note:
If the code you entered is invalid, the red
light makes one long blink.
5. Point the 6-in-One at your TV/V CR combinat ion
and press
POWER
or
PLAY
. Your TV/VCR com-
bination should turn off or start to play.
If the remote does no t oper ate your TV/VCR co mbination, try the other codes you wrote down in Step 1.
Note:
Some TV/VCR combinations require a second
code to control volume. If you cannot control the volume, use the TV code listed in “TV/VCR Combinations” on Page 37.
Need help? Call 1-888-284-8735
9
Page 10
15-1994.fm Page 10 Tuesday, February 29, 2000 2:04 PM
OPERATION
1. Press the device k ey for the device you want to
control.
2. Point the remot e control toward the device you
want to control, then press the desired command keys.
3. Repeat Steps 1 and 2 for all other devices you
want to operate.
Note:
The command keys on the remote control work the same as th e keys on the original
remote control; how ever, the labeling might differ slightly.
4. To turn off the last device you selected, press
POWER
device key for th e device you want to turn off,
then press
USING THE LIGHT
. To turn off other devices, press the
POWER
.
The backlight lets you see the keys on your 6-in-One
in the dark. Press to turn on the light. The keypad
lights for about 5 seconds. Then, every time you
press a key, the 6-i n-One lights up and stay s lit for
about 5 seconds. To turn off the light, press
again.
CONVERTING DEVICE KEYS
You can use your 6-in-One Remote to operate a second TV or VCR (or other c omponents) for a total of
up to six devices. To do this, you must first c onvert
an unused dev ice key (
CBL/SAT
ample, to convert
1. Hold down
10
) to operate each additional device. For ex-
P
until the red light blinks twice.
Need help? Call 1-888-284-8735
AUX1, AUX2, VCR, TV, CD
AUX1
to operate a second TV:
,
Page 11
15-1994.fm Page 11 Tuesday, February 29, 2000 2:04 PM
2. Press
3. Press
4. Press
5. Program the con verted device key (
992
. The red light blinks twice.
TV
.
AUX1
. The red light blinks twice.
AUX1
) with
the code for the sec ond TV. (See “Settin g Up
Your Remote Control” on Page 7.)
Repeat these steps for each key you want to convert.
To convert a key bac k to it s o riginal functi on, repea t
Steps 1–2, then press
AUX1
twice.
USING PUNCH-THROUGH
Punch-Through lets you alternately control two different devices without pressing the device keys for
each one.
For example, a TV is often the only device that uses
the volume keys. W it h the 6- in -On e pr og ra mm ed to
punch-through to t he TV, you can control the TV ’s
volume while the 6-in-One is in any device mode.
1. Hold down
P
until the red light blinks twice.
2. Press
3. Press
9 9 3
.
TV
. When you press
VCR
(or another
device key) and use y our v olu me ke ys, the 6- i nOne controls the volume through the TV instead
of the VCR (or the other device).
Turning Punch-Through Off
1. Hold down P until the red light blinks twice.
2. Press
9 9 3
.
Need help? Call 1-888-284-8735
11
Page 12
15-1994.fm Page 12 Tuesday, February 29, 2000 2:04 PM
3. Press
VOL +
. The 6-in-One controls the v olume
through the currently selected device. (For
example, when you press
VCR
, the 6-in-One
controls the volume through the VCR; when you
press
CBL
, the 6-in-One controls the volume
through the cable converter.)
Note:
The 6-in-One A/V c annot control volume
through a device whi ch do es n ot h av e a v olume
control.
USING THE SMART KEYS
Your RadioShack 6-in-One Smart A/V Remot e can
learn up to 24 features from your original remote control using Smart Technology. Your remote is
equipped with four Smar t Keys (
that you can program to perform special functions
from your original remotes.
For example, if y our or ig ina l re mot e h as a bu tton l abeled CLOCK, the 6-in-One does not come with this
feature preprogramm ed. Follow these st eps to program one of the Smart Key s to perfor m the function
of the CLOCK button:
1s, 2s, 3s
, and 4s)
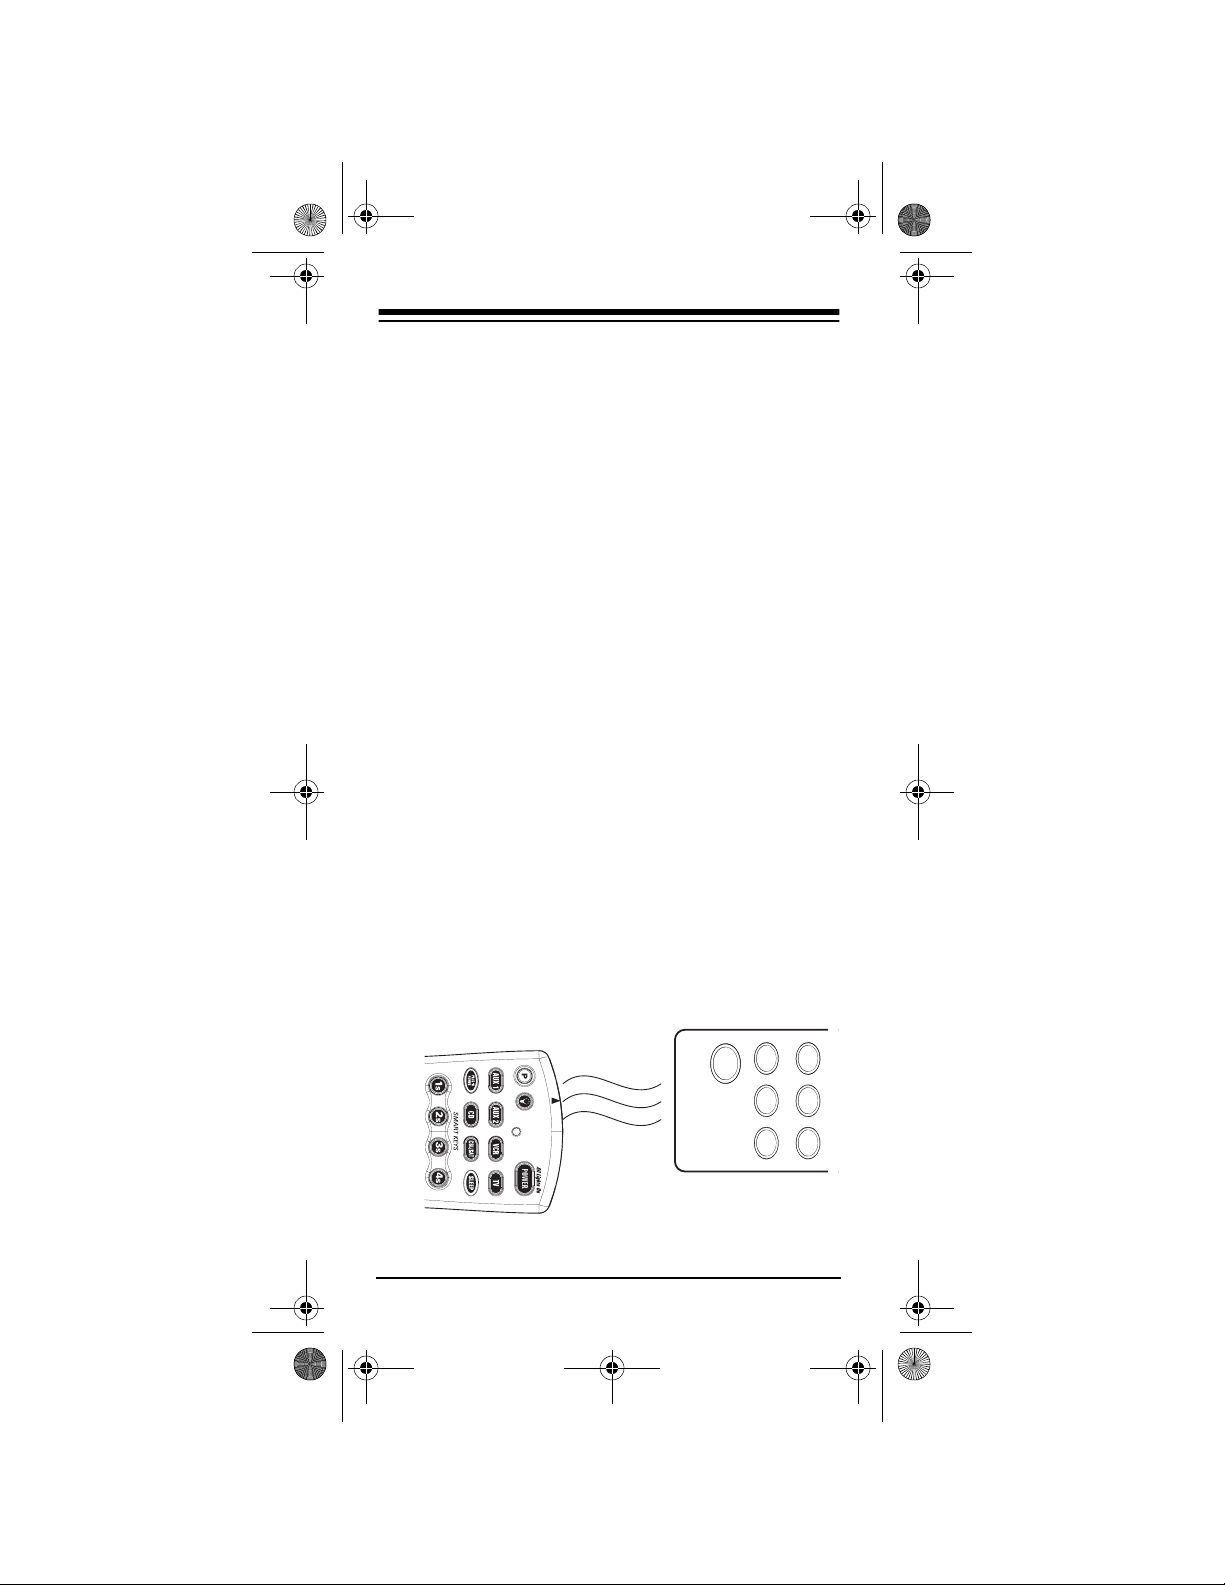
1. Place your origin al remote con trol nose- to-nose
with the RadioShack Smart Light-Up Remote
Control as in the diagram below.
Need help? Call 1-888-284-8735
12
Page 13

15-1994.fm Page 13 Tuesday, February 29, 2000 2:04 PM
2. Hold down P until the red light blinks twic e, then
9 7 5
press
3. Press a device key (
AUX 2
Note:
. The red light blinks twice again.
TV, VCR, CBL, CD, AUX 1
, or
) to select where the function will reside.
You can us e each Smar t Key for one feature in each of the four mo des. For examp le,
can be programmed for CLOCK in TV mode and
TRACKING in VCR mode.
4. Press one of the four Smart Keys (
4s
). The red light blinks rapidly.
1s, 2s, 3s
, or
5. Hold down the key o n your original re mote that
you want the 6-in-One to learn until the red light
blinks twice.
6. Hold down
P
until the red light blinks twice.
7. Press the Smart Key you pressed in Step 4. The
6-in-One performs the fu nction it learned from
your original remote control.
8. Repeat Steps 1–7 to program more functions
onto the Smart Keys.
1s
Clearing Smart Keys
You can clear a function that you previously programmed to a Smart Key to m ake room for a new
function. Follow these steps to clear a Smart Key:
1. Hold down
2. Press
3. Press the Smart Key you want to clear twice.
The red light blinks twice and the key is cleared.
P
until the red light blinks twice.
9 7 6
. The red light blinks twice.
Need help? Call 1-888-284-8735
13
Page 14

15-1994.fm Page 14 Tuesday, February 29, 2000 2:04 PM
USING FAVORITE CHANNEL
SCAN
You can program your 6-in-One Remote to scan
through 10 of your favorite channels in either TV,
VCR, or Cable modes.
Note:
You can only ma intain a favorite channel list
for one device at a time. You cannot set up a favorite
channel list for another device until you clear the existing list.
1. Press the device key for the device you want to
scan (
TV, VCR
, or
CBL
). The red light blinks.
2. Hold down
press
P
until the red light blinks twice, then
9 9 6
.
3. Enter the first channel number you want to
include in your fav orite channel list, then press
P
.
Notes:
0
• Precede a single-digit number with a
example,
0 1, 0 2
, and so on.
. For
• If you enter a th ree-digit number, you do not
need to press
P
after entering the number.
• If you use an ENTER key to directly access
channels on your original remote, press
ENTER
after you enter the last digit of a chan-
nel.
4. Repeat Step 3 for up to 9 other cha nnels you
want to include in your list, then hold down
until the red light blinks twice.
5. To scan throu gh y ou r fa vo rite c ha nne l l ist, pr es s
the appropriate de vice key, point the remote at
your device, then press
SCAN
. The remote con-
trol repeatedly scan s through the favo rite chan-
P
14
Need help? Call 1-888-284-8735
Page 15

15-1994.fm Page 15 Tuesday, February 29, 2000 2:04 PM
nel list, stopping on each channel for about 3
seconds.
6. Press any key when you see a channel you
want to watch. Scanning stops.
Note:
If you do not prog ram a favorite channel li st,
SCAN
acts as a “channel surf” key. Eac h time you
SCAN
press
, the 6-in-One repeatedly performs cycles through the channels, stopping on each for
about 3 seconds.
Clearing Favorite Channel Scan
To change your fav orite channel list, yo u must first
clear the existing list. H old do wn
blinks twice. Press
9 9 6
, then hold down P until the
red light blinks twice. The list is cleared.
P
until the red li ght
USING THE SLEEP FUNCTION
To use the sleep timer bui lt into your TV, cabl e converter, satellite system, or audio device, press
SLEEP
. Most sleep timers advan ce in incremen ts of
10 or 15 minutes. For specific instructions on setting
your device’s s leep tim er, refe r to the device ’s owner’s manual.
If your TV, cable or satellite system does not have a
sleep timer, the 6- in-One has a buil t-in sleep timer
that can perform the function.
1. Press the appropriate device key.
2. Press
for 15 minutes. The red light blinks once.
3. Each additional press of
utes to the sleep timer, u p to 60 minutes. The
red light blinks twi ce when th e slee p timer is se t
SLEEP
to set the 6-in-One’s sleep timer
SLEEP
adds 15 min-
Need help? Call 1-888-284-8735
15
Page 16
15-1994.fm Page 16 Tuesday, February 29, 2000 2:04 PM
for 30 minutes, 3 times for 45 minutes, or 4
times for 60 minutes.
Note:
The 6-in-One’s sleep timer st arts 10 sec-
onds after the last time y ou press
SLEEP
you activate the s leep timer, you must keep the
remote control aimed directly at the component
for this feature to operate.
. Once
16
Need help? Call 1-888-284-8735
Page 17

15-1994.fm Page 17 Tuesday, February 29, 2000 2:04 PM
MANUFACTURER CODES
The following list tells you which 4-di gi t co des to e nter to set up the remote control to operate your:
• Amplifier (see below)
• Cable Converter (see page18)
• CD Player (see page 21)
• DVD Player (see page 24)
• Home Automation (see page25)
• Laser Disc Player (see page25)
• Miscellaneous Audio (see page 26)
• Satellite Receiver (see page 26)
• Television (see page 27)
• Tuner/Receiver (see page 34)
• TV/VCR Combination (see page 37)
• VCR (see page 39)
• Video Accessory (see page 46)
Notes:
• The remote cont rol might not have every command from your original remote controls.
• Use the 6-in-One’s label to record the manufacturers' codes for your remote -cont rolled dev ices.
• A key on the re mote control that ha s the same
name as a key on your original remote control
might have a slightly different function.
RadioShack
Manufacturer Code(s)
Cat. No.
Amplifiers
Aiwa
Carver
Curtis Mathes
Denon
Harman/Kar-
don
JVC
0406
0269
0300
0160
0892
0331
Need help? Call 1-888-284-8735
17
Page 18

15-1994.fm Page 18 Tuesday, February 29, 2000 2:04 PM
Manufacturer Code(s)
Linn
Magnavox
Marantz
Optimus
Panasonic
Philips
Pioneer
Realistic
Technics
Victor
Wards
Yamaha
0269
0269
0269
0013 31-3042
0300 31-3042
0395 31-2105, 31-2107,
0308
0269
0013, 0300
0395, 0231
0308
0331
0013
0354
Cable Converters
ABC
Allegro
Antronix
Archer
Bell & Howell
Cabletenna
Cableview
Century
Citizen
0003, 0008, 0014,
0017, 0007, 0011,
0013
0153, 0315
0022, 0207
0153 16-1283
0022 15-1285
0207 16-1283
0797 15-1288
0014
0022
0022
0153
0153, 0315
RadioShack
Cat. No.
31-2120, 31-3018,
31-3019, 31-3021
18
Need help? Call 1-888-284-8735
Page 19

15-1994.fm Page 19 Tuesday, February 29, 2000 2:04 PM
Manufacturer Code(s)
Colour Voice
Comtronics
Contec
Eastern
Emerson
Everquest
Focus
GC
0025
0040
0019
0002
0797
0015, 0040
0400
0207
Electronics
Garrard
Gemini
General
Instrument
GoldStar
Goodmind
Hamlin
Hitachi
Hytex
Jasco
Jerrold
Memorex
Movie Time
NSC
Oak
Optimus
Panasonic
Paragon
Philips
0153
0015
0476, 0276, 0011,
0810
0144, 0040
0797
0020, 0259, 0009,
0034
0011
0007
0015, 0153, 0315
0003, 0012, 0476,
0276, 0014, 0015,
0011, 0810
0000
0063
0063
0019, 0007
0021
0000, 0107, 0021
0000
0153, 0025
RadioShack
Cat. No.
Need help? Call 1-888-284-8735
19
Page 20

15-1994.fm Page 20 Tuesday, February 29, 2000 2:04 PM
Manufacturer Code(s)
Pioneer
Popular
0144, 0533
0400
Mechanics
Pulsar
Quasar
RCA
RadioShack
Realistic
Recoton
Regal
Regency
Rembrandt
Runco
SL Marx
Samsung
Scientific
0000
0000
0021
0015, 0315, 0883
0797 15-1288
0207 16-1283, 15-
0400
0020, 0259
0002
0011
0000
0040
0144, 0040
0008, 0477, 0017
Atlanta
Signal
Signature
Sprucer
Starcom
Stargate
Starquest
TV86
Tandy
Teleview
Tocom
Toshiba
0015, 0040
0011
0021
0003, 0015
0015, 0040, 0797
0015
0063
0258
0040
0012, 0013
0000
RadioShack
Cat. No.
1285A
20
Need help? Call 1-888-284-8735
Page 21

15-1994.fm Page 21 Tuesday, February 29, 2000 2:04 PM
Manufacturer Code(s)
Tusa
Unika
United Artists
Universal
Viewstar
Zenith
Zentek
0015
0153, 0022, 0207
0007
0153, 0022, 0191,
0207
0063, 0258
0000, 0525
0400
CD Players
ADC
Adcom
Aiwa
Audio
Alchemy
Audio-
Technica
BSR
Burmester
California
Audio Lab
Carrera
Carver
DKK
Denon
Emerson
Fisher
GE
Garrard
Genexxa
0018
0155
0157, 0124
0194
0170
0194
0420
0029
0194
0157, 0179, 0437
0000
0003, 0873
0305, 0155, 0164,
0469
0179, 0174, 0342
0009
0420, 0393, 0280
0032, 0305, 0164
RadioShack
Cat. No.
Need help? Call 1-888-284-8735
21
Page 22

15-1994.fm Page 22 Tuesday, February 29, 2000 2:04 PM
Manufacturer Code(s)
Goodmans
Harman/
0363
0173, 0426
Kardon
Hitachi
JVC
Kenwood
Krell
Kyocera
LXI
Linn
MCS
MTC
Magnavox
Marantz
Mission
NSM
Nikko
Onkyo
Optimus
0032, 0155
0072
0028, 0037, 0190,
0826, 0681
0157
0018
0305
0157
0029
0420
0157, 0305
0029, 0157, 0180
0157
0157
0164, 0170, 0174
0101, 0868
0000, 0087, 0280,
0671
0032 42-5041, 42-5044,
0179 13-1248, 14-545,
0305 42-5048, 42-5061
0037 13-1251
0420 31-3041, 42-5022,
0145 13-1258
0468 42-5045, 42-5060,
RadioShack
Cat. No.
42-5015, 42-5049
42-5025, 42-5071
42-5062, 42-5063,
42-5064
22
Need help? Call 1-888-284-8735
Page 23

15-1994.fm Page 23 Tuesday, February 29, 2000 2:04 PM
Manufacturer Code(s)
Optimus
(continued)
Panasonic
Parasound
Philips
Pioneer
Proton
QED
Quasar
RadioShack
RCA
Realistic
Rotel
SAE
STS
Sansui
Sanyo
0175 42-5013
0194 42-5016
0196 42-5019, 42-5032
0342 42-5037
0426 42-5031, 42-5036,
42-5038
0437 42-5023, 42-5024
0536 13-1261, 13-1263
0775 42-5059
0029, 0367
0420, 0194
0157
0032, 0305, 0468,
0244
0157
0157
0029
0145 13-1259
0179, 0305, 0053,
0009, 0155
0179 42-5014
0420 42-5022
0155 42-5004, 42-5007
0175 42-5010
0180 42-5020
0164, 0452, 0453
0157, 0420
0157
0018
0157, 0305
0179, 0087
RadioShack
Cat. No.
Need help? Call 1-888-284-8735
23
Page 24

15-1994.fm Page 24 Tuesday, February 29, 2000 2:04 PM
Manufacturer Code(s)
Scott
Sears
Sharp
Sherwood
Sony
Staron
Tascam
Teac
Technics
Vector
0305, 0155, 0164
0305
0037, 0180
0114, 0180, 0196,
0426
0000, 0185, 0490,
0604, 0605
0398
0420
0420, 0393, 0174,
0180
0029
0194
Research
Victor
Wards
Yamaha
Yorx
0072
0157, 0053
0036, 0170, 0187
0461
DVD Players
JVC 0558
Kenwood 0534
Magnavox 0503
Mitsubishi 0521
Onkyo 503
Panasonic 0490
Philips 0503, 0539
Pioneer 0525, 0571
Proscan 0522
RCA 0522
Samsung 0573
RadioShack
Cat. No.
24
Need help? Call 1-888-284-8735
Page 25

15-1994.fm Page 25 Tuesday, February 29, 2000 2:04 PM
Manufacturer Code(s)
Sony 0533
Technics 0490
Toshiba 0503
Yamaha 0490, 0545
Zenith 0503
Home Automation
GE
One For All
RadioShack
Security
System
Universal X10
X10
0240
0167
0240
0167
0167
0167
Laser Disc Players
Aiwa
Denon
Funai
JVC
Kenwood
Magnavox
Mitsubishi
NAD
Onkyo
Optimus
Panasonic
Philips
Pioneer
Proscan
RCA
0203
0059
0203
0558
0534
0503
0059, 0521
0059
0503
0525 31-3040
0490
0503, 0539
0059, 0525, 0571
0522
0522
RadioShack
Cat. No.
Need help? Call 1-888-284-8735
25
Page 26

15-1994.fm Page 26 Tuesday, February 29, 2000 2:04 PM
Manufacturer Code(s)
Realistic
Samsung
Sharp
Sony
Technics
Toshiba
Yamaha
Zenith
0203 16-302
0573
0001
0533, 0193, 0201
0490
0503
0490, 0545
0503
Miscellaneous Audio
Aiwa
Jerrold
Scientific
Atlanta
Sony
Starcom
0010, 0159
0459, 0520
0460
0010, 0159
0459
Satellite Receivers
AlphaStar
Chaparral
Echostar
Expressvu
General
Instrument
HTS
Hitachi
Hughes
Network
Systems
JVC
Jerrold
Legend
0772
0216
0775, 0269
0775
0627, 0361, 0869
0775
0819
0749
0775
0627, 0361
0269
RadioShack
Cat. No.
26
Need help? Call 1-888-284-8735
Page 27

15-1994.fm Page 27 Tuesday, February 29, 2000 2:04 PM
Manufacturer Code(s)
Magnavox
Memorex
Next Level
Optimus
Panasonic
Philips
Primestar
RCA
Realistic
Sony
Star Choice
Toshiba
Uniden
Zenith
0724, 0722
0724
0269 16-2511
0869
0724 16-2575
0701
0724, 0722
0627, 0361
0566 16-2530, 16-2531,
16-2539
0143, 0855
0052 16-2502, 16-2507
0051 16-2501
0639 16-2545
0869
0790
0722, 0052
0856
Televisions
A-Mark
AOC
Abex
Admiral
Adventura
Aiko
Akai
Alaron
Ambassador
Ampro
0003
0030, 0019, 0003,
0185
0032
0093
0046
0092
0030
0179
0177
0751
RadioShack
Cat. No.
Need help? Call 1-888-284-8735
27
Page 28

15-1994.fm Page 28 Tuesday, February 29, 2000 2:04 PM
Manufacturer Code(s)
Anam
Anam National
Archer
Audiovox
Baysonic
Belcor
Bell & Howell
Bradford
Brockwood
Broksonic
CXC
Candle
Carnivale
Carver
Celebrity
Cineral
Citizen
Clairtone
Concerto
Contec
Craig
Crosley
Crown
Curtis Mathes
0180
0055
0003
0451, 0180, 0003,
0092, 0623
0180
0019
0154, 0016
0180
0019
0236, 0463, 0003
0180
0030, 0056, 0046
0030
0054
0000
0451, 0092
0060, 0030, 0056,
0039, 0046, 0092,
0280
0185
0056
0180, 0185
0180
0054
0180, 0039
0047, 0054, 0154,
0051, 0451, 0093,
0060, 0030, 0145,
0056, 0016, 0039,
0166, 0466, 1147,
1347
RadioShack
Cat. No.
28
Need help? Call 1-888-284-8735
Page 29

15-1994.fm Page 29 Tuesday, February 29, 2000 2:04 PM
Manufacturer Code(s)
Daewoo
Daytron
Denon
Dumont
Dwin
Electroband
Emerson
Envision
Fisher
Fujitsu
Funai
Futuretech
GE
Gibralter
GoldStar
Gradiente
Grunpy
Hallmark
Harley
0451, 0019, 0039,
0092, 0623, 0624
0019
0145
0017, 0019
0720, 0774
0000, 0185
0154, 0236, 0463,
0180, 0282, 0178,
0019, 0179, 0039,
0177, 0185, 0280,
0623, 0624
0030
0154
0179
0180
0179, 0171
0180
0047, 0051, 0451,
0093, 0282, 0178,
0021, 0055, 0135,
1147, 1347
0017, 0030, 0019
0030, 0019, 0056,
0032, 0178
0053, 0056
0180, 0179
0178
0179
Davidson
Harman/
0054
Kardon
Harvard
0180
RadioShack
Cat. No.
Need help? Call 1-888-284-8735
29
Page 30

15-1994.fm Page 30 Tuesday, February 29, 2000 2:04 PM
Manufacturer Code(s)
Hitachi
Infinity
Inteq
JBL
JCB
JVC
Janeil
KEC
KTV
Kenwood
Kloss
LG
LXI
Logik
Luxman
MEI
MGA
MTC
Magnavox
Majestic
Marantz
Matsushita
Megatron
Memorex
Midland
0145, 0056, 0032,
0151
0054
0017
0054
0000
0053
0046
0180
0180, 0030, 0039,
0185, 0280
0030, 0019
0046
0056
0047, 0054, 0154,
0156, 0178
0016
0056
0185
0150, 0030, 0178,
0019
0060, 0030, 0019,
0056, 0185
0054, 0030, 0179,
0020, 0187
0016
0054, 0030
0250
0178, 0145, 0003
0154, 0250, 0150,
0056, 0016, 0178
0047, 0017, 0051,
0039, 0032, 0135
RadioShack
Cat. No.
30
Need help? Call 1-888-284-8735
Page 31

15-1994.fm Page 31 Tuesday, February 29, 2000 2:04 PM
Manufacturer Code(s)
Minutz
Mitsubishi
Motorola
Multitech
NAD
NEC
NTC
Nikko
Noshi
Onwa
Optimus
Optonica
Orion
Panasonic
Penney
Philco
Philips
Pilot
Pioneer
Portland
Prism
Proscan
Proton
0021
0093, 0150, 0178,
0019
0093, 0055
0180
0156, 0178, 0166
0030, 0019, 0056
0092
0030, 0178, 0092
0018
0180
0154 13-1283
0166 31-3031, 31-3033,
31-3038, 31-3040
0250
0093, 0165
0236, 0463, 0179
0051, 0250, 0055
0047, 0156, 0051,
0060, 0030, 0178,
0021, 0019, 0018,
0056, 0039, 0003,
0032, 0135, 1347
0054, 0463, 0030,
0145, 0019, 0020
0054
0030, 0019, 0039
0166
0019, 0039, 0092
0051
0047
0178, 0003, 0466
RadioShack
Cat. No.
Need help? Call 1-888-284-8735
31
Page 32

15-1994.fm Page 32 Tuesday, February 29, 2000 2:04 PM
Manufacturer Code(s)
Pulsar
Quasar
RCA
RadioShack
Realistic
Rhapsody
Runco
SSS
Sampo
Samsung
Samsux
0017, 0019
0051, 0250, 0165,
0055
0047, 0051, 0093,
0019, 0018, 0090,
0135, 1047, 1147,
1247, 1347
0047, 0154, 0019,
0039
0165 16-232, 16-233,
0180 16-252, 16-253,
0030 16-254, 16-255,
0178 16-256, 16-263,
0056 16-288
0032 16-230, 16-232,
0154 16-229, 16-261,
0165 16-235, 16-235A,
0180, 0030, 0178,
0019, 0039, 0032
0056 16-288
0185
0017, 0030, 0603
0180, 0019
0030, 0039, 0032
0060, 0030, 0178,
0019, 0056, 0032
0039
RadioShack
Cat. No.
16-236, 16-250,
16-260
16-262, 16-292
16-256, 16-265
16-268, 16-280,
16-289
16-233, 16-236,
16-250, 16-260
16-299
16-251
32
Need help? Call 1-888-284-8735
Page 33

15-1994.fm Page 33 Tuesday, February 29, 2000 2:04 PM
Manufacturer Code(s)
Sansei
Sansui
Sanyo
Scimitsu
Scotch
Scott
Sears
Semivox
Semp
Sharp
Shogun
Signature
Simpson
Sony
Soundesign
Spectricon
Squareview
Starlite
Supre-Macy
Supreme
Sylvania
Symphonic
TMK
Tandy
Tatung
Technics
Technol Ace
0451
0463
0154
0019
0178
0236, 0180, 0178,
0019, 0179
0047, 0054, 0154,
0156, 0178, 0179,
0056, 0171
0180
0156
0093, 0165, 0039
0019
0016
0187
0000
0180, 0178, 0179
0003
0171
0180
0046
0000
0054, 0030, 0020
0171
0178, 0056, 0177
0093, 0218
0055, 0003
0051, 0250
0179
RadioShack
Cat. No.
Need help? Call 1-888-284-8735
33
Page 34

15-1994.fm Page 34 Tuesday, February 29, 2000 2:04 PM
Manufacturer Code(s)
Techwood
Teknika
Telefunken
Toshiba
Tosonic
Totevision
Vector
0051, 0056, 0003
0054, 0180, 0150,
0060, 0019, 0179,
0056, 0016, 0039,
0092
0056
0154, 0156, 0060
0185
0039
0030
Research
Victor
Vidikron
Vidtech
Viking
Wards
White
0053
0054
0178, 0019
0046
0054, 0165, 0030,
0178, 0021, 0019,
0179, 0056, 0016,
0020
0623, 0624
Westinghouse
Yamaha
Zenith
Zonda
0030, 0019
0017, 0016, 0092
0003
Tuners/Receivers
ADC
Admiral
Aiwa
Akai
Capetronic
Carver
Casio
0531
0182
0158, 0189
0115
0531
0189, 0042
0195
RadioShack
Cat. No.
34
Need help? Call 1-888-284-8735
Page 35

15-1994.fm Page 35 Tuesday, February 29, 2000 2:04 PM
Manufacturer Code(s)
Clarinette
Curtis Mathes
Denon
Fisher
Garrard
Hanwah
Harman/Kar-
0195 13-1241
0080
0004
0042, 0219
0463, 0286, 0440,
0744
0741
0110, 0189
don
JBL
JVC
Jensen
Kenwood
Koss
LXI
Linn
Lloyd’s
MCS
Magnavox
Marantz
Memorex
Modulaire
NTDE
0110
0074
0754
0027, 0186, 0042
0744
0181, 0744
0189
0195
0039
0531, 0189, 0195,
0364, 0391
0039, 0189
0335, 1024
0195 13-1241, 13-1242
0744
Geniesom
Nakamichi
Onkyo
Optimus
0097
0135
0531 13-1291
0670 13-1271
0186 13-1251
RadioShack
Cat. No.
Need help? Call 1-888-284-8735
35
Page 36

15-1994.fm Page 36 Tuesday, February 29, 2000 2:04 PM
Manufacturer Code(s)
Optimus
(continued)
Orient Power
Panasonic
Penney
Philips
Pioneer
Quasar
RCA
RadioShack
0042 13-1267
0121 13-1273, 13-1274
0177 31-3017, 31-3020
0181 13-1243, 13-1249,
0219 13-1281, 13-1283
0229 13-1294
0286 13-1279
0440 13-1247
0622 13-1272
0738 13-1289, 13-1290
0744 13-1286, 14-547
0754 13-1277, 13-1278
0801 13-1284, 13-1293
1023 31-3014, 31-3023,
0744
0039, 0309
0195
0189, 0391
0531, 0014, 0150,
0080
1023 31-3014, 31-3023,
0039
0531
0744
RadioShack
Cat. No.
13-1250
31-3028, 31-3030,
31-3031, 31-3032,
31-3033, 31-3034,
31-3035, 31-3036,
31-3037, 31-3038,
31-3039, 31-3040,
31-3041, 31-3042
31-3034, 31-3035,
31-3036, 31-3037
36
Need help? Call 1-888-284-8735
Page 37

15-1994.fm Page 37 Tuesday, February 29, 2000 2:04 PM
Manufacturer Code(s)
Realistic
Sansui
Sanyo
Schneider
Scott
Sharp
Sony
Soundesign
Symphonic
Teac
Technics
Techwood
Victor
Wards
Yamaha
Yorx
Zenith
0195, 0001, 0025,
0178, 0534, 0163
0181 13-1233, 13-1234,
13-1235, 13-1244
0182 13-1236, 13-1238,
13-1246
0189
0219, 0801
0364
0163
0186
0158
0415 14-544
0670
0182
0463, 0163
0039, 0309
0364
0074
0158, 0014, 0189,
0080
0176, 0186
0195
0622, 0744, 0857
TV/VCR Combinations
Brocksonic
Citizen
Colt
Curtis Mathes
Daewoo
0002, 0479 (TV: 0463)
0278
0072
0035 (TV: 0051)
0278 (TV: 0624)
RadioShack
Cat. No.
Need help? Call 1-888-284-8735
37
Page 38

15-1994.fm Page 38 Tuesday, February 29, 2000 2:04 PM
Manufacturer Code(s)
Emerson
Funai
GE
Goldstar
Harley
0002, 0278 (TV: 0624),
0479 (TV: 0463)
0000
0240, 0035 (TV: 0051),
0048 (TV: 0093), 0060
(TV: 0047)
0037 (TV: 0056)
0000
Davidson
Hitachi
Lloyds
Magnasonic
Magnavox
Magnin
Memorex
MGA
Mitsubishi
Optimus
Orion
Panasonic
0000
0000
0278
0000, 0081 (TV: 0054)
0240
0037, 1162
1037 16-412
0240
0048 (TV: 0093)
1162 16-421, 16-422,
1262 16-421, 16-422,
1048 16-546
1062 16-632, 16-549,
0002, 0479 (TV: 0463)
1162, 1262
0035 (TV: 0051)
RadioShack
Cat. No.
16-426, 16-427,
16-548, 16-631
16-424, 16-425,
16-426, 16-427
16-650, 16-633,
16-636, 16-634,
16-636, 16-640,
16-641, 16-642
38
Need help? Call 1-888-284-8735
Page 39

15-1994.fm Page 39 Tuesday, February 29, 2000 2:04 PM
Manufacturer Code(s)
RadioShack
RCA
Sansui
Sanyo
Sears
Sharp
Sony
Sylvania
Symphonic
Thomas
White
0037 16-415
1037 16-417
0240, 0035 (TV: 0051),
0060 (TV: 0047), 0048
(TV: 0093)
0000, 0240, 0479 (TV:
0463)
0240
0000, 0037 (TV: 0056)
0048 (TV: 0093)
0000, 0032 (TV: 0000)
0081 (TV: 0054)
0000
0000
0278 (TV: 0624)
Westinghouse
Zenith
0000, 0479
VCRs
Admiral
Adventura
Aiko
Aiwa
Akai
American High
Asha
Audiovox
Beaumark
Bell & Howell
Broksonic
CCE
0048
0000
0278
0037, 0000, 0307
0041, 0061, 0106
0035
0240
0037
0240
0104
0184, 0121, 0209,
0002, 0295, 0479
0072, 0278
RadioShack
Cat. No.
Need help? Call 1-888-284-8735
39
Page 40

15-1994.fm Page 40 Tuesday, February 29, 2000 2:04 PM
Manufacturer Code(s)
Calix
Canon
Capehart
Carver
Cineral
Citizen
Colt
Craig
Curtis Mathes
Cybernex
Daewoo
Daytron
Denon
Dynatech
Electrohome
Electrophonic
Emerex
Emerson
Fisher
Fuji
Funai
GE
Garrard
0037
0035
0020
0081
0278
0037, 0278
0072
0037, 0047, 0240,
0072, 0271
0060, 0035, 0041,
0162
0240
0045, 0278, 0020,
0561
0020
0042
0000
0037
0037
0032
0037, 0184, 0000,
0121, 0043, 0209,
0002, 0278, 0036,
0061, 0068, 0208,
0212, 0295, 0479,
0561
0047, 0104, 0054,
0066
0035, 0033
0000
0060, 0035, 0048,
0240, 0202
0000
RadioShack
Cat. No.
40
Need help? Call 1-888-284-8735
Page 41

15-1994.fm Page 41 Tuesday, February 29, 2000 2:04 PM
Manufacturer Code(s)
Go Video
GoldStar
Gradiente
HI-Q
Harley
0432, 0526
0037, 0038, 0480
0000, 0008
0047
0000
Davidson
Harman/
0081, 0038
Kardon
Harwood
Headquarter
Hitachi
JVC
Jensen
KEC
KLH
Kenwood
Kodak
LXI
Lloyd’s
Logik
MEI
MGA
MGN
0072, 0068
0046
0000, 0042, 0041,
0105
0067, 0041, 0008
0041
0037, 0278
0072
0067, 0041, 0038
0035, 0037
0037
0000, 0208
0072
0035
0240, 0043, 0061
0240
Technology
MTC
Magnasonic
Magnavox
Magnin
0240, 0000
0278
0035, 0039, 0081,
0000, 0149, 0110
0240
RadioShack
Cat. No.
Need help? Call 1-888-284-8735
41
Page 42

15-1994.fm Page 42 Tuesday, February 29, 2000 2:04 PM
Manufacturer Code(s)
Marantz
Marta
Matsushita
Memorex
Minolta
Mitsubishi
Motorola
Multitech
NAD
NEC
Nikko
Nikon
Noblex
Olympus
Optimus
0035, 0081
0037
0035, 0162, 0454
0035, 0039, 0162,
0268, 0299, 0307,
0047
0037 16-524, 16-706
0000 16-406, 16-410,
0048 16-531, 16-618,
0046 16-529, 16-530
0104 16-412, 16-523,
0240 16-533, 16-655
0042, 0105
0048, 0067, 0043,
0061
0035, 0048
0000, 0072
0058
0104, 0067, 0041,
0038, 0040
0037
0034, 0253
0240
0035
0037 16-413, 16-419,
RadioShack
Cat. No.
16-411, 16-517
16-622
16-525, 16-526,
16-529, 16-530,
16-619, 16-620,
16-621, 16-623
16-423, 16-534,
16-535, 16-624
42
Need help? Call 1-888-284-8735
Page 43

15-1994.fm Page 43 Tuesday, February 29, 2000 2:04 PM
Manufacturer Code(s)
Optimus
(continued)
Optonica
Orion
Panasonic
Penney
Pentax
Philco
Philips
Pilot
Pioneer
Portland
0048 16-538, 16-539,
16-540, 16-542,
16-543, 16-544,
16-546, 16-627,
16-628
0104 16-536, 16-537,
16-617, 16-625,
13-1283
0162 16-547, 16-548,
16-630, 16-631,
16-635, 16-640,
16-641, 16-642
0058 31-3023, 31-3031,
31-3032, 31-3033,
31-3037, 31-3038
1048, 1062, 1162
0432 16-541
0240 16-541
0454 16-547, 16-548,
16-630, 16-631
1262 16-426, 16-427
0062
0184, 0002, 0295,
0479
0035, 0162, 0077,
0225, 0454, 1162
0035, 0037, 0240,
0042, 0038, 0040,
0054
0042, 0105
0035, 0209, 0479
0035, 0081, 0062,
0110
0037
0067, 0058
0020
RadioShack
Cat. No.
Need help? Call 1-888-284-8735
43
Page 44

15-1994.fm Page 44 Tuesday, February 29, 2000 2:04 PM
Manufacturer Code(s)
Profitronic
Proscan
Protec
Pulsar
Quarter
Quartz
Quasar
RCA
RadioShack
Radix
Randex
Realistic
0240
0060, 0202
0072
0039
0046
0046
0035, 0162, 0077,
0454, 1162
0060, 0035, 0048,
0240, 0042, 0149,
0077, 0105, 0106,
0202
0000 16-417
1037
0037
0037
0035 16-472, 16-651,
0037 16-408, 16-413,
0000 16-404, 16-505,
0047 16-506, 16-511,
0104 16-520, 16-521,
0062 16-610, 16-700
0046 16-600, 16-601
RadioShack
Cat. No.
16-705
16-414, 16-507
16-508, 16-510,
16-519, 16-522,
16-703, 16-704
16-512, 16-513,
16-515, 16-516,
16-518, 16-613,
16-614, 16-615,
16-652, 16-611,
16-612, 16-616,
16-653, 16-701,
16-702
16-563, 16-617
44
Need help? Call 1-888-284-8735
Page 45

15-1994.fm Page 45 Tuesday, February 29, 2000 2:04 PM
Manufacturer Code(s)
Realistic
(continued)
Ricoh
Runco
STS
Samsung
Sanky
Sansui
Sanyo
Scott
Sears
Semp
Sharp
Shintom
Shogun
Singer
Sony
Sunpak
Sylvania
Symphonic
TMK
Tandy
Tatung
0240 16-514
0066 16-503
0048
0034, 0253
0039
0042
0240, 0045
0048, 0039
0000, 0067, 0041,
0271, 0479
0047, 0240, 0104,
0046, 0268
0184, 0045, 0121,
0043, 0210, 0212
0035, 0037, 0047,
0000, 0042, 0104,
0046, 0054, 0066,
0105
0045
0048, 0062
0072
0240
0072
0035, 0032, 0000,
0033, 0034, 0253
0253
0035, 0081, 0000,
0043, 0110
0000
0240, 0036, 0208
0000, 0104
0041
RadioShack
Cat. No.
Need help? Call 1-888-284-8735
45
Page 46

15-1994.fm Page 46 Tuesday, February 29, 2000 2:04 PM
Manufacturer Code(s)
Teac
Technics
Teknika
Thomas
Toshiba
Totevision
Unitech
Vector
Vector
0000, 0041
0035, 0162
0035, 0037, 0000
0000
0045, 0043, 0066,
0210, 0212
0037, 0240
0240
0045
0038, 0040
Research
Video
0045, 0040, 0061
Concepts
Videosonic
Wards
White
0240
0060, 0035, 0048,
0047, 0081, 0240,
0000, 0042, 0072,
0149, 0062, 0212
0278
Westinghouse
XR-1000
Yamaha
Zenith
0035, 0000, 0072
0038
0039, 0000, 0033,
0034
Video Accessories
Archer
GC
Electronics
Jebsee
RadioShack
0160
0160
0160
0160
RadioShack
Cat. No.
46
Need help? Call 1-888-284-8735
Page 47

15-1994.fm Page 47 Tuesday, February 29, 2000 2:04 PM
TROUBLESHOOTING
Problem Solution
The 6-in-One
does not operate
your device.
The 6-in-One is
not performing
commands properly.
VCR not recording.
CH +/–
not working for
your RCA TV.
Problems changing channels.
The red light
blinks when you
press a key but
you receive no
response from
your device.
and
LAST
Try all of the codes listed for your
brand of device in the appropriate
“Manufacturer Codes” section (see
“Setting Up Your Remote Control”
on Page 7).
If this does not work, try searching
for your c ode (see “Searching for a
Code” on Page 48).
Make sure the device you are setting up can be operated with an
infrared remote.
Try all of the codes listed for your
brand of device in the appropriate
“Manufacturer Codes” section (see
“Setting Up Your Remote Control”
on Page 7). Many set -up codes may
allow some degree of operation.
However , onl y one se t-up co de wi ll
work correctly with your device.
As a safety feature on the 6-in-One,
you must press
recording.
Due to RCA design (1983–1987),
only the original remote will operate
these functions.
If your original remote required an
ENTER keystroke when changing
channels, press
One after you enter the channel
number.
Press the appropriate device key
CBL/SAT, VCR, TV, AUX 1
(CD,
AUX 2, PLUG ’N POWER
device you are trying to operate.
Make sure you aim your 6-in-One at
your device and that you are within
15 feet of the device before using
your remote.
REC
ENTER
twice to begin
on the 6-in-
,
) for the
Need help? Call 1-888-284-8735
47
Page 48

15-1994.fm Page 48 Tuesday, February 29, 2000 2:04 PM
Problem Solution
You can turn your
audio component
on and off and
control its volume, but you cannot change prese t
channels.
Your satellite
receiver does not
respond to the
codes listed in the
manual.
The 6-in-One
does not operate
Bang & Olufsen
audio equipment.
Some audio components might
need both a Tuner/Receiver code
and an Amplifier code to control all
features.
The codes listed in this manual are
set up to operate your satellite
receiver on the 1st or 2nd addresses
only .
Make sure the satellite receiver you
are setting up can be operated with
an infrared remote.
Some Bang & Olufsen and other
manufacturers’ equipm en t opera te
at frequencies higher than 100 kHz.
The 6-in-One will not operate such
devices.
SEARCHING FOR A CODE
If you have tried all the c odes from the lis t and yo ur
device still will not respond to the 6-in-One (or if your
brand is not listed), try searching for your code.
Follow these steps, using the appropriate device key
in Step 1, for each dev ice you need to f ind. For example, to find the code for your TV:
1. Turn on your TV, then press
2. Hold down
press
P
until the red light blinks twice, then
9 9 1
. The red light blinks twice again.
3. Aim the remote control at the TV.
4. Repeatedly press
PWR
turns off.
Need help? Call 1-888-284-8735
48
TV
.
then TV until the TV
Page 49

15-1994.fm Page 49 Tuesday, February 29, 2000 2:04 PM
Note:
If you are searching for a VCR, CD
player, laser disc player, or DVD player code,
insert a tape or di sc and press
POWER
5. Press
.
P
within 10 seconds to save the code.
PLAY
instead of
Notes:
• If you do not press
P
within 10 seconds, the
remote control does not save the code. You
must start again from Step 1.
• Because the 6-in-One’s library has so many
codes, this procedure can take several minutes.
• If your device turns off during the search, but
does not operate after you lock in the code,
begin the search again, pausing longer between
key presses.
Determini ng th e 4 -D igit Code
After you have set up your dev ices using the Code
Search feature, you might need to find out which
code is operating one of them . For exam ple, to find
out what 4-digit code is operating your TV:
1. Turn on the TV and press
2. Hold down
3. Press
4. Press
P
until the red light blinks twice.
9 9 0
. The red light blinks twice again.
1
, then count the number of times the red
light blinks and write it down. This is the first
digit of the 4-digit code.
Note:
If the red light does not blink, the digit is
5. Repeat Step 4, pressing
additional digit.
TV
.
2, 3
, and 4, to see each
0
.
Need help? Call 1-888-284-8735
49
Page 50

15-1994.fm Page 50 Tuesday, February 29, 2000 2:04 PM
CARE AND MAINTENANCE
To enjoy your Radio Shack 6-in-One Smart A/V Remote Control for a long time:
• Keep the 6-in-One dry. If it gets wet, wipe it dry
immediately.
• Use and store the 6-in-One on ly in normal temperature environmen ts.
• Handle the 6-in-One gently and carefully. Don’t
drop it.
• Keep the 6-in-One away from dust and dirt.
• Wipe the 6-in-One with a damp cloth o ccasionally to keep it looking new.
Modifying or tamper ing with the 6-in-One’s internal
components can c aus e a m alf unc ti on and in validate
its warranty. If y our 6-in-One is not perfo rming as it
should, take it to your local RadioShack store for assistance.
Need help? Call 1-888-284-8735
50
Page 51

15-1994.fm Page 51 Tuesday, February 29, 2000 2:04 PM
SPECIFICATIONS
Power ............................................. 4 AAA Batteries
±
IR Control Range .................................... 26 ft
1/2
×
Dimensions (HWD) .............. 93/8
2
× 15/8 Inches
(234 × 64 × 34 mm)
Weight (Without Batteries) .............. 6 oz. (170 gm)
Specifications are typical; individual units might vary.
Specifications are subject to change and improvement without notice.
30
°
Need help? Call 1-888-284-8735
51
Page 52

15-1994.fm Page 52 Tuesday, February 29, 2000 2:04 PM
Limited Ninety-Day Warranty
This product is wa rranted by RadioShack ag ainst manufacturing d efects in material and workmanship under no rmal use for ninety (9 0)
days from the date of purchase from RadioShack company-owned
stores and authorized Ra dioShack fr anchisees and dealers. EXC EPT
AS PROVIDED HEREIN, RadioShack MAKES NO EXPRESS WARRANTIES AND ANY IMPLIED WARRANTIES, INCLUDING THOSE
OF MERCHANTABILITY AND FITNESS FOR A PARTICULAR PURPOSE, ARE LIMITED IN DURATION TO THE DURAT ION OF THE
WRITTEN LIMITED WARRANTIES CONTAINED HEREIN. EXCEPT
AS PROVIDED HEREIN, RadioShack SHALL HAVE NO LIABILITY
OR RESPONSIBILITY TO CUSTOMER OR ANY OTHER PERSON
OR ENTITY WITH RESPECT TO ANY LIABILITY, LOSS OR DAMAGE CAUSED DIRECTLY OR INDIRECTLY BY USE OR PERFORMANCE OF THE PRODUCT OR ARISING OUT OF ANY BREACH
OF THIS WARRANTY, INCLUDING, BUT NOT LIMITED TO, ANY
DAMAGES RESULTING FROM INCONVENIENCE, LOSS OF TIME,
DATA, PROPERTY, REVENUE, OR PROFIT OR ANY INDIRECT,
SPECIAL, INCIDENTAL, OR CONSEQUENTIAL DAMAGES, EVEN
IF RadioShack HAS BEEN ADVISED OF THE POSSIBILITY OF
SUCH DAMAGES.
Some states do not allow limitations on how long an implied warranty
lasts or the exclusion o r limitatio n of incident al or conse quentia l damages, so the above limitations or exclusions may not apply to you.
In the event of a pr oduct defect during t he warranty period , take the
product and the RadioShack sales receipt as proof of purchase date to
any RadioShack store. RadioShack will, at its option, unless otherwise
provided by law: (a) correct the defect by product repair without charge
for parts and labor; (b) replac e the product with one of the same or
similar design; or ( c) refund the purch ase price. All replaced parts and
products, and produ cts on which a refund is ma de, become the property of RadioShack. N ew or recond itioned p arts and pro ducts may be
used in the perform ance of warranty service. Repaired or re placed
parts and products are warranted for the remainder of the original warranty period. You will be charged for repair or replacement of the product made after the expiration of the warranty period.
This warranty does not cover : (a) damage or failure caus ed by or attributable to acts of God, abus e, accide nt, misuse , improp er or ab normal usage, failure to follow instructions, improper installation or
maintenance, altera ti on , lightning or other incide nce of excess voltage
or current; (b) any repairs o ther tha n those pr ovid ed by a Radi oShack
Authorized Service Facility; (c) consumables such as fuse s or batteries; (d) cosmetic damage; (e) transportation, shipping or insura nce
costs; or (f) costs of product removal, installation, set-up service adjustment or reinstallation.
This warranty gives yo u specific legal r ights, and you may also have
other rights which vary from state to state.
RadioShack Customer Relations, 200 Taylor Street, 6th Floor,
Fort Worth, TX 76102
We Service What We Sell
12/99
03A00
15-1994 Printed in China
 Loading...