

Page 1

use any of the following to power your CD player:
• Two AA alkaline batteries (not supplied).
• Two rechargeable batteries (not supplied).
• Standard AC power using a regulated AC adapter (not supplied).
• Vehicle battery power using the
supplied DC adapter.
alkaline/rechargeable
batteries
1. Open the hinged battery cover.
Close when finished.
2 Insert two AA alkaline or
rechargeable Ni-Cd batteries on
top of the ribbon.
charge batteries
You can charge rechargeable
Ni-Cd batteries in this CD player.
If the label of a rechargeable battery extends over the negative
side of the battery, you will not be able to charge it in the CD
player.( You can contact local RadioShack store for the special
rechargeable Ni-Cd battery)
1. Insert two rechargeable NiCd batteries.
2. Plug in the AC/DC adapter. Charge for 12—15 hours.
3. Unplug the AC/DC adapter. Your CD player is ready to play.
AC adapter
You can power your CD player using a 4.5V, 600 mA AC adapter (not
supplied). Follow these steps to connect the CD player to
AC power.
1. Insert one end of the AC adapter into the DC IN jack.
2. Plug the other end into an AC wall outlet.
Do not touch the AC adapter with wet hands. This can
result in electrical shock.
If the AC adapter is connected when the batteries are
installed, the power supply automatically switches to the
AC power source and the batteries are disconnected.
DC adapter
1 Insert one end of the DC adapter into the DC IN
jack.
2. Plug the other end into the cigarette lighter in
your vehicle.
Please read this user’s guide before
installing, setting up and using your new product
www.radioshack.com
Thank you for purchasing your CD/MP3/FM
Stereo Player from RadioShack.
using your MP3/CD(CD/CDR/CDRW) player
CD player Users Guide
Headphones DC Adapter
Car Kit (CD to Cassette Adapter)
Note: Actual product may vary from the images found in this
document.
what’s included
Press EQ repeatedly to select different types of music effects (Normal, Classic,
Rock, Jazz, Pop).
NORMAL will automatically be activated when playing CDs or MP3s.
EQ function cannot be activated in RADIO mode.
Press Stop to stop play in all modes.
The power turns off automatically
after about 30 seconds when you
press STOP, or all the tracks on a
disc have been played. Power turns
off immediately when you press
STOP twice.
Press Skip+ to skip forward to the
next track in CD and MP3 mode.
Press and hold the SKIP+ or SKIP-
during play to scan the disc at high
speed. When you find the desired
section of the disc, release the button.
Normal play will resume.
Press PLAY/PAUSE to activate CD/MP3 mode. Press and hold
PLAY/PAUSE. As the disc begins to spin, READING appears on the
display. When the music begins, adjust the volume as desired.
Press PLAY/PAUSE again to pause. The elapsed time will flash on
the display. Resume normal play by pressing PLAY/PAUSE.
Press Preset - to preset radio
station down in Tuner mode.
Press SKIP - once to skip to
the beginning of the current
track, or repeatedly to skip to
previous tracks.
Press Mode/FM ST./Mono to select
play modes Repeat 1, Repeat All,
Repeat Directory, Random or Intro, in
CD and MP3 mode.
Intro scan play - For CDs and MP3s,
repeatedly press MODE until INT
appears. Press PLAY/PAUSE to
activate. The first 10 seconds of each
track will play in order.
Random play - Press Mode until RND
appears to play CD or MP3 tracks in
random order. Press PLAY/PAUSE
to activate.
powering your CD Player
Use PROG./MEM. to program your
favorite tracks in CD mode, or your
favorite radio stations in Tuner mode.
Press ESP activates the antishock
protection system for 45 seconds in CD
mode, and 120 seconds in MP3 mode.
NOTE
programmed play
CD and MP3 tracks on a disc can be programmed to
play in any order. Up to 60 tracks can be programmed.
1. In stopped mode press PROG./MEM. The track
number 00 flashes, PGM and program number
P01 are shown or 00 000 flashes in MP3 mode
PGM and program number P01 are shown. Press
SKIP+ or SKIP- to select the first track to be
programmed.
When programing in MP3 mode, press the
DIR/PRESET + or DIR/PRESET- to select
directory.
2 Press PROG./MEM. again to store the track you selected. The display
P01 changes to
P02.
3. Repeat steps 1
and 2 to program
additional tracks.
4. After you finish
programming,
press PLAY/PAUSE.
Programmed play begins from the first programmed track.
The player stops automatically after all programmed tracks
have been played. The programmed tracks are stored in
memory until the disc compartment is opened or power is
turned off.
hold switch–hold all buttons
Once you have made all adjustments and selections, slide
HOLD to ON. HOLD appears on the display. This locks
all buttons. Slide the HOLD SWITCH to OFF to unlock all
controls.
NOTE
If you press
PLAY/PAUSE at power off mode during the
HOLD function is activated, the display will show
HOLD, then OFF appears
the unit will power off automatically.
repeat play
For CDs and MP3s to repeat a single track, press MODE repeatedly until
REPT1 appears in the display. Press SKIP+ or SKIP - to select your
favorite song. The track will repeat until you press STOP.
To repeat all tracks on a CD/MP3 press MODE repeatedly until REPT ALL
appears in the display. All tracks will be repeated.
To repeat a single directory in MP3 mode, press MODE repeatedly until
REPT DIR appears in the display, the whole directory will be repeated.
more CD player functions
For MP3 discs, ESP
cannot be cancelled
after you activate it.
Because your MP3
disc has a large
capacity, the discreading time will
increase.
file-selection
playback
Press DIR/PRESET, SKIP+ or SKIP- to select the files
you want to include in the same playlist, just as you would
with a CD.
To select different files from different directories, in play
mode, select the directory first, then choose the file you need
in the directory.
1. Connect the supplied
headphones into the PHONES
jack.
2. Slide OPEN switch to open the
CD door. Insert a disc label side
up. Close the CD door.
special MP3 functions
headphones
volumehold
line out
DC in
place disc here
NOTE
NOTE
The power turns on automatically when
you press PLAY/PAUSE or RADIO.
UBS - enhances
bass effect
hold
open
Page 2
• Batteries to be installed by adults only.
• Use only fresh batteries of the required size and
recommended type.
• Do not mix old and new batteries, different types of batteries
(standard, alkaline, or rechargeable), or rechargeable
batteries of different capacities.
• If you do not plan to use your CD Player for several days,
remove the batteries. Batteries can leak chemicals that can
damage electronic parts.
• Any batteries purchased for use in this audio device may pose
a hazard to children. Please check safety notice supplied with
batteries before use.
• Dispose of old batteries promptly and properly. Do not burn
or bury them.
• Before you use your CD player with Ni-Cd bateries, you need
to charge them, either in an external battery charger (not
supplied, available at your local RadioShack store) or in the
CD player (see “Charge Batteries”) with an adapter.
• The CD player senses whether or not the batteries you
install are rechargeable and turns on the charging circuit or
disconnects the batteries accordingly.
radio controls
©2004. RadioShack Corporation.
All rights reserved. RadioShack and
RadioShack.com are trademarks
used by RadioShack Corporation.
42-6052
08A04
Printed in China
This product is warranted by RadioShack against manufacturing defects in
material and workmanship under normal use for (1) one year from the date of
purchase from RadioShack company-owned stores and authorized RadioShack
franchisees and dealers. For complete warranty details and exclusions, check
with your local RadioShack store.
RadioShack Customer Relations
200 Taylor Street, 6th Floor, Fort Worth, TX 76102
04/04
The EPA certified RBRC(r) Battery Recycling Seal
on the nickel-cadmium (Ni-Cd) battery indicates
RadioShack is voluntarily participating in an industry
program to collect and recycle these batteries at the
end of their useful life, when taken out of service in the
United States or Canada. The RBRC program provides
a convenient alternative to placing used Ni-Cd batteries into the trash
or the municipal waste stream, which may be illegal in your area.
Please call 1-800-THE-SHACK (1-800-843-7422) for information on
Ni-Cd battery recycling and disposal bans/restrictions in your area.
RadioShack’s involvement in this program is part of the company’s
commitment to preserving our environment and conserving our
natural resources.
battery recycling
This equipment has been tested and found to comply with the limits for
a Class B digital device, pursuant to Part 15 of the FCC Rules. These
limits are designed to provide reasonable protection against harmful
interference in a residential installation. This equipment generates, uses,
and can radiate radio frequency energy and, if not installed and used in
accordance with the instructions, may cause harmful interference to radio
communications. However, there is no guarantee that interference will
not occur in a particular installation. If this equipment does cause harmful
interference to radio or television reception, which can be determined by
turning the equipment off and on, the user is encouraged to try to correct
the interference by one or more of the following measures:
• Reorient or relocate the receiving antenna.
• Increase the separation between the equipment and receiver.
• Connect the equipment into an outlet on a circuit different from that
to which the receiver is connected.
Consult your local RadioShack store or an experienced radio/TV technician
for help.
If you cannot eliminate the interference, the FCC requires that you stop
using your CD player. Changes or modifications not expressly approved
by RadioShack may cause interference and void the user’s authority to
operate the equipment.
This device complies with Part 15 of the FCC Rules. Operation is subject
to the following two conditions: (1) This device may not cause harmful
interference, and (2) This device must accept any interference received,
including interference that may cause undesired operation.
This device complies with Part 15 of the FCC Rules. Operation is subject
to the following two conditions: (1) This device may not cause harmful
interference, and (2) This device must accept any interference received,
including interference that may cause undesired operation.
the FCC wants you to know
• Keep your CD player dry; if it gets wet, wipe it dry immediately.
• Use and store the CD Player only in normal temperature
environments.
• Handle your CD Player carefully; do not drop it.
• Keep your CD Player away from dust and dirt, and wipe it with a
damp cloth occasionally to keep it looking new.
• If your CD Player is not performing as it should, take it to your
local RadioShack store for assistance. To locate your nearest
RadioShack, use the store locator feature on RadioShack’s website
(www.radioshack.com), or call 1-800-The Shack (843-7422) and
follow the menu options. Modifying or tampering with your CD
Player’s internal components cause a malfunction and might
invalidate its warranty.
battery notes
1. Press and hold RADIO to activate the Radio function.
During CD play, you can press RADIO to enter Radio
function.
2. For auto tuning, press and hold the SKIP+ or SKIP-
until the displayed frequency starts to change.
Then, release the button. Tuning will stop automatically
when a station is received.
To fine tune your selected station, follow the
procedure in step 2 to tune up or down to achieve
best reception.
STEREO/MONO select
If a stereo broadcast station is being received, ST appears on
the display. Press FM ST./MONO to change to MONO mode.
ST will disappear on the display. If it is hard to hear the FM
broadcast, set FM ST./MONO to MONO. The noise will be
reduced but the radio will play in mono. Press
FM ST./MONO. again to change back to STEREO mode.
program preset stations
1. Refer to step 2 above ”LISTENING TO THE RADIO”.
2. When you tune into a station, press PROG./MEM.
and then press the PRESET + or PRESET -. Channels
1—30 will be shown on the display. You may assign any
channel number to the desired station.
3. Repeat steps 1 and 2 to enter remaining preset stations
and memory numbers.
If not in PROG memory, press PROG and hold. Then
all 30 stations will be cleared to defaulted station.
improving broadcast reception
Extend the head- or earphone cord.
Keep the head- or earphones connected to the
PHONES jack. The head- or earphones cord works
as the FM antenna.
troubleshooting for radio reception
1. Try standing in a new location.
2. Fine tune the radio station by pressing
SKIP+ or SKIP- .
3. Use manual tuning to receive your station.
Preset + presets radio station up in
Tuner mode.
Preset - presets radio station
down in Tuner mode.
Radio selects tuner mode.
Skip+ tunes up to the next station in
Tuner mode.
Skip - tunes down to the
previous station in Tuner
Press PROG./MEM. to program your
favorite radio stations.
Press Mode/FM ST./Mono to switch
between Stereo and FM Mono in
Tuner mode.
To turn off the unit, press STOP.
listening to your radio
NOTE
NOTE
taking care of your CD player
NOTE
To protect your hearing, follow these guidelines when you
use earphones or headphones.
• Set the volume to the lowest setting before you begin
listening. After you begin listening, adjust the volume
to a comfortable level.
• Do not listen at extremely high volume levels.
Extended high-volume listening can lead to permanent
hearing loss.
• Once you set the volume, do not increase it. Over time,
your ears adapt to the volume level, so a volume level
that does not cause discomfort might still damage
your hearing.
traffic safety
Do not wear earphones or headphones while operating a
motor vehicle or riding a bicycle. This can create a traffic
hazard and could be illegal in some areas.
Even though some earphones or headphones let you
hear some outside sounds when listening at normal
volume levels, they still can present a traffic hazard.
listening safely
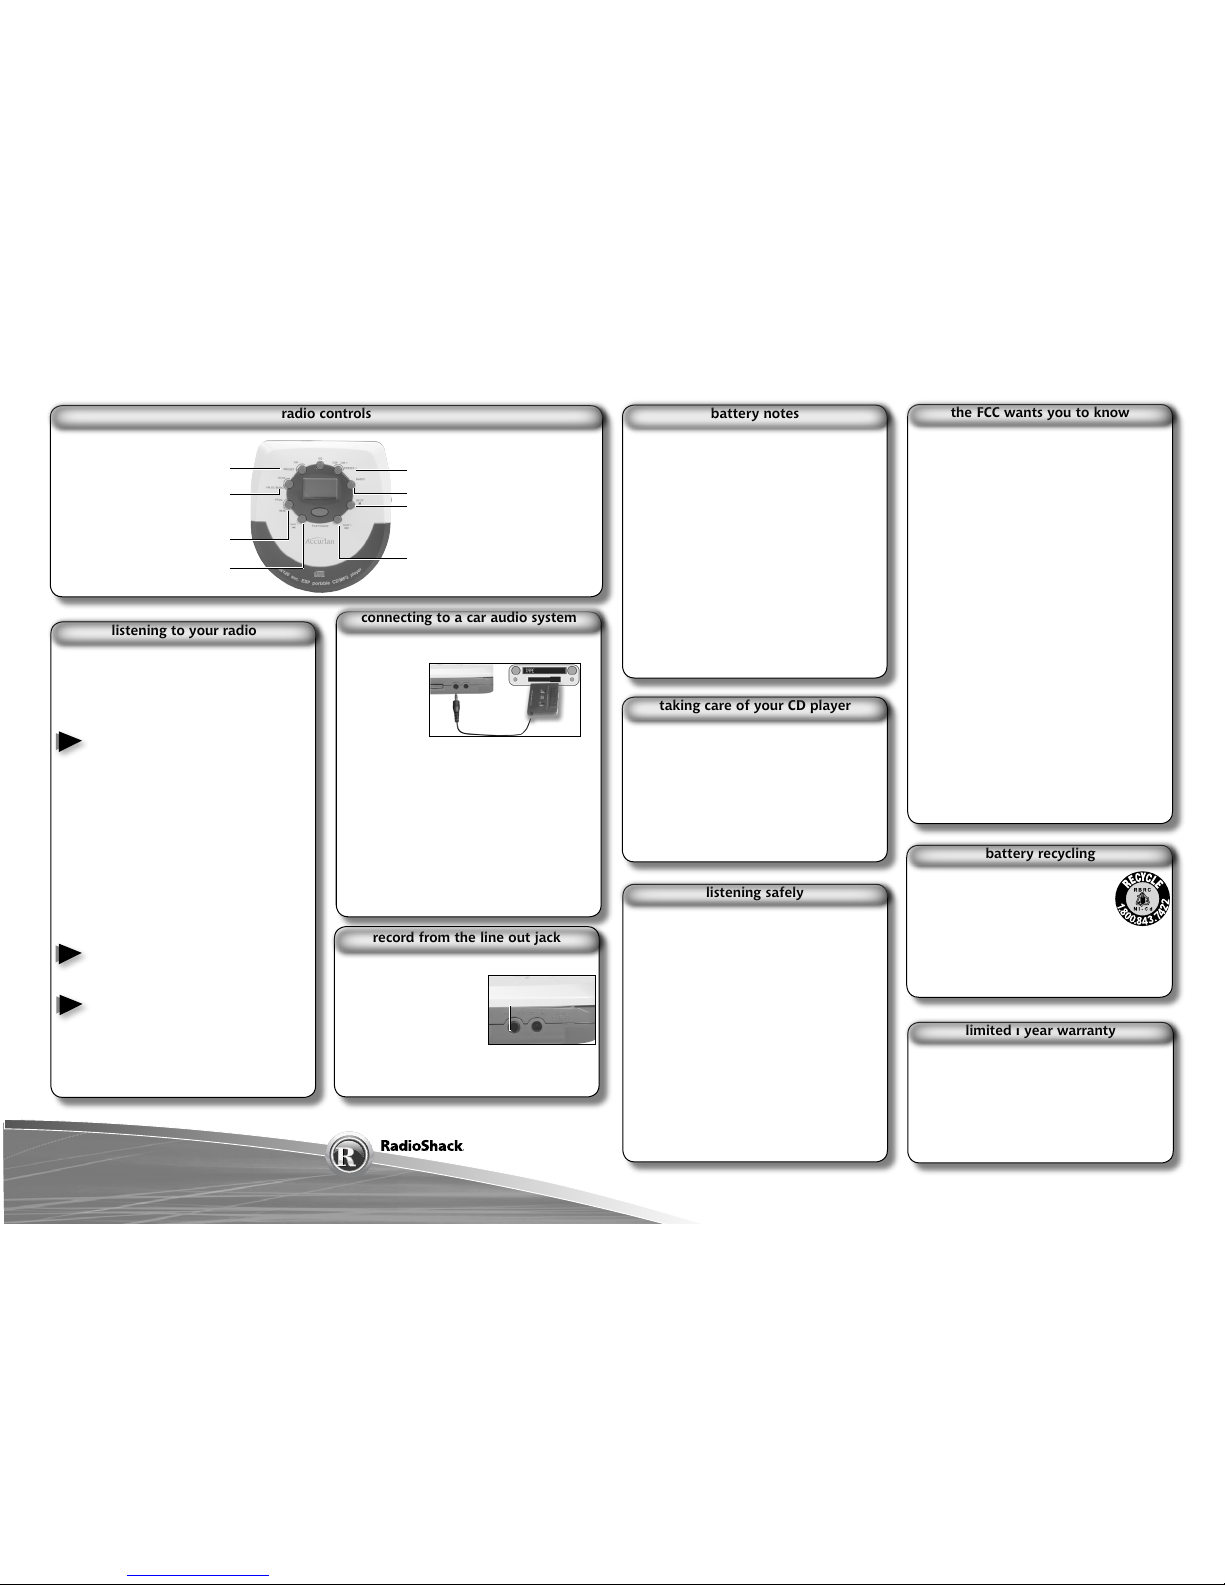
You can listen to your CD player through your vehicle’s
sound system in three ways:
If your car sound system has a cassette deck, connect the
supplied CD-to-cassette adapter’s plug to the CD player ’s
LINE OUT jack. Then insert the cassette end of the adapter
into your cassette deck just like a standard cassette.
If your car sound system has LINE IN jacks, connect an
optional Y-cable’s 1/8-inch (3.5mm) plug to the CD player’s
LINE OUT jack. Connect the Y-cable’s phono plugs to your
auto sound system’s LINE IN input jacks.
If your car sound system has a CD input jack, connect one
end of a 1/8-inch (3.5mm) stereo patch cable to the CD
player’s LINE OUT jack. Connect the other end to your auto
sound system’s CD INPUT jack. To avoid sound distortion,
set VOL to the lowest comfortable listening level and adjust it
as necessary.
1. Connect a patch cable
(not supplied) from the LINE
OUT jack on the CD player
to the LINE INPUT jacks on a
cassette recorder.
The sound from the CD can
be heard through a pair of
speakers.
2. Connect a patch cable, (not
supplied) from the LINE OUT jack on the CD player to the
AUX or INPUT jacks on a stereo system.
connecting to a car audio system
record from the line out jack
limited 1 year warranty
Line out to cassette adapter. Connects CD player to car
audio system.
 Loading...