

Page 1
15-192 4.fm Page 1 Monday, July 19, 1999 12:50 PM
OWNER’S MANUAL
7-in-1 Remote Control
with Lighted Keypad
Plug ’n Power Compatible
Please read before using this equipment.
Cat. No. 15-1924
Page 2

g
g
15-192 4.fm Page 2 Monday, July 19, 1999 12:50 PM
FEATURES
Your RadioShack 7-in-1 Remote Control can replace u p to se ven inf rared remote controls. You
can use it to control your TV, VCR, cable box, satellite receiver, and even lights and appliances
with Plug ’n Power modules (not included).
The 7-in-1 is preprogrammed with the most commonly used commands. All you have t o do is tell
it which TV, VCR, or other components’ remote
controls you want to replace (by ent ering 3-digit
codes). The 7-in-1 remot e also lets you teach it
more specialized comm ands from other remot es
and store them in its memory. This lets you operate most of the same functions as the original remotes.
This manual includes a list of many manufacturers’ 3-digit codes for TVs, VCRs, cable converters, CD players, satellite receivers, and other
popular remote-controlled devices.
The 7-in-1 Remote Control’s features include:
Powerful Infrared Beam
— so you can operate
your remote-controlled devices from a greater
distance than with many of the original remote
controls.
Li
hted Keypad
— lights up so yo u can s ee th e
keys even in a dark or dimly lit room.
— lets you set the 7-in-1 to turn off your TV
Timer
after 60 minutes.
Plu
’n Power Functions
— allow you to operate Plug ’n Power mo dules with your 7-in-1 remote and an optional IR command console (RadioShack Unlimited No. 10037703) or Plug ’n
Power Wireless Remote Control System (RadioShack Cat. No. 61-2676).
©
1997, 1998 Tandy Corporation.
Plug ’n Power and RadioShack are registered trademarks
X-10 is a registered trademark of X-10 (USA) Inc.
Need help? Call 1-800-989-4706
2
All Rights Reserved.
used by Tandy Corporation.
Page 3

15-192 4.fm Page 3 Monday, July 19, 1999 12:50 PM
Convenient Keypad Design
— each key is posi-
tioned for easy operation.
Toll Free Support
— you can get expert help for
your 7-in-1 Remote Control by calling
.
4706
You need four AAA batteries (not supplied)
Note:
to power your 7-in-1 Remote Control.
1-800-989-
Need help? Call 1-800-989-4706
3
Page 4

15-192 4.fm Page 4 Monday, July 19, 1999 12:50 PM
CONTENTS
How the 7-in-1 Works ..................................... 5
Preparation ..................................................... 7
Installing Batteries ...................................... 7
Lighting the Keys ........................................ 8
Device Types .............................................. 8
Setting Up Your 7-in-1 ................................ 9
Using Two or More Similar Devices .. 10
Operation ...................................................... 11
Punch-Through ......................................... 11
Using the 7-in-1’s Timer ........................... 12
Plug ’n Power Functions ........................... 12
Entering a Plug ’n Power
House Code .. .................................... 13
Controlling Lights and Appliances
Using an IR Command Console ....... 13
Controlling Lights and Appliances
Using a Control Center Module ......... 15
Setting a Plug ’n Power Timer .......... 16
Teaching Commands to the 7-in-1 ........... 17
Teaching a Command ....................... 18
Clearing All Commands .................... 19
If You Have Problems .................................. 20
Manual Code Search ................................ 20
Determining the 3-Digit Code ............ 21
Troubleshooting ........................................ 22
Manufacturers’ Codes ................................. 23
Audio Amplifiers ....................................... 23
Audio Receivers ....................................... 23
Audio Systems ......................................... 23
Cable Converte r s ................ ......... .......... .. 23
Cassette Player ........................................ 25
CD Players ............................................... 25
Direct-to-Home Satellite Receivers .......... 28
Home Automation ..................................... 28
Laser Disc Players ................................... 28
Satellite Receivers .................................... 28
Televisions .................... ......... ................. .. 29
TV/VCR Combinations ............................. 36
VCRs ........................................................ 36
Care and Maintenance ................................. 43
Specifi c at ion s ............................................... 44
Need help? Call 1-800-989-4706
4
Page 5
y
15-192 4.fm Page 5 Monday, July 19, 1999 12:50 PM
HOW THE 7-IN-1 WORKS
Your RadioShack 7-in-1 Remote Control was designed to control the most commo nly used functions on your TV, VCR, cable converter, CD
player, satellite receiver, audio equipment, and
Plug ’n Power devices.
When you set up the 7-in-1 Remot e Control, its
command keys work like the keys on your original
remote controls. For example, the 7-in-1 Remote
Control’s
POWER (All Lt s On)
on your original remote control which might be labeled POWER ON/OFF.
key works like a key
Ke
SET UP
POWER (All Lts
On),
digit keys,
CHANNEL + (On),
CHANNEL – (Off),
VOLUME + (Brt),
VOLUME – (Dim),
LAST, MUTE (All
Off), DISP
LEARN
TV, VCR, CBL, CD,
AUX1, AUX2, SAT,
Plug ’n Power
SHIFT
SELECT
Function
Used in setting up your
devices.
Lights your keypad for use in
dark or dimly lit rooms.
Operate the same as the corresponding keys on your origi nal remote control.
Used when you teach the 7in-1 infrared codes from your
original remote controls.
Used when you set up the 7in-1 to replace your original
remote controls . Al so used
during normal operat ion to te ll
the 7-in-1 which device you
want to control.
Used to store and access
additional learned device
functions, or when you must
enter a key shift to access a
function.
Used for menu selecti ons on
some direct-to -home satellite
systems.
Need help? Call 1-800-989-4706
5
Page 6

15-192 4.fm Page 6 Monday, July 19, 1999 12:50 PM
Key Function
GUIDE
REC, PAUSE,
PLAY, REW,
FF, STOP
TIMER
L1, L2
.
A
B
ENT
Displays the main menu on
direct-to-home satellite systems.
Control VCR functions and
are used to select options and
navigate in your Surround
Sound system, satellite system, or other similar device.
Used to set the timer to automatically switch off the TV
after 60 minutes. Or, to turn
on or off a lamp/a ppliance
module or turn of f all modules
after 1 to 99 minutes in t he
Plug ’n Power mode.
Used with
teach the 7-in-1 infrared commands from your or igi nal
remote controls. You can also
use L1 and L2 to add one or
two extra original remote control functions.
Switches between TV and AV
in the TV mode, TV and VCR
in the VCR mode, A and B in
the CBL mode, TV and DSS
in the DSS mode, an d Deck A
and Deck B in the audio
mode.
Lets you ent er information
into the 7-in-1’s memory.
LEARN
when you
Notes:
REC
• Whenever you use
on the remote control, you must press it twice. T his safety feature helps you avoid accidentally recording
over tapes.
• The 7-in-1 Remote Control might not be able
to duplicate some of your original remote
control’s seldom-used functions.
Need help? Call 1-800-989-4706
6
Page 7
15-192 4.fm Page 7 Monday, July 19, 1999 12:50 PM
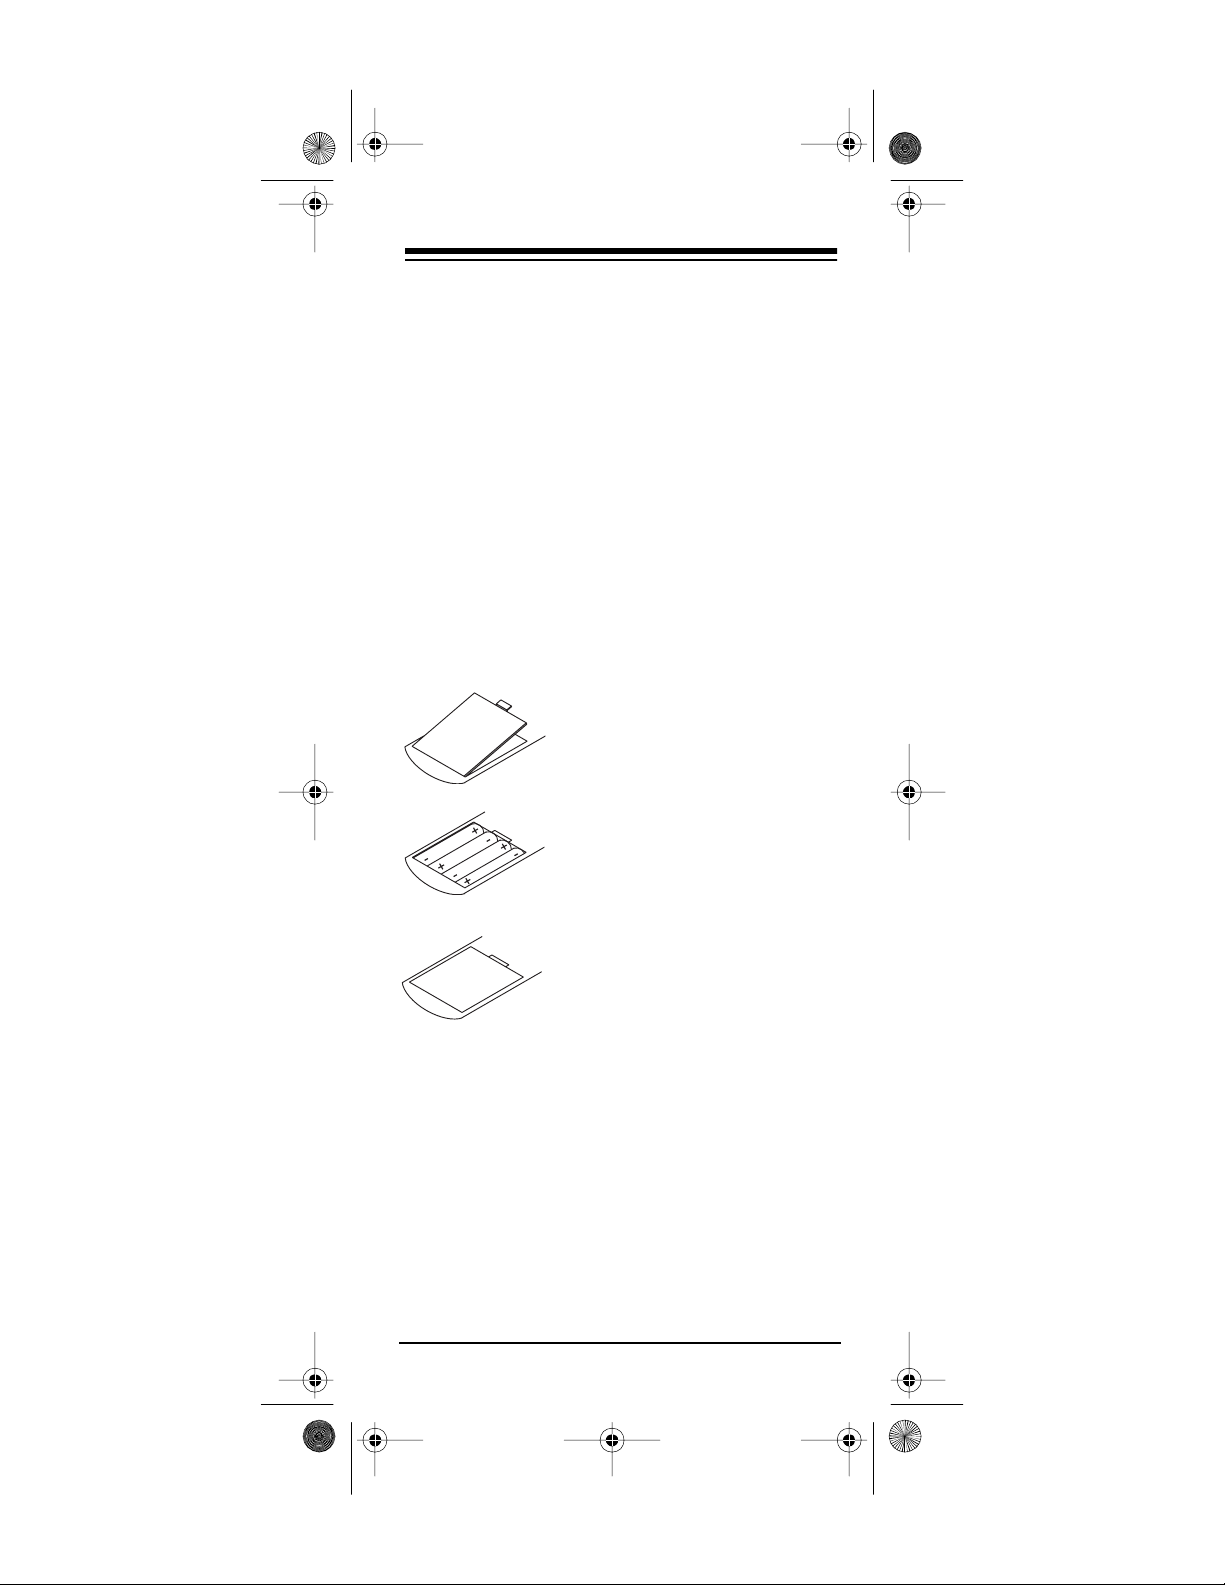
PREPARATION
INSTALLING BATTERIES
You need four AAA batteries to power your remote control. We recommend alkaline batteries,
such as RadioShack Cat. No. 23-558.
Cautions:
• Use only fresh batteries of the required size
and recommended type.
• Do not mix old and new batteries, different
types of batteries (standard, alkaline, or
rechargeable), or rechargeable batteries of
different capacities.
• Do not press an y of the 7-in-1’s keys while
installing batteries.
1. Press the battery compartment cover’s tab and lift off
the cover.
2. Install four AAA alkaline bat-
teries as indicated by the
polarity symbols (+ and
marked inside the compartment.
3. Replace the cover.
Do not place objects on top of the remote
Note:
control after you have installed the batteries. This
can press keys for an extended period of time and
reduce battery life.
When the 7-in-1 Remote Control’s range decreases or it stops operating properly, replace the
batteries.
Although the 7 -in-1 has a buil t-in memory
Note:
backup, we recommend y ou have f resh batteries
ready to install as s oon as you remove the old
ones.
Need help? Call 1-800-989-4706
–
)
7
Page 8
15-192 4.fm Page 8 Monday, July 19, 1999 12:50 PM
LIGHTING THE KEYS
Press to light the keys on the remote for about
5 seconds. If you press a key when the keys are
lit, the keys stay lit for about 5 more seconds.
To turn off the light before it automatically turns
off, press again.
DEVICE TYPES
You can use the 7-in-1 Remote Control’s device
keys to control the following general types of devices:
TV
— TVs
VCR
— VCRs, TV/VCR combinations, laser disc
players, cassette decks and digital audio tape
decks
CBL
— Cable conv erters, satellite receivers and
video accessories
CD
— CD players, amplifiers, tuners, receivers,
and miscellaneous audio products
AUX1/AUX2
— TVs, VCRs, laser dis c players, CD
players, cassette decks, digital audio tape decks,
cable converters, satellite receivers, Plug ’n Power devices, video accessories, am plifiers, tuners,
receivers, and miscellaneous audio products
SAT
— standard and direct-to-home satellite re-
ceivers
Plug ’n Power
— Plug ’n Power or X-10 home
automation devices
Note:
You can also program
AUX1
or
AUX2
or an
unused device key to control additional devices
(see “Using Two or More Similar Devices” on
Page 10).
Need help? Call 1-800-989-4706
8
Page 9

15-192 4.fm Page 9 Monday, July 19, 1999 12:50 PM
SETTING UP YOUR 7-IN-1
1. Refer to “Manufacturers’ Codes” on Page 23
and write down the codes for your original
remote controls.
Notes:
• Some manufacturers have several possi-
ble codes listed. Try each until you find the
right one. See “If You Have Problem s” on
Page 20 if you cannot find the correct
code.
• If you want to set up your 7-in-1 to cont rol
a combination TV/ VCR (such as Cat. No.
16-421 or 16-422), you must program the
TV code for the TV functions
and
the VCR
code for the VCR functions.
2. Hold down
SET U P
until the red light above
turns on.
Note:
To exit the set u p routine at a ny time,
SET UP
press
again. The red light flashes
several times.
3. Press the device key for the type of remote
you are replacing (
Power
Note:
SA T
, or
If you do not press a device key within
TV, VCR, CBL, CD
).
Plug ’n
,
about 15 seconds, the red light flashes for
about 3 secon ds then turns off. Start again
from Step 2.
4. Enter the 3-digit code.
For example, to replace a TV’s remote con-
trol (manufacturer’s code 185), press:
SET UP – TV – 1– 8 – 5
When the red light turns off, the 7-in-1 has
accepted the code.
Note:
If the code you entered i s invalid, the
red light flashes for about 3 seconds then
turns off.
Need help? Call 1-800-989-4706
9
Page 10

g
15-192 4.fm Page 10 Monday, July 19, 1999 12:50 P M
5. Point the 7-in-1 Remote Control at your
device and press
CHANNEL + (On)
for some cable boxes). Your
POWER (All Lts On)
(or
device should turn off (or on, if it was off).
If the remote does not operate your dev ice,
try the other codes listed in “Manu facturers’
Codes” on Page 23 for your brand of TV,
VCR, cable converter, or other device.
6. Repeat Steps 2–5 for additional devices.
Using Two or More Similar Devices
If you have two or more similar devices (two
VCRs for example) and you have already programmed the 7-in-1 to control one of the dev ices
using that device key, you can program the
and
device keys or an unused device key to
AUX2
control the additional device.
AUX1
Follow these steps to program
AUX1
or
AUX2
.
1. Repeat Step 1 and 2 under “Setting Up Your
7-in-1” on Page 9.
2. Press
AUX1
or
AUX2
.
3. If you are replacing a CD’s remote control,
skip to Step 4. Otherwise, press the device
key for the type of rem ote you are replacin g
(
VCR, CBL, TV, CD
If you do not press a device key within
Note:
,
Plu
’n Power
, or
SAT
.
about 15 seconds, the red light flashes for
about 3 seconds then turns off. Start again
from Step 1.
4. Repeat Steps 4–6 under “Setting Up Your 7in-1” on Page 9.
To program an unused d evice key to control an
additional device, choose an unused device key
that controls a similar type of device (see “Device
Types” on Page 8), then program it using the
steps in “Setting Up Your 7-in-1” on Page 9.
Need help? Call 1-800-989-4706
10
Page 11

15-192 4.fm Page 11 Monday, July 19, 1999 12:50 P M
OPERATION
1. Press the device key for the device you want
to control, then point the 7 -in-1 at the device
and press
+ (On)
POWER (Al l Lts O n)
for some cable converters) to turn the
device on.
2. Repeat Step 1 for al l o ther devices yo u wa nt
to operate.
3. Point the 7-in-1 toward the device you want
to control, then press the appropriate device
key and the desired command keys.
The command keys on the 7-in-1 work
Note:
the same as the keys on the original remote
control; however, the labeling might differ
slightly.
4. To turn off the last device you selected , press
POWER (All Lts On)
. To turn off other devices,
press the device key f or the device you want
to turn off, then press
POWER (All Lts On)
(or
CHANNEL
.
PUNCH-THROUGH
The punch-through feature lets you alternately
control two different devices without pressing the
device keys for each one. Here’s how it works.
Not all of the 7-in-1 Remote Control’s keys are
used by every device. For example, a TV is often
the only device that uses the volume keys . After
you press
the volum e control to con trol t h e TV .
Punch-through does not work when you are using
the 7-in-1 to control CD players and Plug ’n Power
devices.
Notes:
• The punc h-through feature might not work if
the last two devices you selected have the
same (or similar) features. For example,
most TVs and some cable converters have
channel select keys on their remote controls.
, then press
TV
Need help? Call 1-800-989-4706
, you can still use
VCR
11
Page 12

15-192 4.fm Page 12 Monday, July 19, 1999 12:50 P M
In this case, you must press the desired
device key before you use the rem ote control’s
CHANNEL + (On)
or
CHANNEL – (Off)
keys.
• If you selected
punch-through
TV, VCR
not programmed
AUX1
AUX1
or
, or
or
, you can
AUX2
if you have
CBL
as a TV,
AUX2
VCR, or CBL device.
USING THE 7-IN-1’S TIMER
This feature lets you set your 7-in-1 to turn off
your TV after 60 minutes.
1. Press
TIMER
2. Within 15 seconds, press
The red light blinks once.
If you do not press
Note:
onds, the red light does not blink. Start again
from Step 1.
3. Leave the 7-in-1 pointing at th e TV’s inf rared
sensor. Make sure there is nothing blocking
the line of sight betwe en the 7-in-1 and the
TV.
To cancel the timer, hold down
light blinks once, or press
(All Lts On)
.
on the 7-in-1.
TV
on the 7-in-1.
ENT
within 15 sec-
ENT
until the red
TIMER
then press
POWER
PLUG ’N POWER FUNCTIONS
The Plug ’n Power feature a llows you to control
lights and appliances with an optional IR command console (RadioShack Unlimited No.
10037703) or Plug ’n Power Wireless Remote
Control System (Cat. No. 61-2676). You also
need Plug ’n Power light modu les and appliance
modules (available through your local RadioShack store) to use this feature.
Need help? Call 1-800-989-4706
12
Page 13
15-192 4.fm Page 13 Monday, July 19, 1999 12:50 P M
Entering a Plug ’n Power House Code
Your IR Command Console or Plug ’n Power
Wireless Remote Control System uses a mas ter
code called a
house code
Console’s or Plug ‘n Power Wireless Remote
Control System’s Owner’s Manual for more information).
(see your IR Command
1. Press
Plug ’n Power
on the 7-in-1 Remote
Control.
2. Hold down
SET UP
on the 7-in-1 until th e red
light above turns on.
3. Use the 7-in-1’s number keys to enter the
numbers equivalent to the house code’s let-
1
ters (
for A, 2 for B, 3 for C, and so on).
For example, if the house code is C, press
4. Press
ENT
on the 7-in-1.
3
When the red light turns off, the 7-in-1 has
accepted the code.
If the code you entered i s invalid, the
Note:
red light flashes for about 3 seconds then
turns off. Start again from Step 1.
Controlling Lights and Appliances Using
an IR Command Console
Follow these steps to control Plug ’n Power modules with your 7-in-1 using an IR command c onsole.
1. Position the IR command console within the
7-in-1’s line of sight.
2. Plug the IR command console’s power cord
into any standard AC outlet.
.
3. Set the house code dial on top of the IR command console to the same letter as your
Plug ’n Power modules.
4. Set the selector switch on the IR command
console for the group of modules you want to
control (1–4 or 5–8).
Need help? Call 1-800-989-4706
13
Page 14

g
g
15-192 4.fm Page 14 Monday, July 19, 1999 12:50 P M
5. Hold down
SET UP
on the 7-in-1 until the red
light above turns on.
6. Press
Plu
’n Po wer
, then enter
0 – 1 – 4
on
the 7-in-1. The red light turns off.
7. Press
Plu
’n Power
on the 7-in-1.
8. To turn on all light and appliance modules set
to the same house code as the IR command
console, press
POWER (All Lts On)
on the 7in-1, or ALL LIGHTS ON on the IR command
console.
To turn off all light and appliance modules set
to the same house code as the IR command
console, press
MUTE (All Off)
on the 7-in-1,
or ALL UNITS OFF on the IR com man d console.
9. To turn specific lights and appliances on or
off using the 7-in-1 Remote Control, press
the digit key (
1, 2, 3, 4, 5, 6, 7
module you want to cont rol. Then press
or
Off (CHANNEL + (On)
or
, or 8) for the
On
CHANNEL – (Off)
To control specific lights and appliances
directly from the IR command console, set
the console’s selector to the number of the
module you want to control (
1–4
or
5–8
press the button on the console that corresponds to the number of the module you
want to control (1/5, 2/6, 3/7, 4/8), then press
ON on the IR command console.
).
),
10. To brighten or dim lights co nnected to lamp
and appliance modules, press the digit key
for the module you want to control. Then
hold down
on the 7-in-1. Release the key when
(Dim)
VOLUME + (Brt)
or
VOLUME –
the desired level of brightness is reached.
You must select the individual light to
Note:
brighten or dim even if you used
Lts On)
on the 7-in-1 to turn on all the lights
POWER (All
at the same time.
Need help? Call 1-800-989-4706
14
Page 15
15-192 4.fm Page 15 Monday, July 19, 1999 12:50 P M
Controlling Lights and Appliances Using
a Control Center Module
Follow these steps to control Plug ’n Power modules with your 7-in-1 using your Plug ’n Power
Wireless Remote Control Syst em’s control center
module.
1. Plug the cont rol center m odule’s po wer cord
into any standard AC outlet.
2. Set the house code dial on top of the control
center module to the same letter as your
Plug ’n Power modules.
3. Set the unit selector switch on the control
center module for t he group of modu les you
want to control (1–8 or 9–16).
If the 7-in-1’s Plug ’n Power code is
Note:
already set to
Steps 4 and 5.
0 – 1 – 3
(the default), skip
4. Hold down
SET UP
on the 7-in-1 until th e red
light above turns on.
5. Press
Plug ’n Power
then enter
0 – 1 – 3
on
the 7-in-1. The red light turns off.
6. On the 7-in-1, enter the house code that
matches your control center mod ule’s house
code (see Step 3 under “Entering a Plug ’n
Power House Code” on Page 1 3).
7. To turn on all light and appliance modules set
to the same house code as the control center
module, press
POWER (All Lts On)
on the 7-
in-1.
To turn off all light and appliance modules set
to the same house code as the control center
module, press
MUTE (All Off)
on the 7-in-1.
8. To turn specific lights and appliances on or
off, press the digit key (1–16) for the module
you want to control. Then press
CHANNEL + (On)
(
Need help? Call 1-800-989-4706
CHANNEL – (Off)
or
On
or
).
Off
15
Page 16

g
15-192 4.fm Page 16 Monday, July 19, 1999 12:50 P M
9. To brighten or di m lights connected to lamp
and appliance modules, press the digit key
for the module you want to control. Then
hold down
on the 7-in-1. Release the key when
(Dim)
VOLUME + (Brt)
or
VOLUME –
the desired level of brightness is reached.
You must select the individual light to
Note:
brighten or dim even if you used
Lts On)
on the 7-in-1 to turn on all the lights
POWER (All
at the same time.
Setting a Plug ’n Power Timer
You can set the 7-in-1 Remote Control to turn on
or off a lamp/appliance module you select or turn
off all modules after a period of 1 to 99 minutes.
This works with an optional IR command console
or Plug ’n Power Wireless Remote Control Sys tem.
When you use the 7-in-1 to control all mod-
Note:
ules at one time, the only command that works is
.
All Off
1. Press
Plu
2. Hold down
’n Power
TIMER
on the 7-in-1.
on the 7-in-1 until the red
light above stays on.
Skip Step 3 if you are turning all m od-
Note:
ules off using the
All Off
command.
3. To turn on or off a specific module using the
7-in-1 Remote Control, p re ss the digit keys
to enter the module’s device code. The red
light blin ks on c e.
4. Press
On (CHANNEL + (On)
to turn on),
Off (CHANNEL – (Off)
module to turn off), or
(to set a module
(to set a
MUTE (A ll Off)
(to set
all modules to turn off.
When the red light blinks once, the 7-in-1
has accepted the code.
Need help? Call 1-800-989-4706
16
Page 17

15-192 4.fm Page 17 Monday, July 19, 1999 12:50 P M
If the code you entered i s invalid, the
Note:
red light flashes for about 3 seconds.
5. Use the 7-in-1’s number keys to enter the
time you want to set. For example, if you
1–5
want to enter 15 minutes, press
When the red light blinks once, the 7-in-1
has accepted the code.
If the time you entered is invalid, the
Note:
red light flashes for about 3 seconds. Start
again from Step 1.
ENT
6. Press
off.
on the 7-in-1. The red light turns
.
To cancel the timer, p ress
7-in-1, then hold down
blinks.
TIMER
Plug ’n Power
until the red light
on the
T EACHING COMMANDS TO THE
7-IN-1
You can teach infrared commands from one or
more original remote controls to your 7-in-1 Remote Control, storing each command in one of
the 7-in-1’s keys. This is handy if a preprogrammed manufacturers’ code you selected does
not control all of your device’s functions, or if none
of the manufacturers’ codes work for your device.
You can teach the functions of as m any as 3 original remote controls, with as many as 50 keys
each, to the 7-in-1.
Notes:
• Depending on how c ommands are stored in
your original remote control, you might not
be able to store all of the remote control’s
commands into your 7-in-1.
Need help? Call 1-800-989-4706
17
Page 18

g
15-192 4.fm Page 18 Monday, July 19, 1999 12:50 P M
• You can store a command into any of t he 7in-1’s keys except
,
Power
SHIFT, ENT
TV, VCR, CBL, CD, AUX1, AUX2, SAT
, and
TIMER
SET UP, LEARN
.
,
Plu
• You can store a com m and in on e of t he 7 - in1’s keys where you have to press
SHIFT
the key to activate the command. This lets
you store more commands.
Te aching a Command
’n
,
then
Important:
Make sure there are fresh batteries in
both the 7-in-1 and the original remote control before following the steps in this section.
Program only one or two of your original re-
Hint:
mote control’s commands into the 7-in-1 at a time
using the steps in this section, then try those commands before programming more commands.
Follow these steps to teach a command from another remote control to one of your 7-in-1’s keys.
1. If this is the first time you are teaching a
command to your 7-in-1, follow the steps in
“Clearing All Commands” on Page 19.
2. Position the 7-in-1 and the original remote
control about 1 or 2 inches apart, so the 7-in1’s infrared eye is pointing at the original
remote control’s infrared eye. Make sure
there is nothing blocking the line of sight
between the two.
3. Hold down
SET UP
on the 7-in-1 until the red
light above turns on.
4. Press the device key on the 7-in-1 for the
device you want to control. The red light
blinks.
5. Press
LEARN
on the 7-in-1.
6. Within 15 seconds, press the key on the 7-in1 that you want to program. For example, if
you want to program the PLAY command
Need help? Call 1-800-989-4706
18
Page 19

15-192 4.fm Page 19 Monday, July 19, 1999 12:50 P M
from a VCR’s original remot e control, press
on the 7-in-1.
PLAY
If the key you want to program is already
used for another command, press
SHIFT
before pressing the key. For example, to
store the command SHIFT-PLAY, press
SHIFT
then
on the 7-in-1.
PLAY
7. On the original remote control, hold down the
key that you want your 7-in-1 to learn until
the red light on the 7-in-1 blinks once.
If the command wa s not programmed
Note:
properly, the red light blinks for about 3 seconds then turns off. If this happens, repeat
Steps 4–7.
8. Repeat Steps 1–7 to store more commands.
9. When you finish, press
on the 7-in-1 to
ENT
save all stored commands.
If you do not press a key within 15 seconds,
Note:
the red light blinks for about 3 seconds then turns
off. Begin again from Step 1.
Clearing All Commands
1. Hold down
SET UP
light above turns on.
2. Press the device key on the 7-in-1 for which
you want to clear all commands. The red
light blinks once.
3. Press
LEARN
light flashes for a few seconds.
4. Press
SET UP
onds, the red light flashes then turns off.
on the 7-in-1 until th e red
on the 7-in-1 twice. The red
on the 7-in-1. After a few sec-
Need help? Call 1-800-989-4706
19
Page 20

15-192 4.fm Page 20 Monday, July 19, 1999 12:50 P M
IF Y OU HAVE PROBLEMS
MANUAL CODE SEARCH
If the 7-in-1 Remote Control does not operate
your remote-controlled devices when you first set
it up, you might have to ma nually find the correct
code for your devices. You can try a ll the codes
listed in “Manufacturers’ Codes” o n Page 23 for
the brand of your device, or you can foll ow t hese
steps to search the 7-in-1’s entire library.
1. Manually turn on the device you want to set
up.
2. Hold down
SET UP
on the 7-in-1 until the red
light above turns on.
3. Press the corresponding devi ce key on your
7-in-1 Remote Control (
TV, VCR, CBL, CD
and so on). Or, to search all the codes available to
press
AUX1
AUX1
or
or
AUX2
to control a device,
AUX2
then the corresponding
device key. The red light blinks once.
4. Aim the 7-in-1 Remote Control at the device
you want to operate.
5. Repeatedly press On (
, or
PLAY
POWER (All Lts On)
CHANNEL + (On),
until the device
responds to the command.
6. When the device re sponds to the c ommand,
press
within 5 seconds to save the
ENT
code.
Notes:
• If you accidentally overshoot the correct
code, repeatedly press
(
CHANNEL + (On), PLAY
on the 7-in-1 to move back through
On)
, or
then
LAST
POWER (All Lts
On
the codes until the device respo nds t o the
command.
,
• If you do not press
ENT
the 7-in-1 does not save the code.
Need help? Call 1-800-989-4706
20
within 5 seconds,
Page 21

15-192 4.fm Page 21 Monday, July 19, 1999 12:50 P M
• Because the 7-in-1’s library has s o many
codes, this procedure can take several
minutes.
• If your device turns off d uring the search,
but does not operate after you lock in the
code, begin the search again, pausing
longer between key presses.
If necessary, repeat these steps for each device.
Determining the 3-Digit Code
After you set up your 7-in-1 Remote Control using
manual code s earch, you can find which 3-digi t
code the 7-in-1 Remote Control is set to by following these steps.
1. Hold down
SET U P
until the red light above
turns on.
2. Press the device key you want to get the
manufacturer’s code from. The red light
blinks once then stays on.
3. Press
SET UP
. The red light blinks once then
stays on.
4. Press 0 – 1 – 2 – 3 – 4 – 5 – 6 – 7 – 8 – 9, waiting a few seconds after you press each number before you press the next one.
If the red light blinks after you press a number, that number is the fi rst number of your 3digit manufacturer’s code.
5. Repeat Step 4 twice to find the second and
third numbers of y our 3-digit manufacturer ’s
code. After the red light blinks for the third
digit in the code, it turns off.
Need help? Call 1-800-989-4706
21
Page 22

15-192 4.fm Page 22 Monday, July 19, 1999 12:50 P M
TROUBLESHOOTING
If the 7-in-1 Remote Control stops working a fter
you have successfully tested the control for each
device, or if you are unable to get the remote control to work at all, check these things:
• Be sure you press the device key for the
device you want to control before you press
any other key.
• Confirm that your remote control de vices are
working properly by using the original remote
control or the manual controls.
• Replace the batteries.
• If some of the keys do not function for your
device, you might be able to find a better
device code.
22
Need help? Call 1-800-989-4706
Page 23

15-192 4.fm Page 23 Monday, July 19, 1999 12:50 P M
MANUFACTURERS’ CODES
The following list tells you which 3-digit codes to
enter to set up the 7-in-1 Remote Control.
Notes:
• The 7-in-1 Remote Control might not have
every command of your original remote c ontrols.
• A key on the 7-in-1 Remote Con trol that has
the same name as a key on your original
remote control might have a s lightly different
function.
RadioShack
Manufacturer Code(s)
AUDIO AMPLIFIERS
Optimus 106 31-3034
Sherwood 079
AUDIO RECEIVERS
JVC 143
Optimus 107 31-3034
Technics 144
AUDIO SYSTEMS
Optimus 020 13-1283
101 13-1277
102 13-1294
Venturer 098
CABLE CONVERTERS
ABC 014, 01 5, 016 , 01 7,
018, 01 9, 020
Antronix 021, 022
Archer 0 2 1, 02 2, 02 3, 02 4
Cabletenna 021
Cableview 021
Cat. No.
31-3035
31-3036
31-3037
31-3038
31-3035
31-3036
31-3037
31-3038
13-1284
13-1293
Need help? Call 1-800-989-4706
23
Page 24

15-192 4.fm Page 24 Monday, July 19, 1999 12:50 P M
RadioShack
Manufacturer Code(s)
Cat. No.
CABLE CONVERTERS (Continued)
Century 024
Citizen 024
Colour Voice 025, 026
Comtronics 027, 028
Contec 029
Eastern 030
Garrard 024
GC Electronics 022
Gemini 031, 03 2
General Instrument 016
Hamlin 033, 034, 035
Hitachi 016
Hytex 015
Jasco 024
Jerrold 014, 016 , 01 7, 0 18,
Magnavox 038
Memorex 039
Movie Time 015, 040
NSC 015, 04 0
Oak 015, 029, 042
Panasonic 013, 061, 064
Paragon 039
Philips 024, 025 , 02 6, 0 32,
Pioneer 046, 047
Pulsar 039
RadioShack 058 15-1288
RCA 013, 06 0
Realistic 022 15-1283
Regal 035
Regency 030
Rembrandt 016
Runco 039
Samsung 0 27, 047
020, 031, 03 7, 0 62,
063
038, 04 3, 044, 04 5
24
Need help? Call 1-800-989-4706
Page 25

15-192 4.fm Page 25 Monday, July 19, 1999 12:50 P M
RadioShack
Manufacturer Code(s)
Cat. No.
CABLE CONVERTERS (Continued)
Scien tifi c Atlanta 019, 04 9, 050 , 05 1,
Signal 027, 031
Signature 016
St. Marx 027
Sprucer 013
Standard
Components
Starc om 0 14, 020, 03 1
Stargate 027, 031
Starquest 031
Star Trak 069
Tandy 053
Teleview 027
Texscan 052
Tocom 017, 054
Toshiba 039
Tusa 031
TV86 040
Unika 021, 022, 02 4
United Artists 015
United Cable 014
Univer sal 021, 022, 023 , 02 4,
Video way 057
View star 028, 038, 0 40, 053,
Zenith 039
066, 067
052
055
056
CASSETTE PLAYER
Optimus 104, 10 5 31-3034
31-3035
31-3036
31-3037
31-3038
CD PLA YERS
ADC 013
Adcom 014, 067
Aiwa 015, 016
Akai 06 8, 09 0
Need help? Call 1-800-989-4706
25
Page 26

15-192 4.fm Page 26 Monday, July 19, 1999 12:50 P M
Manufacturer Code(s)
CD PLAYERS (Continued)
Audio Alchemy 017
Audio Technica 018
BSR 017
California Audio Labs 069
Capetronic 022
Carrera 017
Carver 019, 020, 021
Casio 070
Curti s Ma t h es 070
Denon 023, 024
Emerson 014, 025, 026
Fisher 020, 027 , 02 8, 0 29,
030, 07 1
GE 078
Genexxa 025, 026, 031, 072
Goldstar 032, 073
Harmon Kardon 033
Hitachi 031
Inkel 034
JC Penney 043, 070
JVC 035
Kenwood 027, 036, 037, 0 38,
080, 08 1
Krell 0 19
Kyocera 013
Luxman 039, 040, 082, 0 83,
091
LXI 025, 070
Magnavox 019, 084
Marantz 019, 041, 04 2, 085
MCS 043, 070
MGA 044
Mission 019
Mitsubishi 044, 045
NAD 074, 09 2
Nakamichi 046, 047
NEC 043
Nikko 018, 026, 029
RadioShack
Cat. No.
26
Need help? Call 1-800-989-4706
Page 27

15-192 4.fm Page 27 Monday, July 19, 1999 12:50 P M
RadioShack
Manufacturer Code(s)
Cat. No.
CD PLA YERS (Co ntinued)
NSM 019
Onkyo 048, 04 9, 07 5
Optimus 025 42-5061
052 42-5071
100 42-5044
104 42-5060
017, 02 0, 021 , 03 1,
037, 05 0, 051, 053
Panaso nic 069, 08 6, 09 3
Philips 0 1 9, 08 4
Pioneer 031, 054, 055, 07 2
Proton 019
Quasar 069
RCA 014, 020, 0 25, 056,
RCA Digital Video
Disc
Realis tic 014, 020, 0 22, 026,
Rotel 019
SAE 019
Samsung 094
Sansu i 019, 025, 057 , 07 6,
Sanyo 020, 058, 071 , 08 8,
Scott 0 1 4, 02 5, 02 6
Sears 0 2 5, 03 7, 042, 070
Sharp 037, 04 2
Sherwo od 0 3 4, 04 2, 05 1, 05 9
Shure 043
Sony 0 6 0, 06 1
STS 013
Sylvan ia 019
076
096
031, 04 2, 050
025 42-5061
052 42-5071
087
095
42-5045
42-5062
42-5063
Need help? Call 1-800-989-4706
27
Page 28

15-192 4.fm Page 28 Monday, July 19, 1999 12:50 P M
RadioShack
Manufacturer Code(s)
Cat. No.
CD PLAYERS (Continued)
Symphonic 062
TEAC 029, 042, 05 2, 0 62,
Technics 069, 086, 089
Theta Digital 084
Toshiba 074
Vector Research 017, 032
Victor 035
Yamaha 018, 065, 066, 077
063, 06 4
DIRECT-TO-HOME SATELLITE RECEIVERS
Echosphere 071
Echostar 071
Dish Network 071
Hughes Satellite 075
Optimus 076 16-2575
Panasonic 069, 072
Primestar 070
RCA 065
Sony 066
Star Sight Cable
Services
Toshiba 0 67, 068, 074
Uniden 076
073
HOME AUTOMATION
GE Homeminder 015
Home Automation
(For IR Command
Console)
X-10 (NEC) (For RF
Transceiver Console)
014
013
LASER DISC PLAYERS
Pioneer 093
Proscan 146
RCA 146
SATELLITE RECEIVERS
Amplica 028
Birdview 029
Channel Master 030, 031, 032
28
Need help? Call 1-800-989-4706
Page 29

15-192 4.fm Page 29 Monday, July 19, 1999 12:50 P M
Manufacturer Code(s)
SA TELLITE RECEIVERS (Continued)
Chaparral 013, 014, 033
Cheyenne 014
Drake 015, 016, 038 , 03 9,
040
DX Antenna 021, 035
Echost ar 0 41, 042, 04 3
Fujitsu 04 4, 04 5
Genera l Ins tr u m en t s 017, 01 8, 019, 046
Janeil 049
Jerrold 0 50
Kenwood 051
Luxor 052
Macom State 053
Norstat 054
Realistic 020, 056, 057
Scientific Atlanta 060
Sierra I, II, III 01 4
Star Trak 061
STS 02 1, 022, 023, 02 4
Super Guide 062
Toshiba 025
Uniden 026, 064
Video Cipher II 027
TELEVISIONS
Abex 185
Acme 003
ADA 030
ADC 004, 097
Admiral 014, 186
Adventura 187
Aiko 029
Alleron 059
Amtron 051
Akai 015
Amstrad 202
Anam National 016, 051, 055, 205,
206, 207
RadioShack
Cat. No.
Need help? Call 1-800-989-4706
29
Page 30

15-192 4.fm Page 30 Monday, July 19, 1999 12:50 P M
Manufacturer Code(s)
TELEVISIONS (Continued)
AOC 017, 018, 020, 022 ,
027, 18 8, 208
Audiov ox 051
Belcor 017
Bell & Ho well 014, 062, 096
Bradford 051
Brokwood 017
Candle 017, 02 1, 022, 18 7
Capehart 188
Celebrity 015
Centurion 022
Cetronic 055
Citizen 017, 021, 02 2, 0 29,
051, 05 5, 084, 1 18,
184, 18 7, 190
Clairtone 027
Classic 055
Colortyme 017, 022, 023, 213
Concerto 017, 022
Contec/ Cony 0 24, 026, 027, 0 51,
055, 18 4
Craig 051, 055
Crown 051, 055, 184
Curtis Mathes 013, 017, 02 2, 0 28,
062, 08 4, 118, 184
CXC 051, 05 5
Daewoo 017, 018 , 02 2, 029 ,
030, 031, 05 5, 0 98,
139, 14 0, 184
Daytron 017, 022, 184
Dimens ia 013
Dumont 017, 134
Dynasty 055
Dynatech 191
Electroband 015, 027
Electr ohome 016, 017, 01 8, 0 22,
035
Emerson 017, 022 , 02 7, 0 36,
037, 038, 03 9, 0 40,
043, 044, 04 5, 0 46,
RadioShack
Cat. No.
30
Need help? Call 1-800-989-4706
Page 31

15-192 4.fm Page 31 Monday, July 19, 1999 12:50 P M
Manufacturer Code(s)
TELEVISIONS (Continued)
Emerson (continued) 047, 048, 049, 050,
051, 05 2, 053 , 05 4,
055, 05 6, 057 , 05 8,
059, 06 2, 136 , 13 7,
176, 18 4, 190 , 19 2,
210
Envision 0 1 7, 02 2
Fisher 026, 06 2, 06 4, 19 3
Fujitso 0 5 9
Funai 05 1, 05 5, 05 9
Futuretec 051, 055
GE 013, 016, 0 17, 022,
035, 06 5, 067 , 06 8,
100, 17 6, 177 , 17 9,
180, 19 4
Gibralter 017, 134
Goldst ar 017, 018, 0 22, 069,
070, 07 1,168, 1 69,
184, 18 5
Grundy 051, 05 9, 184
Hallmark 017, 022
Harvard 051
Hitach i 017, 022, 024 , 02 6,
072, 07 3, 074 , 10 0,
150, 15 1, 152 , 15 3,
154, 15 5, 156 , 15 7,
158, 15 9, 160 , 16 1,
163, 184, 192, 211,
212
IMA 051
Infinity 075
Janeil 187
JBL 075
JCB 015
JC Penney 013, 017, 018 , 02 1,
022, 03 5, 065 , 06 7,
071, 07 6, 077 , 08 4,
100, 1 18, 141, 184,
185, 19 4, 214
Jensen 017, 022
JVC 024, 02 6, 067 , 07 3,
078, 07 9, 080 , 10 2,
171, 17 2, 184, 195
RadioShack
Cat. No.
Need help? Call 1-800-989-4706
31
Page 32

15-192 4.fm Page 32 Monday, July 19, 1999 12:50 P M
Manufacturer Code(s)
TELEVISIONS (Continued)
Kawasho 015, 017, 022
KaypanI 188
KEC 055
Kenwood 017, 022
Kloss Novabeam 081, 082, 187
KTV 027, 051, 05 5, 083 ,
184, 19 0
Lodgenet 096
Loewe 075
Logik 096
Luxman 017, 022
LXI 0 13, 022, 06 2, 0 75,
084, 19 4
Megatron 022, 072
Magnavox 017, 021, 022, 075,
081, 082, 08 7, 0 88,
089, 090, 10 1, 1 02,
143, 14 5, 146, 19 7
Majestic 096
Marantz 017, 022, 07 5, 091
Matsui 075
MEI 027
Memore x 014, 018, 02 2, 0 62,
096
MGA 0 17, 018, 02 2, 0 35,
059, 06 4, 092,
Midlan d 067, 134, 184, 185,
194
Minutz 065
Mitsub ishi 017, 018, 022, 0 35,
059, 064, 09 2, 0 94,
102, 13 8
Montgo mery War d 013, 014, 01 7, 0 18,
022, 037, 04 6, 0 59,
065, 075, 08 1, 0 82,
087, 088, 08 9, 0 96,
100, 101, 10 8, 1 32,
133, 19 7
Motorola 016, 186
MTC 017, 018, 022, 0 27,
084, 118, 191
Multitech 051, 191
RadioShack
Cat. No.
32
Need help? Call 1-800-989-4706
Page 33

15-192 4.fm Page 33 Monday, July 19, 1999 12:50 P M
RadioShack
Manufacturer Code(s)
TELEVISIONS (Continued)
Multivision 097
NAD 022, 08 4, 198
NEC 016, 017, 0 18, 022,
098, 10 2, 108, 213
Nikei 055
Nikko 022, 029
NTC 029
Onking 055
Onwa 051, 055
Optimus 183
198 31-3031
Optonica 108, 186
Orion 048
Panaso nic 016, 06 7, 07 5, 183
Philc o 016, 017, 018 , 02 1,
022, 07 5, 081,0 82,
087, 08 8, 090 , 18 4,
197
Philip s 016 , 01 7, 0 19, 02 1,
022, 07 5, 081 , 08 2,
087, 08 8, 089 , 09 9,
100, 10 1, 102, 184
Pilot 017, 184
Pionee r 017, 022, 103 , 104,
105, 19 2, 198
Portl and 017, 018, 022 , 029,
184
Price Club 118
Prism 067
Proscan 0 1 3, 19 4
Proto n 017 , 022, 106 , 18 4,
188, 199
Pulsar 0 17, 134
Quasar 016, 06 7, 083, 107
RadioShack/Realistic 013 16-291
16-292
017 16-288
022 16-263
062 16-229
16-261
16-515
Cat. No.
Need help? Call 1-800-989-4706
33
Page 34

15-192 4.fm Page 34 Monday, July 19, 1999 12:50 P M
Manufacturer Code(s)
TELEVISIONS (Continued)
RadioShack/Realistic
(continued)
RCA 013, 016, 017, 0 18,
Rhapsody 027
Runco 134
Sampo 017, 022 , 184, 185 ,
Samsung 0 17, 018 , 02 2, 024 ,
Samsux 184
Sanyo 017, 026, 062, 064 ,
Scotch 022
Scott 017, 022, 03 7, 0 48,
Sears 013, 017, 022, 026 ,
Sharp 017, 022, 108, 124,
Shogun 017
Signature 0 14, 096, 12 8
Simpson 021
108 16-232
184 16-254
013 16-291
020, 022, 109, 111,
112, 113, 114, 115,
116, 142, 192, 194,
200, 20 1
188
028, 0 84, 117, 1 18,
119, 184, 185, 214,
217
120, 12 1, 193
051, 05 5, 059, 18 4
059, 062, 06 4, 0 79,
084, 118, 122, 123,
193, 19 4, 202, 21 0
125, 126, 12 7, 1 35,
184, 18 6
RadioShack
Cat. No.
16-233
16-242
16-246
16-251
16-252
16-253
16-255
16-256
16-260
16-262
16-288
16-255
16-256
16-292
34
Need help? Call 1-800-989-4706
Page 35

15-192 4.fm Page 35 Monday, July 19, 1999 12:50 P M
Manufacturer Code(s)
TELEVISIONS (Continued)
Sonic 027
Sony 0 1 5, 01 9
Soundes ign 017, 02 1, 022 , 05 1,
055, 059
Squareview 202
SSS 017, 051, 05 5
Starlite 051
Supremacy 187
Supreme 015
Sylva nia 017, 021, 022 , 07 5,
081, 08 2, 087 , 08 8,
089, 09 0, 101 , 17 4,
197
Sympho nic 046, 05 1, 20 2
Tandy 186
Ta tu ng 016, 191
Technics 067
Te chwood 0 1 7, 02 2, 06 7
T ekn ika 017, 01 8, 0 21, 02 2,
026, 02 9, 051 , 05 5,
059, 08 4, 089 , 09 6,
118, 183, 184, 187
Telecaption 130
Telerent 096
Tera 199
TMK 017, 022
T osh iba 026, 062, 084 , 102,
11 8, 122, 130, 131,
214
T otevision 184
Universal 065, 100
Victor 079, 19 5
Vidtech 0 1 7, 01 8, 02 2
Viking 187
Yamaha 017, 018, 022
Yupiteru 055
Zenith 096, 13 4, 166
RadioShack
Cat. No.
Need help? Call 1-800-989-4706
35
Page 36

15-192 4.fm Page 36 Monday, July 19, 1999 12:50 P M
Manufacturer Code(s)
TV/VCR COMBINATIONS
RadioShack 183 (TV function s)
122 (VCR functions)
VCRs
Admiral 014
Adventura 039
Aiko 040
Aiwa 015, 039
Akai 016, 017, 01 8, 0 19,
020, 021, 04 2, 1 24,
125
American High 073
Asha 026
Audio Dynamics 022, 023
Audiov ox 027
Bell & Howell 024
Beaumark 026
Broksonic 025, 038
Calix 027
Candle 026, 027, 02 8, 0 29,
030, 03 1, 032
Canon 035, 073, 127
Capehart 033, 123
Carver 075
CCE 040, 07 4
Citizen 026, 027, 02 8, 0 29,
030, 03 1, 032, 04 0
Colortyme 022
Colt 074
Craig 026, 027, 03 6, 074
Curtis Mathes 013, 015, 02 2, 0 26,
029, 031, 03 5, 0 37,
073, 12 8
Cybernex 026
Daewoo 028, 030 , 03 2, 038 ,
039, 04 0, 041, 12 3
Daytron 1 23
DBX 022, 023
Dimens ia 013
RadioShack
Cat. No.
16-421/
16-422
36
Need help? Call 1-800-989-4706
Page 37

15-192 4.fm Page 37 Monday, July 19, 1999 12:50 P M
Manufacturer Code(s)
VCRs (Continued)
Dynatech 015, 039
Electr oh om e 027, 042
Electrophonic 027
Emerson 015, 019, 025, 027,
028, 03 7, 038 , 03 9,
042, 04 3, 044 , 04 5,
046, 04 7, 048 , 04 9,
050, 05 1, 052 , 05 3,
054, 05 5, 056 , 05 7,
058, 06 0, 073 , 07 8,
118, 129, 130
Fishe r 024, 036, 061 , 06 2,
063, 06 4, 065, 131
Fuji 073, 132
Funai 015, 039
Garrard 039
GE 013, 026, 0 35, 066,
073, 12 8, 133
Goldst ar 022, 027, 0 31, 067,
134
Gradiente 039
Harley Davidson 039
Harman Kardon 022, 081
Harwood 074
Headquarter 024
Hitach i 015, 068, 069 , 07 0,
120, 12 4, 133, 135
HI-Q 036
Inst ant Replay 073
JCL 073
JC Penney 022, 023, 024 , 02 6,
027, 03 5, 068 , 06 9,
072, 07 3, 120 , 12 4,
131
Jensen 124
JVC 022, 02 3, 024 , 03 1,
124, 136
Kenwoo d 022 , 02 3, 0 24, 02 9,
031, 12 4, 136
KLH 074, 144
Kodak 0 2 7, 073
Lloyd 01 5, 03 9
RadioShack
Cat. No.
Need help? Call 1-800-989-4706
37
Page 38

15-192 4.fm Page 38 Monday, July 19, 1999 12:50 P M
RadioShack
Manufacturer Code(s)
Cat. No.
VCRs (Continued)
Logik 074
LXI 027
Magnavox 035, 073, 075, 076,
Magn in 026
Marantz 022, 023, 024, 0 29,
Marta 027
Matsushita 073
MEI 073
Memore x 014, 015, 02 4, 0 26,
MGA 042, 078
MGN Technology 026
Midland 066
Minolta 068, 069, 120
Mitsub ishi 042, 055, 068, 0 69,
Montgo mery War d 014, 088, 01 4, 0 15,
Motorola 014, 073
MTC 015, 026, 039
Multite ch 015, 026 , 03 9, 066 ,
NEC 022, 023, 02 4, 0 29,
Nikko 027
Noblex 026
Olympus 073
Optimus 014 16-538
117, 121, 137
031, 073, 07 5, 0 77,
127
027, 036, 03 9, 0 56,
073, 117, 125
078, 079, 08 1, 0 82,
083, 084, 08 6, 0 87,
136
026, 027, 02 8, 0 36,
039, 042, 06 8, 0 69,
073, 07 4, 088, 1 14,
120, 12 9
074
031, 077, 08 9, 0 90,
091, 09 2, 124, 13 6
16-539
16-540
027 16-406
16-408
16-410
38
Need help? Call 1-800-989-4706
Page 39

15-192 4.fm Page 39 Monday, July 19, 1999 12:50 P M
RadioShack
Manufacturer Code(s)
VCRs (Continued)
Optimus (continued) 027 (continued) 16-411
16-529
16-530
16-623
16-705
149 16-545
150 16-419
16-423
122
Optonica 088, 147
Panas onic 035, 07 3, 1 22, 138,
139, 140
Pentax 029, 06 8, 0 69, 12 0,
133
Pentex Research 031
Philco 0 3 5, 07 3, 07 5, 07 6
Philips 0 7 3, 07 5, 08 8, 13 7
Pilot 027
Pionee r 023, 068, 093 , 094,
136
Portla nd 029, 03 0, 03 2, 123
Proscan 0 13
Protec 07 4
Pulsar 117
Quarter 024
Quartz 024
Quasar 035, 073, 138
RCA 013, 016, 0 26, 068,
069, 07 3, 095 , 09 6,
097, 09 8, 099 , 10 0,
101, 10 2, 103 , 10 4,
120, 12 8, 133, 138
RadioShack/Realistic 014 16-542
16-544
16-616
16-627
16-627
16-628
16-653
015 16-404
16-405
16-410
16-411
Cat. No.
Need help? Call 1-800-989-4706
39
Page 40

15-192 4.fm Page 40 Monday, July 19, 1999 12:50 P M
Manufacturer Code(s)
VCRs (Continued)
RadioShack/Realistic
(continued)
Radix 027
Randex 027
Ricoh 141
015 (co ntinued) 16-411
027 16-408
035 16-651
036 16-511
039 16-404
073 16-651
148 15-1957
149 16-545
150 16-419
151 16-425
013, 024, 02 6, 0 42,
063, 08 8, 122, 12 5
RadioShack
Cat. No.
16-508
16-510
16-519
16-622
16-703
16-704
16-414
16-515
16-534
16-535
16-624
16-705
16-512
16-513
16-515
16-516
16-518
16-613
16-614
16-615
16-652
16-406
16-410
16-411
16-508
16-510
16-519
16-522
16-703
16-704
16-705
16-423
40
Need help? Call 1-800-989-4706
Page 41

15-192 4.fm Page 41 Monday, July 19, 1999 12:50 P M
Manufacturer Code(s)
VCRs (Continued)
Runco 117
Samsu ng 018, 026, 0 28, 046,
066, 125
Sankyo 014, 117
Sansui 023, 105, 124, 13 6
Sanyo 0 2 4, 026, 036
Scott 025, 028, 038 , 04 5,
051, 07 8, 106, 129
Sears 024, 027, 036 , 06 1,
062, 06 3, 064 , 06 8,
069, 07 3, 120, 131
Sharp 014, 015, 030 , 04 2,
088
Shin tom 017, 069, 07 4, 111,
145
Shogun 026
Signat ur e 015
Singer 073, 074
Sony 017, 111, 112, 132,
141
STS 073, 120
Sylva nia 015, 035, 039 , 07 3,
075, 07 6, 078, 137
Sympho nic 015, 03 9
Ta ndy 0 1 5, 024
Tashiko 027
Tatung 124
TEAC 015, 03 9, 098, 124
Technics 073, 122
T ekn ika 015, 02 7, 0 39, 07 3,
113, 142
T osh iba 028, 062, 064 , 068,
078, 10 6, 129
Totevi si on 02 6, 02 7
TMK 02 6, 037, 060
Unitech 026
Vector Research 02 2, 02 3, 02 8, 029
Victor 023
Vid eo Concepts 022, 023, 028 , 02 9,
042
RadioShack
Cat. No.
Need help? Call 1-800-989-4706
41
Page 42

15-192 4.fm Page 42 Monday, July 19, 1999 12:50 P M
Manufacturer Code(s)
VCRs (Continued)
Videosonic 026
XR-100 0 073, 039, 074
Yam aha 022, 023 , 024, 031 ,
124
Zenit h 017, 111, 1 17, 132,
141
RadioShack
Cat. No.
42
Need help? Call 1-800-989-4706
Page 43

15-192 4.fm Page 43 Monday, July 19, 1999 12:50 P M
CARE AND MAINTENANCE
Your RadioShack 7-in-1 Remote Control is an example of superior design and craftsmanship. The
following s uggestions w ill help you care for y our
7-in-1 so you can enjoy it for years.
Keep the 7-in-1 dry. If it gets wet,
wipe it dry imme diately. Liqu ids can
contain minerals that corrode electronic circuits.
Handle the 7-in-1 gently and carefully. Dropping it can damage circuit
boards and cases and can cau se it
to work improperly.
Use and store the 7-i n-1 only in normal temperature environments.
Temperature extremes c an shorten
the life of electronic devices, damage batteries, and distort or melt
plastic parts.
Keep the 7-in-1 away fr om dust and
dirt, which can cause premature
wear of parts.
Wipe the 7-in-1 with a damp cloth
occasionally to keep it looking new.
Do not use harsh chemicals, cleaning solvents, or strong detergents to
clean it.
Modifying or tampering with the 7-in-1’s internal
components can cause a malfunction and invalidate its warranty. If your 7-in-1 is not performing
as it should, take it to your local RadioShack store
for assistance.
Need help? Call 1-800-989-4706
43
Page 44

15-192 4.fm Page 44 Monday, July 19, 1999 12:50 P M
SPECIFICATIONS
Power ....................................... 4 AAA Batteries
Control Range:
IR .................................... 20 Feet (6 .096 M)
RF ..................................100 Feet (30.48 M)
Dimensions (HWD) . ..... 8
Weight (Without Batteries) .......... 5.1 oz. (144 g)
Specifications are typical; individual units might
vary. Specifications are subject to change and improvement without notice.
1
/
¥ 27/
2
¥ 11/16 Inches
16
(21.6 ¥ 6.26 ¥ 2.65 cm)
44
Need help? Call 1-800-989-4706
Page 45

15-192 4.fm Page 45 Monday, July 19, 1999 12:50 P M
NOTES
Need help? Call 1-800-989-4706
45
Page 46

15-192 4.fm Page 46 Monday, July 19, 1999 12:50 P M
46
Need help? Call 1-800-989-4706
Page 47

15-192 4.fm Page 47 Monday, July 19, 1999 12:50 P M
Need help? Call 1-800-989-4706
47
Page 48

g
y
g
y
g
g
y
y
g
g
y
y
y
g
g
y
y
g
g
g
y
g
g
j
y g
g
15-192 4.fm Page 48 Monday, July 19, 1999 12:50 P M
Limited Ninety-Day W arranty
This product is warranted by RadioShack against manufacturin
defects in ma terial and w orkmanship under nor mal use fo r ninet
(90) days from the date of pu rchase from Radio Shack companyowned stores and authorized RadioS hack franchisees and dealers. EX CEPT AS P ROVIDED HERE IN, Radi oShac k MAKES NO
EXPRESS WARRANTIES AND ANY IMPLIED WARRANTIES, INCLUDING THOSE OF MERCHANTABILITY AND FITNESS FOR
A PARTICULAR PURPOSE, ARE LIMITED IN DURATION TO
THE DURATION OF THE WRITTEN LIMITED WARRANTIES
CONTAINED HEREIN. EXCEPT AS PROVIDED HEREIN, RadioShack SHALL HAVE NO LIA BILITY OR R ESP ONSIBIL ITY T O
CUSTOMER OR ANY OTHER PERSON OR ENTITY WITH RESPECT TO A NY LIABILITY, LOSS OR DAMAGE CAUS ED DIRECTLY OR INDIRECTLY BY USE OR PERFORMANCE OF THE
PRODUCT OR ARISING OUT OF ANY BREACH OF THIS WARRANTY, INCLUDING, BUT NOT LIMITED TO, ANY DAMAGES
RESULTING FROM INCONVENIENCE, LOSS OF TIME, DATA,
PROPERTY, REVENUE, OR PROFIT OR ANY INDIRECT, SPECIAL, INCIDENTAL, OR CONSEQUENTIAL DAMAGES, EVEN IF
RadioShack HAS BEEN ADVISED OF THE POSSIBILITY OF
SUCH DAMAGES.
Some states do not allow the limitation s on how lon
warrant
lasts or the exclusion of incidental or conseq uential dam -
a
es, so the above limitations or exclusions may not apply to you.
In the event of a product defect durin
the product and the RadioShack sales receipt as proof of purchase
date to an
less otherwise provided b
repair without ch ar
with one of the same or sim il ar des i
price. All replaced parts and products, and products on which a refund is made, beco me the proper t
ditioned parts and prod ucts ma
warrant
warranted for th e remainder of t he ori
will be char
the expiration of the warrant
This warrant
attributable to acts of God, abuse , accident, misus e, improper o r
abnormal usa
or maintenance, alteration, li
volta
RadioShack Author i zed Serv ice F ac ilit
fuses or batteries; (d) cosmetic dama
pin
tion, set-up service ad
This warrant
have other ri
RadioShack Customer Relations, Dept. W, 100 Throckmorton St.,
RadioShack store. Rad ioShack will, at its opti on, un-
service. Repaired or replaced parts and products are
ed for repair or replacement of the product made after
does not cover: (a) damage or failure caused by or
e, failure to follow instruct ions, improper instal lation
e or current; (b) any repairs other than those pr ovided by a
or insurance costs; or (f) costs of product removal, installa-
ives you specific legal rights, and you may also
hts which vary from state to state.
Suite 600, Fort Worth, TX 76102
law: (a) correct the defe ct by product
e for parts and labo r; (b) replace the pr oduct
period.
ustment or reinstallation.
the warranty period, take
n; or (c) refund the purchase
of RadioShack . New or recon -
be used in the performance of
inal warranty period. You
htning or other inciden ce of excess
; (c) consumables such as
e; (e) transportation, ship-
We Service What We Sell
an implied
3/97
RadioShack
A Division of Tandy Corporation
Fort Worth, Texas 76102
4A8 Printed in Hong Kong
 Loading...