

Page 1

65-790.fm Page 1 Monday, November 29, 1999 3:59 PM
Cat. No. 65-790
OWNER’S MANUAL
Please read before using this equipment.
256K Desktop Electronic Organizer
with Caller/Call Waiting ID
Page 2

65-790.fm Page 2 Monday, November 29, 1999 3:59 PM
FEATURES
Your RadioShack 256K Desktop Electronic Organizer wit h Caller/Call Waiting
ID stores the names and phone numbers of your personal and bus in es s contacts, as well as informat ion about your
daily schedule — all in one compact and
easy-to-use package.
The Caller ID function disp lay s a c al ler’ s
telephone number ( and a name, if a vailable in your area), th e date and time of
the call, the number of times a caller
called, and other cal l i nfo rm ation as provided by your l ocal telephone company
to Caller ID service subscribers. (See
Important Information
“
” on Page 3.)
Your organizer has these features:
256K Memory
— lets you store thou-
sands of records.
Caller ID Memory
— stores and dis-
plays up to 320 incoming call records.
VIP Memory
— stores and displays up
to 80 VIP call records.
Automatic Dialer
— lets you dial a telephone number stored in the telephone
records or the Caller ID memory with the
press of a button.
Schedule Alarms
— lets you store the
date, time, and detail s of im por tan t bus iness meetings and even ts , and s et a reminder alarm.
Daily Alarm
— lets you set an alarm to
sound daily.
Password
— you can set a password of
up to 4 characters, which lets you stor e
confidential inf ormation and prevent unauthorized access to your records.
Calendar
— shows monthly calendars
from January 1901 to December 2099.
12-Digit Calculator
— performs stan-
dard arithmetic calculations.
Large, Liquid-Crystal Display
— gives
you clearly defined characters which
you can easily view from different angles.
Adjustable Display Contrast
— lets
you adjust the display contrast for the
best viewing.
Illuminator Backlight
— lets you see
the display at night.
PC Link Interface
— lets you transfer
data from your o rganizer to a PC (personal computer) or from a PC to your organizer using an optional PC Link cable.
Note:
You need four AAA batter ies (not
supplied) to back up your organizer’s
memory.
1999 Tandy Corporation.
©
RadioShack is a registered trademark used by Tandy Corporation.
All Rights Reserved.
2
Page 3
65-790.fm Page 3 Monday, November 29, 1999 3:59 PM
Important Information
• To use this system’s Caller ID function, you must be in an area where
Caller ID service is available, and
you must subscribe to the service.
• Where Caller ID is offered, one or
more of the following options are
generally available:
– caller’s number only
– caller’s name only
– caller’s name and number
Your system displays the caller’s
name only if that option is available
in your area.
• The actual number of Caller ID
records your system will store
depends on the amount of Cal ler ID
information sent by the phone company.
• Tandy Corporation assumes no
responsibility fo r any loss or claims
that might arise through us e of this
organizer or for damages incurred
as a result of information loss due to
malfunctions, repairs, battery replacement, or misuse. You should
maintain physical records of important information to protect against
such loss.
This device h as been tested and found
to comply with all applicable UL and
FCC standard s.
WARNING
hazard, do not expose this product to rain or
moisture.
CAUTION
ELECTRIC SHOCK, DO NOT REMOVE
COVER OR BACK. NO USER-SERVICEABLE PARTS INSIDE. REFER SERVICING
TO QUALIFIED PERSONNEL.
!
:
To reduce the risk of fire or shock
CAUTION
RISK OF ELECTRIC SHOCK.
DO NOT OPEN.
: TO REDUCE THE RISK OF
This symbol is intended to alert
you to the presence of uninsulated dangerous voltage within
the product’s enclosure that might
be of sufficient magnitude to constitute a risk of electric shock. Do
not open the product’s case.
This symbol is intended to inform
you that important operating and
maintenance instructions are
included in the literature accompanying this product.
!
We have designed your organizer to
conform to federal regu lations, and you
can connect it to most teleph one lines.
However, each organi zer (and each device, such as a tel ephone or answering
machine) that you connect to the telephone line draws power from the telephone line. We r efer to this po wer draw
as the device’s r inger equival ence number, or REN. The REN is on the bottom
of your organizer.
3
Page 4

65-790.fm Page 4 Monday, November 29, 1999 3:59 PM
If you use more th an one telephone or
other device on the li ne, add up all the
RENs. If the total is more than five (or
three in rural areas), your telephones
might not ring. If ringer ope ration is impaired, remove a device from the line.
Your organizer comp lies with Part 68 of
FCC Rules
. You must, upon request,
provide the FCC registration number
and the REN to your teleph one company. Both numbers are on the bottom of
your organizer.
Note:
You must not co nnect your orga-
nizer to:
• coin-op erated system s
• party-line systems
• most electronic key telephone systems
4
Page 5

65-790.fm Page 5 Monday, November 29, 1999 3:59 PM
CONTENTS
Preparation .......................... ............................................. ....................................... 7
Installing Batteries .......................................... ............................................. ....... 7
Connecting the AC Adapter ................................................................................ 7
Initializing the Organizer .............. ............................................. .......................... 8
Connecting the Organizer to the Phone Line ..................................................... 8
Basic Operation ...................................................................................................... 9
Using the Cursor/Arrow Keys ............................................................................. 9
Using the Backlight ............................................................................................. 9
Adjusting the Display Contrast ........................................................................... 9
Setting the Date and Time .................................................................................. 9
Viewing a World Time ...................................................................................... 11
Turning the Key Tone On and Off ..................................................................... 11
Using the Timer ................................................................................................ 11
Using the Monthly Calendar ............................................................................. 12
Selecting a Date to Enter a Schedule Alarm Record ................................. 12
Caller ID ................................................................................................................. 13
Receiving Call Waiting Calls ............................................................................ 13
Setting the Area Code ...................................................................................... 13
Reviewing Call Records ................................................................................... 13
Dialing from a Call Record ............................................................................... 14
Displayed Call Information ................................................................................ 14
Deleting Call Records ....................................................................................... 15
VIP Call List ...................................................................................................... 15
Phone Directory .................................................................................................... 16
Entering a Phone Directory Record ................................................................. 16
Recalling a Phone Directory Record ................................................................ 17
Editing a Phone Directory Record .................................................................... 17
Deleting a Phone Directory Record .................................................................. 17
Auto Dialing ...................................................................................................... 18
Redialing .......................................................................................................... 18
Daily Alarm ............................................................................................................ 19
Setting the Daily Alarm ..................................................................................... 19
Turning the Daily Alarm On and Off ................................................................. 19
Schedule Alarms ................................................................................................... 20
Entering a Schedule Alarm Record .................................................................. 20
Recalling a Schedule Alarm Record ................................................................ 21
Editing a Schedule Alarm Record .................................................................... 21
Deleting a Schedule Alarm Record .................................................................. 21
5
Page 6

65-790.fm Page 6 Monday, November 29, 1999 3:59 PM
Secret Records .......... ............................................. ....... ........................................ 22
Entering a Secret Record ................................................................................. 22
Recalling a Secret Record ................................................................................ 22
Changing the Password .................................................................................... 22
Calculator .............................................................................................................. 23
Percentage Calculations ................................................................................... 23
Square Calculations ......................................................................................... 23
Memory Calculation s ......................................... ....... ...... ....... ...... ....... ...... ...... .. 23
PC Link ....................... ....... ............................................. ...... ....... ........................... 24
Installing The Supplied Software ...................................................................... 24
Transferring Records ........................................................................................ 24
Care and Maintenance .......................................................................................... 25
The FCC Wants You To Know .......................................................................... 26
Lightning ...................... ................................................................ ..................... 26
Specifications ......................... .......................... .......................... ......................... .. 27
6
Page 7
65-790.fm Page 7 Monday, November 29, 1999 3:59 PM
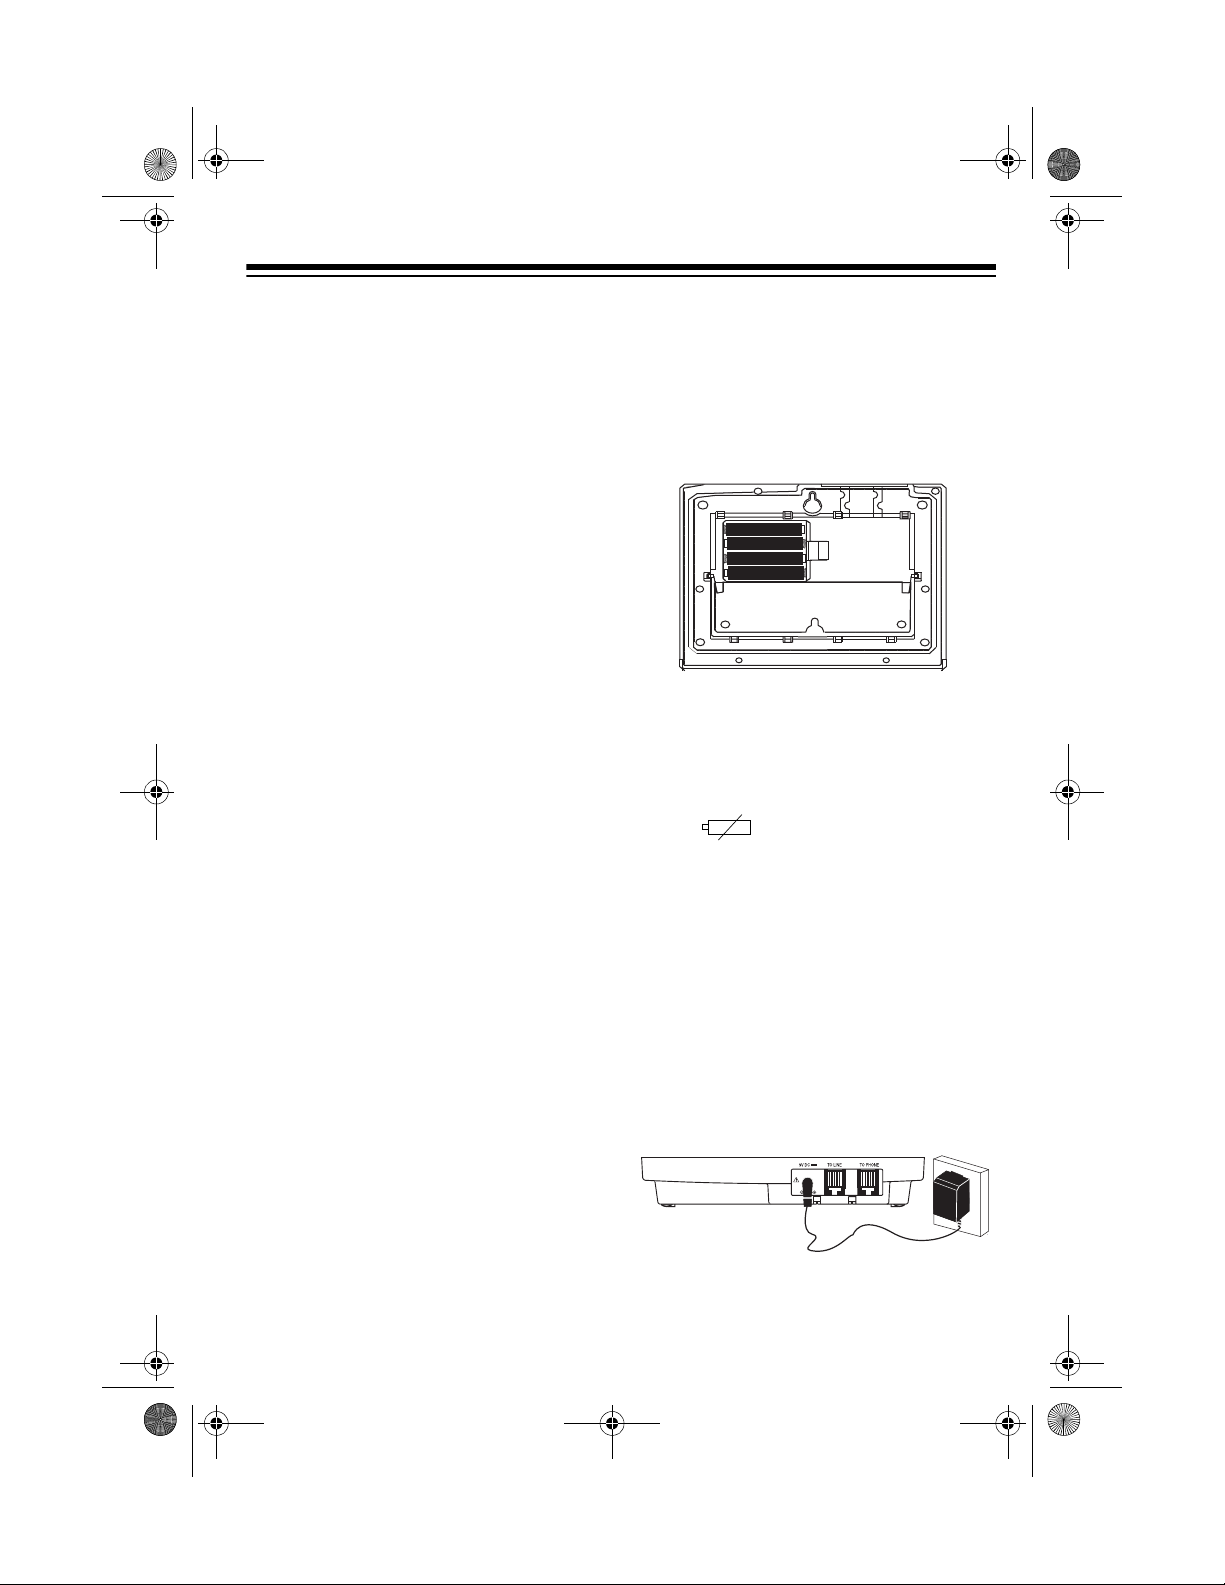
PREPARATION
INSTALLING BATTERIES
You need four AAA batteries (not supplied) to protect the o rganizer’s mem ory
during a power failure. For the longest
operation and best performance, we
recommend you use RadioShack alkaline batteries.
Cautions:
• Always use fresh batteries of the
required size and recommended
type.
• Do not mix old and new batteries,
different types of batteries (standard, alkaline, or rechargeable), or
rechargeable batteries of different
capacities.
• Always remove old or weak batter-
ies. Batteries can leak chemicals
that can damage your system.
• If you are
make sure the supplied AC adapter
is securely connec ted to an AC outlet and to your organizer. Otherwise,
you might lose stored information.
replacing
the batteries,
3. Use a curved object such as a paper
clip to pry off the battery compartment cover.
4. Insert the batteries in the compartment as indicated by the polarity
symbols (+ and –) marked inside.
5. Close the cover and secure it with
the screw. If you are replacing the
batteries, reconnect the phone line
and the phone.
When appears, replace the batteries.
CONNECTING THE AC
ADAPTER
Warning:
promptly and properly. Do not bury or
burn them.
Follow these steps to install the batteries.
1. If you are
2. Use a Phillips screwdriver to remove
Dispose of dead batteries
replacing
unplug both modular tel ephone line
cords from the back of the system.
the screw in the battery compartment cover.
the batteries,
You must connect the supplied AC
adapter to the organizer to power it.
Plug the AC adapter’s barrel plug into
9V DC
the
nizer, then plug the AC adapter into a
standard AC outlet.
jack on the back of the orga-
7
Page 8
65-790.fm Page 8 Monday, November 29, 1999 3:59 PM
Caution:
2 power source that supplies 9
!
volts DC and delivers at least
500 mA. Its center tip must be
set to positive and its plug must fit the
organizer's 9V
adapter meets these s pecifications. Using an adapter that does not m eet thes e
specifications could damage the organizer or the adapter.
You must use a Class
DC
jack. The supplied
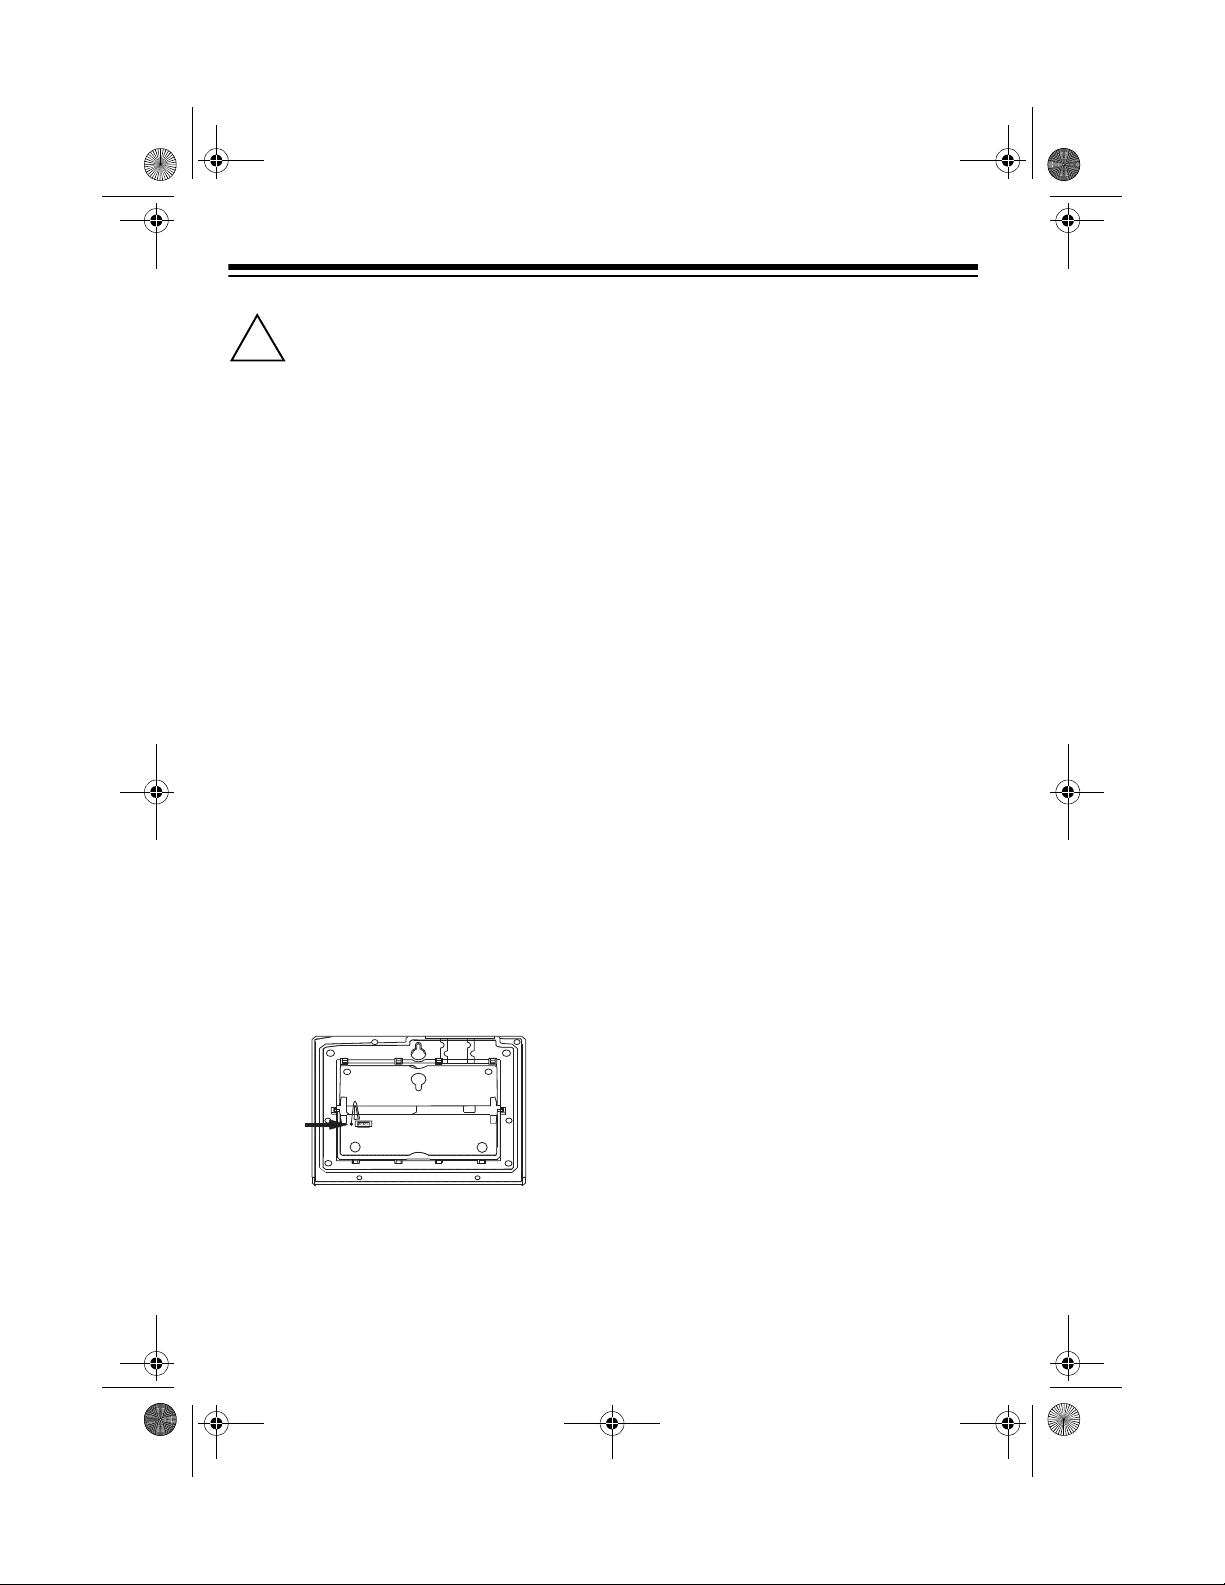
INITIALIZING THE
ORGANIZER
Initialize your organizer before you use it
the first time after connecting it to AC
power, or when you want to delete all
stored records, alarms, and the password.
Important:
stored information!
1. Use a pointed object such as a
straightened paper clip to press
RESET
nizer.
appears.
This procedure deletes all
on the bottom of your or ga-
CLEAR ALL DATA? (Y/N)
CONNECTING THE
ORGANIZER TO THE
PHONE LINE
The organizer c onnects to any modular
phone line jack an d your phone. If your
telephone or line does not have modular
jacks, you can purchase the necessary
adapters at your local RadioShack
store. Or, you can have your local telephone company update your wiring.
Notes:
• The USOC number of th e jack to be
installed is RJ11C (or RJ11W for a
wall plate jack).
• Your organizer dial s using standard
touch tones. If you do no t subscribe
to touch-tone service, you must
order this service from your local
telephone company.
Follow these steps to conne ct the organizer to the phone line.
1. Disconnect the modular phone line
cord (running from the wall jack)
from your telephone and plug it int o
the organizer’s
TO LINE
jack.
2. To delete all stored records , alarms,
and the password, press
N
press
8
to cancel.
Y
. Or,
2. Plug one end of the s upplied modular telephone cord into the organizer’s
3. Plug the other end of th e cord into
the phone’s jack.
TO PHONE
jack.
Page 9
65-790.fm Page 9 Monday, November 29, 1999 3:59 PM
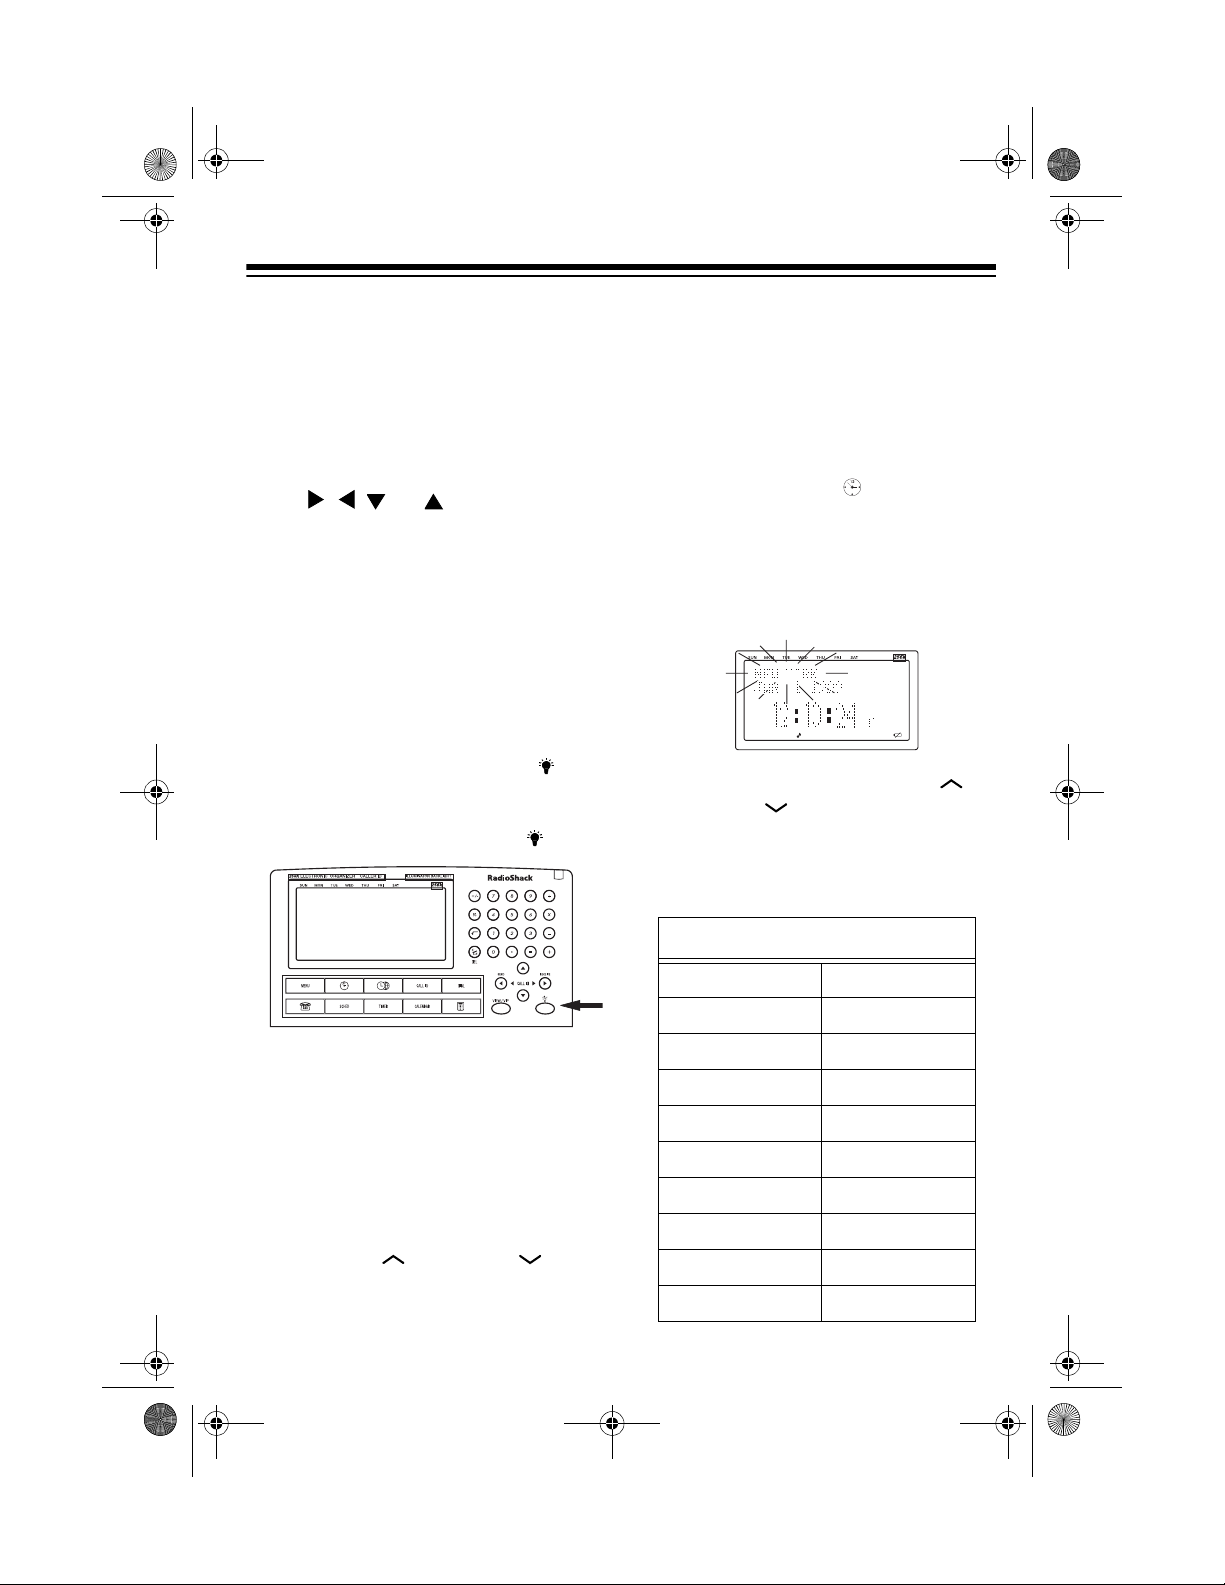
BASIC OPERATION
USING THE CURSOR/
ARROW KEYS
The flashing _ on the screen is called a
cursor. The cursor shows where the
next character typed will appear.
Press
, , ,
or to move the cursor. Hold down an arrow key to rapidly
move the cursor.
When no cursor appears on the displa y,
use the arrow keys to move throug h the
stored records.
USING THE BACKLIGHT
To turn on the back light, press . The
backlight turns off automatically after
about 20 seconds if y ou do not press a
key. To turn it off sooner, press again.
SETTING THE DATE AND
TIME
When you set the time and date for your
home time zone, all other world times
are set automatically.
1. Press
2. Press
3. Repeatedly press
MENU
then . The currently
set home city and the current
month, day, year, day of the week,
and time (if set) appear.
EDIT
. The name of the home
city fla shes.
SEARCH
SEARCH
until your city’s name
or
appears. If your city is not listed,
select a city in the same time zone
as yours.
ADJUSTING THE DISPLAY
CONTRAST
To adjust the organizer’s display contrast, press
appears. Then repeate dly press or hold
SEARCH
down
MENU
. The function menu
SEARCH
or
.
City Names
NEW YORK BERLIN
NOUMEA CAIRO
PARIS CARACAS
RIO DE JANEIRO CHICAGO
RIYADH DELHI
ROME DENVER
SINGAPORE DHAKA
SYDNEY DUBAI
TEHRAN HELSINKI
TOKYO HONG KONG
9
Page 10

65-790.fm Page 10 Monday, November 29, 1999 3:59 PM
City Names
TORONTO HONOLULU
WELLINGTON KABUL
YANGON KARACHI
ADELAIDE LONDON
ANCHORAGE LOS ANGELES
BANGKOK MOSCOW
Or, to quickly select a city you want,
press the first letter o f the city then
repeatedly press
SEARCH
SEARCH
or
(if necessary) until
your city’s name appears.
4. Press
ENTER
. The currently set
month flashes.
5. Repeatedly press
SEARCH
appears, then press
SEARCH
or
until the current mo nth
ENTER
. The
currently set day flashes.
6. Use the number keys to enter the
day, then press
ENTER
. The cur-
rently set year flashes.
7. Repeat Step 6 to enter the year,
hour, and minute, pressing
ENTER
after you enter each one.
8. Repeatedly press
DST (C)
Daylight Saving Time on or off.
to turn
DST
appears when Da yl ig ht Sa vi ng Time
is on.
9. Repeatedly press
12/24 (Z)
to set the
clock to the 12- or 24-hour format.
appears when the cloc k is s et to 12hour format and disappears when
the clock is set to 24-hour format.
10. In the 12-hour format, press
(X)
to choose AM or PM.
11. Press
SHIFT
then
SAVE
AM/PM
to store the
setting.
Note:
If the information yo u enter is in-
valid (for example, if you enter 39 for the
*
day),
appears for ea ch incorrect digit
instead of the numb er you entered. Reenter the correct digits, then press
TER
.
EN-
To view your home time, press . The
date and time in your home city appears.
A
10
Page 11

65-790.fm Page 11 Monday, November 29, 1999 3:59 PM
VIEWING A WORLD TIME
Once you set your hom e time, you can
select a world cit y and view the time in
that city.
Follow these steps to sele ct a world city
and view the time in that city and other
world cities.
1. Press
currently selected world city appears.
2. Press
world city flashes.
3. Repeatedly press
SEARCH
desired world city. If the desired
world city is not listed , select a city
in the same time zone.
4. Press
world time you selected .
To view the time in the world city you selected, press . The date and time in
the world city you selected appears.
.
The date and time in the
EDIT
. The currently selected
SEARCH
to view the time in the
SHIFT
then
SAVE
to store the
or
TURNING THE KEY TONE
ON AND OFF
To set your organizer to sound a tone
each time you press a key, press
then /
(K)
. A beep sounds and ap-
pears when the key tone is on.
To turn off the key tone, press then
(K)
/
again. The organizer beeps and
disappears.
USING THE TIMER
Your organizer’s timer can count up or
down for up to 99 hours, 59 minutes,
and 59 seconds. The ti mer has two display lines; one shows total time and the
other shows elapsed time.
To turn Daylight Saving Time on or off
for the displayed city, repeatedly press
DST (C)
.
Notes:
• Pressing
DST (C)
turns Daylight
Saving Time on or off only for the
displayed city.
• Not all cities use Daylight Saving
Time.
Follow these steps to use the timer.
1. Press
TIMER
TIMER OFF
.
appears.
2. If you are using the timer to count
down, press
EDIT
. The hour digit
flashes.
3. To set the timer to count up, press
ENTER
. The timer counts up. Skip to
Step 6.
Or, to set the timer to count down,
use the number keys to enter the
hour you want the timer to count
down, then press to move the
cursor to the next entry.
11
Page 12

65-790.fm Page 12 Monday, November 29, 1999 3:59 PM
4. Repeat Step 3 to enter the minute
and seconds you want the timer to
count down.
Note:
If you make a mistake while
entering hours, minutes, or seconds, repeatedly press or
move the cursor to the time you
want to change, then enter the correct time.
5. Press
ENTER
. The timer counts
down.
6. To temporarily stop the timer, press
ENTER
again. To continue the
count, press
ENTER
again. To res et
the count shown o n t he TOTA L li ne,
DELETE
press
. To reset the count
shown on the TIMER line, press
DEL
.
7. To add the elapsed time to the total
time, make sure the timer is tempo rarily stopped by pressing
then press
To stop the count, press
=
.
ENTER
set the timer to 00:00 :00, press
set another time, press
EDIT
ENTER
. To re-
DEL
.
to
. To
USING THE MONTHLY
CALENDAR
Your organizer’s calendar can display
any month from January 1901 to December 2099.
CALENDAR
Press
mode. The calendar for the current
month appears with the current date
flashing. If you set a sch edule alarm for
a displayed date, the organizer marks
that date.
• To scroll through the mon th one day
at a time, repeatedly press or
Hold down or to quickly
advance through the days.
• To scroll through the month one
week at a time, repeatedly press
.
or
Hold down or to rapidly
,
advance through the weeks.
• To scroll through the months one
month at a time, repeatedly press
SEARCH
SEARCH
down
to rapidly advance through the
months.
to enter the calendar
SEARCH
or
SEARCH
or
.
. Hold
12
Selecting a Date to Enter a
Schedule Alarm Record
To enter a schedule alar m record on a
specific date, repea tedly press or
to select the date then press
Then follow the steps under “Entering a
Schedule Alarm Record” on Pag e 20 to
enter the schedule alarm.
ENTER
.
Page 13

65-790.fm Page 13 Monday, November 29, 1999 3:59 PM
CALLER ID
Caller ID is a service provided by your
telephone company. When you subscribe to this service, the telephone
company sends the caller’s telephone
number (and name, if availa ble) and the
call’s date and time between the first
and second rings. The organizer receives and displays this information for
each call and updates the display with
the current date and time. When a call is
received, the date and time of the call
and the caller’s name and number appear. Your system sa ves up to 320 call
records, then replaces the oldest call
record with each new one.
During an incoming call,
and the total number of calls ,
the number of times the caller called,
and the date of the call (in month-date
format) appear.
Note:
If the last seven digits of an incoming call phone number match the
last seven digits of a phone nu mber in a
card file record , your organizer display s
the name as it a ppears in that card file
record.
NEW CALL
REPT
and
Note:
To use this system’s Caller ID
Call Waiting function, y ou must be in an
area where Caller ID and Call Waiting
service is availabl e, and you must subscribe to the service.
SETTING THE AREA
CODE
To dial a number from a Caller ID record
(see “Reviewing Call Records”), you
must store your local area code in the
organizer’s memory. Then, when you
dial from a Caller ID record, th e orga ni zer skips the area code if i t matches the
one you stored.
Follow these steps to store your area
code in the organizer’s memory.
1. Press
organizer displays the system settings menu.
2. Press
of the area code flashes.
3. Use the number keys to enter your
area code.
SHIFT
then
2 (AREA CODE)
FUNCTION
. The first digit
. The
RECEIVING CALL
WAITING CALLS
Your organizer beeps and displays information about a new call during a call.
The date and time of the new call and
the new caller’s name and number appear. To answer a new call during a call,
FLASH
press
minate the new call then return to the
original call, press
on your telephone. To t er-
FLASH
again.
4. Press
code.
SHIF T
then
ENTER
to store the
REVIEWING CALL
RECORDS
Each time you receive a call, the system
saves a call record in memory that you
can see while you are on the phone or
review later.
13
Page 14

65-790.fm Page 14 Monday, November 29, 1999 3:59 PM
Your organizer saves up to 320 call
records, then (for subsequent calls) it replaces the oldest call record with each
new one.
Each call record includes the time and
date of the call, the call number (order in
which the call is received), the caller’s
telephone number, and the caller’s
name (if available).
To recall a call record, press
then repeatedly press or
the records.
NO CALL
appears if there
CALL ID
to view
are no records stored in the directory.
Note:
A light blinks on the upper right
corner of the organizer when you store a
call.
DIALING FROM A
CALL RECORD
Follow these steps to dial a phone number stored in the call record memory.
1. Recall the call record containing the
number you want to dial.
DISPLAYED CALL
INFORMATION
The organizer can disp lay the following
information.
Display Description
NEW CALL
1 #
,
REPT #
OUT OF
AREA
LDC
OFF-HOOK
PLEASE
PRIVATE
ERROR
Shows the number of
stored incoming calls.
is the oldest call.
#01
Appears if you have received a call from the
same phone number
more than once.
The incoming call is from
an area that does not send
Caller ID information.
The incoming call is a
long-distance call.
The phone line is not
connected or the
phone’s handset was
not picked up.
The caller has blocked
the Caller ID information
from being sent.
Call informatio n was distorted before reaching
the system.
2. Lift the telephone’s handset (or
press the appropriate button on the
phone for hands-free operation) and
listen for a dial tone.
3. Press
DIAL
. The organizer dials the
displayed telephone number.
14
Page 15

65-790.fm Page 15 Monday, November 29, 1999 3:59 PM
DELETING CALL
RECORDS
Follow these steps to delete call
records.
1. Recall a call record you want to
delete.
2. Press
3. To delete the selected call record,
DELETE
appears.
Y
press
press
deletes the record or re cords. Otherwise, press
remain unchanged.
. Or, to delete
A
then Y. The organizer
DELETE?(A/Y/N)
.
all
call records,
N
. The record or records
VIP CALL LIST
Your system lets you save up to 80 call
records in its VIP c all li st so the y wi ll not
be deleted if the system’s memory is accidentally erased (for example, if the
backup battery goes dead). This lets you
save a list of important callers. When
you receive a call from a caller on the
VIP call list, the organizer sounds a
tone.
pears when you display a VIP call
record.
To store a call record in the VIP call list,
recall the call record you want to store
and press
ganizer moves the call record from the
caller ID list to the VIP call list, storing
the call record as a VIP call record.
Notes:
• Moving a call record deletes the
record from the caller ID list and
adds it to the VIP call list.
• If you try to store mor e than 80 call
records in the VIP call list,
FULL
SHIFT
appears.
then
VIEW/VIP.
The or-
LIST
To turn the VIP call list function on or off,
SHIF T
press
nizer displays t he sy stem se ttin gs menu .
Then repeatedly press
ON
OFF
or
To toggle between the v iewing of standard call records and VIP call records,
repeatedly press
.
then
FUNCTION
1
to set
VIEW/VIP
. The orga-
VIP:
to
VIP
.
ap-
15
Page 16

65-790.fm Page 16 Monday, November 29, 1999 3:59 PM
PHONE DIRECTORY
Your organizer has two phone directories. You can store a contact’s name,
three telephone numbe rs, an email address, and a note into each phone directory record. The record can be up to 116
characters and numbers, including
spaces.
ENTERING A PHONE
DIRECTORY RECORD
Notes:
• In some telephone systems, you
must dial an access code (9 for
example) and wait for a second dial
tone before you can dial an outside
number. If your phone is connected to
one of these systems, you might want
to enter a pause at the appropr iate
point. To enter a pause, press
• You might need to ent er a full telephone number (including any access codes, long distance codes,
and the area code) to use the organizer to auto-dial the number (see
“Auto Dialing” on Page 18).
1. Press .
directory number you s elected (
2
), a number and % (showing the
amount of free memory), and a
number and
number of phone directory records
entered) appear.
2. Repeatedly press to select the
directory you want (1 or 2).
TELEPHONE
ITEMS
(showing the
–
.
and the
1
or
• The organizer stores names
alphabetically, so you might want
to enter the last name first.
• To enter a space, press
• To select a symbol (@,
#, ~, -
SYM
symbol.
• If you make an incorrect entry,
use the arrow keys to move to the
character you want to change,
then type the correct character
over the old one.
• To enter a capital letter, press
CAPS
• To insert a space before a character, press
4. Press
Note:
is full. You can delete phone directory records to free memory (see
“Deleting a Ph one Direct ory Re cord ”
on Page 17).
5. Enter the contact’s telephone number then press
appears.
6. Repeat Step 5 to enter the contact’s
fax number, mobile phone number,
company name, address, note, and
email address.
7. Press
record.
appears and the record is stored.
, or ‘), repeatedly press
. Then press to select the
, then enter the letter.
INSERT.
ENTER
FULL
SHIFT
TEL#?
.
appears if the memory
ENTER
ENTER
then
SAVING ...
SPACE
/, &, \, :
appears.
FAX#?
.
to store the
briefly
.
,
3. Enter the contact’s name (up t o 11
characters).
16
Page 17

65-790.fm Page 17 Monday, November 29, 1999 3:59 PM
RECALLING A PHONE
DIRECTORY RECORD
The organizer stores phone directory
records in alphabeti cal order by contact
name. To recall a phone directory
record, repeatedly press to select
the directory yo u want, then repeatedly
SEARCH
press
view the records al phabetically by contact name.
are no records stored in the directory.
NOT FOUND
SEARCH
or
appears if there
to
EDIT
2. Press
appears on the first char acter of the
contact’s name.
3. Use the arrow keys to move the cursor to the character or digit you want
to change.
• To change a character, simply
type the correct character.
• To change a character to a space,
press
. A flashing cursor
SPACE
.
To quickly recall a phone directory
record, enter any word or number that
appears in the record, press
press
NOT FOUND
records containing the word or number
stored in the directory.
Your organizer can display up to four
telephone numbers a t one time. To see
all of a telephone record’s details, use
the arrow keys to position it at the top of
the display, then press
SEARCH
appears if there are no
or
SHIFT
SEARCH
VIEW/ VIP
, then
.
EDITING A PHONE
DIRECTORY RECORD
1. Recall the record you want to edit.
• To add a character, press
so a space appears, then enter
the character.
• To delete a character, press
.
DELETE
4. When you finish editing, press
and
appears as the organizer saves the
changes you made to the record.
.
SAVE
WAIT...
.
DELETING A PHONE
DIRECTOR Y RECORD
1. Follow the procedure in “Recalling a
Phone Directory Record” to recall
the record you want to delete.
2. Press
appears.
3. If you are sure, press
directory record is deleted. Otherwise, press
unchanged.
DELETE
DELETE?(Y/N)
.
N
. The record remains
INSERT
SHIF T
briefly
Y
. The entire
17
Page 18

65-790.fm Page 18 Monday, November 29, 1999 3:59 PM
AUTO DIALING
If you have touch tone se rvice and you
have connected the organizer to your
phone line, the o rgani zer ca n als o dial a
phone number you entered in a phone
directory record.
Notes:
Follow these steps to a uto dial a phone
number stored in a directory record.
• See “Setting the Area Code” on
Page 1 3 for more information about
setting the organizer so it dials your
area code before dialing a number
stored in a call record.
• The organizer’s auto dial feature
only works with telepho ne numbers
you stored in the first two numbers
in a phone directory record (see
“Entering a Phone Directory
Record” on Page 16).
REDIALING
The organizer stores phone numbers
you dial into its memory, letting you
quickly recall and redial a phone number
without having to find a phone director y
record.
To redial a phone number, press
AL
, repeatedly press
SEARCH
to select the number you
want to dial, then press
SEARCH
DIAL
nizer dials the number.
REDI-
or
. The orga-
1. Recall the record containing the
number you want to dial.
2. Repeatedly press
SEARCH
SEARCH
to position the number
you want to dial at the top of the display.
3. Pick up your phone’s handset.
Dialing...
4. Press
DIAL
.
appears
and the organizer dials the number.
18
or
Page 19

65-790.fm Page 19 Monday, November 29, 1999 3:59 PM
DAILY ALARM
You can set an alarm to s ound at a set
time of day. When the daily alarm is on,
a tone sounds for 30 seconds at the set
time.
To silence the alarm, press any key. The
alarm sounds again the next day at the
set time, unless you turn it off.
Note:
Because pressing any key will
turn off the alarm, the alarm might not
sound if you are entering information at
the precise time the alarm sounds.
SETTING THE DAILY
ALARM
1. Press
MENU
, use
(the arrow keys) to highlight
press
ENTER
screen appears.
2. Press
EDIT
. The hour digit flashes.
, , ,
.
The Daily Alarm
and
,
then
TURNING THE DAILY
ALARM ON AND OFF
1. Press
2. Repeatedly pre ss
Note:
does not affect the schedule alarms (see
“Schedule Alarms” on Page 20).
MENU
, use the arrow keys to
highlight
,
then press
ENTER
.
The
Daily Alarm screen appears.
(J)
/
to turn
the alarm on or off. appe ars on
the bottom of the display when the
alarm is set to sound.
Turning the daily alarm on or off
3. Use the number keys to enter the
alarm hour, then press
ENTER
or
The minute flashes.
4. Use the number keys to enter the
alarm minute.
Note:
If you make a mista ke, press
or to move to the digit that you
want to change. Then type the correct digit.
5. In the 12-hour format, press
(X)
to select the correct AM or PM
AM/PM
hour.
6. Press
SHIFT
then
ENTER
to store the
alarm time. appears on the bot tom of the display an d the or gani zer
sets the alarm to sound.
.
19
Page 20

65-790.fm Page 20 Monday, November 29, 1999 3:59 PM
SCHEDULE ALARMS
Schedule alarms help you stay in control
of your busy sch edule by reminding you
of meetings and other im portant event s.
For each schedule alarm, y ou can e nter
an alarm message of up to 97 characters.
At the set alarm time, the alarm sound s
for 30 seconds and your stored message appears. If the organizer is off at
the alarm time, the organizer turns on,
sounds the alarm, and displays the
alarm message.
To silence the alarm, press any key.
Notes:
• Because pressing any key will turn
off the alarm, the alarm might not
sound if you are entering information at the precise time the alarm
sounds.
• If the alarm sounds and the alarm
message appears while you are
entering information, the information
you are entering might not be
stored.
ENTERING A SCHEDULE
ALARM RECORD
SCHEDULE
1. Press
SCHED
ber and
able memory), and a number and
ITEMS
stored items) appear.
.
% FREE
(showing the number of
(showing the avail-
, a num-
2. Press
month flashes.
3. Enter the schedule month then
press . The first digit of the day
flashes.
4. Repeat Step 3 to enter th e schedul e
day and year. The schedule start
time’s hour flashes.
5. Enter the schedule start hour then
press . The minute flashes.
6. Use the number keys to enter the
schedule start minute.
7. In the 12-hour format, press
(X)
hour. Then press to select the
schedule end time hour or to
select the schedule end time
minute. The schedule end time’s
hour or minute flashes.
Note:
want to change. The n type the correct digit.
8. Repeat Steps 5–7 to set the schedule end time. Then press
set the alarm time after inputting the
alarm time and repeatedly press
alarm on) or
the alarm off).
9. Press
10. Enter the alarm message.
• To enter a space, press
ENTER
to select the correct AM or PM
If you make a mistake, press
or to move to the digit that you
(J)
/
until ON appears (to turn the
ENTER
. The first digit of the
AM/PM
ENTER
OFF
appears (to turn
MESSAGE?
.
appears.
SPACE
to
.
20
• To select a symbol (@,
#, ~, -
SYM
Then press to sel ect the symbol.
, or ‘), repeatedly press
until the symbol appears.
/, &, \, :
,
Page 21

65-790.fm Page 21 Monday, November 29, 1999 3:59 PM
• If you make an incorrect entry,
use the arrow keys to move to the
character you want to change,
then type the correct character
over the incorrect one.
11. Press
nizer saves the message and displays it at the time you set.
SHIFT
then
SAVE
. The orga-
RECALLING A SCHEDULE
ALARM RECORD
1. Press
2. Press
3. To quickly recall a schedule alarm
SCHED
SEARCH
record or
previous record in chronological
order.
record, enter any word or number
that appears in the record, press
SHIFT
, then press
SEARCH
taining the word or number you
typed. The record appears. If no
record matches the search criteria
you typed,
.
to view the next
SEARCH
to view the record co n-
NOT FOUND
to view the
SEARCH
appears.
or
EDITING A SCHEDULE
ALARM RECORD
1. Recall the schedule alarm yo u want
to edit.
2. If there is more than one schedule
alarm record, the system automatically selects the first record on the
list. If necessary, use
move the record you want to the top
of the list.
and to
EDIT
3. Press
the first character of the month.
4. Use the arrow keys to move the cursor to the character you want to
change.
• To change a character, simply
type the correct character.
• To change a character to a space,
press
• To add a character, press
so a space appears, then enter
the character.
• To delete a character, press
DELETE
5. When you finish editing, press
then
appears while the organizer stores
the edited schedule alarm.
. The cursor appea rs on
SPACE
ENTER
.
.
SAVING...
.
INSERT
SHIF T
briefly
DELETING A SCHEDULE
ALARM RECORD
Follow these steps to delete a schedul e
alarm record after its date has passed
(to free up memory) or if you do not want
it to sound on the set date.
1. Recall the schedule a larm you wan t
to delete.
2. Press
appears.
3. If you are sure, press
schedule alarm record is deleted.
Otherwise, press
remains unchanged.
DELETE
DELETE? (Y/N)
.
Y
. The entire
N
. The record
21
Page 22

65-790.fm Page 22 Monday, November 29, 1999 3:59 PM
SECRET RECORDS
The organizer lets you block access to
your phone directory and schedule
alarm. Once you set a password of up to
4 characters, the phone directory and
schedule alarm reco rds are locked until
you enter the password.
Note:
the secret area. When you are in the secret area, disappears.
appears when you are not in
ENTERING A SECRET
RECORD
1. Press .
PASSWORD
word (0000 is the default ), and
PASSWORD
2. Enter a password of up to 4 characters, press
ENTER
. appears.
Notes:
• Your password can include any
combination of letters, numbers,
or symbols.
• Be sure you can remember your
password. If you forget it, you
must initialize the organ iz er whic h
clears all of your records (see “Initializing the Organizer” on
Page 8).
ORIGIN
and the current pass-
(original)
NEW
and a cursor appear.
SHIFT
, then press
re-enter the secret area, follow the steps
under “Recalling a Secret Record.”
Note:
Even if you selected a record before the organizer sets itself to Time
mode, you must follow the steps under
“Recalling a Secret Record” to select the
record.
RECALLING A SECRET
RECORD
1. Press or
phone directory or schedule alarm
record. If you previously set a password,
pears.
2. Enter the password then press
ENTER. The phone directory or
schedule alarm appears.
You edit secret records just like phone
directory or schedule alarm records.
PASSWORD REQUIRE
SCHED
. to view a
ap-
CHANGING THE
PASSWORD
1. Press .
PASSWORD
word (0000 is the de fault), and
PASSWORD
ORIGIN
and the current pass-
(original)
NEW
and a cursor appear.
3. Enter a record i n your phone directory or schedule alarm.
The organizer automatically sets itself to
Time mode if you do not pre ss a key fo r
about 3 minutes. After the organizer sets
itself to Time mode, it automatically exits
the secret area and appears. To
22
2. Enter a new passwor d, press
then press
To clear the secret password, repeat
Steps 1 and 2 above, entering
Step 2. The organizer unlocks the phone
directory and schedule alarm records
and disappears.
ENTER
.
SHIFT
0000
in
,
Page 23

65-790.fm Page 23 Monday, November 29, 1999 3:59 PM
CALCULATOR
To use the calculator, press .
Press the number keys in the orde r they
appear in the arithmetic operation. For
example:
You press: You see:
3 + 4 =
8 × 3 – 4 =
÷
6
2 =
To clear a calculation, press
7
20
3
C/CE
.
Notes:
• If the result of a calculation has
more than 12 digits, or if you try to
divide by 0,
clear the error, press
E
(error) appears. To
C/CE
.
• If you enter a wrong n umber, press
C/CE
and re-enter the correct num-
=
ber before you press
+
•Press
/–
to change the displayed
.
number’s sign from positive to negative or negative to positive.
SQUARE CALCULATIONS
To do square c alc ul ation s, f oll ow th is example (to calculate 4
You press: You see:
4 × =
2
):
16
MEMORY CALCULATIONS
The memory calcul ation f eature lets you
easily perform multi-step calculations.
Use the following k eys to per form memory calculations:
•Press
•Press
•Press
•Press
For example, to calcul ate (4 × 5) + (28 +
2) – (7 – 2) + (75 ÷ 5):
MC
to clear the memory.
M+
to total a calculation and
add the total to the value in memory.
M–
to total a calculation and
subtract the total from the value in
memory.
MR
to recall (display) the
value in memory.
PERCENTAGE
CALCULATIONS
To do percentage calculations, follow
this example (to calculat e 20 percent of
):
720
You press: You see:
720 × 20 %
144
You press:
× 5 =
4
28
7
75
Note:
in memory.
M+
+ 2 =
M+
– 2 =
M–
=
÷
5
M+
MR
M
appears when a value is sto red
M
disappears when you
clear the memory.
The display’s l ast line
shows:
M 20.
M 30.
M 5.
M 15.
M 60.
23
Page 24

65-790.fm Page 24 Monday, November 29, 1999 3:59 PM
PC LINK
You can transfer phone directory
records and schedu le reco rds to or from
your organizer to or from another RadioShack 256K Desktop Electronic Organizer or to a PC (pe rsonal computer)
using an optional PC Link cable and
software (available through your local
RadioShack store).
Cautions:
• Always turn off your computer
before connecting or disconnecting
the PC Link cable to or from the
organizer or computer.
• When disconnecting the cable from
your organizer or the computer, hold
and gently pull on the connector
plug. Do not pull the cable.
Insert the cable’s connector into
on the side of the organizer, then connect the other end of the cable to a PC
or the other organizer.
PC LINK
INSTALLING THE
SUPPLIED SOFTWARE
1. Close all programs in use, then
insert the diskette supplie d with the
optional PC Link cable into your
computer’s floppy disk drive.
2. From the Start Menu, select
tings
, then click on
3. Double click
grams
.
4. Click
5. Select
Install
tions that appear.
, then follow the instr uc-
Model J
Menu.
Control Panel
Add/Remove Pro-
on the PC Link
Set-
TRANSFERRING
RECORDS
Note:
In the following steps, we refe r to
the organizer or PC that contains records you want to transfer as the
“source,” and the organizer or PC where
you want to store transfer red record s as
the “target.”
1. Use the source organizer or PC to
select the phone directory or schedule records you want to tr ansfer.
2. Follow the directions in the PC
Link’s owner’s manual to spec if y th e
serial port used to connect the
source and target organizer and PC,
and to select the same functi on that
you selected on the source organizer and PC.
3. To transmit records to a personal
computer, press
nizer.
transmit all? Y/N ap-
pears.
4. To transmit all selected records,
press
Y. Otherwise, press N.
To transmit a single record to a PC,
open the record y ou want to transfer, send it to the top of the display,
then press
transmit? Y/N
transmit the re cord, press
wise, press
.
To receive record s from a PC, pre ss
RECEIVE
ceive?
the records, press
press
To cancel the transfer at any time, press
DELETE
nizer.
on the organizer.
Y/N
N
.
on the source or target orga-
SEND on the orga-
SEND
on the organizer.
N
.
appears. To receive
Y
appears. To
Y
. Other-
re-
. Otherwise,
24
Page 25

65-790.fm Page 25 Monday, November 29, 1999 3:59 PM
CARE AND MAINTENANCE
Your RadioShac k 256 K D es kto p E le ctron ic Or gan iz er with Caller/Call Waiti ng ID i s
an example of super ior design and craftsmanship. The fo llowing suggestions will
help you care for your organizer so you can enjoy it for years.
Keep the organize r dry. If it gets wet, wipe it dry immedia tely. Liquids
might contain minerals that can corrode the electronic circuits.
Use and store the org anizer only in norma l temperature environment s.
Temperature extrem es can shorten the l ife of electronic dev ices, damage batteries, and distort or melt plastic parts.
Keep the organizer away from dust and dirt, which can cause premature
wear of parts.
Handle the organize r gently and carefully. Dropping it can damage ci rcuit boards and cases and can cause the organizer to work improperly.
Use only fresh batteries of the required size and recommended type.
Batteries can leak chemicals that damage your organizer’s electronic
parts.
Wipe the organizer with a damp cloth occasionally to keep it looking
new. Do not use harsh chemicals, cleaning solvents, or strong detergents to clean the organizer.
Modifying or tampe ring wit h the organi zer’s internal c omponents can cause a malfunction and might in vali date its war ranty an d void y our FCC au thori zatio n to operate it. If your organizer is not performing as it should, take it to your local
RadioShack store for as sistance. If the tr ouble is affecting the telephone li nes, the
phone company can a sk you to di sconnect you r organizer until you have resolved
the problem.
25
Page 26

65-790.fm Page 26 Monday, November 29, 1999 3:59 PM
THE FCC WANTS YOU TO
KNOW
In the unlikely event that you r organizer
causes problems on the phone line, the
phone company can disconnect your
service. The phone company attempts
to notify you in advance. If advance no tice is not practical , the phone compan y
notifies you of your right to file a complaint with the FCC.
Also, the phone company can make
changes to its lin es, equipment, operations, or procedures that could affect the
operation of your organizer . The phone
company notifies you of these changes
in advance, so you can take steps to
prevent interruption of your phone service.
LIGHTNING
Your organizer has built-in protection
circuits to reduce the risk of damage
from surges in phone line or power li ne
current. These protection circuits meet
or exceed FCC requiremen ts. However,
lightning striking the phone line can
damage your organizer.
Lightning damage is not common. How ever, if you live in a n area that has severe electrical storms, we suggest you
unplug your organizer during storms to
reduce the possibility of damage.
26
Page 27

65-790.fm Page 27 Monday, November 29, 1999 3:59 PM
SPECIFICATIONS
Display ................................................................................ Liquid Crystal (Six Lines)
Calculations ............... Add, Subtract, Multiply, Divide, Square Root, and Percentage
Main Power Source .............. ............................................. ... 9V AC with AC Adapter
Backup Power Source ....................................................................... 4 AAA Batteries
Battery Life ......................................................................................... About 7 Months
Operating Temperature ............................................................................ 32 to 109°F
(0 to 43°C)
11
16
8
Dimensions (HWD) ............................................................... 6
×
/
57/
(170
Weight ......................................................................................................... 1 lb 7.5 oz
Specifications are typical; individual units might vary. Specificatio ns are subject to
change and improvement without notice.
16
×
25/
Inches
×
150 × 58 mm)
(665 g)
27
Page 28

65-790.fm Page 28 Monday, November 29, 1999 3:59 PM
Limited One-Year Warranty
This product is warranted by RadioShack a gainst manufactu ring defects in ma terial and workman ship under normal use for one (1) year from the date of purchase from RadioShack company-owned
stores and authorized RadioShack franchisees and dealers. EXCEPT AS PROVIDED HEREIN, RadioShack MAKES NO EXPRESS WARRANTIES AND ANY IMPLIED WARRANTIES, INCLUDING
THOSE OF MERCHANTABILITY AND FITNESS FOR A PARTICULAR PURPOSE, ARE LIMITED
IN DURATION TO THE DURATION OF THE WRITTEN LIMITED WARRANTIES CONTAINED
HEREIN. EXCEPT AS PROVIDED HEREIN, RadioShack SHALL HAVE NO LIABILITY OR RESPONSIBILITY TO CUSTOMER OR ANY OTHER PERSON OR ENTITY WITH RESPECT T O ANY
LIABILITY, LOSS OR DAMAGE CAUSED DIRECTLY OR INDIRECTLY BY USE OR PERFORMANCE OF THE PRODUCT OR ARISING OUT OF ANY BREACH OF THIS WARRANTY, INCLUDING, BUT NOT LIMITED TO, ANY DAMAGES RESULTING FROM INCONVENIENCE, LOSS
OF TIME, DATA, PROPERTY, REVENUE, OR PROFIT OR ANY INDIRECT, SPECIAL, INCIDENTAL, OR CONSEQUENTIAL DAMAGES, EVEN IF RadioShack HAS BEEN ADVISED OF THE
POSSIBILITY OF SUCH DAMAGES.
Some states do not allow the limitations on how long an implied warranty lasts or the exclusion of incidental or consequential damages, so the above limitations or exclusions may not apply to you.
In the event of a p roduct defect dur ing the warranty p eriod, take the pr oduct and the Ra dioShack
sales receipt as proof of purchase date to any RadioShack store. RadioShack will, at its option, unless otherwise pro vided by law: (a) correct th e d efec t by pro du c t r epa ir wi th out cha rg e fo r p art s an d
labor; (b) replac e the product with o ne of the same or sim ilar design; or (c) refund the purchase
price. All repla ced parts and pro ducts, and products on which a refun d is made , become the prop erty of RadioShac k. New or recon ditioned parts an d products may be used in th e performance of
warranty service. Repaired or r eplaced parts and products are w arranted for the remainder o f the
original warranty pe riod . You will be charged for repa ir or rep lacem en t of the product made after the
expiration of the warranty period.
This warranty does not cover: (a) damage or failure caused by or attributable to acts of God, abuse,
accident, misuse, im pro per o r abn or ma l us age , f ai lur e to foll ow i nst ruc ti ons , im pr ope r installation or
maintenance, alter ation, lightning or oth er incidence of exces s voltage or current; ( b) any repairs
other than those provide d by a RadioShack Authorized S ervice Facility; (c) consumab les such as
fuses or batteries; (d) co smetic da mage; ( e) tran sportat ion, shippi ng or in suranc e costs; or (f) costs
of product removal, installation, set-up service adjustment or reinstallation.
This warranty gives you specific legal rights, and you may also have other rights which vary from
state to state.
RadioShack Customer Relations, 200 Taylor Street, 6th Floor, Fort Worth, TX 76102
We Service What We Sell
04/99
RadioShack
A Division of Tandy Corporation
Fort Worth, Texas 76102
11A99 Printed in Hong Kong
 Loading...