

Page 1
60-2642
Bilingual Learning
Laptop
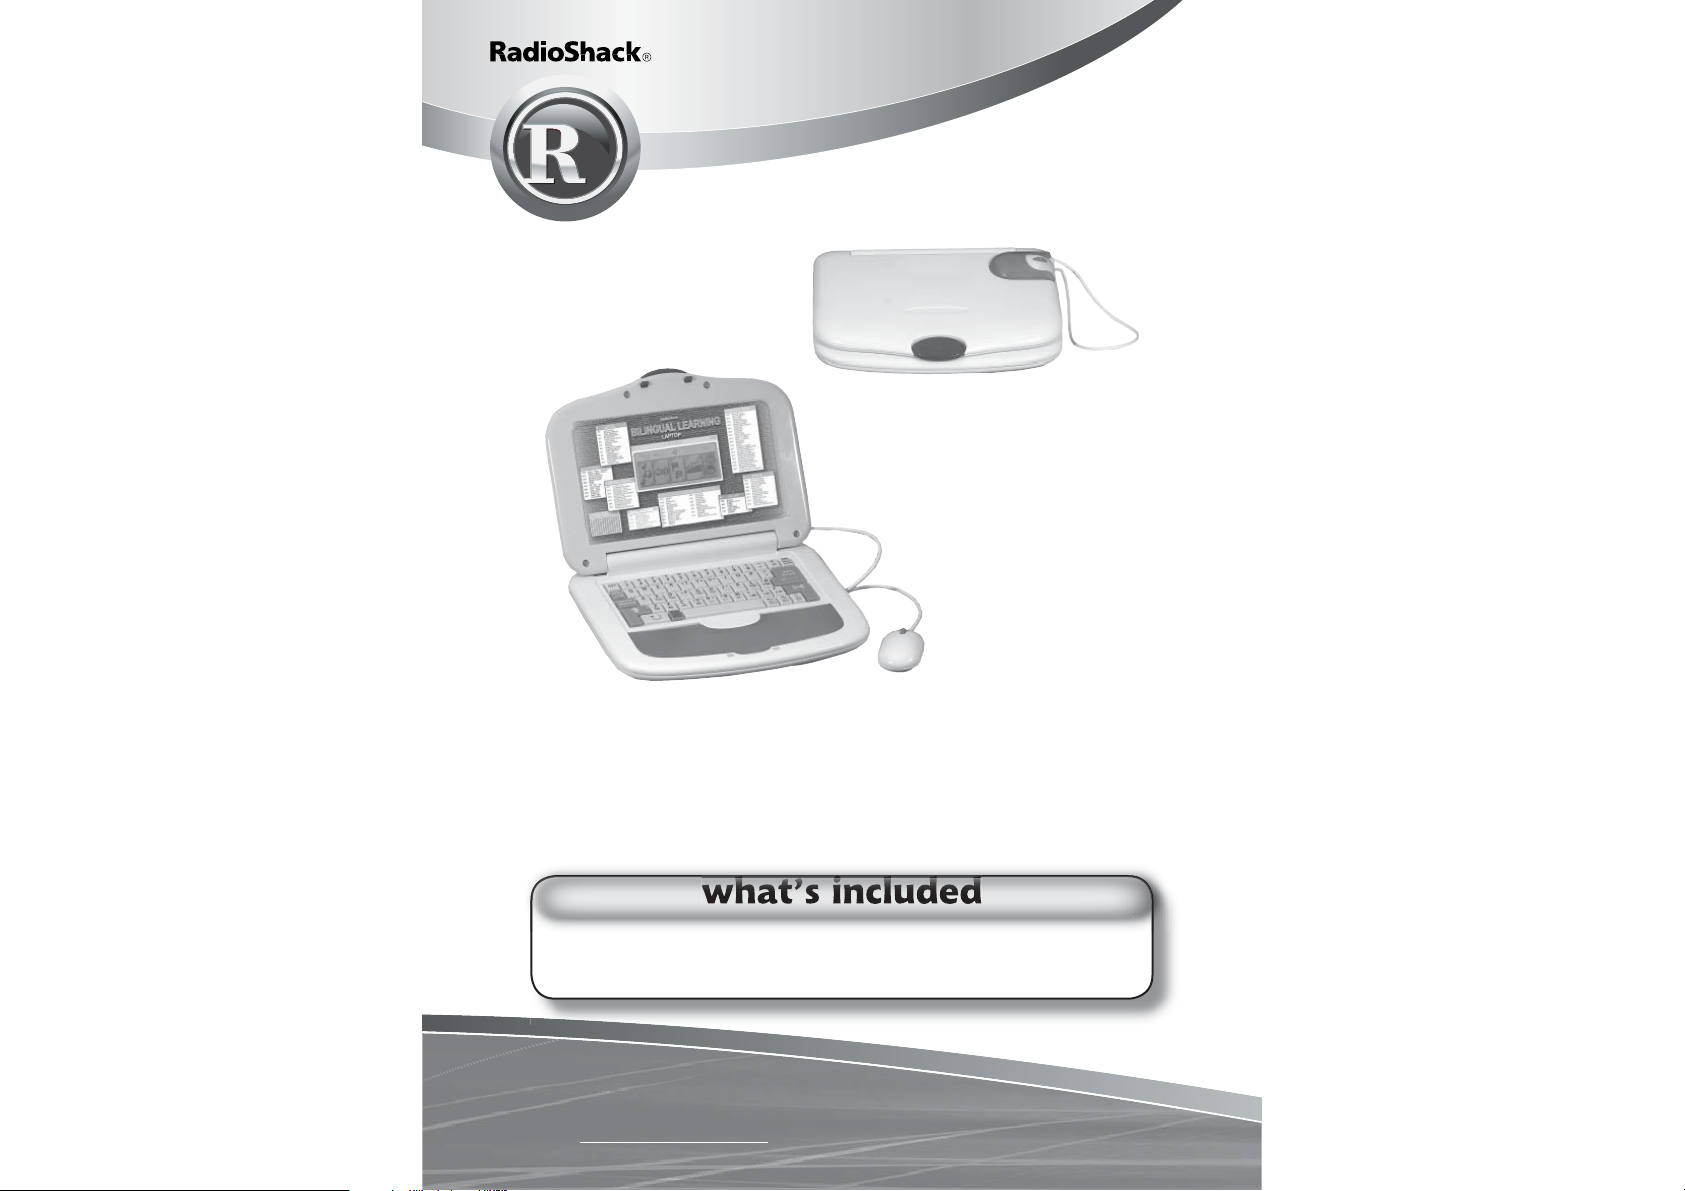
Thank you for purchasing your Bilingual Learning
Laptop from RadioShack, complete with keyboard
and mouse! Use it to play fun and educational games,
develop your computer and music skills, learn math,
spelling, and grammar, and test your memory.
NOTE: Actual product may vary from images found here.
Laptop User’s Guide
Shoulder Strap
Please read this user’s guide before installing,
setting up and using your new product
www.radioshack.com
Page 2

The Basics
The Basics
contents
about your learning laptop 6
setting up your learning laptop 6
installing batteries ................................................... 6
battery notes ............................................................ 6
setting up your learning laptop 7
using an ac/dc adapter ............................................ 7
caution ..................................................................... 7
using your learning laptop 8
turning the laptop on and off .................................. 8
select your settings ................................................. 8
using your learning laptop 10
select an activity ...................................................... 10
scoring ..................................................................... 10
using your learning laptop 11
activities ................................................................... 11
category 1: language 11
activity 1: learn words ............................................. 11
activity 2: learn adjectives ....................................... 11
activity 3: plural forms ............................................ 12
activity 4: learn verbs .............................................. 12
activity 5: present tense .......................................... 13
activity 6: present continuous ................................ 13
activity 7: word translator ....................................... 13
activity 8: comprehension ...................................... 14
activity 9: international trivia ................................... 14
activity 10: fi nal test ................................................ 14
category 2: vocabulary & grammar 15
activity 11: missing letter ........................................ 15
activity 12: extra letter ............................................. 15
activity 13: correct spelling ..................................... 15
activity 14: scrambled word ................................... 16
activity 15: anagram ................................................ 16
activity 16: antonyms .............................................. 16
activity 17: fl ash cards ............................................ 16
activity 18: defi ne the word .................................... 17
activity 19: synonyms ............................................. 17
activity 20: tenses .................................................... 17
activity 21: advanced missing letter ....................... 18
activity 22: sentence completion ............................ 18
activity 23: scrambled sentence ............................. 18
activity 24: sentence correction .............................. 18
activity 25: vocabulary builder ................................ 19
activity 26: word completion .................................. 19
activity 27: two-player fl ash cards .......................... 19
category 3: mathematics 20
activity 28: addition ................................................. 20
activity 29: subtraction ............................................ 20
activity 30: multiplication ........................................ 21
activity 31: division .................................................. 21
activity 32: completing the equation ...................... 21
activity 33: smaller/larger ........................................ 22
activity 34: number logic ........................................ 22
activity 35: algebra .................................................. 23
activity 36: geometry .............................................. 23
activity 37: fractions ................................................ 24
activity 38: percentages .......................................... 24
activity 39: ratios .................................................... 25
activity 40: word problem ....................................... 25
activity 41: formulas ................................................ 25
activity 42: maths in order ...................................... 25
category 4: trivia 26
activity 43: animal trivia .......................................... 26
activity 44: amusement trivia .................................. 26
2
3
Page 3

The Basics
The Basics
activity 45: geography trivia ................................... 26
activity 46: history trivia .......................................... 27
activity 47: science trivia ......................................... 27
activity 48: miscellaneous trivia .............................. 27
activity 49: symbols trivia ....................................... 28
category 5: games 28
activity 50: stone paper scissors ............................ 28
activity 51: tower of hanoi ...................................... 28
activity 52: matching shape .................................... 29
activity 53: snaps ..................................................... 29
activity 54: tic tac toe .............................................. 29
activity 55: ping pong .............................................. 30
activity 56: grand prix ............................................. 30
activity 57: hang man .............................................. 31
category 6: music & drawing 31
activity 58: music station ........................................ 31
activity 59: musical keyboard ................................. 31
activity 60: dance to music ..................................... 31
activity 61: drawing fun ........................................... 32
category 7: my notebook 33
activity 62: mailbox ................................................. 33
activity 63: email ..................................................... 33
activity 64: phone book ........................................... 34
activity 65: scheduler .............................................. 34
activity 66: sound databank .................................... 35
activity 67: picture databank ................................... 35
activity 68: maze game ........................................... 35
activity 69: typing skills ........................................... 36
activity 70: draw programming .............................. 36
activity 71: alarm clock ........................................... 37
activity 72: calculator .............................................. 37
activity 73: word processing ................................... 38
caring for your laptop 38
service and repair .................................................... 39
the fcc wants you to know 39
4
5
Page 4
The Basics
The Basics
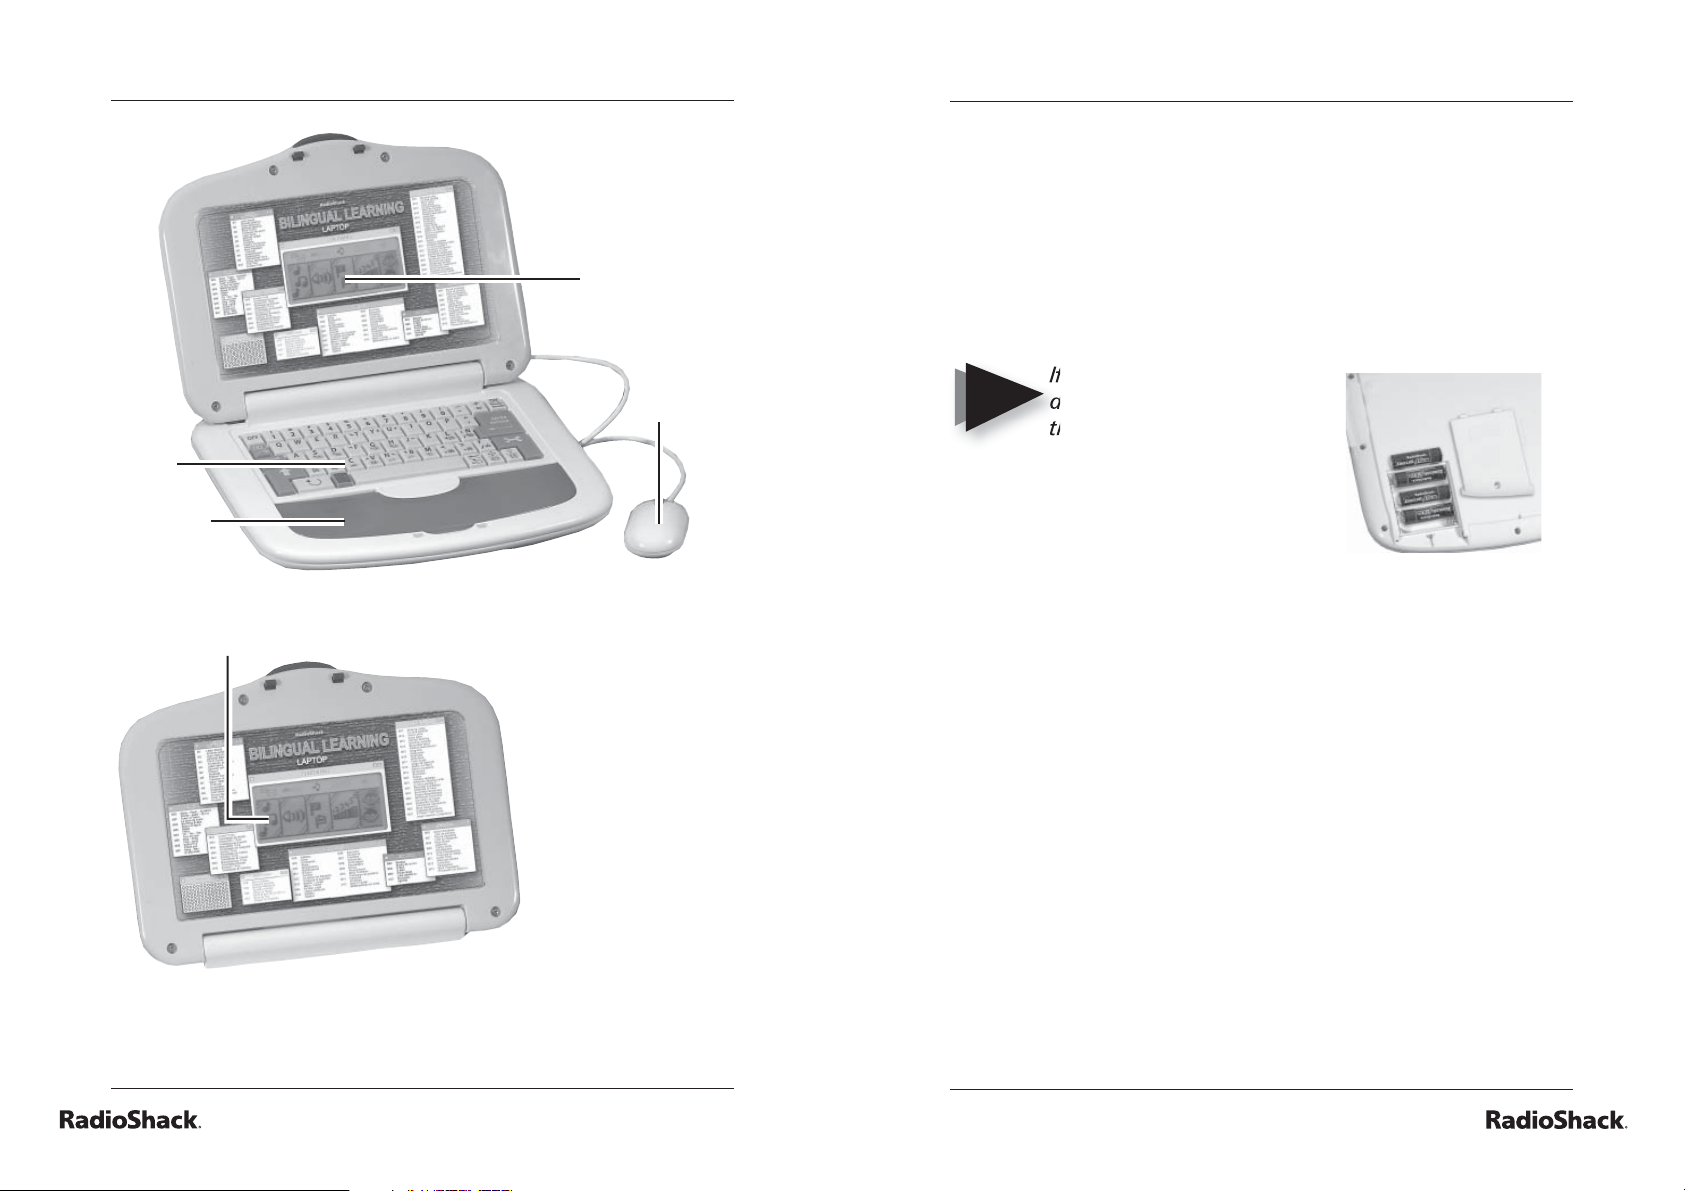
setting up your learning laptop
installing batteries
Your learning laptop requires four AA batteries (not supplied,
available at RadioShack) for power.
4
2
5
1
3
1. Bilingual
Compatiblity
2. Storage
Compartment
3. Built-in Mouse
4. Built-in
Keyboard
5. Electronic
synthesizer
1. Remove the battery cover. Replace when fi nished.
2. Install the batteries as indicated by the polarity symbols
(+ and -) marked inside. Replace the battery cover.
NOTE
If sound weakens or
display dims, replace
the batteries.
2
1
battery notes
• Dispose of old batteries promptly and properly.
• Do not burn or bury batteries.
• Use only fresh batteries of the required size and
recommended type.
• Do not mix batteries of different sizes or chemistries.
• If you do not plan to use the laptop for a month or more,
remove the batteries. Batteries can leak chemicals that
can damage electronic parts.
• Replacing the batteries erases the laptop’s memory. To
protect memory, plug your optional AC adapter (available
at RadioShack) into the laptop and the outlet before
replacing the batteries.
6
• If your laptop locks up, reset it by removing the batteries
and reinstalling them.
7
Page 5
The Basics
The Basics
setting up your learning laptop
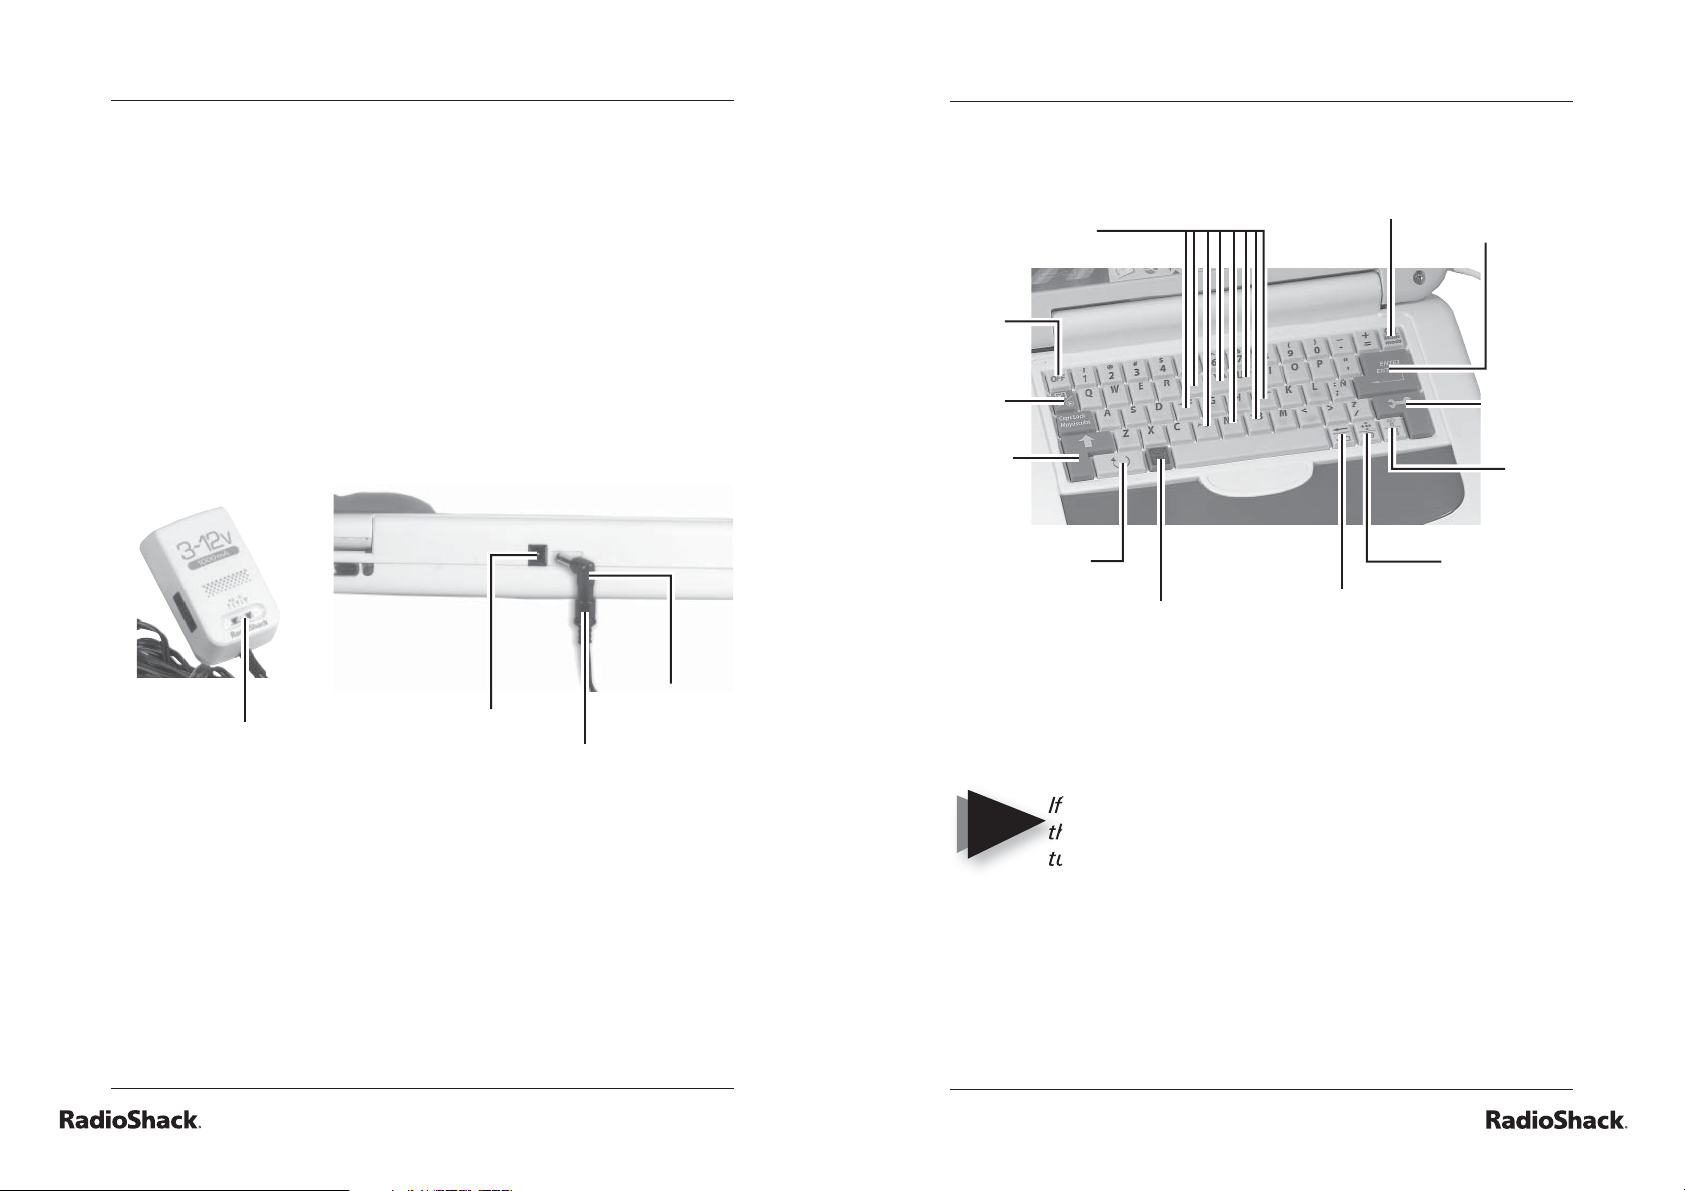
using an ac/dc adapter
To power your laptop from a standard AC outlet or vehicle
battery power, you need an AC-DC adapter and size M
Adaptaplug™ (not supplied, available at RadioShack).
1. Set the voltage switch on the adapter to 6V.
2. Attach the Adaptaplug™ to the adapter’s cord with the
switch set to positive.
3. Insert the adapter’s barrel plug into the laptop’s DC 6V
jack. Plug the other end of the adapter into the power
source.
Barrel
Volt ag e
Switch
DC 6V
Jack
Adapter
Cord
caution
• Use a (Class 2 for AC) power source that supplies 6V DC
and delivers at least 300 mA. Its center tip must be set to
positive and its plug must fi t the laptop’s DC 6V jack.
• Using an adapter that does not meet these specifi cations
could damage the laptop or the adapter.
• Do not leave the laptop plugged in when you are not using
it.
Plug
using your learning laptop
Arrow
Keys
OFF
Play
Shift
Repeat
Clear
turning the laptop on and off
1. Press ON/Mode to turn on the laptop.
2. Press OFF to turn off the laptop.
NOTE
If you do not press any key for about three minutes,
the laptop says “Bye-bye, come back soon,” and
turns off automatically to save power. To turn it
back on, press ON/Mode.
select your settings
Press Settings (the key with a tool on it) and a screen will
appear. Move the cursor either by keypad or mouse to select
an option. Press ENTER to select.
ON/Mode
ENTER
Settings
Help/
Save
Draw/
Move
Backspace/
Erase
8
9
Page 6
The Basics
The Basics
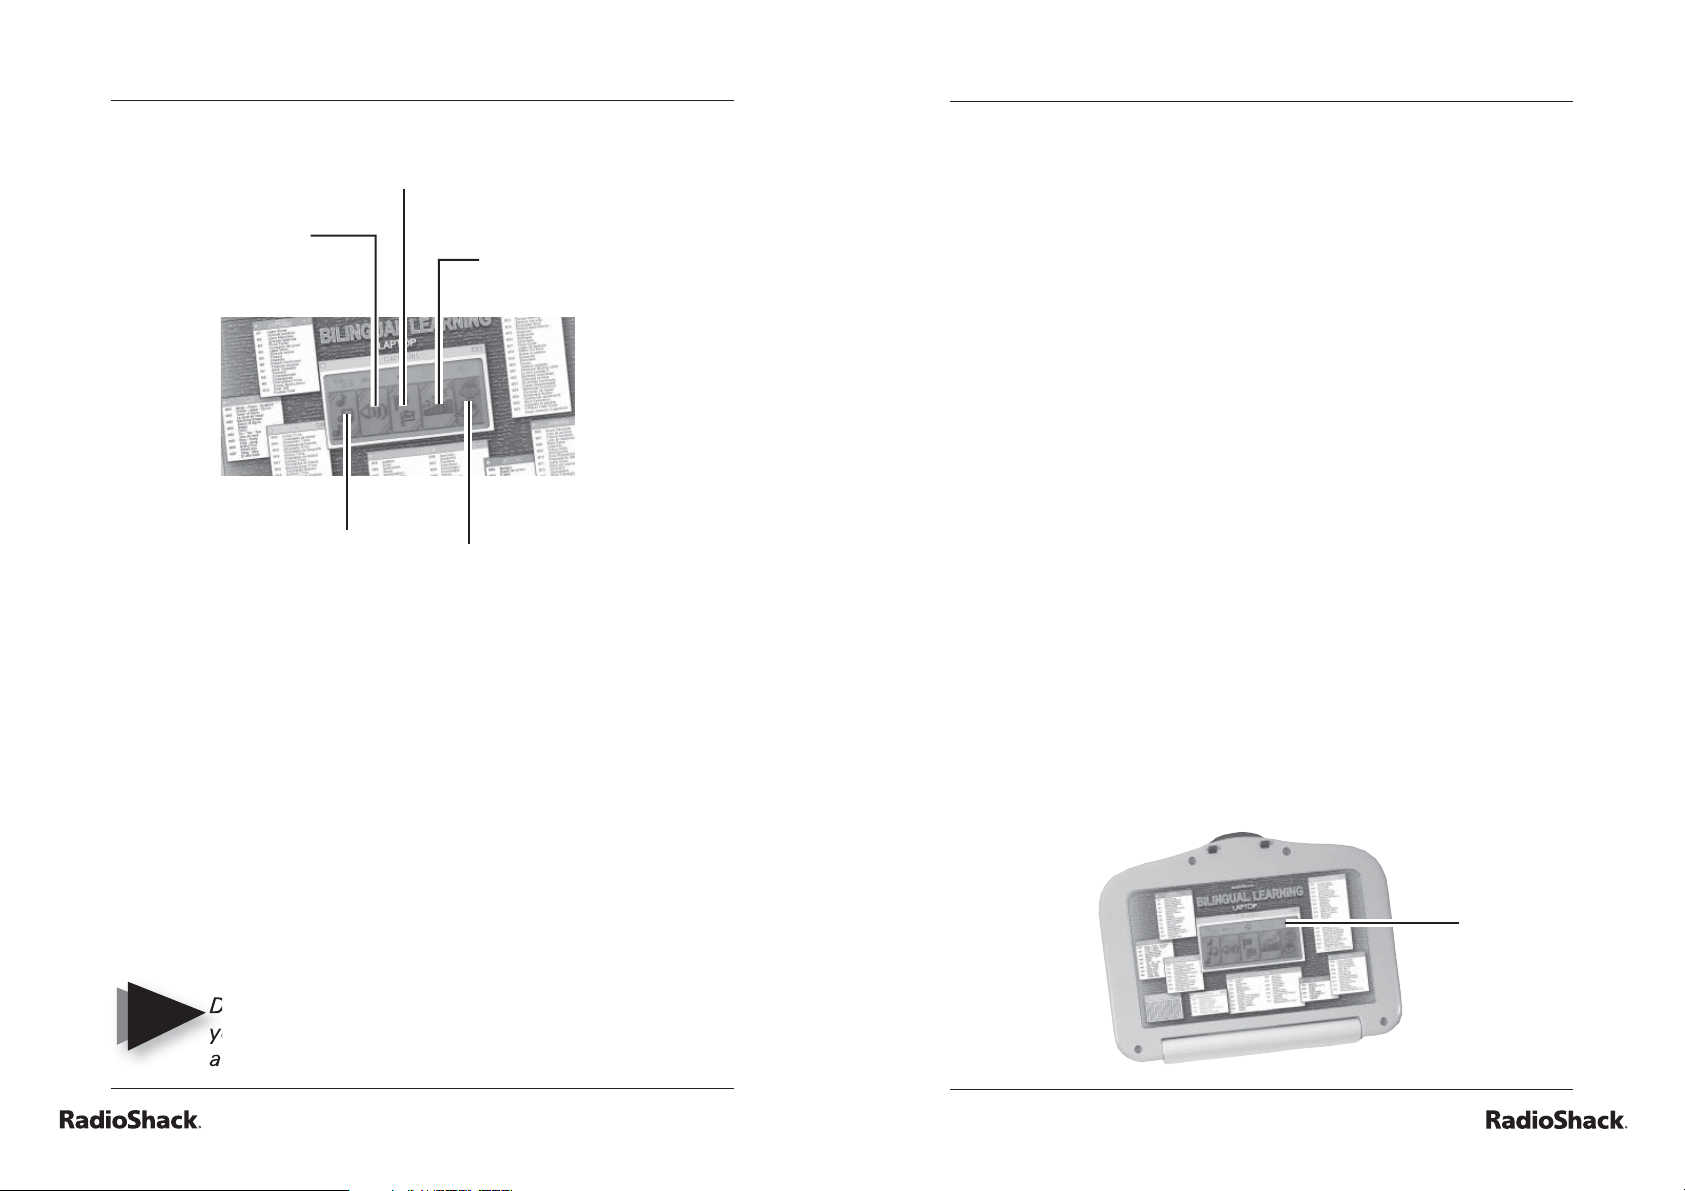
using your learning laptop
Language
Volume
Level
Background
Melody
• Background Melody: activate/deactivate the background
music using arrow keys, then press ENTER.
• Volume: select 3 different volume levels (none/low/high)
using up/down arrow keys, then press ENTER.
• Language: select 1 of 2 different languages. Toggle with
left/right arrows and then press ENTER.
Player
select an activity
1. Press ON/Mode to select an activity.
2. You can do either of the following:
• Type in the activity number and press ENTER.
• The Category Selection Menu will appear (Language
Learning Lesson, Vocabulary/Grammar, Mathematics,
Trivia, Games, Music/Drawing, My Notebook, My
Computer). Use the arrow keys to select the desired
category and press ENTER.
3. If you want to go to another activity before fi nishing the
existing activity, press ON/Mode to return to the Category
Selection Menu, type in the number of the activity you
desire, and press ENTER.
scoring
Each time you answer a question correctly, the laptop
will congratulate you and add up your points. You get ten
points for the fi rst correct answer and seven points for each
thereafter. If you answer a question incorrectly, the laptop will
make an unpleasant sound and give you a second try. If you
answer incorrectly again, it will tell you the correct answer.
• Level: select level of diffi culty with left/right arrow keys,
then press ENTER.
• Player: using the left/right arrows, select 1 or 2 players,
then press ENTER.
• Press ON/Mode to return to the Category Selection Menu.
NOTE
Different activities have different levels. Each time
you select the level, you need to re-select the
activity using the ON/Mode key.
10
Your
Score
11
Page 7

The Basics
Beyond the Basics
using your learning laptop
activity notes
• Clicking the mouse button is the same as pressing ENTER
on the keypad.
• Any time you miss a picture or need to see it again, press
Repeat.
• Any time you need help, press Help.
• When you fi nish an activity, the Category Selection Menu
will appear. Type in the number of your desired activity
and press ENTER.
• Press Clear to fi x any mistakes.
category 1: language
The laptop will give you two chances in each round. The
laptop will reveal the correct answer if you do not press
ENTER within 30 seconds.
activity 1: learn words
1. Press ON/Mode to go to the Category Selection Menu.
2. Press ENTER to start Activity 1. There are two levels in
this activity.
• Level 1: Press a letter key on the keypad. The laptop
will play an animation and teach you a word.
• Level 2: The laptop will display a word. Three pictures
will then scroll across the screen. Select the picture
that matches the word. Press ENTER.
activity 2: learn adjectives
1. Press ON/Mode to go to the Category Selection Menu.
2. Press ENTER to start Activity 2. There are two levels in
this activity.
12
• Level 1: Using the up/down arrow keys, select an
adjective from the list and press ENTER. The laptop
will display an animation to illustrate the word.
• Level 2: The laptop will display an animation. The fi rst
letter of a word associated with that picture will appear.
Type in the missing letters and press ENTER.
activity 3: plural forms
1. Press ON/Mode to go to the Category Selection Menu.
2. Press ENTER to start Activity 3. There are two levels in
this activity.
13
Page 8

Beyond the Basics
Beyond the Basics
• Level 1: Select a word from the list by using the up or
down arrow keys. Press ENTER. The laptop will display
pictures with associated singular or plural forms.
• Level 2: The laptop will display a picture. The fi rst letter
of the word associated with that picture will appear.
Type in the missing letters and press ENTER.
activity 4: learn verbs
1. Press ON/Mode to go to the Category Selection Menu.
2. Press ENTER to start Activity 4. There are two levels in
this activity.
• Level 1: Using the up/down arrow keys, select a verb
from the list and press ENTER. The laptop will display a
picture associated with that verb.
• Level 2: The laptop will display a picture. The fi rst
letter of the verb associated with that picture will then
appear. Type in the missing letters and press ENTER.
activity 5: present tense
1. Press ON/Mode to go to the Category Selection Menu.
2. Press ENTER to start Activity 5. There are two levels in
this activity.
• Level 1: Using the up/down arrow keys, select a verb
from the list and press ENTER. The laptop will display
an animation illustrating the associated verb stem.
• Level 2: The laptop will display a question with a verb
missing. Type in the missing verb and press ENTER.
activity 6: present continuous
1. Press ON/Mode to go to the Category Selection Menu.
2. Press ENTER to start Activity 6. There are two levels in
this activity.
• Level 1: Using the up/down arrow keys, select a verb
from the list and press ENTER. The laptop will display
an animation associated with the verb stem.
• Level 2: The laptop will display a question with a verb
missing. Type in the missing verb and press ENTER.
activity 7: word translator
1. Press ON/Mode to go to the Category Selection Menu.
2. Press ENTER to start Activity 7. There are two levels in
this activity.
• Level 1: A picture will appear with the associated
word in the secondary language. Using the up/down
arrow keys, select a word in the default language that
matches the given word in the secondary language.
Press ENTER.
• Level 2: A word in the secondary language will appear.
Type in the associated word in the default language
and press ENTER.
activity 8: comprehension
1. Press ON/Mode to go to the Category Selection Menu.
2. Press ENTER start Activity 8.
3. A picture will appear, then an associated word will blink
on the top row. Recall the word and type it in. Press
ENTER.
14
15
Page 9

Beyond the Basics
Beyond the Basics
activity 9: international trivia
1. Press ON/Mode to go to the Category Selection Menu.
2. Press ENTER to start Activity 9.
3. An international trivia question will appear. You can press
the right arrow key to make the sentence scroll faster.
4. Use the up/down arrow keys to select the correct answer
and confi rm by pressing ENTER.
activity 10: fi nal test
1. Press ON/Mode to go to the Category Selection Menu.
2. Press ENTER to start Activity 10.
3. The laptop will randomly select activities from the
language category until you have answered one question
from each activity.
4. After you have completed ten rounds, the laptop will give
you a score and congratulate you on your performance.
category 2: vocabulary & grammar
The laptop will give you two chances in each round. The
laptop will tell you the correct answer if you do not press
ENTER within 30 seconds.
activity 11: missing letter
1. Press ON/Mode to go to the Category Selection Menu.
2. Press ENTER start Activity 11.
3. A picture and a word (with a missing letter) will appear.
4. Type in the missing letter and press ENTER.
activity 12: extra letter
1. Press ON/Mode to go to the Category Selection Menu.
2. Press ENTER start Activity 12.
3. A picture and a word associated with the picture (with an
extra letter) will appear.
4. Move the cursor to the extra letter using the arrow keys
or mouse.
16
5. Press ENTER or click the mouse button.
activity 13: correct spelling
1. Press ON/Mode to go to the Category Selection Menu.
2. Press ENTER to start Activity 13.
3. A picture, then a word associated with that picture, will
appear. There is one incorrect letter in the word.
4. Move the cursor to the incorrect letter, type in the correct
letter, then press ENTER.
17
Page 10

Beyond the Basics
Beyond the Basics
activity 14: scrambled word
1. Press ON/Mode to go to the Category Selection Menu.
2. Press ENTER to start Activity 14.
3. A picture and a scrambled word associated with that
picture will appear.
4. Type the fi rst letter of the correct word on the keypad.
The selected letter will move to the second row.
5. Repeat Step 4 until you have used all the letters.
activity 15: anagram
1. Press ON/Mode to go to the Category Selection Menu.
2. Press ENTER to start Activity 15.
3. A word will appear. Your job is to rearrange the letters to
form a different word.
4. Using the keypad, type the fi rst letter of your new word.
The selected letter will move to the second row. Use the
delete key to back up and make corrections.
5. Repeat Step 4 until all the letters from the original word
are used.
activity 17: fl ash cards
1. Press ON/Mode to go to the Category Selection Menu.
2. Press ENTER to start Activity 17.
3. A word will fl ash three times.
4. Recall the word, type it, and press ENTER.
activity 18: defi ne the word
1. Press to ON/Mode to go to the Category Selection Menu.
2. Press ENTER to start Activity 18.
3. A word will appear.
4. Check the three defi nitions on the screen using the up/
down arrow keys.
5. Press ENTER to select the correct defi nition.
activity 19: synonyms
1. Press ON/Mode to go to the Category Selection Menu.
2. Press ENTER to start Activity 19.
3. A word will appear.
activity 16: antonyms
1. Press ON/Mode to go to the Category Selection Menu.
2. Press ENTER to start Activity 16.
3. A word will appear.
4. Type the antonym (a word with the opposite meaning
from the displayed word) and then press ENTER.
NOTE
You will have to come up with the correct antonym.
The laptop will only accept one antonym, but will
give you no clues as to what it might be.
18
4. Type a synonym (a word with a similar meaning) for that
word, then press ENTER.
You will have to come up with the correct synonym.
NOTE
The laptop will only accept one synonym, but will
give you no clues as to what it might be.
activity 20: tenses
1. Press ON/Mode to go to the Category Selection Menu.
2. Press ENTER to start Activity 20.
19
Page 11

Beyond the Basics
Beyond the Basics
3. At the top of the screen, the laptop will ask you either
“Past tense?” or “Past participle?”
A past participle is a word that is used in
NOTE
4. A verb will be shown below the question.
5. Type either the past tense or past participle of the listed
verb and then press ENTER.
combination with the word “have.” For example,
in the sentence, “I have drunk the water,” “drink”
is the verb and “drunk” is the past participle of that
verb.
activity 21: advanced missing letter
1. Press ON/Mode to go to the Category Selection Menu.
2. Press ENTER to start Activity 21.
3. A picture will appear.
4. Type the word that matches the picture, then press
ENTER.
activity 22: sentence completion
1. Press ON/Mode to go to the Category Selection Menu.
2. Press ENTER toto start Activity 22.
3. An incomplete sentence will scroll across the screen.
Complete the sentence using correct grammar. You can
make the sentence scroll faster by pressing the right
arrow key.
4. Use the up/down arrow keys to choose the correct
answer and then press ENTER.
activity 23: scrambled sentence
1. Press ON/Mode to go to the Category Selection Menu.
2. Press ENTER to start Activity 23.
3. A scrambled sentence will appear. Select words in the
correct order to make a complete sentence.
4. Move the mouse or press the arrow keys to the word
that belongs at the beginning of the sentence and press
ENTER to select. The selected word moves to the fi rst
space on the second row.
5. Move the mouse or press the arrow keys to each
consecutive word in the sentence and press ENTER to
select. Repeat until you have used up all of the words.
activity 24: sentence correction
1. Press ON/Mode to go to the Category Selection Menu.
2. Press ENTER to start Activity 24.
3. A grammatically-incorrect sentence will appear. Your job
is to fi nd the word that makes the sentence incorrect.
4. Move the cursor to the incorrect word with the mouse or
arrow keys. Press ENTER to confi rm.
NOTE
Press the help key (?) to fi nd out the position of the
incorrect word.
activity 25: vocabulary builder
1. Press ON/Mode to go to the Category Selection Menu.
2. Press ENTER to start Activity 25.
3. A defi nition will scroll across the screen. You can press
the right arrow key to scroll the sentence faster.
20
4. Use the keys to look at the three choices. Press ENTER to
select the word that matches the defi nition.
21
Page 12

Beyond the Basics
Beyond the Basics
activity 26: word completion
1. Press ON/Mode to go to the Category Selection Menu.
2. Press ENTER to start Activity 26.
3. A defi nition will scroll across the screen. Press the right
arrow key if you wish to scroll the sentence faster.
4. Check the three words listed below the defi nition. Use the
up/down arrow keys or use the mouse to select the word
that matches the defi nition. Press ENTER to select the
word that matches the defi nition.
activity 27: two-player fl ash cards
1. Press ON/Mode to go to the Category Selection Menu.
2. Press ENTER to start Activity 27.
3. Type a word or sentence and press ENTER. Quickly hand
the laptop to another player.
4. The word you typed will fl ash three times. The other
player must recall the word, type it, and then press
ENTER.
category 3: mathematics
The laptop will give you two chances in each round. The
laptop will tell you the correct answer if you do not press
ENTER within 30 seconds.
activity 28: addition
1. Press ON/Mode to go to the Category Selection Menu.
2. Press ENTER to start Activity 28.
3. To select level (1, 2, or 3), press the settings button and
set the level. To return to the activity, repeat steps 1 and 2.
4. An addition problem will appear.
5. Type the correct answer on the keyboard or use the
mouse to click on the number pad on the screen.
activity 29: subtraction
1. Press ON/Mode to go to the Category Selection Menu.
2. Press ENTER to start Activity 29.
3. To select level (1, 2, or 3), press the settings button and
set the level. To return to the activity, repeat steps 1 and 2.
22
4. A subtraction problem will appear.
5. Type the correct answer on the keyboard or use the
mouse to click on the number pad on the screen.
activity 30: multiplication
1. Press ON/Mode to go to the Category Selection Menu.
2. Press ENTER to start Activity 30.
3. To select level (1, 2, or 3), press the settings button and
set the level. To return to the activity, repeat steps 1 and 2.
23
Page 13

Beyond the Basics
Beyond the Basics
4. A multiplication problem will appear.
5. Type the correct answer on the keyboard or use the
mouse to click on the number pad on the screen.
activity 31: division
1. Press ON/Mode to go to the Category Selection Menu.
2. Press ENTER to start Activity 31.
3. To select level (1, 2, or 3), press the settings button and
set the level. To return to the activity, repeat steps 1 and 2.
4. A division problem will appear.
5. Type the correct answer on the keyboard or use the
mouse to click on the number pad on the screen.
activity 32: completing the equation
1. Press ON/Mode to go to the Category Selection Menu.
2. Press ENTER to start Activity 32.
3. To select level (1, 2, or 3), press the settings button and
set the level. To return to the activity, repeat steps 1 and 2.
4. An equation that is missing a mathematical symbol (+, -,
x, /) will appear.
5. Move the cursor with the mouse and click on the correct
symbol for the equation. Or use the right/left arrow keys
and press ENTER for the correct symbol for the equation.
4. Two mathematical problems will appear, one on each row.
5. Work the problems and compare their results.
6. With the mouse, or up/down arrow keys, select >
(greater than), < (less than), or = (equal to) to complete
the question.
activity 34: number logic
1. Press ON/Mode to go to the Category Selection Menu.
2. Press ENTER to start Activity 34.
3. To select level (1, 2, or 3), press the settings button and
set the level. To return to the activity, repeat steps 1 and 2.
4. Three numbers and some question marks will appear.
A number, related to the other three numbers, belongs
where the question marks are.
5. Figure out the mathematical relationship to identify the
missing number.
6. Type the missing number and press ENTER.
activity 35: algebra
1. Press ON/Mode to go to the Category Selection Menu.
2. Press ENTER to start Activity 35.
3. To select level (1, 2, or 3), press the settings button and
set the level. To return to the activity, repeat steps 1 and 2.
activity 33: smaller/larger
1. Press ON/Mode to go to the Category Selection Menu.
2. Press ENTER to start Activity 33.
3. To select level (1, 2, or 3), press the settings button and
set the level. To return to the activity, repeat steps 1 and 2.
24
4. An equation with an unknown value (X) will appear.
5. Figure out the value of X to solve the algebraic equation.
6. Move the cursor with the mouse and click on the number
pad on the screen or type with the number keys on the
keyboard.
25
Page 14

Beyond the Basics
Beyond the Basics
activity 36: geometry
1. Press ON/Mode to go to the Category Selection Menu.
2. Press ENTER to start Activity 36.
3. To select level (1, 2, or 3), press the settings button and
set the level. To return to the activity, repeat steps 1 and 2.
4. A shape will appear with a question about the picture’s
area.
5. Figure out the length, height, area, radius, or volume of
the picture.
6. Type the answer and press ENTER.
Rectangle: Area=Length x Height
NOTE
Triangle: Area=Length x Height / 2
Square: Area=Length x Height
Cylinder: Volume=(Radius x Radius x 3.14) x Height
Cube: Volume=Length x Width x Height
activity 37: fractions
1. Press ON/Mode to go to the Category Selection Menu.
2. Press ENTER to start Activity 37.
3. To select level (1, 2, or 3), press the settings button and
set the level. To return to the activity, repeat steps 1 and 2.
• Level 1: An incomplete fraction will appear on the screen.
Count the blocks on the screen and type the correct
number in the empty space.
• Level 2: An equation consisting of mixed fractions will
appear. Part of one of the fractions is missing. Figure
out the number that makes the equation true. Type the
number.
activity 38: percentages
1. Press ON/Mode to go to the Category Selection Menu.
2. Press ENTER to start Activity 38.
3. To select level (1, 2, or 3), press the settings button and
set the level. To return to the activity, repeat steps 1 and 2.
• Level 1: A percentage question will appear on the screen.
Count the blocks on the screen and fi gure out the correct
percentage. Type the number.
• Levels 2 and 3: If a decimal appears, type in the
percentage corresponding to that decimal. If a percentage
appears, type in the decimal corresponding to that
percentage.
activity 39: ratios
1. Press ON/Mode to go to the Category Selection Menu.
2. Press ENTER to start Activity 39.
3. Two rows of blocks appear on the screen. Count them
out.
4. Type in the missing ratio that makes the equation true.
activity 40: word problem
1. Press ON/Mode to go to the Category Selection Menu.
2. Press ENTER to start Activity 40.
3. A mathematical word problem will appear. Use the right
arrow key to make the problem scroll faster.
4. Use the up/down arrow keys or move the mouse to select
the correct answer.
• Level 3: Two fractions appear. Work the fractions and
compare the results. Enter > (greater than), < (less than),
or = (equal to) to complete the equation.
26
27
Page 15

Beyond the Basics
Beyond the Basics
activity 41: formulas
1. Press to go to the Category Selection Menu.
2. Press ENTER to start Activity 41.
3. To select level (1, 2, or 3), press the settings button and
set the level. To return to the activity, repeat steps 1 and 2.
4. A formula containing one unknown value will appear.
5. Figure out the unknown value, type it in, and then press
ENTER.
activity 42: maths in order
1. Press ON/Mode to go to the Category Selection Menu.
2. Press ENTER to start Activity 42.
3. To select level (1, 2, or 3), press the settings button and
set the level. To return to the activity, repeat steps 1 and 2.
4. A mathematical equation will appear.
5. Solve the equation and type in the value.
category 4: trivia
The laptop will give you two chances in each round. The
laptop will tell you the correct answer if you do not press
ENTER within 60 seconds.
activities 43—49: trivia questions
1. Press ON/Mode to go to the Category Selection Menu.
2. Type in the activity number (e.g.: for Activity 43),
followed by ENTER to begin.
3. A trivia question will appear. You can scroll through the
question faster by pressing the right arrow key.
4. Use the up/down arrow keys to look at the three choices.
Press ENTER to select the correct answer.
28
29
Page 16

Beyond the Basics
Beyond the Basics
category 5: games
activity 50: stone paper scissors
1. Press ON/Mode to go to the Category Selection Menu.
2. Press ENTER to start Activity 50.
3. The laptop will be your opponent.
4. Press (stone), (scissors), (paper) within thirty
seconds or the computer will win.
5. If there are two players, the second player must press
(stone), (scissors), (paper) .
activity 51: tower of hanoi
1. Press ON/Mode to go to the Category Selection Menu.
2. Press ENTER tostart Activity 51.
3. To select level (1 through 6), press the settings button and
set the level. To return to the activity, repeat steps 1 and 2.
4. You must move all of the bars from the pole on the far
left to the pole at the far right. You can move bars to the
middle pole while you work with other bars, but you
cannot stack a larger bar on top of a smaller bar.
5. Place the bars on any pole, use the arrow keys or the
mouse to move the cursor to the desired bar. Press
ENTER or click the mouse to select the bar.
3. Two pictures will appear. The one on the left remains the
same, but the one on the right changes.
4. When you see the matching picture fl ash on the right,
press ENTER.
activity 53: snaps
1. Press ON/Mode to go to the Category Selection Menu.
2. Press ENTER to start Activity 53.
3. Ten small cards appear.
4. Use the arrow keys or mouse to move the cursor or. Press
ENTER on any card to reveal the picture.
5. Find out another card with the same picture.
6. Find all fi ve pairs.
activity 54: tic tac toe
1. Press ON/Mode to go to the Category Selection Menu.
2. Press ENTER to start Activity 54.
3. To select level (1, 2, or 3) and number of players, press
the settings button and set the level and number of
players. To return to the activity, repeat steps 1 and 2.
4. The objective is to get three of the same icons in a row.
5. The fl ashing cursor indicates whose turn it is.
6. Use the arrow keys or the mouse to move the cursor
to the desired pole. Press ENTER or click the mouse to
deposit the selected bar on a pole.
activity 52: matching shape
1. Press ON/Mode to go to the Category Selection Menu.
2. Press ENTER to start Activity 52.
30
6. Use the arrow keys or the mouse to move to the desired
box.
7. Press ENTER or click the mouse to confi rm your
selection.
31
Page 17

Beyond the Basics
Beyond the Basics
activity 55: ping pong
1. Press ON/Mode to go to the Category Selection Menu.
2. Press ENTER to start Activity 55.
3. To select level (1, 2, or 3) and number of players, press
the settings button and set the level and number of
players. To return to the activity, repeat steps 1 and 2.
4. A ball drops from the top of the screen. Use the right/left
arrow keys to move the ping-pong paddle left or right.
5. When you hit the ball, it bounces back up, rebounds, then
comes down again.
activity 56: grand prix
1. Press ON/Mode to go to the Category Selection Menu.
2. Press ENTER to start Activity 56.
3. To select level (1, 2, or 3) and number of players, press
the settings button and set the level and number of
players. To return to the activity, repeat steps 1 and 2.
4. A car will appear in the track.
5. If you choose a letter that is not part of the mystery word,
the letter will appear on the second row and the “hangman” will begin to form.
6. You are given eight chances in each round.
5. Use the right/left arrow keys to turn the car and the up
arrow key to accelerate the car.
activity 57: hang man
1. Press ON/Mode to go to the Category Selection Menu.
2. Press ENTER to start Activity 57.
3. A series of blank spaces will appear. No clues will be
provided. You will have to fi gure out this word all by
yourself.
4. Press any letter on the keypad. If you press the correct
letter, the series of blank spaces will fi ll in.
32
33
Page 18

Beyond the Basics
Beyond the Basics
category 6: music & drawing
activity 58: music station
1. Press ON/Mode to go to the Category Selection Menu.
2. Press ENTER to start Activity 58.
3. Select a song by pressing any letter from A to Z.
activity 59: musical keyboard
1. Press ON/Mode to go to the Category Selection Menu.
2. Press ENTER to start Activity 59.
3. Press the keys with the music symbols to compose your
own melody.
4. Press Play to play back the notes you have just recorded.
5. Press Clear to erase the recorded musical notes.
activity 60: dance to music
1. Press ON/Mode to go to the Category Selection Menu.
2. Press ENTER to start Activity 60.
activity 61: drawing fun
1. Press ON/Mode to go to the Category Selection Menu.
2. Press ENTER to start Activity 61.
3. Select drawing mode by pressing Draw (pencil key),
Move (shift + pencil key), or Erase (eraser key). A
drawing point will appear at the center of the screen.
• Press Draw, then use the arrow keys to draw.
• Press Erase, then use the arrow keys to erase.
• Press Move, then use the arrow keys to move to
another location in your picture.
• Use Clear to clear the whole screen.
8. There are three icons on the left panel.
• Click on the fi rst icon to select a different grey tone.
• Click on the second icon to select a different pen style.
• Click on the third icon to select a different erase style.
3. The laptop will play a short piece of music. Then it
drops different musical notes from the top row into four
different columns. Each column represent an arrow key
(up/down/left/right).
4. When a musical note drops down and the arrow key icon
in a column blinks, press the corresponding arrow key on
the keypad.
5. Try to catch as many musical notes as possible.
34
35
Page 19

Beyond the Basics
Beyond the Basics
category 7: my notebook
activity 62: mailbox
1. Press ON/Mode to go to the Category Selection Menu.
2. Press ENTER to start Activity 62.
3. The message “You’ve got mail. Read now?” will appear
on the screen. Use the left/right arrow key to select “yes”
or “no.” Then press ENTER.
• NO: You will return to the main menu.
• YES: The laptop will display some e-mails. Select
either by up/down arrow key or by mouse. Press
ENTER and read the selected e-mail.
4. There are three rows in the e-mail to tell you the name,
job nature, and the character’s famous speech.
5. Use up/down arrow keys to select a character.
6. Use the right arrow key to scroll through the speech
faster.
7. There are three icons on the right panel. Move the cursor
with the arrow keys and press ENTER to select different
options:
• Return to the list.
• Compose a new e-mail (go to Activity 63).
• Delete the e-mail.
4. You can compose an e-mail here. Press Clear to clear the
e-mail. Press Backspace to delete a character.
5. Press Save to save the e-mail. The laptop will alert you of
a new e-mail next time you enter this activity.
6. Save a new e-mail to overwrite an old e-mail.
activity 64: phone book
1. Press ON/Mode to go to the Category Selection Menu.
2. Press ENTER to start Activity 64.
3. A new phone book page will appear.
4. Type in a name and press ENTER.
5. Type in a phone number.
6. Press Save to save the data in the phone book. The
laptop will alert you of stored phone book data next time
you enter this activity.
7. There are two icons on the right panel of the screen.
• Move the cursor on top of the up arrow icon and press
ENTER to read the previous record in the phone book.
• Move the cursor on top of the down arrow icon and
press ENTER to read the next record in the phone
book.
activity 65: scheduler
1. Press ON/Mode to go to the Category Selection Menu.
activity 63: email
1. Press ON/Mode to go to the Category Selection Menu.
2. Press ENTER to start Activity 63.
3. A blank screen will appear.
36
2. Press ENTER to start Activity 65.
3. A new scheduler page will appear with four lines.
4. You can type in dates, venues, contacts, and event
information in the scheduler.
37
Page 20

Beyond the Basics
Beyond the Basics
5. Move the cursor to any one line and type information.
You can use the delete key to fi x your mistakes. After you
press ENTER to move to the next line, you can no longer
back up to the previous line. You can use the clear key to
clear the entire entry.
6. After you have fi lled in all of the lines, press ENTER. Use
the arrow keys or the mouse to select “Yes” or “No” when
the save box appears.
7. The laptop will alert you of stored information next time
you enter this activity.
activity 66: sound databank
1. Press ON/Mode to go to the Category Selection Menu.
2. Press ENTER to start Activity 66.
3. Press the left/right arrow keys to hear different speeches
or sound effects that have been pre-stored in the laptop.
4. Use the down arrow key to select sound effect column.
Use the left/right arrow keys to hear different sound
effects.
activity 67: picture databank
1. Press ON/Modeto go to the Category Selection Menu.
2. Press ENTER to start Activity 67.
3. Four different pictures from the laptop’s picture gallery
appear.
activity 68: maze game
1. Press ON/Mode to go to the Category Selection Menu.
2. Press ENTER to start Activity 68.
3. A maze will appear.
4. Use the up/down/left/right arrow keys to move the ball
and fi nd your way out of the maze.
activity 69: typing skills
1. Press ON/Mode to go to the Category Selection Menu.
2. Press ENTER to start Activity 69.
3. To select level (1, 2, or 3) and number of players, press
the settings button and set the level and number of
players. To return to the activity, repeat steps 1 and 2.
4. A keyboard will appear and certain letters will be
highlighted in random order.
5. Press the corresponding letter key on the keypad.
6. If you need to type an upper case letter, press Shift and
the corresponding letter on the keypad together.
activity 70: draw programming
1. Press ON/Mode to go to the Category Selection Menu.
2. Press ENTER to start Activity 70.
3. Simple programming lines will appear.
4. Use the mouse or left/right arrow keys and either click or
press ENTER to enter a gallery.
5. Press left/right arrow keys to see different pictures and
pre-stored animation.
6. Press ENTER once the laptop returns to the gallery
selection menu.
38
4. Command: type one of the following commands in each
programming line using the format “Command, direction,
distance.”
• Draw: Press the key with the pencil on it to order the
laptop to draw a line.
39
Page 21

Beyond the Basics
Beyond the Basics
• Move: press Shift and the pencil key together to order
the laptop to move without drawing a line.
• Erase: press Shift and the eraser key together to order
the laptop to erase a line.
5. Direction: press Shift and one of the eight arrow keys on
the keypad together to tell the laptop which direction to
draw the line.
6. Distance: type a number (up to two digits) to tell the
laptop how far the cursor should draw, move, or erase.
7. Press ENTER to jump into the next programming line.
8. After you have fi nished all program lines, press Play to
play the program. You see the cursor move and draw a
picture according to your command. Press any key to
return to the programming line window. Press Save to
save the program.
activity 71: alarm clock
1. Press ON/Mode to go to the Category Selection Menu.
2. Press ENTER to start Activity 71.
3. There are two rows on the window. The upper row is the
clock time setting and the lower row is the alarm setting.
activity 72: calculator
1. Press ON/Mode to go to the Category Selection Menu.
2. Press ENTER to start Activity 72.
3. A calculator will appear.
4. Enter any calculation by typing on the keyboard or using
the mouse and clicking on the screen.
activity 73: word processing
1. Press ON/Mode to go to the Category Selection Menu.
2. Press ENTER to start Activity 73.
3. Type your own message on the blank screen.
TIPS
4. To exit this activity, go to a different activity or turn the
• For capital letters, hold down Shift while you type
your letter, or press CAPS LOCK and then your
letter.
• Press Backspace to delete a character on the
screen. Press Clear to clear the message.
laptop off. You cannot save or print anything you type
here.
4. Use the right/left arrow keys to select different parts of
the setting. Use up/down arrow keys values. Press ENTER
to confi rm the setting.
5. The alarm will sound when the time of the clock matches
the time of the alarm. Press any key to stop the alarm.
NOTE
The alarm works even when the laptop powers off.
40
41
Page 22

Beyond the Basics
Beyond the Basics
caring for your laptop
Keep the laptop dry; if it gets wet, wipe it dry immediately.
Use and store the laptop only in normal temperature
environments. Handle the laptop carefully, do not drop it.
Keep the laptop away from dust and dirt and wipe it with a
damp cloth occasionally to keep it looking new.
service and repair
If your laptop is not performing as it should, take it to
your local RadioShack store for assistance. Modifying or
tampering with the laptop’s internal components can cause a
malfunction and might invalidate its warranty and void your
FCC authorization to operate it.
the fcc wants you to know
This equipment has been tested and found to comply with the limits for a Class
B digital device, pursuant to Part 15 of the FCC Rules. These limits are designed
to provide reasonable protection against harmful interference in a residential
installation. This equipment generates, uses, and can radiate radio frequency
energy and, if not installed and used in accordance with the instructions, may
cause harmful interference to radio communications. However, there is no
guarantee that interference will not occur in a particular installation. If this
equipment does cause harmful interference to radio or television reception, which
can be determined by turning the equipment off and on, the user is encouraged to
try to correct the interference by one or more of the following measures:
• Reorient or relocate the receiving antenna.
• Increase the separation between the equipment and receiver.
• Connect the equipment into an outlet on a circuit different from that to which
the receiver is connected.
Consult your local RadioShack store or an experienced radio/TV technician for
help.
If you cannot eliminate the interference, the FCC requires that you stop using your
phone. Changes or modifi cations not expressly approved by RadioShack may
cause interference and void the user’s authority to operate the equipment.
This device complies with Part 15 of the FCC Rules. Operation is subject to the
following two conditions: (1) This device may not cause harmful interference, and
(2) This device must accept any interference received, including interference that
may cause undesired operation.
frequently asked questions
Can I attach this laptop to the internet via a regular
computer?
No, you cannot. This laptop is totally self-contained.
Can this laptop print? If so, to what printer?
No, this laptop cannot print. It cannot be attached
to any peripheral devices.
Will there be any accessories for this laptop? If so, will they
be available from RSU?
The only accessories available for this laptop
are the size M Adaptaplug™ and AC/DC adapter.
Neither is supplied with the laptop, but both can be
purchased at RadioShack.
42
43
Page 23

This product is warranted by RadioShack against manufacturing defects in material and workmanship
under normal use for ninety (90) days from the date of purchase from RadioShack company-owned stores
and authorized RadioShack franchisees and dealers. For complete warranty details and exclusions, check
with your local RadioShack store.
RadioShack Customer Relations
200 Taylor Street, 6th Floor, Fort Worth, TX 76102 04/04
Printed in China
60-2642
06A04
©2004. RadioShack Corporation.
All rights reserved. RadioShack and RadioShack.com are
trademarks used by RadioShack Corporation.
 Loading...