

Page 1

43-860 .fm Page 1 Mon day, Augus t 16, 1999 1:10 PM
COUNTRY LIFE PHONE
Cat. No. 43-860
OWNER’S MANUAL
Please read before using this equipment.
Page 2

y
g
g
y
43-860 .fm Page 2 Mon day, Augus t 16, 1999 1:10 PM
FEATURES
Your Radio Shack Country Life Phone
combines nostalgic styling with convenient, modern features. The phone’s
authentic, country-style wooden case,
decorative brass bells, and old-fashioned handset m ake it a conversation
piece as well as a bea utiful addition to
your home’s decor.
It also includes these features:
Pulse/Tone Option
— lets you use
your phone with pulse or tone service
and lets you easily switch from pulse to
tone dialing for long-distance, bankby-phone, or other special services.
Last Number Redial
— at the press of
a button, lets you redial the last number dialed.
Simulated Rotar
— gives you
Dial
the look of an old-fashioned, rotary dial
but has the modern convenience of
touch-tone dialing.
Built-In Wall-Mounts
— let you easily
mount the phone on a lmost any wall,
even directly over a telephone wallplate.
Hearin
-Aid Compatibilit
— lets
you use your phone with he aring aids
that have a T (telephone) switch.
Your telephone has been tested and
found to comply with all applicable UL
and FCC standards.
For your records, we recommend you
record the phone’s serial number in the
space below. The number is located
on the back of the phone.
Serial Number:
Wooden W r itin
Compartment
Board and Storage
— provides you with a
convenient space for writing phone
messages and storing small items,
such as an address book.
© 1995 Tandy Corporation.
Radio Shack is a registered trademark used by Tandy Corporation.
All Rights Reserv ed .
2
Page 3

43-860 .fm Page 3 Mon day, Augus t 16, 1999 1:10 PM
READ THIS BEFORE INSTALLATION
We have designed your te lephone to
conform to federal regulations and you
can connect it to most telephone lines.
However, each phone that you connect to the telephone line draws power
from the line. We refer to the power
draw as the phone’s ringer equivalence number (REN). The REN is
shown on the back of your phone.
If you are using more than one phone
or other device on t he line, add up all
the RENs. If the total is more than five,
your phones might not ring. In rural areas, a total REN of three might im pair
ringer operation. If ringer operation is
impaired, remove a device from the
line.
FCC STATEMENT
This telephone complies with Part 68
FCC
of
quest, provide the pho ne’s F CC reg istration number and the REN to your
telephone company. These numbers
are located on the back of your phone.
Rules. You must, upon re-
This telephone also com plies with the
limits for a Class B device as specified
in Part 15 of
provide reasonable pro tection against
radio and TV interference in a residential area. However, your telephone
might cause TV or radio interference
even when it is operating properly. To
determine whether your telephone is
causing the interference, turn off your
telephone. To eliminate interference,
you can try one or more of the following corrective measures.
• Reorient or relocate the radio or
TV’s receiving antenna.
• Increase the distance between the
telephone and the radio or TV.
Consult your local Radio Shack store if
the problem still exists.
FCC
Rules. These limits
: You must not connect your
Note
phone to:
• Coin-operate d syste ms
• Party-line systems
• Most electronic key telephone
systems
3
Page 4

43-860 .fm Page 4 Mon day, Augus t 16, 1999 1:10 PM
CONTENTS
Installation ............................................................................................................ 5
Mounting the Phone ........................................................................................ 5
Preparation ............................................................................................... 5
Mounting on Dry Wall/Sheet Rock ............................................................ 6
Mounting on Plaster/Lathe or Solid Wood ................................................. 8
Connecting the Phone ..................................................................................... 8
Operation ............................................................................................................ 10
Setting the Dialing Mode ............................................................................... 10
Turning the Ringer Off/On ............................................................................. 10
Redial ............................................................................................................ 11
Using Tone Services on a Pulse Line ............................................................ 11
Care and Maintenance ....................................................................................... 12
If You Have Problems .................................................................................... 13
The FCC Wants You to Know ........................................................................ 13
Lightning ........................................................................................................ 13
4
Page 5
COUNTRY LIFE
PHONE
1
2
3
4
5
7
8
9
0
#
6
M
N
O
L
K
J
I
H
G
D
E
F
A
B
C
P
R
S
T
U
V
W
X
Y
43-860 .fm Page 5 Mon day, Augus t 16, 1999 1:10 PM
INSTALLATION
Your telephone c onnects directly to a
modular telephone line jack. Choose a
mounting location for the phone that is
near a modular phone jack and away
from normal activities.
If your telephone wiring does not have
a modular jack, you can update the
wiring yourself. Radio Shack stores
sell the necessary wall jacks and
adapters to convert older wiring methods to modular wiring. Or, you can
have the telephone company update
your telephone wiring for you.
:
Notes
• The telephone company charges
to install the necessary jacks.
• The USOC number of the jack to
be installed if RJ11C for a baseboard jack, or RJ11W for a wall
jack.
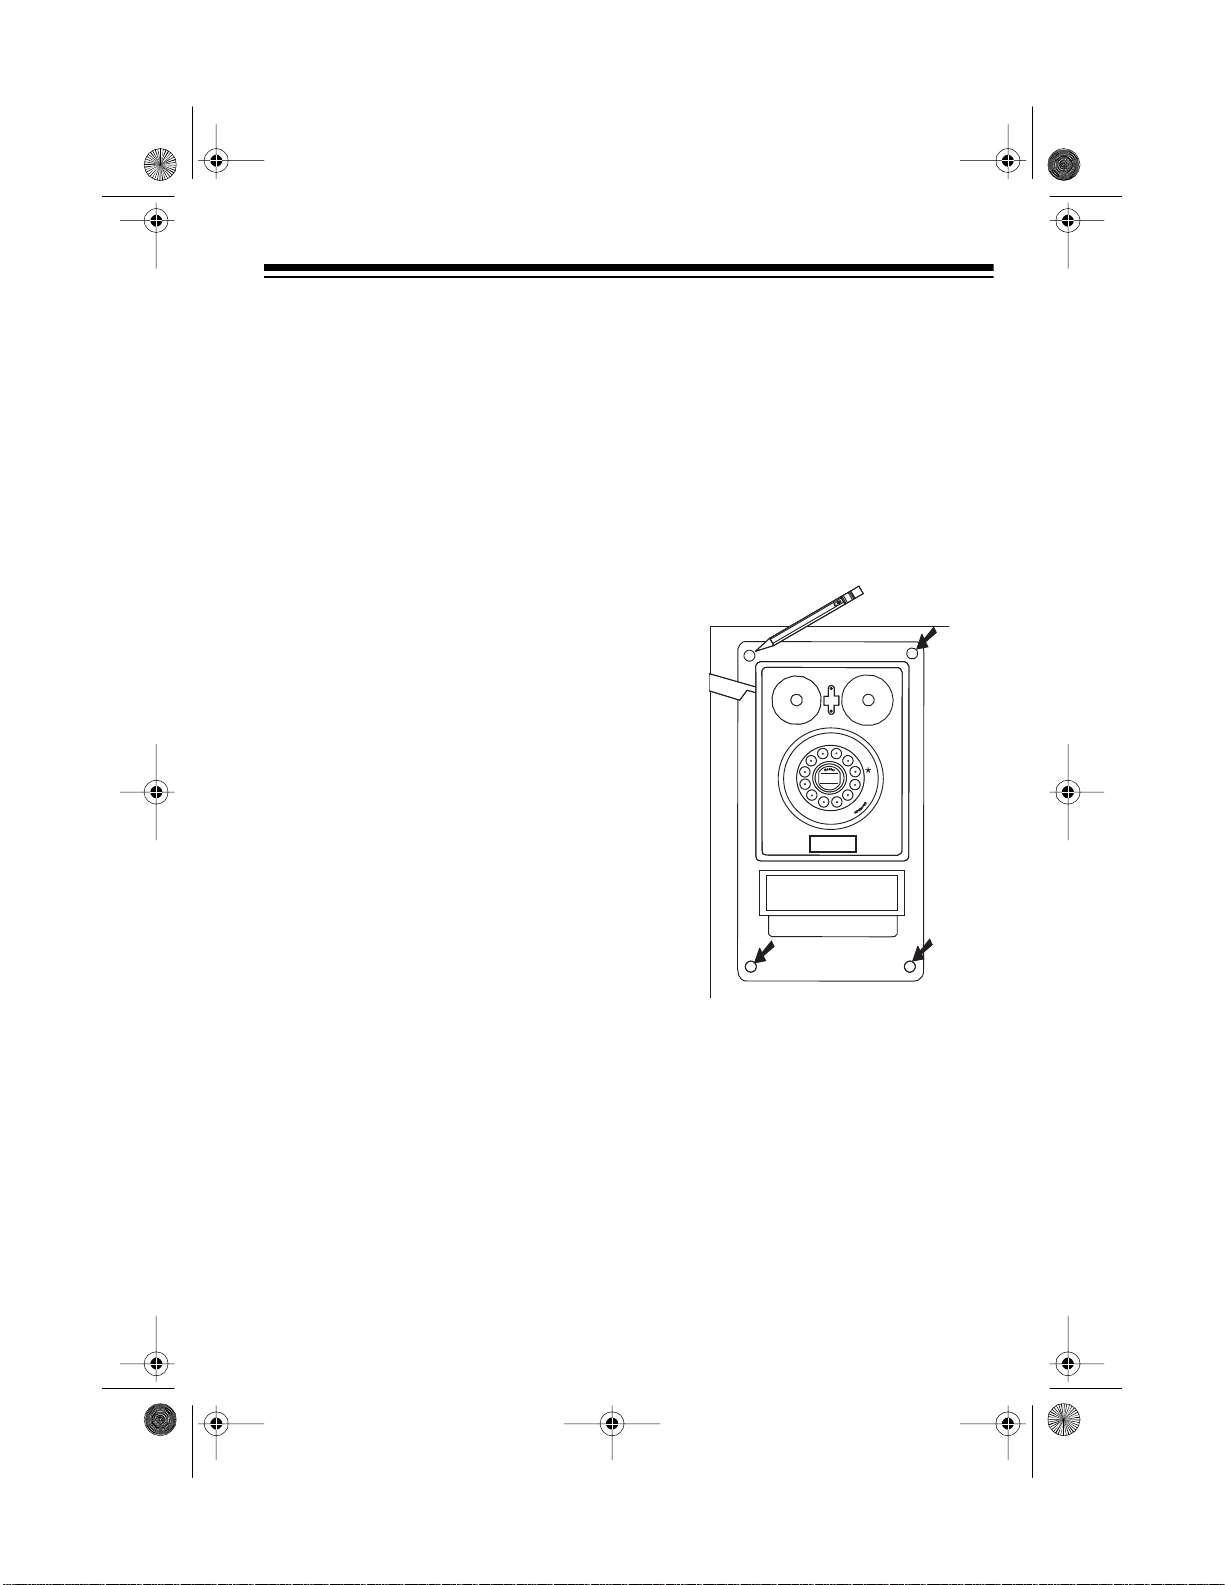
Preparation
Follow these steps to prepare an easyto-use template for marking the wall at
the desired mounting location.
1. Lay the phone flat on a large
piece of paper. Then, without
moving the phone, trace the location of each of the fou r mounting
holes onto the paper.
MOUNTING THE PHONE
In addition to the supplied mounting
hardware (anchors, plugs, screws, and
rubber spacers), you need the f ollowing tools/supplies to mount your
phone:
• A large piece of paper (at least 8 ×
18 in.)
• Phillips screwdriver
•Hammer
3
• Electric dr ill wit h a
/16-inch drill bit
2. Tape the paper “template” on the
wall at the desired mounting location.
5
Page 6

Paper Template
PaperTemplate
Drill a/hole at each of
the bottom holes
3
16
Drill a/hole at each of
the bottom holes
3
16
43-860 .fm Page 6 Mon day, Augus t 16, 1999 1:10 PM
3. Depending on the distance
between the modular phone jack
and the desired mounting location, plug either the supplied 7foot or 10-inch silver phone line
cord into the jack on the back of
the phone, then set the phone
aside.
Note: If you are not mounting the
phone directly over the modular phone
jack, press the phone cord into the
groove on the back of the phone so the
cord is flush with the back.
Mounting on Dry Wall/
Sheet Rock
1. Screw a metal anchor into the wall
with a Ph illips screw driver at e ach
top mark on the template.
Paper Template
2. Using an electric drill, drill a
inch hole at each of the bottom
marks.
3
/16-
Paper Template
3
/16-inch hole
Drill a
at each bottom mark
6
Page 7

COUNTRYLIFE
PHONE
1
2
3
4
5
7
8
9
0
#
6
M
N
O
L
K
J
I
H
G
D
E
F
A
B
C
P
R
S
T
U
V
W
X
Y
43-860 .fm Page 7 Mon day, Augus t 16, 1999 1:10 PM
3. Press a plastic anchor into the
hole at each bottom mark and tap
the anchor into the wall with a
hammer until the anchor is
seated.
Paper Template
Paper Template
4. Carefully pull the paper template
away from the wall to remove it.
For additional stability, you can also
use the supplied rubber spacers in addition to the screws. After you insert
the screws through the phone’s mounting holes, place a rubber spacer ov er
each screw, so the spacer is between
the back of the phone and the wall,
then place the phone against the wall
Note: If you are mounting the
phone directly over the modular
phone jack, plug the phone cord
plug into the jack now (see “Co nnecting the Phone”).
5. Place the phone against the wall
so the phone’s mounting holes
align with the mounting locations
in the wall, then inse rt a self-tapping screw into each mounting
hole and tighten the screw with a
screwdriver.
7
Page 8

43-860 .fm Page 8 Mon day, Augus t 16, 1999 1:10 PM
and tighten the screws with a screwdriver.
Rubber Spacer
8
Page 9

COUNTRYLIFE
PHONE
1
2
3
4
5
7
8
9
0
#
6
M
N
O
L
K
J
I
H
G
D
E
F
A
B
C
P
R
S
T
U
V
W
X
Y
43-860 .fm Page 9 Mon day, Augus t 16, 1999 1:10 PM
Mounting on Pla s ter/ La the
or Solid Wood
1. At each mounting mark on the
template, turn a self-tapping
screw clockwise a few rotations
with a screwdriver to start it, then
turn the screw counterclockwise
to remove it.
Paper Template
Paper Template
CONNECTING THE
PHONE
2. Carefully pull the paper template
away from the wall to remove it.
: If you are mounting the
Note
phone directly over the modular
phone jack, plug the phone cord
plug into the jack now (see “Co nnecting the Phone”).
3. Place the phone against the wall
so the phone’s mounting holes
align with the mounting locations
in the wall, then insert a screw into
each mounting hole and tighten
the screw with a screwdriver .
1. To connect the handset to the
phone, plug one end of the brown,
fabric-covered cord into the handset jack, then plug the other end
into the modular jack beneath the
phone (above the writing/storage
box).
PULSE/TONE
ON/OFF
9
Page 10

43-860 .fm Page 10 Monday, August 16, 1999 1:10 PM
2. Place the handset on the cradle. 3. To connect your phone to the telephone line, plug the o ther end of
the phone cord into the modular
phone jack.
A
B
F
C
E
D
2
3
I
H
1
G
4
L
5
K
J
M
6
N
O
P
7
R
S
8
T
U
V
COUNTRYLIFE
PHONE
#
0
9
Y
X
W
A
B
F
C
E
D
2
3
I
H
1
G
4
L
5
K
J
M
6
N
O
P
7
R
S
8
T
U
V
COUNTRYLIFE
PHONE
#
0
9
Y
X
W
10
Page 11

43-860 .fm Page 11 Monday, August 16, 1999 1:10 PM
OPERATION
SETTING THE DIALING
MODE
PULSE/TONE
Set
service you have, either tone or pulse
(rotary). If you are not sure which type
you have, do this simple test .
1. Set
PULSE/TONE
phone to
2. Lift the handset and listen for a
dial tone.
for the type of phone
beneath the
TONE
.
PULSE/TONE
ON/OFF
:
Notes
• If you have pulse service and
want to use a special service
requiring tone signals (such as
bank-by-phone), see “Using Tone
Services on a Pulse Line.”
• The and
effect when
PULSE
.
#
buttons have no
PULSE/TONE
is set to
TURNING THE RINGER
OFF/ON
To turn off the ringer on the phone, set
(ringer)
phone to
and you can answ er calls if you hear
another phone on the same phone line
ring.
ON/OFF
on the bottom of the
OFF
. You can still make calls,
3. Press any number except
0
.
If the dial tone stops, you have touchtone service. Leave
TONE
to
.
PULSE/TONE
set
If the dial tone continues, you have
pulse service. Set
PULSE
.
PULSE/TONE
to
PULSE/TONE
ON/OFF
To turn the ringer back on, set (ringer)
ON/OFF
to ON.
11
Page 12

43-860 .fm Page 12 Monday, August 16, 1999 1:10 PM
REDIAL
Each time you dial a telephone number, the phone stores it in a redial memory. The
redial memory holds up to 32 digits in either pulse or tone mode.
To quickly redial the last number dialed, lift the handset and press
REDIAL
(the large
button in the center of the dial pad). The phone automatically redials the last phone
number entered.
A
B
F
E
D
I
H
G
4
L
5
K
J
M
6
N
O
P
7
R
S
C
2
3
1
#
0
9
8
T
Y
X
U
W
V
12
Page 13

43-860 .fm Page 13 Monday, August 16, 1999 1:10 PM
USING TONE SERVICES ON A PULSE LINE
Some special services , such as bank by ph one, require tone signals. I f you have
pulse serv ice, you can still use the se
special tone services by following
these steps.
1. Call the special service using
pulse dialing.
2. When the service answers, set
PULSE/TONE
the keys as you normally would
while using the special service.
Your phone sends a tone signal
for each key you press.
3. When you complete the call, hang
up the phone, then set
TONE
back to
TONE
to
PULSE
, then press
PULSE/
.
13
Page 14

43-860 .fm Page 14 Monday, August 16, 1999 1:10 PM
CARE AND MAINTENANCE
Your Radio Shack Country Life Phone
is an example of superior design and
craftsmanship. The following suggestions will help you care for your phone
so you can enjoy it for years.
Keep the phone dry. If it
gets wet, wipe it dry immediately. Liquids
might contain minerals
that can corrode the
electronic circuits.
Handle the phone gently and carefully. Dropping it can damage
circuit boards and cases and can cause the
phone to work improperly.
Use and store the
phone only in normal
temperature environments. Temperature
extremes can shorten
the life of electronic devices and distort or melt
plastic parts.
ly to keep it looking
new. Do not use harsh
chemicals, cleaning
solvents, or strong detergents to clean the
phone.
Modifying or tampering with the
phone’s internal components can
cause a malfunction and might invalidate its warranty and void your FCC
authorization to operate it. If your
phone is not performing as it should,
take it to your loc al Radio Shac k s tore
for assistance.
14
Keep the phone away
from dust and dirt,
which can cause premature wear of parts.
CLEANER
Wipe the phone with a
damp cloth occas ional-
Page 15

43-860 .fm Page 15 Monday, August 16, 1999 1:10 PM
IF YOU HAVE
PROBLEMS
If your telephone is not performing as it
should, check the connection to the
telephone line. Calls are automatically
switched and routed through compl ex
equipment, so you might occ asionally
hear noise on the line. When a call is
too noisy, hang up and redial the number.
If you still have problems, immedi ately
disconnect the telephone. If another
telephone on the same line works
properly, the fault is in this telephone
or its installation. If the trouble is harming the telephone lines, the telephone
company might ask you to disconnect
your telephone until you resolve the
problem.
THE FCC WA NTS YOU
TO KNOW
In the unlikely event that your phone
causes problems on the phone line,
the phone company can temporarily
discontinue your service. If this happens, the phone com pany attem pts to
notify you in advance. If adv ance notice is not practical, the phone company notifies you as soon as possible and
advises you of your right to file a com plaint with the FCC.
Also, the phone company can make
changes to its lines, equipment, operations, or procedures that could affect
the operation of this telephone. The
telephone company notifies you of
these changes in advance, so you can
take the necessary steps to prevent interruption of your telephone service.
LIGHTNING
Your telephone has built-in protection
circuits to reduce the risk of damage
from surges in telephone line and power line current. These protection circuits meet or exceed the FCC
requirements. However, lightning striking the telephon e or power lines can
damage your telephone.
Lightning damage is not common.
Nevertheless, if you live in an area that
has severe electrical storms, we suggest that you unplug your phone during
storms to reduce the possibility of
damage.
15
Page 16

43-860 .fm Page 16 Monday, August 16, 1999 1:10 PM
RADIO SHACK LIMITED WARRANTY
This telephone product is warranted against manufacturing defects in material and
workmanship for one (1) year from the date of purchase from Radio Shack company
owned stores and authorized Radio Shack franchisees and dealers. Within this period
bring your Radio Sha ck sales slip as proof-o f-purchas e date to an y Radio S hack
store.
This warranty does not cover damage or failure caused by or attributable to Acts of
God, abuse, misuse, improper or abnormal usage, faulty installation, improper maintenance, lightning or other incidence of excess voltage, or any repairs other than those
provide d by a Ra dio Sh ack Auth orize d Serv ice Faci lity, or tran spor tation co sts. Radio
Shack is not responsible or liable for indirect, special, or consequential damages
arising out of or in con nection with the us e or performa nce of the pr oduct or
other damages with respect to loss of property, loss of revenue or profit, or costs
of removal, instal lat ion or reins ta lla tion.
EXCEPT AS PROVI DED HE REIN, RADI O SHA CK M AK ES NO EXPRESS WARRANTIES AND ANY IMPLIED WARRANTIES ARE LIMITED IN DURATION TO THE DURATION OF THE WRITTEN LIMITED WARRANTIES CONTAINED HEREIN. Some states
do not allow the limitation or exclusion of incidental or consequential damages and
some states do not allow limitation or exclusion of implied warranties; therefore, the
aforesaid limitation(s) or exclusion(s) may not apply to the purchaser. There will be
charges rend ered for repair s to the p roduct made a fter th e expira tion o f the af oresaid
one (1) year warranty period.
This warra nty gives you specifi c legal rights and you may also have other rights which vary fr om
state to state.
We Se rvi ce What We Se ll
9/94
RADIO SHACK
A Division of Tandy Corporation
Fort Worth, Texas 76102
9A5 Printed in Hong Kong
 Loading...