

Page 1
TM
42-541
User’s Guide
2GB MP3 Player
Please read this user’s guide before using your
new MP3 Player
Page 2

Package contents
• MP3 Player • Earbuds • Quick Start
• Mini USB cable • User’s Guide
Features
• 2GB storage space for music, voice and data
files.
• MP3, WMA and ID3 tag supported.
System Requirements
• Windows Vista™, Windows® XP (SP2),
Windows ME, Windows 2000.
• Pentium II 200; RAM 64MB
• USB 2.0
1 Transfer music files
1. Use the supplied mini USB cable to connect
the player to the USB port of your PC.
2. Open Window Media Player OR double click
“My Computer” in Windows. Then drag
your files to “Removable Disk.”
3. After the transfer is completed, disconnect
your player.
2
Page 3
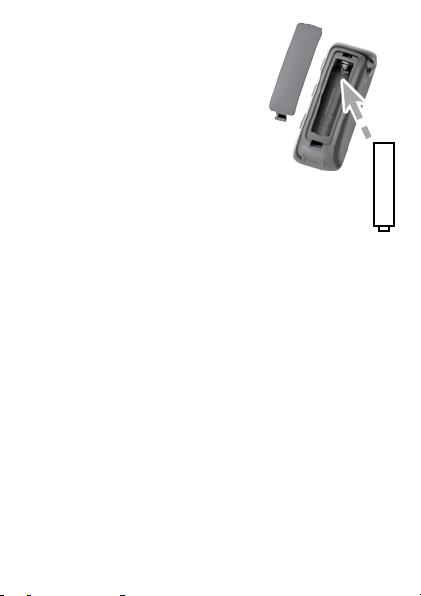
2 Install battery
Open the battery compartment
and insert one AAA alkaline or
1.2V NiMH battery, matching the
polarity symbols (+ –) marked
inside. Close the battery door.
b Battery Notes
• Dispose of batteries promptly
and properly. Do not burn or bury them.
• Use only fresh batteries of the required
size and type.
• If you do not plan to use the player for a few
weeks, remove the battery. Batteries can leak
chemicals that can damage electronic parts.
3 Enjoy music!
1. Connect the supplied earbuds to the player.
2. Turn on the player.
3. See “Controls and Basic Operation”
on pages 4-5 and “Menu Navigation” on
pages 7-10 to choose options for your music.
3
–
AAA
+
Page 4
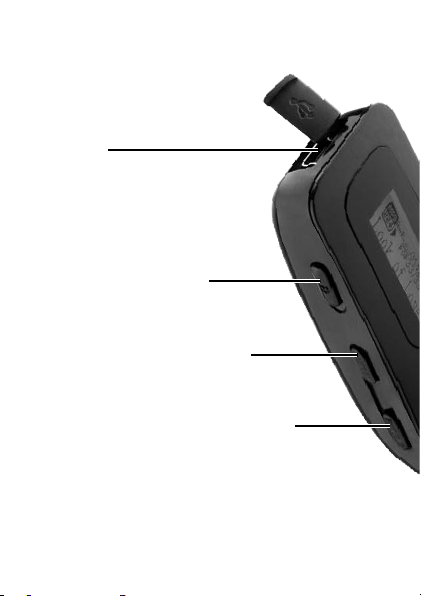
Controls and Basic Operation
USB port
Connect Mini USB cable
for file transfer.
HOLD
Slide to lock your MP3 player.
MENU
Display menu and submenu options.
REC/A-B
• During playback, press to set point A and
press again to set point B. The A-B section
is repeated. Press a third time to cancel A-B
looping.
• Voice recording
Press for 2 seconds to start recording. Press
briefly to end recording.
4
Page 5
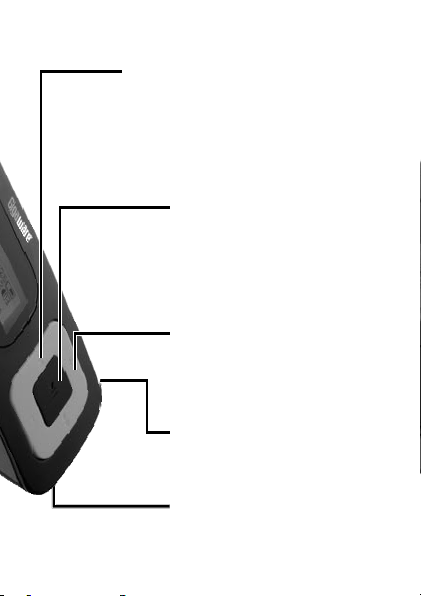
/ (Skip, search)
• Press
/ to skip to the next /
previous file.
• Press and hold
/ backward within a file.
/ to fast forward
§ (Power, play, pause)
• Press and hold to turn on / off.
• Press to start / pause playback
• Press to return to standby or a
previous menu.
+ /– (Volume)
Increase or decrease volume.
* (Headphones)
Insert 3.5mm earphones here.
MIC
Speak here for voice recording.
5
Page 6
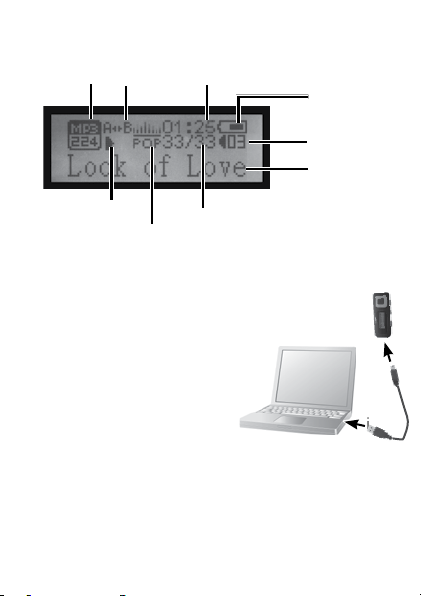
Display
Format/
Bit rate
Play mode
Equalizer setting
A-B loop
Elapsed time
Battery
indicator
Volume level
Song title/
ID3 tag
Track position/
total # of tracks
Transferring Music
1. Lift the USB cover and connect your PC’s
USB port to the player’s
mini USB port using the
included USB cable.
2. Double click “My
Computer” in in
Windows. Then drag
your files to “Audio Player” or “Removable
Disk.”
3. After the transfer is completed, disconnect
your player by doing one of the following:
6
Page 7

• If available, click the USB hardware icon
on the system tray. When the interface
“Unplug or Eject Hardware” appears, click
“Stop”.
• When the “
pop-up window appears, click “OK” and
disconnect the USB cable your PC and player.
Safe To Remove Hardware”
w Caution: ONLY UNPLUG THE PLAYER
WHEN ALL DOWNLOADING IS COMPLETED to
prevent corrupting files stored in your player or
formatting of your player.
Important Copyright Notice
Distribution of MP3 files without permission
from the content owner is against copyright laws.
Ignition L.P will not be liable against such actions.
Menu Navigation
Press MENU and use / to navigate.
Press MENU again to confirm the option and
suboptions available from
the main menu: Play Music,
Play Voice, Setting, Preview,
About, Folder, Exit.
7
Page 8

Main Menu
Play Music, Play Voice
Enters standby display of the last played music
track or voice recording.
Setting
This contains eight configuration submenus. See
details on page 9-10.
Preview
Play a 10 second intro of each music/ voice file.
About
View total memory size and software version.
Folder
Access your music and voice
folders and subfolders from
the root by using MENU and
/ . You can also select
to Play or either Delete a file
by further selecting Yes/ No
to confirm deletion.
Exit
Return to the previous mode.
8
Page 9

Submenus
Equalizer
For MP3/ WMA music
playback only. Six sound
options available: Normal,
Pop, Rock, Classical, Jazz, Bass.
Play Mode
For MP3/ WMA music playback only.
Normal: plays all files once.
Repeat One: continuously repeats the current file.
Repeat All: plays all files repeatedly.
Shuffle: plays all files repeatedly in random order.
Contrast
Adjust brightness.
Backlight
Display backlight options e.g. 5, 10 seconds,
Always off or Always on.
Powerset
Set the player to save energy by automatically
switching off in the stop mode after a preset
period (minutes) of inactivity: Disable, 2MIN,
10MIN, 30MIN.
9
Page 10

Recordset
Frequency options for voice recording: 8000Hz,
11000Hz, 16000Hz, 22000Hz.
Language
Select to display menus in English or Español.
Load Defaults
Option to revert your player to factory default
settings.
Exit
Return to the previous display.
Voice Recording
For best results, make sure you don’t block
the built-in microphone. Place the player close
to your mouth or close to the speaker you are
recording.
All your MIC recordings are saved under
Play Voice in .WAV format. Your recordings
are automatically assigned a file name:
MIC xxxxx.WAV, where xxxxx is a number from
00001 to 99999.
10
Page 11

1. Press REC/A-B for 2
seconds to start recording.
The player switches to
Voice mode if you were
previously in Music mode. The REC flag and
FREE memory bar appears. flashes during
recording.
2. Press again to stop. The recording flag, bar
and disappears.
3. Press to listen to your recording.
n Note: EQ settings do not affect voice files.
Troubleshooting
The player does not work
• Check if batter y is dead or inserted wrong.
• Check the
automatic power off mode has been
selected.
• Check if
The player keeps switching off by itself
• Check the
automatic power off time has been selected.
Select Disable.
Powerset setting to see if
HOLD is activated.
Powerset setting to see if an
11
Page 12

Unable to play music files
• Check if the player is in
Play Music mode.
• Check that the player contains any MP3 or
WMA files.
• MP3 or WMA file maybe corrupt. Download
the files again.
• Make sure the file is not copy-protected.
When using Windows Media Player, check
Tools > Options > Copy Music, where the
option Copy protect music is not selected.
Cannot download music file after connection
• Check if
HOLD is activated.
• Check if the Mini USB cable is properly
connected to the PC.
• Check your folder and file management. You
can only save a maximum of 256 folders in
the root directory. Use shorter file names
(less than 8 characters) and transfer your
folders/ files within subfolders to free up the
root directory.
Cannot open disk after connecting to PC
• Format the player. Press and hold
+. At
the same time, connect the USB cable to
the player and your PC. On your PC, when
12
Page 13

a circle appears
in box 1, press
the Firmware
Feature button to
format. Upgrade is
successful when a
tick appears in
box 1.
w Caution: All files will be deleted during
formatting, so make sure you back up your
files from time to time.
Listening Safely
Do not wear headphones, earphones, or earbuds
while operating a motor vehicle or riding a
bicycle. This can create a traffic hazard and could
be illegal in some areas. To protect your hearing:
• Do not listen at extremely high volume
levels. Extended high volume listening can
lead to permanent hearing loss.
• Set the volume to its lowest level, then turn
on your audio device and adjust the volume
to a comfortable listening level.
• Avoid increasing the volume. Your ears
will adapt to the volume level, so a level
13
Page 14

that does not cause discomfort might still
damage your hearing.
Important Safety
Precautions
To reduce the risk of product damage and
personal injury, follow these safety precautions:
• Do not disassemble, repair or modify
the player by yourself. Refer servicing to
qualified personnel.
• Do not dispose of the player in a fire: the
built-in battery may explode.
• Do not touch the player with your bare
hands if the built-in battery leaks. Contact
your service center for help. If your skin
or eyes have come into contact with the
battery liquid, wash thoroughly with clean
water and consult a doctor.
• Do not expose the unit to rain, moisture,
direct sunlight, sources of heat such as
radiators, or extreme temperatures.
• Do not use the player in extremely dry or
high static environments.
• Avoid dropping the player.
14
Page 15

• Do not place magnets on the player.
• Always disconnect the USB cable from the
computer and your player after use.
• Clean only with a dry cloth. Turn the player
off before cleaning. Do not use liquid
cleaners.
• Be sure to back up your files. Ignition L.P.
will not be liable for the loss of data due to
improper operation, repair, or other causes.
Specifications
Internal flash memory .................................... 2G
Weight (without battery) ................................
MP3 bit rate ...............................
WMA bit rate ...........................
8Kbps~320Kbps
32Kbps~384Kbps
S/N rate .......................................................
Dynamic range ............................................
Distortion .................................................... < 1%
Battery ...................up to 8 hours music playback
Dimensions (WHD). ......2.99 x 1.14 x 0.88 inches
............................................. (76 x 29 x 22.5 mm)
Specifications are subject to change and improvement without notice.
Actual product may vary from the images found in this document.
15
22g
75dB
80dB
Page 16

FCC Information
This equipment has been tested and found to comply with the limits
for a Class B digital device, pursuant to Part 15 of the FCC Rules. These
limits are designed to provide reasonable protection against harmful
interference in a residential installation. This equipment generates, uses
and can radiate radio frequency energy and, if not installed and used in
accordance with the instructions, may cause harmful interference to radio
communications. However, there is no guarantee that interference will
not occur in a particular installation. If this equipment does cause harmful
interference to radio or television reception, which can be determined by
turning the equipment off and on, the user is encouraged to try to correct
the interference by one or more of the following measures:
• Reorient or relocate the receiving antenna.
• Increase the separation between the equipment and receiver.
• Connect the equipment into an outlet on a circuit different from that to
which the receiver is connected.
• Consult the dealer or an experienced radio/TV technician for help.
Changes or modifications not expressly approved by Ignition L.P.
may cause interference and void the user’s authority to operate the
equipment.
This device complies with Part 15 of the FCC Rules. Operation is subject
to the following two conditions: (1) This device may not cause harmful
interference, and (2) this device must accept any interference received,
including interference that may cause undesired operation.
Product 2GB MP3 Player
Model 42--541
Responsible Party Ignition L.P.
Phone 866-315-0426
3102 Maple Ave Suite 450
Dallas, TX 75201
16
Page 17

Limited Warranty
Ignition L.P. warrants this product against defects in materials and
workmanship under normal use by the original purchaser for
(90) days after the date of purchase. IGNITION L.P. MAKES NO OTHER
EXPRESS WARRANTIES.
This warranty does not cover: (a) damage or failure caused by or attribut
able to abuse, misuse, failure to follow instructions, improper installation
or maintenance, alteration, accident, Acts of God (such as floods or
lightning), or excess voltage or current; (b) improper or incorrectly per
formed repairs by persons who are not a Ignition L.P. Authorized Service
Facility; (c) consumables such as fuses or batteries; (d) ordinary wear and
tear or cosmetic damage; (e) transportation, shipping or insurance costs;
(f) costs of product removal, installation, set-up service, adjustment or
reinstallation; and (g) claims by persons other than the original purchaser.
Should a problem occur that is covered by this warranty, take the product
and the sales receipt as proof of purchase date to the place of purchase.
Ignition L.P. will, at its option, unless otherwise provided by law: (a) repair
the product without charge for parts and labor; (b) replace the product
with the same or a comparable product; or (c) refund the purchase price.
All replaced parts and products, and products on which a refund is made,
become the property of Ignition L.P. New or reconditioned parts and
products may be used in the performance of warranty service. Repaired
or replaced parts and products are warranted for the remainder of the
original warranty period. You will be charged for repair or replacement of
the product made after the expiration of the warranty period.
IGNITION L.P. EXPRESSLY DISCLAIMS ALL WARRANTIES AND CONDI
TIONS NOT STATED IN THIS LIMITED WARRANTY. ANY IMPLIED
WARRANTIES THAT MAY BE IMPOSED BY LAW, INCLUDING THE
IMPLIED WARRANTY OF MERCHANTABILITY AND, IF APPLICABLE,
THE IMPLIED WARRANTY OF FITNESS FOR A PARTICULAR PURPOSE,
SHALL EXPIRE ON THE EXPIRATION OF THE STATED WARRANTY
PERIOD.
EXCEPT AS DESCRIBED ABOVE, IGNITION L.P. SHALL HAVE NO
LIABILITY OR RESPONSIBILITY TO THE PURCHASER OF THE PRODUCT
OR ANY OTHER PERSON OR ENTITY WITH RESPECT TO ANY LIABIL
ITY, LOSS OR DAMAGE CAUSED DIRECTLY OR INDIRECTLY BY USE
OR PERFORMANCE OF THE PRODUCT OR ARISING OUT OFIGNITION
L.P. EXPRESSLY DISCLAIMS ALL WARRANTIES AND CONDITIONS NOT
STATED IN THIS LIMITED WARRANTY. ANY IMPLIED WARRANTIES
THAT MAY BE IMPOSED BY LAW, INCLUDING THE IMPLIED WAR
RANTY OF MERCHANTABILITY AND, IF APPLICABLE, THE IMPLIED
ninety
-
-
-
17
-
-
Page 18

WARRANTY OF FITNESS FOR A PARTICULAR PURPOSE, SHALL
EXPIRE ON THE EXPIRATION OF THE STATED WARRANTY PERIOD.
EXCEPT AS DESCRIBED ABOVE, IGNITION L.P. SHALL HAVE NO
LIABILITY OR RESPONSIBILITY TO THE PURCHASER OF THE PRODUCT
OR ANY OTHER PERSON OR ENTITY WITH RESPECT TO ANY
LIABILITY, LOSS OR DAMAGE CAUSED DIRECTLY OR INDIRECTLY BY
USE OR PERFORMANCE OF THE PRODUCT OR ARISING OUT OF
ANY BREACH OF THIS WARRANTY, INCLUDING, BUT NOT LIMITED
TO, ANY DAMAGES RESULTING FROM INCONVENIENCE AND ANY
LOSS OF TIME, DATA, PROPERTY, REVENUE, OR PROFIT AND ANY
INDIRECT, SPECIAL, INCIDENTAL, OR CONSEQUENTIAL DAMAGES,
EVEN IF IGNITION L.P. HAS BEEN ADVISED OF THE POSSIBILITY OF
SUCH DAMAGES.
Some States do not allow limitations on how long an implied warranty
lasts or the exclusion or limitation of incidental or consequential
damages, so the above limitations or exclusions may not apply to you.
This warranty gives you specific legal rights, and you may also have other
rights which vary from State to State. You may contact Ignition L.P. at:
Ignition L.P., 3102 Maple Ave. Suite 450, Dallas, TX 75201 02/09
For product support, call
1-866-315-0426
Protect the environment by recycling used electronics. Go to
E-CyclingCentral.com to find an electronic recycling center
near you.
Windows, WMA and Windows Media Player are registered
trademarks of Microsoft Corporation. Windows Vista is a
trademark of Microsoft Corporation in the United States
and/or other countries.
© 2009. Ignition L.P. All rights reserved. Gigaware is a
trademark used by Ignition L.P.
Print ed
07A09
in China
42-541
18
 Loading...