

Page 1
21-1706.fm Page 1 Wednesday, January 9, 2002 8:37 AM
40 Channel Mobile CB
with Digital Compass, and EL
Backlit LCD Display
Owner’s Manual
Please read before using this equipment.
Page 2

21-1706.fm Page 2 Wednesday, January 9, 2002 8:37 AM
Features
Your RadioShack 40 Channel Mobile CB is a
great way to communicate with other CB
radio operators. You can mount it in a vehicle
for mobile use, or in your home for use as a
base station.
Your CB has these advanced features:
LCD display with EL backlight on display
and controls
operating status at a glance and helps you
easily see the display and controls when you
use the CB at night.
Digital Compass
road.
Emergency Channel One Touch Access
— lets you quickly switch to Channel 9 or 19
so you can monitor or report emergency
situations.
3 Channel Memories
access your favorite channels.
Last Channel Recall (RCL)
quickly recall the last channel used.
Dual Channel Controls
channel from the transceiver or the
microphone.
RF Gain Control
receiver’s gain to match the strength of the
signal.
Phase-Locked Loop (PLL) Frequency
Synthesizer
stable tuning.
Two Built-In Ceramic Filters
superior channel selectivity and freedom
from adjacent channel interference.
— lets you see the CB’s
— aids navigation on the
— let you easily
— Lets you
— let you tune the
— lets you adjust the
— provides highly accurate and
— ensure
2002 RadioShack Corporation.
©
RadioShack and RadioShack.com are trademarks used by RadioShack Corporation.
All Rights Reserved.
Automatic Modulation Control
the transmitter signal from over-modulating
and distorting.
Automatic Noise Limiter
impulse-type noises while receiving.
Built-In PA (Public Address) Amplifier
lets you use your CB as a public address
system when you add an optional PA
speaker.
Universal Mounting Bracket
mount your CB securely in your vehicle.
To use this CB, you must connect a
Note:
mobile or base station antenna. Your local
RadioShack store has a wide variety of
antennas. For more information, see
“Connecting an Antenna” on Page 4.
— prevents
— reduces
—
— lets you
FCC INFORMATION
The Federal Communications Commission
(FCC) does not require you to have a license
to operate this CB radio. However, you must
know Part 95 of
proper operation of a Class D citizen’s band
transceiver. We enclosed a copy of Part 95
with your CB radio.
Warning:
any internal adjustments. A CB radio is set
up to transmit a regulated signal on an
assigned frequency. It is against the law to
alter or adjust the settings inside the unit to
exceed these limitations.
To be safe and sure:
• Never open your CB radio’s case.
• Never change or replace anything in
your CB radio.
FCC Rules
Do not open the CB radio to make
. It explains the
2
Features
Page 3
21-1706.fm Page 3 Wednesday, January 9, 2002 8:37 AM
Your CB radio might cause TV or radio
interference even when it is operating
properly. To determine whether your CB is
causing the interference, turn off your CB. If
the interference goes away, your CB is
causing it. Try to eliminate the interference
by:
• moving your CB away from the receiver
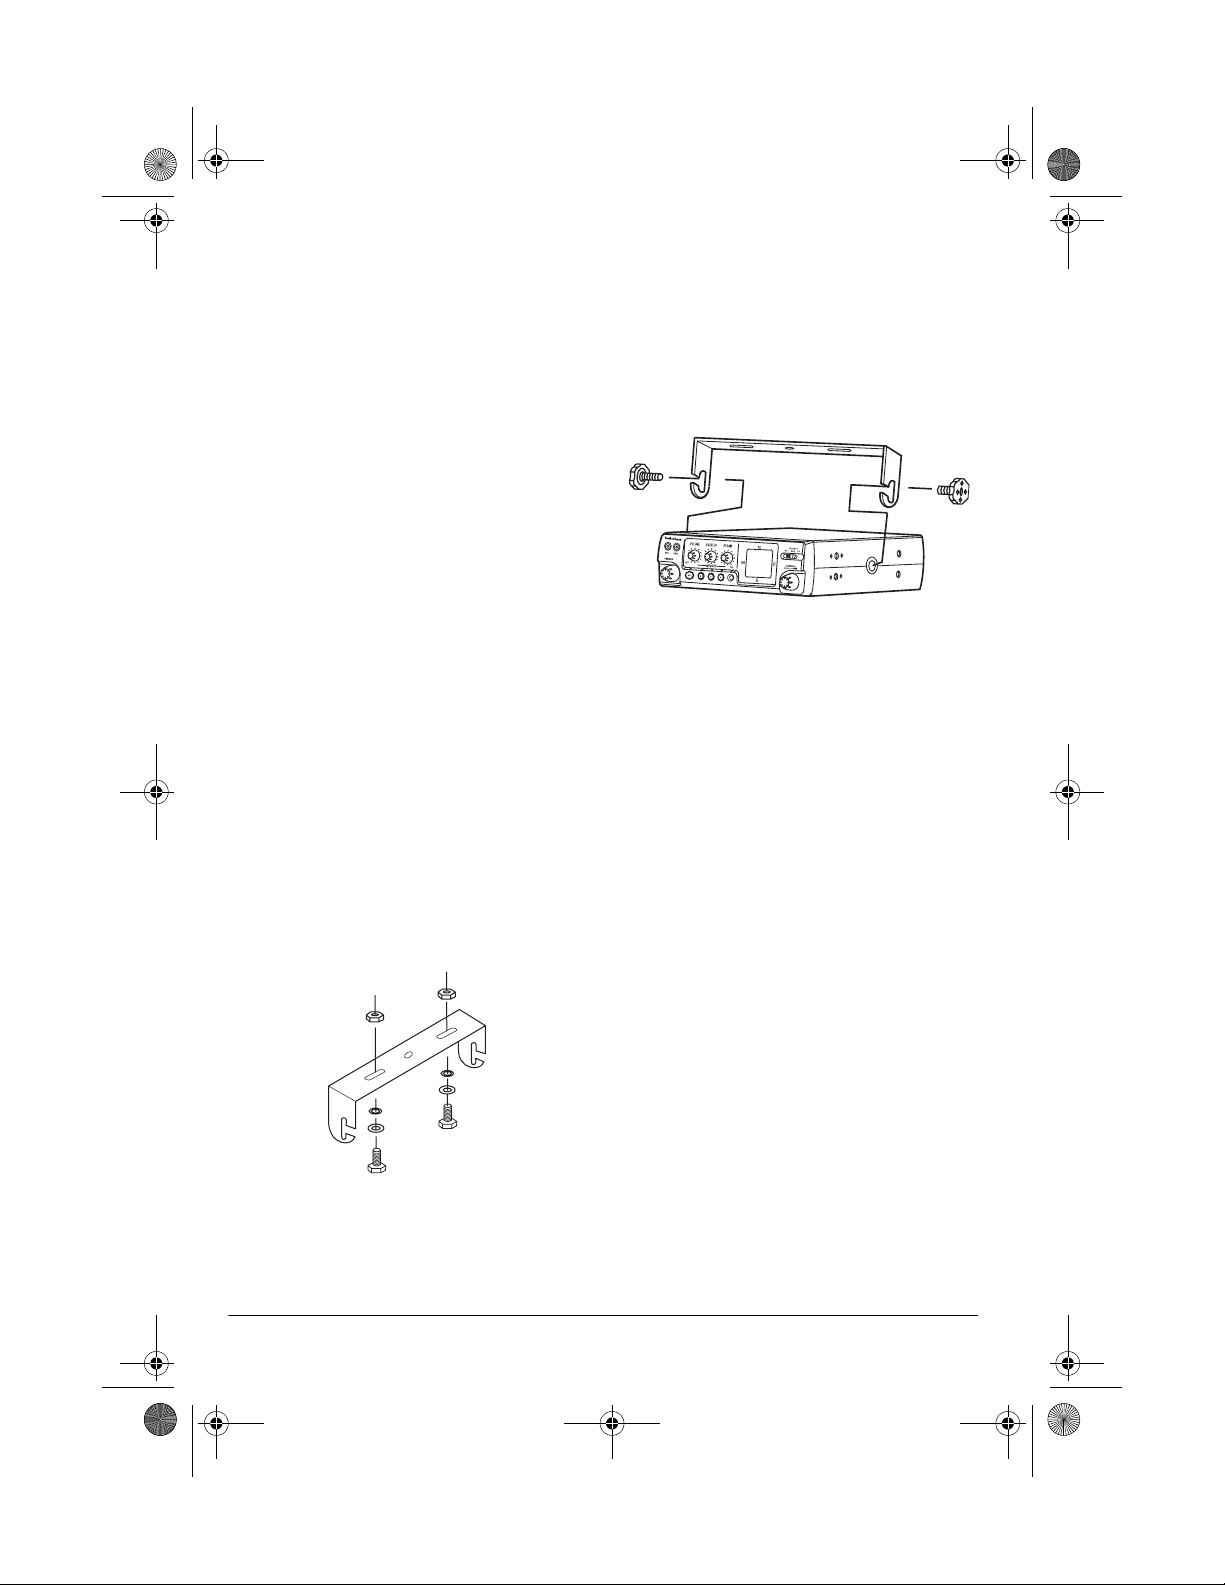
Installation
ATTACHING THE
MICROPHONE HOLDER
You can attach the microphone holder to the
right side of the transceiver or to another
location in your vehicle.
To attach the holder to the transceiver,
secure the holder to the right side using the
supplied 3 mm screws and lock washer.
To attach the holder to another location in
the vehicle, such as the dashboard, follow
these steps.
1. Using the holder as a template, mark th e
positions for the mounting screw holes
at the desired location.
2. At each marked position, drill a small
starter hole.
Caution:
anything behind the mounting surface.
3. Attach the holder at the mounting
location using the supplied machine
Be careful not to drill into
• contacting your local RadioShack store
for help
This device complies with Part 15 of the
following two conditions: (1) this device may
not cause harmful interference, and (2) this
device must accept any interference
received, including interference that may
cause undesired operation.
screws, spring washers, plain washers,
and nuts.
If you cannot reach behind the
Note:
mounting surface to attach the nuts on
the machine screws, use the supplied 3
mm plain washers and self-tapping
screws.
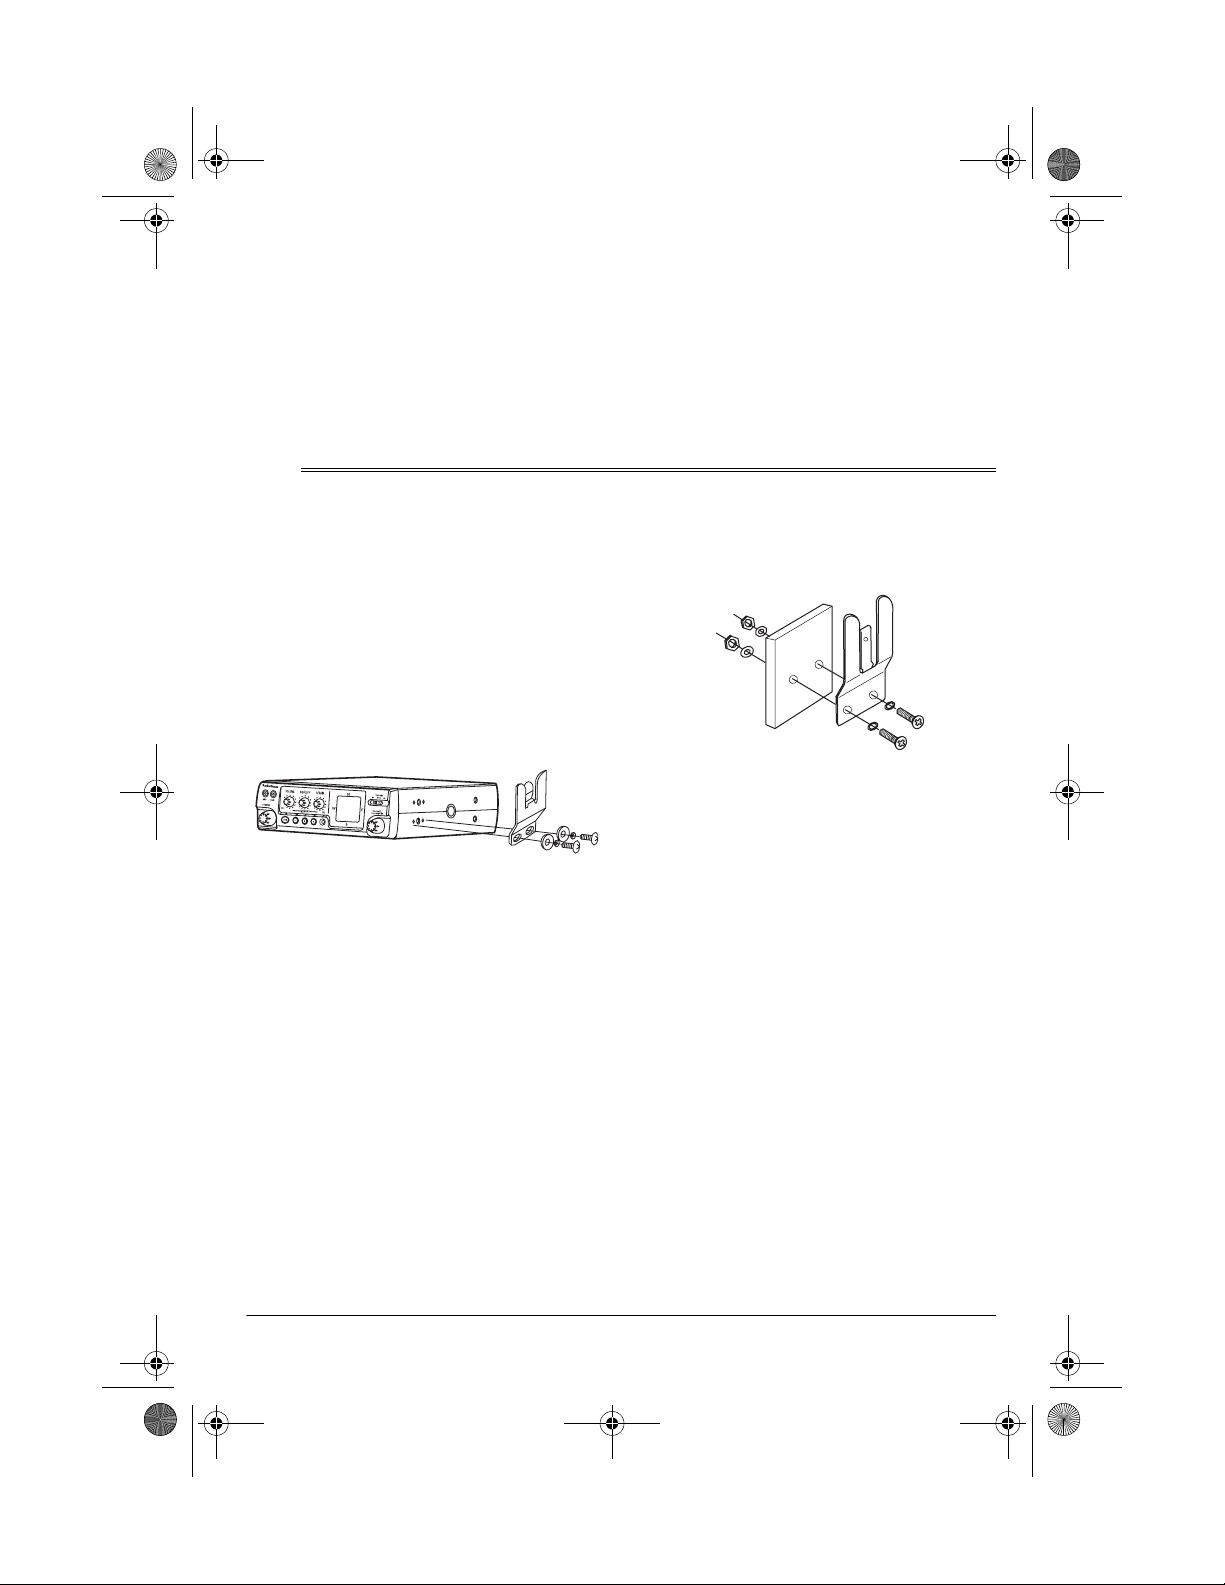
MOUNTING THE
TRANSCEIVER
The most common mounting location for this
CB is under a vehicle’s dashboard. However,
if you plan to use the CB as a base station,
you can place it on a desk, shelf, or table
(see “Using the Transceiver as a Base
Station” on Page 6).
If you are mounting the CB in a vehicle,
choose a location where:
• You can easily reach the CB.
Installation
• Wires and cables are clear of the
vehicle’s pedals or other moving parts.
3
Page 4
21-1706.fm Page 4 Wednesday, January 9, 2002 8:37 AM
• The CB is not directly in front of heating
vents.
• All wires and cables can reach their
connection points.
Warnings:
• If you use the CB in a vehicle, mount it
securely to avoid damage to the CB or
vehicle or injury to anyone in the vehicle
during sudden starts or stops.
• Do not mount the CB where it could
damage or interfere with the operation of
any passive restraint safety device (an
airbag or seat belt).
Follow these steps to mount the CB using
the supplied hardware.
1. Using the mounting bracket as a
template, mark the positions for the
screw holes on the mounting surface.
2. In each marked location, drill a small
starter hole.
Caution:
objects behind the mounting surface.
3. Mount the bracket to the mounting
surface with the supplied 5 mm bolts,
spring washers, plain washers, and
nuts.
Be careful not to drill into
tapping screws and plain washers to
secure the bracket.
4. Peel the backings off the adhesive on
the back of the supplied rubber washers
and attach the washers to the mounting
holes on the CB. then attach the CB to
the mounting bracket using the
mounting knobs.
CONNECTING AN ANTENNA
There are many different types of CB
antennas for mobile CBs. Each type has its
own benefits, so choose the one that best
meets your needs. Your cal RadioShack
store sells a wide variety of antennas.
If you are using this CB as a base
Note:
station, see “Using the Transceiver as a
Base Station” on Page 6.
When you choose an antenna, keep in mind
that, for the best performance, you should
mount the antenna:
• as high as possible on the vehicle
If you cannot reach behind the
Note:
mounting surface to attach the nuts on
the bolts, use the supplied 5 mm self-
4
• as far as possible from sources of
electrical noise
• vertically
Once you choose an antenna, follow its
mounting instructions. Then route the cable
to the transceiver and connect the cable to
Installation
Page 5

21-1706.fm Page 5 Wednesday, January 9, 2002 8:37 AM
the
ANTENNA
jack on the back of the
transceiver.
Antenna
Cautions:
• Avoid routing the cable next to sharp
edges or moving parts, which might
damage the cable.
• Do not run the cable next to power
cables or other radio antenna cables.
• Do not run the cable through the engine
compartment or other areas that
produce extreme heat.
To take advantage of your radio’s maximum
range, adjust the antenna’s Standing Wave
Ratio (SWR) using an SWR meter (not
supplied).
Follow the instructions supplied with the
SWR meter and antenna to adjust your
antenna’s SWR to the lowest possible value.
SWR values of 2.0:1 are generally
acceptable, with readings of 1.5:1 or lower
being more desirable.
To disconnect the microphone from the
transceiver, press the tab on the side of the
plug. Then pull out the plug.
Caution:
Never pull on the microphone
cable.
CONNECTING AN
EXTERNAL SPEAKER
You can connect your transceiver to an
external CB speaker, so you can hear an
incoming call when you are outside your
vehicle, or use the CB as a PA system.
Connecting a CB Speaker
The external speaker you use with the
transceiver should have an impedance of 8
ohms and be able to handle 10 watts of
power. The speaker cable must have a
inch plug.
To connect the external speaker to the
transceiver, insert the speaker cable’s plug
into
EXT SPKR
Note:
When you connect an external
on the back of the CB.
speaker, the CB’s internal speaker
disconnects.
Connecting a PA Speaker
The PA speaker should have an impedance
of 8 ohms and be able to handle 10 watts of
power. The speaker cable must have a
inch plug.
1
/8-
1
/8-
CONNECTING THE
MICROPHONE
Align the tab on the side of the supplied
microphone’s plug with the notch in the
microphone jack (on the side of the
transceiver). Then insert the plug into the
jack.
Slide the microphone onto the microphone
holder.
If your PA speaker meets the other
specifications but does not already have a
8-inch plug, you can connect it using a phono
plug-to-wire cable, available at your local
RadioShack store.
To connect the PA speaker to the
transceiver, insert the speaker cable’s plug
into
Installation
PA SPKR
on the back of the CB.
1
/
5
Page 6
21-1706.fm Page 6 Wednesday, January 9, 2002 8:37 AM
To avoid acoustic feedback, the
Note:
speaker should be at least 6 feet from the
CB. If you experience feedback, avoid keying
the microphone until you have moved the
speaker away from the CB.
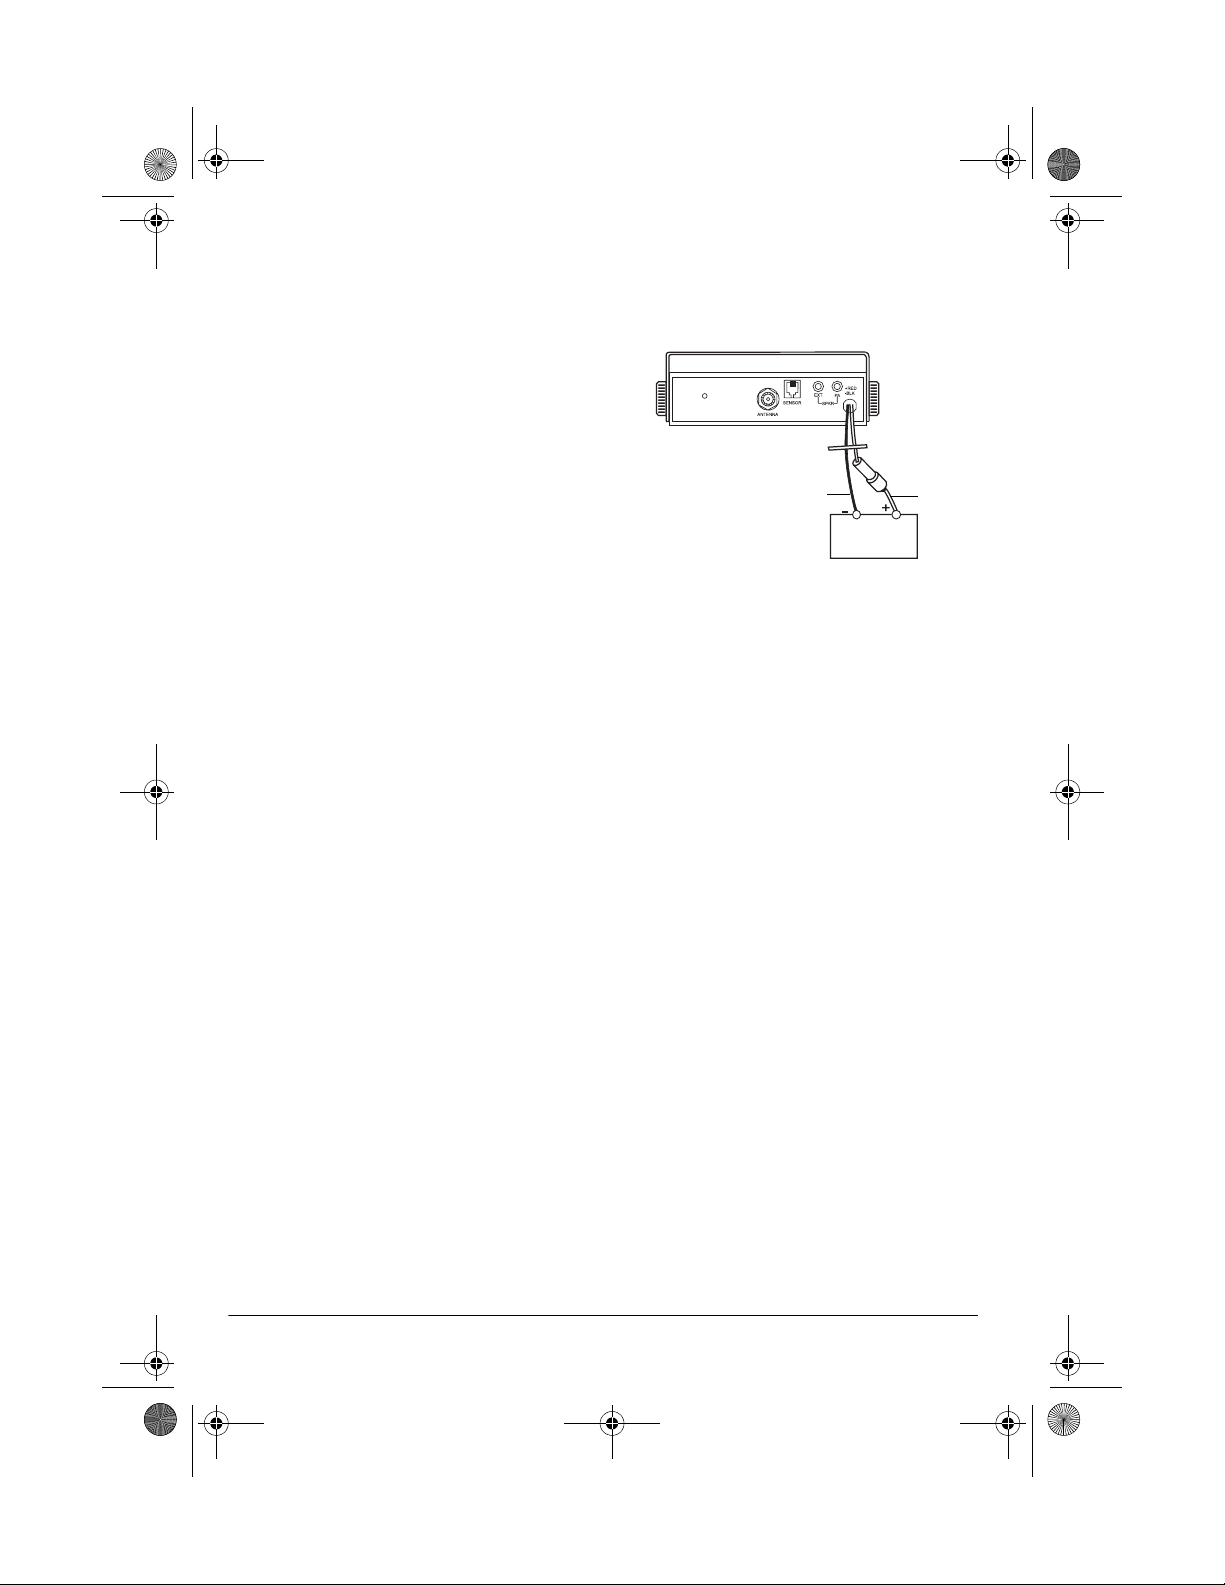
CONNECTING THE
COMPASS
USING VEHICLE BATTERY
POWER
Follow these steps to connect the transceiver
to vehicle battery power.
Insert the compass cable’s plug into
on the back of the CB. Do not place the
compass cable near the DC cord or the
antenna cable.
SENSOR
CONNECTING AN
OPTIONAL MICROPHONE/
EARPHONE
You can connect an optional microphone or
earphone with a
and a 1/8-inch (3.5mm) plug to the
jacks on the front of the CB.
To connect a headset with Voice Activated
operation, we recommend you check the
response sensitivity of the VOX circuit before
installation. Different Voice Activation
devices provide different performance
results.
Traffic Safety
Do not use an earphone with your
transceiver when operating a motor vehicle
in or near traffic. Doing so can create a traffic
hazard and could be illegal in some areas.
If you use an earphone with your transceiver
be very careful. Do not listen to a continuous
broadcast. Even though some earphones/
headphones let you hear some outside
sounds when listening at normal volume
levels, they still can present a traffic hazard.
3
/32-inch (2.5mm) mini plug
MIC/EAR
Black
1. Connect the red wire (with the inline
fuse holder) on the back of the
transceiver to a point in your vehicle’s
fuse block that has power only when the
ignition is in the ACC (accessory) or ON
position.
2. Connect the black wire to a metal part of
the vehicle’s frame (chassis ground).
Caution:
to a non-metallic (plastic) part, or to any
part insulated from the vehicle’s chassis
by a non-metallic part.
Do not connect the black wire
USING THE TRANSCEIVER
AS A BASE STATION
Although this transceiver is designed mainly
for mobile use, you can also use it as a base
station with an AC power source.
For base station installation, you need these
items:
• 12-volt DC power supply that can supply
at least 2 amps
Caution:
supplies plug into a standard AC outlet
to produce DC power. Before
connecting your CB to a 12-volt DC
Most 12-volt DC power
Red
6
Installation
Page 7
21-1706.fm Page 7 Wednesday, January 9, 2002 8:37 AM
power supply, read and follow the
instructions included with the power
supply.
• base station antenna.
• coaxial antenna cable and connectors,
available at your RadioShack store.
For the best performance, place the antenna
as far as the cable length.
Caution:
To prevent damage to the CB, be
sure you connect an antenna and the
microphone before you use your CB.
Follow these steps to install the CB as a
base station.
1. Mount the base station antenna as
described in its owner’s manual.
Warning:
Use extreme caution when
you install or remove a base station CB
antenna. If the antenna starts to fall, let it
go! It could contact overhead power
lines. If the antenna touches a power
line, contact with the antenna, mast,
cable, or guy wires can cause
electrocution and death. Call the power
company to remove the antenna. Do not
attempt to do so yourself!
3. Connect the transceiver’s black power
wire to the negative (–) terminal on the
DC power supply.
4. Connect the transceiver’s red wire (with
the in-line fuse) to the positive (+)
terminal on the DC power supply.
5. Connect the DC power supply to a
standard AC outlet.
Caution:
To comply with the FCC RF
Exposure compliance requirements, a
separation distance of at least 20.0 cm
must be maintained between this
device’s antenna and all persons.This
device must transmit with a sourcebased time-averaging duty factor not
exceeding 50%.
Installation and Operation
Note:
instructions are for satisfying FCC RF
Exposure compliance.
2. Connect the antenna to
ANTENNA
the back of the CB.
on
Installation
7
Page 8

21-1706.fm Page 8 Wednesday, January 9, 2002 8:37 AM
Operation
Before you use your CB, you should know
how to use it effectively and courteously.
“Transmission Courtesy” on Page 10
contains information that will help you get
more enjoyment from your CB.
RECEIVING
TRANSMISSIONS AND
ADJUSTING SQUELCH
1. Set
PA/MON/CB
2. Turn
3. Turn
4. Turn on the transceiver by turning
5. Rotate the channel selector, or
6. Adjust
7. To cut out background noise between
SQUELCH
RF GAIN
VOLUME
segments appear briefly. Then the
channel and
repeatedly press (or hold down)
on the microphone until the
DOWN
desired channel appears.
VOLUME
listening level.
transmissions, wait until there is no
signal, then slowly turn
clockwise until the background noise
stops.
Notes:
• To receive very weak signals, turn
SQUELCH
hear noise between transmissions,
but you also hear weak transmissions
(those not strong enough to break
through a higher squelch setting).
to CB.
fully counterclockwise.
fully clockwise.
clockwise until it clicks. All LCD
HN
appear.
or
UP
to a comfortable
SQUELCH
counterclockwise. You
counterclockwise to reduce the
receiver’s sensitivity.
to
To turn off the CB, turn
it clicks.
VOLUME
OFF
until
TRANSMITTING
Note:
we recommend you try receiving
before you transmit.
Follow Steps 1–7 in “Receiving
Transmissions and Adjusting Squelch.”
to
on the
OFF
until
To transmit, hold down
microphone. JN appears. Hold the
microphone 2–3 inches from your mouth and
speak in a normal tone of voice, then release
PUSH TO TALK
disappears.
To turn off the CB, turn
it clicks.
when you finish. JN
PUSH TO TALK
VOLUME
SELECTING THE
EMERGENCY CHANNEL
Important:
reserved for motorist assistance and for
reporting emergency information about
accidents, hazardous road conditions, and
so on. Always give emergency messages
priority on Channel 9 or Channel 19.
To select the emergency channel 9, press
the channel selector once. Press again to
select channel 19.
more time to return to the previous selected
channel.
You can also select Channel 9 or 19 by
turning the channel selector or pressing
or
DOWN
Channel 9 and Channel 19 are
/
or '/ flashes. Press one
on the microphone.
UP
• If you experience interference from
nearby frequencies, turn
8
RF GAIN
Operation
To select another channel, rotate the
channel selector or press
UP
or
DOWN
.
Page 9

21-1706.fm Page 9 Wednesday, January 9, 2002 8:37 AM
USING THE PA AMPLIFIER
Your CB has a built-in PA (public address)
amplifier. With an optional PA speaker (see
“Connecting a PA Speaker” on Page 5), you
can turn your radio into a mobile public
address system.
1. Turn on the transceiver . Set
PA/MON/CB
to PA. F7 appears.
2. To transmit, hold down
PUSH TO TALK
on the microphone. Hold the
microphone 2–3 inches from your mouth
and speak in a normal tone of voice.
3. Turn
VOLUME
for the desired volume
level. If you hear high-pitched squeal,
turn
VOLUME
counterclockwise until the
squeal stops.
Note:
To avoid acoustic feedback, the
speaker should be at least 6 feet from
the CB. If you experience feedback,
avoid keying the microphone until you
have moved the speaker away from the
CB.
To turn off the PA amplifier, turn the
transceiver off. Or, set
PA/MON/CB
to CB for
CB communication.
USING MONITOR
You can use your CB as a receiver to listen
to transmissions on an optional PA speaker.
With a PA speaker connected, set PA/
to
CB
. Your CB cannot transmit and you
MON
MON
hear sound only from the external PA
speaker.
USING THE COMPASS
from the magnetic field generated by
external influences (such as your vehicle),
providing more accurate heading
information.
Calibrate the compass anytime you move it,
or whenever distortion continuously appears.
Before calibration, peel off the backing on
one side of the tape and attach the tape to
the back of the compass, then mount the
compass by peeling off the backing on the
other side of the tape, then press the
compass onto the level mounting surface.
Notes:
• Before calibration, end CB transmission
and make sure the CB is not tuned to
the Emergency channel 9 or 19 or in PA
mode.
• Do not calibrate the compass near metal
or a strong magnetic field.
• The compass is not available in TX
mode.
for a second. All eight
1. Hold down
CAL
cardinal points flash.
2. Drive your vehicle in two complete
circles. Be sure your vehicle is on level
ground, in an open area, such as a
parking lot.
3. Press
/
After calibration, the current compass
to confirm calibration
CAL
heading displays. For example, if the
compass heading is south, the south cardinal
point appears. Or, if the compass heading is
northeast-north, the northeast cardinal point
appears and the north cardinal point flashes.
You can easily view your current heading at
a glance. There are eight cardinal points on
the display — north, northeast, east,
southeast, south, southwest, west,
northwest. Calibration helps the compass
better separate the earth’s magnetic field
USING MEMORY
You can store three channels in the memory.
The preset channel stored in
and
Operation
is Channel 1. Press the memory
MEM3
MEM1, MEM2
,
9
Page 10

21-1706.fm Page 10 Wednesday, January 9, 2002 8:37 AM
location number to switch to the stored
channel. The channel number,
C;C
and the
memory location number appear.
Note: When you rotate the channel selector
or press
UP
or
on the microphone to
DOWN
turn to the channel stored in the memory,
C;C
and the memory location number
appear.
Follow these steps to store a channel in
memory.
1. Select the desired channel.
2. Hold down the desired memory location
C;C
button for a second.
and the
memory location number flash twice.
USING LAST CHANNEL
RECALL (RCL)
In CB or monitor mode, press
to the last channel used for more than 3
seconds. Press
again to return to the
RCL
previous channel.
Notes:
RCL
to return
TRANSMISSION COURTESY
Follow these guidelines for radio courtesy
when using your CB.
• Wait for a pause in someone else’s
transmission before you ask for a break.
• If you do not receive an answer to your
call after a second attempt, sign off and
wait several minutes before trying again.
• Do not hold down
PUSH TO TALK
when
you are not talking. (This is called dead
keying.)
• Assist callers with directions, information
about road conditions, and any other
reasonable requests.
USING COMMON 10-CODES
CB users have adopted the 10-codes for
standard questions and answers.
This table lists common codes adopted by
the Associated Public Safety
Communications Officers (APCO).
• The channel will only be saved to RCL
memory when the current channel is
manually turned using the rotary switch
and stays on the channel for more than
3 seconds.
• You cannot recall an emergency
channel or a memory channel by
pressing
RCL
.
ADJUSTING THE
BACKLIGHT
You can adjust the backlight by rotating
DIMMER
DIMMER
10
. To turn off the backlight, rotate
fully counterclockwise.
Code Meaning
10-1 Your signal is bad.
10-2 Your signal is good.
10-3 Stop transmitting.
10-4 Message received and understood.
10-5 Relay information to _____.
10-6 I am busy or are you busy?
10-7 Out of service.
10-8 In service.
10-9 Repeat last message.
10-10 Negative (NO).
10-11 _____ in service.
10-12 Stand by.
10-13 Report road/weather conditions.
10-14 Information.
Operation
Page 11

21-1706.fm Page 11 Wednesday, January 9, 2002 8:37 AM
Code Meaning
10-15 Message delivered.
10-16 Reply to message.
10-17 En route.
10-18 Urgent.
10-19 Contact _____.
10-20 What is your location?
10-21 Call _____ by telephone.
10-22 Cancel last message.
10-23 Arrived at the scene.
10-24 Assignment complete.
10-25 Meet _____.
10-26 Estimated time of arrival is _____.
10-30 Use caution.
10-31 Pick up.
10-33 Emergency traffic. Clear the channel.
10-34 What time is it?
10-41 Switch to Channel _____.
10-62 Cannot understand.
Although this table lists the 10-codes’
Note:
meanings in the form of a statement, they
can also be phrased as questions (10-6: Are
you busy?, 10-20: What is your location?).
• The number of nearby radios operating
on the same channel
• Standing wave ratio (SWR) between the
antenna and the CB.
Your CB radio’s transmission rage is
Note:
generally line-of -sight.
MAXIMUM RANGE
The maximum range and quality of CB radio
transmissions vary depending on the
following conditions:
• The type and quality of antenna used
• The height of the antenna’s mounting
location — the higher the antenna, the
better the signal’s range
• The surrounding terrain — mountains
and tall buildings limit the range
• Weather conditions
Operation
11
Page 12

g
21-1706.fm Page 12 Wednesday, January 9, 2002 8:37 AM
Troubleshootin
If your CB is not working as it should, follow
these suggestions to see if you can eliminate
Symptom Check/Try
CB has trouble receiving. Turn transceiver power on.
Microphone connected? Secure connections.
Antenna connected? Secure connections.
Too much squelch? Adjust as needed.
Radio not on operating channel? Switch to an active channel.
Be sure PA/
Adjust
Adjust RF
CB has trouble transmitting. Turn transceiver power on.
Antenna connected? Secure connections.
All connections free of corrosion? Clean and tighten.
Microphone connector loose? Firmly press microphone con-
nector into jack.
Be sure PA/
Radio not on operating channel? Switch to an active channel.
PUSH TO TALK
CB does not work at all. Power connected? Secure connections.
Microphone connected? Secure connections.
Fuse needs replacing? Replace with identical fuse. See
“Replacing the Fuse” on Page 13.
Cannot select a channel. Be sure PA/
PUSH TO TALK
PA does not work. Connect a PA speaker. Secure connections.
Be sure PA/
Adjust
Sound is distorted. Adjust RF
Adjust
the problem. If you cannot, take the CB to
your local RadioShack store for assistance.
MON/CB
VOLUME
GAIN
MON/CB
MON/CB
MON/CB
VOLUME
GAIN
VOLUME
is set to CB.
.
.
is set to CB.
fully pressed? Press completely.
is set to CB.
pressed? Release
is set to PA.
.
.
.
PUSH TO TALK
.
12
Troubleshooting
Page 13

21-1706.fm Page 13 Wednesday, January 9, 2002 8:37 AM
REDUCING NOISE
Because your CB is exceptionally quiet, any
noise you hear is probably from an external
source in your vehicle such as the alternator,
another radio or spark plugs.
The transceiver uses an ANL (Automatic
Noise Limiter) circuit to reduce noise.
However, if possible, try to eliminate noise by
finding its source.
You can determine the noise’s source by
turning off the engine and operating the CB
with your vehicle’s ignition set to ACC. If the
noise is reduced, the problem is in your
vehicle’s ignition or electrical system.
Here are a few hints to help you reduce or
eliminate such noise:
• Make all CB power and antenna wires
as short as possible.
• Route the power wires away from the
antenna wires.
• Be sure that the chassis ground
connection is secure.
CARE
To enjoy your CB for a long time, keep the
CB dry. If it gets wet, wipe it dry immediately.
Use and store the CB only in normal
temperature environments. Handle the CB
gently and carefully. Do not drop it. Keep the
CB away from dust and dirt. Wipe the CB
with a damp cloth occasionally to keep it
looking new.
Modifying or tampering with the CB’s internal
components can cause malfunction and
invalidate its warranty and void your FCC
authorization to operate it. If your CB is not
performing as it should, take it to your local
RadioShack store for assistance.
REPLACING THE FUSE
The CB’s 2-amp in-line fuse helps protect
your CB from power surges and short
circuits. When replacement is required, use a
2-amp, slow-blow glass fuse.
Caution:
than those specified. Doing so might damage
your CB.
Do not use a fuse with ratings other
• Replace old ignition wires with new,
high-voltage, noise suppression wires.
• Install noise suppressors on your spark
plugs, or install new spark plugs that
have built-in noise suppressors.
• If problems persist, check your
alternator/generator and regulator
gauges. You can reduce the noise from
these sources by using bypass
capacitors at the various output voltage
points.
Your local RadioShack store has a wide
selection of noise suppression accessories.
Troubleshooting
Follow these steps to replace the fuse.
1. Make sure the power source and CB are
both off.
2. Hold the fuse holder by both ends, push
the ends together, twist one end
counterclockwise, then pull them apart.
3. Remove the old fuse. If it is blown, insert
a new one of the same type and rating.
If it is not blown, reinsert it.
4. Push the fuse holder ends together and
twist one end clockwise.
13
Page 14

Page 15

21-1706.fm Page 15 Wednesday, January 9, 2002 8:37 AM
Notes
Notes
15
Page 16

21-1706.fm Page 16 Wednesday, January 9, 2002 8:37 AM
Limited Ninety-Day Warranty
This product is warranted by RadioShack against manufacturing defects in material and workmanship under normal use for ninety (90) days from the date of purchase from RadioShack companyowned stores and authorized RadioShack franchisees and dealers. EXCEPT AS PROVIDED
HEREIN, RadioShack MAKES NO EXPRESS WARRANTIES AND ANY IMPLIED WARRANTIES,
INCLUDING THOSE OF MERCHANTABILITY AND FITNESS FOR A PARTICULAR PURPOSE,
ARE LIMITED IN DURATION TO THE DURATION OF THE WRITTEN LIMITED WARRANTIES
CONTAINED HEREIN. EXCEPT AS PROVIDED HEREIN, RadioShack SHALL HAVE NO LIABILITY OR RESPONSIBILITY TO CUSTOMER OR ANY OTHER PERSON OR ENTITY WITH RESPECT TO ANY LIABILITY, LOSS OR DAMAGE CAUSED DIRECTLY OR INDIRECTLY BY USE
OR PERFORMANCE OF THE PRODUCT OR ARISING OUT OF ANY BREACH OF THIS WARRANTY, INCLUDING, BUT NOT LIMITED TO, ANY DAMAGES RESULTING FROM INCONVENIENCE, LOSS OF TIME, DATA, PROPERTY, REVENUE, OR PROFIT OR ANY INDIRECT,
SPECIAL, INCIDENT AL, OR CONSEQ UENTIAL DAMAGES, EVEN IF RadioShac k HAS BEEN ADVISED OF THE POSSIBILITY OF SUCH DAMAGES.
Some states do not allow limitations on how long an implied warranty lasts or the exclusion or limit ation of incidental or consequential damages, so the above limitations or exclusions may not apply to
you.
In the event of a product defect during the warranty period, take the product and the RadioShack
sales receipt as proof of purchase date to any RadioShack store. RadioShack will, at its option, unless otherwise provided by law: (a) correct the defect by product repair without charge for parts and
labor; (b) replace the product with one of the same or similar design; or (c) refund the purchase
price. All replaced parts and products, and products on which a refund is made, become the property of RadioShack. New or reconditioned parts and products may be used in the performance of
warranty service. Repaired or replaced parts and products are warranted for the remainder of the
original warranty period. You will be charged for repair or replacement of the product made after the
expiration of the warranty period.
This warranty does not cover: (a) damage or failure caused by or attributable to acts of God, abuse,
accident, misuse, improper or abnormal usage, failure to follow instructions, improper installation or
maintenance, alteration, lightning or other incidence of excess voltage or current; (b) any repairs
other than those provided by a RadioShack Authorized Service Facility; (c) consumables such as
fuses or batteries; (d) cosmetic damage; (e) transportation, shipping or insurance costs; or (f) costs
of product removal, installation, set-up service adjustment or reinstallat i on.
This warranty gives you specific legal rights, and you may also have other rights which vary from
state to state.
RadioShack Customer Relations, 200 Taylor Street, 6th Floor, Fort Worth, TX 76102
We Service What We S ell
12/99
RadioShack Corporation
Fort Worth, Texas 76102
21-1706
AO0083AAA1
1A02
Printed in China
Page 17

47 CFR Ch. I (10–1–01 Edition)§ 95.222
(3) Tune a receiver to your R/C trans-
mitter.
(Secs. 4(i) and 303(r), Communications Act of
1934, as amended, 47 U.S.C. 154(i) and 303(r),
and sec. 553 of the Administrative Procedures Act, 5 U.S.C. 553)
[48 FR 24890, June 3, 1983, as amended at 49
FR 20673, May 16, 1984; 63 FR 36610, July 7,
1998]
§ 95.222 (R/C Rule 22) May I make any
changes to my R/C station transmitter?
(a) You must not make or have anyone else make an internal modification
to your R/C transmitter.
(b) Internal modification does not include:
(1) Repair or servicing of an R/C station transmitter (see R/C Rule 21,
§ 95.221); or
(2) Changing plug-in modules which
were certificated as part of your R/C
transmitter.
(c) You must not operate an R/C
transmitter which has been modified
by anyone in any way, including modification to operate on unauthorized frequencies or with illegal power. (See R/
C Rules 9 and 10, §§ 95.209 and 95.210.)
[48 FR 24894, June 3, 1983, as amended at 63
FR 36610, July 7, 1998]
§ 95.223 (R/C Rule 23) Do I have to
make my R/C station available for
inspection?
(a) If an authorized FCC representative requests to inspect your R/C station, you must make your R/C station
and records available for inspection.
(b) An R/C station includes all of the
radio equipment you use.
§ 95.224 (R/C Rule 24) What are my sta-
tion records?
Your station records include the following documents, as applicable:
(a) A copy of each response to an FCC
violation notice or an FCC letter. (See
R/C Rule 19, § 95.219.)
(b) Each written permission received
from the FCC. (See R/C Rule 17.)
§ 95.225 (R/C Rule 25) How do I contact
the FCC?
(a) FCC National Call Center at 1–
888–225–5322.
(b) FCC World Wide Web homepage:
http://www.fcc.gov.
(c) In writing, to FCC, Attention: R/
C, 1270 Fairfield Road, Gettysburg, PA
17325–7245.
[63 FR 68976, Dec. 14, 1998]
Subpart D—Citizens Band (CB)
Radio Service
S
OURCE
otherwise noted.
§ 95.401 (CB Rule 1) What are the Citi-
are:
Service—a private, two-way, short-distance voice communications service for
personal or business activities of the
general public. The CB Radio Service
may also be used for voice paging.
(FRS)—a private, two-way, very shortdistance voice communications service
for facilitating family and group activities. The rules for this service are
contained in subpart B of this part.
(LPRS)—a private, short-distance communication service providing auditory
assistance to persons with disabilities,
persons who require language translation, and persons in educational settings, health care assistance to the ill,
law enforcement tracking services in
cooperation with law enforcement, and
point-to-point network control communications for Automated Marine Telecommunications System (AMTS) coast
stations licensed under part 80 of this
chapter. The rules for this service are
listed under subpart G of this part.
Two-way voice communications are
prohibited.
tions Service (MICS)—an ultra-low
power radio service for the transmission of non-voice data for the purpose of facilitating diagnostic and/or
therapeutic functions involving implanted medical devices. The rules for
this service are contained in subpart I
of this part.
Service (WMTS)—a private, short distance data communication service for
: 48 FR 24894, June 3, 1983, unless
G
ENERALPROVISIONS
zens Band Radio Services?
The Citizens Band Radio Services
(a) The Citizens Band (CB) Radio
(b) The Family Radio Service
(c) The Low Power Radio Service
(d) The Medical Implant Communica-
(e) The Wireless Medical Telemetry
538
VerDate 11<MAY>2000 09:08 Oct 16, 2001 Jkt 194192 PO 00000 Frm 00538 Fmt 8010 Sfmt 8010 Y:\SGML\194192T.XXX pfrm04 PsN: 194192T
Page 18

Federal Communications Commission § 95.405
the transmission of patient medical information to a central monitoring location in a hospital or other medical
facility. Voice and video communications are prohibited. Waveforms such
as electrocardiograms (ECGs) are not
considered video. The rules for this
service are contained in subpart H of
this part.
(f) The Multi-Use Radio Service
(MURS)—a private, two-way, short-distance voice, data or image communications service for personal or business
activities of the general public. The
rules for this service are contained in
subpart J of this part.
[61 FR 28769, June 6, 1996, as amended at 61
FR 46566, Sept. 4, 1996; 64 FR 69929, Dec. 15,
1999; 65 FR 44008, July 17, 2000; 65 FR 53190,
Sept. 1, 2000; 65 FR 60877, Oct. 13, 2000]
§ 95.402 (CB Rule 2) How do I use
these rules?
(a) You must comply with these rules
(See CB Rule 21 § 95.421, for the penalties for violations) when you operate
a station in the CB Service from:
(1) Within or over the territorial limits of places where radio services are
regulated by the FCC (see CB Rule 5,
§ 95.405);
(2) Aboard any vessel or aircraft registered in the United States; or
(3) Aboard any unregistered vessel or
aircraft owned or operated by a United
States citizen or company.
(b) Your CB station must comply
with technical rules found in subpart E
of part 95.
(c) Where the rules use the word
‘‘you’’, ‘‘you’’ means a person operating a CB station.
(d) Where the rules use the word
‘‘person,’’ the rules are concerned with
an individual, a corporation, a partnership, an association, a joint stock company, a trust, a state, territorial or
local government unit, or other legal
entity.
(e) Where the rules use the term
‘‘FCC’’, that means the Federal Communications Commission.
(f) Where the rules use the term ‘‘CB
station’’, that means a radio station
transmitting in the CB Radio Service.
§ 95.403 (CB Rule 3) Am I eligible to
operate a CB station?
You are authorized to operate a CB
station unless:
(a) You are a foreign government, a
representative of a foreign government, or a federal government agency;
or
(b) The FCC has issued a cease and
desist order to you, and the order is
still in effect.
§ 95.404 (CB Rule 4) Do I need a li-
cense?
You do not need an individual license
to operate a CB station. You are authorized by this rule to operate your
CB station in accordance with the rules
in this subpart.
§ 95.405 (CB Rule 5) Where may I oper-
ate my CB station?
You are authorized to operate your
CB station from:
(a) Within or over any area of the
world where radio services are regulated by the FCC. Those areas are within the territorial limits of:
(1) The fifty United States.
(2) The District of Columbia.
Caribbean Insular areas
(3) Commonwealth of Puerto Rico.
(4) Navassa Island.
(5) United States Virgin Islands (50
islets and cays).
Pacific Insular areas
(6) American Samoa (seven islands).
(7) Baker Island.
(8) Commonwealth of Northern Mariana Islands.
(9) Guam Island.
(10) Howland Island.
(11) Jarvis Island.
(12) Johnston Island (Islets East,
Johnston, North and Sand).
(13) Kingman Reef.
(14) Midway Island (Islets Eastern
and Sand).
(15) Palmyra Island (more than 50 islets).
(16) Wake Island (Islets Peale, Wake
and Wilkes).
(b) Any other area of the world, except within the territorial limits of
areas where radio services are regulated by—
539
VerDate 11<MAY>2000 09:08 Oct 16, 2001 Jkt 194192 PO 00000 Frm 00539 Fmt 8010 Sfmt 8010 Y:\SGML\194192T.XXX pfrm04 PsN: 194192T
Page 19

47 CFR Ch. I (10– 1– 01 Edition)§ 95.406
(1) An agency of the United States
other than the FCC. (You are subject
to its rules.)
(2) Any foreign government. (You are
subject to its rules.)
(c) An aircraft or ship, with the permission of the captain, within or over
any area of the world where radio services are regulated by the FCC or upon
or over international waters. You must
operate your CB station according to
any applicable treaty to which the
United States is a party.
(d) Anyone intending to operate a CB
station on the islands of Puerto Rico,
Desecheo, Mona, Vieques, and Culebra
in a manner that could pose an interference threat to the Arecibo Observatory shall notify the Interference Office, Arecibo Observatory, Post Office
Box 995, Arecibo, Puerto Rico 00613, in
writing or electronically, of the location of the unit. Operators may wish to
consult interference guidelines, which
will be provided by Cornell University.
Operators who choose to transmit information electronically should e-mail
to: prcz@naic.edu.
(1) The notification to the Interference Office, Arecibo Observatory
shall be made 45 days prior to commencing operation of the unit. The notification shall state the geographical
coordinates of the unit.
(2) After receipt of such notifications,
the Commission will allow the Arecibo
Observatory a period of 20 days for
comments or objections. The operator
will be required to make reasonable efforts in order to resolve or mitigate
any potential interference problem
with the Arecibo Observatory. If the
Commission determines that an operator has satisfied its responsibility to
make reasonable efforts to protect the
Observatory from interference, the
unit may be allowed to operate.
[48 FR 24894, June 3, 1983, as amended at 62
FR 55535, Oct. 27, 1997]
§ 95.406 (CB Rule 6) Are there any spe-
cial restrictions on the location of
my CB station?
(a) If your CB station is located on
premises controlled by the Department
of Defense you may be required to comply with additional regulations imposed by the commanding officer of the
installation.
(b) If your C/B station will be constructed on an environmentally sensitive site, or will be operated in such
a manner as to raise environmental
problems, under § 1.1307 of this chapter,
you must provide an environmental assessment, as set forth in § 1.1311 of this
chapter, and undergo the environmental review, § 1.1312 of this chapter,
before commencement of construction.
[48 FR 24894, June 3, 1983, as amended at 55
FR 20398, May 16, 1990]
HOWTOO
PERATE A
CB S
TATION
§ 95.407 (CB Rule 7) On what channels
may I operate?
(a) Your CB station may transmit
only on the following channels (frequencies):
Channel
1 ...................................................................... 26.965
2 ...................................................................... 26.975
3 ...................................................................... 26.985
4 ...................................................................... 27.005
5 ...................................................................... 27.015
6 ...................................................................... 27.025
7 ...................................................................... 27.035
8 ...................................................................... 27.055
9 ......................................................................
10 .................................................................... 27.075
11 .................................................................... 27.085
12 .................................................................... 27.105
13 .................................................................... 27.115
14 .................................................................... 27.125
15 .................................................................... 27.135
16 .................................................................... 27.155
17 .................................................................... 27.165
18 .................................................................... 27.175
19 .................................................................... 27.185
20 .................................................................... 27.205
21 .................................................................... 27.215
22 .................................................................... 27.225
23 .................................................................... 27.255
24 .................................................................... 27.235
25 .................................................................... 27.245
26 .................................................................... 27.265
27 .................................................................... 27.275
28 .................................................................... 27.285
29 .................................................................... 27.295
30 .................................................................... 27.305
31 .................................................................... 27.315
32 .................................................................... 27.325
33 .................................................................... 27.335
34 .................................................................... 27.345
35 .................................................................... 27.355
36 .................................................................... 27.365
37 .................................................................... 27.375
38 .................................................................... 27.385
39 .................................................................... 27.395
40 .................................................................... 27.405
1
See paragraph (b) of this section.
Frequency
(megahertz—
MHz)
1
27.065
(b) Channel 9 may be used only for
emergency communications or for
traveler assistance.
540
VerDate 11<MAY>2000 09:08 Oct 16, 2001 Jkt 194192 PO 00000 Frm 00540 Fmt 8010 Sfmt 8010 Y:\SGML\194192T.XXX pfrm04 PsN: 194192T
Page 20

Federal Communications Commission § 95.411
(c) You must, at all times and on all
channels, give priority to emergency
communication messages concerning
the immediate safety of life or the immediate protection of property.
(d) You may use any channel for
emergency communications or for
traveler assistance.
(e) You must share each channel with
other users.
(f) The FCC will not assign any channel for the private or exclusive use of
any particular CB station or group of
stations.
(g) The FCC will not assign any channel for the private of exclusive use of
CB stations transmitting single sideband or AM.
§ 95.408 (CB Rule 8) How high may I
put my antenna?
(a) Antenna means the radiating system (for transmitting, receiving or
both) and the structure holding it up
(tower, pole or mast). It also means everything else attached to the radiating
system and the structure.
(b) If your antenna is mounted on a
hand-held portable unit, none of the
following limitations apply.
(c) If your antenna is installed at a
fixed location, it (whether receiving,
transmitting or both) must comply
with either one of the following:
(1) The highest point must not be
more than 6.10 meters (20 feet) higher
than the highest point of the building
or tree on which it is mounted; or
(2) The highest point must not be
more than 18.3 meters (60 feet) above
the ground.
(d) If your CB station is located near
an airport, and if you antenna structure is more than 6.1 meters (20 feet)
high, you may have to obey additional
restrictions. The highest point of your
antenna must not exceed one meter
above the airport elevation for every
hundred meters of distance from the
nearest point of the nearest airport
runway. Differences in ground elevation between your antenna and the
airport runway may complicate this
formula. If your CB station is near an
airport, you may contact the nearest
FCC field office for a worksheet to help
you figure the maximum allowable
height of your antenna. Consult part 17
of the FCC’s Rules for more information.
W
ARNING
station antennas near powerlines is dangerous. For your safety, follow the installation directions included with your antenna.
[48 FR 24894, June 3, 1983, as amended at 48
FR 41416, Sept. 15, 1983]
: Installation and removal of CB
§ 95.409 (CB Rule 9) What equipment
may I use at my CB station?
(a) You must use an FCC certificated
CB transmitter at your CB station.
You can identify an FCC certificated
transmitter by the certification label
placed on it by the manufacturer. You
may examine a list of certificated
equipment at any FCC Field Office or
at FCC Headquarters. Use of a transmitter which is not FCC certificated
voids your authority to operate the
station.
(b) You must not make, or have
made, any internal modification to a
certificated CB transmitter. (See CB
Rule 25, § 95.425). Any internal modification to a certificated CB transmitter cancels the certification, and
use of such a transmitter voids your
authority to operate the station.
[48 FR 24894, June 3, 1983, as amended at 63
FR 36610, July 7, 1998]
§ 95.410 (CB Rule 10) How much power
may I use?
(a) Your CB station transmitter
power output must not exceed the following values under any conditions:
AM (A3)—4 watts (carrier power) SSB—12
watts (peak envelope power)
(b) If you need more information
about the power rule, see the technical
rules in subpart E of part 95.
(c) Use of a transmitter which has
carrier or peak envelope power in excess of that authorized voids your authority to operate the station.
§ 95.411 (CB Rule 11) May I use power
amplifiers?
(a) You may not attach the following
items (power amplifiers) to your certificated CB transmitter in any way:
(1) External radio frequency (RF)
power amplifiers (sometimes called
linears or linear amplifiers); or
541
VerDate 11<MAY>2000 09:08 Oct 16, 2001 Jkt 194192 PO 00000 Frm 00541 Fmt 8010 Sfmt 8010 Y:\SGML\194192T.XXX pfrm04 PsN: 194192T
Page 21

47 CFR Ch. I (10– 1– 01 Edition)§ 95.412
(2) Any other devices which, when
used with a radio transmitter as a signal source, are capable of amplifying
the signal.
(b) There are no exceptions to this
rule and use of a power amplifier voids
your authority to operate the station.
(c) The FCC will presume you have
used a linear or other external RF
power amplifier if—
(1) It is in your possession or on your
premises; and
(2) There is other evidence that you
have operated your CB station with
more power than allowed by CB Rule
10, § 95.410.
(d) Paragraph (c) of this section does
not apply if you hold a license in another radio service which allows you to
operate an external RF power amplifier.
[48 FR 24894, June 3, 1983, as amended at 63
FR 36610, July 7, 1998]
§ 95.412 (CB Rule 12) What commu-
nications may be transmitted?
(a) You may use your CB station to
transmit two-way plain language communications. Two-way plain language
communications are communications
without codes or coded messages. Operating signals such as ‘‘ten codes’’ are
not considered codes or coded messages. You may transmit two-way
plain language communications only
to other CB stations, to units of your
own CB station or to authorized government stations on CB frequencies
about—
(1) Your personal or business activities or those of members of your immediate family living in your household;
(2) Emergencies (see CB Rule 18,
§ 95.418);
(3) Traveler assistance (see CB Rule
18, § 95.418); or
(4) Civil defense activities in connection with official tests or drills conducted by, or actual emergencies announced by, the civil defense agency
with authority over the area in which
your station is located.
(b) You may use your CB station to
transmit a tone signal only when the
signal is used to make contact or to
continue communications. (Examples
of circuits using these signals are tone
operated squelch and selective calling
circuits.) If the signal is an audible
tone, it must last no longer than 15
seconds at one time. If the signal is a
subaudible tone, it may be transmitted
continuously only as long as you are
talking.
(c) You may use your CB station to
transmit one-way communications
(messages which are not intended to establish communications between two
or more particular CB stations) only
for emergency communications, traveler assistance, brief tests (radio
checks) or voice paging.
§ 95.413 (CB Rule 13) What commu-
nications are prohibited?
(a) You must not use a CB station—
(1) In connection with any activity
which is against federal, state or local
law;
(2) To transmit obscence, indecent or
profane words, language or meaning;
(3) To interfere intentionally with
the communications of another CB station;
(4) To transmit one-way communications, except for emergency communications, traveler assistance, brief
tests (radio checks), or voice paging;
(5) To advertise or solicit the sale of
any goods or services;
(6) To transmit music, whistling,
sound effects or any material to amuse
or entertain;
(7) To transmit any sound effect solely to attract attention;
(8) To transmit the word ‘‘MAYDAY’’
or any other international distress signal, except when your station is located in a ship, aircraft or other vehicle which is threatened by grave and
imminent danger and your are requesting immediate assistance;
(9) To communicate with, or attempt
to communicate with, any CB station
more than 250 kilometers (155.3 miles)
away;
(10) To advertise a political candidate
or political campaign; (you may use
your CB radio for the business or organizational aspects of a campaign, if you
follow all other applicable rules);
(11) To communicate with stations in
other countries, except General Radio
Service stations in Canada; or
(12) To transmit a false or deceptive
communication.
(b) You must not use a CB station to
transmit communications for live or
542
VerDate 11<MAY>2000 09:08 Oct 16, 2001 Jkt 194192 PO 00000 Frm 00542 Fmt 8010 Sfmt 8010 Y:\SGML\194192T.XXX pfrm04 PsN: 194192T
Page 22

Federal Communications Commission § 95.419
delayed rebroadcast on a radio or television broadcast station. You may use
your CB station to gather news items
or to prepare programs.
§ 95.414 (CB Rule 14) May I be paid to
use my CB station?
(a) You may not accept direct or indirect payment for transmitting with a
CB station.
(b) You may use a CB station to help
you provide a service, and be paid for
that service, as long as you are paid
only for the service and not for the actual use of the CB station.
§ 95.415 (CB Rule 15) Who is respon-
sible for communications I make?
You are responsible for all communications which are made by you from
a CB station.
§ 95.416 (CB Rule 16) Do I have to limit
the length of my communications?
(a) You must limit your CB communications to the minimum practical
time.
(b) If you are communicating with
another CB station or stations, you,
and the stations communicating with
you, must limit each of your conversations to no more than five continuous
minutes.
(c) At the end of your conversation,
you, and the stations communicating
with you, must not transmit again for
at least one minute.
§ 95.417 (CB Rule 17) Do I identify my
CB communications?
(a) You need not identify your CB
communications.
(b) [You are encouraged to identify
your CB communications by any of the
following means:
(1) Previously assigned CB call sign;
(2) K prefix followed by operator initials and residence zip code;
(3) Name; or
(4) Organizational description including name and any applicable operator
unit number.]
(c) [You are encouraged to use your
‘‘handle’’ only in conjuction with the
methods of identification listed in
paragraph (b) of this section.]
§ 95.418 (CB Rule 18) How do I use my
CB station in an emergency or to
assist a traveler?
(a) You must at all times and on all
channels, give priority to emergency
communications.
(b) When you are directly participating in emergency communications,
you do not have to comply with the
rule about length of transmissions (CB
Rule 16, § 95.416). You must obey all
other rules.
(c) You may use your CB station for
communications necessary to assist a
traveler to reach a destination or to receive necessary services. When you are
using your CB station to assist a traveler, you do not have to obey the rule
about length of transmissions (CB Rule
16, § 95.416). You must obey all other
rules.
(d) You may use your CB station to
transmit one-way communications
concerning highway conditions to assist travelers.
[48 FR 24894, June 3, 1983, as amended at 57
FR 22442, May 28, 1992]
§ 95.419 (CB Rule 19) May I operate my
CB station transmitter by remote
control?
(a) You may not operate a CB station
transmitter by radio remote control.
(b) You may operate a CB transmitter by wireline remote control if
you obtain specific approval in writing
from the FCC. To obtain FCC approval,
you must show why you need to operate your station by wireline remote
control. If you receive FCC approval,
you must keep the approval as part of
your station records. See CB Rule 27,
§ 95.427.
(c) Remote control means operation
of a CB transmitter from any place
other than the location of the CB
transmitter. Direct mechanical control
or direct electrical control by wire
from some point on the same premises,
craft or vehicle as the CB transmitter
is not considered remote control.
[48 FR 24894, June 3, 1983, as amended at 57
FR 40343, Sept. 3, 1992; 63 FR 68976, Dec. 14,
1998]
543
VerDate 11<MAY>2000 09:08 Oct 16, 2001 Jkt 194192 PO 00000 Frm 00543 Fmt 8010 Sfmt 8010 Y:\SGML\194192T.XXX pfrm04 PsN: 194192T
Page 23

47 CFR Ch. I (10– 1– 01 Edition)§ 95.420
§ 95.420 (CB Rule 20) May I connect
my CB station transmitter to a telephone?
(a) You may connect your CB station
transmitter to a telephone if you comply with all of the following:
(1) You or someone else must be
present at your CB station and must—
(i) Manually make the connection
(the connection must not be made by
remote control);
(ii) Supervise the operation of the
transmitter during the connection;
(iii) Listen to each communication
during the connection; and
(iv) Stop all communications if there
are operations in violation of these
rules.
(2) Each communication during the
telephone connection must comply
with all of these rules.
(3) You must obey any restriction
that the telephone company places on
the connection of a CB transmitter to
a telephone.
(b) The CB transmitter you connect
to a telephone must not be shared with
any other CB station.
(c) If you connect your CB transmitter to a telephone, you must use a
phone patch device with has been registered with the FCC.
O
THERTHINGSYOUNEEDTOKNOW
§ 95.421 (CB Rule 21) What are the
penalties for violating these rules?
(a) If the FCC finds that you have
willfully or repeatedly violated the
Communications Act or the FCC Rules,
you may have to pay as much as $10,000
for each violation, up to a total of
$75,000. (See section 503(b) of the Communications Act.)
(b) If the FCC finds that you have
violated any section of the Communications Act or the FCC Rules, you
may be ordered to stop whatever action
caused the violation. (See section
312(b) of the Communications Act.)
(c) If a Federal court finds that you
have willfully and knowingly violated
any FCC Rule, you may be fined up to
$500 for each day you committed the
violation. (See section 502 of the Communications Act.)
(d) If a Federal court finds that you
have willfully and knowingly violated
any provision of the Communications
Act, you may be fined up to $10,000 or
you may be imprisoned for one year, or
both. (See section 501 of the Communications Act.)
[48 FR 24894, June 3, 1983, as amended at 57
FR 40343, Sept. 3, 1992]
§ 95.422 (CB Rule 22) How do I answer
correspondence from the FCC?
(a) If it appears to the FCC that you
have violated the Communications Act
or these rules, the FCC may send you a
discrepancy notice.
(b) Within the time period stated in
the notice, you must answer with:
(1) A complete written statement
about the apparent discrepancy;
(2) A complete written statement
about any action you have taken to
correct the apparent violation and to
prevent it from happening again; and
(3) The name of the person operating
at the time of the apparent violation.
(c) If the FCC sends you a letter asking you questions about your CB radio
station or its operation, you must answer each of the questions with a complete written statement within the
time period stated in the letter.
(d) You must not shorten your answer by references to other communications or notices.
(e) You must send your answer to the
FCC office which sent you the notice.
(f) You must keep a copy of your answer in your station records. (See CB
Rule 27, § 95.427.)
§ 95.423 (CB Rule 23) What must I do if
the FCC tells me that my CB station
is causing interference?
(a) If the FCC tells you that your CB
station is causing interference for technical reasons you must follow all instructions in the official FCC notice.
(This notice may require you to have
technical adjustments made to your
equipment.)
(b) You must comply with any restricted hours of CB station operation
which may be included in the official
notice.
§ 95.424 (CB Rule 24) How do I have
my CB station transmitter serviced?
(a) You may adjust an antenna to
your CB transmitter and you may
make radio checks. (A radio check
means a one way transmission for a
544
VerDate 11<MAY>2000 09:08 Oct 16, 2001 Jkt 194192 PO 00000 Frm 00544 Fmt 8010 Sfmt 8010 Y:\SGML\194192T.XXX pfrm04 PsN: 194192T
Page 24

Federal Communications Commission § 95.601
short time in order to test the transmitter.)
(b) You are responsible for the proper
operation of the station at all times
and are expected to provide for observations, servicing and maintenance as
often as may be necessary to ensure
proper operation. You must have all internal repairs or internal adjustments
to your CB transmitter made in accordance with the Technical Regulations (see subpart E). The internal repairs or internal adjustments should be
performed by or under the immediate
supervision and responsibility of a person certified as technically qualified to
perform transmitter maintenance and
repair duties in the private land mobile
services and fixed services by an organization or committee representative
of users in those services.
(c) Except as provided in paragraph
(d) of this section, each internal repair
and each internal adjustment of a CB
transmitter in which signals are transmitted must be made using a nonradiating (‘‘dummy’’) antenna.
(d) Brief test signals (signals not
longer than one minute during any five
minute period) using a radiating antenna may be transmitted in order to:
(1) Adjust an antenna to a transmitter;
(2) Detect or measure radiation of energy other than the intended signal; or
(3) Tune a receiver to your CB transmitter.
(Secs. 4(i) and 303(r), Communications Act of
1934, as amended, 47 U.S.C. 154(i) and 303(r),
and sec. 553 of the Administrative Procedures Act, 5 U.S.C. 553)
[48 FR 24894, June 3, 1983, as amended at 49
FR 20673, May 16, 1984]
§ 95.425 (CB Rule 25) May I make any
changes to my CB station transmitter?
(a) You must not make or have any
one else make any internal modification to your CB transmitter.
(b) Internal modification does not include:
(1) Repair or servicing of a CB station
transmitter (see CB Rule 24, § 95.424); or
(2) Changing plug-in modules which
were certificated as part of your CB
transmitter.
(c) You must not operate a CB transmitter which has been modified by any-
one in any way, including modification
to operate on unauthorized frequencies
or with illegal power. (See CB Rules 9
and 11, §§ 95.409 and 95.411.)
[48 FR 24894, June 3, 1983, as amended at 63
FR 36610, July 7, 1998]
§ 95.426 (CB Rule 26) Do I have to
make my CB station available for
inspection?
(a) If an authorized FCC representative requests to inspect your CB station, you must make your CB station
and records available for inspection.
(b) A CB station includes all of the
radio equipment you use.
§ 95.427 (CB Rule 27) What are my sta-
tion records?
Your station records include the following documents, as applicable.
(a) A copy of each response to an FCC
violation notice or an FCC letter. (See
CB Rule 22, § 95.422.)
(b) Each written permission received
from the FCC. (See CB Rule 19, § 95.419.)
§ 95.428 (CB Rule 28) How do I contact
the FCC?
(a) FCC National Call Center at 1–
888–225–5322.
(b) FCC World Wide Web homepage:
http://www.fcc.gov.
(c) In writing, to FCC, Attention: CB,
1270 Fairfield Road, Gettysburg, PA
17325–7245.
[63 FR 68976, Dec. 14, 1998]
Subpart E— Technical Regulations
S
OURCE
otherwise noted.
§ 95.601 Basis and purpose.
standards to which each transmitter (ap-
paratus that converts electrical energy
received from a source into RF (radio
frequency) energy capable of being radiated) used or intended to be used in a
station authorized in any of the Personal Radio Services must comply.
This section also provides requirements for obtaining certification for
such transmitters. The Personal Radio
: 53 FR 36789, Sept. 22, 1988, unless
G
ENERALPROVISIONS
This section provides the technical
545
VerDate 11<MAY>2000 09:08 Oct 16, 2001 Jkt 194192 PO 00000 Frm 00545 Fmt 8010 Sfmt 8010 Y:\SGML\194192T.XXX pfrm04 PsN: 194192T
 Loading...