

Page 1
Page 2
Page 3

IMPORTANT SAFETY INSTRUCTIONS
1) Read these instructions.
2) Keep these instructions.
3) Heed all warnings.
4) Follow all instructions.
5) Do not use this apparatus near water.
6) Clean only with a dry cloth.
7) Do not block any of the ventilation openings. Install in accordance with the manufacturerʼs instructions.
8) Do not install near any heat sources such as radiators, heat registers, stoves, or other apparatus (including amplifiers) that produce heat.
9) Do not defeat the safety purpose of the polarized or grounding type plug. A polarized plug has two blades with one wider than the other.
A grounding type plug has two blades and a third grounding prong. The wide blade or the third prong is provided for your safety.
When the provided plug does not fit into your outlet, consult an electrician for replacement of the obsolete outlet.
10) Protect the power cord from being walked on or pinched particularly at plugs, convenience receptacles, and the point where they exit from the apparatus.
11) Only use the attachments/accessories specified by the manufacturer.
12) Use only with a cart, stand, tripod, bracket, or table specified by the manufacturer, or sold with the apparatus.
When a cart is used, use caution when moving the cart/apparatus combination to avoid injury from tip-over.
03
Important Safety Instructions
Page 4
04
Important Safety Instructions
13) Unplug this apparatus during lightning storms or when unused for long periods of time.
14) Refer all servicing to qualified service personnel. Servicing is required when the apparatus has been damaged in any way, such as power supply cord or plug is damaged,
liquid has been spilled or objects have fallen into the apparatus, the apparatus has been exposed to rain or moisture, does not operate normally, or has been dropped.
15) Lightning - For added protection for this product during a lightning storm, or when it is left unattended and unused for long periods of time, unplug it from the wall outlet and
disconnect the antenna or cable system. This will prevent damage to the product due to lightning and power-line surges.
16) Power Lines - An outside antenna system should not be located in the vicinity of overhead power lines or other electric light or power circuits,
or where it can fall into such power lines or circuits. When installing an outside antenna system, extreme care should be taken to keep from touching such power lines
or circuits as contact with them might be fatal.
17) Overloading - Do not overload wall outlets, extension cords, or integral convenience receptacles as this can result in a risk of fire or electrical shock.
18) Object and Liquid Entry - Never push objects of any kind into this product through openings as they may touch dangerous voltage points or short-out parts that could result in a fire
or electric shock. Never spill liquid of any kind on the product.
19) Servicing - Do not attempt to service this product yourself as opening or removing covers may expose you to dangerous voltage or other hazards.
Refer all servicing to qualified service personnel.
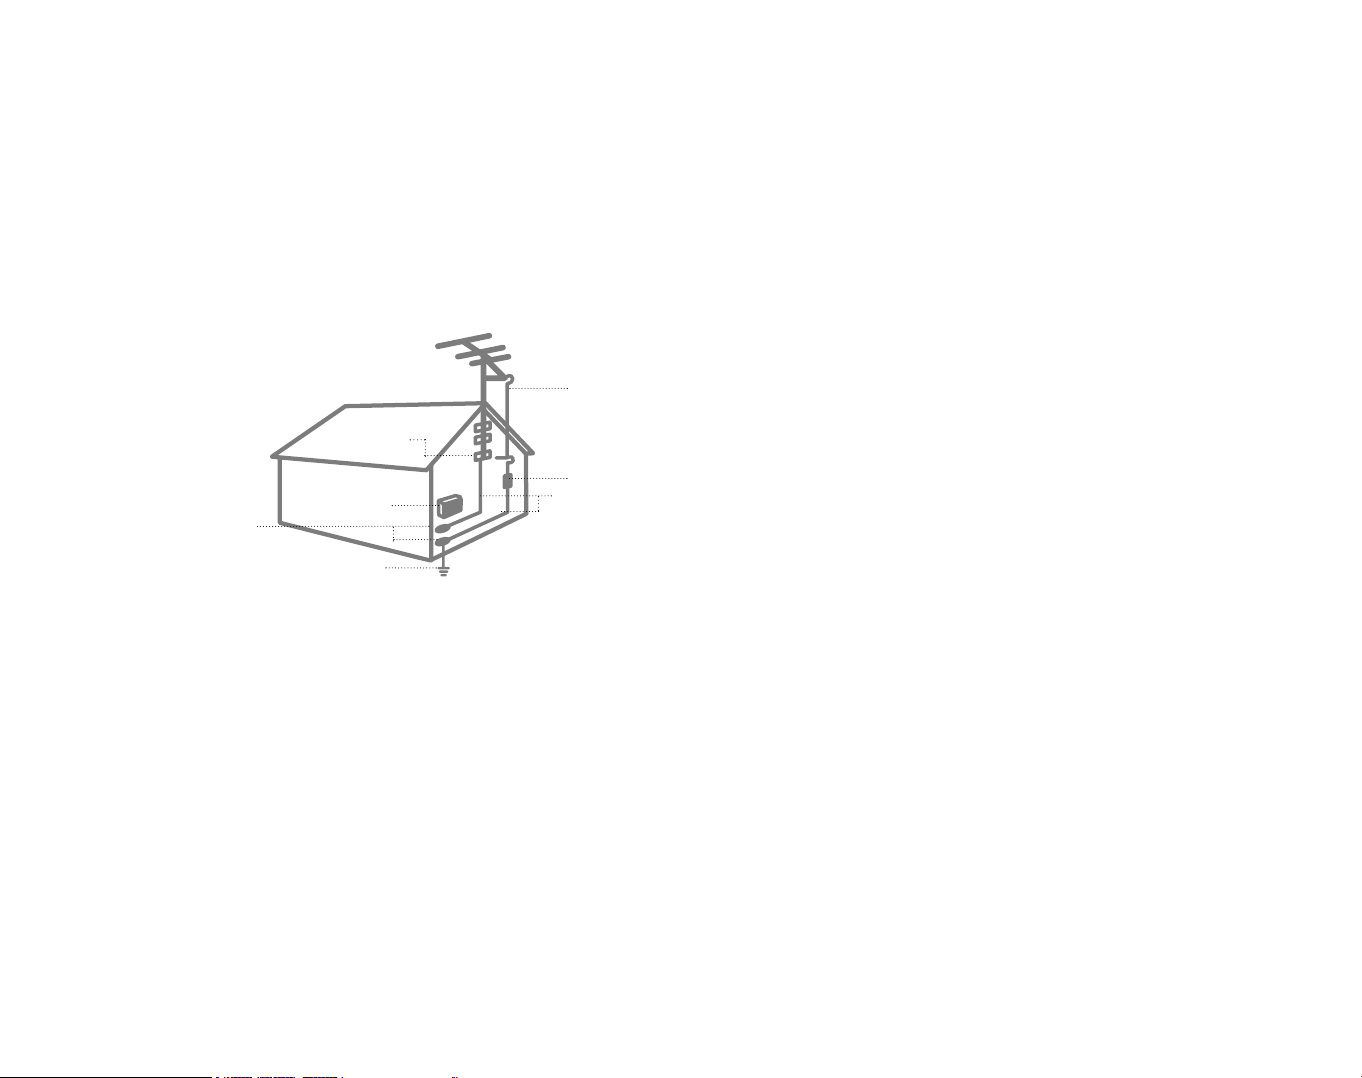
GROUND CLAMP
EXAMPLE OF
ANTENNA GROUNDING
ANTENNA
DISCHARGE UNIT
(NEC SECTION 810-20)
POWER SERVICE GROUNDING
ELECTRODE SYSTEM
(NEC ART 350, PART H)
GROUND CLAMPS
ELECTRIC SERVICE
EQUIPMENT
GROUNDING
CONDUCTORS
(NEC SECTION 810-21)
ANTENNA
LEAD IN WIRE
Page 5
20) Damage Requiring Service - Unplug this product from the wall outlet and refer servicing to qualified service personnel under the following
conditions:
a) When the power-supply cord or plug is damaged,
�����b) If liquid has been spilled, or objects have fallen into the product,
�����c) If the product has been exposed to rain or water,
�����d) If the product does not operate normally by following the operating instructions. Adjust only those controls that are covered by the operating instructions
as an improper adjustment of other controls may result in damage and will often require extensive work by a qualified technician to restore the product to
its normal operation,
�����e) If the product has been dropped or damaged in any way, and
�����f) When the product exhibits a distinct change in performance - this indicates a need for service.
21) Replacement Parts - When replacement parts are required, be sure the service technician has used replacement parts specified by the manufacturer or have the same
characteristics as the original part. Unauthorized substitutions may result in fire, electric shock, or other hazards.
22) Safety Check - Upon completion of any service or repairs to this product, ask the service technician to perform safety checks to determine that the product is
in proper operating condition.
23) Wall or Ceiling Mounting - The product should be mounted to a wall or ceiling only as recommended by the manufacturer.
24) Heat - The product should be situated away from heat sources such as radiators, heat registers, stoves, or other products (including amplifiers) that produce heat.
Note to CATV system installer:
This reminder is provided to call the CATV system installerʼs attention to Section 820-40 of the NEC which
provides guidelines for proper grounding and, in particular, specifies that the cable ground shall be connected to
the ground system of the building, as close to the point of cable entry as practical.
05
Important Safety Instructions
Page 6

Page 7

11
17
24
54
Before Operating
■
Digital HDTV Receiver Features
■
Remote Control Battery Installation
■
Front Panel
■
Rear Panel
■
Remote Control
Setup
■
Connecting
The Set-Top Box
To A Terrestrial Antenna
■
Connecting The Set-Top Box To A Digital HDTV Monitor (YPbPr inputs)
■
Connecting The Set-Top Box To A HDMI Equipment
■�
Connecting The Set-Top Box To A DVI Equipment
■
Connecting The Set-Top Box To An Analog TV Set
■
Connecting The Set-Top Box To Audio Equipment
Operating
■
Explanation Of Available Display Modes
■
Choosing A Digital Sound Format (Dolby Digital Or PCM)
■
Multiple Audio Language Tracks
■
Setting The Time Zone
■
Setting The Time And Date
■
Using Auto Power-On
■
Using Auto Power-Off
■
Using The Sleep Timer
■
Setting Daylight Savings
■
Viewing Current Channel Information
■
Using The EPG (Electronic Program Guide)
■
Changing The MENU Language
■
Adjusting The MENUʼs Opacity
■
Setting Up The DTV CC Display
■
V-chip Lock
■
Additional Remote Control Functions
Troubleshooting and Warranty
■
Troubleshooting Guide
■
Specifications
■
Warranty
08
A Quick Start
■
Display Menu (OSD)
■
Set Up Antenna Input
■
Channel Scanning
■
Editing Memorized Channels
■
Verify The Signal Strength Of Digital Channels
■
Selecting Your Screen Format
■
Display Modes
03
Important Safety Information
P
lease read ownerʼs manual carefully before operating your
Accurian HDTV receiver.
Page 8

08
A Quick Start
How To Receive The Best Terrestrial Digital TV Signal - A Quick Start
Congratulations! You have just purchased HDTV receiver representing the latest in DTV (Digital Television) technology for receiving Terrestrial/
Over-The-Air DTV signals. Over-the-air DTV signals include both High Definition (HDTV) and Standard Definition (SDTV) broadcasts. DTV
broadcasts also allow you to receive Dolby Digital surround sound and multicasting of minor (sub) channels all for absolutely free!
Unlike cable or satellite, there are no subscription fees charged to receive local HDTV programming.
Terrestrial DTV channels are proliferating rapidly. For example, the number of terrestrial DTV broadcast stations tripled in the Year 2002, from
225 to 779. As of May 2004, there are now 1216 stations broadcasting DTV. DTV signals are now being broadcasted in markets that include
99.69 percent of the 106 million U.S. TV households. 85.75 percent of U.S. TV households are in markets with 5 or more broadcasters airing
DTV and 65.73 percent are in markets with 8 or more transmitting DTV signal. All broadcasters have been currently mandated, by the FCC,
to transmit DTV (ATSC) signal as opposed to the previously common analog (NTSC) signal by the end of 2006, or when 85 percent of U.S. TV
households have DTV signal penetration.
How can you find out which stations in your area are broadcasting in DTV and what kind of antenna system you will need?
Please follow these next simple steps:
Step 1: Find What DTV Channels are Available in Your Area.
We suggest the following two websites:
http://www.titantv.com
http://www.antennaweb.org
The first site gives you local DTV channels, programming and station information. The second website gives you station information, antenna
selection suggestions and detailed antenna pointing information for both your DTV and analog TV signals.
Both websites are very easy to use. You can just input your zip code and obtain most of the information you need. However, itʼs advisable
to input your detailed address, especially on www.antennaweb.org because the site uses sophisticated software that takes into account
topographical data supplied by the US Geographical Survey for each specified address.
Page 9

09
A Quick Start
Step 2: Selecting Your Antenna.
After noting all available DTV channels in your area from the websites above, a suitable antenna must be selected.
a. Can I use my existing analog TV Antenna?
If you receive good noise free, ghost free signals on your analog channels, especially UHF channels (most DTV signals are transmitted on UHF), you MAY be
able to use your existing antenna system. In this case, to feed the TV signals to both the set-top box and your existing TV/VCR system, you will need to use
a signal splitter (see Page 18). Passive signal splitters cause loss which can degrade the signal. If needed, contact your local RadioShack store for an Amplified
2-way splitter that will not degrade the signal.
b. Can I use an indoor set-top antenna?
In strong signal areas, without reflection problems, this may be satisfactory, but is not recommended. Your local RadioShack store sells antennas for cases where
an indoor antenna is suitable.
c. Do I need an antenna upgrade?
If (a) and (b) are not satisfactory, then you need an antenna upgrade. Consult with your local RadioShack store.
d. Choosing a new Antenna System:
If all available DTV transmissions are from approximately the same direction, the installation should be simple and inexpensive. The websites can help with
choice of antenna and pointing details. Ideally, antennas should be mounted high (e.g. on a chimney) and clear of obstructions. An attic installation may be
satisfactory. If available DTV transmissions are from different directions, then either a motorized antenna (with a rotator) or an “area special” antenna system is
required. You can purchase antenna rotators from your local RadioShack store or a professional antenna installer. Area special antennas are best handled by
professional antenna installers..
Step 3: Scan and Store DTV Channels into Your HDTV Receiver.
Once you have installed your antenna and rotator (if needed), you should use the information you collected from the above websites and point your antenna
towards the direction where there are the largest number of DTV stations. If there are no previous channels stored in your HDTV receiver, the factory default
settings will have the unit automatically scan for channels when turned on. Otherwise, use the AUTO SCAN MENU, followed by the RESCAN function
(see page 27 of this manual) of the HDTV receiver to find and store all these stations into the receiver. Then, if necessary, rotate your antenna towards the
direction where there are the second largest numbers of DTV stations and select the UPDATE function in the AUTO SCAN menu to add new channels only and
store the previously scanned channels.
Do not use the RESCAN function, because it will erase the previously stored channels. Continue the process until you store all channels you are capable
of receiving.
After these simple steps, you are now ready to enjoy crisp, clear, and FREE terrestrial/over-the-air DTV programming!
Page 10

Page 11

11
Before Operating
Before Operating
Digital HDTV Receiver Features
Remote Control Battery Installation
Front Panel
Rear Panel
Remote Control
Page 12

12
Before Operating
■
Dolby digital ( )
Digital HDTV Receiver Features
■
High resolution picture quality
■
Filtering
■
Closed caption service
■
Various inputs and outputs
Experience picture quality clearer than a DVD with High Definition digital broadcasts.
DTV broadcasts eliminates noise and snow experienced in analog TV signals.
If provided by the broadcaster, closed caption service can be viewed in multiple
languages.
Supports a RF 75ohm coaxial input with various outputs such as composite, component,
S-video and digital audio (coaxial & optical).
Broadcast time and contents of program can be viewed in the user-friendly Electronic Program
Guide if information is transmitted by broadcasters.
Supports programs broadcasted in Dolby digital 5.1 surround sound.
■
EPG
Electronic Program Guide
■
HDMI( )
Supports HDMI Video/Audio output.
Page 13
13
Before Operating
1. 2. 3.
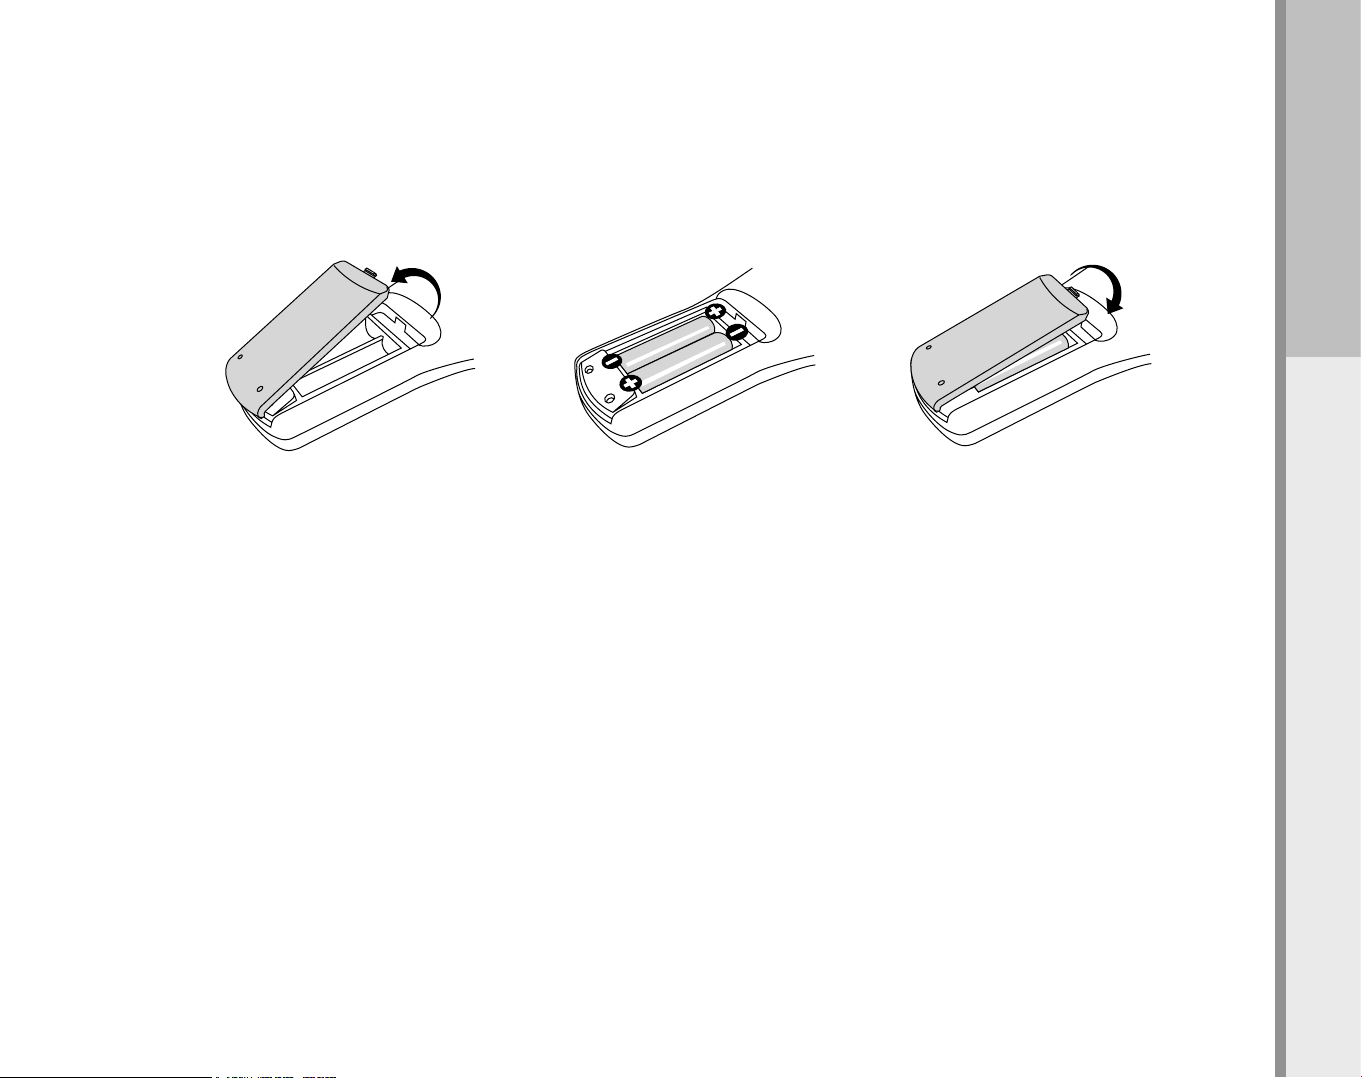
Remote Control Battery Installation
Press and detach battery cover on the
back of the remote control.
Install 2 AAA batteries + and
- aligned correctly.
Replace the battery cover.
Page 14
14
Before Operating
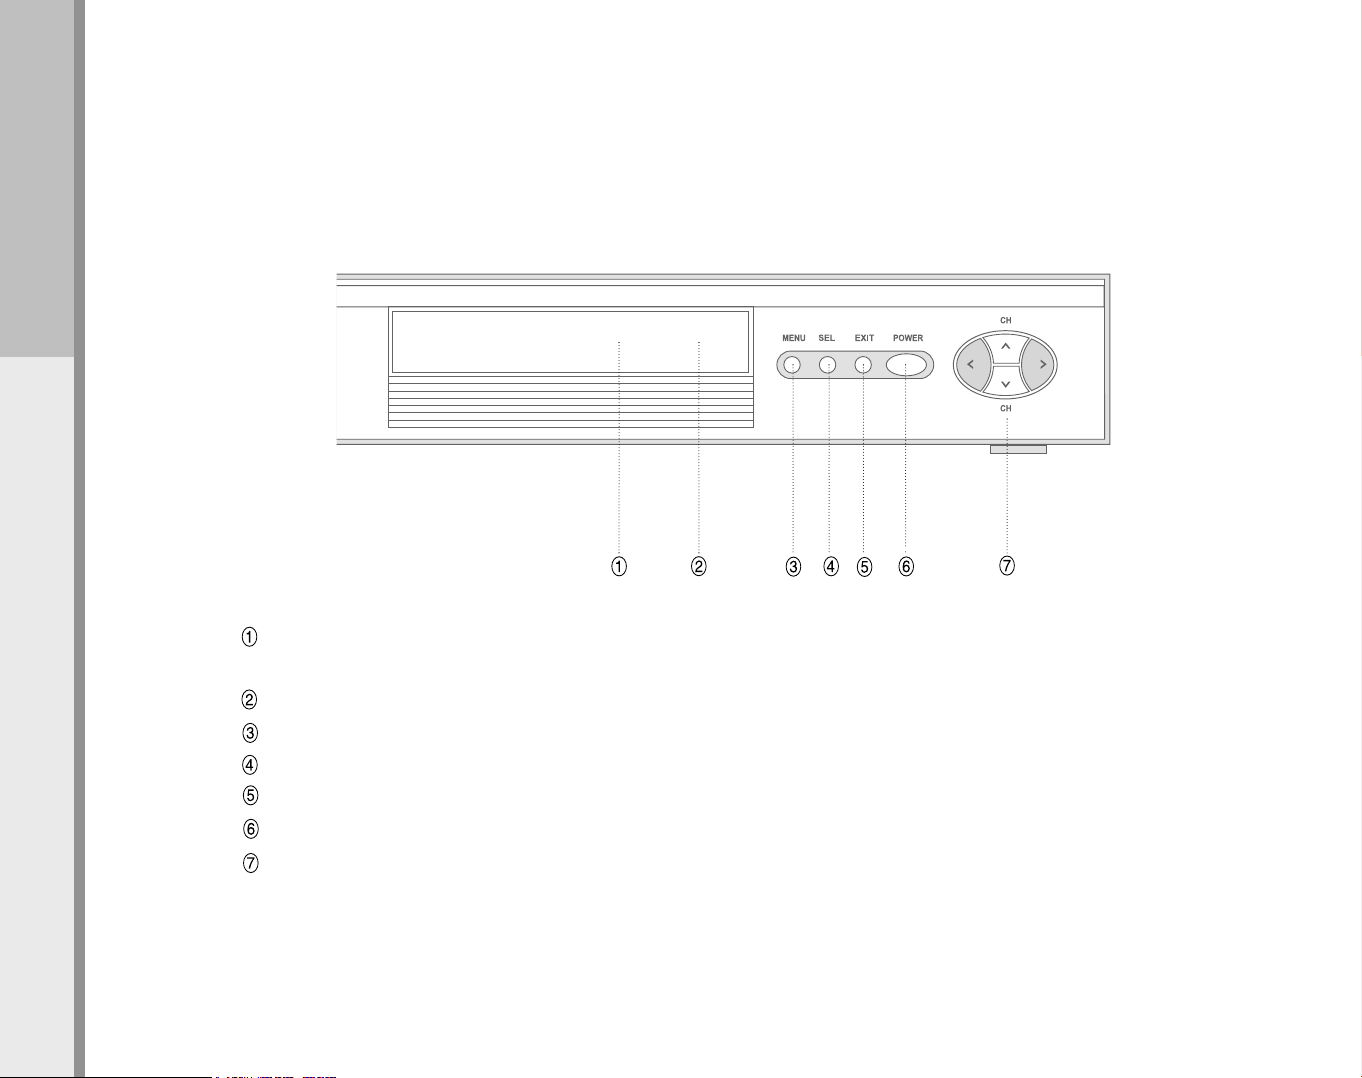
Front Panel
Front panel controls and LEDs.
Channel Display - Displays major and minor (sub) channel being viewed.
i.e. “7-1” indicates that the major channel is 7 and the minor channel is 1.
LED -
When the receiver is powered on , the LED indicator light green. In standy mode, LED light is red.
MENU - Press to display the OSD (on-screen display).�
SEL - Press to make a selection when using the on-screen menu.
EXIT - Press to exit from any on-screen display.
Standby / on - Press to turn power on or off.
Left / Right / Up / Down - Use to change channels or to move cursor about the on-screen menus.
12345678910112131415
12345678910112131415
12345678910112131415
12345678910112131415
Page 15
15
Before Operating
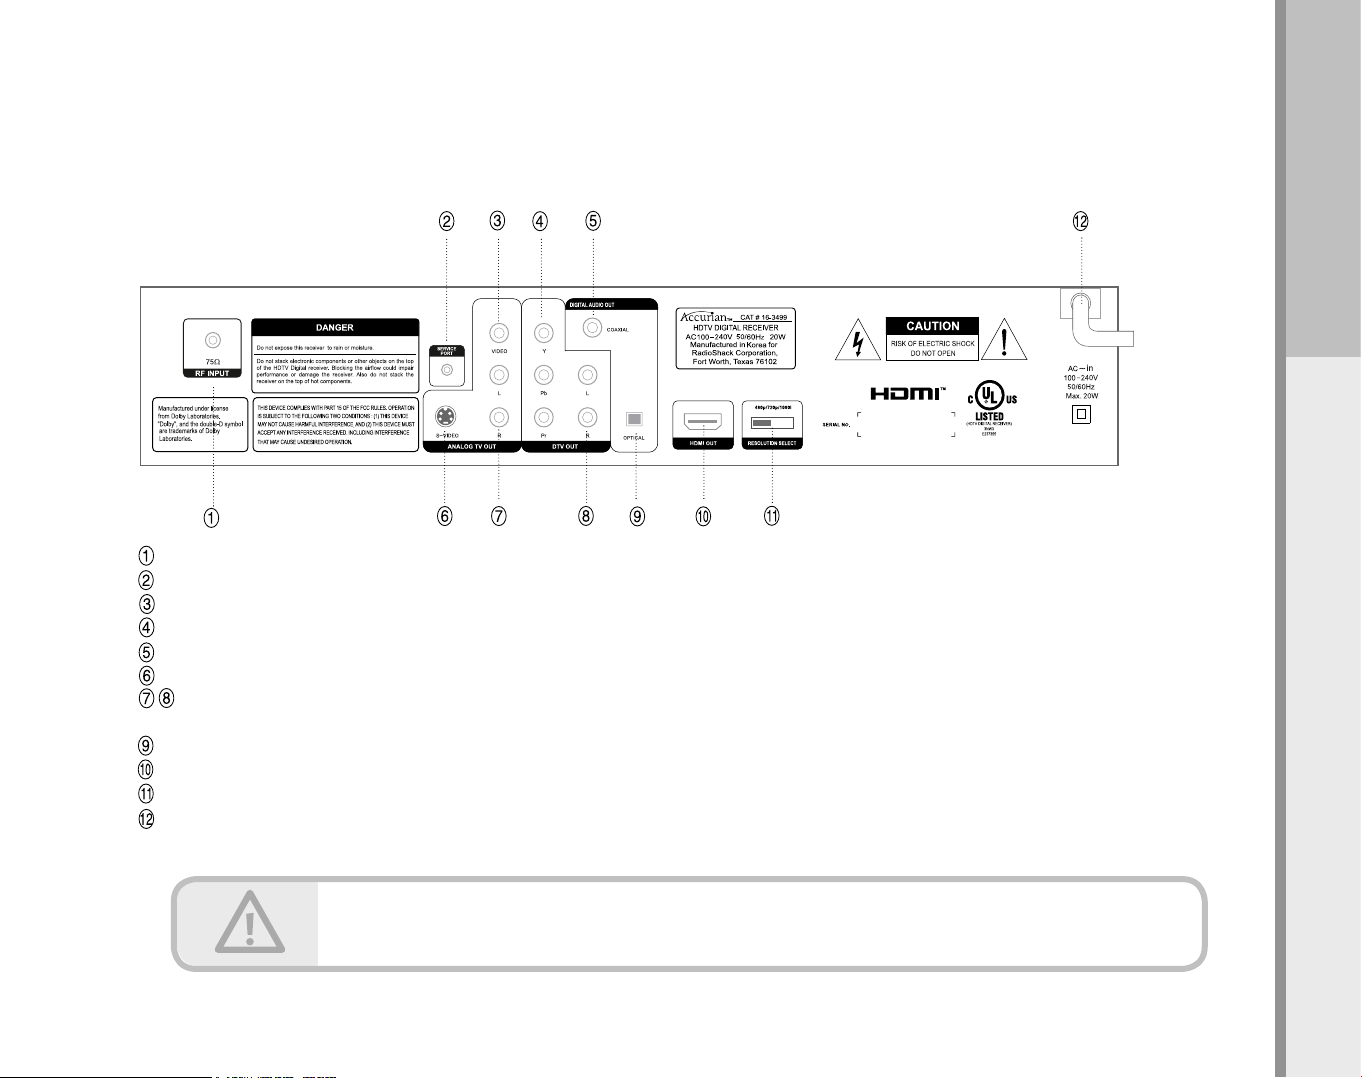
Rear Panel
Rear panel jacks.
RF Antenna INPUT (75 Ohm) - Connect the outdoor/indoor antenna here. Connect cable in the event that a local cable provider is passing 8VSB signal through their system.
Service Port (RS232C) -DO NOT USE THIS PORT AT ANY TIME! For service only.
VIDEO OUT (CVBS) - Connect to a TV with video inputs. Use this output for conventional TVʼs without S-video or component input.
DTV COMPONENT VIDEO OUT (Y, Pb, Pr) - Connect to the Y-Pb-Pr digital video input of a digital compatible TV set (or the Y-Pb-Pr inputs of some other video component).
SPDIF Output (Coaxial) - Connect to digital (coaxial) input of TV or audio equipment.
S-VIDEO OUTPUT - Connect to a TV with S-video inputs. Use this output for conventional TV sets without component video inputs.
Left/Right ANALOG-AUDIO OUTPUTS - Connect these terminals to the analog audio inputs of a TV set (i.e., to a TV that has jacks for L/R inputs). Or, connect
these terminals to the L/R inputs of a separate audio component.
SPDIF Output(Fiber optic connector) - Connect to digital (optical) input of TV or audio equipment.
HDMI out - Connect to TV or Receiverʼs input that support HDMI.
Resolution Format Selector - Switches between 1080i (interlaced scanning), 720p (progressive scanning) and 480p (progressive scanning) for use with component outputs.
Power Cable - Connect the AC Power 100V ~ 240V into power source.
“ANALOG TV OUT” outputs are displayed in 480i format only.
12345678910112131415
12345678910112131415
12345678910112131415
12345678910112131415
Page 16
16
Before Operating
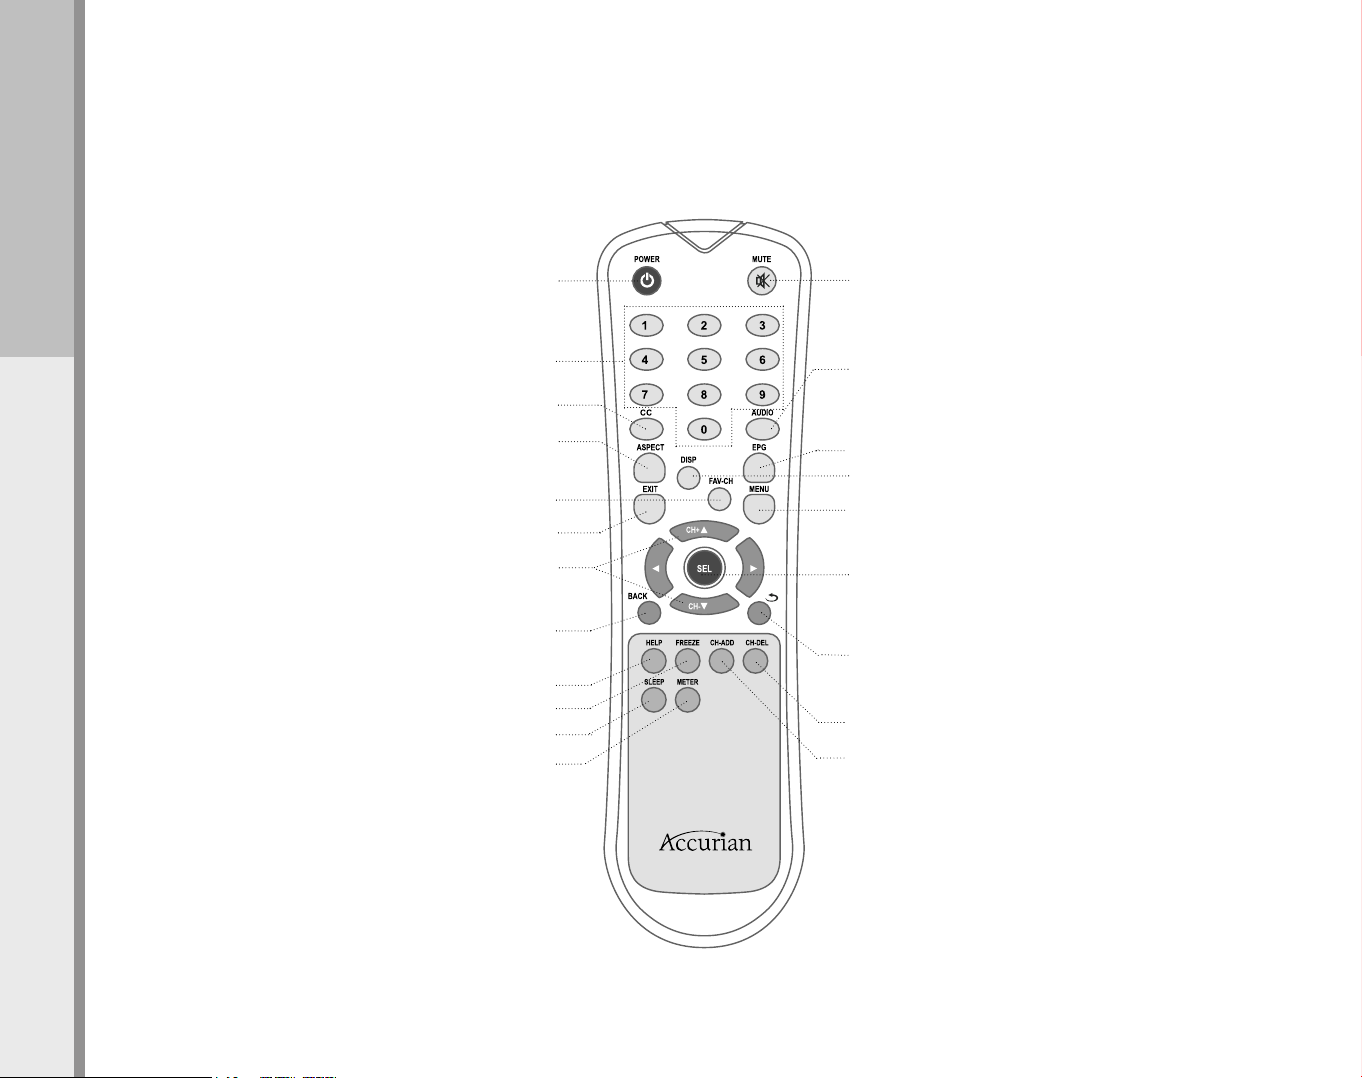
Remote Control
Remote control review.
Power:Turns the HDTV receiver On and Off.
Channel-Number Buttons:Press to directly tune to a particular channel.
CC:Press to turn On or Off the CC service, or toggle through available
languages, if available from the broadcaster.
ASPECT (Picture Display Mode):Press to select picture display mode
for best viewing. Picture display modes consist of Nomal, Wide and Zoom views.
Previous Channel:Press to alternate between the current channel and the
last channel that was viewed.
Channel up and down/Navigation:Press to change channels and
navigate through the on-screen menus.
Back:Press to return to the previous menu.
METER (Signal Quality Information):
Press to view signal strength of the current channel.
Sleep:Press to set the turn off time.
Mute:Press to turn off the sound. Press again to restore the sound.
AUDIO (Multitrack Sound):
Press to select available “multitracks,” or audio languages.
Depending on the particular broadcast, one or more foreign language
translations may be available.
FREEZE: Press to freeze the current picture. Press again to resume motion.
FAV-CH (Favorite Channel):Press to switch to your favorite channel(s).
Program Guide:Press to display the on-screen, Electronic Program Guide (EPG).
SEL (Channel Info):While using the on-screen menus, press to select (or change)
a particular function. In viewing state, press SEL to bring up the Channel Info Banner
with station and program infomation of current channel.
MENU:Press to display the on-screen menus, or to exit the menu-screen.
Help:Press to view help information on functions in the menu state.
CH-DEL (Channel Delete):Press to delete the current channel.
CH-ADD (Channel Add):Press to add the current channel.
DISP (Current Channel Number): Press to display the current channel number.
EXIT:Press to exit from any on-screen display.
Page 17

17
Set Up
Set Up
Connecting The Set-Top Box To A Terrestrial Antenna
Connecting The Set-Top Box To A Digital HDTV Monitor (YPbPr inputs)
Connecting The Set-Top Box To A HDMI Equipment
Connecting The Set-Top Box To A DVI Equipment
Connecting The Set-Top Box To An Analog TV Set
Connecting The Set-Top Box To Audio Equipment
Page 18
18
Set Up
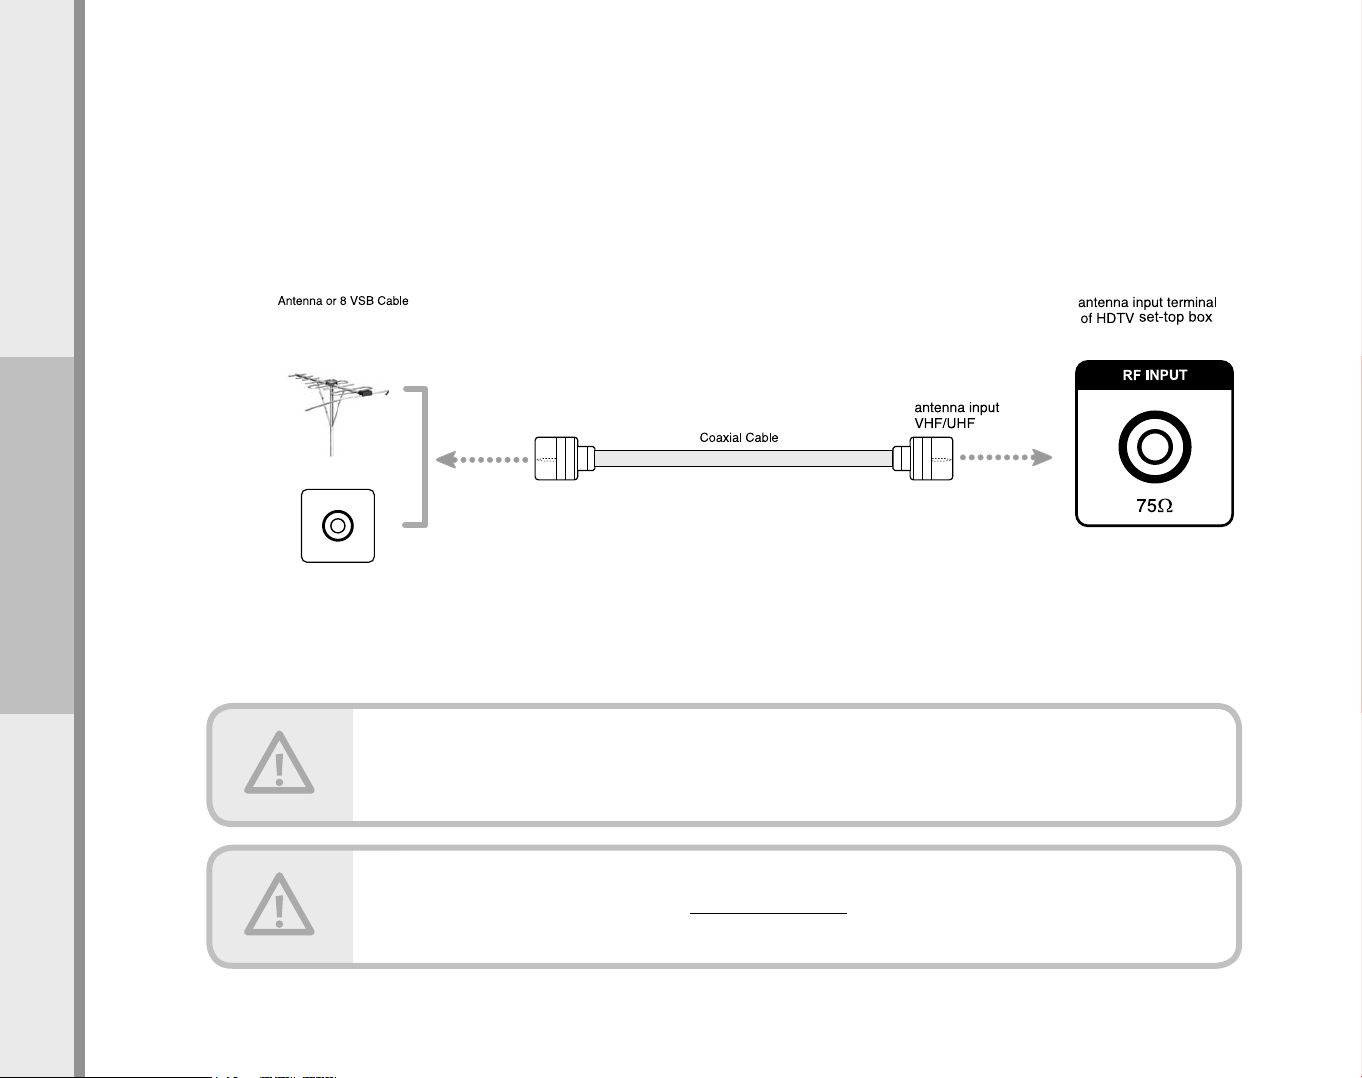
Connecting The Set-Top Box To A Terrestrial Antenna
Connect the “Antenna” coaxial cable to the antenna input jack of the set-top box.
- Do NOT bend/crease the coaxial cable. Bending of cable will hamper signal transfer.
- Use a HDTV amplifier to boost signal strength.
- Use a 2-way splitter to feed both the HDTV receiver and your TV/VCR. This will allow your TV to continue to
receive analog (NTSC), or non-digital, signals/channels.
Spanish Quick Start Guide is being created on www.radioshack.com.
Page 19

19
Set Up
Connecting The Set-Top Box To A Digital HDTV Monitor (YPbPr Inputs)
1. Connect a component (YPbPr) video cable from “DTV OUT” jacks of the HDTV set-top box to the input jacks of your HDTV monitor/set/projector.
2. Connect an audio cable from the audio output jacks of the HDTV set-top box to the audio input jacks of your HDTV monitor/set/projector.
- Use digital audio input/output for better audio quality.
3. Select resolution output format of the HDTV set-top box to correspond to the resolution of your HDTV monitor/set/projector.)
Page 20

20
Set Up
Connecting The Set-Top Box To A HDMI(Video+Audio) Equipment
Connect the HDMI cable from the HDMI output jack of the HDTV set-top box to the HDMI input jack of the your HDTV monitor/sets/projector.
If a standard definition digital TV(480p resolution) is connected to the HDMI port, the output will automatically be set to
standard definition(480p resolution), not high definition.
If the Accurian is connected to HDMI TV, the aspect ratio shall be automatically adjusted to those of the screen(16:9 or 4:3).
Page 21

21
Set Up
Connecting The Set-Top Box To A DVI Equipment
1. Connect the HDMI to DVI cable from the HDMI output jacks of the HDTV set-top box to the DVI input jacks of your HDTV
monitor/set/projector.
2. Connect an audio cable from the audio output jacks of the HDTV set-top box to the audio input jacks of your HDTV monitor/set/projector.
- Use digital audio input/output for better audio quality.
3. Select resolution output format of the HDTV set-top box to correspond to the resolution of your HDTV monitor/set/projector.
For the screen which HDCP(High Definition Copy Protection) is not supportive, thereʼs a chance for Video Output to fail.
Page 22

22
Set Up
Connecting The Set-Top Box To An Analog TV Set
1. Connect a video cable from the “ANALOG TV OUT” video outputs of the HDTV set-top box to the video input of your analog TV.
- Use S-video for higher quality video.
2. Connect an audio cable from the audio output of the HDTV set-top box to the audio input of your analog TV.
The “ANALOG TV OUT” video feed is in 480i display format.
Page 23

23
Set Up
1. When connecting to an amplifier equipped with two channel digital stereo (PCM) or a multi-channel decoder (Dolby Digital), connect an
audio cable (coaxial or optical) between the “DIGITAL AUDIO OUT” of the HDTV set-top box and the input (coaxial or optical) of your
digital audio amplifier.
2. When connecting to an amplifier equipped with two channel analog stereo or Dolby sound, connect the left and right audio out jacks from
the HDTV set-top box to the left and right audio in jacks of your amplifier, receiver, or stereo system.
Connecting The Set-Top Box To Audio Equipment
Page 24

24
Operating
Operating
Display Menu(OSD)
Set Up Antenna Input
Channel Scanning
Editing Memorized Channels
Verify The Signal Strength Of Digital Channels
Selecting Your Screen Format
Display Modes
Explanation Of Available Display Modes
Choosing A Digital Sound Format (Dolby Digital Or PCM)
Multiple Audio Language Tracks
Setting The Time Zone
Setting The Time And Date
Using Auto Power-On
Using Auto Power-Off
Using The Sleep Timer
Setting Daylight Savings
Viewing Current Channel Information
Using The EPG (Electronic Program Guide)
Changing The MENU Language
Adjusting The MENUʼs Opacity
Setting Up The DTV CC Display
V-chip Lock
Additional Remote Control Functions
Page 25

25
Operating
1.
2.
Display Menu (OSD)
How to navigate through the OSD(On-Screen Display) Menu.
Display and close menu (OSD)
Press the MENU button to display the menu.
Press the MENU button again or EXIT button to close the menu.
Navigating through menu
Move to desired content using the / / / button of remote
control. Press the SEL or corresponding arrow buttons to move
through tiers or to select a function.
You may use the “BACK” button on remote control to return to previous menu tier.
Menu
Page 26

26
Operating
If you have 8VSB cable service available, you will need to ask your cable provider which cable standard (STD, HRC,
or IRC) they are utilizing. In VERY LIMITED areas are there cable providers feeding 8VSB signal.
Call your local cable service provider to inquire about availability.
Select “Channel” in the Menu
Press the MENU button.
Press the / on the remote control to highlight
the “Channel” icon and press the or SEL button.
3.
1.
2.
How to select source input.
Set Up Antenna Input
Select input type
Press the / button on the remote control to select
either “Air” for over-the-air DTV broadcasts or “Cable
(8VSB)” to receive DTV broadcast through cable.
Select “Input Select”
Press the / button on the remote control to highlight
the “Input Select” icon and the press the or SEL button.
Page 27

27
Operating
- The HDTV Digital Receiver MUST be connected to an antenna in order to receive digital TV signals.
- Even if a particular channel is deleted from the memory, you can always tune to that channel
directly by pressing the NUMBER buttons control to the stationʼs RF channel.
- “Update” scan is ideal for regions where station transmit towers are in different directions and require
rotating of your antenna.
Select “Channel” in the menu
Press the MENU button.
Press the / on the remote control to highlight
the “Channel” icon and press the or SEL button.
Select “Auto Scan”
Press the / button on the remote control to
highlight the “Auto Scan” icon and press the or
SEL button.
3.
1.
2.
How to scan and store channels.
Start auto scan
Channel Scanning
Select either:
Rescan - To delete all previously stored channels
and to store all channels found with current scan.
Update - To keep all previously stored channels
and to update your receiverʼs channel list with newly
scanned channels only.
If you want to stop the AutoScan during scanning,
press the SEL button once more.
Page 28

28
Operating
You may also manually add or delete current channels by utilizing the “CH-ADD” or “CH-DEL” buttons on the remote
control when viewing the specific channel.
Select “Channel” in the menu
Press the MENU button.
Press the / on the remote control to highlight
the “Channel” icon and press the or SEL button.
3.
1.
2.
Select “Channel Edit”
Press the / button on the remote control to highlight
the “Channel Edit” icon and press the or SEL button.
Editing Memorized Channels
Channel edit
Press the arrow button on the remote control to move to
desired channel and press the SEL button to activate or
deactivate the channel on your channel list or add or
delete from your favorite list.
Press the button to move the cursor to Save/Cancel.
How to edit your channel list and your favorite channels list.
Page 29

29
Operating
1.
2.
How to view the signal strength meter to help you adjust your antenna system.
Verify The Signal Strength Of Digital Channels
- You may also view the signal meter by pressing the “METER” button on the remote.
- Digital channels will either have exellent reception or none at all. It is quite unlike analog reception, which can vary
in reception quality from snowy to clear.
Select “Channel” in the menu
Press the MENU button.
Press the / on the remote control to highlight
the “Channel” icon and press the or SEL button.
Select “Signal Strength”
Press the / button on the remote control to
highlight the “Signal strength” icon.
Page 30

30
Operating
The aspect ratio of your TV/monitor plus the broadcasterʼs feed will determine what various Display Modes
can be performed.
3.
1.
2.
Selecting Your Screen Format
How to select the correct screen format according to your TV/monitor/projectorʼs aspect ratio.
Select “A/V” in the menu
Press the MENU button.
Press the / on the remote control to highlight the
“A/V” icon and press the or SEL button.
Select “Monitor Select”
Press the / button on the remote control to highlight
the “Monitor Select” icon and press the or SEL button.
Aspect ratio
Press the / button on the remote control to select
your monitor type either 4:3 (conventional) or 16:9
(widescreen) and press the SEL button.
Page 31

31
Operating
- The availability of display mode format features depends on the resolution select and current broadcasting
signal format.
- You may press the “ASPECT” button on the remote to toggle through available display mode options.
Display Modes
How to select available display modes.
1.
2.
3.
Select “A/V” in the menu
Press the Menu button.
Press the / on the remote control to highlight
the “A/V” icon and press the or SEL button.
Select “Display Mode”
Press the / button on the remote control to highlight
the “Display Mode” icon and press the or SEL button.
Press the / button on the remote control to select
a “Display Mode” among ʻNormalʼ, ʻWideʼ or ʻZoomʼ.
Normal/Wide/Zoom
Available display modes will be highlighted.
Press the / buttons to choose desired mode and
press the SEL button to select.
Page 32

32
Operating
1.
4:3 TV/Monitor/Projector
-
-
Explanation Of Available Display Modes
When the broadcaster is transmitting a 4:3 feed.
wide
normal
zoom
The “Normal” display mode is the only available option.
When the broadcaster is transmitting a 16:9 feed.
Wide, Normal, and Zoom display modes are all available.
■�
Wide : Choose this when receiving a 16:9 image and you want to see the original wide format. Letter boxing shrinks the picture so the entire
image will fit on the screen. Blank panels appear at the top and bottom of the screen.
■�
Normal : Choose this when you want the television to adjust the 16:9 image vertically so it fills your 4:3 screen. No blank panels will be added, and
the image is vertically stretched.
■�
Zoom : Choose this when receiving a 16:9 image and you want the wide movie format to fill the entire screen. Outer portions of image are cropped, or cut.
wide
normal
zoom
Somtimes broadcasters fill a 16:9 aspect ratio feed with vertical bars on the left and right of a 4:3 image.
You will then see blank vertical panels in “Wide” or “Normal” mode. In case of, “zoom” mode allow to see full image
without vertical bars.
Denotes default viewing mode.
*
*
*
A/V
This is dependent upon aspect ratio of TV/monitor/projector and aspect ratio of broadcasterʼs feed.
Page 33

33
Operating
Denotes default viewing mode.
*
2.
16:9 Wide TV/Monitor/Projector.
-
When the broadcaster is transmitting a 4:3 feed.
Wide, Normal, and Zoom display modes are all available.
■
Wide : If wide mode is selected, it stretches images horizontally, so the picture fills the 16:9 ratio screen.
■
Normal : If this mode is selected, blank panels will be on the left and right side in the screen, so user can see 4:3 ratio image without distortion.
■
Zoom : If zoom mode is selected, user can see zoomed image correspond with 16:9 screen. Outer portions of image are cropped.
When the broadcaster is transmitting a 16:9 feed.
Wide and Normal display modes are available.
■
Wide : If wide mode is selected, user can watch optimal ratio image without distortion.
■
Normal : If this mode is selected, it makes a 4:3 ratio image with blank panels on the left and right side, and stretches the image vertically.
wide
normal
zoom
wide
normal
zoom
*
*
A/V
Page 34

34
Operating
Refer to ʻConnecting The Set-Top Box To Audio Equipmentʼ in regards to connecting to a digital audio amp.
3.
1.
2.
Select “A/V” in the menu
Press the MENU button.
Press the / on the remote control to highlight
the “A/V” icon and press the or SEL button.
Choosing A Digital Sound Format (Dolby Digital Or PCM)
How to select your digital audio format.
Digital audio output mode set up
Press the / button on the remote control to
select your digital audio transmission format (Dolby or
PCM as appropriate to your particular equipment).
Select “Digital Audio”
Press the / button on the remote control to
highlight the “Digital Audio” icon and press the
or SEL button.
Page 35

35
Operating
- If your selected default language is unavailable, the primary audio source will be heard only.
- If broadcaster does not transmit language identifier or broadcasts another language aside from English, Spanish or
French, then available multiple track(s) are shown as Audio 1, Audio 2, etc.
- You may press “AUDIO” on the remote to toggle through available audio language options.
3.
1.
2.
Select “A/V” in the menu
Press the MENU button.
Press the / on the remote control to highlight
the “A/V” icon and press the or SEL button.
Multiple Audio Language Tracks
How to select available audio languages.
Select “Audio Language”
Press the / button on the remote control to
highlight the “Audio Language” icon and press
the or SEL button.
Select language
Press the / button on the remote control
to select “English”, “Spanish” or “French” as your
default language.
Page 36

36
Operating
Select “Time” in the menu
Press the MENU button.
Press the / on the remote control to
highlight the “Time” icon and press the or SEL
button.
Select “Time Zone”
Press the / button on the remote control to
highlight the “Time Zone” icon and press the
or SEL button.
Time zone set
Press the / / / button on the remote
control to highlight the Time Zone you are in and
press the SEL button to save the setting.
3.
1.
2.
Setting The Time Zone
Important: Time zone must be correctly set for all auto time functions to work properly.
Time
Page 37

37
Operating
Select “Time” in the menu
Press the MENU button.
Press the / on the remote control to highlight the
“Time” icon and press the or SEL button.
3.
1.
2.
Setting The Time And Date
Automatic date/time set up
Select AUTO by pressing the / button, and
press the�SEL. Both date and time will be set up
automatically if the broadcaster is transmitting the
information.
How to set the current time and date via automatic or manual options.
Time
Select “Date/Time Set”
Press the / button on the remote control to
highlight the “Date/Time Set” icon and press the
or SEL button.
Page 38

38
Operating
4.
- Date/Time will be erased when power cord is unplugged or when power is not supplied.
- Auto time set function will work correctly only if broadcaster is transmitting the vaild information.
If auto function dose not work try other channels or use manual time set.
- Correct time zone must be set for auto time set function to work properly.
Time
Manual date/time set up
Press the / button on the remote control to
select ʻMANUALʼ and press the or SEL button.
Use the arrows to set the year, month, date, and time.
When the set up is finished, press the SEL button to
save the setting.
Page 39

39
Operating
Select “Auto Power-On”
Press the / button on the remote control to
highlight the “Auto Power-On” icon and press the
or SEL button.
Select “Time” in the Menu
Press the MENU button.
Press the / on the remote control to highlight
the “Time” icon and press the or SEL button.
3.
1.
2.
Using Auto Power-On
Time
Auto power-on set up
Select ʻEverydayʼ or ʻOnceʼ by pressing the /
button, and press the or SEL button to set up the
time by pressing the NUMBER buttons. You must press
the SEL before exiting to save the setting. Be sure to
select “Off” if youʼd like to disable the “Auto Power-On”
function.
Page 40

40
Operating
Select “Auto Power-Off”
Press the / button on the remote control to
highlight the “Auto Power-Off” icon and press the
or SEL button.
3.
1.
2.
Using Auto Power-Off
Select “Time” in the menu
Press the MENU button.
Press the / on the remote control to highlight the
“Time” icon and press the or SEL button then move
to second stage.
Time
Auto power-off set up
Select ʻEverydayʼ or ʻOnceʼ by pressing the /
button, and press the button to set up the time by
pressing the NUMBER buttons. You must press the SEL
before exiting to save the setting. Be sure to select “Offʼ
if youʼd like to disable the “Auto” function.
Page 41
41
Operating
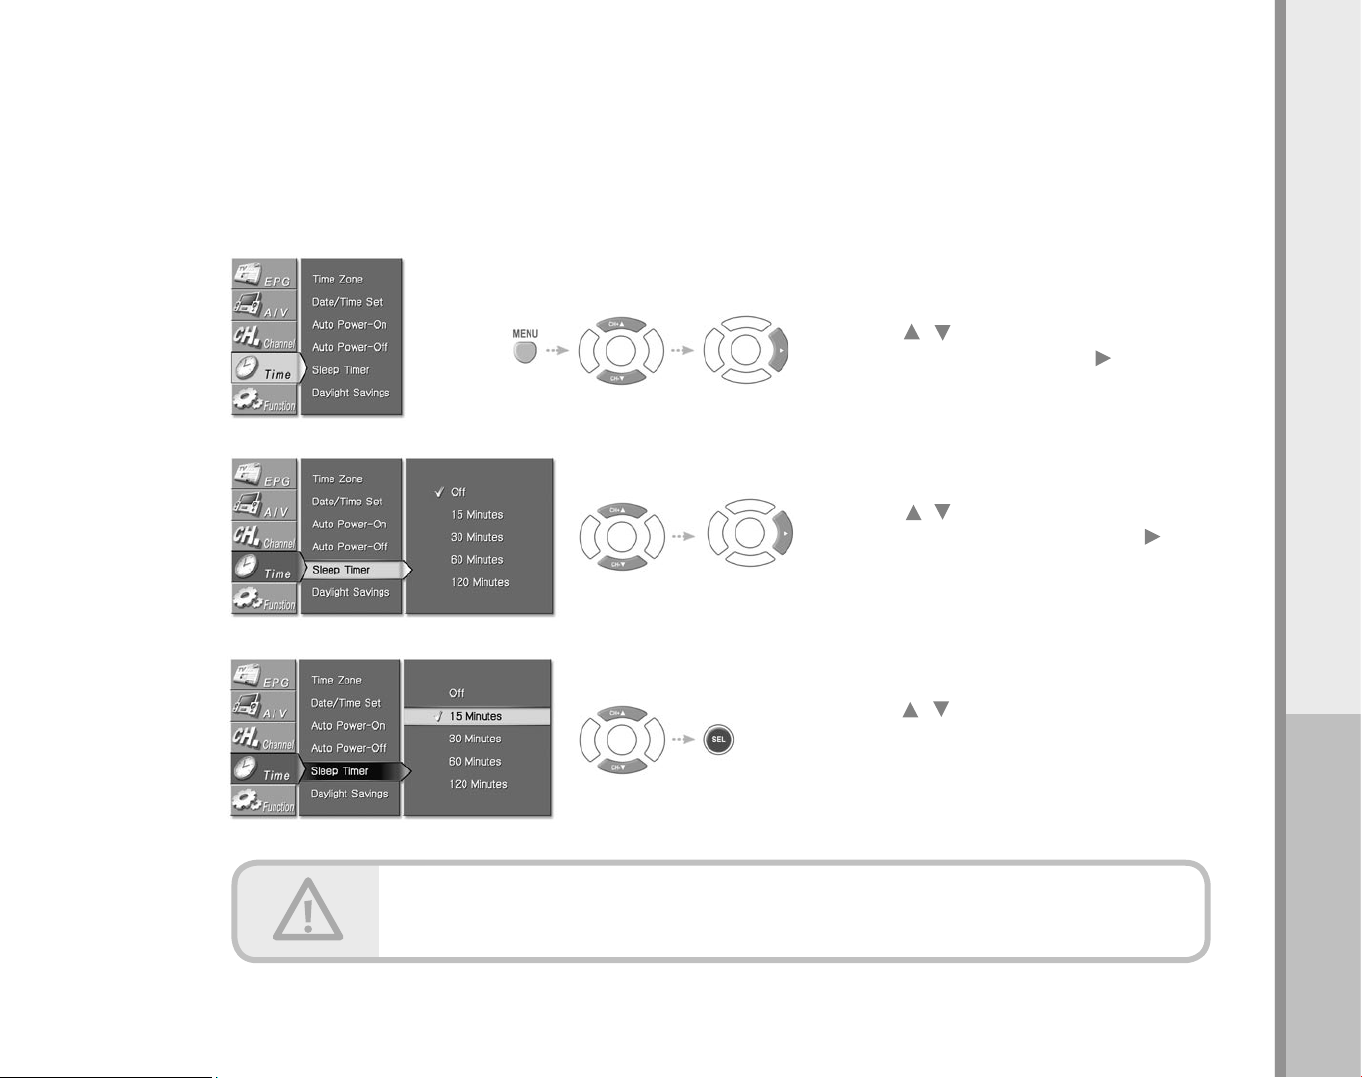
Select “Time” in the menu
Press the MENU button.
Press the / on the remote control to
highlight the “Time” icon and press the or SEL
button.
Sleep time set on/off
Press the / button on the remote control to move
to desired time and press the SEL button.
If “Off” is selected, the sleep timer will be canceled.
3.
1.
2.
Using The Sleep Timer
The sleep timer may also be set by pressing the “SLEEP” button on the remote and toggling through
the various times.
Time
Select “Sleep Timer”
Press the / button on the remote control to
highlight the “Sleep Timer” icon and press the
or SEL button.
Page 42

42
Operating
Select “Time” in the menu
Press the MENU button.
Press the / on the remote control to highlight
the “Time” icon and press the or SEL button.
Daylight savings set
Press the / button on the remote control to select
Auto, On, or Off and press the SEL button to save the
settings.
3.
1.
2.
Setting Daylight Savings
Select “Daylight Savings”
Press the / button on the remote control to
highlight the “Daylight Savings” icon and press the or
SEL button.
Auto means daylight savings is dependent on Broadcasterʼs feed.
Time
Page 43

43
Operating
Viewing Current Channel Information
How to view the channel info banner to obtain quick information of program.
�� channel number
��broadcaster
�� program title
�� telecasting time of
the program
�� current time
�� signal strength
■
The Info banner shows
The major channel number and the sub/minor channel number.
Station name.
Program title.
Program start and end time.
The current time and date.
������
The signal strength.
■
To view the Info banner
Press the SEL on the remote contol while viewing program.
■
To hide the Info banner
Press the SEL, BACK, EXIT, MENU, or wait 10 seconds and the display will disappear.
is highlighted when broadcast feed is 720p or 1080i resolution.
is highlighted when stereo is available.
is highlighted when multilanguage audio tracks are available.
is highlighted when digital close caption service is available.
is highlighted when multi channel Dolby Digital surround sound is available.
Ch. Info
12345678910112131415
12345678910112131415
12345678910112131415
12345678910112131415
Page 44

Detailed information about a program
If “ ” mark is displayed in the EPG window, press the
button to view detailed program information.
44
Operating
3.
1.
2.
Using The EPG (Electronic Program Guide)
The HDTV receiver has an EPG(Electronic Program Guide) to help give you an overview of programming
available. The EPG supplies program list, start and end times, and detailed information.
(Availability and amount of program details is dependent upon broadcastʼs feed.)
EPG
Press the Arrow buttons on the remote control to navigate
through the EPG.
- You may press the “EPG” button on the remote to view the EPG.
- To receive the EPG information from a broadcaster, you must flip to the specific channel to receive the broadcasterʼs
PSIP(Program and System Information Protocol) to update the EPG (if available).
- Time must be set correctly for EPG to function properly.
EPG
SELECTING CHANNEL
Press the SEL button to directly tune to highlighted
programming/channel.
Select “EPG” in the menu
Press the MENU button.
Press the / on the remote control to
highlight the “EPG” icon and press the or SEL button.
Page 45

45
Operating
Select langauge
Press the / button on the remote control to select
either “English” or “Spanish” as the text language for the
OSD MENU.
3.
1.
2.
Changing The MENU Language
How to change MENU language to either English or Spanish.
Select “Function” in the menu
Press the MENU button.
Press the / on the remote control to
highlight the “Function” icon and press the or SEL
button.
Function
Select “Menu Language”
Press the / buttons on the remote control
to highlight the “Menu Language” icon and press the
or SEL button.
Page 46

46
Operating
Choose level of opacity
Press the / button on the remote control to select the
desired transparency and press the SEL button.
Select “Opacity”
Press the / button on the remote control to highlight
the “Opacity” icon and press the or SEL button.
Select “Function” in the menu
Press the MENU button.
Press the / on the remote control to highlight the
“Function” icon and press the or SEL button.
1.
2.
3.
Adjusting The MENUʼs Opacity
Function
How to change the OSD MENUʼs transparency.
Page 47

Select “CC Display”
Press the / button on the remote control to
highlight the “CC Display” icon and press the
or SEL button.
Select “Function” in the menu
Press the MENU button.
Press the / on the remote control to highlight the
“Function” icon and press the or SEL button.
Pen Style
Press the / button on remote control to highlight
“Pen Style” and press the SEL button.
Then use the arrows to highlight selection and press
the SEL button to store settings.
3.
1.
2.
Setting Up The DTV CC Display
Function
47
Operating
How to manipulate text, background border, and position of closed captions.
Page 48

48
Operating
Color & Effects
Press the / button on remote control to
highlight “Color & Effect” and press the SEL button.
Then use arrows to adjust desired settings and
press the SEL button to store settings.
Font Style
Press the / button on remote control to
highlight “Font Style” and press the SEL button.
Then use the arrows to highlight selection and press
the SEL button to store settings.
4.
5.
Character Edge
Press the / button on remote control to
highlight “Character Edge” and press the SEL button.
Then use the / button to highlight selection
and press the SEL button to store settings.
6.
Caption Location
Press the / button on remote control to highlight
“Caption Location” and press the SEL button.
Then use the / button to choose desired location
and press the SEL button to select.
7.
Function
Page 49

49
Operating
Select “V-Chip”
Press the / button on the remote control to
highlight the “V-Chip” icon and press the or SEL
button. PIN prompt will appear.
Select “Function” in the menu
Press the MENU button.
Press the / on the remote control to highlight the
“Function” icon and press the or SEL button.
Enter the PIN
Enter your PIN number by pressing the NUMBER
buttons on the remote control. The default code is
“0000”.
3.
1.
2.
V-chip Lock
Function
How to control access to program via a 4 digit code and ratings.
Page 50

50
Operating
4.
Rating Control
Press the Arrow buttons on the remote control to
highlight the item that you want to lock or unlock and
press the SEL button. After setting locks press the
button to move to Save/Cancel prompt and press the
SEL button to save or cancel.
5.
6.
Function
Select “Rating Control”
While in the V-Chip menu, press the / button on the
remote control to highlight the “Rating Control” icon and
press the SEL button. The Rating Control Settings window
will appear.
V-Chip Lock
Press the / button on the remote control
to highlight selection and press the SEL button to store
setting. If you want to use the rating control, “Lock” should
be selected.
Page 51

51
Operating
Change PIN
Enter and re-enter your new PIN by pressing the
NUMBER buttons on the remote control.
7.
8.
Function
Change PIN selection
Press the / button on the remote control
to highlight the “Change PIN” icon and press
the SEL button. Change PIN menu will appear.
Page 52

52
Operating
If you forget the PIN, look in the trouble shooting guide to key in the master PIN.
Important Notes About Parental Locks.
Explanation of the MPAA and TV(FCC) Rating Systems:
TV(FCC) Age-Based Ratings
TV-MA Mature audiences only. This program may contain mature themes, profane language, graphic and explicit sexual
content.
TV-14 Parents strongly cautioned. This program may contain sophisticated themes, sexual content, strong language and more
intense violence.
TV-PG Parental guidance suggested. The program may contain infrequent coarse language, limited violence, some suggestive
sexual dialogue and situations.
TV-G General audience. It contains little or no violence, no strong language, and little or no sexual dialogue or situations.
TV-Y7 Directed to older children. Themes and elements in this program may include mild physical or comedic violence, or may
frighten children under the age of seven.
TV-Y All children. The themes and elements in this program are specifically designed for a very young audience, including
children from ages 2~6.
TV(FCC) Content Category
V : Violence.
S : Sexual content.
L : Offensive language.
D : Dialogue...sexual innuendo.
FV : Fantasy or cartoon violence.
MPAA Rating System (Movies)
G : General audience. No restriction.
PG : Parental guidance suggested. Some material may not be suitable for children.
PG-13 : Parents strongly cautioned. Some material may be inappropriate for children under 13.
R : Restricted. Under 17 requires accompanying parent or adult guardian.
NC-17 : No one 17 and under admitted.
X : Adults only.
Function
Page 53

53
Operating
Additional Remote Control Functions
FREEZE
Press the FREEZE button on the remote control to freeze current frame.
Cancel FREEZE
Press the FREEZE button on the remote control once more to release frozen frame and resume with live broadcast feed.
Help Button
Press the HELP button on remote while in the OSD MENU to view help information in regards to specific function in MENU.
Remote
Programming a Universal Remote
Your HDTV receiver can be controlled by most Universal Remote Controls by programming your universal remote with a Pioneer Cable Box code.
Page 54

54
Troubleshooting and Warranty
Troubleshooting and Warranty
Troubleshooting Guide
Specifications
Warranty
Page 55

55
Troubleshooting and Warranty
Troubleshooting Guide
If you are having difficulty with your HDTV receiver, below are a few troubleshooting guides to follow.
If problems persist, please call your RadioShack store for further assistance.
No Power.
- Check to make sure the power cord is plugged in securely to the wall outlet and without damage.
Intermittent signal
or no signal.
- Make sure your antenna is connected and without damage.
- The antenna signal strength maybe low. Check the signal meter on the receiver to see if youʼre receiving ample signal. If not, adjust
your antenna system.
- If you are using a powered antenna, make sure the power boost is on.
- Make sure the correct resolution format compatible with your monitor is selected.
Poor or no sound.
- Check to make sure the audio cables are connected properly and without damage.
- Make sure the MUTE function is Not ʻOnʼ on your TV, HDTV Receiver, or audio receiver.
Picture is distorted.
- Make sure the correct aspect ratio is selected.
- Make sure the correct format is selected.
- Make sure the video cables are connected properly and without damage.
Remote control does
not work.
- Make sure you have fresh batteries installed properly into the remote control.
- Operate the remote within 23 ft of the HDTV Receiver.
- Remove any obstruction from the HDTV Receiverʼs sensor.
Youʼve forgotten the
V-chip lock password.
- Enter the master PIN “0000”
Symptoms
Possible Solutions
Page 56

56
Troubleshooting and Warranty
MPEG-2 MP@HL (HDTV), MPEG-2 MP@ML (SDTV)
Supports all (18) ATSC formats
1080i, 720p, 480p, 480i (CVBS, S-Video)
�
Audio
Dolby
�
Functions
Terrestrial: Channel 2~69
Cable: Channel 1~135
DTV (ATSC)
English, Spanish
Support
16:9/4:3, Wide/Normal/Zoom
�Input Output Terminals
IEC 169-2, Female (F-type), 75 Ohms
1 CVBS (Composite), 1 S-Video
2 x Lt/Rt
Component (Y/Pb/Pr), Lt, Rt, HDMI
Fiber Optic, Coaxial
�
Others
Specifications
Coding Algorithm
Decoding Algorithm
Display Format
Dolby Digital
Antenna Input
Video Output
Audio Out
DTV Output
Digital Audio Output
Band Corverage
Broadcasting
standard
On Screen
Display
EPG
Display Format
Selection
Remote Controller Unit
Power Requirement
Power Consumption
Dimensions (W x H x D)
Weight
Requires DC 1.5V AAA battery x 2
100~240 VAC, 47~63 Hz
22W (Max)
14.6”(W) X 2.3”(H) X 10.4”(D)
4.5lbs
■
■
�
Video
■
■
■
Page 57

57
Troubleshooting and Warranty
This product is warranted by RadioShack against manufacturing defects in material and workmanship under normal use for 90 (ninety) days from the date of purchase from
RadioShack company-owned stores and authorized RadioShack franchisees and dealers. For complete warranty details and exclusions, check with your local RadioShack store.
RadioShack Customer Relations
200 Taylor Street, 6th Floor, Fort Worth, TX 76102
04/04
WARRANTY
08A04
Printed in Korea
Page 58

Memo
 Loading...