

Page 1
www.radioshack.com
.
SM
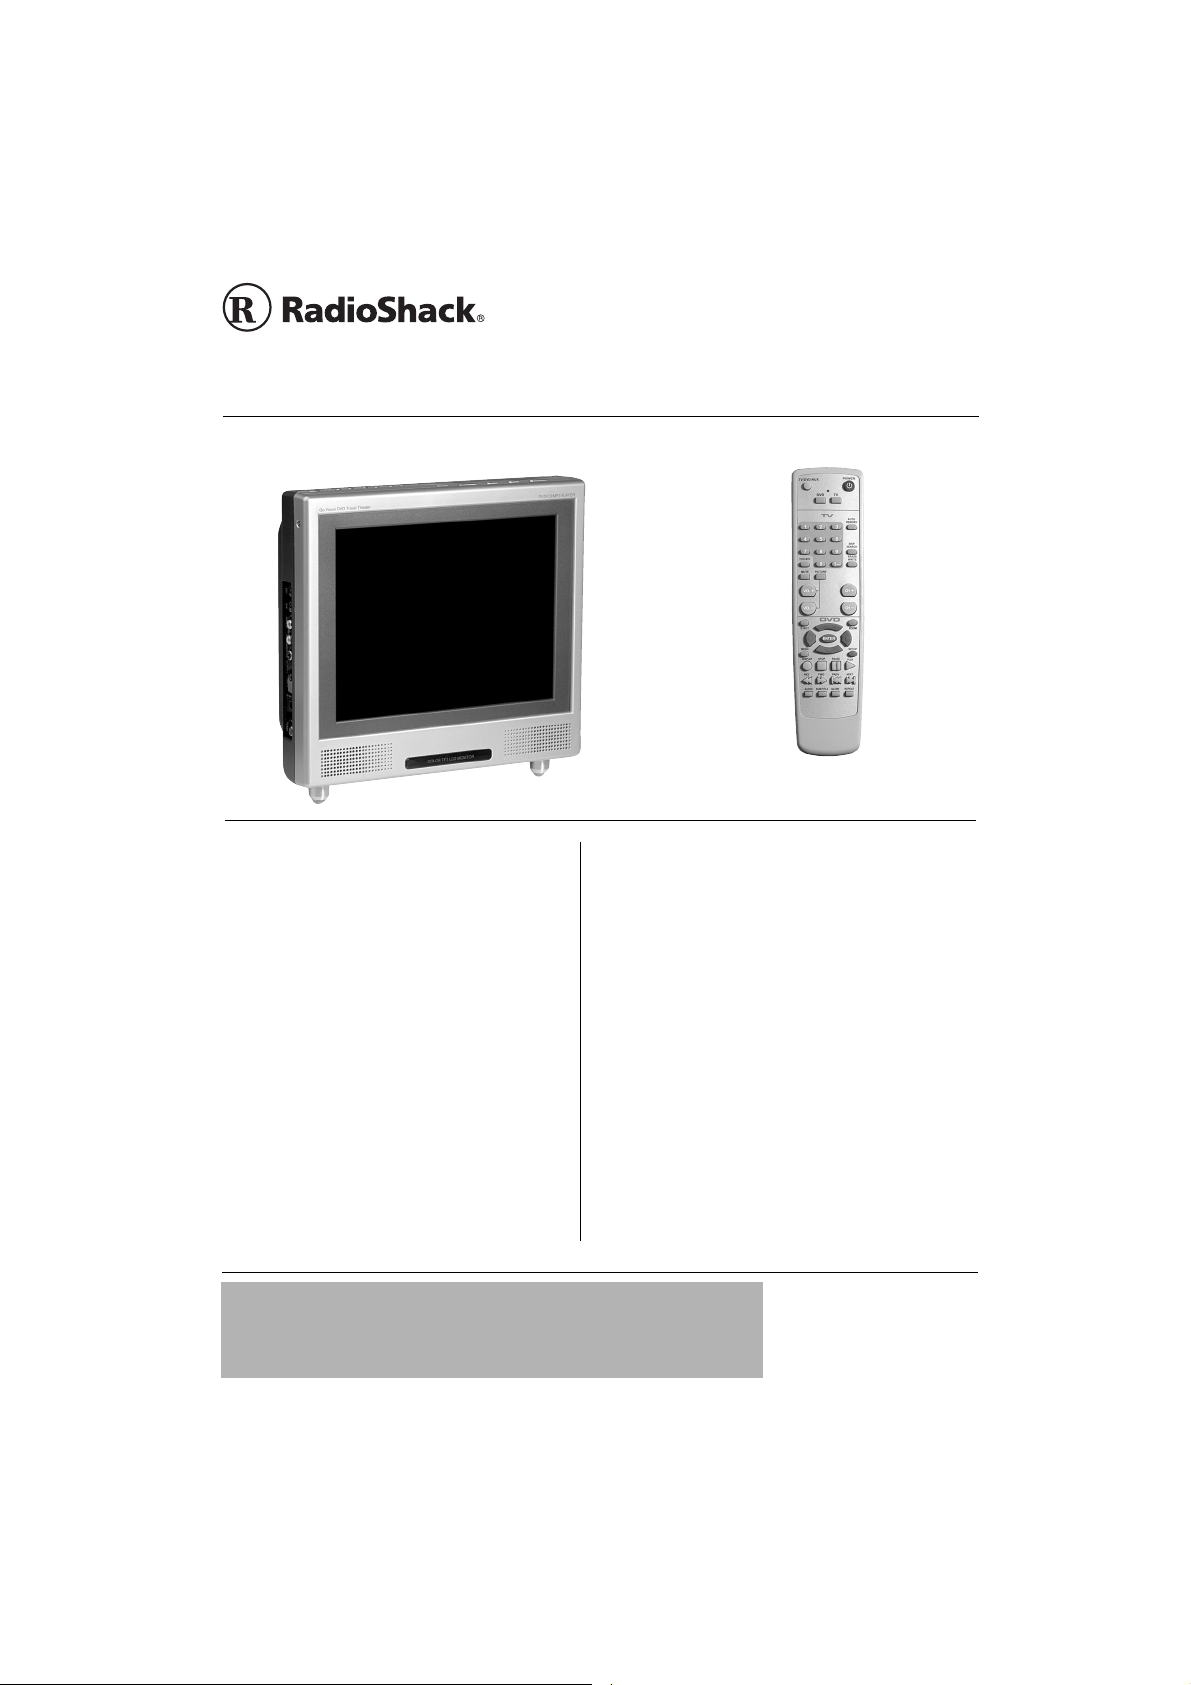
10.4” Go Vision
DVD Travel Theater
OWNER’S MANUAL —
Please read before using this equipment.
10.4-InchFlatLiquid Crystal Display(LCD)—
delivers higher resolution and brighter colors
than standard LCD screens.
Fluorescent Backlight — illuminates the LCD
so you can watch the TV in the dark or in lowlight conditions.
Automatic E lectronic Tuning System —
scans VHF and UHF bands and locks in your
favorite stations at the touch of a button.
Dual speakers – enjoy stereo sound from the
DVD player.
16-3314
What’s Included
AC Adapter — power the Travel Theater from a
standard AC outlet.
DC Adapter — power the Travel Theater from your
vehicle’s cigarette lighter socket.
Carrying Case — protects the Travel Theater and
enables convenient carrying.
Two Pairs of Stereo Earbuds — for private listening
Audio/Video Cables — connect the Travel Theater
to a TV, amplifier, video game, or camcor der.
RF Antenna Adapter — connect cable TV or an
external antenna for viewing regular TV.
Shoulder Strap — Attaches to the carrying case.
Four Straps for Vehicle Installation — install the
Travel Theater in your vehicle.
Remote Control
IMPORTANT
If an icon appears at the end of a paragraph, go to the box on that page
with the corresponding icon for pertinent information.
— Important Ô — Note —Caution
!
!
!
© 2003 RadioShackCorporation.
All Rights Reserved.
RadioShackandRadioShack.com
are trademarks used by
RadioShack Corporation.
Page 2
Region Mana gement Information
Region Management Information ........... 2
Important Safety Information .................. 2
A Quick Look at Your Travel Theater ..... 4
Front View .......................................... 4
Side View ............................................ 5
A Quick Look at Your Remote Control ... 6
Preparation ............................................. 7
Installing Batteries in the Remote ....... 7
Installing the Travel Theater ............... 7
Connecting to Vehicle Battery Power . 8
Connecting Headphones .................... 9
Other Connections ............................... 10
To an External TV Antenna
or Cable TV ...................................... 10
To a TV and Audio/Video Receiver ... 10
To a Camcorder, Game Console,
or Digital Camera .............................. 11
Connecting to AC Power ................. 12
Operation ............................................. 13
Compatible Disc Types ..................... 13
Loading and Playing a Disc .............. 13
Programming TV Channels .............. 14
Watching TV ..................................... 14
DVD Advanced Features ..................... 15
Menus ............................................... 15
DVD Playback Features ................... 15
Using ZOOM ..................................... 17
Playing Audio CDs ............................... 17
Skipping Tracks ................................ 17
Using Repeat ................................... 17
Using the Display Function ............... 17
Playing MP3 Discs ............................... 18
Selecting Tracks ............................... 18
Skipping Tracks ................................ 18
To Repeat an MP3 Track .................. 18
Using the Display Function ............... 18
Playing JPEG Discs ............................. 19
To Repeat a JPEG Photo ................. 19
Default Setup ....................................... 20
General Setup .................................. 20
Setting Preferences .......................... 20
Troubleshooting .................................... 23
Care ..................................................... 24
Service and Repair ............................... 25
The FCC Wants You to Know ............... 26
Specifications ....................................... 27
WARNING:To reduce the risk of fire or shock
hazard, do not expose this product to rain or moisture.
CAUTION: TO REDUCE THE RISK OF ELECTRIC
SHOCK, DO NOT REMOVE COVER OR BACK. NO
USER-SERVICEABLE PARTS INSIDE. REFER
SERVICING TO QUALIFIED PERSONNEL.
CONTENTS
..CAUTION..
RISK OF ELECTRIC SHOCK
DO NOT OPEN
The lightning symbol is intended to alert you to the
presenceof uninsulateddangerous voltage withinthis
product’s enclosure that might be of sufficient
magnitude to constitute a risk of electric shock. Do not
open the product’s case.
The exclamation symbol is intendedto informyou that
importantoperating and maintenance instructionsare
includedin theliterature accompanying this product.
!
Thank you for purchasingthe 10.4-Inch Go Vision Travel
Theater. It uses the latest in solid state design to give you
the highest quality picture andsound.It is small,lightweight,
and easy to carry. It is perfect for use in your car, SUV, or
van.
Your Travel Theater Plays:
• DVD Video Discs — Video discs consistingof movies,
concerts, and so on.
• Audio Discs — Audio CDs containing musical or sound
content only.
• CD-R — A disc that you can write information to once
(for example, downloading MP3 or JPEG photo files).
• CD-RW — A re-writable disc. You can write information
onto this type of disc more than once. For example, if
you have previously downloaded MP3 or JPEG files to
a CD-RW disc,you can write information to the disc
again, after it erases the previouslywritten information.
REGION MANAGEMENT
INFORMATION
This Travel Theater is designed andmanufactured to
respond to the Region Management Information that is
recorded on a DVD disc. If the region number on the DVD
disc does not correspondto the region number on this
Travel Theater, the Travel Theater cannot play that disc.
The Region number of this Travel Theater is
1 (USA/CANADA).
IMPORTANT SAFETY
INFORMATION
This manual contains important information about how to
safely and properly install, operate, and care for this
product.Failure to properlyinstall, operate, and carefor this
product can increase the risk of electric shock or fire. It can
also increase the risk of product failure and possibly
personal injury. To reduce the risk of serious injury, death,
!
or damage, read and follow these instructions. Heed all
warnings.
• Do not attempt to service or repair the Travel Theater
yourself. Refer all servicing to qualified service
personnel.
2
Page 3

• Do not block ventilation openings. D o not place the
TravelTheater on abed, sofa, orother soft surfacethat
may block ventilation openings.
• Do not install the Travel Theater near heat sources,
suchas radiators, stoves, or otherdevicesthat produce
heat.
• Do not use this product near water (for example, sinks,
tubs, and pools) or expose it to rain, moisture, or
dripping or splashing liquids. No objects filled with
water (such as vases) should be placed on the product.
• Do not play headphones at a high volume. Even if your
headset is an open-air type (designed to let your hear
outsidesounds), do not turn up the volumeso high that
you cannot hear what is around you.
• THE VEHICLE’S DRIVER SHOULD NEVER
OPERATE OR WATCH THE TRAVEL THEATER
WHILE DRIVING.There are laws that prohibit usage of
this unit when viewable by the driver.
• As with many other electrical devices, failure to take
precautions can result in serious injury or death from
electrical shock or fire, and can damage the Travel
Theater.
• As the laser beamusedin the Travel Theater is harmful
to eyes, and to avoid electrical hazards, do not attempt
to disassemble the housing. Refer servicing toqualified
personnel.
• Protect the AC adapter cord from being walked on or
pinched, particularly at plugs, and the point where they
exit from the apparatus.
• Do not jerk, knot, sharply bend, or otherwise abusethe
AC adaptercord.
• Do not expose the AC adapter cord to sources of heat.
• Keep children and pets away fromthe AC adapter cord.
Do not allow them to bite or chew on it.
• When disconnecting the AC adapter cord from the
Travel Theater or a power outlet, pull on the plug. Do
not pull on the cord.
• If the AC adapter cord becomes damaged in any way,
stop using it immediately. Ô
Notes on Copyright
Ô NOTE Ô
It is forbidden by law to copy,
broadcast, show, broadcast on
cable, play in public, and rent
copyrighted material without
permission. DVD video discs are
copy protected, and any recordings
made from these discs will be
distorted.
Thisproductincorporatescopyright
protection technology that is
protected by method claims of
certain U.S. patents and other
intellectual property rights owned
by Macrovision Corporation and
other rights owners. Use of this
copyright protection technology
must be authorized by Macrovision
Corporation and is intended for
home and other limited viewing
uses only, unless otherwise
authorized by Macrovision
Corporation. Reverse engineering
or disassembly is prohibited.
Important Safety Information
3
Page 4
A QUICK LOOK AT YOUR TRAVEL THEATER
P
a
c
M
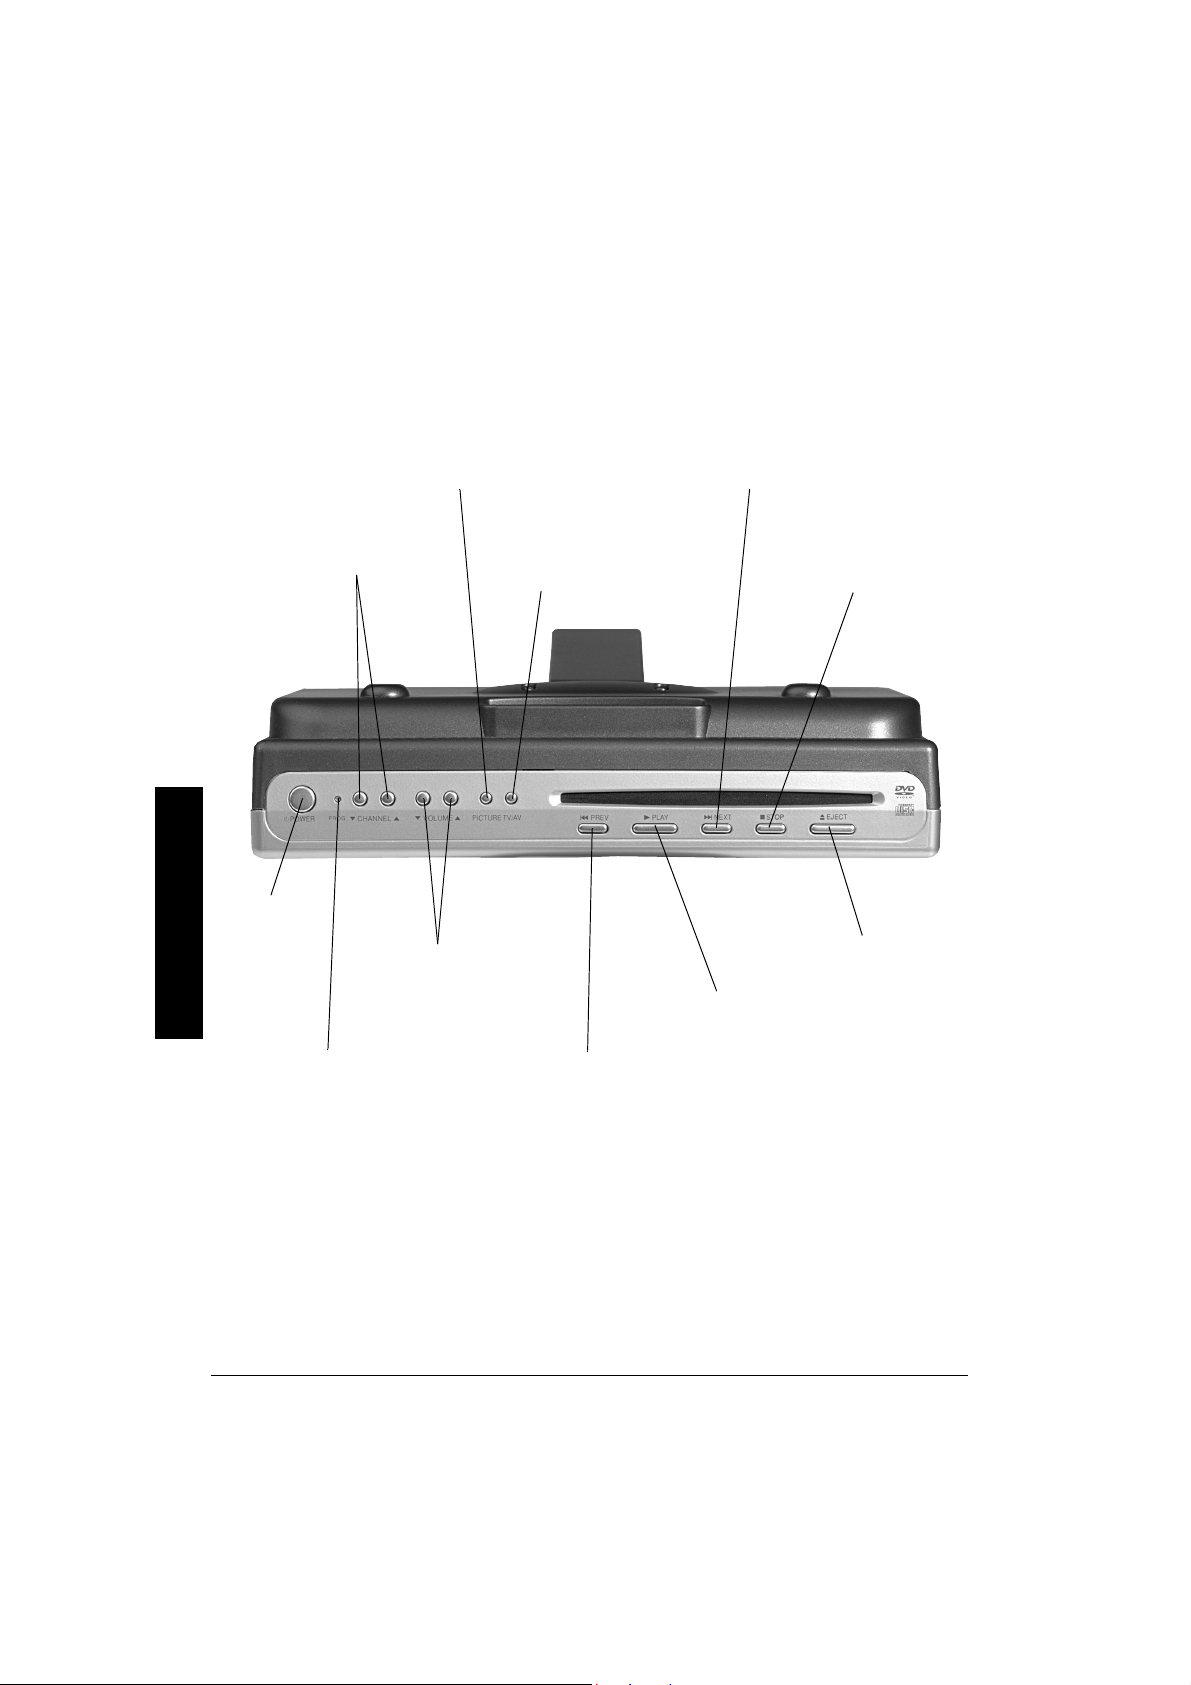
FRONT VIEW
PICTURE — Press repeatedly to adjust the on-screen
picture contrast, brightness, tint, and color.
CHANNELe — Press to
d
scroll downward or upward to
view TV channels.
A Quick Look at Your Travel Theater
POWER —
º
Press t o turn
power on or off.
VOLUMEe — Press to
d
decrease or increase volume.
TV/AUX — Press
repeatedly to toggle
between TV and AUX mode.
Next — Press to go to the next DVD
J
chapter or to the next track on a CD.
STOP— Press to stop
D
playing a DVD or CD.
EJECT— Press
Ï
to eject a disc.
PLAY — Press to
g
play a DVD or CD.
ROG — Press to scan through
vailable antenna and Cable TV
hannels. (Sam e as AUTO
EMORY on the remote)
4
PREV— Press to go back
F
to the previous chapter of a
DVD or thelast track of a CD.
Page 5
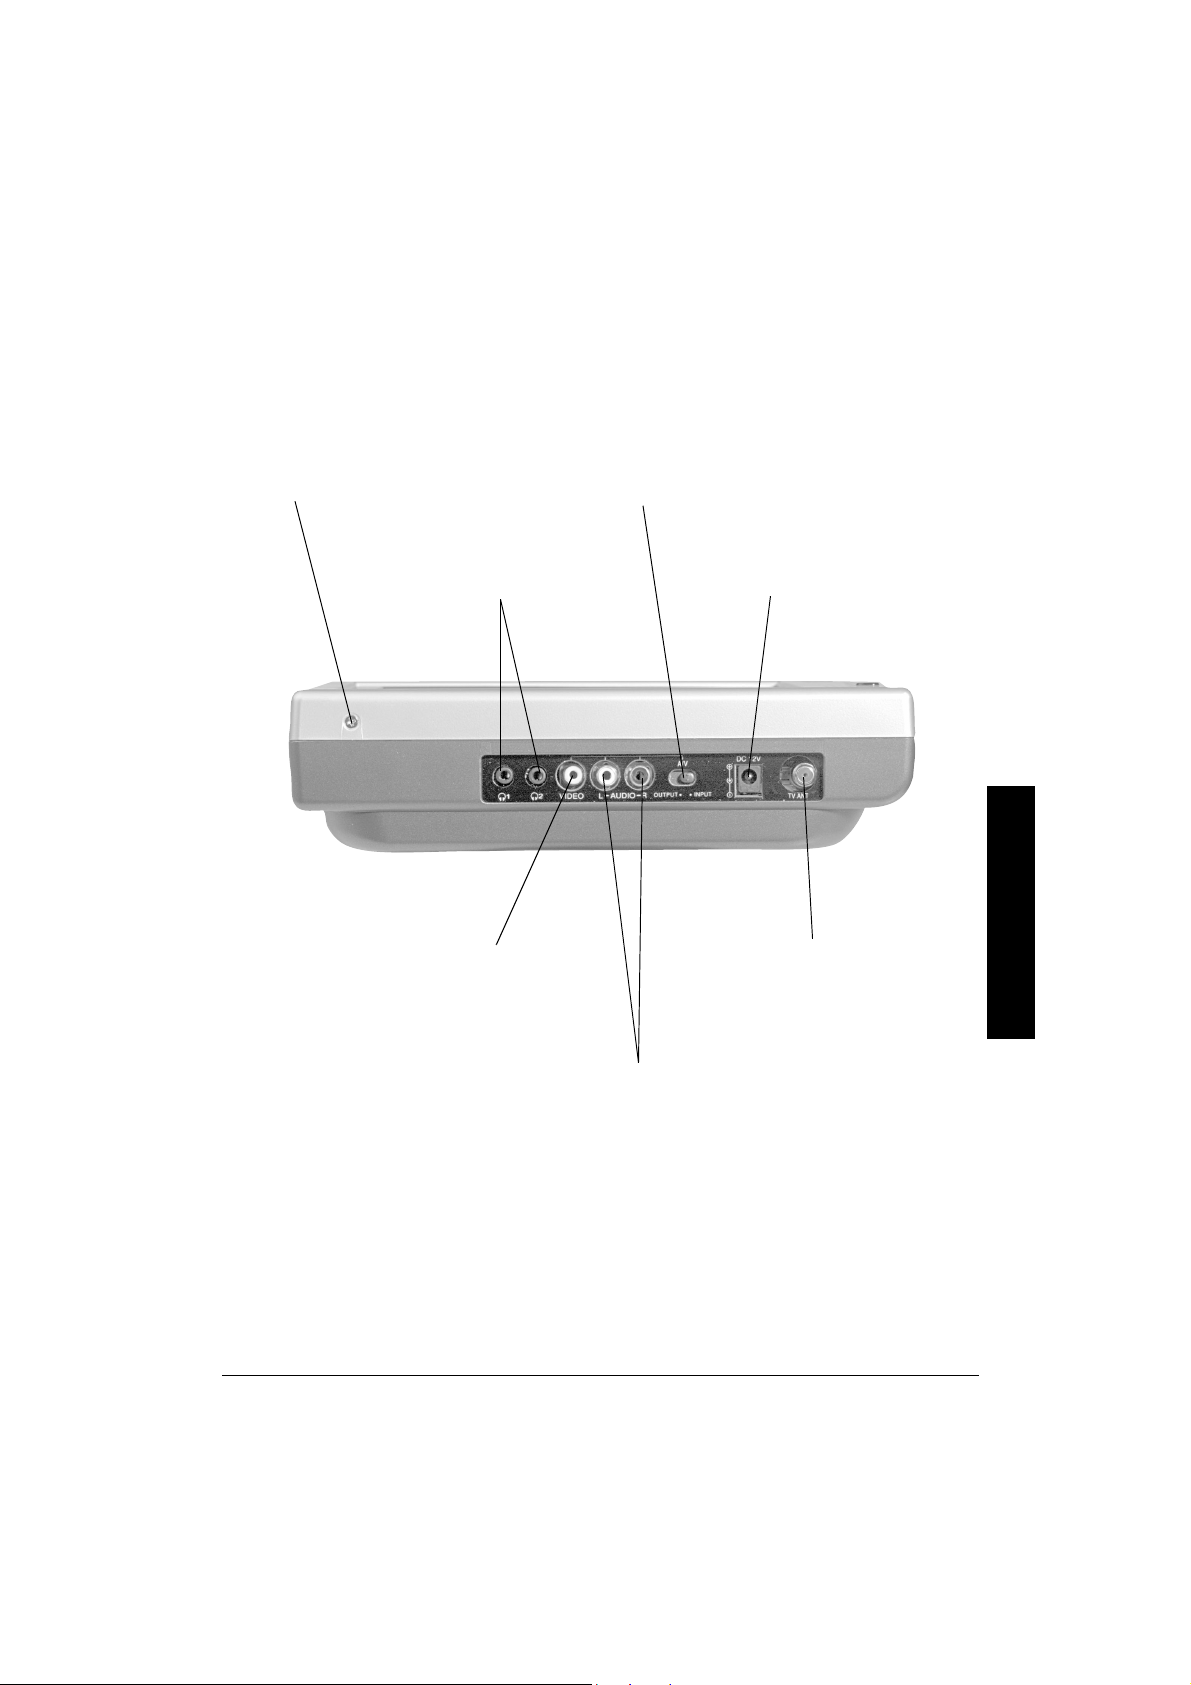
Remote Control Sensor
s 1 and s 2—Insert up to two sets
of headphones for private listening.
SIDE VIEW
A/V Output-Input — Set to OUTPUT to
output the Travel Theater’s A/V signal to
external A/V equipment. Set to INPUT to
input an external A/V signal to the Travel
Theater.
DC 12V — Insert the supplied DC
adapter cord plug here to connect to
vehicle battery power.
VIDEO — Insert the supplied audio/
video cable’s yellow plug here to
connect t o a TV and amplifier.
L-AUDIO-R — Insert the supplied audio/
video cable’s white plug to the AUDIO L
jack, and insert the cable’s red plug tothe
AUDIO R jack to hear sound from the
external, connected device.
TV ANT. — Insert the supplied
75-ohm coaxial cable connector
here to connect to cable TV or to
an external antenna.
A Quick Look at Your Travel Theater
5
Page 6
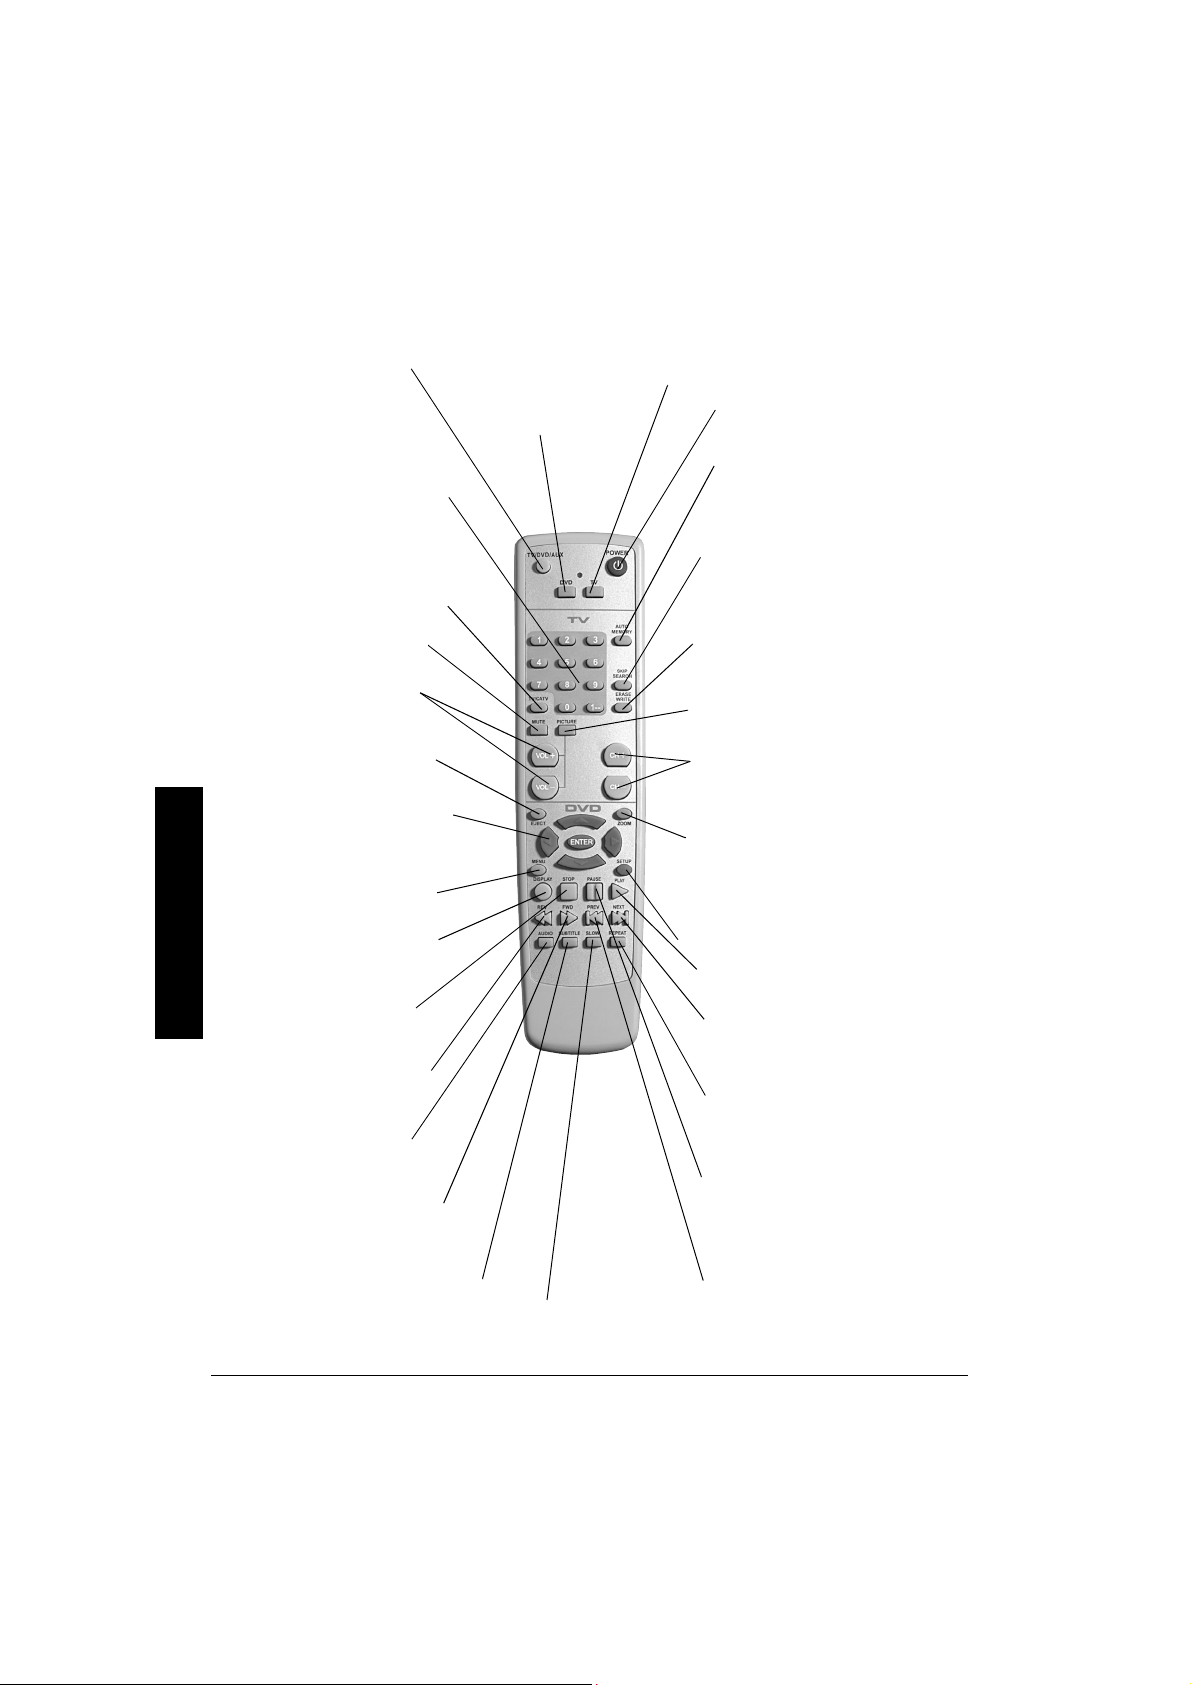
A QUICK LOOK AT YOUR REMOTE CONTROL
r.
V
i
E
o
e
A
d
p
TV/DVD/AUX — Press
repeatedly to toggle between
TV, AUX, and DVD mode.
Number Buttons (0–9, 1--) —
Use to input chapter and track
numbers,or to makeselectionson
menu screens. Before pressing a
numberbutton, youmust pressTV
or DVD.
TV/CATV — Press to toggle
between antenna and cable TV.
MUTE — Presstosilencethe
Travel Theater’s sound.
OL + and VOL – Press to
ncrease or decrease volume.
DVD — Press this button,
and then press number
buttons to enter a DVD
chapter/track number.
TV — Press this button, and
then press number buttons to
enter TV channels.
POWER
on or off.
AUTO MEMORY — Presstotunet
allTV or cable TVchannelsand stor
the channels automatically.
SKIP SEARCH — In SKIP mode, the
TV stops only on channels that are
programmedintomemory.InSEARCH
mode, the TV scansand stops at
available channels.
ERASE WRITE — Press while in Erase
modeto erasea TV channel.Press while
inWritemodetostoreaTVchannel.
PICTURE — Press repeatedly to adjust
picturecontrast, brightness,tint, and colo
— Press toturn power
º
JECT — Presstoejectadisc.
A Quick Look at Your Remote Control
— Use to navigate onscreen
edf g
menus. After highlighting your
selection, press ENTER to select.
MENU —Press to viewthe Travel
Theater’s menu options.
DISPLAY — Press during DVD
playback to view elapsedand
remaining time.
STOPD — Presstostopdisc
playback.
REV@ —Pressd uring playback
to fast reverse a disc.
UDIO — Lets you select a
ifferentlanguage during DVD
layback.
FWDI —Press during playback
to fast forward through a disc.
SUBTITLE —Press toview the
subtitle banner.
SLOW — Slowly advances
DVD’s picture.
CH + and CH– Press to scroll upward or
downward through external antenna or
Cable TV channels.
ZOOM — Press while playing a DVD
to zoom in on picture. Press
and REV@ or FWDI while playing a
JPEG to zoom in or out.
SETUP — Press to view the setup menu.
PLAYg— Presstoplayadisc.
NEXTJ — Press during disc
playbacktoskiptothenextchapter of
a DVD, or the next track of a CD.
REPEAT — Press to repeatpart or
all of a chapter or track,ortorepeat
an entire disc.
PAUSE — Press during playback to
pause disc play.
PREVF— Presstoreturnto the last chapter
of a DVD, or to the last track of a CD during
playback.
ZOOM
6
Page 7
PREPARATION
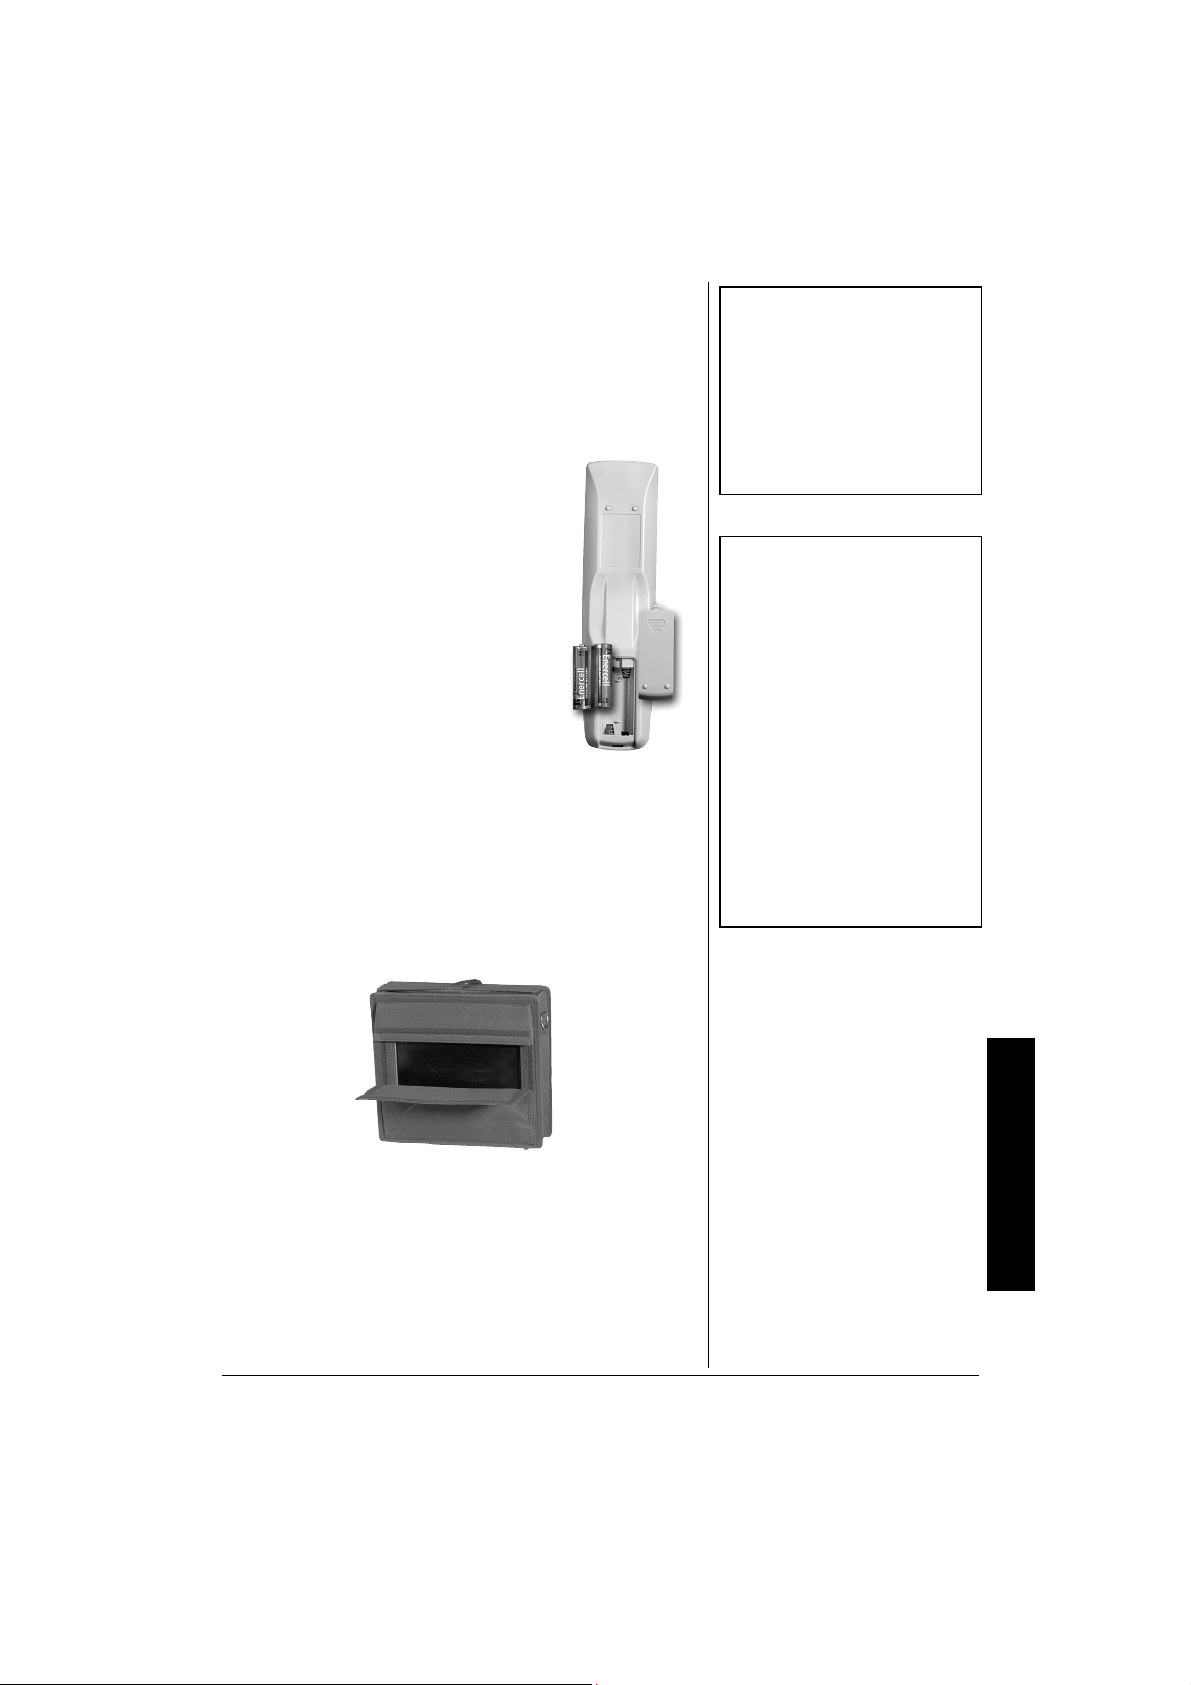
INSTALLING BATTERIES IN THE REMOTE
Your remote control requires two AAA batteries (not
supplied) for power. Batteries are available at your local
RadioShack store or online at www.radioshack.com.
1. Press the battery compartment
cover in the direction of the arrow
to slideit off.
2. Insert two AAA batteries into the
battery compartment according to
the polaritymarks inside.
3. Replace the cover.
When the remote becomes inoperative,
replace the batteries. Ô
INSTALLING THE TRAVEL THEATER
In a Vehicle
1. Make sure the Travel Theater is securely fastened in
the carrying case.
2. Pull down the flap on the back of the carrying case and
reattach it, aligning the velcro strip to the panel.
• Make sure there is a clear path
Ô NOTE Ô
between the remote and the
Travel Theater so the signal is
not blocked.
• Aim the remote at the Travel
Theater’s Remote Sensor when
you press any button on the
remote.
Ô BATTERY NOTES Ô
• Dispose of old batteries
promptly and properly.
• Do not burn or bury batteries.
• Use only fresh batteries of the
required size and
recommended t ype.
• Do not mix old and new
batteries, different types of
batteries (standard, alkaline, or
rechargeable), or rechargeable
batteries of different capacities.
• If you do not plan to use the
remote for a month or more,
remove the batteries. B atteries
can leak chemicals that can
damage electronic parts.
3. Attach one of the supplied straps to the carrying case
and hang the strap over the back of the headrest.
4. Attach one strap to each loop on the bottom of each
side of the carrying case.
Preparation
7
Page 8
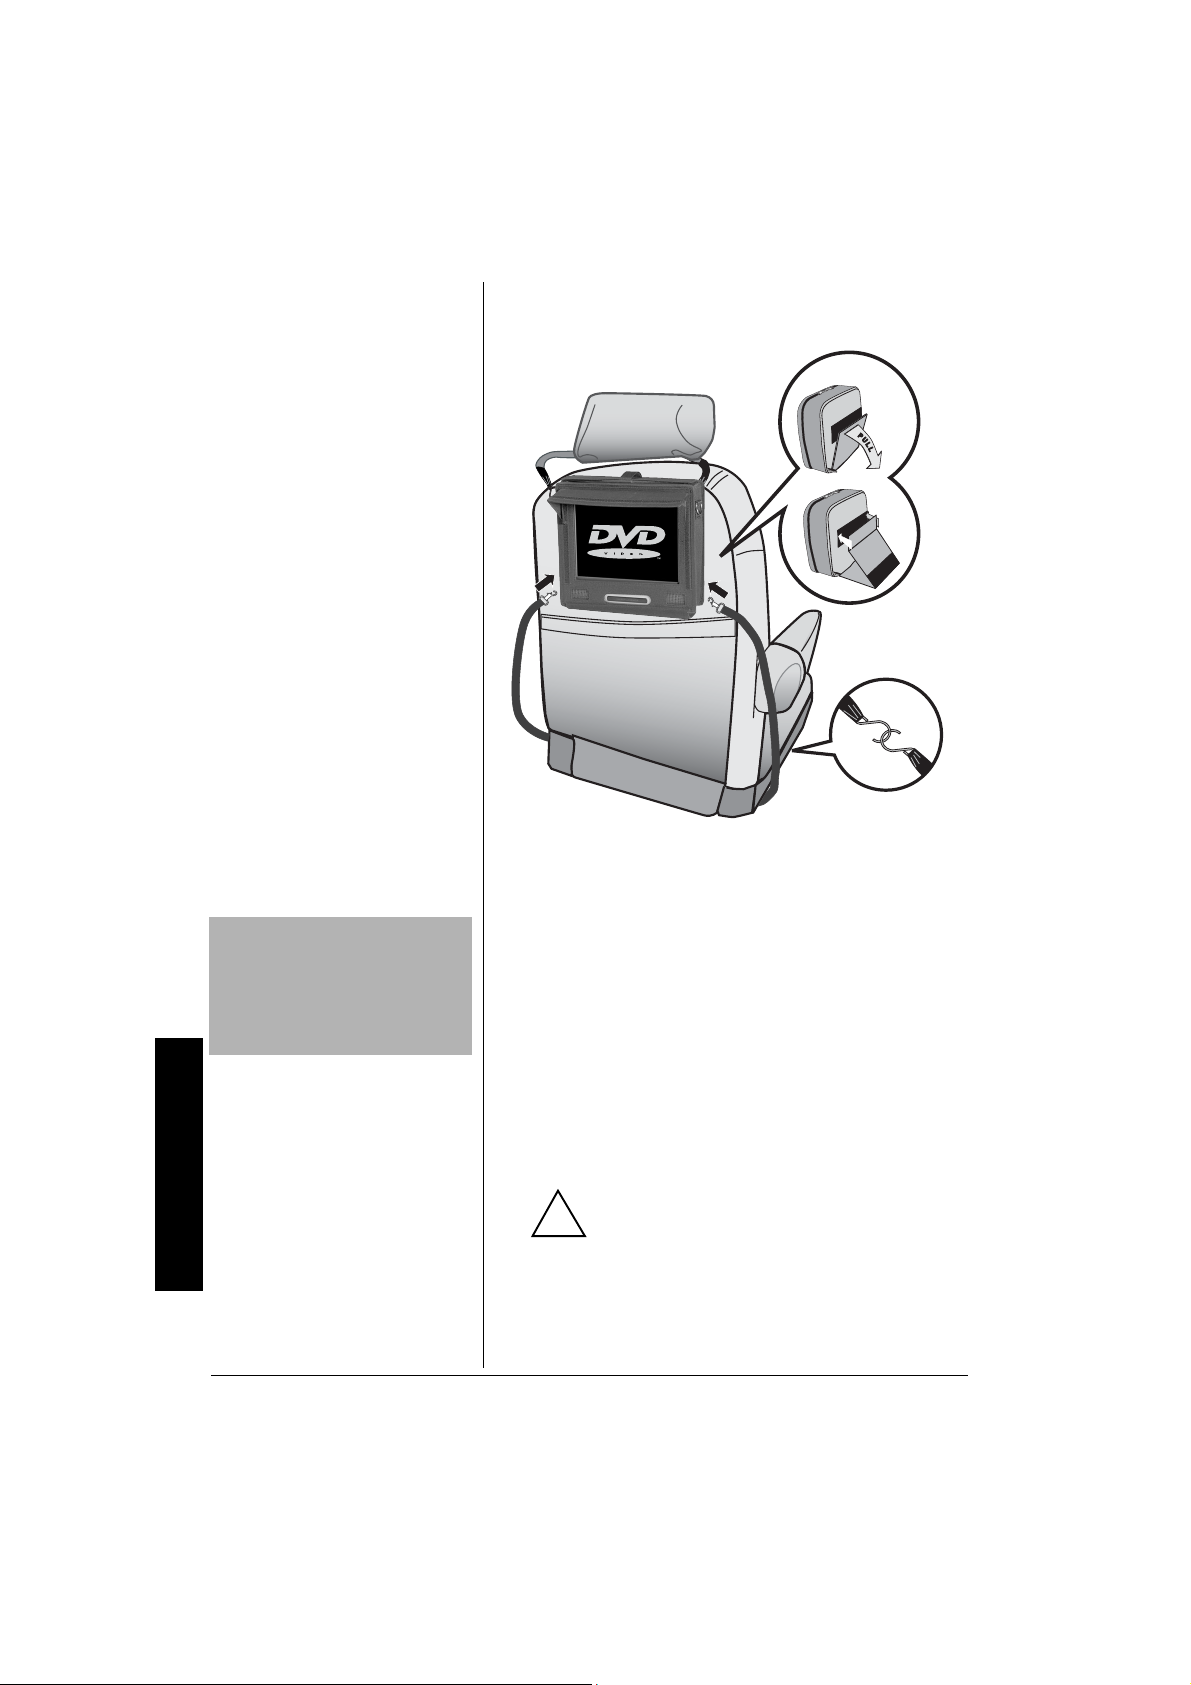
5. Wrap the straps around the bottom front of your seat
!
and attach them together. The configuration varies
depending on you car seat.
6. Secure the TravelTheater to your seat byadjusting the
straps to the appropriatelength.
IMPORTANT
!
To avoid draining your car’s
battery power, do not leave the
Travel Theater on or connected to
the cigarette lighter socket when
your vehicle is not running.
Preparation
8
!
You canpower the Travel Theater from your vehicle’s 12V
power source (such as a cigarette-lighter socket) using the
supplied DC adapter.
1. Connect the supplied DC adapter cord’s barrel plug to
the Travel Theater’s
2. Connect the other end of the adapter to the vehicle’s
cigarette lighter socket.
Cautions:
the Travel Theater's
does not meet these specifications could damage the
Travel Theater or the adapter.
!
DC 12V jack.
You must use a power source that supplies
12V DC and delivers at least 2.5A. Its center
tipmustbesettopositiveanditsplugmustfit
DC 12V jack.Using an adapterthat
CONNECTING TO VEHICLE BATTERY POWER
Page 9

CONNECTING HEADPHONES
The Travel Theater has two 3.5 mm (1/8-inch) headphone
jacks for private listening. Connect the supplied stereo
headphones’ plug(s) into the s1 and/or s2 jack(s). Ô
Listening Safely
To protectyour hearing,follow these guidelines when you
use headphones.
• Set the volume to the lowest setting before you begin
listening.After you beginlistening,adjust the volumeto
a comfortable level.
• Do not listen at extremelyhighvolumelevels.Extended
high volume listening can lead to permanent hearing
loss.
• Once you setthe volume, donot increase it.Over time,
your ears adapt to the volume level, so a volume level
that does not causediscomfort might still damage your
hearing.
Traffic Safety
Do not wearheadphones while operating a motor vehicle or
riding a bicycle. This can create a traffic hazard and could
be illegal in some areas.
Even though some headphones let you hear some outside
soundswhenlisteningat normal volumelevels, they still can
present a traffic hazard.
The Travel Theater’s speaker is not
Ô NOTE Ô
disconnected when the
headphone(s) are connected.
Preparation
9
Page 10

OTHER CONNECTIONS
You can connect to an external TV antennaor cableTV, or a TV and audio/video receiver. The
Other Connections
picture below shows the Travel Theaterconnected to an external TV antenna, TV, and audio/
video receiver.
TO AN EXTERNAL TV ANTENNA OR CABLE TV
1. Plug thesupplied 75-ohm coaxial cableconnector into the TravelTheater’s TV ANT.socket.
2. Connect the antenna’s or cable TV’s 75-ohm connectorto the coaxial cable connector as
shown
75-ohm coaxial
cable con nector
• Position cables properly to
Ô NOTE Ô
avoid audio interference. Insert
each cable firmly into the
designated jack.
• If you place components above
the TV, route all cables down
the side of the back of the TV.
• If your antenna uses 300-ohm
twin lead cables, do not coil the
cables. Keep the twin lead
cables away from audio/video
cables.
10
TO A TV AND AUDIO/VIDEO RECEIVER
1. Connect the suppliedaudio/videocable’s yellow plugto
the Travel Theater’s
plug’s other end to the TV’s VIDEO IN jack. Ô
2. Connect the supplied audio/videocable’s white plug to
your Travel Theater’s
end to your TV or receiver’s Audio In L jack.
3. Connect the supplied audio/videocable’s red plug to
your Travel Theater’s
end to your TV’s or receiver’s Audio In R jack.
4. Set the Travel Theater’s
OUTPUT.
VIDEO jack. Connect the yellow
AUDIO L jack. Connect the other
AUDIO R jack. Connect the other
A/V INPUT/OUTPUT switch to
Page 11

TO A CAMCORDER, GAME CONSOLE, OR DIGITAL CAMERA
You canconnect a camcorder or a digital camera using the supplied audio/video cable.The
picture shown below is an example of a connection to a camcorder
Other Connections
1. Connect the audio/video cable’s white plug to your
device’s left output socket. Connect the other end of the
cable to the Travel Theater’s
AUDIO L jack.
2. Connect the audio/video cable’s red plug to your
device’s right outputsocket. Connect the other end of
the cable to the Travel Theater’s
AUDIO R jack.
3. Connect the suppliedaudio/videocable’s yellow plug to
the Travel Theater’s
VIDEO jack. Connect the otherend
of the yellow plug to the Video Output jack on your
camcorder, game systemconsole, or digital camera. Ô
4. Set the Travel Theater’s
INPUT.
A/V INPUT/OUTPUT switch to
Some game systems have a
Ô NOTE Ô
proprietary output cable. Follow
your game system’s hookup
instructions to send audio/video to
the Travel Theater.
11
Page 12

Other Connections
!
CONNECTING TO AC POWER
You can power the Travel Theater using the supplied 12V,
2.5A AC adapter.
1. Turn the “feet” on the bottom of the TravelTheater
counterclockwiseto remove them
2. Remove the TravelTheater fromthe carrying case, and
positionthe stand so it supports the Travel Theater on a
flat surface.
12
3. Connect the supplied AC adapter’s barrel plug to the
Travel Theater’s
4. Insert the AC plug to a standard AC outlet.
Cautions:
its plug must fit the Travel Theater's
an adapterthat does not meet these specifications
could damage the Travel Theater or the adapter.
DC 12V jack.
YoumustuseaClass2orITEpowersource
that supplies 12V DC and delivers at least
2.5A. Its center tip mustbe set to positiveand
DC 12V jack. Using
Page 13

OPERATION
COMPATIBLE DISC TYPES
Your Travel Theater plays DVD discs, audio CD discs, and
most CD-R / CD-RW discs. Before loading a disc, make
sure that it is compatible with the Travel Theater.
The following discs cannot be played:
• Video CD discs
• Laserdiscs and mini discs
• CD-I, CD-ROM (computer-only discs), DVD-ROM discs
• Discs recorded using other broadcast standards (PAL
or SECAM).
• CD-G discs
LOADING AND PLAYING A DISC
1. Press POWER º to turn on the Travel Theater.
2. Press
3. With the disc’s label facing front, slowly insert a disc
Remote Control
Sensor
4. Press
TV/DVD/AUX on the remote until the DVD logo
appears on screen, indicating DVD mode.
into the slot on top of the Travel Theater.
L
A
D
B
V
E
D
L
PLAY
. The Travel Theater reads the disc’s
g
table of contents, and then one of followinghappens
depending on how the disc was programmed:
Operation
The disc starts playing.
The disc menu appearson the screen. Highlight the
option to play the disc using
.PressENTER on
eord
theremotetoconfirm.
13
Page 14

When you stop pl a yi ng a disc, the
Ô NOTE Ô
Travel Theater remembers where
you stopped. When you press
PLAY
again, the Travel Theater picks up
where you left off unless you press
STOP
the Travel Theater.
to start playing the disc
g
, eject the disc, or turn off
D
5. Adjust VOLUME to a comfortable listening level.
6. To stop playinga disc, press
7. Press
EJECT to remove the disc from the player.
8. To turn off the TravelTheater, press
STOP
. Ô
D
POWER º.
PROGRAMMING TV CHANNELS
1. Press POWER º.
Operation
2. Press
TV/DVD/AUX on the remote or TV/AUX on the
TravelTheater to select TV mode.
3. Press
TV/CATV on the remote to select regular
broadcast TV or cable TV (Standard Cable, HRC
Cable, and IRC Cable).
4. Press
AUTO MEMORY on the remote or PROG. on the
Travel Theater. All available channels are searched
and tuned. Channelswith signals detectedare
automatically stored.
5. Repeatedly press
SKIP is on, when you used CHANNEL
If
SKIP/SEARCH to turn SKIP on or off.
CH+/CH–
or
e
to scroll through channels, the TV stops only on
channels that were stored into memory. If
SKIP is off,
the TV searches and stops at all available channels.
6. To manually store a TV channel, tune to that channel
and press
ERASE/WRITE until MANUAL MEMORY ADD
appears on the screen.
To erase a channel from memory, tune to that channel
and press
MEMORY ERASE
ERASE/WRITE on the remote until MANUAL
appears on the screen.
WATCHING TV
1. Press
on the remote to tune to the desired channel. You can
also use the number buttons to manually enter the
channel number.
CHANNEL
d
on the TravelTheater or
e
CH+/CH–
14
2. Toadjust the volume,press
Theater or
VOL +/ VOL– on the remote.
VOLUME
d
on the Travel
e
Page 15

DVD ADVANCED FEATURES
MENUS
Each disc is programmed with different features. There are
three menus available to access features:
Disc
The Disc m enu is part of each individual disc, separatefrom
the TravelTheater’s menu. Disc menucontent varies
according to how the disc was authored and what features
are included. Press
disc menu. Press
option, and press
Info
The Info menuappears across the top of the screen when a
disc is playing. Itshows Title Elapsed Time,Title Remaining
Time,ChapterElapsedTime,andChapterRemainingTime.
Repeatedly press
DISPLAY OFF appears when the Info menu is off.
Setup Main Menu
The Setup Main Menu can be accessed when a disc is not
in the player. It allows you to specify general setup
information and preferences. Press
Menu. This menu appears automatically when you press
.
STOP
D
MENU while a disc is playing to view the
eord
ENTER on the remote to confirm.
DISPLAY to view the desired option.
to highlight the desired menu
SETUP to view the Main
DVD PLAYBACK FEATURES
Fast Motion Playback (Picture Scan)
1. During playback, press REV@or FWDIon the
remote to search backward or forward through a disc.
2. Press
3. Press
REV@or FWD
speed. There are four speeds — 2X, 4X, 8X, and 16X.
With each consecutive press of the button, the search
speed increases. If youpress the buttonmore than four
times, Picture Scan returns to normal playback speed.
PLAY
to resume normal playback.
g
Freeze Frame
1. Press PAUSE on the remote to freezeplayback.
2. Press
PLAY
or PAUS E to resume normal playback.
g
again to accelerate search
I
DVD AdvancedFeatures
15
Page 16

Slow Motion Playback
1. Press SLOW to begin slow motion playback.
Subtitles
Ô NOTE Ô
Any settings you change on the
disc menu temporarily override the
default settings in the Travel
Theater’s menu. Default settings
are the factory presets in the Tr a vel
Theater’s menu system. S ee
“Setting Pr eferences” on Page 20
Changing Audio Language
When you play a disc, the Travel
Theater’s default audio language is
DVD Advanced Features
selected. If the disc does not
contain this language, the disc’s
default language is automatically
selected. This feature is discdependent and may not work with
all DVDs.
2. Press
SLOW again to decrease the speed. There are
four speeds in reverse (1/2, 1/4, 1/8, 1/16), and four
speeds forward (1/2, 1/4, 1/8, 1/16).
3. To return to normal speed, press
PLAY
.
g
Skipping Chapters
Use NEXTJ to go to the next chapter and PREVF to go to
the previous chapter.
Subtitles
When a DVD is recorded with subtitles, you can use the
Subtitle feature to viewthem on screen. Ô
1. Press
SUBTITLE. The subtitles appear in the default
language.
2. To view subtitlesin a different language, press
SUBTITLE again until the desired language appears.
3. To turn subtitles off, press
SUBTITLE until SUBTITLE OFF
appears.
Changing Audio Language
When a DVD isrecorded with multiple soundtracks, you can
use the Audio feature to temporarily change the audio
language. Ô
1. During disc playback, press
language banner appearsif the disc is programmed for
a different audio language. Otherwise,
AUDIO. The audio
appears.
½
16
2. Continue pressing
AUDIO until the desired language
appears.
Using Repeat
There are three repeat options:
• Chapter — repeats the chapter that is playing.
• Title— repeats the title that is playing.
• All — repeats the entire disc.
1. While a disc is playing, press
REPEAT. Ù CHAPTER
appears. The current chapter is repeated.
2. To repeat the current title, press
REPEAT again.
Ù TITLE appears.
Page 17

3. To repeat the entire disc, press
ÙALL appears.
REPEAT again.
4. To turn repeat off, press
appears.
REPEAT until REPEAT OFF
Using Zoom
While a DVD is playing, repeatedly press ZOOM to enlarge
the picture.
PLAYING AUDIO CDS
1. Press POWER º.
2. Press
3. With the disc’s label facing front, slowly insert a disc
4. Adjust
5. To remove the CD from the player, press
SKIPPING TRACKS
Press NE XTJto goto the next track and PREVF to goto
the previous track.
USING REPEAT
There are two repeat options:
TV/AV on the Travel Theater or TV/DVD/AUX on
theremotetoselectDVDmode.
into the disc slot on the top of the Travel Theater.
VOLUME to a comfortable listening level.
EJECT.
• TRACK — repeats the track that is playing
• ALL — repeats the entire disc
1. While a disc is playing,press
appears. The current track repeats.
2. To repeat the entire disc, press
appears.
3. To turn repeat off, press
appears.
REPEAT. Ù TRACK
REPEAT again. Ù ALL
REPEAT until REPEAT OFF
USING THE DISPLAY FUNCTION
While an audio CD is playing, repeatedly press DISPLAY.
The following optionsappear in sequence:
SINGLE ELAPSED (timeforasong)
SINGLE REMAIN (time for a song)
Playing Audio CDs
17
Page 18

TOTAL ELAPSED (time for the entire disc)
Playing MP3 Discs
Ô NOTE Ô
This Travel Theater only plays
discs containing MP3 files
recorded from your CD-R and CDRW drives. Though it plays most
MP3 files, it may not play them all.
TOTAL REMAIN (timefortheentiredisc)
DISPLAY OFF
PLAYING MP3 DISCS
When you play an MP3 disc, the MP3 menu appears. Ô
1. Press POWER º.
2. Press
3. With the disc’s label facing front, slowly insert a disc
SELECTING TRACKS
1. Usee,d,f ,or
2. Press ENTER on the remote to select the track.
3. Press
SKIPPING TRACKS
1. Press NEXTJ to skip to the beginning of the next
2. Press
TV/AV or TV/DVD/AUX to select DVD mode.
into the disc slot on the top of the Travel Theater.
, to highlight a track.
g
PLAY
song.
PREV
song.
to beginplaying the track.
g
to skipto the beginning of the previous
F
18
TO REPEAT AN MP3 TRACK
While a disc is playing, press REPEAT to toggle among the
following:
SINGLE (playsthe highlighted track)
REPEAT ONE (repeats the highlighted track)
REPEAT FOLDER (repeats the highlighted folder)
FOLDER (plays the folder and then stops)
USING THE DISPLAY FUNCTION
While a disc is playing, press DISPLAY to view the track,
elapsed time, and track remaining time.
Page 19

PLAYING JPEG DISCS
1. After loading a JPEG disc, the JPEG main menu page
appears. Use
picture.
e,d,f
,or gto highlight the desired
2. Press
3. During playback, use
4. Press
5. Press
ENTER on the remote to select it.
,or
picture.
e,d,f
ZOOM,and then FWD
to shrink or enlarge the picture by 50%, 75%, 100%,
125%, 150%, or 200%. While enlarging the photo, use
,or
e,d,f
whole picture. To exit zoom mode, press
NEXT
J
STOP
e,d,f
desired function. To return to the JPEG main menu,
STOP
press
to panup, down, left, or right to view the
g
,orPREV
,or gand ENTER to highlight and select the
F
to view the JPEG submenu pages. Use
D
.
D
I
.
to rotate the
g
or REV@on the remote
PLAYg,
TO REPEAT A JPEG PHOTO
While in the JPEG main menu, press REPEAT to toggle
among the following:
SINGLE (plays the highlightedtrack and then stops)
REPEAT ONE (repeats the highlighted track)
REPEAT FOLDER (repeats the highlighted folder)
FOLDER (plays the folder and then stops)
Playing JPEG Discs
While playing JPEG photos, repeatedly press
toggle among the following:
SINGLE (plays the photo and then stops)
REPEAT ONE (repeats the current photo)
REPEAT ALL (repeats the highlighted folder)
REPEAT OFF (turn off repeat function)
REPEAT to
19
Page 20

DEFAULT SETUP
GENERAL SETUP
1. Press SETUP.TheSETUP MENU -- MAIN PAGE appears.
2. Select
3. Select
GENERAL SETUP using
ENTER.
TV DISPLAY using
Press
e or d
following options. Press
on the remote to select one of the
e or d
ENTER to confirm the setting.
, and then press
e or d
, and then press ENTER.
NORMAL/PS — When watching a DVD with wide picture
with a normal TV (not wide one), a portion may be cut
off automatically to fit the screen.
NORMAL/LB — When watching a DVD with wide picture
with a normal TV (not wide one), a blackstrip at both
the top and bottom of the screen appears.
WIDE — When the Travel Theater is connected to a
wide screen TV, a wide picture is then shown on the full
screen.
4. Select
5. Press
DefaultSetup
6. To resume play, press
MAIN PAGE using
ENTER to return to the main page.
SETUP.
e or d
on the remote.
SETTING PREFERENCES
When there is no disc inside the Travel Theater, press
SETUP. SETUP MENU -- MAIN PAGE appears. Use
theremotetoselect
PREFERENCE SETUP. Then press ENTER.
e or d
on
20
Audio
1. Select AUDIO usinge or don the remote.
2. Press
3. Select the desired audio language using
(ENGLISH, FRENCH, SPANISH, CHINESE,orJAPANESE).
4. Press
5. Press
to access the audio options.
g
ENTER to confirm the setting.
to return to the PREFERENCE SETUP menu.
f
Subtitles
1. Select SUBTITLE usinge or don the remote.
e or d
Page 21

2. Press
3. Select the desired subtitle language using
the remote (
or OFF). Ô
4. Press
5. Press
to access the subtitle options.
g
ENGLISH, FRENCH, SPANISH, CHINESE,JAPANESE
ENTER to confirmthe setting.
to return to the PREFERENCE SETUP menu.
f
Disc Menu
1. Select DISC MENU usinge or don the remote.
e or d
on
• Language selection is only
Ô NOTE Ô
available for discs recorded in
the listed languages. If a
language is not available, the
Travel Theater plays and the
original recorded language
contained in the disc appears.
• Some discs let you set limits
depending on the age of users
while other discs do not.
2. Press
3. Use
language (
to access the disc menu options.
g
on the remote to select the disc menu
e or d
ENGLISH, FRENCH, SPANISH, CHINESE,or
JAPANESE).
4. Press
5. Press
ENTER to confirmthe setting.
to return to the PREFERENCE SETUP menu.
f
Parental
1. Select PARENTAL usinge or don the remote.
2. Press
3. Select the desiredparental level using
1 KID SAF
2 G
(General Audiences – all ages)
3 PG (Parental guidance suggested)
4 PG 13 (Parents strongly cautioned)
5 PGR
(Restricted. Under 17 requires parent or adult)
6 R
7 NC17 (No one 17 and under admitted)
8 ADULT
OFF
4. Press ENTER.ThePassword Verify Page appears.
to access the parental options.
g
e or d
.
Default Setup
5. Press
6. Press
DVD, and then use the number buttons on the
remote to enter the 4-digit password.
ENTER to store setting.
21
Page 22

The default password is 3308.
Ô NOTE Ô
This password is always effective
whether you have changed it to a
new one or not, just in case that
you forget the new password. To
avoid others using it to set the
parental level and change the
password, note this default
password a nd delete it from this
manual.
Password
1. Select PASSWORD usinge or don the remote.
2. Press
3. Press
to access the password options.
g
ENTER.
4. Use the number keys to input the old password, the
new password, and the confirmed new password.
Press
ENTER to store the change.
5. Press
to return to the previous menu. Ô
f
Defaults
1. Select DEFAULTS usinge or don the remote.
2. Press
3. Press
to access the default options.
g
ENTER to reset the Travel Theater to
factory-preset mode.
Main Page
Select MAIN PAGE usinge or don the remote. Press ENTER
to return to the SETUP MENU -- MAIN PAGE.
DefaultSetup
22
Page 23

TROUBLESHOOTING
DVD SECTION
Problem Suggestion
Travel Theater does not
work.
No power.
Disc does not play.
Play starts but then
stops immediately.
No sound or distorted
sound.
Sound is muted during
still or slow-motion play.
Remotecontroldoesnot
work.
Cannot advance
through a movie.
appears.
Ì
Thepictureisdistorted.
Picture is distorted
during forward and
reverse scan.
Subtitle and/or audio
language is not the one
selected.
The menu appears in a
foreign language.
No forward or reverse
scan.
Cannot copy discs to
video tape.
MP3 does not play.
Disconnect and reconnect power to reset the Travel Theater
Make sure both ends of the power cord are securely plugged into the Travel
Theater and the power outlet.
Insert a disc with the label side facing front.
Check the type of disc to make sure it is compatible with the Travel Theater.
Both the Travel T heat er and disc are coded by region. I f the region codes do
not match, the disc will not play.This Travel Theater’s region code is 1.
Clean the disc.
Condensation has formed. Allow the Travel Theater to dry.
Make sur e your Travel Theater is connected properly. Make sure all cables
are securely inserted into the appropriate jacks.
If you connected an audio or audio/video receiver to your TravelTheater,
make sure you chose the correct input setting on the receiver.
Batteries are weak. Install new batteries.
Operate the remote at a distance of no more than 20 feet (6 meters).
Remove any obstacles between the remote and the Travel Theater or other
component.
The disc is programmed to prohibit that action.
The disc’s software restricts this action.
The disc’s software does not support that feature
The feature is not available at the moment.
You have requested a title or chapter that is out of range.
Adjust the image setting.
Check to see that the setting in the disc menu and the setting in the Travel
Theater Display menu are compatible.
If your VCR is connected to the Travel Theater, disconnect it.
The disc might be damaged. Try another disc.
It is normal for some distortion to appear while scanning.
If the subtitle and/or audio language does not exist on the disc, the initial
settings are not recognized. Thedisc’s default language is selected instead.
Set the subtitle and/or audio language manually through the setup menu.
The menu lan guage preference is set to that language. Press SUBTITLE on
the remote to select the desired language.
Some discs have sections that prohibit rapid scanning, or title and chapter
skip.
If you are trying to skip through the warning information and credits at the
beginning of a movie, you cannot do so because this part of the movie is
often programmed to prohibit this.
You cannot record DVD discs onto video cassettes because the discs are
encoded with anti-copy protection.
MP3fileiscorrupt.
Disc is scratched.
Your Travel Theater does not play all CD-R/ CD-RW discs.
Troubleshooting
23
Page 24

TV SECTION
Problem Suggestion
No picture when
watching TV.
Care
No picture and no sound. If you use an AC or DC adapter, be sure it is securely connected.
No picture and noisy
sound.
Picture is too light or
dark.
Picture appears, but n o
there is no sound.
There is sound, but the
picture is white, dark, or
blurred.
Picture jumps or
disappears periodically.
Set A/V OUTPUT INPUT to INPUT.
Set TV/DVD/AUX to TV mode.
Make sure your Travel Theater is connected properly. Make sure all cables
are securely inserted into the appropriate jacks.
If you use a DC adapter, be sure the fuse inside the adapter is not blown.
Be sure the antenna is connected.
Be sure the A/V cable is securely connected.
Be sure the TV is away from appliances that might cause interference.
Adjust picture brightness.
Adjust the volume.
Make sure earphones are not connected.
Adjust picture brightness.
Be sure the antenna is securely connected.
Picturebecomesf u zzyor
blurry (ghost image).
Be sure the TV is away from appliances that might cause interference.
CARE
Keep theTravel Theater dry; if it gets wet, wipe it dry
immediately. Use and store theTravel Theater only in room
temperature environments. Handle the Travel Theater
carefully; do not drop it.Keep the Travel Theater away from
dust and dirt, andwipe it with a damp cloth occasionally to
keep it looking new.
HANDLING
• Do not place anythingother than the disc in the disc
tray.
• Exterior influences such as lightning and static
electricity can affect normal operation of this Travel
Theater. If this occurs, turn the Travel Theateroff and
reconnect AC power.
• Remove the disc and turn off the Travel Theater after
use.
24
Page 25

CASE MAINTENANCE
• When cleaning the case, disconnect the AC adapter
from the AC outlet.
• Do not use benzene, thinner,or other solvents for
cleaning.
• Wipe the case with a soft cloth.
CONDENSATION
Due to sharp changesin temperature and humidity,
condensation may form if warm air comes in contact with
any cold parts inside the Travel Theater. When
condensation forms inside the Travel Theater, the Travel
Theater may not operate correctly. If this occurs, leave the
Travel Theater at room temperature.
• until the inside of the Travel Theater becomes dry and
operational.
• If c ondensation forms on a disc, wipe the disc with a
soft, dry cloth.
DISCS
• Do not touch disc surfaces. Hold by the edges or by
one edgeand the hole in the center.
• Do not affix labels or adhesive tape to label surfaces.
Don’t scratch or damage the label.
• Do not use damaged, cracked, or warped discs.
• Dirty discs can cause reduced video and audio
performance. Always keep discs clean by wiping them
gently with a soft cloth from the inner edge toward the
outer perimeter.
• If a disc becomes very dirty, wet a soft cloth in water
and wring it well.Wipethe dirt awaygently, andremove
any water drops with a dry cloth.
• Do not use record-cleaning sprays or anti-static agents
on discs.
Service and Repair
SERVICE AND REPAIR
If your Travel Theateris not performing as it should, take it
to your local RadioShackstore for assistance. Modifying or
tampering with the Travel Theater’s internal components
can cause a malfunction and might invalidateits warranty.
25
Page 26

The FCC Wants You to Know
THE FCC WANTS YOU TO
KNOW
This equipment has been tested and found to comply with
the limitsfor a Class B digital device, pursuant to Part 15 of
the FCC Rules. These limits are designed to provide
reasonable protection against harmful interference in a
residentialinstallation. This equipment generates,uses,and
can radiate radio frequency energy and, if not installed and
used in accordance with the instructions, may cause
harmful interference to radio communications.
However, there is no guarantee that interference willnot
occur in a particularinstallation. If this equipment does
cause harmful interference to radio or television reception,
which can be determinedby turning the equipment off and
on, the user is encouraged to try to correct the interference
by oneor more of the following measures:
• Reorient or relocate the receiving antenna.
• Increase the separation between the equipment and
receiver.
• Connect the equipment into an outlet on a circuit
different from that to which the receiver is connected.
• Consultyour local RadioShack store or an experienced
radio/TV technician for help.
• If y ou cannot eliminatethe interference, the FCC
requires that you stop using your DVD player.
Changes or modifications not expressly approved by
RadioShack may cause interference and void the user’s
authority to operate the equipment.
26
This device complies with Part 15 of the FCC Rules.
Operation is subject to the following two conditions: (1) this
device may not cause harmful interference, and (2) this
device must accept any interference received, including
interference that may cause undesired operation.
Page 27

SPECIFICATIONS
TV Type ........................................................................................................................... Color TFT-LCDTV
System ................................................................................................................................................. NTSC
Screen Size ............................................................................................ 10.4 inches (measured diagonally)
Display format .................................................................................................... 640 dots (H) x 480 dots (V)
Back Light ..................................................................................................... Cold cathode fluorescent lamp
VHF/UHF Channels .................................................. VHF Low CH 2-6, VHF High CH 7-13, UHF CH 14-69
Cable TV Channels . ........................................................................................................................... 1-125
Power Supply .....................................................................................................AC adapter (12V / 2500mA)
Power Consumption ................................................................................................................ DC 12V 30W
DC Power Jack ................................................................................................................................. DC 12V
Playable Disc Types ................................................................................ DVD/CD/CDR/CDRW/MP3/JPEG
Audio/Video Jacks ............ for Game System Console, Camcorder, Digital Camera, TV or Stereo Amplifier
INPUT/OUTPUT Switch ................................................................................................................ Slide Type
Speaker .............................................................. Built I n Stereo Speakers (Maximum 2 Watts per Channel)
Headphones Jacks ..................................................................................... Two (2) Jacks,
Operation Temperature ..................................................................................... 41°F to 104°F (5°C to 40°C)
Operating Humidity ...................................................................................................................... 10 to 75 %
StorageTemperature ................................................................................................................ 4°F to 40° F
AC Adapter Input Voltage ...................................................... 100 to 240 Volts, 50/60 Hz, 0.7~0.3 Amperes
Power Source .................................................................................... UL Listed, 12V AC Adapter (included)
Remote Control Battery ............................................................................ Two AAA Batteries (not included)
13
Travel Theater Dimensions (WHD) ................................ 10
Weight ....................................................................................................................................... 8.8 lbs (4 kg)
Specifications are typical; individual units might vary. Specifications are subject to change and improvement
without notice.
/16 x105/8 x211/16 Inches (274 x 270 x68 mm)
DC adapter (12V / 2500mA)
1
/8 inch (3.5mm)
12V DC Car Adapter (included)
27
Specifications
Page 28

Limited Ninety-Day Warranty
This product is warranted by RadioShack against manufacturing defects in material and workmanship under normal use for ninety (90) days from the date of purchase from RadioShack companyowned stores and authorized RadioShack franchisees and dealers. EXCEPT AS PROVIDED
HEREIN, RadioShack MAKES NO EXPRESS WARRANTIES AND ANY IMPLIED WARRANTIES,
INCLUDING THOSE OF MERCHANTABILITY AND FITNESS FOR A PARTICULAR PURPOSE,
ARE LIMITED IN DURATION TO THE DURATION OF THE WRITTEN LIMITED WARRANTIES
CONTAINED HEREIN. EXCEPT AS PROVIDED HEREIN, RadioShack SHALL HAVE NO LIABILITY OR RESPONSIBILITY TO CUSTOMER OR ANY OTHER PERSON OR ENTITY WITH RESPECT TO ANY LIABILITY, LOSS OR DAMAGE CAUSED DIRECTLY OR INDIRECTLY BY USE
OR PERFORMANCE OF THE PRODUCT OR ARISING OUT OF ANY BREACH OF THIS WARRANTY, INCLUDING, BUT NOT LIMITED TO, ANY DAMAGES RESULTING FROM INCONVENIENCE, LOSS OF TIME, DATA, PROPERTY, REVENUE, OR PROFIT OR ANY INDIRECT,
SPECIAL, INCIDENTAL,OR CONSEQUENTIAL DAMAGES, EVEN IF RadioShack HAS BEEN ADVISED OF THE POSSIBILITY OF SUCH DAMAGES.
Some states do not allow limitations on how long an implied warranty lasts or the exclusion or limitation of incidental or consequential damages, so the above limitations or exclusions may not apply to
you.
In the event of a product defect during the warranty period, take the product and the RadioShack
sales receipt as proof of purchase date to any RadioShack store. RadioShack will, at its option, unless otherwise provided by law: (a) correct the defect by product repair without charge for parts and
labor; (b) replace the product with one of the same or similar design; or (c) refund the purchase
price. All replaced partsand products, and products on which a refund is made, become the property
of RadioShack. New or reconditioned parts and products may be used in the performance of warranty service. Repaired or replaced parts and products are warranted for the remainder of the original warranty period. You will be charged for repair or replacement of the product made after the
expiration of the warranty period.
This warranty does not cover: (a) damage or failure caused by or attributable to acts of God, abuse,
accident, misuse, improper or abnormal usage, failure to follow instructions, improper installation or
maintenance, alteration, lightning or other incidence of excess voltage or current; (b) any repairs
other than those provided by a RadioShack Authorized Service Facility; (c) consumables such as
fuses or batteries; (d) cosmetic damage; (e) transportation, shipping or insurance costs; or (f) costs
of productremoval, installation, set-up service adjustmentor reinstallation.
This warranty gives you specific legal rights, and you may also have other rights which vary from
statetostate.
RadioShack Customer Relations, 200 Taylor Street, 6th Floor,Fort Worth, TX 76102
12/99
Printed in Taiwan
16-331406A03
 Loading...