

Page 1
)Q"8KUKQP &8&"6TCXGN"6JGCVGT
OWNER’S MANUAL —
Please read before using this equipment.
Thank you for purchasing a Go
Vision DVD Travel Theater. Your
DVD player uses the latest in solidstate design to give you highquality picture and sound as well
as reliable operation. It is a
compact, all-in-one audio/video
entertainment system. You can
use it to enjoy music from your
favorite CDs as well as DVDs. It is
small, lightweight and easy to carry
using the supplied carrying case
and shoulder strap. It is perfect for
use in your car, SUV or van.
Dual AC/DC Power Sources
let you power the player using either
your car’s DC power source or
household AC power.
5.6'' TFT Flat LCD Color Monitor
makes the DVD player more
compact and use less power than a
standard picture tube.
Remote Control
conveniently control the DVD player.
Dual Headphones Jacks
connect the supplied headphones for
private listening.
Audio/Video Input Jacks
connect a video game console,
camcorder, or digital camera.
Audio/Video Output Jacks
let you connect to an external TV.
— lets you
—
—
— let you
— let you
—
16-3255
;QWT"&8&"6TCXGN"6JGCVGT"2NC[U<
•
DVD Video Discs
consisting of movies, concerts, and so on.
•
Audio Discs
musical or sound content only.
•
•
— A disc that you can write
CD-R
information to once (for example,
downloading MP3 files).
CD-RW
information onto this type of disc more than
once. For example, if you have previously
downloaded MP3 files to a CD-RW disc,
you can write information to the disc again,
after it erases the previously written
information.
— A re-writable disc. Y ou can write
— Video discs
— Audio CDs containing
"+/2146#06"
If an icon appears at the end of a paragraph, go to the box on that page
with the corresponding icon for pertinent information.
— Warning
RRRR
ý
.... — Caution
#
°°°°
#
— Important
— Hint
#
— Note
±±±±
2002 RadioShack Corporation.
©
All Rights Reserved.
RadioShack and RadioShack.com
are trademarks used by
RadioShack Corporation.
AXION is a registered trademark of
Action Electronics Taiwan.
Page 2

The FCC Wants You to Know
Important Safety Information ................ 3
A Quick Look at You r DVD Player ........ 5
A Quick Look at the Remote Control .... 6
Included Accessories ............................ 7
Basic Installation ................................... 9
Basic Operation .................................. 10
Other Connections ............................... 11
Advanced Features ............................. 14
Playing Audio CDs .............................. 18
(Continued)
%106'065
Avoid Damaging the
AC Adapter Cord ............................... 4
Installing the DVD Player in a Vehicle 9
Connecting Vehicle Battery Power .... 9
Connecting Headphones ................... 9
Loading and Playing a DVD ............ 10
Compatible Disc Types .............. 10
Loading and Playing a Disc ........ 10
Connecting to a TV .................... ...... 11
Connecting to a TV and Amplifier ... 12
Connecting to a Camcorder, TV, Game
Console, or Digital Camera ............. 13
Connecting a Game Console ..... 13
Connecting AC Power
for Indoor Use ................................. 13
Menus ............................................. 14
Using Different Menus ................ 14
Using a Disc Menu ..................... 14
DVD Playback Features .................. 15
Fast Motion Playback
(Picture Scan) ............................. 15
Freeze Frame ............................. 15
Slow Motion Playback ................ 15
Skipping Chapters ...................... 15
Title ............................................. 15
Subtitles ...................................... 16
Changing the Audio Language ... 16
Changing the Camera Angle ...... 16
Using the Repeat Feature .......... 17
Loading and Playing an Audio CD .. 18
Audio CD Playback Features .......... 18
Skipping Tracks .......................... 18
Using the Repeat Feature .......... 18
A-B Repeat ................................. 18
Using the Display Function ......... 19
"9#40+0)"R"
R
• This system employs a laser
light beam. Only a qualified
service person should remove
the cover or attempt to service
this device, due to possible eye
injury.
• The use of controls,
adjustments, or procedures
other than those specified
herein might result in
hazardous radiation exposure.
6*'"(%%"9#065";17"
61 -019
This equipment has been tested and found to comply with
the limits for a Class B digital device, pursuant to Part 15 of
the
FCC Rules
. These limits are designed to provide
reasonable protection against harmful interference in a
residential installation. This equipment generates, uses and
can radiate radio frequency energy and, if not installed and
used in accordance with the instructions, may cause
harmful interference to radio communications.
However, there is no guarantee that interference will not
occur in a particular installation. If this equipment does
cause harmful interference to radio or television reception,
which can be determined by turning the equipment off and
on, the user is encouraged to try to correct the interference
by one or more of the following measures:
• Reorient or relocate the receiving antenna.
• Increase the separation between th e equipment and
receiver.
• Connect the equipment into an outlet on a circuit
different from that to which the receiver is connected.
• Consult your local RadioShack store or an experienced
radio/TV technician for help.
• If you cannot eliminate the interference, the FCC
requires that you stop using your DVD player.
Changes or modifications not expressly approved by
RadioShack may cause interference and void the user’s
authority to operate the equipment.
RRRR
ý
4')+10"/#0#)'/'06"
+0(14/#6+10
This DVD Player is designed and manufactured to respond
to the Region Management Information that is recorded on
a DVD disc. If the Region number described on the DVD
disc does not correspond to the Region number of this DVD
player, this DVD player cannot play that disc.
The Region number of this DVD player is 1
(USA/CANADA).
TO REDUCE THE RISK OF
To reduce
WARNING:
the risk of fire or shock
hazard, do not expose this
product to rain or moisture.
The lightning symbol is intended to alert you to the presence of
uninsulated dangerous volta ge withi n this pr oduct’s enclosure that
might be of sufficient magnitude to constitute a risk of electr ic
shock. Do not open the produc t’s case.
CAUTION
RISK OF ELECTRIC
SHOCK DO NOT OPEN
CAUTION:
ELECTRIC SHOCK, DO NOT REMOVE COVER
OR BACK. NO USER-SERVICEABLE PARTS
!
INSIDE. REFER SERVICING TO QUALIFIED
PERSONNEL.
The exclamation symbol is intended to inform
you that important operat ing an d ma in tena nc e
!
instructions are incl uded in the literature
accompanying this product.
2
Page 3

016'5"10"%12;4+)*6
It is forbidden by law to copy, broadcast, show, broadcast
on cable, play in public, and rent copyrighted material
without permission. DVD video discs are copy protected,
and any recordings made from these discs will be distorted.
This product incorporates copyright protection technology
that is protected by method claims of certain U.S. patents
and other intellectual property rights owned by Macrovision
Corporation and other rights owners. Use of this copyright
protection technology must be authorized by Macrovision
Corporation, and is intended for home and other limited
viewing uses only, unless otherwise authorized by
Macrovision Corporation. Reverse engineering or
disassembly is prohibited.
+/2146#06"5#('6;"
+0(14/#6+10
This manual contains important information about how to
safely and properly install, operate and care for this product.
Failure to properly install, operate and care for this product
can increase the risk of electric shock or fire. It can also
increase the risk of monitor failure and possibly personal
injury. To reduce the risk of serious injury or death, or
damage:
(continued)
%106'065
Playing MP3 Discs ............................... 19
Selecting Tracks .............................. 19
Skipping Tracks ............................... 19
To Repeat a MP3 Track or Disc ....... 20
Using the Display Function .............. 20
Setting Up Defaults .............................. 20
General Setup .................................. 20
Setting Preferences ............................. 21
Replacing the Remote’s Battery .......... 22
Setting the
Parental Levels .................................... 22
Changing the Password ...................... 23
Troubleshooting ................................... 24
Specifications ...................................... 25
Care ..................................................... 26
Handling Cautions ........................... 26
Case Maintenance ........................... 26
Formation of Condensation ............. 26
Handling Discs ................................. 27
Cleaning Discs ................................. 27
Service and Repair .............................. 27
Important Safety Information
• Read these instructions
• Keep these instructions
• Heed all warnings
• Follow all instructions
Do not attempt to service or repair the monitor & DVD player
yourself. Refer all servicing to qualified service personnel.
Do not block any ventilation openings. Do not place the
Monitor and DVD player on a bed, sofa, or other soft surface
that may block ventilation openings.
Do not install the Monitor and DVD player near any heat
sources, such as radiators, stoves, or other devices that
produce heat.
Do not use this apparatus near water (for example, sinks,
tubs, and pools) or expose it to rain, moisture, or dripping or
splashing liquids. No objects filled with water (such as
vases) should be placed on the apparatus.
3
Page 4

Do not play headphones at a high volume to avoid exposure
to excessive sound pressures. You should use extreme
caution or temporarily discontinue use in a potentially
hazardous situation. Even if your headset is an open-air
type, designed to let your hear outside sounds, do not turn
up the volume so high that you can not hear what is around
you.
THE VEHICLE’S DRIVER SHOULD NEVER OPERATE
OR WATCH THE DVD PLAYER WHILE DRIVING.
Important Safety Information
General Electrical Precautions
electrical devices, failure to take precautions can result in
serious injury or death from electrical shock or fire, and can
damage the Monitor and DVD player.
Avoid Laser Hazards
DVD player is harmful to eyes, and to avoid electrical
hazards, do not attempt to disassemble the housing. Refer
servicing to qualified personnel.
— As the laser beam used in the
— As with many others
#81+&"&#/#)+0)"6*'"#%"#'4"
14&
%
• Protect the AC adapter cord from being walked on or
pinched particularly at plugs, and the point where they
exit from the apparatus.
• Do not jerk, knot, sharply bend, or otherwise abuse the
AC adapter cord.
• Do not expose the AC adapter cord to the sources of
heat.
• Keep children and pets away from the AC adapter cord
do not allow them to bite or chew on it.
• When disconnecting the AC adapter cord from DVD
player or a power outlet, pull on the plug do not pull on
the cord.
If the AC adapter cord becomes damaged in any way, stop
using it immediately.
4
Page 5
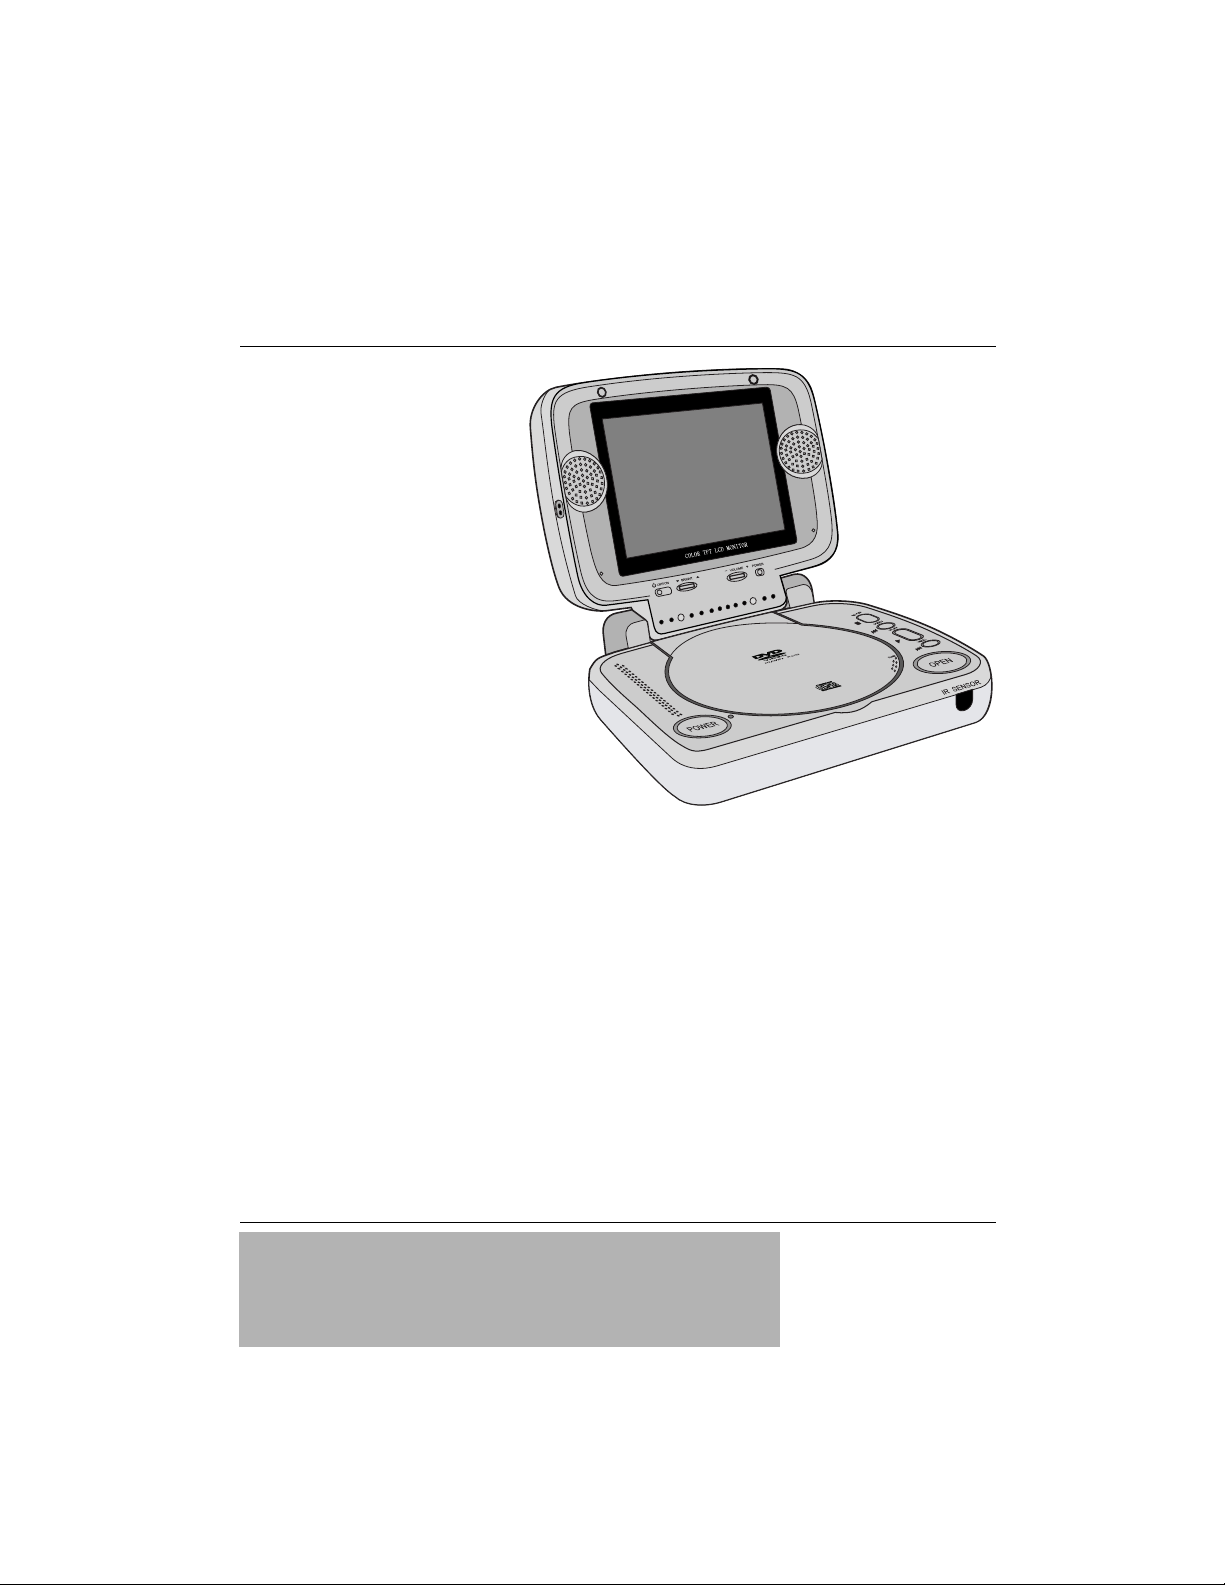
#"37+%-".11-"#6";174"
&8&"64#8'."6*'#6'4
1 and V2
V
—
OFF/ON
ìììì
Turns the LCD
display on or off.
—
— —
–
VOLUME
+
LCD POWER Indicator
STOP
PREV
disc is playing to view
previous chapters.
))))
— Press while a
PLAY
J
----
NEXT
a disc is playing to view
upcoming chapters.
— Press while
OPEN
GGGG
BRIGHT
brightness of LCD display.
HHHH
—
Adjusts
POWER
DVD Player
Power Indicator
CLOSE
IR (infrared)
SENSOR
Your DVD Travel Theater
5
Page 6
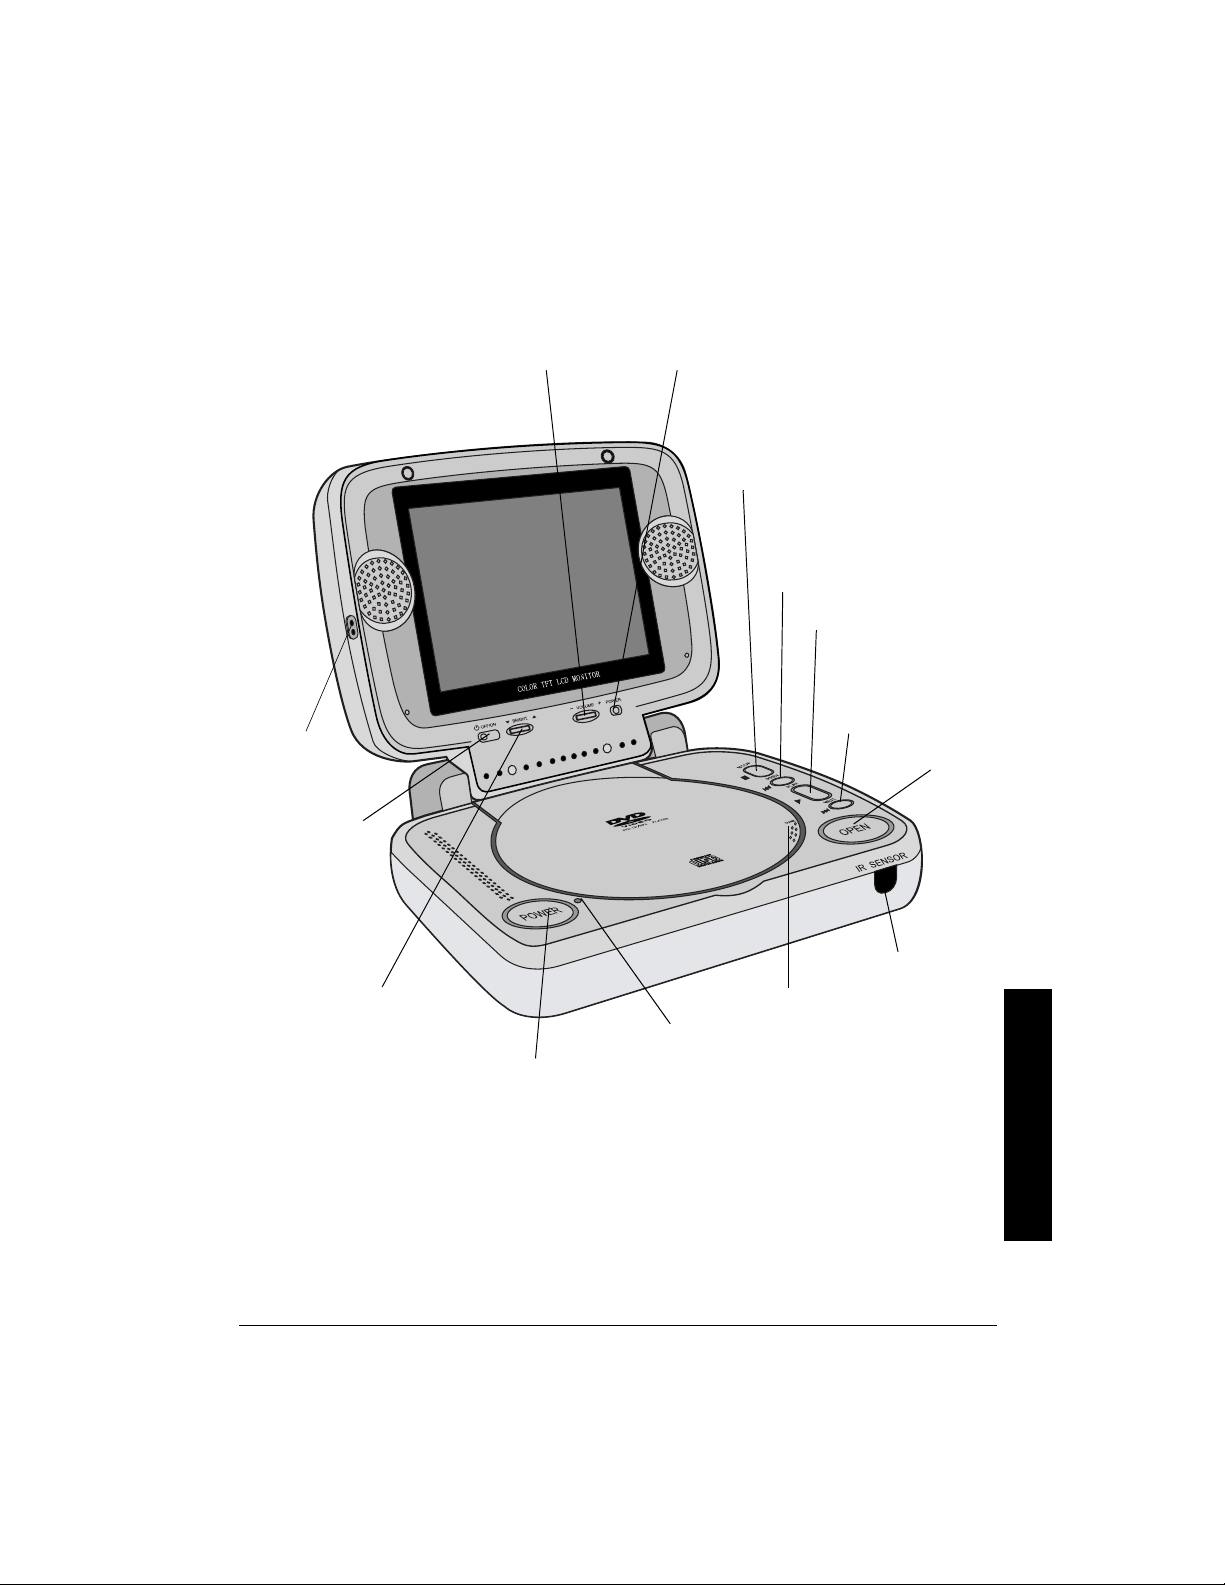
#"37+%-".11-"#6"6*'"4'/16'"%10641.
DISPLA Y — Press during playback
to briefly display the elapsed time
and disc remaining time.
ANGLE — Press to access various
camera angles on a disc (If the disc
contains multiple camera angles,
otherwise
SUBTITLE — Press to briefly
show the subtitle banner (If the
disc was created with subtitles,
otherwise
AUDIO — Lets you select a
different language during DVD
playback (if the disc was
authored with multiple languages
otherwise
SETUP — Press to display the
setup menu main page.
TITLE — Returns you to
the title menu.
MENU — Displays the
DVD player’s root menu.
####
REW/
— Press during playback
to fast reverse through a disc.
,,,,
FF/
— Press during playback to
fast forward through a disc.
A Quick Look at the Remote
PLAY/
*
play and select menu items.
}}}}
appears).
}}}}
appears.
}}}}
— Press to begin disc
JJJJ
appears).
— Press
STOP/
''''
*
to stop disc play.
PAUSE/
to pause disc play.
For audio CDs, a
second press
resumes playback.
— Press
ffff
Number Buttons — Use to input
information such as chapter
numbers, track numbers, or to make
selections on some menu screens.
HHHH/ GGGG/ IIII/ JJJJ
the onscreen menus. To highlight a
menu item, press
press ENTER to select it.
A-B — Lets you repeat a portion of
the disc from a designated point (A)
to another designated point (B).
REPEAT — Press to display the
Repeat info banner. You can
repeat part or all of a chapter,
track, or an entire disc.
*SKIP+/
forward through a disc during
playback. Advances forward one
chapter or track at a time.
— Use to move through
HHHH, GGGG, IIII
----
— Press to search
))))
*SKIP–/
backward through a disc during
playback. Advances backward
one chapter or track at a time.
SLOW — Advances
picture slowly.
— Press to search
, or
JJJJ
then
"016'"±"
±
• Make sure there is a clear path between the remote and the DVD player so the signal is not
blocked.
— indicates the control has the same function as the controls on the DVD player.
•
*
• Your remote is shipped with a vinyl insulation slip to prevent battery drain. Pull out the insulation
slip before using the remote.
6
Page 7
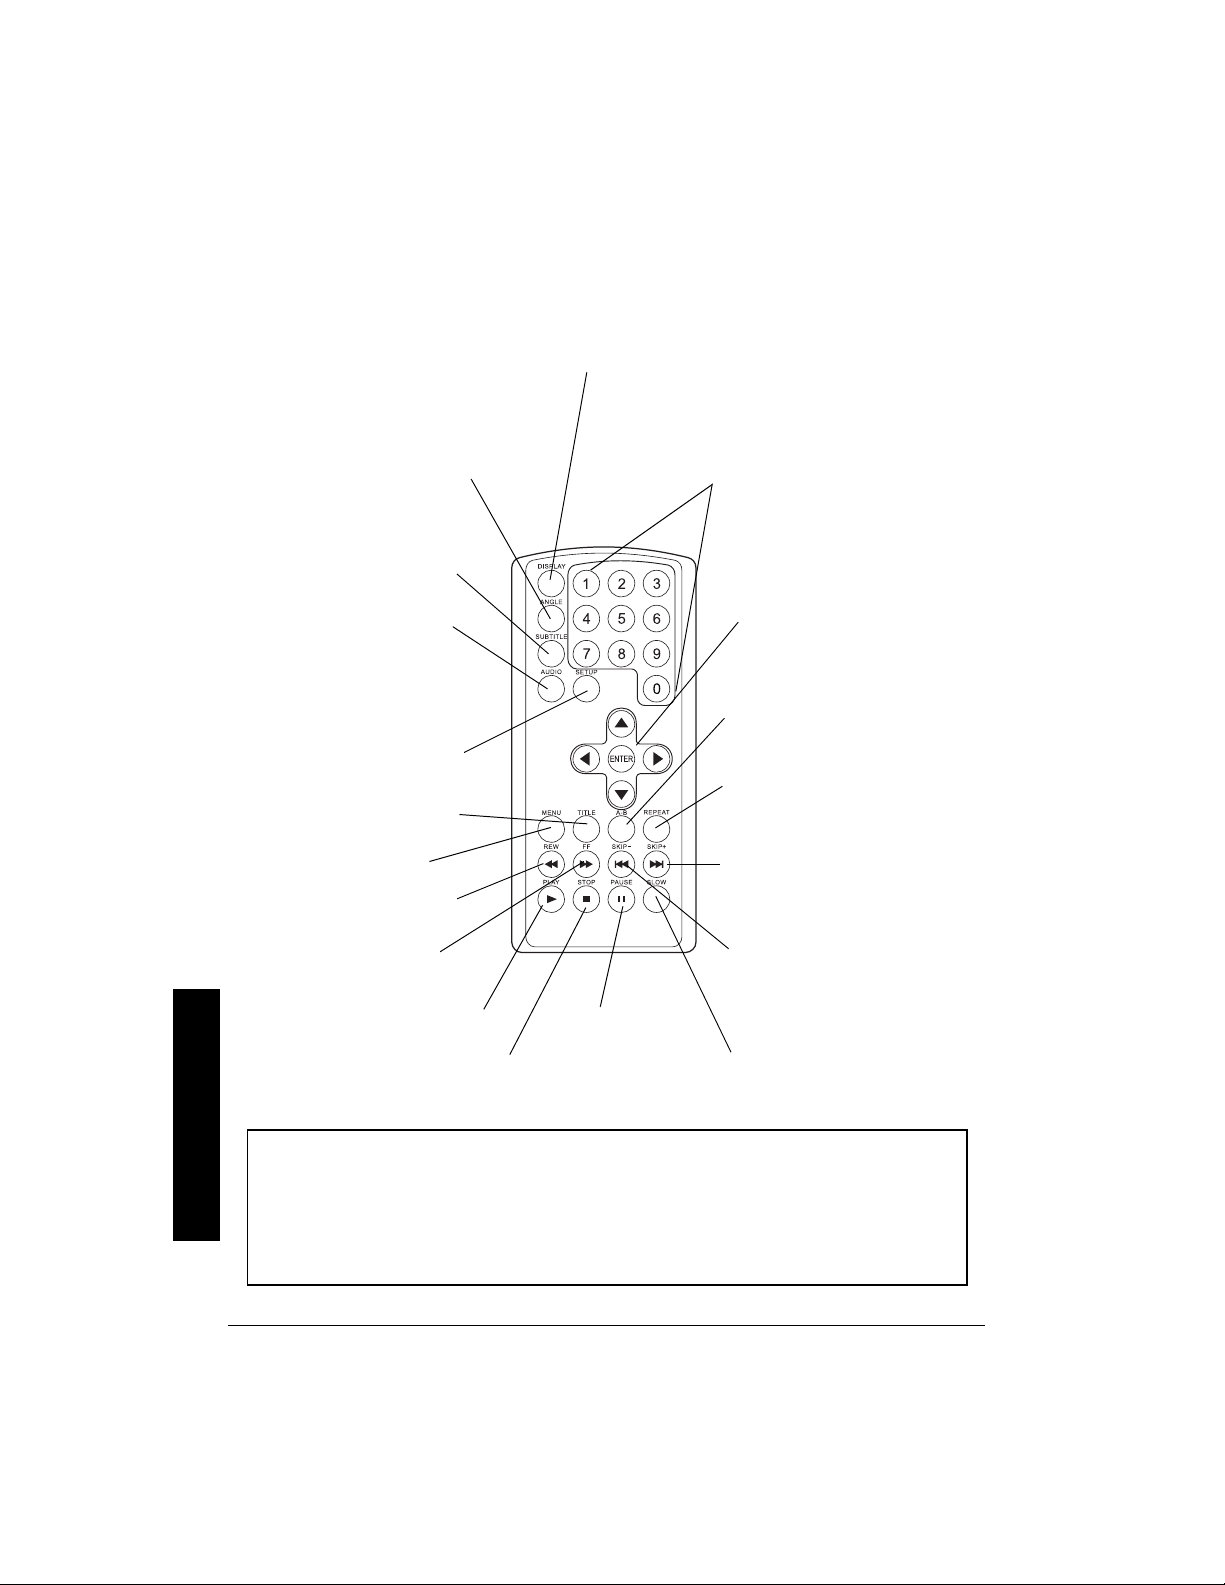
+0%.7&'&"#%%'5514+'5
Your DVD player includes the following accessories.
Carrying Case
accessories) anywhere. An accessory pouch is also included.
Shoulder Strap
DC Adapter
— protects the DVD player and lets you easily carry it (and all of the
— Attaches to the carrying case (Clip hooks on both ends).
— lets you power the DVD player from your vehicle’s cigarette lighter socket.
Included Accessories
Two (2) Pairs of Earbuds
— for private listening.
7
Page 8
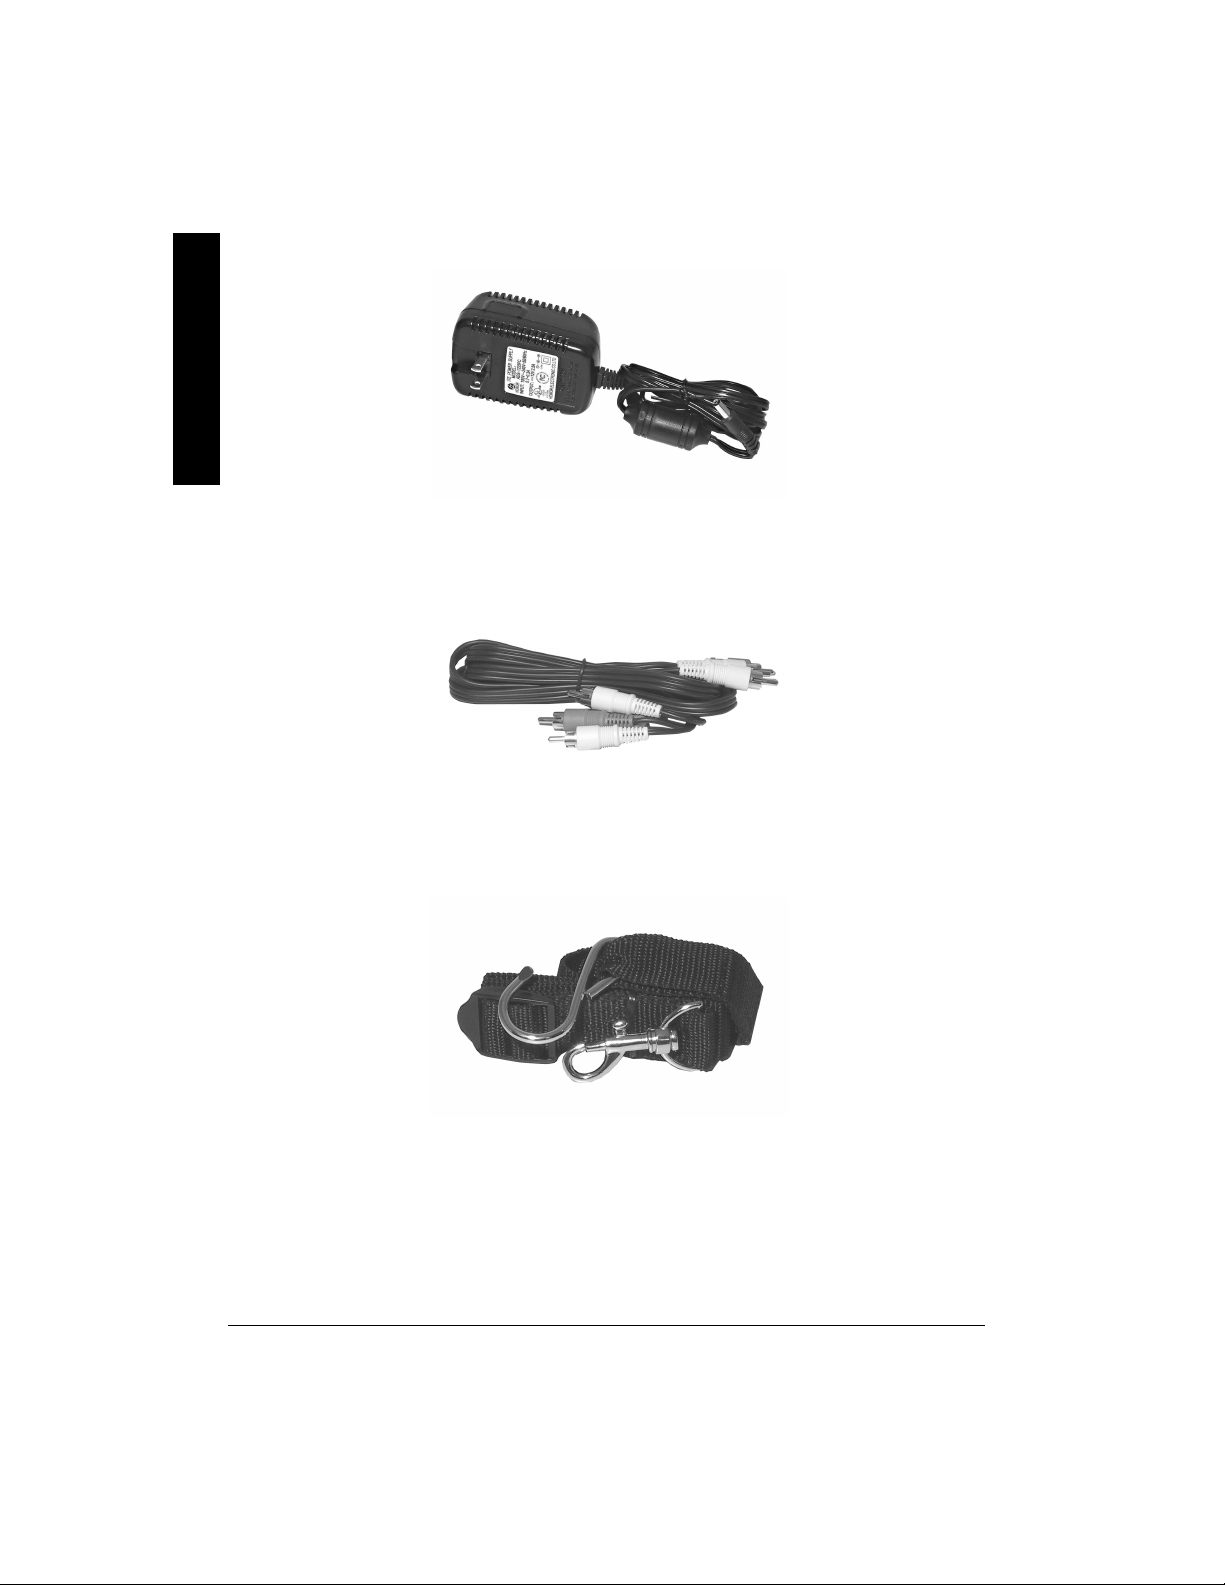
AC Adapter
Included Accessories
— lets you power the DVD player from a standard AC outlet.
Audio/Video Cables
— let you connect the DVD player to a TV, amplifier, video game, or
camcorder.
Four (4) Straps for Vehicle Installation
— let you install the DVD player securely in your
vehicle (Clip the hook on one end and the “S” hook on the other).
8
Page 9

$#5+%"+056#..#6+10
For a graphical view of the installation, see the Quick Start.
+056#..+0)"6*'"&8&"2.#;'4
"#"8'*+%.'
+0
1. Make sure the DVD player is securely fastened in the
carrying case.
2. Pull down the panel on the back of the carrying case
and reattach it, aligning the velcro strip to the catch
panel.
3. Attach one of the supplied straps to the carrying case
and hang the strap over the back of the headrest.
4. Attach one strap to each loop on the bottom of each
side of the carrying case.
5. Wrap the straps around the bottom front of your seat
and attach them together. The configuration varies
depending on you car seat.
6. Secure the DVD player by adjusting the straps to the
appropriate length for your car seat.
%100'%6+0)"8'*+%.'"$#66'4;"219'4
You can power the DVD player from your vehicle’s 12V
power source (such as a cigarette-lighter socke t) usi n g the
supplied 12 volt, 2.5 Amp DC adapter.
1. Unzip the middle zipper on the carrying case to insert
the adapter plug into the jack.
2. Connect the supplied 12V DC adapter cord’s barrel
plug to the
player.
3. Connect the other end of the adapter to the vehicle’s
cigarette lighter socket.
DC IN 12V
jack on the back of the DVD
#
%100'%6+0)"*'#&2*10'5
The DVD player has two 1/8-inch (3.5 mm) headphones
jacks on the left side of the screen panel for private
listening. Connect the supplied stereo headphones’
1
/8inch (3.5 mm) plug(s) into the
V
1
....
and/or
jack(s).
2
V
.
"%#76+10"
• You must use a power source
that supplies 12V DC and
delivers at least 2.5A. Its center
tip must be set to positive and its
plug must fit the DVD player's
DC IN 12V jack. The supplied
adapter meets these
specifications. Using an adapter
that does not meet these
specifications could damage the
DVD player or the adapter.
• Always connect the adapter to
the DVD player before you
connect it to the power source.
When you finish, disconnect the
DC adapter from the power
source before you disconnect it
from the DVD player.
"+/2146#06"
#
To avoid draining your car’s
battery power, do not leave the
DVD player on or the DC adapter
connected to the cigarette lighter
when your vehicle is not running.
.
#
Basic Installation
9
Page 10

$#5+%"12'4#6+10
Listening Safely
To protect your hearing, follow
these guidelines when you use
headphones.
• Set the volume to the lowest
setting before you begin
listening. After you begin
listening, adjust the volume to a
comfortable level.
• Do not listen at extremely high
volume levels. Extended highvolume listening can lead to
permanent hearing loss.
• Once you set the volume, do not
increase it. Over time, your ears
adapt to the volume level, so a
volume level that does not cause
discomfort might still damage
your hearing.
Traffic Safety
• Do not wear headphones while
operating a motor vehicle or
riding a bicycle. This can create a
traffic hazard and could be illegal
in some areas.
Basic Operation
• Even though some headphones
let you hear some outside
sounds when listening at normal
volume levels, they still can
present a traffic hazard.
.1#&+0)"#0&"2.#;+0)"#"&8&
%QORCVKDNG"&KUE"6[RGU
Your DVD player plays DVD discs, Audio CD discs, and
most CD-R discs/CD-RW discs. Before you load a disc,
make sure that it is compatible with the player.
The following discs cannot be used with this player:
• Video CD discs
• Laserdiscs and mini discs
• CD-I, CD-ROM (computer-only discs), DVD-ROM
• Discs recorded using other broadcast standards (PAL
or SECAM).
• CD-G Discs play audio only, not graphics.
.QCFKPI"CPF"2NC[KPI"C"&KUE
1. Lift up the DVD player ’s upper case.
2. T o turn power on, press
POWER,
left of the DVD player . The DVD player’s POWER
indicator lights.
3. Open the disc tray by pressing
of the disc tray.
4. Place a disc in the tray with the disc’s label facing up
(double-sided discs have content on both sides, so you
can place either side up). Make sure the disc fully seats
on the tray’s spindle.
located on the lower
at the lower right
OPEN
10
5. Press
at the right side of the tray door until it
CLOSE
clicks shut.
6. Slide
OFF/ON,
located below the LCD display, to ON to
turn on the LCD display. The LCD’s POWER indicator
below the LCD display lights.
7. Press
J,ýlocated on the right side of the disc tray
PLAY
or on the remote. The DVD player reads the disc’s table
of contents, and then one of following happens
depending on how the disc was programmed:
• The disc starts playing.
• The disc menu appears on the screen. One of the
options starts disc play. Highlight that option using
H /G/ Iý
or J press
ENTER
on the remote.
Page 11

8. Rotate
BRIGHT
and
VOLUME,
located below the LCD to
adjust the LCD’s brightness and the DVD player’s
volume.
9. To stop playing a disc, press
STOP
'.
• When you stop playing a disc, the DVD player
remembers where you stopped.
• When you press
J to start playing the disc
PLAY
again, the player picks up where you left off unless
you removed the disc or unplugged the DVD player.
10. To turn off the DVD player, press
POWER
on the DVD
player. The DVD player’s POWER indicator turns off.
To turn off the display, slide
OFF/ON
to
OFF
. The LCD’s
POWER indicator turns off.
16*'4"%100'%6+105
You can connect your DVD player to a TV, a TV and Audio/
Video receiver, a camcorder, a game system console, or a
digital camera.
%100'%6+0)"61"#"68
Position Cables Properly to Avoid Audio
Interference.
• Insert each cable firmly into the
designated jack.
• If you place components above the
TV, route all cables down the side of
the back of the TV instead of straight
down the middle of the back of the TV.
• If your antenna uses 300-ohm twin
lead cables, do not coil the cables.
Also, keep the twin lead cables away
from audio/video cables.
1. Connect the supplied Audio/Video
cable’s yellow plug to the
OUTPUT
jack on the back of the DVD
player and connect the yellow plug’s
other end to the TV’s Video Input jack.
2. Connect the supplied Audio/Video
cable’s red plug to the
socket on the rear of the DVD
R
AUDIO OUTPUT
player. Connect the red plug’s other
end to the TV’s Audio Input Right jack.
VIDEO
Other Connections
11
Page 12

"016'"±"
±
• Some TVs do not have an RCA
or S-Video jack, they only have a
coaxial antenna jack. In this
case, you must purchase an RF
modulator (not supplied,
available at your local
RadioShack store).
• When you connect the DVD
player to a TV, the DVD player’s
display and speakers remain on.
To turn off the display, slide OFF/
ON under the screen to OFF.
• You may turn the DVD player’s
volume to the minimum level
when listening to the TV’s
speaker.
3. Connect the supplied Audio/Video cable’s white plug to
the
AUDIO OUTPUT L
jack on the rear of the DVD player
and connect the white plug’s other end to the TV’s
Audio Input Left jack.
±±±±
%100'%6+0)"61"#"68"#0&"#/2.+(+'4
You can also connect the DVD player to a TV and to a
stereo amplifier to enjoy high quality stereo sound.
1. Connect the audio/video cable’s left (white) and right
(red) plugs to your audio/video receiver’s Audio In Left
and Right jacks. Connect the other end of the cable to
your DVD player’s
AUDIO OUTPUT L
2. Connect the audio/video cable’s yellow plug to the
VIDEO OUTPUT
jack on the back of your DVD player,
and the other yellow plug to the Video Input jack on
your TV.
and R jacks.
Other Connections
12
Page 13

%100'%6+0)"61"#"%#/%14&'4."
)
#/' %1051.'."14"&+)+6#."%#/'4#
You can connect a camcorder for video playback, or a
digital camera to view pictures. For this connection, if you
have not connected the
supplied audio/video cable for this connection.
1. Connect the left (white) and right
(red) plugs on the audio/video
cable to your camcorder’s or
game console’s left (white) and
right (red) Output sockets, and
connect the other end to the
AUDIO INPUT L
jacks on the back of your DVD
player.
2. Connect the audio/video cable’s
yellow plug to the
jack on the back of your DVD
player, and the other yellow plug
to the Video Output jack on your
camcorder, game system
console, or digital camera.
OUTPUT
(white) and R (red)
VIDEO INPUT
jacks to a TV, use the
"016'"±"
±
Some game systems have a
proprietary output cable. Follow
your game system’s hookup
instructions to send audio/video to
the DVD player.
%QPPGEVKPI"C")COG"%QPUQNG
If you are connecting a game system console, you may
need to connect a DC to AC inverter (not supplied, available
from RadioShack).
±±±±
%100'%6+0)"#%"219'4"(14"
+
0&114 75'
You can power the DVD player using the supplied 12V, 2.5
Amp AC adapter.
1. To use the DVD player indoors, connect the supplied
AC adapter’s barrel plug into the
2. Lift up the AC plug module’s two blades and insert the
AC plug to a standard AC outlet.
....
DC IN 12V
jack.
.
"%#76+10"
• You must use a Class 2 or ITE
power source that supplies 12V
DC and delivers at least 2.5
Amps. Its center tip must be set
to positive and its plug must fit the
DVD player's DC IN 12V jack.
The supplied adapter meets
these specifications. Using an
adapter that does not meet these
specifications could damage the
DVD player or the adapter.
• Always connect the AC adapter
to the DVD player before you
connect it to AC power. When
you finish, disconnect the adapter
from AC power before you
disconnect it from the DVD
player.
.
Other Connections
13
Page 14

#&8#0%'&"('#674'5
Advanced Features
/'075
7UKPI"&KHHGTGPV"/GPWU
Each disc is programmed with different features. There are
three separate menu paths that you can use to access
features:
•
The Disc menu
and is separate from the DVD player’s menu. The
contents of each Disc menu varies according to how
the disc was authored and what features are included.
Press
MENU
view the the Disc menu. Press
the Disc menu.
•
The DVD player’s Info Display
appears across the top of the screen when a disc is
playing. It can only be accessed while you are playing a
disc. Press
on and off.
•
The DVD player menu
system is accessed only when a disc isn’t playing. It
appears automatically when you press
remote or the DVD player.
A feature only works if the disc was programmed with that
feature. For example, if you choose subtitles on the Info
Display, the subtitles only appear if the disc was created
with subtitles. If a menu item is “grayed out” it means that
item is not available.
— The Disc menu is part of each disc
on the remote (while a disc is playing) to
again to turn off
MENU
— The Info Display
DISPLAY
on the remote to turn Info Display
— The DVD player’s menu
on the
''''
STOP/
14
7UKPI"C"&KUE"/GPW
A disc may have an on-screen menu that is separate from
the DVD player’s menu system and on-screen Info Display.
The disc menu might only contain a list of the titles and
chapters, or it may allow you to change features such as
language and playback settings.
Although the content and operation of disc menus vary from
disc to disc, the following example gives you an idea of what
to expect.
1. While the disc is playing, press
The disc menu appears.
2. Press H /G to highlight the section of the disc menu
you want to choose, and press
on the remote.
MENU
on the remote.
ENTER
Page 15

3. Press H /G to select a language, and press
ENTER
the remote.
4. Press
on the remote to resume playback.
MENU
±±±±
&8&"2.#;$#%-"('#674'5
(CUV"/QVKQP"2NC[DCEM"
*2KEVWTG"5ECP+
You can search in forward or reverse mode.
1. Press # (reverse) or , (forward) on the remote during
playback to search through a disc.
2. Press the button again on the remote to search at the
next speed. Picture Scan has 4 speeds. With each
consecutive press of the button, the search speed
increases. If you press the button more than 4 times,
Picture Scan cycles back to normal playback.
on
"016'"±"
±
Any settings you change on the
disc menu only override the default
settings in the DVD player’s menu
temporarily. Default settings are
the settings that you set up in the
DVD player’s menu system. To
change the default settings, see
“Setting Up Defaults” on Page 20.
Advanced Features
3. Press
J on the remote to resume normal
PLAY/
playback.
(TGG\G"(TCOG"
1. Press f
2. Press
PLAY/
on the remote once to freeze playback.
PAUSE
J to resume normal playback.
5NQY"/QVKQP"2NC[DCEM
Press
Press the button again to decrease the speed. Each time
you press
“Playback Speed” to the right).
You may also press
on the remote for slow motion playback.
SLOW
, the playback speed decreases (see
SLOW
J to return to normal speed.
PLAY/
5MKRRKPI"%JCRVGTU
Use
SKIP +
to the previous chapter.
to go to the next chapter and
----
SKIP –
to go
))))
6KVNG
If your DVD is programmed with a title menu, pressing
on the remote returns the program to the start then the title
menu appears. If the DVD is not programmed with a title
menu,
appears.
}}}}
TITLE
5WDVKVNGU
When a DVD is recorded with subtitles, you can use the
Subtitle feature to view the subtitles on-screen. To turn
subtitles on:
Playback Speed
"2TGUU"
5.19
12X, Forward
2 4X, Forward
3 8X, Forward
4 2X, Reverse
5 4X, Reverse
6 8X, Reverse
7 Normal Speed,
2NC[DCEM"5RGGF1
&KTGEVKQP
Forward
15
Page 16

Advanced Features
1. Press
SUBTITLE
on the remote. The Info banner
displays the default subtitle language and the number
of subtitle languages available. If no subtitles are
available,
appears.
}}}}
"016'"±"
±
Changing the Audio
Language
• If the disc does not contain the
language desired, the disc’s
default language is automatically
selected.
• When you play a disc, the
player’s default audio language
is selected. If the disc does not
contain this language, the disc’s
default language is automatically
selected. This feature is discdependent, and may not work
with all DVDs.
Changing the Camera Angle
• This feature only works when a
DVD has been recorded with a
multi-camera angle system.
2. Press
SUBTITLE
again to turn subtitles on. The subtitles
appear in the default language. To see subtitles in a
different language, press
SUBTITLE
to scroll through
the available subtitles.
3. T o turn subtitles off, press
SUBTITLE
until the subtitles
disappear.
%JCPIKPI"VJG"#WFKQ".CPIWCIG
When a DVD is recorded with multiple sound tracks, you
can use the Audio feature to temporarily change the audio
language (the language of the sound track).
1. During disc playback, press
on the remote (the
AUDIO
audio language banner appears if the disc is
programmed for a different audio language. Otherwise
appears).
}
2. Continue pressing
languages.
±±±±
to scroll through available
AUDIO
%JCPIKPI"VJG"%COGTC"#PING"
Some DVDs contain multiple angles of a particular scene or
sequence. Follow these steps to change the camera angle.
1. During disc playback, press
current and total angle numbers appear.
If no camera angle is available, } appears. If multiple
camera angles are available, appears and shows
the current angle number and the number of angles
available. For example, 1/4 indicates that angle one is
being displayed, and there are four different angles
available.
2. Press
3. Continue to press
playback.
again to go to the next camera angle.
ANGLE
to resume normal
ANGLE
±±±±
on the remote. The
ANGLE
16
7UKPI"VJG"4GRGCV"(GCVWTG
There are four repeat options:
•Off
• Chapter — repeats the chapter that is playing
• Title — repeats the title that is playing
Page 17

• A-B Repeat — repeats a selected segment of the disc
To Repeat a Chapter or Title
REPEAT
J?JB;
J?JB; H;F;7J
J?JB;J?JB;
on the remote toggles between
H;F;7J
H;F;7JH;F;7J
and
H;F;7J
H;F;7J E<<
H;F;7JH;F;7J
E<<
E<<E<<
.
9>7FJ;H
9>7FJ;H H;F;7J
9>7FJ;H9>7FJ;H
H;F;7J
H;F;7JH;F;7J
,
1. While a disc is playing, press
chapter repeat.
current chapter repeats.
2. To repeat a title, press
appears.
3. To turn repeat off, press
appears.
A-B Repeat
A-B Repeat lets you repeat a specific segment on the DVD
that you define.
1. At the beginning of the segment you want to repeat,
Press
A-B
the segment (the on-screen display shows “A TO B
SET A”).
2. Allow the movie to play to the end of the segment you
want to mark. You must let the movie play in standard
playback mode to set the B point in A-B Repeat. If you
reverse or fast-forward, A-B Repeat is cancelled.
3. Press
4. The segment that you set plays until you turn off A-B
A-B
appears on-screen).
Repeat. To turn A-B repeat off, press
normal playback (
9>7FJ;HýH;F;7J
9>7FJ;HýH;F;7J ED
9>7FJ;HýH;F;7J9>7FJ;HýH;F;7J
on the remote to mark the start (A) point of
again to set the B point (“A TO B SET B”
7777 JE
JE 8888 97D9;BB;:
JEJE
REPEAT
REPEAT
97D9;BB;:
97D9;BB;:97D9;BB;:
REPEAT
to turn on
appears. The
ED
EDED
again.
J?JB;
J?JB; H;F;7J
J?JB;J?JB;
until
H;F;7J
H;F;7J E<<
H;F;7JH;F;7J
A-B
appears).
H;F;7J ED
H;F;7JH;F;7J
E<<
E<<E<<
to resume
ED
EDED
Advanced Features
17
Page 18

2.#;+0)"#7&+1"%&U
Playing Audio CDs
.1#&+0)"#0&"2.#;+0)"#0"#7&+1"%&
1. Press
2. Place a disc into the tray with the disc’s label facing up.
Make sure the disc fully seats onto the spindle.
3. Press down on
door to close the tray. The DVD player reads the disc’s
table of contents and the current track number/total
track number appears (CDDR1/(total track number))
Track 1 begins playing automatically.
4. Press
at the front right of the DVD player.
OPEN
at the lower right side of the tray
CLOSE
to stop playback.
''''
STOP/
#7&+1"%&"2.#;$#%-"('#674'5
When playing audio CDs, your DVD player has many of the
same features that a CD player has, including track skip and
repeat play.
5MKRRKPI"6TCEMU
Press
to the previous track.
7UKPI"VJG"4GRGCV"(GCVWTG
There are three repeat options:
•
•
•
To Repeat a Track or Disc:
+ - to go to the next track and
SKIP
— repeats the track that is playing
Track
— repeats the entire disc
Disc
A-B Repeat
— repeats a selected segment of the disc
SKIP
– ) to go
18
1. While a disc is playing, press
H;F#ED;
H;F#ED;
H;F#ED;H;F #E D;
2. To repeat the entire disc, press
appears.
3. To turn repeat off, press
appears.
appears. The current track repeats.
REPEAT
REPEAT
on the remote.
REPEAT
until
H;F;7J
H;F;7J E<<
H;F;7JH;F;7J
again.
H;F#7BB
H;F#7BB
H;F#7BBH;F#7BB
E<<
E<<E<<
#/$"4GRGCV
A-B Repeat lets you repeat a specific segment on the disc.
See “A-B Repeat” on Page 17 to use A-B Repeat with a
DVD disc.
Page 19

7UKPI"VJG"&KURNC["(WPEVKQP
While an audio CD is playing, consecutively press
on the remote. The following appears on the screen in turns
for 2 seconds:
DISPLAY
•
I?D=B;
I?D=B; ;B7FI;:
;B7FI;:
I?D=B;I?D=B;
;B7FI;:;B7FI;:
•
I?D=B;
I?D=B; H;C7?D
H;C7?D
I?D=B;I?D=B;
H;C7?DH;C7?D
•
JEJ7B
JEJ7B ;B7FI;:
;B7FI;:
JEJ7BJEJ7B
;B7FI;:;B7FI;:
•
JEJ7B
JEJ7B H;C7?D
H;C7?D
JEJ7BJEJ7B
H;C7?DH;C7?D
•
E<<
E<<
E<<E<<
time for a song
time for a song
time for the entire disc
time for the entire disc
±±±±
2.#;+0)"/25"&+5%U
This DVD player only plays discs containing MP3 files
#
recorded from your CD-R and CD-RW drives. Though
it plays most MP3 files, it may not play them all.
When you play a MP3 disc, the MP3 menu appears instead
of the DVD player menu. The DVD player menu is not
available when playing MP-3 discs.
1. Press
2. Insert an MP3 disc into the tray with the disc’s label
facing up.
3. Press
clicks shut. Track 1 begins playing.
4. Press
5'.'%6+0)"64#%-5
Once you stop an MP3 disc, press
bring up the list of tracks available on that disc. The track list
is displayed in two columns.
on the front right of the DVD player.
OPEN
at the right side of the tray door until it
CLOSE
to stop playback.
STOP/
''''
J on the player to
PLAY/
"016'"±"
±
When playing a CD or MP3, we
recommend that you turn off the
LCD display by setting the OFF/ON
switch below the LCD display to
OFF. To view the disc’s menu, set
the OFF/ON switch to ON.
Playing MP3 Discs
Use H/ G /I and Jýon the remote to select different tracks.
As you highlight a track in the track list, that track begins
playing when you press
PLAY/
Jýagain.
5-+22+0)"64#%-5
To skip forward to the beginning of the next song on a MP3
disc, press
player.
To skip backward to the beginning of the previous track on
an MP3 disc, press
the player.
- on the remote or the front of the
SKIP +
) on the remote or the front of
SKIP –
19
Page 20

When skipping tracks, the highlight moves from left to right
across the columns, so track 1 is the first track listed in
column one, track 2 is the first track listed in column 2, track
3 is the second track in column 1, and so on.
61"4'2'#6"#"/25"64#%-"14"&+5%
1. While a disc is playing, press
H;F#ED;
H;F#ED;
H;F#ED;H;F #E D;
appears. The current track repeats.
REPEAT
on the remote.
Setting Up Defaults
2. To repeat the entire disc, press
appears.
3. To turn repeat off, press
appears.
REPEAT
REPEAT
until
again.
H;F;7J
H;F;7J E<<
H;F;7JH;F;7J
E<<
E<<E<<
H;F#7BB
H;F#7BB
H;F#7BBH;F#7BB
75+0)"6*'"&+52.#;"(70%6+10"
While a disc is playing, press
track elapsed time,
I?D=B;
I?D=B; ;B7FI;:
;B7FI;:
I?D=B;I?D=B;
;B7FI;:;B7FI;:
DISPLAY
to display single
displays briefly.
5'66+0)"72"&'(#7.65
)'0'4#."5'672
Press
.
F7=;
F7=;
F7=;F7=;
Select
press
JLý:?IFB7O0
JLý:?IFB7O0
JLý:?IFB7O0JLý:?IFB7O0
remote and then press J to enter the submenu. Press H/
on the remote to select one of the following then press
G
ENTER
•
DEHC7B%FI0
DEHC7B%FI0
DEHC7B%FI0DEHC7B%FI0
with a normal TV (not wide one), a portion may be cut
off automatically to fit the screen.
•
DEHC7B%B80
DEHC7B%B80
DEHC7B%B80DEHC7B%B80
with a normal TV (not wide one), a black strip at both
top and bottom screen appear to fit the screen.
•
M?:;0
M?:;0
M?:;0M?:;0
TV, a wide picture is then shown on the full screen.
7D=B;ýC7HA0
7D=B;ýC7HA0
7D=B;ýC7HA07D=B;ýC7HA0
remote and then press J to enter the submenu.
on the remote to view the
SETUP
=;D;H7B
=;D;H7B I;JKF
=;D;H7B=;D;H7B
to enter to the General Setup page.
ENTER
Select
to confirm the setting.
When the player is connected to a wide screen
Select
using HýorýG on the remote and then
I;JKF
I;JKFI;JKF
JL
JL :?IFB7O
JLJL
When watching a DVD with wide picture
When watching a DVD with wide picture
7D=B;
7D=B; C7HA
7D=B;7D=B;
using H/ G/ I or J on the
:?IFB7O
:?IFB7O:?IFB7O
using H/ G/ I or J on the
C7HA
C7HAC7HA
I;JKF
I;JKF C;DK
C;DK C7?D
I;JKFI;JKF
C;DKC;DK
C7?D
C7?DC7?D
"016'"±"
±
This function only works for discs
with scenes recorded at different
angles.
20
Some DVDs may contain scenes shot simultaneously
from different angles. For these discs, the same scene
can be viewed from each of these different angles
using
the disc.
. The recorded angles differ depending on
ANGLE
±±±±
Page 21

• Choose
then press
ED0
ED0
ED0ED0
E<<0
E<<0
E<<0E<<0
7d]b[
7d]b[ CWha
7d]b[7d]b[
shows angle mark on the screen
does not show the Angle mark on the screen
on the screen
CWha
CWhaCWha
to confirm the following setting.
ENTER
ED%E<<
ED%E<<
ED%E<<ED%E<<
using Hýor G
C7?DýF7=;0ý
C7?DýF7=;0ý
C7?DýF7=;0ýC7?DýF7=;0ý
remote and then press
To resume play, press
Select
C7?D
C7?D F7=;
C7?DC7?D
using H/ G/ I or J on the
F7=;
F7=;F7=;
to return to the main page.
ENTER
.
SETUP
5'66+0)"24'('4'0%'5
When there is no disc inside the player, press
display the
Fh[\[h[dY[i
Fh[\[h[dY[i
Fh[\[h[dY[iFh[\[h[dY[i
page.
•
•
•
•
•
C7?DýF7=;
C7?DýF7=;
C7?DýF7=;C7?DýF7=;
. Then press
:?I9ý7K:?E0ý
:?I9ý7K:?E0ý
:?I9ý7K:?E0ý:?I9ý7K:?E0ý
remote, and then press J to enter the submenu.
Select the audio language you desire using Hýor G
(
;D=B?I>
;D=B?I>, <H;D9>
;D=B?I>;D=B?I>
press
ENTER
the menu.
IK8J?JB;0
IK8J?JB;0
IK8J?JB;0IK8J?JB;0
remote, and then press J to enter the submenu.
Select the subtitle language you desire using H/ G on
the remote (
or
setting. Press I to return to the menu.
:?I9
:?I9 C;DK
:?I9:?I9
remote and then J to enter the submenu.
Select the disc menu language you desire using H/
(
;D=B?I>
;D=B?I>, <H;D9>
;D=B?I>;D=B?I>
press
the menu.
:;<7KBJI0ý
:;<7KBJI0ý
:;<7KBJI0ý:;<7KBJI0ý
remote, and then press J to enter the submenu. Press
ENTER
C7?D
C7?D F7=;0
C7?DC7?D
remote and then press
page.
Select
IK8J?JB;ýE<<
IK8J?JB;ýE<<
IK8J?JB;ýE<<IK8J?JB;ýE<<
C;DK
C;DKC;DK
ENTER
to return to the factory-preset mode.
F7=;0
F7=;0F7=;0
. Use H/ G on the remote to select
to enter the preferences
ENTER
Select
:?I9
:?I9 7K:?E
:?I9:?I9
<H;D9>, IF7D?I>
<H;D9><H;D9>
<H;D9>, IF7D?I>
<H;D9><H;D9>
IF7D?I>, 9>?D;I;
IF7D?I>IF7D?I>
to confirm the setting. Press I to return to
IK8J?JB;
IK8J?JB;
IK8J?JB;IK8J?JB;
;D=B?I>
;D=B?I>, <H;D9>
;D=B?I>;D=B?I>
). Then press
Select
:
±±±±
Select
Select
:?I9
:?I9 C;DK
:?I9:?I9
IF7D?I>, 9>?D;I;
IF7D?I>IF7D?I>
to confirm the setting. Press I to return to
:;<7KBJI
:;<7KBJI
:;<7KBJI:;<7KBJI
C7?D
C7?D F7=;
C7?DC7?D
using H/ G/ I or J on the
7K:?E
7K:?E7K:?E
, or
9>?D;I;
9>?D;I;9>?D;I;
using H/ G/ I or J on the
<H;D9>, IF7D?I>
<H;D9><H;D9>
IF7D?I>, 9>?D;I;
IF7D?I>IF7D?I>
ENTER
using H/ G/ I or J on the
C;DK
C;DKC;DK
, or
9>?D;I;
9>?D;I;9>?D;I;
using H/ G/ I or J on the
using H/ G/ I or J on the
F7=;
F7=;F7=;
to return to the main
ENTER
SETUP
@7F7D;I;
@7F7D;I;
@7F7D;I;@7F7D;I;
9>?D;I;, @7F7D;I;
9>?D;I;9>?D;I;
to confirm the
@7F7D;I;
@7F7D;I;
@7F7D;I;@7F7D;I;
to
) then
@7F7D;I;
@7F7D;I;@7F7D;I;
Gý
). Then
"016'"±"
±
• Language selection is only
available for discs recorded in
the listed languages. If a
language is not available, the
player plays and the original
recorded language contained in
the disc appears.
• When you reset to
menu, parental level returns to
no parental level.
:;<7KBJI
:;<7KBJI
:;<7KBJI:;<7KBJI
Setting Preferences
21
Page 22

Back View
4'2.#%+0)"6*'"4'/16'N5"
$#66'4;
Your remote control requires one CR2025 lithium button cell
battery for power. Batteries are available at your local
RadioShack store or online at www.radioshack.com.
RRRR
....
ý
Replacing the Remote’s Battery
1. Press the tab on the
battery compartment tray
to the right and slide the
battery compartment tray
out.
"9#40+0)"R"
R
• Keep button-cell batteries away
from children. Swallowing a
button-cell battery can be fatal.
• Dispose of the old battery
promptly and properly. Do not
burn or bury it.
.
"%#76+10"
• Use only a fresh battery of the
required size and recommended
type.
• If you do not plan to use the
remote for a month or more,
remove the battery. Batteries
can leak chemicals that can
destroy electronic parts.
.
2. Remove the old battery
and insert a new CR2025
button cell Lithium battery
in the battery compartment
tray , +side up.
3. Slide the tray back into the
battery compartment until it
clicks.
5'66+0)"6*'"
2#4'06#.".'8'.5
F7H;DJ7B
F7H;DJ7B
F7H;DJ7BF7H;DJ7B
remote and then press J to enter the submenu.
Select the parental level you desire using H/ G for discs
with lock-up function categories in different levels. The
levels are listed from the highest level of restriction (
lowest level of restriction (
— Select
.GXGN &GUETKRVKQP
1 G (General Audiences – all ages)
3 PG (Parental guidance suggested. Some material
4 PG-13 (Parents strongly cautioned. Some material
6 R (Restricted. Under 17 requires accompanying of
7 NC-17 (No one 17 and under admitted)
8 Adult
No
Parental
F7H;DJ7B
F7H;DJ7B
F7H;DJ7BF7H;DJ7B
may not be suitable for children)
may be inappropriate for children under 13)
parent or adult)
No limits
using H/ G/ I or J on the
DE
DE F7H;DJ7B
F7H;DJ7B
DEDE
F7H;DJ7BF7H;DJ7B
)
) to the
''''
22
Page 23

Press
password in 4 digits, and then press
parental level setting.
to enter the password verify page. Input the
ENTER
ENTER
to store the
%*#0)+0)"6*'"2#55914&
Select
F7IIMEH:
F7IIMEH:
F7IIMEH:F7IIMEH:
remote and then press J to enter the submenu. Press
ENTER
password, the new password, and the confirmed new
password. Press
return to the previous menu.
The default password is 2001 and this password is always
effective whether you have changed it to a new one or not,
just in case that you forget the new password. To avoid
others using it to set the parental level and change the
password, you may note this default password by other
means and delete it from this manual.
:
to enter the password change page. Input the old
F7IIMEH:
F7IIMEH:
F7IIMEH:F7IIMEH:
ENTER
using H/ G/ I or J on the
to store the change. Press I to
±±±±
±±±±
"016'"±"
±
• When entering the password,
you must pause for 3 seconds
between each key press for the
system to accept the number.
• Some discs let you set limits
depending on the age of users
while other discs do not.
Changing the Password
23
Page 24

6417$.'5*116+0)
2TQDNGO 5WIIGUVKQP
DVD player does not work. Disconnect and reconnect the power to reset the DVD player
No power. Plug in the DVD player. Make sure both ends of the power cord are
securely plugged into the player and the power outlet.
Disc does not play. Insert a disc with the label side facing up.
Check the type of disc to make sure it is compatible with the player.
If the disc is a DTS music CD, it requires a DTS decoder.
Both the DVD player and disc are coded by region. If the codes do not
match, the disc does not play. This DVD player is Region 1.
Play starts but then stops
immediately.
No picture when watching on
a TV.
No sound or distorted sound. Make sure your player is connected properly. Make sure all cables are
Remote control does not
work.
Cannot advance through a
movie.
appears. The feature or action cannot be completed at this time because:
}}}}
Troubleshooting
The picture is distorted. Adjust the image setting. Check to see that the setting in the disc menu
Picture is distorted during
forward and reverse scan.
The disc is dirty, clean it.
Condensation has formed. Allow the player to dry out.
Turn the TV to its Video Input Channel.
Turn on the TV.
Make sure your player is connected properly. Make sure all cables are
securely inserted into the appropriate jacks.
securely inserted into the appropriate jacks.
Sound is muted during still or slow-motion play.
If you connected an audio or audio/video receiver to your player, make
sure you chose the correct input setting on the receiver.
Install a new battery.
Operate the remote at a distance of no more than 20 feet.
Remove any obstacles between the remote and the DVD player or
other component.
Be sure the battery insulation strip is removed.
You cannot advance through the opening credits and warning
information that appear at the beginning of movies because the disc is
programmed to prohibit that action.
• The disc’s software restricts it.
• The disc’s software does not support that feature
(for example: angles).
• The feature is not available at the moment.
• You have requested a title or chapter that is out of range.
and the setting in the player
Did you connect your VCR to the DVD player? If so, disconnect it.
The disc might be damaged. Try another disc.
It is normal for some distortion to appear while scanning.
menu are compatible.
Display
24
Page 25

2TQDNGO 5WIIGUVKQP
Subtitle and/or audio
language is not the one
selected from the initial
setting.
The menu is displayed in a
foreign language.
No forward or reverse scan. Some discs have sections that prohibit rapid scanning, or title and
Camera angle cannot be
changed.
Cannot copy discs to video
tape.
MP3 does not play MP3 file is corrupt.
If the subtitle and/or audio language does not exist on the disc, the
initial settings does not be seen/heard. The disc’s priority language is
selected instead. Set the subtitle and/or audio language manually
through the setup menu.
The menu language preference is set to that language. Press
SUBTITLE then press H/ G/ I or J to select the desired language .
chapter skip.
If you are trying to skip through the warning information and credits at
the beginning of a movie, you does not be able to do so because this
part of the movie is often programmed to prohibit skipping through it.
Some discs do not have the multi-camera angle system and some discs
only have it in certain parts of the movie.
You cannot record DVD disc onto video cassettes because the discs
are encoded with anti-copy protection.
Disc is scratched.
Your player does not play all CD-R/CD-RW discs.
52'%+(+%#6+105
Monitor ............................................................................................................................5.6 Inches TFT LCD
System .................................................................................................................................................. NTSC
Playable Disc Types ................................................................................................................ DVD/CD/MP3
Screen Type ......................................................................................... Flip up with adjustable viewing angle
Audio/Video Input Jacks ........................................ for Game System Console, Camcorder, Digital Camera
Audio/Video Output Jacks .................................................................................... for TV or Stereo Amplifier
Speaker .............................................. Built In Stereo Speakers (Maximum Power: 0.4 Watts per Channel)
Headphones Jacks .......................................................................................Two (2) Jacks,
DVD Player Input Voltage ......................................................... 100~240 Volts, 50/60 Hz, 0.7~0.3 Amperes
Power Source ................................ UL Listed, 12V AC Adapter (Included), 12V DC Car Adapter (Included)
Remote Control Battery ...................................................... CR 2025 Button Cell Lithium Battery (Included)
DVD Player Dimensions (WHD) ........................................... 8
Weight ................................................................................................................................ 2.56 lbs (1.16 kg)
1
/4 × 31/16 × 67/16 Inches (210 × 78 × 163 mm)
1
/8 inch (3.5mm)
Specifications
Specifications are typical; individual units might vary. Specifications are subject to change and improvement
without notice.
25
Page 26

Care
%#4'
Keep the DVD player dry; if it gets wet, wipe it dry
immediately. Use and store the DVD player only in normal
temperature environments. Handle the DVD player
carefully; do not drop it. Keep the DVD player away from
dust and dirt, and wipe it with a damp cloth occasionally to
keep it looking new.
*#0&.+0)"%#76+105
Before connecting other components to this player, be sure
to turn all components off.
Do not place anything other than the disc in the disc tray.
Exterior influences such as lightning and static electricity
can affect normal operation of this player. If this occurs, turn
the player off and on again using
disconnect and then reconnect the AC power cord to the AC
power outlet.
Remove the disc and turn off the player after use.
POWER
%#5'"/#+06'0#0%'
For safety reasons, when cleaning the case be sure to
disconnect the AC power cord from the AC outlet.
• Do not use benzene, thinner, or other solvents for
cleaning.
• Wipe the case with a soft cloth.
on the player, or
26
(14/#6+10"1("%10&'05#6+10
Due to sharp changes in temperature and humidity,
condensation may form if warm air comes in contact with
any cold parts inside the player.
When condensation forms inside the player, the player may
not operate correctly. If this occurs, leave the player at room
temperature until the inside of the player becomes dry and
operational.
If condensation forms on a disc, wipe the disc with a soft,
dry cloth by moving the cloth from the center hole toward
the outer edge.
Page 27

*#0&.+0)"&+5%5
• Do not touch the disc’s signal surfaces. Hold by the
edges or by one edge and the hole in the center.
• Do not affix labels or adhesive tape to label surfaces.
Don’t scratch or damage the label.
• Do not use damaged (cracked or warped) discs.
%.'#0+0)"&+5%5
• Dirty discs can cause reduced video and audio
performance. Always keep discs clean by wiping them
gently with a soft cloth from the inner edge toward the
outer perimeter.
• If a disc becomes very dirty, wet a soft cloth in water,
wring it out well. Wipe the di rt away ge ntly, and remove
any water drops with a dry cloth.
• Do not use record-cleaning sprays or anti-static agents
on discs. Also, never clean the discs with benzene,
thinner, or other volatile solvents which may cause
damage to the disc surface.
5'48+%'"#0&"4'2#+4
If your DVD player is not performing as it should, take it to
your local RadioShack store for assistance. Modifying or
tampering with the DVD player’s internal components can
cause a malfunction and might invalidate its warranty and
void your FCC authorization to operate it.
27
Service and Repair
Page 28

Limited Ninety-Day Warranty
This product is warranted by RadioShack against manufacturing defects in material and workmanship under normal use for ninety (90) days from the date of purchase from RadioShack companyowned stores and authorized RadioShack franchisees and dealers. EXCEPT AS PROVIDED
HEREIN, RadioShack MAKES NO EXPRESS WARRANTIES AND ANY IMPLIED WARRANTIES,
INCLUDING THOSE OF MERCHANTABILITY AND FITNESS FOR A PARTICULAR PURPOSE,
ARE LIMITED IN DURATION TO THE DURATION OF THE WRITTEN LIMITED WARRANTIES
CONTAINED HEREIN. EXCEPT AS PROVIDED HEREIN, RadioShack SHALL HAVE NO LIABILITY OR RESPONSIBILITY TO CUSTOMER OR ANY OTHER PERSON OR ENTITY WITH RESPECT TO ANY LIABILITY, LOSS OR DAMAGE CAUSED DIRECTLY OR INDIRECTLY BY USE
OR PERFORMANCE OF THE PRODUCT OR ARISING OUT OF ANY BREACH OF THIS WARRANTY, INCLUDING, BUT NOT LIMITED TO, ANY DAMAGES RESULTING FROM INCONVENIENCE, LOSS OF TIME, DATA, PROPERTY, REVENUE, OR PROFIT OR ANY INDIRECT,
SPECIAL, INCIDENT AL, OR CONSEQ UENTIAL DAMAGES, EVEN IF RadioShac k HAS BEEN ADVISED OF THE POSSIBILITY OF SUCH DAMAGES.
Some states do not allow limitations on how long an implied warranty lasts or the exclusion or limit ation of incidental or consequential damages, so the above limitations or exclusions may not apply to
you.
In the event of a product defect during the warranty period, take the product and the RadioShack
sales receipt as proof of purchase date to any RadioShack store. RadioShack will, at its option, unless otherwise provided by law: (a) correct the defect by product repair without charge for parts and
labor; (b) replace the product with one of the same or similar design; or (c) refund the purchase
price. All replaced parts and products, and products on which a refund is made, become the property of RadioShack. New or reconditioned parts and products may be used in the performance of
warranty service. Repaired or replaced parts and products are warranted for the remainder of the
original warranty period. You will be charged for repair or replacement of the product made after the
expiration of the warranty period.
This warranty does not cover: (a) damage or failure caused by or attributable to acts of God, abuse,
accident, misuse, improper or abnormal usage, failure to follow instructions, improper installation or
maintenance, alteration, lightning or other incidence of excess voltage or current; (b) any repairs
other than those provided by a RadioShack Authorized Service Facility; (c) consumables such as
fuses or batteries; (d) cosmetic damage; (e) transportation, shipping or insurance costs; or (f) costs
of product removal, installation, set-up service adjustment or reinstallat i on.
This warranty gives you specific legal rights, and you may also have other rights which vary from
state to state.
RadioShack Customer Relations, 200 Taylor Street, 6th Floor, Fort Worth, TX 76102
12/99
RadioShack Corporation
Fort Worth, Texas 76102
16-3255
09A02
Printed in China
 Loading...