

Radio Shack 15-2146 - Voice Prompt Universal Remote, 15-2146 Owner's Manual

OWNER’S MANUAL
Table of Contents 1
TABLE OF CONTENTS
Introduction . . . . . . . . . . . . . . . . . . . . . . . . . . . . . . . . . . . . . . . 2
Installing Batteries . . . . . . . . . . . . . . . . . . . . . . . . . . . . . . . . . 2
Battery Use And Safety. . . . . . . . . . . . . . . . . . . . . . . . . . . . 2
About Battery Life. . . . . . . . . . . . . . . . . . . . . . . . . . . . . . . . 2
Installing Batteries. . . . . . . . . . . . . . . . . . . . . . . . . . . . . . . 2
Features And Functions. . . . . . . . . . . . . . . . . . . . . . . . . . . . . . 3
Key Chart. . . . . . . . . . . . . . . . . . . . . . . . . . . . . . . . . . . . . . . 3
Device Table . . . . . . . . . . . . . . . . . . . . . . . . . . . . . . . . . . . . 5
Setup Menu Overview . . . . . . . . . . . . . . . . . . . . . . . . . . . . . 5
Programming Device Control . . . . . . . . . . . . . . . . . . . . . . . . . 6
Enter a Device Code . . . . . . . . . . . . . . . . . . . . . . . . . . . . . . 6
Searching For Your Code . . . . . . . . . . . . . . . . . . . . . . . . . . 7
Checking The Codes . . . . . . . . . . . . . . . . . . . . . . . . . . . . . . 7
Using Channel Scan . . . . . . . . . . . . . . . . . . . . . . . . . . . . . . . . . 7
Programming Favorite Channel Scan . . . . . . . . . . . . . . . . 7
Clearing the Favorite Channel List. . . . . . . . . . . . . . . . . . . 8
Using Macros . . . . . . . . . . . . . . . . . . . . . . . . . . . . . . . . . . . . . . 8
Programming a Macro . . . . . . . . . . . . . . . . . . . . . . . . . . . . 8
Clearing a Macro . . . . . . . . . . . . . . . . . . . . . . . . . . . . . . . . 8
Setting the Sleep Timer . . . . . . . . . . . . . . . . . . . . . . . . . . . . . . 8
Setting the Sleep Timer . . . . . . . . . . . . . . . . . . . . . . . . . . . 8
Enabling Sleep . . . . . . . . . . . . . . . . . . . . . . . . . . . . . . . . . . 9
Disabling the Sleep Timer. . . . . . . . . . . . . . . . . . . . . . . . . . 9
Using Learning. . . . . . . . . . . . . . . . . . . . . . . . . . . . . . . . . . . . . 9
Learning Precautions . . . . . . . . . . . . . . . . . . . . . . . . . . . . . 9
Programming a Learned Key . . . . . . . . . . . . . . . . . . . . . . . 9
Deleting a Single Learning Key. . . . . . . . . . . . . . . . . . . . . 10
Deleting All Learned Keys in a Specific Mode . . . . . . . . . 10
Changing Volume Lock . . . . . . . . . . . . . . . . . . . . . . . . . . . . . 10
Locking Volume Control to One Mode (Global Volume Lock)
10
Unlocking Volume Control For A Single Device (Individual
Volume Unlock). . . . . . . . . . . . . . . . . . . . . . . . . . . . . . . . . 10
Unlocking All Volume Control (Restoring Default Setting)11
Reassigning Device Keys . . . . . . . . . . . . . . . . . . . . . . . . . . . . 11
Resetting the Remote . . . . . . . . . . . . . . . . . . . . . . . . . . . . . . 11
Clearing Custom Settings (Basic User Reset) . . . . . . . . . 11
Clearing All Custom Programming. . . . . . . . . . . . . . . . . . 11
Troubleshooting . . . . . . . . . . . . . . . . . . . . . . . . . . . . . . . . . . . 11
Specifications . . . . . . . . . . . . . . . . . . . . . . . . . . . . . . . . . . . . 12
Care . . . . . . . . . . . . . . . . . . . . . . . . . . . . . . . . . . . . . . . . . . . . 12
Additional Information . . . . . . . . . . . . . . . . . . . . . . . . . . . . . .13
FCC Compliance . . . . . . . . . . . . . . . . . . . . . . . . . . . . . . . . . . .13
Limited 90-Day Warranty . . . . . . . . . . . . . . . . . . . . . . . . . . . .13
Manufacturer’s Codes (Códigos del Fabricante) . . . . . . . . . .30
Setup Codes for Audio Amplifiers (Códigos de Configuración
para Amplificadores de Audio) . . . . . . . . . . . . . . . . . . . . .30
Setup Codes for Audio Amp/Tuners (Códigos de
Configuración para Amplificadores de Audio/
Sintonizadores) . . . . . . . . . . . . . . . . . . . . . . . . . . . . . . . . .30
Setup Codes for Cable Boxes (Códigos de Configuración
para Cajas/Convertidores de Cable) . . . . . . . . . . . . . . . . .31
Setup Codes for Cable Boxes/PVR Combos (Códigos de
Configuración para Aparatos Combinados Cajas/
Convertidores de Cable/DVR/PVR). . . . . . . . . . . . . . . . . . .32
Setup Codes for CD Players (Códigos de Configuración para
Reproductores de CDs) . . . . . . . . . . . . . . . . . . . . . . . . . . .33
Setup Codes for DVD Players (Códigos de Configuración
para Reproductores DVD) . . . . . . . . . . . . . . . . . . . . . . . . .33
Setup Codes for DVD Player/VCR Combos (Códigos de
Configuración para Aparatos Combinados Reproductores
DVD/VCR) . . . . . . . . . . . . . . . . . . . . . . . . . . . . . . . . . . . . . .35
Setup Codes for Home-Theater-in-a-Box Systems (Códigos
de Configuración para Dispositivos Sistema de Teatro en
Casa) . . . . . . . . . . . . . . . . . . . . . . . . . . . . . . . . . . . . . . . . .35
Setup Codes for PVRs (Códigos de Configuración para DVR/
PVRs, Grabadores Personales en Disco Duro) . . . . . . . . .36
Setup Codes for Satellite Receivers (Códigos de
Configuración para Receptores de Satélite). . . . . . . . . . .36
Setup Codes for Satellite Receivers/PVR Combos (Códigos
de Configuración para Aparatos Combinados Receptor de
Satélite/ DVR/PVR) . . . . . . . . . . . . . . . . . . . . . . . . . . . . . . .37
Setup Codes for TVs (Códigos de Configuración para
Televisores) . . . . . . . . . . . . . . . . . . . . . . . . . . . . . . . . . . . .37
Setup Codes for TV/DVD Player Combos (Códigos de
Configuración para Aparatos Combinados TV/DVD) . . . . .39
Setup Codes for TV/VCR Combos (Códigos de Configuración
para Aparatos Combinados TV/VCR) . . . . . . . . . . . . . . . . .40
Setup Codes for TV/VCR/DVD Player Combos (Códigos de
Configuración para Aparatos Combinados TV/VCR/DVD) .41
Setup Codes for VCRs (Códigos de Configuración para
Videograbadoras). . . . . . . . . . . . . . . . . . . . . . . . . . . . . . . .41
RADIOSHACK 6-IN-1 EASY SETUP VOICE REMOTE
2 Introduction
INTRODUCTION
T
he RadioShack 6-in-1 Easy Setup Voice Remote is a
revolutionary universal remote control that features
voice prompts to help you set up the remote. Moreover,
it allows you to consolidate the clutter of all of your
original remote controls into one easy-to-use product.
Advanced features include
:
• Macros – for instant activation of favorite
key sequences
• Learning – to capture unique functions from
your devices’ original remote controls
• Direct Code Setup – for easy voice-prompted
programming with setup codes
• Favorite Channel Scan – for easy channel
surfing of favorite channels
• Vol um e L oc k – to assign volume controls to
individual devices or to one global device
• Extensive Code Library – largest and most
efficient group of IR remote control codes for
virtually every current brand and make
After installing four (4) new AAA alkaline batteries
(not included, see next page), you can immediately
use the unit to control a RCA DVD Player, a Pioneer
CD Player and Audio Receiver, and a RCA TV,VCR,
and Satellite Receiver. To control other brands than
the default ones, see Programming Device Control
on page 6.
INSTALLING BATTERIES
BATTERY USE AND SAFETY
• Dispose of old batteries promptly and
properly.
• Do not burn or bury batteries.
• Use only new batteries of the required size.
• Do not mix old and new batteries, different
types of batteries (e.g., standard, alkaline, or
rechargeable), or rechargeable batteries of
different capacities.
• If you do not plan to use the remote control for
an extended period, remove the batteries.
They can leak chemicals that can destroy
electronic parts.
ABOUT BATTERY LIFE
As with all battery-operated devices, battery life
will vary depending on use, including frequency
and duration of key presses. The LED will flash and
the remote will say “Low batteries” when the
batteries in your RadioShack 6-in-1 Easy Setup
Voice Remote are running low.
INSTALLING BATTERIES
Your remote requires four AAA batteries (not
supplied) for power.
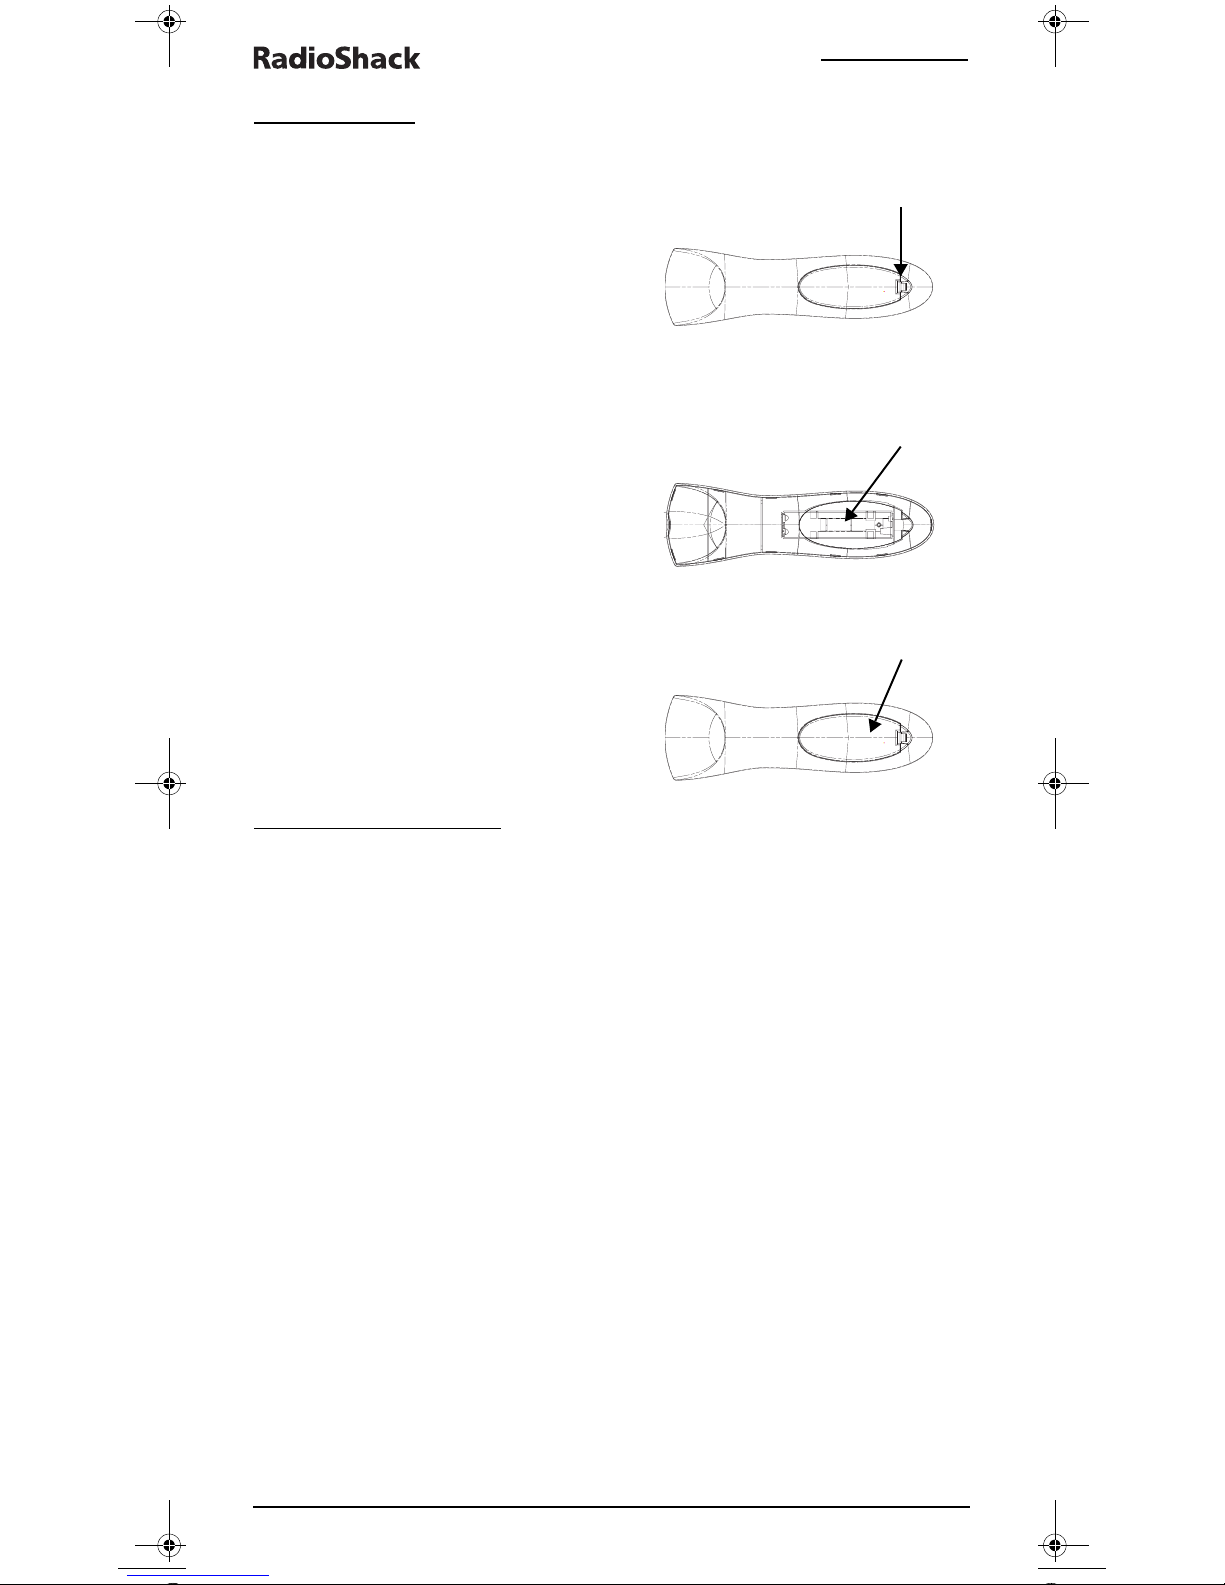
1. Press the tab on the battery compartment
cover (located on the back of the remote) and
lift off the cover.
2. Place the AAA batteries in the compartment as
indicated by the polarity symbols (+ and -)
marked inside.
3. Align the cover with the compartment opening
and replace it.
❶
❷
❸

OWNER’S MANUAL
Features And Functions 3
FEATURES AND FUNCTIONS
Use the illustration below to locate features on the
RadioShack 6-in-1 Easy Setup Voice Remote and
then refer to the “Key Chart” (starting on the right)
to learn how they function.
To find out what type of devices can be controlled
by each device key after programming, see the
“Device Table” on page 5.
KEY CHART
Press a Device Key once to
select a desired home
entertainment device to
control (e.g., DVD).
Press POWER to turn a
selected device on or off.
Press (Light) to turn the
backlight on or off
In the CBL/SAT mode, press
PAGE+ or PAGE– to page up
or down through channels in
the program guide.
Use the navigation keys as
follows:
Press MENU to display the
your device's main menu.
Press GUIDE to display your
device's program guide, or
setup or program menu.
Press INFO to display the
current channel and
program information.
Press EXIT to exit from your
device's guide or menu.
Use the cursor keys (
S,X,
T,or W) to navigate
through the program guide
and menu screens.
In the AUD mode, press
S(or T) to raise (or
lower) rear channel volume
or navigate through menus
and press
Wor X to
balance audio left (or right).
Press OK to choose options
from your device's menu or
guide.
After programming, press
M1 or M2 once to run a
macro (see “Using Macros”
on page 8).
Press SLEEP to turn on the
sleep function. See “Setting
the Sleep Timer” on page 8.
RADIOSHACK 6-IN-1 EASY SETUP VOICE REMOTE
4 Features And Functions
In the TV, VCR, or DVD mode,
press TV/VCR to switch the
TV's input to view TV or
video programs.
In the AUD mode, press TV/
VCR to sw itch between audio
inputs.
In the CBL/SAT mode press
A/B to change your cable
boxes A/B or Bypass
function, or input on your
SAT.
In all modes except AUD and
DVD, press LAST once to
recall the last channel.
Press PVR Menu to open the
menu for your PVR device.
Press VOL S(or VOL T) to
raise (or lower) the sound
volume for the selected
device (also see Changing
Volum e L ock on page 7).
In the CBL/SAT, VCR, DVD,
and TV modes, press FAV
SCAN to scan through all
channels, or after
programming, to scan
through 10 favorite
channels.
Press MUTE once to turn the
sound off or on.
Press CH S(or CH T) to
select the next higher (or
lower) channel.
In all modes except AUDIO,
use the Number Keys (1 – 9
and 0) to directly select
channels (e.g., 009 or 031)
or enter numbers. In the
AUDIO mode, use the
Number Keys to directly
select inputs 1 – 9 and 10.
Press +100 to enter channels
over 100 (for example,
+100, 3, 1 = 131). For a
DVD player, press +100 to
access chapters over 10 (for
example, +100, 3 = 13).
For certain brands in all
modes except CD and AUDIO,
press ENTER once after
entering numbers (if
required on your original
remote control).
In the all modes, use the
Transport Keys to control the
device’s transport if that
function is available.
In all modes, press REC
twice to re cord a program on
your device (if function is
avai lable) .
In the TV mode, use the PIP
keys to control the following
Picture-In-Picture features
(if available) on your TV:
Press PIP to switch the
Picture-In-Picture feature on
or off.
Press MOVE to move the
window picture to different
places in the main picture.
Press SWAP to switch images
and sound between the main
and window pictures.
OWNER’S MANUAL
Features And Functions 5
DEVICE TABLE
NOTE: Please refer to the table below when
performing the instructions in “Programming Device
Control” on page 6.
After programming, the RadioShack 6-in-1 Easy
Setup Voice Remote will be able to control the
following types of devices:
SETUP MENU OVERVIEW
Your new RadioShack 6-in-1 Easy Setup Voice
Remote includes an audio menu to help guide you
through setup options. Press and hold SETUP to
hear the top-level menu through the speaker on the
front of the remote. Once you’ve accessed the toplevel menu), press VOLSor VOLTto increase or
decrease the volume of the product’s voice. The
main setup menu options are:
• “Press one to set up a device, such as TV or
Cable/SAT.”
See “Programming Device Control” on page 6.
• “Press two to set up favorite channels.”
See “Programming Favorite Channel Scan” on
page 7.
• “Press three to program multiple commands,
known as a macro.”
See “Programming a Macro” on page 8.
• “Press four to enable sleep.”
See “Enabling Sleep” on page 9
• “Press five for learning.”
“Programming a Learned Key” on page 9
•“Press six for volume lock.”
See “Locking Volume Control to One Mode
(Global Volume Lock)” on page 10.
• “Press seven to reassign a device key.”
See “Reassigning Device Keys” on page 11.
• “Press eight to reset the remote.”
See “Resetting the Remote” on page 11.
Use the number pad to select any of these setup
options. After you select an option, more
instructions will be provided. See the sections listed
above for details.
In the CBL/SAT, VCR, or DVD
modes, use the PVR/DVR
Keys as follows:
Press the REPLAY key to
instantly replay the last 7
seconds of a program you
are watching (if the feature is
available).
Press the ADV key to skip
past commercials or other
uninteresting scenes (if the
feature is available).
In the DVD or CD mode, press
the advance key to change
discs.
Press LIVE TV to switch
between live TV and video
programming (if the feature
is available).
Press BACK to replay the
previous setup command
menu. Press and hold BACK
for 3 seconds to completely
exit programming at any
time.
Press SETUP to program
your remote. See “Setup
Menu Overview” on page 5
for more information.
Press REPEAT to replay the
current voice command
menu.
DEVICE KEY CONTROLS THESE DEVICES
Audio Amplifier, Audio Receiver,
or CD Player
Cable Box (Converter), Satellite
Receiver, Cable/PVR, or Satellite/
PVR Combo
Tel evi si on , T V /VC R C om bo , T V/
VCR /DVD Combo, or TV/DVD
Combo
Audio Amplifier, Audio Receiver,
or CD Player
VCR , DVD, Home- The ater-in -aBox, or PVR (DVR)
VCR , DVD, Home- The ater-in -aBox, or PVR (DVR)
DEVICE KEY CONTROLS THESE DEVICES
RADIOSHACK 6-IN-1 EASY SETUP VOICE REMOTE
6 Programming Device Control
PROGRAMMING DEVICE
CONTROL
The RadioShack 6-in-1 Easy Setup Voice Remote is
preset at the factory to operate an RCA TV, VCR,
DVD Player, or Satellite Receiver, Pioneer CD Player
and Audio Receiver.
To begin programming device control:
1. Press and hold SETUP until you hear the
programming menu.
2. Press 1. The Programming Device Control
options play:
• “Press one to enter a device code.”
See “Enter a Device Code” on page 6.
• “Press two to search for a device code.”
See “Searching For Your Code” on page 7.
• “Press three to retrieve a device code you
found during search.”
See “Checking The Codes” on page 7.
ENTER A DEVICE CODE
To control devices other than the default brands,
perform the following steps; otherwise skip this
section:
1. Turn on a desired device (e.g.,VCR or DVD
player) and, if applicable, insert media (e.g.,
cassette or disc).
NOTE: Please read steps 2 through 9 completely
before proceeding. Before starting step 2, review
the “Manufacturer’s Codes” (starting on page
30). Brands are listed alphabetically in order of
most popular ones first. Highlight or write down
the devices and the codes you wish to program.
2. Press and hold SETUP until you hear the
programming menu, then press 1.
NOTE: If more than 15 seconds pass between key
presses, the remote says “Goodbye” and exits
programming.
3. Press 1 again.
NOTE: To stop programming at any time, press and
hold BACK.
NOTE: If more than 15 seconds pass between key
presses, the remote says “Goodbye” and exits
programming.
4. At the prompt, press a device key once (i.e.,
CBL/SAT, AUX, TV, DVD, AUDIO, or VCR).
NOTE: Please refer to the “Device Table” on page 5
when choosing a device key for programming.
5. Use the Manufacturer’s Codes (starting on page
30) to locate the type of device and brand
name. At the prompt, use the Number Keys to
enter the first four-digit code for your device.
If performed correctly, the LED blinks twice,
the remote says “Success”.
NOTE: If the LED displayed one long flash instead,
and the remote played “Try again”, a mistake has
occurred and the remote returns to the prompt for
step 4. Try entering the same code again.
6. The remote prompts “Press a test key, such as
power or play. If your device performs the test
function, press Setup to save, or enter the next
code from the manual.” Press a test key.
NOTE: Do not use number keys as test functions. The
remote will think you are entering a different code.
7. If the device performs the test function, press
SETUP to save the code. The remote says
“Success”, and returns to the prompt for
step 3.
NOTE: If the device does not respond, repeat steps 5
through 7 with the next code for your device.
8. Hold BACK until the remote states “Goodbye.”
Aim the remote control at the device and press
POWER once.The device should turn off.
If it does not, repeat steps 2 through 6, trying
each code for your brand until you find one
that works. If it still doesn’t work, try
“Searching For Your Code” on page 7.
9. If the code works, repeat steps 2 through 6 to
program another device or press and hold
SETUP to exit programming.
10. For future reference, write down each working
device code in the following boxes:
CBL/SAT Code:
Brand Name:_______________________
AUX Code:
Brand Name:_______________________
DVD Code:
Brand Name:_______________________
TV Code:
Brand Name:_______________________
AUDIO Code:
Brand Name:_______________________

OWNER’S MANUAL
Using Channel Scan 7
VCR Code:
Brand Name:_______________________
SEARCHING FOR YOUR CODE
If your device does not respond to the remote
control after trying all codes listed for your brand,
or if your brand is not listed at all, try searching for
your code:
NOTE: Before performing a code search for a CD or
DVD player or a VCR, turn on the device and insert
the required media.
1. Press and hold SETUP until you hear the
programming menu, then press 1.
NOTE: If more than 15 seconds pass between key
presses, the remote says “Goodbye” and exits
programming.
2. Press 2.
3. At the prompt, press a device key (i.e., CBL/
SAT, AUX, TV, DVD, AUDIO, or VCR).
4. A
t the prompt, press a test key, such as
POWER
.
NOTE: If your device or its original remote control
does not have a Power key, select a different test
function in this step (e.g., VOL+, Play, etc.).
5. At the prompt, aim the remote control at the
device (e.g., TV) and press CH+ one or more
times to try each code. Stop when a code
performs the test function selected in step 4. If
desired, use CH- to try a previous code.
NOTE: In the search mode, the remote control will
send IR codes from its library to the selected device,
starting with the most popular code first.
6. To lock in the code, press SETUP once.The LED
blinks twice and the remote plays “Success”
and returns to the Device Programming
options.
7. Repeat steps 2 through 6 to program another
device or press and hold SETUP to exit
programming.
NOTE: Use the appropriate device key and test
function key for the device you are searching for.
CHECKING THE CODES
If you have set up the remote control using the
Searching For Your Code procedure (on page 7), you
may need to find out which four-digit code is
operating your equipment. To do so:
1. Press and hold SETUP until you hear the
programming menu, then press 1.
2. Press 3.
3. At the prompt, press a device key (i.e., CBL/
SAT, AUX, TV, DVD, AUDIO, or VCR). The remote
will state the code.
4. Write down the code digits in the appropriate
code boxes on page 6.
5. Repeat steps 2 through 3 to hear another
device’s code or press and hold SETUP to exit
programming.
NOTE: Use the appropriate device key for the device
you are noting.
USING CHANNEL SCAN
In the VCR, DVD, CBL/SAT, or TV mode, use the FAV
SCAN key to start a 3-second scan of all channels. If
programmed, use the FAV SCAN key to scan only
your favorite channels (see “Programming Favorite
Channel Scan” on page 7).
1. Press VCR, DVD, CBL/SAT, or TV to select that
device.
2. Press FAV SCAN once.The LED will blink as
each channel is changed.
•If Favorite Channel Scan has been set up,
scanning of favorite channels will start
and cycle through stored channels for
3 minutes or until stopped by pressing
any key.
•If Favorite Channel Scan has not been set
up, scanning will start with the current
channel, then proceed to the next channel
up and cycle through all channels for 3
minutes or until stopped by pressing any
key.
3. To stop scanning channels at any time, press
any key once.
PROGRAMMING FAVORITE CHANNEL SCAN
In the VCR, DVD, CBL/SAT, or TV mode, you can store
a list of up to 10 favorite channels, in any order, that
will be immediately scanned when you press FAV
Scan (see “Using Channel Scan” on page 7).
NOTE: You can only program Favorite Channels for
one mode. After programming, if you press FAV Scan
while in another mode, the remote control will start a
normal channel scan instead (if applicable to the
selected device).
1. Press and hold SETUP until you hear the
programming menu, then press 2.
NOTE: If more than 15 seconds pass between key
presses, the remote says “Goodbye” and exits
programming.
2. At the prompt, select a Favorite Channel Mode
by pressing VCR, DVD, CBL/SAT, or TV.
3. At the prompt, use the Number Keys to enter a
favorite channel number (e.g., 0 1 2),
including +100 or Enter, if your device
requires this.

RADIOSHACK 6-IN-1 EASY SETUP VOICE REMOTE
8 Using Macros
NOTE: Each channel entry must be five characters or
fewer. If you press more than five characters, the
remote says “Try again” and repeats the prompt for
step 3.
4. Press SETUP to save this channel.
5. Repeat steps 3 and 4 for each channel to be
stored, up to a total of 10 channels, or press
and hold SETUP to return to the programming
menu. Press and hold BACK to exit
programming.
NOTE: The remote automatically saves and exits
Favorite Channel Programming after you enter the
10th channel.
CLEARING THE FAVORITE CHANNEL LIST
If you no longer want to scan favorite channels, or if
you want to program a completely new list, you can
erase the saved channels. To do so:
1. Press and hold SETUP until you hear the
programming menu, then press 2.
NOTE: If more than 15 seconds pass between key
presses, the remote says “Goodbye” and exits
programming.
2. At the prompt, select a Favorite Channel Mode
by pressing VCR, DVD, CBL/SAT, or TV.
3. Press and hold SETUP to erase the saved
channels and return to the programming
menu. Press and hold BACK to exit
programming.
USING MACROS
The RadioShack 6-in-1 Easy Setup Voice Remote
includes two Macro Keys, M1, and M2. Each one can
be set up to perform a repetitive, time-consuming
operation with the press of a single key. You can also
program a macro onto any other key, except mode
keys, SLEEP, FAV SCAN, SETUP, BACK, or REPEAT.
A macro can be used to control a home theater
operation, to set a favorite channel, or for other
multiple functions you would like to control with
one key press. Moreover, each Macro Key can hold
up to 15 key presses total.
NOTE: Programming a new macro over an existing
one will erase the original macro.
PROGRAMMING A MACRO
To program a macro to perform a sequence of
commands:
1. Press and hold SETUP until you hear the
programming menu, then press 3.
NOTE: If more than 15 seconds pass between key
presses, the remote says “Goodbye” and exits
programming.
2. At the prompt, press an open Macro Key
(e.g.,M1 or M2) or the POWER key.
NOTE: If you program a macro onto the POWER key,
you must press and hold the POWER key for about 2
seconds to activate the macro. Otherwise, the POWER
key will function normally (i.e., turn on the selected
device only).
3. At the prompt, enter a series of up to 15
commands.
For example, press TV once, then POWER, then
enter 0 3 for the TV’s channel number. Next,
press CBL/SAT once, then POWER, then enter 0
7 1 for the Cable Box’s channel number (a total
of 9 key presses). This example turns the TV
on, sets it to channel 3, turns the cable or
satellite box on, then sets it to channel 71.
NOTE: If there are more than 15 key presses in the
sequence, the LED displays a long flash denoting an
error and the remote says “Try again” and returns to
the prompt for step 2.
4. To save the macro, press and hold SETUP until
the remote says “Success”, the LED blinks
twice and the remote returns to the
programming menu.
5. Press 3 and repeat steps 2 through 4 to
program another macro or press and hold
BACK to exit programming.
CLEARING A MACRO
1. Press and hold SETUP until you hear the
programming menu, then press 3.
NOTE: If more than 15 seconds pass between key
presses, the remote says “Goodbye” and exits
programming.
2. At the prompt, press an open Macro Key
(e.g.,M1 or M2) or the POWER key.
3. Press and hold SETUP until the remote says
“Success”, the LED blinks twice and the
remote returns to the programming menu.
4. Press 3 and repeat steps 2 and 3 to clear
another macro or press and hold BACK to exit
programming.
SETTING THE SLEEP TIMER
The RadioShack 6-in-1 Easy Setup Voice Remote
includes a sleep timer that lets you set your devices
to be turned off after a specified time, even if the
device does not have a sleep function.
SETTING THE SLEEP TIMER
If you want to set any device to turn off after a
specified time:
1. Press a mode key (AUD, CD, TV, VCR, DVD, CBL/
SAT).

OWNER’S MANUAL
Using Learning 9
2. Press the Sleep key until the desired time is
set. The timer increases by 15 minutes each
time you press the key, up to 60 minutes.
When the timer counts down to 0, the remote sends
a “power off” signal to the selected device.
The sleep timer will work even if you have
reassigned the mode key to a different mode (see
“Reassigning Device Keys” on page 11).
If you turn off the device yourself, the sleep timer
turns off as well.
ENABLING SLEEP
If the SLEEP key does not operate your device’s
built-in sleep timer or if your device does not have a
sleep mode, you must enable the sleep timer for
that mode:
1. Press and hold SETUP until you hear the
programming menu, then press 4.
NOTE: If more than 15 seconds pass between key
presses, the remote says “Goodbye” and exits
programming.
2. At the prompt, press 1.
3. At the prompt, press a device key (i.e., CBL/
SAT, AUX, TV, DVD, AUDIO, or VCR). The LED
blinks twice and the remote says “Success”
and returns to the programming menu.
4. Press 4 and repeat steps 2 and 3 for another
device or press and hold BACK to exit
programming.
DISABLING THE SLEEP TIMER
To disable the sleep timer for a mode:
1. Press and hold SETUP until you hear the
programming menu, then press 4.
NOTE: If more than 15 seconds pass between key
presses, the remote says “Goodbye” and exits
programming.
2. At the prompt, press 2.
3. At the prompt, press a device key (i.e., CBL/
SAT, AUX, TV, DVD, AUDIO, or VCR). The LED
blinks twice and the remote says “Success”
and returns to the programming menu.
4. Press 4 and repeat steps 2 and 3 for another
device or press and hold SETUP to exit
programming.
USING LEARNING
The RadioShack 6-in-1 Easy Setup Voice Remote
includes a Learning feature so you can add
functions that are unique to your home
entertainment devices (e.g.,VCR Tracking Up or
Down).However, there are some considerations:
LEARNING PRECAUTIONS
• Your original remote controls must be in
working order for learning to work properly.
• Learned keys are mode specific, so each one
can store a unique function for each mode.
• Learned keys can be used in macros (see Using
Macros on page 8).
• Do not use the following keys for learning:
Device Keys, SETUP, BACK, REPEAT, FAV SCAN,
SLEEP, or Record (•) Key.
• Learning capacity is approximately 16 to 25
keys, depending on the code being learned.
• Certain device codes are not learnable
including multi-frequency types, some high
frequency ones, and other unusual formats.
• For optimum learning, avoid high levels of
ambient light such as natural sunlight or
energy-efficient fluorescent lights.
NOTE: Please have your original remote controls
handy before programming learning.
PROGRAMMING A LEARNED KEY
1. Press and hold SETUP until you hear the
programming menu, then press 5.
NOTE: If more than 15 seconds pass between key
presses, the remote says “Goodbye” and exits
programming.
2. At the prompt, press 1 to learn a function.
3. At the prompt, press a device key once (i.e.,
CBL/SAT, AUX, TV, DVD, AUDIO, or VCR) to assign
a mode for learning.
4. Place the RadioShack 6-in-1 Easy Setup Voice
Remote head-to-head (about 2" apart) from
your original remote control. Also locate the
key (on your original remote control) that will
serve as the teaching function.
5. On the RadioShack 6-in-1 Easy Setup Voice
Remote, press a key where the learned
function will be stored.
6. On the original remote, press and hold the key
to be learned. The RadioShack 6-in-1 Easy
Setup Voice Remote’s LED will turn off.
Continue holding the key on the original
remote until the RadioShack 6-in-1 Easy Setup
Voice Remote’s LED blinks twice, and the
remote says “Success” and returns to the
prompt for step 3.
2"
RADIOSHACK 6-IN-1 EASY SETUP VOICE REMOTE
10 Changing Volume Lock
NOTE: If the LED displays one long blink, a learning
error has occurred.Try repeating this step again until
a successful capture occurs. If the function is still
not captured, press and hold BACK to exit
prog ramming and review the “Learni ng Precaut ions”
on the previous page. If needed, also see
“Troubleshooting” on page 11.After review, start
programming again at step 1.
7. Press 5 and repeat steps 3 through 6 for
another device and/or key or press and hold
BACK to exit programming.
DELETING A SINGLE LEARNING KEY
1. Press and hold SETUP until you hear the
programming menu, then press 5.
NOTE: If more than 15 seconds pass between key
presses, the remote says “Goodbye” and exits
programming.
2. At the prompt, press 2 to delete a learned
function.
3. At the prompt, press 1 to delete a single
learned key.
4. At the prompt, press a device key once (i.e.,
CBL/SAT, AUX, TV, DVD, AUDIO, or VCR) to
indicate the mode where the learned key to be
deleted is stored.
5. At the prompt, press the key containing the
learned function to be deleted.
6. At the prompt, press this key again. The
remote says “Success” and returns to the
programming menu.
7. Press 5 and repeat steps 3 through 6 for
another key or press and hold BACK to exit
programming.
DELETING ALL LEARNED KEYS IN A SPECIFIC MODE
1. Press and hold SETUP until you hear the
programming menu, then press 5.
NOTE: If more than 15 seconds pass between key
presses, the remote says “Goodbye” and exits
programming.
2. At the prompt, press 2 to delete a learned
function.
3. At the prompt, press 2 to delete all the learned
keys for a particular device.
4. At the prompt, press a device key (i.e., CBL/
SAT, AUX, TV, DVD, AUDIO, or VCR) to indicate
the mode to be cleared of learned keys.
5. Press the same device key again. The remote
says “Success” and returns to the prompt for
step 3.
6. Press 5 and repeat steps 3 through 5 for
another device or press and hold SETUP to exit
programming.
CHANGING VOLUME LOCK
The RadioShack 6-in-1 Easy Setup Voice Remote is
set at the factory for independent volume control of
each selected device.
However, you may change the Volume Lock setting
to Global Volume Lock so that a device’s volume will
be locked to one mode (e.g., to control TV volume
in all other modes).After that, if desired, you can
perform Individual Volume Unlock on a selected
device to set its volume control for independent
operation.
LOCKING VOLUME CONTROL TO ONE MODE
(GLOBAL VOLUME LOCK)
1. Press and hold SETUP until you hear the
programming menu, then press 6.
NOTE: If more than 15 seconds pass between key
presses, the remote says “Goodbye” and exits
programming.
2. At the prompt, press 1 to lock all volume
control to a single device.
3. At the prompt, press the device key (i.e., CBL/
SAT, AUX, TV, DVD, AUDIO, or VCR) to which you
want the volume controls locked. The remote
says “Success” and returns to the prompt for
step 2.
4. Press and hold BACK to exit programming.
Now, when you press VOLS, VOLT, or MUTE, the
selected device’s volume will be controlled,
regardless of the mode selected. For example, if you
lock the volume to the TV, the buttons listed above
will control the volume, even if the remote is in
CBL/SAT mode.
UNLOCKING VOLUME CONTROL FOR A
S
INGLE DEVICE (INDIVIDUAL VOLUME
UNLOCK)
1. Press and hold SETUP until you hear the
programming menu, then press 6.
NOTE: If more than 15 seconds pass between key
presses, the remote says “Goodbye” and exits
programming.
2. At the prompt, press 2 to unlock all volume
control for a single device.
3. At the prompt, press the device key (i.e., CBL/
SAT, AUX, TV, DVD, AUDIO, or VCR) for which you
want the volume controls unlocked. The
remote says “Success” and returns to the
prompt for step 2.
4. Press and hold BACK to exit programming.
Now, after you select a device that has volume
unlocked, pressing VOLS, VOLT, or MUTE will
control the device’s volume only in its own mode.

OWNER’S MANUAL
Reassigning Device Keys 11
UNLOCKING ALL VOLUME CONTROL (RESTORING
DEFAULT SETTING)
1. Press and hold SETUP until you hear the
programming menu, then press 6.
NOTE: If more than 15 seconds pass between key
presses, the remote says “Goodbye” and exits
programming.
2. At the prompt, press 3 to unlock all volume
contro l. The remote s ays “Success” and retu rns
to the prompt at the beginning of this step.
3. Press and hold BACK to exit programming.
Volume will again be independently controlled
according to its default states for all programmed
devices.
REASSIGNING DEVICE KEYS
The RadioShack 6-in-1 Easy Setup Voice Remote
can be set to control a second device. For example,
to control a TV, a cable box, and two DVD players,
you can reassign the unused AUD key to operate the
second DVD player. To reassign a device key:
1. Press and hold SETUP until you hear the
programming menu, then press 7.
NOTE: If more than 15 seconds pass between key
presses, the remote says “Goodbye” and exits
programming.
2. At the prompt, press a device key (i.e., CBL/
SAT, CD, TV, DVD, AUDIO, VCR) of the type you
want to move.
NOTE: Only one device can be assigned to an unused
device key at a time.
3. At the prompt, press the device key (i.e., CBL/
SAT, CD, TV, DVD, AUDIO, VCR) that will now be
used for the moved device. The remote says
“Success” and returns to the programming
menu. It will also announce the new mode for
the mode key.
4. Press 7 then repeat steps 2 and 3 for any other
devices you want to move or press and hold
BACK to exit programming.
RESETTING THE REMOTE
The RadioShack 6-in-1 Easy Setup Voice Remote
includes a Setup Code Reset program.You can use it
to restore all your programmed codes to factory
settings and delete all custom programming.
CLEARING CUSTOM SETTINGS (BASIC USER RESET)
IMPORTANT: Executing this program will erase
all custom settings for Macros, Learned Keys,
Reassigned Device Keys, Favorite Channels, and
Sleep and Volume Lock.
1. Press and hold SETUP until you hear the
programming menu, then press 8.
NOTE: If more than 15 seconds pass between key
presses, the remote says “Goodbye” and exits
programming.
2. At the prompt, press 1 to reset Macros,
Learned Keys, Reassigned Device Keys,
Favorite Channels, and Sleep and Volume Lock
to the default factory settings. The remote says
“Success” and returns to the programming
menu.
3. Press and hold BACK to exit programming.
CLEARING ALL CUSTOM PROGRAMMING
IMPORTANT: Executing this program will erase
all custom settings including device codes.
1. Press and hold SETUP until you hear the
programming menu, then press 8.
NOTE: If more than 15 seconds pass between key
presses, the remote says “Goodbye” and exits
programming.
2. At the prompt, press 2 to reset Macros,
Learned Keys, Reassigned Device Keys,
Favorite Channels, Sleep and Volume Lock,
and all device codes to the default factory
settings. The remote says “Success” and
returns to the programming menu.
3. Press and hold BACK to exit programming.
TROUBLESHOOTING
PROBLEM: The LED is flashing and the
remote is saying “Low batteries”.
SOLUTION: Replace batteries with four new
AAA alkaline batteries.
PROBLEM: The remote said “Goodbye” and
exited programming.
SOLUTION: Programming has ended due to
inactivity. Start programming
again and do not pause more than
15 seconds while performing
instructions.
PROBLEM: During programming, the LED
displayed a long flash.
SOLUTION: An invalid entry has occurred.
Check the keys to be pressed and
start program again.
PROBLEM: How do I stop programming?
SOLUTION: Press and hold SETUP until the
remote says “Goodbye”.
RADIOSHACK 6-IN-1 EASY SETUP VOICE REMOTE
12 Specifications
For more help, or if your issue is not listed, visit
www.radioshack.com or call 866-269-8705.
SPECIFICATIONS
Remote Power ..............................(4) AAA Batteries
Remote Dimensions
(H x W x D) ..............................9.01 x 2.68 x 1.19 in.
.................................... (228.79 x 68.15 x 30.13 mm)
Remote Weight (no batteries) ....... 5.6 oz (158.75 g)
NOTE: Specifications are typical. Individual units
might vary. Specifications are subject to change and
improvement without notice.
CARE
• Keep the remote dry. If the remote gets wet,
wipe it dry immediately.
• Handle the remote gently and carefully. Don't
drop it.
• Use and store the remote only in normal
temperature environments.
• Keep the remote away from dust and dirt.
• Wipe the remote with a damp cloth to keep it
looking new.
• Modifying or tampering with internal parts
can cause damage and invalidate the warranty.
If your remote is not performing as it should,
please contact us at:
www.radioshack.com
or visit your local RadioShack store for help.
PROBLEM: The unit does not control home
entertainment devices or
commands are not working
properly.
SOLUTION: Try all listed codes for the device
brands being set up. Make sure
they can be operated with an
infrared remote control.
PROBLEM: Tried Searching For Your Code
method and still could not find a
working code.
SOLUTION: Perform Restoring Factory Default
Settings on page 11. Then repeat
Searching For Your Code on page
7.
PROBLEM: Cannot program a macro onto M1
– M2 or POWER keys.
SOLUTION: Make sure the total number of key
presses being programmed for
each macro is less than 15.
PROBLEM: Power macro does not execute.
SOLUTION: Press and hold POWER for more
than 2 seconds.
PROBLEM: Favorite channel function does
not work properly.
SOLUTION: Some devices (e.g.,Cable Boxes or
Satellite Receivers) use two-digit
channel numbers. During
programming, press ENTER or OK
once after entering a channel
number (e.g., 0 2 ENTER for
channel 2). See Programming
Favorite Channel Scan on page 7.
PROBLEM: Changing channels does not work
properly.
SOLUTION: If the original remote control
required pressing ENTER to
change channels, then press
ENTER on the remote control after
entering channel numbers.
PROBLEM: No remote control of volume.
SOLUTION: See Changing Volume Lock on
page 7 to lock/unlock volume.
PROBLEM: LED flashes when a key is
pressed, but home entertainment
device does not respond.
SOLUTION: Make sure the remote control is
aimed at your home
entertainment device and is not
farther than 15 feet away.
PROBLEM: CHS and CHTdo not work for
your RCA TV.
SOLUTION: Due to RCA design (1983-1987),
only the original remote control
will operate these functions.

OWNER’S MANUAL
Additional Information 13
ADDITIONAL INFORMATION
© 2004 Universal Electronics.No part of this
publication may be reproduced, transmitted,
transcribed, stored in any retrieval system, or
translated to any language, in any form or by any
means, electronic, mechanical, magnetic, optical,
manual, or otherwise, without the prior written
permission of Universal Electronics.
© 2004 RadioShack Corporation. All Rights
Reserved.RadioShack and RadioShack.com are
trademarks used by RadioShack Corporation.
The RadioShack 6-in-1 Easy Setup Voice Remote is
compatible for use in North America. This product
uses technologies licensed under one or more of the
following U.S. patents: 6,587,067; 6,496,135;
5,515,052, 6,014,092; 6,195,033; 5,959,751;
6,587,067; 5,481,256; 6,330,09; 6,097,309,
6,522,262, and patents pending.
M6135
FCC COMPLIANCE
This equipment has been tested and found to
comply with the limits for a class B digital device,
pursuant to part 15 of the FCC Rules.These limits
are designed to provide a reasonable protection
against harmful interference in a residential
installation.This equipment generates, uses, and
can radiated radio frequency energy and if not
installed and used in accordance with the
instructions, may cause harmful interference to
radio communications.
However, there is no guarantee that interference will
not occur in a particular installation. If this
equipment does cause harmful interference to radio
or television reception, which can be determined by
turning the equipment off and on, the user is
encouraged to try to correct the interference by one
or more of the following measures:
• Reorient or relocate the receiving antenna.
• Increase the separation between the
equipment and receiver.
• Connect the equipment into an outlet or a
circuit different from that to which the receiver
is connected.
• Consult the dealer or an experienced radio/TV
technician for help
LIMITED 90-DAY WARRANTY
This product is warranted by RadioShack against
manufacturing defects in material and
workmanship under normal use for ninety (90)
days from the date of purchase from RadioShack
company-owned stores and authorized RadioShack
franchisees and dealers.
EXCEPT AS PROVIDED HEREIN, RadioShack
MAKES NO EXPRESS WARRANTIES AND ANY
IMPLIED WARRANTIES, INCLUDING THOSE OF
MERCHANTABILITY AND FITNESS FOR A
PARTICULAR PURPOSE, ARE LIMITED IN
DURATION TO THE DURATION OF THE
WRITTEN LIMITED WARRANTIES CONTAINED
HEREIN. EXCEPT AS PROVIDED HEREIN,
RadioShack SHALL HAVE NO LIABILITY OR
RESPONSIBILITY TO CUSTOMER OR ANY
OTHER PERSON OR ENTITY WITH RESPECT TO
ANY LIABILITY, LOSS OR DAMAGE CAUSED
DIRECTLY OR INDIRECTLY BY USE OR
PERFORMANCE OF THE PRODUCT OR ARISING
OUT OF ANY BREACH OF THIS WARRANTY,
INCLUDING, BUT NOT LIMITED TO, ANY
DAMAGES RESULTING FROM INCONVENIENCE,
LOSS OF TIME, DATA, PROPERTY, REVENUE, OR
PROFIT OR ANY INDIRECT, SPECIAL,
INCIDENTAL, OR CONSEQUENTIAL DAMAGES,
EVEN IF RadioShack HAS BEEN ADVISED OF THE
POSSIBILITY OF SUCH DAMAGES.
Some states do not allow limitations on how long an
implied warranty lasts or the exclusion or limitation
of incidental or consequential damages, so the
above limitations or exclusions may not apply to
you.
In the event of a product defect during the warranty
period, take the product and the RadioShack sales
receipt as proof of purchase date to any RadioShack
store. RadioShack will, at its option, unless
otherwise provided by law: (a) correct the defect by
product repair without charge for parts and labor;
(b) replace the product with one of the same or
similar design; or (c) refund the purchase price.
All replaced parts and products, and products on
which a refund is made, become the property of
RadioShack.New or reconditioned parts and
products may be used in the performance of
warranty service. Repaired or replaced parts and
products are warranted for the remainder of the
original warranty period.You will be charged for
repair or replacement of the product made after the
expiration of the warranty period.
This warranty does not cover: (a) damage or failure
caused by or attributable to acts of God, abuse,
accident, misuse, improper or abnormal usage,
failure to follow instructions, improper installation
or maintenance, alteration, lightning or other
incidence of excess voltage or current; (b) any
 Loading...