

Page 1
12-519
User’s Guide
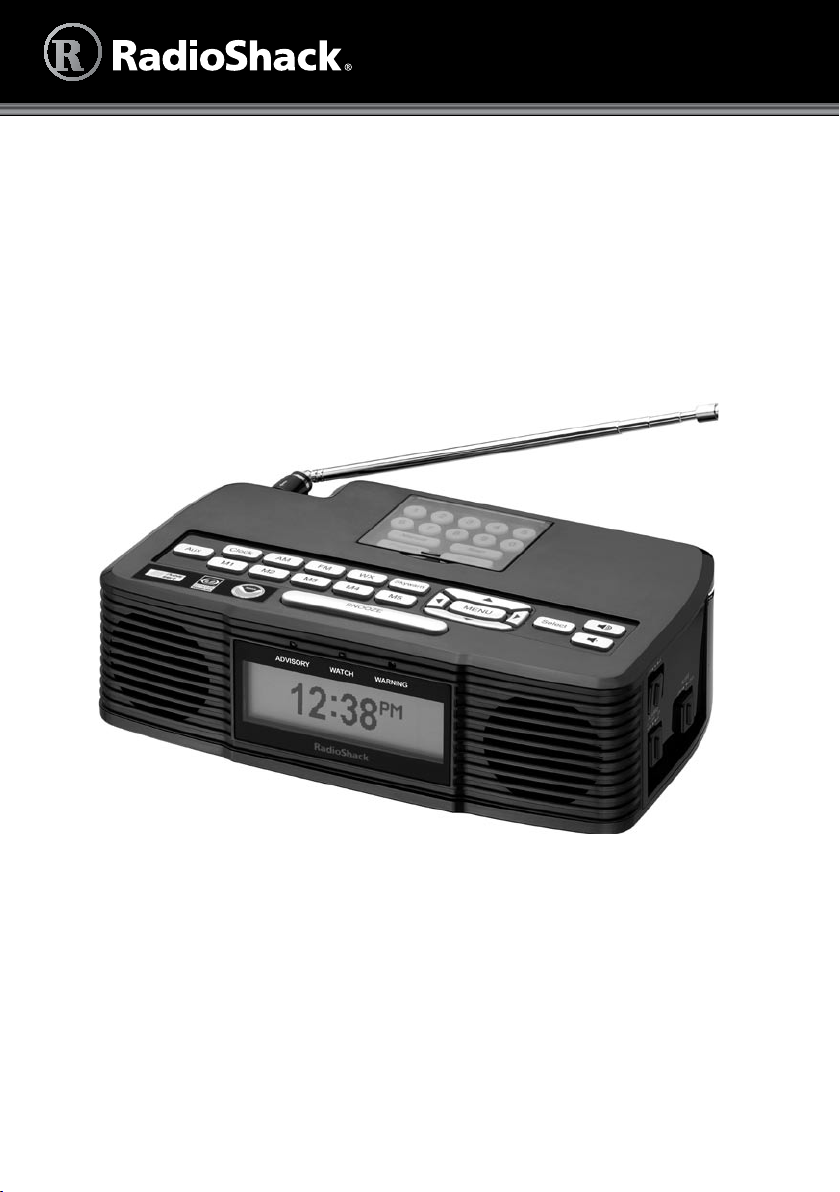
All-Hazards Weather Alert Clock Radio with Skywarn
Thank you for purchasing your All-Hazards Weather Alert Clock Radio with
Skywarn from RadioShack. Please read this user’s guide before installing, setting
up, and using your new weather radio.
Page 2

2
Contents
Package Contents ........................................................................................................3
Features .........................................................................................................................3
Contents
Setup .................................................................................................................. 4
Understanding Your Radio ............................................................................................ 4
Power your Radio .......................................................................................................... 6
Install Backup Batteries .............................................................................................6
Use the Antenna ............................................................................................................ 7
Basic Operation ..................................................................................................8
Set the Clock ................................................................................................................. 8
Set the Alarm................................................................................................................. 8
When the Alarm Sounds ........................................................................................... 8
Using the Radio ............................................................................................................. 8
Set Radio Station Memory ........................................................................................ 9
Using the Weather Radio ......................................................................................... 9
Set Weather Channel Memory ..................................................................................9
Viewing Weather Alerts .......................................................................................... 10
Receiving Alerts for Specific Areas ......................................................................... 10
Using Skywarn ............................................................................................................. 10
Programming Skywarn Channels into Memory ......................................................11
Advanced Operation ........................................................................................12
Changing Radio Settings ............................................................................................12
Turning Audible Alerts ON or OFF ............................................................................. 15
Connecting an External Alert ...................................................................................... 15
Restoring Factory Default Settings .............................................................................15
Additional Information ..................................................................................... 16
NWS Alert Descriptions ..............................................................................................16
Frequently Asked Questions (FAQs) ........................................................................... 19
Specifications............................................................................................................... 22
Care ............................................................................................................................. 22
Service and Repair .......................................................................................................22
FCC Information .......................................................................................................... 23
Limited Warranty ......................................................................................................... 24
Page 3

Package Contents
• Radio • AC Adapter
• BNC-to-Phono Adapter
• User’s Guide • Quick Start
Features
• Multifunctional design: alarm clock, radio, and weather radio
• Receive FM, AM, seven NOAA weather channels, and Skywarn reports.
• Digital SAME technology.
• Programmed with all U.S. states and counties.
• Sixteen alert volume levels.
• Separate daytime and night time alert volume settings.
• Different color LEDs indicate if the alert is a warning (red), watch (orange), or
advisory (yellow).
• Alert reminder lets you know if you’ve missed an incoming transmission.
• Alert notifications display as text and can sound as tone or tone with voice.
• Auxiliary input enables you to play an MP3 player or other device through
the radio speakers.
• Dual alarm clock can be set for two people to wake up at different times.
• Choose an alarm to wake you up: FM, AM, or alarm tone.
• Battery indicators.
• 60-hour battery backup.
• Recharges Ni-MH rechargeable batteries.
• Bilingual display: English or Spanish.
3
Page 4
4
Setup
Setup
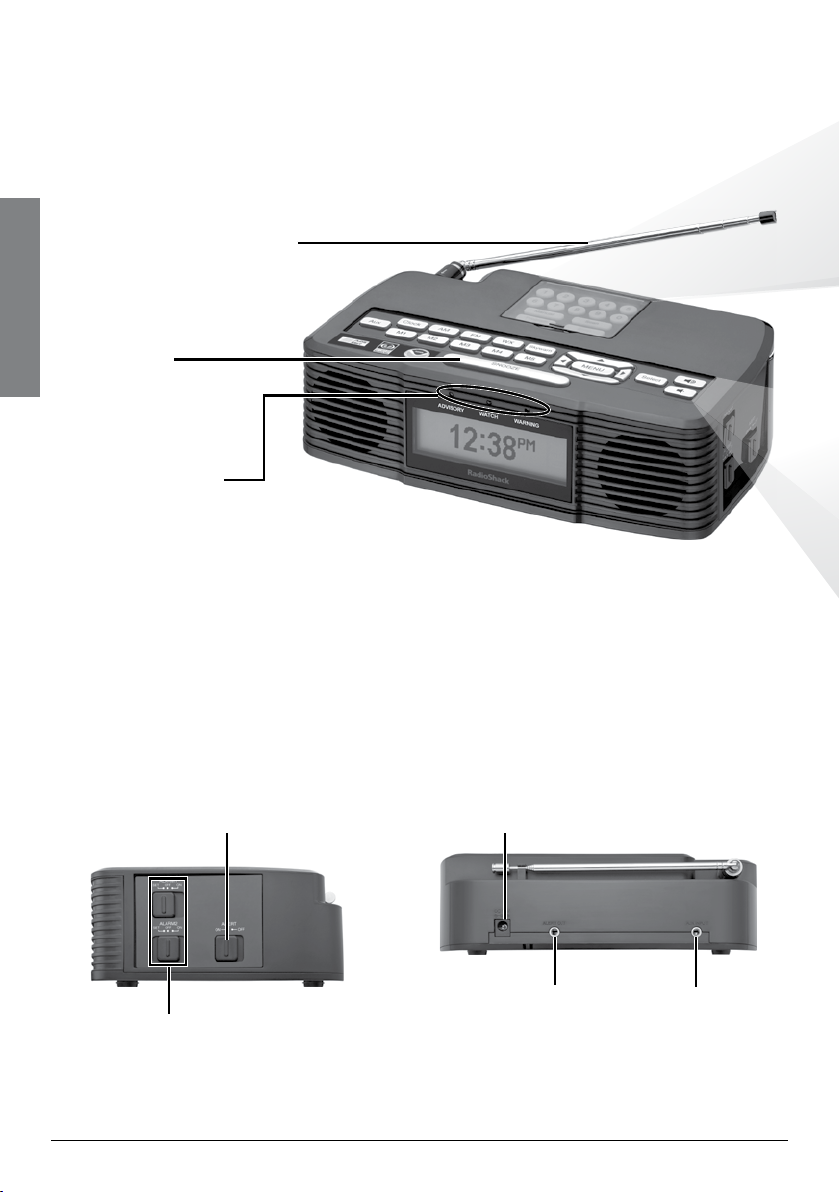
Understanding Your Radio
Telescopic Antenna
Adjust to receive best
signal reception.
SNOOZE
Pause the alarm
for 15 minutes.
Alert Indicators
ADVISORY/WATCH/WARNING
• Flashes for 60 seconds when the alert
begins, then lights for the duration of
the aler
• Alternating flashes indicate loss of
weather signal.
t.
Right Panel Back Panel
ALERT ON/OFF
Turn audible alerts
on or off.
ALARM1 SET/ON/OFF,
ALARM2 SET/ON/OFF
Turn the alarm on /off or set
alarm.
DC 12V
Connect the AC adapter.
ALERT OUT
Connect to a
compatible external
alert device with a
3.5mm phono plug.
AUX INPUT
Connect to an
external audio
source.
Page 5
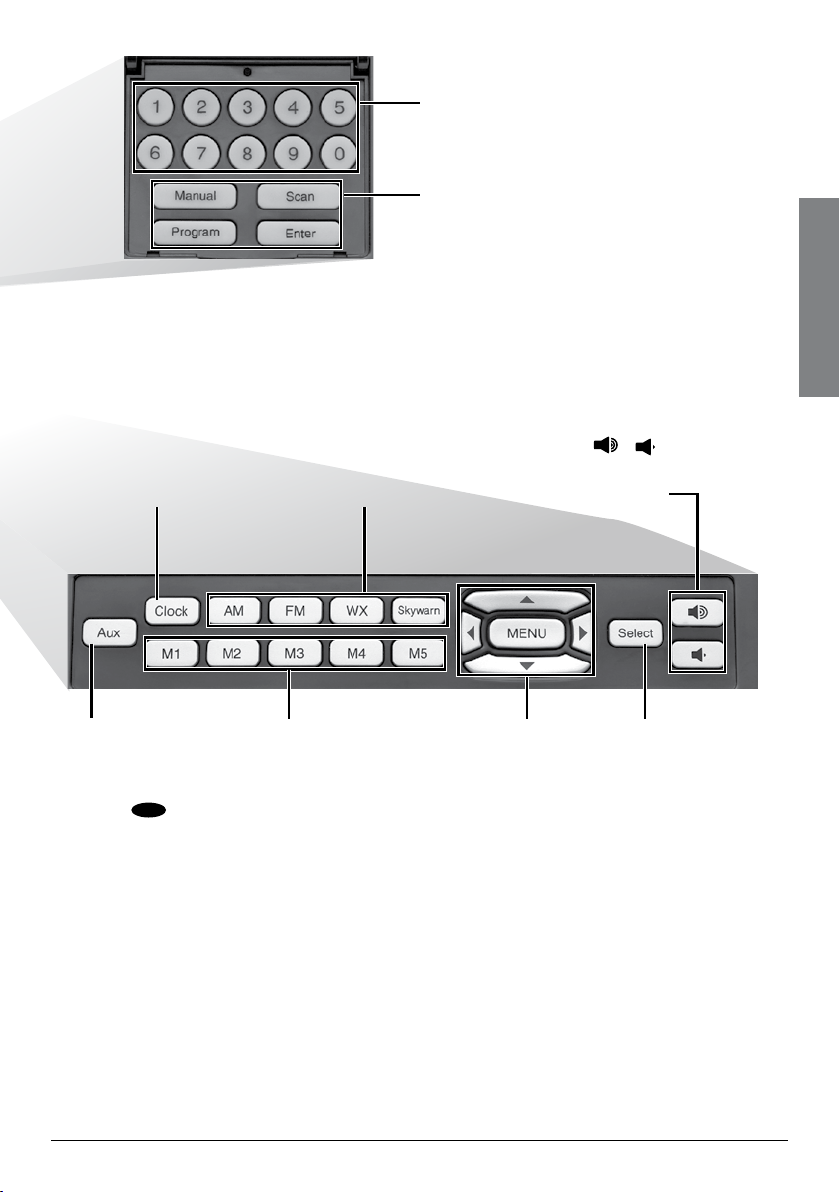
Number Buttons
Enter FIPS code or Skywarn channel
frequency.
Manual/Scan/Program/Enter
Refer to “Using Skywarn” on page 10.
Setup
CLOCK
Press and hold
to set the clock.
AUX
Listen to an
external audio
source.
appears.
AUX
FM/AM/ WX
SKYWARN
Select a band.
M1 – M5
Radio station
memory
locations.
Menu and
,,,
• Set time and
choose radio
stations.
• Navigate and
adjust menu
items.
/
Increase /decrease
volume.
SELECT
Confirm
settings.
n Note: The power source must supply 12V DC and deliver at least 400mA. Its
center tip must be set to positive and its plug must fit the DC 12V jack. Using
an adapter that does not meet these specifications could damage the radio or
adapter.
5
Page 6
6
Power your Radio
Connect the supplied AC adapter to the DC 12 V jack and plug in to a
standard household outlet.
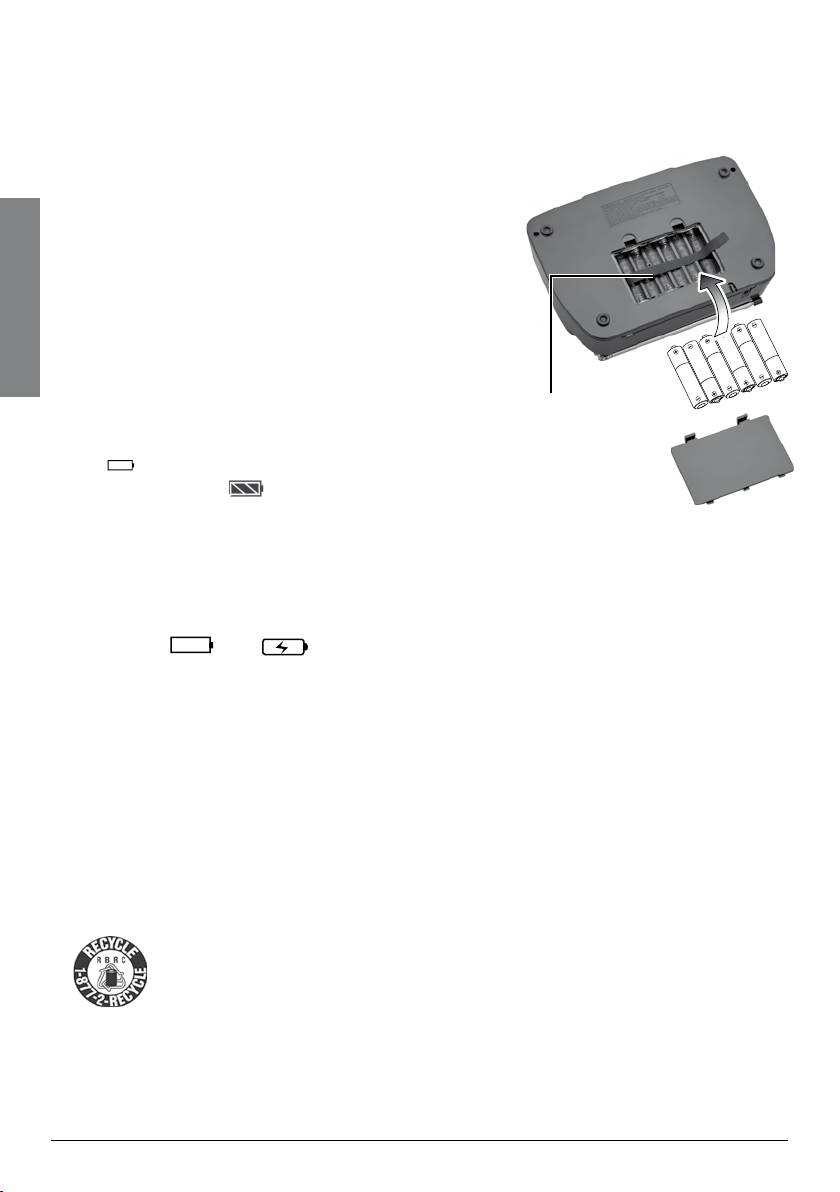
Install Backup Batteries
1. Open the battery compartment cover.
2. Slide the RCH/ALK switch to RCH for
rechargeable or ALK for alkaline backup
batteries.
Setup
3. Install six AA alkaline or Ni-MH rechargeable
batteries (neither supplied). Insert batteries
as indicated by the polarity symbols (+ and –)
marked inside.
n Notes:
•
• If the radio’s power supply is switched from AC to battery operation, the
flashes when the rechargeable batteries
are charging, will appear when charging is
finished. Charging can take up to 30 hours.
three alert LEDs will blink for 3 minutes.
b Battery Notes:
• When
• Use only fresh batteries of the required size and type.
• Dispose of old batteries promptly and properly. Do not burn or bury them.
• Do not mix old and new batteries, different types of batteries (standard,
alkaline, or rechargeable), or rechargeable batteries of different capacities.
• If you do not plan to use your radio for a long period, remove the batteries.
Batteries can leak chemicals that may damage electronic parts.
or
displays, replace the batteries.
RCH/ALK
Recycle Rechargeable Batteries
Placing rechargeable batteries in the trash can be harmful to the environment. Instead,
recycle old rechargeable batteries at your local RadioShack store free of charge.
preserving the environment and conserving natural resources. Call 1-800-THE-SHACK (1-800-843-
7422) for more information.
RadioShack participates in the RBRC© battery recycling program, and is committed to
Page 7

Use the Antenna
Telescopic Antenna
External Antenna
For better reception, you can install an external antenna to your radio.
1. Pull out the installed telescopic antenna.
Basic Operation
2. If needed, connect the supplied BNC-to-phono adapter to the phono/RCA
plug from your antenna.
3. Connect the external antenna (Follow the installation instructions that came
with your external antenna.)
BNC-to-Phono Adapter
Phono/RCA plug
7
Page 8

8
Basic Operation
Basic Operation
Set the Clock
1. If necessary, press CLOCK to switch to clock
mode.
2. Briefly hold CLOCK until the hour digits flash.
3. Use
4. After setting clock , press
Set the Alarm
1. Slide ALARM 1 or ALARM 2 to SET.
2. Press ,,, to set the alarm hour, minute, and alarm source (buzzer
3. After setting the alarm, slide
4. To turn the alarm on, slide
When the Alarm Sounds
• The alarm will sound for 2 hours at the set time.
• To pause the alarm for 15 minutes, press
• When the alarm time expires, the alarm will sound again the next day at the
,,, to set the hour, minute and AM/PM.
CLOCK or SELECT to confirm and exit.
loudness / / or FM / AM).
ALARM 1 or ALARM 2 to ON/OFF to confirm
and exit.
ALARM 1 / ALARM 2 to ON. To turn it off, slide
ALARM 1 / ALARM 2 to OFF.
SNOOZE.
same time.
n Note: The radio automatically exits setting mode if you do not press any
button for 15 seconds while setting the alarm or clock.
Using the Radio
Press AM or FM to enter radio mode.
Manual Scan – Press or to find a station.
Auto Scan – Briefly hold or until the channels start to change rapidly. The
radio automatically stops when it finds a station. If no station is found, the radio
will continue scanning.
Page 9

Set Radio Station Memory
1. Press AM or FM to toggle between AM1, AM2,
FM1 or FM2. The selected band indicator
appears on the left side of the display.
2. Press or to find a station.
3. Briefly hold a memory button (M1–M5) until the selected memory indicator
(M1–M5) appears on the right side of the display.
You can store up to five channels each for
4. To listen to a preset station, press
AM2, FM1 or FM2, then press one of memory buttons M1–M5.
AM or FM to toggle between AM1,
AM1, AM2, FM1, and FM2.
Using the Weather Radio
Press WX to listen to the weather radio. The radio will select the last channel
used.
Manual Scan – Press WX, then press or .
Auto Scan – Press WX and then briefly hold
or until the channels start to change. The
radio stops when it finds the channel with strongest
signal strength.
n Notes:
•
All seven NOAA weather channels are preprogrammed on your radio. If the
radio cannot find a signal, it will keep scanning.
• If the weather signal is lost, WARNING and ADVISORY alert indicators
flash alternately, and WATCH indicator lights.
• If you are having trouble finding a weather signal, try adjusting the antenna
or moving the radio to a different location. You may need to install an
external antenna. See “External Antenna” on page 7.
• If the radio has not received a SAME alert signal (including test or demo
signals) for 10 days or longer, a warning message will scroll on the display:
“10 days have lapsed since last message received. Check
reception.” See “How do I test my radio?” on page 20.
Basic Operation
9
Page 10

10
Basic Operation
Set Weather Channel Memory
While the radio is on the desired channel, press and hold M1 to M5 until
the selected memory indicator (M1–M5) is displayed. You can store up to five
channels.
To listen to a channel from memory, press
mode.
M1–M5 while in weather radio
Viewing Weather Alerts
You can view the last four different weather alerts received by the radio. When
an alert is received, the alert description scrolls across the display. If multiple
alerts are received, press or to view them in order. The first description is
always the newest and descriptions are shown in chronological order. Example:
1) Flash Flood Watch 0:15
2) Hurricane Watch 1:15
Receiving Alerts for Specific Areas
When an emergency event happens, the National Weather Service (NWS)
broadcasts a SAME code indicating the affected region along with the alert
signal. You can program your weather radio to alert you for events in up to ten
regions.
1. Press MENU, then press or to scroll to SAME Code.
2. Press or to select Mul tip le. Press SELECT.
3. Press
4. Press
5. Press or to choose your state and press SELECT.
6. Press
7. Press
8. Press
9. Repeat steps 4 – 8 to program additional locations.
SELECT to choose Location #1.
SELECT to choose Edit By Name.
or to choose your county and press SELECT.
MENU to return to the location menu.
to go to Location #2.
n Notes:
• If you want to program only one location, choose
• For more information see “
and SAME signals?” on page 19.
SAME Code” on page 13 and “What are FIPS codes
Single at step 2.
Page 11

Skywarn
About Skywarn
Many areas of the country have amateur radio repeaters that have been
designated as “Skywarn” repeaters. During times of severe weather, these
repeaters are used to relay reports of severe weather directly to meteorologists
at a local National Weather Service forecast office. Using the Skywarn feature
in your radio, you can easily jump to your local Skywarn frequency and monitor
these reports, in many cases hearing about severe weather in your area
instantly as it occurs.
n Note: If you tune to a Skywarn frequency when the Skywarn net is not
active, you may hear nothing, or you may hear amateur radio operators talking
on a local repeater system.
Programming Skywarn Channels into Memory
Before using the Skywarn function, you must
store Skywarn channels into the memory.
Visit RadioReference.com to find the Skywarn
frequencies used in your area. You can store up to
20 Skywarn frequencies into memory.
Skywarn to enter the Skywarn mode, the radio will select the last channel
Press
used.
1. Press Program and use or to scroll to the desired channel number
(1-20).
2. Use the number keys to enter a 6-digit frequency.
3. Press
Enter to confirm.
Basic Operation
Using Skywarn
To listen to a stored channel:
Manual and use or to find desired channel. Press Enter to confirm.
Press
Or, press Scan to auto scan the stored Skywarn channels.
11
Page 12

12
Advanced Operation
Advanced Operation
Changing Radio Settings
1. Press MENU then press or to scroll through the features menu. A feature
and one of its options appears.
2. Press or to view the feature’s
options.
3. Press
4.
Press MENU to exit or return to a
Select
Channel
Alert Mode • Tone – when an alert is received, an alert tone will sound
Alert
Reminder
SELECT at the feature you want.
An asterisk (*) appears next to the
selected feature.
previous level.
Feature Options
• Auto – the radio will scan for the best weather channel
(strongest signal strength) automatically after power on.
• Manual – the radio will return to the current weather
radio channel after power on.
for 5 minutes. Pressing any key stops the alert.
• Voice – when an alert is received, an alert tone will
sound for 10 seconds, then an audio broadcast for 5
minutes.
If no key is pressed when the radio receives an alert, the
radio will sound a reminder message every 30 seconds until
the effective alert time expires.
•
On – turns on the alert reminder.
• Off – turns off the alert reminder.
Feature
Feature option
Page 13

Feature Options
Signal
Reminder
When a weather channel is not detected and there is no key
pressed, the radio will sound a reminder message.
• On – turns on the signal reminder.
• Off – turns off the signal reminder.
When the signal reminder sounds, you can press any button
to mute it.
n Notes:
• If the signal is lost, WARNING and ADVISORY alert
indicators flash alternately, and WATCH indicator lights.
• Press any button to mute signal loss reminder alert. If a
signal is detected but lost within 10 minutes, then the
reminder won’t sound.
SAME Code You can set your weather radio to alert for events affecting
all regions, a single region, or multiple regions.
•
All – the radio will alert for all regions within the
broadcast area.
• Single – the radio will alert only for Location 1.
• Edit By Name – select your state and county.
• Edit By FIPS – use number button to key in 6-digit
FIPS code.
• Delete? – clear current memory location.
•
Multiple – the radio will alert for events in any of the
programmed regions.
• Edit By Name – select your state and county.
• Edit By FIPS – use number button to key in 6-digit
FIPS code.
• Delete? – clear current memory location.
Advanced Operation
n Notes:
• For more information see “Receiving Alerts for Specific
Areas” on page 10 and “What are FIPS codes and SAME
signals?” on page 19.
• When you key in FIPS code, you can press or to
select the digit you want to change.
13
Page 14

14
Advanced Operation
Feature Options
Set Alert You can turn off audio alert for specific alert events.
Press
or to scroll through the events and press SELECT
to turn the alert tone on or off. See “NWS Alert Descriptions” on
page 16 for a list of alert events.
n Note: Some events cannot be turned off.
Set
Language
Alert Vol-Day
Alert VolNight
Backlight Select from three brightness levels: High, Mid, or Low
Select either English or Spanish.
• Press or to adjust volume level for the hours
between 6 AM to 10 PM. *
• Press or to adjust volume level for the hours
between 10 PM to 6 AM.*
n Note: If the radio is powered by the AC adapter, the
backlight will stay on all the time. But if radio is powered
by battery, the backlight will turn off automatically after 10
seconds.
* n Note: To avoid missing alerts, always set the volume level at maximum
volume.
Page 15

Turning Audible Alerts On or Off
• To enable audible alerts, slide ALERT ON/OFF to ON.
• To disable audible alerts, slide
ALERT ON/OFF to OFF.
n Notes:
• You must slide
or the change will not take effect. This prevents accidentally switching off
alerts.
• Even if you’ve turned off audible alerts, the backlight will still light up and
the event message will scroll on the display until the effective time expires.
ALERT ON/OFF to OFF while your radio is powered on,
Connecting an External Alert
Connect a compatible external alerting device such as a pillow shaker or a
flasher to the ALERT OUT jack. The external device can be up to 200mA with a
3.5mm phono plug (not supplied).
Your radio passes alerts to the external device.
when the alert period ends or is manually reset by pressing SNOOZE.
The alert turns off automatically
Restoring Factory Default Settings
1. Unplug the AC adapter and remove the backup batteries.
2. While holding down MENU, plug the AC adapter into an outlet. Keep
holding MENU until “Reset to default Completed” is shown on the
display.
3. Unplug and then plug in the AC adapter again and install batteries.
Advanced Operation
15
Page 16

16
Advanced OperationAdditional Info
Additional Information
NWS Alert Descriptions
Event Code Level Default
Administrative message
Avalanche Watch Watch On
Avalanche Warning
Biological Hazard Warning Warning On*
Boil Water Warning
Blizzard Warning Warning On
Child Abduction Emergency
Civil Danger Warning Warning On*
Civil Emergency Message
Coastal Flood Watch
Coastal Flood Warning Warning On
Chemical Hazard Warning
Contaminated Water Warning Warning On*
Dam Watch
Dam Break Warning Warning On*
Contagious Disease Warning
Practice/Demo Advisory Off
Dust Storm Warning
Emergency Action Notification
Emergency Action Termination Advisory On*
Earthquake Warning
Immediate Evacuation Warning On*
Evacuation Watch
Food Contamination Warning Warning On*
Flash Flood Watch
Flash Flood Statement Advisory On
Flash Flood Warning
Flood Watch Watch On
Flood Statement
Advisory Off
Warning On
Warning On
Advisory On
Warning On*
Watch On
Warning On*
Watch On
Warning On*
Warning On
Warning On*
Warning On*
Watch On
Watch On
Warning On
Advisory On
Page 17

Event Code Level Default
Flood Warning Warning On
Fire Warning
Warning On
Flash Freeze Warning Warning On
Freeze Warning
Warning On
Hurricane Statement Advisory On
Hazardous Materials Warning
Warning On*
Hurricane Watch Watch On
Hurricane Warning
Warning On*
High Wind Watch Watch On
High Wind Warning
Warning On
Iceberg Warning Warning On
Industrial Fire Warning
Local Area Emergency
Warning On*
Advisory On*
Law Enforcement Warning Warning On*
Land Slide Warning
Warning On*
National Audible Test Advisory Off
National Information Center
Advisory Off
Network Notification Message Advisory Off
National Periodic Test
Advisory Off
National Silent Test Advisory Off
Nuclear Power Plant Warning
Power Outage Advisory
Warning On*
Advisory On
Radiological Hazard Warning Warning On*
Required Monthly Test
Required Weekly Test Advisory Off
Advisory Off
†
Special Marine Warning Warning On
Special Weather Statement Advisory On
Shelter In-Place Warning
Warning On*
Severe Thunderstorm Watch Watch On
Severe Thunderstorm Warning
Warning On
Severe Weather Statement Advisory On
Tornado Watch
Watch On
Advanced OperationAdditional Info
17
Page 18

18
Advanced OperationAdditional Info
Event Code Level Default
911 Telephone Outage Emergency Advisory On
Tornado Warning
Tropical Storm Watch Watch On
Tropical Storm Warning
Tsunami Watch Watch On*
Tsunami Warning
Transmitter Backup On Advisory Off
Transmitter Carrier Off
Transmitter Carrier On Advisory Off
Transmitter Primary On
Volcano Warning Warning On*
Wild Fire Watch
Wild Fire Warning
Winter Storm Watch Watch On
Winter Storm Warning
Unrecognized Watch Watch On
Unrecognized Emergency
Unrecognized Statement Advisory On
Unrecognized Warning
Warning On*
Warning On*
Warning On*
Advisory Off
Advisory Off
Watch On
Warning On*
Warning On
Advisory On
Warning On*
n Notes:
* Alert is enabled permanently and cannot be selected or disabled.
† Test alerts you can use to ensure your local broadcasts are being
received.
Page 19

Frequently Asked Questions (FAQs)
What are FIPS codes and SAME signals?
The National Weather Service (NWS) precedes each weather alert with a
digitally encoded
Hz tone. The SAME signal includes a FIPS (Federal Information Processing
Standard) code and an event code that corresponds with the type of alert
being sent.
The FIPS code format is:
Subdivisions State County
0-9
(0=entire area)
(0=All; 48=Texas; 439=Tarrant County)
To obtain the FIPS codes for your area, contact your local RadioShack store or
call the NWS toll free at 1-888-NWR-SAME (1-888-697-7263). You can also visit
the NWS website: www.nws.noaa.gov/nwr/indexnw.htm.
n Note: Your weather radio comes pre-programmed with FIPS codes sorted
by state and county. Do not change your FIPS code unless you have confirmed
with the NWS. See “Receiving Alerts for Specific Areas” on page 10 for more
information.
SAME (Specific Area Message Encoding) signal, then a 1050
01-50
(00=all states)
Example: 048439
XXX
(000=all counties)
Advanced OperationAdditional Info
What is an alert?
Your radio is preset to receive warnings, watches, and advisories from the
NWS. When an alert is received, a voice or tone alert sounds, and the alert
description and duration appear on the display. Alert descriptions are based
on a list of specific weather alert types published by NWS. For a list of alert
descriptions displayed on your Weather Alert Radio, refer to “
Descriptions” on page 16-18.
NWS Alert
n Note: If severe weather is imminent, do not wait for an alert tone.
What are undefined or unrecognized alerts?
The NWS occasionally broadcasts weather information intended for
commercial or other non-public use, or creates and broadcasts new alert
types. If a signal for a new alert type is received and the alert is turned on,
UNRECOGNIZED and the alert description (warning, watch, or advisory)
displays.
19
Page 20

20
Advanced OperationAdditional Info
How do I test my radio?
The NWS broadcast test alerts every week on Wednesday between 11 AM
and 1 PM. To find out the specific test schedule in your area, contact your
local NOAA (National Oceanic and Atmospheric Administration) or the NWS
(National Weather Service). These offices are listed in most telephone books
or online at
your alert settings see “Set Alerts” on page 14.
www.nws.noaa.gov. These test alerts are off by default. To change
w Important: Clear reception of a weather broadcast signal does not
guarantee an emergency alert will trigger your radio’s alert function. The alert
function will only be triggered by an emergency alert when you program the
weather radio with the FIPS code for your area.
Multiple FIPS codes are stored, but why does the radio only respond to
alerts for one area?
Make sure your radio is set to
13.
Why is there no weather broadcast when I press WX?
• Make sure the telescoping antenna is fully extended.
• Make sure the radio is set to the weather channel broadcast in your area.
See “
Select Channel” on page 12
What is the difference between a watch and a warning?
• A watch alerts you to potential severe weather approaching your area. It
doesn’t mean severe weather will occur, but that the right conditions exist
which could lead to severe storms. You should be prepared for deteriorating
weather.
• A warning states the severe weather is imminent or present in your vicinity.
You should immediately take precautions to protect yourself and your
family.
How can I adapt my weather alert radio for special needs?
You can use your weather alert radio with a universal interface or modules that
trigger a siren and/or flash lights when an alert is received. See
External Alert” on page 15 for more information.
MULTIPLE mode. See “SAME Code” on page
“Connecting an
Page 21

Why can’t I receive the test signal from NOAA?
By default your weather alert radio does not receive test alerts. For information
about turning on test alerts, see “
When programming alerts, keep in mind that although NOAA is a national
organization, test alerts are sent locally. Some local services send test signals
out once a month instead of once a week. Other local services do not send out
any test alerts other than seasonal alerts (hurricane, tornado, etc.). Check with
your local weather service to find out their testing frequency.
If you are on the right frequency and a signal was sent, you might need to try a
different location for the radio, such as near a window and away from any other
audio equipment, or you may need an external antenna.
Should the radio pick up a weather broadcast all of the time?
The weather service broadcasts constantly. If you cannot pick up any weather
broadcasts, check the NWS website at
on the right frequency.
If you ar
weather radio. If you are in a metal building or in a weak signal area, you may
need to use an external antenna. See “Connect Antenna” on page 7 for more
information.
e on the correct frequency and do not get a signal, try moving your
Set Alerts” on page 14.
www.nws.noaa.gov to be sure you are
What is SKYWARN?
SKYWARN is a nationwide program, sponsored by the National Weather
Service, which consists of specifically trained volunteers by the NWS to observe
and report on developing or occurring severe weather.
How do I know the Skywarn channels available in my area?
You can check the Skywarn channels available at your area online at
www.radioreference.com.
Why is the radio silent when I turn on the Skywarn mode?
A muting function is implemented for Skywarn operation to avoid excessive
noise to be heard. When no signal is available at the Skywarn frequency
selected, nothing will be heard.
How do I charge the batteries?
To charge the rechargeable batteries, the unit should be powered by AC
Adapter and the
switched to RCH. Please note that RCH must NOT be selected when alkaline
batteries are used.
RCH/ALK switch inside the battery compartment should be
21
Advanced OperationAdditional Info
Page 22

22
Advanced OperationAdditional Info
Specifications
Weather Radio Bands
Channel 1 ................................................................................................................................162.400 MHz
Channel 2 ................................................................................................................................162.425 MHz
Channel 3 ................................................................................................................................162.450 MHz
Channel 4 ................................................................................................................................162.475 MHz
Channel 5 ................................................................................................................................162.500 MHz
Channel 6 ................................................................................................................................162.525 MHz
Channel 7 ................................................................................................................................162.550 MHz
Skywarn Bands
VHF Band ...............................................................................................................144.390 – 148.000 MHz
UHF Band ...............................................................................................................441.000 – 452.000 MHz
Radio Frequency Range
AM Band ............................................................................................................530 – 1710 kHz
FM Band ........................................................................................................ 87.5 – 108.1 MHz
Receiver Sensitivity
Weather Radio Band .........................................................................................................................0.3 µV
Skywarn Band ......................................................................................................................... ………0.3 uV
AM Band ..................................................................................................................................... 2200 uV/m
FM Band ................................................................................................................................................ 6 uV
FIPS codes sensitivity ........................................................................................................................0.3 µV
Others
Audio Output Power ................................................................................................................2 x 200 mW
Dimensions (W×H×D) .............................................................8.7
Weight (without batteries) ...................................................................................................1.3 lbs (600 g)
Power Requirement
AC Adapter ............................................................................................ DC12V, 400mA (Center positive)
Batteries ...............................................................................................................................6 AA Batteries
Specifications above show the typical values. Specifications are subject to change and
improvement without notice. Actual product may vary from the images found in this
document.
x
2.6 x 5.8 inches (220 x 66 x 147 mm)
Care
Keep the dry. If it gets wet, wipe it dry immediately. Use and store the radio
only in normal temperature environments. Handle the radio carefully; do not
drop it. Keep the radio away from dust and dirt, and wipe it with a damp cloth
occasionally to keep it looking new.
Service and Repair
If your radio is not performing as it should, take it to your local RadioShack
store for assistance. To locate your nearest RadioShack, use the store locator
feature at www.radioshack.com, or call 1-800-The Shack (1-800-843-7422)
and follow the menu options. Modifying or tampering with the radio internal
Page 23

components can cause a malfunction and might invalidate its warranty and void
your FCC authorization to operate it.
FCC Information
This equipment has been tested and found to comply with the limits for a Class B
digital device, pursuant to Part 15 of the FCC Rules. These limits are designed to
provide reasonable protection against harmful interference in a residential installation. This equipment generates, uses, and can radiate radio frequency energy
and, if not installed and used in accordance with the instructions, may cause
harmful interference to radio communications. However, there is no guarantee
that interference will not occur in a particular installation. If this equipment
does cause harmful interference to radio or television reception, which can be
determined by turning the equipment off and on, the user is encouraged to try
to correct the interference by one or more of the following measures:
• Reorient or relocate the receiving antenna.
• Increase the separation between the equipment and receiver.
• Connect the equipment into an outlet on a circuit different from that to which
the receiver is connected.
• Consult your local RadioShack store or an experienced radio/TV technician for
help.
If you cannot eliminate the interference, the FCC requires that you stop
using your equipment. Changes or modifications not expressly approved by
RadioShack may cause interference and void the user’s authority to operate the
equipment.
This device complies with Part 15 of the FCC rules. Operation is subject to the
following two conditions: (1) This device may not cause harmful interference, and
(2) This device must accept any interference received, including interference that
may cause undesired operation.
Advanced OperationAdditional Info
Product All-Hazards Weather Alert
Clock Radio with Skywarn
Model 12-519
Responsible
Party
Phone 817-415-3200
RadioShack
300 RadioShack Cir.
Fort Worth, TX 76102
23
Page 24

Limited Warranty
RadioShack warrants this product against defects in materials and workmanship under normal use
by the original purchaser for one (1) year after the date of purchase from a RadioShack-owned store
or an authorized RadioShack franchisee or dealer. RADIOSHACK MAKES NO OTHER EXPRESS
WARRANTIES.
This warranty does not cover: (a) damage or failure caused by or attributable to abuse, misuse, failure
to follow instructions, improper installation or maintenance, alteration, accident, Acts of God (such
as floods or lightning), or excess voltage or current; (b) improper or incorrectly performed repairs
by persons who are not a
batteries; (d) ordinary wear and tear or cosmetic damage; (e) transportation, shipping or insurance
costs; (f) costs of product removal, installation, set-up service, adjustment or reinstallation; and (g)
claims by persons other than the original purchaser.
Should a problem occur that is covered by this warranty, take the product and the RadioShack sales
receipt as proof of purchase date to any RadioShack store in the U.S. RadioShack will, at its option,
unless otherwise provided by law: (a) repair the product without charge for parts and labor; (b) replace
the product with the same or a comparable product; or (c) refund the purchase price. All replaced parts
and products, and products on which a refund is made, become the property of RadioShack. New or
reconditioned parts and products may be used in the performance of warranty service. Repaired or
replaced parts and products are warranted for the remainder of the original warranty period. You will be
charged for repair or replacement of the product made after the expiration of the warranty period.
RADIOSHACK EXPRESSLY DISCLAIMS ALL WARRANTIES AND CONDITIONS NOT STATED IN THIS
LIMITED WARRANTY. ANY IMPLIED WARRANTIES THAT MAY BE IMPOSED BY LAW, INCLUDING
THE IMPLIED WARRANTY OF MERCHANTABILITY AND, IF APPLICABLE, THE IMPLIED WARRANTY
OF FITNESS FOR A PARTICULAR PURPOSE, SHALL EXPIRE ON THE EXPIRATION OF THE STATED
WARRANTY PERIOD.
EXCEPT AS DESCRIBED ABOVE,
TO THE PURCHASER OF THE PRODUCT OR ANY OTHER PERSON OR ENTITY WITH RESPECT TO
ANY LIABILITY, LOSS OR DAMAGE CAUSED DIRECTLY OR INDIRECTLY BY USE OR PERFORMANCE
OF THE PRODUCT OR ARISING OUT OF ANY BREACH OF THIS WARRANTY, INCLUDING, BUT
NOT LIMITED TO, ANY DAMAGES RESULTING FROM INCONVENIENCE AND ANY LOSS OF
TIME, DATA, PROPERTY, REVENUE, OR PROFIT AND ANY INDIRECT, SPECIAL, INCIDENTAL, OR
CONSEQUENTIAL DAMAGES, EVEN IF RADIOSHACK HAS BEEN ADVISED OF THE POSSIBILITY
OF SUCH DAMAGES.
Some States do not allow limitations on how long an implied warranty lasts or the exclusion or
limitation of incidental or consequential damages, so the above limitations or exclusions may not
apply to you. This warranty gives you specific legal rights, and you may also have other rights which
vary from State to State. You may contact
RadioShack Customer Relations
300 RadioShack Circle, Fort Worth, TX 76102 04/08
RadioShack Authorized Service Facility; (c) consumables such as fuses or
RADIOSHACK SHALL HAVE NO LIABILITY OR RESPONSIBILITY
RadioShack at:
Protect the environment by recyclying your used electronics. Go to
E-CyclingCentral.com to find an electronic recycling center near you.
RadioShack Corporation.
©2009.
All rights reserved. RadioShack and RadioShack.com are
trademarks used by RadioShack Corporation.
Printed
in China
AO0357ABA1
07A09
12-519
 Loading...