

Page 1
www.radioshack.com
OWNER’S MANUAL —
Please read before using this equipment.
Thank you for buying the
RadioShack Portable
Handheld NWR-Same
Weatheradio
Specific Area Message
Encoding (SAME) circuitry to
provide more complete
information about weather
conditions in your immediate
area, letting you avoid hearing
alerts for geographical areas
that do not interest you. There
are 10 location codes that can
be programmed for multiple
location warnings. The
warnings are indicated by
WARNING, STATEMENT, and
WATCH.
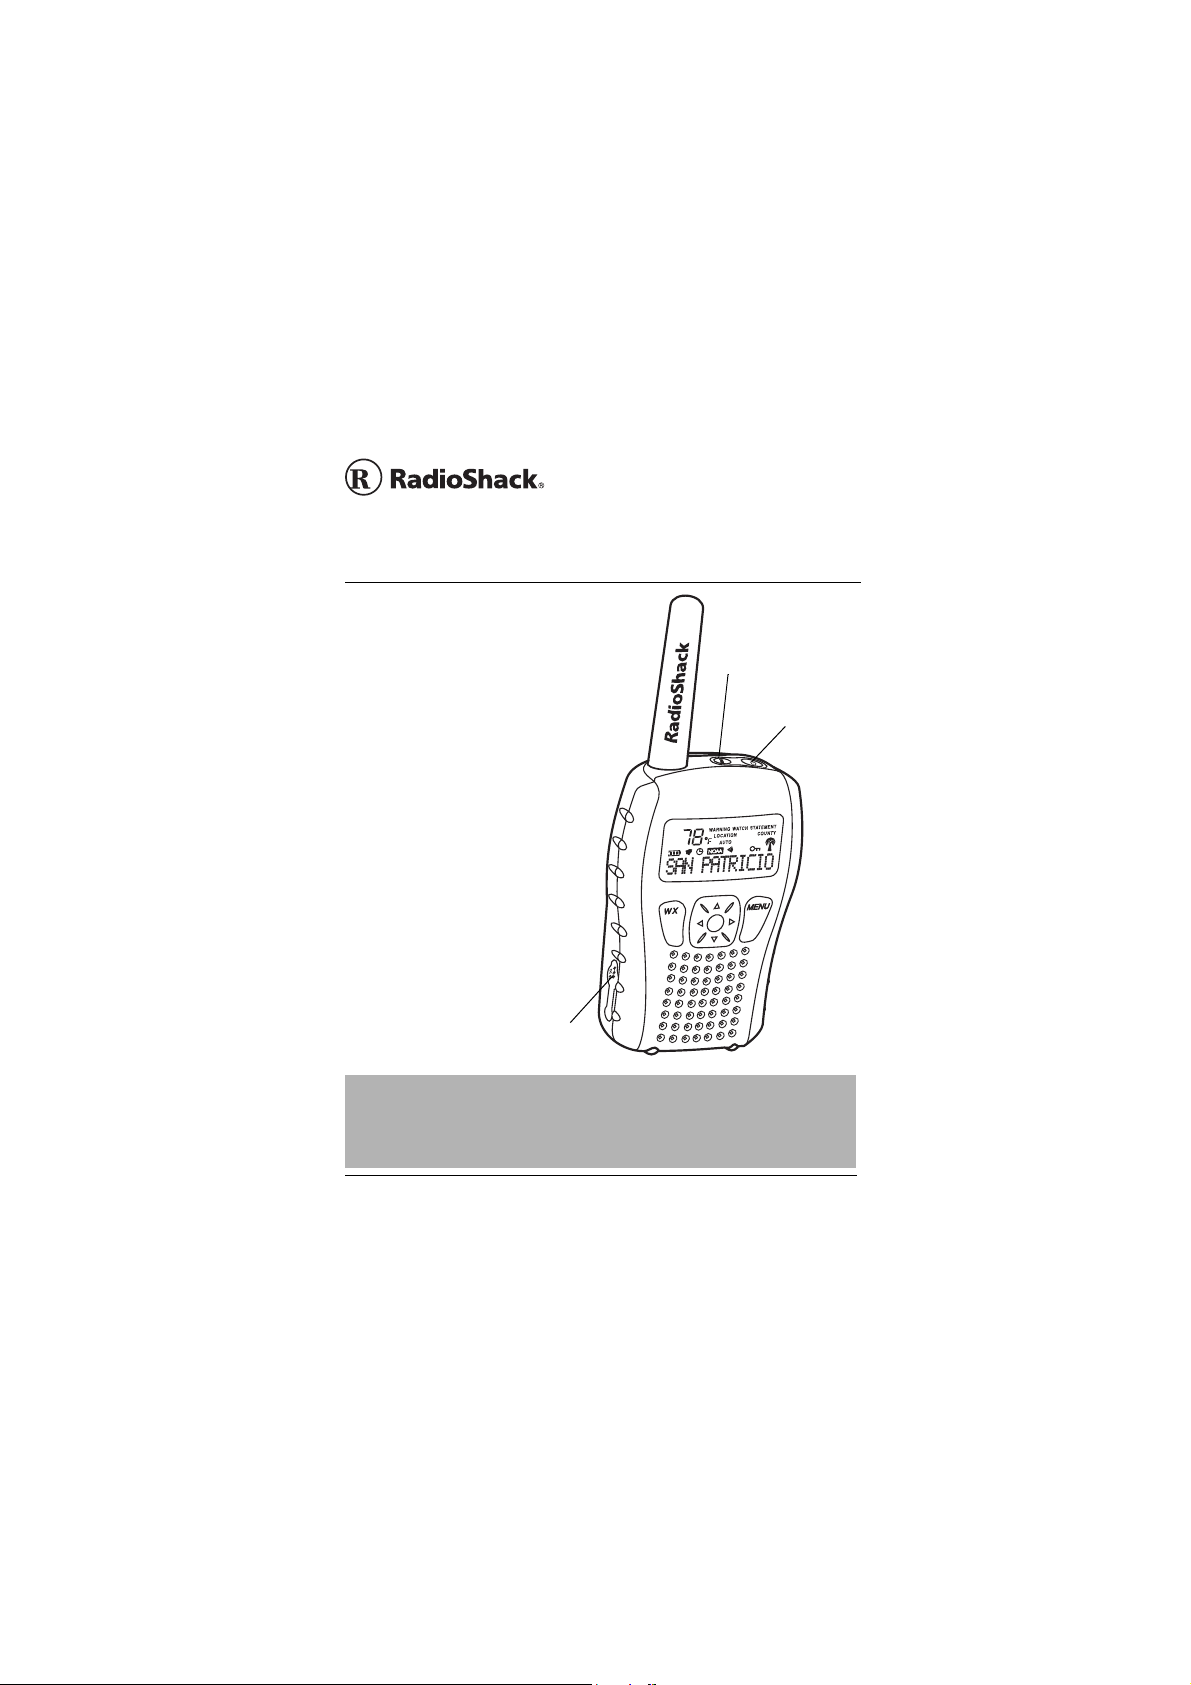
. It uses
SM
DC 6V Jack
Portable Handheld
NWR-SAME
Weatheradio
TR/HM — Select
data receive
modes: travel or
home.
— On/Off
º
12-259
IMPORTANT
If an icon appears at the end of a paragraph, go to the box on that page with the
!
corresponding icon for pertinent information.
© 2003 RadioShack Corporation. All Rights Reserved.
RadioShack and RadioShack.com are trademarks
used by RadioShackCorporation.
!
Ô — Note
Page 2

How Your Weatheradio‚ Works
CONTENTS
How Your Weatheradio
Works ............................... 2
Preparation ....................... 3
Installing Batteries ........ 3
Using AC Power ........... 4
Power Up Reset ........... 4
Turning Power
On and Off .................... 5
Attaching the Belt Clip .. 5
Programming the
Weatheradio ............... ...... 6
Setting the Alarm .......... 7
Setting the Clock .......... 8
Selecting Temperature
Display Mode ................ 8
Selecting a Channel ..... 9
Selecting Alert Mode .. 10
Enabling/Disabling Missed
Alert Reminder ............ 11
Enabling/Disabling Signal
Loss Reminder ........... 13
Understanding the FIPS
Code .................. ......... 13
Response Location
Selection ................. .... 15
Enabling/Disabling Alert
Tones .......................... 17
Receiving Weather Alerts 20
Viewing Signal
Strength ...................... 21
Locking Key ................ 21
Selecting Travel
/Home Mode ............... 21
Troubleshooting ............. 23
FCC Declaration of
Conformity ............. ......... 25
The FCC Wants
You to Know ................... 25
Care ............................... 27
Specifications ................. 27
HOW YOUR
WEATHERADIO
WORKS
Traditional weather radios simply
receive the National Oceanic and
Atmospheric Administration (NOAA)
weather broadcast (usually within a 50mile radius), then s ound an al arm if any
emergency code w as trans mitted along
with the broadcast. This means that
people outside an affected area are
often alerted even though their area is
not affected, leading some to ignore
weather warnings that apply to their
own area.
In 1994, NOAA began broadcasting
signals called FIPS (Federal
Information Processing System) codes
along with their standard weather
broadcasts. These codes identify the
type of emergency and the specific
geographic (such as a country)
information about the codes, so you
can determine if the emergency mig ht
affect your area. Only SAMEcompatible weather radios are able to
take advantage of this technology.
Each FIPS code identifies a specific
geographic area defined by the
National Weather Service (NWS), so
2
Page 3
your Weatheradio sounds an alert
•
e
only when a weather emergency is
declared in that area. This helps you
more efficiently track the weather
conditions in and around your area.
PREPARATION
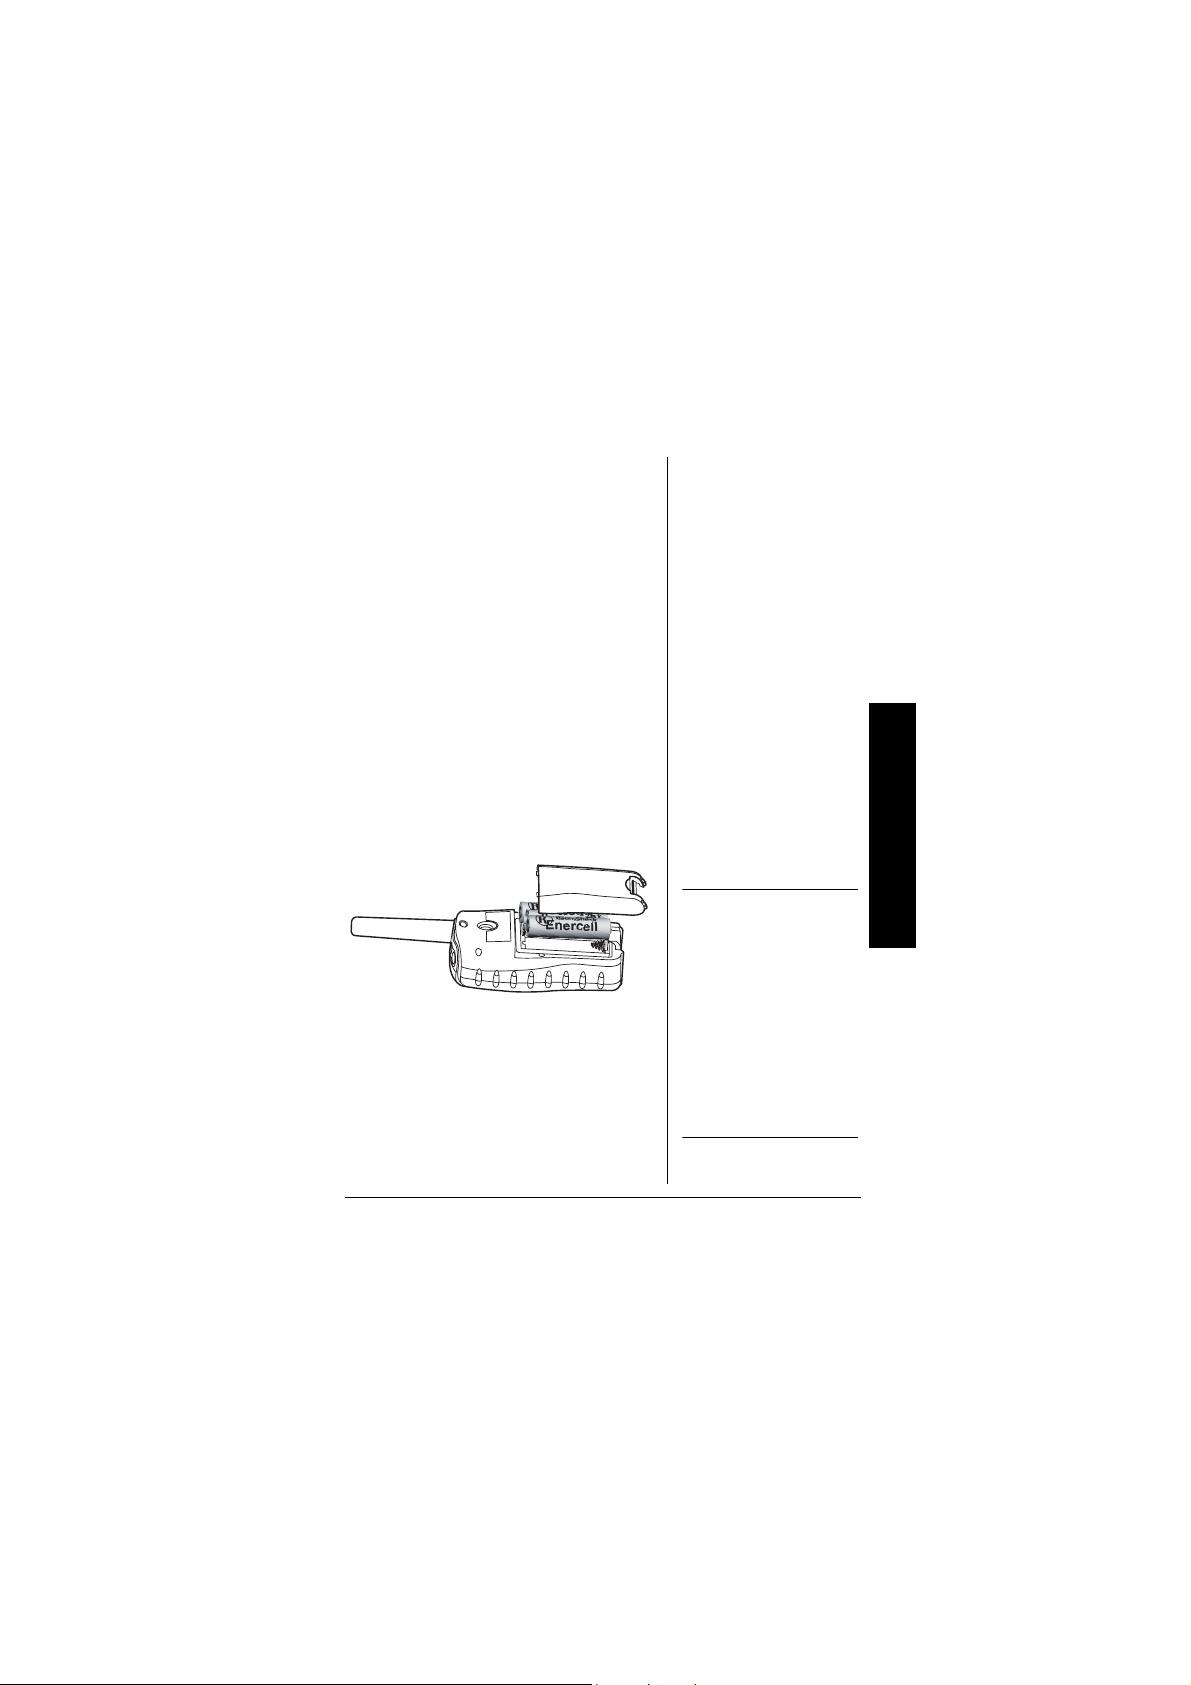
INSTALLING BATTERIES
1. Pull down the latch on the battery
compartment cover and then
remove the cover.
2. Install three AA batteries (not
supplied) as indicated by the
polarity symbols (+ and –) marked
inside.Ô.
3. Replace and secure the cover.
Full battery power is indicated on the
display as
weak,
are not allowed until you replace the
batteries. Ô
j. When battery power is
² appears. Further operations
Ô BATTERY NOTES Ô
• Dispose of old batteries
promptly and properly.
• Do not burn or bury
batteries.
• Use only fresh batteries of
the required size and
recommended type.
• Do not mix old and new
batteries, different types
of batteries (standard,
alkaline, or rechargeable),
or rechargeable batteries
of different capacities.
• If you do not plan to use
the weatheradio for a
month or mor e, remove
the batteries. Batteries
can leak chemicals that
can damage electronic
parts.
Ô NOTE Ô
Be sure to turn off th
power first and then
replace the batteries
in less than 1 minute
as to keep the set
clock time. If it takes
more than 1 minute
to replace, the clock
time may be reset.
Preparation
3
Page 4

Preparation
Ô NOTE Ô
The backlight is on
when receiving an alert
message, or for any key
operation.
USING AC POWER
Your Weatheradio can also use 6V,
300mA AC/DC adapter with plug size H
(not supplied) for normal operation.
With AC connected, normal operation
is allowed even if there are batteries in
unit.
1. Open the rubber DC 6V jack cover.
2. Insert the AC/DC adapter’s barrel
plug into
the adapter into a standard AC
outlet.
DC 6V jack. Then plug
POWER UP RESET
When powered on for the first ti me after
installing batteries, all LCD segments
turn on for one second. The device
starts to search for the best (strongest)
weather channel. Reset the
Weatheradio
following the steps below.Ô
1. Remove the batteries and/or
disconnect AC power.
to default settings by
2. Hold down
batteries or reconnect to AC
power. Hold down WX until USER
SETUP
sounds.
4
WX and re-inser t
appears and a short beep
Page 5

3. Release WX and press MENU.
DEFAULT ON appears briefly, and
USER SETUP appears.
then
4. Remove batteries and/or
disconnect AC power. Reinsert to
begin use.
TURNING POWER
N AND OFF
O
Press and hold down G for two
seconds to turn the Weatheradio
and off. Ô
on
ADJUSTING VOICE AND
T
ONE VOLUME
1. Press WX to turn on broadcast.
2. Repeatedly press e or d to adjust
the volume to the desired listening
VOLUME: and the volume level
level.
appear.
Ô NOTE Ô
If power is off, weather
alert messages are not
detected.
Preparation
3. Press
4. Repeatedly press e or d to adjust
WX to turn off the weather
broadcast.
the alert tone volume to the
desired listening level.
and the alert tone level appear.
TONE VOL:
5
Page 6

ATTACHING THE BELT CLIP
Insert the clip into the hole at the back
of the weatheradio until it clicks. To
remove the belt clip, press the button
on the tip of the clip and pull it out.
ATTACHING THE WRIST
S
TRAP (NOT SUPPLIED)
Slide the wrist strap’s small loop under
the bar at the back of the weatheradio.
Then pull the strap’s larg e loop th rough
the small loop and fasten it.
Ô NOTE Ô
• The weatheradio
does not receive alert
signals during
Programming the Weatheradio‚
programming.
• If you press MENU or
do not press a key for
45 seconds while
programming, the
weatheradio saves
all valid entries you
made and exits
programming mode.
6
PROGRAMMING THE
WEATHERADIO
Your Weatheradio is pre-programmed
with seven NOAA broadcast
frequencies (channel s 1-7). Depending
on your location, you might need to
select a different channel.
Your Weatheradio
any weather alert broadcast within
about a 50 mile radius. The first time
you use your Weatheradio
for the strongest channel and receives
all SAME alert signals broadcast within
a 50 mile radius of its location. Ô
is preset to rece ive
, it scans
Page 7

1. Press MENU. The following
functions can be set:
SET ALARM SET CLOCK
TEMPERATURE SELECT CH
ALERT MODE ALT REMINDER
SIG REMINDER AREA SELECT
TONE DEFEAT
2. Press e or d to scroll through
functions. Press g to select a
function to modify. Press f to go
back to the previous mode or to
exit.
SETTING THE ALARM
1. Press MENU. Then press e and d
until
SET ALARM appears.
2. Press g. É and alarm tim e appear.
The first time you activate the
alarm, the alarm time shows 12:00
AM
. Ô
3. Press g. The hour digits flash.
Repeatedly press e or d to set the
desired hour.
4. Press g. The minute digits flash.
Repeatedly press e or d to set the
desired min utes.
Ô NOTE Ô
• Repeatedly press e
or d to enable or
disable the alarm.
The alarm is enabled
with
É on and
disabled with
flashing.
É
Programming the Weatheradio‚
7
Page 8

5. Press g. AM or PM flashes.
Repeatedly press e or d to make
your selection.
6. Press g to confirm. One long beep
sounds. Press
MENU to exit.
Ô NOTES Ô
Setting the Alarm
• The alarm duration
is one hour under
standby mode and
is only five seconds
during NWS alert
broadcast.
Setting the Clock
• Hold down MENU
to view the clock
time during NWS
alert broadcast.
Programming the Weatheradio‚
At the set alarm time, the
Weatheradio
generates an alarm.
Press any button to stop the alarm.Ô
SETTING THE CLOCK
1. Press MENU. Then press e or d
SET CLOCK and Ì appear.
until
2. Press g. The hour digits flash.
Press e or d to set the hour.
3. Press g. The minute digits flash.
Repeatedly press e or d to set the
minutes.
4. Press g.
Repeatedly press e or d to
choose the desired format.
5. Press g again to store the time. A
long beep sounds to confirm the
entry.
6. Press
AM or PM flashes.
MENU to exit. Ô
8
Page 9

SELECTING TEMPERATURE
l
.
ISPLAY MODE
D
1. Press MENU. Then press e or d
TEMPERATURE appears.
until
2. Press g. The current temperature
reading flashes.
3. Press e or d to select the desired
temperature display mode (
°F or
°C).
4. Press g to confirm the setting.
Press
MENU to exit. Ô
SELECTING A CHANNEL
1. Press MENU. Then press e or d
SELECT CH appears.
until
2. Press g. Ô
3. To automatically search for
channels, press g when AUTO
appears.
appear . If there is an ava il abl e
channel, CHANNEL, and the number
of the curre ntly selected channels,
and
available channel,
AVAILABLE
number of the last selected
CHANNEL and SEARCHING …
AVAILABLE appear. If there is no
NO CHANNEL,
, BACK TO CHANNEL, and the
Ô NOTE Ô
Selecting
Temperature
Display Mode
The current temperature
is updated about every
30 seconds.
Selecting a Channe
• If Auto mode was
selected previously,
AUTO appears. If
Manual mode was
selected previously,
MANUAL appears.
• During manual
channel selection,
the weather
broadcast turns on
so that you can verify
a station exists on
the selected channel
• The Weatheradio
automatically
searches for and
tunes to the
strongest weather
broadcast channel in
your area if you
select AUTO.
Programming the Weatheradio‚
9
Page 10

Programming the Weatheradio‚
channel appear. AUTO appears and
the Weatheradio
To manually search for channels,
press g when
beeps.
MANUAL appears.
CHANNEL and the number of the
currently selected channels
appear . The W e atheradio tunes
to a channel and turns on the
broadcast. To select another
channel, repeatedly press e or d
until the desired channel number
appears.
4. Press g to confirm the sele cti on. A
beep sounds and CH, the number
of the curre ntly selected channels,
SELECT (the newly selected
and
channel) appear. Then
appears. Press MENU to exit.
SELECT CH
SELECTING ALERT MODE
You can set the Weatheradio to
respond to an NWS alert broadcast in
one of two ways:
TONE — The Weatheradio sounds an
alert for five minutes or until End of
Message is received and an alert
description appears until the alert’s
effective time expires. To turn off the
alert sooner, press
WX. The
10
Page 11

Weatheradio automatically selects
TONE the first time you turn it on.
VOICE — The Weatheradio
an alert for about eight seconds, and
then automatically turns o n the wea ther
(voice) broadcast for five minutes. It
also displays the alert description (such
as TORNADO WARNING) until the
alert’s effective time , received as part of
the NWS broadcast code, expires.
sounds
1. Press
2. Press g .
3. Press e or d to select
MENU. Then press e or d
ALERT MODE appears.
until
TONE or
VOICE.
4. Press g to confirm, or press f to
return without changes.
5. Press
MENU to exit.
ENABLING/DISABLING
M
ISSED ALERT REMINDER
The Weatheradio beeps about every
10 seconds after a specific weather
alert broadcast ends and until the
weather alert expires. This is called a
missed alert reminder. Ô
Ô NOTE Ô
Í flashes to indicate the
alert reminder is off.
flashes to indicate the
alert reminder is on.
¹
Programming the Weatheradio‚
11
Page 12

1. Press MENU. Then press e or d
ALT REMINDER appears.
until
or
2. Press g.
Í
appears.
¹
3. Repeatedly press e or d to select
(off) or ¹ (on). When the
Í
desired mode appears, press g to
select. Press f to return without
changes.
Programming the Weatheradio‚
12
4. Press
MENU to exit.
The following weather alert messages
will generate a missed alert reminder.
Avalanche Warning Hurricane Warning
Blizzard Warning
Child Abduction
Emergency
Civil Danger Warning Local Area Emergency
Coastal Flood Warning
Dust Storm Warning
Emergency Action
Notification
Emergency Action
Termination
Earthquake Warning
Immediate Evacuation
Warning
Law Enforcement
Warning
National Hazard
Warning
Nuclear Power Plant
Warning
Radiological Hazard
Warning
Unkown Emergency
Severe Thunderstorm
Warning
Page 13

Evacuate I mmediately
Fire Warning Special Marine Warning
Flash Flood Warning
Flood Warning Tor nado Warning
Hazardous Materia l
Warning
High Wind Warning
Civil Emergency Unknown Warning
Tropical Storm Warning Volcano Warning
Tsunami Warning Winter Storm Warning
Shelter In-Place
Warning
911 Telephone Outage
Emergency
Hurricane Warning
Immediate Evacuation
Warning
ENABLING/DISABLING
S
IGNAL LOSS REMINDER
1. Press MENU. Then press e or d
SIG REMINDER appears.
until
2. Press g .
3. Repeatedly press e or d to select
Í
desired option appears, press g.
Or press f to return without
changes. Ô
4. Press
Í or ¹ appears.
(off) or ¹ (on) . When the
MENU to exit.
Ô NOTE Ô
Í flashes to indicate the
signal loss reminder is
off.
¹ flashes to
indicate the signal loss
reminder is on.
When signal loss
reminder is on, with
Signal Loss detected,
signal loss reminder will
be generated in the
interval of 30 seconds, 1
minute, 1.5 minutes, 2
minutes,...up to 5
minutes. With no signal
recovered, the reminder
continues to beep every
5 minutes and will be
terminated with any key
pressed.
Programming the Weatheradio‚
13
Page 14

Ô NOTE Ô
To get all alerts for your
county, enter 0 as the
first digit of the FIPS
code. To be alerted only
to county notices and
Programming the Weatheradio‚
notices for your
particular part of the
county, enter your code
(1–9). Your county or
parish may not be
divided.
UNDERSTANDING THE FIPS
ODE
C
For the purpose of broadcasting
weather inf ormation, the NWS has
divided the United States into regions
by state and county. A 6-digit FIPS
code is used to identify each county,
parish, or part of a county. For
example, the code for Tarrant County,
Texas, is 048439. The first digit in a
FIPS code identifies a portion of
Tarrant Co unty. The next two digits
identify the state, and the last three
digits identify the county or parish .
Your Weatheradio
SAME alert signals broadcast within
about a 50-mile radius of where you
program it. To receive SAME alerts and
broadcasts about weather occurring
only in particular counties within that
area, you can program up to 10 FIPS
codes into the Weatheradio’s
memory. Ô
You can also set the locati on by directly
selecting a state and county. While
displaying Location Code under Single
or Multiple mode, LOCX ----- (default
with memory blank), press and hold g
for a second. A list of states appear.
Press e or d to scroll through the list.
can receive all
14
Page 15

With the correct state displayed, press
g to view the correspon ding county li st.
Press e or d to scroll through the
county list and press g to confirm. If
your county cannot be found from the
list, please refer to “Obtaining Your
Area’s FIPS Code(s)”.
Obtaining Your Area’s FIPS
Code(s)
To obtain the FIPS code for the loca tion
where you programmed your
Weatheradio
RadioShack store or call the NWS toll
free at 1-888-NWR-SAME (1-888-697-
7263).
You can also obtain a state/county list
of all FIPS codes by visiting the NWS
website: www.nws.noaa.gov/nwr/
indexnw.htm.
, contact your local
RESPONSE LOCATION
ELECTION
S
You can set the Weatheradio to work
with FIPS codes in one of three ways:
ALL LOCATION — The
Weatheradio
alert signals broadcast within
about a 50-mile radius. The
Weatheradio
receives all SAME
automatically
Programming the Weatheradio‚
15
Page 16

selects ALL LOCATION the first
time you turn it on.
Programming the Weatheradio‚
SINGLE LOC — The
Weatheradio
alert signal for one FIPS code
programmed in memory location 1.
MULTIPLE LOC — The
Weatheradio
alert signal for u p to 10 FIPS co des
programmed in multiple locations
in the Weatheradio’s
1. Press MENU. Then press e or d
until
AREA SELECT appears.
2. Press g. The currently selected
FIPS mode (
LOC
, or MULTIPLE LOC) appears.
3. Repeatedly press e or d until the
desired FIPS mode appea rs. Then
press g.
If you select
beeps and
Y ou will now receive all SAME alert
signals within a 50-mile radius.
If you select SINGLE LOC or MULTIPLE
and have not programmed the
LOC
Weatheradio
receives a SAME
receives a SAME
memory.
ALL LOCATION, SINGLE
ALL LOCATION, the radio
AREA SELECT appears.
with a FIPS code,
LOC1 ------------appears.
Otherwise, LOC and FIPS codes
16
Page 17

already programmed into t hat
memory location appear.
4. If you select
SINGLE LOC, go to step
5. Otherwise, repeatedly press e
or d to select the memory location
where you wa nt to store a FIPS
code.
5. To add a FIPS code or change the
displayed FIPS co de, pre ss g. The
FIPS code’s first digit flashes.
6. Repeatedly press g or f to move
the cursor backward or forward to
change the digit. Then repeatedly
press e or d until the desired digit
appears. Then press g. Ô
7. Repeat Step 6 for each digit you
want to change or add. Press g
when the last digit flashes. The
radio beeps and saves the FIPS
code. If the code is not in the
weatheradio’s database,
ppears. Press gagain to
CODE? a
NEW
save the FIPS code.
8. If you select
MULTIPLE LOC in step 4,
the FIPS code stored in the next
memory location appears. Repeat
5 -7 for each additional FIPS code.
Ô NOTE Ô
To erase the FIPS code,
press e or d to select –
for the first digit and
press g to confirm.
Programming the Weatheradio‚
17
Page 18

9. When you finish programming the
Weatheradio
about 45 seconds without pressing
any key.
, press MENU or wait
ENABLING/DISABLING A LERT
ONES
T
The Weatheradio automatically
sounds an alert tone during specific
types of weather alerts. You can turn
the alert tone on or off for each of these
alerts. For example, you can turn off
the alert tone for a volcano warning if
you do not live near a volcano.
Programming the Weatheradio‚
18
1. Press
2. Press g.
3. Repeatedly press e or d until the
MENU. Then press e or d
until
TONE DEFEAT appears.
type of alert you want to enable or
disable (
WARNING, WATCH,
STATEMENT, o r TEST) appears.
4. Press g.
5. If you selected
press e or d to select one of the
following specific alerts
WARNING, repeatedly
Page 19

AVALANCHE
WARNING
BLIZZARD WARNING HIGH WIND WARNING
CHILD ABDUCTION
EMERGENCY
COASTAL FLO OD
WARNING
DUST STORM
WARNING
FLASH FLOOD
WARNING
FLOOD WARNING
SPECIAL MARINE
WARNING
VOLCANO WARNING
WINTER STORM
WARNING
If you selected WATCH, repeatedly pre ss
e or d to select one of the following
specific alerts.
AVALANCHE WATCH HURRICANE WATCH
COASTAL FLO OD
WATCH
FLASH FLOOD
WATCH
FLOOD WATCH VOLCANO WATCH
HIGH WIND WATCH
SEVERE
THUNDERSTORM
WATCH
TROPICAL STORM
WATCH
WINTER STORM
WATCH
19
Programming the Weatheradio‚
Page 20

Programming the Weatheradio‚
If you selected
STATEMENT, repeatedly
press e or d to select one of the
following specific alerts:
Ô NOTE Ô
When more than one
alert message
(maximum three
messages can be stored
and displayed) is
received, press f or g to
review the alerts.
FLASH FLOOD
STATEMENT
FLOOD STATEMENT
HURRICANE
STATEMENT
If you selected
SEVERE WEAT HER
STATEMENT
SPECIAL WEATHER
STATEMENT
UNKNOWN
STATEMENT TUNE TV
TEST, repeatedly press
e or d to select one of the following
specific alerts:
ALL TEST WEEKLY TEST
DEMO MESSAGE MONTHLY TEST
6. Press g.
TONE ON or TONE OFF
appears.
7. Repeatedly press e or d to select
TONE ON or TONE OFF for the specific
alert you selected. Then press g.
8. To select another alert type and
specific alert, pre ss f. Then repe at
Steps 3-7. Otherwise, press
or wait about 45 seco nds without
pressing any key.
MENU
20
Page 21

RECEIVING
WEATHER ALERTS
The Weatheradio generates an alert
when the FIPS code matches the preprogrammed location code. The
corresponding alert type icon appears
at the top of the display. Ô
In Voice mode, a siren sounds for
about eight seconds, followed by a
voice weather broadcast for five
minutes or until End Of Message
(EOM) is received.
In Tone mode, the Weatheradio
generates a siren for five minutes or
until the End of Message (EOM) is
received.
VIEWING SIGNAL STRENGTH
The Weatheradio can monitor the
signal availability indicated by
a signal is available,
signal is lost,
flashes. If a signal loss occurs and
signal reminder is enabled, a series of
beeps occur. The beep terminates
when a signal is detected again or if
any key is pressed. Ô
Ê is on. When the
SIGNAL LOSS appears and Ê
Ê. When
Ô NOTE Ô
SIGNAL LOSS
When
appears, press and hold
down MENU. The clock
time appears. Release
MENU, and the
weatheradio returns to
SIGNAL LOSS display.
Receiving Weather Alerts
21
Page 22

Receiving Weather Alerts
Ô NOTE Ô
When the keypad is
locked, the weatheradio
do not response to any
key operation. Unlock
the keypad first to
terminate alarm or alert
sound.
Ô NOTE Ô
• If the weatheradio is
broadcasting, a
reminder beep is
generated in Travel
mode but not
generated in Home
mode for signal loss.
• When carrier is lost,
auto channel rescan
can be performed
automatically in
Travel mode.
LOCKING KEY
1. Press MENU once to enter menu
mode.
2. Press f with in two seconds. A long
beep sounds and ì appears.
3. The keypad of the Weatheradio
is now locked. Ô
4. Repeat steps 1 an d 2 to unlock the
keypad.
SELECTING TRAVEL/HOME
ODE
M
There are two data receiving modes:
Travel and Home. Press and hold
HM
for two seconds. The alert receiving
mode switches between Travel and
Home. With Travel selected,
appears. With Home selected,
Î
disappears.
Î
When in Home Mode, the
Weatheradio
selections for channel selection, alert
mode, missed alert reminder, and
response location. The Weatheradio
does not perform auto re-scan. Ô
uses your default
TR/
22
When in Travel mode, the radio
searches for the best channel. When a
Signal Loss occurs and no channel is
Page 23

detected for 10 seconds, the radio
switches back to the channel last
selected, wheth er it was in H ome mod e
or in Travel mode. In Travel Mode, the
Weatheradio
is configured with the
following defaults:
Channel Selection — Auto
Alert Mode — Tone
Missed Alert Reminder — Off
Response Location — All Locations
TROUBLESHOOTING
If your Weatheradio is not working properly, these suggestion s
might help you eliminate the problem. If it still does not operate
properly, take it to your local RadioShack store for assistance.
Problem Suggestion
No power.
No sound.
Multiple FIPS codes are stored, but
the weatheradio only responds to
weather alert broadcasts for one
code.
Make sure the AC adapter is
connected to the weatheradio or a
backup battery is installed.
If the backup battery becomes weak,
your weatheradio might not sound a
tone when an alert is broadcast. Test
your weatheradio’s reception
periodically, and replace the battery if
the tone does not sound.
Make sure the weatheradio is set to
MULTIPLE LOC mode.
Make sure the FIPS codes stored in
memory are correct.
Troubleshooting
23
Page 24

One or more FIPS codes are stored,
but the weatheradio responds to
weather alert broadcasts for areas
not covered by those codes.
The weatheradio’s continuous alert
tone sounds intermittently or seems
to warble.
Troubleshooting
No weather broadcast when you
press WX.
The weatheradio is not responding
properly to NWS weather alert
broadcasts.
CHECK OPERATION
(check operation) appears.
Make sure the weatheradio is not set
to ALL LOCATION
Make sure the weatheradio is not set
to TRAVEL mode.
The weatheradio constantly monitors
the channel you set it to, even while it
is sounding a continuous alert. Each
time a signal is received on the
channel, it pauses briefly to compare
the signal against those stored in its
memory. If the weatheradio pauses
frequently (depending on how often it
receives a signal), it might make the
continuous alert tone sound
intermittent. This is not a malfunction.
Make sure your hand is not holding
the antenna.
Adjust the volume.
Make sure the correct FIPS code(s)
are programmed into the memory.
You might be out of the broadcast
range. Move the weatheradio closer
to the broadcast source, if possible.
Make sure the weatheradio is set to
the NOAA channel that is being
broadcast in your area.
If the backup battery becomes weak,
your weatheradio might not sound a
tone when an alert is broadcast. Test
your weatheradio’s reception
periodically, and replace the battery if
the tone does not sound.
The weatheradio is broadcasting and
has not received a SAME alert signal
for about one week. Make sure the
FIPS code(s) stored in memory are
correct.
24
Page 25

FCC DECLARATION
OF CONFORMITY
This device complies with Part 15 of the FCC
Rules. Operation is subject to the following two
conditions: (1) this device may not cause harmful
interference, and (2) this device must accept any
interference received, including interference that
may cause undesired operation
.
Product:
Model: 12-259
Responsible Party:
Phone: 817-415-3200
Portable Handheld NWRSAME Weatheradio
RadioShack
100 Throckmorton
Fort Worth, TX 76102
THE FCC WANTS
YOU TO KNOW
This equipment has been tested and found
to comply with the limits for a Class B digital
device, pursuant to Part 15 of the FCC
FCC Declaration of Conformity
25
Page 26

The FCC Wants You to Know
Rules. These limits are designed to provide
reasonable protection against harmful
interference in a residential installation. This
equipment generates, uses and can radiate
radio frequency energy and, if not installed
and used in accordance with the
instructions, may cause harmful interference
to radio communications.
However, there is no guarantee that
interference will not occur in a particular
installation. If this equipment does cause
harmful interference to radio or television
reception, which can be determined by
turning the equipment off and on, the user is
encouraged to try to correct the interference
by one or more of the following measures:
• Reorient or relocate the receiving
antenna.
• Increase the separation between the
equipment and receiver.
• Connect the equipment into an outlet
on a circuit different from that to which
the receiver is connected.
• Consult your local RadioShack store or
an experienced radio/TV technician for
help.
• If you cannot eliminate the interference,
the FCC requires that you stop using
your weatheradio.
Changes or modifications not expressly
approved by RadioShack may cause
interference and void the user’s authority to
operate the equipment.
26
Page 27

CARE
Keep the weatheradio dry; if it gets wet, wipe it dry immediately. Use and
store the weatheradio only in normal temperature environments. Handle
the weatheradio carefully; do not drop it. Keep the weatheradio away
from dust and dirt, and wipe it with a damp cloth occasionally to keep it
looking new.
SPECIFICATIONS
Power Supply................... 6V DC 300 mA AC/DC Adapter (not supplied)
Thermometer Operating Range.............. –4°F to 122°F (–20°C to 50°C)
Dimensions (HWD)...............................................6
Weight (without batteries and belt clip)......................................... 5.6 oz
Supplied Accessories..................................................................Belt Clip
Channel 1 ...................................... .... .. ..... .... .. .. .. .. .... ..... .. .. ...162.400MHz
Channel 2 ...................................... .... .. ..... .... .. .. .. .. .... ..... .. .. ...162.425MHz
Channel 3 ...................................... .... .. ..... .... .. .. .. .. .... ..... .. .. ...162.450MHz
Channel 4 ...................................... .... .. ..... .... .. .. .. .. .... ..... .. .. ...162.475MHz
Channel 5 ...................................... .... .. ..... .... .. .. .. .. .... ..... .. .. ...162.500MHz
Channel 6 ...................................... .... .. ..... .... .. .. .. .. .... ..... .. .. ...162.525MHz
Channel 7 ...................................... .... .. ..... .... .. .. .. .. .... ..... .. .. ...162.550MHz
3 x AA battery (not supplied)
9
/16 x 213/16 x 17/16 in.
(167 x 72x 37 mm)
160 g
Care
27
Page 28

Limited Ninety-Day Warranty
This product is warranted b y R adioS ha ck aga inst m anufa cturi ng defe ct s i n mater i al and wor kmanship under normal use for ninety (90) days from the date of purchase from RadioShack
company-owned stores and authorized RadioShack franchisees and dealers. EXCEPT A S
PROVIDED HEREIN, RadioShack MAKE S NO E XPRESS WARRANTIES AND ANY IMPLIED WARRANTIES, INCLUDING THOSE OF MERCHANTABILITY AND FITNESS FOR A
PARTICULAR PURPOSE, ARE LIMITED IN DURATION TO THE DURATION OF THE
WRITTEN LIMITED WARRANTIES CONTAINED HEREIN. EXCEPT AS PROVIDED
HEREIN, RadioShack SHALL HAVE NO LIABILITY OR RESPONSIBILITY TO CUSTOMER
OR ANY OTHER PERSON OR ENTITY WITH RESPECT TO ANY LIABILITY, LOSS OR
DAMAGE CAUSED DIRECTLY OR INDIRECTLY BY USE OR PERFORMANCE OF THE
PRODUCT OR ARISING OUT OF ANY BREACH OF THIS WARRANTY, INCLUDING, BUT
NOT LIMITED TO, ANY DAMAGES RESULTING FROM INCONVENIENCE, LOSS OF
TIME, DATA, PROPERTY, REVENUE, OR PROFIT OR ANY INDIRECT, SPECIAL, INCIDENTAL, OR CONSEQUENTIAL DAMAGES, EVEN IF RadioShack HAS BEEN ADVISED
OF THE POSSIBILITY OF SUCH DAMAGES.
Some states do not allow limitations on how long an implied w arranty last s or the excl usio n or
limitation of incidental or consequential damages, so the above limitations or exclusions may
not apply to you.
In the event of a product defect during the warranty period, take the product and the RadioShack sales receipt as proof of purchase date to any RadioShack store. RadioShack will,
at its option, unless otherwise pro vid ed by law: ( a)correct the defect by product repair without
charge for parts and labor; (b) replace the product with one of the same or similar design; or
(c) refund the purchase price. All replaced parts and products, and products on which a refund is made, become the property of RadioShack. New or reconditioned parts and products
may be used in the perform ance of war rant y service. Repaired or replaced parts and products
are warranted for the remainder of the original warranty period. You will be charged for repair
or replacement of the product made after the expiration of the warranty period.
This warranty does not cover: (a) damage or failure caused by or attributable to acts of God,
abuse, accident, misuse, improper or abnormal usage, failure to follow instructions, improper
installation or maintenance, alteration, lightning or other incidence of excess voltage or current; (b) any repairs other than those provided by a RadioShack Authorized Service Facility;
(c) consumables such as fuses or batteries; (d) cosmetic damage; (e) transportation, shippi ng
or insurance costs; or (f) costs of product removal, installation, set-up service adjustment or
reinstallation.
This warranty gives you specific legal rights, and you may also have other rights which vary
from state to state.
RadioShack Customer Relations, 200 Taylor Street, 6th Floor, Fort Worth, TX 76102
12/99
12-259
AO0158AAA1
06A03
Printed in China
 Loading...