

Page 1

Cat. No. 12-240
OWNER’S MANUAL
Please read before using this equipment.
Weatheradio with Alert
Page 2

FEATURES
y
y
g
Your Radio Shack Weatheradio with Alert is designed to
receive National Weather Service broadcasts. These
broadcasts provide information ab out weather conditions
and forecasts 24 hours a day. Your radio receives these
transmissions from up to 50 miles away. Its features include:
Alert Mode
— monitors weather broadcast s and sounds
an alert siren in emergency weather situations.
Optional S ir e n Lock
— sets the siren to sound until you
turn it off.
Siren Test Button
— lets you check the alert siren to
make sure the alert circuit is operating.
Two Anten na s
— give you the option of using the power
cord or the telescoping antenna for the best reception.
Batter
Backup
— automatically switches to internal
battery power if AC power is interrupted.
Three Channels
— let you choose the frequency that
provides the best reception.
stal-Con t rol led Tunin
Cr
©
1996 Tandy Corporation.
Radio Shack and Weatheradio are registered trademarks
2
All Rights Reserved.
used by Tandy Corporation.
— provides accurate tuning.
Page 3

Warning
: To prevent fire or shock hazard, do not expose
this product to rain or moisture.
CAUTION
RISK OF ELECTRIC SHOCK.
DO NOT OPEN.
!
CAUTION
ELECTRIC SHOCK, DO NOT REMOVE
COVER OR BACK. NO USER-SERVICEABLE PARTS INSIDE. REFER SERVICING TO QUALIFIED PERSONNEL.
This symbol is intended to alert you to the presence of uninsulated dangerous voltage within the product’s enclosure
that might be of sufficient ma gnitude to con stitute a risk of
electr ic shock. Do not open the product’s case.
This symbol is intended to inform you that important operating and maintenance instructions are included in the litera-
!
ture accompanying this product.
: TO REDUCE THE RISK OF
The graphical symbols with supplemental markings are
located on the bottom of the unit.
3
Page 4

CONTENTS
Power Sources ............................................................ 5
Connecting AC Power .................................. ....... .. . 5
Installing a Backup Battery ..................................... 5
Operation ..................................................................... 6
Receiving Weather Broadcasts .............................. 6
Using the Alert Mode .............................................. 7
Testi ng Alert Operation ................ .......... ......... ........ 8
Testing the Alert Circuit .................................... 9
Testing Alert Reception .................................. 10
Care and Maintenance .............................................. 11
FCC Statement ..................................................... 12
Specifications ............................................................ 13
4
Page 5

POWER SOURCES
CONNECTING AC POWER
Plug the Weatheradio’s power cord into a standard AC
outlet.
Caution:
polarized and fit only one way. If the plug will not fit easily, turn it over and try again. Do not force it.
To prevent electric shock, the plug’s blades are
INSTALLING A BACKUP BATTERY
The radio automatically swi tches to battery power if AC
power fails. Follow these steps t o install a 9-volt battery
(not supplied), such as RadioShack Cat. No. 23-553.
1. Remove the battery compartm ent cover by pressing
the tab in the direction of the arrow and lifting u p the
cover.
2. Snap the battery connector onto the battery contacts.
3. Place the battery in the compartment and replace the
compartment cover.
5
Page 6

OPERATION
RECEIVING WEATHER
BROADCASTS
Follow these steps to receive National Weather Service
(NWS) broadcasts.
1. To turn on the radio, turn
clicks. The alert indicator lights. When you turn on
the radio, it is set to the alert mode.
2. Press
3. Set
4. Set
6
WEATHER
broadcasts. The alert indicator turns off.
ANTENNA
If the signal is broken or noisy , set
Note:
. Then unsnap the telescoping antenna and
ROD
extend it to its full length. If rece ption is st ill not clear,
try locating the radio near an outside wall or window .
CHANNEL
reception.
to set the radio to receive weather
to
LINE
to the frequency that provides the best
VOLUME
.
to the right u ntil it
ANTENNA
to
Page 7

5. Adjust
VOLUME
to a comfortable listening level.
6. To turn off the radio, turn
VOLUME
to the left until it
clicks.
USING THE ALERT MODE
You can set t he Weatheradio to alert you when the National Weather Service broadcasts an emergency signal,
without having to listen to c ontinuous weather updates.
Follow these steps to set the radio to the alert mode.
1. To turn on the radio, turn
VOLUME
clicks. The radio is in the alert mode and the alert
indicator lights. The n set
VOLUME
tion.
If the radio is set to receive weather broad-
Note:
casts, simply pre ss
ALERT
to set the radio to the alert
mode. The alert indicator lights and the receiver is
silent.
2. Set
ALERT LOCK
— The siren sounds until you press
ON
as follows:
silence it.
— The siren sounds only during the 10-secon d
OFF
alert signal broadcast.
to the right u ntil it
to its center posi-
WEATHER
to
7
Page 8

OFF
We suggest you use the
Note:
will be away from the radio s o the s iren does not di sturb others if it sounds. When you return, the radio’s
alert indicator flashes to let you know that the radio
received an alert signal broadcast.
3. When the radio receives an alert signal and sounds
the alert siren, press
is still sounding), the alert indicator stops flashing,
and you hear the current weather broadcast.
WEATHER
setting when you
. The siren stops (if it
4. To turn off the radio, turn
clicks.
Caution:
alert; turn on your radio and monitor the latest weather information.
If severe weather threatens, do not wait for an
VOLUME
to the lef t until it
TESTING ALERT OPERATION
For your Weatheradio to be ef fective, you m us t place t he
radio where you can hear its alert tone (see “Testing the
Alert Circuit”) and where it can receive an emergency
alert broadcast (see “Testing Alert Reception”).
Once you determine a location that meets these two conditions, leave the radio there for the best protection.
8
Page 9

Testing the Alert Circuit
The
button lets you hear th e alert siren the Weat h-
TEST
eradio produces, but does not guaran tee your radio will
receive an emergency alert broadcast (see “Test ing Alert
Reception”).
Follow these steps to sound the alert siren.
1. Turn on the Weatheradio.
2. Press
3. Press and hold
If
ALERT LOCK
. The alert indicator lights.
ALERT
. The siren sounds.
TEST
is set to ON, press
WEATHER
to stop
the siren.
If
ALERT LOCK
is set to
while you hold down
TEST
, the siren sounds o nly
OFF
.
9
Page 10

Testing Alert Reception
The fact that you get clear voice reception or that the siren sounds when you press
that an emergency alert broadcast will trigger your
Weatheradio’s alert siren. Also, if you are in a fringe area,
your radio might be triggered by an alert broadcast in one
area, but not be triggered if you plac e it somewhere else
(even close by).
To verify actual reception, your radio must receive a test
or emergency alert broadcast. The National Weather
Service (NWS) broadcasts a test alert every week on
Wednesday between 11 AM and 12 noon. To find out the
specific test schedule in your area, contact your local National Oceanic and Atmospheric Administration (NOAA)
or National Weather Service office. These offices are
usually listed in the telephone directory under “US Government, Department of Commerce.”
To verify that your Weatheradio receives the test alert
properly, press
ALERT
before the time when the test alert
is broadcast in your local area. I f the test alert broadc ast
does not trigger your radio’s alert siren, you are either out
of range of the broadcast, the po wer cord is disconnected, or your radio’s batteries are weak.
does not guarantee
TEST
If you use your Weatheradio when y ou travel, be
Note:
sure to test it at its new location.
10
Page 11
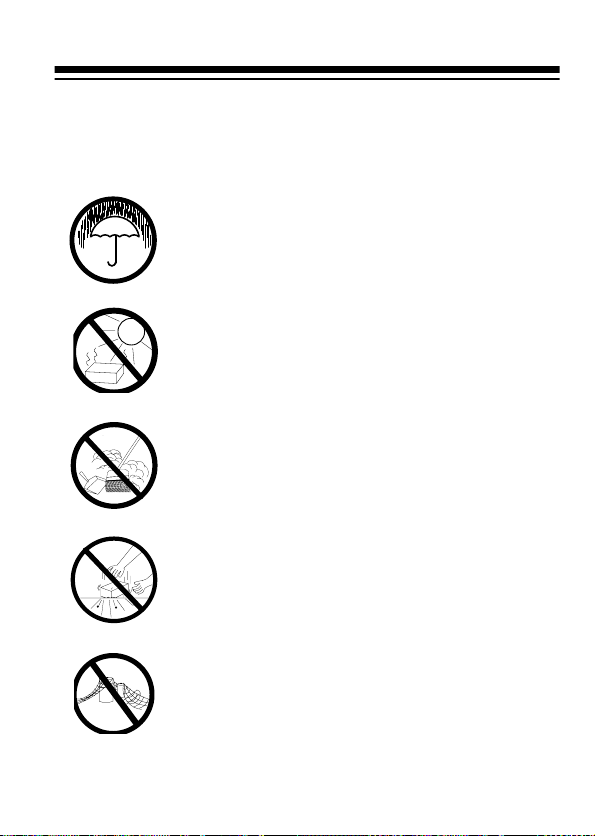
CARE AND MAINTENANCE
Your Weatheradio is an example of superior design and
craftsmanship. The following suggestions will help you
care for your radio so you can enjoy it for years.
Keep the radio dry. If it gets wet, wipe it dry
immediately. Liquid s might contain minerals that can corrode the electronic circuits.
Use and store the radio only in normal temperature environments. Temperature extremes can shorten the life of electronic
devices and distort or melt plastic parts.
Keep the radio away from dust and dirt,
which can cause premature wear of parts.
Handle the radio gently and carefully.
Dropping it can damage circuit boards and
cases and can cause the radio to work improperly.
Use only fresh batteries of the required
size and type. Old batteries can leak chemicals that damage your radio’s electronic
parts.
11
Page 12

Wipe the Weatheradio with a dam p cloth
CLEANER
occasionally to keep it looking new. Do not
use harsh chemicals, cleaning solvents, or
strong detergents to clean the radio.
Modifying or tampering with the Weatheradio’s internal
components can cause a malfunction and might invalidate
your radio’s warranty and void your FCC authorization to
operate it. If your radio is not performing as it should, t ake
it to your local Radio Shack store for assistance.
FCC STATEMENT
Your Weatheradio might caus e TV or radio interference
even when it is operating properly. To determine whether
your radio is causing the in terference, turn i t off. I f the interference goes away, your radio is causing it. Try to
eliminate the interference by:
• Moving your radio away from the receiver
• Contacting your local Radio Shack store for help
If you cannot eliminate the interference, the FCC requires
that you stop using the radio.
12
Page 13

SPECIFICATIONS
Frequency Coverage ................Channel A: 162.400 MHz
Channel B: 162.475 MHz
Channel C: 162.550 MHz
Power Output......................................Maximum 440 mW
Power Supply...................... 120 Volts, 60 Hz, 5 watts AC
Battery Backup Power ....9-Volt Battery (Cat. No. 23-553)
Antenna ............................. Li ne Cord or Telescoping Rod
Dimensions (HWD) ....................1
Weight...................................................................15.5 oz
Specifications are typical; individual unit might vary.
Specifications are subject to change and improvement
without notice.
3
/4 × 61/16 × 41/8 Inches
(45 × 153 × 104 mm)
(439 g)
13
Page 14

NOTES
14
Page 15

15
Page 16

RADIO SHACK LIMITED WARRANTY
This pr oduct is warranted against defe cts for 90 days from date of purchase from Radio Shack company-owned stores and authorized
Radio Shack fra nchisees and dealer s. Within this period, we will re pair
it without charge for parts and labor. Simply
sales slip
ranty does not cover transportation costs. Nor does it cover a product
subjected to misuse or accide ntal dama ge.
EXCEPT AS PROVIDED HEREIN, RADIO SHACK MAKES NO
EXPRESS WARRANTIES AND ANY IMPLIED WARRANTIES ARE
LIMITED IN DURATION TO THE DURATION OF THE WRITTEN LIMITED WARRANTIES CONTAINED HEREIN. Some states do not permit limitation or exclusion of implied warranties; therefore, the
aforesaid limitation(s) or exclusion(s) may not apply to the purchaser.
This warranty gives you speci fic leg al righ ts and yo u may also hav e oth er rights
which vary from state to state.
as proof of purchase date to any Radio Shack store. War-
We Service What We Sell
bring y ou r Rad io Sha ck
9/94
RADIO SHACK
A Division of Tandy Corporation
Fort Worth, Texas 76102
4A6 Printed in China
 Loading...