

Radio Shack 12-1631 Owner's Manual
Dual Alarm AM/FM Clock Radio
OWNER’S MANUAL — Please read before using this equipment.
CONNECTING AC POWER
Plug the clock radio’s power cord into a
standard AC outlet. The display lights.
Caution:
equipped with a polarized plug to prevent
electric shock. One blade on the cord’s plug
is wider than the other and the plug only fits
an outlet one way. If you can not easily insert
the plug, turn it over and try again. Do not
force it.
WARNING:
shock hazard, do not expose this product to rain
or moisture.
The clock radio’s AC power cord is
To reduce the risk of fire or
CAUTION
RISK OF ELECTRIC SHOCK.
DO NOT OPEN.
CAUTION:
ELECTRIC SHOCK, DO NOT REMOVE
COVER OR BACK. NO USER-SERVICEABLE PARTS INSIDE. REFER SERVICING
TO QUALIFIED PERSONNEL.
TO REDUCE THE RISK OF
This symbol is intended to alert
you to the presence of uninsulated dangerous voltage within
the product’s enclosure that might
be of sufficient magnitude to constitute a risk of electric shock. Do
not open the product’s case.
!
INSTALLING A BACK-UP
BATTERY
If AC power fails, the clock radio’s Battery
Sentinel back-up power system continues to
operate the clock for up to 8 hours with the
display turned off to conserve power. This
lets the alarm sound for at least 10 minutes
at the preset time, even if AC power fails.
Your clock radio requires a 9-volt battery (not
supplied) for back-up power. For the best
performance and longest life, we recommend a RadioShack alkaline battery.
Caution:
quired size and recommended type.
1. Press the battery compartment cover’s
2. Snap the battery onto the connector and
3. Replace the cover.
When the BATTERY SENTINEL icon
pears, replace the battery.
Warning:
and properly. Do not bury or burn them.
Caution:
tery. Battery can leak chemicals that can destroy electronic parts.
Use only a fresh battery of the re-
tab, then lift off the cover.
place it in the compartment.
Dispose of old batteries promptly
Always remove an old or weak bat-
¢
ap-
#
This symbol is intended to inform
you that important operating and
!
maintenance instructions are
included in the literature accompanying this product.
2001 RadioShack Corporation. All Rights Reserved.
©
RadioShack and RadioShack.com are trademarks
used by RadioShack Corporation.
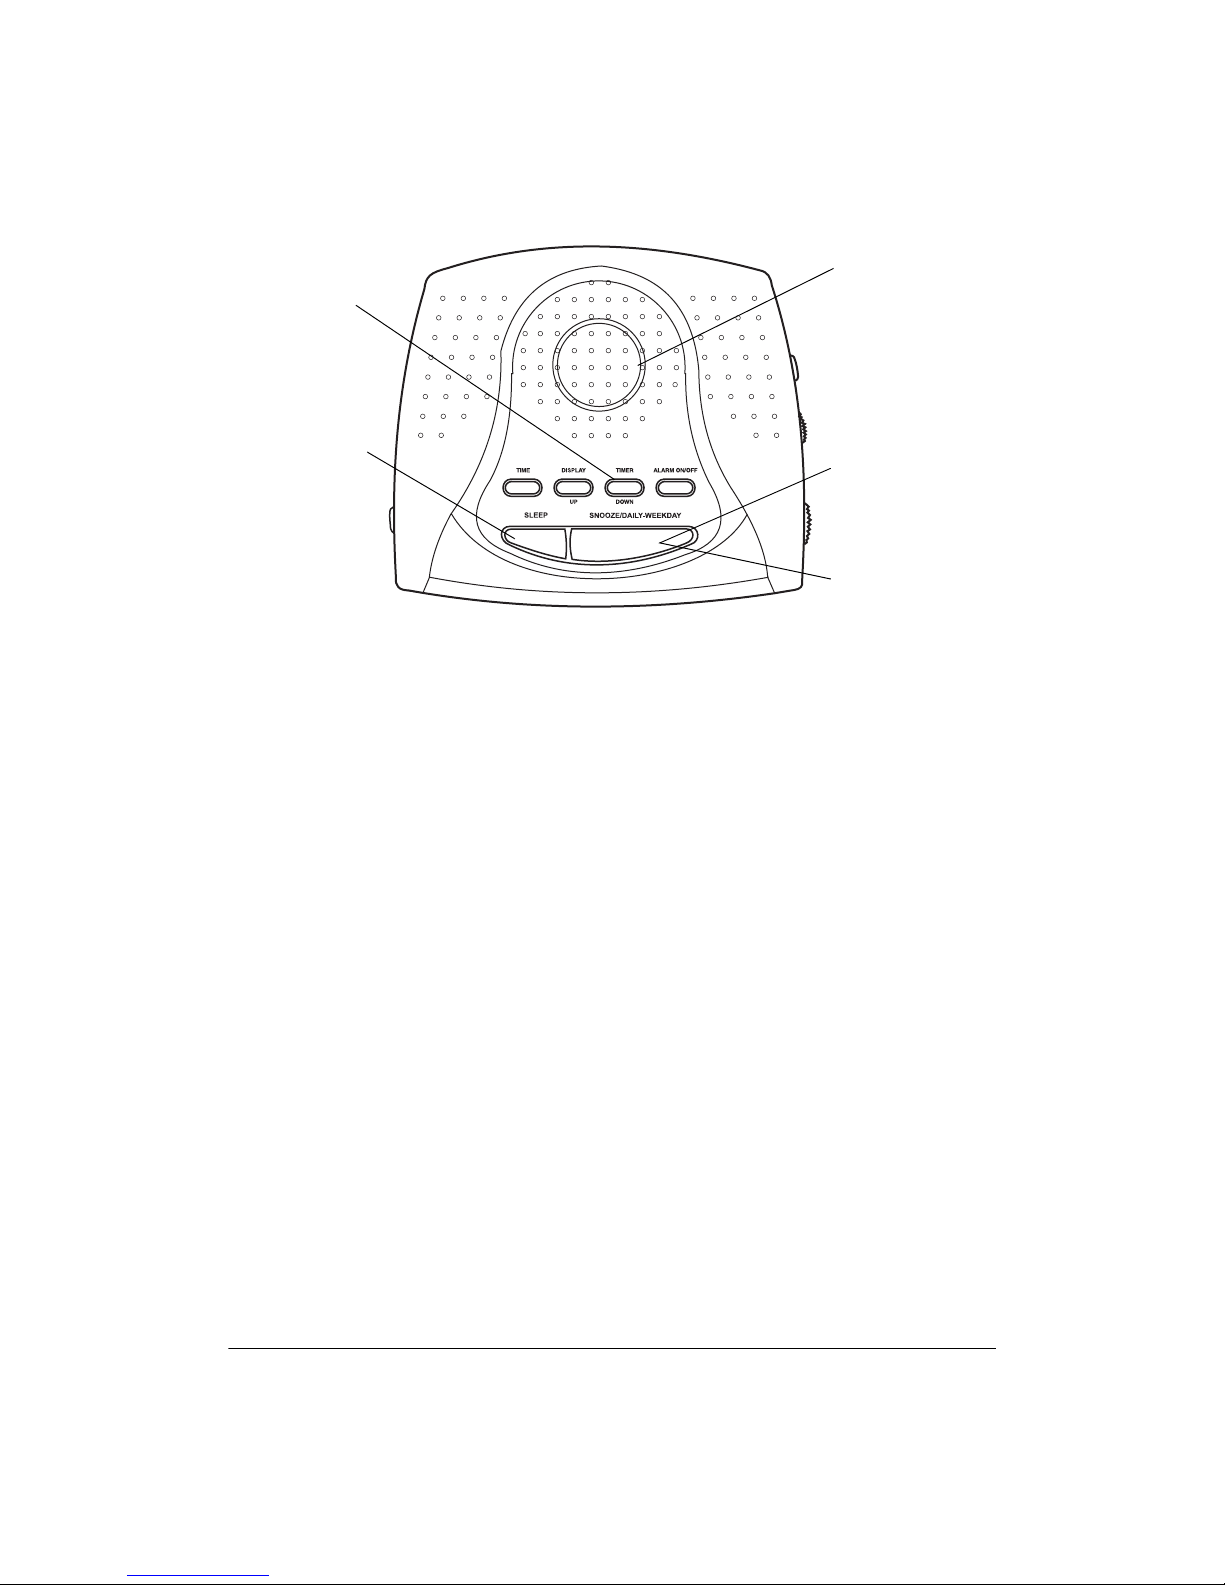
Interval Timer —
lets you set a timer
for up to 2 hours;
ideal for naps. See
“Using the Interval
Timer.”
— lets you
SLEEP
set the radio so it
plays as you fall
asleep, then automatically turns off.
See “Using Sleep”
on Page 3.
Backlit Display —
lets you see the
time in a dark
room.
3-Inch Speaker —
provides excellent
radio fidelity.
SNOOZE
silence the alarm for
about 9 minutes. You
can press SNOOZE/
DAILY-WEEKDAY repeatedly for an hour
after the alarm time.
To silence the alarm
until the set alarm
time the next day,
press ALARM ON/
OFF.
DAIL Y -WEEKDAY
— lets you set a daily
alarm for every day or
weekdays only. See
“Using the Alarms.”
— press to
SETTING THE TIME
1. Press
the week flash.
2. Repeatedly press
DOWN
increments. Or, hold down
TIMER/DOWN
minute increments.
cate a PM time.
3. Repeatedly press
DAY
4. Press
Note:
seconds, the clock stores the settings
and the normal time display returns.
. The current time and day of
TIME
DISPLAY/UP
to change the time by 1-minute
DISPLAY/UP
to change the time by 10-
appears to indi-
FC
FC
FCFC
SNOOZE/DAILY-WEEK-
to select the day of week.
to confirm the settings.
TIME
If you do not press a button for 15
USING THE ALARMS
1. Repeatedly press
7B'
7B'
7B'7B'
or
appears, while the current
7B(
7B(
7B(7B(
alarm time and the day of the week flash.
2. Repeatedly press
to have the alarm work either daily
DAY
(Monday to Sunday) or from Monday to
Friday. Either
ALARM ON/OFF
SNOOZE/DAILY-WEEK-
IkýCeýJkýM[ýJ^ý<hýIW
IkýCeýJkýM[ýJ^ý<hýIW
IkýCeýJkýM[ýJ^ý<hýIWIkýCeýJkýM[ýJ^ý<hýIW
or
TIMER/
or
until
or
Ce
Ce
CeCe
JkýM[ ýJ ^ý <h
JkýM[ ýJ ^ý <h
JkýM[ ýJ ^ý <hJkýM[ ýJ ^ý <h
appears to confirm your selec-
tion.
3. Press or hold down
TIMER/DOWN
to change the alarm time
DISPLAY/UP
or
setting.
4. Repeatedly press
SLEEP
until the bell
icon for a beeping alarm ( or ¡) or
musical note icon for a radio alarm (£ or
) appears.
¤
5. To store the alarm setting, press
or wait 15 seconds until the nor-
ON/OFF
ALARM
mal time display appears. At the preset
time, the alarm beeps or the radio turns
on.
USING THE INTERVAL TIMER
1. Press
TIMER/DOWN
timer icon
¦
2. Press or hold down
TIMER/DOWN
tion. If you do not press any button for 2
seconds, the timer stores the setting and
starts counting.
. The preset timer and
appear.
#
DISPLAY/UP
or
to change the timer dura-
2
 Loading...