

Page 1
21-869.fm Page 1 Wednesday, October 13, 1999 11:50 AM
10M Ham/CB Base Antenna
Your RadioShack 10M Ham/CB Base
Antenna provides excellent reception of
amateur radio, CB, and commercial radio
signals. The antenna can handle up to
2000 watts of transmit power.
Your antenna’s features include:
Electrical Half-Wave Design — pro-
vides high gain.
Note: To improve your antenna’s gain,
you can connect an optional ground
plane kit (available through your local
RadioShack store) to your antenna.
Three Easy-to-Assemble Sections —
help you quickly and ea sily assemble the
antenna.
Dual Tuning Rings — help you quickly
set the antenna for optimum performance over a wide range of frequencies.
Ultraviolet Inhibitor — the antenna’s
UV-protected housing is made of impactresistant fiberglass, making the exterior
resistant to weathering and color change.
Strong Internal Construction — prevents the antenna’s internal wires from
rattling, for maximum strength.
IMPORTANT SAFETY
PRECAUTIONS
Many do-it-yourself and professional antenna installers are injured or killed each
year by electric shock. Many power wires
are within 20 to 25 feet of the ground and
could easily be touched by an assembled
antenna or cable. Touching the overhead
wires with any part of the antenna is the
same as touching the wires with your
bare hand. Contacting an electrical wire
almost always results in a very serious
shock.
To avoid electric shock, please read and
follow these important safety precautions:
Cat. No.
• Be sure to select an antenna site
well away from all overhead wires.
• Do not try to guess which overhead
wires carry high voltage. Check with
the power company.
• If you notice anything making contact with th e ov erh ead w i res , ca ll th e
power company to have it r emoved.
• Do not run the antenna’s cable over
power wires.
• Get help from a qualified professional when removing the old
antenna, especially if you have any
doubt about clearing overhead
wires.
• Never install an antenna by yourself. Be sure to have at least two
people available for help.
• Never install an antenna on a windy
day.
21-869
© 1999 Tandy Corpor atio n.
RadioShack is a registered trademark used by Tandy Corporation.
All Rights Reserved.
Page 2
21-869.fm Page 2 Wednesday, October 13, 1999 11:50 AM
BEFORE YOU BEGIN
When deciding on an antenna’s location,
consider these points:
• The antenna should be as high as
possible on the building.
• The antenna and its cable should be
as far as possible from sources of
electrical noise such as applianc es
or other radios.
• The antenna should be vertical for
the best performance.
Always use 50-ohm coaxial cable, such
as RG-58 or RG-8, to conn ect the antenna to your radio. For lengths over 50
feet, use RG-8 low-loss dielectric coaxial
cable. Your local RadioShack store carries a wide variety of c oax ia l an ten na c able and connectors.
Warning: When you install an outdoor
antenna, use extreme caution. If the
antenna starts to fall, let it go! It could
contact overhead power lines. If the
antenna touches the power line, contact with the antenna, mast, cable, or
guy wires can cause electrocution and
death. Call the power company to remove the antenna. Do not attempt to
remove it yourself!
Coaxial Cable Installation
Precautions
• Do not install coaxial cable where it
will have a pu lli n g t e ns io n of g r ea ter
than 50 pounds. Leave no tension
on the cable after installing it.
• Use only round-headed staples.
Any clamps or securing devices
used with coaxial cable should grip
the cable evenly about the circumference without crushing the cable.
Flat staples can damage coaxial
cable.
• Do not expose coaxial cable to a
temperature greater than 176°F
(80°C). Keep the cable away from
heating vents and water heaters.
• Do not install coaxial cable where it
will be crushed, stuffed, wedged, or
pinched.
• The cable’s jacket withstands most
outdoor environments. However,
you must seal connections and
splices to prevent moisture from
entering them.
Cautions:
• Do not run the cable over sharp
edges or moving parts that might
damage it.
• Do not run the cable next to power
cables or ot her antenna cables.
2
Page 3
21-869.fm Page 3 Wednesday, October 13, 1999 11:50 AM
PREPARATION
Pre-Tuning the Antenna
Your antenna is preset to use 27.205
MHz (the midd le of th e CB ban d) for t he
lowest SWR.
na with a CB radi o, you do not have to
pre-tune it.
ing the Antenna” on Page3.
Before you assemble and mount the an-
tenna, you must determine the frequency range you will be using with it.
are not using CB frequencies
either trim the antenna’s top element to
match the range you are using or use an
antenna tuner (not supplied) to electrically trim the antenna.
Caution: To avoid damaging the antenna, do not trim the antenna’s middle or
bottom elements.
If you are using your antenna with an
amateur radio and want to trim the antenna’s top element to pre-tune it, follow
these steps.
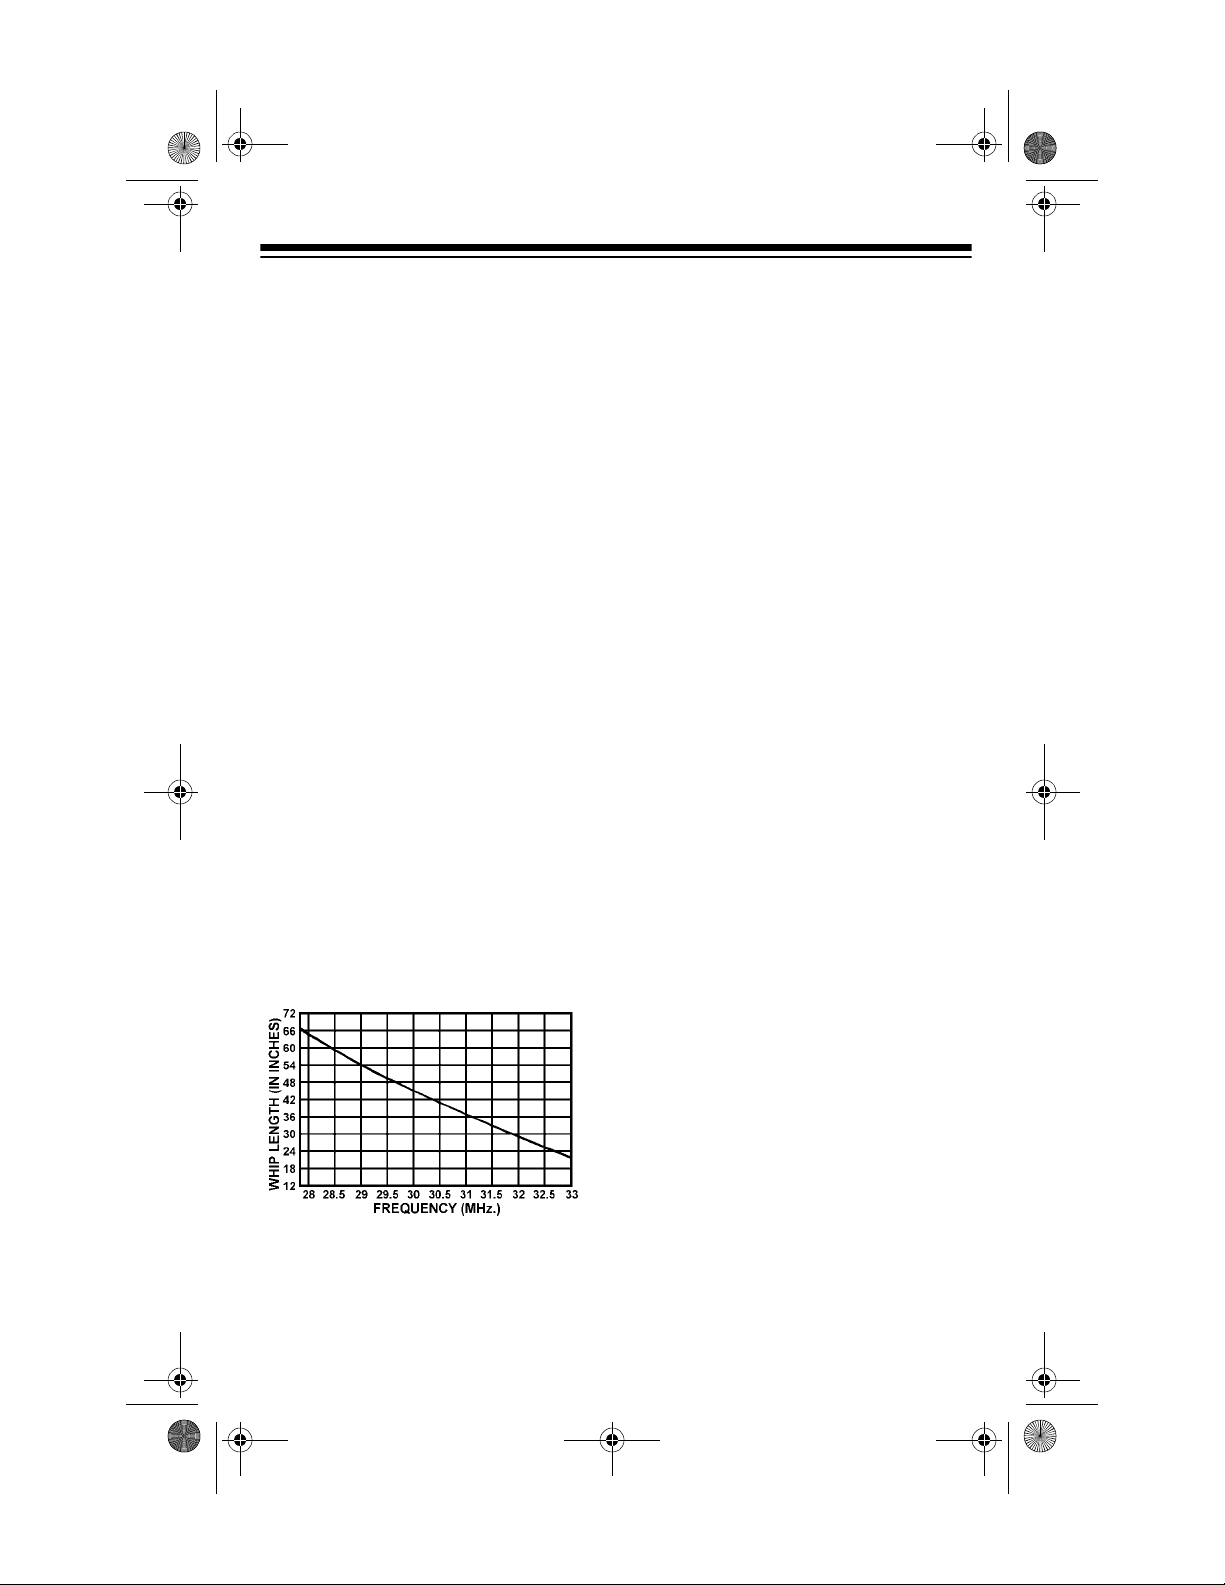
1. Use the following chart to determine
how much you need to trim of f of the
top element (if any).
If you are using your anten -
See “Assembling and Mount-
If you
, you must
2. Remove the cap from the top of the
top element.
3. Use a tape measure to measure the
length you need to cut off of the top
element, then use a hacksaw to
carefully cut the top element.
4. Replace the cap on th e to p e lem en t.
5. Set the tuning rings on the bottom
element of the antenna to their lowest position.
Note: If you trim too much off of the top
element or use the antenna for a different frequency later, you can order a replacement top element from your local
RadioShack store.
If you need to pre-tune the antenna to a
frequency lower than 28 MHz, use an
antenna tuner (not supplied).
Assembling and Mounting
the Antenna
Before you can use the antenna, you
must assemble and mount it then connect it to your radio. You c an mount t he
antenna outdoors on a vertical, solid object such as a TV antenna mast. For the
best results, mount the antenna vertically as high as possib le a wa y fro m t rees or
other obstructions. (Higher frequencies
are noticeably affected by obstructions.)
For example, to pre-tune the
antenna to use a frequency of
29.328 MHz, you must cut off
enough of the top elem ent (abo ut 21
inches) to leave it approximately 51
inches in length.
Important:
• Do not mount the antenna on a
metal surface such as aluminum
siding. This greatly reduces the
antenna’s ability to receive signals.
• Before you assemble the antenna,
prepare the structure that you will
mount it to. RadioShack stores carry
standard TV masts which you can
use to mount the antenna. Make
sure the supplied U-bolts will fit
around whicheve r mast you choose.
3
Page 4

21-869.fm Page 4 Wednesday, October 13, 1999 11:50 AM
Follow these steps to assemble and mount the antenna.
1. Lay the antenna’s components on the ground in a flat, open
area.
2. Place the supplied
of the top element (1).
3. Insert the threaded end of the top e lemen t into th e thread s on th e
center element (3), screw the top element into the center element, then use a
1
4. Place the supplied
of the center element.
5. Insert the threaded end of the center element into the threads on
the bottom element (5), sc rew th e c ente r el em ent into the bottom
element, then use a 1-inch wrench to tighten it.
6. Hold the assembled antenna vertically next to the structure
where you want to mount it, then slide the supplied U-bolts (6)
over the antenna and the structure.
7. Slide the supplied brackets (7) over the ends of the U-bolts, then
use the supplied lock washers (8) and hex nuts (9) to secure it.
Caution: To avoid damaging the bottom element, do not overtighten the hex nuts.
8. Connect one end of the coaxial cable (not supplied) to the connector on the bottom of the bottom elem ent. Th en route the ca ble
to your radio and connect it to the antenna jack on the back of
the radio.
3
/
8
-inch lock washer (2) o ve r th e threaded end
/
2
-inch wrench to tighten it.
1
/
2
-inch lock washer (4) o ve r th e threaded end
Important: Your antenna is designed to let excess moisture escape
from inside the bottom element. Do not use a silicone sealant or
caulking material around any part of your antenna to seal it. Otherwise, the antenna might not work properly.
4
Page 5

21-869.fm Page 5 Wednesday, October 13, 1999 11:50 AM
TUNING THE ANTENNA
If you are using your ant enna at frequencies in the range of 25 to 30 MHz, you
can tune the antenna using an standingwave ratio (SWR) meter (not supplied)
and the dual tuning rings on the bottom
element.
Notes:
• If you are using your antenna at frequencies below 25 MHz, you will
need an antenna tuner (not supplied) to tune it.
• The antenna's coaxial cable connector is the best place to check
your antenna's SWR, but you can
also check it a t th e radio's coax con nection.
Follow these steps to tune the antenna.
1. Follow the instructions supplied with
your SWR meter to adjust your
antenna’s SWR to the lowest possible value.
SWR values of 2.0:1 are generally
acceptable, with readings of 1.5: 1 o r
lower being more desirable.
2. With the antenna assembled and
mounted, slowly move the tuning
rings up as you check the SWR,
until you reach your desired frequency.
3. If the center frequency is still too
low, follow the steps under “PreTuning the Antenna” on Page 3 to
shorten the top element by
Then check the SWR again. Keep
shortening the top element until you
reach the desired SWR.
1
/
2
inch.
4. Using an SWR meter, check the
SWR at the top and bottom of the
band. If the SWR is higher at the top
of the band than at th e b otto m, ra is e
both tuning rings counterclockwise
at increments of
1
1
/
/
4
2
to
turns.
5. Repeat Step 4 until the SWR is as
low as possib le at both ends of the
band.
6. When you have set the desired
SWR, tighten the tuning rings
against each other by simultaneously turning the top ring down
(clockwise) and the bottom ring up
(counterclockwise) to lock them.
After you have properly installed and
tuned your antenna, use a watt meter
(not supplied) to test the amount of power your transmitter is sending to your antenna. If you have properly tuned the
antenna, the meter should show the
transmitter’s maximum output power and
the SWR meter should show very l ow reflected power.
5
Page 6

21-869.fm Page 6 Wednesday, October 13, 1999 11:50 AM
TROUBLESHOOTING
If you have problems mounting or tuning your antenna, here are some suggestions that
might help. If you still have trouble, contact your local RadioShack store for assistanc e .
PROBLEM POSSIBLE CAUSE SOLUTION
SWR reading is too
high or cannot be set.
Depending on the frequency you
want to use it for, the antenna
might be too long or too short.
The antenna is not installed in a
good location.
The coaxial cable might be broken
or damaged.
The coaxial cable might be coiled. Uncoil the coaxial cable.
The SWR meter might be con-
nected incorrectly.
The antenna or radio might not be
properly grounded.
Pre-tune the antenna (see “PreTuning the Antenna” on Page 3).
Move the antenna to a different
location and try again.
Use another coaxial cable.
Make sure the SWR meter is connected correctly to the antenna
and your radio.
Make sure the antenna and radio
are properly grounded.
6
Page 7

21-869.fm Page 7 Wednesday, October 13, 1999 11:50 AM
SPECIFICATIONS
Reception ....................................................... VHF and UHF (Pre-tuned for 27.205 MHz)
Half-Wave Gain ....................................................................................................... 9.9 dBi
Optimum SWR Range ............................................................................... Less than 1.5:1
Height (assembled) .............................................................................................. 17.5 feet
(5.3 m)
Maximum Diameter ........................................................................................... 1.8 inches
34 mm.)
Weight .............................................................................................................. 4 lbs 15 oz
(2.24 kg)
Specifications are typical; individual units might vary. Specifications are subject to change
and improvement without notice.
7
Page 8

21-869.fm Page 8 Wednesday, October 13, 1999 11:50 AM
Limited Ninety-Day Warranty
This product is warran ted by RadioShack a gainst manufactu ring defects in ma terial and workman ship under norma l use for ninet y (90) days fr om the date of purchase f rom RadioSha ck companyowned stores and authorized RadioShack franchisees and dealers. EXCEPT AS PROVIDED
HEREIN, RadioShack MAKES NO EXPRESS WARRANTIES AND ANY IMPLIED WARRANTIES,
INCLUDING THOSE OF MERCHANTABILITY AND FITNESS FOR A PARTICULAR PURPOSE,
ARE LIMITED IN DURATION TO THE DURATION OF THE WRITTEN LIMITED WARRANTIES
CONTAINED HEREIN. EXCEPT AS PROVIDED HEREIN, RadioShack SHALL HAVE NO LIABILITY OR RESPONSIBILITY TO CUSTOMER OR ANY OTHER PERSON OR ENTITY WITH RESPECT TO ANY LIABILITY, LOSS OR DAMAGE CAUSED DIRECTLY OR INDIRECTLY BY USE
OR PERFORMANCE OF THE PRODUCT OR ARISING OUT OF ANY BREACH OF THIS WARRANTY, INCLUDING, BUT NOT LIMITED TO, ANY DAMAGES RESULTING FROM INCONVENIENCE, LOSS OF TIME, DATA, PROPERTY, REVENUE, OR PROFIT OR ANY INDIRECT,
SPECIAL, INCIDENTAL , OR CONSEQUENTI AL DAMAGES, EVE N IF Radio Shack HAS BEEN ADVISED OF THE POSSIBILITY OF SUCH DAMAGES.
Some states do not allow the limitations on how long an implied warranty lasts or the exclusion of incidental or consequential damages, so the above limitations or exclusions may not apply to you.
In the event of a p roduct defect dur ing the warranty p eriod, take the pr oduct and the Rad ioShack
sales receipt as proof of purchase date to any RadioShack store. RadioShack will, at its option, unless otherwise pro vi de d b y law : (a ) correct the defect b y p rod uct re pair w itho ut cha rge for parts and
labor; (b) replac e the product wit h one of the same or si milar design; or ( c) refund the purcha se
price. All repla ced parts and pro ducts, and products on which a refun d is ma de, become the prop erty of RadioShack . New or recon ditioned parts an d products m ay be used in the performance o f
warranty service. Repaired or r eplaced parts and products are wa rranted for the remainder o f the
original warranty period. You will be charged for repair or replacement of the product made after the
expiration of the warranty period.
This warranty does not cover: (a) damage or failure caused by or attributable to acts of God, abuse,
accident, misuse, i m pro per o r abn or ma l usa ge , f ail ure to follow instruc tions , i m pr ope r insta l lation o r
maintenance, alter ation, lightning or oth er incidence of exces s voltage or current; ( b) any repairs
other than those provide d by a RadioShack Authorized S ervice Facility; (c) consumab les such as
fuses or batteries; (d) cosmetic da mage; ( e) transpor tation, sh ipping or insuranc e costs; or (f) costs
of product removal, installation, set-up service adjustment or reinstallation.
This warranty gives you specific legal rights, and you may also have oth er rights which vary from
state to state.
RadioShack Customer Relations, 200 Taylor Street, 6th Floor, Fort Worth, TX 76102
We Service What We Sell
04/99
RadioShack
A Division of Tandy Corporation
Fort Worth, Texas 76102
10A99 Printed in the USA
 Loading...